

Page 1
INSTALLATION/OPERATION
DIGITAL VIDEO RECORDER
H.264 ( 4/8/16 CHANNEL)
Page 2
H.264 DVR - Installation/ Operation Manual
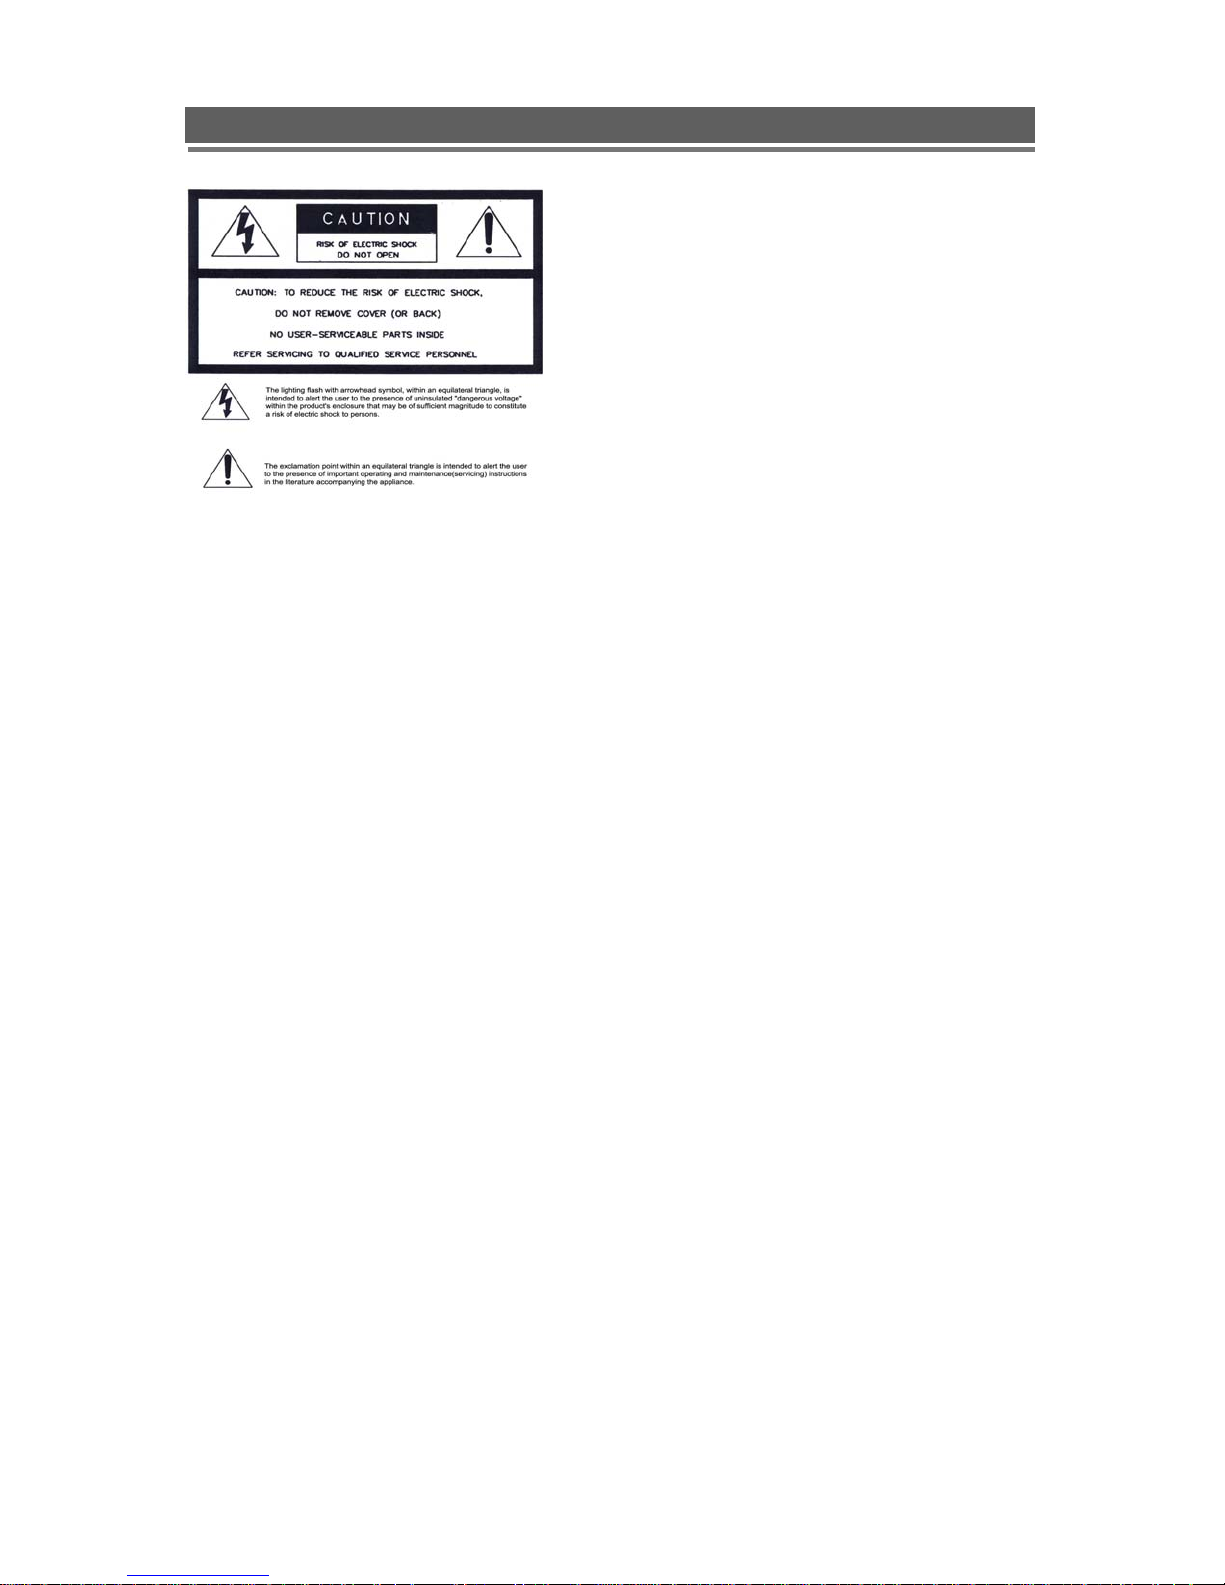
WARNING: To prevent a risk of fire of electric shock, do not expose this product to rain or moisture.
• This installation should be made by a qualified service person and should conform to all local codes.
• This is a Class A product. In a domestic environment this product may cause radio
interference in which case the user may be required to take adequate measures.
Copyright This manual is the intellectual property of Manufacturer and is
protected by copyright. All rights are reserved. No part of this
document may be reproduced or transmitted for any purpose,
by whatever means, be they electronic or mechanical, without
the express written permission of Manufacturer.
Edition : Dec.2009
Copyright 200ⓒ 9 Manufacturer
Note This Manual was compiled with the greatest of care and all information
double checked. At the time of printing the description was complete and
correct. Because of the further development of products, the content of the
manual might change without prior notice. Manufacturer will not be liable
for damage which is directly or indirectly due to errors, incompleteness, or
discrepancies the manual and the product described.
Trade marks All names used in this manual for hardware and software are very probably
registered trade marks and must be treated as such.
2
Page 3

H.264 DVR - Installation/ Operation Manual
Contents
FOR THE SAFETY OF CUSTOMERS…………………...………………………….…………………………4
DESCRIPTION OF PARTS AND FUNCTION…………...…………………………………………………....7
COMPOSITION OF UNIT…………………………………...……………………………………………………7
FEATURES …………………………………………………..……………………………….……………….....8
DESCRIPTION OF PARTS AND FUNCTION ………………..…………….…………..……..……………….. 9
Front Panel……………………………………………………..………………………………..…………........9
Rear Panel………………………………………………………..………………………………………… …11
Connection diagram………………………………………………………………………………………….11
IR Remote Controller………………………………………………………………………………………….12
OSD Description.................................................................................................................................................13
MENU………………………………………………………………...………………………………………......14
MENU TREE…………………………………………………………..…………………………………………14
Main Menu.…………………………………………………………..………………………………………..16
Display………………………………………………………………..………………………………………..16
Recording……………………………………………………………..………………………………………..19
System ….……………………………………………………………..……………………………………….23
Network …………………………………………………………………..…………….……………………..30
Event ….……………………………….…………………………..…………………………….….32
Search………………………………………….……………………………………………………….………33
Search……………………………….…………………………………………………….………33
BackUp……….……………………………………………………………………………….………36
Log……….……….……………………….……………………………………………………….………38
Client Program…………………………………………………………………………………........................39
Q & A……………….………………………………………………………………………………….…………64
Appendix 1…...……………………………………………………………………….........…………………….66
Appendix 2...………………………………………………………………………….........…………………….69
Appendix 3…...........………………………………………………………………….........…………………….73
Appendix 4…...........………………………………………………………………….........…………………….76
Appendix 5…...........………………………………………………………………….........…………………….78
Appendix 6 (Specification) ………….…………………………………………….........…………………….85
Product Warranty……………………………………………………………………………………………….86
3
Page 4

H.264 DVR - Installation/ Operation Manual
1. FOR THE SAFETY OF CUSTOMERS
Caution before use
Please read this manual for proper use.
The caution described in this manual contains very important information for the safe use, so, please
follow the instruction.
Please keep it whether you could reach after read.
For the safety and proper use, it marked various symbol. So, please read it to prevent your physical or
financial loss.
Tips for installation
Please avoid water which could be the reason of firing or electric shock.
Clean the plug and socket.
Please keep the socket and plug clean so that you could avoid the fire. The plug should be tightly
connected to the wall socket.
Do not put the unit on an unstable place.
Do not put the unit on an unstable place like rugged table or slope place.
Be careful for the installation position.
Don’t put the device in humid, direct sunlight, dusty, hot, greasy condition.
4
Page 5

H.264 DVR - Installation/ Operation Manual
Caution for proper usage
During use
In following cases, please turn off the power and remove the plug then, please contact technical
support.
If you use it continually, it could be a reason for a fire or electric shock.
If smoke comes out of the device or when you smell something burning.
If a alien substance is split into the device.
If the device is dropped or the case is damaged.
If the power cable has been damaged ( ex. slipped etc.)
No picture being displayed.
Don’t open the case or modify.
There is the high voltage sector inside the unit so, if you open the case
or modify it, it could cause the fire or electric shock.
Don’t put a cup containing water or juice and small material on the device
If you spilt water or alien substance into the device, it could cause the fire or electric shock.
Don’t put any alien substance.
Don’t put alien substance through the fan.
Don’t touch when lightning .
When the lightning starts, don’t touch the plug or cable. It could cause the electric shock.
Don’t touch the power plug with wet hand.
Don’t unplug with wet hands. It could cause a electric shock.
Don’t pull out the power cable.
5
Page 6

H.264 DVR - Installation/ Operation Manual
Use the designated HDD
Please use the designated HDD. Otherwise, recording may be operated improperly.
Maker HDD Capacity
Western Digital
Seagate
Don’t pull out the cable when plug out from the wall socket.
It could damage the cable and cause the fire.
Please pull out holding the plug.
When you move, please remove plug.
If you move the device while the plug is in the socket, it could cause a fire by damaging the cable.
Don’t block the ventilation window.
When the ventilation window is blocked, it could cause the fire by the generation of Internal heat.
Don’t put a heavy item on the device.
80,160,250,320,500,640,750GB, 1 and 2TB (excl. 4CH) is supported.
HDD is available up to 1pcs for 4CH(Max 1TB), 8/16CH.(Max 2TB)
When it looses the balance and falls down, the customer could be hurt.
Keep the plug and socket clean.
Regarding the cleaning, please contact your Installer.
If there is too much dust inside the device, it could cause the fire or internal short.
Clean the plug and socket.
Please keep the socket and plug clean to avoid fire. The plug should be tightly connected to the wall
socket.
Caution when you don’t use the device for a long time.
If you don’t use the device for a while, please switch off and unplug.
6
Page 7

H.264 DVR - Installation/ Operation Manual
22.. DDEESSCCRRIIPPTTIIOONN OOFF PPAARRTTSS AANNDD FFUUNNCCTTIIOONN
2-1 COMPOSITION OF UNIT
Standard
CD(Client Software,
User Manual_Softcopy)
Power Cable
Battery
When you have received a product “without HDD” , the accessories
1) Bracket & Cable for HDD installing 2) fixing screws will be supplied.
※ Accessories are subject to change without notice.
Quick Guide
Remote Controller
7
Page 8

H.264 DVR - Installation/ Operation Manual
2-2 FEATURES
● Convenience
- User-friendly GUI( Graphic User Interface)
- Easy-to-use menu composition
- Easy-to-use recorded data search (Time, Date, Motion, Alarm)
- Easy-to use menu with USB Mouse.
● Stability
- Auto restart after power interruption
- DB structure offers data stabilization and best storage utilization
● Expandability
-Various remote multi DVR’s can be controlled by Web browser (PC Client System)
● Technology
-Embedded LINUX OS
-Totally maximum recording rate 120/100 fps
-High-resolution & high-quality H.264 algorithm
-Using Water marking & scrambling technologies,
-Strong protection recorded data
-H.264 : 1 ~ 2 Kbytes per image with resolution 360x240
● Functionality
- Privacy Masking Set
- Variable recording function (normal, alarm, motion, schedule, Duration)
- Full channel real-time monitoring
- Live monitoring, recording, playback, backup, remote access at the same time
- Multi channel playback
- Variable events notification to e-mail, buzzer or PC Client system
8
Page 9
H.264 DVR - Installation/ Operation Manual
2-3 DESCRIPTION OF PARTS AND FUNCTIONS
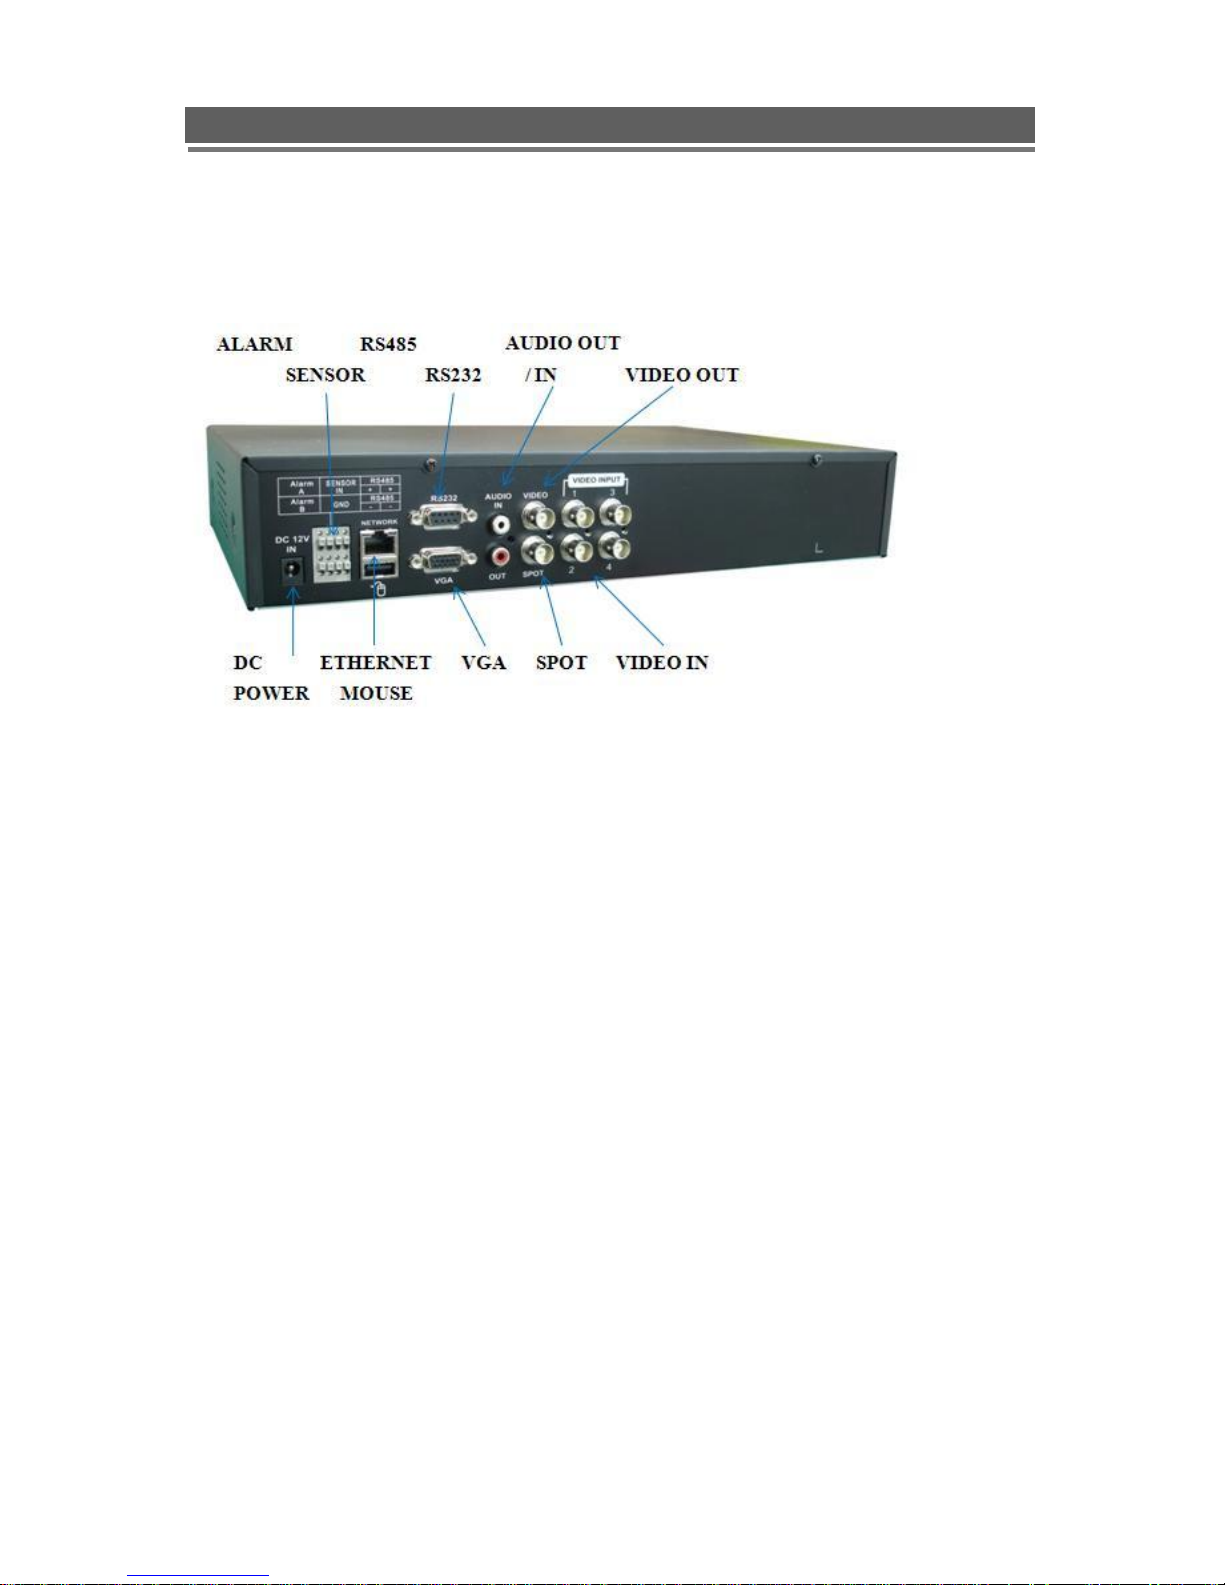
2-3-1 Rear Panel
(1) VIDEO IN (BNC)
- 4, 8, 16 Camera input (1.0v p-p, 75
Ω)
(2) VIDEO OUT
- Composite / VGA / SPOT
(3) AUDIO IN / OUTPUT
- 1 Audio Input / Output
(5) RS232
- 1 Serial Communication
(6) Network Port (RJ-45)
- Available to monitor live screen and recorded data on the HDD through Internet or LAN
(7) MOUSE
- Front : Port for both Thumbs drive and USB Mouse
- Rear : This is for the PS2 mouse and may not support some USB mouse.
In this case, please insert the USB mouse into the front USB port.
9
Page 10

H.264 DVR - Installation/ Operation Manual
(8) ALARM / SENSOR
- ALARM / 1 SENSOR INPUT, OUTPUT PORT
(9) RS485_CAMERA / KEYBOARD CONTROLER
- 1 Serial Communication for Pan / Tilt Camera
- 1 Serial Communication for P/T/Z Control Keyboard
(10) DC POWER
- AC 110~240 V (Free Voltage) / DC 12V 3A OVER
ATTENTION
When the video format is changed, the system should be re-booted
The video format should be selected before booting
Default Passwords
“00000000” i.e. 8x Zero’s. Password is required if you need to
down-power or stop recording, prompt will be displayed asking
for password.
Web Client
User ID “admin” (not case sensitive).
Admin ID cannot be changed this is full
administrator ID.
Password “00000000” i.e. 8x Zero’s
10
Page 11
H.264 DVR - Installation/ Operation Manual
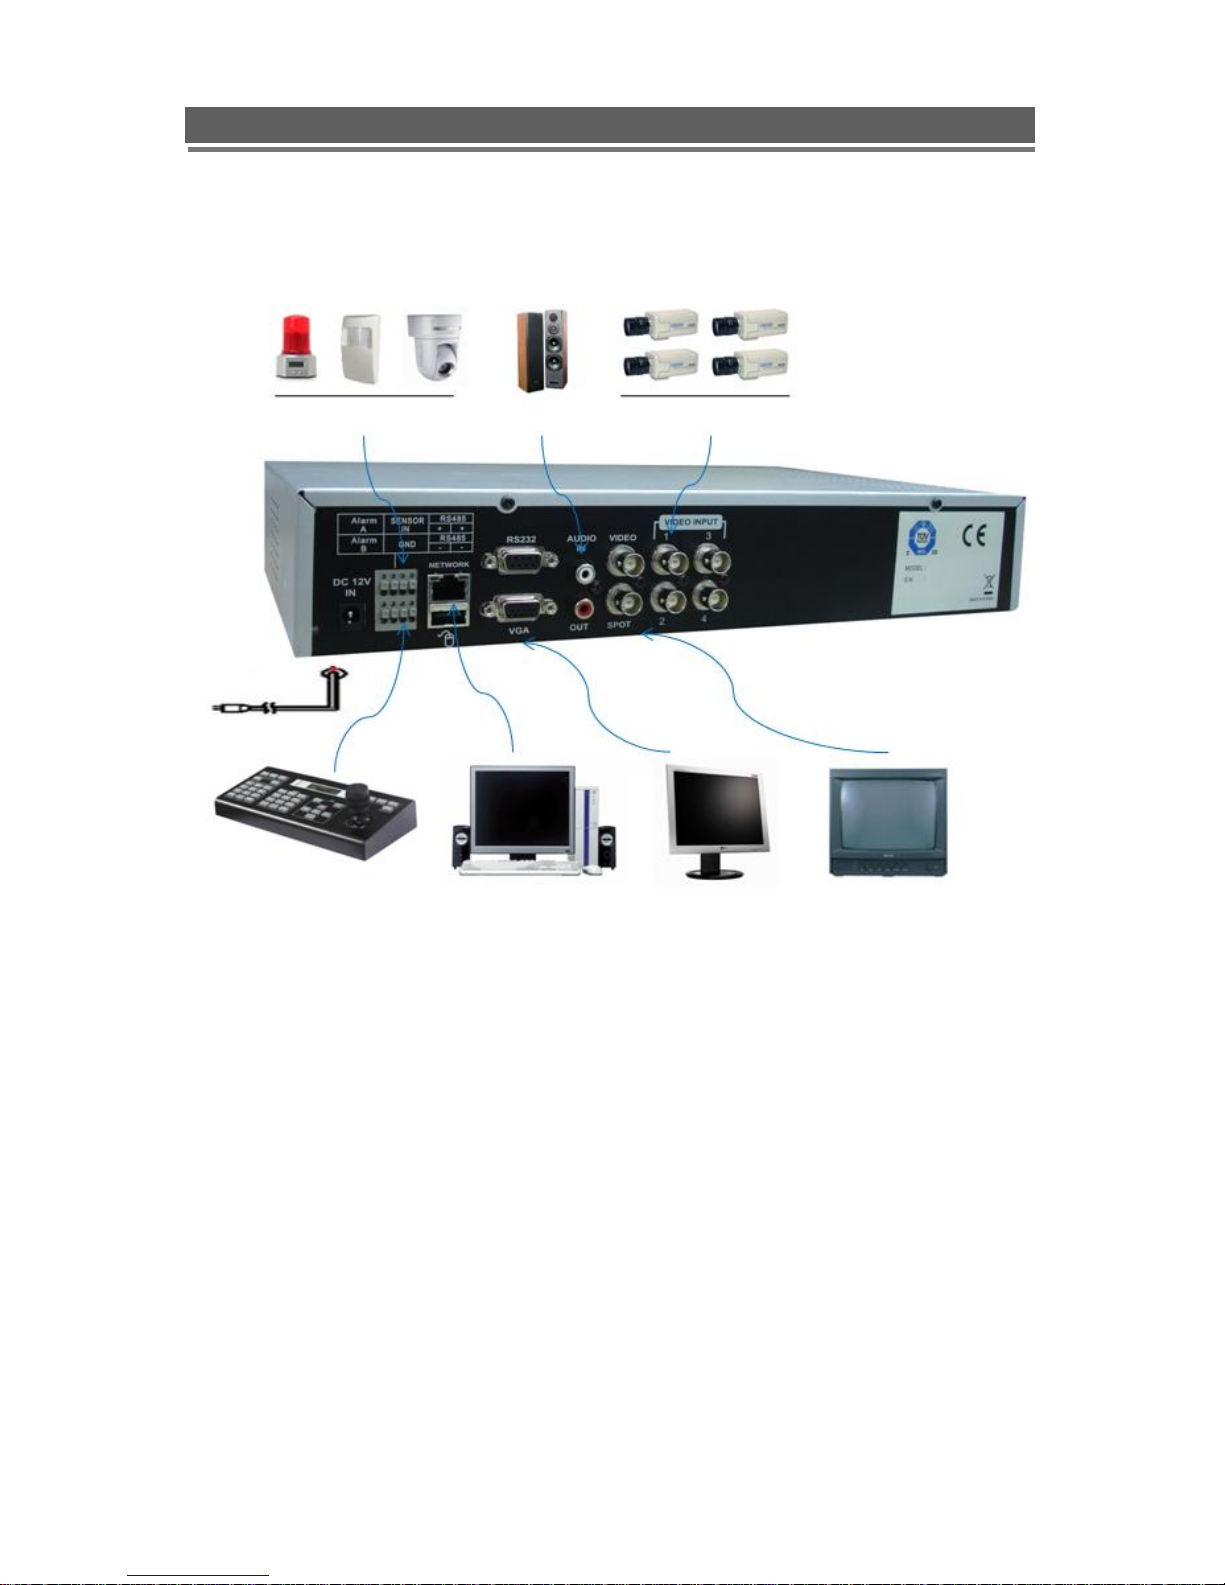
2-3-3 System Connection Diagram
11
Page 12

H.264 DVR - Installation/ Operation Manual
2-3-4. IR Remote Controller
1.Power : Power ON/OFF
2. Rec : Start & Stop Recording
3.ⓞ~⑨:Key for figure and character
4. P/T/Z: Entering PTZ menu directly
5. OSD : Operating OSD ON/OFF
6. SEQ : Hot key for Spot(120/100fps)
7. LOG : Direct access Log list
8. INFO: Direct access system Info.
9. ID : Reserved.
Key for SEQ operation(4808/400fps)
10. MUTE : Audio Mute
11. AUDIO : Available audio switching when
user select this key
12. MENU : Entering system menu
13. SEARCH : Entering search
14. ARROW & SPLIT : Key moving left,
right, up and down. Also, Screen split display
shows
15. VOL”+,-“ : Up, down volume
16. CH “+,-“ : Up, down channel(s)
17. ▶(▶) : Play(or fast forward)
18. ◀ (◀ ) : Reverse play
19 II : Pause
20. █ : Stopping playback
21. Cam : Changing PTZ icon
22. P/T : Pan &Tilt
23. Z/F : Zoom/ & Focus
24. DIS : Channel Division
12
Page 13
H.264 DVR - Installation/ Operation Manual
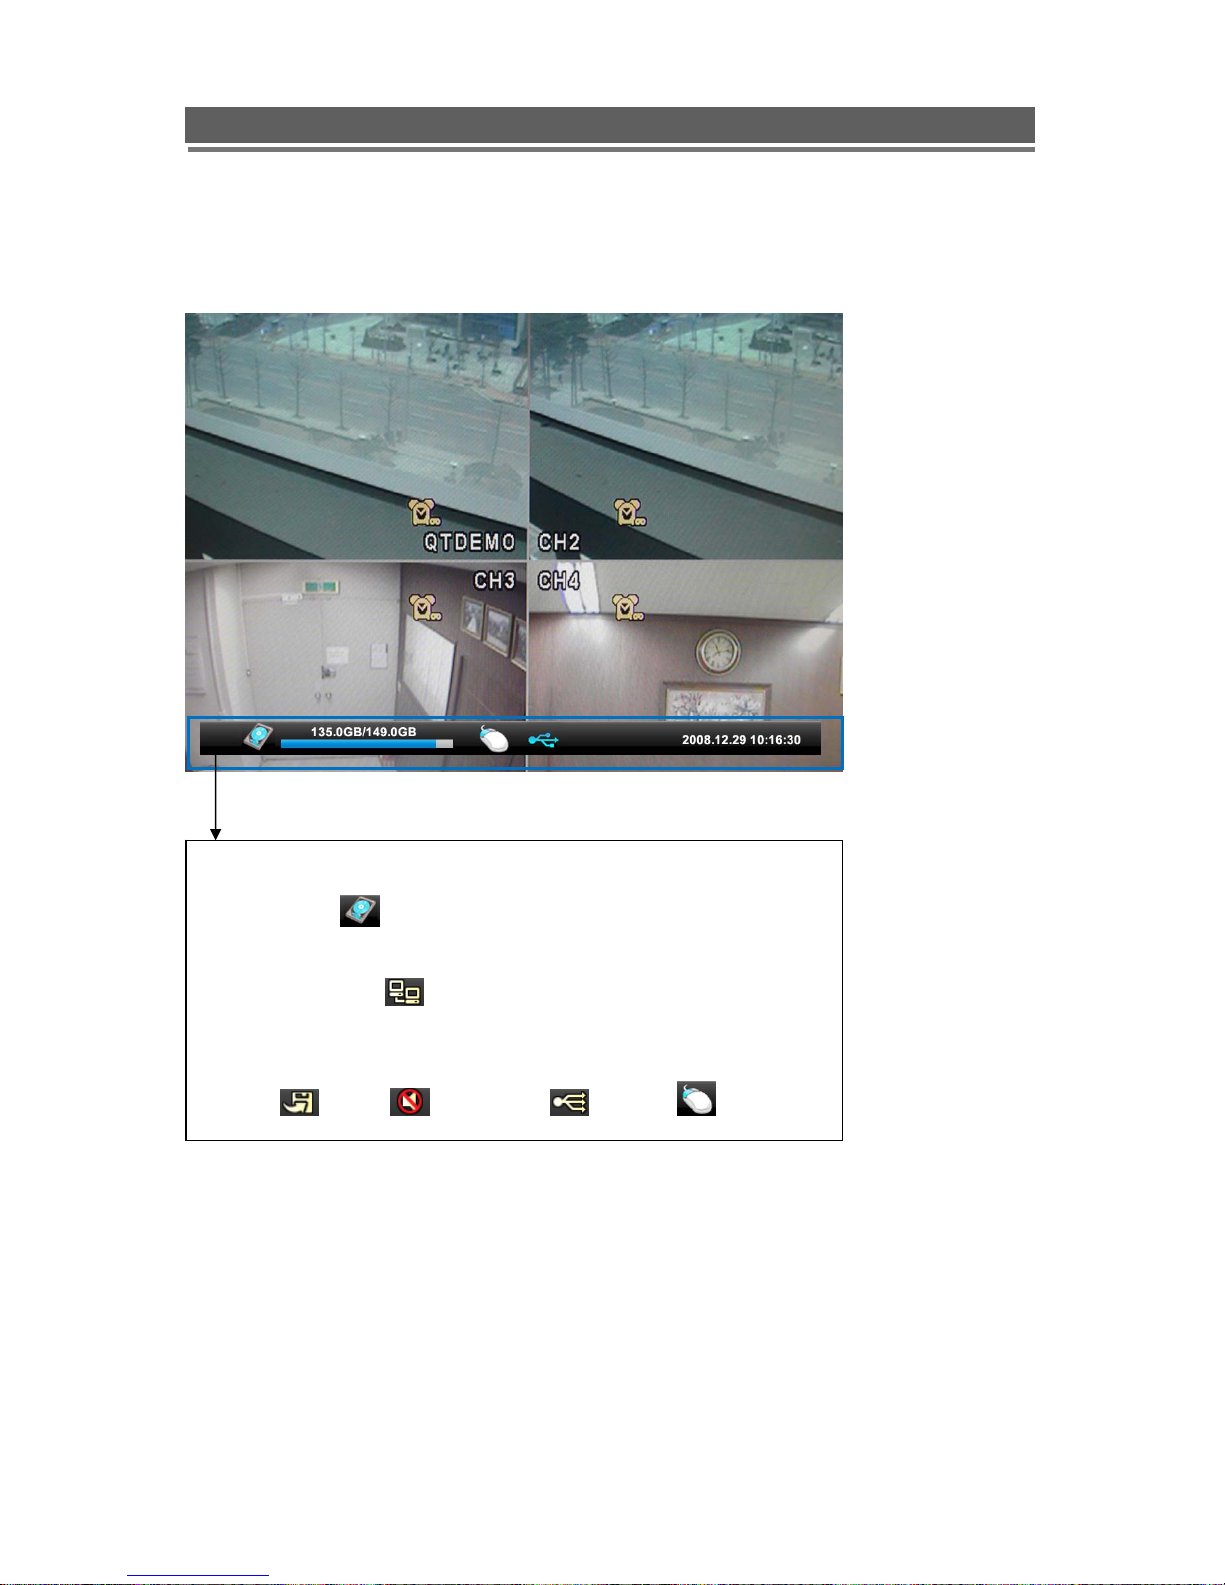
2-3-5. OSD Description
Status Bar is shown HDD capacity, Event, Network connection, Time, etc
using by icons.
-HDD Capacity
-Event : Power Fail, Video loss, etc will be shown
when it is occurred.
-Network connection
-Date/Time
*Others :
-Backup
-Mute -USB Stick: - Mouse
: 135GB is used out of 149GB
: It is shown that admin or user is connected.
:
13
Page 14

y
H.264 DVR - Installation/ Operation Manual
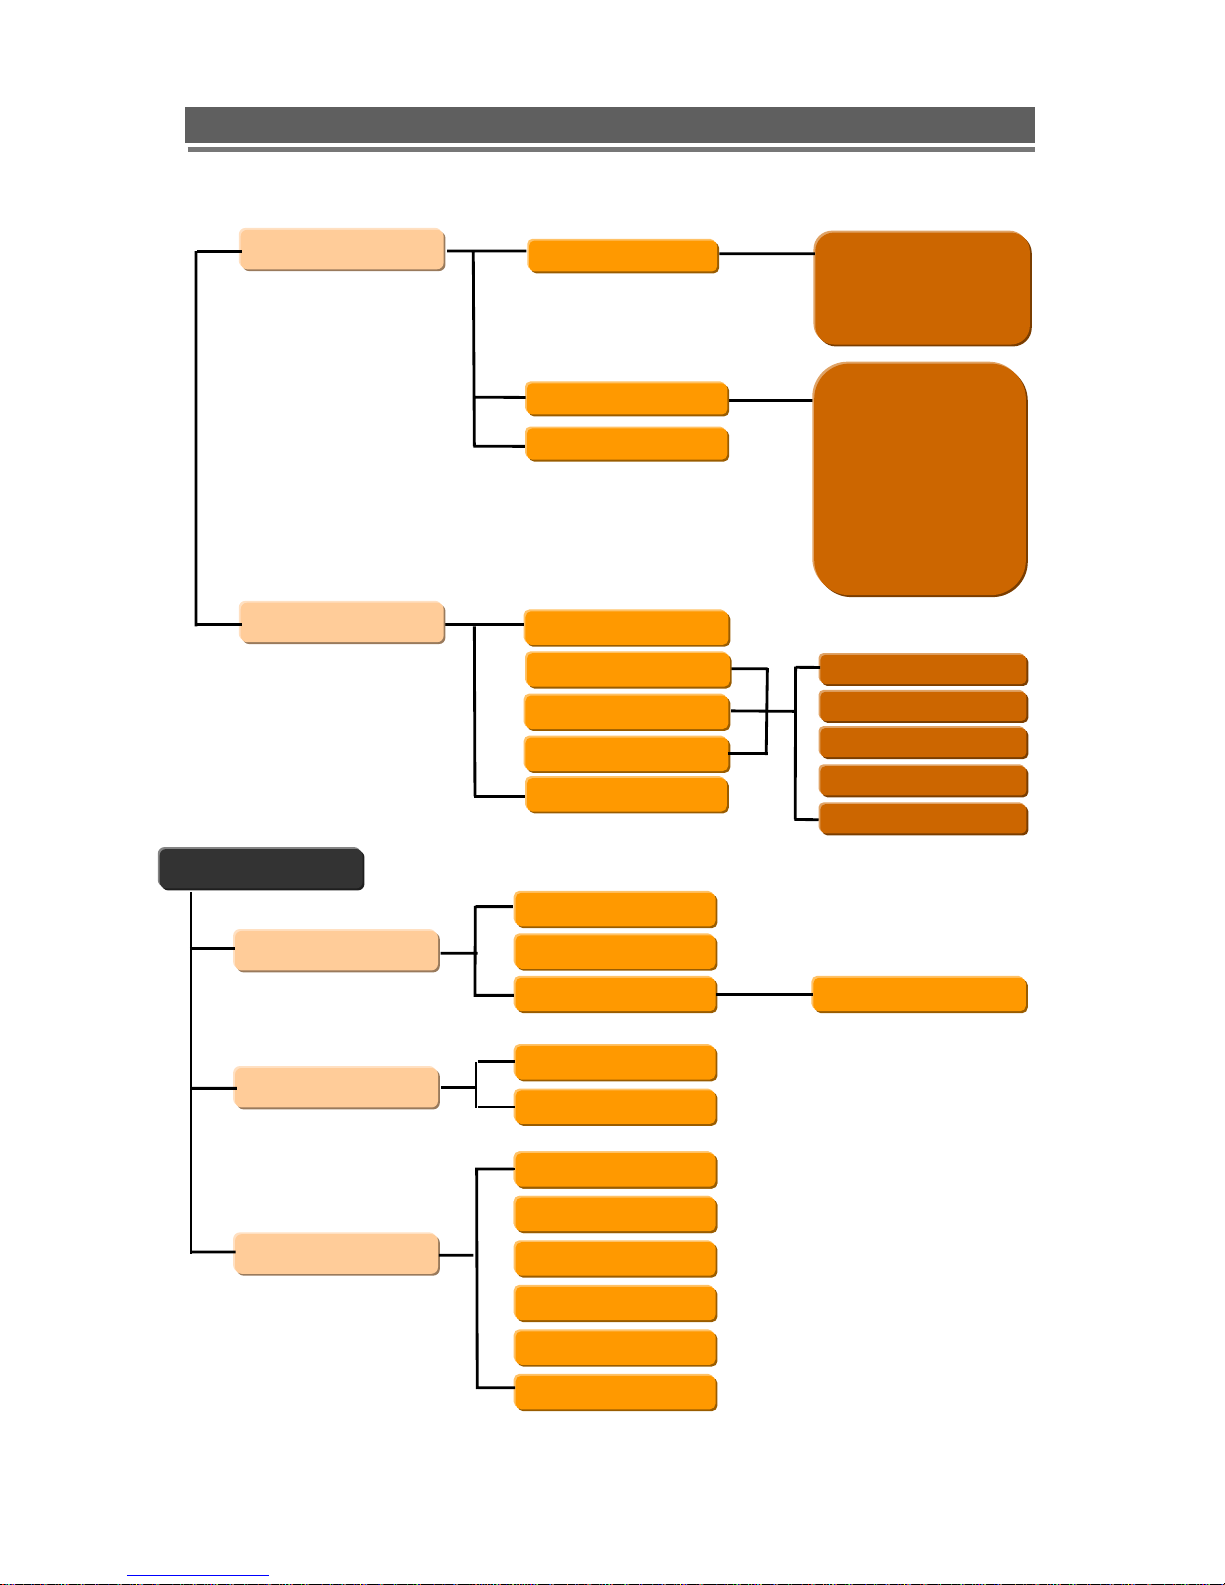
33.. MMEENNUU
3-1. Menu tree
Main Menu
Display
Recording
Camera Setting
Camera Covert
Camera Name
Spot Setting
OSD Setting
Global
Normal
Alarm
Motion
Schedule
Duration
Priority
HDD Overwrite
Pre Resolution
Pre FPS
Pre Duration
Post Duration
Quality
Resolution
Frame Rate
Sound On/Off
Recording Qualit
Setup Motion
Setup Schedule
System
Basic
Disk Format
Password Change
Client Account
Program Update
Sensor
P.T. Z S et up
P.T.Z Controller
Apply
14
Language
Auto Delete Mode
Date Format
Time/DST Set
Video Type
System ID
Deinterlace
User Name
New Password
Confirm PW
Page 15
H.264 DVR - Installation/ Operation Manual
Network Set
Event
DDNS
IP SET
NTP
E-Mail Registration
SMTP Mode
E-Mail Out
Beep Out
Alarm Out
DDNS
User ID
User Password
Domain
Dynamic IP
IP
GateWay
Netmask
DNS Server
DSL ID
DSL PW
DVR Port
Web P ort
Video Loss
Alarm
Motion
Power Loss
Duration
Search Menu
Search
Archive
Log
Date/Time
Event
Calendar
Internal
External
All
All
Power
Power
Record
Operation
Client
Event
Preview
15
Page 16
H.264 DVR - Installation/ Operation Manual
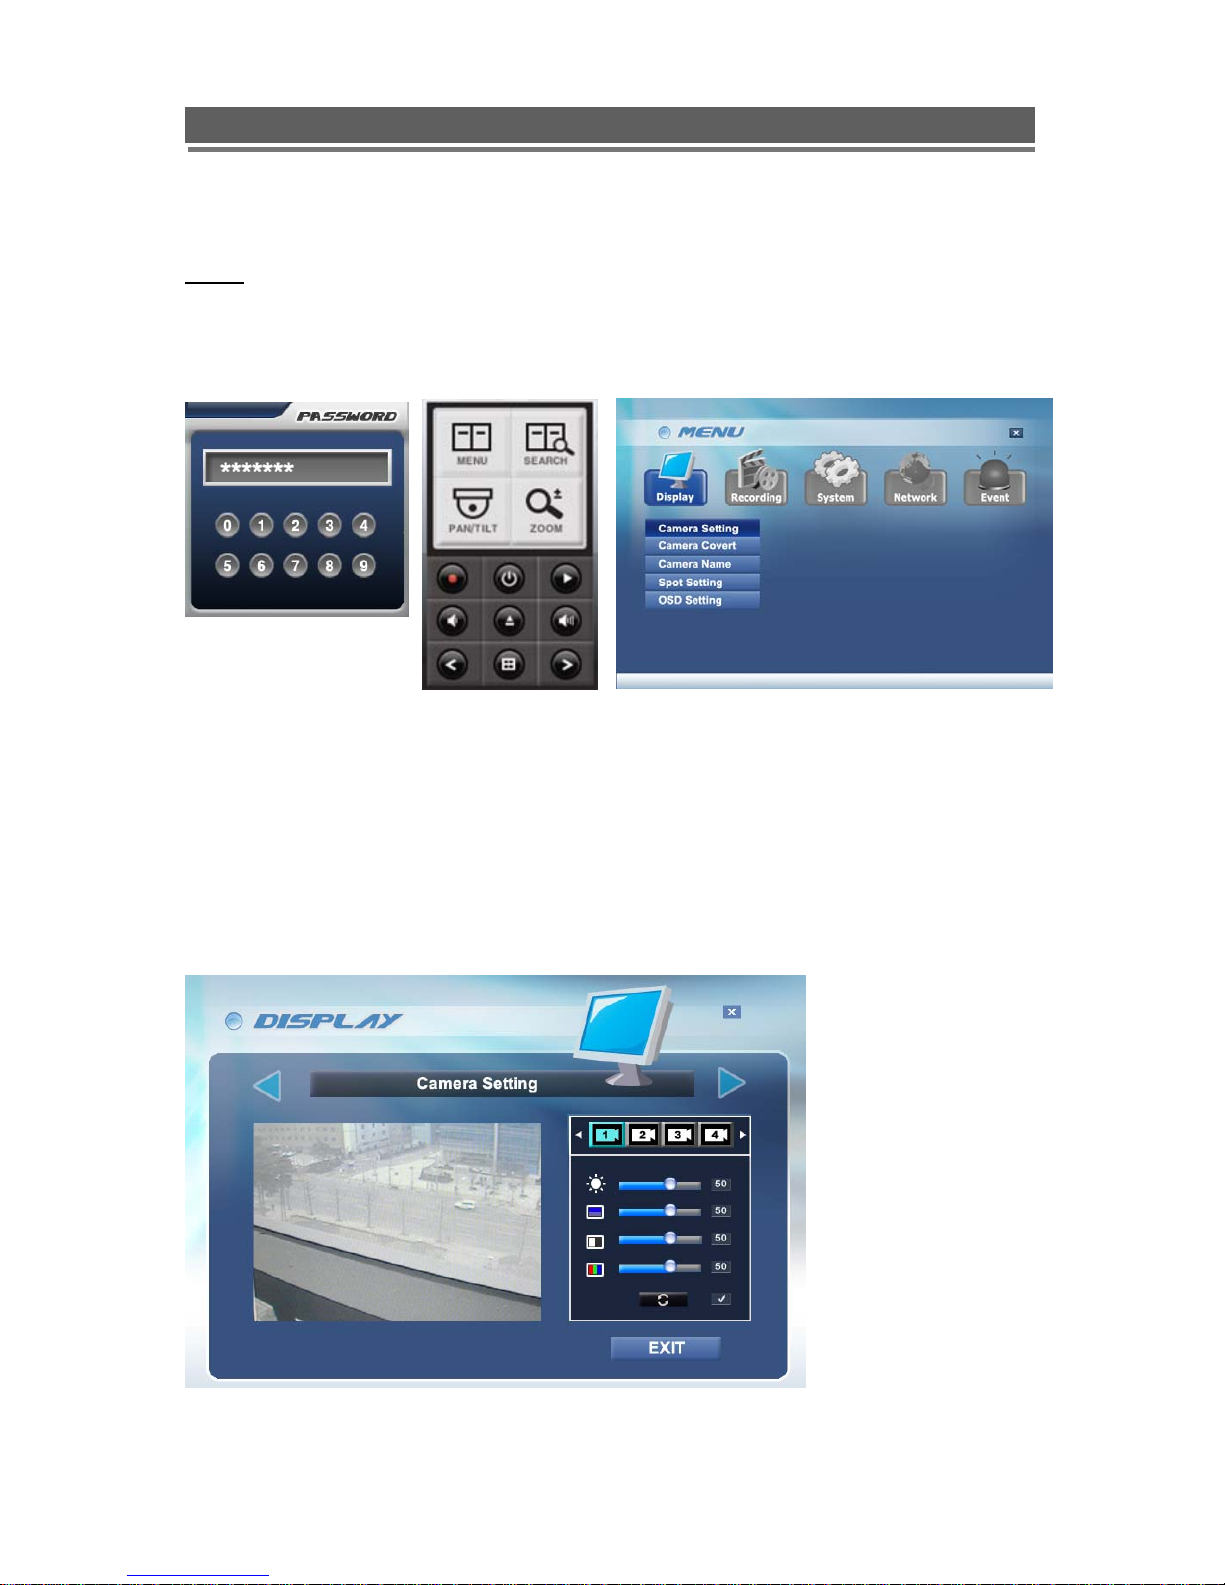
3-2 Main Menu
NOTE
Before use, be sure to setup the unit properly.
When ‘MENU” button is pressed, “Password” is required first. Then, below menu shows on the screen.
‘- Mouse
Please use UP() / DOWN() Numeric buttons on the front panel or Mouse to move to next menu.
To move to the submenu, use the “SELECT” button or mouse. It will be applied instantly without
“Apply”.
Display
-Camera Setting
User can change Brightness, Saturation, Contrast, Hue.
16
Page 17
H.264 DVR - Installation/ Operation Manual
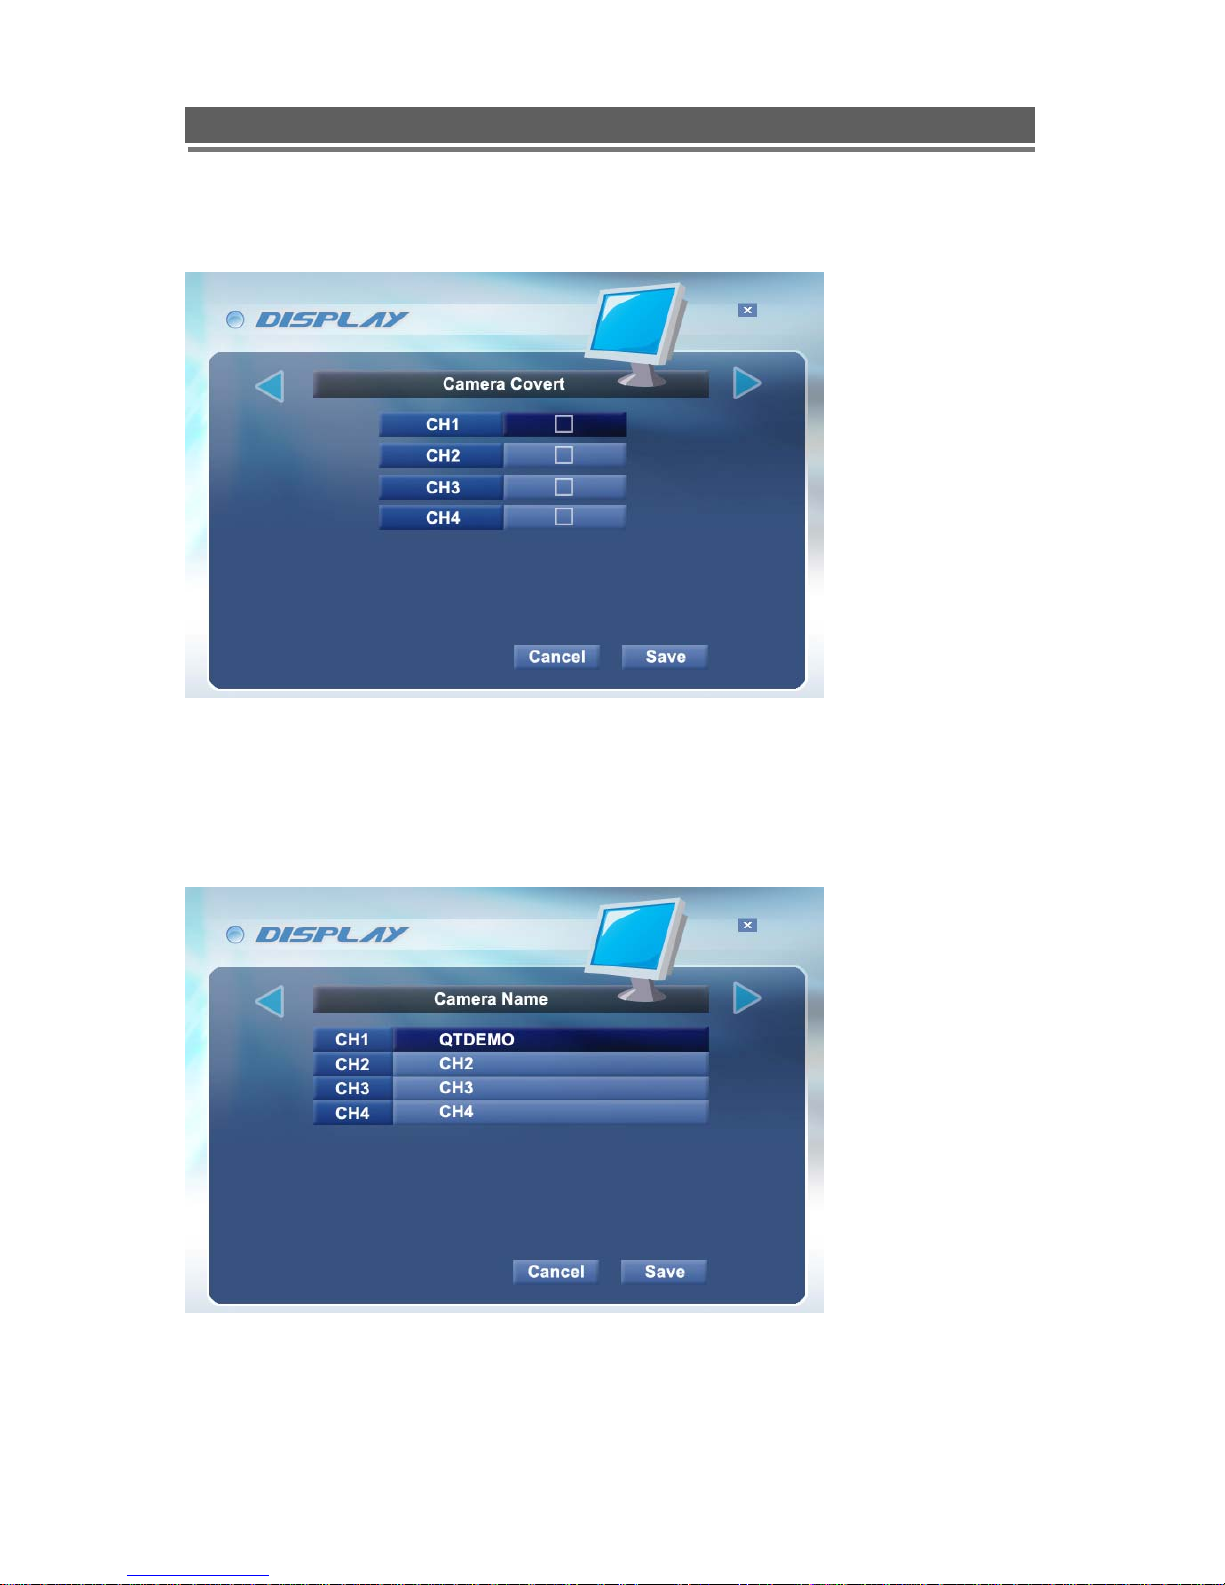
- Camera Covert
It allows hidden Camera, which mean, even live monitoring screen isn’t shown on the screen(black
screen), however, the recording( if recording is “on” condition) is activating.
- Camera Name
Camera title can be written on the screen in both System(DVR) and Client(Network). It will be
available up to 30 characters, if the monitor couldn’t show it in 1 line, it will be shown as ___ …. For
example, ‘FIRST MEETING ROOM’ -> ‘FIRST MEETIN…’
17
Page 18
H.264 DVR - Installation/ Operation Manual
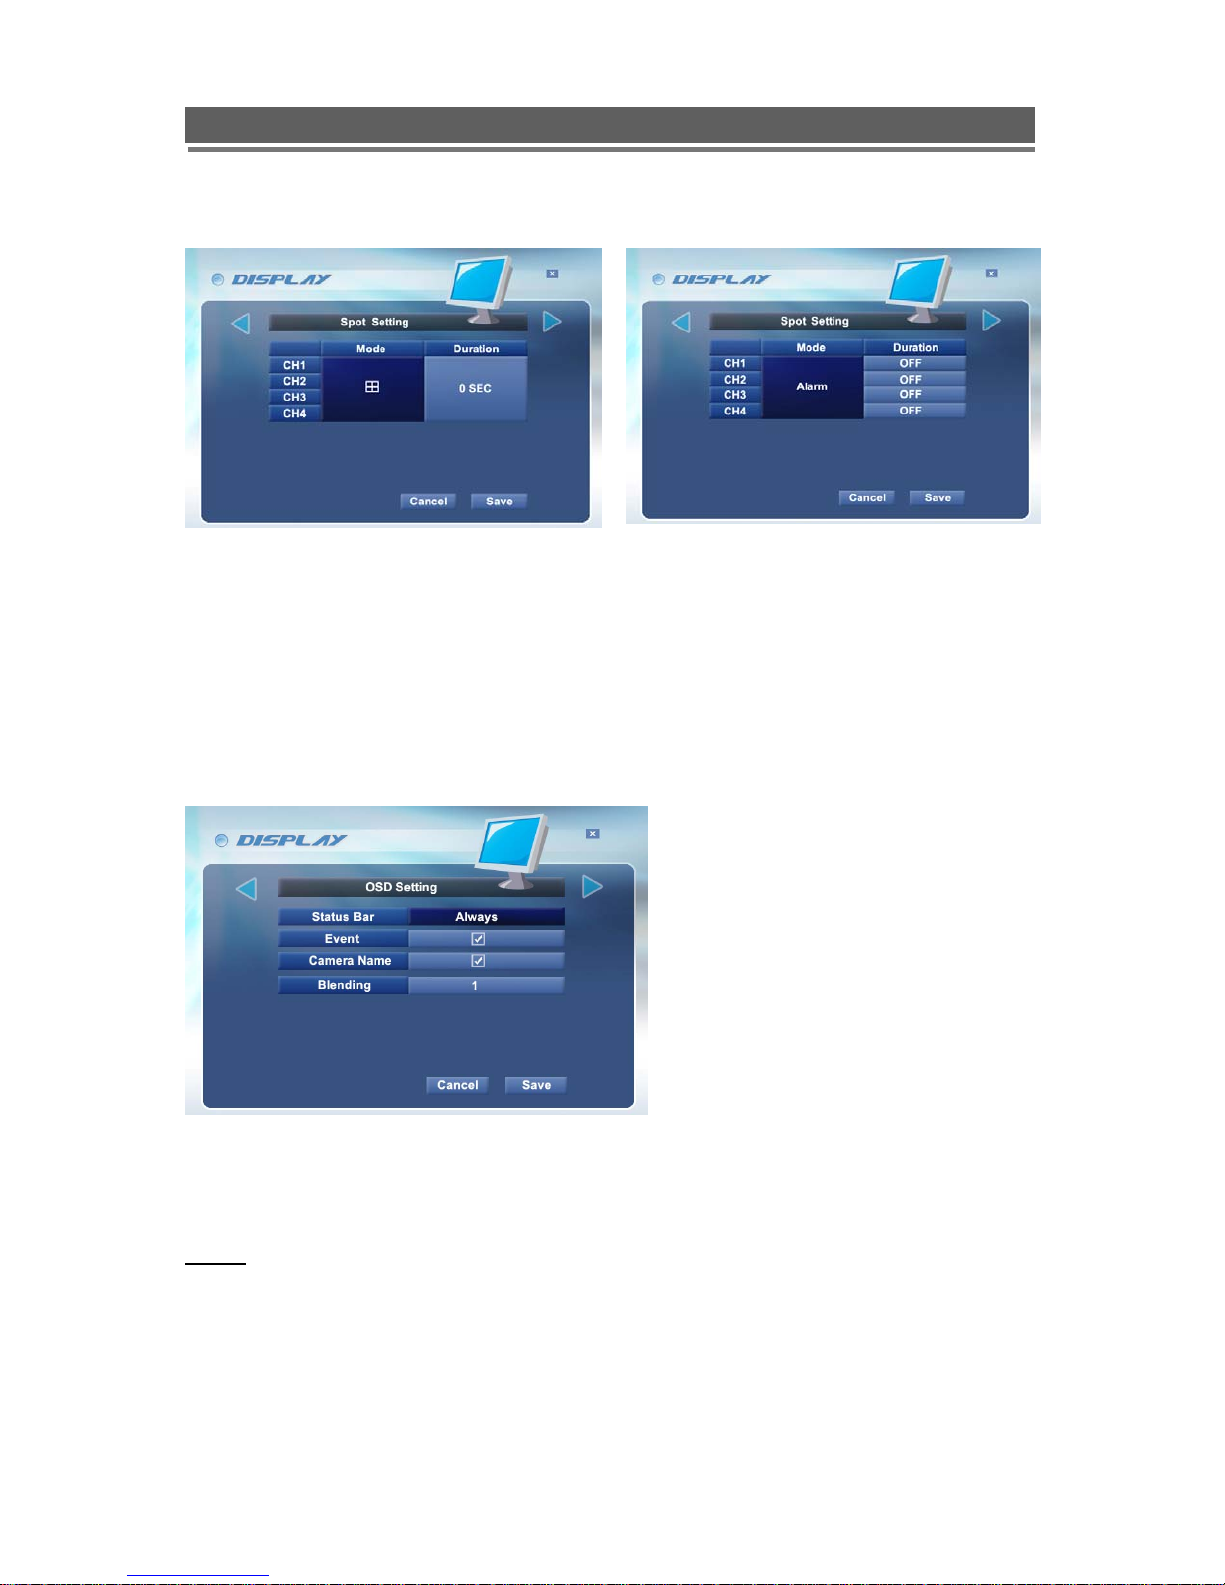
- Spot Setting
Spot output is used when user would like to see event channel instantly. For example, if you want to
see ‘Motion’ event channel, please set as ‘Motion’ in the ‘Mode’ section then, select duration. Spot
Mode is available from ‘Single/Quad/9Channel/16Channel/Alarm/Motion/Audio.
- OSD Setting
User can select OSD On/Off, Event, Camera Name on/off and Blending as well.
New setting value will be applied instantly without pressing “Apply”.
< Channel Division > < Event >
- EVENT Clear : It is for erasing OSD characters related with events.
- APPLY : In order to save any modified setting value, please press “SEL” key in the “SAVE”
NOTE
In every first sub menu_ Display, Recording, System, Network, Event has “SAVE” feature in the
above. If any setting value is changed, “SAVE” is required to save the new value. User can simply
save new value pressing “SAVE” once in one sub menu. Camera Setting & OSD Setting doesn’t need
to be pressed “ SAVE”.
18
Page 19
H.264 DVR - Installation/ Operation Manual
Recording
In our system, all recording setup will be applied globally.
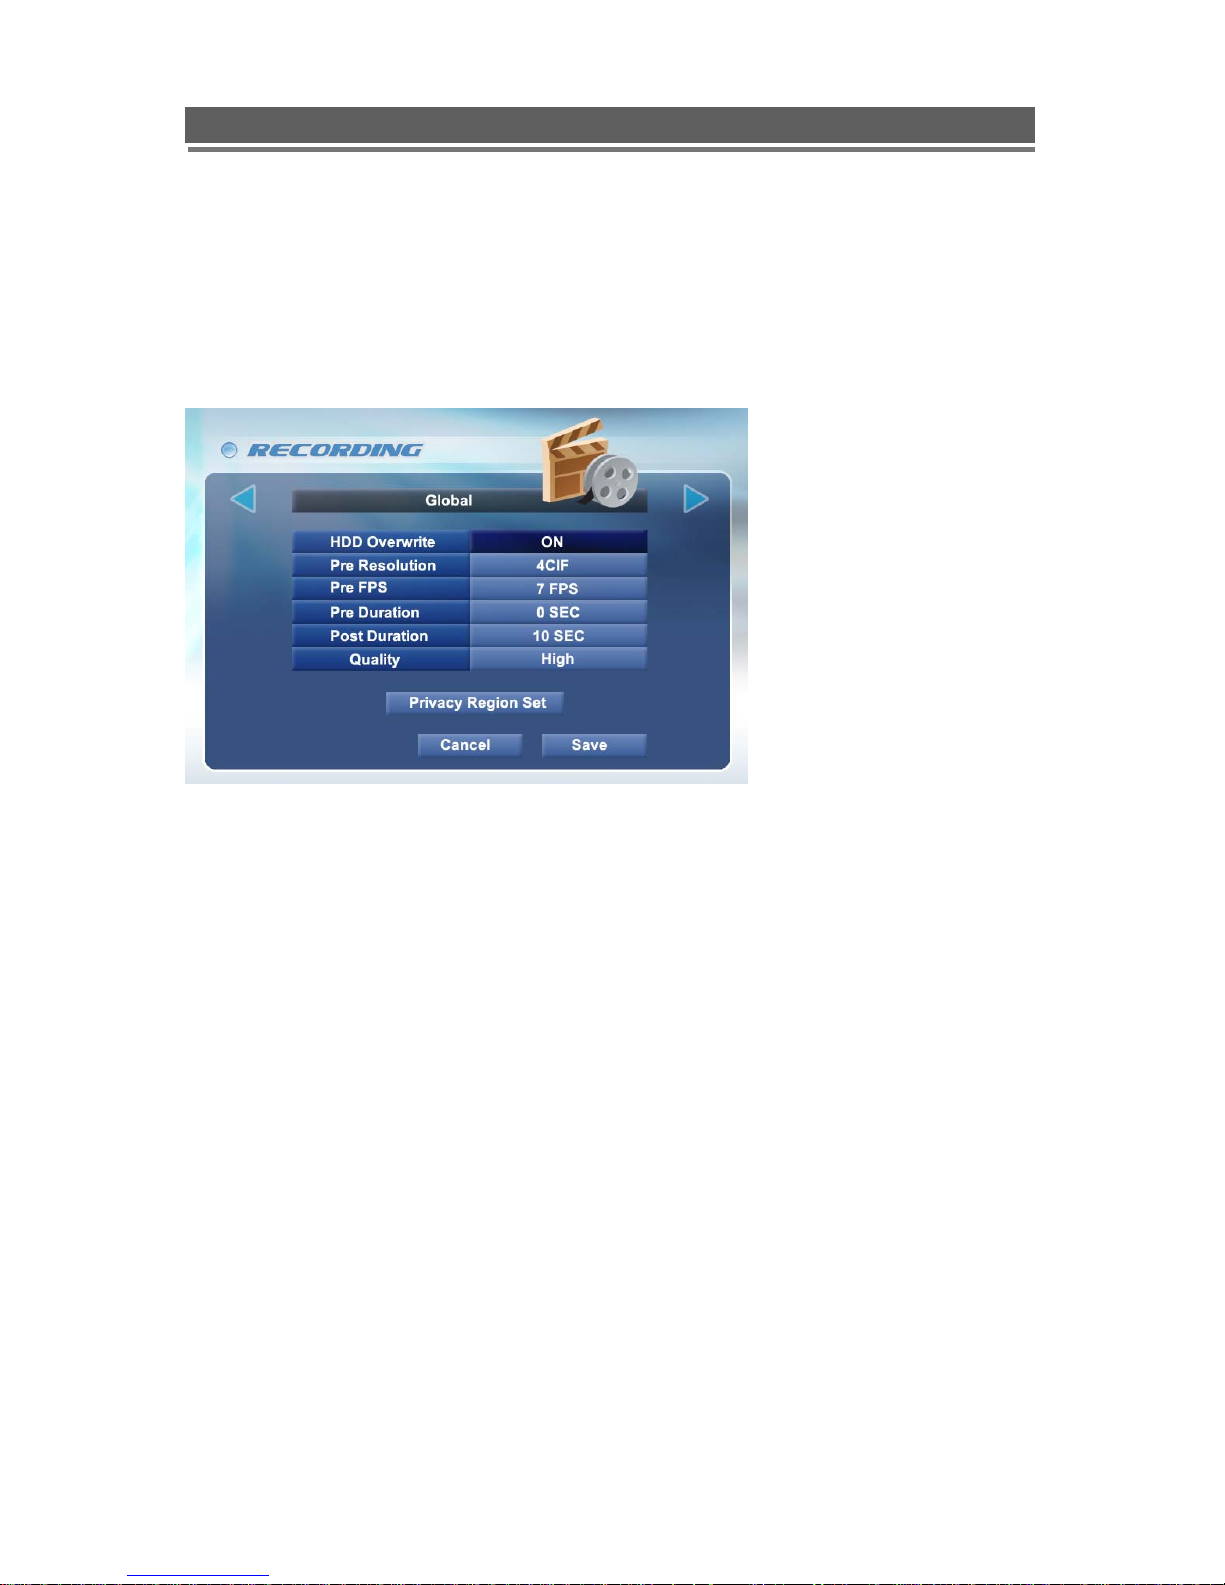
-Global
All the setup values will be applied globally to all channels.
-HDD Overwrite
It sets the recording mode when the HDD capacity is exceeding. It can be selected between “On”
(overwrite) / “Off” (stop).
- Pre Resolution
It supports 360x240 / 720x240 / 720x480 mode(based on NTSC). The default is 360x240 and “Sel, ↑,
↓” arrow button is for changing the figures.
-Pre Duration
As the system support “Pre recording” function, user can select frame rate and Duration as well.
-Post Duration
After event occurred, it sets how long the recording continues. The value is selectable among
5/ 30/ 60/ 90/ 120/ 150/ 180/ 210/ 240 sec.
-Quality
It selects among High, Mid, Low .
19
Page 20
H.264 DVR - Installation/ Operation Manual
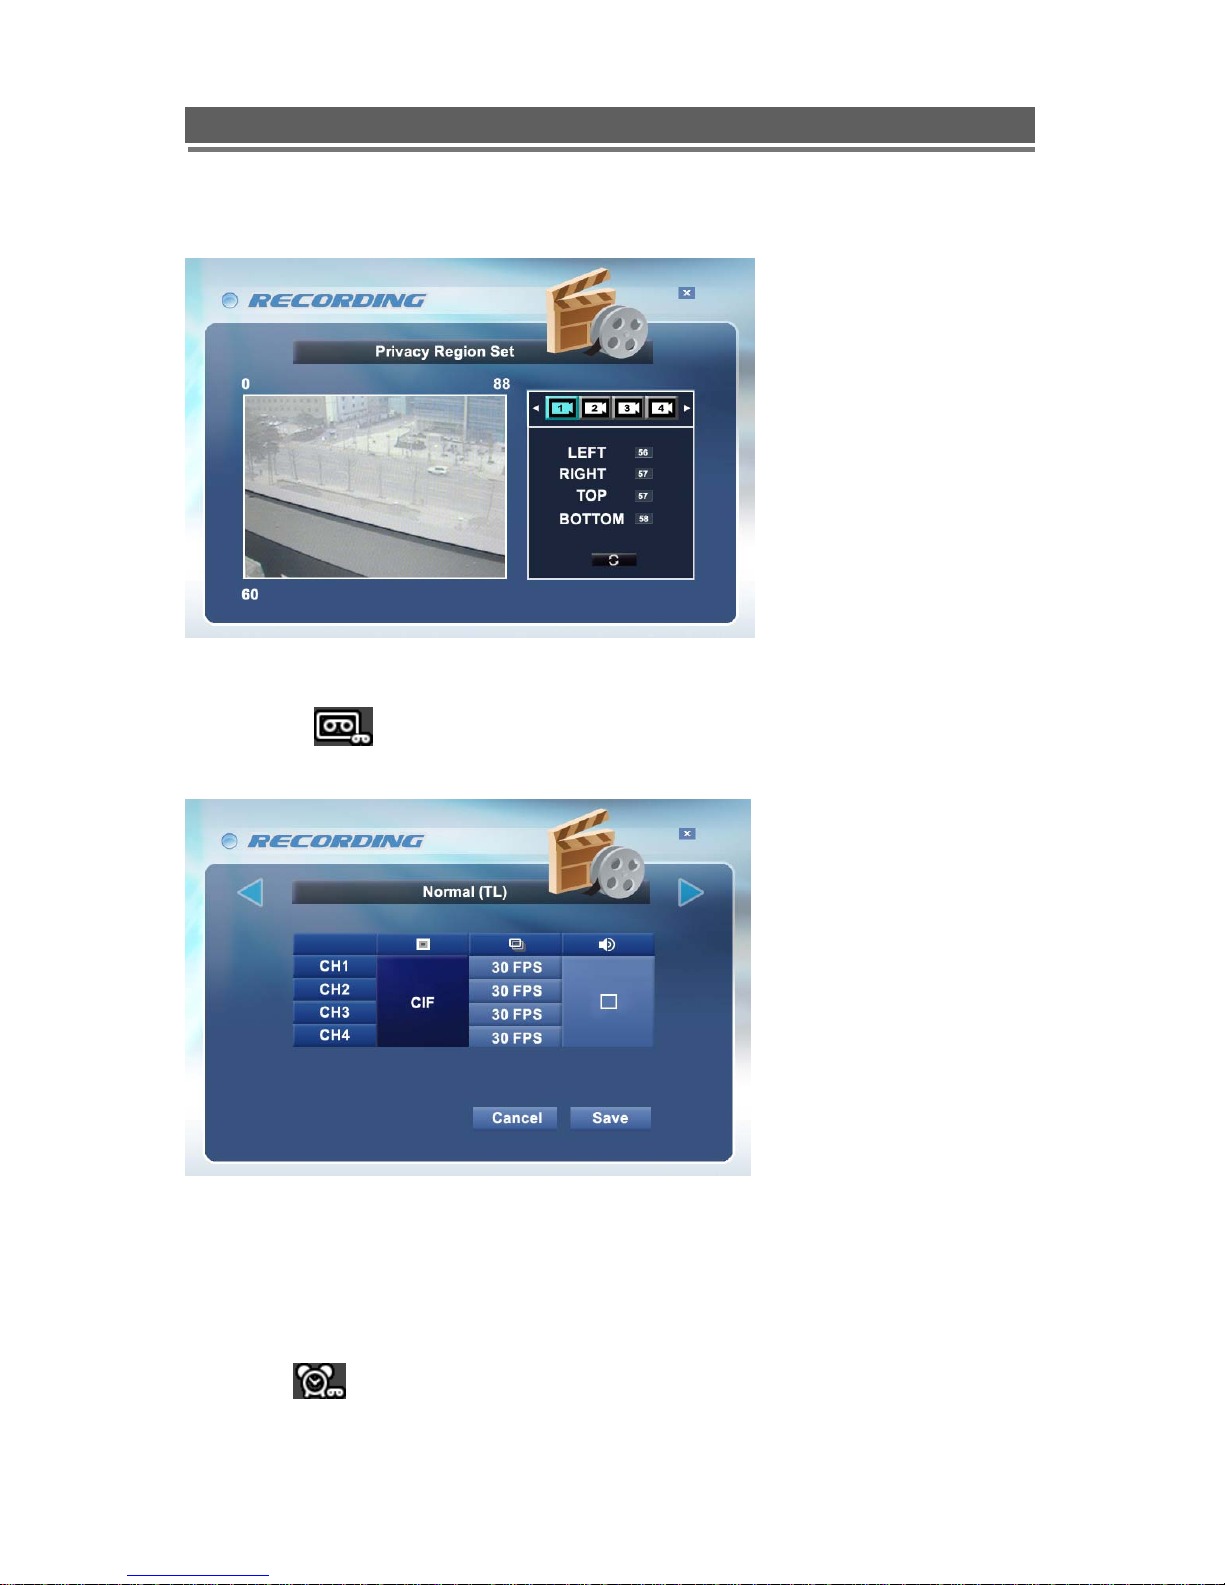
-Privacy Region Set
User can select privacy region with mouse after dragging on the display for privacy purpose.
-Normal
It executes the continuous recording according to the designated set-up value.
The above shows available frame rate each channel. In 360x240 modes, 30 fps is available each
channel (totally 120fps), 720x 240 is 15 fps each (Totally 60fps), 720x480 is 7.5 fps each(Totally
30fps). Individual frame rate control is available and selecting audio on/off individually as well.
Figures can be changed pushing the “↑,↓” button.
-Alarm
It executes the recording when sensor is taken. How to set is same as Normal.
20
Page 21
H.264 DVR - Installation/ Operation Manual
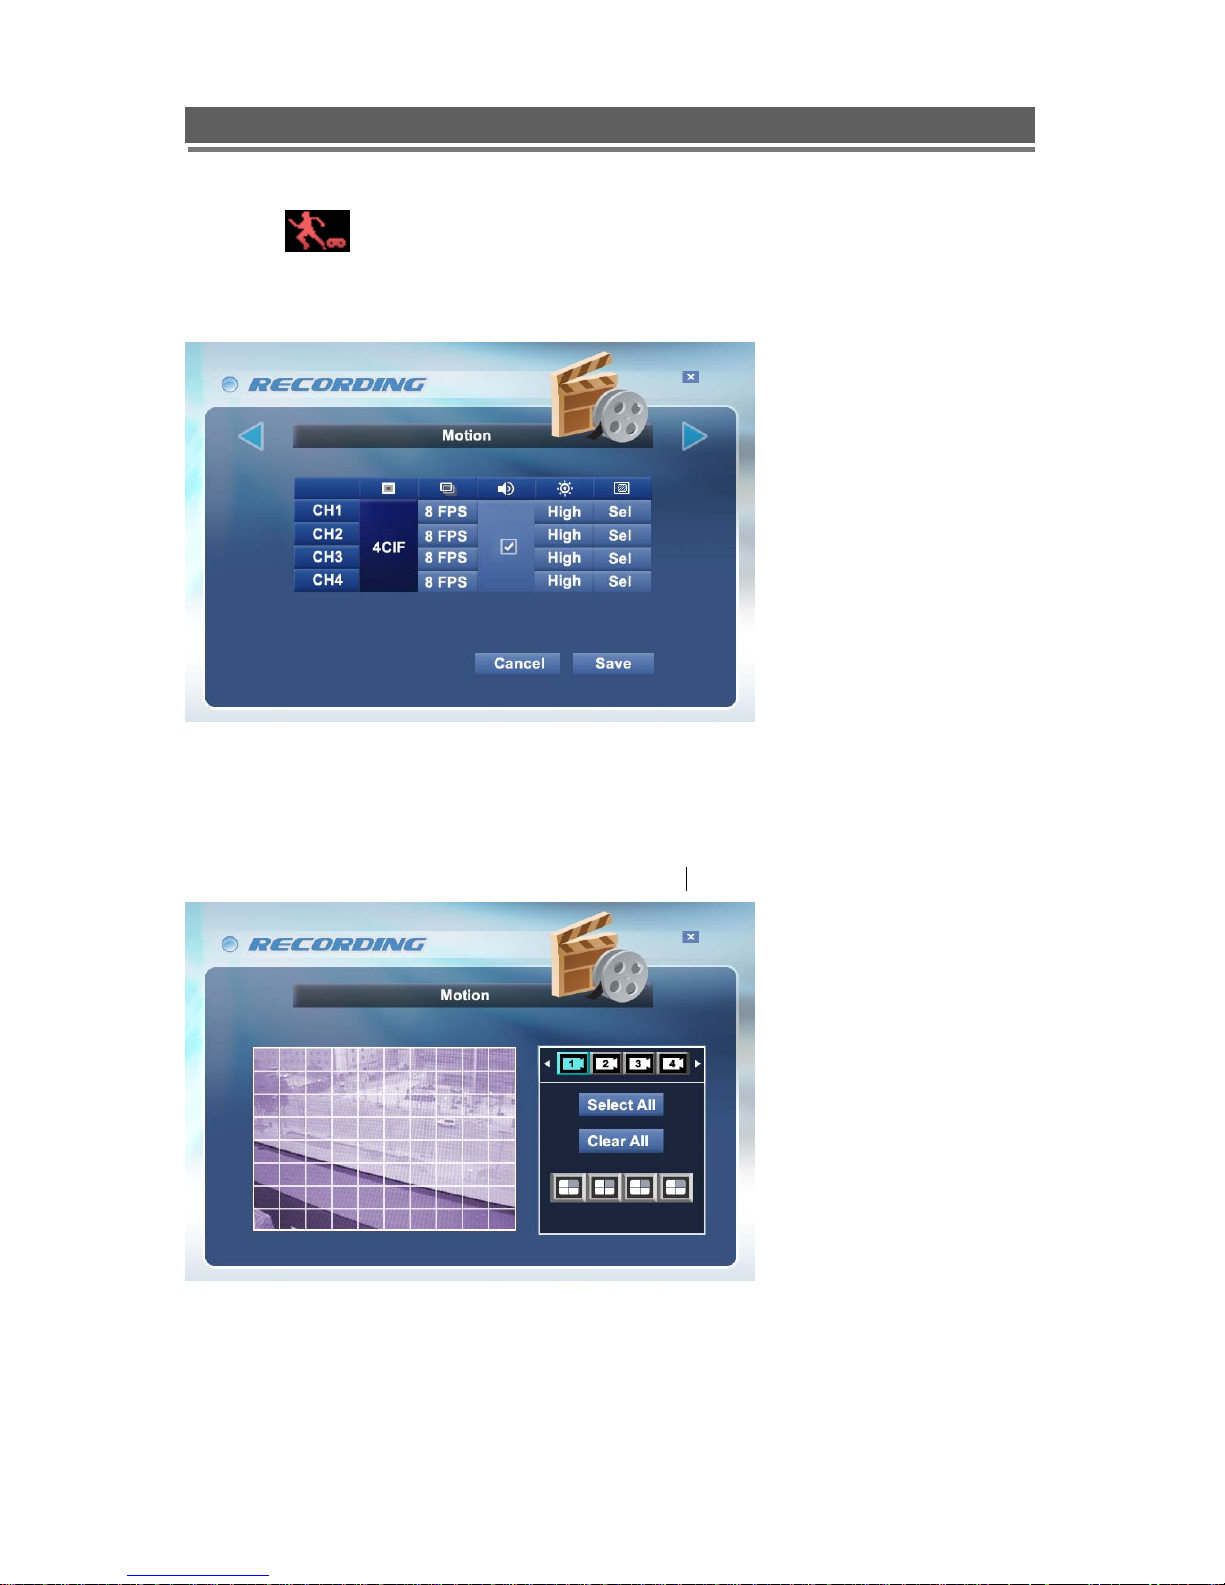
-Motion
It executes the recording when motion is captured. User can select Recording Resolution, Frame,
Audio On/Off, Sensitivity and Region.
- Motion Sensitivity
It consists of High, Mid, Low.
- Motion Region
The following will be displayed when user selects the menu.
The detection area is divided 10x8 cells. Default is all-cells activating mode. 1~10 cells(white color
background) is disabled area. “SEL” button is required for selecting some area.
21
Page 22
H.264 DVR - Installation/ Operation Manual
NOTE
When you record the camera image with the motion recording mode, the data file will be saved
depending on the motion sensitivity. So, higher caution is required to apply the sensitivity to the actual
recording.
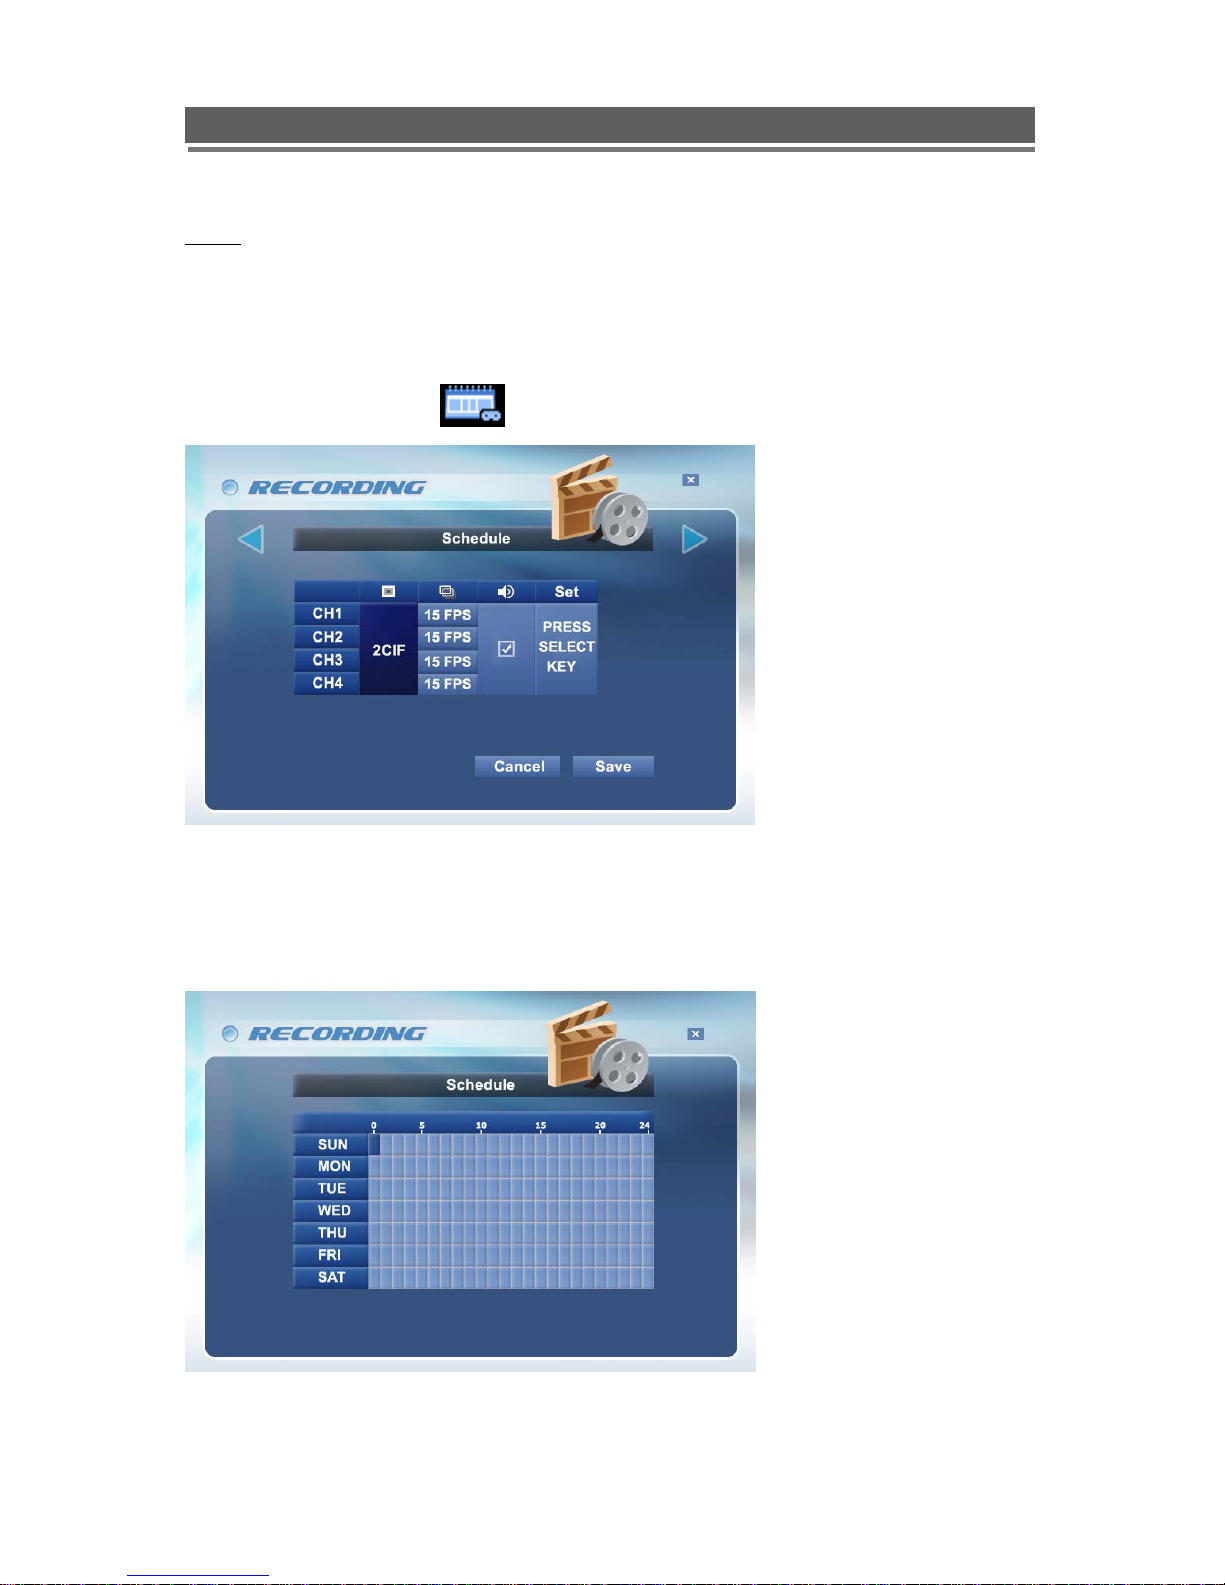
- Schedule recording
It executes the recording as per the programmed time table.
The above shows available frame rate each channel. In 360x240 mode, 30fps is available each
channel (totally 120fps), 720x 240 is 15fps each (totally 60fps). 720x480 is 7.5fps each(totally 30fps)
Setting values will be changed pushing the “↑,↓” button
“SEL” button is used for selecting relevant time and day. Arrow Key will be used for movement.
22
Page 23
H.264 DVR - Installation/ Operation Manual
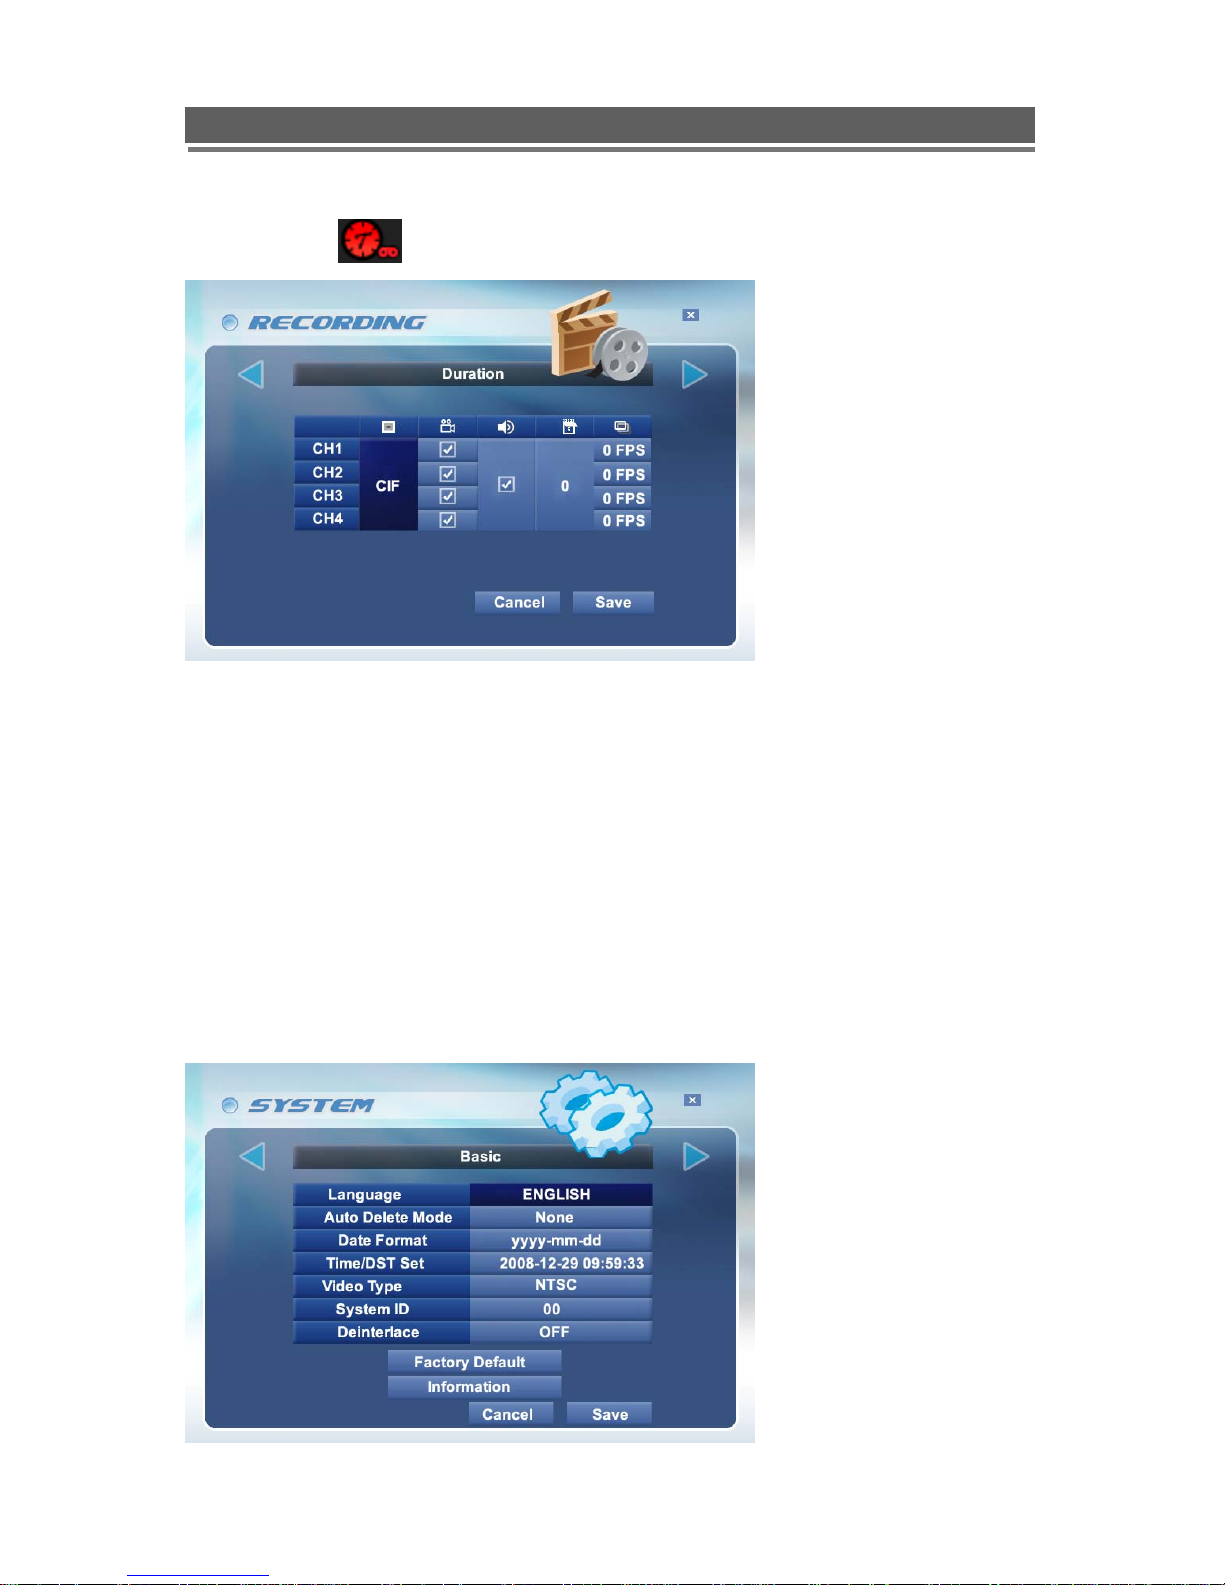
- Duration
It helps user to set FPS automatically if user select Recording & Audio On/Off in each channel and
days to record. So, if the user set Recording & Audio On/Off in the channel and set the days, it will
shows the assigned FPS.
- Priority
It specify the priority among 6 kinds of recording methods. (Normal, Alarm, Motion, Schedule, Audio
Event, Time Lapse ) If Normal is 1
setup value.
st
priority, the recording is carried out as per normal recording’s
System
- Basic
23
Page 24
H.264 DVR - Installation/ Operation Manual
User can set Language, Auto Delete Mode, Date Format, Time/DST Set, Video Type, System ID,
Deinterlace. Also, Initialization and checking Information is available.
-Language
English, Italian, French, Hungarian, Slovak, German, Russian, Polish, Dutch, Spanish, Portuguese,
Chinese, Japanese are available. The default is English.
- Auto Delete Mode
Auto Delete Mode will remain recorded data only for specified days and the rest days will be erased
automatically. User can select from 00days to 99days.
- Date Format
Can select among the formats, mm-dd-yyyy / dd-mm-yyyy, yyyy-mm-dd.
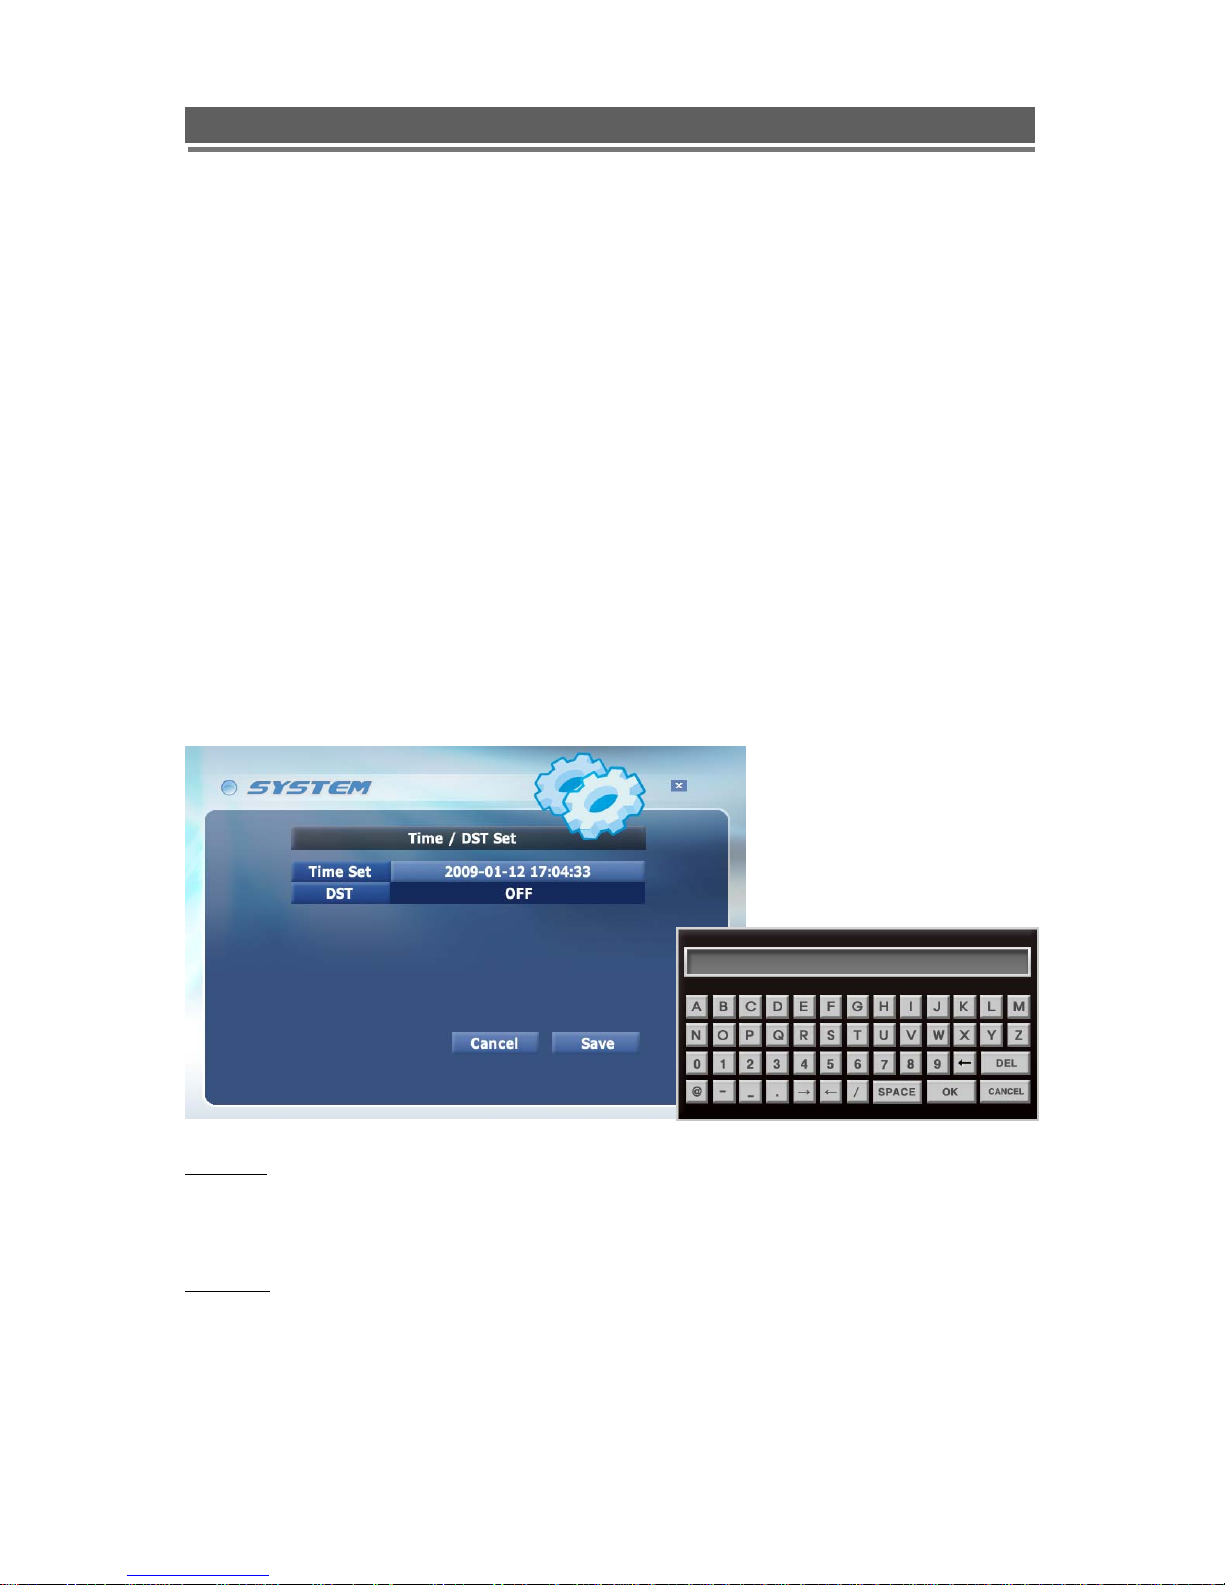
- Time / DST Set
User can change Time for DVR and able to set DST in this menu.
DST OFF
If user doesn’t want to set ‘DST’, please press ‘OFF’ in the Time/DST set. Then, press ‘Save’.
Time Set
It is available as above image after changing the year, date & time on virtual keyboard, “OK” is
required to be applied.
24
Page 25
H.264 DVR - Installation/ Operation Manual
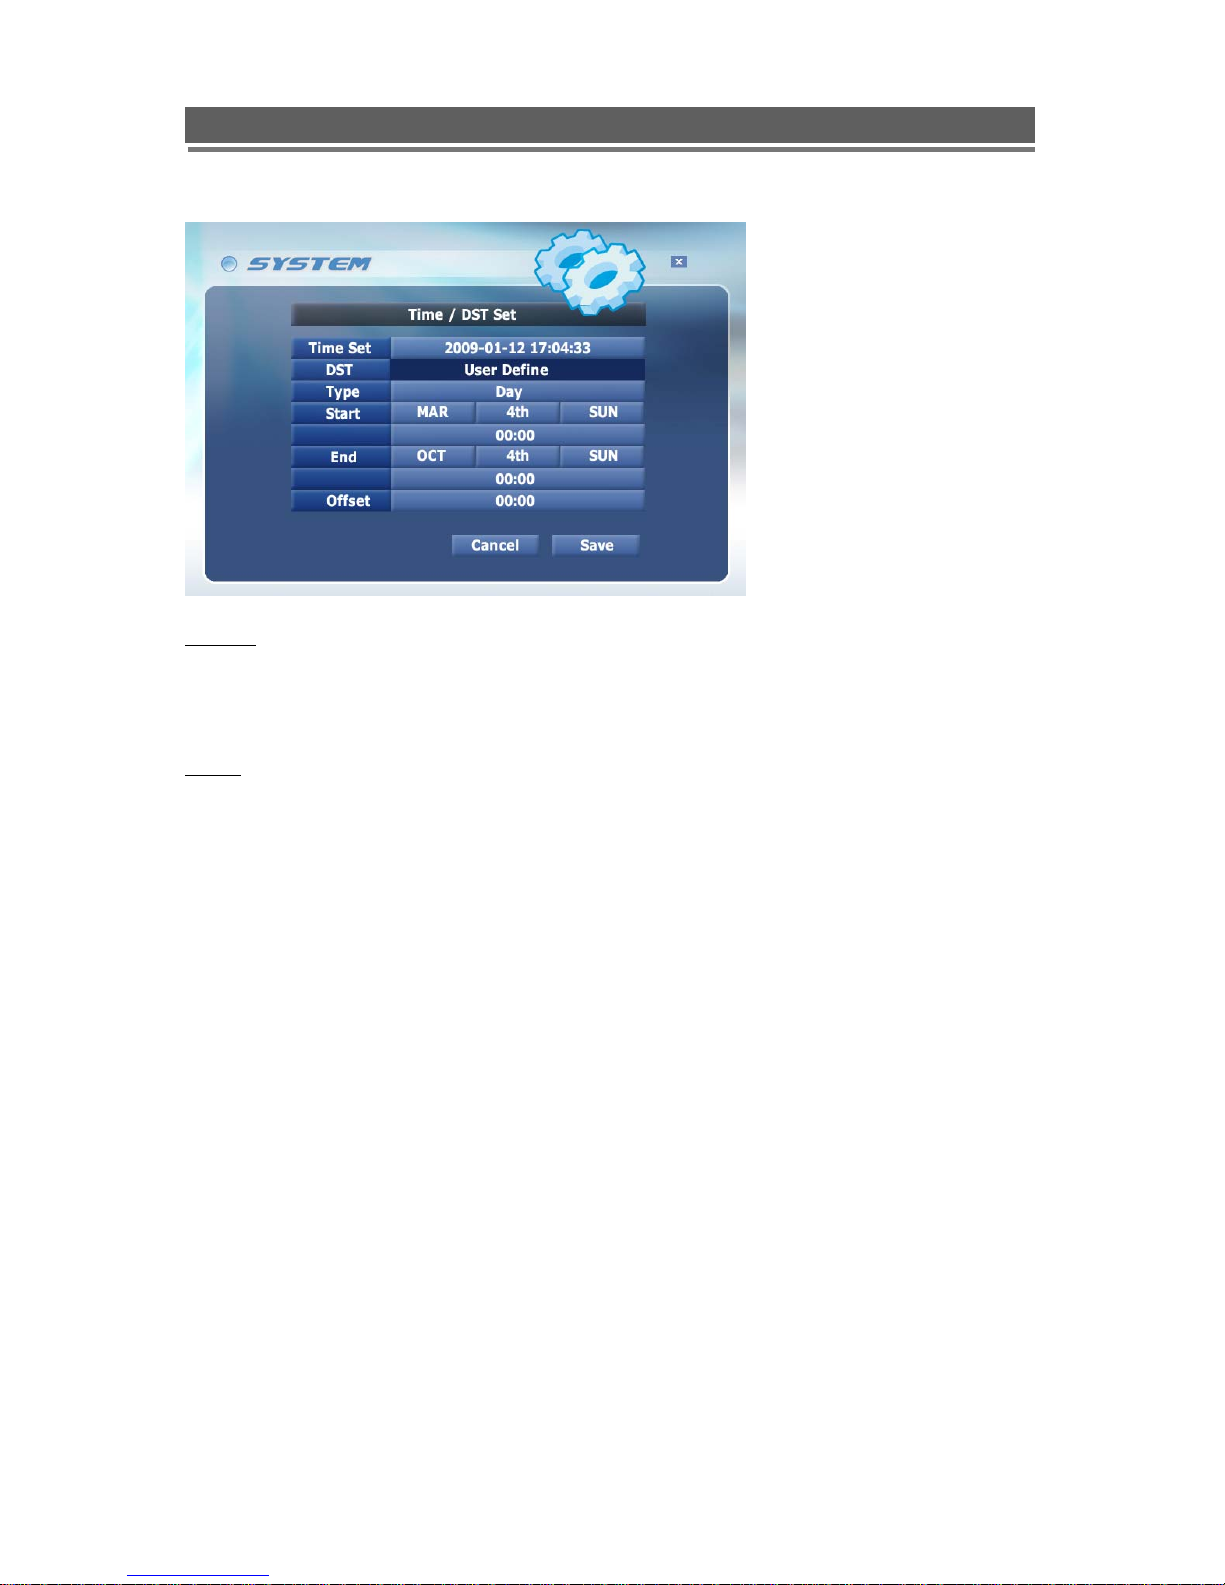
DST Set
It will be available either by Day or Date. When user press ‘User Define’, available country will be
shown. then select Start & End Time and Offset as well. At last, press ‘Apply’ to save the figures.
NOTE
PLAYBACK FOLLOWING TIME CHANGE
The DVR uses the time and date to index video on the hard disk drive so you can find it later.
Changing the time can cause the DVR to work improperly when you try to play back video. If you set
the hour ahead, this is not a problem. But, if you set the hour back, there will be more than one
recording at the same time.
Such as during the October Daylight Saving Time changeover, if you try to search for video between
1 a.m and 2 a.m, the recorder may not operate properly because there will be two hours of recorded
video during this time period. To view video during this overlapping time period, you must start
playback before 1 a.m, then recorder will play both hours between 1 a.m and 2 a.m.
You cannot do a backward search through the overlapping time . But, you can do forward search.
-Video Type : NTSC vs PAL
Video Type is able to set by software, it can be simply done in this menu without rebooting or
initialization.
- System ID
It is used when user use IR remote controller to control more than 1 DVR. It is designed to prevent
the same series of DVR works together in 1 IR remote controller at the same time. If user set each ID
in both IR remote controller and DVR, the IR remote controller only work with same ID of DVR.
25
Page 26
H.264 DVR - Installation/ Operation Manual
- Factory Default
All the menu value will be returned to the factory default. When the DVR is in recording mode, the
system will ask you whether you want to stop recording then execute Initialization.
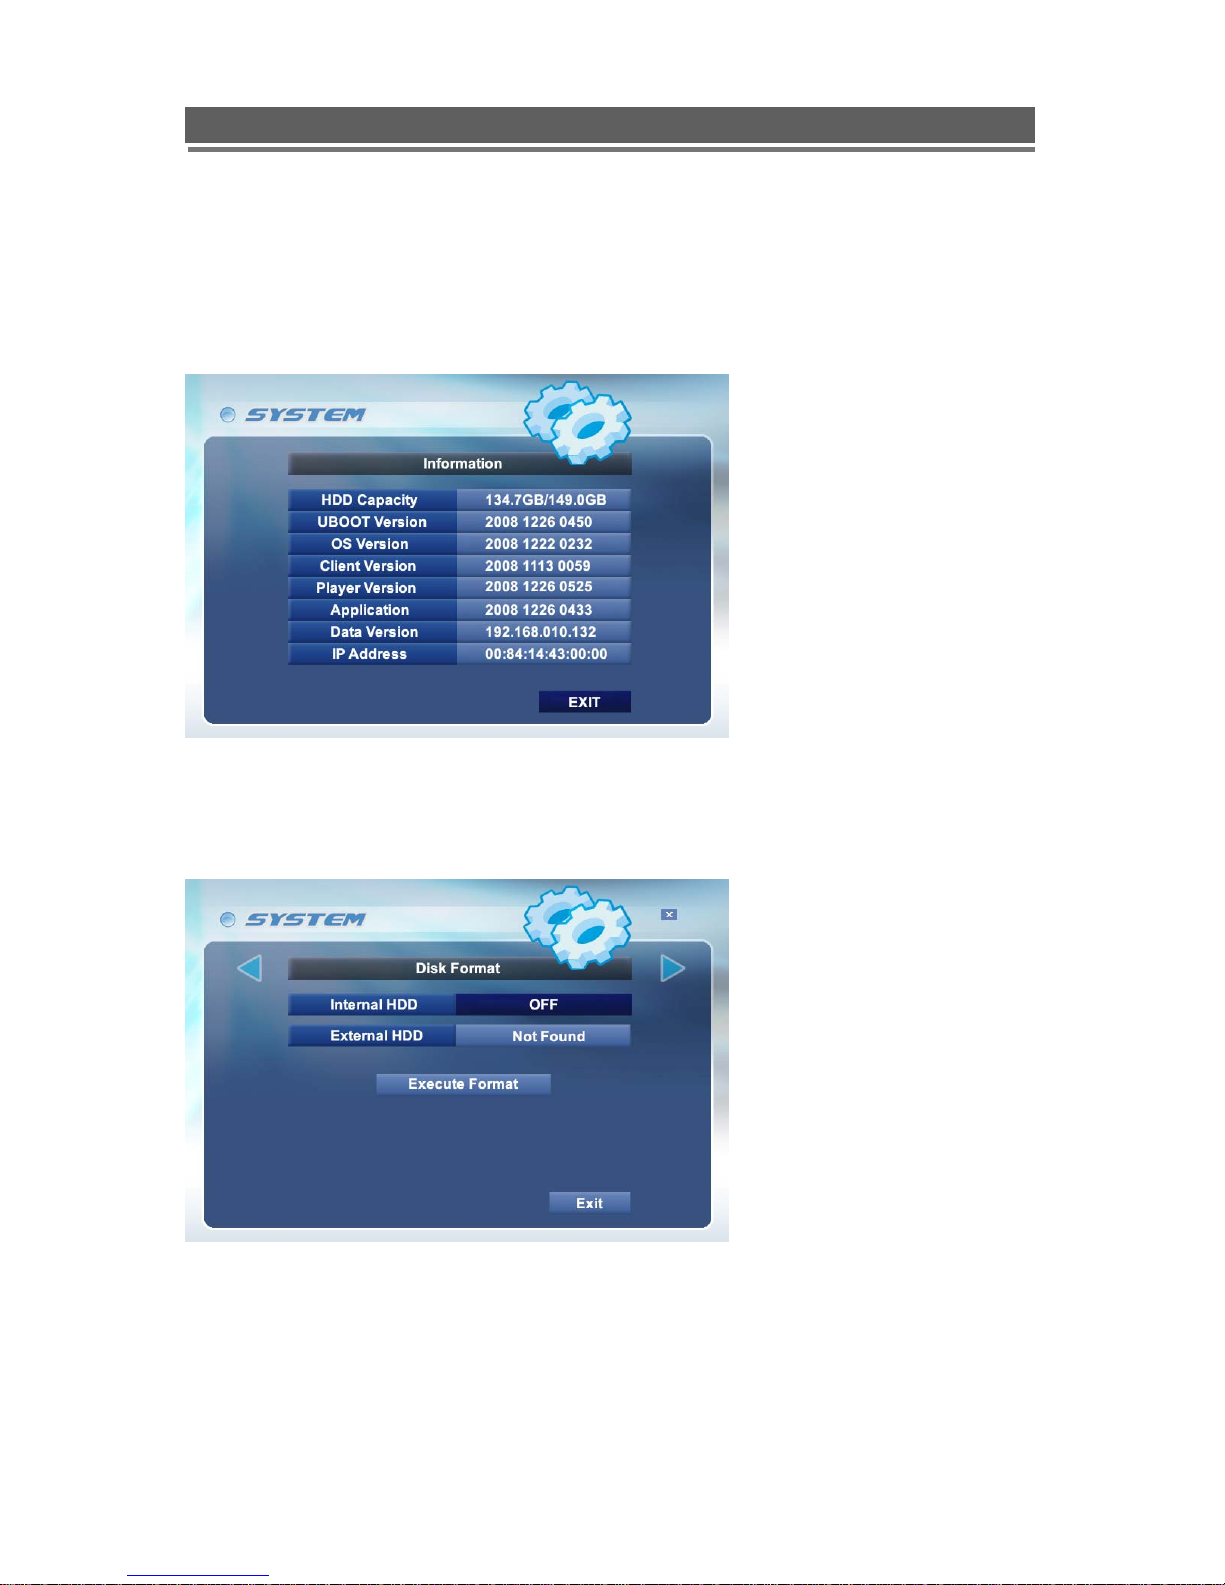
- Information
It will show the HDD capacity and version information for UBOOT, OS, Client, Player, Application,
DATA version and IP address as well.
- Disk Format
User can format the HDD disk (Internal and External as well) here, and if there is no device to format,
the system will show you as ‘Not Found’ as above image.
26
Page 27
H.264 DVR - Installation/ Operation Manual
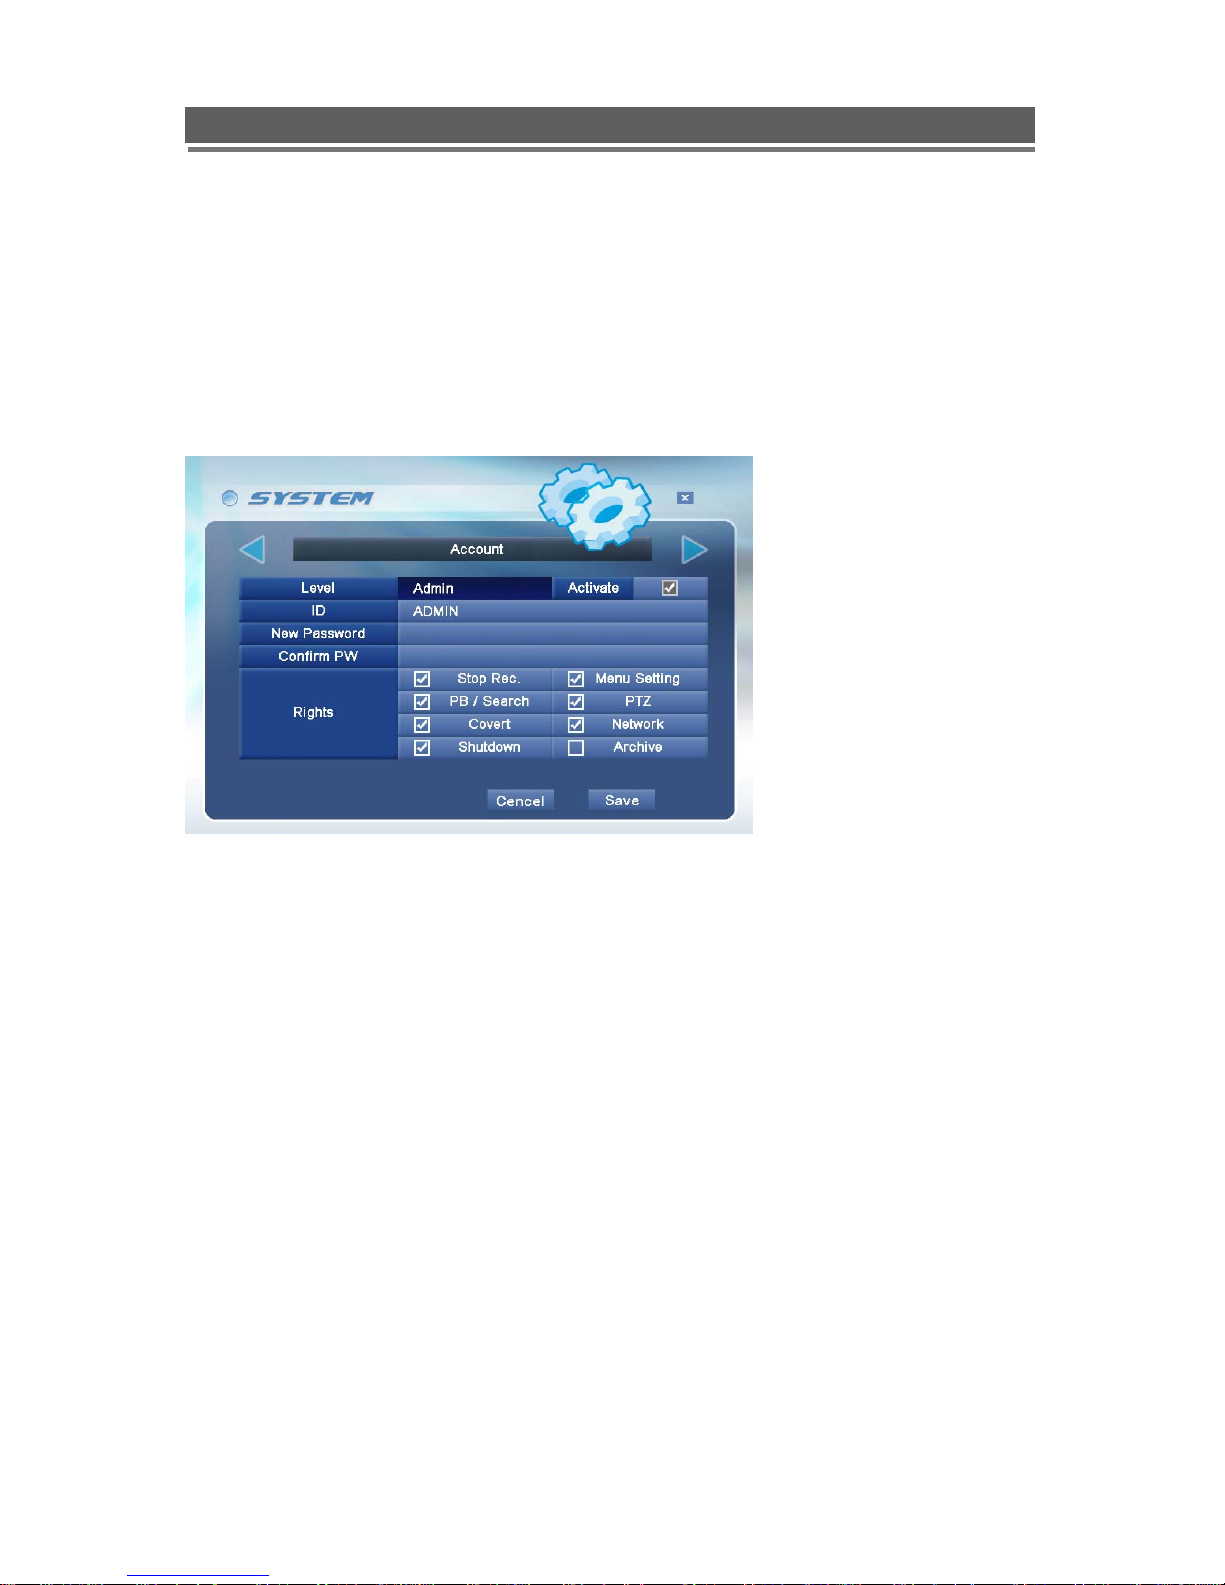
- Account
There are ADMIN, MANAGER and 4 USERS for ‘ACCOUNT’.
ADMIN can assign rights to MANAGER and USERS. MANAGER can assign rights to USERS.
So, this will give an option for flexible account level for multi level’s usage.
Please check Level, Activate On/Off, ID, Password(Confirm PW) and Rights for each level.
27
Page 28

H.264 DVR - Installation/ Operation Manual
- Program Update
The latest firmware version can be upgraded through USB 2.0 Port using Memory Stick. When
memory stick connects USB port,
enter “menu”-> “System Set”-> “Program Update”. If the system recognize “new program”, “New
program found
” will be displayed on the screen. Then, please buttons “Select” Key. Processing
will be shown on the status bar of the screen. Then,
percentage will be displayed.
NOTE .
1. If the system doesn’t recognize “new program”, “Program Update Device not found! Press ‘Menu’
Key to Exit” will be displayed.
2. USB compatibility has been tested successfully, Lexar Jumpdrive 128/256MB, Sandisk Mini Cruzer
& Cruzer Micro 1GB,
SANDISK 1GB, 512MB, MARUZEN 1GB
3. For system stability, please off 1) recording 2) playback 3) network connection during upgrading.
4. After updating program, reboot should be required.
28
Page 29

H.264 DVR - Installation/ Operation Manual
- Sensor
Sensor Input is selectable N.C, N.O, None.
- PTZ Setup (will be supported soon)
Protocol is available Pelco D &,P , Dongyang, Vista PD and Baud Rate can be selected among 2400,
4800, 9600, 19200 BPS.
- PTZ Controller (will be supported soon)
PTZ Controller Model is available QSC-1000 and Vista KBD and Baud Rate can be selected among
2400, 4800, 9600(QSC-1000 Default), 19200 BPS. Setting way is same as PTZ Setup.
29
Page 30

H.264 DVR - Installation/ Operation Manual
- Etc.
Key Beep sound and Mouse sensibility can be selected on/off and High, Mid, Low
Network (If you connect network, this icon will be shown)
To enter Network Set menu, system ask password (Default is 00000000).
When user is using the fixed IP, each address is required to be filled out as per network environment.
In fixed IP environment, no need to change DVR & Web Server Port.
As per DVR & Web server port, please refer Appendix 4.
-DDNS
For DDNS usage, please refer to below image.
DDNS Server is needed when clients connect to the DVR, usually for Dynamic IP, since clients
don’t know an IP of system DVR. ( Please register your ID & domain at www.ddns-dvr.com
which you can use DDNS server as free of charge)
in
30
Page 31

H.264 DVR - Installation/ Operation Manual
Then please set ‘DDNS : ON’ and User ID& PW and Domain(don’t need to input ddns-dvr.com) as
well in the DVR. After filling the blank, please select ‘DDNS Status Check’ and if it shows ‘DDNS
Status Check OK’, you will be successfully connect the network through the domain.
If User want to use DDNS quickly, please select DDNS-DVR.CON(AUTO) and use the given number
as a domain (000A05054432.ddns-dvr.com)
-IP Set
If user is on the condition of “Dynamic IP or Non-Dynamic IP(Fixed IP), the following will be shown.
-NTP
It supports keep matching local time from internet to the DVR.
31
Page 32

H.264 DVR - Installation/ Operation Manual
User can select the city of each county
EVENT
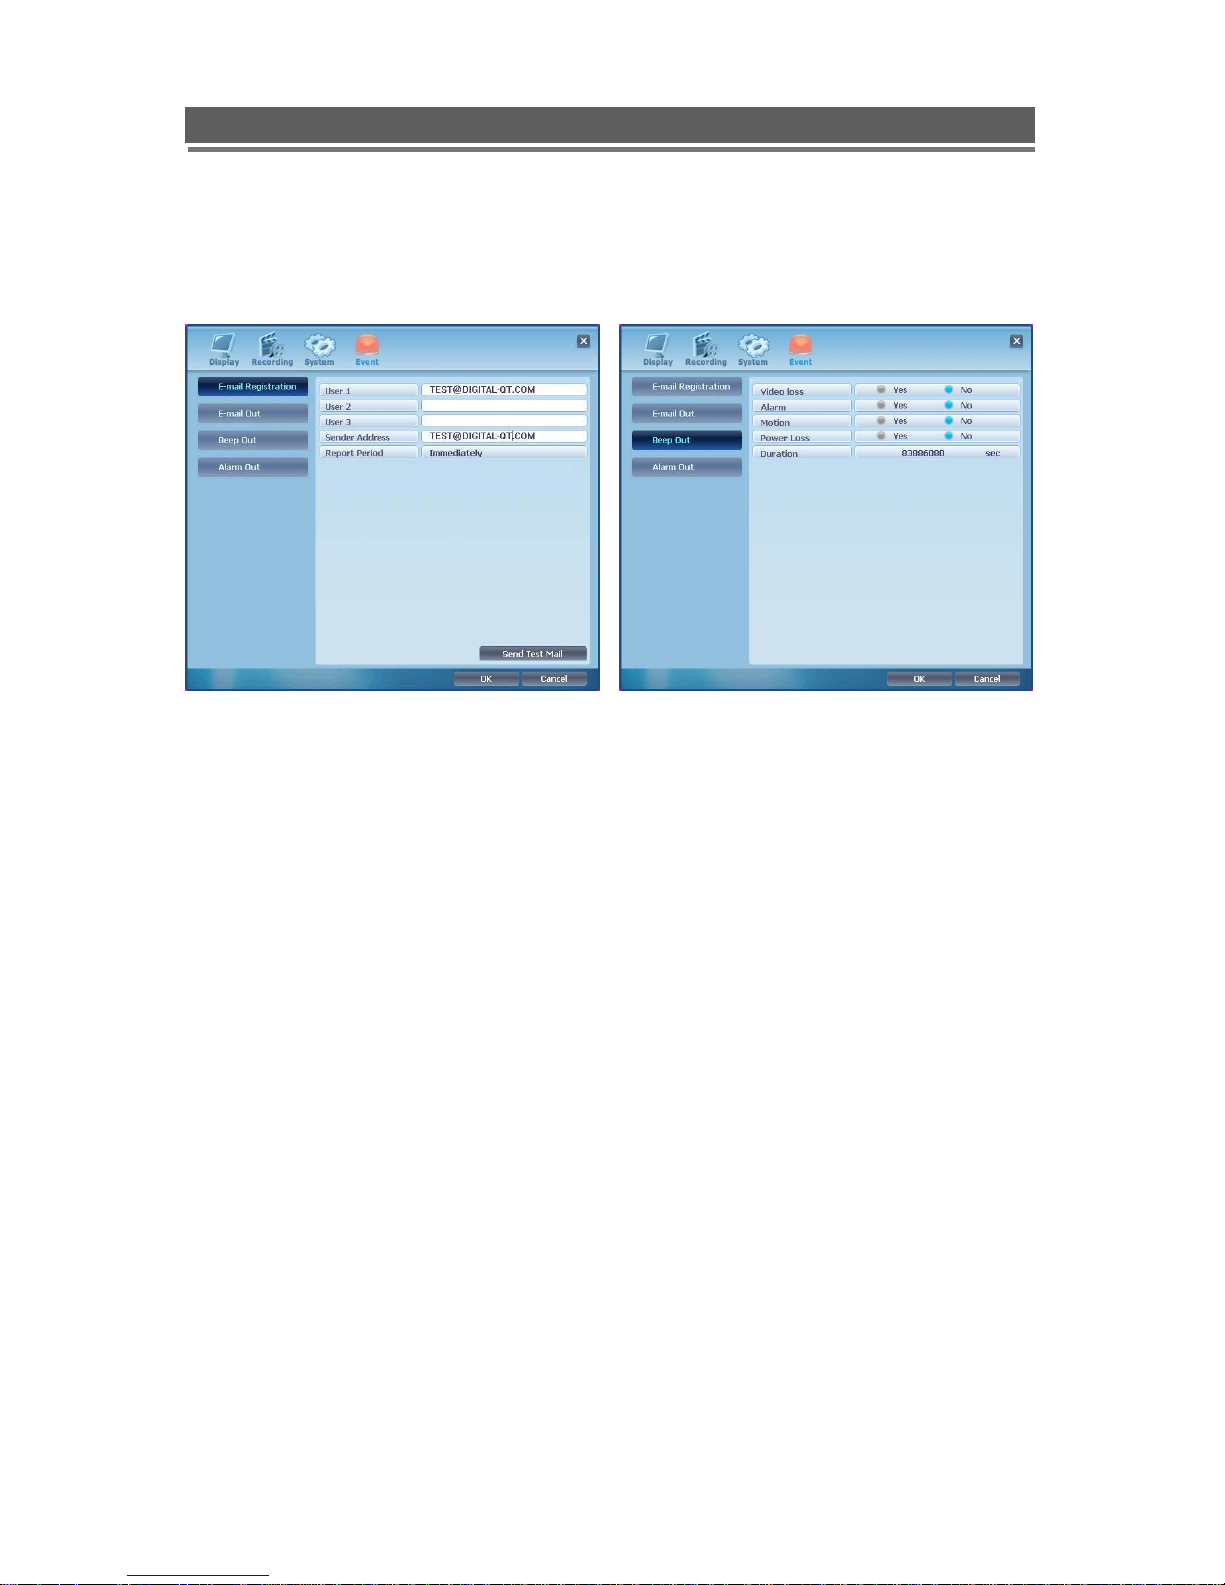
-E-mail Registration
At E-Mail registration menu, user register the e-mail address to receive several event notification.
To register the e-mail address, 1) input the address for users and sender 2) Select Report Period
3) Try “ Send Test Mail”.
NOTE :
1. Sender address should be input. If not, e-mail doesn’t work. If you input DVR as
mail ID & company.com as domain, sender’s information will have “QT@digital.com
2. IP & Gateway in the system should be set up first .
E-MAIL Report is available among Daily/ Weekly/ Immediately. Daily report will be done
00(H):00(M) each day and weekly report will be done 00(H):00(M) on Sunday.
32
Page 33

H.264 DVR - Installation/ Operation Manual
-E-mail Out/ Beep Out/ Alarm Out
When event happens, the each output is operated as per setup value. Events such as “ Video Loss/
Alarm/ Motion/Power Loss” will be sent to E-Mail address or Beep or Alarm according to setup value.
4. Search
- Date / Time Search
If you select “Date/Time”, the following window will be shown.
The (▲),(▼) buttons for selecting each clause. When you set the specific time/date and then press
“Play” button, which execute the playback.
User can change channel division and perform Pause, playback(4steps), reverse(3steps).
33
Page 34

H.264 DVR - Installation/ Operation Manual
- Event
If you select “Event”, the following will be shown
The ( ),( ) buttons of Arrow key buttons for selecting each clause .
If you select one of the events , it would be displayed recording data of each event as the above
and then click one of the recording data of each event which you want and playback will be operated.
- Calendar Search
If you select “Calendar”, the following will be shown
.
The date which has recorded data is displayed in a white color . you can select the date in Calendar as
using arrow buttons. And if you select the date, It will be displayed the sub menu of the hour and
minute as the below.
34
Page 35

H.264 DVR - Installation/ Operation Manual
The hours which has the recorded data are displayed as the color bar of each event and if the
hours which you want to play are selected, the following sub-menu will be displayed
The minutes which have recorded data will be displayed as the color bar of each event and if
the minutes which user wants to play is selected, the playback is operated.
35
Page 36

H.264 DVR - Installation/ Operation Manual
- Archive
INTERNAL
1).
Archive Device
Internal DVD-R is available.
> Note :
1. Manufacturer guarantee
* DVD-R drive : LG GSA-H22N/H42N( DVD-R disk: Imation or Melody brand, 8x Max)
2. When DVR system try to read disk or drive, “ READING OPTICAL MEDIA” message will be
shown and no key buttons works.
Device Format
Format for DVD-R is not needed. When use DVD-RW, format should be done first.
File Format
Exclusive file is available . Exclusive file will be played with our own player. Player is downloaded
automatically together with video data.
.
From/ To
You can set up the time which is required to be backed up to the internal DVD-R Drive .
36
Page 37

H.264 DVR - Installation/ Operation Manual
Channel
When you select exclusive type, all channels can be downloaded at the same time.
Transfer
Downloading the backup data to internal disk . Percentage during downloading will be shown.
* Note :Highly recommended that network & playback would be off to speed it up during
downloading to internal DVD/CD-R disk.
2). EXTERNAL
When Memory stick connects USB port, the icon will be shown at the bottom of
Monitor.
Backup Device
USB memory stick(thumbs drive) is available.
Device Format
To back up the data, please delete existing files on the stick first..
File Format
Exclusive is available . Exclusive file will be played with our own player. Player is downloaded
automatically together with video data.
From/ To
You can set up the time which is required to be backed up to the memory stick .
Channel
If you select exclusive, Even all channels can be downloaded at the same time.
Transfer
Downloading the backup data to archiving device. Percentage during downloading will be shown.
* USB compatibility has been tested successfully for these recommended USB devices.
USB Sticks : The Guaranteed Brands Only (Refer to P.31)
DVD/RW Plextor PX-716UFL
Lite-On CDRW (LTR-52327SX)
37
Page 38

H.264 DVR - Installation/ Operation Manual
* Procedure for saving data onto a USB device.
1. Insert USB device. Wait until USB symbol appears on screen
2. Press “Search” button
3. Go to “Backup” Press “SEL” button.
4. Select Start & Stop times (Press “SEL” to change, use numeric & character buttons) Press “SEL”
5. Set channel number (cameras 1~16) Press “SEL”
6. Select “Calculate Backup size”
7. Select “Transfer”
8. The percentage status of data backed up is displayed on the screen (while back up, user can do other
work as Pressing “menu” button > Multi tasking function)
“Exclusive” allows all cameras to be selected and recorded.
* PC Playback
1. Insert USB device
2. Folders & Files on device: download, bkplay48, autorun,client48.cab, client.htm,
index.htm, tagscrip.js
3. Double Click “bkplay48”
4. Local search > click “play” button
LOG
ALL/POWER/RECORD/OPERATION/CLIENT/EVENT
-
User can see events in LOG
menu, and it is splitted. Total
2500 of Log are available.
*Sub Menu of Log List
Power : Power on, Power off, Power fail
Reocrd : Rec fail, Rec start, Rec stop, Rec error, Rec full
Operation : Play start, Play stop, HDD format, Menu set
Client : R_Login, R_Logout, R_Logfail, R_Play, R_Transfer, R_Rec on, R_Rec off, R_Upgrade
Event : Alarm, Motion, Audio, Videoloss, Email_fail
38
Page 39

H.264 DVR - Installation/ Operation Manual
5. CLIENT PROGRAM
5-1. Network Connection
Minimum PC specification
CPU : Core 2 Duo 1.8GHz, Graphic : 256MB
Name of icons on the client screen
1) IP Insertion through IE -
Connection will be done just writing DVR IP address on the Internet Explorer window. If
domain is kept to reach DVR by DDNS server, it is allowed to write domain name directly.
Downloading ActiveX Control
When DVR connects network, the window to download active X control will be displayed in
case that no downloading “Active X control” has been done or one installed DVR is higher
version than PC Client. Then, select “Yes”.
39
Page 40

H.264 DVR - Installation/ Operation Manual
2) IP Insertion through Network Installation -
User can also simply connect network via Network Installation(Product CD)
When User click the button of ‘Connection’, , of Network installation program, the IP
SET window will be appeared to connect to a DVR.
Please put DVR IP address, DVR Port, ID, Password in the blank then press “OK” button.
Live on/off :
Live monitoring will be started automatically when you connect network.
40
Page 41

H.264 DVR - Installation/ Operation Manual
Channel Division (1, 4, 6, 7, 8, 9, 10, 13, 16) :
It is available during monitoring or playback with right buttons on the screen.
1) Single 2) Multi
Full Screen on/ off
The Full screen will be shown up as above.
41
Page 42

H.264 DVR - Installation/ Operation Manual
OSD on/off :
(SMART)ARRANGE on/off :
When Channel direction is mixed on the screen, it makes the camera channel in order.
Image Save / Load
SAVE : This is for saving format either JPEG or BMP or TIF. There is no change on the main screen
when user press “Save” button.
LOAD : When user click “Load”, there are lists of saved images. If user select one of the lists, there
will be shown the image with data information(Status-Live/Playback, IP address, CH No.)
42
Page 43

H.264 DVR - Installation/ Operation Manual
Playback
Forward)
(Step Backward, Backward, Playback, Pause, Recording, Stop, Step
Audio (Mute, V olume, Microphone)
※ Select Audio : Select Audio from the channels, it toggles in order.
※ Microphone : It is used for transmitting sound to System through microphone.
Quit (Stop Client program)
Remote search
Search (Date/Time/Event/Calendar), Backup(Remote Backup), Log(Remote Log) are available.
1) SEARCH
- Remote search – Date/Time - Remote search – Event
When user click “Play” button, this windows disappears and Remote Playback will be started.
If user click one of the lists, “Play” button will be activated. Then click “Play” for Remote Playback.
43
Page 44

H.264 DVR - Installation/ Operation Manual
- Remote search – Calendar
If user click one of the date in blue (recorded data), user can see the details as follow picture.
There are 2 options for Remote Playback.
1) Drag the Red line to the color bar(I.e. Blue : Normal Recording)
2) Click the point which user want to playback on the blue bar then the red line will be dragged to the
point.
Then click the “Play” button for Remote Playback.
- Select Channel :
User can simply include/exclude channel what user want to Search. It is available for Search, Backup
and Log as well.
44
Page 45

H.264 DVR - Installation/ Operation Manual
2) Archive
- Remote Archive – Date/Time - Remote Archive – Event
Select Start Date&Time and End Date&Time as well through the light grey bar for backup. Then, click
“Calculate” to check the data size. At last, when the data size is shown beside the “Calculate” bow,
please click “Backup” button to make backup data.
If user select one of the lists, then “Calculate” button will be activated. Then, press “Calculate” to
check the data size and press “Backup” finally.
- Remote Archive – Calendar Start
If user click one of the date in blue (recorded data and able to make backup file), user can see the
details as follow picture. There are 2 options for Remote backup in schedule.
1) Drag the Red line to the color bar(I.e. Blue : Normal Recording)
2) Click the point which user want to playback on the blue bar then the red line will be dragged to the
point.
Then click the “Play” button for Remote backup.
45
Page 46

H.264 DVR - Installation/ Operation Manual
Please, click “Next” button to set “End Backup SET” as follows.
The procedure is same as “Start Archive”.
At last, check the data size and press “Archive”.
Please note that we can see the preview with pressing button “Prev” before doing Archive.
46
Page 47

H.264 DVR - Installation/ Operation Manual
3) Remote Log
User can see the “log list” as “ALL” or relevant log only by choosing it’s sub-menu.
※ Sub Menu of Remote Log
Power : Power on, Power off, Power fail
Reocrd : Rec fail, Rec start, Rec stop, Rec error, Rec full
Operation : Play start, Play stop, HDD format, Menu set
Client : R_Login, R_Logout, R_Logfail, R_Play, R_Transfer, R_Rec on, R_Rec off, R_Upgrade
Event : Alarm, Motion, Audio, Videoloss, Email_fail
- “System Info” of the Remote Log - “Status Info” of the Remote Log
User can see Mac address / System version information.
It is shown status of both HDD disk and recording mode by channel.
47
Page 48

H.264 DVR - Installation/ Operation Manual
Remote Setup : Checking settings menu (Same as DVR)
1) Display
– Camera Setting – Camera Covert
- Camera Name
Up to 32 Characters are available for Camera Name.
48
Page 49

H.264 DVR - Installation/ Operation Manual
- Spot Setting
1)Please set “Mode” first then click “OK”
2)Select Duration using the white bar, user can select/unselect all at the same time.
– OSD On/Off
User can select OSD On/Off
49
Page 50

H.264 DVR - Installation/ Operation Manual
2) Recording
– Global – Normal
User can change Normal Recording Rate after moving with pressing the bar and select Audio
ON/ OFF in each channel.
50
Page 51

H.264 DVR - Installation/ Operation Manual
– Alarm
User can change Alarm Recording Rate after moving with pressing the bar and select Audio
ON/ OFF in each channel as the same with Normal Recording.
– Motion
User can change Motion Resolution, Recording Rate after moving with pressing the bar and select
Audio ON/ OFF in each channel.
User can change Motion sensitivity after moving with pressing the bar in each channel.
The motion area will be displayed when user select the Region button.
The detection area is divided 10x8 cells and default is all-cells activation mode.
The transparent cells are disabled area but, it can be changed able area after clicking on it.
51
Page 52

H.264 DVR - Installation/ Operation Manual
– Schedule
User can change schedule Resolution, Recording Rate after moving with pressing the bar and select
Audio ON/ OFF in each channel.
The calendar will be displayed when user select the Set button and User can select / unselect
day and time after clicking on it.
– Duration
User can select Duration of Resolution, Rate and Audio ON/ OFF in each channel.
User can change Duration Days after moving with pressing the bar.
52
Page 53

H.264 DVR - Installation/ Operation Manual
– Priority
User can select recording priority among 5 kinds of recording methods. If Normal recording is
st
1
priority, the recording is proceeded as per normal recording setup value.
3) System
– Basic
User can select language, Date format, Video type, System ID and Deinterlace.
53
Page 54

H.264 DVR - Installation/ Operation Manual
– Client Account
Administrator can add 2 users in Client account, user ID & password has to be registered at the system
first to connect with a ‘user level’ and can access without registering.
Administrator can add, edit and delete user account in Client account after clicking blank box.
– Sensor – Auto Delete Mode
User can select None, N.C and N.O in each Sensor.
Auto delete mode will remain recorded data only for specified days and the rest days will be erased
automatically.
54
Page 55

H.264 DVR - Installation/ Operation Manual
– PTZ Setup
User can input PTZ camera name and can select available protocol in each channel.
User can select available Baud rate of PTZ camera in each channel.
55
Page 56

H.264 DVR - Installation/ Operation Manual
– PTZ Controller
User can select PTZ Controller ID from 1 to 5 and increase/decrease after pressing button +/-1
or moving with pressing the bar up to number 255 and select available Protocol.
User can select PTZ Controller Baud rate from 2400bps to 19200bps.
56
Page 57

H.264 DVR - Installation/ Operation Manual
– DST – NTP
User can setup Daylight Saving Time in DST Setup.
User can select available country default or can set it up individually.
User can select NTP On/Off and City to match DVR time to Internet Standard time.
– ETC
User can select key button beep on / off and mouse sense High, Mid, Low
57
Page 58
H.264 DVR - Installation/ Operation Manual
4) Event
- Email Registration - Email / Beep / Alarm Out
User can register e-mail address up to 3 people and select report period.
User can select each event On/Off in E-mail, Beep, Alarm out.
58
Page 59

H.264 DVR - Installation/ Operation Manual
Local Search
MENU : Search (Local Playback), Log(Local Log)
– Date/Time – Event
User can select specific Date and Time in order to playback with pressing the Play button.
User can select any event in order to playback with selecting one in the list of events and
pressing the play button.
59
Page 60

H.264 DVR - Installation/ Operation Manual
– Calendar – Calendar Result
User can select recorded date, time, hour, minute and playback after pressing Play button in
Calendar.
Local Log
※ Local Log List
Program start, Program end / Login, Logout, Log fail / Local play start, Local play stop
Local setup, Save image
60
Page 61
H.264 DVR - Installation/ Operation Manual
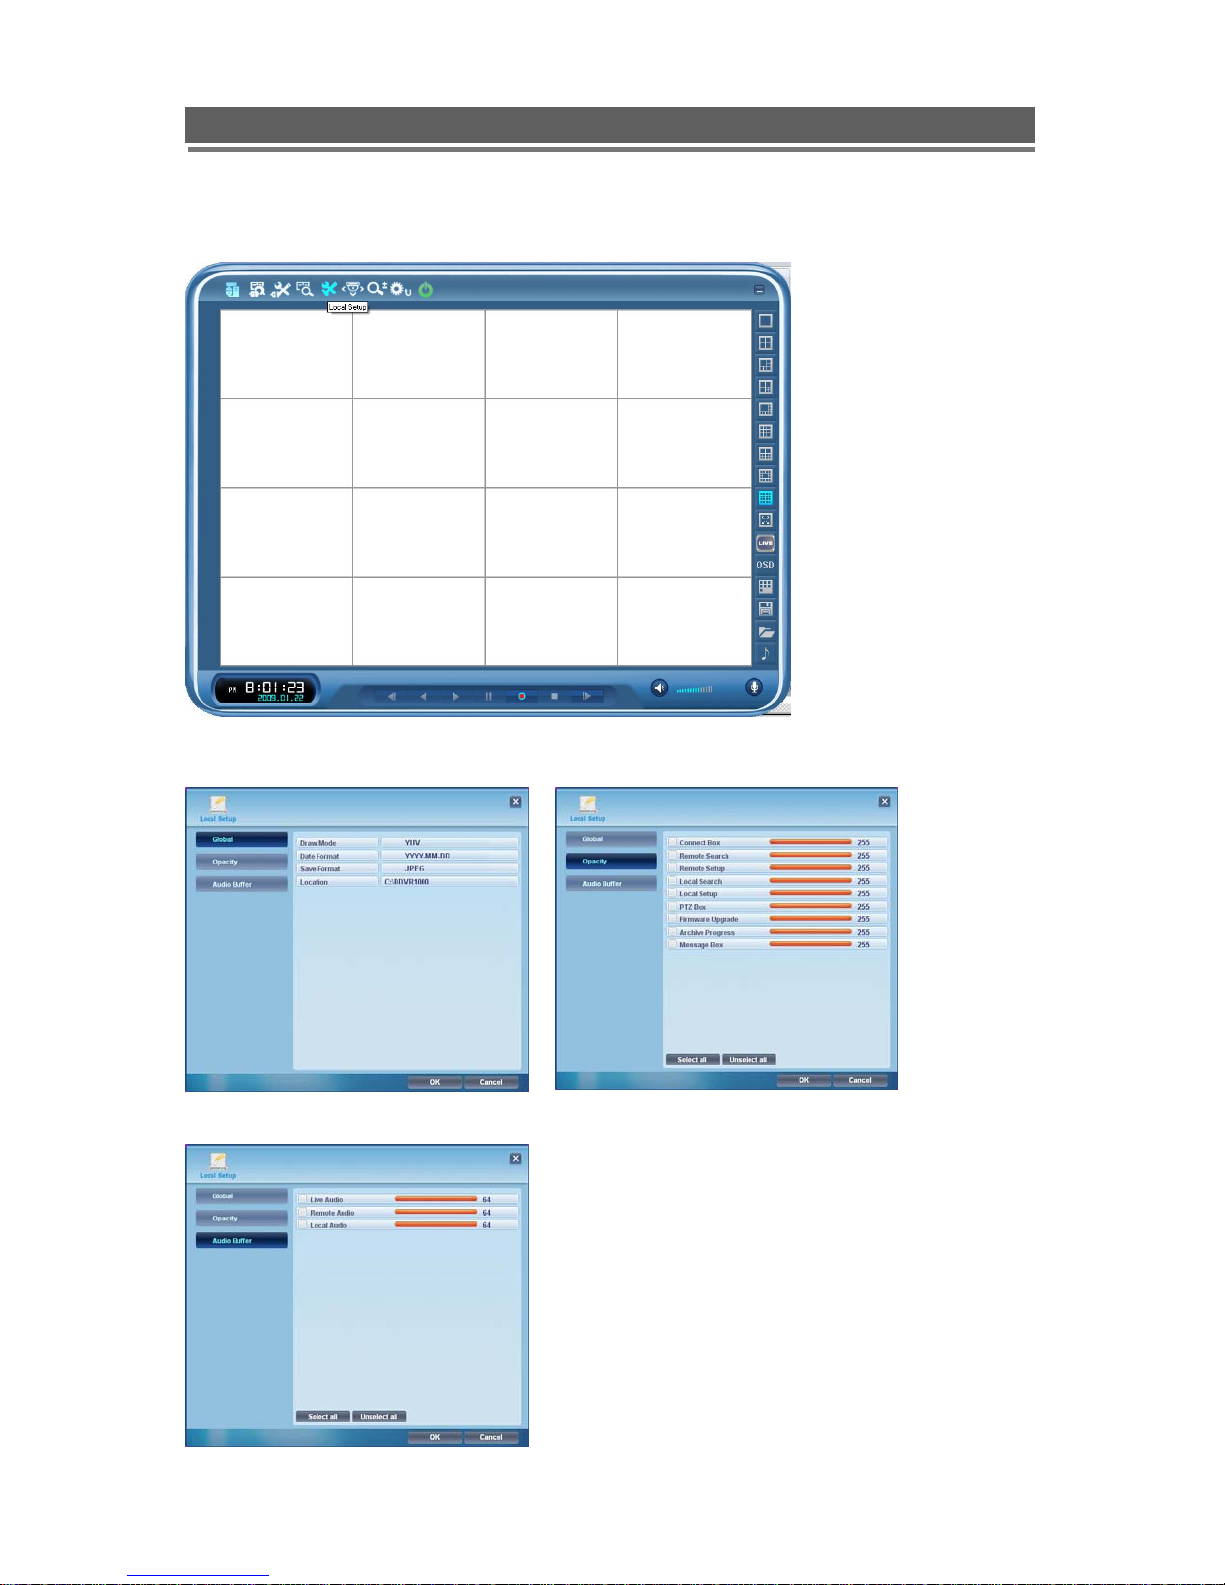
Local Setup
Global Opacity
Audio Buffer
User can change Global setup, Opacity and Audio Buffer
61
Page 62

H.264 DVR - Installation/ Operation Manual
PTZ Setup (will be supported soon)
It is possible to control Pan/Tilt and Zoom/focus in Live.
-Pan/Tilt control - Zoom/Focus control
It, Using arrow key, controls the Pan/Tilt and Zoom/Focus.
62
Page 63

H.264 DVR - Installation/ Operation Manual
Firmware Upgrade
User can select Firmware Upgrade menu, if new version exits in C:/GDVR Client/Upgrade fold, ‘New
program found!’ and if not ‘New program not found!’ message will be displayed.
User can proceed upgrading after pressing OK button and select each firmware to upgrade it to
the system.
User can see the display ‘Firmware upgrade success!’ after upgrading it successfully.
User have to press OK button to reboot the DVR since the firmware will be applied completely to the
system after rebooting it.
63
Page 64

H.264 DVR - Installation/ Operation Manual
Q & A
1.
Q : The message “ Can’t display the page” is shown and failed to connect to DVR , though input the
IP address or domain name on the internet explorer window.
A : 1) DVR is out of work or 2) a problem on the network connection. Please check the DVR is
working properly and , if it does, check the connection both DVR and PC .
2.
Q : Can’t download the ActiveX Control.
A : It does if “Windows XP Service Pack 2” is installed on the PC. Remove “service pack 2” on the
menu , “program add & removal” on the control panel. Or, refer to Appendix 3.
3.
Q : The client program is terminated with the message “Unsupported OS version !”
A : The client program is working on the Window XP , 2000. Doesn’t support Win.98, 98SE, ME.
4.
Q : Log-In box repeats appearing
A : It appears repeatedly when Client ID & Password is input wrong. Please check the exact ID &
PW memorized on the DVR.
5
.Q : Can’t change “Draw mode” on the menu, Local setup.
A : It doesn’t allow the change during the live monitoring and playback. If it required, please stop
the live monitoring or playback. Then, you can change the “Draw mode”.
6.
Q : Where is the saved file located ?
A : It locates at “C:\GDVR Client\Saved”. The file can be played with Image viewer.
7.
Q :
There is no response after pushing the OSD button.
A : OSD is showing several status during playback. If the detail items is not specified on the “Local
Setup”, there is no response even if pushing the OSD button during playback. Try it after
selecting required OSD menu on the Local Set-up .
64
Page 65

H.264 DVR - Installation/ Operation Manual
8.
Q : Client program(internet explorer) was disappeared when I have entered new several web site.
A : Since some web site is possible to remove the existing explorer , please disable “ re-use the
window in executing shortcut” under “ Tools-> Internet Option-> advance( advance is located
under “Search”.
9.
Q : I can see the display web layout on the monitor but no picture.
A1 : Please check your PC specification needs to be Pentium III 750MHz and Graphic Memory 32M
Over.
A2 : Please, go to control panel -> internet options -> security -> select Customer Level.
Go to ActiveX controls and plug-ins -> Automatic prompting for ActiveX Controls => Disable"
Go to Download unsigned ActiveX controls => Prompt"
Go to Miscellaneous -> Allow script-initiated windows without size or position constraints" =>
Enable"
65
Page 66

H.264 DVR - Installation/ Operation Manual
Appendix 1
SENSOR INSTALLATION
1. Components
1) External Sensor : 1 (You should prepare one set)
2) DVR System : 1
2. Inner Circuit for Sensor Input
The inner circuit of Mpeg 4 DVR is as follows,
① PC817 : Photo Coupler
② The Specification of PC817
66
Page 67

H.264 DVR - Installation/ Operation Manual
Absolute Maximum Ratings
Parameter Symbol
Forward current IF 50 mA
Input
Output
Total power dissipation P tot 200 mW
*3Soldering temperature T sol 260 °C
*1 Pulse width<=100 s, Duty ratio : 0.001
*2 40 to 60% RH, AC for 1 minute
*3 For 10 seconds
*1Peak forward current I FM 1 A
Reverse voltage V R 6 V
Power dissipation P 70 mW
Collector-emitter voltage V CEO
Emitter-collector voltage V ECO
Collector current IC 50 mA
Collector power dissipation
*2Isolation voltage V iso 5 000 V rms
Operating temperature T opr -30 to + 100 °C
Storage temperature T stg -55 to + 125 °C
P C 150 mW
Rating Unit
35 V
6 V
Electro-optical Characteristics
Parameter Symbol Conditions MIN. TYP. MAX. Unit
Forward voltage V F IF = 20mA - 1.2 1.4 V
Peak forward
Input
Output
Transfer
characteristics
voltage
Reverse current IR V R =4V - - 10 µ A
Terminal
capacitance
Collector dark
current
*4Current transfer
ratio
Collector-emitter
saturation voltage V CE( sat)
Isolation resistance R ISO
Floating capacitance Cf V = 0, f = 1MHz - 0.6 1.0 pF
Cut-off frequency fc
Rise
Response
time
time
Fall
time tf -
V FM IFM = 0.5A - - 3.0 V
Ct V = 0, f = 1kHz - 30 250 pF
ICEO V CE = 20V - - 10 -7 A
CTR
IF = 5mA, V CE =
5V
IF = 20mA, I C =
1mA
DC500V, 40 to 60%
RH
V CE = 5V, I C =
2mA, R L = 100 W, 3dB
t r
V CE = 2V, I C =
2mA, R L = 100 Ω
50 - 600 %
- 0.1 0.2 V
5 x
1011 - Ω
1010
- 80 - kHz
- 4 18 µ s
3 18 µ s
67
Page 68

H.264 DVR - Installation/ Operation Manual
3. SENSOR Install Processing
① Please refer the below block diagram.
DVR
12V DC
?? V DC
2.2k
AC
SENSOR
N.C
3.3k
Or 10k
PC817
Outlet Point
SENSOR IN
GND
68
Page 69

H.264 DVR - Installation/ Operation Manual
Appendix 2
INSTALLING GRYPES WEB CLIENT ON WINDOW XP/2000 & WINDOW VISTA
SERVICE PACK 2.
1) Security Setup
> Window XP / 2000 > Window Vista
Tools-> Internet Options-> Security
-> Select “Customer Level”
Tools-> Internet Options-> Security
-> Unselect square box ->
Select “Customer Level”
Select “ Allow script-initiated windows
without Size or position constraints”
-> Enable.
69
Page 70

H.264 DVR - Installation/ Operation Manual
Select “ Download unsigned Active X
controls”-> Prompt
Select “ Automatic Prompting for Active X
controls”-> Disable
70
Page 71

H.264 DVR - Installation/ Operation Manual
2) Connection
Click here as described
Select “ Temporary Allow
Pop-ups”
Click “ To help protect security,
Internet Explorer stopped this site
from installing an Active X control
on your computer. Click here for
options…”
71
Page 72

H.264 DVR - Installation/ Operation Manual
Select “Install Active X Control “
Select “Install” and then ‘Log-In’ box
will be shown.
72
Page 73

H.264 DVR - Installation/ Operation Manual
Appendix 3
DYNAMIC IP ( Supporting DDNS Server)
1. visit www.ddns-dvr.com to get the DDNS user ID & PW as well as Host name.
2. Click to create / set account of “Dynamic DNS”.
73
Page 74

H.264 DVR - Installation/ Operation Manual
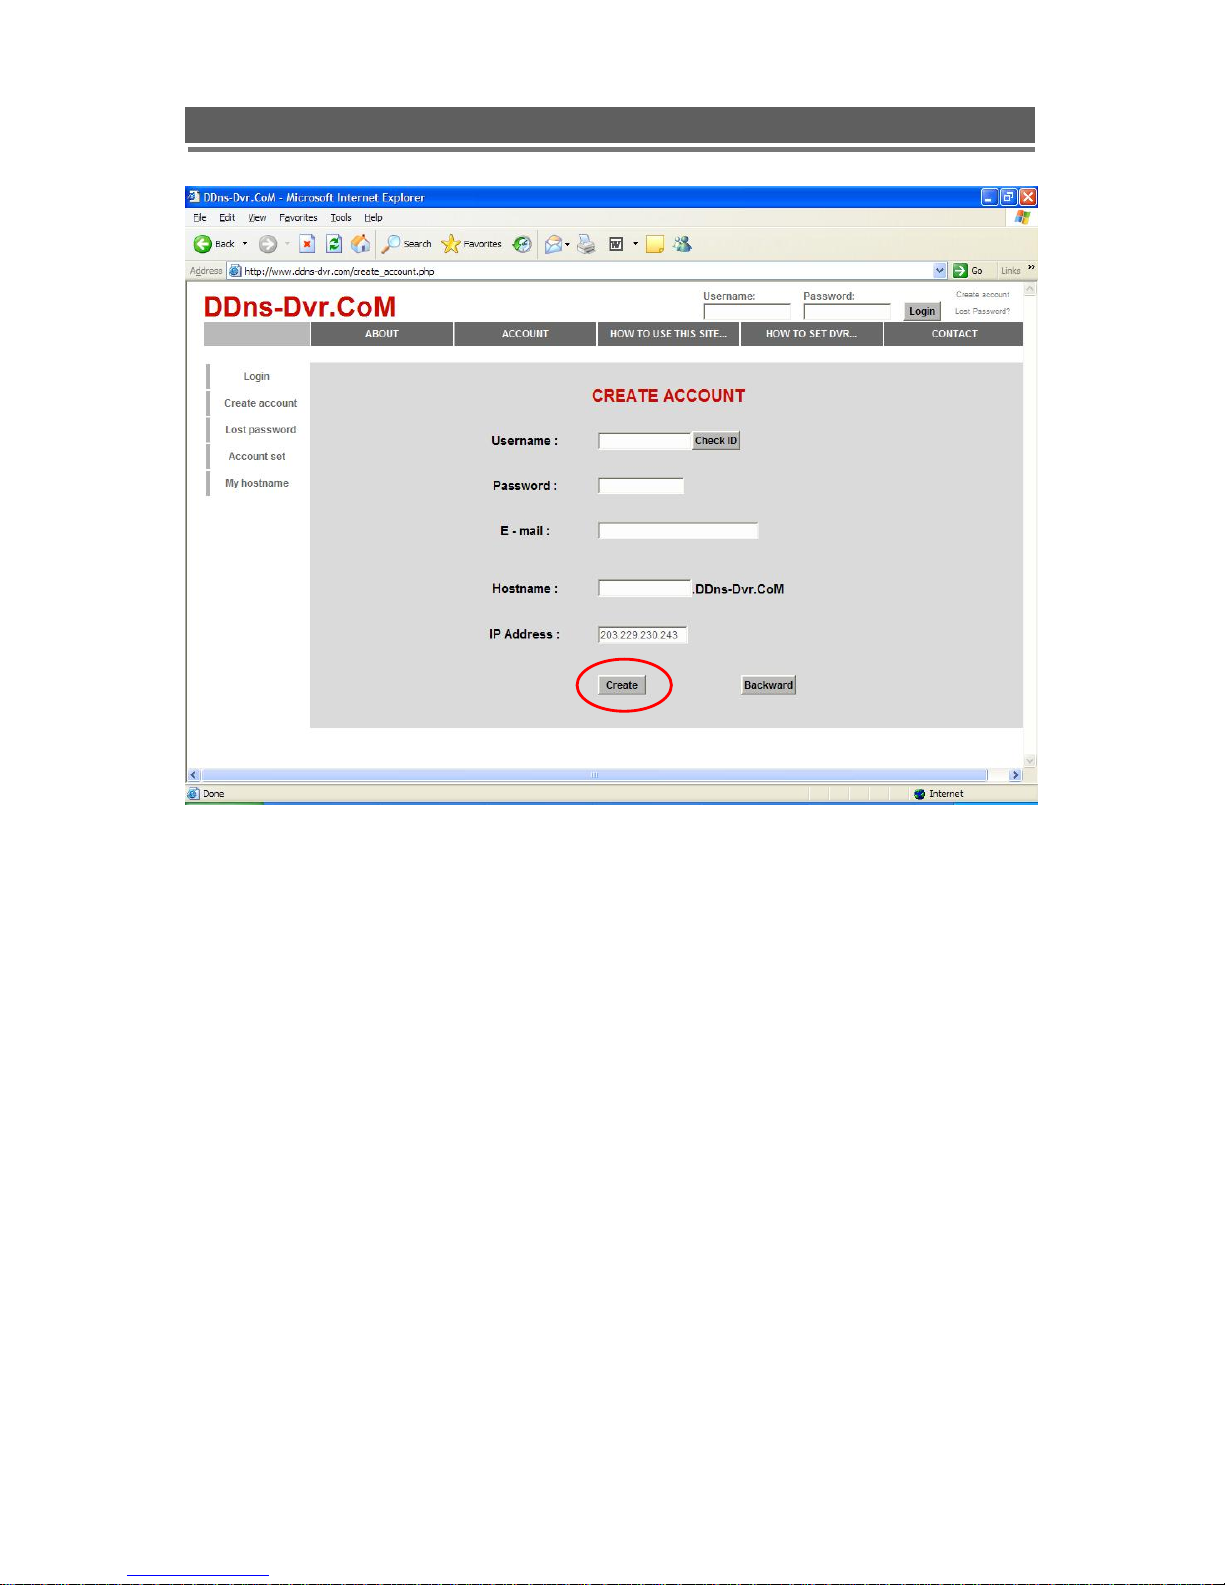
3. Select “Create Account” menu.
4. Create Account.
74
Page 75
H.264 DVR - Installation/ Operation Manual
Please set up all blank in order to create new account.
ID & Password will be emailed you when the account is created well.
Appendix 4
75
Page 76

H.264 DVR - Installation/ Operation Manual
> DDNS SET
To enter Network set menu, system ask password (Default is 00000000).
In DDNS environment, need to be changed DVR & Web server port, please refer to IP set.
With DDNS Server, User can connect private fixed IP over Lan under router(Please register
your ID & Domain at www.ddns-dvr.com
in which you can use DDNS server as free of charge)
Please refer to Appendix 3
* Set up DDNS
Change DDNS to ON -> Input User ID -> Input User PW -> Input Domain
-> Click “DDNS Status Check” -> if it is “ok” -> Click “Apply”
> Note ; In DDNS Set, User have to type Domain Name “QT”
SETUP FOR DVR PORT/ WEB SERVER PORT USING IP SHARING ROUTER
76
Page 77

H.264 DVR - Installation/ Operation Manual
1) To use IP sharing Router, it should be “NO” at “Use Dynamic IP”.
- DVR Port : It is possible to be input any numbers from 2000 to 65535.
- Web Server Port : It is possible to be input any numbers without overlapping with DVR Port
(2000~65535).
2) Setup “virtual server” on IP sharing Router
It is for setting virtual server to forward IP which is allowed to DVR.
> For example,
DVR-1, IP : 192.168.10.132, DVR Port : 2000, Web Server Port : 2001
If DVR-1 is configured as above, the virtual server on IP sharing router is as follows.
1)
PC Server Name : DVR-1(IP 192.168.10.132)
Protocol : TCP, Internal Port : 2000, External Port : 2000
2) PC Server Name : DVR-1 (IP 192.168.10.132)
Protocol : TCP, Internal Port : 2001, External Port : 2001
* For more detail, please refer to relevant IP sharing manual .
(3) ‘DDNS’ Setup on IP sharing router
DDNS configuration is no needed in case of fixed IP.
(4) To connect DVR-1 with Internet Explorer, http://QT.ddns-dvr.com:2001,
to connect DVR-1 with CD installer, “QT.ddns-dvr.com.”
Appendix 5
77
Page 78

H.264 DVR - Installation/ Operation Manual
MAKING PARTITION ON EXTERNAL USB HDD
To back up to USB HDD, the USB HDD should be formatted first on PC. We are supporting FAT32
file system of which maximum size is 80GB at one partition. Please refer to the following procedure to
make a partition and format on PC.
1. Select Control panel-> administrative Tools.
2. Select “Computer Management”
78
Page 79

H.264 DVR - Installation/ Operation Manual
3. Select “Disk Management”.
4. Click right mouse button and select “New Partition”.
79
Page 80

H.264 DVR - Installation/ Operation Manual
5. Follow “New Partition Wizard” procedure as below.
6.
80
Page 81

H.264 DVR - Installation/ Operation Manual
7. Maximum is 30GB at FAT32 file format.
8.
81
Page 82

H.264 DVR - Installation/ Operation Manual
9.
10. At this stage, New Partition has been made.
82
Page 83

H.264 DVR - Installation/ Operation Manual
11.Check New partition was created correctly.(Format will be executed automatically)
12. Check New Partition was created correctly
83
Page 84

H.264 DVR - Installation/ Operation Manual
Appendix 6
84
Page 85

H.264 DVR - Installation/ Operation Manual
SPECIFICATION
*Design and product specifications subject to change without notice*
85
Page 86

H.264 DVR - Installation/ Operation Manual
PRODUCT WARRANTY
Manufacturer will repair or replace without charge any merchandise proved defective in main board or
Workmanship for a period of one year after the date of shipment. But all goods requiring warranty repair
shall be sent freight prepaid to us.
Exclusion and Limitations : Any of the following will void this warranty,
I. Installation or use of the product other than strictly in accordance with the instructions contained in the
product’s instruction manual.
II. If the product is subjected to operating conditions (including atmospheric, moisture and humidity
conditions) outside of the acceptable conditions specified in the product’s instruction manual.
III. If the product is subjected to misuse or abuse.
IV. If the product is subjected to electrical short circuits or transients, accident, fire, flood or Acts of God.
V. Adjustment, maintenance or repair of the product other than in accordance with approved procedures.
VI. Use of replacement parts other than those specified by Us.
VII. All the accessories will be charged except defective units.
We assume no risk and shall be subject to no liability for damages or loss resulting from the specific use or
application made of the products. Our liability for any claim whether based on breach of contract,
negligence, infringement of any rights of any party or product liability, Relating to the products shall not
exceed the price paid by the dealer to us for such products. In no event will manufacturer be liable for
any special, incidental or consequential damages (including loss of use, loss of profit and claims of third
parties) however caused, whether by the negligence of us or otherwise.
If a warranty repair is required, the dealer must contact us or to obtain a repair authorization
number(RA), and provide the following information.
1. Model and serial number
2. System Version Information
3. Details of the defect or problem
If there is a dispute regarding the warranty of a product which does not fall under the warranty
conditions stated above, please include a written explanation with the product when returned.
Method of return shipment shall be the same or equal to the method by which the item was received by us.
RETURNS
All goods returned for repair should be clearly identified with the assigned CA or RA number
and requiring warranty repair shall be sent freight prepaid to us or round trip fare will be charge to the
dealer if the warranty is expired.
86
 Loading...