

PEERLESS CME Series, 30 CME Operation & Maintenance Manual

Operation & Maintenance
Manual
CME Series
Water Softeners

PEERLESS 30 CME AUTOMATIC WATER SOFTENER
Maximum Softening Capacity 30,000 grains
Softener Tank 9 x 48 Polyester Fiberglass - 150 PSI W.P.
Brine Tank 18 x 33 Polyethylene w/Cover
Service Flow Rate 8.3 GPM
Backwash Rate 1.3 GPM
Media 1 cubic foot
Piping Size 3/4”
Control Center - Valve CS1-30
Meter 1”
Elec. Req’d 115V/60Hz
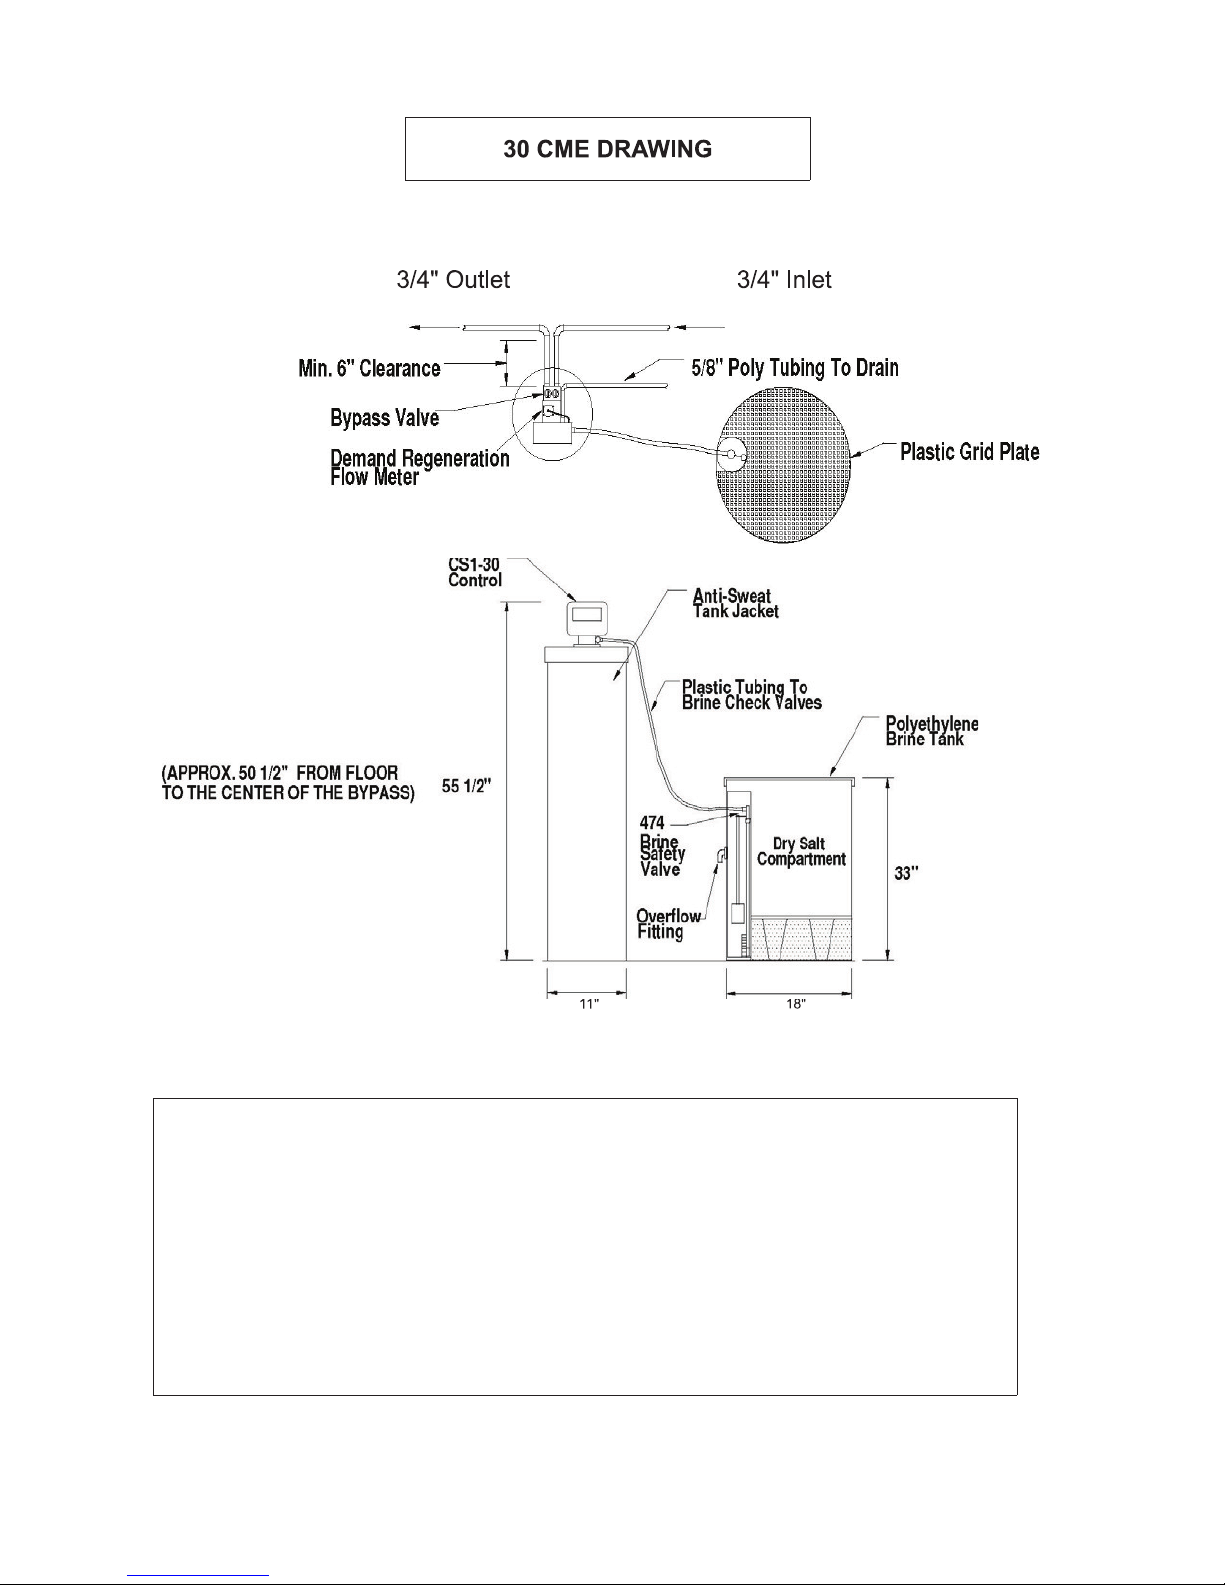
Specifications:
Rough in Dimension - From the floor to the center of bypass approximately 50-1/2”.
Maxium distance and size for Drain line: 50’ horizontal, 10’ vertical rise, using 1/2” ID drain line.
Maxium distance and size for Brine line: 15’ horizontal, (see note), using 1/4” ID poly tubing.
Note: The horizontal distance for the Brine tank can be increased to 35’ if the Brine tank is installed
above the unit. Example: Softener installed in the basement and Brine tank installed on 1st floor.
The brine tank can Not
be installed below bottom of unit. The Drain and Brine lines should Not be
installed with tubing that can collapse. This will cause the unit to malfunction.
Caution: Do Not
tank.
connect drain line tubing from control valve to over flow fitting/tubing on brine

START UP PROCEDURE
PEERLESS CME WATER SOFTENER
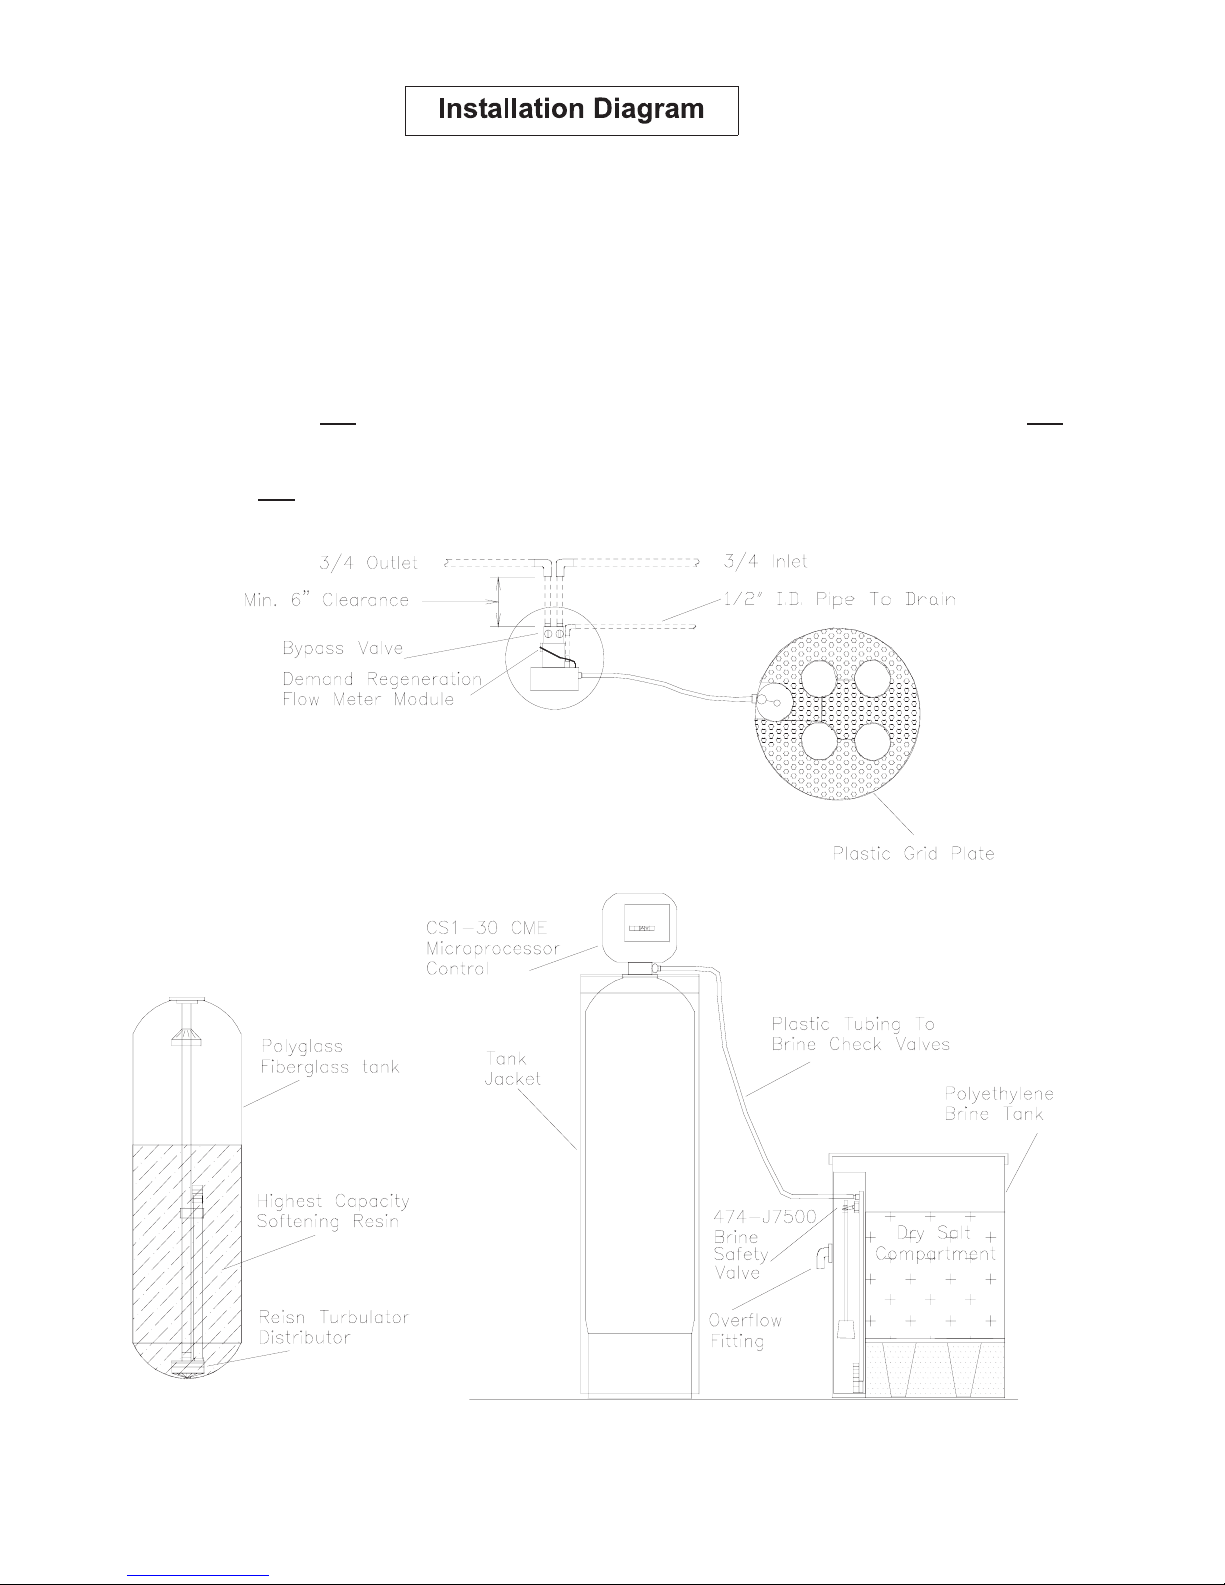
1. Pipe ¾” or 1” inlet and outlet service piping, according to the print, and arrows on bypass.
2. Connect brine line (furnished in brine tank) from brine tank to valve. Line must be air tight.
3. Connect 5/8” OD poly tubing (not supplied) from valve to suitable drain. DO NOT use clear collapsible tubing.
4. With the bypass valve in the bypass position, open a cold water tap nearby and let it run a few minutes. Once free from
air, close tap. Partly open bypass to allow water to slowly fill tank. Once water stops running into the tank, rotate the
bypass valve into the full service position. Again, open a cold water tap nearby and let the water run until the water is
clear and free of air.
5. Plug the unit into an approved 120V AC outlet. Press the Set Clock button once and hour will flash. Use the up or
down triangle buttons until the correct hour is displayed. Press the Set Clock button again and the minutes will flash.
Use the up or down triangle buttons until the correct minutes are displayed. Press the Set Clock button to finish.
NOTE: Time of day must be set correctly to either AM or PM.
6A. Test the raw water, and set computed grains of hardness expressed as gpg (grains per gallon), and iron expressed as
ppm (parts per million) Do not forget to compensate for iron. The iron result in ppm should be rounded up to the nearest
whole number. Take that number and times it by four (4). Take that result and add it to the hardness value. This is the
number you will use to set up your control for your specific requirements.
NOTE: If your iron result is higher than 5 ppm, we recommend an iron filter be installed before the softener. If
an iron filter is installed, or you do not have any iron in your water, you do not have to compensate for iron when
setting up the control for your specific requirements.
B .To set the total hardness in the unit, press the Next and Up triangle buttons at the same time. The display will show
Hardness. Press the Up or Down triangle to enter your total hardness result from stop 6.A.
C. Press the Next button, and the display will show Regen Day. The factory default is set at 7. Please do not change
this value.
D. Press the Next button, and the display will show Time Regen. The factory default is set at 2:00 A.M. Press the Up
or Down triangle to change the hour. Press the Next button and the minutes will flash. To change press the Up or Down
triangle to change the minutes. Press the Next button to finish.
7. Manually add water to brine tank until water is ½” above the grid.
8A. Press and hold the Regen button for 5 seconds. Release when display shows backwash. Let the water run for 5
minutes.
B. Press the Regen button and release. The display will show Brine. Wait 1 minute.
C. Press the Regen button and release. The display will show Backwash. Wait 1 minute.
D. Press the Regen button and release. The display will show Rinse. Wait one 1 minute.
E. Press the Regen button and release. The display will show Fill. Push down on the float rod to purge air from the brine
line.
9. Fill brine tank with salt. Peerless recommends Hardi-Cube, Dura-Cube or Mini-Cube or salt substitutes, i.e. Potassium
Chloride, (trade names) K-Life or Soft Touch.
10. Open the cold water valves in house to relieve air. Let water run for 3 minutes and test cold water to make sure it is
soft.
11. Hot water from the water heater (unless drained and filled with soft water) will not become soft until the customer has
used approximately 3 times the holding capacity of the water heater.
12. Write the installation date (month/year) on the sticker found inside the front cover. Plug in 9V Alkaline Battery that
is supplied with your unit
CONTROL PROGRAMMING
INSTALLER (I) Displays/Settings
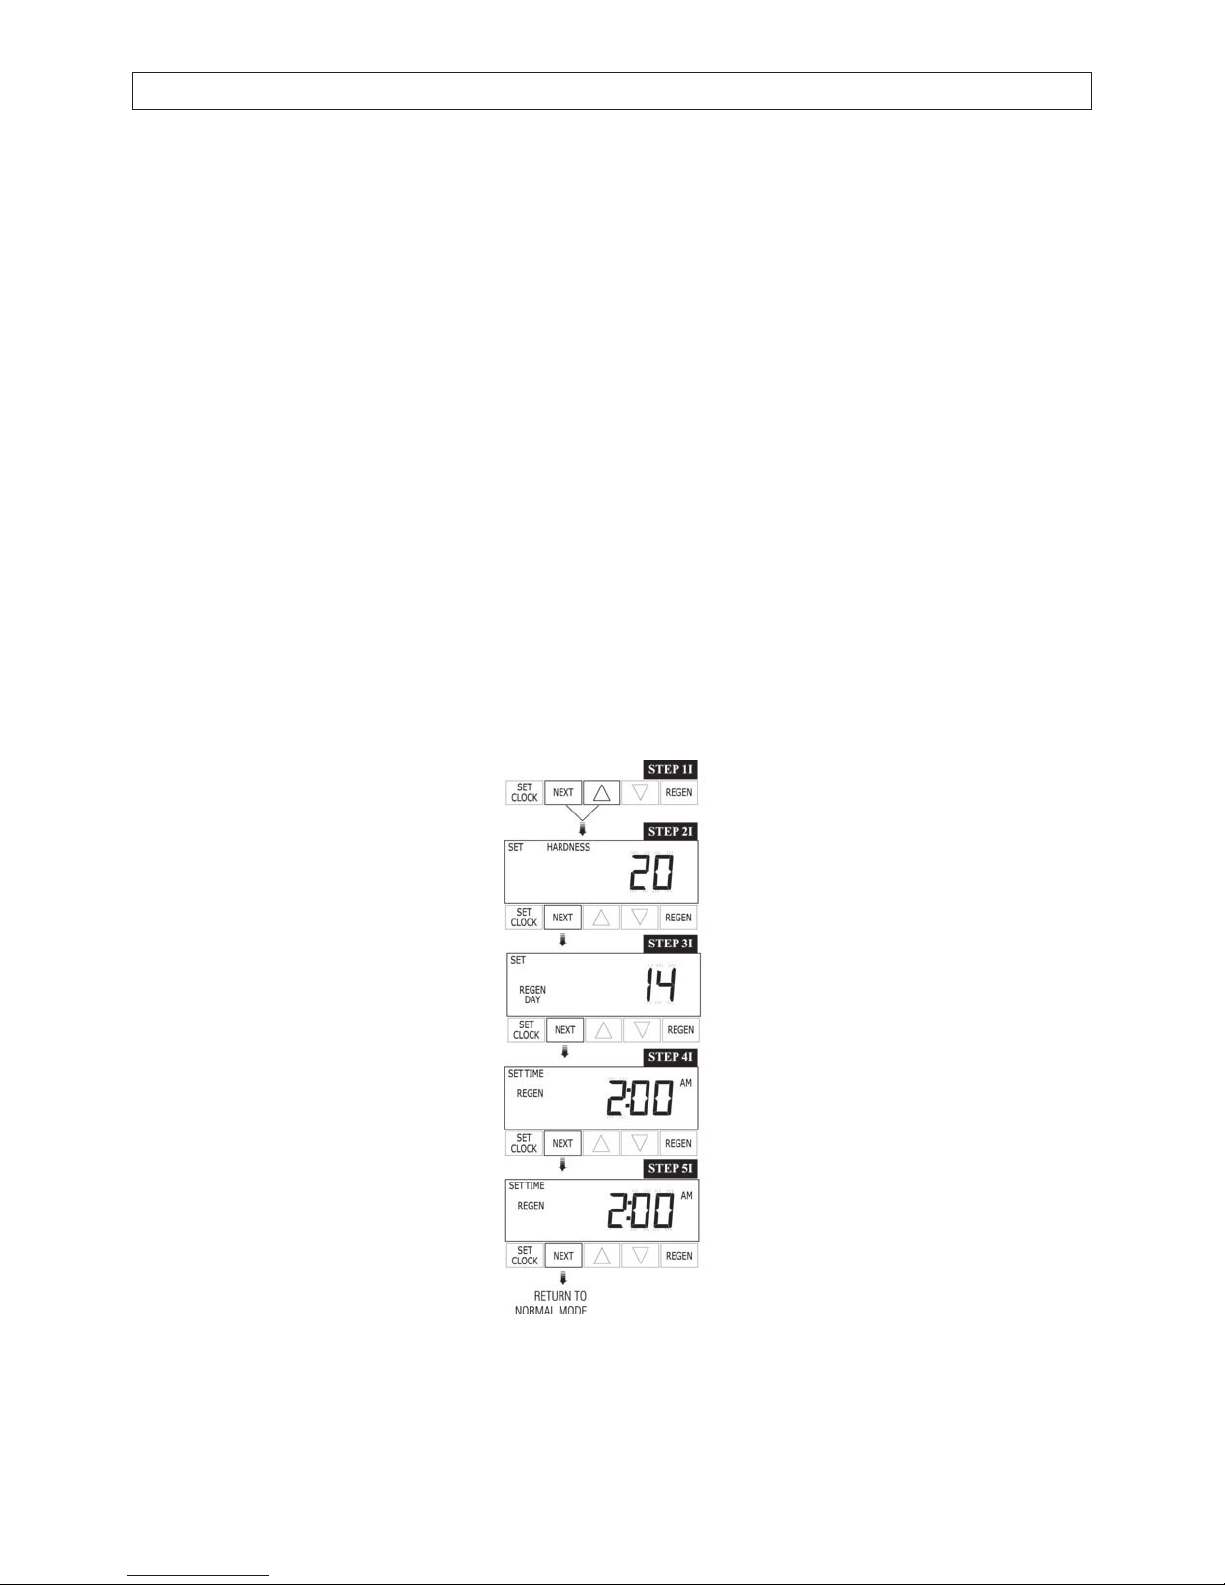
STEP 1I – Press NEXT and arrow up simultaneously for 3 seconds.
STEP 2I – Hardness: Set the amount of hardness as calcium carbonate per gallon using, arrow down or arrow
up buttons. The default is 20 with value ranges from 1 to 150 in 1 grain increments. Note the drains per gallon
can be increased if soluble iron needs to be reduced. Press NEXT to go to step 3I. Press REGEN to exit
Installer Displays/Settings.
STEP 3I - Day Override: When gallon capacity is set to off, sets the number of days between regenerations.
When gallon capacity is set to AUTO or to a number sets the maximum number of days between
regenerations. If value set to “off” regeneration initiation is based solely on gallons used. If value is set as a
number (allowable range from 1 to 28) a regeneration initiation will be called for on that day even if sufficient
number of gallons were not used to call for a regeneration. Set Day Override using arrow button to days
between regeneration (1 to 28); or OFF. Press NEXT to go to step 4I. Press REGEN to return to previous
step.
STEP 4I – Next Regeneration Time (hour): Set the hour of day for regeneration using down or up arrow
buttons. AM/PM toggles after 12. The default time is 2:00 AM. Press NEXT to go to step 5I. Press REGEN to
return to previous step.
STEP 5I - Next Regeneration Time (minutes): Set the minutes of day regeneration using the arrow buttons.
Press NEXT to exit Installer Displays/Settings. Press REGEN to return to previous step.
To initiate a manual regeneration immediately, press and hold the REGEN button for 3 seconds. The system
will beam to regenerate immediately. The control valve may be stepped through the various regeneration
cycles by pressing the “REGEN” button.
 Loading...