

Pebble Smart Installation And Training
Pebble Smart™ Doggie Doorbell
Installation and Training
Training your dog to ring the Pebble
Smart Doggie Doorbell is a rewarding
experience. Be patient and don’t expect
results right away. Do short and fun
sessions daily. Here are the steps for
installation and training.
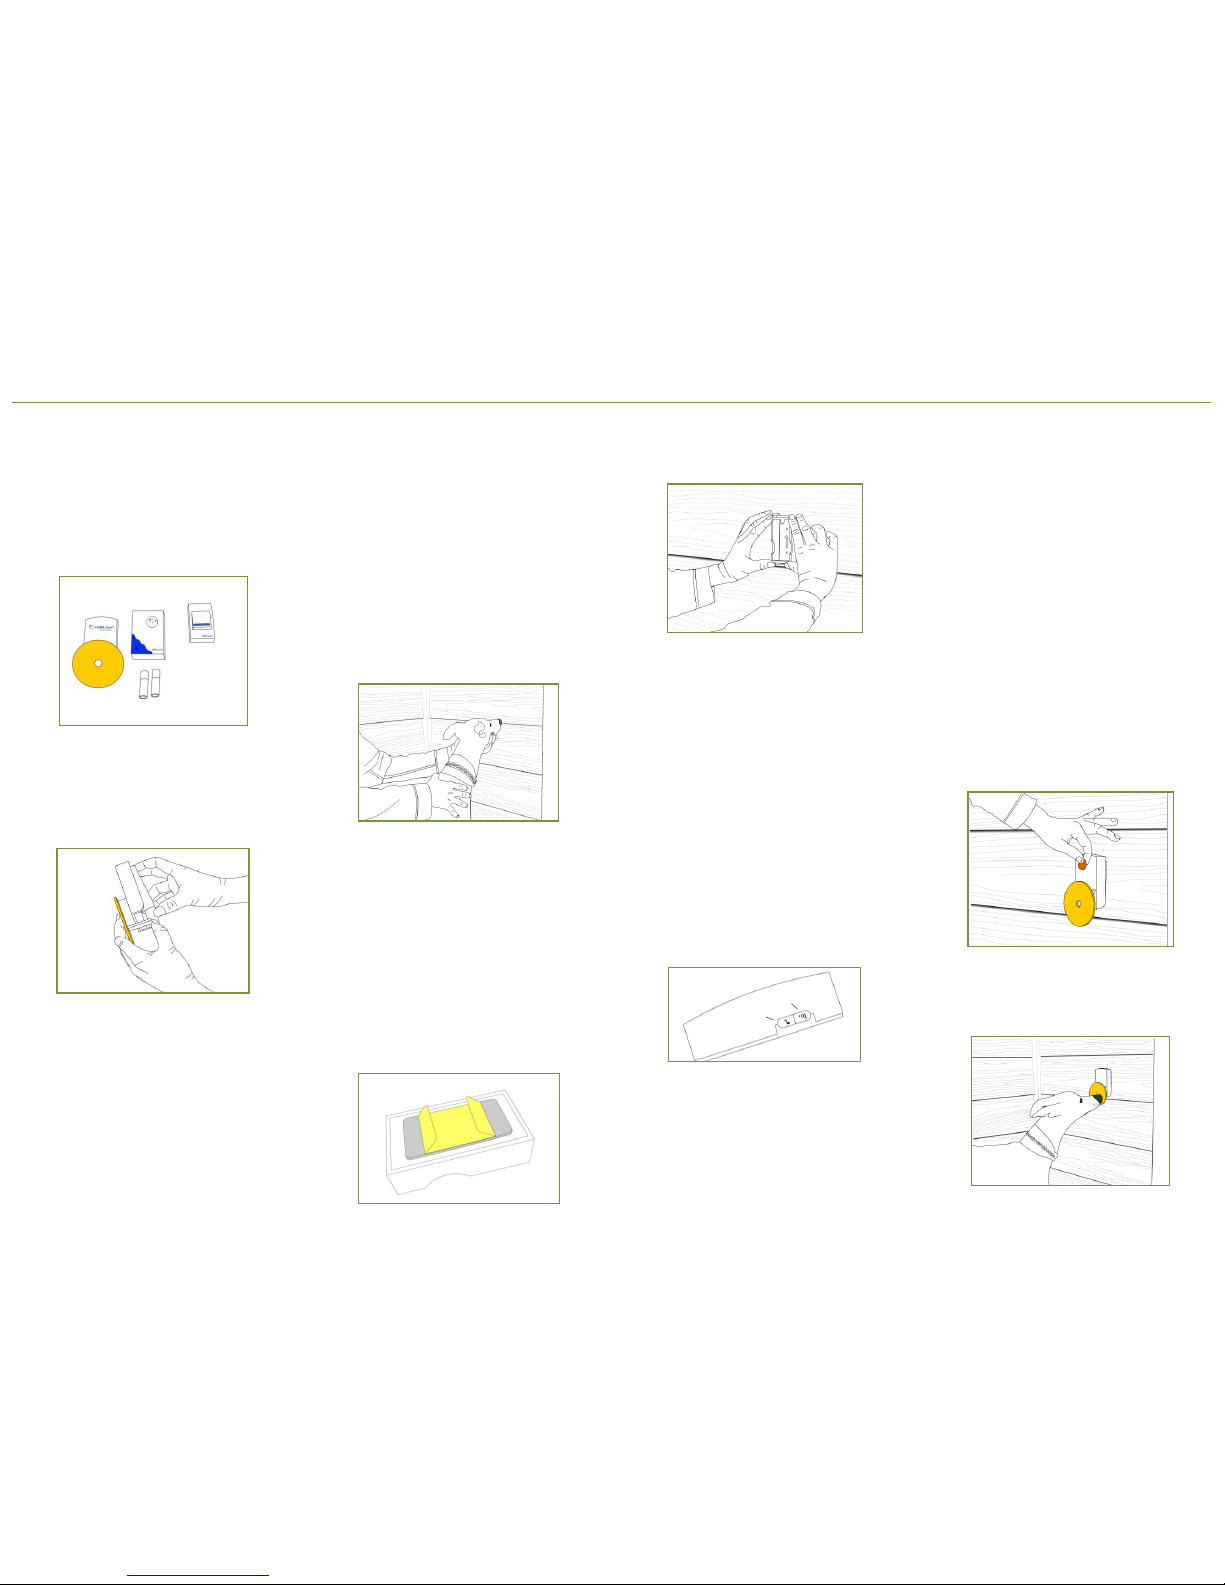
Installation
D Install 2 new AA batteries (not included)
in the receiver.
D Separate the adapter cover from the
housing, by gently pulling the bottom
hook downward.
D Hold both sides of the transmitter
button and slide the transmitter out of the
housing, bottom first.
D On the back of the transmitter, pull out
the plastic tab. This will activate the
transmitter battery. Push the transmitter
to test. The receiver should sound. Note:
If your dog is sensitive to sound, do not
test with the receiver close to him.
D If you have a single pack, decide if you
want your dog to use the doorbell when
he comes in or goes out. Then select
accordingly either an inside or an outside
location on the wall near the door. If you
have a twin-pack, select a location on both
sides. Note: For indoor installation, a
wood or glass surface is more preferable
than a drywall surface. (See caution
below.)
D With your dog in standing position, hold
his head up slightly and mark the height of
his nose.
D Thoroughly clean the mounting area
above the mark.
D Peel the paper off the mounting tape
on the back of the housing. Caution: For
indoor installation, especially on a drywall,
expose only the ends of the mounting
tape by folding the two ends of the paper
toward the center. This will help reduce
the chance of damaging the wall surface
during removal. See the Notes section for
alternative mounting methods.
D With the inside arrow pointing upward,
press the housing firmly onto the wall, just
above the mark.
D Replace the transmitter inside the
housing.
D Hook the adapter cover over the
housing and snap the hook in at the
bottom.
D Push the paddle to test. You should
only need to push gently to trigger the
receiver.
If your dog is sensitive to sound, you can
acclimate him to the sound of the doorbell
by placing the receiver in another room
and gradually bring it closer.
D Adjusting volume and tune:
Press the volume control button to cycle
through the 4 volume levels. Press the
tune selector to change to a new tune.
There are 36 tunes in a cycle. Replace the
batteries will reset the volume and the
tune to the factory defaults.
Training
Now the fun begins! With either method
below, training with a clicker will quicken
the process. Use a reward that best
motivates your dog, his favorite treats,
games, etc. Train one step at a time with
repetitions until your dog has got it and
only then move on to the next step. Keep
each session short, about 5 minutes. Have
one or two sessions a day.
Method 1: Using Treats as Lures
D Step 1: Hold a piece of your dog’s
favorite treat with your fingers and let him
sniff it. Lure his nose toward the paddle
and drop the treat in the treat holder
behind it. Say “Ring the bell!” (or another
command of your choice).
As soon as he touches the paddle, praise
(or click) and reward him with a different
piece of treat. Repeat this step.
Transmitter
AA Batteries
Receiver
Adapter
Cover & Housing
Paddle
Single pack shown
Tune selector
Volume control
Receiver side view

D Step 2: Transition to rewarding your
dog only when he makes the receiver ring.
D The treat should not be left in the treat
holder after the training session. To
remove the treat, lift the U-shaped treat
holder from behind the paddle.
D Step 3: Train without a treat in the treat
holder. Point to the paddle (or stare at it)
and say your command. As soon as your
dog nudges the paddle, praise and reward
him enthusiastically.
D Step 4: Same as Step 3, but when your
dog rings the bell, open the door, take him
through the door, and then reward him.
D You can also approach the door with
your dog together and ask him to “Ring
the bell!” When he rings the bell, open the
door, take him through, and reward him.
Method 2: Target Training
D Step 1: Offer the back of your hand to
your dog at his nose level. Optionally, say
the command “touch.” When your dog
touches your hand with his nose, reward
him immediately. Repeat until he gets it.
D Step 2: Take the adapter cover off the
housing. Hold it in your hand and offer the
paddle to your dog at his nose level.
Your dog will naturally show interest,
glancing, sniffing, or touching with his
nose. At the beginning, reward him
immediately when he makes even the
smallest gesture. Repeat until he can
reliably touch the paddle with his nose.
D Step 3: Same as Step 2, but reward your
dog only when he touches the paddle with
enough force to move it. Withholding the
reward may create a little frustration in
your dog, which will make him repeat the
gesture with more force.
D Step 4: Replace the adapter cover onto
the housing. Look at the Doggie Doorbell
and wait. Your dog will try to offer a
behavior. As soon as you see the correct
behavior, such as touching, sniffing, or
glancing at the Doggie Doorbell, reward
him immediately. Repeat this step until
your dog nudges the paddle with enough
force to trigger the receiver.
D Step 5: Same as Step 4, but when your
dog rings the bell, open the door, take him
through the door, and then reward him.
Soon your dog will clearly associate his
nudging the paddle with the door opening.
The speed of training will vary with each
dog. For some, it may take a day or two.
For others, it may need several days or a
couple of weeks before they can firmly
establish this new behavior. Be patient
and persistent and you will succeed.
Notes
D Alternative mounting methods: On
fragile wall surfaces, such as drywall, using
the included adhesive mounting tape may
cause damage during removal. For clean
and no-damage removal, we highly
recommend using the 3M Command™
brand adhesive strips to mount the
adaptor housing. Purchase the medium or
long refill strips on the web or in office
supply stores.
If the mounting surface is rough or has
loose paint, you can use screws to attach
the housing to the wall. You can also
mount the housing on a wooden board
and place it on the ground.
D Correcting old habits: If your dog is
used to scratching the door, it may take
some persistence to retrain him. First
firmly establish ringing on command. Then
try to remind him before he scratches the
door. If he does scratch, give him a minute
to remember the new routine before
responding. If he does not remember, ask
him to ring the bell before letting him in.
D Using paws: You can train your dog to
use his paws to strike or push the paddle.
For small dogs, you can mount the
housing higher so that he can push the
paddle with his front paws while standing
on his hind legs.
D Over-ringing: If your dog rings the bell
repeatedly just to receive a treat, you can
help him adjust his behavior by not giving
him a treat but only opening the door for
him. Usually, he will adjust quickly.
D Batteries: If the receiver frequently fails
to ring when you push the transmitter,
the AA batteries in the receiver might
need to be replaced. The transmitter
comes with a small 12v battery
preinstalled. It will typically last over a
year on average use. Replacement can be
purchased online or at local electronic
stores. To replace the transmitter battery,
insert a small flat-blade screwdriver into
the slot below the transmitter and pry
upward to open the back.
D Metal interference: Do not place the
receiver near metal objects. Do not install
the doorbell on a metal door.
We Love Dogs
We created the Pebble Smart Doggie
Doorbell for our beloved Whippet, Pebble.
We hope you and your dog enjoy it as
much as we and Pebble do. For us, the
true reason for having a dog is love.
Training your dog with fun activities
deepens that loving connection. When
Pebble rings the doorbell, he feels happy
and smart, every time.
Visit us at www.PebbleSmart.com for
more information. And we would love to
hear from you. Thank you!
Installation and Training
©Pebble Smart LLC
 Loading...