

Page 1

Operating Guide
Page 2
Intended to alert the user to the presence of uninsulated “dangerous voltage” within the product’s
enclosure that may be of sufficient magnitude to constitute a risk of electric shock to persons.
Intended to alert the user of the presence of important operating and maintenance (servicing)
instructions in the literature accompanying the product.
CAUTION: Risk of electrical shock — DO NOT OPEN!
CAUTION: To reduce the risk of electric shock, do not remove cover. No user serviceable parts inside. Refer
servicing to qualified service personnel.
WARNING: To prevent electrical shock or fire hazard, do not expose this appliance to rain or moisture. Before
using this appliance, read the operating guide for further warnings.
Este símbolo tiene el propósito, de alertar al usuario de la presencia de “(voltaje) peligroso” sin aislamiento dentro de la caja del producto y que puede tener una magnitud suficiente como para constituir
riesgo de descarga eléctrica.
Este símbolo tiene el propósito de alertar al usario de la presencia de instruccones importantes sobre la
operación y mantenimiento en la información que viene con el producto.
PRECAUCION: Riesgo de descarga eléctrica ¡NO ABRIR!
PRECAUCION: Para disminuír el riesgo de descarga eléctrica, no abra la cubierta. No hay piezas útiles dentro.
Deje todo mantenimiento en manos del personal técnico cualificado.
ADVERTENCIA: Para evitar descargas eléctricas o peligro de incendio, no deje expuesto a la lluvia o humedad
este aparato Antes de usar este aparato, Iea más advertencias en la guía de operación.
Ce symbole est utilisé dans ce manuel pour indiquer à l’utilisateur la présence d’une tension dangereuse
pouvant être d’amplitude suffisante pour constituer un risque de choc électrique.
Ce symbole est utilisé dans ce manuel pour indiquer à l’utilisateur qu’il ou qu’elle trouvera d’importantes
instructions concernant l’utilisation et l’entretien de l’appareil dans le paragraphe signalé.
ATTENTION: Risques de choc électrique — NE PAS OUVRIR!
ATTENTION: Afin de réduire le risque de choc électrique, ne pas enlever le couvercle. Il ne se trouve à l’intérieur
aucune pièce pouvant être reparée par l’utilisateur. Confiez I’entretien et la réparation de l’appareil à un réparateur
Peavey agréé.
AVERTISSEMENT: Afin de prévenir les risques de décharge électrique ou de feu, n’exposez pas cet appareil à la
pluie ou à l’humidité. Avant d’utiliser cet appareil, lisez attentivement les avertissements supplémentaires de ce
manuel.
Dieses Symbol soll den Anwender vor unisolierten gefährlichen Spannungen innerhalb des Gehäuses
warnen, die von Ausreichender Stärke sind, um einen elektrischen Schlag verursachen zu können.
Dieses Symbol soll den Benutzer auf wichtige Instruktionen in der Bedienungsanleitung aufmerksam
machen, die Handhabung und Wartung des Produkts betreffen.
VORSICHT: Risiko — Elektrischer Schlag! Nicht öffnen!
VORSICHT: Um das Risiko eines elektrischen Schlages zu vermeiden, nicht die Abdeckung enfernen. Es befinden
sich keine Teile darin, die vom Anwender repariert werden könnten. Reparaturen nur von qualifiziertem
Fachpersonal durchführen lassen.
ACHTUNG: Um einen elektrischen Schlag oder Feuergefahr zu vermeiden, sollte dieses Gerät nicht dem Regen
oder Feuchtigkeit ausgesetzt werden. Vor Inbetriebnahme unbedingt die Bedienungsanleitung lesen.
2
Page 3
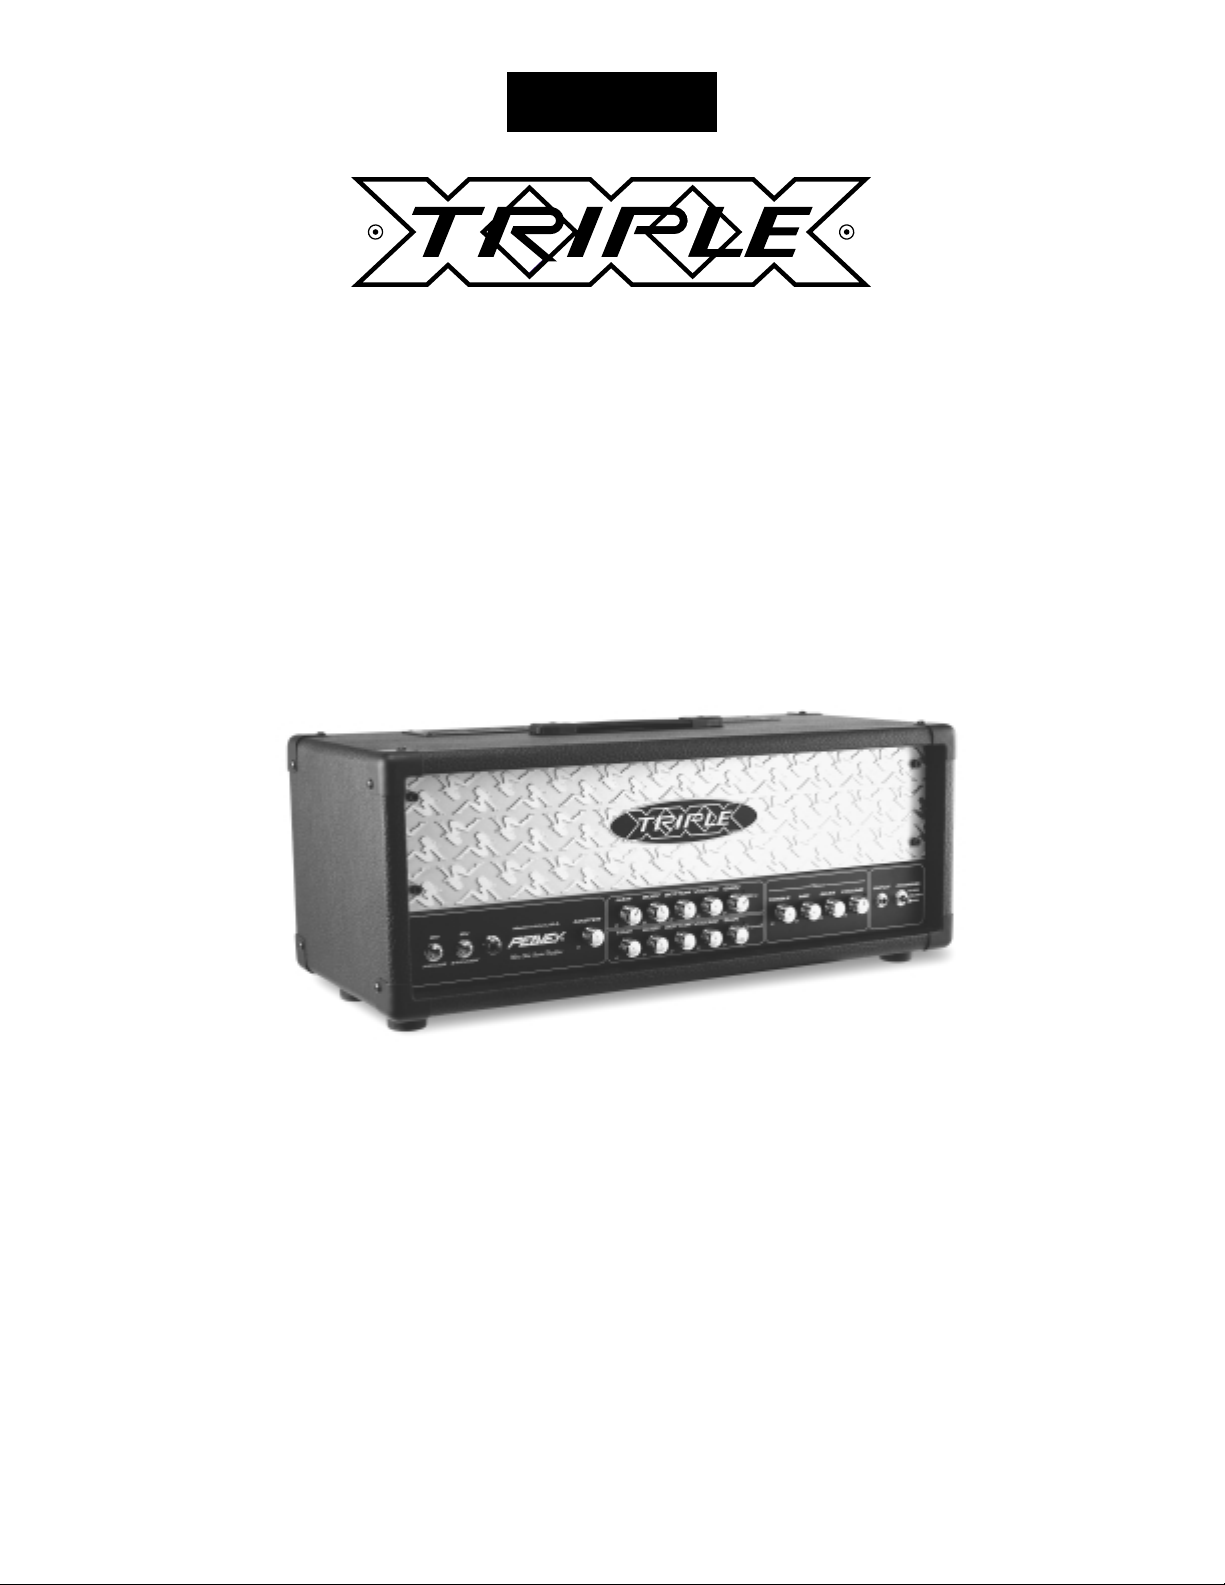
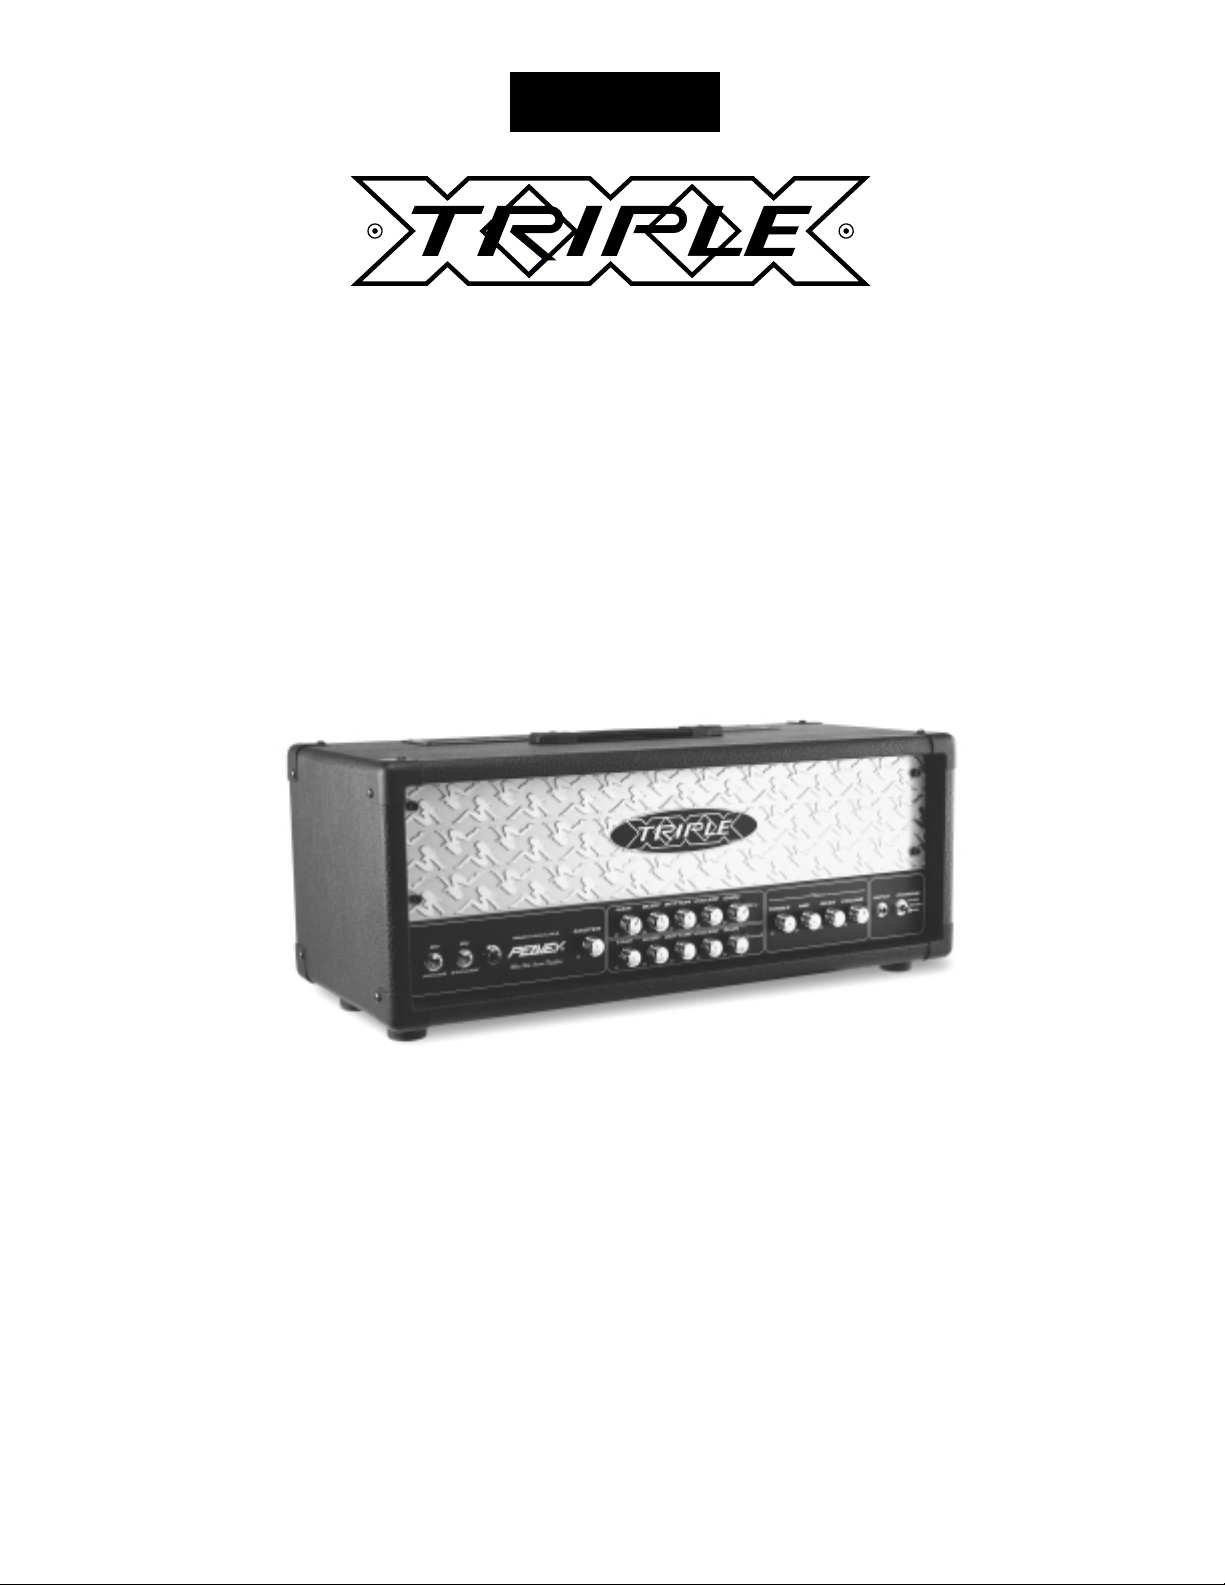
As hot as the name implies, this newest member of the Ultra™Tube Series rips. From its high-gain
input to paralleled speaker output jacks, the Peavey Electronics Triple XXX is not for the faint of
heart. Engineered for today’s discriminating guitarist, this amplifier is loaded with practical features
useful in real-world applications. Delivering an earth-quaking 120 Watts of pure tube power, the
Triple XXX is easily controllable thanks to a master volume pot, as well as independent volume
controls for each of its three channels. The Ultra and Crunch channels also have gain controls to
further assist in taming this beast while achieving killer sound. Tone contour is accomplished through
passive controls for Bass, Mid, and Treble on the Clean channel, while the Ultra and Crunch
channels utilize Peavey’s exclusive Bottom, Body, and Hair active controls. Designed to work
equally well into 4, 8, or 16-Ohm loads, matching this monster to a cabinet is limited only by your
imagination. With footswitchable channel and effects loop, the Triple XXX lets you keep your hands
on the guitar - and your eyes on your dream.
FEATURES
• Three 12AX7 preamp tubes
• Four 6L6GC power amp tubes driven by a 12AX7
• Power amp convertible to use four EL34 tubes
• Footswitchable effects loop with independent send and return controls
• Damping switch (Tight, Medium, Loose)
• Special noise gate circuitry on Ultra and Crunch channels
• Line out with level control
• Cabinet impedance switch (4, 8, or 16 Ohms)
• Heavy-duty power, standby and channel select toggle switches
• Classic power status indicator lamp
• Chrome-plated brass control knobs
3
ENGLISH
Page 4
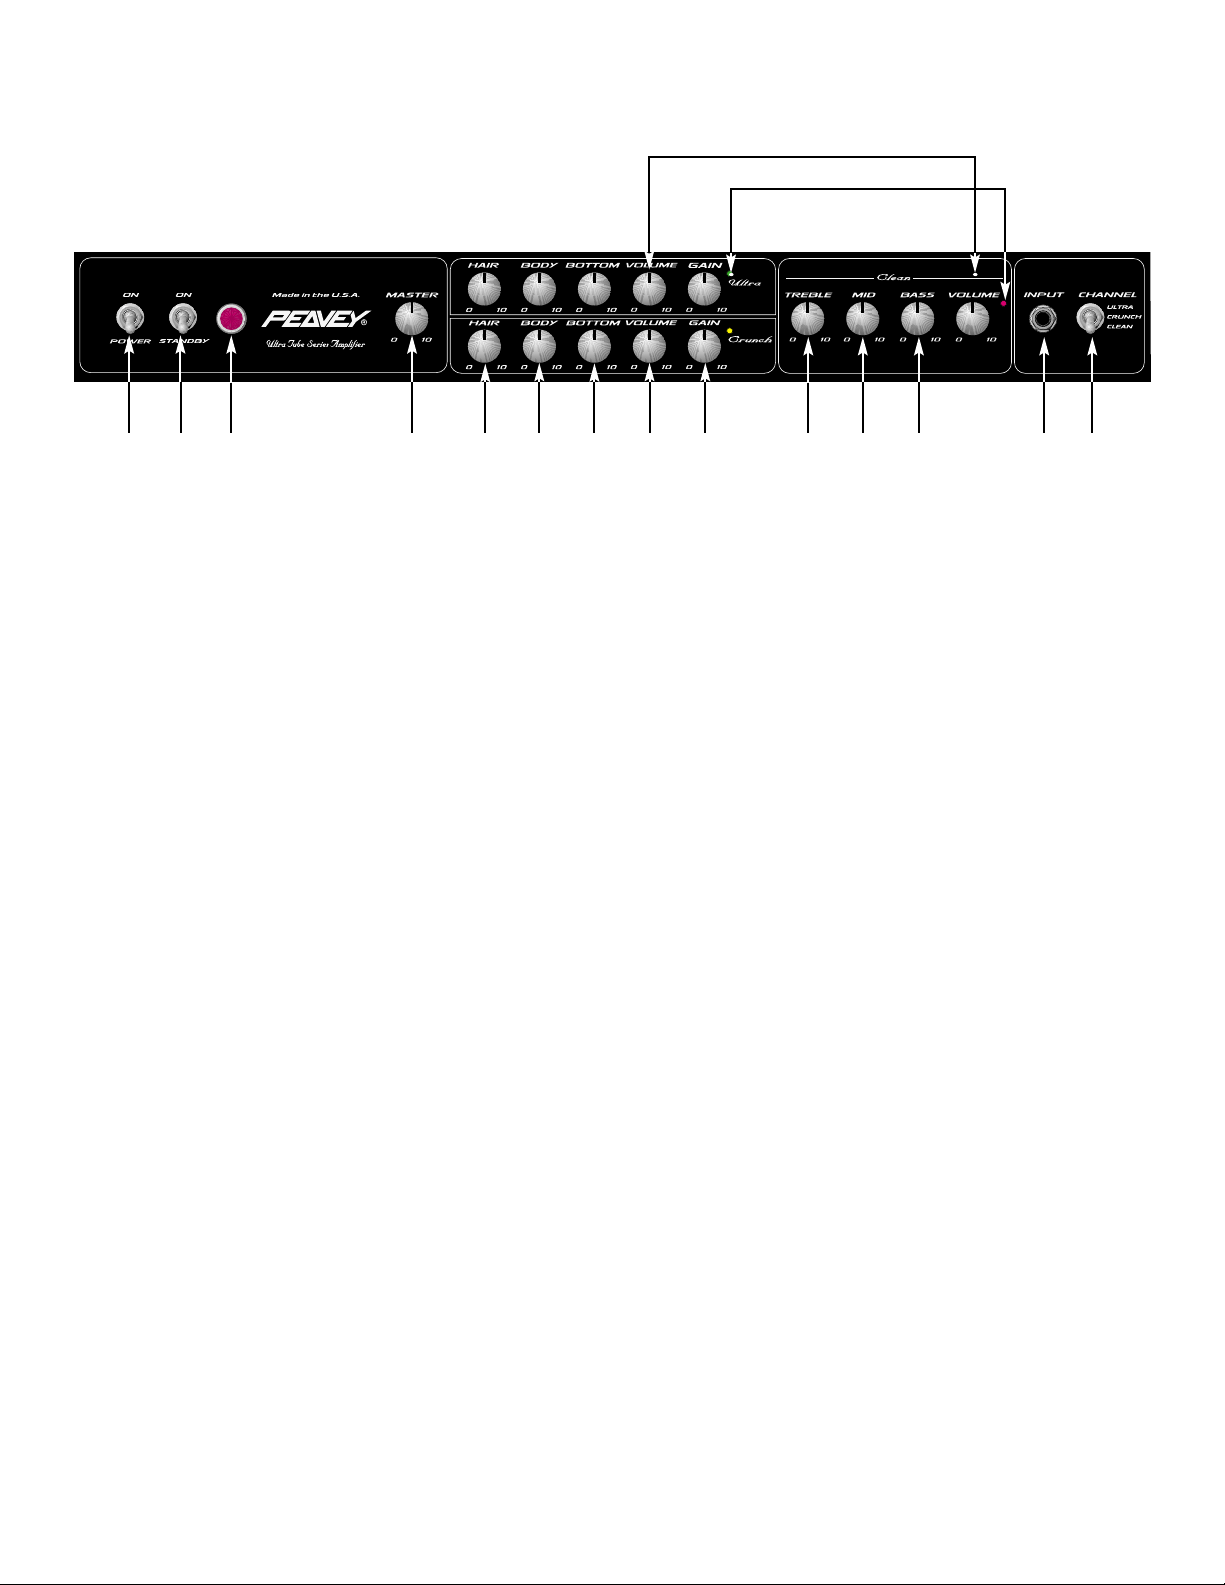
(1) POWER SWITCH
This two-way toggle switch applies mains power to the unit. The red POWER STATUS LAMP
(3) will illuminate when this switch is in the ON position.
(2) STANDBY SWITCH
This two-way toggle switch allows the amp to be placed in the STANDBY mode. In the
STANDBY position the tubes stay hot but the amplifier is not operational. Switching to the ON
position places the amp in active mode.
(3) POWER STATUS LAMP
This indicator illuminates when mains power is being supplied to the amp.
(4) MASTER VOLUME
This control sets the overall volume level of the amp. Once the desired balance between the
three channels in the amplifier has been achieved, the entire output level of the unit can be
increased or decreased by rotating this control. Clockwise rotation increases level;
counterclockwise rotation decreases level.
(5) HAIR
This control, on both the Ultra and Crunch channels, varies the high frequency response of
the amplifier. It is an active control (shelving type) and allows 15 dB of boost or cut.
(6) BODY
This control, on both the Ultra and Crunch channels, varies the mid frequency response of
the amplifier. It is an active control (peak/notch type) and allows 15 dB of boost or cut.
(7) BOTTOM
This control, on both the Ultra and Crunch channels, varies the low frequency response of the
amplifier. It is an active control (shelving type) and allows 15 dB of boost or cut.
(8) VOLUME
This control, on all three channels, sets the overall level of its respective channel.
FRONT PANEL
1 2 43 65 87 9 11 12 13 14 15
10
8
4
Page 5

(9) GAIN
This control, on both the Ultra and Crunch channels, controls the input volume level of the
channel. Rotating this control clockwise will increase the amount of preamp distortion and
sustain.
(10) CHANNEL ACTIVATION LEDs
These indicators signify which channel is active. Ultra channel activation illuminates the red
LED; Crunch channel activation illuminates the yellow LED; and Clean channel activation
illuminates the green LED.
(11) TREBLE
This passive control regulates the high frequencies for the Clean channel.
(12) MID
This passive control regulates the mid frequencies for the Clean channel.
(13) BASS
This passive control regulates the low frequencies for the Clean channel.
(14) INPUT
This 1/4" jack is designed to accommodate most any guitar output signal. Input signal gain
can be adjusted by the GAIN (9) controls (Ultra and Crunch channels only).
(15) CHANNEL SELECT SWITCH
This three-position toggle switch allows selection between the amplifier’s three channels. LED
(10) illumination indicates which channel is active. Channel switching can also be
accomplished by footswitch. See the FOOTSWITCH section of this manual for explanation of
switch operation. The CHANNEL SELECT SWITCH must be set in the Ultra position in order
for the footswitch to operate properly.
5
Page 6
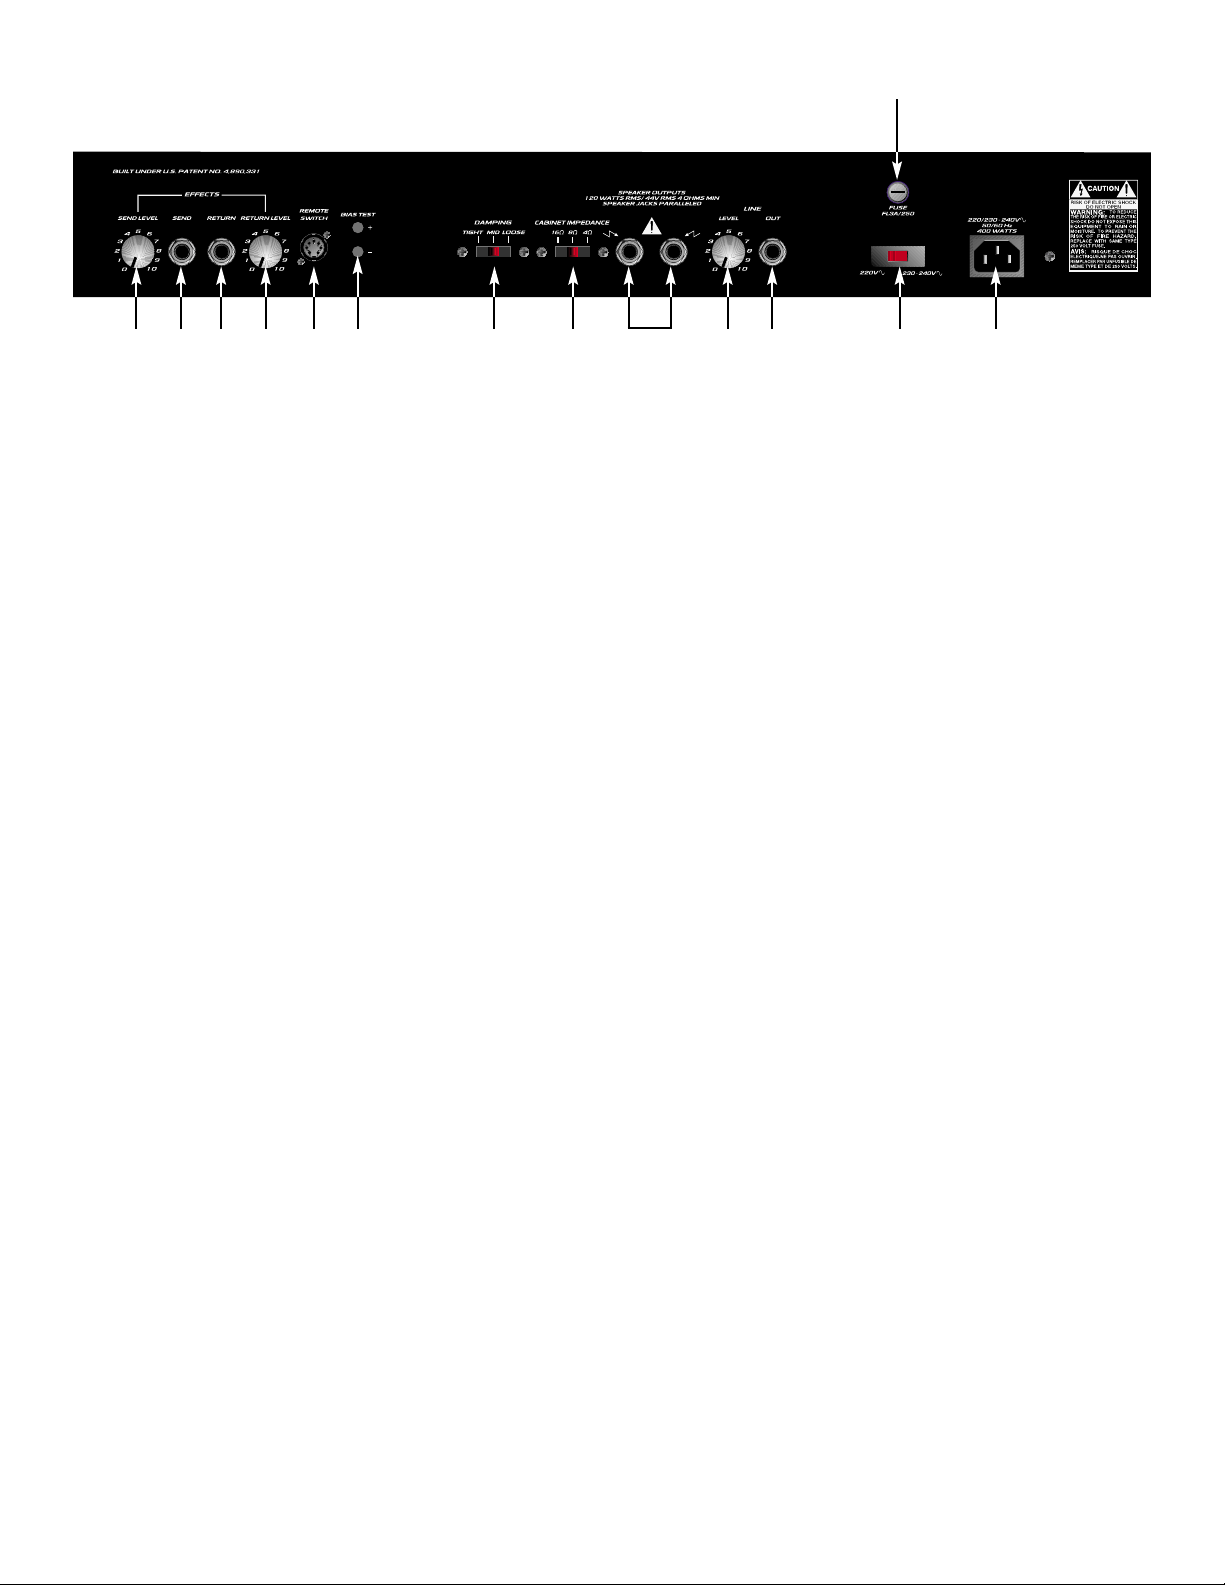
(16) EFFECTS SEND LEVEL
This calibrated (0 – 10) control sets the level of signal being sent to external effects and/or
signal processors. Clockwise rotation increases the amount of signal being sent;
counterclockwise rotation decreases the amount. For the quietest operation, the EFFECTS
SEND LEVEL should be set as high as possible. Generally, the SEND and RETURN levels
should be set oppositely. If the EFFECTS SEND LEVEL is set low, the EFFECTS RETURN
LEVEL (19) is set high to achieve unity gain. If volume boost is desired, turn both controls to
higher settings.
(17/18) EFFECTS SEND / EFFECTS RETURN
These 1/4" mono (TS) jacks allow signal to be sent to and returned from external effects
and/or signal processors. Using shielded cables with 1/4" mono (TS) phone plugs, patch from
EFFECTS SEND to the input of the external device, and from the output of the external
device to EFFECTS RETURN. Only devices that do not increase signal gain should be used
in this effects loop (chorus, delay, reverb, etc.). If the footswitch is used, the EFFECTS
SELECTOR (33) switch must be depressed to activate the effects loop. See the
FOOTSWITCH section of this manual for explanation of switch operation.
(19) EFFECTS RETURN LEVEL
This calibrated (0 – 10) control sets the level of signal being returned from external effects
and/or signal processors. Clockwise rotation increases the amount of signal being returned;
counterclockwise rotation decreases the amount. Again, SEND and RETURN levels should
be set oppositely, with the SEND level being high and the RETURN level low to ensure the
quietest operation.
(20) REMOTE SWITCH
This seven-pin DIN connector is provided for the connection of the remote footswitch. The
footswitch cable should be connected before the amp is powered up. See the FOOTSWITCH
section of this manual for explanation of switch operation.
(21) BIAS TEST TERMINALS
These terminals are provided to measure the bias of the amplifier’s power tubes. A knob
behind the back panel grill allows for adjustment. Bias adjustment should only be done by a
qualified technician.
(22) DAMPING SWITCH
This three-position switch allows adjustment of the amplifier’s damping factor. Damping is the
REAR PANEL
16 17 18 19 20 21 22 23 2524 26 28 29
27
6
Page 7

ability of an amplifier to control speaker cone motion after a signal disappears. A high
damping factor (TIGHT) reduces cone vibration quicker than a low (LOOSE) factor. This
switch works much like the resonance and presence controls on other Peavey amps, if those
controls were turned simultaneously. If the DAMPING SWITCH is changed, the volume of the
amp will also change and require re-adjustment.
(23) CABINET IMPEDANCE SWITCH
This three-position switch allows appropriate selection of speaker cabinet impedance. If two
enclosures of equal impedance are used, the switch should be set to half the individual value.
For example, two 16-Ohm enclosures necessitate an 8-Ohm setting, while two 8-Ohm
enclosures would require a 4-Ohm setting. Minimum speaker impedance is 4 Ohms.
(24) SPEAKER OUTPUTS
These paralleled 1/4" mono (TS) jacks are provided for the connection of speaker
enclosure(s). Again, minimum speaker impedance is 4 Ohms. The CABINET IMPEDANCE
SWITCH (23) should be set to match the load of the speaker cabinet(s).
(25) LINE OUT LEVEL
This control sets the level of signal being sent out of the LINE OUT (26) jack. It may be used
to balance the level of slave power amp/speaker systems driven from the LINE OUT (26) to
the level of cabinets driven from the SPEAKER OUTPUTS (24).
(26) LINE OUT
This 1/4" mono (TS) jack provides a post-power amp signal to drive another power
amp/speaker system while maintaining the amplifier’s tone.
(27) FUSE
A fuse is located within the cap of the fuse holder. This fuse must be replaced with one of the
same type and value to avoid damaging the amplifier and voiding the warranty. If the amp
repeatedly blows the fuse, it should be taken to a qualified service center for repair.
WARNING: THE FUSE SHOULD ONLY BE REPLACED AFTER THE POWER CORD HAS
BEEN DISCONNECTED.
(28) GROUND POLARITY SWITCH
This three-position, rocker-type switch should normally be placed in the center (0) position. If
hum or noise is noticed coming from the speaker enclosure(s), the switch may be placed in
the “+” or “-” position to minimize hum/noise. If changing the polarity does not alleviate the
problem, consult your authorized Peavey dealer, the Peavey factory, or a qualified service
technician.
(29) IEC MAINS CONNECTOR
This is a standard IEC power connector. An AC mains cord having the appropriate AC plug
and ratings for the intended operating voltage is included in the carton. The mains cord
should be connected to the amplifier before connecting to a suitable AC outlet.
U.S DOMESTIC AC MAINS CORD
The mains cord supplied with the unit is a heavy-duty, 3-conductor type with a conventional
120 VAC plug with ground pin. If the outlet used does not have a ground pin, a suitable
grounding adapter should be used, and the third wire should be grounded properly.
Never break off the ground pin on any equipment. It is provided for your safety.
7
Page 8
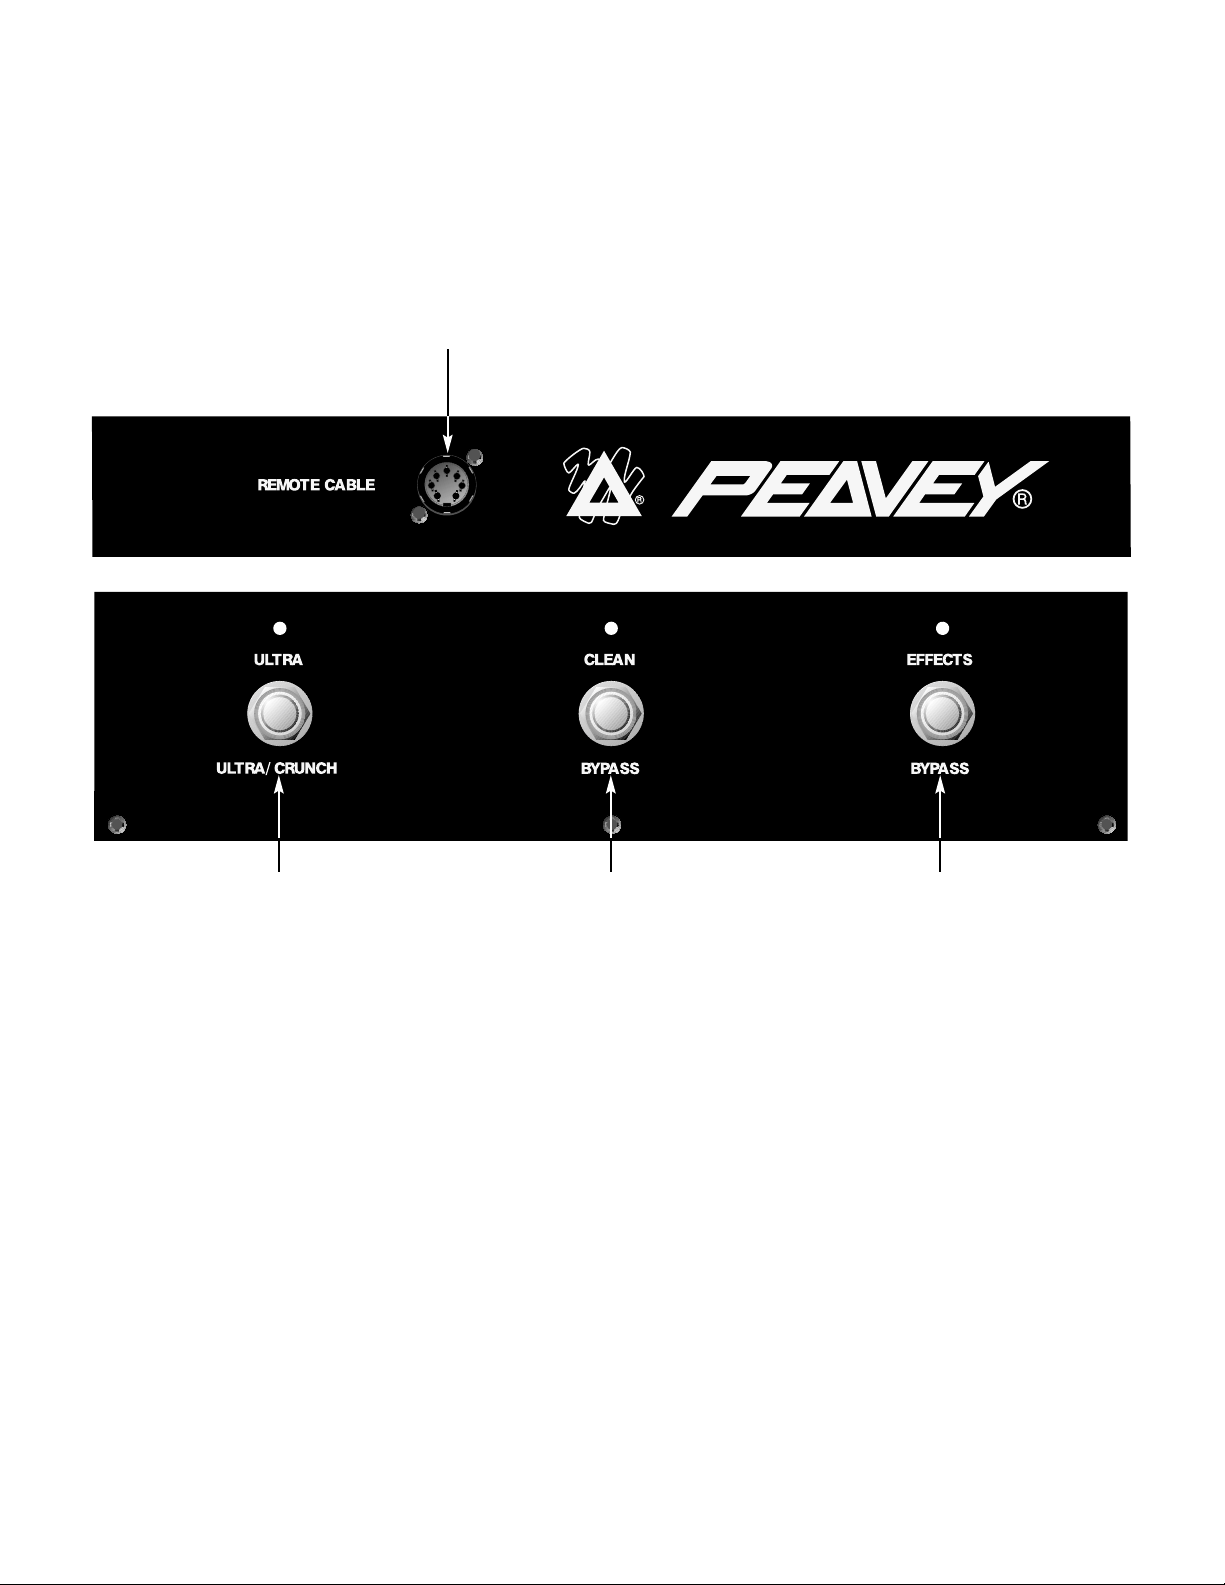
(30) CABLE CONNECTOR
This 7-pin DIN connector is provided for connecting the footswitch to the amplifier REMOTE
SWITCH (20) via the cable included in the carton. Connections at the switch and the amplifier
should be made before the amp is powered up.
(31) ULTRA / CRUNCH SELECTOR
This switch selects between the Ultra and Crunch channels on the amplifier. The adjacent
LED will illuminate when the Ultra channel is selected. When the LED is dark, the Crunch
channel is selected. The CLEAN SELECTOR (32) must be in the BYPASS mode to activate
either the Ultra or Crunch channel.
(32) CLEAN SELECTOR
This switch selects the Clean channel and will activate regardless of the position of the
ULTRA / CRUNCH SELECTOR (31). The adjacent LED will illuminate when the Clean
channel is selected. This switch must be in the BYPASS position, indicated by a dark LED, in
order to utilize the ULTRA / CRUNCH SELECTOR (31).
(33) EFFECTS SELECTOR
This switch activates the amplifier’s effects loop (16 – 19). The adjacent LED will illuminate
when the effects loop is active.
FOOTSWITCH
30
8
NOTE: FOR UK ONLY
If the colors of the wires in the mains lead of this unit do not correspond with the colored markings
identifying the terminals in your plug, proceed as follows: (1) The wire that is colored green and
yellow must be connected to the terminal that is marked by the letter E, the earth symbol, colored
green, or colored green and yellow. (2) The wire that is colored blue must be connected to the
terminal that is marked with the letter N or the color black. (3) The wire that is colored brown must
be connected to the terminal that is marked with the letter L or the color red.
31 32 33
Page 9

Power Amplifier Section:
Tubes:
Four 6L6GCs with 12AX7 driver
Rated Power and Load:
120 W RMS into 16, 8, or 4 Ohms
Power @ Clipping:
(typically @ 5% THD, 1 kHz, 120 VAC line)
120 W RMS into 16, 8, or 4 Ohms
Frequency Response:
±3 dB 50 Hz to 20 kHz @ 90 W RMS into 8 Ohms
Hum and Noise:
Greater than 76 dB below rated power
Power Consumption:
Domestic: 400 W, 50/60 Hz, 120 VAC
Export: 400 W, 60 Hz, 220-230/240 VAC
Preamp Section:
Tubes:
Three 12AX7s
The following specs are measured @ 1 kHz with the controls
preset as follows:
Low and High EQ @ 10, Mid EQ @ 0
Ultra and Crunch Posts @ 10
Bottom, Body, and Hair EQ @ 5
Effects Send @ 0
Effects Return @ 10
Master Level @ 5
Nominal Levels are with Pre Gain @ 5
Minimum Levels are with Pre Gain @ 10
Clean Channel:
Nominal Input Level: -20 dBV, 100 mV RMS
Minimum Input Level: -30 dBV, 30 mV RMS
Maximum Input Level: 0 dBV, 1.0 mV RMS
Crunch Channel:
Nominal Input Level: -80 dBV, 0.1 mV RMS
Minimum Input Level: -90 dBV, 0.03 mV RMS
Ultra Channel:
Nominal Input Level: -80 dBV, 0.1 mV RMS
Minimum Input Level: -90 dBV, 0.03 mV RMS
Effects Send:
Load Impedance: 47 k Ohms or greater
Minimum Output: -10 dBV, 300 mV RMS
Maximum Output: 0 dBV, 1 V RMS
Effects Return:
Impedance: High-Z, 80 k Ohms
Minimum Input Sensitivity: -10 dBV, 300 mV RMS
Maximum Input Sensitivity: 0 dBV, 1 V RMS
Line Output:
Load Impedance: 47 k Ohms or greater
Adjustable Output: ±20 dBV, 0.1 V RMS-10 V RMS
Remote Footswitch:
Special 3-button unit with LED indicators (supplied)
System Hum and Noise @ Nominal Level:
(Clean channel, 20 Hz to 20 kHz unweighted)
Greater than 74 dB below rated power
(Special noise gate circuitry for Ultra & Crunch)
Equalization: (Clean channel only)
Custom Low, Mid, and High passive type EQ
Voicing: (Ultra and Crunch channels only)
Active Bottom, Body, and Hair (Edge) EQ
Boost/Cut ±12 dB
Dimensions and Weight:
11.0" (279 mm) H x 26.5" (673 mm) W x 11.0" (279 mm) D
52 lbs. (23.6 kg)
TRIPLE XXX SPECIFICATIONS
9
Page 10
10
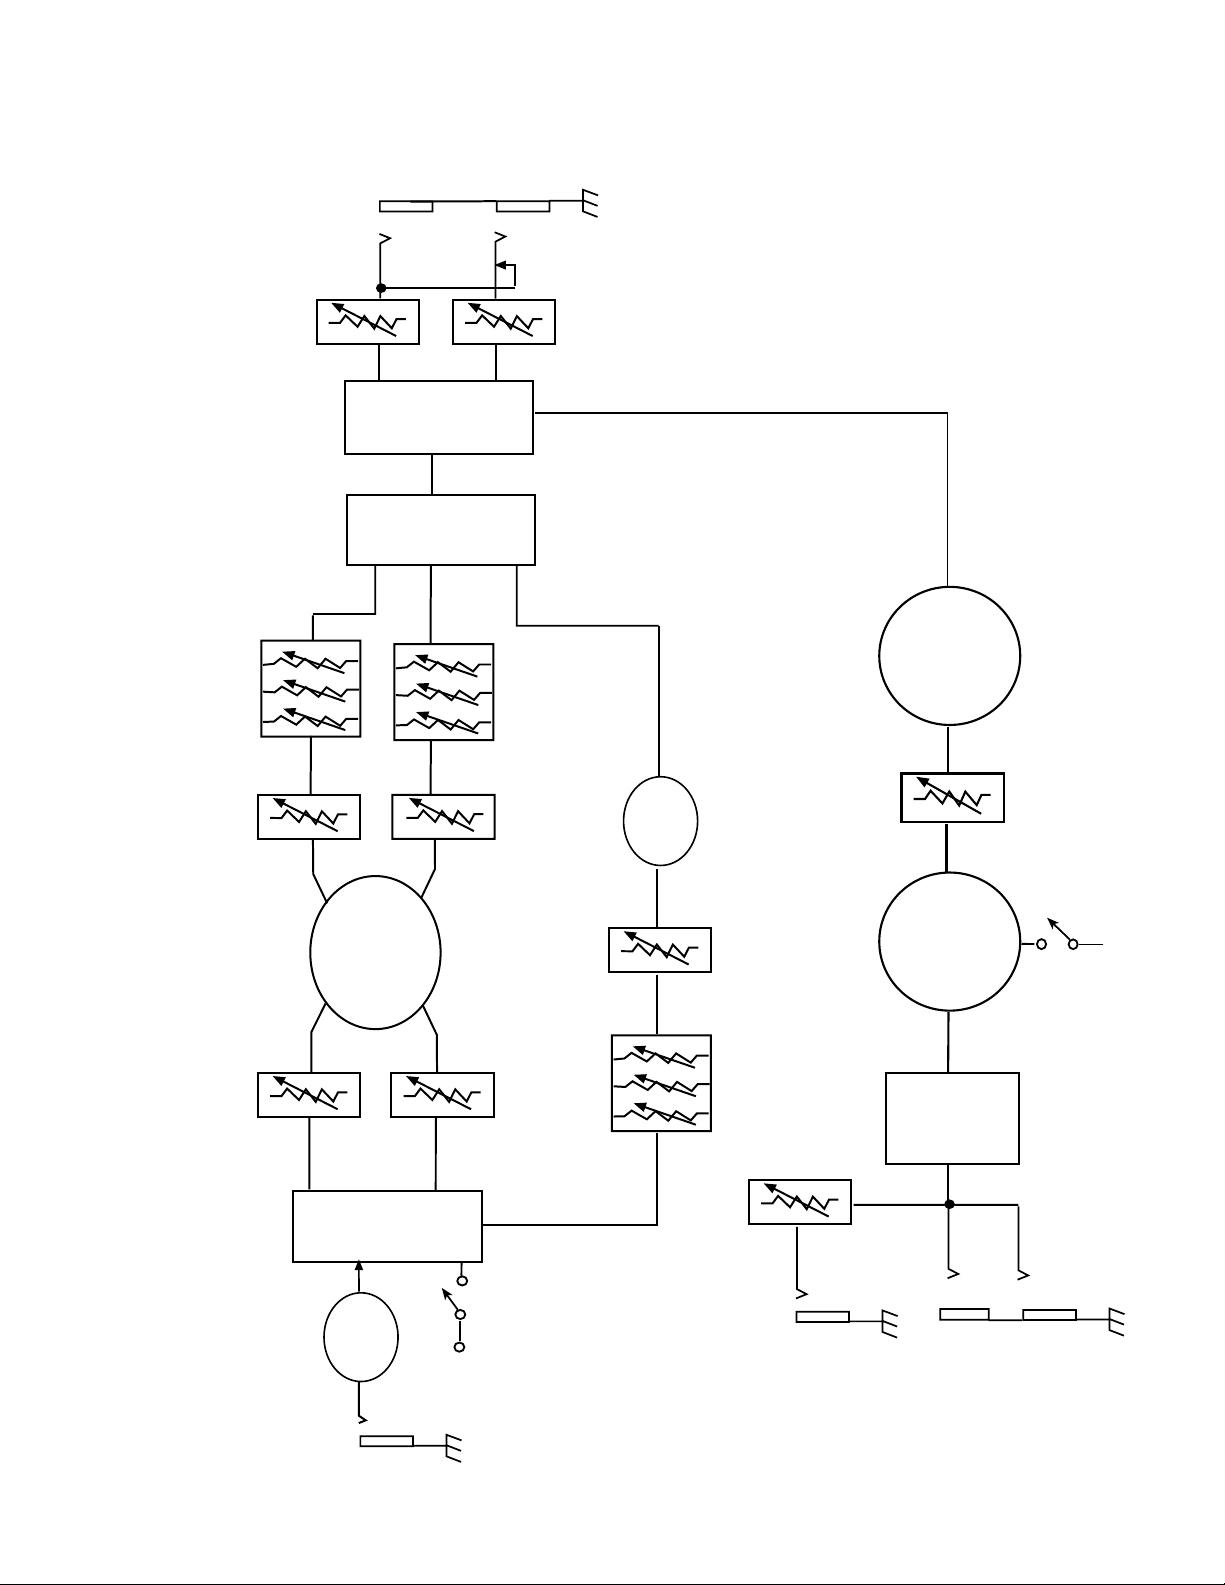
LOOP
Triple XXX Block Diagram
EFFECTS
SEND
RETURN
VOICING
ULTRA
FX LOOP
SWITCH
BOT. BODY HAIR
POST
SEND
BYPASS
LOGIC
CRUNCH
RETURN
CLEAN
BOT. BODY HAIR
POST
TUBE
STAGE
TUBE
STAGES
MASTER
VOLUME
understand the unit's functions, please study the block diagram carefully.
This block diagram shows the signal path within the unit. In order to thoroughly
ULTRA
INPUT
TUBE
PRE
SWITCH
TUBE
STAGE
STAGES
LOGIC
CRUNCH
CHANNEL
F.S.W
PRE
CLEAN
PRE
BASS MID TREBLE
LEVEL
LINE
OUT
TUBE
POWER AMP
4Ω 8 Ω 16 Ω
SWITCH
IMPEDANCE
SWITCH
DAMPING
Page 11
11
Como su nombre lo indi-
ca, el nuevo miembro de la serie Ultra
™
Tube en increíble. Desde su entrada de alta ganancia a salidas de parlantes en paralelo, el Triple XXX de Peavey Electronics no es para débiles del corazón.
Diseñado para el guitarrista exigente de hoy, este amplificador viene cargado de posibilidades prácticas para el mundo real. Ofreciendo 120 watts de poder de bulbos, el Triple XXX es fácil de controlar gracias a su perilla de volumen maestro, así como controles de volumen independientes para
cada uno de sus 3 canales. Los canales Ultra y Crunch también cuentan con controles ayudando
aun más el conseguir un sonido que mate. El control de tono se lleva a cabo por medio de controles
pasivos de Graves, Medios y Agudos en el canal limpio, mientras que los canales Ultra y Crunch
utilizan los controles activos exclusivos de Peavey Bottom (graves), Body (cuerpo) y Hair (agudos).
Diseñados para funcionar bien con impedancias de 4, 8, ó 16 ohmios, el igualarlo con parlantes se
limita sólo por tu imaginación. Con circuitos controlables por pedal de canal y efectos, el Triple XXX
te permite mantener tus manos en tu guitarra... y tus ojos en tu sueño.
CARACTERISTICAS
• Tres Bulbos de preamplificador 12AX7
• Cuatro bulbos de amplificador 6L6GC alimentados por un 12AX7
• Amplificador convertible para usar bulbos EL34
• Circuito de efectos controlable por pedal con controles independientes de envió y retorno
• Interruptor de Damping (Apretado, Medio y Suelto)
• Circuitos especiales de compuerta en los canales Ultra y Crunch
• Salida de línea con control de nivel
• interruptor de impedancia de gabinetes (4, 8, o 16 Ohmios)
• Interruptores resistentes de encendido standby y canal
• Lámpara clásica indicadora de estatus
• Perillas de control cromadas.
ESPAÑOL
Page 12

12
(1) INTERRUPTRO DE PODER
Este interruptor de dos posiciones aplica corriente a la unidad. La lámpara de estatus roja (3)
se iluminará cuando el interruptor de encuentre en la posición de encendido (ON).
(2) INTERRUPTOR DE STANDBY
Este interruptor de dos posiciones permite poner al amplificador en modo STANDBY. En la
posición STANDBY los bulbos se mantienen calientes pero el amplificador no puede ser
operado. Cambiar a la posición de ON pone al amplificador en modo activo.
(3) LÁMPARA DE ESTATUS DE PODER
Este indicador se ilumina cuando el amplificador recibe corriente.
(4) VOLUMEN MAESTRO
Este control ajusta el volumen general del amplificador. Una vez que se alcanza el balance
entre los tres canales del amplificador, la salida completa del amplificador puede ser
incrementada o reducida al rotar este control. Con las manecillas del reloj el nivel se
incrementará; y contra las manecillas se reducirá.
(5) HAIR
Este control, tanto en el canal Crunch como en el Ultra, varia la respuesta de frecuencias
agudas del amplificador. Es un control activo y permite 15 dB de recorte o aumento.
(6) BODY
Este control, tanto en el canal Crunch como en el Ultra, varia la respuesta de frecuencias
medias del amplificador. Es un control activo y permite 15 dB de recorte o aumento.
(7) BOTTOM
Este control, tanto en el canal Crunch como en el Ultra, varia la respuesta de frecuencias
graves del amplificador. Es un control activo y permite 15 dB de recorte o aumento.
(8) VOLUMEN
Este control, en los tres canales, ajusta el nivel de su respectivo canal.
(9) GANANCIA
Este control, tanto en el canal Ultra como Crunch, controla el volumen de entrada del canal.
El rotar la perilla en dirección de las manecillas del reloj incrementará la cantidad de
distorsión y suspensión.
1 2 43 65 87 9 11 12 13 14 15
10
8
PANEL FRONTAL
Page 13

13
(10) LEDs DE ACTIVACIÓN DE CANAL
Estos indicadores indican el canal que está activo. El canal Ultra ilumina el LED rojo, el canal
Crunch el amarillo y el canal Limpio el LED verde.
(11) TREBLE
Este control pasivo regula las frecuencias agudas del canal Limpio.
(12) MID
Este control pasivo regula las frecuencias medias del canal Limpio.
(13) BASS
Este control pasivo regula las frecuencias graves del canal Limpio.
(14) ENTRADA
Este conectador de 1/4" ha sido diseñado para funcionar con casi cualquier señal de salida
de guitarra. La ganancia de entrada puede ser ajustada por medio de los controles de
GANANACIA (9) (Canales Ultra y Crunch solamente).
(15) INTERRUPTOR DE SELECCIÓN DE CANAL
Este interruptor de tres posiciones permite la selección entre los tres canales del
amplificador. La iluminación de los LEDs (10) indica el canal que está activo. Los canales
también se pueden cambiar con pedal. Ver la sección de PEDAL en este manual para una
explicación de su uso. El INTERRUPTOR DE SELECCION DE CANAL tiene que estar en la
posición Ultra para que el pedal funcione correctamente.
(16) NIVEL DE ENVIO DE EFECTOS
Este control calibrado (0-10) ajusta el nivel de señal que se manda a una unidad externa de
efectos o procesador. La rotación en dirección de las manecillas del reloj incrementa la
cantidad de señal que se manda, contrarreloj la reduce. Para la operación más silenciosa el
NIVEL DE ENVIO DE EFECTOS debe estar lo más alto posible. Generalmente, los niveles
de ENVIO y RETORNO deben ser ajustados opuestamente. Si el NIVEL DE ENVIO DE
EFECTOS (16) es muy bajo, el NIVEL DE RETORNO DE EFECTOS debe ser alto. Si se
desea incrementar el volumen, ajusta las dos perillas altas.
(17-18) ENVIO DE EFECTOS/RETORNO DE EFECTOS
Estos conectadores mono de 1/4" permiten que la señal sea enviada y regresada de
unidades de efectos externas y/o procesadores. Con cables propiamente aislados mono de
1/4" (TS) tipo phone, conecta del ENVIO DE EFECTOS (17) a la entrada del procesador
externo, y de la salida del procesador al RETORNO DE EFECTOS (18). Sólo se deben usar
REAR FRONTAL
16 17 18 19 20 21 22 23 2524 26 28 29
27
Page 14

14
procesadores que no incrementen la ganancia de la señal en este circuito (chorus, delay,
reverb, etc.). Si se usa pedalera el interruptor SELECTOR DE EFECTOS (33) debe estar
oprimido para activar el circuito de efectos. Ver la sección de PEDALERA en este manual
para más detalles de operación.
(19) NIVEL DE RETORNO DE EFECTOS
Este control calibrado (0-10) ajusta el nivel de señal que regresa de la unidad de efectos o
procesador externo. La rotación en sentido de las manecillas del reloj incrementará la
cantidad de señal que regresa; la rotación en dirección contrarreloj reducirá la cantidad. Una
vez más, los controles de ENVIO y RETORNO deben usarse de manera opuesta, con el
ENVIO alto y el RETORNO bajo para una operación más silenciosa.
(20) CONTROL REMOTO
Este conectador DIN de 7 agujas se incluye para la conexión de un pedal de control remoto.
El cable del pedal debe ser conectado antes que el amplificador sea encendido. Ver la
sección de PEDALERA en este manual para más detalles de operación.
(21) TERMINALES DE PRUEBA DE BIAS
Estas terminales se incluyen para medir el bias de los bulbos del amplificador. Una perilla
detrás de la parrilla trasera permite su ajuste. El ajuste del bias sólo debe llevarse a cabo por
un técnico calificado.
(22) INTERRUPTOR DE DAMPING
Este interruptor de tres posiciones permite ajustar el factor de damping del amplificador.
Damping es la habilidad del amplificador de controlar el cono del parlante una vez que la
señal ha desaparecido. Un factor de damping elevado (ajustado) reduce la vibración del cono
más rápido que un factor bajo (suelto). Este interruptor funciona similar a los controles de
resonancia y presencia de otros amplificadores Peavey, si esos controles fueran subidos
simultáneamente.. Si el INTERRUPTOR DE DAMPING es cambiado, el volumen del
amplificador también cambiará y requerirá ajustes.
(23) INTERRUPTOR DE IMPEDANCIA DE GABINTES
Este interruptor de tres posiciones permite seleccionar la impedancia del gabinete de
parlantes. Si se usan dos gabinetes de distintas impedancias, el interruptor debe estar en la
mitad de su valor individual. Por ejemplo, dos parlantes de 16 ohmios necesitan una posición
de 8 ohmios, mientras que dos parlantes de 8 ohmios necesitan la posición de 4 ohmios. La
impedancia mínima en parlantes es 4 ohmios.
(24) SALIDAS DE PARLANTES
Estos conectores paralelos de 1/4" (TS) se proveen para las conexiones de los parlantes.
Una vez más, la impedancia mínima en parlantes es de 4 ohmios. EL INTERRUPTOR DE
IMPEDANCIA DE GABINTES (23) debe estar de acuerdo con la capacidad de los gabinetes.
(25) NIVEL DE SALIDA DE LINEA
Este control ajusta en nivel de la señal que es mandada por el conector de SALIDA DE
LINEA (26). Puede ser usado para balancear el nivel de poder esclavo de sistemas de
amps/parlantes alimentados por la SALIDA DE LINEA (26) al nivel de gabinetes alimentados
de las SALIDAS DE PARLANTES(24).
Page 15

15
(26) SALIDA DE LINEA
Este conector de 1/4" (TS) provee una señal post-amplificador para alimentar otro
amplificador/parlante manteniendo el tono del amplificador.
(27) FUSIBLE
Un fusible se localiza dentro de la tapa de fusible. Este fusible tiene que ser reemplazado
con uno del mismo tipo y valor para no dañar el amplificador y cancelar la garantía. Si el
amplificador continuamente vuela el fusible, debe ser llevado a un centro de servicio
calificado para su reparación.. CUIDADO: EL FUSIBLE SÓLO DEBE SER CAMBIADO UNA
VEZ QUE EL CABLE DE CORRIENTE HA SIDO DESCONECTADO.
(28) INTERRUPTOR DE POLARIDAD DE TIERRA
Este interruptor de tres posiciones por lo general debe encontrarse en la posición central (0).
Si se escucha hum o ruido de los parlantes, el interruptor puede cambiarse a las posiciones
(+) o (-) para minimizar el ruido. Si el cambio de polaridad no resuelve el problema, consulte
a su distribuidor Peavey autorizado, la fabrica de Peavey o a un técnico capacitado.
(29) CONECTADOR PRINCIPAL IEC
Este es un conectador estándar IEC. Un cable de CA con los conectores y capacidades para
el voltaje de operación es incluido en el paquete. El cable de corriente debe ser conectado al
amplificador antes de conectarse a la fuente de corriente.
CABLE DE CORRIENTE DOMESTICO EN EEUU
El cable de corriente incluido con la unidad es uno de 3 vías con conectador convencional de
120 VAC y aguja de tierra. Si la fuente no cuenta con entrada de tierra, un adaptador debe
ser usado y la tercera aguja debe ser aterrizada correctamente.
Nunca se rompa la aguja de tierra en ningún equipo. Esta está ahí por tu seguridad.
NOTA: REINO UNIDO SOLAMENTE
Page 16

16
(30) CONECTOR DE CABLE
Este conector tipo DIN de 7 agujas se provee para conectar una pedalera en el CONTROL
REMOTO (20) vía el cable incluido en el paquete. Las conexiones de la pedalera y
amplificador deben llevarse a cabo antes de encenderlo.
(31) SELECTOR ULTRA / CRUNCH
Este interruptor selecciona entre los canales Ultra y Crunch del amplificador. El LED
adyacente se iluminará cuando el canal es seleccionado. Cuando el LED no esté encendido,
el canal Crunch está seleccionado. El SELECTOR LIMPIO (32) tiene que estar en posición
BYPASS para activar el canal Ultra o Crunch.
(32) SELECTOR LIMPIO
Este interruptor selecciona el canal limpio y es activado amén de la posición del SELECTOR
ULTRA / CRUNCH (31). El LED adyacente se iluminará cuando el canal limpio es
seleccionado. Este interruptor tiene que estar en la posición BYPASS, indicado por el LED
oscuro, para utilizar los canales el SELECTOR ULTRA / CRUNCH (31).
(33) SELECTOR DE EFECTOS
Este interruptor activa el circuito de efectos del amplificador (16-19). El LED adyacente se
iluminará cuando el circuito de efectos esté activo
FOOTSWITCH
30
31 32 33
Page 17

17
Sección del Amplificador de Poder:
Bulbos:
Cuatro 6L6GCs con driver 12AX7
Poder medido y carga:
120 W RMS a 16, 8, o 4 Ohmios
Capacidad @ Clipping:
(Típicamente @ 5% THD, 1 kHz, línea de CA de 120 V)
120 W RMS a 16, 8, o 4 Ohmios
Respuesta de frecuencias:
±3 dB 50 Hz a 20 kHz @ 90 W RMS a 8 Ohmios
Hum y ruido:
Más de 76 dB bajo poder medido
Consumo de poder:
Domestico: 400 W, 50/60 Hz, 120 V CA
Exportación: 400 W, 60 Hz, 220-230/240 V CA
Sección de preamplificador:
Bulbos:
Tres 12AX7s
Las siguientes especificaciones medidas @ 1 kHz con
controles de la siguiente manera:
EQ Grave y Agudo @ 10, EQ Medio @ 0
Ultra y Crunch @ 10
EQ Bottom, Body, y Hair @ 5
envió de Efectos @ 0
Retorno de Efectos @ 10
Nivel Maestro @ 5
Niveles nominales con Pre Ganancia @ 5
Niveles mínimos con Pre Ganancia @ 10
Canal Limpio:
Nivel de Entrada Nominal: -20 dBV, 100 mV RMS
Nivel de Entrada Mínimo: -30 dBV, 30 mV RMS
Nivel de Entrada Máximo: 0 dBV, 1.0 mV RMS
Canal Crunch:
Nivel de Entrada Nominal: -80 dBV, 0.1 mV RMS
Nivel de Entrada Mínimo: -90 dBV, 0.03 mV RMS
Canal Ultra:
Nivel de Entrada Nominal: -80 dBV, 0.1 mV RMS
Nivel de Entrada Mínimo: -90 dBV, 0.03 mV RMS
envió de Efectos:
Impedancia: 47 k Ohmios o más
Salida Mínima: -10 dBV, 300 mV RMS
Salida Máxima: 0 dBV, 1 V RMS
Retorno de Efectos:
Impedancia: High-Z, 80 k Ohmios
Sensibilidad de Entrada Mínima: -10 dBV, 300 mV RMS
Sensibilidad de Entrada Máxima: 0 dBV, 1 V RMS
Salida de Línea:
Impedancia: 47 k Ohmios o más
Salida Ajustable: ±20 dBV, 0.1V RMS-10 V RMS
Pedalera de Control Remoto:
Unidad Especial de tres botones con indicadores LED (incluidos)
Hum y Ruido del Sistema @ Nivel Nominal:
(Canal Limpio, 20 Hz a 20 kHz sin pesar (unweighted)
Más de 74 dB bajo el poder medido
(Circuitos especiales de compuerta para los canales Crunch y
Ultra)
Ecualización: (Canal Limpio Solamente)
Ecualizador Pasivo de Graves, Medios y Agudos
Voicing: (Canales Ultra y Crunch Solamente)
EQ de Graves activos, Cuerpo (Body), y Hair (Edge)
Incremento/Recorte ±12 dB
Dimensiones y peso:
11.0" (279 mm) A x 26.5" (673 mm) A x 11.0" (279 mm) P
52 lbs. (23.6 Kg.)
TRIPLE XXX ESPECIFICACIONES.
Page 18

18
FRANÇAIS
Félicitations pour votre achat Peavey! Comme son nom l’indique, la Triple XXX est un produit
énorme tant en terme de puissance, de polyvalence, de qualité sonore et de fabrication. Etudiée
pour satisfaire même les guitaristes les plus intransigeants, elle représente un aboutissement dans
le mariage de la lampe et la technologie moderne. 120 Watts de puissance “tout lampes” acceptant
les deux standards 6L6 et EL-34, équalisations active et passive, préampli équippé de 12AX7, sortie
ligne et boucle d’effets permettent au Triple XXX de proposer une solution à tous types de
guitaristes, à un prix défiant toute concurrence.
CARACTERISTIQUES
• Trois lampes 12AX7 de pré-amplification, une pour l’amplification
• Quatre lampes 6L6GC pour l’amplification
• Possibilité d’utiliser quatre lampes EL34 pour l’amplification
• Boucle d’effets activable au pied à niveaux d’entrée et de sortie indépendants
• Interrupteur d’”amortisement” (Damping switch) à trois positions (tight, medium, loose)
• Circuit spécial de suppression de bruit (noise gate) sur les canaux Ultra et Crunch
• Contrôle de niveau ligne (Line out)
• Sélecteur d’impédance de cabinet de hauts-parleurs (4, 8, et 16 Ohms)
• Interrupteur renforcé pour l’alimentation, le circuit de chauffe des lampes et la sélection de canal
• Indicateurs de statut à lampes classiques (Très visibles)
• Boutons de contrôle chromés
Page 19

19
(1) SELECTEUR D’ALIMENTATION
Cet interrupteur 2-positions contrôle l’alimentation électrique pour votre unité. Une lampe de
statut (3) s’illumine lorsque l’unité est sous tension.
(2) SELECTEUR DE CIRCUIT DE CHAUFFE (STANDBY)
Cet interrupteur 2-positions permet à votre unité d’alimenter les lampes sans les rendre
opérationnelles (aucun signal en sortie). En position STANDBY, les lampes sont alimentées
pour leur permettre de monter (ou de rester) en température mais votre unité n’est pas
opérationelle. Passez en position ON pour mettre votre unité en mode de fonctionnement.
(3) LAMPE DE STATUT
Cette indicateur s’illumine lorsque votre unité est mise sous tension.
(4) MASTER VOLUME
Ce contrôle permet de rélgler le niveau de sortie général de votre unité. Un fois que la
balance entre les différents volumes des différents canaux vous satisfait, vous pouvez utilisez
ce contrôle pour monter ou descendre le niveau général des 3 canaux.
(5) HAIR
Ce contrôle, sur les canaux Ultra et Crunch, permet de modifier la réponse en hautes
fréquences de votre unité sur ces canaux. Ce contrôle est actif et vous permet jusqu’à 15 dB
de modification (boost ou cut).
(6) BODY
Ce contrôle, sur les canaux Ultra et Crunch, permet de modifier la réponse en fréquences
mediums de votre unité sur ces canaux. Ce contrôle est actif et vous permet jusqu’à 15 dB
de modification (boost ou cut).
(7) BOTTOM
Ce contrôle, sur les canaux Ultra et Crunch, permet de modifier la réponse en basses
fréquences de votre unité sur ces canaux. Ce contrôle est actif et vous permet jusqu’à 15 dB
de modification (boost ou cut).
(8) VOLUME
Ce contrôle, sur chacun des canaux, permet de régler le niveau du canal concerné.
1 2 43 65 87 9 11 12 13 14 15
10
8
PANNEAU AVANT
Page 20

20
(9) GAIN
Ce contrôle, sur les canaux Ultra et Crunch, vous permet de déterminer le niveau du signal
d’entrée dans le canal correspondant. Tournez ce contrôle horairement pour augmenter le
niveau de saturation.
(10) LEDS D’INDICATION DE CANAL ACTIF
Ces Leds vous indique quel canal est actif. Le canal Ultra active la Led rouge, le canal
Crunch active la Led jaune et le canal clair la Led verte.
(11) TREBLE
Ce contrôle passif vous permet de filtrer les fréquences aigues du canal clair.
(12) MID
Ce contrôle passif vous permet de filtrer les fréquences medium du canal clair.
(13) BASS
Ce contrôle passif vous permet de filtrer les fréquences graves du canal clair.
(14) ENTREE (INPUT)
Ce jack 1/4" est prévu pour recevoir tous types de signaux de sortie de guitare. L’ajustement
du niveau d’entrée peut être effectué par les contrôles de GAIN (9) sur les canaux Crunch et
Ultra seulement.
(15) SELECTEUR DE CANAL
Ce selecteur 3-positions vous permet de sélectionner un des 3 canaux de votre unité. Les
Leds d’indication de canal actif(10) vous signale lequel est actuellement actif. La sélection de
canal peut également être controlée par le pédalier (fourni). Reportez-vous à la section
PEDALIER de ce manuel pour plus d’informations sur ce sujet. Le sélecteur de canal (15)
doit être en position Ultra pour que le pédalier fonctionne correctement.
(16) CONTROLE DE NIVEAU D’ENVOI D’EFFETS (EFFECTS SEND LEVEL)
Ce contrôle calibré (0 –10) détermine le niveau du signal envoyé par la sortie EFFECTS
SEND(17) à une unité externe d’effets ou autre (Pédale de volume,...). Le tourner
horairement augmentera ce niveau et vice-versa. Sa position est déterminée par la sensibilité
de l’unité externe en question.
PANNEAU ARRIERE
16 17 18 19 20 21 22 23 2524 26 28 29
27
Page 21

21
(17/18) BOUCLE D’EFFETS (EFFECTS SEND / EFFECTS RETURN)
Ces jacks 1/4" mono (TS) permettent de connecter une unité externe d’effets ou autres
(Pédale de volume,...). En utilisant des cables blindés mono (les plus courts possibles),
connectez le EFFECT SEND(17) à l’entrée de votre unité externe et sa sortie au EFFECTS
RETURN (18). Si le pédalier est utilisé, le sélecteur EFFECTS SELECTOR (33) doit être en
position relachée pour activer la boucle d’effets. Reportez-vous à la section PEDALIER de ce
manuel pour plus d’informations.
(19) CONTROLE DE NIVEAU DE RETOUR D’EFFETS (EFFECTS RETURN LEVEL)
Ce contrôle calibré (0 –10) détermine le niveau du signal retourné par votre unité externe
d’effets ou autre (Pédale de volume,...). Le tourner horairement augmentera ce niveau et
vice-versa. Sa position est déterminée par le niveau de sortie de l’unité externe en question.
(20) REMOTE SWITCH (PEDALIER)
Ce connecteur 7-pins DIN vous permet de connecter le pédalier (fourni) à votre unité. Cette
connection doit être effectuée avant la mise sous tension de l’appareil. Reportez-vous à la
section PEDALIER de ce manuel pour plus d’informations.
(21) BIAS TEST TERMINALS
Ces connecteurs permettent d’obtenir la valeur de Bias de votre ampli de puissance. Un
contrôle situé derrière la grille permet de le modifier si besoin. Seul un technicien qualifié peut
correctement régler ce contrôle.
(22) INTERRUPTEUR D’AMORTISSEMENT(DAMPING SWITCH)
Ce sélecteur 3-positions permet d’ajuster le facteur d’amortissement de l’ampli de puissance.
Ce facteur est déterminé par l’aptitude d’un ampli à contrôler les mouvements des hauts
parleurs à la fin d’un signal. Un haut facteur d’amortissement (TIGHT) réduit les vibrations
des hauts-parleurs plus rapidement qu’un bas facteur d’amortissement (LOOSE). Ce
sélecteur à une action comparable aux contrôles de présence et résonnance d’autres
produits Peavey, si ceux-ci etaient altérés simultanément. Si la position de ce sélecteur est
changée, le volume de votre unité sera modifiée et demandera ré-ajustement.
(23) SELECTEUR D’IMPEDANCE D’ENCEINTE
Ce sélecteur 3-positions vous permet d’accorder le transformateur de sortie de votre unité à
la charge totale de vos enceintes. Si une seule enceinte est utilisée, positionnez le sélecteur
sur l’impédance de celle-ci. Si 2 enceintes sont utilisées (identiques), positionnez le sélecteur
sur la moitié de l’impédance d’une de vos enceintes. Par exemple, 2 enceintes de 8 Ohms
chacunes nécessitent la position 4 Ohms,...
La charge de travail minimum de votre unité est 4 Ohms.
(24) SORTIES HAUTS-PARLEURS
Ces jack 1/4" mono (TS) sont montés en parallèles et vous permettent de connecter vos
enceintes à votre unité. Le sélecteur d’impédance (23) doit ëtre positionné sur la position
donnée par le nombre et l’impédance des enceintes que vous comptez utiliser. La charge de
travail minimum de votre unité est 4 Ohms
(25) CONTROLE DE SORTIE LIGNE (LINE LEVEL)
Ce potentiomètre permet de controler le niveau du signal à la sortie ligne de votre unité (26).
Ajustez ce niveau en fonction de la sensibilité de l’appareil à réception (Mixer, Amplificateur
additionnel,...).
Page 22

22
(26) SORTIE LIGNE (LINE OUT)
Ce jack 1/4" mono (TS) permet d’envoyer un signal post-ampli vers un autre appareil (Mixer,
Amplificateur additionnel,...) pour augmenter le volume sonore sans changer la tonalité de
votre unité.
(27) FUSIBLE
Un fusible est situé dans le capuchon dévissable. Il peut être remplacé par un autre fusible
de mêmes type et valeur pour éviter tout dommage à votre unité et la validité de sa garantie.
Si votre unité fait régulièrement sauter ce fusible, faites-la vérifier par un technicien qualifié.
ATTENTION: LE CABLE SECTEUR DOIT ETRE DECONNECTE AVANT TOUTE
OPERATION SUR LE FUSIBLE.
(28) SELECTEUR DE VALEUR D’ALIMENTATION
Placez ce sélecteur en accordance avec l’alimentation de votre localité.
(29) CONNECTEUR IEC
Ce connecteur vous permet d’alimenter votre unité. Utilisez uniquement un cordon de mêmes
caractéristiques que celui fourni. Ce cordon doit d’abord être connecté à votre unité, ensuite
à la source d’alimentation (prise murale ou autre).
(30) CONNECTEUR CABLE DIN
Ce connecteurs 7-pins DIN vous permet de connecter le pédalier à votre unité via un cable 7pins DIN (fourni). Le branchement du pédalier doit se faire avant la mise sous tension de
votre unité.
FOOTSWITCH
30
31 32 33
Page 23

23
(31) SELECTEUR ULTRA / CRUNCH
Ce sélecteur vous permet de choisir entre les canaux Ultra et Crunch de votre unité. La Led
correspondante s’illuminera quand le canal Ultra est actif, et restera éteinte pour indiquer la
sélection du canal Crunch. Le sélecteur CLEAN(32) doit être sur BYPASS pour pouvoir
activer les canaux Crunch et Ultra.
(32) SELECTEUR DE CANAL CLAIR (CLEAN)
Ce sélecteur vous permet d’activer le canal clair, quelle que soit la position du sélecteur
Ultra/Crunch(31). La Led correspondante s’illuminera quand le canal clair est sélectionné. Ce
sélecteur doit être en position BYPASS (Led éteinte) pour activer les autres canaux Crunch et
Ultra.
(33) SELECTEUR D’EFFETS
Ce sélecteur vous permet d’activer la boucle d’effets de votre unité(16 – 19). La Led
correspondante s’illuminera quand la boucle est active.
Page 24

24
Power Amplifier Section:
Tubes:
Four 6L6GCs with 12AX7 driver
Rated Power and Load:
120 W RMS into 16, 8, or 4 Ohms
Power @ Clipping:
(typically @ 5% THD, 1 kHz, 120 V AC line)
120 W RMS into 16, 8, or 4 Ohms
Frequency Response:
±3 dB 50 Hz to 20 kHz @ 90 W RMS into 8 Ohms
Hum and Noise:
Greater than 76 dB below rated power
Power Consumption:
Domestic: 400 W, 50/60 Hz, 120 V AC
Export: 400 W, 60 Hz, 220-230/240 V AC
Preamp Section:
Tubes:
Three 12AX7s
The following specs are measured @ 1 kHz with the controls
preset as follows:
Low and High EQ @ 10, Mid EQ @ 0
Ultra and Crunch Posts @ 10
Bottom, Body, and Hair EQ @ 5
Effects Send @ 0
Effects Return @ 10
Master Level @ 5
Nominal Levels are with Pre Gain @ 5
Minimum Levels are with Pre Gain @ 10
Clean Channel:
Nominal Input Level: -20 dBV, 100 mV RMS
Minimum Input Level: -30 dBV, 30 mV RMS
Maximum Input Level: 0 dBV, 1.0 mV RMS
Crunch Channel:
Nominal Input Level: -80 dBV, 0.1 mV RMS
Minimum Input Level: -90 dBV, 0.03 mV RMS
Ultra Channel:
Nominal Input Level: -80 dBV, 0.1 mV RMS
Minimum Input Level: -90 dBV, 0.03 mV RMS
Effects Send:
Load Impedance: 47 k Ohms or greater
Minimum Output: -10 dBV, 300 mV RMS
Maximum Output: 0 dBV, 1 V RMS
Effects Return:
Impedance: High-Z, 80 k Ohms
Minimum Input Sensitivity: -10 dBV, 300 mV RMS
Maximum Input Sensitivity: 0 dBV, 1 V RMS
Line Output:
Load Impedance: 47 k Ohms or greater
Adjustable Output: ±20 dBV, 0.1V RMS-10 V RMS
Remote Footswitch:
Special 3-button unit with LED indicators (supplied)
System Hum and Noise @ Nominal Level:
(Clean channel, 20 Hz to 20 kHz unweighted)
Greater than 74 dB below rated power
(Special noise gate circuitry for Ultra & Crunch)
Equalization: (Clean channel only)
Custom Low, Mid, and High passive type EQ
Voicing: (Ultra and Crunch channels only)
Active Bottom, Body, and Hair (Edge) EQ
Boost/Cut ±12 dB
Dimensions and Weight:
11.0" (279 mm) H x 26.5" (673 mm) W x 11.0" (279 mm) D
52 lbs. (23.6 kg)
SPECIFICATIONS
Page 25

25
DEUTSCH
Der Name verrät es bereits: Das neueste Mitglied der Ultra™Tube Series liefert den amtlichen
Röhren-Sound. Nichts für zartbesaitete Gemüter also, sondern für den modernen, anspruchsvollen
Gitarristen – auf den ersten Blick bereits erkennbar an praxisorientierten Features wie High-GainEingang, parallelen Lautsprecherausgängen und vielem mehr. Das ist der Peavey Electronics Triple
XXX.
Der Triple XXX bietet satte 120 Watt Röhrenpower in Reinkultur und dank separater
Lautstärkeregler für alle drei Kanäle plus übergeordnetem Master-Volume-Regler differenzierteste
Steuerungsmöglichkeiten. Für den absoluten Killersound bei optimaler Kontrolle sind Ultra- und
Crunch-Kanal zusätzlich mit Gain-Reglern ausgestattet. Die Klangformung erfolgt im Clean-Kanal
mittels passiver Regler für Tiefen, Mitten und Höhen. Für den Ultra- und Crunch-Kanal kommt
Peaveys exklusive Aktiv-Klangregelung (Regler Bottom, Body und Hair) zum Einsatz. Darüber hinaus verarbeitet der Triple XXX Lasten von 4, 8 und 16 Ohm und eignet sich damit für jede nur
denkbare Boxenkonfiguration. Last but not least zeichnet sich der Bolide durch fußschaltbare
Kanalsteuerung und Effekt-Einschleifweg aus. Konzentrieren Sie sich also ab sofort ganz auf Ihre
Gitarre… und auf Ihren Traum.
EIGENSCHAFTEN
• Drei 12AX7-Vorstufenröhren
• Vier 6L6GC Endstufenröhren, angesteuert via 12AX7
• Endstufe auch für EL34-Röhren geeignet
• Fußschaltbarer Effektweg mit separaten Send- und Return-Reglern
• Dämpfungsschalter (tight, medium, loose)
• Eigens entwickelte Noise-Gate-Schaltung für die Kanäle Ultra und Crunch
• Line-Ausgang mit Pegelregler
• Impedanzwahlschalter für die Lautsprecherausgänge (4, 8 oder 16 Ohm)
• Robuste Schalter (Toggle-Switches) für Power, Standby und Kanalanwahl
• Klassische Netzstatusanzeige
• Verchromte Messing-Regler
Page 26

26
(1) POWER
Mit diesem Wechselschalter schalten Sie den Strom für das Gerät ein oder aus. In der
Schalterstellung ON leuchtet die rote Statusanzeige (3).
(2) STANDBY
Mit diesem Wechselschalter schalten Sie den Verstärker in den STANDBY-Betrieb, d.h. die
Betriebstemperatur der Röhren bleibt erhalten, der Verstärker als solches ist jedoch inaktiv.
Möchten Sie in den aktiven Betrieb wechseln, schalten Sie diesen Schalter in die ONPosition.
(3) POWER-ANZEIGE
Die Netzstatusanzeige leuchtet, wenn die Stromzufuhr des Verstärkers eingeschaltet ist.
(4) MASTER VOLUME
Mit diesem Regler stellen Sie die Gesamtlautstärke des Verstärkers ein. Stimmen Sie zuerst
das Lautstärkeverhältnis der drei Verstärkerkanäle aufeinander ab und bestimmen dann die
Gesamtlautstärke des Verstärkers, indem Sie den Master-Volume-Regler nach links oder
rechts drehen. Mit dem Uhrzeigersinn gedreht erhöht sich die Gesamtlautstärke; gegen den
Uhrzeigersinn gedreht verringert sich die Gesamtlautstärke.
(5) HAIR
Mit diesem Regler stellen Sie in den Kanälen Ultra und Crunch den Höhenanteil ein (aktiver
Shelving-Regler für bis zu 15 dB Anhebung oder Absenkung).
(6) BODY
Mit diesem Regler stellen Sie in den Kanälen Ultra und Crunch den Mittenanteil ein (aktiver
Peak/Notch-Regler für bis zu 15 dB Anhebung oder Absenkung).
(7) BOTTOM
Mit diesem Regler stellen Sie in den Kanälen Ultra und Crunch den Bassanteil ein (aktiver
Shelving-Regler für bis zu 15 dB Anhebung oder Absenkung).
1 2 43 65 87 9 11 12 13 14 15
10
8
FRONT PLATTE
Page 27

27
(8) VOLUME
Mit diesem Regler bestimmen Sie in allen drei Kanälen die Lautstärke des jeweiligen
Verstärkerkanals.
(9) GAIN
Mit diesem Regler bestimmen Sie den Eingangspegel für die Kanäle Ultra und Crunch. Mit
dem Uhrzeigersinn gedreht erhöhen Sie den Verzerrungsgrad des Vorverstärkers und damit
das Sustain.
(10) CHANNEL-LEDs
Diese LEDs dienen der Anzeige des jeweils aktiven Kanals. Rot steht für den Ultra-Modus,
gelb für den Crunch-Modus und grün für den Clean-Modus.
(11) TREBLE
Mit diesem passiven Regler bestimmen Sie den Höhenanteil des Clean-Kanals.
(12) MID
Mit diesem passiven Regler bestimmen Sie den Mittenanteil des Clean-Kanals.
(13) BASS
Mit diesem passiven Regler bestimmen Sie den Bassanteil des Clean-Kanals.
(14) INPUT
Diese 6,3-mm-Klinkenbuchse eignet sich für den Anschluss beliebiger Gitarrenmodelle. Die
Eingangsempfindlichkeit für die Kanäle Ultra und Crunch bestimmen Sie via GAIN-Regler (9).
(15) CHANNEL-SCHALTER
Mit diesem Dreifach-Toggle-Switch wechseln Sie zwischen den drei Verstärkerkanälen, wobei
der jeweilige Betriebszustand anhand der CHANNEL-LEDs (10) angezeigt wird. Darüber hinaus lässt sich der Kanalwechsel auch per Fußschalter durchführen; in diesem Fall muss sich
der CHANNEL-Schalter in der Ultra-Position befinden. (Näheres hierzu finden Sie im
Abschnitt FUSSSCHALTER dieser Bedienungsanleitung.)
(16) EFFECTS SEND-REGLER
Mit diesem kalibrierten Trimregler (0 –10) stellen Sie den an ein externes Effektgerät oder
anderen Signalprozessor ausgegebenen Pegel ein. Mit dem Uhrzeigersinn gedreht erhöht
sich der Signalanteil, gegen den Uhrzeigersinn gedreht verringert er sich. Für ein möglichst
rauschfreies Signal empfiehlt sich eine hohe Einstellung des EFFECTS SEND-Pegels. Als
Anhaltspunkt kann man sagen, dass SEND- und RETURN-Regler stets gegenläufig
RÜCKWÄRT PLATTE
16 17 18 19 20 21 22 23 2524 26 28 29
27
Page 28

28
eingestellt werden sollten. Möchten Sie also einen Arbeitspegel von 0 dB (“Unity Gain”) erzielen, sollte der EFFECTS RETURN-Pegel bei niedrigem EFFECTS SEND-Pegel (16)
entsprechend hoch eingestellt sein. Möchten Sie hingegen eine Anhebung der
Gesamtlautstärke erreichen, stellen Sie beide Regler höher ein.
(17/18) EFFECTS SEND / EFFECTS RETURN
Diese beiden 6,3-mm-Monoklinkenbuchsen dienen der Anbindung externer Effektgeräte oder
anderer Signalprozessoren. Führen Sie zu diesem Zweck ein abgeschirmtes Kabel mit 6,3mm-Monoklinkensteckern von der EFFECTS SEND-Buchse (17) zum Eingang des externen
Geräts und ein weiteres vom Ausgang des Geräts zur EFFECTS RETURN-Buchse (18).
Derartige Einschleifwege (“Effektwege”) eignen sich für alle Prozessoren, die das Signal nicht
zusätzlich verstärken (Chorus, Delay, Reverb etc.). Bei Verwendung des Fußschalters
aktivieren Sie den Einschleifweg über den EFFECTS-Schalter (33). (Näheres hierzu finden
Sie im Abschnitt FUSSSCHALTER dieser Bedienungsanleitung.)
(19) EFFECTS RETURN-REGLER
Mit diesem kalibrierten Trimregler (0 –10) stellen Sie den von einem externen Effektgerät
oder anderen Signalprozessor zurückgeführten Signalpegel ein. Mit dem Uhrzeigersinn
gedreht erhöht sich der Signalanteil, gegen den Uhrzeigersinn gedreht verringert er sich.
Auch hier gilt, dass SEND- und RETURN-Regler stets gegenläufig eingestellt werden sollten.
Für ein möglichst rauschfreies Signal empfiehlt sich eine hohe Einstellung des SEND-Pegels
bei entsprechend niedriger Einstellung des RETURN-Pegels.
(20) REMOTE SWITCH
An diese 7-polige DIN-Buchse schließen Sie den Fußschalter an. Beachten Sie, dass die
Kabelverbindung bei Einschalten des Verstärkers bereits bestehen sollte. (Näheres hierzu
finden Sie im Abschnitt FUSSSCHALTER dieser Bedienungsanleitung.)
(21) BIAS TEST
Diese Anschlüsse sind für das Einmessen der Endstufenröhren (Bias-Abgleich) des
Verstärkers vorgesehen. Zu diesem Zweck befindet sich hinter der rückwärtigen
Verstärkerabdeckung ein spezieller Regler, dessen Einstellung jedoch nur vom Fachmann
verändert werden sollte.
(22) DAMPING
Mit diesem Dreifach-Schalter stellen Sie den Dämpfungsfaktor ("Damping") des Verstärkers
ein. Der Begriff Dämpfung bezeichnet die Eigenschaft eines Verstärkers, die Auslenkung der
Lautsprechermembran nach Abklingen eines Signals zu steuern. Ein hoher Dämpfungsfaktor
(TIGHT) bewirkt ein schnelleres Ende des Ausschwingvorgangs als ein niedriger (LOOSE).
Vergleichbar ist diese Funktion mit dem gleichzeitigen Betätigen der Resonance- und
Presence-Regler anderer Peavey-Verstärker. Jede Veränderung des DAMPING-Schalters
zieht eine Lautstärkeänderung nach sich, die gegebenenfalls kompensiert werden sollte.
(23) CABINET IMPEDANCE
Mit diesem Dreifach-Schalter stellen Sie die Lautsprecherimpedanz ein. Bei Anschluss zweier
Lautsprecherboxen mit identischen Impedanzwerten setzen Sie diesen Schalter auf den halben Wert einer Box. Bei zwei 16-Ohm-Boxen stellen Sie den Impedanzwahlschalter also auf
8 Ohm ein, bei zwei 8-Ohm-Boxen auf 4 Ohm (Mindestimpedanz 4 Ohm).
Page 29

29
(24) SPEAKER OUTPUTS
An diese beiden parallelgeschalteten 6,3-mm-Monoklinkenbuchsen schließen Sie die
Lautsprecherbox(en) an, wobei die Mindestimpedanz 4 Ohm beträgt. Stellen Sie den
Impedanzwahlschalter (CABINET IMPEDANCE, 23) stets so ein, dass er der Impedanz der
verwendeten Lautsprecherbox(en) entspricht.
(25) LINE OUT LEVEL
Mit diesem Regler bestimmen Sie den Signalpegel für den LINE-Ausgang (LINE OUT, 26),
z.B. wenn Sie die Lautstärke einer zweiten, via LINE OUT (26) als "Slave" angesteuerten
Leistungsverstärker/Lautsprecher-Kombination an den Pegel der via SPEAKER OUTPUTS
(24) direkt angesteuerten Lautsprecher angleichen möchten.
(26) LINE OUT
Diese 6,3-mm-Monoklinkenbuchse bietet die Möglichkeit, das Endstufensignal des
Verstärkers abzugreifen, um z.B. unter Beibehaltung der Klangcharakteristik eine weitere
Leistungsverstärker/Lautsprecher-Kombination anzusteuern.
(27) FUSE (NETZSICHERUNG)
Die Netzsicherung befindet sich in der Sicherungshalterung. Sollte die Sicherung auslösen,
ist es unbedingt erforderlich, sie durch eine gleichartige Sicherung zu ersetzen, da das Gerät
sonst ernstlichen Schaden nehmen kann und Ihr Garantieanspruch erlischt. Falls die
Sicherung wiederholt auslöst, sollten Sie das Gerät unbedingt durch einen qualifizierten
Service-Techniker überprüfen lassen.
WARNUNG: ERSETZEN SIE DIE NETZSICHERUNG AUSSCHLIESSLICH BEI GEZOGENEM NETZSTECKER!
(28) GROUND POLARITY
Für die meisten Anwendungen sollte sich dieser Dreifach-Wippschalter in Mittelposition
(Nullposition) befinden. Eventuelles Brummen lässt sich durch Umschalten des
Polaritätswahlschalters in die positive (+) bzw. negative (-) Position minimieren. Bei anhaltenden Brummproblemen wenden Sie sich an einen Peavey-Vertragshändler, direkt an
Peavey oder an einen qualifizierten Service-Techniker.
(29) IEC MAINS
An diese Normbuchse schließen Sie das im Lieferumfang enthaltene, den Spannungswerten
Ihres Landes entsprechende Netzkabel an. Stellen Sie stets zuerst die verstärkerseitige
Verbindung her, bevor Sie das Kabel in die Netzsteckdose stecken.
Entfernen oder umgehen Sie an Ihrem Equipment niemals die Erdleiter, da diese Ihrer
Sicherheit dienen.
Page 30

30
(30) REMOTE CABLE
An diese 7-polige DIN-Buchse schließen Sie das im Lieferumfang enthaltene FußschalterAnschlusskabel an und verbinden es mit dem Fußschaltereingang des Verstärkers (REMOTE
SWITCH, 20). Beachten Sie, dass die Kabelverbindung bei Einschalten des Verstärkers bereits bestehen sollte.
(31) ULTRA/CRUNCH
Mit diesem Schalter wechseln Sie zwischen den Verstärkerkanälen Ultra und Crunch, wobei
die Anwahl des Ultra-Kanals durch die zugehörige LED angezeigt wird. Leuchtet die LED
nicht, ist der Crunch-Kanal aktiviert. Beachten Sie, dass sich der Schalter für den CLEANKanal (32) bei Anwahl des Ultra- bzw. Crunch-Kanals im BYPASS-Modus befinden muss.
(32) CLEAN
Mit diesem Schalter wählen Sie unabhängig von der Position des ULTRA/CRUNCHWahlschalters (31) den Clean-Kanal an, wobei die Aktivierung des Clean-Kanals durch die
zugehörige LED angezeigt wird. Beachten Sie, dass sich dieser Schalter vor Betätigen des
ULTRA/CRUNCH-Wahlschalters (31) im BYPASS-Modus befinden muss (d.h. die LED für
den Clean-Kanal leuchtet nicht).
(33) EFFECTS
Mit diesem Schalter aktivieren Sie den Effektweg des Verstärkers (16 – 19), angezeigt durch
die zugehörige LED.
FUSSSCHALTER
30
31 32 33
Page 31

31
Leistungsverstärker:
Röhren:
4 x 6L6GC, 12AX7 Treiberröhre
Nennleistung und -Last:
120 W RMS an 16, 8 oder 4 Ohm
Leistung @ Übersteuerungsgrenze:
(typisch 5% Gesamtklirrfaktor [THD], 1 kHz, 120 V AC)
120 W RMS an 16, 8 oder 4 Ohm
Frequenzgang:
±3 dB, 50 Hz … 20 kHz @ 90 W RMS an 8 Ohm
Rauschabstand:
> 76 dB unter Nennleistung
Stromversorgung:
USA: 400 W, 50/60 Hz, 120 V AC
Export: 400 W, 60 Hz, 220-230/240 V AC
Vorverstärker:
Röhren:
3 x 12AX7
Technische Daten gemessen bei 1 kHz mit folgender
Einstellung:
EQ (Tiefen/Höhen):10; EQ (Mitten): 0
Ultra/Crunch: 10
EQ (Bottom, Body, Hair): 5
Effects Send: 0
Effects Return: 10
Master Level: 5
Pre Gain (Nennpegel): 5
Pre Gain (min. Pegel): 10
Clean-Kanal:
Eingangspegel (nominal): -20 dBV, 100 mV RMS
Eingangspegel (min.): -30 dBV, 30 mV RMS
Eingangspegel (max.): 0 dBV, 1,0 mV RMS
Crunch-Kanal:
Eingangspegel (nominal): -80 dBV, 0,1 mV RMS
Eingangspegel (min.): -90 dBV, 0,03 mV RMS
Ultra-Kanal:
Eingangspegel (nominal): -80 dBV, 0,1 mV RMS
Eingangspegel (min.): -90 dBV, 0,03 mV RMS
Effects Send:
Lastimpedanz: 47 kOhm oder höher
Ausgangsleistung (min.): -10 dBV, 300 mV RMS
Ausgangsleistung (max.): 0 dBV, 1 V RMS
Effects Return:
Impedanz: hochohmig, 80 kOhm
Eingangsempfindlichkeit (min.): -10 dBV, 300 mV RMS
Eingangsempfindlichkeit (max.): 0 dBV, 1 V RMS
Line-Ausgang:
Lastimpedanz: 47 kOhm oder höher
Ausgang (regelbar): ±20 dBV, 0,1 ... 10 V RMS
Fußschalter:
Spezieller 3-Tasten-Fußschalter mit LED-Anzeigen (im
Lieferumfang enthalten)
Gesamt-Rauschabstand @ Nennpegel:
(Clean-Kanal, 20 Hz … 20 kHz unbewertet)
> 74 dB unter Nennleistung
(Spezielle Rauschunterdrückung für Ultra- und Crunch-Kanal)
Equalizer: (Clean-Kanal)
Spezieller passiver EQ mit Tiefen-, Mitten- und Höhenregelung
Klangcharakteristiken: (Ultra- und Crunch-Kanal)
Aktiver EQ: Klangregelung Bottom, Body und Hair (Edge)
Anhebung/Absenkung ±12 dB
Abmessungen und Gewicht:
279 mm (H) 673 mm (B) x 279 mm (T)
23,6 kg
TECHNISCHE DATEN
Page 32

32
NOTES:
Page 33

NOTES:
33
Page 34

34
PEAVEY ELECTRONICS CORPORATION LIMITED WARRANTY
Effective Date: July 1, 1998
What This Warranty Covers
Your Peavey Warranty covers defects in material and workmanship in Peavey products purchased and serviced in the U.S.A. and Canada.
What This Warranty Does Not Cover
The Warranty does not cover: (1) damage caused by accident, misuse, abuse, improper installation or operation, rental, product modification or neglect; (2) damage occurring during shipment; (3) damage caused by repair or service performed by persons not authorized by Peavey; (4) products on
which the serial number has been altered, defaced or removed; (5) products not purchased from an Authorized Peavey Dealer.
Who This Warranty Protects
This Warranty protects only the original retail purchaser of the product.
How Long This Warranty Lasts
The Warranty begins on the date of purchase by the original retail purchaser. The duration of the Warranty is as follows:
Product Category Duration
Guitars/Basses, Amplifiers, Pre-Amplifiers, Mixers, Electronic
Crossovers and Equalizers 2 years *(+ 3 years)
Drums 2 years *(+ 1 year)
Enclosures 3 years *(+ 2 years)
Digital Effect Devices and Keyboard and MIDI Controllers 1 year *(+ 1 year)
Microphones 2 years
Speaker Components (incl. speakers, baskets, drivers,
diaphragm replacement kits and passive crossovers)
and all Accessories 1 year
Tubes and Meters 90 days
[*Denotes additional warranty period applicable if optional Warranty Registration Card is completed and returned to Peavey by original retail purchaser within
90 days of purchase.]
What Peavey Will Do
We will repair or replace (at Peavey's discretion) products covered by warranty at no charge for labor or materials. If the product or component must
be shipped to Peavey for warranty service, the consumer must pay initial shipping charges. If the repairs are covered by warranty, Peavey will pay the
return shipping charges.
How To Get Warranty Service
(1) Take the defective item and your sales receipt or other proof of date of purchase to your Authorized Peavey Dealer or Authorized Peavey
Service Center.
OR
(2) Ship the defective item, prepaid, to Peavey Electronics Corporation, International Service Center, 412 Highway 11 & 80 East, Meridian, MS 39301
or Peavey Canada Ltd., 95 Shields Court, Markham, Ontario, Canada L3R 9T5. Include a detailed description of the problem, together with a copy of
your sales receipt or other proof of date of purchase as evidence of warranty coverage. Also provide a complete return address.
Limitation of Implied Warranties
ANY IMPLIED WARRANTIES, INCLUDING WARRANTIES OF MERCHANTABILITY AND FITNESS FOR A PARTICULAR PURPOSE, ARE LIMITED
IN DURATION TO THE LENGTH OF THIS WARRANTY.
Some states do not allow limitations on how long an implied warranty lasts, so the above limitation may not apply to you.
Exclusions of Damages
PEAVEY'S LIABILITY FOR ANY DEFECTIVE PRODUCT IS LIMITED TO THE REPAIR OR REPLACEMENT OF THE PRODUCT, AT PEAVEY'S
OPTION. IF WE ELECT TO REPLACE THE PRODUCT, THE REPLACEMENT MAY BE A RECONDITIONED UNIT. PEAVEY SHALL NOT BE
LIABLE FOR DAMAGES BASED ON INCONVENIENCE, LOSS OF USE, LOST PROFITS, LOST SAVINGS, DAMAGE TO ANY OTHER EQUIPMENT
OR OTHER ITEMS AT THE SITE OF USE, OR ANY OTHER DAMAGES WHETHER INCIDENTAL, CONSEQUENTIAL OR OTHERWISE, EVEN IF
PEAVEY HAS BEEN ADVISED OF THE POSSIBILITY OF SUCH DAMAGES.
Some states do not allow the exclusion or limitation of incidental or consequential damages, so the above limitation or exclusion may not
apply to you.
This Warranty gives you specific legal rights, and you may also have other rights which vary from state to state.
If you have any questions about this warranty or service received or if you need assistance in locating an Authorized Service Center, please contact
the Peavey International Service Center at (601) 483-5365 / Peavey Canada Ltd. at (905) 475-2578.
Features and specifications subject to change without notice.
Page 35

35
IMPORTANT SAFETY INSTRUCTIONS
WARNING: When using electric products, basic cautions should always be followed, including the following:
1. Read all safety and operating instructions before using this product.
2. All safety and operating instructions should be retained for future reference.
3. Obey all cautions in the operating instructions and on the back of the unit.
4. All operating instructions should be followed.
5. This product should not be used near water (i.e., a bathtub, sink, swimming pool, wet basement, etc.)
6. This product should be located so that its position does not interfere with its proper ventilation. It should not be placed flat against a wall
or placed in a built-in enclosure that will impede the flow of cooling air.
7. This product should not be placed near a source of heat such as a stove, radiator, or another heat producing amplifier.
8. Connect only to a power supply of the type marked on the unit adjacent to the power supply cord.
9. Never break off the ground pin on the power supply cord. For more information on grounding, write
for our free booklet “Shock Hazard and Grounding."
10. Power supply cords should always be handled carefully. Never walk on or place equipment on power supply cords. Periodically check cords
for cuts or signs of stress, especially at the plug and the point where the cord exits the unit.
11. The power supply cord should be unplugged when the unit is to be unused for long periods of time.
12. If this product is to be mounted in an equipment rack, rear support should be provided.
13. Metal parts can be cleaned with a damp rag. The vinyl covering used on some units can be cleaned with a damp rag or an ammonia-based
household cleaner if necessary. Disconnect unit from power supply before cleaning.
14. Care should be taken so that objects do not fall and liquids are not spilled into the unit through the ventilation holes or any other openings.
15. This unit should be checked by a qualified service technician if:
a. The power supply cord or plug has been damaged.
b. Anything has fallen or been spilled into the unit.
c. The unit does not operate correctly.
d.The unit has been dropped or the enclosure damaged.
16. The user should not attempt to service this equipment. All service work should be done by a qualified service technician.
17. This product should be used only with a cart or stand that is recommended by Peavey Electronics.
18. Exposure to extremely high noise levels may cause a permanent hearing loss. Individuals vary considerably in susceptibility to noise induced
hearing loss, but nearly everyone will lose some hearing if exposed to sufficiently intense noise for a sufficient time. The U.S. Government’s
Occupational Safety and Health Administration (OSHA) has specified the following permissible noise level exposures.
Duration Per Day In Hours Sound Level dBA, Slow Response
890
692
495
397
2 100
1 1/2 102
1 105
1/2 110
1/4 or less 115
According to OSHA, any exposure in excess of the above permissible limits could result in some hearing loss. Ear plugs or protectors for the ear
canals or over the ears must be worn when operating this amplification system in order to prevent a permanent hearing loss if exposure is in excess
of the limits as set forth above. To ensure against potentially dangerous exposure to high sound pressure levels, it is recommended that all persons
exposed to equipment capable of producing high sound pressure levels such as this amplification system be protected by hearing protectors while
this unit is in operation.
SAVE THESE INSTRUCTIONS!
Page 36

Features and specifications subject to change without notice.
Peavey Electronics Corporation • 711 A Street • Meridian • MS • 39301
(601) 483-5365 • FAX (601) 486-1278 • www.peavey.com
©2001 Printed in the U.S.A. 7/01
80304881
 Loading...