

Page 1
Page 2
A
Intended to alert the user to the presence of uninsulated “dangerous voltage” within the product’s enclosure
that may be of sufficient magnitude to constitute a risk of electric shock to persons.
A
Intended to alert the user of the presence of important operating and maintenance (servicing) instructions in the
literature accompanying the product.
CAUTION: Risk of electrical shock - DO NOT OPEN!
CAUTION: To reduce the risk of electric shock, do not remove cover. No user serviceable parts inside. Refer servicing to
qualified service personnel.
WARNING: To prevent electrical shock or fire hazard, do not expose this appliance to rain or moisture. Before using this
appliance, read the operating guide for further warnings.
A
Este simbolo tiene el proposito de alertar al usuario de la presencia de
“(voltaje)
peligroso” que no tiene
aislamiento dentro de la caja
de1
product0 que puede tener una magnitud suficiente coma
para
constituir riesgo de
corrientazo.
A
Este simbolo tiene el proposito de alertar al usario de la presencia de instruccones importantes sobre la operation
y mantenimiento en la literatura que viene con el
producto.
PRECAUCION: Riesgo de corrientazo - No
abra.
PRECAUCION:
Para
disminuir el riesgo de corrientazo, no
abra
la cubierta. No hay piezas adentro que el usario pueda
reparar. Deje todo mantenimiento a
10s
tecnicos calificados.
ADVERTENCIA:
Para
evitar corrientazos o peligro de incendio, no deje expuesto a la lluvia o humedad este aparato
Antes de usar este aparato, lea
mas
advertencias en la guia de operation.
IA
Ce symbole est utilise pur indiquer a l’utilisateur la presence a
l’interieur
de ce produit de tension non-isolee
dangereuse pouvant
etre d’intensite
suffisante pour constituer un risque de
choc electrique.
A
Ce symbole est utilise pour indiquer a l’utilisateur qu’il ou qu’elle trouvera d’importantes instructions sur
l’utilisation et l’entretien (service) de l’appareil dans la litterature accompagnant le produit.
ATTENTION: Risques de
choc
electrique - NE PAS OUVRIR!
ATTENTION: Afin de reduire le risque de choc electrique, ne pas enlever le couvercle. 11 ne se trouve a
l’interieur
aucune piece pouvant
etre reparee
par l’utilisateur. Confier I’entretien a un personnel qualifie.
AVERTISSEMENT: Afin de prevenir les risques de decharge electrique ou de feu,
n’exposez
pas cet appareil a la pluie
ou a
l’humidite.
Avant d’utiliser cet appareil, lisez les avertissements supplementaires situ& dans le guide.
A
Dieses Symbol
sol1
den Anwender vor unisolierten gefahrlichen Spannungen innerhalb des Gehauses
warnen,
die
von Ausreichender
St8rke
sind,
urn
einen elektrischen Schlag verursachen zu konnen.
A
Dieses Symbol
sol1
den Benutzer auf wichtige Instruktionen in der Bedienungsanleitung aufmerksam machen, die
Handhabung und Wartung des Produkts betreffen.
VORSICHT: Risiko - Elektrischer Schlag! Nicht offnen!
VORSICHT:
Urn
das Risiko eines elektrischen Schlages zu vermeiden, nicht die Abdeckung enfernen. Es befinden
sich
keine Teile darin, die vom Anwender repariert werden kiinnten. Reparaturen nur von qualifiziertem Fachpersonal
durchfiihren
lassen.
ACHTUNG:
Urn
einen elektrischen Schlag oder Feuergefahr zu vermeiden, sollte dieses Gerat nicht dem Regen oder
Feuchtigkeit ausgesetzt werden. Vor Inbetriebnahme unbedingt die Bedienungsanleitung lesen.
2
Page 3
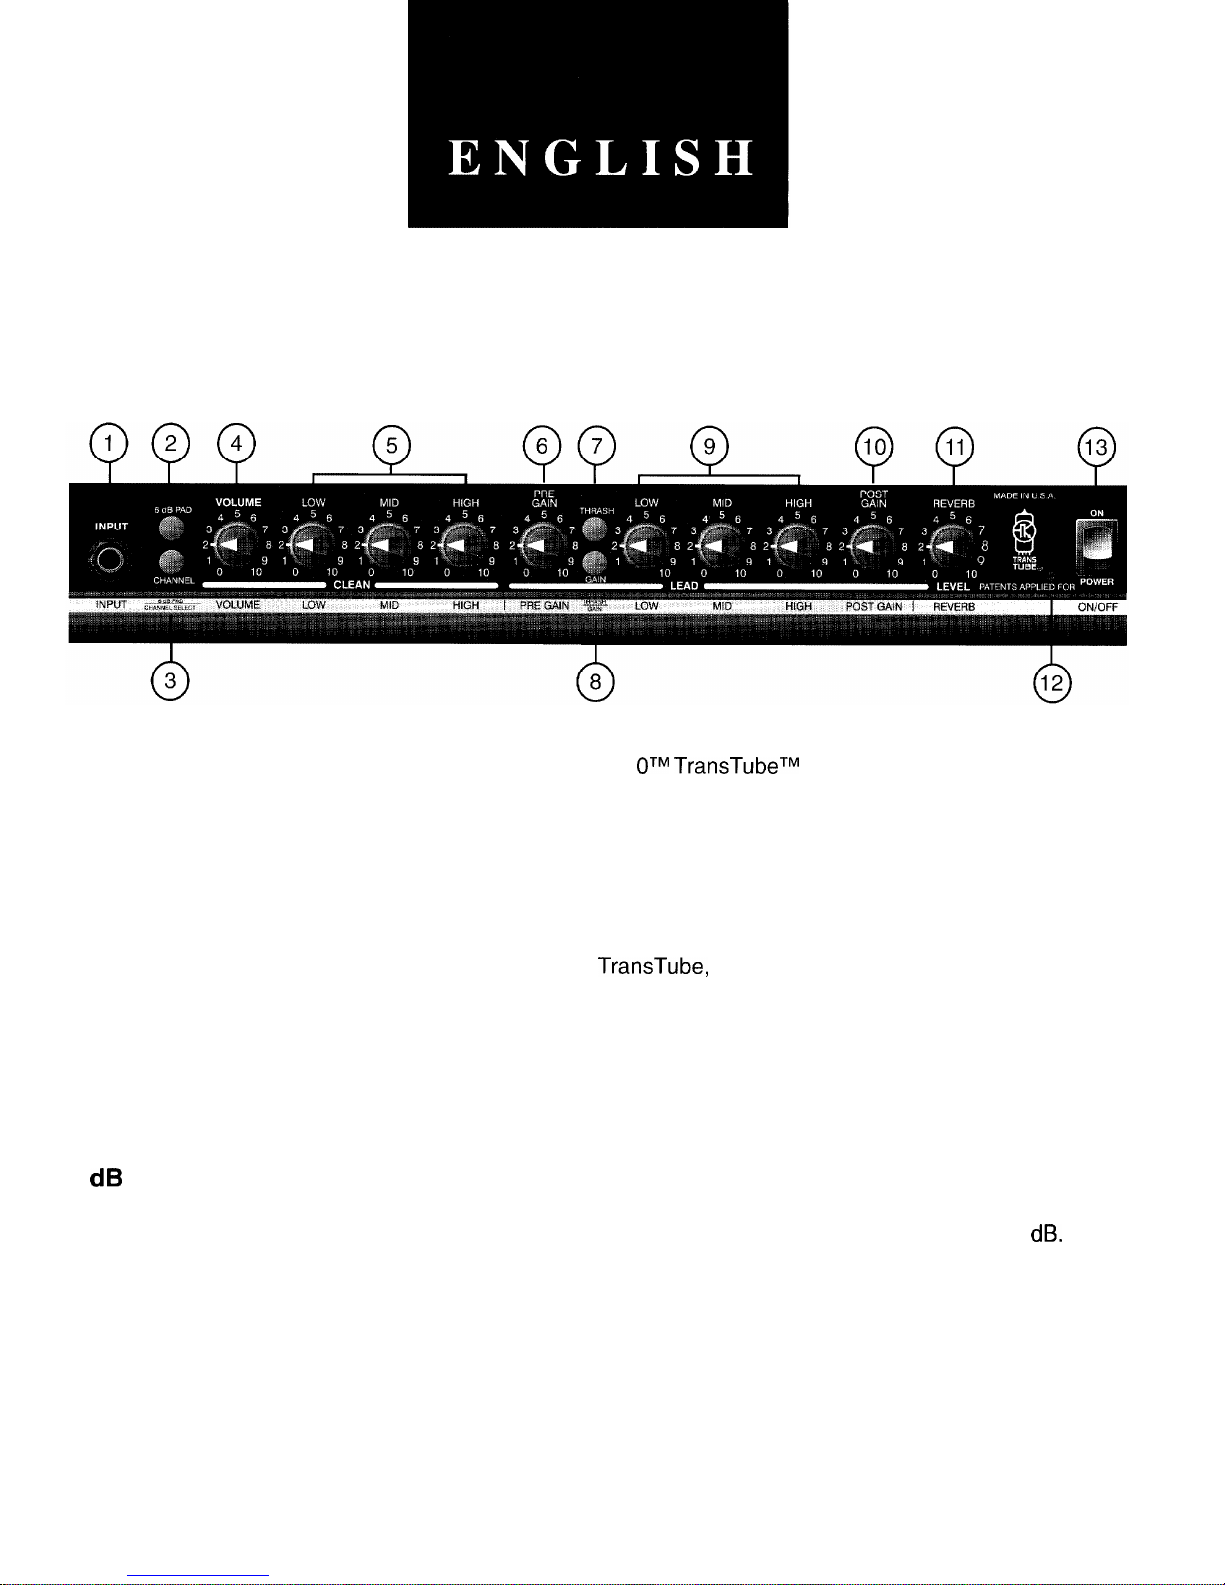
Congratulations on your purchase of the all new Envoy 11
OTM TransTubeTM
Series. This amp represents
years of research on vacuum tube emulation, resulting in a totally new Envoy. The preamp has been redesigned using patent-applied for technology that redefines tube-like distortion and harmonic generation in
solid-state amps.
The new T. Dynamics circuitry, also awaiting several patents, creates the long sought for tube power compression phenomenon. This, when combined with the preamp circuitry, yields the closest tube amp simulation to date.
To further enhance the performance of the Envoy 110 TransTube, an external speaker jack is provided along
with a preamp out jack for greater flexibility.
Front Panel:
INPUT (1)
This input will accept signals from all types of guitar pickups.
6 dB PAD SWITCH (2)
Provided for instruments that have extremely high output, which can result in overdriving (distorting) the
input gain stage. Depressing the switch to its “in” position reduces the level of the input signal by 6
dB.
CHANNEL SELECT SWITCH (3)
Allows selection of the Lead or Clean channel. The “in” position of the switch selects the Lead channel and
the “out” position selects the Clean channel.
NOTE: Channel selection may also be achieved by the remote footswitch. If remote selection is desired, the
channel switch must be in the “in” (Lead) position.
VOLUME (4)
Controls the volume level of the Clean channel.
3
Page 4

LOW, MID, and HIGH EQ - CLEAN CHANNEL (5)
Passive tone controls that regulate the low, mid, and high frequencies of the Clean channel.
PRE GAIN (6)
Controls the input gain of the Lead channel.
THRASH SWITCH (7)
Notches the mid range about 20
dB.
GAIN SWITCH (8)
Boosts the overall system gain. Depress to the “in” position to activate.
LOW, MID, and HIGH EQ - LEAD CHANNEL (9)
Passive tone controls that regulate the low, mid, and high frequencies of the Lead channel.
POST GAIN
(10)
Controls the overall volume level of the lead channel. The final level adjustment should be made after the
desired sound has been achieved.
REVERB LEVEL (11)
Controls the overall reverb level.
POWER LED (12)
Illuminates when AC power is being supplied to the amp.
POWER SWITCH (13)
Depress the switch to the “on” position. The red LED will illuminate indicating power is being supplied to the
unit.
Back Panel:
0
14
LINE CORD (120 V products only) (14)
For your safety, we have incorporated a 3-wire line (mains) cable with proper grounding facilities. It is not
advisable to remove the ground pin under any circumstances. If it is necessary to use the equipment without
proper grounding facilities, suitable grounding adaptors should be used. Less noise and greatly reduced
shock hazard exists when the unit is operated with the proper grounded receptacles
EXTERNAL SPEAKER JACK (15)
A
Provided for connection of external speaker cabinet. Minimum total impedance is 8 ohms.
Disconnects internal speaker when used.
PREAMP OUT (16)
The preamp output can be used to route the amplified signal to a mixing console, tape recorder, etc. Connect the preamp output using a shielded cable to an input of the tape recorder, mixer, etc. This patch does
not affect the operation of the amplifier.
REMOTE SWITCH JACK (17)
Provided for the connection of the optional remote footswitch. The footswitch is used to select the Lead or
Clean channel and defeat Reverb. When using remote footswitch, always insert plug fully (second click) to
insure proper operation.
NOTE: The Channel Select switch must be in the “in” position in order for the footswitch to function properly.
4
Page 5

SPECIFICATIONS
Rated Power and Load:
Preamp Low Gain Input:
40 W RMS into 6 ohms
4 ohms not recommended
Power at Clipping: (typically)
Impedance: High-Z, 44 k
ohms
Nominal Input Level:
-12
dBV,
240 mV RMS
Minimum Input Level:
-24
dBV,
60 mV RMS
Maximum Input Level:
6
dBV,
2 V RMS
(5% THD, 1
kHz,
120 V AC line)
40 W RMS into 6 ohms
Preamp Output:
Frequency Response:
Lead Impedance: 1 k ohm or greater
Nominal Output Level: 0
dBV, 1
V RMS
+O,
3
dB,
60 Hz to 20
kHz
at 25 W RMS into 6 ohms
System Hum & Noise at Nominal Input Level:
Power Consumption:
(20 Hz to 20
kHz
unweighted)
68 dB below rated power
Domestic: 75 watts, 50/60 Hz, 120 V AC
Export: 75 watts, 60 Hz, 220-230/240 V AC
PREAMP SECTION
Equalization:
Special low, mid, & high passive type
EQ
Push Thrash: -20 dB notch at 1
kHz
in Lead
channel
The following
specs
preset
as follows:
are
measured
at 2
kHz with the controls
Push Gain: Increases Lead gain
Channel Select Normal
(out)
Low &
High at
IO
External Footswitch Functions:
MidatO
-
Pre & Post Gain at
10
Gain & Thrash,
Off
(out)
Normal
levels are with
normal
volume at 5
Minimum levels
are with
normal
volume at
10
Preamp High Gain Input:
Impedance: High-Z, 1 M ohm
Nominal Input Level:
-18
dBV,
120 mV RMS
Minimum Input Level: -30
dBV,
30 mV RMS
Maximum Input Level: 0
dBV, 1
V RMS
featurm
and
Due to our efforts for- constant improvements,
specifications listed herein are subject to change
Lead Channel Defeat (when selected
with
button)
Reverb Defeat
TECHNOLOGY
PATENTS
AI’I’LIED FOR
without notice.
5
Page 6

dl4V
WMOd
r
WHO 9
tWW3dS
lVNtl3lNI
3NOl
NV313
4
13NNVH3
HSrld
HSWHI
HSfki
NIV3
HSnd
--
1fIdNl
d
1SOd
IHaw 07
NIV3
H3lH
Page 7

Tone Settings
VOLUME
LOW
MID
HI(;H
PRE GAIN
MID
HIGH
POST GAIN
CLEAN
LEAD
“IN”
CLEAN
METAL
“OUT”
VOLUME
MID HIGH
PRE GAIN
I‘IIKASH
I,OW
MID
HIGIl
POST
GAIN
CLEAN
LEAD
“OUT”
JAZZ
MEDIUM DISTORTION
“OUT”
VOLUME
MID
HIGH
PRE GAIN
MID
HIGH
POST GAIN
456
CLEAN
LEAD
“OUT”
CLEAN BLUES
DIRTY BLUES
7
Page 8

Consulte
10s
diagramas
de1
panel delantero
y
detrhs
en la
seccih
de
inglbs
de este manual.
Felicidades por tu compra
del
totalmente nuevo Envoy
llOTM
de la Serie
TransTubeTM.
Este amplificador
representa anos de
investigation
sobre la
emulation
de tubos de vacio, que tienen
coma
resultado el nuevo
Envoy. El preamplificador ha sido redisenado usando tecnologia de Patente solicitada que redefine la
distorsion y
generation
armonica similares a
las
que producen
10s
bulbos en amplificadores de estado
solido.
Los nuevos circuitos T. Dynamics, que tambien esperan varias patentes, crean el tan buscado fenomeno de
compresion de potencia de
10s
bulbos. Esto, combinado con
10s
circuitos del preamplificador, ofrece la
simulation
de amplificador de bulbos
mas
calida a la fecha.
Para mejorar sun
m&s el
desempeno del Envoy 110 TransTube, se ofrece un enchufe
para
altavoz externo
junto con un enchufe de salida del preamplificador para una mayor flexibilidad.
Tablero Frontal:
INPUT (Entrada) (1)
Esta entrada aceptara senales de todo tipo de pastillas de guitarra.
6 dB PAD SWITCH (Interruptor de atenuador de 6
dB)
(2)
Se proporciona para instrumentos que tienen una salida extremadamente alta,
10s
cuales pueden causar
que se distorsione la etapa de ganancia de entrada. Oprimir el
baton
a la
position
‘W’ reduce el nivel de la
sehal de entrada en 6
dB.
CHANNEL SELECT SWITCH (Interruptor selector de canal) (3)
Permite la
selection
de
10s
canales de Solo o Limpio. La
position
“in” selecciona el canal de Solo y la
position
“out” selecciona el canal Limpio
NOTA:
Tambien se puede lograr la
selection
de canal por medio del interruptor de pedal remoto. Si se
desea la
selection
remota, el interruptor de canal debe estar en la posicicn “in” (de Solo).
VOLUME (Volumen) (4)
Controla el nivel de volumen del canal Limpio.
LOW, MID, and HIGH EQ - CLEAN CHANNEL (Ecualizador de Graves, Medios y Agudos
-
canal Limpio) (5)
Controles pasivos de tono que regulan
las
frecuencias bajas, medias y altas del canal Limpio.
PRE GAIN (Pre-ganancia) (6)
Controla la ganancia de la entrada del canal de Solo.
THRASH SWITCH (Interruptor de muesca) (7)
Cotta el rango intermedio en cerca de 20
dB.
GAIN SWITCH (Interruptor de ganancia) (8)
Refuerza la ganancia global del sistema. Oprimelo a la
position
“in” para activarlo.
8
Page 9

LOW, MID, and HIGH EQ - LEAD CHANNEL (Ecualizador de Graves, Medios y Agudos
-
canal de Solo) (9)
Controles pasivos de tono que regulan
las
frecuencias bajas, medias y altas del canal de Solo.
POST GAIN (Post-ganancia)
(10)
Controla el nivel de volumen global del canal de solo. El ajuste final de volumen debe hacerse despues de
lograr el sonido deseado.
REVERB LEVEL (Nivel de reverberation) (11)
Controla el nivel de
reverberation
global.
POWER LED (Indicador LED de encendido) (12)
Se enciende cuando se alimenta energia de CA al amplificador.
POWER SWITCH (Interruptor de encendido) (13)
Oprime el interruptor a la
position LLon”.
El indicador LED rojo se encendera indicando que se esta
alimentando energia a la unidad.
Tablero Trasero:
LINE CORD (Cable de corriente -
productos
de
120
volts solamente) (14)
Para tu seguridad, hemos incorporado un cable para alimentacion de corriente de 3 conductores con
10s
elementos apropiados
para
la conexion a tierra. En ninguna circunstancia es aconsejable retirar la varilla de
tierra. Si es necesario operar el equip0 sin
las
instalaciones apropiadas de conexion a tierra, deberan
usarse adaptadores de conexion a tierra idoneos. Habra menos ruido y mucho menor peligro de choques
electricos si la unidad se opera con
las
instalaciones adecuadas de
conexicn
a tierra.
EXTERNAL SPEAKER JACK (Enchufe
para
altavoz externo) (15)
A
Se proporciona para la conexion de una caja acustica externa. La impedancia minima total
es de 8 ohms. Cuando se
usa,
se desconecta automaticamente el altavoz interno.
PREAMP OUT
(Salida del
preamplificador) (16)
La salida del preamplificador puede usarse para dirigir la serial amplificada a una consola mezcladora,
grabadora de cinta, etc. Conecta la salida del preamplificador usando un cable blindado a la entrada de una
grabadora de cinta, mezcladora, etc. Esta conexion no afecta el funcionamiento del amplificador.
REMOTE SWITCH JACK (Enchufe
para el
interruptor remoto) (17)
Se proporciona para el interruptor de pedal remoto
optional.
El interruptor de pedal se
usa
para seleccionar
entre
10s
canales de Solo o Limpio y para anular la
Reverberation.
Cuando uses el interruptor de pedal
remoto, siempre inserta totalmente la clavija
(Segundo “clic”)
para asegurar un funcionamiento adecuado.
NOTA: El Interruptor selector de canal debe estar en la
position
“in” para que el interruptor de pedal
funcione adecuadamente.
9
Page 10

Veuillez vous
r6f6rer
au “front panel art” et “back panel art”
situ6 dans la section en langue anglaise de ce manuel.
Nous vous felicitons de votre achat du tout nouveau Envoy
llOTM
de la serie
TransTubeTM.
Le nouvel
amplificateur Envoy est le fruit de nombreuses annees de recherche sur I’emulation de tubes a vide. Le
preamplificateur a ete completement reconfigure a I’aide d’une technologie en attente de brevet, qui redefinit
la distorsion a effet de tubes et la production d’harmonies des amplificateurs a semi-conducteurs.
Les nouveaux circuits T. Dynamics, egalement en attente de brevet, creent I’effet tant attendu de compression
g&r&e
par tubes, et, en combinaison avec
les
circuits du preamplificateur, offrent une simulation
d’amplification par tubes inegalee.
Un jack externe pour haut-parleurs et un jack de sortie du preamplificateur permettent d’ameliorer
les
performances de I’Envoy 110 TransTube, tout en off rant une grande souplesse d’emploi.
Panneau Avant:
INPUT (Entree) (1)
Cette entree accepte
les
signaux de toutes sortes de guitares.
6 dB PAD SWITCH (Commutateur a tampon 6
dB)
(2)
Ce commutateur est fourni pour
les
instruments ayant une sortie tres elevee, ce qui peut produire une
distorsion du gain d’entree. En appuyant sur le commutateur (position
CC
in
,Q, il
est possible de reduire
le
signal d’entree de 6
dB.
CHANNEL SELECT SWITCH (Commutateur de selection des canaux) (3)
Permet de selectionner le canal d’entree ou Clean.
S’il
est en position << in
>>, le
canal d’entree est
selectionne, en position
<<
out
>>, le
canal Clean est selectionne.
REMARQUE
:
II est egalement possible de selectionner
les
canaux grace a la pedale de commande
a
distance. Pour ce faire, s’assurer que le commutateur est en position CC in )> (Entree).
VOLUME (4)
Controle le volume du canal Clean.
LOW, MID, and HIGH EQ - CLEAN CHANNEL (Egalisation basse, moyenne et haute
-
canal Clean) (5)
Boutons de reglage passifs de la tonalite permettant de regler
les
frequences basses, moyennes et hautes
du canal Clean.
PRE GAIN (Commutateur de
pre-gain)
(6)
Permet de regler le gain d’entree du canal d’entree.
THRASH SWITCH (Commutateur d’emballement) (7)
Augmente la gamme moyenne d’environ 20
dB.
10
Page 11

GAIN SWITCH (Commutateur de gain) (8)
Augmente le gain du systeme. Le mettre en position CC in a> pour I’activer.
LOW, MID, and HIGH EQ - LEAD CHANNEL (Egalisation basse, moyenne et haute - canal
d’entree) (9)
Boutons de reglage passifs de la tonalite permettant de regler les frequences basses, moyennes et hautes
du
canal d’entree.
POST-GAIN (10)
Controle le volume total du canal d’entree. Le reglage definitif doit etre fait lorsque le niveau du son est
satisfaisant.
REVERB LEVEL (Niveau de reverberation) (11)
Controle le niveau general de reverberation.
POWER LED (DEL d’alimentation) (12)
Est illuminee lorsque I’amplificateur est alimente par le courant alternatif.
POWER SWITCH (Commutateur marche-arret) (13)
Lorsque ce commutateur est en position
t<
in
>j,
la DEL rouge est illuminee, ce qui indique que I’amplificateur
est
aliment&
Panneau Arriere:
LINE CORD (Cordon d’alimentation -mod&es en
120
V uniquement) (14)
Pour une plus grande securite, nous avons incorpore un cordon d’alimentation secteur a trois cables avec
prise de terre. II n’est pas recommande de retirer la broche de terre.
S’il
est necessaire d’utiliser
I’equipement sans prise de terre, utiliser un adaptateur de mise a la terre adequat. Le bruit et les risques de
choc electrique sont considerablement reduits lorsque ie produit est utilise avec une prise de terre.
EXTERNAL SPEAKER JACK (Jack de haut-parleur externe) (15)
A
Fourni pour la connexion d’une enceinte de haut-parleur externe. Impedance minimale
totale : 8 ohms. Deconnecter le haut-parleur interne avant de I’utiliser.
PREAMP OUT (Sortie du preamplificateur) (16)
La sortie du preamplificateur peut servir a acheminer le signal amplifie vers une console de melange,
un
magnetophone, etc. Connecter la sortie du preamplificateur a I’entree du magnetophone,
melangeur,
etc.,
a
I’aide d’un cable
blind&
Cela n’affecte en rien le fonctionnement de I’amplificateur.
REMOTE JACK SWITCH (Jack de commutateur a distance) (17)
Permet de connecter la pedale de commande & distance en option. Celle-ci set-t a selectionner le canal
d’entree ou Clean et a supprimer la reverberation. La fiche doit toujours etre enfoncee a fond (un deuxieme
clic doit se faire entendre) pour que la pedale de commande a distance fonctionne correctement.
REMARQUE
:
Le commutateur de selection du canal doit etre dans la position <c in >’ pour que la pedale
fonctionne correctement.
11
Page 12

Siehe Diagramm der Frontplatte im englischen Teil des Handbuchs.
Herzlichen
Gliickwunsch
zum Erwerb des Envoy
110
l”,
dem neuesten Mitglied in unserer
TransTubeTM-
Serie. Dieser neue Verstarker ist das Ergebnis jahrelanger Forschung auf dem Gebiet der Vakuumrohren-
Emulation. Der
Vowerstarker
wurde unter Einsatz einer zum Patent angemeldeten Technologie neu
konstruiert, die die Erzeugung von Verzerrungen und Oberschwingungen mit einem fur Rohrenverstarker
typischen Klang in Festkorperverstarkern ermoglicht.
Die neuen T. Dynamics-Schaltkreise (ebenfalls zum Patent angemeldet) realisieren das lang gesuchte
Kompressionsverhalten von Rohrenverstarkern. In Kombination mit den Vorverstarkerschaltungen ergeben
diese Schaltkreise die bislang beste Simulation eines Rohrenverstarkers.
Zu
den Features des Envoy 110 TransTube gehoren
aul3erdem
eine Lautsprecher-Ausgangsbuchse sowie
eine Vorverstarker-Ausgangsbuchse.
Frontplatte:
INPUT (Eingang) (1)
uber
diesen Eingang konnen Signale von Gitarrentonabnehmern
aller
Art zugefuhrt werden.
6 dB PAD SWITCH (Schalter
fur
6 dB
Dgmpfung)
(2)
Vorgesehen fur lnstrumente mit einem sehr
hohen
Ausgang, die eine ubersteuerung (Verzerrung) der
Eingangsverstarkungsstufe verursachen konnen.
Durch
Drticken des Schalters wird der Pegel des
Eingangssignals
urn
6 dB verringert.
CHANNEL SELECT SWITCH (Kanalwahlschalter) (3)
Gestattet die Wahl des Lead- oder Clean-Kanals.
Bei
gedrijcktem Schalter wird der Lead-Kanal gewahlt,
bei
nicht gedrticktem Schalter der Clean-Kanal.
HINWEIS: Die Kanalwahl kann such
iiber
den FuOschalter vorgenommen werden. Dazu
mut3
sich der
Kanalwahlschalter in der gedrtickten Position (Lead-Kanal) befinden.
VOLUME (Lautstarke) (4)
Regelt den Lautstarkepegel des Clean-Kanals.
LOW, MID, and HIGH EQ - CLEAN CHANNEL (Tiefen-, Mitten- und
HGhen-Equalizer -
Clean-Kanal) (5)
Dies sind passive Klangregler, die die tiefen, mittleren und
hohen
Frequenzen des Clean-Kanals regeln.
PRE GAIN
(Vorverstiirkung)
(6)
Regelt die Eingangsverstarkung des Lead-Kanals.
THRASH SWITCH (Thrash-Schalter) (7)
Verringert den Mittenbereich
urn
etwa 20
dB.
GAIN SWITCH
(Verstgrkungsschalter)
(8)
Hebt die gesamte Systemverstarkung an. Den Schalter driicken,
urn
diese Funktion zu aktivieren.
12
Page 13

LOW, MID, and HIGH EQ - LEAD CHANNEL (Tiefen-, Mitten- und Hohen-Equalizer
-
Lead-Kanal) (9)
Dies sind passive Klangregler, die die tiefen, mittleren und hohen Frequenzen des Lead-Kanals regeln.
POST GAIN (Nachverstarkung) (IO)
Regelt den gesamten Lautstarkepegel des Lead-Kanals. Die abschlieOende Pegeleinstellung sollte erfolgen,
nachdem der
gewtinschte
Sound erreicht wurde.
REVERB LEVEL (Nachhallpegel) (11)
Regelt den gesamten Nachhallpegel.
POWER LED (Betriebs-LED) (12)
Leuchtet auf, wenn der Verstarker eingeschaltet ist.
POWER SWITCH (Ein-/Aus-Schalter) (13)
Wenn der Schalter
gedriickt
ist, leuchtet die rote LED auf,
urn
anzuzeigen,
daf3
das Gerat mit Spannung
versorgt wird.
Ruckplatte:
LINE CORD (Netzkabel
-nur
fur
120 Volt-Gertite)
(14)
Zu
lhrer Sicherheit
verfijgt
dieses Gerat
iiber
ein 3adriges Netzkabel mit Schutzerdung. Der Erdungsstift
darf unter keinen Umstanden entfernt werden. Wenn die Verwendung des Gerats ohne Erdungsmoglichkeit
erforderlich sein sollte,
mut3
ein geeigneter Erdungsadapter verwendet werden. Wenn das Gerat an einer
Schutzkontaktsteckdose angeschlossen ist, treten weniger Stbrgerausche auf, und es besteht ein
weitgehender Schutz vor elektrischen Schlagen.
EXTERNAL SPEAKER JACK (Buchse
fur
externen Lautsprecher) (15)
A
Zum AnschlieBen einer externen Lautsprecherbox vorgesehen. Die minimale
Gesamtimpedanz betragt 8 Ohm. Wenn hier ein
AnschluO
besteht, ist die Verbindung zum
internen Lautsprecher unterbrochen.
PREAMP OUT (Vorverst8rkerausgang) (16)
Der Vorverstarkerausgang kann dazu verwendet werden, das verstarkte Signal zu einer Mischkonsole,
einem Bandgerat usw. zu fuhren. Verbinden Sie den Vorverstarkerausgang mit einem abgeschirmten Kabel
mit einem Eingang des Bandgerats, Mixers usw. Der Betrieb des Verstarkers wird hierdurch nicht beeinflunt.
REMOTE SWITCH JACK (Buchse fur
FuOschalter)
(17)
Dient zum
Anschluf3
des optionalen
FuOschalters.
Mit diesem Schalter kann der Lead- oder Clean-Kanal
gewahlt oder der Nachhall deaktiviert werden. Der Stecker des FuBschalters
muO
ganz eingesteckt werden
(bis zur zweiten Einrastposition),
urn
einen einwandfreien Betrieb zu gewahrleisten.
HINWEIS: Damit der FuOschalter einwandfrei arbeitet,
mut3
der Kanalwahlschalter
gedrijckt
sein.
13
Page 14

THIS LIMITED WARRANTY VALID ONLY WHEN PURCHASED AND REGISTERED IN THE UNITED STATES OR CANADA. ALL EXPORTED PRODUCTS
ARE SUBJECT TO WARRANTY AND SERVICES TO BE SPECIFIED AND PROVIDED BY THE AUTHORIZED DISTRIBUTOR FOR EACH COUNTRY.
Ces clauses de garantie ne sont vaiables qu’aux Etats-Unis et au Canada. Dans tour
les
autres pays, les clauses de garantie et de maintenance sont
fixees par le distributeur national et assuree par
lul
seion la legislation envigueur.
l
* Diese Garantie ist nur in den USA and Kanada gultig. Alle Export-
Produkte sind der Garantie und dem Service des lmpotteurs des jewelligen Landes unterworfen.
l l
Esta garantia es valida solamente cuando
el
product0
es
comprado
en E.U. continentales o en Canada. Todos
10s productos
que
Sean
comprados en el extranjero, estan sujetos a
las
garantias y
servicio que cada distribuidor autorizado determine y ofrezca en
10s
diferentes paises.
PEAVEY ONE-YEAR LIMITED
WARRANTY/REMEDY
PEAVEY ELECTRONICS CORPORATION (“PEAVEY”) warrants this product, EXCEPT for covers, footswitches, patchcords, tubes and meters, to be free from
defects in material and workmanship for a period of one (1) year from date of purchase, PROVIDED, however, that this limited warranty is extended only to the
original retail purchaser and is subject to the conditions, exclusions, and limitations hereinafter set forth:
PEAVEY
90-DAY
LIMITED WARRANTY ON TUBES AND METERS
If this product contains tubes or meters, Peavey warrants the tubes or meters contained in the product to be free from defects in material and workmanship for
a period of ninety (90) days from date of purchase; PROVIDED, however, that this limited warranty
IS
extended only to the original retail purchaser and is also
subject to the conditions, exclusions, and limitations hereinafter set forth.
CONDITIONS, EXCLUSIONS, AND LIMITATIONS OF LIMITED WARRANTIES
These
limtted
warranties shall be void and of no effect, if:
a.
The first purchase of the product is for the purpose of resale; or
b.
The original retail purchase is not made from an AUTHORIZED PEAVEY DEALER; or
c.
The product has been damaged by accident or unreasonable use, neglect, improper service or maintenance, or other causes not arising out of defects in
material or workmanship; or
d.
The serial number affixed to the product is altered, defaced, or removed.
In the event of a defect in material and/or workmanship covered by this limited warranty, Peavey
wtll:
a.
In the case of tubes or meters, replace the defective component wrthout charge.
b.
In other covered cases (i.e., cases involving anything other than covers, footswitches, patchcords, tubes or meters), repair the defect
In
matenal or
workmanship or replace the product, at Peavey’s option; and provided, however, that, in any case, all costs of shipping, if necessary, are paid by you, the
purchaser.
THE WARRANTY REGISTRATION CARD SHOULD BE ACCURATELY COMPLETED AND MAILED TO AND RECEIVED BY PEAVEY WITHIN FOURTEEN (14)
DAYS FROM THE DATE OF YOUR PURCHASE.
In order to obtain service under these warranties, you must:
a.
Bring the defective
item
to any PEAVEY AUTHORIZED DEALER or AUTHORIZED PEAVEY SERVICE CENTER and present therewith the ORIGINAL
PROOF OF PURCHASE supplied to you by the AUTHORIZED PEAVEY DEALER in connection
with
your purchase from him of this product.
If the DEALER or SERVICE CENTER is unable to provide the necessary warranty service you will be directed to the nearest other PEAVEY AUTHORIZED
DEALER or AUTHORIZED PEAVEY SERVICE CENTER which can provide such service.
OR
b.
Ship the defective item, prepaid, to:
PEAVEY ELECTRONICS CORPORATION
International Service Center
326
Hwy. 11 &
80 East
MERIDIAN, MS 39301
including therewith a complete, detailed description of the problem, together with a legible copy of the original PROOF OF PURCHASE and a complete return
address. Upon Peavey’s receipt of these items:
If the defect is remedial under these limited warranties and the other terms and conditions expressed herein have been complied with, Peavey will provide the
necessary warranty service to repair or replace the product and will return it, FREIGHT COLLECT, to you, the purchaser.
Peavey’s liability to the purchaser for damages from any cause whatsoever and regardless of the form of action, including negligence, is limited to the actual
damages up to the greater of $500.00 or an amount equal to the purchase price of the product that caused the damage or that is the subject of or is directly related
to the cause of action. Such purchase price will be that in effect for the specific product when the cause of action arose. This limitation of liability will not apply to
claims
for personal injury or damage to real property or tangible personal property allegedly caused by Peavey’s negligence. Peavey does not assume
liabrlrty
for
personal injury or property damage arising out of or caused by a non-Peavey alteration or attachment, nor does Peavey assume any responsbility for damage to
interconnected non-Peavey equipment that may result from the normal functioning and maintenance of the Peavey equipment.
UNDER NO CIRCUMSTANCES WILL PEAVEY BE LIABLE FOR ANY LOST PROFITS, LOST SAVINGS, ANY INCIDENTAL DAMAGES, OR ANY
CONSEQUENTIAL DAMAGES ARISING OUT OF THE USE OR INABILITY TO USE THE PRODUCT, EVEN IF PEAVEY HAS BEEN ADVISED OF THE
POSSIBILITY OF SUCH DAMAGES.
THESE LIMITED WARRANTIES ARE IN LIEU OF ANY AND ALL WARRANTIES, EXPRESSED OR IMPLIED, INCLUDING, BUT NOT LIMITED TO, THE
IMPLIED WARRANTIES OF MERCHANTABILITY AND FITNESS FOR A PARTICULAR USE; PROVIDED, HOWEVER, THAT IF THE OTHER TERMS AND
CONDITIONS NECESSARY TO THE EXISTENCE OF THE EXPRESSED, LIMITED WARRANTIES, AS HEREINABOVE STATED, HAVE BEEN COMPLIED
WITH, IMPLIED WARRANTIES ARE NOT DISCLAIMED DURING THE APPLICABLE ONE-YEAR OR NINETY-DAY PERIOD FROM DATE OF PURCHASE OF
THIS PRODUCT.
SOME STATES DO NOT ALLOW LIMITATION ON HOW LONG AN IMPLIED WARRANTY LASTS, OR THE EXCLUSION OR LIMITATION OF INCIDENTAL
OR CONSEQUENTIAL DAMAGES, SO THE ABOVE LIMITATIONS OR EXCLUSIONS MAY NOT APPLY TO YOU. THESE LIMITED WARRANTIES GIVE YOU
SPECIFIC LEGAL RIGHTS, AND YOU MAY ALSO HAVE OTHER RIGHTS WHICH MAY VARY FROM STATE TO STATE.
THESE LIMITED WARRANTIES ARE THE ONLY EXPRESSED WARRANTIES ON THIS PRODUCT, AND NO OTHER STATEMENT, REPRESENTATION,
WARRANTY, OR AGREEMENT BY ANY PERSON SHALL BE VALID OR BINDING UPON PEAVEY.
In the event of any modification or disclaimer of expressed or implied warranties, or any limitation of remedies, contained herein conflicts with applicable law,
then such modification, disclaimer or limitation, as the case may be, shall be deemed to be modified to the extent necessary to comply with such law.
Your remedies for breach of these warranties are limited to those remedies provided herein and Peavey Electronics Corporation gives this limited warranty only
with respect to equipment purchased in the United States of America.
INSTRUCTIONS - WARRANTY REGISTRATION CARD
1.
Mail the completed WARRANTY REGISTRATION CARD to:
PEAVEY ELECTRONICS CORPORATION
POST OFFICE BOX 2898
MERIDIAN, MISSISSIPPI 39302-2898
a. Keep the PROOF OF PURCHASE. In the event warranty service is required during the warranty period, you will need this document. There will be no
identification card issued by Peavey Electronics Corporation.
2.
IMPORTANCE OF WARRANTY REGISTRATION CARDS AND NOTIFICATION OF CHANGES OF ADDRESSES:
a. Completion and mailing of WARRANTY REGISTRATION CARDS - Should notification become necessary for any condition that may require correction,
the REGISTRATION CARD will help ensure that you are contacted and properly notified.
b. Notice of address changes - If you move from the address shown on the WARRANTY REGISTRATION CARD, you should notify Peavey of the change of
address so as to facilitate your receipt of any bulletins or other forms of notification which may become necessary in connection with any condition that may
require dissemination of information or correction.
3.
You may contact Peavey directly by telephoning (601) 483-5365.
14
Page 15

IMPORTANT SAFETY INSTRUCTIONS
WARNING: When using electric products, basic cautions should always be followed, including the following.
1.
2.
3.
4.
5.
6.
Read all safety and operating instructions before using this product.
All safety and operating instructions should be retained for future reference.
Obey all cautions in the operating instructions and on the back of the unit.
All operating instructions should be followed.
7.
8.
9.
This product should not be used near water, i.e., a bathtub, sink, swimming pool, wet basement, etc.
This product should be located so that its position does not interfere with its proper ventilation. It should not be placed flat against a
wall or placed in a built-in enclosure that will impede the flow of cooling air.
This product should not be placed near a source of heat such as a stove, radiator, or another heat producing amplifier.
Connect only to a power supply of the type marked on the unit adjacent to the power supply cord.
Never break off the ground pin on the power supply cord. For more information on grounding, write for our free booklet “Shock
Hazard and Grounding.”
10.
11.
12.
13.
14.
Power supply cords should always be handled carefully. Never walk or place equipment on power supply cords. Periodically check
cords for cuts or signs of stress, especially at the plug and the point where the cord exits the unit.
The power supply cord should be unplugged when the unit is to be unused for long periods of time.
If this product is to be mounted in an equipment rack, rear support should be provided.
Metal parts can be cleaned with a damp rag. The vinyl covering used on some units can be cleaned with a damp rag or an ammonia-
based household cleaner if necessary. Disconnect unit from power supply before cleaning.
Care should be taken so that objects do not fall and liquids are not spilled into the unit through the ventilation holes or any other
openings.
15.
16.
17.
18.
This unit should be checked by a qualified service technician if:
a.
The power supply cord or plug has been damaged.
b.
Anything has fallen or been spilled into the unit.
C.
The unit does not operate correctly.
d.
The unit has been dropped or the enclosure damaged.
The user should not attempt to service this equipment. All service work should be done by a qualified service technician.
This product should be used only with a cart or stand that is recommended by Peavey Electronics.
Exposure to extremely high noise levels may cause a permanent hearing loss. Individuals vary considerably in susceptibility to noise
induced hearing loss, but nearly everyone will lose some hearing if exposed to sufficiently intense noise for a sufficient time.
The U.S. Government’s Occupational Safety and Health Administration (OSHA) has specified the following permissible noise level
exposures.
Duration Per Day In Hours
Sound Level dBA, Slow Response
8
90
6
92
4
95
3
97
2
100
1
l/2
102
1
105
l/2
110
l/4
or less
115
According to OSHA, any exposure in excess of the above permissible limits could result in some hearing loss.
Ear plugs or protectors in the ear canals or over the ears must be worn when operating this amplification system in order to prevent a
permanent hearing loss if exposure is in excess of the limits as set forth above. To ensure against potentially dangerous exposure to high
sound pressure levels, it is recommended that all persons exposed to equipment capable of producing high sound pressure levels such as
this amplification system be protected by hearing protectors while this unit is in operation.
SAVE THESE INSTRUCTIONS!
15
Page 16

Features and specifications subject to change without notice.
A
01995
Peavey Electronics Corporation
711 A Street / Meridian, MS 39301 / U.S.A. / (601) 483-5365 / Fax 486-1278
#80302354
Printed in U.S.A.
12/95
 Loading...