

Page 1
PXR™ 1506 / 1508
150-WATT MIXER AMPLIFIER
Operating
Manual
www.peavey.com
Page 2

ENGLISH
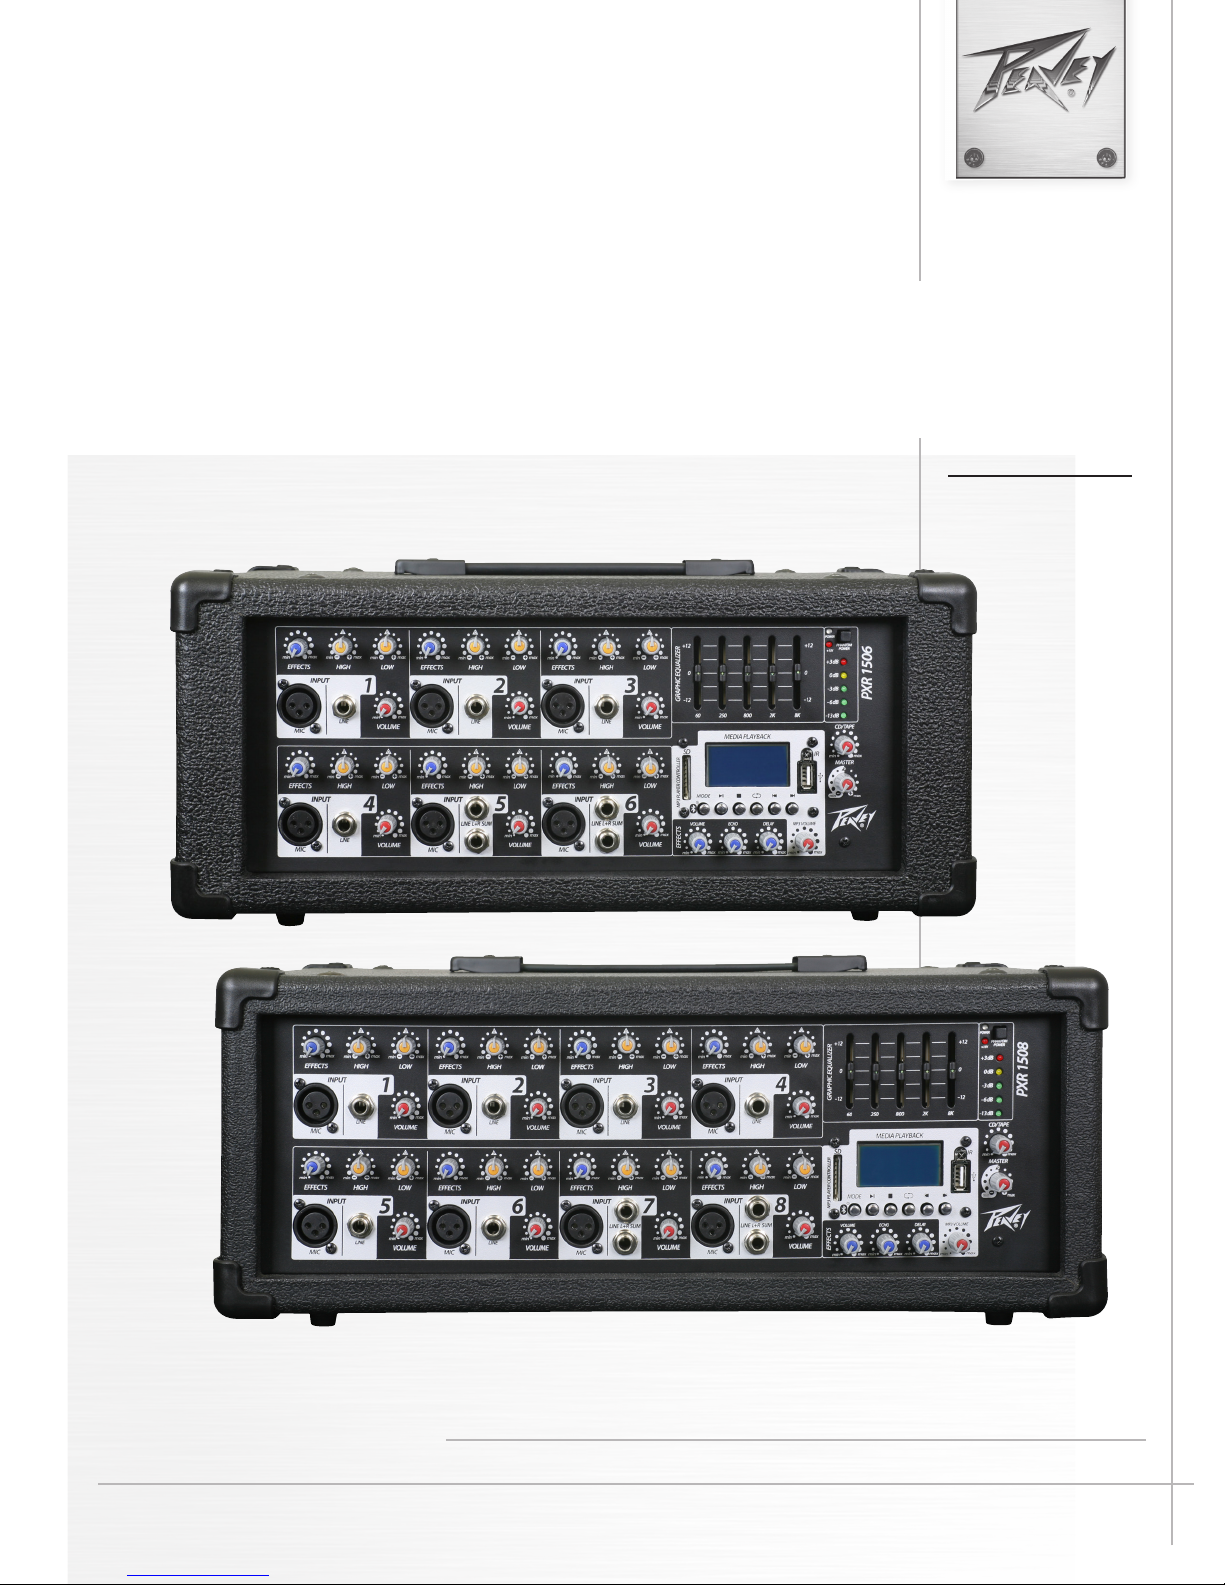
PXR™ 1506 / 1508
150-Watt, 8-Channel Mixer Amplifier
Designed with the latest Peavey technology, the PXR™ 1506 / 1508 powered mixers are easy to use and transport. Constructed
with a rugged metal structure, wood cabinet, vinyl surface and protective corners, the PXR 1506 and 1508 are the ideal powered
mixers.
From packaging to quality control, we produce a product of maximum quality and efficiency with the same specifications you
see on other, more expensive powered mixers.
Please read this guide carefully to ensure your personal safety as well as the safety of your equipment.
Features
• 150 watts into 4-ohm (2 x 8 ohm) speakers
• Balanced microphone inputs
• RCA and 3.5mm Inputs
• Effects Level control on each channel
• Line Out for connection to external amplifiers
• Return input for connection of external effects processors
• Record Out for recording
• 5-band graphic EQ
• On-board effects
• Bluetooth® Streaming Audio
• Audio playback from USB jump drive or SD card
• 15-volt phantom power
Page 3

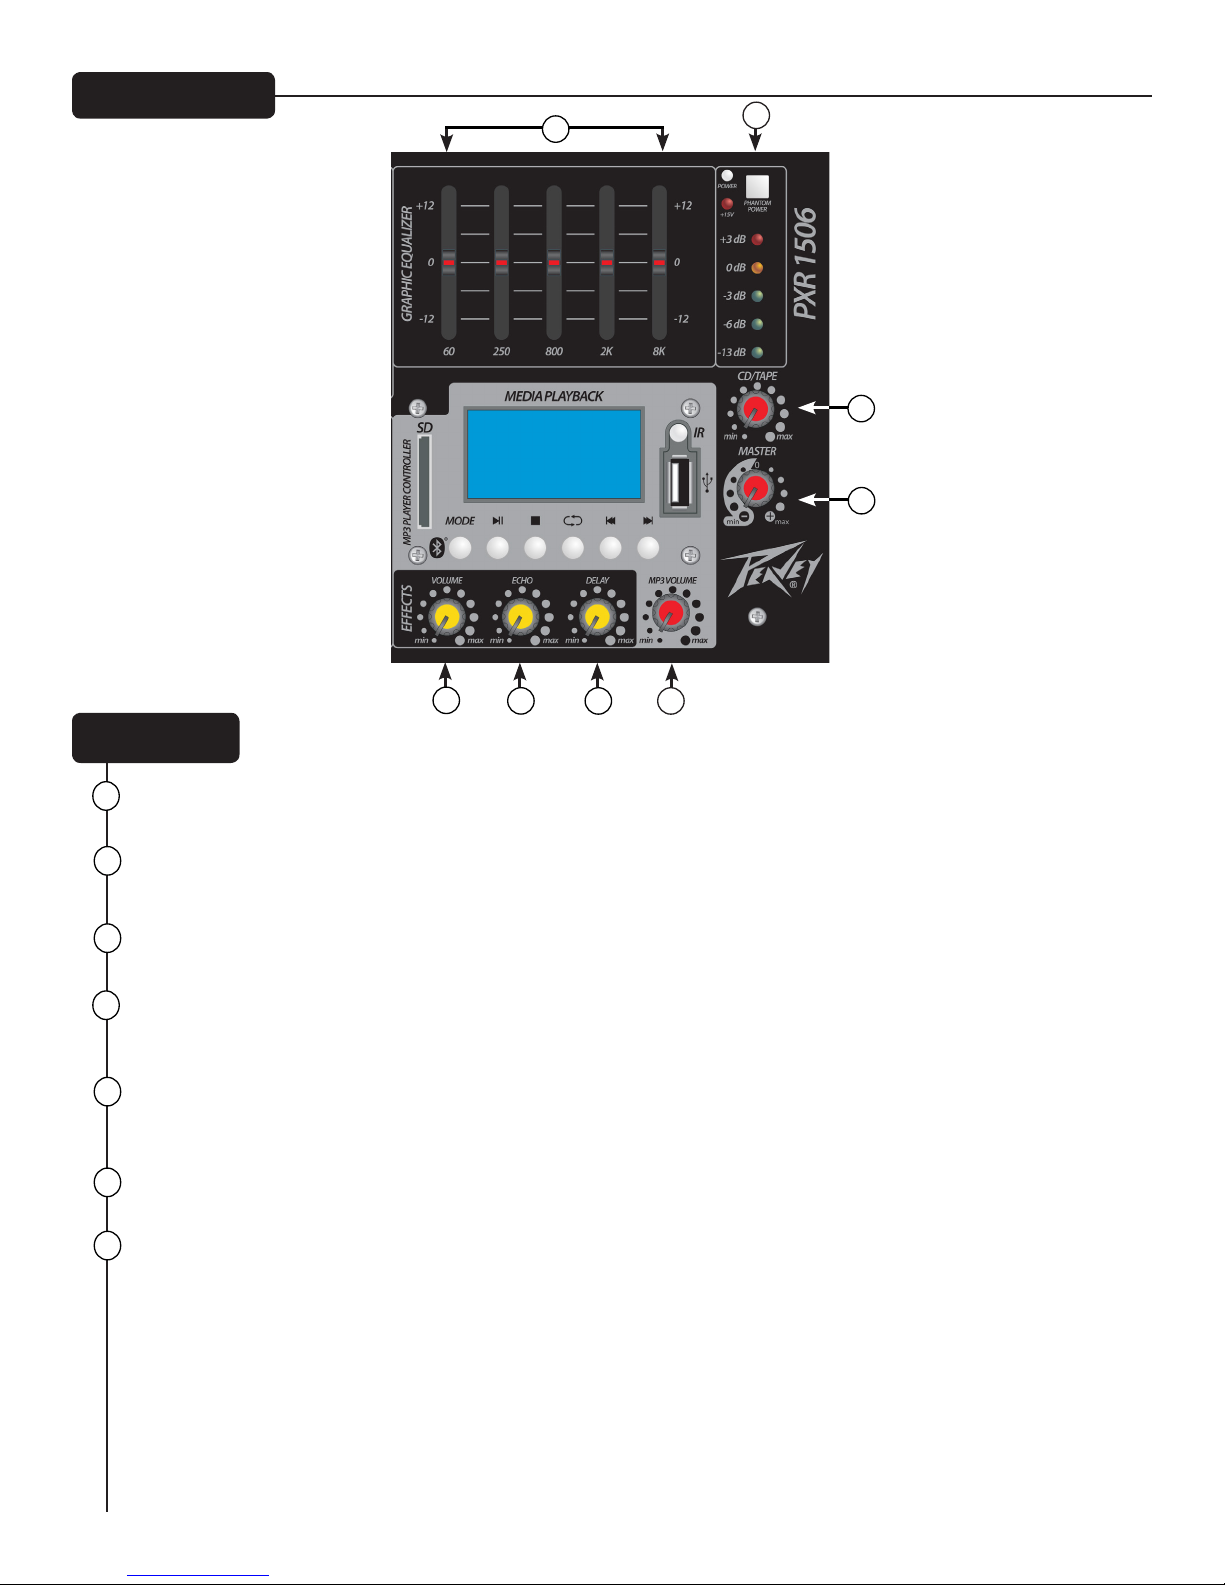
Front Panel
Input Section
6
1
4 5
2
3
3-PIN LOW-IMPEDANCE MICROPHONE INPUT
1
This input is for typical balanced, low-impedance microphones. This has an input impedance of 1k ohms. The connector
is wired as: Pin 1=shield; Pin 2=positive (hot); Pin 3=negative (cold).
1/4" LINE/HIGH-IMPEDANCE INPUT
2
This input may be used as either a high-impedance microphone input or for line-level devices such as a cassette player,
CD player, video projector or laptop. This will also allow connection from an electric guitar, bass or keyboard. It is a
two-conductor input with an impedance of 10k ohms.
Features
3
VOLUME CONTROL
The level control for each channel sends the signal to the master mix bus. Typical operation is between 4 and 8 (dependent
upon the input devices) but should be lower than the master level. Please remember that this acts like a preamp, so if you
are using a device that has a volume output control (i.e.: a tape or CD player) you will need to do some level matching by
adjusting the level controls on each unit.
HIGH CONTROL
4
This is used to adjust the overall tone of the individual inputs. Since it is a cut or boost control (+/-15 dB), it will add or
diminish presence frequencies in the sound beginning at 2 kHz.
LOW CONTROL
5
This is used to adjust the overall tone of the individual inputs. Since it is a cut or boost control (+/-15 dB), it will add or diminish bass
frequencies in the sound beginning at 300 Hz.
EFFECTS CONTROL
6
This is used as a send control to the effects bus. It controls the amount of reverberation added to the input signals.
Page 4
Front Panel
14
13
8
7
9
10
11
12
Features
7
MASTER LEVEL
This controls the overall volume level of the entire amplifier. Typical operation is between 4 and 8.
8
TAPE/CD VOLUME
This controls the level of the playback inputs (RCA jacks).
EFFECTS VOLUME
9
This controls the level of the echo and delay that is added back to the master mix.
EFFECTS ECHO
10
This controls the character of the Reverb that is added back to the master mix. This is analogous with changing the rate at
which the echo decays.
EFFECTS DELAY
11
This controls the delay of the Reverb that is added back to the master mix. Increase this control to simulate the effect of
larger rooms.
MP3 VOLUME
12
This controls the level of the playback inputs on the MP3 player.
13
PHANTOM POWER
When depressed, this switch, applies +15 VDC to all input XLR connectors to power microphones that require phantom
power.
Caution: When phantom power is switched on, make sure that any channel you are plugging a microphone into is turned
down and the Master Main and Monitor controls are set to minimum. Otherwise, there will be a loud pop in the system. For
best results, first plug all microphones into their respective channels before phantom power is switched on. This reduces
noise through the system and reduces the chance of damage to the microphones. If phantom power is used, do not connect
unbalanced, dynamic microphones or other devices to the XLR inputs that cannot handle this voltage. (Some wireless
receivers may be damaged. Consult their manuals.) The line input jacks are not connected to the phantom supply and are safe
for all inputs (balanced or unbalanced). An unbalanced to balanced impedance converter such as the Peavey 5116 or a Peavey
1:1 Interface Adapter may also be used to isolate a microphone from phantom voltage.
Page 5

17
15
18
19 20 21
22
16
Features
MASTER EQ
14
These are used to adjust the overall EQ of the master mix. Since these cover five frequency bands (+/-15 dB), they will add
or diminish the level of the sound at the indicated frequencies, spread across approximately one octave of frequency range.
Most situations should require using no more than three controls simultaneously. Do not boost or cut all five at the same
time. Excessive boosting will increase the probability of feedback.
SD CARD SLOT
15
To connect the SD card, push the card completely in the slot until it clicks into place. The player will accept a SD card up to
32Gb in size.
16
USB DISK SLOT
On the right side of the device is a USB drive slot where a USB memory stick can be connected. The player will accept a
memory stick up to 32Gb.
IR RECEIVER
17
This is the receiver for the remote control. For proper use do not block.
MODE
18
If both, a memory stick and SD card are present, a short press of the MODE button will toggle between the USB input, SD card
input and Bluetooth. A long press of the MODE button will enter the settings menu. In the settings menu, you can select the
pre-programmed EQ modes, the repeat modes and select between the SD card and USB inputs. Once in the settings menu,
press the >> or << buttons to navigate. When the desired mode is highlighted, press the >II button to select.
PLAY/PAUSE
19
A short press of the PLAY/PAUSE button causes the operation to change from PLAY to PAUSE or from PAUSE back to PLAY.
STOP
20
Press the STOP button to stop a file that is playing.
21
REPEAT
Pressing the REPEAT button toggles the function between ALL, REPEAT ONE, REPEAT FOLDER, NORMAL, RANDOM and
BROWSE.
ALL: Repeats all songs.
REPEAT ONE: Repeats a single song.
REPEAT FOLDER: Repeats all the songs in a single folder.
NORMAL: Plays all songs in order.
RANDOM: Plays all songs in a random order.
BROWSE: Plays the first 10 seconds of each song.
22
TRACK SKIP
In playback mode the TRACK SKIP buttons let you select the track to play.
A short press skips to the next track. A long press allows you to fast forward/rewind through a song. Hold the button down
until the desired playback point is found. Release the button and the song will start playing.
The TRACK SKIP buttons are used to increment/decrement through the options in the menu.
Page 6

Bluetooth® Player
Bluetooth OPERATION
To listen to your music via Bluetooth wireless connection, you need to pair (link) your PXR™ 1506/1508 mixer with your
Bluetooth phone and/or music device.
1. Turn off any Bluetooth devices previously paired with your PXR 1506/1508 mixer.
2. Turn on the Bluetooth feature on your phone or music device.
3. Press the mode button until the Bluetooth symbol appears in the upper left hand corner of the LCD display.
4. Place your phone or music device in Bluetooth search mode.
5. Select Bluetooth audio from search results on your phone or music device.
6. Select OK or YES to pair your speaker system with your phone or music device.
When your PXR 1506/1508 successfully pairs and connects with your phone or music device, the LCD display will indicate
the name of the device connected. You will now be able to play music from your connected music source through your PXR
1506/1508. The level can either be adjusted from the connected source or by the MP3 Volume control.
* Wireless range can vary depending on Bluetooth class of source device, and be subject to interference from obstructions
such as walls or other electronic devices.
Remote Control
For ease of use and convenience, a remote control comes with the PXR 1506/1508 mixer (battery included). To replace the
battery, push in left tab and pull out. Use only a CR2025 model battery as a replacement.
NOTE: For proper use, do not block the IR Receiver.
PLAY/PAUSE: A short press of the PLAY/PAUSE button causes the operation to change from PLAY to PAUSE or
from PAUSE back to PLAY
CH- / CH+: Channel adjustment buttons.
EQ: EQ Preset adjustment button.
- / +: Volume adjustment buttons.
I<< / >>I: Track skip buttons let you select the track to play.
0-9: Directly access tracks.
PICK SONG: N/A on this model
ENTER: Enters the settings menu.
MODE: Toggles between the USB input, SD card input and Bluetooth.
Page 7

WARNING
Do not ingest the battery. Chemical Burn Hazard.
(The remote control supplied with) This product contains a coin/button cell battery. If the coin/button cell
battery is swallowed, it can cause severe internal burns in just 2 hours and can lead to death.
Keep new and used batteries away from children.
If the battery compartment does not close securely, stop using the product and keep it away from children.
If you think batteries might have been swallowed or placed inside any part of the body, seek immediate
medical attention.
Page 8

Rear Panel
WARNING
1
100 -12 0V 220 -24 0V
2
87
3
4
6
Features
VOLTAGE SELECT SWITCH
1
This switch must be set properly for the local AC line voltage. Select between 115 (110-120 VAC) or 230 (220-240 VAC)
using this switch.
POWER SWITCH
2
This switches the unit on or off. When the unit is powered ON, the front-panel blue LED will illuminate.
THE ON/OFF SWITCH IN THIS APPA RATUS
DOES NOT BREAK BOTH SIDES OF THE MAINS.
HAZARDOUS ENERGY MAY BE PRESENT INSIDE
THE ENCLOSURE WHEN THE POWER SWITCH IS
IN THE OFF POSITION.
IEC POWER CONNECTOR
3
This is a standard IEC cable connector for use with standard voltages from AC wall outlets. Its safety ground pin is
connected to the chassis and should never be removed (or defeated in the line cord) for any reason. The IEC connector
contains an internal fuse holder. The fuse rating is 5 amperes.
SPEAKER OUTPUTS
4
These are two-conductor 1/4" speaker outputs. Each one is rated at 8 ohms minimum impedance. Total minimum load for
the amplifier is 4 ohms. You may connect either one 4-ohm, one 8-ohm or two 8-ohm speakers. Do not operate below rated
minimum impedance. For maximum power transfer, be sure to use speaker cables and not instrument cables to connect to
the speakers. We recommend the use of 18-gauge or larger speaker wire.
LINE SEND
5
This is a 1/4" two-conductor line output. It is intended to connect the mixer to the input of an external effects device or
additional power amp, or to send a submix to a larger P.A. system. This line-level signal disconnects the main outputs.
LINE RETURN
6
This is a 1/4" two-conductor line input. It is intended primarily to connect the mixer to the output of an external effects
device.
7
MEDIA IN (L/R)
These RCA jacks are for connecting a cassette deck, CD player or other line-level source.
REC OUT (L/R)
8
These RCA output jacks are primarily intended for connecting a tape deck, MP3 player, or other device for the purpose of
recording from the mixer. Both channels are summed into mono for compatibility. The signals are taken pre-master section,
meaning that they are without reverb or the master tone section, and do not include the Tape-In signal.
5
Page 9

PXR™ 1506 / 1508
Logo referenced in Directive 2002/96/EC Annex IV
13 August 2005
SPECIFICATIONS
Output Power:
150 watts / 4 ohms
100 watts / 8 ohms
Aux SEND Output:
-10 dBv nominal, 1k ohms
Tape REC Output:
-10 dBv nominal, 1k ohms
Input lmpedance:
Low-Z Mic: 1k ohms
High-Z Line: 10k ohms
Tape Input: 10k ohms
Input Channel Equalization:
Bass Control: 300 Hz
Treble Control: 2000 Hz
Master Graphic Equalization:
60 Hz: +/- 15 dB
250 Hz: +/- 15 dB
800 Hz: +/- 15 dB
2000 Hz: +/- 15 dB
8000 Hz: +/- 15 dB
Protection Circuit:
Power on Mute delay time: 2 seconds
Power Consumption:
140 watts
Dimensions (HxWxD):
PXR 1506: 8.25" x 17.5" x 12.25"
PXR 1508: 8.25" x 20.5" x 12.25"
Weight:
PXR 1506: 20.6 lbs.
PXR 1508: 22.7 lbs.
(OJ(L)37/38,13.02.03 and defined in EN 50419: 2005
The bar is the symbol for marking of new waste and
is applied only to equipment manufactured after
Page 10

NOTES
Page 11

NOTES
Page 12

Logo referenced in Directive 2002/96/EC Annex IV
The bar is the symbol for marking of new waste and
13 August 2005
Warranty registration and information for U.S. customers available online at
Peavey Electronics Corporation 5022 Hartley Peavey Drive Meridian, MS 39305 (601) 483-5365 FAX (601) 486-1278
www.peavey.com
www.peavey.com/warranty
or use the QR tag below
Features and specications subject to change without notice.
(OJ(L)37/38,13.02.03 and defined in EN 50419: 2005
is applied only to equipment manufactured after
 Loading...