

Page 1
PVX™p Sub
Compact Vented Powered Subwoofer System
Operating
Manual
www.peavey.com
Page 2

Intended to alert the user to the presence of uninsulated “dangerous voltage” within the product’s enclosure that may be of sufcient magnitude to constitute
a risk of electric shock to persons.
Intended to alert the user of the presence of important operating and maintenance (servicing) instructions in the literature accompanying the product.
CAUTION: Risk of electrical shock — DO NOT OPEN!
CAUTION: To reduce the risk of electric shock, do not remove cover. No user serviceable parts inside. Refer servicing to qualied service personnel.
WARNING: To prevent electrical shock or re hazard, this apparatus should not be exposed to rain or moisture‚ and objects lled with liquids‚ such as vases‚
should not be placed on this apparatus. Before using this apparatus‚ read the operating guide for further warnings.
Protective earthing terminal. The apparatus should be connected to a mains socket outlet with a protective earthing connection.
Este símbolo tiene el propósito, de alertar al usuario de la presencia de “(voltaje) peligroso” sin aislamiento dentro de la caja del producto y que puede tener
una magnitud suciente como para constituir riesgo de descarga eléctrica.
Este símbolo tiene el propósito de alertar al usario de la presencia de instruccones importantes sobre la operación y mantenimiento en la información que
viene con el producto.
PRECAUCION: Riesgo de descarga eléctrica ¡NO ABRIR!
PRECAUCION: Para disminuír el riesgo de descarga eléctrica, no abra la cubierta. No hay piezas útiles dentro. Deje todo mantenimiento en manos del
personal técnico cualicado.
ADVERTENCIA: Para prevenir choque electrico o riesgo de incendios, este aparato no se debe exponer a la lluvia o a la humedad. Los objetos llenos de
liquidos, como los oreros, no se deben colocar encima de este aparato. Antes de usar este aparato, lea la guia de funcionamiento para otras advertencias.
Terminal de puesta a tierra de protección. El aparato debe estar conectado a una toma de corriente con conexión a tierra de protección.
Ce symbole est utilisé dans ce manuel pour indiquer à l’utilisateur la présence d’une tension dangereuse pouvant être d’amplitude sufsante pour constituer
un risque de choc électrique.
Ce symbole est utilisé dans ce manuel pour indiquer à l’utilisateur qu’il ou qu’elle trouvera d’importantes instructions concernant l’utilisation et l’entretien de
l’appareil dans le paragraphe signalé.
ATTENTION: Risques de choc électrique — NE PAS OURIR!
ATTENTION: An de réduire le risque de choc électrique, ne pas enlever le couvercle. Il ne se trouve à l’intérieur aucune pièce pouvant être reparée par
l’utilisateur. Conez I’entretien et la réparation de l’appareil à un réparateur Peavey agréé.
AVIS: Dans le but de reduire les risques d’incendie ou de decharge electrique, cet appareil ne doit pas etre expose a la pluie ou a l’humidite et aucun objet
rempli de liquide, tel qu’un vase, ne doit etre pose sur celui-ci. Avant d’utiliser de cet appareil, lisez attentivement le guide fonctionnant pour avertissements
supplémentaires.
Borne de terre de protection. L'appareil doit être connecté à une prise secteur avec une connexion à la terre.
SPANISHENGLISH
FRENCH
Dieses Symbol soll den Anwender vor unisolierten gefährlichen Spannungen innerhalb des Gehäuses warnen, die von Ausreichender Stärke sind, um einen
elektrischen Schlag verursachen zu können.
Dieses Symbol soll den Benutzer auf wichtige Instruktionen in der Bedienungsanleitung aufmerksam machen, die Handhabung und Wartung des Produkts
betreffen.
VORSICHT: Risiko — Elektrischer Schlag! Nicht öffnen!
VORSICHT: Um das Risiko eines elektrischen Schlages zu vermeiden, nicht die Abdeckung
repariert werden könnten. Reparaturen nur von qualiziertem Fachpersonal durchführen lassen.
WARNUNG: Um elektrischen Schlag oder Brandgefahr zu verhindern, sollte dieser Apparat nicht Regen oder Feuchtigkeit ausgesetzt werden und
Gegenstände mit Flüssigkeiten gefuellt, wie asen, nicht auf diesen Apparat gesetzt werden. Bevor dieser Apparat verwendet wird, lesen Sie bitte den
Funktionsführer für weitere Warnungen.
Schutzerdung Terminal. Das Gerät nur an Steckdose mit Schutzleiter angeschlossen werden.
Tarkoitettu kiinnittämään käyttäjän huomio sellaiseen eristämättömään vaaralliseen jännitteeseen tuotteen kotelossa, joka saattaa olla riittävän suuri
aiheuttaakseen sähköiskuvaaran.
Tarkoitettu kiinnittämään käyttäjän huomio tärkeisiin käyttö- ja huolto-ohjeisiin tuotteen mukana seuraavassa ohjeistuksessa.
VAROITUS: Sähköiskun vaara — ÄLÄ AAA!
VAROITUS: Sähköiskuvaaran vuoksi älä poista kantta. Ei sisällä käyttäjän huollettavissa olevia osia. Huoltaminen tulee jättää pätevän huoltohenkilöstön
tehtäväksi.
VAARA: Sähköiskun tai tulipalon vaaran estämiseksi tätä laitetta ei saa altistaa sateelle tai kosteudelle, eikä sen päälle saa asettaa nesteellä täytettyjä
esineitä, kuten maljakoita. Ennen laitteen käyttöä lue muut varoitukset käyttöohjeesta.
Suojamaadoitus terminaali. Laite tulee kytkeä sähköverkkoon suojajohtimella.
Laite on liitettävä suojamaadoituskoskettimilla varustettuun pistorasiaan.
GERMAN
entfernen. Es benden sich keine Teile darin, die vom Anwender
FINNISH
Page 3
Är avsedd att varna användaren för förekomsten av oisolerad ”farlig spänning” inom produktens hölje som kan vara av tillräcklig nivå för att personer ska
tais como vasos, não devem ser colocados sobre ele. Antes de usar este aparelho, leia o guia de operação para mais advertências.
riskera elektrisk stöt.
Är avsedd att uppmärksamma användaren på förekomsten av viktiga handhavande- och underhållsinstruktioner (service) i den litteratur som medföljer
produkten.
OBSERVERA: Risk för elektrisk stöt – ÖPPNA INTE!
OBSERVERA: För att minska risken för elektrisk stöt, avlägsna inte höljet. Inga delar inuti kan underhållas av användaren. Låt kvalicerad servicepersonal
sköta servicen.
VARNING: För att förebygga elektrisk stöt eller brandrisk bör apparaten inte utsättas för regn eller fukt, och föremål fyllda med vätskor, såsom vaser, bör
inte placeras på denna apparat. Läs bruksanvisningen för ytterligare varningar innan denna apparat används.
Skyddsjordning terminalen. Apparaten skall anslutas till ett uttag med skyddande jordanslutning.
Apparaten skall anslutas till jordat uttag.
SWEDISH
Har til hensikt å advare brukeren om tilstedeværelse av uisolert “farlig spenning” inne i produktet, som kan ha tilstrekkelig styrke til å medføre risiko for elek-
trisk støt for en person.
Har til hensikt å informere brukeren om tilstedeværelsen av viktige bruks- og vedlikeholds (service)-instruksjoner i litteraturen som følger med produktet.
ADVARSEL: Risiko for elektrisk støt — MÅ IKKE ÅPNES!
ADVARSEL: For å redusere risikoen for elektrisk støt må ikke dekslet fjernes. Det nnes ingen deler på innsiden som brukeren kan justere. Overlat service-
arbeidet til kvalisert servicepersonell.
ADVARSEL: For å hindre elektrisk støt eller brannfare må ikke dette apparatet utsettes for regn eller fuktighet‚ og gjenstander fylt med væske, som en vase,
må ikke settes på apparatet. Før du tar apparatet i bruk må du lese bruksanvisningen for ytterligere advarsler.
Beskyttende jordingsterminal. Apparatet må kobles til en elektrisk kontakt med et støpsel som har skjermet jordkontakt.
Apparatet må tilkoples jordet stikkontakt.
Bedoeld om de gebruiker te attenderen op de aanwezigheid van ongeïsoleerde “gevaarlijke spanning” binnen de behuizing van het product dat van voldoende om-
vang kan zijn om een risico op elektrische schokken te vormen.
Bedoeld om de gebruiker te attenderen op de aanwezigheid van belangrijke gebruiks- en onderhoudsinstructies in de literatuur bij het product.
OPGELET: Risico op een elektrische schok - NIET OPENEN
OPGELET: Om het risico op elektrische schokken te verkleinen, verwijder niet het deksel. Er zijn geen voor de gebruiker bruikbare onderdelen binnenin aanwezig.
erwijs onderhoud door naar gekwaliceerd onderhoudspersoneel.
WAARSCHUWING: Om elektrische schokken of brandgevaar te voorkomen, stel dit apparaat mag niet bloot aan regen of vocht ‘ en voorwerpen gevuld met vloei-
stoffen, zoals vazen mogen niet op dit apparaat worden geplaatst. Lees de gebruiksaanwijzingen voor nadere waarschuwingen voordat u dit apparaat gebruikt.
Beschermende aardklem. Het apparaat dient te worden aangesloten op een stopcontact met een beschermend aardcontact.
NORWEGIANDUTCH
Atto ad avvisare l’utente in merito alla presenza “voltaggio pericoloso” non isolato all’interno della scatola del prodotto che potrebbe avere una magnitudo
sufciente a costituire un rischio di scossa elettrica per le persone.
Atto ad avvisare l’utente in merito alla presenza di istruzioni operative e di assistenza importanti (manutenzione) nel libretto che accompagna il prodotto.
ATTENZIONE: Rischio di scossa elettrica — NON APRIRE!
ATTENZIONE: per ridurre il rischio di scossa elettrica, non rimuovere il coperchio. Non vi sono parti utili all’utente all’interno. Fare riferimento a personale
addetto qualicato.
AVVERTENZA: per prevenire il rischio di scossa o il rischio di incendio, questo apparecchio non dovrebbe essere esposto a pioggia o umidità, e oggetti
riempiti con liquidi, come vasi, non dovrebbero essere posizionati sopra questo apparecchio. Prima di usare questo apparecchio, leggere la guida operativa
per ulteriori informazioni.
Morsetto di terra di protezione. L'apparecchio deve essere collegato a una presa di corrente di rete con un conduttore di terra.
Destinado a alertar o usuário da presença de “voltagem perigosa” não isolada dentro do receptáculo do produto que pode ser de magnitude suciente para
constituir um risco de choque elétrico a pessoas.
Destinado a alertar o usuário da presença de instruções importantes de operação e manutenção (conserto) na literatura que acompanha o produto.
CUIDADO: Risco de choque elétrico — NÃO ABRA!
CUIDADO: Para evitar o risco de choque elétrico, não remova a cobertura. Contém peças não reparáveis pelo usuário. Entregue todos os consertos apenas
a pessoal qualicado.
ADVERTÊNCIA: Para evitar choques elétricos ou perigo de incêndio, este aparelho não deve ser exposto à chuva ou umidade e objetos cheios de líquidos,
ITALIAN PORTUGUESE
Page 4
ﺔﻣﺪﺼﻟ ﺹﺎﺨﺷﻷﺍ ﺽﺮﻌﺗ ﻲﻓ ﺐﺒﺴﺘﺘﻟ ﺔﻴﻓﺎﻛ ﻥﻮﻜﺗ ﺪﻗ ﻲﺘﻟﺍﻭ جﺘﻨﻤﻟﺍ ﺕﺎﻳﻮﺘﺤﻣ ﻞﺧﺍﺩ ﺔﻟﻭﺰﻌﻣ ﺮﻴغ "ﺓﺮﻄﺧ ﺔﻴﺑﺮﻬﻛ ﺕﺍﺭﺎﻴﺗ" ﺩﻮﺟﻮﻟ ﻡﺪﺨﺘﺴﻤﻟﺍ ﻪﻴﺒﻨﺘﻟ ﺮﻴﺸﺗ
.ﺔﻴﺑﺮﻬﻛ
ﺔﻣﺪﺼﻟ ﺹﺎﺨﺷﻷﺍ ﺽﺮﻌﺗ ﻲﻓ ﺐﺒﺴﺘﺘﻟ ﺔﻴﻓﺎﻛ ﻥﻮﻜﺗ ﺪﻗ ﻲﺘﻟﺍﻭ جﺘﻨﻤﻟﺍ ﺕﺎﻳﻮﺘﺤﻣ ﻞﺧﺍﺩ ﺔﻟﻭﺰﻌﻣ ﺮﻴغ "ﺓﺮﻄﺧ ﺔﻴﺑﺮﻬﻛ ﺕﺍﺭﺎﻴﺗ" ﺩﻮﺟﻮﻟ ﻡﺪﺨﺘﺴﻤﻟﺍ ﻪﻴﺒﻨﺘﻟ ﺮﻴﺸﺗ
.ﺔﻴﺑﺮﻬﻛ
.جﺘﻨﻤﻟﺍ ﺍﺬﻫ ﻊﻣ ﻖﻓﺮﻤﻟﺍ ﺐﻴﺘﻜﻟﺍ ﻞﺧﺍﺩ ﺔﻤﻬﻣ (ﺔﻧﺎﻴﺻ) ﺔﻧﺎﻴﺻﻭ ﻞﻴﻐﺸﺗ ﺕﺎﻤﻴﻠﻌﺗ ﺩﻮﺟﻮﻟ ﻡﺪﺨﺘﺴﻤﻟﺍ ﻪﻴﺒﻨﺘﻟ ﺮﻴﺸﺗ
!ﺢﺘﻔﺗ ﻻ - ﺔﻴﺑﺮﻬﻛ ﺔﻣﺪﺼﻟ ﺽﺮﻌﺘﻟﺍ ﺮﻄﺧ :ريذحت
ﺔﻣﺪﺼﻟ ﺹﺎﺨﺷﻷﺍ ﺽﺮﻌﺗ ﻲﻓ ﺐﺒﺴﺘﺘﻟ ﺔﻴﻓﺎﻛ ﻥﻮﻜﺗ ﺪﻗ ﻲﺘﻟﺍﻭ جﺘﻨﻤﻟﺍ ﺕﺎﻳﻮﺘﺤﻣ ﻞﺧﺍﺩ ﺔﻟﻭﺰﻌﻣ ﺮﻴغ "ﺓﺮﻄﺧ ﺔﻴﺑﺮﻬﻛ ﺕﺍﺭﺎﻴﺗ" ﺩﻮﺟﻮﻟ ﻡﺪﺨﺘﺴﻤﻟﺍ ﻪﻴﺒﻨﺘﻟ ﺮﻴﺸﺗ
.ﺔﻴﺑﺮﻬﻛ
.جﺘﻨﻤﻟﺍ ﺍﺬﻫ ﻊﻣ ﻖﻓﺮﻤﻟﺍ ﺐﻴﺘﻜﻟﺍ ﻞﺧﺍﺩ ﺔﻤﻬﻣ (ﺔﻧﺎﻴﺻ) ﺔﻧﺎﻴﺻﻭ ﻞﻴﻐﺸﺗ ﺕﺎﻤﻴﻠﻌﺗ ﺩﻮﺟﻮﻟ ﻡﺪﺨﺘﺴﻤﻟﺍ ﻪﻴﺒﻨﺘﻟ ﺮﻴﺸﺗ
!ﺢﺘﻔﺗ ﻻ - ﺔﻴﺑﺮﻬﻛ ﺔﻣﺪﺼﻟ ﺽﺮﻌﺘﻟﺍ ﺮﻄﺧ :ريذحت
人体への電気ショックの危険が考えられる製品筐体内の非絶縁「危険電圧」の存在をユーザーに警告す るものです。
注意: 電気ショックの危険を低減するため、カバーを外さないでください。内部部品はユーザーによるサービス不可。資格のあるサービス要因のサービスを要請してくだ
警告:電気ショックまたは火災の危険を避けるため、この装置を雨または湿気にさらしてはなりません。ま た、過敏など液体を含む物をこの装置上に置いてはなりません。
製品に付属している説明書に記載の重要な操作およびメンテナンス(サービス)要領の存在をユーザーに警告するものです。
注意: 電気ショックの危険あり — 開けないでください!
さい 。
この装置を使用する前に、警告事項につ いて操作ガイドをお読みください。
保護接地端子。装置は保護接地に接続している電源コンセントに接続する必要があります
三角形内带有箭头闪电状符号意在敬告用户,表明产品内部有非绝缘的“危险电压”存在,而且具有足以致人触电的危险。
三角形内的感叹号意在警告用户,表明与机器的操作和维护(维修)有关的重要说明。
警告 :触电危险—勿打开!
警告 :为了避免触电危险,请勿打开机壳。机内无用户可以维修的部件。需要维修时,请与指定的专业维修人员联系。
警告 :为了避免触电或火灾危险,请勿将本机置于雨中或潮湿之处。请勿将装满液体的物体,例如花瓶等置于本机之上。使用本机之前,请仔细阅读本操作说
明书中的安全说明。
保 保护接地端子。设备应该连接到带有保护接地连接的电源插座。
제품의 케이스 내에 감전을 유발할 수 있는 절연되지 않은 " 위험한 전압 " 이 존재함을 사용자에게 알 립니다 . 제품과 함께 제공되는 인쇄물에 중요
한 작동 및 유지 보수 ( 서비스 ) 지침이 있음을 사용자에게 알립 니다 .
주의 : 감전 위험 — 열지 마십시오 !
주의 : 감전 위험을 낮추기 위해 덮개를 제거하지 마십시오 . 장치 내부에는 사용자가 직접 수리할 수 있는 부품이 없습니다 . 자격을 갖춘 서비스 요
원에게 서비스를 의뢰하십시오 .
경고 : 감전 또는 화재 위험을 예방하기 위해 본 기기를 비 또는 습기에 노출하거나 꽃병과 같이 액체 가 들어 있는 물체를 본 기기 위에 올려놓지 마
십시오 . 본 기기를 사용하기 전에 추가 경고 사항에 대 한 작동 설명서를 읽어 주십시오 .
보호 접지 단자.장치는 보호 접지 연결 전원 소켓 콘센트에 연결되어야
ﺔﻣﺪﺼﻟ ﺹﺎﺨﺷﻷﺍ ﺽﺮﻌﺗ ﻲﻓ ﺐﺒﺴﺘﺘﻟ ﺔﻴﻓﺎﻛ ﻥﻮﻜﺗ ﺪﻗ ﻲﺘﻟﺍﻭ جﺘﻨﻤﻟﺍ ﺕﺎﻳﻮﺘﺤﻣ ﻞﺧﺍﺩ ﺔﻟﻭﺰﻌﻣ ﺮﻴغ "ﺓﺮﻄﺧ ﺔﻴﺑﺮﻬﻛ ﺕﺍﺭﺎﻴﺗ" ﺩﻮﺟﻮﻟ ﻡﺪﺨﺘﺴﻤﻟﺍ ﻪﻴﺒﻨﺘﻟ ﺮﻴﺸﺗ
.ﺔﻴﺑﺮﻬﻛ
.جﺘﻨﻤﻟﺍ ﺍﺬﻫ ﻊﻣ ﻖﻓﺮﻤﻟﺍ ﺐﻴﺘﻜﻟﺍ ﻞﺧﺍﺩ ﺔﻤﻬﻣ (ﺔﻧﺎﻴﺻ) ﺔﻧﺎﻴﺻﻭ ﻞﻴﻐﺸﺗ ﺕﺎﻤﻴﻠﻌﺗ ﺩﻮﺟﻮﻟ ﻡﺪﺨﺘﺴﻤﻟﺍ ﻪﻴﺒﻨﺘﻟ ﺮﻴﺸﺗ
CHINESEJAPANESE
KOREAN ARABIC
ﻞﺜﻣ ،ﻞﺋﺍﻮﺴﻟﺎﺑ ﺓءﻮﻠﻤﻤﻟﺍ ءﺎﻴﺷﻷﺍ ﻊﺿﻭ ﺐﺠﻳ ﻻﻭ ،ﺔﺑﻮﻃﺮﻟﺍ ﻭﺃ ﺮﻄﻤﻠﻟ ﺯﺎﻬﺠﻟﺍ ﺍﺬﻫ ﺾﻳﺮﻌﺗ ﺐﺠﻳ ﻻ ،ﻖﻳﺮﺣ ﺮﻃﺎﺨﻣ ﻭﺃ ﺔﻴﺑﺮﻬﻛ ﺔﻣﺪﺻ ثﻭﺪﺣ ﻊﻨﻤﻟ :ريذحت
.ﺕﺍﺮﻳﺬﺤﺘﻟﺍ ﻦﻣ ﺪﻳﺰﻤﻟ ﻞﻴﻐﺸﺘﻟﺍ ﻞﻴﻟﺩ ﺃﺮﻗﺍ ،ﺯﺎﻬﺠﻟﺍ ﺍﺬﻫ ﻡﺍﺪﺨﺘﺳﺍ ﻞﺒﻗ .ﻪﻗﻮﻓ ،ﺕﺎﻳﺮﻫﺰﻟﺍ
ريذحت
.ﻦﻴﻠﻫﺆﻤﻟﺍ ﻦﻴﻔﻇﻮﻤﻟﺍ ﻦﻣ ﺔﻣﺪﺧ
Page 5
IMPORTANT SAFETY INSTRUCTIONS
WARNING: When using electrical products, basic cautions should always be followed, including the following:
1. Read these instructions.
2. Keep these instructions.
3. Heed all warnings.
4. Follow all instructions.
5. Do not use this apparatus near water.
6. Clean only with a dry cloth.
7. Do not block any of the ventilation openings. Install in accordance with manufacturer’s instructions.
8. Do not install near any heat sources such as radiators, heat registers, stoves or other apparatus (including amplifiers) that
produce heat.
9. Do not defeat the safety purpose of the polarized or grounding-type plug. A polarized plug has two blades with one wider than
the other. A grounding type plug has two blades and a third grounding plug. The wide blade or third prong is provided for your
safety. If the provided plug does not fit into your outlet, consult an electrician for replacement of the obsolete outlet.
10. Protect the power cord from being walked on or pinched, particularly at plugs, convenience receptacles, and the point they exit
from the apparatus.
11. Only use attachments/accessories provided by the manufacturer.
12. Use only with a cart, stand, tripod, bracket, or table specified by the manufacturer, or sold with the apparatus. When a cart is
used, use caution when moving the cart/apparatus combination to avoid injury from tip-over.
13. Unplug this apparatus during lightning storms or when unused for long periods of time.
14. Refer all servicing to qualified service personnel. Servicing is required when the apparatus has been damaged in any way, such
as power-supply cord or plug is damaged, liquid has been spilled or objects have fallen into the apparatus, the apparatus has
been exposed to rain or moisture, does not operate normally, or has been dropped.
15. Never break off the ground pin. Write for our free booklet “Shock Hazard and Grounding.” Connect only to a power supply of the
type marked on the unit adjacent to the power supply cord.
16. If this product is to be mounted in an equipment rack, rear support should be provided.
17. Note for UK only: If the colors of the wires in the mains lead of this unit do not correspond with the terminals in your plug‚
proceed as follows: a) The wire that is colored green and yellow must be connected to the terminal that is marked by the letter
E‚ the earth symbol‚ colored green or colored green and yellow. b) The wire that is colored blue must be connected to the
terminal that is marked with the letter N or the color black. c) The wire that is colored brown must be connected to the terminal
that is marked with the letter L or the color red.
18. This electrical apparatus should not be exposed to dripping or splashing and care should be taken not to place objects
containing liquids, such as vases, upon the apparatus.
19. The on/off switch in this unit does not break both sides of the primary mains. Hazardous energy can be present inside the
chassis when the on/off switch is in the off position. The mains plug or appliance coupler is used as the disconnect device, the
disconnect device shall remain readily operable.
20. Exposure to extremely high noise levels may cause a permanent hearing loss. Individuals vary considerably in susceptibility to
noise-induced hearing loss, but nearly everyone will lose some hearing if exposed to sufficiently intense noise for a sufficient
time. The U.S. Government’s Occupational Safety and Health Administration (OSHA) has specified the following permissible
noise level exposures:
8 90
6 92
4 95
3 97
2 100
11⁄2 102
1 105
1⁄2 110
1⁄4orless 115
Duration Per Day In Hours Sound Level dBA, Slow Response
ENGLISH
According to OSHA, any exposure in excess of the above permissible limits could result in some hearing loss. Earplugs or protectors to
the ear canals or over the ears must be worn when operating this amplification system in order to prevent a permanent hearing loss, if
exposure is in excess of the limits as set forth above. To ensure against potentially dangerous exposure to high sound pressure levels, it is
recommended that all persons exposed to equipment capable of producing high sound pressure levels such as this amplification system be
protected by hearing protectors while this unit is in operation.
SAVE THESE INSTRUCTIONS!
Page 6
INSTRUCCIONES IMPORTANTES PARA SU SEGURIDAD
CUIDADO: Cuando use productos electrónicos, debe tomar precauciones básicas, incluyendo las siguientes:
1. Lea estas instrucciones.
2. Guarde estas instrucciones.
3. Haga caso de todos los consejos.
4. Siga todas las instrucciones.
5. No usar este aparato cerca del agua.
6. Limpiar solamente con una tela seca.
7. No bloquear ninguna de las salidas de ventilación. Instalar de acuerdo a las instrucciones del fabricante.
8. No instalar cerca de ninguna fuente de calor como radiadores, estufas, hornos u otros aparatos (incluyendo amplificadores) que
produzcan calor.
9. No retire la patilla protectora del enchufe polarizado o de tipo “a Tierra”. Un enchufe polarizado tiene dos puntas, una de ellas
más ancha que la otra. Un enchufe de tipo “a Tierra” tiene dos puntas y una tercera “a Tierra”. La punta ancha (la tercera ) se
proporciona para su seguridad. Si el enchufe proporcionado no encaja en su enchufe de red, consulte a un electricista para
que reemplaze su enchufe obsoleto.
10. Proteja el cable de alimentación para que no sea pisado o pinchado, particularmente en los enchufes, huecos, y los puntos que
salen del aparato.
11. Usar solamente añadidos/accesorios proporcionados por el fabricante.
12. Usar solamente un carro, pie, trípode, o soporte especificado por el fabricante, o vendido junto al aparato. Cuando se use
un carro, tenga cuidado al mover el conjunto carro/aparato para evitar que se dañe en un vuelco. No suspenda esta caja de
ninguna manera.
13. Desenchufe este aparato durante tormentas o cuando no sea usado durante largos periodos de tiempo.
14. Para cualquier reparación, acuda a personal de servicio cualificado. Se requieren reparaciones cuando el aparato ha
sido dañado de alguna manera, como cuando el cable de alimentación o el enchufe se han dañado, algún líquido ha sido
derramado o algún objeto ha caído dentro del aparato, el aparato ha sido expuesto a la lluvia o la humedad, no funciona de
manera normal, o ha sufrido una caída.
15. Nunca retire la patilla de Tierra.Escríbanos para obtener nuestro folleto gratuito “Shock Hazard and Grounding” (“Peligro de
Electrocución y Toma a Tierra”). Conecte el aparato sólo a una fuente de alimentación del tipo marcado al lado del cable de
alimentación.
16. Si este producto va a ser enracado con más equipo, use algún tipo de apoyo trasero.
17. Nota para el Reino Unido solamente: Si los colores de los cables en el enchufe principal de esta unidad no corresponden con
los terminales en su enchufe‚ proceda de la siguiente manera: a) El cable de color verde y amarillo debe ser conectado al
terminal que está marcado con la letra E‚ el símbolo de Tierra (earth)‚ coloreado en verde o en verde y amarillo. b) El cable
coloreado en azul debe ser conectado al terminal que está marcado con la letra N o el color negro. c) El cable coloreado en
marrón debe ser conectado al terminal que está marcado con la letra L o el color rojo.
18. Este aparato eléctrico no debe ser sometido a ningún tipo de goteo o salpicadura y se debe tener cuidado para no poner
objetos que contengan líquidos, como vasos, sobre el aparato.
19. El interruptor de en/lejos en esta unidad no rompe ambos lados de la red primaria. La energía peligrosa puede ser presente
dentro del chasis cuando el interruptor de en/lejos está en el de la posición. El tapón de la red o el acoplador del aparato son
utilizados como el desconecta dispositivo, el desconecta dispositivo se quedará fácilmente operable.
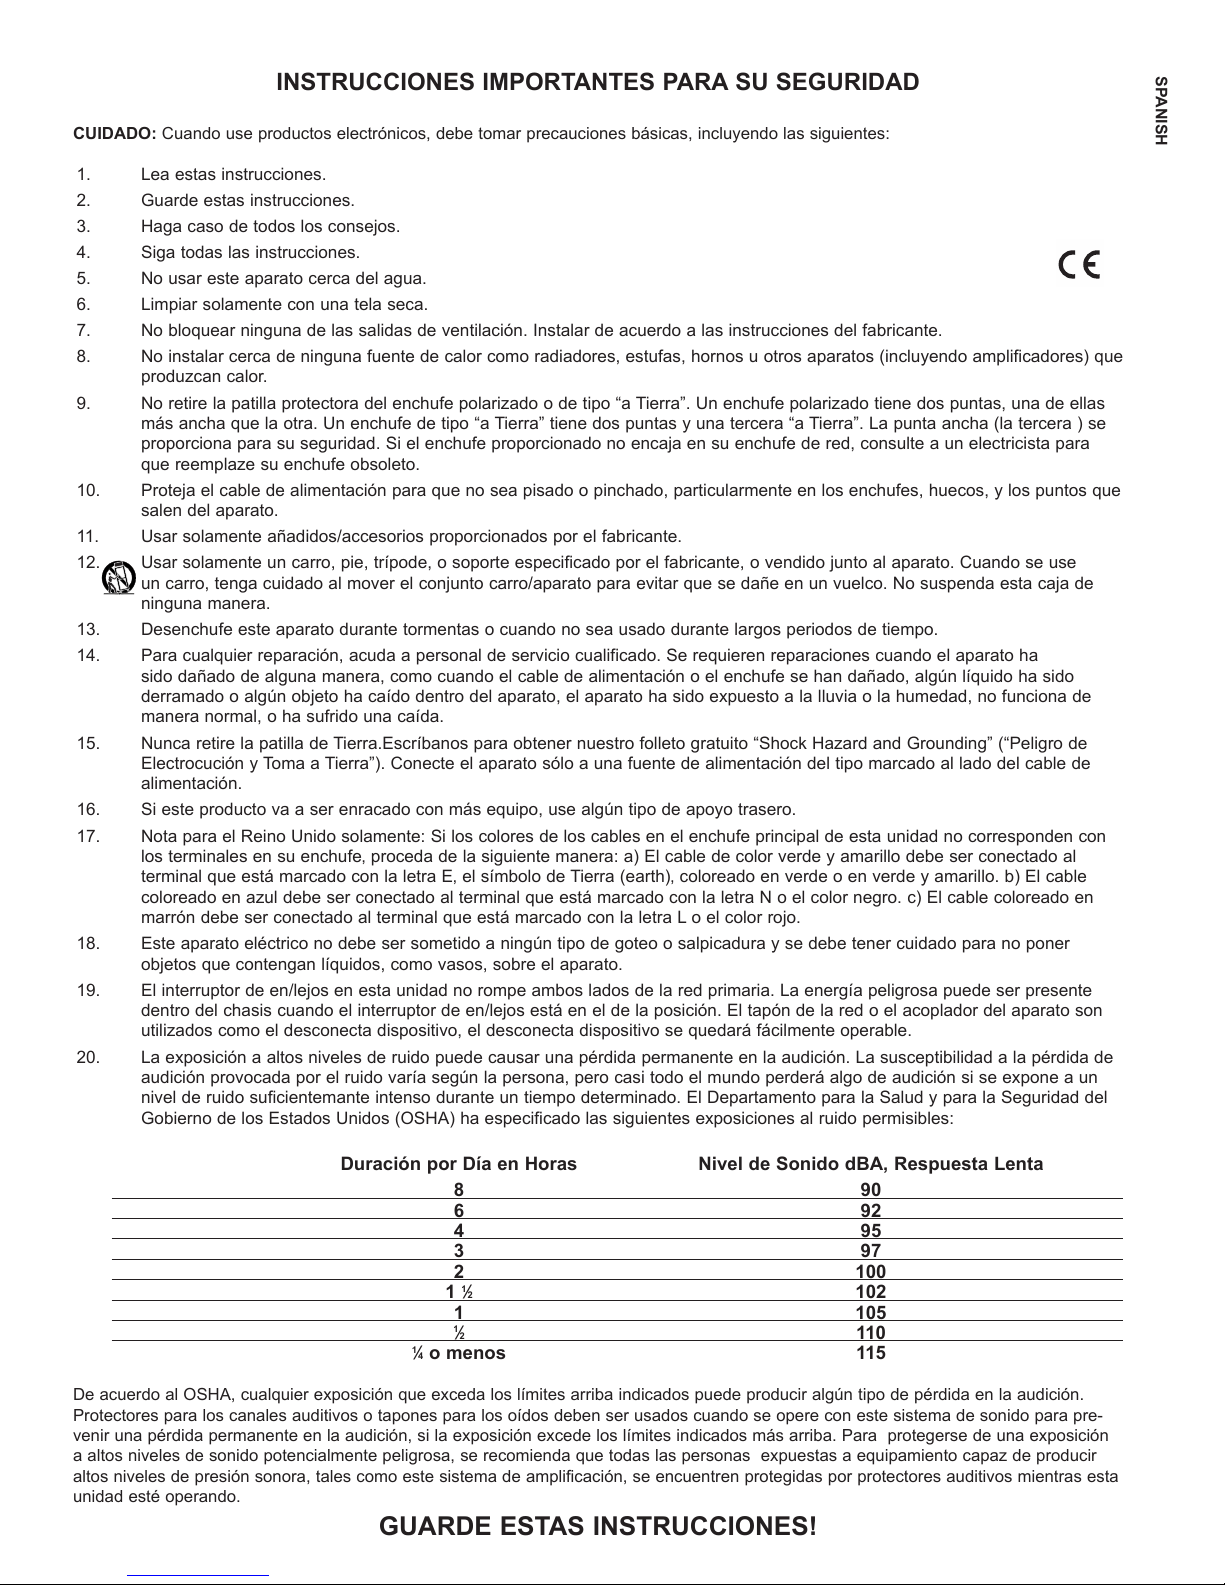
20. La exposición a altos niveles de ruido puede causar una pérdida permanente en la audición. La susceptibilidad a la pérdida de
audición provocada por el ruido varía según la persona, pero casi todo el mundo perderá algo de audición si se expone a un
nivel de ruido suficientemante intenso durante un tiempo determinado. El Departamento para la Salud y para la Seguridad del
Gobierno de los Estados Unidos (OSHA) ha especificado las siguientes exposiciones al ruido permisibles:
8 90
6 92
4 95
3 97
2 100
1
1 105
Duración por Día en Horas Nivel de Sonido dBA, Respuesta Lenta
1
⁄2 102
1
⁄2 110
1
⁄4 o menos 115
SPANISH
De acuerdo al OSHA, cualquier exposición que exceda los límites arriba indicados puede producir algún tipo de pérdida en la audición.
Protectores para los canales auditivos o tapones para los oídos deben ser usados cuando se opere con este sistema de sonido para pre-
venir una pérdida permanente en la audición, si la exposición excede los límites indicados más arriba. Para protegerse de una exposición
a altos niveles de sonido potencialmente peligrosa, se recomienda que todas las personas expuestas a equipamiento capaz de producir
altos niveles de presión sonora, tales como este sistema de amplificación, se encuentren protegidas por protectores auditivos mientras esta
unidad esté operando.
GUARDE ESTAS INSTRUCCIONES!
Page 7
INSTRUCTIONS IMPORTANTES DE SECURITE
ATTENTION: L’utilisation de tout appareil électrique doit être soumise aux precautions d’usage incluant:
1. Lire ces instructions.
2. Gardez ce manuel pour de futures références.
3. Prétez attention aux messages de précautions de ce manuel.
4. Suivez ces instructions.
5. N’utilisez pas cette unité proche de plans d’eau.
6. N’utilisez qu’un tissu sec pour le nettoyage de votre unité.
7. N’obstruez pas les systèmes de refroidissement de votre unité et installez votre unité en fonction des instructions de ce manuel.
8. Ne positionnez pas votre unité à proximité de toute source de chaleur.
9. Connectez toujours votre unité sur une alimentation munie de prise de terre utilisant le cordon d’alimentation fourni.
10. Protégez les connecteurs de votre unité et positionnez les cablages pour éviter toutes déconnexions accidentelles.
11. N’utilisez que des fixations approuvées par le fabriquant.
12. Lors de l’utilsation sur pied ou pole de support, assurez dans le cas de déplacement de l’ensemble enceinte/support de prévenir tout
basculement intempestif de celui-ci.
13. Il est conseillé de déconnecter du secteur votre unité en cas d’orage ou de durée prolongée sans utilisation.
14. Seul un technicien agréé par le fabriquant est à même de réparer/contrôler votre unité. Celle-ci doit être contrôlée si elle a subit des
dommages de manipulation, d’utilisation ou de stockage (humidité,…).
15. Ne déconnectez jamais la prise de terre de votre unité.
16. Si votre unité est destinée a etre montée en rack, des supports arriere doivent etre utilises.
17. Note pour les Royaumes-Unis: Si les couleurs de connecteurs du cable d’alimentation ne correspond pas au guide de la prise
secteur, procédez comme suit: a) Le connecteur vert et jaune doit être connectrer au terminal noté E, indiquant la prise de terre
ou correspondant aux couleurs verte ou verte et jaune du guide. b) Le connecteur Bleu doit être connectrer au terminal noté N,
correspondnat à la couleur noire du guide. c) Le connecteur marron doit être connectrer au terminal noté L, correspondant à la
couleur rouge du guide.
18. Cet équipement électrique ne doit en aucun cas être en contact avec un quelconque liquide et aucun objet contenant un liquide, vase
ou autre ne devrait être posé sur celui-ci. 1
9. L’interrupter (on-off) dans cette unité ne casse pas les deux côtés du primaire principal. L’énergie hasardeuse peut être preésente
dans châssis quand l’interrupter (on-off) est dans le de la position. Le bouchon principal ou atelage d’appareil est utilisé comme le
débrancher l’appareil restera facilement opérable.
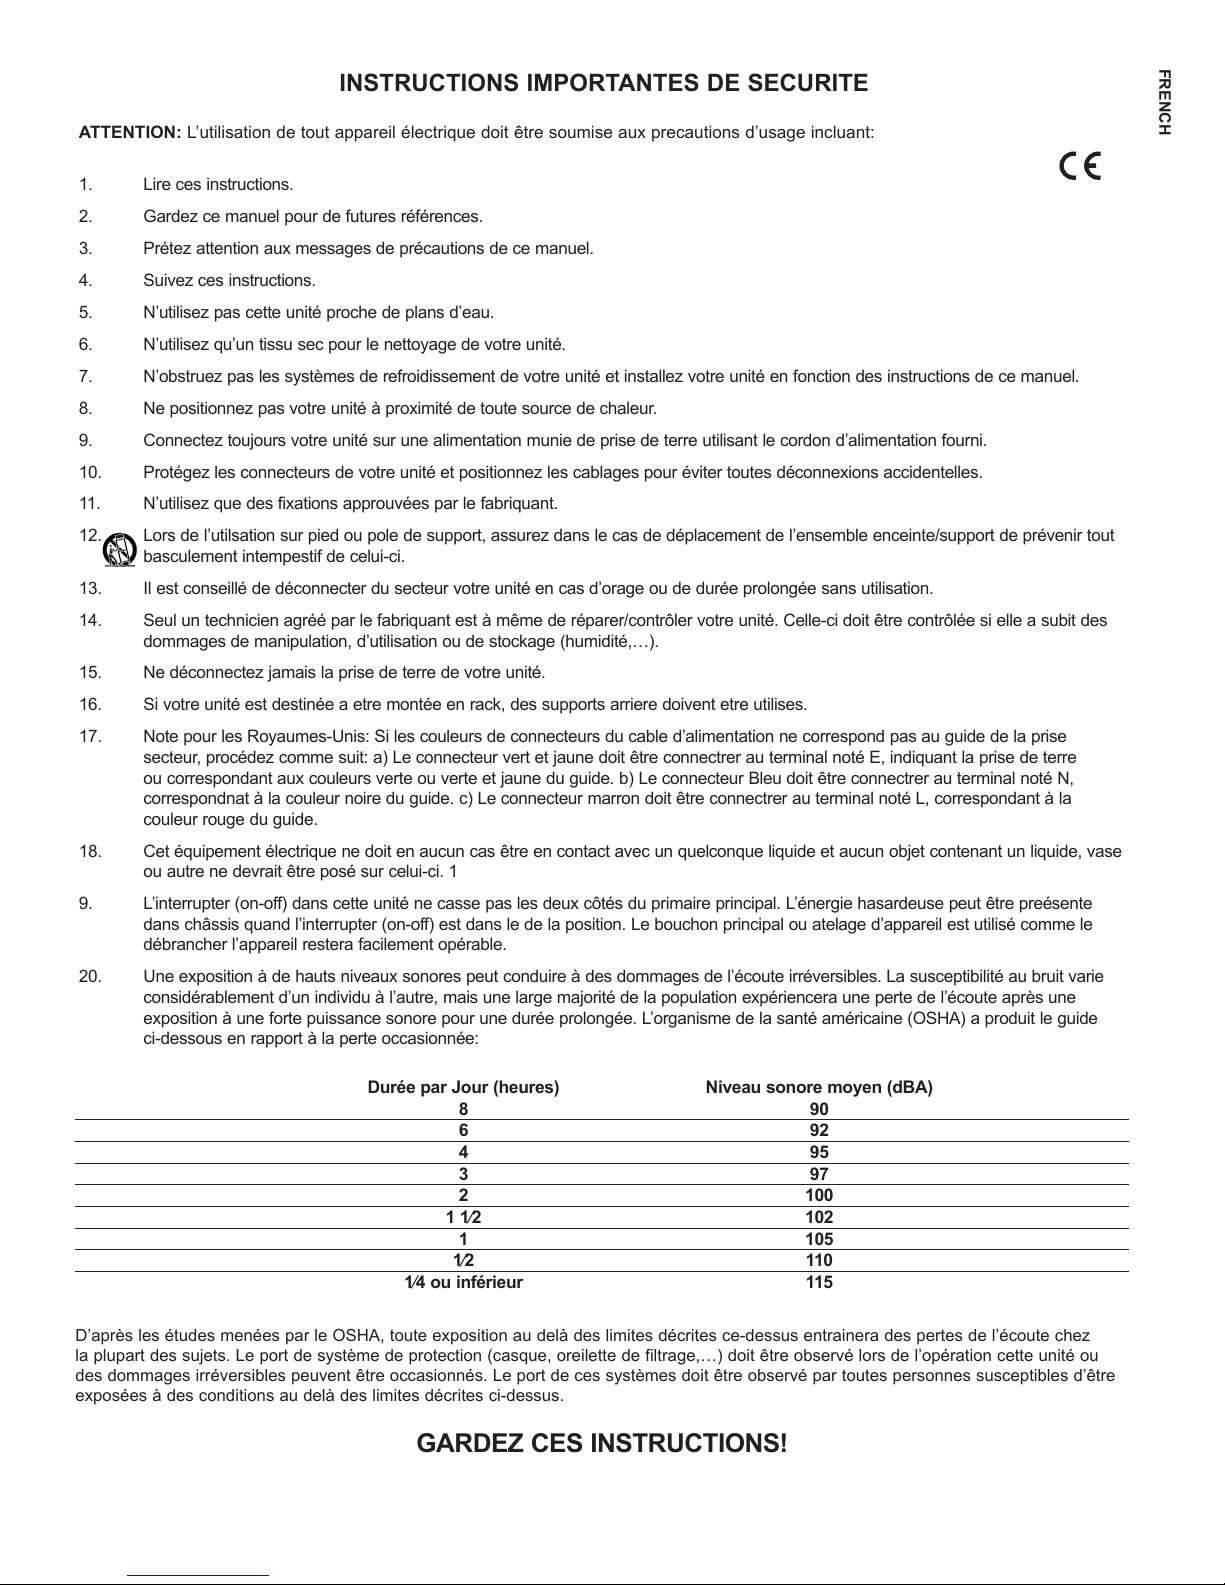
20. Une exposition à de hauts niveaux sonores peut conduire à des dommages de l’écoute irréversibles. La susceptibilité au bruit varie
considérablement d’un individu à l’autre, mais une large majorité de la population expériencera une perte de l’écoute après une
exposition à une forte puissance sonore pour une durée prolongée. L’organisme de la santé américaine (OSHA) a produit le guide
ci-dessous en rapport à la perte occasionnée:
Durée par Jour (heures) Niveau sonore moyen (dBA)
8 90
6 92
4 95
3 97
2 100
11⁄2 102
1 105
1⁄2 110
1⁄4ouinférieur 115
FRENCH
D’après les études menées par le OSHA, toute exposition au delà des limites décrites ce-dessus entrainera des pertes de l’écoute chez
la plupart des sujets. Le port de système de protection (casque, oreilette de filtrage,…) doit être observé lors de l’opération cette unité ou
des dommages irréversibles peuvent être occasionnés. Le port de ces systèmes doit être observé par toutes personnes susceptibles d’être
exposées à des conditions au delà des limites décrites ci-dessus.
GARDEZ CES INSTRUCTIONS!
Page 8

WICHTIGE SICHERHEITSHINWEISE
SICHERHEITSHINWEISEACHTUNG: Beim Einsatz von Elektrogeräten müssen u.a. grundlegende orsichtsmaßnahmen befolgt werden:
1. Lesen Sie sich diese Anweisungen durch.
2. Bewahren Sie diese Anweisungen auf.
3. Beachten Sie alle Warnungen.
4. Befolgen Sie alle Anweisungen.
5. Setzen Sie dieses Gerät nicht in der Nähe von Wasser ein.
6. Reinigen Sie es nur mit einem trockenen Tuch.
7. Blockieren Sie keine der Lüftungsöffnungen. Führen Sie die Installation gemäß den Anweisungen des Herstellers durch.
8. Installieren Sie das Gerät nicht neben Wärmequellen wie Heizungen, Heizgeräten, Öfen oder anderen Geräten (auch erstärkern),
die Wärme erzeugen.
9. Beeinträchtigen Sie nicht die Sicherheitswirkung des gepolten Steckers bzw. des Erdungssteckers. Ein gepolter Stecker weist zwei
Stifte auf, von denen einer breiter ist als der andere. Ein Erdungsstecker weist zwei Stifte und einen dritten Erdungsstift auf. Der breite
Stift bzw. der dritte Stift dient Ihrer Sicherheit. Sollte der beiliegende Stecker nicht in Ihre Steckdose passen, wenden Sie sich bitte an
einen Elektriker, um die ungeeignete Steckdose austauschen zu lassen.
10. Schützen Sie das Netzkabel, sodass niemand darauf tritt oder es geknickt wird, insbesondere an Steckern oder Buchsen und ihren
Austrittsstellen aus dem Gerät.
11. erwenden Sie nur die vom Hersteller erhältlichen Zubehörgeräte oder Zubehörteile.
12. erwenden Sie nur einen Wagen, Stativ, Dreifuß, Träger oder Tisch, der den Angaben des Herstellers entspricht oder zusammen
mit dem Gerät verkauft wurde. Wird ein Wagen verwendet, bewegen Sie den Wagen mit dem darauf befindlichen Gerät besonders
vorsichtig, damit er nicht umkippt und möglicherweise jemand verletzt wird.
13. Trennen Sie das Gerät während eines Gewitters oder während längerer Zeiträume, in denen es nicht benutzt wird, von der
Stromversorgung.
14. Lassen Sie sämtliche Wartungsarbeiten von qualifizierten Kundendiensttechnikern durchführen. Eine Wartung ist erforderlich, wenn
das Gerät in irgendeiner Art beschädigt wurde, etwa wenn das Netzkabel oder der Netzstecker beschädigt wurden, Flüssigkeit oder
Gegenstände in das Gerät gelangt sind, das Gerät Regen oder Feuchtigkeit ausgesetzt wurde, nicht normal arbeitet oder herunt-
ergefallen ist.
15. Der Erdungsstift darf nie entfernt werden. Auf Wunsch senden wir Ihnen gerne unsere kostenlose Broschüre „Shock Hazard and
Grounding“ (Gefahr durch elektrischen Schlag und Erdung) zu. Schließen Sie nur an die Stromversorgung der Art an, die am Gerät
neben dem Netzkabel angegeben ist.
16. Wenn dieses Produkt in ein Geräte-Rack eingebaut werden soll, muss eine ersorgung über die Rückseite eingerichtet werden.
17. Hinweis – Nur für Großbritannien: Sollte die Farbe der Drähte in der Netzleitung dieses Geräts nicht mit den Klemmen in Ihrem
Stecker übereinstimmen, gehen Sie folgendermaßen vor: a) Der grün-gelbe Draht muss an die mit E (Symbol für Erde) markierte
bzw. grüne oder grün-gelbe Klemme angeschlossen werden. b) Der blaue Draht muss an die mit N markierte bzw. schwarze Klemme
angeschlossen werden. c) Der braune Draht muss an die mit L markierte bzw. rote Klemme angeschlossen werden.
18. Dieses Gerät darf nicht ungeschützt Wassertropfen und Wasserspritzern ausgesetzt werden und es muss darauf geachtet werden,
dass keine mit Flüssigkeiten gefüllte Gegenstände, wie z. B. Blumenvasen, auf dem Gerät abgestellt werden.
19. Der Netzschalter in dieser Einheit bricht beide Seiten von den primären Haupleitungen nicht. Gerfährliche Energie kann anwesend
innerhalb des Chassis sein, wenn her Netzschalter im ab Poistion ist. Die Hauptleitungen stöpseln zu oder Gerätkupplung ist benutzt,
während das orrichtung abschaltet, das schaltet orrichtung wird bleiben sogleich hantierbar ab.
20. Belastung durch extrem hohe Lärmpegel kann zu dauerhaftem Gehörverlust führen. Die Anfälligkeit für durch Lärm bedingten
Gehörverlust ist von Mensch zu Mensch verschieden, das Gehör wird jedoch bei jedem in gewissem Maße geschädigt, der über
einen bestimmten Zeitraum ausreichend starkem Lärm ausgesetzt ist. Die US-Arbeitsschutzbehörde (Occupational and Health
Administration, OSHA) hat die folgenden zulässigen Pegel für Lärmbelastung festgelegt:
Dauer pro Tag in Stunden Geräuschpegel dBA, langsame Reaktion
8 90
6 92
4 95
3 97
2 100
1 1⁄2 102
1 105
1
⁄2 110
1
⁄4oderweniger 115
DEUTSCH
Laut OSHA kann jede Belastung über den obenstehenden zulässigen Grenzwerten zu einem gewissen Gehörverlust führen. Sollte die Belastung
die obenstehenden Grenzwerte übersteigen, müssen beim Betrieb dieses erstärkungssystems Ohrenstopfen oder Schutzvorrichtungen im
Gehörgang oder über den Ohren getragen werden, um einen dauerhaften Gehörverlust zu verhindern. Um sich vor einer möglicherweise
gefährlichen Belastung durch hohe Schalldruckpegel zu schützen, wird allen Personen empfohlen, die mit Geräten arbeiten, die wie dieses
erstärkungssystem hohe Schalldruckpegel erzeugen können, beim Betrieb dieses Geräts einen Gehörschutz zu tragen.
BEWAHREN SIE DIESE SICHERHEITSHINWEISE AUF!
Page 9
TÄRKEÄT TURVALLISUUSOHJEET
VAARA: Käytettäessä sähkölaitteita tulee aina huomioida mm. seuraavat turvallisuusohjeet:
1. Lue nämä ohjeet.
2. Säilytä nämä ohjeet.
3. Huomioi kaikki varoitukset.
4. Noudata kaikkia ohjeita.
5. Älä käytä laitetta veden lähellä.
6. Puhdista vain kuivalla kankaalla.
7. Älä tuki mitään tuuletusaukkoja. Asenna valmistajan ohjeiden mukaisesti.
8. Älä asenna lämpölähteiden, kuten pattereiden, liesien tai muiden lämpöä tuottavien laitteiden (kuten vahvistinten) lähelle.
9. Älä poista polarisoidun tai maadoitustyyppisen tulpan suojausta. Polarisoidun tulpan toinen napa on leveämpi kuin toinen.
Maadoitustulpassa on kaksi napaa ja kolmas maadoitusnapa. Leveä napa ja maadoitusnapa on tarkoitettu turvaamaan laitteen
käyttöä. Jos mukana toimitettu tulppa ei sovi pistorasiaan, kutsu sähkömies vaihtamaan pistorasia, sillä se on vanhentunut.
10. Suojaa virtajohtoa päälle kävelemiseltä ja nipistykseltä, erityisesti pistotulppien, pistorasioiden sekä laitteen ulosvientien kohdalla.
11. Käytä vain valmistajan toimittamia lisälaitteita.
12. Käytä vain valmistajan määrittämän tai laitteen mukana myydyn vaunun, jalustan, kolmijalan, kiinnikkeen tai pöydän kanssa.
Käytettäessä vaunua liikuta vaunun ja laitteen yhdistelmää varovasti, jotta vältetään loukkaantumiset kaatumisesta johtuen.
13. Irrota laite sähköverkosta ukkosmyrskyjen aikana tai jos laitetta ei käytetä pitkään aikaan.
14. Huoltaminen tulee jättää pätevän huoltohenkilöstön tehtäväksi. Huoltoa tarvitaan, kun laite on jollakin tavoin vioittunut, esim.
virtalähteen johto tai pistoke on vioittunut, laitteen sisään on joutunut nestettä tai esineitä, laite on altistettu sateelle tai kosteudelle,
laite ei toimi normaalisti tai se on pudonnut.
15. Älä koskaan katkaise maadoitusnastaa. Ottamalla meihin yhteyttä saat kirjasen "Sähköiskuvaara ja maadoitus". Kytke vain
virtalähteeseen, joka vastaa laitteen virtajohdon viereen merkittyä tyyppiä.
16. Jos laite kiinnitetään laiteräkkiin, tulee se tukea takaosastaan.
17. Note for UK only: If the colors of the wires in the mains lead of this unit do not correspond with the terminals in your plug‚ proceed as
follows:
a) The wire that is colored green and yellow must be connected to the terminal that is marked by the letter E‚ the earth symbol‚
colored green or colored green and yellow.
b) The wire that is colored blue must be connected to the terminal that is marked with the letter N or the color black.
c) The wire that is colored brown must be connected to the terminal that is marked with the letter L or the color red.
18. Tätä sähkölaitetta ei tule altistaa nestetipoille tai roiskeille, eikä laitteen päälle saa asettaa nestettä sisältäviä esineitä, kuten
maljakoita.
19. Laitteen virtakytkin ei katkaise ensiövirran molempia puolia. Laitteen sisällä voi olla vaarallinen jännite, kun virtakytkin on pois-
asennossa. irtajohto toimii pääkytkimenä, ja sen pitää olla aina käytettävissä.
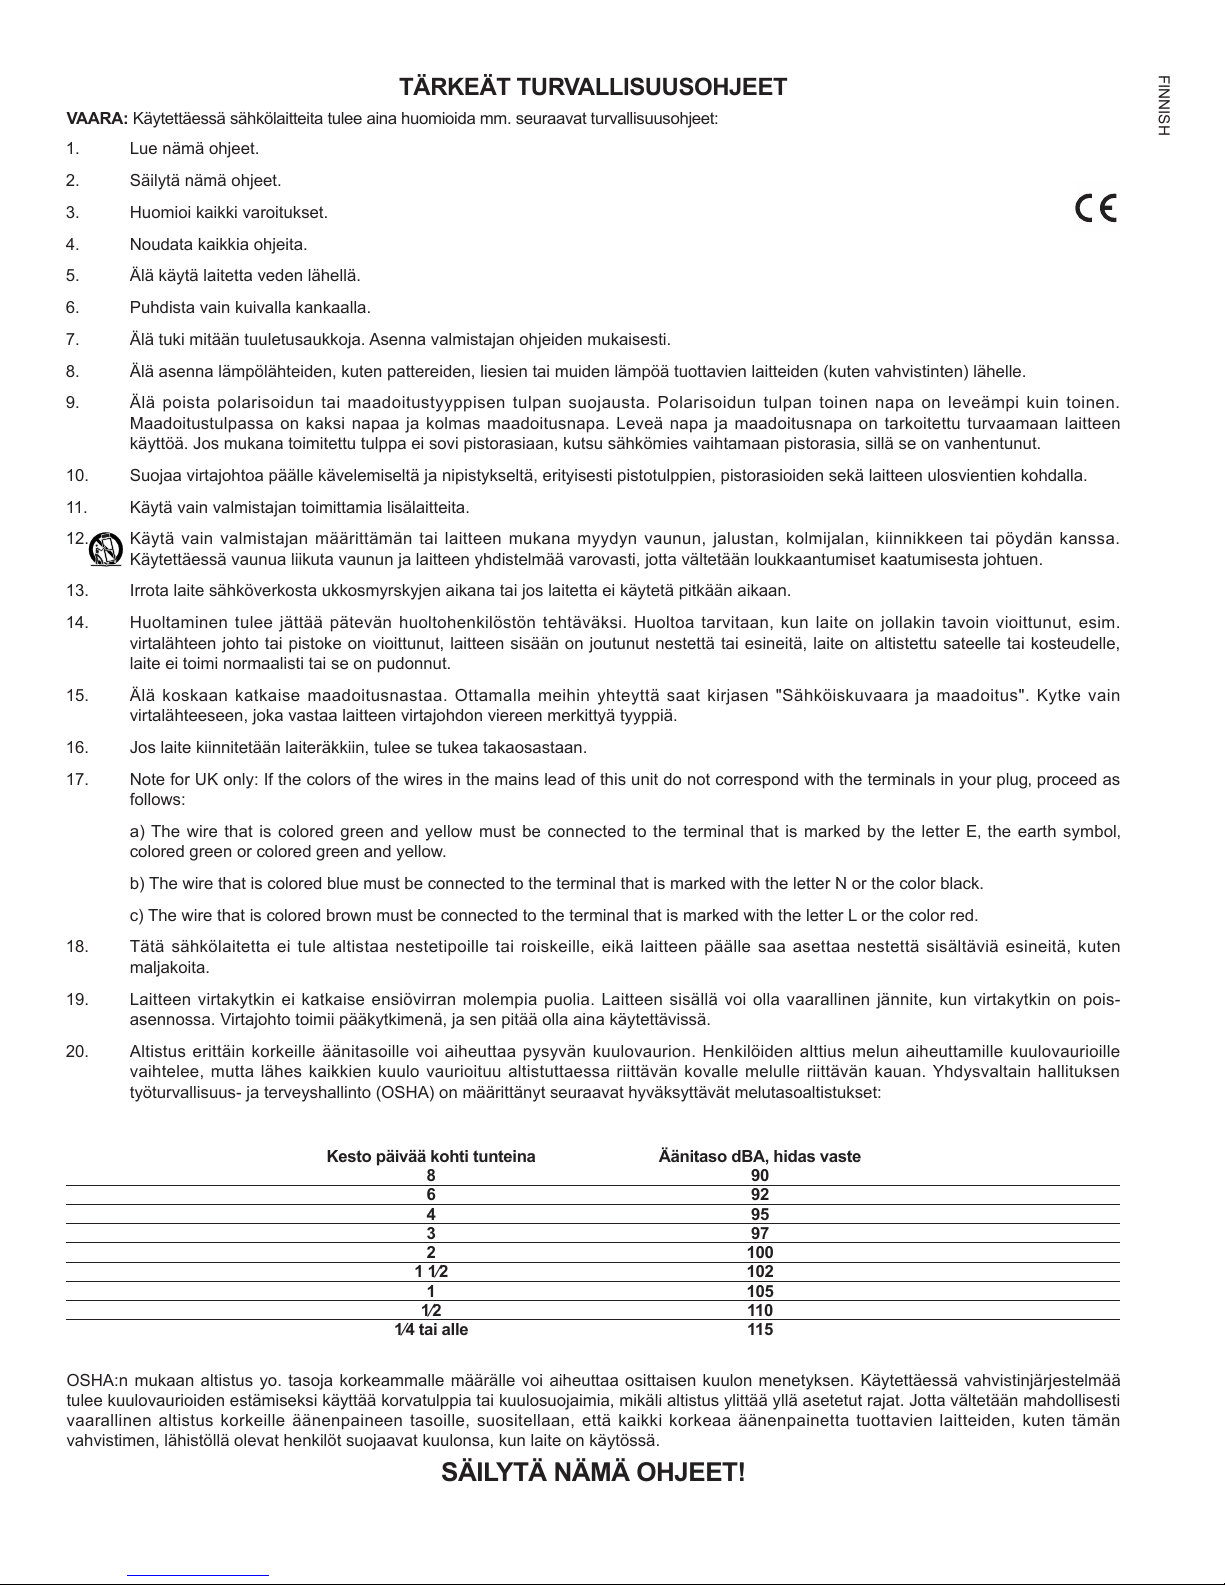
20. Altistus erittäin korkeille äänitasoille voi aiheuttaa pysyvän kuulovaurion. Henkilöiden alttius melun aiheuttamille kuulovaurioille
vaihtelee, mutta lähes kaikkien kuulo vaurioituu altistuttaessa riittävän kovalle melulle riittävän kauan. Yhdysvaltain hallituksen
työturvallisuus- ja terveyshallinto (OSHA) on määrittänyt seuraavat hyväksyttävät melutasoaltistukset:
FINNISH
Kesto päivää kohti tunteina Äänitaso dBA, hidas vaste
OSHA:n mukaan altistus yo. tasoja korkeammalle määrälle voi aiheuttaa osittaisen kuulon menetyksen. Käytettäessä vahvistinjärjestelmää
tulee kuulovaurioiden estämiseksi käyttää korvatulppia tai kuulosuojaimia, mikäli altistus ylittää yllä asetetut rajat. Jotta vältetään mahdollisesti
vaarallinen altistus korkeille äänenpaineen tasoille, suositellaan, että kaikki korkeaa äänenpainetta tuottavien laitteiden, kuten tämän
vahvistimen, lähistöllä olevat henkilöt suojaavat kuulonsa, kun laite on käytössä.
8 90
6 92
4 95
3 97
2 100
11⁄2 102
1 105
1⁄2 110
1⁄4taialle 115
SÄILYTÄ NÄMÄ OHJEET!
Page 10
VIKTIGA SÄKERHETSINSTRUKTIONER
VARNING: När du använder elektriska produkter ska grundläggande försiktighetsåtgärder iakttas, inklusive följande:
1. Läs dessa instruktioner.
2. Behåll dessa instruktioner.
3. Iakttag alla varningar.
4. Följ alla instruktioner.
5. Använd inte apparaten i närheten av vatten.
6. Rengör endast med en torr trasa.
7. Blockera inte ventilationsöppningarna. Installera i enlighet med tillverkarens instruktioner.
8. Installera inte i närheten av värmekällor som radiatorer, varmluftsventiler, spisar eller andra apparater (inklusive förstärkare) som ger
ifrån sig värme.
9. Motverka inte säkerhetsfunktionen hos en jordad stickkontakt. En jordad stickkontakt har två stift och metallbleck på sidorna.
Metallblecket finns där för din säkerhet. Kontakta en elektriker för utbyte av det föråldrade vägguttaget om den medföljande
stickkontakten inte passar i ditt vägguttag.
10. Skydda strömsladden från att klivas på eller klämmas, särskilt vid kontakten, grenuttag och platsen där den lämnar apparaten.
11. Använd enbart tillsatser/tillbehör som tillhandahålls av tillverkaren.
12. Använd endast med en kärra, ställ, trefot, fäste eller bord i enlighet med tillverkarens specikationer, eller som säljs tillsammans med
apparaten. ar försiktig när du använder en kärra så att inga personskador uppstår på grund av att kombinationen kärra-apparat
välter när den yttas.
13. Koppla ur apparaten vid åskväder eller när den inte används under en längre tid.
14. Låt kvalicerad servicepersonal sköta all service. Service krävs om apparaten har skadats på något vis, till exempel om strömsladden
eller stickkontakten har skadats, vätska har spillts eller föremål har fallit ner i apparaten, apparaten har utsatts för regn eller fukt, inte
fungerar normalt eller har tappats.
15. Anslut aldrig till ojordade uttag. Skriv till oss för vårt gratishäfte ”Stötrisk och jordning”. Anslut endast till en strömkälla av samma typ
som enhetens märkning anger (bredvid strömsladden).
16. Om produkten ska monteras i ett utrustningsrack bör bakre stöd användas.
17. Note for UK only: If the colors of the wires in the mains lead of this unit do not correspond with the terminals in your plug‚ proceed as
follows:
a) The wire that is colored green and yellow must be connected to the terminal that is marked by the letter E‚ the earth symbol‚
colored green or colored green and yellow.
b) The wire that is colored blue must be connected to the terminal that is marked with the letter N or the color black.
c) The wire that is colored brown must be connected to the terminal that is marked with the letter L or the color red.
18. Denna elektriska apparat bör inte utsättas för dropp eller stänk och försiktighet bör iakttas så att inte föremål som innehåller vätskor,
såsom vaser, placeras ovanpå apparaten.
19. Enhetens strömbrytare bryter inte båda sidor av strömkretsen. Farlig energi kan förekoma inuti höljet när strömbrytaren är i av-läget.
Stickkontakten eller apparatkontakten fungerar som bortkopplingsenhet, bortkopplingsenheten ska hållas lättillgänglig.
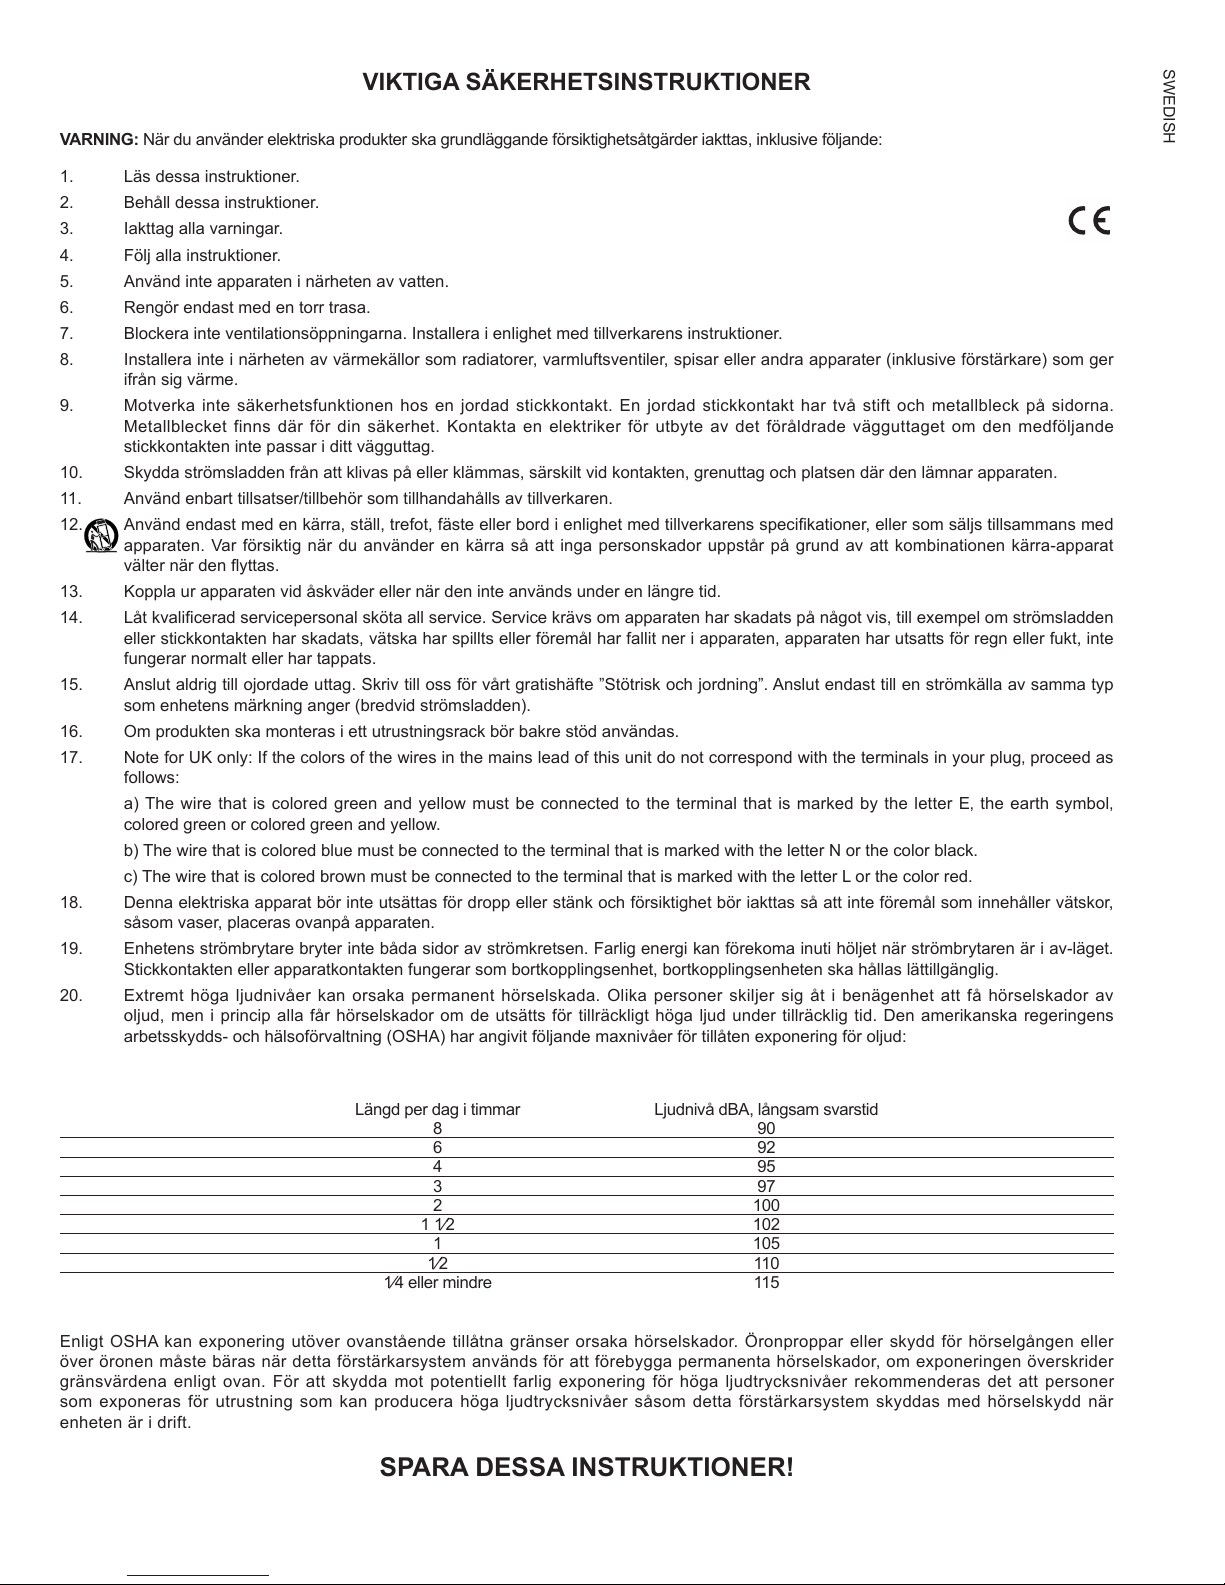
20. Extremt höga ljudnivåer kan orsaka permanent hörselskada. Olika personer skiljer sig åt i benägenhet att få hörselskador av
oljud, men i princip alla får hörselskador om de utsätts för tillräckligt höga ljud under tillräcklig tid. Den amerikanska regeringens
arbetsskydds- och hälsoförvaltning (OSHA) har angivit följande maxnivåer för tillåten exponering för oljud:
SWEDISH
Längd per dag i timmar Ljudnivå dBA, långsam svarstid
Enligt OSHA kan exponering utöver ovanstående tillåtna gränser orsaka hörselskador. Öronproppar eller skydd för hörselgången eller
över öronen måste bäras när detta förstärkarsystem används för att förebygga permanenta hörselskador, om exponeringen överskrider
gränsvärdena enligt ovan. För att skydda mot potentiellt farlig exponering för höga ljudtrycksnivåer rekommenderas det att personer
som exponeras för utrustning som kan producera höga ljudtrycksnivåer såsom detta förstärkarsystem skyddas med hörselskydd när
enheten är i drift.
8 90
6 92
4 95
3 97
2 100
1 1⁄2 102
1 105
1⁄2 110
1⁄4 eller mindre 115
SPARA DESSA INSTRUKTIONER!
Page 11
VIKTIGE SIKKERHETSINSTRUKSJONER
ADVARSEL: ed bruk av et elektrisk apparat må grunnleggende forsiktighetsregler følges, inklusive de følgende:
1. Les disse instruksjonene.
2. Ta vare på disse instruksjonene.
3. Følg alle advarslene.
4. Følg alle instruksjoner.
5. Ikke bruk apparatet i nærheten av vann.
6. Rengjør bare med en tørr klut.
7. Ikke blokker noen av ventilasjonsåpningene. Installer i henhold til produsentens instruksjoner.
8. Ikke installer i nærheten av en varmekilde som radiatorer, varmekanaler, ovn er eller andre apparater (inklusive forsterkere) som
utvikler varme.
9. Ikke reduserer sikkerhetshensiktene med polariserte eller jordede støpsler. Et polarisert støpsel har to blader, der det ene er
bredere enn det andre. Et støpsel med jording har to blader og en tredje jordingsplugg. Det brede bladet eller den tredje pluggen
er der for å gi deg beskyttelse. Hvis det medfølgende støpslet ikke passer inn i den elektriske kontakten der du bor, kontakt en
elektriker for å få støpslet skiftet.
10. Beskytt den elektriske ledningen mot å bli trådt på eller klemt, spesielt ved støpslet, stikkontakten og punktet der den kommer ut
av apparatet.
11. Bruk bare tilkoblinger/tilbehør som er levert av produsenten.
12. Bruk bare med vogn, stativ, tripod, brakett eller bord spesisert av produsenten eller solgt sammen med apparatet. Når det be-
nyttes en vogn, vis forsiktighet når vogn/apparat yttes for å unngå skade som følge av et velt.
13. Trekk ut ledningen til apparatet under tordenvær eller når det skal stå ubrukt over en lengre periode.
14. Overlat servicearbeidet til kvalisert servicepersonell. Service er påkrevet når apparatet har vært utsatt for skade, som at den
elektriske ledningen eller støpslet er skadet, væske er blitt sølt over apparatet eller en gjenstand har falt ned i apparatet, appara-
tet har vært utsatt for regn eller fuktighet, at det ikke virker normalt eller har falt i gulvet.
15. Bryt aldri av jordingspinnen. Skriv etter gratis hefte “Shock Hazard and Grounding” (Fare for elektrisk støt og jording). Tilkoble
bare elektriske anlegg av den typen som er angitt på enheten ved siden av den elektriske ledningen.
16. Hvis dette produktet skal plasseres i en utstyrsreol må det etableres støtte på baksiden.
17. Note for UK only: If the colors of the wires in the mains lead of this unit do not correspond with the terminals in your plug‚ pro-
ceed as follows: a) The wire that is colored green and yellow must be connected to the terminal that is marked by the letter E‚ the
earth symbol‚ colored green or colored green and yellow. b) The wire that is colored blue must be connected to the terminal that
is marked with the letter N or the color black. c) The wire that is colored brown must be connected to the terminal that is marked
with the letter L or the color red.
18. Dette elektriske apparatet må ikke utsettes for drypp eller sprut fra væske, og det må utvises forsiktighet slik at det ikke plasseres
gjenstander fylt med vann - som en vase - på apparatet.
19. På/av-bryteren på denne enheten bryter ikke begge sider av den primære strømkretsen. Farlig strøm kan nnes på innsiden av
chassiset også når På/Av-bryteren er i posisjon Av. Det elektriske støpslet eller utstyrskoblingen brukes som frakoblingsutstyr,
frakoblingsutstyret skal være lett å komme til og bruke.
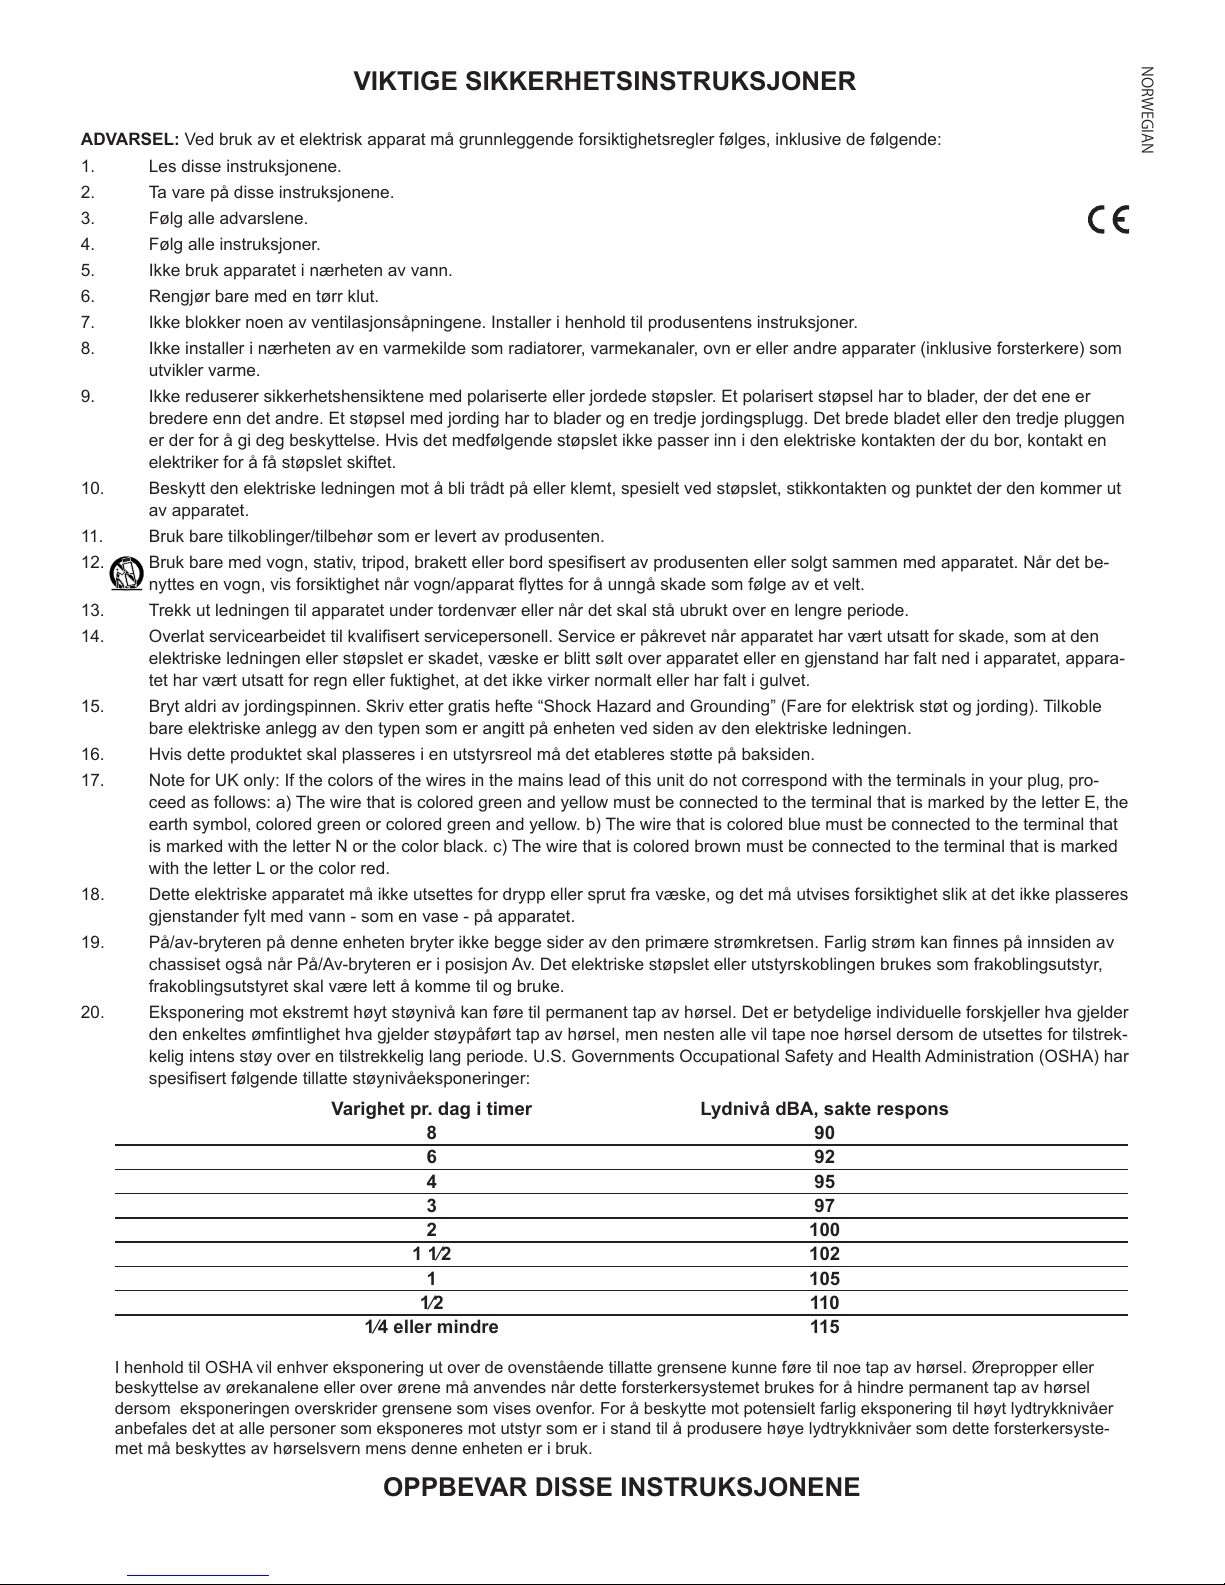
20. Eksponering mot ekstremt høyt støynivå kan føre til permanent tap av hørsel. Det er betydelige individuelle forskjeller hva gjelder
den enkeltes ømntlighet hva gjelder støypåført tap av hørsel, men nesten alle vil tape noe hørsel dersom de utsettes for tilstrek-
kelig intens støy over en tilstrekkelig lang periode. U.S. Governments Occupational Safety and Health Administration (OSHA) har
spesisert følgende tillatte støynivåeksponeringer:
Varighet pr. dag i timer Lydnivå dBA, sakte respons
8 90
6 92
4 95
3 97
2 100
11⁄2 102
1 105
1⁄2 110
1⁄4ellermindre 115
NORWEGIAN
I henhold til OSHA vil enhver eksponering ut over de ovenstående tillatte grensene kunne føre til noe tap av hørsel. Ørepropper eller
beskyttelse av ørekanalene eller over ørene må anvendes når dette forsterkersystemet brukes for å hindre permanent tap av hørsel
dersom eksponeringen overskrider grensene som vises ovenfor. For å beskytte mot potensielt farlig eksponering til høyt lydtrykknivåer
anbefales det at alle personer som eksponeres mot utstyr som er i stand til å produsere høye lydtrykknivåer som dette forsterkersyste-
met må beskyttes av hørselsvern mens denne enheten er i bruk.
OPPBEVAR DISSE INSTRUKSJONENE
Page 12
BELANGRIJKE VEILIGHEIDSINSTRUCTIES
WAARSCHUWING: Bij gebruik van elektrische producten, moeten elementaire voorzorgsmaatregelen altijd worden opgevolgd, waaron-
der het volgende:
1. Lees deze gebruiksaanwijzing.
2. Bewaar deze gebruiksaanwijzing.
3. Besteed aandacht aan alle waarschuwingen.
4. olg alle instructies op.
5. Gebruik dit apparaat niet in de buurt van water.
6. Reinig het alleen met een droge doek.
7. Blokkeer geen ventilatieopeningen. Installeer volgens de instructies van de fabrikant.
8. Installeer niet in de buurt van warmtebronnen zoals radiatoren, kachels, ovens of andere apparaten (inclusief versterkers) die
warmte produceren.
9. Omzeil nooit de veiligheidsvoorziening van de gepolariseerde of geaarde stekker. Een gepolariseerde stekker heeft twee bladen,
waarvan er één breder is dan de andere. Een geaarde stekker heeft twee bladen en een derde aardingspen. Het bredere blad
of de derde pen is bedoeld voor uw veiligheid. Mocht de geleverde stekker niet in uw stopcontact passen, raadpleeg dan een
elektricien voor het vervangen van het verouderde stopcontact.
10. Bescherm het netsnoer zodat er niet over gelopen kan worden of bekneld kan raken, vooral bij stekkers, stopcontacten en het
punt waar ze het apparaat verlaten.
11. Gebruik alleen aansluitstukken/accessoires geleverd door de fabrikant.
12. Gebruik uitsluitend een wagentje, standaard, statief, beugel of tafel die door de fabrikant wordt aanbevolen of bij het apparaat
wordt verkocht. Wanneer u een wagentje gebruikt, wees dan voorzichtig bij het verplaatsen van de combinatie wagen/apparaat
en voorkom letsel door omvallen.
13. Haal de stekker van dit apparaat uit het stopcontact tijdens bliksem of wanneer het apparaat gedurende lange perioden niet
gebruikt wordt.
14. Laat al het onderhoud uitvoeren door gekwaliceerd onderhoudspersoneel. Onderhoud is nodig wanneer het apparaat op enige
wijze beschadigd is, zoals het netsnoer of de stekker is beschadigd, er vloeistof in het apparaat is gemorst of voorwerpen in zijn
terechtgekomen, het apparaat aan regen of vocht is blootgesteld, niet normaal werkt, of is gevallen.
15. Breek nooit de aardingspen af. Raadpleeg ons gratis boekje “Schokgevaar en aarding”. Sluit alleen op een voedingsspanning
aan van het type aangegeven op het apparaat naast het netsnoer.
16. Als dit product in een apparatuurrek gemonteerd moet worden, moet voor achterondersteuning worden verzorgd.
17. Note for UK only: If the colors of the wires in the mains lead of this unit do not correspond with the terminals in your plug‚ pro-
ceed as follows: a) The wire that is colored green and yellow must be connected to the terminal that is marked by the letter E‚ the
earth symbol‚ colored green or colored green and yellow. b) The wire that is colored blue must be connected to the terminal that
is marked with the letter N or the color black. c) The wire that is colored brown must be connected to the terminal that is marked
with the letter L or the color red.
18. Dit elektrisch apparaat mag niet aan druip- of spatwater worden blootgesteld en er moet op gelet worden dat geen voorwerpen
gevuld met vloeistoffen, zoals vazen, op het apparaat worden geplaatst.
19. De aan/uit-schakelaar van dit apparaat onderbreekt niet beide contacten van het lichtnet. Gevaarlijke spanning kan binnenin het
chassis aanwezig zijn ondanks dat de aan/uit-schakelaar op uit staat. De stekker van het apparaat wordt gebruikt als onderbre-
kingsmechanisme, het onderbrekingsmechanisme dient eenvoudig bedienbaar te blijven.
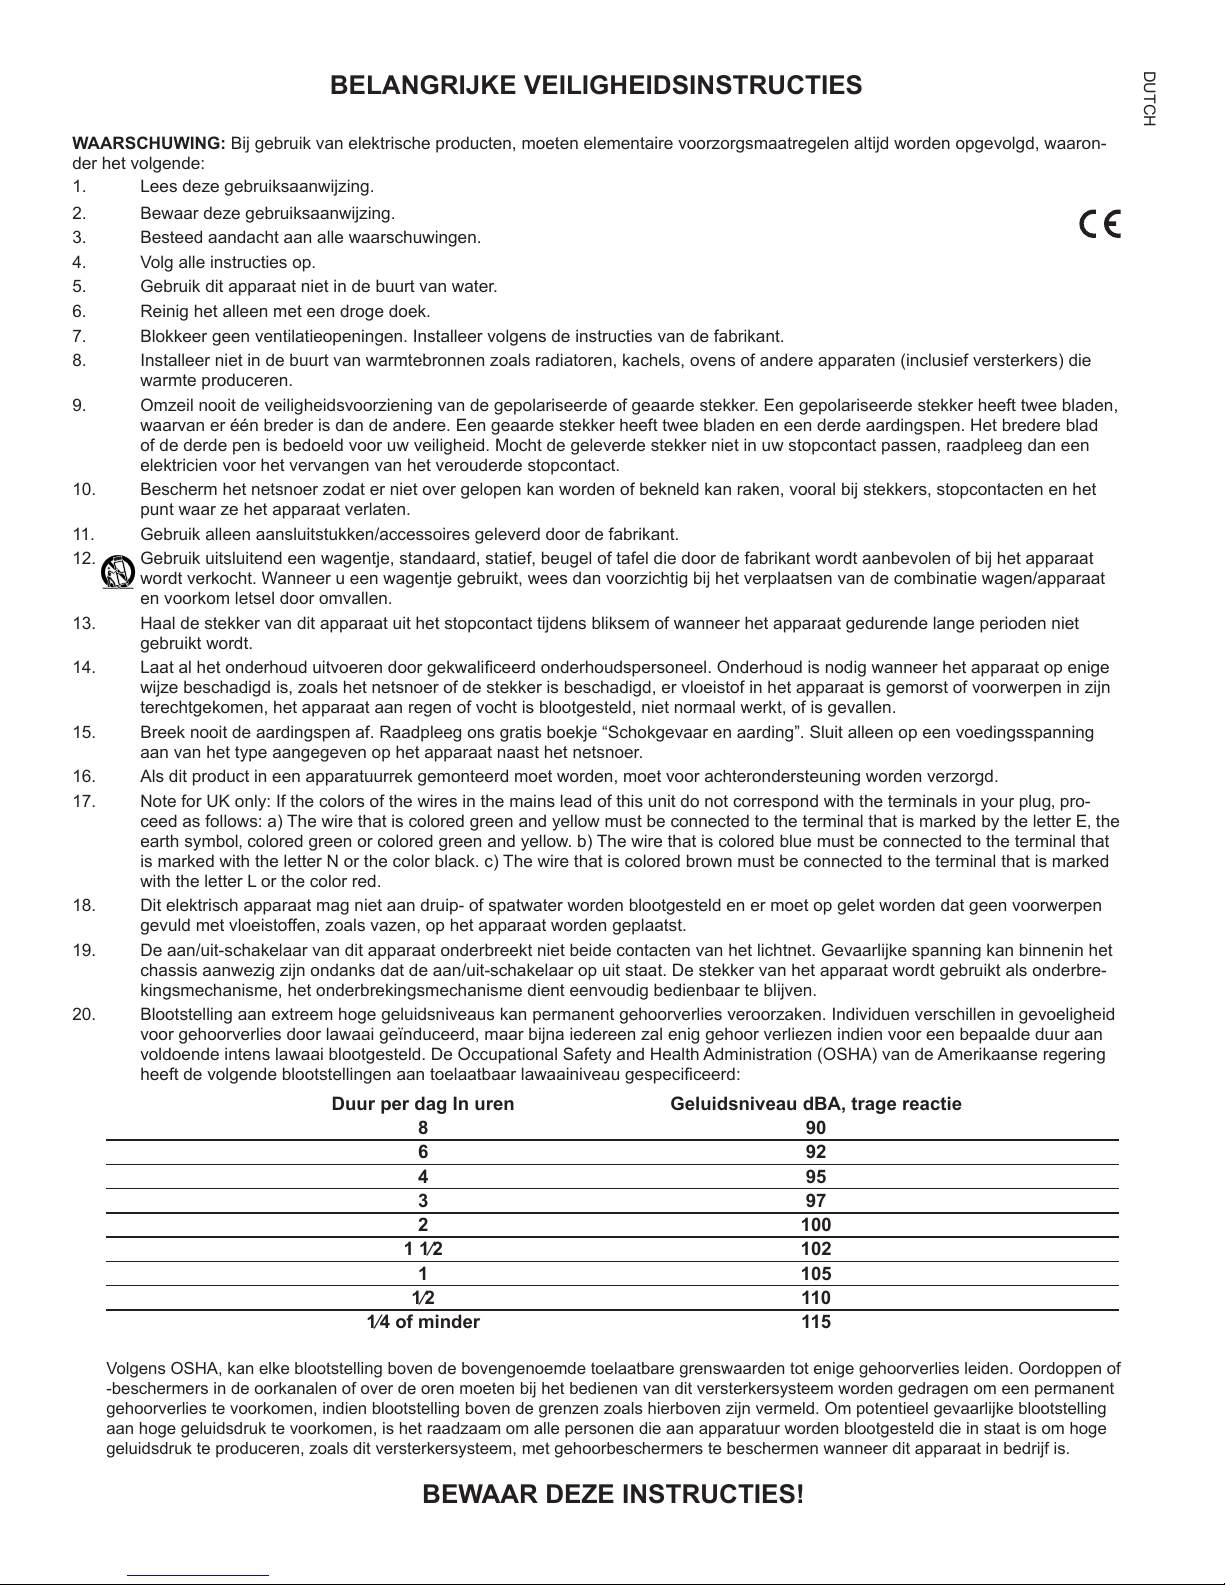
20. Blootstelling aan extreem hoge geluidsniveaus kan permanent gehoorverlies veroorzaken. Individuen verschillen in gevoeligheid
voor gehoorverlies door lawaai geïnduceerd, maar bijna iedereen zal enig gehoor verliezen indien voor een bepaalde duur aan
voldoende intens lawaai blootgesteld. De Occupational Safety and Health Administration (OSHA) van de Amerikaanse regering
heeft de volgende blootstellingen aan toelaatbaar lawaainiveau gespeciceerd:
Duur per dag In uren Geluidsniveau dBA, trage reactie
8 90
6 92
4 95
3 97
2 100
11⁄2 102
1 105
1⁄2 110
1⁄4ofminder 115
DUTCH
olgens OSHA, kan elke blootstelling boven de bovengenoemde toelaatbare grenswaarden tot enige gehoorverlies leiden. Oordoppen of
-beschermers in de oorkanalen of over de oren moeten bij het bedienen van dit versterkersysteem worden gedragen om een permanent
gehoorverlies te voorkomen, indien blootstelling boven de grenzen zoals hierboven zijn vermeld. Om potentieel gevaarlijke blootstelling
aan hoge geluidsdruk te voorkomen, is het raadzaam om alle personen die aan apparatuur worden blootgesteld die in staat is om hoge
geluidsdruk te produceren, zoals dit versterkersysteem, met gehoorbeschermers te beschermen wanneer dit apparaat in bedrijf is.
BEWAAR DEZE INSTRUCTIES!
Page 13
IMPORTANTI NORME DI SICUREZZA:
ATTENZIONE: Durante uso di apparecchiature elettriche vanno osservate alcune precauzioni basilari, tra cui le seguenti:
1. Leggete queste istruzioni.
2. Conservate le istruzioni.
3. Rispettate tutte le avvertenze.
4. Seguite le istruzioni.
5. Non usate questo prodotto vicino all’acqua.
6. Pulite esclusivamente con un panno asciutto.
7. Non ostruite le fessure di ventilazione. Installate il dispositivo seguendo le istruzioni del produttore.
8. Il prodotto va collocato lontano da sorgenti di calore quali radiatori, pompe di calore, stufe o altri dispositivi che generano calore
(compresi gli amplificatori).
9. Non eliminate i dispositivi di sicurezza come spine polarizzate o con messa a terra. La spina polarizzata ha due lame, una
più grande dell’altra. La spina con messa a terra ha due contatti più un terzo per la terra. Il contatto più largo o terzo polo è
indispensabile per la vostra sicurezza. Se la spina fornita non adatta alla vostra presa, mettetevi in contatto con un elettricista
per la sostituzione della presa obsoleta.
10. Fate attenzione a non camminare o incastrare il cavo di alimentazione, soprattutto in prossimità della spina o del punto in cui si
collega all’apparecchiatura.
11. Usate solo accessori originali forniti dal costruttore.
12. L’apparato va usato esclusivamente con il supporto indicato dal produttore o venduto con l’apparato. Se intendete adoperare un
carrello su ruote, fate attenzione quando spostate apparecchio e supporto per evitare che la loro caduta possa causare danni a
cose o persone.
13. Scollegatelo l’apparecchio dalla presa di corrente durante un temporale con fulmini o quando non s’intende usare per un lungo
periodo.
14. L’assistenza va eseguita esclusivamente da personale autorizzato. È necessario ricorrere all’assistenza se il dispositivo ha
subito danni, per esempio si sono rovinati il cavo di alimentazione o la spina, all’interno è caduto del liquido o un oggetto, il
dispositivo è rimasto esposto alla pioggia o all’umidità, non funziona normalmente o è caduto a terra.
15 Non rimuovete lo spinotto della terra. Collegate il dispositivo esclusivamente a una presa di corrente del tipo indicato accanto
alla targhetta posta vicino al cavo di alimentazione.
16. Se questo prodotto deve essere montato a rack, è necessario sostenerlo anche nella parte posteriore.
17. Nota per UK: Se i colori dei fili nel cavo di alimentazione per questa unità non corrispondono con i terminali della vostra spina,
procedere come segue: a) Il filo di colore verde/giallo deve essere collegato al terminale che marcato con lettera E, o simbolo di
terra, o colore verde o verde/giallo. b) Il filo di colore blu deve essere collegato al terminale marcato con la lettera N o di colore
Nero. c) Il filo di colore marrone deve essere collegato al terminale marcato con la lettera L o di colore Rosso.
18. Questo apparato elettrico non deve essere esposto a gocce o schizzi, va in ogni caso evitato di appoggiare oggetti contenenti
liquidi, come bicchieri, sull'apparecchio.
19. L'interruttore on/off in questa unità non interrompe entrambi i lati della rete di alimentazione. All'interno dell'apparecchio può
essere presente elettricità anche con interruttore on/off in posizione off. La spina o il cavo di alimentazione è utilizzato come
sezionatore, il dispositivo di sezionamento deve restare sempre operativo.
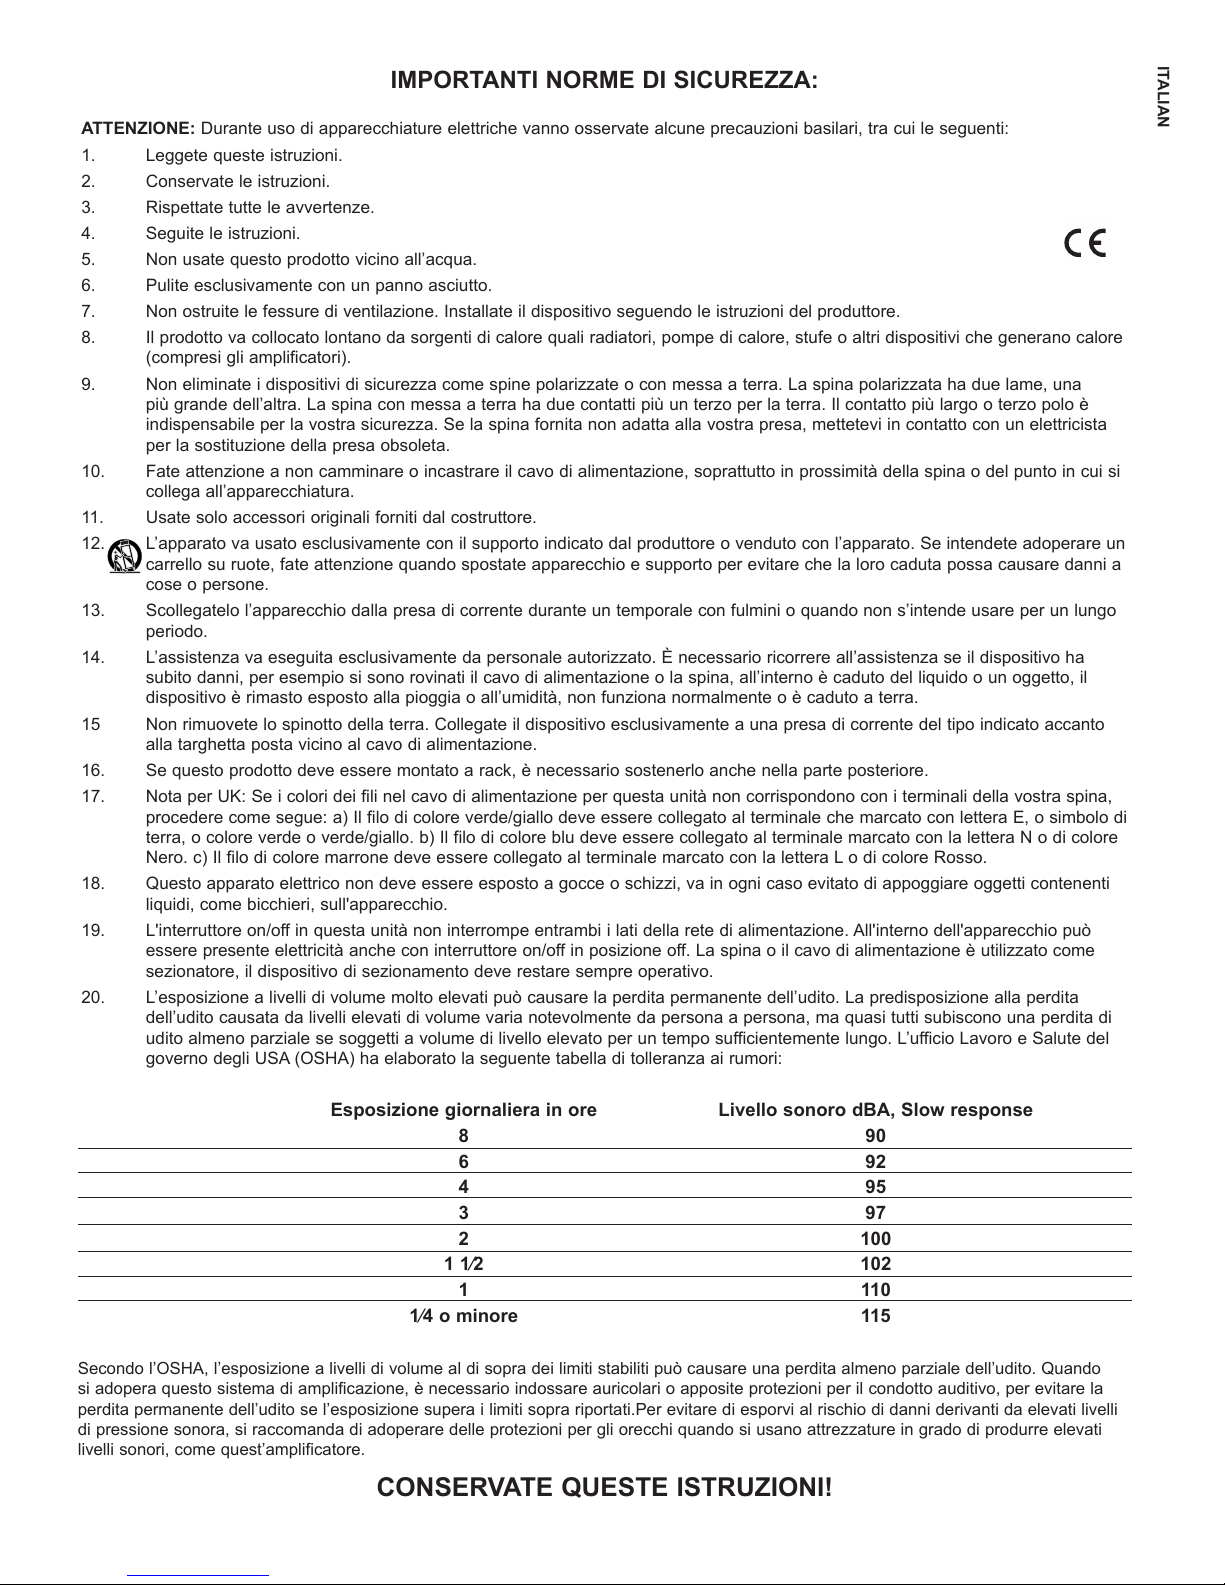
20. L’esposizione a livelli di volume molto elevati può causare la perdita permanente dell’udito. La predisposizione alla perdita
dell’udito causata da livelli elevati di volume varia notevolmente da persona a persona, ma quasi tutti subiscono una perdita di
udito almeno parziale se soggetti a volume di livello elevato per un tempo sufficientemente lungo. L’ufficio Lavoro e Salute del
governo degli USA (OSHA) ha elaborato la seguente tabella di tolleranza ai rumori:
ITALIAN
Esposizione giornaliera in ore Livello sonoro dBA, Slow response
8 90
6 92
4 95
3 97
2 100
11⁄2 102
1 110
1⁄4ominore 115
Secondo l’OSHA, l’esposizione a livelli di volume al di sopra dei limiti stabiliti può causare una perdita almeno parziale dell’udito. Quando
si adopera questo sistema di amplificazione, è necessario indossare auricolari o apposite protezioni per il condotto auditivo, per evitare la
perdita permanente dell’udito se l’esposizione supera i limiti sopra riportati.Per evitare di esporvi al rischio di danni derivanti da elevati livelli
di pressione sonora, si raccomanda di adoperare delle protezioni per gli orecchi quando si usano attrezzature in grado di produrre elevati
livelli sonori, come quest’amplificatore.
CONSERVATE QUESTE ISTRUZIONI!
Page 14
INSTRUÇÕES IMPORTANTES DE SEGURANÇA
ADVERTÊNCIA: Ao usar eletrodomésticos, precauções básicas devem sempre ser seguidas, incluindo as seguintes:
1. Leia estas instruções.
2. Mantenha estas instruções.
3. Preste atenção a todas as advertências.
4. Siga todas as instruções.
5. Não use este aparelho perto d’água.
6. Limpe somente com um pano seco.
7. Não obstrua nenhuma das aberturas de ventilação. Instale de acordo com as instruções do fabricante.
8. Não instale perto de nenhuma fonte de calor tais como radiadores, registros de calor, fogões ou outros aparelhos (incluindo
amplicadores) que produzam calor.
9. Não desae o propósito de segurança do plugue polarizado ou do tipo aterrado. Um plugue polarizado tem duas lâminas com uma
mais larga que a outra. Um plugue do tipo aterrado tem duas lâminas e um terceiro plugue terra. A lâmina larga ou o terceiro pino
são fornecidos para sua segurança. Se o plugue disponibilizado não couber em sua tomada, consulte um eletricista para troca da
tomada obsoleta.
10. Proteja o cabo de energia para não ser pisado ou espremido principalmente em plugues, recipientes e o ponto de onde sai do
aparelho.
11. Use apenas conexões/acessórios fornecidos pelo fabricante.
12. Use apenas um carrinho, banqueta, tripé, suporte, ou mesa especicado pelo fabricante, ou vendido com o aparelho. Quando um
carrinho for usado, tome cuidado ao mover a combinação carrinho/aparelho para evitar ferimentos por tombamento.
13. Tire esse aparelho da tomada durante tempestades de raios ou quando for car sem usar por longos períodos de tempo.
14. Entregue todos os consertos apenas a pessoal qualificado. O conserto é necessário quando o aparelho tiver sofrido qualquer
dano, tais como o cabo de energia ou plugue estiverem danicados, líquidos tenham sido derramados ou objetos tenham caído no
aparelho, o aparelho tenha sido submetido à chuva ou umidade, não funcionar normalmente, ou tenha sido deixado cair.
15. Nunca quebre fora o pino terra. Escreva pedindo nosso livreto grátis “Perigos de Choque e Aterramento.” Ligue apenas a um
suprimento de energia do tipo marcado na unidade adjacente ao o de fornecimento de energia.
16. Se este produto for ser montado em uma estante para equipamentos, deve ser montado um suporte traseiro.
17. Note for UK only: If the colors of the wires in the mains lead of this unit do not correspond with the terminals in your plug‚ proceed as
follows:
a) The wire that is colored green and yellow must be connected to the terminal that is marked by the letter E‚ the earth symbol‚
colored green or colored green and yellow.
b) The wire that is colored blue must be connected to the terminal that is marked with the letter N or the color black.
c) The wire that is colored brown must be connected to the terminal that is marked with the letter L or the color red.
18. Este aparelho elétrico não deve ser exposto a pingos ou respingos e deve ser tomado cuidado para não colocar objetos contendo
líquidos, tais como vasos, sobre o aparelho.
19. O comutador liga/desliga nesta unidade não interrompe ambos os lados da rede elétrica primária. Energia perigosa pode estar
presente dentro do chassi quando o comutador liga/desliga estiver na posição desligado. O plugue de alimentação ou um dispositivo
de união é usado como dispositivo de desligamento, o dispositivo de desligamento deve permanecer pronto para funcionar.
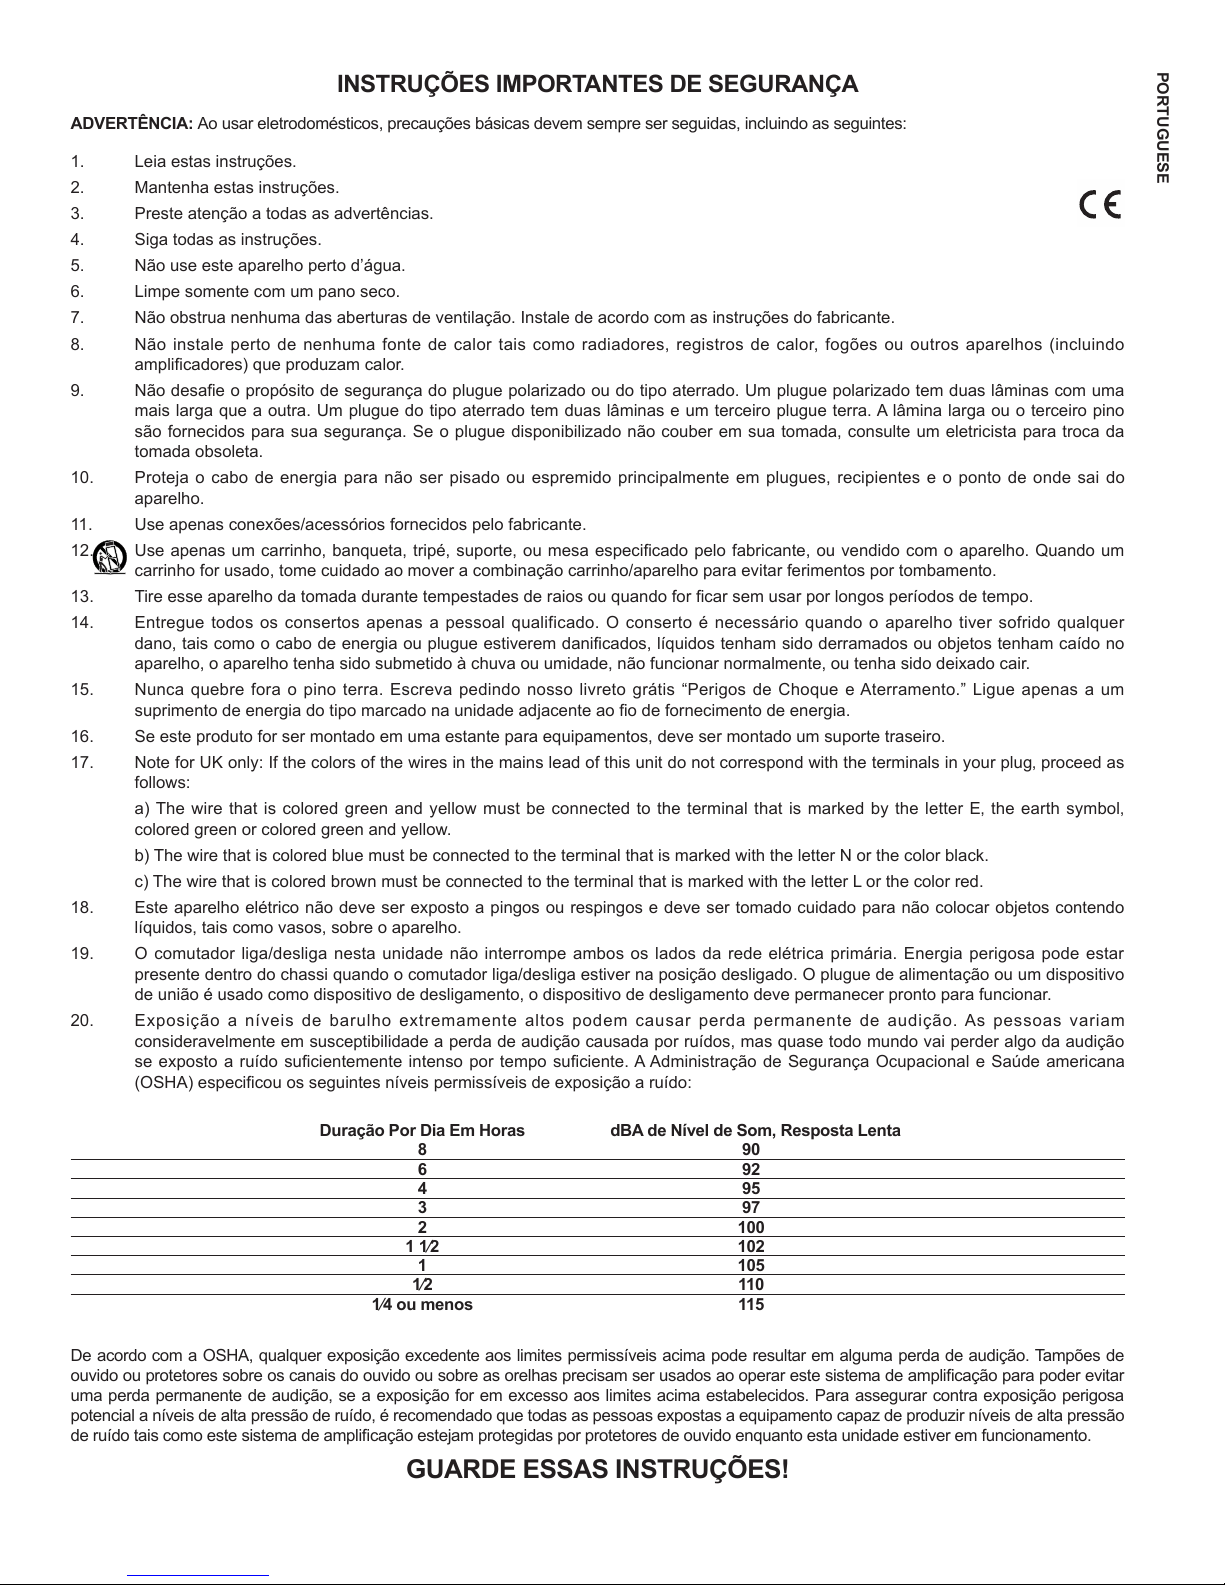
20. Exposição a níveis de barulho extremamente altos podem causar perda permanente de audição. As pessoas variam
consideravelmente em susceptibilidade a perda de audição causada por ruídos, mas quase todo mundo vai perder algo da audição
se exposto a ruído sucientemente intenso por tempo suciente. A Administração de Segurança Ocupacional e Saúde americana
(OSHA) especicou os seguintes níveis permissíveis de exposição a ruído:
PORTUGUESE
Duração Por Dia Em Horas dBA de Nível de Som, Resposta Lenta
11⁄2 102
1⁄4oumenos 115
De acordo com a OSHA, qualquer exposição excedente aos limites permissíveis acima pode resultar em alguma perda de audição. Tampões de
ouvido ou protetores sobre os canais do ouvido ou sobre as orelhas precisam ser usados ao operar este sistema de amplicação para poder evitar
uma perda permanente de audição, se a exposição for em excesso aos limites acima estabelecidos. Para assegurar contra exposição perigosa
potencial a níveis de alta pressão de ruído, é recomendado que todas as pessoas expostas a equipamento capaz de produzir níveis de alta pressão
de ruído tais como este sistema de amplicação estejam protegidas por protetores de ouvido enquanto esta unidade estiver em funcionamento.
GUARDE ESSAS INSTRUÇÕES!
8 90
6 92
4 95
3 97
2 100
1 105
1⁄2 110
Page 15
安全のための重要事項
分極プラグや接地プラグの安全性を損なわないようにしてください。分極プラグの2つのブレードは、一方が他より幅広くなっています。
接地式のプラグには2つのブレードと接地プラグがあります。幅広のブレードや接地プラグは安全のために付けられています。所定のプ
電源コードを踏んだり挟んだりしないように保護してください。特にプラグ、コンセント、装置から出る部分を保護してください。
カート、スタンド、三脚、ブラケット、テーブルなどは、メーカー指定のもの、または装置とともに販売されているもの使用してください。カ
保守作業はすべて資格のあるサービス担当者に依頼してください。保守作業が必要になるのは、装置が故障した場合、たとえば、電源
コードやプラグが破損、装置に液体がかかる。物が落ちる、雨など湿度の影響を受ける、正常に動作しない、落下した場合などです。
グランドピン(接地ピン)は決して取り外さないでください。フリーブックレット「感電と接地」を入手してください。装置の電源コードの横
オン/オフスイッチは、主電源のどちらの側も切断しません。オン/オフスイッチがオフ位置のとき、シャシー内部のエネルギー(高電圧)
は危険なレベルにあります。主電源プラグまたは機器のカプラが切断装置になっています。切断装置はすぐに動作し使用できる状態に
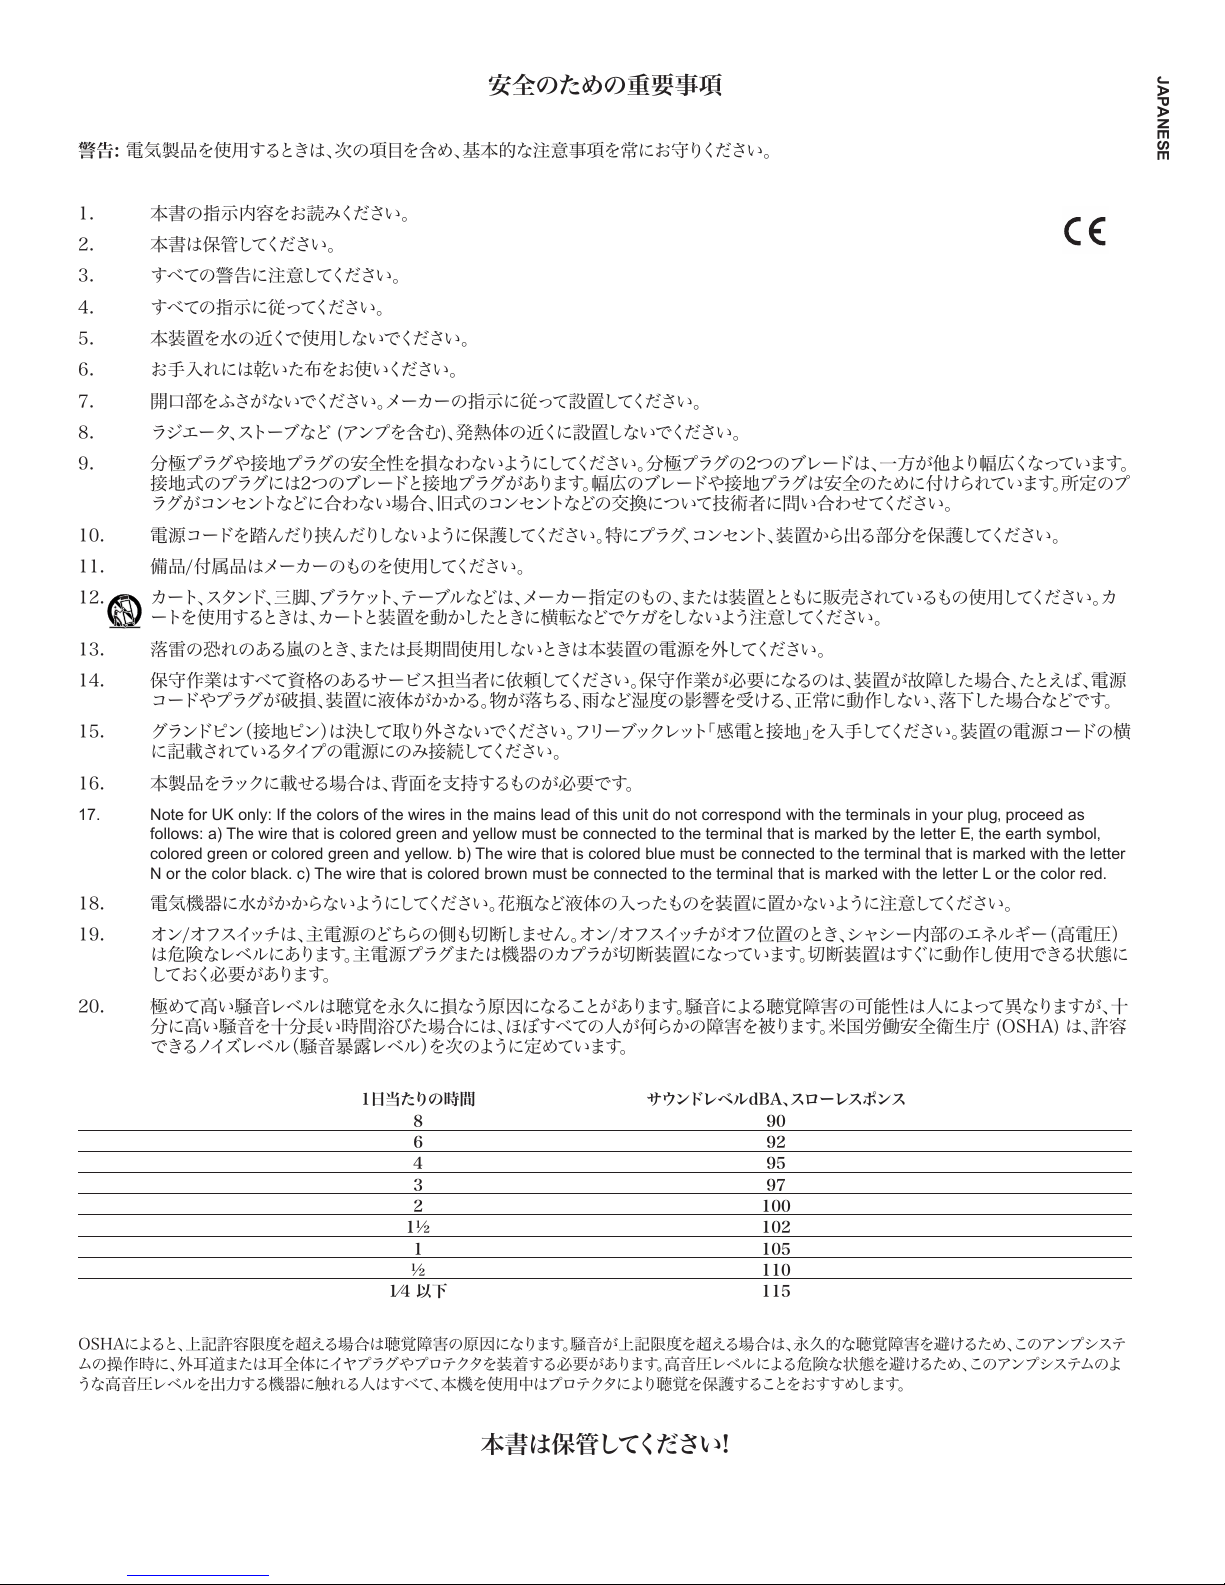
極めて高い騒音レベルは聴覚を永久に損なう原因になることがあります。騒音による聴覚障害の可能性は人によって異なりますが、十
分に高い騒音を十分長い時間浴びた場合には、ほぼすべての人が何らかの障害を被ります。米国労働安全衛生庁 (OSHA) は、許容
OSHAによると、上記許容限度を超える場合は聴覚障害の原因になります。騒音が上記限度を超える場合は、永久的な聴覚障害を避けるため、このアンプシステ
ムの操作時に、外耳道または耳全体にイヤプラグやプロテクタを装着する必要があります。高音圧レベルによる危険な状態を避けるため、このアンプシステムのよ
警告: 電気製品を使用するときは、次の項目を含め、基本的な注意事項を常にお守りください。
1. 本書の指示内容をお読みください。
2. 本書は保管してください。
3. すべての 警告 に注 意してください 。
4. すべての 指示 に従 ってください 。
5. 本装置を水の近くで使用しないでください。
6. お手入れには乾いた布をお使いください。
7. 開口部 を ふ さ が ない で くだ さい。メー カーの指示に 従っ て 設置 してくださ い。
8. ラジエータ、ストーブなど (アンプを含む)、発熱体の近くに設置しないでください。
9.
ラグがコンセントなどに合わない場合、旧式のコンセントなどの交換について技術者に問い合わせてください。
10.
11. 備品/付属品はメーカーのものを使用してください。
12.
ートを使用するときは、カートと装置を動かしたときに横転などでケガをしないよう注意してください。
13. 落雷の恐れのある嵐のとき、または長期間使用しないときは本装置の電源を外してください。
14.
15.
に記載されているタイプの電源にのみ接続してください。
16. 本製品をラックに載せる場合は、背面を支持するものが必要です。
17. Note for UK only: If the colors of the wires in the mains lead of this unit do not correspond with the terminals in your plug‚ proceed as
follows: a) The wire that is colored green and yellow must be connected to the terminal that is marked by the letter E‚ the earth symbol‚
colored green or colored green and yellow. b) The wire that is colored blue must be connected to the terminal that is marked with the letter
N or the color black. c) The wire that is colored brown must be connected to the terminal that is marked with the letter L or the color red.
18. 電気機器に水がかからないようにしてください。花瓶など液体の入ったものを装置に置かないように注意してください。
19.
して おく必要が あり ます 。
20.
できるノイズレベル(騒音暴露レベル)を次のように定めています。
1日当たりの時間サウンドレベルdBA、スローレスポンス
890
692
495
397
2100
1½102
1105
½110
1⁄4以下115
JAPANESE
うな高音圧レベルを出力する機器に触れる人はすべて、本機を使用中はプロテクタにより聴覚を保護することをおすすめします。
本書は保管してください!
Page 16

重要安全事项
警告 :操作电器产品时,请务必遵守基本安全注意事项,包括 :
1. 阅读说明书。
2. 妥善保管说明书。
3. 注意所有安全警告。
4. 按照要求和指示操作。
5. 请勿在靠近水(或其它液体)的地方使用本机。
6. 本机只能用干燥布料擦拭。
7. 请勿遮盖任何通散热口。确实依照本说明书安装本机。
8. 请勿将本机安装在任何热源附近,例如电暖器、蓄热器件、火炉或其他发热电器(包括功率放大器)。
9. 请勿破坏两脚型插头或接地型插头的安全装置。两脚型插头有两个不同宽度的插头片,一个窄,另一个宽一点。接地型插头有两个相同
的插头片和一个接地插脚。两脚型插头中宽的插头片和接地型插头接地插脚起着保障安全的作用。如果所附带的插头规格与您的插座不
匹配,请让电工更换插座以保证安全。
10. 请勿踩踏或挤压电源线,尤其是插头、插座、设备电源输入接口或者电源线和机身连接处。
11. 本机只可以使用制造商指定的零件 / 配件。
12. 本机只可以使用与本机搭售或由制造商指定的机柜、支架、三角架、托架或桌子。使用机柜时,请小心移动已安装设备的机柜,以避免
机会推翻造成身体伤害。
CHINESE
13. 在雷雨天或长期不使用的情况下,请拔掉电源插头。
14. 所有检查与维修都必须由指定的专业维修人员进行。如本机的任何形式的损伤都须检修,例如电源线或插头受损,有液体或物体落入机
身内,曾暴露于雨天或潮湿的地方,不能正常运作,或曾掉落后损坏等。
15. 不得拔出接地插脚。请写信索取免费手册《 Shock Hazard and Grounding》。使用前,请仔细检查确认所使用的电源电压是否匹配设备
上标注的额定电压。
16. 如果本机装在机柜中 , 其后部也应给予相应的支撑固定。
NoteforUKonly: If the colors of the wires in the mains lead of this unit do not correspond with the terminals in your plug‚ proceed as
17.
follows:
a) The wire that is colored green and yellow must be connected to the terminal that is marked by the letter E‚ the earth symbol‚
colored green or colored green and yellow.
b) The wire that is colored blue must be connected to the terminal that is marked with the letter N or the color black.
c) The wire that is colored brown must be connected to the terminal that is marked with the letter L or the color red.
18. 本机不得暴露于滴水或溅水中。请勿将诸如花瓶等装有液体的物体放置于本机上。
19. 本机电源开关不能同时断开两端的电源,完全切断外部电源。因此当开关位于“OFF”位置时,本机外壳仍有可能带有触电的危险。电
源插头或耦合器能够与设备或者电源容易分开,保证电源的完全切断,从而保证安全。
20. 声压级较高的噪音容易造成听力的永久性损失。因噪声而造成的听力损失程度 , 个体间的差异较大 , 但几乎每个人在声压级较高的噪音
环境里一定时间,都会有不同程度的听力损失。美国政府职业安全与保健管理局(OSHA)就此规定了下列容许噪声级 :
每天持续小时数 声压级(dBA)慢反应
8 90
6 92
4 95
3 97
2 100
½
1
1 105
½
¼
或更少 115
据 OSHA, 任何超出以上所允许的范围 , 都会造成部分听力的损失。使用本功放系统时,必须佩戴如耳塞等保护耳朵的器件,防止长时间处于上述
限制级以上的环境而引起永久性听力受损。本机运行时,如果超过上述所规定的最大限制,为了抵御较高的声压对于听受损所造成的潜在危险,建
议使用诸如功放系统等引起高声压级噪声的所有人均佩戴保护耳朵的器件。
102
110
请妥善保管本说明书!
Page 17
중요 안전 지침
경고: 전기 제품 사용 시 다음 사항을 포함해 기본적인 주의 사항을 항상 따라야 합니다.
1. 이 지침을 읽어 주십시오.
2. 이 지침을 준수하여 주십시오.
3. 모든 경고 사항에 주의해 주십시오.
4. 모든 지침을 따라 주십시오.
5. 물기가 있는 근처에서 이 기기를 사용하지 마십시오.
6. 마른 헝겊으로만 청소해 주십시오.
7. 통풍구를 막지 마십시오. 제조업체의 지침에 따라 설치해 주십시오.
8. 라디에이터, 가열기, 난로 또는 열을 발산하는 기타 기기(앰프 포함) 근처에 설치하지 마십시오.
9. 극성 플러그나 접지형 플러그의 안전 용도를 무시하지 마십시오. 극성 플러그는 한쪽 날이 다른 쪽보다 더 넓습니다. 접지형
플러그에는 2개의 날과 1개의 접지 플러그가 있습니다. 넓은 날 또는 1개의 접지 플러그는 안전을 위해 제공됩니다. 제공된
플러그가 사용자의 콘센트에 맞지 않으면 구식 콘센트의 교체에 대해 전기 기술자에게 문의하십시오.
10. 전원 코드 특히, 플러그, 소켓 및 기기에서 나오는 지점이 밟히거나 집히지 않도록 보호하십시오.
11. 제조업체에서 제공하는 부착 장치/액세서리만을 사용하십시오.
12. 제조업체에서 지정하거나 기기와 함께 판매되는 카트, 스탠드, 삼각대, 브래킷 또는 테이블만을 사용하십시오. 카트 사용 시
카트/기기 결합물을 움직일 때 전복으로 인해 부상을 입지 않도록 주의해 주십시오.
13. 번개와 폭풍이 올 때 그리고 장기간 사용하지 않을 때는 이 기기의 플러그를 뽑아 놓으십시오.
14. 자격을 갖춘 서비스 요원에게 모든 서비스를 의뢰하십시오. 전원 공급 코드 또는 플러그가 손상되거나 액체를 엎지르거나 기
기 안에 이물질을 떨어뜨리거나 비 또는
이 기기가 손상된 경우에는 서비스를 받아야 합니다.
15. 접지 핀을 제거하지 마십시오. 당사의 무료 소책자인 “감전 위험 및 접지”을 우편으로 주문해 주십시오. 전원 공급 코드의 기
기에 표시된 유형의 전원 공급 장치만 연결해 주십시오.
16. 이 제품을 장비 랙에 장착할 경우에는 후면 지지대를 설비해야 합니다.
17. Note for UK only: If the colors of the wires in the mains lead of this unit do not correspond with the terminals in your plug‚ proceed as
follows: a) The wire that is colored green and yellow must be connected to the terminal that is marked by the letter E‚ the earth symbol‚
colored green or colored green and yellow. b) The wire that is colored blue must be connected to the terminal that is marked with the letter
N or the color black. c) The wire that is colored brown must be connected to the terminal that is marked with the letter L or the color red.
18.
전기 기기가 비나 물방울에 노출되지 않도록 주의하고 꽃병과 같이 용액이 들어 있는 물체를 기기 위에 놓지 않도록 주의해
주십시오.
19. 본 기기의 ON/OFF 스위치는 양쪽의 주 기기 전원을 차단하지 않습니다. ON/OFF 스위치가 OFF 위치에 있더라도 섀시 내부
에 위험한 전기가 흐를 수 있습니다. 기본 플러그 또는 기기 커플러는 분리 장치로 사용됩니다. 분리 장치는 바로 사용 가능
한 상태로 두어야 합니다.
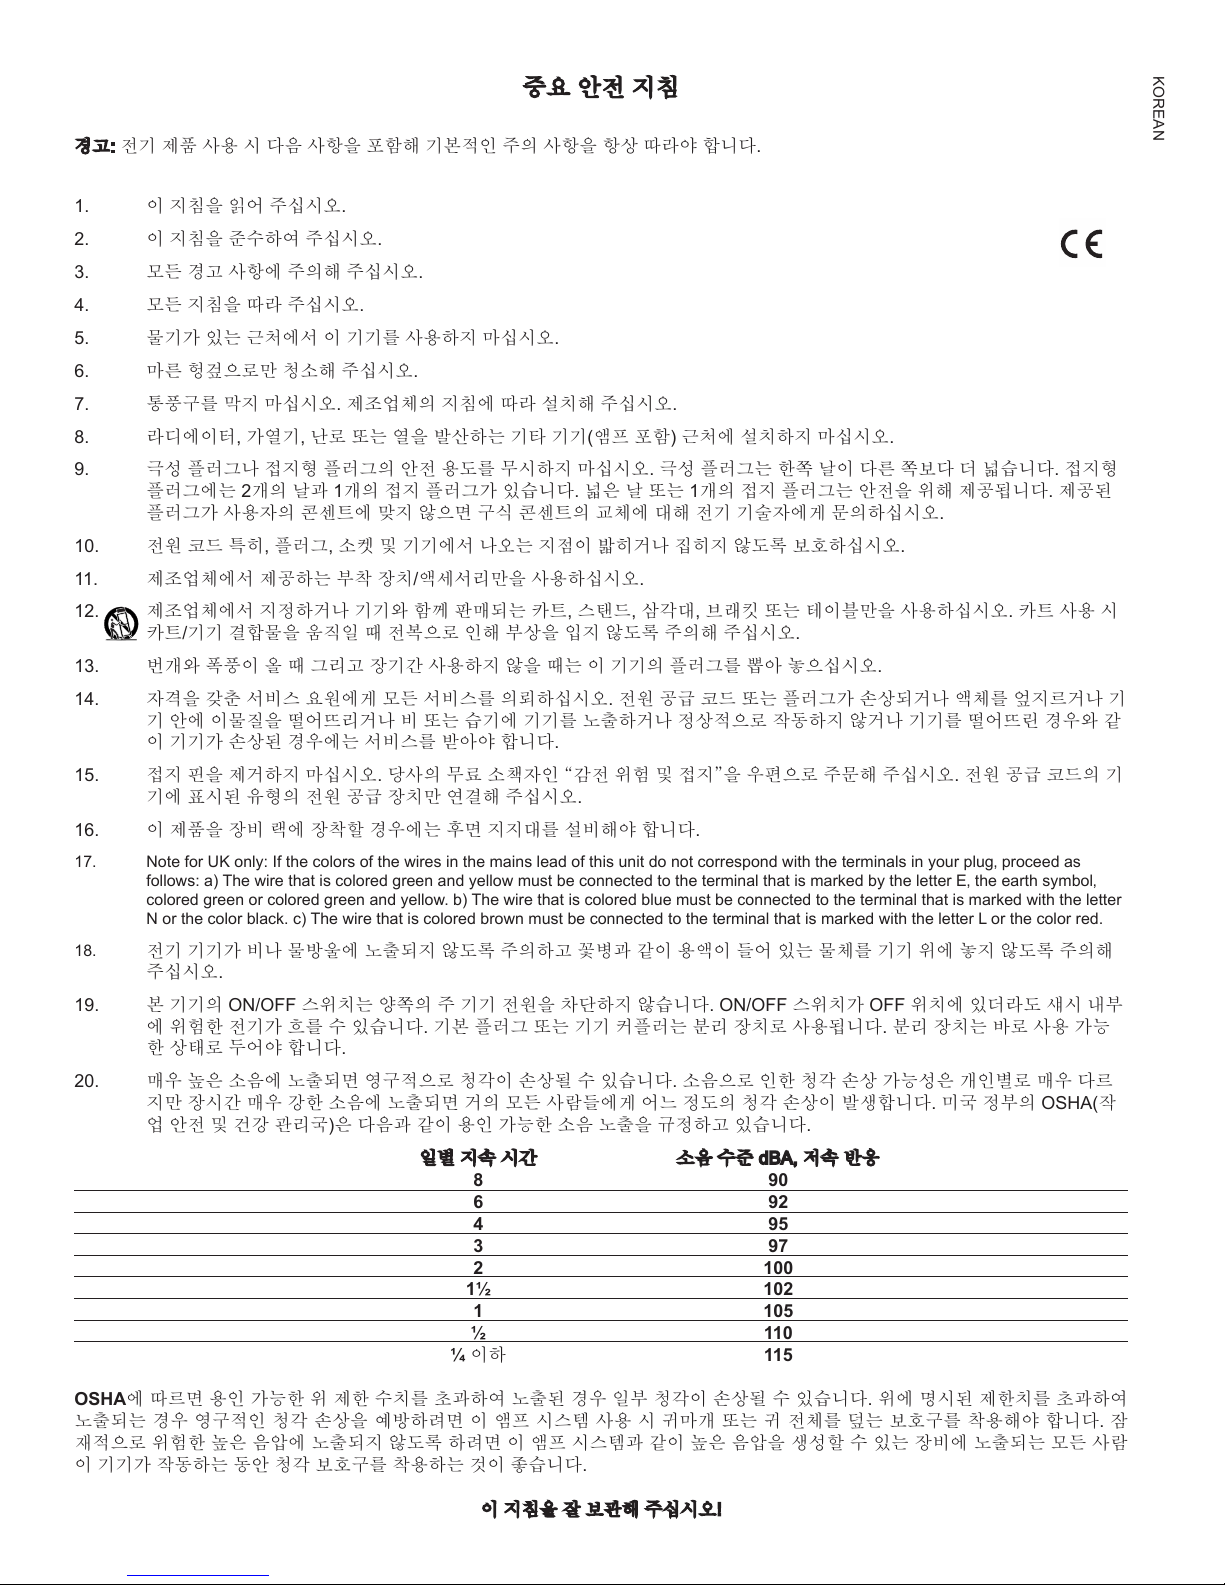
20. 매우 높은 소음에 노출되면 영구적으로 청각이 손상될 수 있습니다. 소음으로 인한 청각 손상 가능성은 개인별로 매우 다르
지만 장시간 매우 강한 소음에 노출되면 거의 모든 사람들에게 어느 정도의 청각 손상이 발생합니다. 미국 정부의 OSHA(작
업 안전 및 건강 관리국)은 다음과 같이 용인 가능한 소음 노출을 규정하고 있습니다.
8 90
6 92
4 95
3 97
2 100
1½ 102
1 105
½ 110
¼ 이하 115
습기에 기기를 노출하거나 정상적으로 작동하지 않거나 기기를 떨어뜨린 경우와 같
일별 지속 시간 소음 수준 dBA, 저속 반응
KOREAN
OSHA에 따르면 용인 가능한 위 제한 수치를 초과하여 노출된 경우 일부 청각이 손상될 수 있습니다. 위에 명시된 제한치를 초과하여
노출되는 경우 영구적인 청각 손상을 예방하려면 이 앰프 시스템 사용 시 귀마개 또는 귀 전체를 덮는 보호구를 착용해야 합니다. 잠
재적으로 위험한 높은 음압에 노출되지 않도록 하려면 이 앰프 시스템과 같이 높은 음압을 생성할 수 있는 장비에 노출되는 모든 사람
이 기기가 작동하는 동안 청각 보호구를 착용하는 것이 좋습니다.
이 지침을 잘 보관해 주십시오!
Page 18
ﺔﻤﻬﻤﻟﺍ ﻥﺎﻣﻷﺍ ﺕﺎﻤﻴﻠﻌﺗ
:ﻲﻟﺎﺘﻟﺍ ﻞﻤﺸﺗ ﻲﺘﻟﺍﻭ ،ﺎﻤﺋﺍﺩ ﺔﻴﺳﺎﺳﻷﺍ ﺕﺎﻃﺎﻴﺘﺣﻻﺍ ﻉﺎﺒﺗﺍ ﺐﺠﻳ ،ﺔﻴﺑﺮﻬﻜﻟﺍ ﺕﺎﺠﺘﻨﻤﻟﺍ ﻡﺍﺪﺨﺘﺳﺍ ﺪﻨﻋ :ﺮﻳﺬﺤﺗ
.ﺕﺎﻤﻴﻠﻌﺘﻟﺍ ﻩﺬﻫ ﺓءﺍﺮﻗ .1
.ﺕﺎﻤﻴﻠﻌﺘﻟﺍ ﻩﺬﻫ ﻰﻠﻋ ﻅﺎﻔﺤﻟﺍ .2
.ﺕﺍﺮﻳﺬﺤﺘﻟﺍ ﻊﻴﻤﺠﻟ ﻩﺎﺒﺘﻧﻻﺍ .3
.ﺕﺎﻤﻴﻠﻌﺘﻟﺍ ﻩﺬﻫ ﻉﺎﺒﺗﺍ .4
.ءﺎﻤﻟﺍ ﻦﻣ ﺔﺑﺮﻘﻣ ﻰﻠﻋ ﺯﺎﻬﺠﻟﺍ ﺍﺬﻫ ﻡﺍﺪﺨﺘﺳﺍ ﻡﺪﻋ .5
.ﺔﻓﺎﺟ ﺵﺎﻤﻗ ﺔﻌﻄﻘﺑ ﻂﻘﻓ ﻒﻈﻨﻳ .6
.ﻊﻨﺼﻤﻟﺍ ﺕﺎﻤﻴﻠﻌﺘﻟ ﺎﻘﻓﻭ ﺖﻴﺒﺜﺘﻟﺍ ﻢﺘﻳ .ﺔﻳﻮﻬﺗ ﺕﺎﺤﺘﻓ ﻱﺃ ﺪﺴﺑ ﻢﻘﺗ ﻻ .7
.ﺓﺭﺍﺮﺣ ﺎﻬﻨﻋ ﺭﺪﺼﻳ ﻲﺘﻟﺍ (ﺕﻮﺼﻟﺍ ﺕﺍﺮﺒﻜﻣ ﺎﻬﻴﻓ ﺎﻤﺑ) ﻯﺮﺧﺃ ﺓﺰﻬﺟﺃ ﻱﺃ ﻭﺃ ﺪﻗﺍﻮﻤﻟﺍ ﻭﺃ ،ﺕﺂﻓﺪﻤﻟﺍﻭ ،ﺕﺍﺩﺮﺒﻤﻟﺍ ﻞﺜﻣ ﺓﺭﺍﺮﺣ ﺭﺩﺎﺼﻣ ﻱﺃ ﻦﻣ ﺏﺮﻘﻟﺎﺑ ﺯﺎﻬﺠﻟﺍ ﻊﻀﺗ ﻻ .8
ﻲﺿﺭﺃ ﺲﺑﺎﻗﻭ ﻥﺎﻨﺳ ﻪﺑ ﻲﺿﺭﻷﺍ ﻉﻮﻨﻟﺍ ﻦﻣ ﺲﺑﺎﻘﻟﺍ .ﻲﻧﺎﺜﻟﺍ ﻦﻣ ﺽﺮﻋﺃ ﺎﻤﻫﺪﺣﺃ ﻥﺎﻨﺳ ﻪﺑ ﻲﺒﻄﻘﻟﺍ ﺲﺑﺎﻘﻟﺍ .ﻲﺿﺭﻷﺍ ﻉﻮﻨﻟﺍ ﻦﻣ ﻭﺃ ﻲﺒﻄﻘﻟﺍ ءﺎﺑﺮﻬﻜﻟﺍ ﺲﺑﺎﻗ ﻥﺎﻣﺃ ﻦﻣ ﺽﺮﻐﻟﺍ ﻞﺸﻓ ﻲﻓ ﺐﺒﺴﺘﺗ ﻻ .9
.ﻢﻳﺪﻘﻟﺍ ﺲﺒﻘﻤﻟﺍ ﻝﺍﺪﺒﺘﺳﻻ ءﺎﺑﺮﻬﻛ ﻲﻨﻓ ﺮﺸﺘﺳﺍ ،ﻚﺑ ﺹﺎﺨﻟﺍ ﻂﺋﺎﺤﻟﺍ ﺲﺒﻘﻣ ﺚﻟﺎﺜﻟﺍ ﺲﺑﺎﻘﻟﺍ ﺐﺳﺎﻨﻳ ﻢﻟ ﺍﺫﺇ .ﻚﺘﻣﻼﺳ ﻞﺟﺃ ﻦﻣ ﺚﻟﺎﺜﻟﺍ ﻦﺴﻟﺍ ﺮﻴﻓﻮﺗ ﻢﺘﻳ ﻭﺃ ﺔﻀﻳﺮﻋ ﻦﺴﺑ ﺩﻭﺰﻣ ﺲﺑﺎﻘﻟﺍ .ﺚﻟﺎﺛ
.ﺯﺎﻬﺠﻟﺍ ﻦﻣ ﺎﻬﺟﻭﺮﺧ ﻊﺿﻮﻣﻭ ،ﺔﻤﺋﻼﻤﻟﺍ ﺲﺑﺎﻘﻤﻟﺍﻭ ،ﺲﺑﺍﻮﻘﻟﺍ ﻲﻓ ﺔﺻﺎﺧ ،ﻪﻄﻐﺿ ﻭﺃ ﻪﻴﻠﻋ ﻲﺸﻤﻟﺍ ﻦﻣ ءﺎﺑﺮﻬﻜﻟﺍ ﻞﺒﻛ ﺔﻳﺎﻤﺤﺑ ﻢﻗ .10
.ﻂﻘﻓ ﻊﻨﺼﻤﻟﺍ ﻦﻣ ﺔﻣﺪﻘﻤﻟﺍ ﺕﺎﻘﺤﻠﻤﻟﺍ / ﺕﺎﻘﻓﺮﻤﻟﺍ ﻡﺪﺨﺘﺳﺍ .11
ﺯﺎﻬﺠﻟﺍ ﺔﻋﻮﻤﺠﻣ / ﺔﺑﺮﻌﻟﺍ ﻚﻳﺮﺤﺗ ﺪﻨﻋ ﻙﺭﺬﺣ ﺬﺧ ،ﺔﺑﺮﻌﻟﺍ ﻡﺍﺪﺨﺘﺳﺍ ﺪﻨﻋ .ﺯﺎﻬﺠﻟﺍ ﻊﻣ ﻉﺎﺒﺗ ﻲﺘﻟﺍ ﻭﺃ ،ﻊﻨﺼﻤﻟﺍ ﺎﻫﺩﺪﺣ ﻲﺘﻟﺍ ﺔﻟﻭﺎﻄﻟﺍ ﻭﺃ ،ﺪﻨﺴﻤﻟﺍﻭ ،ﻞﻤﺤﻤﻟﺍﻭ ،ﺓﺪﻀﻨﻤﻟﺍﻭ ،ﻞﻣﺎﺤﻟﺍ ﻊﻣ ﻂﻘﻓ ﻪﻣﺪﺨﺘﺳﺍ .12
.ﺏﻼﻘﻧﻻﺍ ﺪﻨﻋ ﻚﺘﺑﺎﺻﺇ ﺐﻨﺠﺘﻟ
.ﺔﻠﻳﻮﻃ ﺕﺍﺮﺘﻔﻟ ﻪﻣﺍﺪﺨﺘﺳﺍ ﻡﺪﻋ ﺪﻨﻋ ﻭﺃ ﻕﺮﺒﻟﺍ ﻒﺻﺍﻮﻋ ءﺎﻨﺛﺃ
ﻰﻠﻋ ءﺎﻴﺷﺃ ﻭﺃ ﻞﺋﺎﺳ ﻁﻮﻘﺳ ﺪﻨﻋ ﻭﺃ ،ﺲﺑﺎﻘﻟﺍ ﻭﺃ ءﺎﺑﺮﻬﻜﻟﺍ ﺩﻭﺰﻣ ﻞﺒﻛ ﻒﻠﺗ ﻞﺜﻣ ،ﺔﻘﻳﺮﻃ ﻱﺄﺑ ﻒﻠﺘﻠﻟ ﺯﺎﻬﺠﻟﺍ ﺽﺮﻌﺗ ﺪﻨﻋ ﺔﻧﺎﻴﺼﻟﺍ ءﺍﺮﺟﺇ ﺐﺠﻳ .ﻦﻴﻠﻫﺆﻤﻟﺍ ﻦﻴﻔﻇﻮﻤﻠﻟ ﺔﻧﺎﻴﺼﻟﺍ ﻝﺎﻤﻋﺃ ﻊﻴﻤﺟ ﻲﻓ ﻊﺟﺭﺍ .14
.ﺽﺭﻷﺍ ﻰﻠﻋ ﻪﻃﻮﻘﺳ ﺔﻟﺎﺣ ﻲﻓﻭﺃ ،ﺔﻴﻌﻴﺒﻃ ﺓﺭﻮﺼﺑ ﻞﻤﻌﻳ ﻢﻟ ﺍﺫﺇ ﻭﺃ ،ﺔﺑﻮﻃﺮﻠﻟ ﻭﺃ ﺮﻄﻤﻠﻟ ﺯﺎﻬﺠﻟﺍ ﺽﺮﻌﺗ ﺪﻨﻋ ﻭﺃ ،ﺯﺎﻬﺠﻟﺍ
ﻉﻮﻨﻟﺍ ﻦﻣ ءﺎﺑﺮﻬﻛ ﺩﻭﺰﻤﺑ ﻂﻘﻓ ﺯﺎﻬﺠﻟﺍ ﻞﺻﻭ .ﺎﻨﺑ ﺹﺎﺨﻟﺍ ﻲﻧﺎﺠﻤﻟﺍ "ﺔﻴﺿﺭﻷﺍ ﺔﻴﺑﺮﻬﻜﻟﺍ ﻑﺍﺮﻃﻷﺍﻭ ﻖﻋﺍﻮﺼﻟﺎﺑ ﺔﺑﺎﺻﻹﺍ ﺮﻄﺧ" ﺐﻴﺘﻛ ﻰﻠﻋ ﻝﻮﺼﺤﻠﻟ ﺎﻨﻠﺳﺍﺭ .ﻲﺿﺭﻷﺍ ﻞﺻﻮﻤﻟﺍ ﻊﻄﻘﺑ ﺍﺪﺑﺃ ﻢﻘﺗ ﻻ .15
.ﺔﻗﺎﻄﻟﺍ ﺩﻭﺰﻣ ﻞﺒﻜﻟ ﺓﺭﻭﺎﺠﻤﻟﺍ ﺓﺪﺣﻮﻟﺍ ﻰﻠﻋ ﺩﺪﺤﻤﻟﺍ
.ﺕﺍﺪﻌﻣ ﻑﺭ ﻰﻠﻋ ﺯﺎﻬﺠﻟﺍ ﺐﻴﻛﺮﺗ ﺪﻨﻋ ﻲﻔﻠﺨﻟﺍ ﻢﻋﺪﻟﺍ ﺮﻴﻓﻮﺗ ﺐﺠﻳ .16
:ﻲﻠﻳ ﺎﻣ ﻊﺒﺗﺍ ،ﻚﺑ ﺹﺎﺨﻟﺍ ﺲﺒﻘﻤﻟﺍ ﻲﻓ ﻑﺍﺮﻃﻸﻟ ﺓﺩﺪﺤﻤﻟﺍ ﺔﻧﻮﻠﻤﻟﺍ ﺕﺎﻣﻼﻌﻟﺍ ﻊﻣ ﻖﻓﺍﻮﺘﺗ ﻻ ﺓﺪﺣﻮﻟﺍ ﻩﺬﻬﻟ ﺔﻴﺴﻴﺋﺮﻟﺍ ﻑﺍﺮﻃﻷﺍ ﻲﻓ ﻙﻼﺳﻷﺍ ﻥﺍﻮﻟﺃ ﺖﻧﺎﻛ ﺍﺫﺇ :ﻂﻘﻓ ﺓﺪﺤﺘﻤﻟﺍ ﺔﻜﻠﻤﻤﻠﻟ ﺔﻈﺣﻼﻣ .17
.ﺮﻔﺻﻷﺍﻭ ﺮﻀﺧﻷﺍ ﻭﺃ ﺮﻀﺧﻷﺎﺑ ﻥﻮﻠﻤﻟﺍ ﻭﺃ ﻲﺿﺭﻷﺍ ﺰﻣﺭ ﻭﺃ ،E ﻑﺮﺤﻟﺎﺑ ﺰﻴﻤﻤﻟﺍ ﻑﺮﻄﻟﺎﺑ ﺮﻔﺻﻷﺍﻭ ﺮﻀﺧﻷﺎﺑ ﻥﻮﻠﻤﻟﺍ ﻚﻠﺴﻟﺍ ﻞﻴﺻﻮﺗ ﺐﺠﻳ (ﺃ
.ﺩﻮﺳﻷﺍ ﻥﻮﻠﻟﺍ ﻭﺫ ﻭﺃ ،N ﻑﺮﺤﻟﺎﺑ ﺰﻴﻤﻤﻟﺍ ﻑﺮﻄﻟﺎﺑ ﻕﺭﺯﻷﺍ ﻥﻮﻠﻟﺎﺑ ﻥﻮﻠﻤﻟﺍ ﻚﻠﺴﻟﺍ ﻞﻴﺻﻮﺗ ﺐﺠﻳ (ﺏ
.ﺮﻤﺣﻷﺍ ﻥﻮﻠﻟﺍ ﻭﺫ ﻭﺃ ،L ﻑﺮﺤﻟﺎﺑ ﺰﻴﻤﻤﻟﺍ ﻑﺮﻄﻟﺎﺑ ﻲﻨﺒﻟﺎﺑ ﻥﻮﻠﻤﻟﺍ ﻚﻠﺴﻟﺍ ﻞﻴﺻﻮﺗ ﺐﺠﻳ (ﺝ
.ﺯﺎﻬﺠﻟﺍ ﻕﻮﻓ ،ﺕﺎﻳﺮﻫﺰﻟﺍ ﻞﺜﻣ ،ﻞﺋﺍﻮﺳ ﻰﻠﻋ ﻱﻮﺘﺤﺗ ﻲﺘﻟﺍ ءﺎﻴﺷﻷﺍ ﻊﺿﻭ ﻡﺪﻌﺑ ﻪﺑ ﺔﻳﺎﻨﻌﻟﺍ ﺐﺠﻳ ﺎﻤﻛ ،ﻞﺋﺍﻮﺴﻟﺍ ﺵﺭ ﻭﺃ ﻂﻴﻘﻨﺘﻟ ﻲﺑﺮﻬﻜﻟﺍ ﺯﺎﻬﺠﻟﺍ
.ﻑﺎﻘﻳﻹﺍ ﻊﺿﻭ ﻲﻓ ﻑﺎﻘﻳﻹﺍ/ﻞﻴﻐﺸﺘﻟﺍ ﺡﺎﺘﻔﻣ ﻥﻮﻜﻳ ﺎﻣﺪﻨﻋ ﺯﺎﻬﺠﻟﺍ ﻞﻜﻴﻫ ﻞﺧﺍﺩ ﺓﺮﻄﺧ ﺔﻴﺑﺮﻬﻛ ﺕﺎﻨﺤﺷ ﺪﺟﻮﺗ ﺪﻗ .ﺔﻴﻟﻭﻷﺍ ﺔﻴﺴﻴﺋﺮﻟﺍ ﻑﺍﺮﻃﻷﺍ ﻲﺒﻧﺎﺟ ﺓﺪﺣﻮﻟﺍ ﻩﺬﻬﺑ ﻑﺎﻘﻳﻹﺍ/ﻞﻴﻐﺸﺘﻟﺍ ﺡﺎﺘﻔﻣ ﻞﻄﻌﻳ ﻻ .19
.ﻞﻴﻐﺸﺘﻠﻟ ﻞﺑﺎﻗ ﻞﻈﻳ ﻥﺃ ﺐﺠﻳ ﻱﺬﻟﺍ ،ﻝﺎﺼﺗﻻﺍ ﻊﻄﻗ ﺯﺎﻬﺠﻛ ﺯﺎﻬﺠﻟﺍ ﺔﻠﺻﻭ ﻭﺃ ﺔﻴﺴﻴﺋﺮﻟﺍ ﻑﺍﺮﻃﻷﺍ ﺲﺑﺎﻗ ﻡﺍﺪﺨﺘﺳﺍ ﻢﺘﻳ
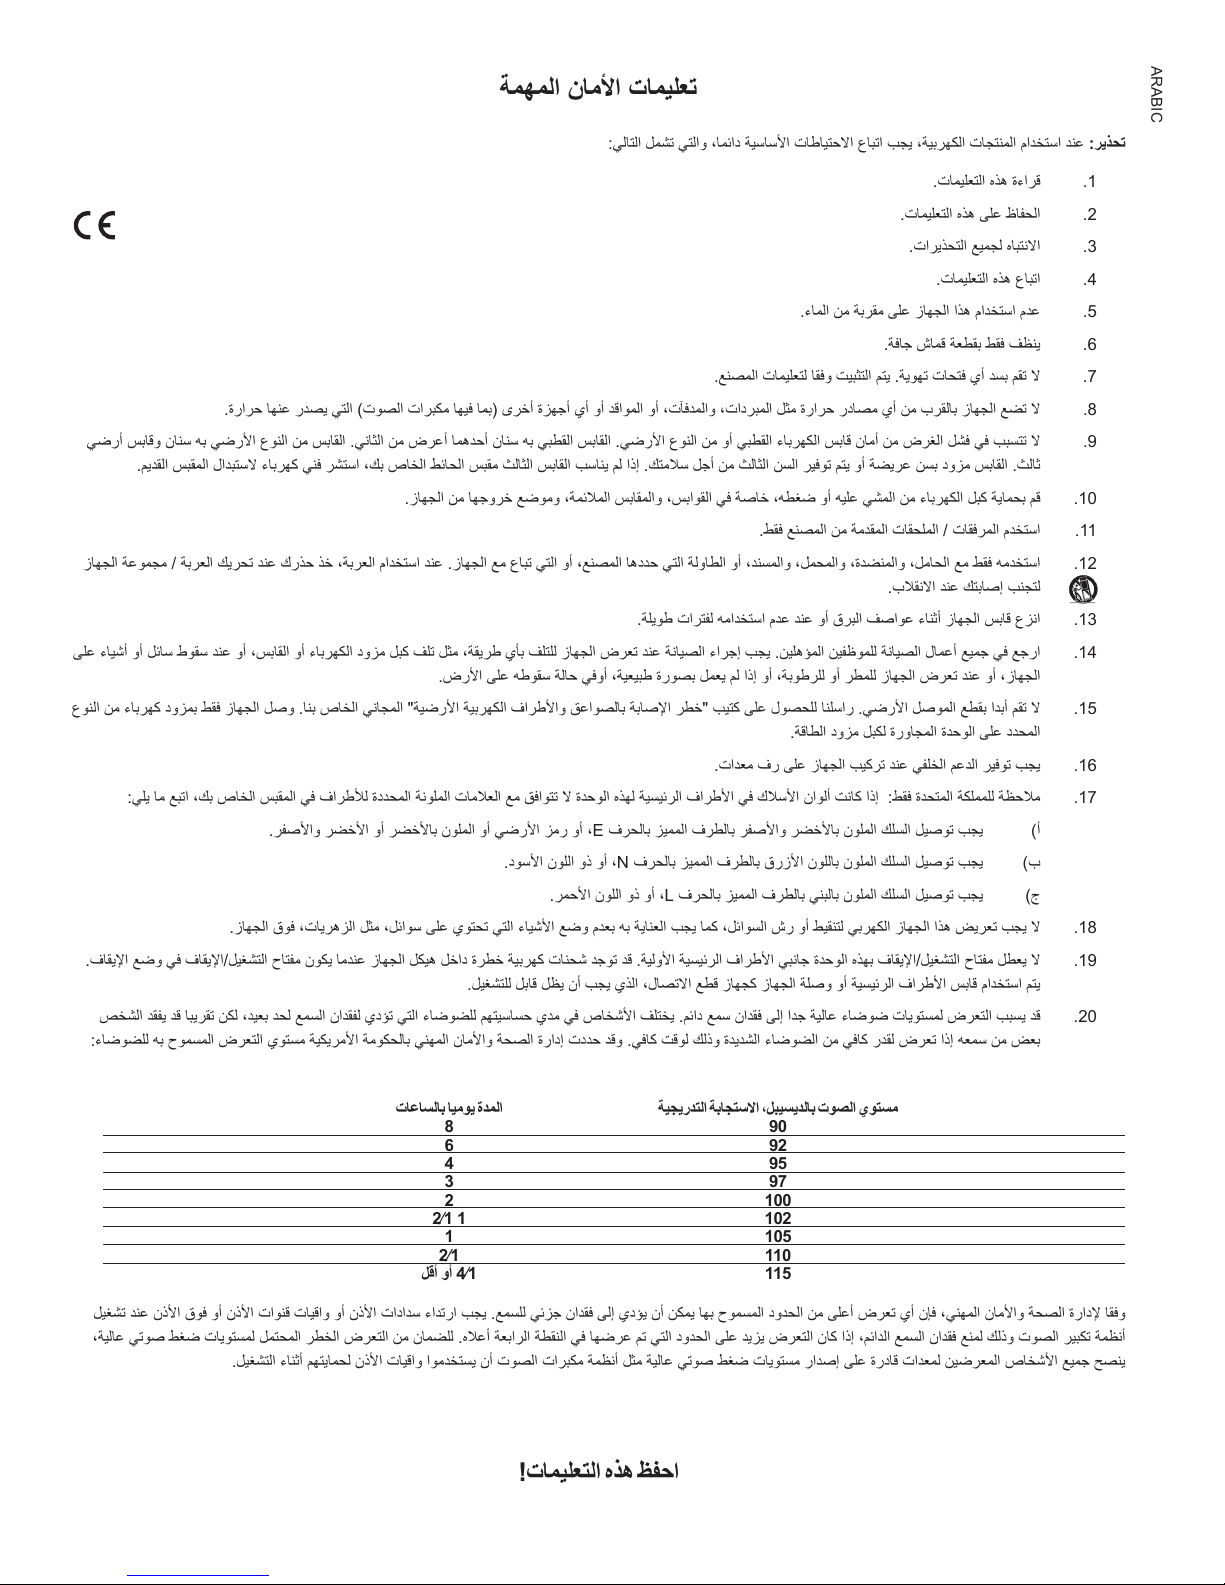
ﺺﺨﺸﻟﺍ ﺪﻘﻔﻳ ﺪﻗ ﺎﺒﻳﺮﻘﺗ ﻦﻜﻟ ،ﺪﻴﻌﺑ ﺪﺤﻟ ﻊﻤﺴﻟﺍ ﻥﺍﺪﻘﻔﻟ ﻱﺩﺆﺗ ﻲﺘﻟﺍ ءﺎﺿﻮﻀﻠﻟ ﻢﻬﺘﻴﺳﺎﺴﺣ ﻱﺪﻣ ﻲﻓ ﺹﺎﺨﺷﻷﺍ ﻒﻠﺘﺨﻳ .ﻢﺋﺍﺩ ﻊﻤﺳ ﻥﺍﺪﻘﻓ ﻰﻟﺇ ﺍﺪﺟ ﺔﻴﻟﺎﻋ ءﺎﺿﻮﺿ ﺕﺎﻳﻮﺘﺴﻤﻟ ﺽﺮﻌﺘﻟﺍ ﺐﺒﺴﻳ ﺪﻗ .20
:ءﺎﺿﻮﻀﻠﻟ ﻪﺑ ﺡﻮﻤﺴﻤﻟﺍ ﺽﺮﻌﺘﻟﺍ ﻱﻮﺘﺴﻣ ﺔﻴﻜﻳﺮﻣﻷﺍ ﺔﻣﻮﻜﺤﻟﺎﺑ ﻲﻨﻬﻤﻟﺍ ﻥﺎﻣﻷﺍﻭ ﺔﺤﺼﻟﺍ ﺓﺭﺍﺩﺇ ﺕﺩﺪﺣ ﺪﻗﻭ .ﻲﻓﺎﻛ ﺖﻗﻮﻟ ﻚﻟﺫﻭ ﺓﺪﻳﺪﺸﻟﺍ ءﺎﺿﻮﻀﻟﺍ ﻦﻣ ﻲﻓﺎﻛ ﺭﺪﻘﻟ ﺽﺮﻌﺗ ﺍﺫﺇ ﻪﻌﻤﺳ ﻦﻣ ﺾﻌﺑ
ﺯﺎﻬﺠﻟﺍ ﺲﺑﺎﻗ ﻉﺰﻧﺍ .13
ﺍﺬﻫ ﺾﻳﺮﻌﺗ ﺐﺠﻳ ﻻ .18
ARABIC
ﺕﺎﻋﺎﺴﻟﺎﺑ ﺎﻴﻣﻮﻳ ﺓﺪﻤﻟﺍ ﺔﻴﺠﻳﺭﺪﺘﻟﺍ ﺔﺑﺎﺠﺘﺳﻻﺍ ،ﻞﺒﻴﺴﻳﺪﻟﺎﺑ ﺕﻮﺼﻟﺍ ﻱﻮﺘﺴﻣ
ﻞﻴﻐﺸﺗ ﺪﻨﻋ ﻥﺫﻷﺍ ﻕﻮﻓ ﻭﺃ ﻥﺫﻷﺍ ﺕﺍﻮﻨﻗ ﺕﺎﻴﻗﺍﻭ ﻭﺃ ﻥﺫﻷﺍ ﺕﺍﺩﺍﺪﺳ ءﺍﺪﺗﺭﺍ ﺐﺠﻳ .ﻊﻤﺴﻠﻟ ﻲﺋﺰﺟ ﻥﺍﺪﻘﻓ ﻰﻟﺇ ﻱﺩﺆﻳ ﻥﺃ ﻦﻜﻤﻳ ﺎﻬﺑ ﺡﻮﻤﺴﻤﻟﺍ ﺩﻭﺪﺤﻟﺍ ﻦﻣ ﻰﻠﻋﺃ ﺽﺮﻌﺗ ﻱﺃ ﻥﺈﻓ ،ﻲﻨﻬﻤﻟﺍ ﻥﺎﻣﻷﺍﻭ ﺔﺤﺼﻟﺍ ﺓﺭﺍﺩﻹ ﺎﻘﻓﻭ
،ﺔﻴﻟﺎﻋ ﻲﺗﻮﺻ ﻂﻐﺿ ﺕﺎﻳﻮﺘﺴﻤﻟ ﻞﻤﺘﺤﻤﻟﺍ ﺮﻄﺨﻟﺍ ﺽﺮﻌﺘﻟﺍ ﻦﻣ ﻥﺎﻤﻀﻠﻟ .ﻩﻼﻋﺃ ﺔﻌﺑﺍﺮﻟﺍ ﺔﻄﻘﻨﻟﺍ ﻲﻓ ﺎﻬﺿﺮﻋ ﻢﺗ ﻲﺘﻟﺍ ﺩﻭﺪﺤﻟﺍ ﻰﻠﻋ ﺪﻳﺰﻳ ﺽﺮﻌﺘﻟﺍ ﻥﺎﻛ ﺍﺫﺇ ،ﻢﺋﺍﺪﻟﺍ ﻊﻤﺴﻟﺍ ﻥﺍﺪﻘﻓ ﻊﻨﻤﻟ ﻚﻟﺫﻭ ﺕﻮﺼﻟﺍ ﺮﻴﺒﻜﺗ ﺔﻤﻈﻧﺃ
.ﻞﻴﻐﺸﺘﻟﺍ ءﺎﻨﺛﺃ ﻢﻬﺘﻳﺎﻤﺤﻟ ﻥﺫﻷﺍ ﺕﺎﻴﻗﺍﻭ ﺍﻮﻣﺪﺨﺘﺴﻳ ﻥﺃ ﺕﻮﺼﻟﺍ ﺕﺍﺮﺒﻜﻣ ﺔﻤﻈﻧﺃ ﻞﺜﻣ ﺔﻴﻟﺎﻋ ﻲﺗﻮﺻ ﻂﻐﺿ ﺕﺎﻳﻮﺘﺴﻣ ﺭﺍﺪﺻﺇ ﻰﻠﻋ ﺓﺭﺩﺎﻗ ﺕﺍﺪﻌﻤﻟ
8 90
6 92
4 95
3 97
2 100
21 1 102
1 105
21 110
ﻞﻗﺃ ﻭﺃ 41 115
ﻦﻴﺿﺮﻌﻤﻟﺍ ﺹﺎﺨﺷﻷﺍ ﻊﻴﻤﺟ ﺢﺼﻨﻳ
!ﺕﺎﻤﻴﻠﻌﺘﻟﺍ ﻩﺬﻫ ﻆﻔﺣﺍ
Page 19
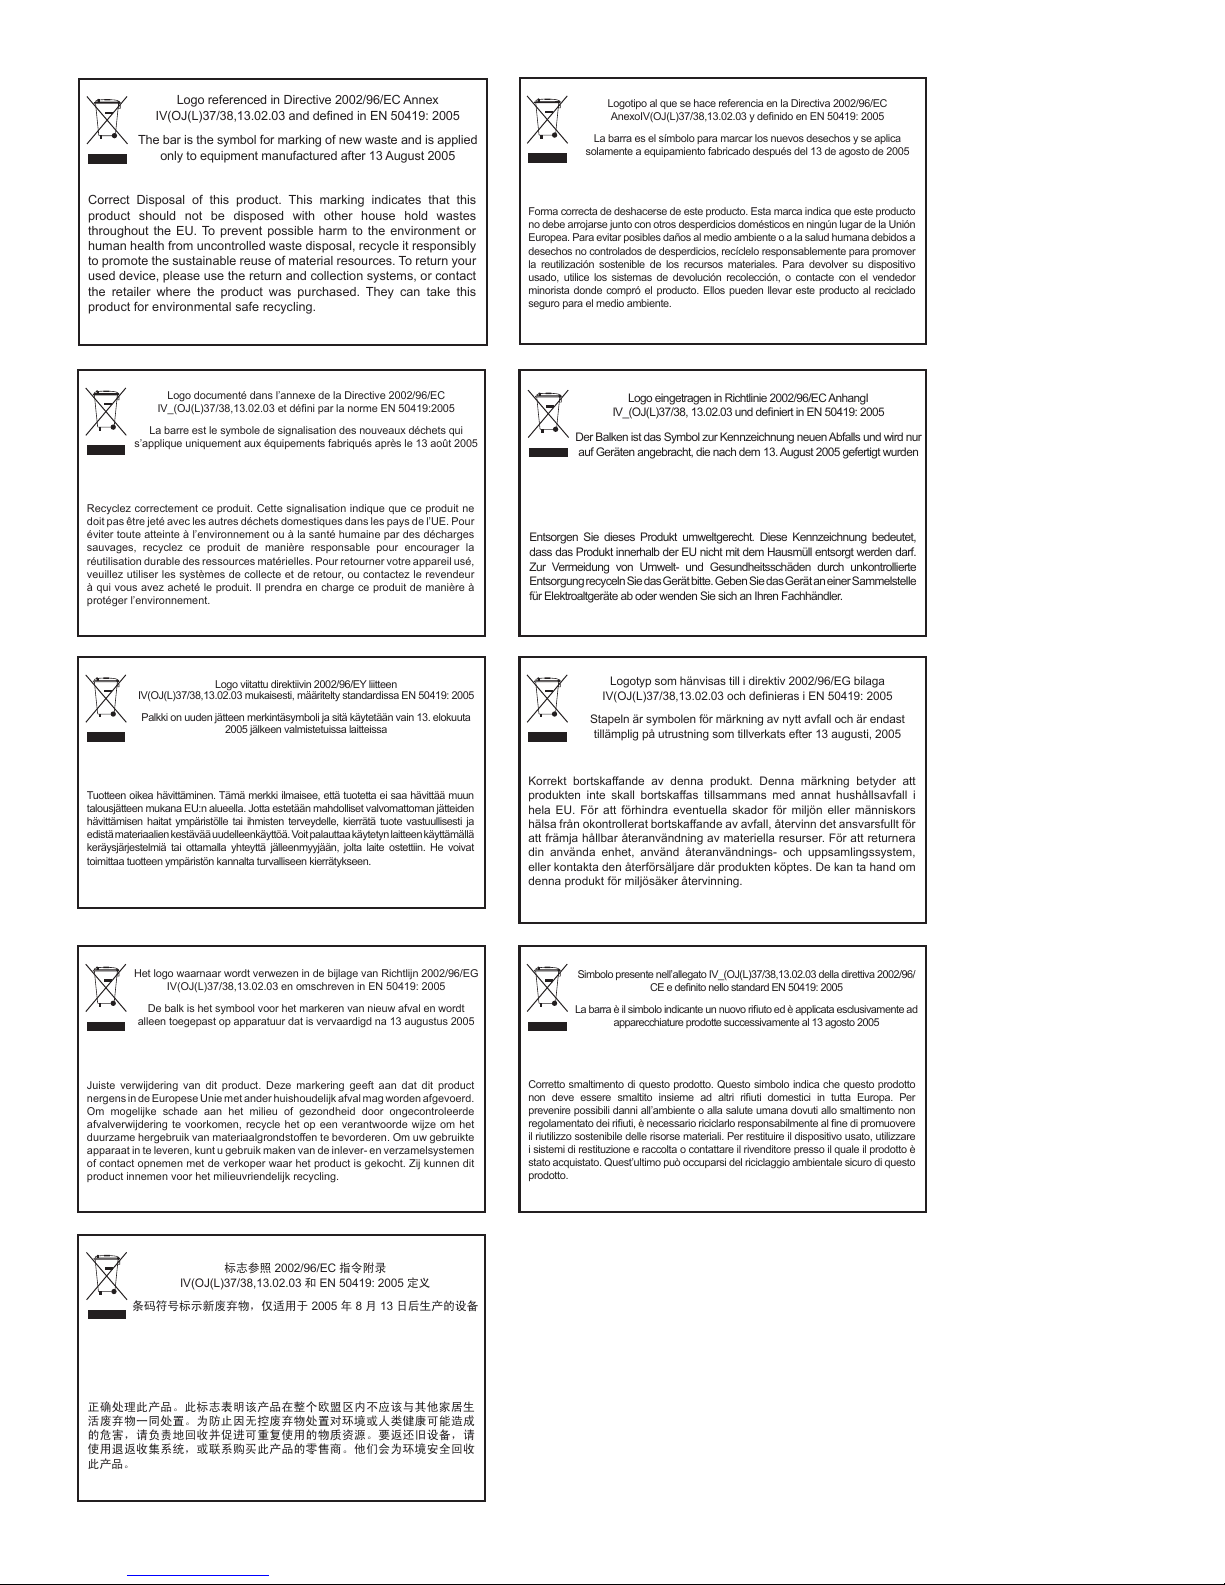
Logo referenced in Directive 2002/96/EC Annex
I(OJ(L)37/38,13.02.03 and dened in EN 50419: 2005
The bar is the symbol for marking of new waste and is applied
only to equipment manufactured after 13 August 2005
Logotipo al que se hace referencia en la Directiva 2002/96/EC
AnexoIV(OJ(L)37/38,13.02.03 y denido en EN 50419: 2005
La barra es el símbolo para marcar los nuevos desechos y se aplica
solamente a equipamiento fabricado después del 13 de agosto de 2005
Correct Disposal of this product. This marking indicates that this
product should not be disposed with other house hold wastes
throughout the EU. To prevent possible harm to the environment or
human health from uncontrolled waste disposal, recycle it responsibly
to promote the sustainable reuse of material resources. To return your
used device, please use the return and collection systems, or contact
the retailer where the product was purchased. They can take this
product for environmental safe recycling.
Logo documenté dans l’annexe de la Directive 2002/96/EC
IV_(OJ(L)37/38,13.02.03 et déni par la norme EN 50419:2005
La barre est le symbole de signalisation des nouveaux déchets qui
s’applique uniquement aux équipements fabriqués après le 13 août 2005
Recyclez correctement ce produit. Cette signalisation indique que ce produit ne
doit pas être jeté avec les autres déchets domestiques dans les pays de l’UE. Pour
éviter toute atteinte à l’environnement ou à la santé humaine par des décharges
sauvages, recyclez ce produit de manière responsable pour encourager la
réutilisation durable des ressources matérielles. Pour retourner votre appareil usé,
veuillez utiliser les systèmes de collecte et de retour, ou contactez le revendeur
à qui vous avez acheté le produit. Il prendra en charge ce produit de manière à
protéger l’environnement.
IV(OJ(L)37/38,13.02.03 mukaisesti, määritelty standardissa EN 50419: 2005
Palkki on uuden jätteen merkintäsymboli ja sitä käytetään vain 13. elokuuta
Logo viitattu direktiivin 2002/96/EY liitteen
2005 jälkeen valmistetuissa laitteissa
Forma correcta de deshacerse de este producto. Esta marca indica que este producto
no debe arrojarse junto con otros desperdicios domésticos en ningún lugar de la Unión
Europea. Para evitar posibles daños al medio ambiente o a la salud humana debidos a
desechos no controlados de desperdicios, recíclelo responsablemente para promover
la reutilización sostenible de los recursos materiales. Para devolver su dispositivo
usado, utilice los sistemas de devolución recolección, o contacte con el vendedor
minorista donde compró el producto. Ellos pueden llevar este producto al reciclado
seguro para el medio ambiente.
Logo eingetragen in Richtlinie 2002/96/EC AnhangI
IV_(OJ(L)37/38, 13.02.03 und deniert in EN 50419: 2005
Der Balken ist das Symbol zur Kennzeichnung neuen Abfalls und wird nur
auf Geräten angebracht, die nach dem 13. August 2005 gefertigt wurden
Entsorgen Sie dieses Produkt umweltgerecht. Diese Kennzeichnung bedeutet,
dass das Produkt innerhalb der EU nicht mit dem Hausmüll entsorgt werden darf.
Zur Vermeidung von Umwelt- und Gesundheitsschäden durch unkontrollierte
Entsorgung recyceln Sie das Gerät bitte. Geben Sie das Gerät an einer Sammelstelle
für Elektroaltgeräte ab oder wenden Sie sich an Ihren Fachhändler.
Logotyp som hänvisas till i direktiv 2002/96/EG bilaga
IV(OJ(L)37/38,13.02.03 och denieras i EN 50419: 2005
Stapeln är symbolen för märkning av nytt avfall och är endast
tillämplig på utrustning som tillverkats efter 13 augusti, 2005
Tuotteen oikea hävittäminen. Tämä merkki ilmaisee, että tuotetta ei saa hävittää muun
talousjätteen mukana EU:n alueella. Jotta estetään mahdolliset valvomattoman jätteiden
hävittämisen haitat ympäristölle tai ihmisten terveydelle, kierrätä tuote vastuullisesti ja
edistä materiaalien kestävää uudelleenkäyttöä. Voit palauttaa käytetyn laitteen käyttämällä
keräysjärjestelmiä tai ottamalla yhteyttä jälleenmyyjään, jolta laite ostettiin. He voivat
toimittaa tuotteen ympäristön kannalta turvalliseen kierrätykseen.
Het logo waarnaar wordt verwezen in de bijlage van Richtlijn 2002/96/EG
IV(OJ(L)37/38,13.02.03 en omschreven in EN 50419: 2005
De balk is het symbool voor het markeren van nieuw afval en wordt
alleen toegepast op apparatuur dat is vervaardigd na 13 augustus 2005
Juiste verwijdering van dit product. Deze markering geeft aan dat dit product
nergens in de Europese Unie met ander huishoudelijk afval mag worden afgevoerd.
Om mogelijke schade aan het milieu of gezondheid door ongecontroleerde
afvalverwijdering te voorkomen, recycle het op een verantwoorde wijze om het
duurzame hergebruik van materiaalgrondstoffen te bevorderen. Om uw gebruikte
apparaat in te leveren, kunt u gebruik maken van de inlever- en verzamelsystemen
of contact opnemen met de verkoper waar het product is gekocht. Zij kunnen dit
product innemen voor het milieuvriendelijk recycling.
标志参照 2002/96/EC 指令附录
IV(OJ(L)37/38,13.02.03 和 EN 50419: 2005 定义
条码符号标示新废弃物,仅适用于 2005 年 8 月 13 日后生产的设备
Korrekt bortskaffande av denna produkt. Denna märkning betyder att
produkten inte skall bortskaffas tillsammans med annat hushållsavfall i
hela EU. För att förhindra eventuella skador för miljön eller människors
hälsa från okontrollerat bortskaffande av avfall, återvinn det ansvarsfullt för
att främja hållbar återanvändning av materiella resurser. För att returnera
din använda enhet, använd återanvändnings- och uppsamlingssystem,
eller kontakta den återförsäljare där produkten köptes. De kan ta hand om
denna produkt för miljösäker återvinning.
Simbolo presente nell’allegato IV_(OJ(L)37/38,13.02.03 della direttiva 2002/96/
La barra è il simbolo indicante un nuovo riuto ed è applicata esclusivamente ad
Corretto smaltimento di questo prodotto. Questo simbolo indica che questo prodotto
non deve essere smaltito insieme ad altri riuti domestici in tutta Europa. Per
prevenire possibili danni all’ambiente o alla salute umana dovuti allo smaltimento non
regolamentato dei riuti, è necessario riciclarlo responsabilmente al ne di promuovere
il riutilizzo sostenibile delle risorse materiali. Per restituire il dispositivo usato, utilizzare
i sistemi di restituzione e raccolta o contattare il rivenditore presso il quale il prodotto è
stato acquistato. Quest’ultimo può occuparsi del riciclaggio ambientale sicuro di questo
prodotto.
CE e denito nello standard EN 50419: 2005
apparecchiature prodotte successivamente al 13 agosto 2005
正确处理此产品。此标志表明该产品在整个欧盟区内不应该与其他家居生
活废弃物一同处置。为防止因无控废弃物处置对环境或人类健康可能造成
的危害,请负责地回收并促进可重复使用的物质资源。要返还旧设备,请
使用退返收集系统,或联系购买此产品的零售商。他们会为环境安全回收
此产品。
Page 20

FCC Compliancy Statement
This equipment has been tested and found to comply with the limits for a Class A digital device,
pursuant to Part 15 of the FCC rules. These limits are designed to provide reasonable protection against
harmful interference when the equipment is operated in a commercial environment. This equipment
generates, uses and can radiate radio frequency energy and, if not installed and used in accordance
with the instruction manual, may cause harmful interference to radio communications. Operation of this
equipment in a residential area is likely to cause harmful interference in which case the user will be
required to correct the interference at his own expense.
Warning: Changes or modications to the equipment not approved by Peavey Electronics Corp. can
void the user’s authority to use the equipment.
Peavey Electronics Corporation • 5022 Hartley Peavey Drive • Meridian, MS • 39305
(601) 483-5365 • FAX (601) 486-1278 • www.peavey.com
Features and specifications are subject to change without notice.
Page 21
ENGLISH
PVX™p Sub
Thank you for purchasing the powered Peavey® PVX™p Sub. The PVXp Sub features an ultra-reliable power section that
provides a total of 800 watts of peak available power with DDT™ compression. This powered enclosure also features a 15”
heavy-duty woofer with a 3" voice coil. The PVXp Sub provides a balanced input via a combination jack that accepts balanced
TRS 1/4" input as well as a balanced XLR input. There are two balanced thru high pass XLR outputs, and a Full-Range XLR
output. There is an adjustable Level control, as well as a combination LED indicator, that illuminates when power is on and
when the “soft-limiting” DDT circuit is activated.
Features
• Vented bass powered subwoofer enclosure
• 800 watts peak available power
• 15” heavy-duty woofer
• Power Amp has forced air cooling for maximum reliability
• Internal line level low-pass/high-pass crossover network
• Fully adjustable Kosmos® C for increased bass impact
• XLR/1/4" combo jack input
• Two high-pass XLR outputs, and one full-range thru XLR output
• Polarity switch for polarity reversal of subwoofer
• Ground lift for lifting cable shield from ground
• Large heavy-duty locking casters with damped bearings
• Full-coverage heavy-duty perforated steel grill
• Steel handles
• Compact dimensions for a 15” woofer based sub
• Threaded pole mount with speaker pole included
DESCRIPTION
The Peavey® PVXp Sub is a compact, vented, powered subwoofer system utilizing a 15” heavy-duty woofer, coupled to a
power amplifier, with 800 watts peak available power. The full-length black perforated steel grille provides protection and a
professional appearance, along with the sturdy steel handles and heavy-duty 4” tall casters for transport.
Internal line-level crossover with two high-pass outputs, independently electrically buffered; and one full-range thru output,
also electrically buffered.
Peavey’s exclusive Kosmos® C bass enhancer for extra bass punch from very low frequency program material is incorporated
for maximum versatility.
A threaded pole-mount system provides a sturdy and stable platform to mount a suitably equipped speaker system above the
sub woofer. The PVXp two-way powered speaker series are an excellent partner for the PVXp Sub.
The PVXp Sub speaker system power amplifier providing the power is a low-distortion ultra-reliable fan-cooled unit providing a
total of 800W peak available power for the system. The power supply for the power amp is a switch-mode type for low weight
and high efficiency. The amplifier features our DDT compression, which virtually eliminates audible power amplifier clipping.
Cooling is provided via a low-noise fan, for reliable operation under any conditions.
Input is via a combo female XLR and 1/4” TRS phone jack with balanced input to the preamp/EQ electronics, and a level
control.
An independent pair of High-Pass Outputs provides a buffered and balanced output signal for a pair of satellite speakers to
carry the high range of the music, via a pair of male XLR jacks.
Page 22
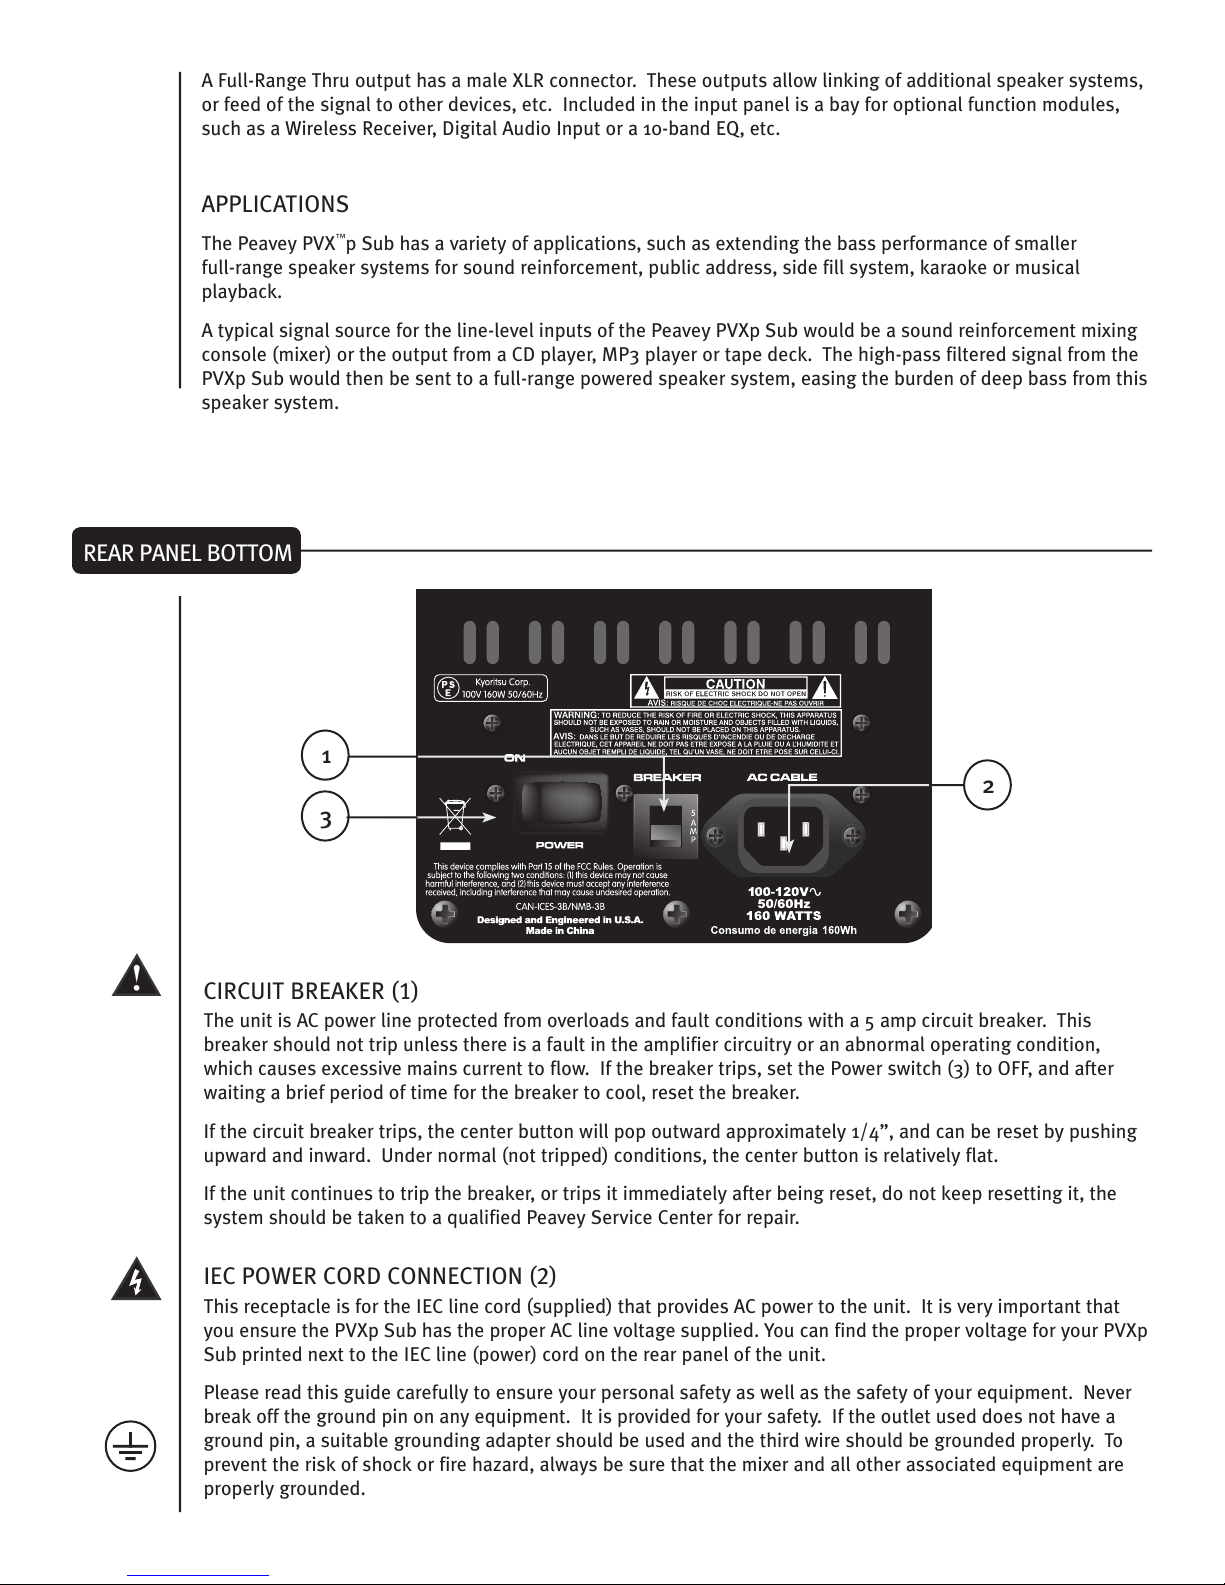
A Full-Range Thru output has a male XLR connector. These outputs allow linking of additional speaker systems,
or feed of the signal to other devices, etc. Included in the input panel is a bay for optional function modules,
such as a Wireless Receiver, Digital Audio Input or a 10-band EQ, etc.
APPLICATIONS
The Peavey PVX™p Sub has a variety of applications, such as extending the bass performance of smaller
full-range speaker systems for sound reinforcement, public address, side fill system, karaoke or musical
playback.
A typical signal source for the line-level inputs of the Peavey PVXp Sub would be a sound reinforcement mixing
console (mixer) or the output from a CD player, MP3 player or tape deck. The high-pass filtered signal from the
PVXp Sub would then be sent to a full-range powered speaker system, easing the burden of deep bass from this
speaker system.
REAR PANEL BOTTOM
1
2
3
CIRCUIT BREAKER (1)
The unit is AC power line protected from overloads and fault conditions with a 5 amp circuit breaker. This
breaker should not trip unless there is a fault in the amplifier circuitry or an abnormal operating condition,
which causes excessive mains current to flow. If the breaker trips, set the Power switch (3) to OFF, and after
waiting a brief period of time for the breaker to cool, reset the breaker.
If the circuit breaker trips, the center button will pop outward approximately 1/4”, and can be reset by pushing
upward and inward. Under normal (not tripped) conditions, the center button is relatively flat.
If the unit continues to trip the breaker, or trips it immediately after being reset, do not keep resetting it, the
system should be taken to a qualified Peavey Service Center for repair.
IEC POWER CORD CONNECTION (2)
This receptacle is for the IEC line cord (supplied) that provides AC power to the unit. It is very important that
you ensure the PVXp Sub has the proper AC line voltage supplied. You can find the proper voltage for your PVXp
Sub printed next to the IEC line (power) cord on the rear panel of the unit.
Please read this guide carefully to ensure your personal safety as well as the safety of your equipment. Never
break off the ground pin on any equipment. It is provided for your safety. If the outlet used does not have a
ground pin, a suitable grounding adapter should be used and the third wire should be grounded properly. To
prevent the risk of shock or fire hazard, always be sure that the mixer and all other associated equipment are
properly grounded.
Page 23
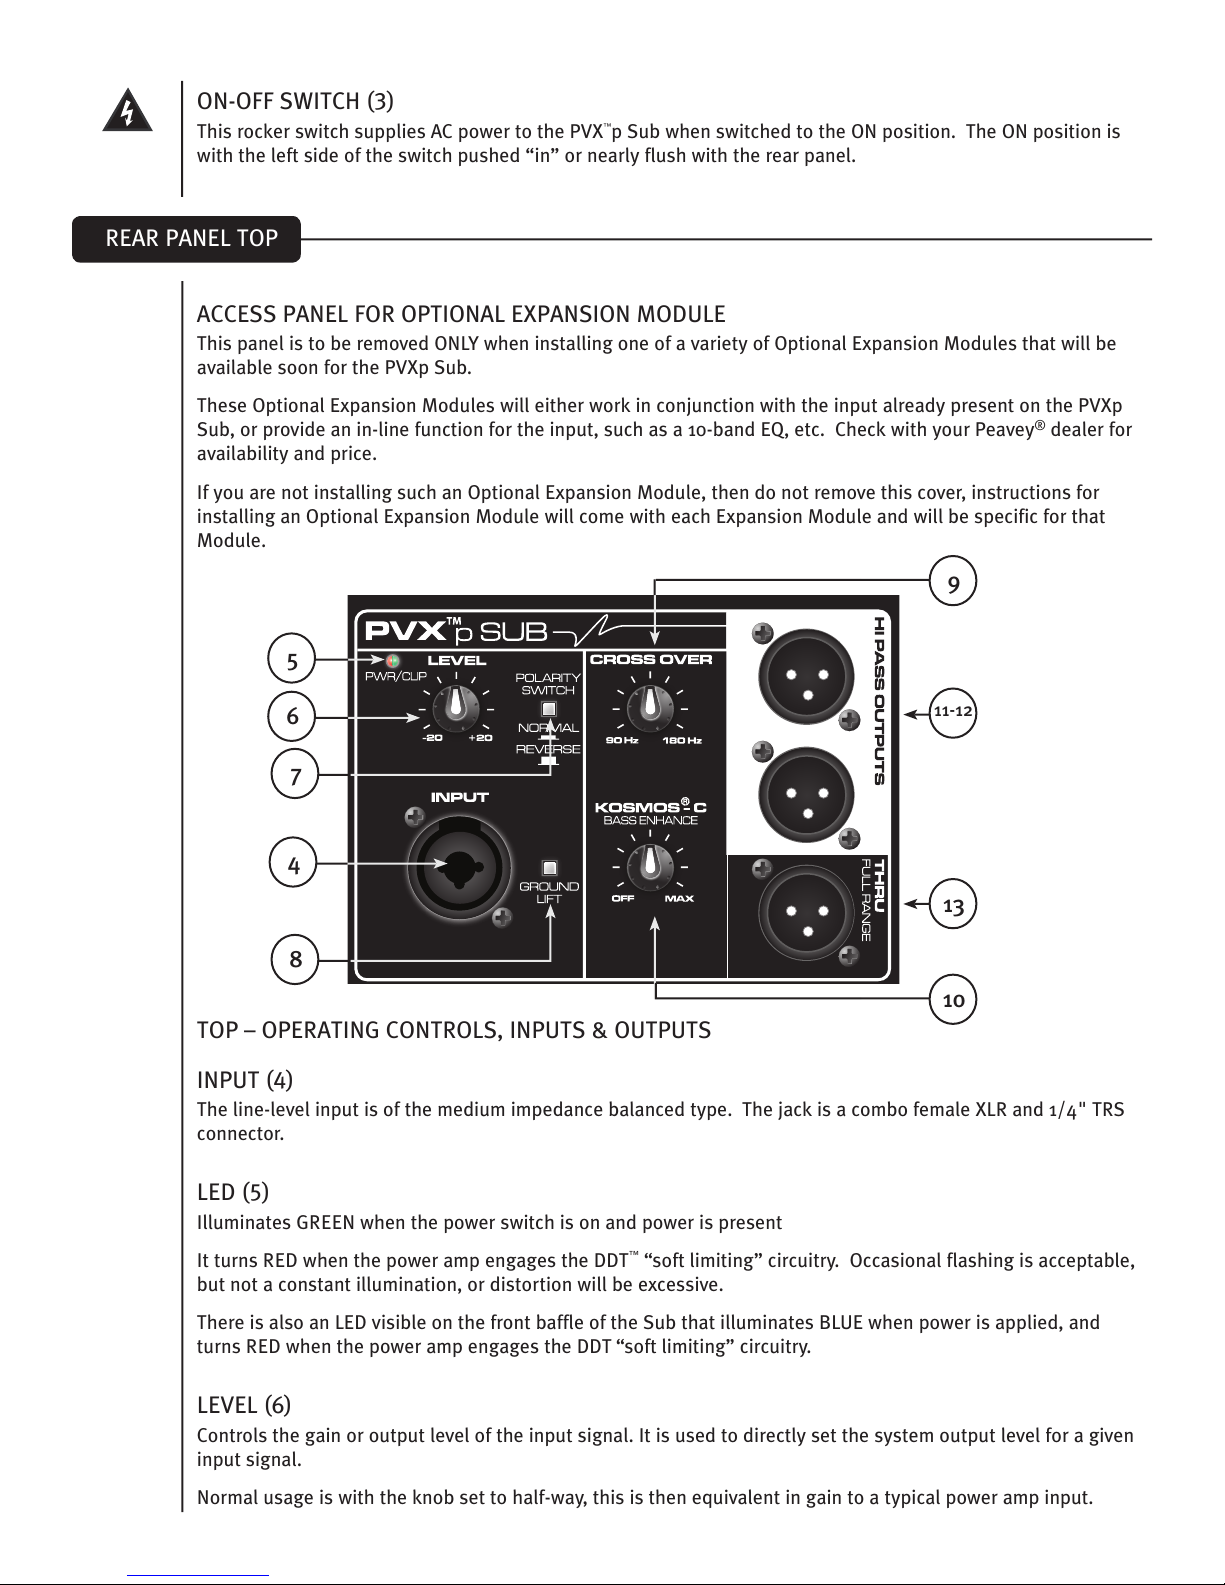
ON-OFF SWITCH (3)
This rocker switch supplies AC power to the
with the left side of the switch pushed “in” or nearly flush with the rear panel.
REAR PANEL TOP
ACCESS PANEL FOR OPTIONAL EXPANSION MODULE
This panel is to be removed ONLY when installing one of a variety of Optional Expansion Modules that will be
available soon for the PVXp Sub.
These Optional Expansion Modules will either work in conjunction with the input already present on the PVXp
Sub, or provide an in-line function for the input, such as a 10-band EQ, etc. Check with your Peavey® dealer for
availability and price.
If you are not installing such an Optional Expansion Module, then do not remove this cover, instructions for
installing an Optional Expansion Module will come with each Expansion Module and will be specific for that
Module.
Sub when switched to the ON position. The ON position is
PVX™p
9
5
6
11-12
7
4
13
8
10
TOP – OPERATING CONTROLS, INPUTS & OUTPUTS
INPUT (4)
The line-level input is of the medium impedance balanced type. The jack is a combo female XLR and 1/4" TRS
connector.
LED (5)
Illuminates GREEN when the power switch is on and power is present
It turns RED when the power amp engages the DDT™ “soft limiting” circuitry. Occasional flashing is acceptable,
but not a constant illumination, or distortion will be excessive.
There is also an LED visible on the front baffle of the Sub that illuminates BLUE when power is applied, and
turns RED when the power amp engages the DDT “soft limiting” circuitry.
LEVEL (6)
Controls the gain or output level of the input signal. It is used to directly set the system output level for a given
input signal.
Normal usage is with the knob set to half-way, this is then equivalent in gain to a typical power amp input.
Page 24
POLARITY SWITCH (7)
Provides either 0 degrees or 180 degrees sub woofer polarity
This switch is used on conjunction with the Crossover Frequency Control (9) to provide for the best match
between the Subwoofer output and the satellite speaker output in the crossover region.
GROUND LIFT SWITCH (8)
Provided for lifting cable shield from chassis ground, to break potential ground loops and reduce hum.
CROSSOVER FREQUENCY CONTROL (9)
Varies the crossover frequency between the Subwoofer and the High Pass Outputs sent to the satellite/s
speaker/s (11 & 12). Varies the electrical crossover frequency from 90 Hz to 180 Hz.
CAUTION! SETTING THIS CONTROL TOO LOW MAY ALLOW THE SATELLITE SPEAKER TO BE OVERLOADED BY
DEEP BASS!
™
Setting the control lower DOES NOT increase the deep bass output of the PVX
higher setting works best for most speakers.
p
Sub, a middle (12 o'clock) to
KOSMOS® C BASS ENHANCEMENT (10)
Provides the capability to add bass harmonics to enhance the perception of deep bass in the program material
without overloading the Subwoofer speaker.
This control is best used in moderation, and turning it full up can cause the program material to sound distorted
or unnatural.
HIGH PASS OUTPUTS (11 & 12)
These outputs provide a high-pass filtered signal to be fed to a full-range powered speaker system, such as the
PVXp 10, PVXp 12 or PVXp 15. Other full-range powered speakers can be used, and full-range passive speakers
can be used in conjunction with a suitable power amp to drive them.
These outputs are electronically buffered and isolated from the input and from each other, and their level is not
affected by the PVXp Sub Level control (6).
THRU FULL RANGE OUTPUT (13)
This output provides a full-range signal to be sent to any other device that requires a full-range signal, such as
another PVXp Sub, or some other line level audio device. This output is electronically buffered and isolated
from the input and from the other outputs.
OPERATING INSTRUCTIONS
CAUTIONS
The unit must be disconnected from the AC power source before any work is done on it. Refer all servicing to
qualified service personnel.
The back plate can become hot to the touch. Do not block or cover the fan or the exhaust louvers from
ventilation. There must be a minimum of 4” of space behind the fan. Do not allow the airflow to be become
blocked by objects such as curtains or drapes, thermal building insulation, etc. It is recommended that the rear
of the PVXp Sub not be placed in a closed space or a space that has no fresh, cool airflow.
DO NOT connect the inputs of the PVXp Sub to the output of a power amplifier. The inputs are meant to be
driven from a line-level strength signal.
DO NOT remove the protective metal grilles.
WARNING! The PVXp Sub is very efficient and powerful! This sound system can permanently damage hearing!
Use extreme care setting the overall maximum volume!
Page 25
™
The apparent sound level of the PVX
p
Sub can be deceiving due to its clear, clean sound output and lack of
high frequencies. The lack of distortion or obvious distress can make the sound level seem much lower than it
actually is. This system is capable of SPL in excess of 127 dB at 1 M from the speaker!
PLACING A SATELLITE SPEAKER SYSTEM ON TOP OF THE PVX™p SUB
The PVXp Sub has a threaded pole mount built-in to the top of the unit, and this is designed to mate with an
M20 threaded pole of approximately 32” in length or less. This pole is specifically designed to be used with the
following speaker systems:
Peavey PVXp 10
Peavey PVXp 12
Peavey PVXp 15
Do not place a taller/larger or heavier speaker system than the PVXp 15 on this pole, or it may be unsafe due to
the potential to tip over.
The PVXp Sub must be placed on firm and level ground, in order for the pole mounted speaker to be safe from
tipping.
When installing or de-installing the speaker on the pole, it is a good practice to have a helper, if possible. It can
be hard to “thread the needle” and mate the pole cup to the Subwoofer pole while holding the speaker system
at arm’s length.
When using the PVXp Sub and pole outdoors, never attach banners or flags to the pole or the pole mounted
speaker system, strong winds may cause the speaker to blow over. If there is a possibility of strong windy
conditions, then it may be prudent to consider removing the speaker from the pole to prevent the PVXp Sub and
pole mounted speaker system from being blown over.
CONNECTING AC POWER TO THE PVXp SUB
The PVXp Sub comes with a 6-foot IEC connection AC power cord. If you are using an extension cord or power
strip with this powered speaker, make sure it is of good quality and of a sufficient current capacity to maintain
safety and maximize the power output capability of the PVXp Sub. For maximum undistorted output, do not
connect any other device to the same extension cord that the PVXp Sub is connected to. Do not exceed the
rated current capacity of the extension cord with the sum total of all units connected to it.
When first plugging in the PVXp Sub AC cord, make sure the power switch is in the Off position, and then turn
it On only after connecting the power cord. Built-in muting will engage, when the proper sequence of steps is
taken.
SPECIAL NOTE FOR PERMANENT INSTALLATION
When installing the PVXp Sub, AC power runs will be used and a certified electrician should be consulted, to be
sure that all AC wiring complies with local codes and regulations. It is also advisable to use a cable clip properly
affixed to the cabinet to strain relief the IEC power cord connected to the amplifier module at (2) so the power
cord cannot be pulled out or vibrate loose.
CONNECTING A SIGNAL TO THE PVXp SUB
There are a variety of ways to input a signal into the PVXp Sub.
The input (4) provides a balanced line-level input, allowing the use of a 1/4" TRS (ring-tip-sleeve) type phone
plug or a male XLR plug. Of course, an unbalanced 1/4" phone plug can be used as well, but it will not have the
benefit of the balanced connections rejection of outside interference, such as hum and RFI.
Do not connect cables to the jacks while the unit is ON and the Level knob is turned up! While a standard
single-ended 1/4" phone plug-equipped cable will work well and the balanced input circuitry will provide some
interference rejection, a balanced cable using either the balanced TRS 1/4" phone plug or the XLR plug will
provide superior interference rejection and performance.
Page 26
Sometimes, with difficult interference problems, it will be helpful to lift the shield ground ( Pin #1 of an XLR)
of a balanced cable at the PVX™p Sub end. This can be done quite easily, by activating the Ground Lift switch
(10) built into the PVXp Sub. Check any input changes carefully, always turning the Level control down before
plugging and unplugging cables, or lifting the ground.
Use of high quality, premium cables is recommended for the PVX™p Sub, as these usually have better shielding
and materials and will provide greater long-term reliability. The best option is a shielded balanced cable no
longer than necessary to reach the PVXp Sub. It is usually a good idea to leave some slack at the input to the
PVXp Sub and also to tape the cables down or run them under a cable guard, to avoid anyone tripping over them
or pulling the PVXp Sub over when it is holding a speaker on top of it’s pole.
LEVEL CONTROL ADJUSTMENT
The PVXp Sub is equipped with a Level control (6) on the input to facilitate use in many different applications.
With the Level control adjusted fully clockwise, gain is at maximum and the input sensitivity is 0.24 V RMS for
full-rated output.
It is recommended that the PVXp Sub Level control be set close to 12 o'clock position, or 0 dB preamp gain. At
this setting, the input sensitivity is approximately 2.4 volts RMS for full-rated output. The PVXp Sub will now
more closely match a typical power amp input.
If the mixing board indicates clipping of its output signals, then all of the PVXp Sub power capability is not
being utilized cleanly. Clipping the signal before it gets to the PVXp Sub is not optimal. Reduce the mixer
output level and turn up the Level control on the PVXp Sub.
The amplifier in the PVXp Sub is equipped with DDT™ and the LED indicator will show when PVXp Sub DDT
has engaged. If the sound seems heavily compressed, check these indicators; if it is blinking RED more than
occasionally, then the drive level from the mixer (or the Level control on the PVXp Sub) needs to be reduced.
When first turning on the sound system, switch on all upstream electronics first, then the PVXp Sub with its
Level control fully counterclockwise (all the way down). Begin checking levels with the mixer output level
controls all the way down, and bring them up slowly with the PVXp Sub Level control set to the desired setting
(one-half way up recommended to start).
It is not good practice to turn the Level control on the PVXp Sub all the way up and then try to control level only
from the mixer, this approach would tend to pick up excess noise. Best practice would be to run a “hot” signal
from the mixer down the cable to the PVXp Sub, and then turn the PVXp Sub Level control up only as much
as necessary to reach full desired output. With this approach, it is necessary to verify the mixer output is not
clipping.
CABLES FROM THE HIGH PASS OUTPUTS (11 & 12)
The preferred method of connecting a full-range satellite speaker system to the PVXp Sub’s High Pass Outputs
(11 & 12), is to use a balanced XLR cable no longer than necessary to comfortably reach the satellite speaker
system.
If the satellite speaker is on top of a pole above the PVXp Sub, then a 6 foot cable will be plenty long. A 10,
or 20 foot cable could also be used, but cables longer than that will only allow more interference pickup, and
start to lose high-frequency information. Use of high quality, premium cables is recommended for the PVXp
Sub, as these usually have better shielding and materials and will provide greater long-term reliability. . It is
usually a good idea to leave some slack at the output of the PVXp Sub, and also to tape the cables down or run
them under a cable guard to avoid anyone tripping over them or pulling the PVXp Sub over when it is holding a
speaker on top of it’s pole.
RECOMMENDED SETTINGS FOR USE OF THE PVXp SUB WITH THE PVXp SERIES POWERED
SPEAKERS
The ideal location for placement of the powered PVX
pole. In that close proximity, the following settings will provide the best results in the crossover region, and for
tonal balance.
Note that the XLR outputs (11 & 12), have been padded 12 dB to allow the XLR inputs on the PVXp 12 and PVXp
15 to be used. Normally, these are considered the mic level inputs, but with the PVXp Sub outputs padded, the
usage of the XLR inputs on the PVXp powered speakers is possible.
™
p
series full-range speakers is on top of the PVXp Sub
Page 27
PVXp 10
Polarity Switch on Sub (7): Normal or IN
Crossover Frequency Control (9): From 12 o'clock to full clockwise. This represents a range from approximately
110 Hz to 160 Hz for the crossover point. Recommended optimal setting is full clockwise position.
Level Controls (6): PVXp™Sub Level control at 12 o'clock (0 dB), PVXp10 Level control at 12 o'clock
PVXp 12
Polarity Switch on Sub (7): Normal or IN
Crossover Frequency Control (9): From 12 o'clock to full clockwise. This represents a range from approximately
110 Hz to 160 Hz for the crossover point.
Recommended optimal setting is set to two tics past 12 o'clock.
Level Controls (6): PVXp sub Level control at 12 o'clock (0 dB), PVXp 12 Level control at - 2 tics before 12 o'clock
PVXp 15
Polarity Switch on Sub (7): Normal or IN
Crossover Frequency Control (9): From 12 o'clock to full clockwise. This represents a range from approximately
110 Hz to 160 Hz for the crossover point.
Recommended optimal setting is set to 12 o'clock.
Level Controls (6): PVXp Sub Level control at 12 o'clock (0 dB), PVXp 12 Level control at - 2 tics before 12 o'clock
CAUTION! SETTING THE CROSSOVER FREQUENCY CONTROL TOO LOW MAY ALLOW THE SATELLITE SPEAKER TO
BE OVERLOADED BY DEEP BASS AT HIGH SPL !
Setting the control lower DOES NOT increase the deep bass output of the PVXp Sub, a middle (12 o'clock) to
higher setting works best for most speakers.
If the PVXp series speakers are not set on top of the Subwoofer on the pole, then the polarity switch settings
may need to be different than what is provided here. The Crossover Frequency Control may need to be set to a
lower point in order for the Subwoofer and the satellites to sum well through the crossover region. The settings
outlined above will work the best when the satellite speaker and the Subwoofer are closer together, and
essentially the same distance from the audience.
SETTING THE PVXp SUB CONTROLS FOR USE WITH OTHER SATELLITE SPEAKERS
Crossover Frequency Control (9): In general, for smaller full-range speakers to be used as satellites, set the
Crossover Frequency Control (9) to a higher frequency setting. For larger full-range speakers, set the Crossover
Frequency Control (9) to a lower frequency setting. Setting the Crossover Frequency Control very much below
the 12 o'clock position will not be needed most of the time, as a crossover frequency below 100 Hz is not going
to allow the PVXp Sub and the satellite speaker to add together very well in the crossover region.
Polarity Switch (7): Try changing the Polarity Switch setting back and forth at each selected crossover frequency,
so as to determine which switch position provides the most bass output in the crossover region
Level Controls (6): Start with the PVXp Sub Level control in the 12 o'clock position, and adjust the satellite
speaker system to match it’s level. Note that if the Subwoofer can be heard as a distinctly separate sound
source, then it is probably set too high in level.
SETTING THE KOSMOS® C BASS ENHANCE CONTROL (10)
The Kosmos® C Bass Enhance control can add apparent bass extension and output to the reproduced sound,
especially when the program material has significant content below the PVXp Sub’s cut-off frequency.
When appropriate, judicious use can enhance the enjoyment of the music, and add punch and boom to the mix.
However, setting the control to higher than optimal level can result in a perception of noticeable distortion or
less clear bass sounds. Seldom will it be helpful to turn the control all the way up.
Typical use will involve a setting of the control knob somewhere between Off (full counter clockwise) and 12
o'clock (half-way up). Then the added effect is more subtle and less intrusive during certain moments in the
music, while still providing a welcome enhancement of the overall sound.
Page 28
Note that at extreme full clockwise settings, the effective gain of the Subwoofer is increased, so if it was on the
verge of clipping before, turning the Bass Enhance Control way up may cause it to go into clipping.
DISCONNECTING AC POWER TO THE PVX™p SUB
We recommend that the Power switch (3) be used to turn the unit off first, and then the AC power cord can be
removed, this minimizes stress to the power amplifiers and the transducers from turn-off transients. The power
switch has an arc suppression capacitor to help during turn-off, and tends to make a clean disconnect from
the AC power, while the power cord IEC connector can make intermittent contact before finally becoming fully
disconnected, e.g., as when wiggling the cord.
TROUBLESHOOTING
NO OUTPUT AT ALL
First, make sure the unit has AC power and is turned ON. Make sure the LED on the power amp module is
illuminated.
If not, make certain the ON/OFF switch (3) is in the ON position and check the IEC power cord connection (2) by
ensuring it is fully engaged and seated. Make certain the AC line cord is plugged into a working AC outlet.
Finally, check the breaker (1). (See the Rear Panel: Breaker section, for safety instructions.)
™
Once assured your unit is getting AC power, check that the PVX
disconnect the cable running to its inputs and connect it to some other device capable of reproducing the signal
(i.e., a power amp and speaker). If this produces a signal, make sure that all Level controls being used have
been turned up to a satisfactory level (one-third to halfway).
p
Sub is getting a signal. Temporarily
If the PVXp Sub has been subjected to direct sunlight or excessive heat, the built-in thermal protection may
have been triggered. If so, turn off the PVXp Sub and let it cool for a sufficient amount of time.
If there is still no output, contact your authorized Peavey dealer or the Peavey International Service Center.
HUM OR BUZZ
If the PVXp Sub is producing a hum or buzz, this can be AC outlet related. Try plugging the PVXp Sub into a
different AC outlet. Sometimes, if a different circuit (breaker) is used for the mixer and for the PVXp Sub, it can
cause hum problems. Unless it is not practical, it is best to use the same wall outlet (breaker) to supply power
to both the mixer and the powered speaker.
Ensure that shielded cables have been used to route the signal to the PVXp Sub’s input. If speaker cables with
1/4" plugs are used as input cables instead of shielded cables, they will be prone to hum or buzz.
Hum may be ground loop related. It may be helpful to lift the shield ground (Pin #1) on a balanced cable at
the PVXp Sub end. This is done quite easily by activating the Ground Lift switch (10) built-in to the PVXp Sub.
Check any input changes carefully by first turning down the Level control, before plugging and unplugging
cables, or lifting the shield ground at the Sub.
Check to make sure light dimmers are not on the same circuit as the PVXp Sub, the mixer or any source devices.
If light dimmers are used, then it may be necessary to turn them full ON or full OFF to eliminate or reduce hum.
This is a typical AC wiring/light dimmer interference problem, not a design flaw of the PVXp Sub.
The third wire (ground plug) on the AC plug should NEVER be removed or broken off, as this is a potential safety
hazard.
DISTORTED OR FUZZY SOUND
First, ensure the mixer (signal source) is not clipping or being overdriven. Make sure the Level (6) control on the
PVXp Sub has not been set too low. Check that the input plug is fully seated in the input jack on the rear panel
of the PVXp Sub. Ensure that a power amp has not been plugged into the input jack of the PVXp Sub. If an
extension cord is being used to provide the AC power to the unit, ensure that it is of sufficient current capacity
and that it is not also being used to supply power to any other device.
The PVXp Sub has a built-in bass boost to extend and smooth the natural response of the speakers in the
system, so it should require little, if any, additional EQ. If excessive additional bass boost have been added
externally to the PVXp Sub, it could cause premature overload at high SPL. Reduce the amount of any external
(mixer, rack) EQ and see if that clears up the distortion.
Page 29

Finally, realize that even though the PVXp Sub is a powerful and high output unit, it does ultimately have limits,
and it may need additional powered Subwoofer units to provide enough sound output or coverage. In this case,
try turning the mixer levels down a little to see if that clears things up. If, after checking all the things listed to
check and anything else you can think of to check safely, and the system still exhibits problems, carefully note
all conditions and check with your Peavey dealer for advice.
CARE AND MAINTENANCE
Your PVXp Sub is a sturdy and durable product and will provide years of reliable use if properly cared for. Use
common sense and read the safety warnings to avoid hazardous operating conditions.
The unit must be disconnected from the AC power source before any work is done on it. Refer all servicing to
qualified service personnel.
SUNLIGHT/HEAT
Avoid prolonged exposure to direct sunlight, as this may cause the unit to overheat and thermally shut off.
Excessively hot operating conditions can also cause a thermal shutdown.
Do not store in extremely hot or cold conditions or extremely high humidity. Always allow unit to come to
room temperature before use.
CLEANING
Never clean the PVXp Sub while plugged in or turned ON! When the unit has been fully disconnected from
AC power sources, use a dry cloth to remove soil or other dirt. Never use strong solvents on the PVXp Sub,
as they could damage the cabinet. Do not allow ANY fluids to drip inside the PVXp Sub.
TOUCH-UP
For a touch-up of any damage to the black painted finish of the PVXp Sub, you can use a black spray paint
such as Peavey Commercial Sound, Black Touch-Up Paint, Peavey part number 00052110. Follow the
directions on the can for safety and best results.
CHECK FOR SECURE HARDWARE
After the first few months of use and periodically thereafter, check the hardware of the PVXp Sub for
tightness, including the rear panel screws and the screws that hold the grille and cabinet together.
The unit is subject to a great deal of vibration, and this could cause them to loosen with use.
Features and specifications are subject to change without notice.
Peavey Electronics Corporation • 5022 Hartley Peavey Drive • Meridian • MS • 39305
(601) 483-5365 • FAX (601) 486-1278 • www.peavey.com • ©2013 • EX000178
Page 30
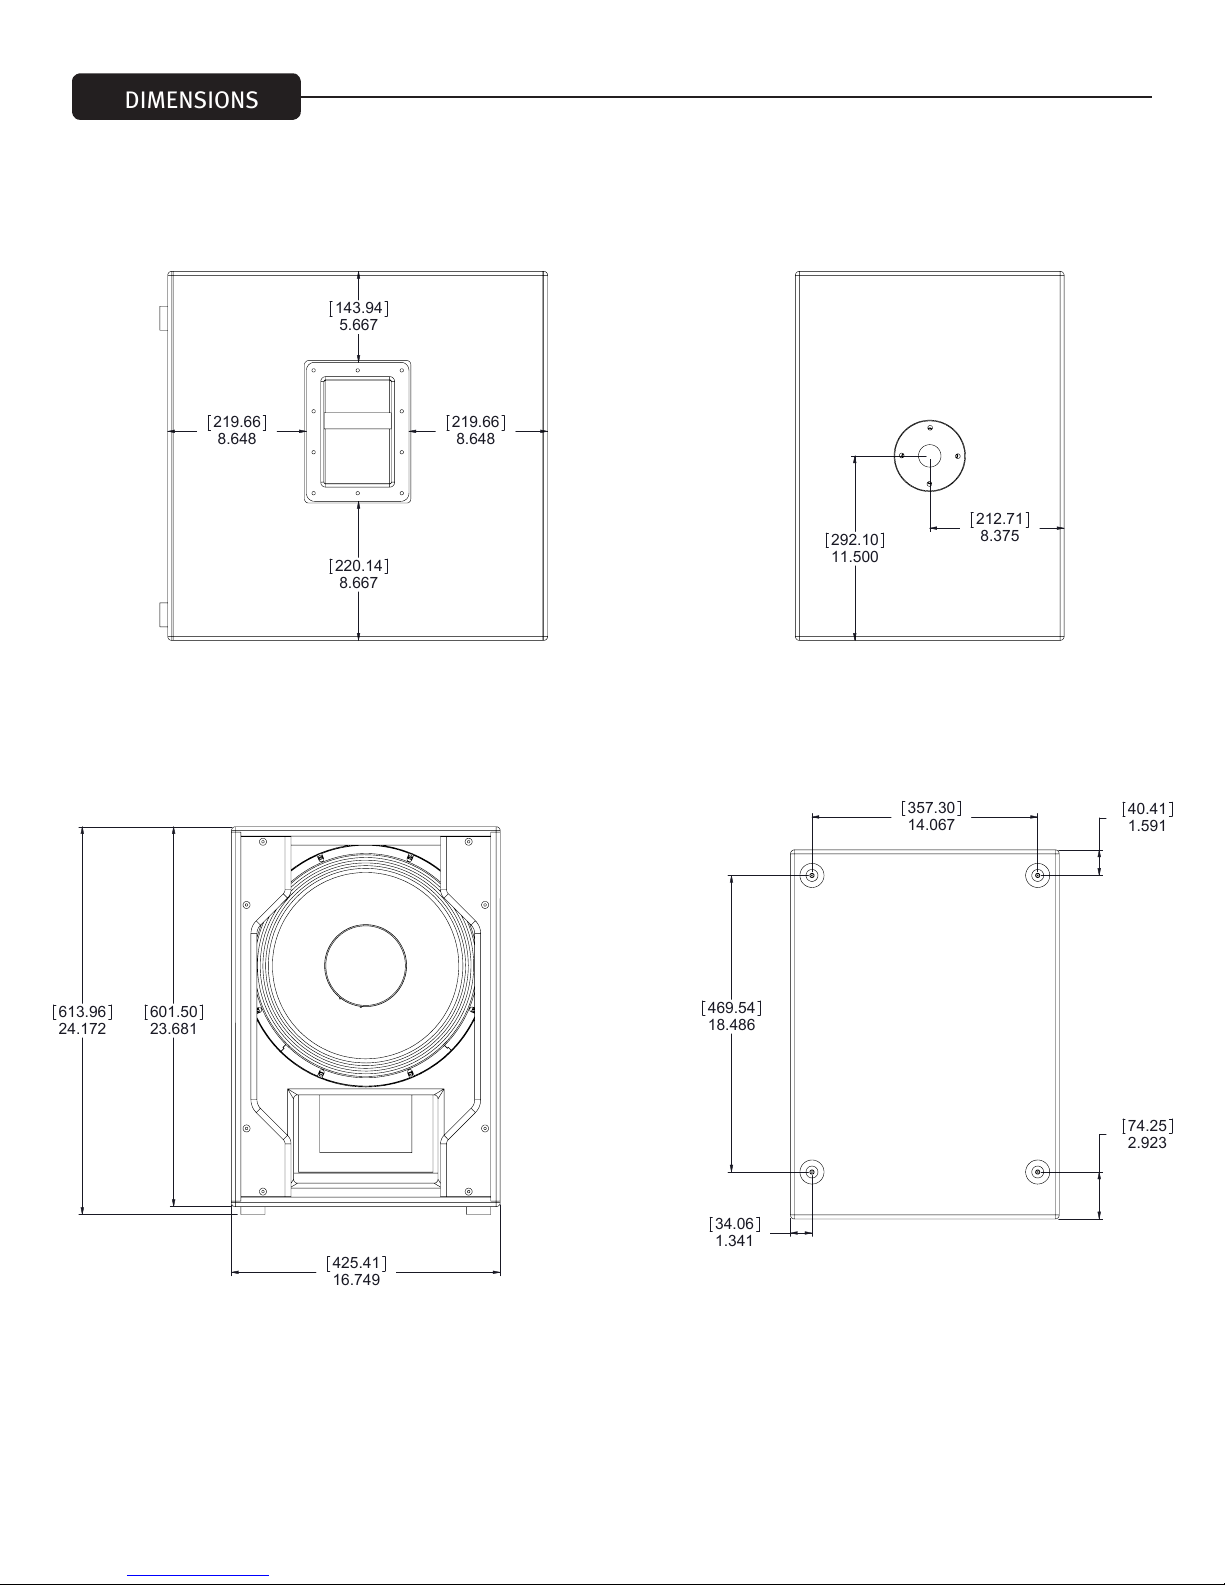
16.749
8
7
6
5
4
DIMENSIONS
143.94
5.667
219.66
8.648
219.66
8.648
212.71
8.375
220.14
292.10
11.500
8.667
357.30
14.067
40.41
1.591
613.96
24.172
601.50
23.681
425.41
469.54
18.486
74.25
2.923
34.06
1.341
Page 31

UNLESS OTHERWISE SPECIFIED,
3
2
1
G
F
E
D
C
B
DIMENSIONS
Typical Usage
Output Inputs
143.94
5.667
Keyboard
219.66
8.648
219.66
8.648
220.14
8.667
Mixer
Dynamic Mic
(No Electrets)
Guitar
PVXp 12 or PVXp 15
Output Inputs
Mixer
Dynamic Mic
(No Electrets)
Keyboard
Guitar
PVXp 12 or PVXp 15
PVXp 12 or PVXp 15
Input to
1st Sub
Daisy-Chain Connection (Multiple Subs)
Page 32

SPECIFICATIONS
Frequency Range (-10 dB, Half Space):
43 Hz – 180 Hz*
*Crossover Control Full CW
Frequency Response, 1 Meter On-axis, Swept-sine In
Anechoic Environment (-6 dB):
48 Hz – 138 Hz*
*Crossover Control Full CW
Power Amp Rating, Total Power Output:
800 watts peak available power
Continuous Power: 470 watts into 4 ohms
Electronic Input Impedance (Nominal):
Line In: 2.2 k ohms balanced (XLR or 1/4"), 10 k ohms
unbalanced 1/4"
Sound Pressure Level, 1 Watt, 1 Meter In Anechoic
Environment:
97 dB SPL
Maximum Sound Pressure Level (1 meter):
123 dB SPL continuous
127 dB SPL peak
Transducer Complement:
15" premium heavy-duty woofer, 3" voice coil
Electronic Crossover
Continuously variable from 90 Hz to 180 Hz.
Low Pass slope: 24 dB/octave
High Pass Output slope: 18 dB/octave
Infrasonic Filter Slope:
36 dB/octave
Nominal Amplifier Frequency Response:
+0, -3 dB from 20 Hz to 20 kHz
Hum and Noise:
Greater than 90 dB below rated power
DDT Dynamic Range:
Greater than 21 dB
THD and IM:
Typically less than 0.5 %
Damping Factor:
Greater than 100 @ 1000 Hz, 4 Ohms
™
Power Requirements Of Peavey PVX
p Sub System:
Nominal 160 Watts, 100-120 VAC 50-60 Hz (Domestic)
220-240 VAC 50-60 Hz (Export)
Box Tuning Frequency:
50 Hz
Input Connections:
One combo female XLR/ 1/4" phone jack providing balanced
or unbalanced operation.
Output Connections:
Two High Pass Outputs, independently electrically buffered,
with switchable output level pad.
One Full Range Thru, electrically buffered.
Controls:
Level: Provides +/- 20 dB gain adjustment
Crossover Frequency Adjust: Adjusts electrical crossover
frequency from 90 Hz to 180 Hz, continuously variable.
®
Kosmos
C: Provides bass enhancement processing.
Polarity Switch: Provides either 0 degrees or 180 degrees
sub woofer polarity
Ground Lift Switch: For input
Enclosure Materials & Finish:
Black acrylic painted enclosure with 15 mm MDF, with a
full-length, black powder coated perforated steel grille.
DImensions (H x W x D)
In use position:
24.25" x 16.75" x 23.00"
(not including wheels, 4.06” deep)
616 mm x 425 mm x 584 mm
In transport position:
27.06" x 16.75" x 24.25"
687 mm x 425 mm x 616 mm
Net Weight:
76.Lbs. (34.5 kg)
Mounting Provisions:
1 3/8" pole mount with M20 threaded pole for stand
mounting a suitable speaker on top of the Sub, and four large
rubber feet on bottom for floor use.
Page 33

FRANÇAIS
PVX™p Sub
Nous vous remercions d'avoir acheté l'enceinte active Peavey® PVX™p Sub. L'enceinte PVXp Sub dispose d'une section de
puissance très fiable qui délivre un total de 800 Watts de puissance de crête effective avec une compression DDT™. Cette
enceinte active dispose aussi d'un robuste haut-parleur de 380 mm (15") à bobine acoustique de 75 mm (3"). L'enceinte PVXp
Sub offre une entrée isolée via une prise combinée qui accepte aussi bien une entrée TRS isolée de 6,5 mm (1/4") qu'une
entrée XLR isolée. Elle possède également deux sorties XLR isolées directes à filtrage passe-haut et une sortie XLR pleine
gamme. Une commande de niveau réglable est présente ainsi qu'un témoin LED combiné qui s'allume lors de la mise sous
tension et quand le circuit DDT à "limitation progressive" est activé.
Particularité s
• Enceinte subwoofer active ventilée
• Puissance effective de 800 watts crête.
• Haut-parleur robuste de 15" (380 mm)
• L'amplificateur de puissance est doté d'un refroidissement à air forcé pour un maximum de fiabilité
• Réseau de filtrage passe-bas/passe-haut de niveau de ligne interne
• Technologie Kosmos
• Entrée par prise combinée XLR / 1/4" (6,5 mm)
• Deux sorties XLR à filtrage passe-haut et une sortie XLR directe pleine gamme
• Inverseur de polarité sur le subwoofer
• Commutateur de non-retour de masse pour lever le blindage du câble à la terre.
• Grandes roulettes à verrou, résistantes et à coussinets d'amortissement
• Grille intégrale en acier perforée résistante
• Poignées en acier
• Dimensions compactes pour un haut-parleur de type subwoofer de 380 mm (15”)
• Support fileté à montant pour enceinte inclus
®
C entièrement réglable pour des basses améliorées
DESCRIPTION
L'enceinte Peavey
de 380 mm, couplé à un amplificateur de puissance efficace de 800 watts crête. La grille en acier perforée intégrale de couleur
noire offre une protection et un aspect professionnel, des poignées résistantes en acier et de solides roulettes de 4" (100 mm)
pour le transport sont également présentes.
Étage de filtrage de niveau de ligne interne avec deux sorties à filtrage passe-haut, à mémoire tampon électriquement
indépendante; et une sortie directe pleine gamme, également à mémoire tampon.
Le système de renforcement des basses exclusif Kosmos
signal de base de très faibles fréquences est intégré pour encore plus de souplesse.
Un système de support à montant fileté offre une plate-forme stable et solide pour la fixation d'enceintes convenablement
équipées au-dessus du subwoofer. Les enceintes actives à deux voies de la gamme PVXp sont d'excellents compagnons du
système PVXp Sub.
Les amplificateurs de l'enceinte active PVXp Sub présentent une faible distorsion, une très grande fiabilité grâce au
refroidissement par ventilateur et délivrent un total de 800 W crête de puissance effective. L'alimentation électrique de
l'amplificateur de puissance est de type à commutation qui garantit un poids léger et une très grande efficacité. L'amplificateur
dispose de notre système de compression DDT qui élimine la saturation d'amplification de puissance audible. Le
refroidissement est garanti par un ventilateur à faible bruit pour un fonctionnement fiable sous toutes conditions.
L'entrée dispose d’une prise combinée femelle XLR et TRS de 6,5 mm (1/4”) à entrée isolée vers les composants électroniques
preamp/EQ et une commande de niveau.
Une paire indépendante de sorties à filtrage passe-haut fournit un signal de sortie à mémoire tampon et isolé pour une paire
d'enceintes déportées de reproduction des fréquences élevées musicales par l'intermédiaire d'une paire de prises XLR mâles.
®
PVXp Sub est un système subwoofer actif, compact et ventilé qui met en œuvre un robuste haut-parleur
®
C de chez Peavey pour des basses plus profondes à partir d'un
Page 34

La sortie directe pleine gamme est munie d'un connecteur XLR mâle. Ces sorties permettent de relier des
enceintes supplémentaires ou d'alimenter en signal d'autres appareils. Une baie est prévue sur le panneau
d’entrée pour recevoir des modules de fonction en option, tels qu’un récepteur sans fil, une entrée audio
numérique ou un EQ 10 bandes, etc.
APPLICATIONS
L'enceinte Peavey PVX™p Sub peut être utilisée pour diverses applications, comme pour étendre les
performances des basses d'un petit ensemble d'enceintes pleine gamme afin d'améliorer le son, elle peut être
destinée à un concert, à renforcer un système complet, au karaoké ou à la reproduction musicale.
La source de signal type pour les entrées de niveau de ligne de l’enceinte Peavey PVXp Sub sera une console de
mixage pour la sonorisation ou la sortie d’un lecteur CD, d’un lecteur MP3 ou d'une platine à cassette. Le signal
filtré par le passe-haut du PVXp Sub pourra ensuite être envoyé à un ensemble d'enceinte active pleine gamme,
allégeant ainsi le fardeau des basses profondes de cet ensemble d'enceintes.
PANNEAU ARRIÈRE INFÉRIEUR
1
2
3
COUPE-CIRCUIT (1)
L’enceinte est protégée de l’alimentation AC contre les surcharges et les conditions anormales par un coupe-circuit de 5
ampères. Le coupe-circuit ne doit se déclencher qu'en présence d'une anomalie dans le circuit des amplificateurs ou d'une
condition de fonctionnement anormale induisant une circulation excessive de courant du secteur. En cas de déclenchement
du coupe-circuit, positionner le commutateur d’alimentation (3) sur OFF (arrêt), attendre le refroidissement du coupe-circuit
puis le réenclencher.
En cas de déclenchement du coupe-circuit, le bouton du centre est éjecté d’environ 6,5 mm et peut être réenclenché
en le poussant vers le haut et l’intérieur. Dans des conditions normales (sans déclenchement), le bouton du centre est
relativement à plat.
Si l'enceinte continue de déclencher le coupe-circuit (disjoncteur) ou le déclenche immédiatement après avoir été
réinitialisée, ne pas insister à le réinitialiser, le système doit être traité par un centre de service Peavey qualifié pour sa
réparation.
CONNEXION DU CORDON D'ALIMENTATION AUX NORMES IEC (2)
Cette prise est prévue pour le cordon d'alimentation aux normes IEC (fourni) en vue du raccordement de l’enceinte à
l'alimentation AC. Il est très important que vous vérifiez que l'amplificateur PVXp Sub soit alimenté par la bonne valeur de
tension de secteur. La tension d'alimentation de votre amplificateur PVXp Sub est indiquée sur l'étiquette à proximité de la
prise IEC du cordon du panneau arrière de l'unité.
S'assurer d’observer les directives suivantes pour garantir les conditions de sécurité des personnes et de l'équipement. Ne
jamais supprimer la broche de mise à la terre des équipements. Elle est présente pour votre sécurité. Si la prise utilisée ne
possède pas de broche de mise à la terre, un adaptateur adéquat de mise à la terre doit être utilisé, de même, le troisième
fil doit être correctement mis à la terre. Pour éviter tout risque de décharge électrique ou d’incendie, veiller impérativement
à ce que la console de mixage et tous les autres ¨équipements associés soient correctement mis à la terre.
Page 35

COMMUTATEUR MARCHE-ARRÊT (3)
Ce commutateur à bascule sert à délivrer l'alimentation AC à l'enceinte PVX™p Sub lorsqu’il est placé sur la
position “ON”. La position ON est atteinte lorsque le côté gauche du commutateur est enfoncé ou de façon à
presque affleurer le panneau arrière.
PANNEAU ARRIÈRE SUPÉRIEUR
PANNEAU D'ACCÈS POUR MODULE D’EXTENSION EN OPTION
Ce panneau doit être déposé UNIQUEMENT pour monter l'un des modules d'extension proposé en option pour
l'enceinte PVXp Sub.
Ces modules d'extension en option fonctionne soit avec l'entrée déjà présente sur l'enceinte PVXp Sub, soit
fournissent une fonction d'entrée de ligne pour l'entrée, comme un composant 10-band EQ, etc. Consultez votre
vendeur Peavey® pour la disponibilité et le prix.
Si vous n'installez pas de module d'extension en option, alors ne retirez pas ce capot. Les instructions
d'installation du module d'extension en option sont fournies avec chaque module d'extension et ne concerne
que ce module.
5
9
6
11-12
7
4
13
8
10
PARTIE SUPÉRIEURE – COMMANDES, ENTRÉES ET SORTIES
ENTRÉE (4)
L’entrée du niveau de ligne est du type isolé à moyenne impédance. La prise est du type à fiche combinée XLR
femelle et connecteur TRS de 6,5 mm (1/4").
INDICATEUR LUMINEUX (5)
Il devient VERT quand l'enceinte est mise sous tension et l'alimentation est présente.
Il devient rouge en cas d'activation des circuits DDT
Un clignotement occasionnel est possible, mais pas une illumination constante, ou la distorsion sera excessive.
Un indicateur LED visible est présent sur le devant du coffret du subwoofer qui devient BLEU quand
l'alimentation est appliquée et ROUGE quand l'amplificateur de puissance enclenche les circuits DDT à
“limitation progressive”.
™
à "limitation progressive" de l'un des amplificateurs de puissance.
NIVEAU (6)
Il règle le niveau de sortie ou de gain du signal d'entrée. Il sert à définir directement le niveau de sortie de
l’enceinte pour un signal d'entrée donné.
En utilisation normale, la commande est réglée à moitié, c'est alors l'équivalent en gain d'une entrée d'un
amplificateur de puissance typique.
Page 36

INVERSEUR DE POLARITÉ (7)
Il permet de régler la polarité du subwoofer de 0 à 180 degrés.
Ce commutateur est utilisé en plus de la Crossover Frequency Control (9) pour obtenir le meilleur réglage entre
la sortie du subwoofer et la sortie des enceintes satellites pour la zone de filtrage.
COMMUTATEUR DE NON-RETOUR DE MASSE (8)
Prévu pour lever le câble de blindage à la terre du châssis afin de limiter le risque de boucles de masse et
réduire le bourdonnement.
CROSSOVER FREQUENCY CONTROL (9)
Elle permet de régler la fréquence de filtrage entre les sorties subwoofer et à filtrage passe-haut envoyées aux
enceintes satellites (11 et 12). Le réglage de la fréquence de filtrage électrique varie de 90 Hz à 180 Hz.
ATTENTION ! UN RÉGLAGE TROP FAIBLE DE CETTE COMMANDE PEUT PROVOQUER LA SURCHARGE EN BASSES
PROFONDES DES ENCEINTES SATELLITES !
™
Un réglage faible N'AUGMENTE PAS la sortie de basses profondes de l'enceinte PVX
(à 12 heures) ou plus élevé fonctionne mieux pour la plupart des enceintes.
p Sub, un réglage moyen
RENFORCEMENT DES BASSES KOSMOS® C (10)
Ce système permet d'ajouter des harmoniques basses pour améliorer la perception de la profondeur des basses
dans le signal de base sans surcharger l'enceinte subwoofer.
Il convient d'utiliser cette commande avec modération et si vous la réglez à son maximum, elle peut déformer et
dénaturer le son du signal de base.
SORTIES À FILTRAGE PASSE-HAUT (11 ET 12)
Ces sorties proposent un signal filtré par un passe-haut pour alimenter un ensemble d'enceintes actives
pleine gamme, comme les enceintes PVXp 10, PVXp 12 ou PVXp 15. D'autres enceintes actives pleine gamme
sont utilisables, et des enceintes passives pleine gamme conviennent aussi si un amplificateur de puissante
approprié les alimente.
Ces sorties sont à mémoire tampon électronique, isolées de l'entrée et l'une de l'autre, leur niveau ne dépend
pas de la commande de niveau du PVXp Sub (6).
SORTIE DIRECTE PLEINE GAMME (13)
Cette sortie propose un signal pleine gamme qui est envoyé à tout autre appareil qui nécessite un signal pleine
gamme, comme un autre PVXp Sub ou comme d'autres appareils audio de niveau de ligne. Cette sortie est à
mémoire tampon électronique et isolée de l'entrée et des autres sorties.
MODE D’EMPLOI
PRÉCAUTIONS
L'enceinte doit être débranchée de l'alimentation AC avant toute intervention. Confier toute opération
d'entretien à du personnel qualifié.
Éviter de toucher la plaque à l’arrière qui peut être chaude. Ne pas boucher ni couvrir le ventilateur ou les
dissipateurs thermiques pour assurer une bonne ventilation. Un espace d’au moins 10 cm doit être prévu
derrière le ventilateur. Veiller à ce qu’aucun objet tel qu'un rideau, une tenture ou un isolant thermique, etc.
n’obstrue la circulation d’air. Il est recommandé de ne pas exposer l’arrière de l’enceinte PVXp Sub dans des
endroits confinés ou dans des emplacements où il n’existe pas de circulation libre d’air.
NE PAS raccorder les entrées de l’enceinte PVXp Sub à la sortie d’un amplificateur de puissance. Les entrées
sont destinées à être commandées par la force du signal du niveau de ligne.
NE PAS retirer les grilles de protection en métal.
AVERTISSEMENT ! L'enceinte PVXp Sub est extrêmement efficace et puissante ! Elle peut entraîner des lésions
auditives permanentes ! Procéder avec d’extrêmes précautions pour le réglage du volume maximal de sortie !
Page 37

Le niveau sonore effectif de l’enceinte PVX
™
p Sub peut paraître décevant du fait de la clarté et de la netteté
du son émis. L’absence de distorsion ou une dégradation manifeste du signal peut donner l’impression que le
niveau du son est nettement plus bas qu’il l’est en réalité. Cette enceinte peut délivrer un niveau de pression
acoustique dépassant 127 dB à 1 m !
INSTALLATION D'ENCEINTES SATELLITES AU SOMMET DU PVX
™
P SUB
L'enceinte PVXp Sub possède un support à montant fileté intégré à son sommet qui est conçu pour accueillir
un montant fileté M20 long de 80 cm environ ou inférieur. Ce montant est spécialement conçu pour monter les
ensembles d'enceintes suivants :
Peavey PVXp 10
Peavey PVXp 12
Peavey PVXp 15
N'installez pas un ensemble d'enceintes plus hautes/grandes ou plus lourdes que l'enceinte PVXp 15 sur ce
montant, ou bien il peut être dangereux en raison du risque de basculement.
L'enceinte PVXp Sub doit être installée fermement sur une surface au sol stable afin d'éviter au système
d'enceintes sur le montant de basculer.
Pour monter ou démonter l'enceinte sur le support à montant, il est conseillé de se faire si possible aider par
une autre personne. Les manœuvres nécessitent en effet de faire correspondre la coupelle du montant au
montant du subwoofer tout en retenant l’enceinte par les bras.
Lors de l’utilisation du montant du PVXp Sub en extérieur, n'attachez jamais de bannières ou de drapeaux
au montant ou à l’enceinte par vents forts, l’enceinte risque d’être emportée. Si des conditions de fort vent
sont annoncées, il peut être prudent de retirer l'enceinte du montant pour éviter que l'enceinte PVXp Sub et
l'ensemble des enceintes fixées au montant soit emportée.
RACCORDER L’ENCEINTE PVXP SUB AU SECTEUR
L’enceinte PVXp Sub est livrée avec un cordon d’alimentation AC aux normes IEC de 6 pieds (1,80 m environ)
de long. Si une rallonge ou une multiprise est utilisée, s’assurer qu’elle est de bonne qualité et d'une capacité
suffisante en courant pour garantir la sécurité et ne pas compromettre la puissance délivrée par l’enceinte PVXp
Sub. Pour assurer une puissance de sortie maximale sans distorsion, ne pas raccorder d’autres appareils à la
rallonge utilisée pour l’enceinte PVXp Sub. Ne pas dépasser la capacité nominale en courant de la rallonge avec
l'ensemble des appareils qui y sont raccordés.
Avant de brancher le cordon d’alimentation AC de l'enceint PVXp Sub pour la première fois, s’assurer que
l’interrupteur d’alimentation est sur la position “ Off ” (hors circuit) puis le positionner sur “ On ” (en circuit)
une fois que le cordon d’alimentation est branché. La fonction de sourdine intégrée s’enclenche lorsque l’ordre
correct des opérations est suivi.
REMARQUE SPÉCIALE POUR UNE INSTALLATION PERMANENTE
Lors de l'installation de l'enceinte PVXp Sub, celle-ci fonctionnera sur l'alimentation AC et un électricien certifié
doit être consulté pour s’assurer que tout le câblage électrique est conforme aux codes et réglementations
locales. Il est également conseillé d’utiliser un collier pour câbles à fixer au caisson de l’enceinte afin d’éviter
les contraintes sur le cordon d’alimentation aux normes IEC qui est raccordé au module amplificateur au niveau
de l'emplacement (2) de façon à ce que le cordon ne soit pas soumis à une traction ou se débranche suite aux
vibrations.
CONNECTER UN SIGNAL À L’ENCEINTE PVXP SUB
L'entrée d'un signal pour l'enceinte PVXp Sub peut s’effectuer de différentes manières.
L'entrée (4) fournit une entrée de niveau de ligne isolée, qui permet d'utiliser des cordons de type téléphonique
TRS 6,5 mm (pointe-anneau-manchon) ou un cordon XLR mâle. Bien entendu, un cordon téléphonique non isolé
6,5 mm est également utilisable mais il n'aura pas les avantages de rejet des connexions isolées contre les
interférences extérieures RFI ou le bourdonnement.
Ne pas raccorder les câbles aux prises alors que l’enceinte est sous tension (ON) et le bouton de niveau est
réglé en position haute ! Tandis qu'un câble de type téléphonique standard à embout unique de 6,5 mm (1/4”)
fonctionnera correctement et que les circuits d’entrée symétrique induiront un certain niveau de rejet des
interférences, un câble symétrique utilisant soit la fiche TRS symétrique de 6,5 mm (1/4”) soit la fiche XLR
assurera un niveau supérieur de rejet des interférences et de performance.
Page 38

Il peut parfois s’avérer utile en cas de problèmes d'interférence difficiles à résoudre de lever le blindage à la terre
(Broche #1 d'une prise XLR) sur un câble symétrique côté enceinte PVX
™
p Sub. Cette opération est facilement
réalisable en agissant sur le commutateur de non-retour de masse (10) intégré à l'enceinte PVXp Sub. Vérifier avec
précaution l’absence de variations dans l’entrée, en baissant toujours la commande de niveau avant de brancher et de
débrancher les câbles ou de lever la mise à la terre.
Il est recommandé d'utiliser des câbles de première qualité pour l'enceinte PVX
™
p Sub, qui en principe disposent d'un
meilleur blindage et sont réalisés dans des matériaux de meilleure qualité, et qui pourront ainsi garantir la fiabilité
à long terme. La meilleure solution consiste à utiliser un câble symétrique et blindé, d’une longueur suffisante, sans
plus, pour atteindre l’enceinte PVXp Sub. Il est en principe conseillé de laisser un certain débattement dans les câbles
d’entrée de l’enceinte PVXp Sub et également de fixer avec du ruban adhésif les câbles pour les retenir ou de les faire
passer dans un guide-câbles ou sous un protecteur pour éviter que des personnes ne viennent trébucher ou renverser
l’enceinte PVXp Sub lorsqu’elle supporte une enceinte au sommet de son montant.
RÉGLAGE DE LA COMMANDE DE NIVEAU
L'enceinte PVXp Sub est équipée d’une commande de niveau (6) sur l'entrée pour faciliter son utilisation dans nombre
d’applications. Lorsque la commande de niveau est réglée à fond dans le sens horaire, le gain est maximum et la
sensibilité d’entrée est de 0,24 V RMS pour la pleine sortie nominale.
Il est conseillé de régler la commande de niveau du PVXp Sub le plus possible sur la position de 12 heures ou sur
un gain de préamplification de 0 dB. À ce niveau, la sensibilité d'entrée est de 2,4 volts RMS environ pour une sortie
pleine nominale. L’enceinte PVXp Sub est alors réglée pour répondre plus précisément à d'entrée d'un amplificateur
de puissance type.
Si la table de mixage indique une saturation de ses signaux de sortie, l'enceinte PVXp Sub n’est alors pas proprement
utilisée à pleine puissance. La saturation du signal avant qu’il ne parvienne à l’enceinte PVXp Sub n’est pas optimale.
Réduire le niveau de sortie de la console de mixage et monter la commande de niveau de l’enceinte PVXp Sub.
L’amplificateur de l’enceinte PVXp Sub est équipé d’un système DDT
DDT de l'enceinte PVXp Sub est enclenché. Si le son paraît fortement comprimé, contrôler ces voyants indicateurs. S’il
clignote en ROUGE par intermittence, le niveau de commande de la console de mixage (ou la commande de niveau de
l’enceinte PVXp Sub) doit être réduit.
™
et d’un indicateur LED indiquant que le système
Lors de la première mise en service de l'enceinte, mettre en fonction tous les circuits électroniques en amont en
premier puis l’enceinte PVXp Sub avec sa commande de volume tournée à fond dans le sens antihoraire (baissée à
fond). Commencer par contrôler les niveaux avec les commandes de niveau de sortie de la console de mixage et les
faire monter progressivement avec la commandes de niveau de l'enceinte PVXp Sub réglée sur la position voulue (un
réglage d’un tiers est recommandé au démarrage).
Il n’est pas recommandé de régler à fond vers le haut la commande de niveau de l’enceinte PVXp Sub et d’essayer
ensuite de contrôler le niveau uniquement à partir de la console de mixage, ce qui risque d’induire un bruit excessif.
La meilleure solution consiste à exploiter un signal “ à chaud ” issu de la console de mixage et transmis dans le câble
vers l’enceinte PVXp Sub puis à agir sur la commande de niveau de l'enceinte PVXp Sub de manière à augmenter son
niveau du strict nécessaire pour atteindre la pleine puissance voulue. Dans ce cas, il est nécessaire de vérifier que la
sortie de la console de mixage ne sature pas.
CÂBLES DEPUIS LES SORTIES À FILTRAGE PASSE-HAUT (11 ET 12)
La méthode de connexion préférée d'un ensemble d'enceintes satellites pleine gamme aux sorties à filtrage
passe-haut de l'enceinte PVXp Sub est l'utilisation d'un câble isolé XLR pas plus long que nécessaire pour atteindre
sans problème l'ensemble des enceintes satellites.
Si les enceintes satellites sont fixées au sommet d'un montant au-dessus de l'enceinte PVXp Sub, un câble d'environ
1,8 m (6 pieds) est plus que suffisant. Un câble de 3 ou 6 m (10 et 20 pieds) peut également être utilisé, mais des
câbles plus longs seront plus sensibles aux interférences et susceptibles d'atténuer les fréquences hautes. Il est
recommandé d'utiliser des câbles de bonne qualité pour l'enceinte PVXp Sub, qui en principe disposent d'un meilleur
blindage et sont réalisés dans des matériaux de meilleure qualité, et qui pourront ainsi garantir la fiabilité à long
terme. Il est en principe conseillé de laisser un certain débattement dans les câbles de sortie de l’enceinte PVXp Sub
et également de fixer avec du ruban adhésif les câbles pour les retenir ou de les faire passer dans un guide-câbles ou
sous un protecteur pour éviter que des personnes ne viennent trébucher ou renverser l’enceinte PVXp Sub lorsqu’elle
supporte une enceinte au sommet de son montant.
RÉGLAGES RECOMMANDÉS POUR L'UTILISATION DU PVXP SUB AVEC DES ENCEINTES ACTIVES DE LA
GAMME PVX
L'emplacement idéal des enceintes pleine gamme de la gamme PVX
emplacement, les réglages suivants donneront les meilleurs résultats dans la zone de l'étage de filtrage et de tonalité.
P
™
p est au sommet du montant du PVXp Sub. À cet
Notez que les sorties XLR (11 et 12) sont renforcées à 12 dB pour permettre l'utilisation des entrées XLR sur les
enceintes PVXp 12 et PVXp 15. Normalement, ces dernières sont considérées comme des entrées de niveau de
microphone, mais avec les sorties renforcées du PVXp Sub, l'utilisation des entrées XLR sur les enceintes actives
PVXp est possible.
Page 39

PVXp 10
Inverseur de polarité sur le subwoofer (7) : Normal ou enfoncé (IN)
CROSSOVER FREQUENCY CONTROL (9) De la position de 12 heures à la position tournée entièrement à droite. Cela
représente une plage de 110 Hz à 160 Hz environ pour le point de filtrage. Le réglage optimum recommandé est la position
entièrement tournée à droite.
Commandes de niveau (6) : Commande de niveau du PVX
PVXp10 à la position de 12 heures
™
p Sub à la position de 12 heures (0 dB), commande de niveau du
PVXp 12
Inverseur de polarité sur le subwoofer (7) : Normal ou enfoncé (IN)
CROSSOVER FREQUENCY CONTROL (9) De la position de 12 heures à la position tournée entièrement à droite. Cela
représente une plage de 110 Hz à 160 Hz environ pour le point de filtrage.
Le réglage optimum recommandé est à deux crans au-dessus de la position de 12 heures.
Commandes de niveau (6) : Commande de niveau du PVXp Sub à la position de 12 heures (0 dB), commande de niveau du
PVXp 12 à deux crans en-dessous de la position de 12 heures
PVXp 15
Inverseur de polarité sur le subwoofer (7) : Normal ou enfoncé (IN)
CROSSOVER FREQUENCY CONTROL (9) De la position de 12 heures à la position tournée entièrement à droite. Cela
représente une plage de 110 Hz à 160 Hz environ pour le point de filtrage.
Le réglage optimum recommandé est à la position de 12 heures.
Commandes de niveau (6) : Commande de niveau du PVXp Sub à la position de 12 heures (0 dB), commande de niveau PVXp 12
à deux crans en-dessous de la position de 12 heures
ATTENTION ! UN RÉGLAGE TROP FAIBLE DE LA COMMANDE CROSSOVER FREQUENCY PEUT PROVOQUER LA SURCHARGE EN
BASSES PROFONDES DES ENCEINTES SATELLITES À UN NIVEAU SPL ÉLEVÉ !
Un réglage faible de la commande N'AUGMENTE PAS la sortie de basses profondes de l'enceinte PVXp Sub, un réglage
moyen (à 12 heures) ou plus élevé fonctionne mieux pour la plupart des enceintes.
Si les enceintes de la gamme PVXp ne sont pas installées au sommet du montant du subwoofer, alors le réglage de
l'inverseur de polarité doit être éventuellement différent de celui indiqué ici. La Crossover Frequency Control doit être
éventuellement régler à un niveau inférieur afin que les enceintes subwoofer et satellites se complètent à travers la zone
de l'étage de filtrage. Les réglages précisés ci-dessus fonctionnent mieux quand les enceintes satellites et subwoofer sont
proches l'une de l'autre, et fondamentalement à la même distance du public.
RÉGLAGE DES COMMANDES DU PVXP SUB POUR L'UTILISATION AVEC D'AUTRES ENCEINTES SATELLITES
CROSSOVER FREQUENCY CONTROL (9) En général, pour les enceintes pleine gamme plus petites utilisées comme satellites,
réglez la Crossover Frequency Control (9) à un réglage plus haut en fréquence. Pour les enceintes pleine gamme plus
grandes, réglez la Crossover Frequency Control (9) à un réglage plus bas en fréquence. Régler la Crossover Frequency
Control vraiment très en-dessous de la position de 12 heures ne sera pas nécessaire dans la plupart des cas, car une
fréquence de filtrage en-dessous de 100 Hz ne permettra aux enceintes PVXp Sub et satellites de se compléter de façon
satisfaisante dans la région de filtrage.
Inverseur de polarité (7) : Essayez de modifier les réglages de l'inverseur de polarité dans les deux sens pour chaque
fréquence de filtrage sélectionnée, de façon à déterminer la position de l'inverseur qui fournit le meilleur rendu des basses
dans la région de filtrage.
Commandes de niveau (6) : Commencez avec la commande de niveau du PVXp Sub à la position de 12 heures et réglez celui
l'ensemble des enceintes satellites en conséquence. Notez que, si le subwoofer s'entend clairement comme une source
sonore séparée, alors son niveau est probablement trop élevé.
RÉGLAGE DU RENFORCEMENT DES BASSES KOSMOS® C (10)
La commande de renforcement des basses Kosmos
reproduit, spécialement quand le signal de base possède un contenu significatif en-dessous de la fréquence de coupure du
PVXp Sub.
®
C peut ajouter une extension de basses apparentes et l'ajoute au son
Une utilisation judicieuse et adéquate peut améliorer le plaisir d'écouter de la musique, ajouter du punch et enrichir le
mixage. Cependant, le réglage de la commande à un niveau plus élevé que celui optimum peut produire la perception
d'une déformation remarquable du son et réduire la netteté des basses. Il est rarement nécessaire ou utile de tourner la
commande jusqu'au maximum.
Une utilisation typique implique le réglage du bouton de commande quelque part entre la position off (entière tournée à
gauche) et de 12 heures (à mi-réglage). Par la suite, l'effet ajouté est plus subtil et moins indiscret à certains endroits du
morceau musical, tout en offrant toujours une amélioration agréable à l'ensemble du son.
Page 40

Notez qu'à un réglage extrême, entièrement tourné à droite, le gain effectif du subwoofer est accru et donc, s'il était proche
de la saturation au préalable, tourner la Bass Enhance Control vers des valeurs hautes provoquera éventuellement sa
saturation.
COUPER L'ALIMENTATION SECTEUR DU PVX
Nous recommandons de mettre hors circuit au préalable l'interrupteur d'alimentation (3) avant de débrancher le cordon
d’alimentation secteur, afin de réduire les contraintes sur les amplificateurs de puissance et les transducteurs pour une mise
hors circuit progressive .
™
P SUB
DÉPANNAGE
AUCUNE SORTIE
S’assurer en premier lieu que l’enceinte est alimentée par le secteur et mise sous tension. Vérifier que le voyant lumineux du
module de l'amplificateur de puissance est allumé.
Si ce n'est pas le cas, s'assurer que le commutateur d’alimentation (3) est en position « ON » et vérifier la connexion du
cordon d’alimentation aux normes IEC (2) pour s'assurer qu'elle est enfichée à fond. S’assurer que le cordon d’alimentation
AC est branché à une prise de courant de l'alimentation AC qui fonctionne.
Vérifier en dernier le disjoncteur (1). (Voir le panneau arrière : section consacrée au disjoncteur pour les instructions de
sécurité).
™
Après s'être assuré que l'enceinte PVX
Débrancher provisoirement le câblage raccordé aux entrées et le raccorder à un autre appareil pouvant reproduire le signal
(par exemple, un amplificateur de puissance et un haut-parleur). Si cet équipement génère un signal, s’assurer que toutes
les commandes de niveau utilisées ont été réglées au niveau satisfaisant (réglage entre tiers et moitié).
Si l’enceinte PVXp Sub a été exposée à la lumière directe du soleil ou à une chaleur excessive, la protection thermique
intégrée peut s'être déclenchée. Dans ce cas, mettre l’enceinte PVXp Sub hors tension et la laisser refroidir pendant un laps
de temps suffisant.
Si aucune sortie n’est alors constatée, contacter un revendeur Peavey agréé ou Peavey International Service Center.
p Sub est alimentée par l'alimentation AC, vérifier qu’elle reçoit un signal.
BOURDONNEMENT OU RONFLEMENT
Si l’enceinte PVXp Sub émet un bourdonnement ou un ronflement, cela peut provenir de la tension d'alimentation AC.
Essayer de brancher l’enceinte PVXp Sub à une autre prise de courant. Si un circuit (disjoncteur) différent est utilisé pour
la console de mixage et l’enceinte PVXp Sub, il peut dans certain cas entraîner des problèmes de ronflement. À moins que
cette solution s'avère impossible, il est conseillé d’utiliser la même prise de courant (disjoncteur) pour alimenter la console
de mixage et l'enceinte active.
S’assurer que des câbles blindés ont été utilisés pour acheminer le signal vers l'entrée de l’enceinte PVXp Sub. Si des câbles
pour enceintes avec fiches de 1/4” sont utilisés pour l’entrée au lieu de câbles blindés, ils sont susceptibles d’être à l’origine
d’un ronflement ou d’un bourdonnement.
Le ronflement peut être lié à la boucle de mise à la terre. Il peut parfois s’avérer utile de lever le blindage à la terre
(Broche #1) sur un câble symétrique côté enceinte PVXp Sub. Cette opération est facilement réalisable en agissant sur le
commutateur Ground Lift (10) intégré à l'enceinte PVXp Sub. Vérifier avec précaution l’absence de variations dans l’entrée,
en baissant au préalable la commande de niveau avant de brancher et de débrancher les câbles ou de lever la mise à la terre
côté enceinte.
S’assurer que des variateurs d’éclairage ne partagent pas le même circuit que l’enceinte PVXp Sub, la console de mixage
ou tout autre appareil constituant la source du signal. Si des variateurs d’éclairage sont utilisés, il peut être nécessaire
de les actionner à fond ou de les couper complètement pour supprimer ou réduire le ronflement. Il s'agit d'un problème
d'interférence classique lié au câblage d'alimentation à partir de l'alimentation AC ou à un variateur d'éclairage et non pas à
un défaut de conception de l’enceinte PVXp Sub.
Le troisième fil (de mise à la terre) sur la fiche d’alimentation AC ne doit JAMAIS être débranché ou rompu, ce qui risquerait
de compromettre la sécurité.
SON DÉFORMÉ OU FLOU
S’assurer en premier lieu que la console de mixage (source du signal) n’est pas saturée ou surchargée. S’assurer que
la commande de niveau (6) de l’enceinte PVXp Sub n’a pas été réglée à un niveau trop bas. Vérifier que les fiches des
câbles d'entrée sont insérées à fond dans la prise d'entrée sur le panneau arrière de l’enceinte PVXp Sub. S’assurer qu’un
amplificateur de puissance n’a pas été raccordée à la prise d’entrée de l’enceinte PVXp Sub. Si une rallonge électrique est
utilisée pour l’alimentation secteur de l’enceinte, s’assurer qu’elle est dotée d’une capacité suffisante en courant et qu’elle
ne sert également pas à alimenter un autre appareil.
L'enceinte PVXp Sub possède une fonction intégrée de renforcement des basses pour étendre et adoucir la réponse
naturelle des enceintes dans le système, elle pourrait donc nécessiter en plus d'une faible égalisation par un composant
EQ au besoin. Si une amplification excessive des basses fréquences a été ajoutée en externe à l’enceinte PVXp Sub, cela
peut entraîner une surcharge prématurée à haut niveau de pression acoustique SPL. Réduire le niveau d'intervention sur le
composant EQ en externe (console de mixage, table) et vérifier si cela a pour effet d'éliminer la distorsion.
Page 41

Enfin, prendre conscience que bien que l'enceinte PVXp Sub soit à la fois puissante et à haut rendement, elle
est en fin de compte soumises à des limites et peut nécessiter le recours à des enceintes subwoofer actives
supplémentaires pour assurer un niveau de puissance ou de couverture suffisant. Dans ce cas, essayer
d’abaisser légèrement le niveau de la console de mixage pour voir si cela permet de résoudre les problèmes. Si
après avoir vérifié tous les points énumérés précédemment et tous les points pouvant être contrôlés en toute
sécurité, l’enceinte présente encore des problèmes, noter avec soin toutes les conditions de survenue des
anomalies et s’adresser à un revendeur Peavey pour obtenir des conseils.
ENTRETIEN ET MAINTENANCE
L'enceinte PVXp Sub est un équipement robuste et résistant dont la fiabilité est prévue pour durer de
nombreuses années dans la mesure où son entretien est correctement assuré. Faire preuve de bon sens et
observer les consignes de sécurité pour prévenir les risques liés à l'utilisation de l'enceinte.
L'enceinte doit être débranchée du secteur avant toute intervention. Confier toute opération d'entretien à du
personnel qualifié.
LUMIÈRE DU SOLEIL/CHALEUR
Éviter l’exposition prolongée à la lumière directe du soleil qui peut entraîner une surchauffe de l’enceinte et son
arrêt par disjonction thermique.
Des conditions de chaleur excessives peuvent également entraîner un arrêt par disjonction thermique.
Ne pas entreposer l’enceinte dans des conditions extrêmement froides ou chaudes ou dans un lieu extrêmement
humide. Veiller à toujours permettre à l’enceinte d'atteindre la température amiante avant de l’utiliser.
NETTOYAGE
Ne jamais procéder au nettoyage de l’enceinte PVXp Sub lorsque celle-ci est branchée ou sous tension
! Une fois l’avoir débranchée de la prise de courant, nettoyer l’enceinte avec un chiffon sec pour la
débarrasser de la poussière ou de la saleté. Ne jamais utiliser de solvants puissants pour nettoyer
l’enceinte PVXp Sub au risque d’endommager son coffret. Ne pas laisser de liquide QUEL QU’IL SOIT
s’infiltrer à l’intérieur de l’enceinte PVXp Sub.
RETOUCHE
Pour la retouche de toute détérioration de la finition noire de l'enceinte PVXp Sub, un aérosol de peinture
noire comme sous la référence 00052110 Peavey, Commercial Sound, Black Touch-Up Paint, Peavey peut
être utilisé. Suivez les instructions sur le coffret pour plus de sécurité et obtenir les meilleurs résultats.
VÉRIFICATION DES VIS D'ASSEMBLAGE
Après les premiers mois d’utilisation et à intervalles périodiques par la suite, vérifier les vis d’assemblage
de l’enceinte PVXp Sub pour s’assurer qu’elles ne sont pas desserrées, notamment les vis du panneau
arrière et les vis d'assemblage entre baffle et arrière du coffret.
L’enceinte est soumise à des vibrations intenses qui peuvent entraîner le desserrage de ces vis au fur et à
mesure de l'utilisation.
Page 42

16.749
8
7
6
5
4
DIMENSIONS
143.94
5.667
219.66
8.648
219.66
8.648
212.71
8.375
220.14
292.10
11.500
8.667
357.30
14.067
40.41
1.591
613.96
24.172
601.50
23.681
425.41
469.54
18.486
74.25
2.923
34.06
1.341
Page 43

DIMENSIONS
2
1
G
F
E
D
C
B
219.66
8.648
143.94
5.667
219.66
8.648
Usage typique
Sortie Entrées
Clavier
Console de mixage
Micro dynamique
(non Électret)
Guitare
220.14
8.667
PVXp 12 ou PVXp 15
Sortie Entrées
Console de mixage
Micro dynamique
(non Électret)
Clavier
Guitare
PVXp 12 ou PVXp 15
PVXp 12 ou PVXp 15
Entrée sur
le 1er sub-
woofer
Connexion en cascade (Plusieurs subwoofer)
Page 44

CARACTÉRISTIQUES
Plage de fréque nce s (-10 dB, e n s emi-es pace ) :
43 Hz – 180 Hz*
*Commande Crossover entièrement tournée à droite
Répons e e n fréquence , 1 mè tre s ur axe , o nde s inus oïdale à
balayag e dans environne me nt anéchoïque (-6 dB) :
48 Hz – 138 Hz*
*Commande Crossover entièrement tournée à droite
Puis s ance nominale e n s ortie de l’amplificate ur :
Puissance effective de 800 watts crête.
Puissance continue : 470 watts sous 4 ohms
Impé dance é lectronique d’e ntrée (no minale) :
Entrée de ligne : 2,2 kOhms symétriques (XLR ou 1/4"), 10
kOhms dissymétriques 1/4".
Nive au de pres s ion aco us tique, 1 watt, 1 mè tre dans un
environne me nt ané cho ïque :
97 dB SPL
Nive au de pres s ion aco us tique maximum (1 m) :
123 dB SPL continu
127 dB SPL crête
Étag e de filtrage (Cross ove r) é le ctronique
Réglage progressif de 90 Hz à 180 Hz
Pente du filtre passe-bas : 24 dB/octave
Pente du filtre passe-haut : 18 dB/octave
Pe nte du filtre infras onique :
36 dB/octave
Répons e e n fréquence nominale de l'a mplificate ur :
+0, -3 dB de 20 Hz à 20 kHz
Ronflement e t bruit :
Plus de 90 dB en dessous de la puissance nominale
Plage dynamique DDT :
Supérieure à 21 dB
THD et IM:
Normalement inférieurs à 0,5 %
Facte ur d’amortis s e me nt :
Supérieur à 100 à 1 000 Hz, 4 ohms
Complé ment de trans ducte ur :
Haut-parleur robuste de première qualité de 380 mm (15",
bobine acoustique de 75 mm (3")
Fréque nce de réglage de cais s o n :
50 Hz
Connexio ns d’entrée :
Un connecteur combiné à fiche XLR femelle/prise de
type téléphonique de 1/4" permettant le fonctionnement
symétrique ou asymétrique.
CONNEXIONS DE SORTIE :
Deux sorties à filtrage passe-haut, à mémoire tampon
électriquement indépendante, avec un atténuateur de niveau
de sortie commutable.
Une sortie pleine gamme, à mémoire tampon électriquement
indépendante.
Commande s :
Niveau : Offre un réglage de gain +/-20 dB
Crossover Frequency Adjust: Offre un réglage progressif de
la fréquence de filtrage électrique de 90 Hz à 180 Hz.
®
Kosmos
C: Offre un renforcement des basses.
Polarity Switch: Il permet de régler la polarité du subwoofer
de 0 à 180 degrés.
Ground Lift Switch: Pour entrée
Alimentation éle ctrique de l'e nceinte Peave y PVX™p S ub:
160 watts nominaux, 100-120 V AC 50-60 Hz
220-240 V AC 50-60 Hz (Exportation)
Maté riau de cons truction e t finition du cais s on :
Coffret peint en noir acrylique en fibres de bois (MDF) 15 mm,
avec une grille intégrale en acier perforée avec revêtement en
poudre noir.
Dime nsions (H x L x P)
En position d'utilisation :
195 x 210 x 135 mm (24,25" x 16,75" x 23,00")
(Roulettes non incluses, profondeur 10 cm)
616 mm x 425 mm x 584 mm
En position de transport :
195 x 210 x 135 mm (27,06" x 16,75" x 24,25")
687 mm x 425 mm x 616 mm
Poids net:
76 lbs. (34,5 kg)
Dis pos itifs de montag e :
1 support à montant 35 mm (1+3/8") à filetage M20 pour
la fixation sur pied d'une enceinte compatible au sommet
du subwoofer, et quatre pieds larges en caoutchouc sur le
dessous pour un usage au sol.
Page 45

DEUTSCH
PVX™p Sub
Vielen Dank für den Kauf des aktiven Peavey® PVX™p Sub. Der PVXp Subverfügt über einen hochzuverlässiges Leistungsteil,
das insgesamt 800 Watt Hochleistung mit DDT™ Komprimierung liefert. Er verfügt zudem über einen 15” Hochleistungstieftöner
mit einer 3" Schwingspule. Der PVXp Subbietet einen symmetrischen Eingang über eine Kombisteckbuchse, die einen
symmetrischen TRS1/4" Eingang wie auch einen symmetrischen XLR Eingang annimmt. Es gibt zwei symmetrischen Hochpass-
XLR-Ausgänge und einen Vollbereichs-XLR-Ausgang. Es gibt einen einstellbaren Pegelregler sowie eine Kombi-LED-Anzeige, die
anzeigt, dass das Gerät eingeschaltet ist und wenn der “soft-limiting”- DDT-Stromkreis aktiviert ist.
Eig e nschafte n
• Belüftetes Subwoofer-Gehäuse mit Bass
• 800 Watt verfügbare Hochleistung
• 15” Hochleistungstieftöner
• Die Endstufe bietet Zwangsbelüftung für maximale Zuverlässigkeit
• Tiefpass/Hochpass-Frequenzweiche des internen Line Pegels
• Komplett einstellbarer Kosmos® C für verstärkten Bass
• XLR/1/4" Kombi-Eingangsbuchse
• Zwei Hochpass-XLR-Ausgänge und ein Vollbereichs-Thru-XLR-Ausgang
• Polaritätswahlschalter für Verpolung des Subwoofers
• Ground-Lift zum Heben des Kabelschirms vom Boden
• Große verriegelbare Schwerlastlaufrollen mit gedämpften Lagern
• Perforiertes Hochleistungsstahlgitter mit kompletter Abdeckung
• Stahlgriffe
• Kompakte Abmessungen für einen 15” Tieftöner basierten Sub
• Gewindestangenhalterung mit Stange für Lautsprecher inbegriffen
BESCHREIBUNG
Der Peavey® PVXpSub ist ein kompaktes, belüftetes, Subwoofer-System mit 15” Hochleistungs-Tieftöner, gekoppelt an
eine Endstufe mit 800 Watt Höchstleistung. Der durchgehende schwarze perforierte Stahlgrill bietet Schutz und einem
professionellem Erscheinungsbild zusammen mit den robusten Stahlgriffen und 4” Schwerlastlaufrollen für den Transport.
Frequenzweiche des internen Line Pegels mit zwei Hochpass-Ausgängen, unabhängig elektrisch gepuffert; und ein
Vollbereichs-Thru-Ausgang, auch elektrisch gepuffert.
Peavey’s exklusiver Kosmos® C Bassverstärker für zusätzlichen Druck im Bass von sehr niederfrequentem Programmmaterial
ist für maximale Einsatzflexibilität eingebaut.
Ein Gewindestangen-Befestigungssystem bietet eine robuste und stabile Plattform, um ein angemessen ausgestattetes
Lautsprechersystem über dem Subwoofer zu montieren. Die PVXp Zweiwege-Lautsprecherserie ist ein exzellenter Partner für
den PVXp Sub.
Der Verstärker des PVXp Sub-Lautsprechersystems, die die Leistung bietet, ist ein hoch zuverlässiges, lüftergekühltes
Gerät mit geringer Verzerrung mit 800W Höchstleistung für das System. Die Stromversorgung für den Verstärker ist ein
Schaltmodus-Typ für geringes Gewicht und hohe Effizienz. Der Verstärker verfügt über unsere DDT-Komprimierung, die
virtuell die hörbare Verstärkerübersteuerung beseitigt. Kühlung wird über einen geräuscharmen Ventilator gewährleistet, für
zuverlässigen Betrieb unter allen Bedingungen.
Der Eingang erfolgt über eine XLR und 1/4” TRS-Phonobuchse mit symmetrischem Eingang zu der preamp/EQ Elektronik und
einer Pegel-Steuerung.
Ein unabhängiges Paar Hochpass-Ausgänge bietet ein gepuffertes und symmetrisches Ausgangssignal für ein Paar
Satellitenlautsprecher, um die hohe Reichweite der Musik zu übertragen über ein Paar XLR-Buchsen.
Page 46

Ein Vollbereichs-Thru-Ausgang verfügt über eine XLR-Verbindung. Diese Ausgänge ermöglichen die Verbindung
von zusätzlichen Lautsprechersystemen oder die Versorgung der anderen Geräte mit dem Signal, etc. In dem
Eingabeplatte inbegriffen ist ein Arbeitsfeld für optionale Funktionsmodule wie ein Funkempfänger, ein Digitaler
Audioeingang oder ein 10-band EQ, etc.
ANWENDUNGEN
Der Peavey PVX
Vollbereichs-Lautsprechersysteme für Beschallung, Durchsage, Seitenfüllsystem, Karaoke oder musikalisches
Playback.
Eine typische Signalquelle für die Line Pegel-Eingänge des Peavey PVXp Sub wäre ein Beschallungsmischpult
(Mischpult) oder der Ausgang eines CD-Player, MP3-Players oder eines Kassettendecks. Das Hochpass-
Filtersignal vom PVXp Sub würde dann an ein Vollbereichs-Lautsprechersystem gesendet werden und schwächt
die Last des Tiefbasses von diesem Lautsprechersystem ab.
BODEN DER RÜCKSEITE
™
p Sub bietet eine Vielfalt an Anwendungen wie die Erweiterung der Bassleistung der
1
2
3
TRENNSCHALTER (1)
Das Gerät wird durch eine AC-Netzleitung vor Überbelastungen und Fehlerbedingungen mit einem 5 Amper
Trennschalter geschützt. Dieser Ausschalter sollte nicht auslösen, bis ein Fehler in der Verstärkerschaltung oder
ein ungewöhnlicher Betriebszustand vorhanden ist, der übermäßige Netzstromaufnahme verursacht. Wenn der
Schalter auslöst, stellen Sie den Netzschalter (3) AUS und nachdem Sie kurz gewartet haben, dass der Schalter
abkühlt, setzen Sie den Schalter zurück.
Wenn der Trennschalter auslöst, wird die Mitteltaste nach außen springen etwa 1/4” und kann zurückgesetzt
werden, indem Sie diese nach oben und nach innen drücken. Unter normalen (nicht ausgelösten) Bedingungen,
ist die Mitteltaste relativ flach.
Wenn das Gerät weiterhin den Trennschalter auslöst oder ihn direkt nach der Rücksetzung auslöst, setzen Sie
ihn nicht weiterhin zurück, das System sollte dann zu einem qualifizierten Peavey Service Center zur Reparatur
gebracht werden.
IEC-NETZKABELANSCHLUSS (2)
Die Anschlussdose ist für das IEC-Netzkabel (mitgeliefert), dass das Gerät mit AC-Strom versorgt. Es ist sehr
wichtig, dass Sie sicherstellen, dass der PVXp Sub die richtige Netzspannung liefert. Die geeignete Spannung
für Ihren PVXp Sub ist auf der Rückseite des Gerätes neben dem IEC Line-(Netz-)Kabel aufgedruckt.
Bitte lesen Sie dieses Handbuch sorgfältig, um Ihre persönliche Sicherheit sowie die Sicherheit Ihrer
Ausrüstung zu gewährleisten. Brechen Sie niemals den Erdungspol eines Gerätes ab. Er dient zu Ihrer
Sicherheit. Falls die Steckdose, die Sie verwenden, nicht geerdet ist, sollten Sie einen geeigneten
Erdungsadapter verwenden und das dritte Kabel sollte ordnungsgemäß geerdet sein. Um das Risiko eines
Stromschlags oder Brandes zu vermeiden, vergewissern Sie sich, dass das Mischpult und alle dazugehörigen
Ausrüstungsteile ordnungsgemäß geerdet sind.
Page 47

EIN-AUS-SCHALTER (3)
Dieser Kippschalter liefert AC-Strom an den PVX™p Sub, wenn dieser sich in der Position EIN befindet. Die
Position EIN ist auf der linken Seite des Schalters, “ein”gedrückt oder fast bündig mit der Rückseite.
OBERSEITE DER RÜCKSEITE
ZUGANGSPLATTE FÜR OPTIONALES ERWEITERUNGSMODUL
Diese Platte muss NUR entfernt werden, wenn Sie eines der zahlreichen Optionalen Erweiterungsmodule
installieren, die bald für den PVXp Sub verfügbar sein werden.
Diese Optionalen Erweiterungsmodule funktionieren entweder in Verbindung mit dem Eingang, der schon am
PVXp Sub vorhanden ist oder bieten einen Inline-Funktion für den Eingang wie ein 10-band EQ, etc. Überprüfen
Sie bei Ihrem Peavey®-Händler die Verfügbarkeit und den Preis.
Wenn Sie nicht so ein Optionales Erweiterungsmodul installieren, entfernen Sie nicht diese Abdeckung,
Anweisungen zur Installation eines Optionalen Erweiterungsmoduls werden mit jedem Erweiterungsmodul
geliefert und sind spezifisch für dieses Modul.
5
9
6
11-12
7
4
13
8
10
OBERSEITE – BEDIENELEMENTE, EINGÄNGE & AUSGÄNGE
EINGANG (4)
Der Line Pegel ist aus einem mittelohmigen symmetrischen Typ. Die Buchse ist eine Kombi-XLR und 1/4"
TRS-Verbindung.
LED (5)
Leuchtet GRÜN, wenn der Netzschalter eingeschaltet ist und der Strom vorhanden ist.
Sie wird ROT, wenn der Verstärker den DDT
annehmbar, aber ein dauerhaftes Aufleuchten oder eine Verzerrung wären zu viel.
™
“Soft-Limiting”-Stromkreis aktiviert. Gelegentliches Blinken ist
Auf der vorderen Schallwand des Sub ist auch eine LED sichtbar, die BLAU leuchtet wenn das Gerät
eingeschaltet ist und ROT wird wenn der Verstärker den DDT“Soft-Limiting”-Stromkreis aktiviert.
PEGEL (6)
Steuert den Verstärkungspegel oder den Ausgangspegel des Eingangssignals. Er wird verwendet, um den
Ausgangspegel des Systems direkt für ein angegebenes Eingangssignal einzustellen.
Normale Verwendung erfolgt mit dem Knopf, der auf der Mitte steht, dies ist dann gleichwertig in der
Verstärkung zu einem typischen Verstärkerausgang.
Page 48

POLARITÄTS-SCHALTER (7)
Bietet entweder 0 Grad oder 180 Grad Subwoofer-Polarität
Dieser Schalter wird in Verbindung mit dem Crossover Frequency Control (9) verwendet, um die beste
Übereinstimmung zwischen dem Subwoofer-Ausgang und dem Satellitenlautsprecher-Ausgang im
Übergangs-Bereich zu liefern.
GROUND-LIFT-SCHALTER (8)
Geliefert zum Heben eines Kabelschirms von der Gehäuseerdung, um potentielle Erdschleifen zu brechen und
das Brummen zu reduzieren.
CROSSOVER FREQUENCY CONTROL (9)
Ändert die Übergangsfrequenz zwischen dem Subwoofer und den Hochpass-Ausgängen, die an die Satellit/
en-Lautsprecher (11 &12) gesendet werden. Ändert die elektrische Übergangsfrequenz von 90 Hz auf 180 Hz.
VORSICHT! DIE ZU GERINGE EINSTELLUNG DIESER STEUERUNG KÖNNTE DEN SATELLITEN-LAUTSPRECHER MIT
EINEM TIEFBASS ÜBERLASTEN!
™
Die geringere Einstellung der Steuerung verstärkt NICHT den Tiefbass-Ausgang des PVX
Uhr) bis höhere Einstellung funktioniert besser bei den meisten Lautsprechern.
p Sub, eine mittlere (12
KOSMOS® C BASS-VERSTÄRKUNG (10)
Bietet die Möglichkeit, Bass-Oberwelle hinzuzufügen, um die Wahrnehmung des Tiefbasses in dem
Programmmaterial ohne Überbelastung des Subwoofer-Lautsprechers zu verstärken.
Diese Steuerung wird am besten bei der Moderation verwendet und wenn Sie sie komplett aufdrehen, kann
dazu führen, dass das Programmmaterial verzerrt oder unnatürlich klingt.
HOCHPASS-AUSGÄNGE (11 & 12)
Diese Ausgänge bieten ein Hochpass-Filtersignal, das einem Vollbereichs-Lautsprechersystem wie dem PVXp10,
PVXp12 oder PVXp15 zugeführt werden muss. Andere Vollbereichs-Lautsprecher können verwendet werden und
Vollbereichs-Passivlautsprecher können in Verbindung mit einem angemessenen Verstärker verwendet werden,
um sie anzutreiben.
Diese Ausgänge sind elektronisch gepuffert und vom Eingang und jedem anderen Ausgang getrennt und ihr
Pegel ist nicht vom Pegelregler des PVXp Sub beeinflusst.
THRU-VOLLBEREICHS-AUSGANG (13)
Dieser Ausgang bietet ein Vollbereichssignal, das an jedes andere Geräte gesendet werden muss, das ein
Vollbereichssignal erfordert wie einen weiteren PVXp Sub oder ein anderes Line Pegel-Audiogerät. Dieser
Ausgang wird elektronisch gepuffert und vom Eingang und den anderen Ausgängen getrennt.
BETRIEBSANLEITUNG
VORSICHTSMASSNAHMEN
Das Gerät muss von der AC-Stromquelle getrennt werden bevor die Arbeit darauf getätigt wird. Richten Sie alle
Wartungen an das qualifizierte Servicepersonal.
Die Rückplatte kann sich heiß anfühlen. Blockieren Sie den Ventilator oder die Abluftgitter der Belüftung nicht
oder decken Sie sie ab. Es muss mindestens 4” Platz hinter dem Ventilator sein. Lassen Sie den Luftfluss nicht
blockieren durch Objekte wie Vorhänge oder Gardinen, Gebäudewärmedämmung, etc. Es wird empfohlen, dass
die Rückseite des PVXp Sub nicht an geschlossenen Orten oder einem Ort der keinen frischen, kühlen Luftfluss
hat platziert wird.
Verbinden Sie die Eingänge des PVXp Sub NICHT mit dem Ausgang des Verstärkers. Die Eingänge sind dazu
gedacht, von einem Line Pegel Stärke-Signal angetrieben zu werden.
Entfernen Sie NICHT die schützenden Metallgitter.
WARNUNG! Der PVXp Sub ist sehr effizient und leistungsfähig! Dieses Soundsystem kann dauerhaft das Gehör
schädigen! Achten Sie besonders auf die allgemeine maximale Lautstärke!
Page 49

Der offensichtliche Geräuschpegel des PVX™p Sub kann aufgrund der klaren, sauberen Soundausgabe und dem
Mangel an Hochfrequenzen trügen. Der Mangel an Verzerrung oder deutlicher Gefahr kann den Geräuschpegel
viel geringer scheinen lassen, als er eigentlich ist. Dieses System ist für SPL über 127 dB bei 1 M vom
Lautsprecher geeignet!
PLATZIERUNG EINES SATELLITENLAUTSPRECHERSYSTEMS OBEN AUF DEM PVX
™
P SUB
Der PVXp Sub bietet eine Gewindestangenhalterung die oben auf dem Gerät eingebaut ist und diese wurde
entwickelt, um das Gerät mit einer M20 Gewindestange von etwa 32” Länge oder weniger zu verbinden. Diese
Stange wurde besonders dafür entwickelt, um sie mit den folgenden Lautsprechersystemen zu verbinden:
Peavey PVXp 10
Peavey PVXp 12
Peavey PVXp 15
Setzen Sie kein gerößeres oder schwereres Lausprechersystem auf diese Stange als den PVXp15 ansonsten
könnte es aufgrund der Möglichkeit umzukippen unsicher sein.
Der PVXp Sub muss auf einem ebenen und festem Untergrund platziert werden, damit der Lautsprecher auf
einer Stange, vor dem Umkippen gesichert ist.
Bei Installation oder De-Installation des Lautsprechers auf dieser Stange, empfiehlt es sich, wenn möglich,
einen Helfer zu habe. Es könnte schwer sein “die Nadel einzufädeln” und da obere Ende der Stange mit der
Stange des Subwoofers zu verbinden, während das Lautsprechersystem selbstständig gehalten wird.
Wenn der PVXp Sub und die Stange im Freien verwendet wird, bringen Sie niemals Banner oder Flaggen an
der Stange oder den Lautsprechersystemen an, die mit einer Stange montiert werden, starke Winde können
die Lautsprecher zum umstürzen bringen. Wenn es eine Möglichkeit stark windiger Bedingungen gibt, könnte
es besser sein den Lautsprecher von der Stange zu nehmen, um zu vermeiden, dass PVXp Sub und das
Lautsprechersystem, das mit einer Stange montiert ist umstürzt.
DEN PVXP SUB MIT AC-STROM VERBINDEN
Der PVXp Sub wird mit einem 1,8 m langen IEC-Verbindungs-AC-Netzkabeln geliefert. Wenn Sie ein
Verlängerungskabel oder eine Steckdosenleiste an diesem Lautsprecher verwenden, stellen Sie eine
gute Qualität und eine ausreichend aktuelle Leistung sicher, um Sicherheit zu gewährleisten und die
Leistungsabgabe des PVXp Sub zu maximieren. Für maximalen unverzerrten Ausgang, verbinden Sie kein
anderes Gerät mit demselben Verlängerungskabel, mit dem der PVXpSub verbunden ist. Erweitern Sie nicht die
aktuelle Nennkapazität des Verlängerungskabels mit der Anzahl aller Geräte, die damit verbunden sind.
Wenn Sie das Kabel des PVXp Sub AC zum ersten Mal einstecken, stellen Sie sicher, dass der Netzschalter
Ausgeschaltet ist und schalten Sie diesen erst nach der Verbindung des Netzkabels Ein. Die eingebaute
Stummschaltung wird aktiviert, wenn die angemessene Sequenz aller Schritte genommen wurde.
BESONDERER HINWEIS FÜR DAUERHAFTE INSTALLATION
Bei Installation des PVXp Sub, werden AC-Stromverläufe verwendet und ein zertifizierter Elektriker sollte
konsultiert werden, um sicher zu sein, das die gesamte AC-Schaltung den lokalen Vorschriften und Regelungen
entspricht. Es ist auch ratsam, eine Kabelschalle zu verwenden, die angemessen an dem Gehäuse angebracht
ist, zur Zugentlastung des IEC-Netzkabels, das mit dem Verstärkermodul an (2) verbunden ist, damit das
Netzkabel nicht herausgezogen werden kann oder lose wird.
DEN PVXP SUB MIT EINEM SIGNAL VERBINDEN
Ein Signal in das PVXp SUB eingeben ist auf mehreren Wegen möglich.
Der Eingang (4) bietet einen symmetrischen Line Pegel-Eingang, der die Nutzung eines 1/4" TRS
(ring-tip-sleeve) Typ Klinkenstecker oder eines XLR-Steckers ermöglicht. Natürlich kann auch ein
unsymmetrischer 1/4" Klinkenstecker verwendet werden, aber er wird nicht den Vorteil der symmetrischen
Verbindungs-Unterdrückung der äußeren Störung haben, wie Brummen und RFI.
Verbinden Sie nicht die Kabel mit den Buchsen, während das Gerät Eingeschaltet ist und der Pegelsteller
hochgestellt ist! Während ein standardmäßiges single-ended 1/4" mit Klinkenstecker ausgerüstetes Kabel gut
funktionieren wird und die symmetrische Eingangsbeschaltung etwas Verbindungs-Unterdrückung bietet, wird
ein symmetrisches Kabel, das entweder des symmetrischen TRS 1/4" Klinkenstecker oder den XLR-Stecker
verwendet ausgezeichnete Verbindungs-Unterdrückung und Leistung.
Page 50

Manchmal ist es mit schwierigen Störungsproblemen hilfreich die Schirmmasse ( Adapter #1 eines XLR)
eines symmetrischen Kabels am Ende des PVX™p Sub zu heben.Dies kann ziemlich einfach gemacht werden,
indem der Ground-Lift-Schalter (10), der in den PVXp Sub eingebaut ist aktiviert wird. Überprüfen Sie alle
Eingangsänderung sorgfältig, indem Sie immer den Pegelregler herunterdrehen, bevor Sie Kabel einstecken und
ziehen oder den Boden anheben.
Die Nutzung qualitativ hochwertiger Premiumkabel wird für den PVX
bessere Abschirmungen und Materialien haben und noch zuverlässiger sind. Die beste Option ist ein
abgeschirmtes symmetrisches Kabel, das nicht länger ist als notwendig, um den PVXp Sub zu erreichen. Es ist
normalerweise eine gute Idee etwas Platz am Eingang des PVXp Sub zu lassen und auch die Kabel festzukleben
oder sie unter einen Kabelschutz zu legen, um zu vermeiden, dass jemand darüber fällt oder den PVXp Sub
umwirft, wenn ein Lautsprecher auf der Stange steht.
™
p Sub empfohlen, da diese normalerweise
ANPASSUNG DES PEGELREGLERS
Der PVXp Sub ist mit einem Pegelregler (6) am Eingang ausgestattet, um die Nutzung in vielen verschiedenen
Anwendungen zu vereinfachen. Mit dem komplett im Uhrzeigersinn angepassten Pegelregler, ist die Verstärkung
am Maximum und die Eingangsempfindlichkeit beträgt 0.24 V RMS für volle Nennleistung.
Es wird empfohlen, den Pegelregler des PVXp Sub auf fast 12 Uhr oder 0 dB Vorverstärker zu stellen. Bei dieser
Einstellung, ist die Eingangsempfindlichkeit etwa 2,4 Volt RMS für voll Nennleistung. DerPVXp Sub wird jetzt
noch mehr mit einem typischen Verstärker-Eingang übereinstimmen.
Wenn das Mischpult das Clipping der Ausgangssignale anzeigt, dann wird die gesamte Leistungsfähigkeit
des PVXp Sub nicht sauber genutzt. Clipping des Signals, bevor es zum PVXp Sub gelangt, ist nicht optimal.
Reduzieren Sie den Ausgangspegel des Mischpult und drehen Sie den Pegelregler auf dem PVXp Sub hoch.
Der Verstärker in dem PVXp Sub ist mit DDT™ ausgestattet und die LED-Anzeige zeigt an, wann der PVXp Sub
DDTaktiviert wurde. Wenn der Klang stark komprimiert scheint, überprüfen Sie diese Anzeigen; wenn sie öfter
als gelegentlich ROT blinken, dann muss der Treiberpegel des Mischpults (oder der Pegelregler auf dem PVXp
Sub) reduziert werden.
Wenn Sie das Soundsystem zum ersten Mal einschalten, schalten Sie erst die gesamte vorgeschaltete
Elektronik ein, dann den PVXp Sub mit dem Pegelregler komplett im Uhrzeigersinn (ganz nach unten). Beginnen
Sie mit der Überprüfung der Pegel mit den Pegelreglern des Mischpults ganz nach unten und bringen Sie sie
langsam nach oben mit dem Pegelregler des PVXp Sub, der auf die gewünschte Einstellung eingestellt ist (auf
der Mitte, zum Starten).
Es ist nicht gut, den Pegelregler auf dem PVXp Sub ganz nach oben zu drehen und dann zu versuchen nur den
Pegel des Mischpults zu regeln, diese Einstellung tendiert dazu übermäßige Geräusche aufzunehmen. Am
besten wird es sein, ein “heißes” Signal vom Mischpult das Kabel hinunter zum PVXp Sub laufen zu lassen
und dann den Pegelregler des PVXp Sub nur so hoch zu drehen, um den kompletten gewünschten Ausgang zu
erreichen. Mit dieser Einstellung ist es notwendig, ein Clipping des Mischpultausgangs zu prüfen.
KABEL VON DEN HOCHPASS-AUSGÄNGEN (11 & 12)
Die bevorzugte Methode der Verbindung eines Vollbereichs-Satelliten-Lautsprechersystems mit den
Hochpass-Ausgängen des PVXp Sub (11 & 12) ist es, ein symmetrisches XLR-Kabel zu verwenden, dass nicht
länger ist als notwendig, um das Satellitenlautsprechersystem bequem zu erreichen.
Wenn der Satelliten-Lautsprecher sich oben auf einer Stange über dem PVXp Sub befindet, dann ist ein 1,8
m langes Kabel ziemlich lang. Ein 3m oder 6m langes Kabel könnte auch verwendet werden, aber Kabel die
länger sind, werden nicht mehr Störungs-Aufnahme ermöglichen und beginnen die Hochfrequenz-Informationen
zu verlieren. Die Nutzung qualitativ hochwertiger, Premiumkabel wird für den PVXp Subempfohlen, da
diese normalerweise bessere Abschirmungen und Materialien haben und noch zuverlässiger sind. Es
ist normalerweise eine gute Idee etwas Platz am Ausgang des PVXp Subb zu lassen und auch die Kabel
festzukleben oder sie unter einen Kabelschutz zu legen, um zu vermeiden, dass jemand darüber fällt oder den
PVXp Sub umwirft, wenn ein Lautsprecher auf der Stange steht.
EMPFOHLENE EINSTELLUNGEN FÜR DIE NUTZUNG DES PVXP SUB MIT DEN LAUTSPRECHERN
DER PVXPSERIES
Der ideale Standort zur Platzierung der Vollbereichslautsprecher der PVX™p Serie ist oben auf der Stange
des PVXp Sub. In der nahen Umgebung werden die folgenden Einstellung die besten Ergebnisse im
Übergangsbereich und für die Tongleichheit bieten.
Beachten Sie, dass zu den XLR-Ausgängen (11 & 12),12 dB hinzugefügt wurden, um die Nutzung
der XLR-Eingänge auf dem PVXp12 und PVXp15zu ermöglichen . Normalerweise werden diese als
Mikrofonpegeleingänge betrachtet, aber mit den hinzugefügten Ausgängen des PVXp Sub, ist die Nutzung der
XLR-Eingänge auf den PVXp-Lautsprechern möglich.
Page 51

PVXp 10
Polaritätsumschalter auf dem Sub (7): Normal oder IN
Crossover Frequency Control (9): Von 12 Uhr zum vollen Anschlag im Uhrzeigersinn. Dies zeigt einen Bereich
von etwa 110 Hz bis 160 Hz für den Übergangspunkt. Die empfohlene optimale Einstellung ist die Position bis
zum vollen Anschlag im Uhrzeigersinn.
Pegelregler (6): Der Pegelregler des PVXp
™
Subauf 12 Uhr (0 dB), der Pegelregler des PVXp10 auf 12 Uhr
PVXp 12
Polaritätsumschalter auf dem Sub (7): Normal oder IN
Crossover Frequency Control (9): Von 12 Uhr zum vollen Anschlag im Uhrzeigersinn. Dies zeigt einen Bereich
von etwa 110 Hz bis 160 Hz für den Übergangspunkt.
Die empfohlene optimale Einstellung ist zwei Ticks nach 12 Uhr.
Pegelregler (6): Der Pegelregler des PVXpsubauf 12 Uhr (0 dB), der Pegelregler des PVXp12 auf - 2 Ticks vor 12 Uhr
PVXp 15
Polaritätsumschalter auf dem Sub (7): Normal oder IN
Crossover Frequency Control (9): Von 12 Uhr zum vollen Anschlag im Uhrzeigersinn. Dies zeigt einen Bereich
von etwa 110 Hz bis 160 Hz für den Übergangspunkt.
Die empfohlene optimale Einstellung ist auf 12 Uhr gestellt.
Pegelregler (6): Der Pegelregler des PVXp Sub auf 12 Uhr (0 dB), der Pegelregler des PVXp12 auf - 2 Ticks vor 12 Uhr
VORSICHT! DIE ZU GERINGE EINSTELLUNG DIESER ÜBERGANGSFREQUENZSTEUERUNG KÖNNTE DEN
SATELLITEN-LAUTSPRECHER MIT EINEM TIEFBASS BEI SPL ÜBERLASTEN!
Die geringere Einstellung der Steuerung verstärkt NICHT den Tiefbass-Ausgang des PVXp Sub, eine mittlere (12
Uhr) bis höhere Einstellung funktioniert besser bei den meisten Lautsprechern.
Wenn die Lautsprecher der PVXp-Serie nicht oben auf dem Subwoofer auf der Stange gestellt sind, müssen
die Einstellungen der Polaritätsschalter eventuell anders sein, als das was hier dargestellt wird. Der Crossover
Frequency Control müssten eventuell niedriger eingestellt werden, damit der Subwoofer und die Satelliten sich
durch den Übertragungsbereich gut summieren. Die oben zusammengefassten Einstellungen funktionieren am
besten, wenn der Satellitenlautsprecher und der Subwoofer nah beieinander sind und in erster Linie denselben
Abstand vom Publikum haben.
EINSTELLUNG DER REGLER DES PVXP SUB ZUR NUTZUNG MIT ANDEREN
SATELLITENLAUTSPRECHERN
Crossover Frequency Control (9): Stellen Sie den Crossover Frequency Control (9) im allgemeinen auf eine
höhere Frequenzeinstellung für kleinere Vollbereichs-Lautsprecher, um diese als Satelliten zu verwenden.
Für größere Vollbereichs-Lautsprecher, stellen Sie den Crossover Frequency Control (9) auf eine geringere
Frequenzeinstellung ein. Die Einstellung des Crossover Frequency Control auf sehr weit unter die 12 Uhr
Position wird meistens nicht benötigt, da eine Übergangsfrequenz unter 100 Hz nicht ermöglicht, dass der PVXp
Sub und der Satellitenlautsprecher zusammen in dem Übergangsbereich hinzugefügt werden.
POLARITÄTS-SCHALTER (7): Versuchen Sie den Polaritäts-Schalter vor und zurück zu stellen bei jeder
gewählten Übergangsfrequenz, als ob Sie bestimmen, welche Schalterposition den meisten Bass-Ausgang im
Übergangsbereich bietet.
Pegelregler (6): Beginnen Sie mit dem Pegelregler des PVXp Sub in der 12 Uhr Position und passen Sie das
Satelliten-Lautsprechersystem an, damit es mit dem Pegel übereinstimmt. Beachten Sie, dass wenn der
Subwoofer als merklich separate Soundquelle hörbar ist, dann ist der Pegel wahrscheinlich zu hoch eingestellt.
EINSTELLUNG DER BASSVERSTÄRKUNGSSTEUERUNG DES KOSMOS® C (10)
Die Bassverstärkungssteuerung des Kosmos® C kann offensichtliche Basserweiterung und Ausgang zum
reproduzierten Sound hinzufügen, besonders wenn das Programmmaterial einen erheblichen Anteil unter der
Grenzfrequenz des PVXp Sub besitzt.
Wenn zutreffend, kann eine vernünftige Nutzung den Genuss der Musik verbessern und Schlagkraft und
Aufschwung zum Mix hinzufügen. Dennoch kann die Einstellung des Reglers höher als der optimale Pegel zu
einer Wahrnehmung auffälliger Verzerrung oder weniger klaren Bassgeräuschen führen. Selten ist es hilfreich,
den Regler ganz nach oben zu drehen.
Die typische Nutzung beinhaltet eine Einstellung des Reglerknopfes irgendwo zwischen Aus (voll Drehung
gegen den Uhrzeigersinn) und auf 12 Uhr (in der Mitte). Dann ist der hinzugefügt Effekt feiner und weniger
aufdringlich in bestimmten Momenten bei der Musik, während immer noch eine willkommene Bereicherung des
allgemeinen Klangs geliefert wird.
Page 52

Bitte beachten, dass bei übermäßigem Rechtsanschlag, die effektive Verstärkung es Subwoofers erhöht ist, daher wird die
Einschaltung der Bass Enhance Control weit nach oben, zum Clipping führen, wenn es schon vorher am Rand des Clippings
war.
™
DEN AC-STROM VOM PVX
Wir empfehlen, dass der Netzschalter (3) dazu verwendet wird, um das Gerät zunächst auszuschalten und dann kann das
AC-Netzkabel entfernt werden, dies minimiert die Belastung der Verstärker und des Wandlers von Abschaltungs-Transienten.
P SUB TRENNEN
FEHLERBEHEBUNG
ÜBERHAUPT KEIN AUSGANG
Vergewissern Sie sich zunächst, dass das Gerät über AC-Strom verfügt und Eingeschaltet ist. Stellen Sie sicher, dass die LED
auf dem Verstärkermodul aufleuchtet.
Wenn nicht, stellen Sie sicher, dass der EIN/AUS-Schalter (3) auf der Position EIN ist und prüfen Sie die
IEC-Netzkabelverbindung (2), indem Sie sicherstellen, dass sie komplett aktiviert und gesetzt ist. Stellen Sie sicher, dass das
AC-Netzkabel in eine funktionierende AC-Steckdose eingesteckt ist.
Überprüfen Sie schließlich den Trennschalter (1). (Siehe Rückseite: Abschnitt Trennschalter, für Sicherheitsanweisungen.)
Sobald Sie sich vergewissert haben, dass Ihr Gerät mit AC-Strom versorgt wird, überprüfen Sie, dass der PVX
Signal bekommt. Trennen Sie vorübergehend das Kabel, das zu den Eingängen verläuft und verbinden Sie es mit einigen
anderen Geräten, die geeignet sind das Signal zu reproduzieren (z.B. ein Verstärker und ein Lautsprecher). Wenn dies
ein Signal herstellt, stellen Sie sicher, dass alle Pegelregler, die verwendet werden, zu einem zufriedenstellenden Pegel
hochgedreht wurden (ein Drittel oder zur Mitte).
Wenn der PVXp Sub direktem Sonnenlicht oder übermäßiger Hitze ausgesetzt wurde, könnte der eingebaute Wärmeschutz
ausgelöst worden sein. Wenn dem so ist, schalten Sie den PVXp Sub ab und lassen Sie ihn ausreichend lange abkühlen.
Wenn es immer noch keine Ausgabe gibt, kontaktieren Sie Ihren autorisierten Peavey-Händler oder das Peavey International
Service Center.
™
p Sub ein
BRUMMEN ODER SUMMEN
Wenn der PVXp Sub ein Brummen oder Summen produziert, kann dies mit der AC-Steckdose verbunden sein. Versuchen Sie
den PVXp Sub in eine andere AC-Steckdose einzustecken. Manchmal wenn ein anderer Trennschalter für das Mischpult und
den PVXp Sub verwendet wird, kann dies einen Brummton verursachen. Wenn dies nicht praktisch ist, ist es das beste die
Wandsteckdose (Trennschalter) zu verwenden, um den Strom sowohl zum Mischpult als auch dem Lautsprecher zu liefern.
Stellen Sie sicher, dass abgeschirmte Kabel verwendet wurden, um das Signal zum Eingang des PVXp Sub zu leiten. Wenn
Lautsprecherkabel mit 1/4"-Buchsen anstatt abgeschirmter Kabel als Eingangskabel verwendet werden, werden diese zu
einem Brummen oder Summen neigen.
Brummen könnte Erdschleifen-bezogen sein. Es könnte hilfreich sein, den Schutzleiter (Adapter #1) auf ein symmetrisches
Kabel am Ende des PVXp Sub zu heben. Dies wird ziemlich einfach gemacht, indem der Ground-Lift-Schalter (10), der in
den PVXp Sub eingebaut ist aktiviert wird. Prüfen Sie alle Eingangsänderungen sorgfältig, indem Sie erst den Pegelregler
herunterdrehen, bevor Sie Kabel einstecken und ziehen oder den Schutzleiter heben.
Überprüfen Sie, dass die Lichtregler nicht im selben Stromkreis sind wie der PVXp Sub, das Mischpult oder alle Quellgeräte.
Wenn Lichtdimmer verwendet werden, kann es notwendig sein sie komplett EIN oder komplett AUS zu schalten, um das
Brummen zu entfernen oder zu reduzieren. Dies ist ein typisches Störungsproblem mit AC-Verkabelung/Lichtdimmer, kein
Konstruktionsfehler des PVXp Sub.
Das dritte Kabel (Erdungsstecker) am AC-Stecker sollte NIEMALS entfernt oder abgebrochen werden, da dies ein potentielles
Sicherheitsrisiko ist.
VERZERRTER ODER UNSCHARFER SOUND
Stellen Sie zuerst sicher, dass das Mischpult (Originalquelle) nicht clippt oder übersteuert wird. Stellen Sie sicher, dass
der Pegelregler (6) am PVXp Sub nicht zu niedrig eingestellt wurde. Überprüfen Sie, dass der Eingangsstecker komplett
in die Eingangsbuchse auf der Rückseite des PVXp Sub gesteckt ist. Stellen Sie sicher, dass ein Verstärker nicht in die
Eingangsbuchse des PVXp Sub eingesteckt wurde. Wenn ein Verlängerungskabel verwendet wird, um das Gerät mit
AC-Strom zu versorgen, stellen Sie sicher, dass es ausreichend aktuelle Leistung hat und dass es auch nicht verwendet wird
um ein anderes Gerät mit Strom zu versorgen.
Der PVXp Sub verfügt über einen eingebauten Bassverstärker, um die natürliche Rückmeldung des Lautsprechers in dem
System zu erweitern und zu filtern, so dass es wenig, wenn überhaupt, zusätzlichen EQ erfordert. Wenn übermäßiger
zusätzlicher Bassverstärker extern dem PVXp Sub hinzugefügt wurde, könnte dies zu vorzeitiger Überbelastung bei hohem
SPL führen. Reduzieren Sie die Menge jedes externen (Mischpult, Ständer) EQ und schauen Sie, ob dies die Verzerrung
aufklärt.
Page 53

Stellen Sie schließlich fest, dass auch wenn der PVXp Sub ein leistungsfähiges Gerät mit hoher Leistung ist, hat
es letztlich Grenzen und es könnte zusätzliche Subwoofer benötigen, um ausreichend Sound-Ausgaabe oder
Abdeckung zu bieten. In diesem Fall versuchen Sie die Mischpultpegel etwas herunterzudrehen, um zu schauen,
ob das aufklärt. Wenn nach Überprüfung aller aufgelisteten Dinge und allem anderen, das Sie sicher überprüfen
können, das System immer noch Probleme aufweist, notieren Sie sorgfältig alle Bedingungen und holen Sie sich
einen Rat bei Ihrem Peavey-Händler.
PFLEGE UND WARTUNG
Ihr PVXp Sub ist ein robustes und langlebiges Produkt und wird Ihnen jahrelang zuverlässig nutzen, wenn Sie
es sorgfältig pflegen. Benutzen Sie Ihren gesunden Menschenverstand und lesen Sie die Sicherheitswarnungen,
um gefährliche Betriebsbedingungen zu vermeiden.
Das Gerät muss von der AC-Stromquelle getrennt werden bevor die Arbeit darauf getätigt wird. Richten Sie alle
Wartungen an das qualifizierte Servicepersonal.
SONNENLICHT/HITZE
Vermeiden Sie eine längere direkte Aussetzung zum Sonnenlicht, da dies verursachen kann, dass das Gerät
überhitzt und thermisch abschaltet.
Übermäßig warme Betriebsbedingungen können ebenfalls eine thermische Abschaltung verursachen.
Lagern Sie das Gerät nicht in extrem warmen oder kalten Bedingungen oder extremer Feuchtigkeit. Ermöglichen
Sie, dass das Gerät immer auf Raumtemperatur kommt bevor Sie es nutzen.
REINIGUNG
Reinigen Sie den PVXp Sub nie wenn er angeschlossen oder Eingeschaltet ist! Wenn das Gerät komplett
von AC-Stromquellen getrennt ist, verwenden Sie ein trockenes Tuch, um Schmutz oder Dreck zu entfernen.
Verwenden Sie nie starke Lösemittel am PVXp Sub, da diese das Gehäuse schädigen könnten. Lass Sie
KEINE Flüssigkeiten in den PVXp Sub eindringen.
RETUSCHE
Für eine Retusche eines Schadens am schwarzen Lack des PVXp Sub können Sie eine schwarze Sprühfarbe
wie Peavey Commercial Sound, Black Touch-Up Paint, Peavey Teilenummer 00052110 verwenden. Folgen Sie
den Anweisungen auf der Dose für Sicherheit und beste Ergebnisse.
ÜBERPRÜFUNG AUF SICHERE HARDWARE
Überprüfen Sie nach den ersten paar Monaten der Nutzung und regelmäßig danach die Hardware des PVXp
Sub auf Festigkeit, einschließlich der Rückseitenschrauben und der Schrauben, die das Gitter und das
Gehäuse zusammenhalten.
Das Gerät ist hohen Vibrationen ausgesetzt und diese könnte dazu führen, dass diese bei Nutzung sich
lösen.
Page 54

ABMESSUNGEN
16.749
8
7
6
5
4
143.94
5.667
219.66
8.648
219.66
8.648
212.71
8.375
220.14
292.10
11.500
8.667
357.30
14.067
40.41
1.591
613.96
24.172
601.50
23.681
425.41
469.54
18.486
74.25
2.923
34.06
1.341
Page 55

ABMESSUNGEN
2
1
G
F
E
D
C
B
219.66
8.648
143.94
5.667
219.66
8.648
Typische Nutzung
Ausgänge Eingänge
Keyboard
Mixer
Dynamisches Mikro-
fon (Keine Elektrete)
Gitarre
220.14
8.667
PVXp 12 oder PVXp 15
Ausgänge Eingänge
Mixer
Dynamisches Mikro-
fon (Keine Elektrete)
Keyboard
Gitarre
PVXp 12 oder PVXp 15
PVXp 12 oder PVXp 15
Eingang
zum 1.
Sub
Reihenschaltung (Mehrere Subs)
Page 56

TECHNISCHE DATEN
Freque nzbereich (-10 dB, Halbraum):
43 Hz – 180 Hz*
*Trennfrequenzregler Voll CW
Freque nzgang, 1 Mete r Auf Achs e, Gleits inus In
Refle xions freie r Umge bung (-6 dB):
48 Hz – 138 Hz*
*Trennfrequenzregler Voll CW
Nenns troms tärke des Leistung s ve rstärkers,
Ges amtausg ang s le is tung:
800 Watt verfügbare Höchstleistung
Dauerleistung: 470 Watt an 4 Ohm.
Elektronis che Eing ang s impe danz (Nominal):
Line-Eingangspegel: 2.2 k Ohm symmetrisch (XLR oder 1/4"),
10 k Ohm unsymmetrisch 1/4"
Schalldruckpeg el, 1 Watt, 1 Me te r In Reflexio ns freie r
Umg e bung :
97 dB SPL
Maximale r Schalldruckpeg e l (1 Mete r):
123 dB SPL dauerhaft
127 dB SPL Höchstleistung
Wandle r-Erwe iterung:
15" Premium Hochleistungstieftöner, 3" Schwingspule
Box-Tuning frequenz:
50 Hz
Elektronis che Freque nzwe iche
Stufenlos von 90 Hz bis 180 Hz
Tiefpassneigung: 24 dB/oktave
Hochpass-Ausgangsneigung: 18 dB/oktave
Infras chall-Filte rne ig ung:
36 dB/oktave
Nominale r Verstä rke r-Freque nzgang:
+0, -3 dB von 20 Hz bis 20 kHz
Brummen und Rauschen:
Höher als 90 dB unter Nennleistung
DDT Dynamikbe reich:
Höher als 21 dB
THD und IM:
Typischerweise weniger als 0,5 %
Dämpfungs faktor:
Höher als 100 @ 1000 Hz, 4 Ohm
Leis tung s be darf Des Peave y PVX™p S ub-Sys te ms :
Nominal 160 Watt, 100-120 VAC 50-60 Hz (im Haushalt)
220-240 VAC 50-60 Hz (Lieferung)
Gehäuse mate rialie n & Oberfläche :
Schwarzes mit Acrylfarbe bemaltes Gehäuse mit 15 mm
MDF mit durchgehendem, schwarzem pulverbeschichtetem
perforiertem Stahlgitter.
Eingangs ans chlüs s e :
Ein Kombi XLR/ 1/4"-Klinkenstecker bietet symmetrische und
unsymmetrische Bedienung
Aus g ang s ans chlüs s e :
Zwei Hochpass-Ausgänge, unabhängig elektrisch gepuffert,
mit schaltbarem Ausgangspegel-Pad.
Ein Vollbereichs-Thru, elektrisch gepuffert.
Ste ue rung e n:
Pegel: Bietet +/- 20 dB Verstärkungseinstellung
Crossover Frequency Adjust: Passt die elektrische
Trennfrequenz von 90 Hz bis 180 Hz stufenlos an
®
Kosmos
C: Bietet Verarbeitung der Bassverstärkung.
Polarity Switch: Bietet entweder 0 Grad oder 180 Grad
Subwoofer-Polarität
Ground Lift Switch: Für den Eingang
Abme s s unge n (H x B x T)
Im Gebrauchszustand:
24,25" x 16,75" x 23,00"
(ohne Räder, 4,06" tief)
616 mm x 425 mm x 584 mm
In Transportposition:
27,06" x 16,75" x 24,25"
687 mm x 425 mm x 616 mm
Nettog ewicht:
76.Lbs. (34.5 kg)
Montage vorrichtung :
1 3/8" Stabmontage mit M20 Gewindestab zur Montage eines
geeigneten Lautsprechers oben auf dem Sub und vier große
Gummifüße unten für den Bodenbetrieb.
Page 57

ITALIANO
PVX™p Sub
Grazie per aver acquistato il sistema attivo Peavey® PVX™p Sub. PVXp Sub presenta una sezione di potenza ultra affidabile che
eroga un totale di 800 watt di potenza di picco con circuito di compressione DDT™. Questa cassa attiva è caratterizzata da un
woofer di potenza da 15” con dua bobina mobile da 3”. PVXp Sub presenta un ingresso bilanciato mediante un jack combinato
che accetta un ingresso bilanciato TRS da 1/4" nonché un ingresso bilanciato XLR. Ci sono due uscite bilanciate XLR e un uscita
XLR Full-Range. C'è un controllo di livello regolabile nonché indicatore LED, combinato che si illumina quando acceso e se il
circuito DDT “soft-limiting” è attivato.
Caratteristiche
• Cassa subwoofer attiva bassi ventilata
• 800 Watt di potenza di picco disponibile
• Woofer di potenza da 15”
• Amplificatore di potenza con raffreddamento aria forzato per il massimo dell'affidabilità
• Livello linea interno rete crossover passo-basso/passo-alto
• Kosmos
• Ingresso jack XLR/1/4" combinato
• Due uscite XLR passo-alto e un'uscita XLR full-range thru
• Interruttore di polarità per inversione di polarità del subwoofer
• Ground lift per sollevamento schermatura cavo da terra
• Chiusura resistente grande con cuscinetti ammortizzanti
• Griglia di copertura completa in acciaio forato rivestita
• Impugnature in acciaio
• Dimensioni compatte per sub basato su woofer da 15”
• Supporto per palo filettato con palo altoparlante incluso
®
C completamente regolabile per impatto bassi aumentato
DESCRIZIONE
Peavey® PVXp Sub è un subwoofer compatto, ventilato e attivo che utilizza un woofer di potenza da 15”, accoppiato con un
amplificatore di potenza, con potenza di picco disponibile di 800 watt. Una griglia in acciaio forato nera offre protezione per il
driver e un aspetto professionale, insieme a impugnature in acciaio e resistenti ruote da 4'' per il trasporto.
Crossover livello linea interno con due uscite pass-alto, bufferizzate elettricamente indipendentemente; e un'uscita full-range,
anch'essa bufferizzata elettricamente.
Intensificatore di bassi Kosmos
bassa è integrato per la massima versatilità.
Un sistema mondato su palo filettato fornisce una piattaforma robusta e stabile per il montaggio del sistema di altoparlante
fornito in modo idoneo sul subwoofer. La serie di altoparlanti attivi a due vie PVXp è un abbinamento eccellente per PVXp Sub.
L'amplificatore di potenza del sistema altoparlante PVXp Sub prevede un'unità a bassa distorsione, ventilata e ultra affidabile
che fornisce un totale di 800 Watt di potenza di picco disponibile per il sistema. L'unità di alimentazione per l'amplificatore di
potenza è di tipo switching, in modo da garantire alta efficienza e peso ridotto. L'amplificatore offre la nostra compressione
DDT che elimina virtualmente clipping acustici dovuti agli amplificatori di potenza. Il raffreddamento avviene mediante una
ventola a basso rumore per funzionamento affidabile in condizioni ardue.
L'ingresso è mediante jack femmina combo XLR e jack telefonico TRS da 1/4” con ingresso bilanciato all'elettronica preamp/EQ
e controllo livello.
Una coppia di uscite a passo-alto indipendenti fornisce un segnale in uscita bufferizzato e bilanciato per una coppia di
altoparlanti satellite per il trasporto della gamma alta della musica, attraverso una coppia di jack XLR maschi.
®
C esclusivo di Peavey per forza di bassi extra da materiale di programma a frequenza molto
Page 58

Un'uscita Full-Range Thru ha un connettore XLR maschio. Queste uscite consentono il collegamento di sistemi di
altoparlanti supplementari o di fornitura del segnale ad altri dispositivi ecc. Il pannello d'ingresso dispone di un
supporto per moduli aggiuntivi opzionali come ricevitore wireless, ingresso audio digitale o equalizzatore a 10
bande ecc.
APPLICAZIONI
Peavey PVX
di altoparlanti full-range più piccoli per rafforzamento del suono, eventi in luoghi pubblici, sistemi sonori
supplementari laterali, karaoke e riproduzione musicale.
Un ingresso tipico per il livello di linea del Peavey PVXp Sub sono console di missaggio (mixer) per rinforzo
sonoro o uscite di lettori CD, lettori MP3 o unità a nastro. Il segnale filtrato a passo-alto da PVXp Sub può
essere quindi inviato a un sistema di altoparlanti attivo full-range, che gestisce i bassi profondi provenienti dal
sistema altoparlante.
™
p Sub ha una varietà di applicazioni, come estensione delle prestazioni dei bassi per sistemi
PANNELLO POSTERIORE - PARTE INFERIORE
1
2
3
INTERRUTTORE DIFFERENZIALE (1)
L'unità di alimentazione è protetta da sovraccarichi e guasto grazie ad un interruttore differenziale da 5 amp. Questo
interruttore rimane chiuso finché non si verificano malfunzionamenti nel circuito dell'amplificatore o condizioni anomale che
portino ad un eccessivo flusso di corrente dalla rete elettrica. Se l'interruttore scatta, impostare l'interruttore di accensione
(3) su OFF, attendere un breve periodo di tempo lasciando raffreddare l'interruttore differenziale, quindi riaccenderlo.
Nel caso in cui l'interruttore scatti, il pulsante centrale si estenderà verso l'esterno di circa 1/4 di pollice, e potrà essere
richiuso premendolo verso l'alto e verso l'interno. In condizioni normali (interruttore chiuso), il pulsante centrale si trova in
posizione relativamente piatta rispetto alla superficie posteriore dell'unità.
Nel caso in cui l'interruttore differenziale continui a scattare o scatti immediatamente dopo essere stato richiuso evitare di
effettuare ulteriori tentativi di reset. Portare il sistema presso un centro di assistenza qualificato Peavey per la riparazione.
CONNETTORE DI ALIMENTAZIONE IEC (2)
Questa presa è destinata al cavo di alimentazione IEC (in dotazione) che fornisce alimentazione AC a corrente
alternata all'unità. È molto importante per l'utente garantire che il PVXp Sub abbia un corretto valore di tensione
alternata. La tensione corretta per il PVXp Sub è presente vicino al cavo della linea IEC (alimentazione) sul pannello
posteriore dell'unità.
Leggere questo manuale attentamente per garantire la propria sicurezza nonché la sicurezza dell'impianto. Non
staccare il piedino di messa a terra di qualsiasi tipo di apparecchiatura, Essa, infatti, è stata fornita per la sicurezza
dell'utente. Se la presa non è dotata di una spina di messa a terra, deve essere utilizzato un adattatore di messa
a terra e il terzo cavo deve essere messo a terra adeguatamente. Onde evitare il rischio di shock o di incendio,
assicurarsi sempre che il mixer e tutte le altre apparecchiature simili siano correttamente collegate a terra.
Page 59

INTERRUTTORE DI ACCENSIONE/SPEGNIMENTO (3)
Questo interruttore a bilanciere fornisce alimentazione AC a PVX
ON corrisponde al lato sinistro dell'interruttore completamente spinto a raggiungere il livello della superficie
del pannello posteriore.
PANNELLO POSTERIORE - PARTE SUPERIORE
PANNELLO DI ACCESSO PER MODULO DI ESPANSIONE OPZIONALE
Questo pannello deve essere rimosso unicamente quando si installa uno dei moduli di espansione opzionali
che saranno presto disponibili per PVXp Sub.
I moduli di espansione opzionali, come ad esempio un equalizzatore a 10 bande, funzionano congiuntamente
all'ingresso già disponibile sull'unità PVXp Sub, o fornire un funzionamento in linea per l'ingresso, come un
10-band EQ ecc. Verificare disponibilità e prezzi con il proprio rivenditore Peavey
Se non si sta installando un modulo di espansione opzione, non rimuovere questo coperchio. Le istruzioni
per l'installazione dei moduli opzionali di espansione saranno fornite con ogni modulo acquistato e saranno
specifiche per tale modulo.
5
™
p Sub quando in posizione ON. La posizione
®
.
9
6
11-12
7
4
13
8
10
PARTE SUPERIORE – CONTROLLI OPERATIVI, INGRESSI E USCITE
INGRESSO (4)
L'ingresso per livello di linea è bilanciato ad impedenza media. Il jack è un connettore combo femmina XLR e
TRS da 1/4".
LED (5)
Si illumina di VERDE quando l'interruttore di alimentazione è acceso e l'alimentazione è presente.
Diventa ROSSO quando l'amplificatore di potenza attiva il circuito "soft limiting" DDT™. Lampeggio occasionale
è accettabile, ma non un'illuminazione costante o distorsione eccessiva.
C'è anche un LED visibile dallo schermo anteriore del Sub che si illumina BLU quando è applicata
alimentazione, e diventa ROSSO quando l'amplificatore di potenza attiva il circuito "soft limiting" DDT .
LIVELLO (6)
Controlla il livello di guadagno o di uscita del segnale di ingresso. È utilizzato per impostare in maniera diretta
il livello di uscita del sistema in risposta ad un determinato segnale di ingresso.
Uso normale è con la manopola impostata a metà, cioè con un guadagno equivalente a un ingresso di
amplificatore di potenza tipico.
Page 60

INTERRUTTORE POLARITÀ (7)
Fornisce una polarità di subwoofer da 0° o 180°
Questo interruttore è usato insieme al Crossover Frequency Control (9) per fornire la migliore corrispondenza tra
l'uscita Subwoofer e l'uscita dell'altoparlante satellite nella regione crossover.
INTERRUTTORE GROUND LIFT (8)
Fornito per sollevare la schermatura del cavo dalla base dello chassis, rompere i potenziali circuiti di terra e
ridurre l'effetto "hum".
CROSSOVER FREQUENCY CONTROL (9)
Varia la frequenza di crossover tra il Subwoofer e le uscite passo-alto inviata agli altoparlanti satellite (11 & 12).
Varia la frequenza di crossover elettrica da 90 Hz a 180 Hz.
ATTENZIONE! L'IMPOSTAZIONE DI QUESTO CONTROLLO TROPPO BASSA CONSENTE ALL'ALTOPARLANTE
SATELLITE DI ESSERE SOVRACCARICATO DI BASSI PROFONDI!
™
L'impostazione troppo bassa del controllo NON aumenta l'uscita di bassi profondi del PVX
un'impostazione da media (ore 12) ad alta funziona meglio per la maggior parte degli altoparlanti.
p Sub,
MIGLIORAMENTO BASSI KOSMOS® C (10)
Fornisce la possibilità di aggiungere armoniche basse per migliorare la percezione di bassi profondi nel
materiale in programma senza sovraccaricare l'altoparlante Subwoofer.
Questo controllo è meglio se usato con moderazione e l'utilizzo al massimo può causare suono distorto o
innaturale del materiale in programma.
USCITE PASSO-ALTO (11 & 12)
Queste uscite forniscono un segnale filtrato a passo-alto per alimentare un sistema di altoparlanti attivo
full-range, come PVXp 10, PVXp 12 o PVXp 15. Possono essere utilizzati anche altri altoparlanti attivi full-range,
e altoparlanti passivi full-range possono essere utilizzati insieme a un amplificatore di potenza idoneo per
supportarli.
Queste uscite sono bufferizzate elettronicamente e isolate dall'ingresso e l'una dall'altra, e il loro livello non è
influenzato dal controllo di livello del PVXp Sub (6).
USCITA THRU FULL RANGE (13)
Questa uscita fornisce segnale full-range da inviare a qualsiasi altro dispositivo che richiede tale tipo di
segnale, come un altro PVXp Sub, o qualche altro dispositivo audio di livello linea. Questa uscita è bufferizzata
elettronicamente e isolata dall'ingresso e da altre uscite.
ISTRUZIONI PER L'USO
PRECAUZIONI
L'unità deve essere scollegata dalla fonte di alimentazione AC prima di svolgere qualsiasi tipo di lavoro su di
essa. Segnalare tutti gli interventi di manutenzione al personale di assistenza qualificato.
La piastra posteriore può raggiungere temperature elevate. Non bloccare o coprire la ventola o le alette di
scarico ostruendone la ventilazione. Lasciare uno spazio libero minimo di 4'' dietro la ventola. Non ostruire il
flusso d'aria con oggetti come tende o drappi, materiale isolante termico per costruzione, ecc. Si raccomanda
inoltre di non posizionare il retro del PVXp Sub in spazi chiusi o privi di ventilazione.
NON collegare le uscite di amplificatori di potenza agli ingressi dell'unità PVXp Sub. Gli ingressi sono studiati
per segnali di livello di linea.
NON rimuovere le griglie metalliche di protezione.
ATTENZIONE! L'unità PVXp Sub è molto efficiente e potente! Questo diffusore sonoro può causare danni
permanenti all'udito! Prestare particolare attenzione alla regolazione del volume massimo generale!
Page 61

L'apparente livello sonoro dell'unità PVX
™
p Sub potrebbe trarre in inganno a causa della chiarezza e nitidezza
del suono in uscita. La mancanza di distorsione o di evidente affanno dell'apparecchiatura potrebbe far
apparire il livello sonoro molto più basso rispetto al valore effettivo. Questo sistema è in grado di produrre
livelli di pressione sonora superiori a 127 dB a distanza di 1 m dal diffusore!
POSIZIONAMENTO DEL SISTEMA ALTOPARLANTE SATELLITE SUL PVX
™
P SUB
PVXp Sub ha un supporto per palo filettato integrato sulla parte alta dell'unità ed è concepito per abbinarsi a
un palo filettato M20 di circa 32” di lunghezza o meno. Questo palo è realizzato in modo specifico per essere
usato con i seguenti sistemi di altoparlante:
Peavey PVXp 10
Peavey PVXp 12
Peavey PVXp 15
Non porre un sistema altoparlante più alto/grande o più pesante rispetto al PVXp 15 su questo palo, ciò può
non essere sicuro a causa della possibilità di ribaltamento.
PVXp Sub deve essere posto su una superficie stabile e a livello affinché l'altoparlante montato sul palo sia
sicuro dal ribaltamento.
Quando si monta o si smonta l'altoparlante dal palo, è buona norma avvalersi dell'aiuto di una seconda
persona, ove possibile. Può essere difficile "filettare l'ago" e inserire correttamente la testa del palo nella
corrispondente sede del Subwoofer, mantenendo il sistema altoparlante a distanza opportuna.
Quando si utilizza PVXp Sub e palo all'aperto, evitare di attaccare striscioni o bandiere al palo o al sistema di
altoparlanti montato su palo, in quanto in caso di forte vento potrebbero trascinare e travolgere le unità. In
condizioni di forte vento potrebbe essere prudente considerare di rimuovere l'altoparlante dal palo per evitare
che PVXp Sub e il sistema di altoparlanti montato su palo siano spinti e travolti.
COLLEGAMENTO DELL'ALIMENTAZIONE AL PVXP SUB
L'unità PVXp Sub viene fornita di un cavo di alimentazione AC IEC lungo 6 piedi. Se si utilizzano prolunghe o
ciabatte assicurarsi che tutti i componenti siano di buona qualità e capaci di condurre abbastanza corrente
garantendo sicurezza e massima potenza in uscita per l'unità PVXp Sub. Per massimi livelli di uscita senza
distorsioni, non connettere alcun altro dispositivo alla stessa prolunga utilizzata per l'unità PVXp Sub. Non
superare il valore nominale di corrente massima della prolunga tenendo conto di tutte le unità ad essa
collegate.
Quando si collega per la prima volta il cavo di alimentazione AC al PVXp Sub, accertarsi prima che l'interruttore
sia in posizione Off, e accendere l'unità solamente una volta collegato il cavo di alimentazione. La funzione di
muting integrata scatta quando si segue la corretta sequenza di passaggi.
NOTA SPECIALE PER INSTALLAZIONE PERMANENTE
Nell'installare l'unità PVXp Sub vengono utilizzate linee elettriche AC. Occorre dunque consultare un elettricista
qualificato per assicurarsi che tutti i collegamenti AC adempiano alle leggi e alle normative in vigore. Si
consiglia inoltre di utilizzare un morsetto fissato saldamente alla cassa per alleviare le tensioni sul cavo di
alimentazione IEC collegato al modulo amplificatore su (2), in modo da evitare la disconnessione accidentale
dovuta a strattoni o vibrazioni.
COLLEGAMENTO DI UN SEGNALE AL PVXP SUB
È possibile connettere un segnale all'ingresso dell'unità PVXp Sub in vari modi.
Il connettore jack (4) fornisce un ingresso bilanciato di livello di linea, permettendo l'utilizzo di un jack TRS
(ring-tip-sleeve) da 1/4" tipo telefonico o un jack XLR maschio. Certamente, un jack telefonico da 1/4" non
bilanciato può essere utilizzato, ma non avrà il vantaggio di proteggere connessioni bilanciate da interferenza
esterna, come effetto "hum" e RFI.
Non collegare cavi ai connettori mentre l'unità è accesa e la manopola del volume è alzata! Mentre un cavo
dotato di jack mono standard da 1/4" funziona correttamente e il circuito d'ingresso bilanciato del jack di
ingresso fornisce reiezione delle interferenze, un cavo bilanciato dotato di jack TRS da 1/4" o connettore XLR
offriranno prestazioni e reiezione delle interferenze superiori.
Page 62

A volte, in presenza di critici problemi di interferenza, potrebbe risultare utile disconnettere lo schermo di
massa dai cavi bilanciati (Pin #1 di un XLR) collegati all'unità PVX™p Sub. Ciò può essere effettuato in modo
semplice, attivando l'interruttore Ground Lift integrato nel PVXp Sub. Controllare attentamente le variazioni
all'ingresso, avendo sempre cura di azzerare il volume prima di connettere o disconnettere cavi o di effettuare
modifiche di terra.
Si raccomanda l'utilizzo di cavi di prima classe per l'unità PVX
™
p Sub in quanto hanno migliore schermatura
e sono realizzati con materiali di migliore qualità, offrendo maggiore affidabilità a lungo termine. La migliore
opzione è un cavo bilanciato schermato non più lungo del necessario per raggiungere il PVXp Sub. È
solitamente buona norma lasciare un certo gioco sui cavi collegati all'ingresso dell'unità PVXp Sub e assicurare
i cavi al suolo con del nastro o utilizzando guide protettive, in modo da evitare inciampi e strattoni verso l'unità
PVXp Sub quando l'altoparlante è fissato all'estremità del palo.
REGOLAZIONE CONTROLLO LIVELLO
L'unità PVXp Sub è dotata di un controllo del livello (6) che ne permette l'utilizzo per un'ampia gamma di
applicazioni. Con il controllo di livello regolato completamente in senso orario, il guadagno è al massimo e la
sensibilità di ingresso è di 0,24 V RMS per un livello massimo di uscita.
Si raccomanda che il controllo di livello PVXp Sub sia quanto più vicino possibile alla posizione ore 12, o un
guadagno in pre-amplificazione di 0 dB. A questa impostazione, la sensibilità di ingresso è di circa 2.4 volt RMS
per uscita. Il PVXp Sub corrisponderà ora in maniera più fedele ad un tipico ingresso di amplificatore di potenza.
Se il mixer segnala clipping sui segnali di uscita, non viene utilizzata in maniera pulita l'intera potenza dell'unità
PVXp Sub. Il clipping del segnale prima che raggiunga l'unità PVXp Sub non rappresenta una condizione
ottimale. Ridurre il livello di uscita del mixer ed aumentare il livello dell'unità PVXp Sub.
L'amplificatore dell'unità PVXp Sub è dotato di circuito DDT
del PVXp Sub DDT . Nel caso in cui il suono sia fortemente compresso, controllare questo indicatore: se
lampeggiano in ROSSO piuttosto di frequente, allora il livello di uscita del mixer (o il livello dell'unità PVXp Sub)
dovrà essere ridotto.
™
e di indicatore LED che indica l'attivazione
Quando si accende il sistema audio, assicurarsi di accendere dapprima tutte le apparecchiature elettroniche
a monte, e poi l'unità PVXp Sub, avendo provveduto a ruotare la manopola di livello completamente in senso
antiorario (guadagno azzerato). Iniziare il controllo dei livelli partendo con il livello di uscita del mixer azzerato,
e aumentandolo gradualmente, mantenendo il livello dell'unità PVXp Sub impostato come desiderato (si
raccomanda di cominciare da un terzo della corsa totale).
Si sconsiglia normalmente di impostare il(i) controllo(i) del livello dell'unità PVXp Sub al massimo, controllando
il livello generale dal mixer, in quanto questo approccio tende ad amplificare eccessivamente il rumore. La
pratica migliore è quella di portare un segnale "caldo" (ad alta potenza) dal mixer all'unità PVXp Sub, ed
aumentare il livello su PVXp Sub solo quanto necessario per raggiungere l'uscita desiderata. Se si segue questo
approccio è necessario verificare che l'uscita del mixer non raggiunga il clipping.
CAVI DA USCITE PASSO-ALTO (11 & 12)
Il metodo preferito per collegare un sistema altoparlante satellite full-range alle uscite passo-alto di PVXp Sub
(11 & 12), è utilizzare un cavo XLR bilanciato non più lungo del necessario per raggiungere in modo comodo il
sistema altoparlante satellite.
Se l'altoparlante satellite è sulla parte alta del palo al di sopra del PVXp Sub, un cavo da 6 piedi sarà a piena
lunghezza. Può essere anche utilizzato un cavo da 10 o 20 piedi, ma cavi più lunghi di questi consentiranno
solo maggiore possibilità di interferenze e la perdita di informazioni ad alta frequenza. Si raccomanda l'utilizzo
di cavi di prima classe per l'unità PVXp Sub, in quanto hanno migliore schermatura e sono realizzati con
materiali di migliore qualità, offrendo maggiore affidabilità a lungo termine. . È solitamente buona norma
lasciare un certo gioco sui cavi collegati all'uscita dell'unità PVXp Sub e assicurare i cavi al suolo con del
nastro o utilizzando guide protettive, in modo da evitare inciampi e strattoni verso l'unità PVXp Sub quando
l'altoparlante è fissato all'estremità del palo.
IMPOSTAZIONI RACCOMANDATE PER L'UTILIZZO DI PVXP SUB CON GLI ALTOPARLANTI ATTIVI
SERIE PVX
L'ubicazione ideale per il posizionamento di altoparlanti full-range serie PVX
PVXp Sub. In tale condizione, le seguenti impostazioni forniranno i migliori risultati nella regione crossover e
bilanciamento del tono.
P
™
p attivi è l'estremità di un palo
Si noti che le uscite XLR (11 & 12) sono state bufferizzate a 12 dB per consentire agli ingressi XLR su PVXp 12 e
PVXp 15 di essere usati. Normalmente, questi sono considerati ingressi livello mic, ma con le uscite PVXp Sub
bufferizzate, l'utilizzo degli ingressi XLR sugli altoparlanti attivi PVXp è possibile.
Page 63

PVXp 10
Interruttore polarità su Sub (7): Normale o IN
Crossover Frequency Control (9): Da ore 12 a completamente in senso orario. Ciò rappresenta una gamma da circa 110 Hz a
160 Hz per il punto di crossover. Impostazione ottimale raccomandata è posizione completamente in senso orario.
Controlli di livello (6): Controllo livello PVXp
™
Sub a ore 12 (0 dB), controllo livello PVXp10 a ore 12
PVXp 12
Interruttore polarità su Sub (7): Normale o IN
Crossover Frequency Control (9): Da ore 12 a completamente in senso orario. Ciò rappresenta una gamma da circa 110 Hz a
160 Hz per il punto di crossover.
Impostazione ottimale raccomandata è impostare due tacche dopo le ore 12.
Controlli di livello (6): Controllo livello PVXp sub a ore 12 (0 dB), controllo livello PVXp 12 a - 2 tacche prima delle ore 12
PVXp 15
Interruttore polarità su Sub (7): Normale o IN
Crossover Frequency Control (9): Da ore 12 a completamente in senso orario. Ciò rappresenta una gamma da circa 110 Hz a
160 Hz per il punto di crossover.
Impostazione ottimale raccomandata è impostare a ore 12.
Controlli di livello (6): Controllo livello PVXp Sub a ore 12 (0 dB), controllo livello PVXp 12 a - 2 tacche prima delle ore 12
ATTENZIONE! L'IMPOSTAZIONE DEL CONTROLLO DI FREQUENZA CROSSOVER TROPPO BASSA CONSENTE ALL'ALTOPARLANTE
SATELLITE DI ESSERE SOVRACCARICATO DI BASSI PROFONDI A SPL ELEVATO!
L'impostazione troppo bassa del controllo NON aumenta l'uscita di bassi profondi del PVXp Sub, un'impostazione da media
(ore 12) ad alta funziona meglio per la maggior parte degli altoparlanti.
Se gli altoparlanti della serie PVXp non sono impostati al di sopra del Subwoofer sul palo, le impostazioni dell'interruttore
di polarità possono essere diverse da quelle fornite qui. Il Crossover Frequency Control può necessitare di essere impostato
a un punto più basso affinché il Subwoofer e i satelliti siano ben sommati nella regione crossover. Le impostazioni illustrate
in precedenza funzionano al meglio quando l'altoparlante satellite e il Subwoofer sono vicini, ed essenzialmente alla stessa
distanza dal pubblico.
IMPOSTAZIONE DEI CONTROLLI PVXP SUB PER USO CON ALTRI ALTOPARLANTI SATELLITE
Crossover Frequency Control (9): In generale, per gli altoparlanti full-range più piccoli da utilizzarsi come satellite, impostare
il Crossover Frequency Control (9) a una frequenza più alta. Per altoparlanti full-range più grandi, impostare il Crossover
Frequency Control (9) a una frequenza più bassa. L'impostazione del Crossover Frequency Control molto al di sotto della
posizione a ore 12 non sarà necessaria per la maggior parte del tempo, in quanto una frequenza di crossover inferiore a 100
Hz non consentirà a PVXp Sub e all'altoparlante satellite di aggiungersi molto bene in questa regione di crossover.
Interruttore di polarità (7): Cercare di modificare l'impostazione Interruttore di polarità avanti e indietro per ciascuna
frequenza di crossover selezionata, in modo da terminare quale posizione dell'interruttore fornisce la migliore uscita di
bassi nella regione crossover
Controlli di livello (6): Iniziare con Controllo livello PVXp Sub a ore 12 e regolare il sistema altoparlante satellite al livello
corrispondente. Si noti che se il Subwoofer può essere sentito come fonte audio separata in modo distinta, probabilmente il
livello impostato è troppo alto.
IMPOSTAZIONE CONTROLLO MIGLIORAMENTO BASSI KOSMOS® C (10)
Il controllo di miglioramento bassi Kosmos® C può essere un'estensione apparente dei bassi e uscita per il suono
riprodotto, soprattutto quando il programma ha in contenuto significativo al di sotto della frequenza di cut-off di PVXp Sub.
Quando appropriato, un uso giudizioso può migliorare il godimento della musica e aggiungere un effetto "punch and boom"
al mix. Tuttavia, un'impostazione del controllo troppo alta rispetto al livello ottimale può comportare una percezione di
distorsione notevole o minore chiarezza nel suono dei bassi. Raramente sarà utile portare il controllo al massimo.
L'uso tipico riguarderà un'impostazione della manopola di controllo in un punto tra Off (completamente in senso antiorario)
e ore 12 (a metà). Quindi l'effetto aggiunto è più soffice e meno intrusivo durante alcuni momenti della musica, mentre
continua a fornire un miglioramento della musica in generale.
Page 64

Si noti che a impostazioni completamente in senso orario, il guadagno effettivo del Subwoofer è aumentato, quindi se prima
era sul bordo del clipping, ora l'aumento del Bass Enhance Control può causare una sua andata nel clipping.
DISCONNESSIONE DELL'UNITÀ PVX
Si consiglia di spegnere l'unità utilizzando l'interruttore di alimentazione (3) prima di scollegare il cavo di alimentazione.
Questo minimizza gli stress dovuti ai transitori di spegnimento negli amplificatori di potenza e nei trasduttori.
™
P SUB DALLA RETE CA
RISOLUZIONE PROBLEMI
NESSUN SEGNALE DI USCITA
Prima di tutto, assicurarsi che l'unità sia alimentata ed accesa. Accertarsi che il LED sul modello amplificatore di potenza è
illuminato.
In caso contrario, accertarsi che l'interruttore di accensione (3) sia in posizione ON e verificare la corretta connessione del
cavo di alimentazione IEC (2) facendo attenzione a che sia sia completamente inserito e posizionato. Assicurarsi che il cavo
di alimentazione AC sia collegato ad una presa di corrente AC funzionante.
Infine, controllare l'interruttore (1). (Consultare la sezione Pannello posteriore: sezione Interruttore per le precauzioni di
sicurezza.)
Una volta accertato che l'unità sia alimentata correttamente in AC, verificare che l'unità PVX
il segnale in ingresso. Scollegare temporaneamente il cavo utilizzato per l'ingresso e collegarlo ad un altro dispositivo in
grado di riprodurre il segnale (ad esempio, un amplificatore dotato di un altoparlante). Se si riesce in quest'ultimo modo a
riprodurre il segnale, assicurarsi che tutti i controlli di livello siano impostati a livelli opportuni (tra un terzo e metà).
Se l'unità PVXp Sub è stato sottoposto a luce solare diretta o calore eccessivo, potrebbe essere stato innescato il dispositivo
di protezione termica integrato. In tal caso, spegnere l'unità PVXp Sub e lasciar raffreddare l'unità per un periodo di tempo
sufficiente.
™
p Sub riceva correttamente
Se non si ottiene ancora alcun segnale di uscita, si prega di rivolgersi al proprio rivenditore autorizzato Peavey o al Peavey
International Service Center.
RONZIO O RUMORE
Nel caso in cui l'unità PVXp Sub produca ronzio o rumore, il problema potrebbe essere legato alla presa di AC utilizzata.
Provare a collegare l'unità PVXp Sub ad una presa di corrente diversa. Nel caso circuiti o interruttori differenziali diversi
vengano utilizzati per il mixer e per l'unità PVXp Sub, è talvolta possibile che si osservino problemi di rumore. A meno che
risulti scomodo, è consigliabile utilizzare la stessa presa a muro ed interruttore per alimentare sia il mixer che il diffusore
attivo.
Assicurarsi di aver utilizzato cavi schermati per portare il segnale agli ingressi dell'unità PVXp Sub. I cavi per altoparlanti con
jack da 1/4" sono più inclini a causare problemi di rumore rispetto a cavi schermati.
I ronzii possono essere dovuto a loop di massa. Potrebbe risultare utile disconnettere lo schermo di massa (Pin #1) dai cavi
bilanciati collegati all'unità PVXp Sub. Ciò può essere effettuato in modo semplice, attivando l'interruttore Ground Lift (10)
integrato nel PVXp Sub. Controllare attentamente le variazioni all'ingresso, avendo sempre cura di azzerare il volume prima
di connettere o disconnettere cavi o sollevare lo schermo di terra all'estremità del Sub.
Verificare che eventuali attenuatori per luci non siano collegati allo stesso circuito dell'unità PVXp Sub del mixer o qualsiasi
dispositivo sorgente. Nel caso siano presente attenuatori per luci, potrebbe essere necessario impostare tali dispositivi su
potenza massima o spegnerli per poter eliminare o ridurre il ronzio. Questo è un problema di interferenza tipico dei cablaggi
in AC e degli attenuatori per luci, e non un difetto di progettazione dell'unità PVXp Sub.
Il terzo cavo (connessione di terra) del connettore di alimentazione AC non deve MAI essere rimosso o spezzato, in quanto
questo può comportare rischi di sicurezza.
SUONO DISTORTO O CONFUSO
Assicurarsi innanzitutto che il mixer (la sorgente del segnale) non sia in clipping o sovraccarico. Assicurarsi che il controllo
di livello (6) dell'unità PVXp Sub non sia impostato su un livello troppo basso. Verificare che i connettori di ingresso siano
completamente inseriti nella presa di ingresso sul pannello posteriore dell'unità PVXp Sub. Assicurarsi di non aver collegato
l'amplificatore al jack di ingresso dell'unità PVXp Sub. Se si utilizza una prolunga per alimentare l'unità in AC, assicurarsi
che sia capace di condurre una corrente sufficiente e che non venga utilizzata per fornire corrente ad altri dispositivi.
L'unità PVXp Sub è dotata di un boost di bassi integrato per estendere e sfumare la naturale risposta degli altoparlanti del
sistema, quindi richiede, se presente, un piccolo EQ aggiuntivo. Nel caso in cui livelli di bass boost o di spinta degli alti
siano applicati esternamente rispetto al PVXp Sub, si potrebbe verificare sovraccarico prematuro del segnale a SPL elevati.
Ridurre i livelli di EQ di dispositivi esterni (mixer, rack) e verificare se questo elimina la distorsione.
Page 65

Infine occorre prendere atto che anche se l'unità PVXp Sub è un apparecchiatura ad alta potenza, possiede
anch'essa dei limiti, e potrebbe necessitare di ulteriori unità Subwoofer attive per poter fornire potenza sonora
o copertura sufficiente. In questo caso, provare ad abbassare leggermente i livelli del mixer e verificare se il
problema viene risolto. Nel caso in cui i problemi persistano anche dopo aver seguito tutti gli accorgimenti
elencati e aver eseguito altri rilevanti controlli, annotare attentamente tutte le condizioni osservate e rivolgersi
al proprio rivenditore Peavey per ottenere una consulenza.
CURA E MANUTENZIONE
L'unità PVXp Sub è un prodotto robusto e durevole e offrirà anni di affidabile funzionamento se sottoposto
ad adeguata manutenzione. Seguire le regole del buon senso e leggere le avvertenze di sicurezza per evitare
condizioni operative pericolose.
L'unità deve essere scollegata dalla fonte di alimentazione a corrente alternata prima di svolgere qualsiasi tipo
di lavoro su di essa. Segnalare tutti gli interventi di manutenzione al personale di assistenza qualificato.
LUCE E CALORE SOLARE
Evitare l'esposizione prolungata alla luce solare diretta, onde evitare surriscaldamento e spegnimento termico.
Condizioni operative eccessivamente calde potrebbero causare uno spegnimento termico.
Non riporre l'unità in ambiente estremamente caldi o freddi o estremamente umidi. Lasciare sempre che l'unità
raggiunga la temperatura ambiente prima dell'utilizzo.
PULIZIA
Mai pulire l'unità PVXp Sub mentre è collegata o accesa! Una volta scollegata completamente l'unità dalla
fonte di alimentazione, utilizzare un panno asciutto per rimuovere terreno o altra sporcizia. Non usare mai
solventi aggressivi sull'unità PVXp Sub, in quanto potrebbero danneggiare il cabinet. Evitare che fluidi di
qualsiasi tipo penetrino all'interno dell'unità PVXp Sub.
RITOCCO
Per un ritocco di qualsiasi danneggiamento delle finiture di vernice nera del PVXp Sub, è possibile
utilizzare una vernice nera spray come Peavey Commercial Sound, Black Touch-Up Paint, Peavey codice
articolo 00052110. Seguire le istruzioni sulla bomboletta per sicurezza e migliori risultati.
VERIFICA DI SICUREZZA DEI COMPONENTI MECCANICI
Dopo i primi mesi di utilizzo, e successivamente su base regolare, controllare che i componenti meccanici
del PVXp Sub conservino un'adeguata tenuta, comprese le viti del pannello posteriore e le viti che tengono
insieme la griglia e il cabinet.
L'unità è soggetta ad una grande quantità di vibrazioni, comportando il rischio che tali viti si allentino con
l'utilizzo.
Page 66

DIMENSIONI
16.749
8
7
6
5
4
143.94
5.667
219.66
8.648
219.66
8.648
212.71
8.375
220.14
292.10
11.500
8.667
357.30
14.067
40.41
1.591
613.96
24.172
601.50
23.681
425.41
469.54
18.486
74.25
2.923
34.06
1.341
Page 67

DIMENSIONI
2
1
G
F
E
D
C
B
219.66
8.648
143.94
5.667
219.66
8.648
Utilizzo tipico
Uscita Ingressi
Tastiera
Mixer
Mic dinamico (non
elettrorete)
Chitarra
220.14
8.667
PVXp 12 o PVXp 15
Uscita Ingressi
Mixer
Mic dinamico (non
elettrorete)
Tastiera
Chitarra
PVXp 12 o PVXp 15
PVXp 12 o PVXp 15
Ingresso al
1° Sub
Connessione Daisy-Chain (più sub)
Page 68

SPECIFICHE
Intervallo di frequenza (-10 dB, metà spazio):
43 Hz – 180 Hz*
*CW completo controllo crossover
Risposta in frequenza, 1 metro su asse, segnale sinusoidale
spazzato in ambiente anecoico (-6 dB):
48 Hz – 138 Hz*
*CW completo controllo crossover
Valore nominale della potenza degli amplificatori:
800 Watt di potenza di picco disponibile
Potenza continua: 470 Watt in 4 Ohm
Impedenza ingresso elettronica (Nominale):
Linea In: 2.2 k ohm bilanciati (XLR o 1/4"), 10 k ohm non
bilanciati 1/4"
Livello pressione sonora, 1 Watt, 1 metro in ambiente
anecoico:
97 dB SPL
Livello massimo di pressione sonora (1 m):
123 dB SPL continui
127 dB SPL picco
Componenti trasduttori:
woofer di potenza premium da 15", bobina mobile da 3"
Crossover elettronico
Continuamente variabile da 90 Hz a 180 Hz.
Incl. flusso basso: 24 dB/ottava
Incl. flusso uscita alto: 18 dB/ottava
Inclinazione filtro infrasonico:
36 dB/ottava
Risposta in frequenza nominale dell'amplificatore:
+0, -3 dB da 20 Hz a 20 kHz
Ronzio e rumore:
Superiore a 90 dB inferiore alla potenza nominale
Intervallo dinamico DDT:
Superiore a 21 dB
THD e IM:
generalmente meno dello 0,5 %
Fattore di attenuazione:
maggiore di 100 @ 1000 Hz, 4 ohm
™
Requisiti di potenza del sistema Peavey PVX
p Sub:
160 Watt nominale, 100-120 VCA 50-60 Hz (Nazionale)
220-240 VCA 50-60 Hz (Esportazione)
Frequenza di risonanza della cassa:
50 Hz
Connessioni di ingresso:
Un connettore combo femmina XLR /Jack 1/4" bilanciato o
non bilanciato.
Connessioni di uscita:
Due uscite passo-alto, bufferizzate elettricamente
indipendentemente, con pad livello uscita commutabile.
Un'uscita Full Range, bufferizzata elettricamente.
Controlli:
Livello: Fornisce una regolazione del guadagno di +/- 20 dB
Crossover Frequency Adjust: Regola la frequenza di
crossover elettrica da 90 Hz a 180 Hz, continuamente
variabile.
®
Kosmos
C: Fornisce miglioramento dei bassi.
Polarity Switch: Fornisce una polarità di subwoofer da 0° o
180°
Ground Lift Switch: Per ingresso
Materiali e finitura del cabinet:
Alloggiamento verniciato acrilico nero con MDF da 15 mm, con
griglia forata in acciaio rivestita con vernice in polvere che
copre l'intera lunghezza.
Dimensioni (A x L x P)
In posizione d'uso:
24.25" x 16.75" x 23.00"
(ruote non incluse, prof. 4.06”)
616 mm x 425 mm x 584 mm
In posizione di trasporto:
27.06" x 16.75" x 24.25"
687 mm x 425 mm x 616 mm
Peso netto:
76 libbre. (34,5 kg)
Disposizioni di montaggio:
Supporto palo da 1 3/8"con palo filettato M20 per montaggio
in verticale su altoparlante idoneo sulla parte superiore del
Sub e quattro piedi in gomma grandi sul fondo per uso su
pavimento.
Page 69

SVENSKA
PVX™p Sub
Tack för att du har köpt den aktiva Peavey® PVX™p Sub. PVXp Sub har en extremt tillförlitlig kraftsektion med totalt 800
watt tillgänglig toppeffekt med DDT™-kompression. Denna aktiva högtalarlåda har också en 15-tums kraftfull woofer med en
3-tums högtalarspole. PVXp Sub har en en balanserad ingång via en kombinationskontakt som kan ta emot både balanserad
TRS 1/4 -tum-insignal och balanserad XLR-insignal. Det finns två balanserade thru lågpass XLR-utgångar, och en fullregister
XLR-utgång. Det finns en justerbar nivåkontroll, och en kombinerad LED-indikator, som lyser när strömmen är på och när
”soft-limiting” DDT-kretsen är aktiverad.
Funktione r
• Ventilerad aktiv bas subwoofer-högtalarlåda
• 800 watt tillgänglig toppeffekt
• 15-tums kraftfull woofer
• Effektförstärkaren har forcerad luftkylning för maximal tillförlitlighet
• Internt linjenivå lågpass/högpass delningsfilter
• Fullt justerbar Kosmos
• XLR/1/4-tum kombinationsingång
• Två högpass XLR-utgångar, och en fullregister thru XLR-utgång
• Polaritetsomkopplare för polaritetsväxling av subwoofern
• Ground lift för att lyfta kabelskärmningen från jorden
• Kraftiga låsbara hjul med dämpade lager
• Heltäckande kraftigt perforerat stålgaller
• Stålhandtag
• Kompakta mått för en 15-tums wooferbaserad sub
• Gängat stativfäste med högtalarstativ ingår
®
C för ökad baseffekt
BESKRIVNING
Peavey® PVXp Sub är ett kompakt, ventilerat aktivt subwoofersystem som använder en 15-tums kraftfull woofer, kopplad till
en effektförstärkare, med 800 watt tillgänglig toppeffekt. Det heltäckande svarta perforerade stålgallret ger skydd och ett
professionellt utseende, tillsammans med de stabila stålhandtagen och kraftiga 4-tum höga hjul för transport.
Internt linjenivå delningsfilter med två högpassutgångar, oberoende elektriskt buffrade; och en fullregister thru-utgång, också
elektriskt buffrad.
Peavey’s exklusiva Kosmos
maximal flexibilitet.
Ett gängat stativmonteringssystem ger en stark och stabil plattform för att montera ett lämpligt utrustat högtalarsystem
ovanför subwoofern. Den aktiva tvåvågs högtalarserien PVXp fungerar utmärkt tillsammans med PVXp Sub.
Det aktiva högtalarförstärkarsystemet i PVXp Sub som levererar effekten är en extremt pålitlig fläktkyld enhet med låg
distorsion som ger systemet totalt 800 W toppeffekt. Förstärkarens strömförsörjning är av växlingsläge-typ, för låg vikt och
hög effektivitet. Förstärkaren har vår DDT-kompression, som praktiskt taget helt eliminerar den hörbara förstärkarklippningen.
Kylningen utförs av en tyst fläkt, för tillförlitlig användning under alla förhållanden.
Inmatning sker via en kombinerad XLR-honkontakt och 1/4 -tum TRS-telefonkontakt med balanserad inmatning till preamp/
EQ-elektroniken, och nivåkontroll.
Två oberoende högpass-utgångar ger en buffrad och balanserad utsignal för ett par satellithögtalare som sköter det höga
registret i musiken, via ett par XLR-hankontakter.
®
C basförstärkare för extra baseffekt från programmaterial med mycket låg frekvens ingår för
Page 70

En fullregister thru-utgång har en XLR-hankontakt. Dessa utgångar möjliggör sammankoppling med ytterligare
högtalarsystem, eller utmatning av signalen till andra enheter, etc. På ingångspanelen finns även en panel för
extra funktionsmoduler som till exempel trådlös mottagare, digital audioinmatning eller 10-bands EQ, etc.
ANVÄNDNINGSOMRÅDEN
Peavey PVX™p Sub har en mängd användningsområden, såsom att utöka basprestandan hos mindre fullregister
högtalarssystem för ljudförstärkning, PA-utrustning, side fill-system, karaoke eller musikuppspelning.
En typisk signalkälla för linjenivåingångarna på Peavey PVXp Sub är en mixningskonsol (mixer) för
ljudförstärkning eller utgångar från CD-spelare, MP3-spelare eller kassettdäck. Den högpassfiltrerade signalen
från PVXp Sub skickas sedan till ett fullregister aktivt högtalarsystem, vilket minskar belastningen från djup bas
från detta högtalarsystem.
BAKPANEL, NEDERDEL
1
2
3
AUTOMATSÄKRING (1)
Enheten är AC-strömledningsskyddad från överbelastningar och felförhållanden med en 5 A automatsäkring.
Denna säkring ska inte utlösas om det inte finns ett fel i förstärkarkretsen eller ett onormalt driftförhållande,
som orsakar strömöverbelastning. Om säkringen utlöses, ställ in strömbrytaren (3) på OFF, och återställ
säkringen efter att ha väntat en stund tills den har kylts ner.
Om automatsäkringen utlöses hoppar mittenknappen ut ungefär en halv centimeter och den kan återställas
genom att tryckas uppåt och inåt. Under normala (ej utlöst) förhållanden är mittenknappen relativt platt.
Om enheten fortsätter att lösa ut automatsäkringen, eller om den löses ut omedelbart efter att ha återställts,
fortsätt inte återställa den. Ta med systemet till ett kvalificerat Peavey-servicecenter för reparation.
IEC-NÄTSLADDSANSLUTNING (2)
Detta uttag är avsett för IEC-strömkabeln (medföljer) som ger AC-ström till enheten. Det är mycket viktigt att du
ser till att PVXp Sub strömförsörjs med korrekt AC-spänning. Du hittar rätt spänning för PVXp Sub tryckt bredvid
IEC-kabeln (ström) på baksidan av enheten.
Läs denna guide noggrant för att säkerställa din och utrustningens säkerhet. Bryt aldrig av jordstiftet på någon
utrustning. Det finns där för din säkerhet. Om uttaget som används inte har något jordstift måste en lämplig
jordningsadapter användas och den tredje ledningen jordas ordentligt. För att förhindra risken för elektriska
stötar eller brand, se alltid till att mixern och all tillhörande utrustning är ordentligt jordad.
Page 71

STRÖMBRYTARE (3)
Denna vippkontakt ger AC-ström till PVX™p Sub när den slås på (ON). Läget ON är med vänstra sidan av
kontakten ”intryckt” eller nästan i höjd med bakpanelen.
BAKPANEL, ÖVERDEL
LÖSTAGBAR PANEL FÖR EXPANSIONSMODUL (TILLVAL)
Denna panel ska ENDAST tas bort vid installation av någon av de många olika expansionsmoduler (tillval) som
snart kommer att finnas tillgängliga för PVXp Sub.
Dessa expansionsmoduler (tillval) fungerar antingen tillsammans med de insignaler som redan finns på PVXp
Sub, eller så ger de en linjefunktion för insignalen, som till exempel 10-band EQ, etc. Fråga din Peavey®-
återförsäljare om tillgänglighet och priser.
Om du inte ska installera en sådan expansionsmodul, ta inte bort denna lucka. Instruktioner om installation av
expansionsmodulen medföljer varje expansionsmodul, och är specifika för just den modulen.
9
5
6
11-12
7
4
13
8
10
TOPP – FUNKTIONSKONTROLLER, INGÅNGAR & UTGÅNGAR
INPUT (4)
Linjenivåingången är av balanserad typ med medium-impedans. Kontakten är en kombination av
XLR-honkontakt och 1/4 -tum TRS-kontakt.
LED (5)
Lyser GRÖNT när strömbrytaren är på och ström finns
Den blir RÖD när effektförstärkningen aktiverar DDT
acceptabelt, men inte konstant ljus, då blir distorsionen kraftig.
™
”soft limiting”-kretsen. Enstaka blinkningar är
Det finns också en LED på den främre baffeln på Sub som lyser BLÅTT när ström finns, och blir RÖD när effekt-
förstärkningen aktiverar DDT ”soft limiting”-kretsen.
LEVEL (6)
Styr förstärkningen eller utmatningsnivån på insignalen. Används för att direkt ställa in systemutmatningsnivån
för en given insignal.
Normal användning är med vredet inställt halvvägs, vilket motsvarar förstärkningen för en normal effektför-
stärkningsinmatning.
Page 72

POLARITY SWITCH (7)
Ger antingen 0 grader eller 180 grader sub woofer-polaritet
Detta reglage används tillsammans med Crossover Frequency Control (9) för att ge bästa matchning mellan
subwooferns utmatning och satellithögtalarens utmatning i delningsfilterområdet.
GROUND LIFT SWITCH (8)
Används för att lyfta kabelskärmningen från chassijorden, för att bryta potentiella jordloopar och minska
brumljud.
CROSSOVER FREQUENCY CONTROL (9)
Varierar delningsfrekvensen mellan subwoofern och högpassutmatningen som sänds till satellithögtalarna (11 &
12). Varierar den elektriska delningsfrekvensen från 90 Hz till 180 Hz.
VARNING! OM DENNA INSTÄLLNING STÄLLS IN FÖR LÅGT KAN SATELLITHÖGTALAREN ÖVERBELASTAS AV DJUP
BAS!
™
Att ställa in reglaget lägre ökar INTE utmatningen av djup bas från PVX
inställning fungerar bäst för de flesta högtalare.
p Sub. Ett mellanläge (kl. 12) till högre
KOSMOS® C BASFÖRSTÄRKNING (10)
Ger möjlighet att lägga till basharmonier för att förbättra uppfattningen av djup bas i programmaterialet utan att
överbelasta subwooferhögtalaren.
Detta reglage bör användas försiktigt, och om det vrids upp helt kan programmaterialet låta förvrängt eller
onaturligt.
HÖGPASSUTGÅNGAR (11 & 12)
Dessa utgångar ger en högpassfiltrerad signal att mata till ett fullregister aktivt högtalarsystem, såsom PVXp 10,
PVXp 12 eller PVXp 15. Andra fullregister aktiva högtalare kan användas, och fullregister passiva högtalare kan
användas tillsammans med en lämplig effektförstärkare för att driva dem.
Dessa utgångar är elektroniskt buffrade och isolerade från inmatningen och från varandra, och deras nivå
påverkas inte av PVXp Sub nivåkontroll (6).
THRU FULLREGISTERUTGÅNG (13)
Denna utgång ger en fullregistersignal att sända till andra enheter som kräver en fullregistersignal, såsom en
annan PVXp Sub eller en annan linjenivå-ljudenhet. Denna utgång är elektroniskt buffrad och isolerad från
inmatningen och från andra utgångar.
ANVÄNDARINSTRUKTIONER
VARNINGAR
Enheten måste kopplas bort från AC-strömförsörjningen innan arbete utförs på den. All service ska utföras av
kvalificerad servicepersonal.
Den bakre plattan kan bli varm. Blockera inte och täck inte över fläkten eller luftutloppen från ventilationen.
Det måste finnas minst 10 cm utrymme bakom fläkten. Låt inte luftflödet blockeras av föremål såsom gardiner
eller draperier, isolering eller liknande. Vi rekommenderar att baksidan av PVXp Sub inte placeras i ett stängt
utrymme eller ett utrymme utan kylande luftflöde.
Anslut INTE ingångarna på PVXp Sub till utmatningen från en effektförstärkare. Inmatningen är avsedd att drivas
från en signal med linjenivå.
Ta INTE bort de skyddande metallgallren.
VARNING! PVXp Sub är mycket effektiv och kraftfull! Detta ljudsystem kan ge permanenta hörselskador! Var
mycket försiktig när du ställer in den totala volymnivån!
Page 73

Den uppfattade ljudnivån hos PVX™p Sub kan vara förledande på grund av dess klara, rena ljudutmatning och
frånvaron av höga frekvenser. Frånvaron av distorsion eller uppenbara fel kan innebära att ljudnivån verkar
mycket lägre än den verkligen är. Detta system har kapacitet för SPL över 127 dB vid 1 m från högtalaren!
PLACERA EN SATELLITHÖGTALARE UPPE PÅ PVX
™
P SUB
PVXp Sub har ett gängat stativfäste inbyggt uppe på enheten, och detta är avsett att passa för ett M20-gängat
stativ ungefär 80 cm långt eller kortare. Detta stativ är speciellt utvecklat för att användas med följande
högtalarsystem:
Peavey PVXp 10
Peavey PVXp 12
Peavey PVXp 15
Placera inte ett högre/större eller tyngre högtalarsystem än PVXp 15 på detta stativ, annars finns risk för skador
om det tippar och faller.
PVXp Sub måste placeras på ett fast och plant underlag, annars finns risk att den stativmonterade högtalaren
tippar och faller.
Det är bra om två personer kan hjälpas åt när högtalaren monteras på och tas bort från stativet. Det kan
vara svårt att ”trä på” och passa in stativkoppen i subwooferns stativ om man håller i högtalarsystemet på
armslängds avstånd.
När PVXp Sub och stativet används utomhus, fäst aldrig banderoller eller flaggor på stativet eller det
stativmonterade högtalarsystemet. Högtalaren kan då blåsa omkull i stark vind. Om det finns risk för starka
vindar kan det vara lämpligt att överväga att ta bort högtalaren från stativet för att förhindra att PVXp Sub och
den stativmonterade högtalaren blåser omkull.
ANSLUTA STRÖMFÖRSÖRJNINGEN TILL PVXP SUB
En ungefär 2 m lång AC-nätkabel med IEC-kontakt medföljer PVXp Sub. Om du använder en förlängningssladd
eller grenuttag med denna aktiva högtalare, se till att de är av hög kvalitet och har tillräcklig strömkapacitet
för att upprätthålla säkerheten och maximera effektutmatningskapaciteten hos PVXp Sub. För att få maximal
utmatning utan distorsion, anslut inga andra enheter till samma förlängningssladd som PVXp Sub är ansluten
till. Överskrid inte märkströmskapaciteten hos förlängningssladden med den totala summan av alla enheter
som är ansluten till den.
När du kopplar in PVXp Sub AC-kabel, se till att strömbrytaren är avstängd, och slå endast på den efter att
strömkabeln anslutits. Den inbyggda dämpningen aktiveras när stegen följs i rätt ordning.
SPECIELLT MEDDELANDE FÖR PERMANENT INSTALLATION
När PVXp Sub installeras används fasta strömkablar och en behörig elektriker ska kontaktas, för att säkerställa
att alla strömkablar uppfyller lokala lagar och förordningar. Vi rekommenderar också att en kabelklämma
monteras på höljet för att avlasta IEC-strömkabeln som ansluts till förstärkarmodulen vid (2) så att strömkabeln
inte kan dras ut eller vibrera loss.
ANSLUTA EN SIGNAL TILL PVXP SUB
Det finns många olika sätt att ansluta en signal till PVXp Sub.
Ingången (4) ger en balanserad linjenivåinsignal, vilket möjliggör användning av en 1/4 -tums TRS-teleplugg
eller en XLR-hankontakt. Naturligtvis kan även en obalanserad 1/4 -tum teleplugg användas, men den har inte
fördelen av balanserade anslutningars eliminering av yttre störningar, såsom brum och RFI.
Anslut inte kablar till uttagen när enheten är på (ON) och volymnivån är uppvriden! Även om en kabel
med standard 1/4 -tums monoteleplugg fungerar bra och de balanserande ingångskretsarna ger ett visst
störningsskydd ger en balanserad kabel med antingen en balanserad 1/4 -tums TRS-teleplugg eller XLR-plugg
överlägset bättre störningsskydd och prestanda.
Page 74

Ibland, om svåra störningsproblem förekommer, kan det hjälpa att lyfta skärmjordningen (Stift #1 på en XLR) för
en balanserad kabel vid PVX
™
p Sub-änden. Detta görs enkelt genom att aktivera Ground Lift-omkopplaren (10)
som är inbyggd i PVXp Sub. Kontrollera alla ändringar av inmatningen noggrant, vrid alltid ner volymnivån innan
kablar kopplas in eller ur, eller jorden lyfts.
Vi rekommenderar att kablar med hög kvalitet används för PVX™p Sub, då dessa oftast har bättre skärmning och
material och ger bättre tillförlitlighet under längre tid. Det bästa alternativet är en skärmad balanserad kabel
som inte är längre än nödvändigt för att nå PVXp Sub. Det är oftast en bra idé att lämna lite slack vid ingången
till PVXp Sub och också att tejpa kablarna eller dra dem i en kabelkanal, för att undvika att någon snubblar på
dem eller drar ner PVXp Sub när det sitter en högtalare uppe på dess stativ.
NIVÅKONTROLLJUSTERING
PVXp Sub är utrustad med en nivåkontroll (6) på inmatningen som underlättar användningen i många olika
situationer. Med nivåkontrollen vriden helt medurs är förstärkningen på maximal nivå, och ingångskänsligheten
är 0,24 V RMS för full märkuteffekt.
Vi rekommenderar att nivåkontrollen på PVXp Sub ställs in i närheten av kl. 12-positionen, eller 0 dB
förförstärkning. Med denna inställning är ingångskänsligheten ungefär 2,4 volt RMS för full märkuteffekt. PVXp
Sub matchar nu en typisk effektförstärkarinmatning.
Om mixerbordet indikerar klippning i dess utsignaler används inte all effektkapacitet hos PVXp Sub rent.
Att signalen klipps innan den når PVXp Sub är inte optimalt. Minska mixerns utmatningsnivå och vrid upp
nivåkontrollen på PVXp Sub.
Förstärkaren i PVXp Sub är utrustad med DDT
™
och LED-indikatorn visar när PVXp Sub DDT har aktiverats.
Om ljudet låter mycket komprimerat, titta på dessa indikatorer; om de blinkar RÖTT mer än då och då måste
drivnivån från mixern (eller nivåkontrollen på PVXp Sub) sänkas.
När du först slår på ljudsystemet, slå på all uppströms elektronik först, sedan PVXp Sub med dess nivåkontroll
vriden helt moturs (hela vägen ner). Börja kontrollera nivåerna med mixerns utgångsnivåer hela vägen nere, och
höj dem långsamt med nivåkontrollen på PVXp Sub inställd på önskad nivå (halvvägs upp rekommenderas till
att börja med).
Det är ingen bra idé att vrida upp nivåkontrollen på PVXp Sub hela vägen och sedan försöka styra nivån enbart
från mixern, eftersom man då tenderar att få en mängd brus. Det bästa sättet är att köra en ”het” signal från
mixern genom kabeln till PVXp Sub och sedan vrida upp nivåkontrollen på PVXp Sub endast så mycket som
behövs för att få önskad uteffekt. Med denna metod måste man kontrollera att mixern inte klipper utsignalen.
KABLAR FRÅN HÖGPASSUTGÅNGARNA (11 & 12)
Den rekommenderade metoden för att ansluta ett fullregister satellithögtalarsystem till högpassutgångarna (11
& 12) på PVXp Sub’s är att använda en balanserad XLR-kabel inte längre än nödvändigt för att nå satellithögta-
larsystemet.
Om satellithögtalaren sitter på ett stativ ovanför PVXp Sub är en 2 m kabel mer än tillräckligt lång. En kabel på 5
eller 7 meter kan också användas, men längre kablar än så tar bara upp mer brus, och börjar förlora högfrekven-
sinformation. Vi rekommenderar att kablar med hög kvalitet används för PVXp Sub, då dessa oftast har bättre
skärmning och material och ger bättre tillförlitlighet under längre tid. . Det är oftast en bra idé att lämna lite
slack vid ingången till PVXp Sub och också att tejpa kablarna eller dra dem i en kabelkanal, för att undvika att
någon snubblar på dem eller drar ner PVXp Sub när det sitter en högtalare uppe på dess stativ.
REKOMMENDERADE INSTÄLLNINGAR FÖR ATT ANVÄNDA PVXP SUB MED PVXP SERIES AKTIVA
HÖGTALARE
Den ideala placeringen av PVX™p-seriens fullregister aktiva högtalare är uppe på stativet på PVXp Sub. På
sådant kort avstånd ger följande inställningar bäst resultat i delningsområdet, och för tonbalansen.
Notera att XLR-utgångarna (11 & 12) har dämpats 12 dB för att XLR-ingångarna på PVXp 12 och PVXp 15 ska
kunna användas. Normalt anses dessa vara micnivå-ingångar, men med PVXp Sub-utgångarna dämpade kan
XLR-ingångarna på aktiva högtalare PVXp användas.
Page 75

PVXp 10
Polaritetsomkopplare på Sub (7): Normal eller IN
Crossover Frequency Control (9): Från kl. 12 till helt medurs. Detta representerar ett intervall från ungefär 110 Hz
till 160 Hz för delningspunkten. Rekommenderad optimal inställning är positionen helt medurs.
Nivåkontroller (6): PVXp™Sub nivåkontroll vid kl. 12 (0 dB), PVXp10 nivåkontroll vid kl. 12
PVXp 12
Polaritetsomkopplare på Sub (7): Normal eller IN
Crossover Frequency Control (9): Från kl. 12 till helt medurs. Detta representerar ett intervall från ungefär 110 Hz
till 160 Hz för delningspunkten.
Rekommenderad optimal inställning är inställd på två klick förbi kl. 12.
Nivåkontroller (6): PVXp sub nivåkontroll vid kl. 12 (0 dB), PVXp 12 nivåkontroll vid - 2 klick före kl. 12
PVXp 15
Polaritetsomkopplare på Sub (7): Normal eller IN
Crossover Frequency Control (9): Från kl. 12 till helt medurs. Detta representerar ett intervall från ungefär 110 Hz
till 160 Hz för delningspunkten.
Rekommenderad optimal inställning är inställd på kl. 12.
Nivåkontroller (6): PVXp Sub nivåkontroll vid kl. 12 (0 dB), PVXp 12 nivåkontroll vid - 2 klick före kl. 12
VARNING! OM CROSSOVER FREQUENCY CONTROL STÄLLS IN FÖR LÅGT KAN SATELLITHÖGTALAREN
ÖVERBELASTAS AV DJUP BAS VID HÖG SPL!
Att ställa in reglaget lägre ökar INTE utmatningen av djup bas från PVXp Sub. Ett mellanläge (kl. 12) till högre
inställning fungerar bäst för de flesta högtalare.
Om högtalare i PVXp-serien inte ställs ovanför subwoofern på stativet kanske inställningarna för polaritets-
omkopplaren måste vara annorlunda än de som ges här. Crossover Frequency Control måste kanske ställas
in på en lägre punkt så att subwoofern och satelliterna fungerar bra tillsammans genom delningsområdet.
Inställningarna ovan fungerar bäst när satellithögtalaren och subwoofern står nära varandra, och i princip på
samma avstånd från publiken.
STÄLLA IN PVXP SUB-KONTROLLERNA FÖR ANVÄNDNING MED ANDRA SATELLITHÖGTALARE
Crossover Frequency Control (9): I allmänhet, för mindre fullregisterhögtalare som används som satelliter,
ställ in Crossover Frequency Control (9) till en högre frekvensinställning. För större fullregisterhögtalare, ställ
in Crossover Frequency Control (9) till en lägre frekvensinställning. Att ställa in Crossover Frequency Control
långt under kl. 12-positionen behövs oftast inte, då en delningsfrekvens under 100 Hz inte låter PVXp Sub och
satellithögtalaren fungera bra tillsammans i delningsområdet.
Polaritetsomkopplare (7): Försök att ändra inställningen för polaritetsomkopplaren fram och tillbaka vid varje
vald delningsfrekvens, för att avgöra vilken position som ger mest baseffekt i delningsområdet.
Nivåkontroller (6): Börja med nivåkontrollen på PVXp Sub i kl. 12-positionen, och justera satellithögtalar-
systemet för att matcha dess nivå. Notera att om subwoofern kan höras som en distinkt separat ljudkälla så är
dess nivå förmodligen inställd för högt.
STÄLLA IN KOSMOS® C BASFÖRSTÄRKNING (10)
Kosmos
programmaterialet har mycket innehåll under PVXp Sub’s klippfrekvens.
När det är lämpligt kan riklig användning förbättra upplevelsen av musiken, och lägga till kraft och boom i
blandningen. Men om reglaget ställs in högre än den optimala nivån kan resultatet bli märkbar distorsion eller
mindre klart basljud. Det hjälper sällan att vrida upp reglaget hela vägen.
Typisk användning är att ställa in kontrollvredet någonstans mellan Av (helt moturs) och kl. 12 (halvvägs
upp). Den tillagda effekten är då mindre påträngande under vissa delar av musiken, men ger fortfarande en
välkommen förbättring av det totala ljudet.
®
C basförstärkning kan lägga till basförlängning och effekt till det reproducerade ljudet, speciellt när
Page 76

Notera att vid extrema inställningar medurs ökas subwooferns effektiva förstärkning, så att om den var på väg
att klippa förut så kan den börja klippa när Bass Enhance Control vrids upp hela vägen.
KOPPLA BORT STRÖMMEN TILL PVX
™
P SUB
Vi rekommenderar att du först stänger av enheten med strömbrytaren (3), och sedan kan strömkabeln kopplas
bort. Detta minskar stressen på effektförstärkarna och högtalarelementen från avstängningstransienter.
FELSÖKNING
INGET UTLJUD ALLS
Kontrollera först att enheten får ström och att den är PÅ. Kontrollera att lysdioden på effektförstärkaren lyser.
Om inte, kontrollera att strömbrytaren (3) är i läge på (ON) och att IEC-nätsladden (2) är ansluten ordentligt.
Kontrollera att AC-nätsladden är ansluten till ett fungerande eluttag.
Kontrollera slutligen automatsäkringen (1). (Se avsnittet Bakpanel: automatsäkring för säkerhetsinstruktioner.)
När du försäkrat dig om att enheten får AC-ström, kontrollera att PVX
™
p Sub får en signal. Koppla tillfälligt
bort kabeln som går till ingångarna och anslut den till någon annan enhet som kan reproducera signalen (till
exempel en effektförstärkare och högtalare). Om detta ger en signal, kontrollera att alla nivåkontroller som
används har vridits upp till lämplig nivå (mellan en tredjedel och halvvägs).
Om PVXp Sub har utsatts för direkt solljus eller kraftig värme kan det inbyggda värmeskyddet ha aktiverats.
Stäng i så fall av PVXp Sub och låt den svalna under tillräckligt lång tid.
Finns det fortfarande inget utljud, kontakta din auktoriserade Peavey-återförsäljare eller Peavey International
Service Center.
BRUM ELLER SURR
Om PVXp Sub producerar brum eller surr kan det orsakas av AC-uttaget. Prova att ansluta PVXp Sub till ett
annat eluttag. Ibland kan brum orsakas av att olika kretsar används för mixern och för PVXp Sub. Om det inte är
opraktiskt är det bäst att använda samma eluttag för att strömförsörja både mixern och den aktiva högtalaren.
Kontrollera att du använder skärmade kablar för att leda signalen till PVXp Sub’s ingångar. Om du använder
högtalarkablar med 1/4 -tums kontakter som ingångskablar istället för skärmade kablar är det större risk för
brum eller surr.
Brum kan vara jordloopsrelaterat. Det kan hjälpa att lyfta skärmjordningen (stift #1) på en balanserad kabel
i PVXp Sub-änden. Detta kan göras enkelt genom att aktivera Ground Lift-omkopplaren (10) som är inbyggd i
PVXp Sub. Kontrollera alla ändringar av inmatningen noggrant genom att först vrida ner nivåkontrollen innan du
ansluter och kopplar loss kablar, eller lyfter skärmjordningen vid subben.
Kontrollera så att inga dimmrar är inkopplade på samma krets som PVXp Sub, mixern eller någon källenhet.
Om dimmrar används kan det vara nödvändigt att vrida på dem helt, eller helt av, för att eliminera eller minska
brummet. Detta är ett typiskt interferensproblem för AC-ledningar/dimmrar, inte ett konstruktionsfel på PVXp Sub.
Mittledaren (jordstickproppen) på AC-kontakten ska ALDRIG tas bort eller brytas av, eftersom det skulle
innebära en potentiell säkerhetsrisk.
DISTORSION ELLER FUZZ
Kontrollera först att mixern (signalkällan) inte klipper eller överstyrs. Se till att nivåkontrollen (6) på PVXp
Sub inte har ställts in för lågt. Kontrollera att ingångskontakten är ordentligt isatt i ingången på bakpanelen
på PVXp Sub. Se till att ingen effektförstärkare har anslutits till ingången på PVXp Sub. Om du använder en
förlängningssladd för AC-strömmen till enheten måste du se till att den har tillräcklig strömkapacitet och att den
inte används för att ge ström till även någon annan enhet.
PVXp Sub har inbyggd basförstärkning för att förlänga och jämna ut den naturliga responsen från högtalarna
i systemet, så det krävs lite eller ingen ytterligare EQ. Om alltför mycket extra basförstärkning har lagts till
externt till PVXp Sub kan det orsaka för tidig överbelastning vid hög SPL. Minska mängden extern (mixer, rack)
EQ och testa om det tar bort distorsionen.
Page 77

Slutligen måste du inse att även om PVXp Sub är en kraftfull enhet med hög effekt så har den sina
begränsningar, och den kan behöva ytterligare aktiva subwooferenheter för att ge tillräckligt med ljudutmatning
eller täckning. Försök i detta fall att sänka mixernivåerna en aning för att se om det rensar upp lite. Om du
har kontrollerat alla saker på kontrollistan och allt annat du kan kontrollera säkert och systemet fortfarande
uppvisar problem, skriv ned alla förhållanden och kontakta din Peavey-återförsäljare för rådgivning.
SKÖTSEL OCH UNDERHÅLL
PVXp Sub är en tålig och hållbar produkt och kommer att ge dig många år av pålitlig användning om du sköter
om den ordentligt. Använd sunt förnuft och läs säkerhetsvarningarna för att undvika riskfyllda situationer.
Enheten måste kopplas bort från strömförsörjningen innan arbete utförs på den. All service ska utföras av
kvalificerad servicepersonal.
SOLLJUS/VÄRME
Utsätt inte enheten för långvarigt direkt solljus eftersom det kan få enheten att överhettas och då stänger
enhetens värmeskydd av enheten.
Likaså kan långvarig användning vid höga temperaturer orsaka att enhetens värmeskydd stänger av enheten.
Förvara inte enheten i extremt kalla eller varma omgivningar eller vid extremt hög luftfuktighet. Låt alltid
enheten svalna till rumstemperatur innan du använder den.
RENGÖRING
Rengör aldrig PVXp Sub om den är ansluten till elnätet eller påslagen! Koppla först bort enheten
från elnätet, använd sedan en torr trasa för att ta bort fläckar och annan smuts. Använd aldrig starka
lösningsmedel på PVXp Sub, de kan skada lådan. INGA vätskor får lov att droppa in i PVXp Sub.
FÖRBÄTTRINGAR
För att åtgärda skador på den svarta målade ytan på PVXp Sub kan du använda svart sprayfärg såsom
Peavey Commercial Sound, Black Touch-Up Paint, Peavey detaljnummer 00052110. Följ instruktionerna på
burken för säkerhet och bästa resultat.
KONTROLLERA HÅRDVARAN
Efter ett par månaders användning och sedan periodiskt återkommande, kontrollera skruvarna i PVXp Sub.
Detta inkluderar bakpanelens skruvar och skruvarna som håller ihop gallret och lådan.
Enheten utsätts för starka vibrationer som kan orsaka att skruvarna lossnar.
Page 78

MÅTT
16.749
8
7
6
5
4
143.94
5.667
219.66
8.648
219.66
8.648
212.71
8.375
220.14
292.10
11.500
8.667
357.30
14.067
40.41
1.591
613.96
24.172
601.50
23.681
425.41
469.54
18.486
74.25
2.923
34.06
1.341
Page 79

MÅTT
2
1
G
F
E
D
C
B
219.66
8.648
Typisk användning
Utgångar Ingångar
143.94
5.667
Keyboard
219.66
Mixer
8.648
Dynamisk Mic (Ingen
elektret)
Gitarr
220.14
8.667
PVXp 12 eller PVXp 15
Utgångar Ingångar
Mixer
Dynamisk Mic (Ingen
elektret)
Keyboard
Gitarr
PVXp 12 eller PVXp 15
PVXp 12 eller PVXp 15
Ingång till
1:a sub
Daisy-Chain-anslutning (era subs)
Page 80

SPECIFIKATIONER
Frekve ns område (-10 dB, Half Space ):
43 Hz – 180 Hz*
*Crossover Control helt medurs
Frekve ns svar, 1 Mete r On-axis , S wept-s ine In Ane choic
Environment (-6 dB):
48 Hz – 138 Hz*
*Crossover Control helt medurs
Sammanlag d märkute ffe kt, e ffe ktförstärkare:
800 watt tillgänglig toppeffekt
Kontinuerlig effekt: 470 watt till 4 ohm
Elektronis k ing å ng s impe dans (no mine ll):
Inlinje: 2,7 kohm balanserad (XLR eller 1/4 -tum), 10 kohm
obalanserad 1/4 -tum
Ljudtrycks nivå, 1 Watt, 1 Me te r In Anechoic
Environment:
97 dB SPL
Maximal ljudtrycks nivå (1 meter):
123 dB SPL kontinuerlig
127 dB SPL topp
Hög talarele me nt:
15" kraftfull woofer, 3-tums högtalarspole
Elektronis k de lning:
Kontinuerligt varierbar från 90 Hz till 180 Hz.
Lågpassbranthet: 24 dB/oktav
Högpassbranthet: 18 dB/oktav
Infraljuds filte rbranthe t:
36 dB/oktav
Nomine ll frekve ns åte rgivning fö r förstärkaren:
+0, –3 dB från 20 Hz till 20 kHz
Brum och brus :
Mer än 90 dB under märkeffekten
Dynamikområde fö r DDT:
Mer än 21 dB
THD och IM:
Typiskt under 0,5 %
Dämpning sfa ktor:
Större än 100 vid 1000 Hz, 4 ohm
Effektbe ho v för Peave y PVX™p S ub-s ysteme t:
Nominellt 700 watt, 120 VAC, 60 Hz (inhemskt)
220-240 V AC 50-60 Hz (export)
Box-tuning-frekve ns :
50 Hz
Ingångar:
Kombinerad XLR-hona/ 1/4 -tums teleplugg, för balanserad
eller obalanserad användning.
Utg ång ar:
Två högpassutgångar, oberoende elektriskt buffrade, med
växlingsbar nivåplatta.
En fullregister Thru, elektriskt buffrad.
Kontroller:
Nivå: Ger +/- 20 dB förstärkningsjustering
Crossover Frequency Adjust: Justerar den elektriska
delningsfrekvensen från 90 Hz till 180 Hz, kontinuerligt
varierbar.
®
Kosmos
C: Ger basförbättringsbearbetning.
Polarity Switch: Ger antingen 0 grader eller 180 grader
subwoofer-polaritet
Ground Lift Switch: För inmatning
Höljets material och finis h:
Svart målat akrylhölje med 15 mm MDF, med fullängds, svart
pulverlackerat stålgaller.
Mått (H x B x D)
Vid användning:
616 mm x 425 mm x 584 mm
(hjul ej inkluderat, 10 cm djup)
Vid transport:
687 mm x 425 mm x 616 mm
Nettovikt:
34,5 kg
Monterings mö jlig heter:
1 3/8-tum stativfäste med M20 gängat stativ för montering
av en lämplig högtalare uppe på subwoofern, och fyra stora
gummifötter under för golvanvändning.
Page 81

SUOMI
PVX™p Sub
Kiitos, että olet ostanut aktiivin Peavey®PVX™p Subin. PVXpSubkäsittää erittäin luotettavan virtalähdeosan, jonka
huippulähtöteho on 800 wattia DDT™-kompressiolla. Aktiivikotelossa on myös 15 tuuman tukeva bassoelementti 7,5 cm (3")
puhekelalla. PVXpSubissaon balansoidun 1/4 tuuman TRS-tulon ja balansoidun XLR-tulon yhdistelmäliitin. Siinä on kaksi
balansoitua ylipäästön XLR-läpivientilähtöä ja koko äänialueen XLR-lähtö. Siinä on säädettävä tasonsäädin sekä yhdistetty
LED-merkkivalo, joka syttyy, kun virta on kytketty ja kun "pehmeästi rajoittava" DDT-piiri on toiminnassa.
Ominaisuudet
• ilmareiällinen basso aktiivisubwooferkotelo
• 800 watin huippulähtöteho
• 15 tuuman tukeva bassoelementti
• tehovahvistimessa on pakotettu ilmajäähdytys parhaan luotettavuuden takaamiseksi
• sisäinen linjatason alipäästön/ylipäästön jakosuodin
• täysin säädettävä Kosmos
• 1/4 tuuman XLR-yhdistelmäliitintulo
• kaksi XLR-ylipäästölähtöä ja yksi koko äänialueen XLR-läpivientilähtö
• napaisuuskytkin subwooferin napaisuuden vaihtoa varten
• maan irrotus kaapelisuojan nostoa varten maasta
• isot tukevat lukitsevat rullapyörät, jossa vaimennetut laakerit
• täysin kattava tukeva rei'itetty terässäleikkö
• teräskahvat
• pienikokoinen 15 tuuman bassoelementtiin perustuva subwoofer
• kierretankokiinnitys; mukana kaiutintanko
®
C lisää basson vaikutusta
KUVAUS
Peavey®PVXpSub on pienikokoinen, 800 watin huippulähtötehoiseen tehovahvistimeen kytketty, 15 tuuman tukevaa
bassoelementtiä käyttävä ilmareiällinen aktiivisubwooferjärjestelmä. Täyspitkä musta rei'itetty terässäleikkö suojaa ja antaa
ammattimaisen ulkonäön, ja siinä on lujat teräskahvat ja vankat 4 tuuman korkuiset rullapyörät kuljetusta varten.
Sisäinen linjatason jako kahdella itsenäisesti sähköisesti puskuroidulla ylipäästölähdöllä ja yhdellä koko äänialueen, myöskin
sähköisesti puskuroidulla läpivientilähdöllä.
Peaveyn hieno, erittäin matalataajuisesta ohjelma-aineistosta lisäbassopuhtia antava Kosmos® C -bassotehostin on
sisällytetty maksimi monipuolisuutta varten.
Kierretankokiinnitysjärjetelmään voidaan bassokaiuttimen yläpuolelle kiinnittää tukevasti asianmukaisesti varustettu
kaiutinjärjestelmä. Kaksisuuntainen PVXp-kaiutinsarja sopii erinomaisesti PVXpSubin kumppaniksi.
Tehoa syöttävä PVXpSub -kaiutinjärjestelmän päätevahvistin on vähäsäröinen erittäin luotettava puhallinjäähdytetty yksikkö,
joka tuottaa järjestelmään 800 watin huipputehon. Päätevahvistimen hakkurityyppinen virtalähde on kevyt ja tehokas.
Vahvistimessa on DDT-kompressio, joka käytännössä poistaa kuuluvan päätevahvistimen leikkautumisen. Hiljainen tuuletin
hoitaa jäähdytyksen ja takaa luotettavan toiminnan kaikissa olosuhteissa.
Tulo tapahtuu yhdistetyn XLR-naaras- ja 1/4 tuuman TRS-kuulokeliittimen kautta tasonsäädöllä ja balansoidulla syötteellä
preamp/EQ -elektroniikkaan.
Riippumaton pari ylipäästölähtöjä tuottaa puskuroidun ja balansoidun lähtösignaalin parin XLR-urosliittimen kautta satelliitti-
kaiutinpariin musiikin ylä-äänien tuottamiseen.
Page 82

Koko äänialueen läpivientilähdössä on XLR-urosliitin. Näillä lähdöillä voidaan yhdistää lisäkaiutinjärjestelmiä tai
syöttää signaali muihin laitteisiin jne. Lähtöpaneelissa on myös asemapaikka valinnaisille toimintamoduuleille,
kuten langaton vastaanotin, digitaalinen äänitulo tai 10-kaistainen EQ jne.
SOVELLUKSET
PeaveyPVX™p Subilla on monenlaisia käyttökohteita, kuten koko äänialueen kaiutinjärjestelmien bassoäänien
laajentaminen äänenvahvistusta varten, kuulutuskäyttöön, tukilaitteistoksi, karaokeen tai musiikin toistoon.
Tyypillinen signaalinlähde Peavey PVXp Subin linjatasoisille tuloille on esim. miksauspöytä tai CD-soittimen,
MP3-soittimen tai kasettisoittimen lähtö. Ylipäästösuodattimella suodatettu PVXpSubin signaali lähtisi sitten
koko äänialueen kaiutinjärjestelmään, auttaen äänentoistojärjestelmän syvän basson kantavuutta.
TAKAPANEELIN ALAOSA
1
2
3
KATKAISIJA (1)
Laitteen verkkojännitetulo on suojattu ylikuormitusta ja vikaantumista vastaan 5 A katkaisijalla. Katkaisijan
ei tulisi laueta, ellei vahvistimen piirisarjassa ole vikaa tai epänormaalia toimintaa, joka aiheuttaa liiallisen
verkkovirran. Jos katkaisija laukeaa, aseta virtakytkin (3) asentoon OFF (Pois), ja nollaa katkaisija odotettuasi
hetken, että katkaisija jäähtyy.
Jos katkaisija laukeaa, keskipainike ponnahtaa ulos noin 6 mm, jolloin se voidaan nollata painamalla ylös ja
sisään. Normaaleissa olosuhteissa (ei lauenneena) keskipainike on suhteellisen tasainen.
Jos laitteen katkaisija laukeaa edelleen tai se laukeaa heti nollauksen jälkeen, älä nollaa toistuvasti, järjestelmä
pitää viedä korjattavaksi pätevään Peavey-huoltoliikkeeseen.
IEC-VIRTAJOHDON LIITÄNTÄ (2)
Tämä liitin on IEC-virtajohdolle (toimitetaan mukana), joka syöttää laitteeseen AC-virtaa. On erittäin tärkeää
varmistaa, että PVXp Subiin syötetään asianmukaista vaihtovirtajännitettä. PVXp Subin oikea jännite lukee IEC
(virta)-johdon vieressä laitteen takapaneelissa.
Lue tämä opas huolellisesti, jotta varmistat oman turvallisuutesi sekä laitteistosi turvallisuuden. Älä koskaan
katkaise maadoitusjohdinta. Se on tarkoitettu suojaamaan sinua. Laitteen saa liittää vain maadoitettuun
pistorasiaan. Sähköisku- ja tulipalovaaran välttämiseksi tulee aina varmistaa, että vahvistin ja siihen kytketyt
laitteet on maadoitettu.
Page 83

VIRTAKYTKIN (3)
Tämä keinukytkin syöttää AC-virtaa PVX™pSubiin ollessaan ON-asennossa. ON-asento on käytössä, kun
kytkimen vasen reuna on painettuna "sisään" tai lähes takapaneelin tasolle.
TAKAPANEELIN YLÄOSA
VALINNAISEN LAAJENNUSMODUULIN ASENNUSPANEELI
Tämä paneeli tulee poistaa VAIN, kun asennetaan jokin PVXp Subiin pian saatavilla olevista valinnaisista laajen-
nusmoduuleista.
Valinnaiset laajennusmoduulit joko toimivat yhdessä PVXp Subissa jo olevien tulojen kanssa tai lisäävät tuloon
jonkin toiminnon, kuten 10-alueisen EQn jne. Kysy Peavey®-jälleenmyyjältä saatavuutta ja hintaa.
Jos et asenna valinnaista laajennusmoduulia, älä poista tätä kantta, valinnaisen laajennusmoduulin
asennusohjeet tulevat kunkin laajennusmoduulin mukana ja ne koskevat vain sitä moduulia.
5
9
6
11-12
7
4
13
8
10
YLÄOSA - SÄÄTIMIEN, TULOJEN JA LÄHTÖJEN KÄYTTÖ
TULO (4)
Linjatasoinen tulo on tyypiltään balansoitu keskitasoinen impedanssi. Liitin on naaras-XLR-liittimen ja 1/4
tuuman TRS-liittimen yhdistelmä.
LED (5)
VIHREÄ valo palaa, kun virtakytkin on kytketty ja virta on päällä
Valo muuttuu PUNAISEKSI, kun tehovahvistin kytkee DDT™:n "pehmeästi rajoittavan" piiristön. Satunnainen
vilkkuminen on hyväksyttävissä, mutta ei jatkuva palaminen, tai häiriöitä on liikaa.
Subin etulevyssä näkyy myös LED, joka palaa SINISENÄ virran ollessa päällä ja muuttuu PUNAISEKSI, kun
tehovahvistin kytkee DDT:n "pehmeästi rajoittavan" piiristön.
TASO (6)
Ohjaa tulosignaalin vahvistusta tai ulostulotasoa. Sitä käytetään säätämään suoraan järjestelmän lähtötaso
tietylle tulosignaalille.
Normaalikäytössä säätönupin asento on puolivälissä, mikä vastaa sitten vahvistukseltaan tyypillistä
tehovahvistimen tuloa.
Page 84

NAPAISUUSKYTKIN (7)
Säätää subwooferille joko 0 tai 180 asteen napaisuuden
Tätä kytkintä käytetään yhdessä CrossoverFrequency Controlin (9) kanssa säätämään subwooferin lähtö ja
satelliittikaiuttimen lähtö jakoalueella mahdollisimman hyvin yhteen.
MAAN IRROTUSKYTKIN (8)
Tällä voidaan nostaa kaapelisuojus rungon maadoituksesta katkaisemaan mahdolliset maasilmukat ja
vähentämään huminaa.
CROSSOVER FREQUENCY CONTROL (9)
Vaihtelee satelliitikaiuttimiin (11 ja 12) lähetettyä jakotaajuutta subwooferin ja ylipäästölähtöjen välillä.
Vaihtelee sähköistä jakotaajuutta välillä 90–180 Hz.
VAARA! TÄMÄN ASETUKSEN SÄÄTÄMINEN LIIAN PIENEKSI VOI MAHDOLLISTAA SATELLIITTIKAIUTTIMEN
YLIKUORMITTUMISEN SYVÄLLÄ BASSOLLA!
™
Asetuksen säätäminen pienemmäksi EI kasvata PVX
säätö toimii parhaiten useimpien kaiuttimien kohdalla.
pSubin syvän basson lähtöä, keski- (klo 12) tai korkeampi
KOSMOS ® C -BASSOKOROSTUS (10)
Mahdollistaa harmonisten bassotaajuuksien lisäämisen ohjelmamateriaalissa olevan syvän basson aistimisen
parantamiseksi ylikuormittamatta subwoofer-kaiutinta.
Säätöä on hyvä käyttää maltillisesti, kääntämällä se täydelle ohjelmamateriaali voi kuulostaa epäluonnolliselta
tai vääristyneeltä.
YLIPÄÄSTÖLÄHDÖT (11 JA 12)
Näillä lähdöillä syötetään ylipäästösuodatettu signaali koko äänialueen kaiutinjärjestelmään, kuten PVXp 10,
PVXp 12 tai PVXp 15. On mahdollista käyttää muita koko äänialueen kaiuttimia ja koko äänialueen passiivisia
kaiuttimia voi käyttää yhdessä sopivan niitä ohjaavan tehovahvistimen kanssa.
Nämä lähdöt on elektronisesti puskuroitu ja eristetty sekä tulosta että toisistaan, eikä PVXp Subin tasonsäätö
(6) vaikuta niiden tasoon.
LÄPIMENEVÄ KOKO ÄÄNIALUEEN LÄHTÖ (13)
Tällä lähdöllä syötetään koko äänialueen signaali mihin tahansa koko äänialueen vaativaan laitteeseen,
esimerkiksi toiseen PVXp Subiin tai johonkin muuhun linjatason äänilaitteeseen. Tämä lähtö on elektronisesti
puskuroitu ja eristetty tulosta ja muista lähdöistä.
KÄYTTÖOHJEET
VAROITUKSET
Laite tulee irrottaa AC-virtalähteestä, ennen kuin sille tehdään mitään toimenpiteitä. Huoltaminen tulee jättää
pätevän huoltohenkilöstön tehtäväksi.
Takalevyn pinta voi kuumentua. Älä tuki tai peitä tuuletinta eikä ilmanvaihtoaukkoja. Tuulettimen taakse
pitää jättää vähintään 10 cm tilaa. Älä anna verhojen, rakennuksen lämpöeristeiden tms. estää ilmavirtaa. On
suositeltavaa, että PVXp Subin takaosaa ei sijoiteta suljettuun tai sellaiseen tilaan, johon ei pääse raitista
viileää ilmaa.
ÄLÄ KOSKAAN kytke PVXp Subin tuloa päätevahvistimen lähtöön. Tulot on tarkoitettu ohjattavaksi linjatasoisella
signaalilla.
ÄLÄ poista suojaavia metalliristikoita.
VAROITUS! PVXp Sub on erittäin tehokas! Äänijärjestelmä voi vahingoittaa kuuloa pysyvästi! Säädä
kokonaisvoimakkuus erittäin varovaisesti!
Page 85

PVX™p Subin äänenvoimakkuus voi tuntua alhaiselta, koska sen ääni on kirkas ja särötön ja siitä puuttuvat
korkeat taajuudet. Särön puuttuminen voi saada äänen tason tuntumaan todellista alhaisemmalta. Järjestelmä
voi kuitenkin tuottaa äänenpainetta yli 127 dB 1 metrin päässä kaiuttimesta!
SATELLIITTIKAIUTINJÄRJESTELMÄN ASETTAMINEN PVX
™
P SUBIN PÄÄLLE
PVXp Subissa on kierretankokiinnitys sisäänrakennettuna laitteen päälle ja se on suunniteltu sopimaan
korkeintaan n. 80 cm:n M20-kierretankoon. Tanko on suunniteltu käytettäväksi seuraavien kaiutinjärjestelmien
kanssa:
Peavey PVXp 10
Peavey PVXp 12
Peavey PVXp 15
Älä aseta tankoon korkeampaa/isompaa tai painavampaa kaiutinjärjestelmää kuin PVXp 15 kaatumisvaaran
takia.
PVXp Sub on asetettava on kovalle ja tasaiselle alustalle, jotta tankokiinnitetty kaiutin ei pääse kaatumaan.
Asennettaessa kaiutinta tankoon tai irrotettaessa tangosta on hyvä käyttää avustajaa. Voi olla vaikeaa ohjata
tankoa koloonsa samalla, kun kannattelee subwooferia suorin käsin.
Käytettäessä PVXp Subia ja tankoa ulkona, älä koskaan kiinnitä viirejä tai lippuja tankoon tai siihen
kiinnitettyyn kaiutinjärjestelmään; voimakas tuuli voi puhaltaa kaiuttimen nurin. Jos odotettavissa
on voimakasta tuulta, voi olla viisasta poistaa kaiutin tangosta, jotta PVXp Sub ja tankoon kiinnitetty
kaiutinjärjestelmä ei kaadu tuulessa.
VERKKOVIRRAN KYTKEMINEN PVXP SUBIIN
PVXp Subin mukana tulee 1,8 metrin IEC -liitännällä varustettu AC-verkkovirtajohto. Jos käytät aktiivikaiuttimen
kanssa jatkojohtoa, varmista, että se on hyvälaatuinen ja sen virrankestävyys on riittävä, jotta kytkentä on
turvallinen ja voit maksimoida PVXp Subin tehontuoton. Jotta saadaan mahdollisimman suuri teho ilman säröä,
älä kytke muita laitteita samaan jatkojohtoon PVXp Subin kanssa. Älä ylitä jatkojohdon virtakapasiteettia
kytkemällä siihen liikaa laitteita.
Kun PVXp Subin AC-johto liitetään ensimmäistä kertaa, varmista, että virtakytkin on Off-asennossa ja käännä se
sitten On-asentoon vasta verkkovirtajohdon liittämisen jälkeen. Sisäänrakennettu mykistys tulee käyttöön, kun
toimenpiteet tehdään oikeassa järjestyksessä.
ERITYISHUOMAUTUS PYSYVÄÄ ASENNUSTA VARTEN
Asennettaessa PVXp Sub, AC-verkkovirtajohdot pitää vetää siten, että AC-johdotukset vastaavat paikallisia
vaatimuksia. Tämä tulee varmistaa pätevältä sähköasentajalta. On myös suositeltavaa käyttää koteloon
kiinnitettyä kaapelikiinnikettä vähentämään rasitusta vahvistinmoduuliin (2) liitetystä IEC-virtajohdosta, jotta
virtajohtoa ei voi vetää ulos eikä se irtoa värinän johdosta.
SIGNAALN KYTKEMINEN PVXP SUBIIN
PVXp Subiin voidaan syöttää signaali monin eri tavoin.
Tulo (4) tarjoaa balansoidun linjatasoisen tulon, jossa voidaan käyttää 1/4 tuuman TRS (ring-tip-sleeve)
-tyyppistä puhelinpistoketta tai uros-XLR-liitintä. On selvää, että voidaan myös käyttää epätasapainoista 1/4
tuuman puhelinpistoketta, mutta silloin ei ole käytettävissä yhteyksien ulkopuolisten häiriöiden, kuten hurina
ja RFI, balansoitua hylkäämistä.
Älä kytke kaapeleita liittimiin, kun laite on PÄÄLLÄ ja tasonuppi ei ole minimissään! Vaikka normaali 1/4
tuuman kaksinapaisilla kuulokeliittimellä varustettu kaapeli toimii hyvin ja balansoitu tulovirtapiiri hylkää osan
häiriöistä, balansoitu kaapeli joko balansoidulla 1/4 tuuman TRS-kuulokeliittimellä tai XLR-liittimellä takaa
huomattavasti paremman häiriönpoiston ja suorituskyvyn.
Page 86

Joskus vakavien häiriöiden esiintyessä on tarpeen nostaa balansoidun kaapelin suojamaa ( XLR:n napa nro 1 )
PVX™p Subin päässä. Tämä voidaan tehdä helposti aktivoimalla PVXp Subiin rakennettu maan nostokatkaisin
(10). Tarkista tulojen muutokset huolellisesti ja käännä aina tasonsäädin alas ennen kaapeleiden kytkentää tai
irrotusta tai maadoituksen nostamista.
PVX™pSubin kanssa suositellaan käytettäväksi laadukkaita kaapeleita, sillä niissä on yleensä parempi suojaus
ja materiaalit ja ne toimivat luotettavasti pitempään. Paras vaihtoehto on suojattu, balansoitu kaapeli,
jonka pituus on juuri riittävä PVXp Subin kytkemiseen. On yleensä hyödyllistä jättää hieman löysää PVXp
Subin tulopäähän sekä teipata kaapelit kiinni lattiaan tai vetää ne kaapelisuojuksen alla, jotta vältetään
kompastuminen niihin tai PVXp Subin kaatuminen, kun sen tangon päässä on kaiutin.
TASON SÄÄTÖ
PVXp Subin tulo on varustettu tasonsäädöllä (6), joka helpottaa käyttöä monissa eri käyttökohteissa. Kun
tasonsäätö on käännetty täysin myötäpäivään, vahvistus on suurimmillaan ja tulon herkkyys on 0,24 V RMS
täydelle teholle.
On suositeltavaa, että PVXp Subin tasonsäätö asetetaan lähelle kello 12:ta eli 0 dB esivahvistusta. Tässä
asetuksessa tuloherkkyys on noin 2,4 V RMS täydellä teholla. Tällöin PVXp Sub vastaa lähemmin tyypillisen
päätevahvistimen tuloa.
Jos miksauspöytä ilmaisee lähtösignaalien leikkautumista, PVXp Subin koko tehokapasiteettia ei käytetä oikein.
Signaalin ei ole tarkoitus leikkautua, ennen kuin se pääsee PVXp Subiin. Vähennä mikserin lähtötasoa ja nosta
PVXp Subin tasonsäätöä.
PVXp Subin vahvistin on varustettu DDT™: llä ja LED-merkkivalo osoittaa, milloin PVXp Sub DDTon kytkettynä.
Jos ääni kuulostaa kompressoituneelta, tarkista nämä merkkivalot. Jos ne vilkkuvat PUNAISENA muuten kuin
satunnaisesti, on mikserin ohjaustasoa (tai PVXp Subin tasonsäätöä) laskettava.
Kun äänijärjestelmää käynnistetään ensimmäistä kertaa, kytke ensin päälle kaikki ketjussa ensin tulevat laitteet
ja sitten PVXp Sub niin, että sen tasonsäädin on käännettynä kokonaan vastapäivään (täysin pois). Aloita
tasojen tarkistaminen mikserin lähtötason säätimet kokonaan pois päältä ja nosta niitä sitten hitaasti PVXp
Subin tasonsäätimen ollessa halutussa asennossa (puoli kierrosta suositellaan aloituskohdaksi).
Ei ole suositeltavaa kääntää PVXp Subin tasonsäätimiä täysille ja yrittää sitten säätää tasoa vain mikseristä,
tällöin laite tuottaa ylimääräistä kohinaa. Paras tapa on ohjata mikseristä “täysi” signaali PVXp Subiin ja
kääntää sitten PVXp Subin tasonsäätöä vain sen verran kuin on tarpeen, että saadaan täysi haluttu taso. Tällöin
on syytä varmistaa, ettei mikserin lähtö leikkaa.
KAAPELIT YLIPÄÄSTÖLÄHDÖISTÄ (11 JA 12)
Ensisijainen tapa yhdistää koko äänialueen satelliittikaiutinjärjestelmä PVXp Subin ylipäästölähtöihin (11 ja 12)
on käyttää balansoitua XLR-kaapelia, joka ulottuu juuri satelliittikaiutinjärjestelmään.
Jos satelliittikaiutin on tangon päässä PVXp Subin yläpuolella, 1,8 metrin kaapeli on riittävän pitkä. Voidaan
myös käyttää 3 tai 6 metrin kaapelia, mutta sitä pidemmät kaapelit kehittäisivät vain enemmän häiriöitä ja
korkeat taajuudet alkaisivat hävitä. PVXp Subin kanssa suositellaan käytettäväksi laadukkaita kaapeleita, sillä
niissä on yleensä parempi suojaus ja materiaalit ja ne toimivat luotettavasti pidempään. On yleensä hyödyllistä
jättää hieman löysää PVXp Subin lähtöpäähän sekä teipata kaapelit kiinni lattiaan tai vetää ne kaapelisuojuksen
alla, jotta vältetään kompastuminen niihin tai PVXp Subin kaatuminen, kun sen tangon päässä on kaiutin.
PVXP SUBIN KÄYTÖN SUOSITELLUT ASETUKSET PVXP-SARJAN AKTIIVIKAIUTTIMIEN KANSSA
PVX™p -sarjan koko äänialueen aktiivikaiuttimien ihanteellinen sijoituspaikka on PVXp Sub -tangon päässä. Niin
lähellä antavat seuraavat asetukset parhaan tuloksen jakoalueella ja sävyjen tasapainon suhteen.
Huomaa, että XLR-lähtöjä (11 ja 12) on vaimennettu 12 dB, jotta voidaan käyttää PVXp 12:n ja PVXp 15:n
XLR-tuloja. Normaalisti näitä pidetään mikrofonitason tuloina, mutta kun PVXp Subin lähdöt on vaimennettu,
XLR-tulojen käyttö PVXp-aktiivikaiuttimissa on mahdollista.
Page 87

PVXp 10
Napaisuuskytkin Subissa (7): Normaali tai SISÄÄN
CrossoverFrequency Control (9): Kello 12:sta täysin myötäpäivään. Tämä vastaa jakopisteelle aluetta noin
110–160 Hz. Suositeltava ihanteellinen asetus on ääriasennossa myötäpäivään.
Tasonsäätimet (6):PVXp™ Subin tasonsäätö kello 12 (0 dB), PVXp 10 tasonsäätö kello 12
PVXp 12
Napaisuuskytkin Subissa (7): Normaali tai SISÄÄN
CROSSOVER FREQUENCY CONTROL (9): Kello 12:sta täysin myötäpäivään. Tämä vastaa jakopisteelle aluetta
noin 110–160 Hz.
Suositeltava ihanteellinen asetus on asettaa kaksi askelta yli kello 12.
Tasonsäätimet (6):PVXp Subin tasonsäätö kello 12 (0 dB), PVXp 12: n tasonsäätö –2 askelta ennen kello 12
PVXp 15
Napaisuuskytkin Subissa (7): Normaali tai SISÄÄN
CROSSOVER FREQUENCY CONTROL (9): Kello 12:sta täysin myötäpäivään. Tämä vastaa jakopisteelle aluetta
noin 110–160 Hz.
Suositeltava ihanteellinen asetus on kello 12.
Tasonsäätimet (6):PVXp Subin tasonsäätö kello 12 (0 dB), PVXp 12: n tasonsäätö –2 askelta ennen kello 12
VAARA! JOS JAKOTAAJUUSSÄÄTÖ ASETETAAN LIIAN PIENEKSI, VOI SYVÄ BASSO KORKEALLA SPL:LLÄ
MAHDOLLISTAA SATELLIITTIKAIUTTIMEN YLIKUORMITTUMISEN!
Asetuksen säätäminen pienemmäksi EI kasvata PVXp Subin syvän basson lähtöä, keski- (klo 12) tai korkeampi
säätö toimii parhaiten useimpien kaiuttimien kohdalla.
Jos PVXp-sarjan kaiuttimia ei ole asetettu subwooferin päälle tankoon, pitää napaisuuskytkimen asetukset
mahdollisesti olla erilaiset, kuin mitä tässä on esitetty. CrossoverFrequency Control pitää mahdollisesti
säätää pienemmälle, jotta subwoofer ja satelliitit toimivat hyvin koko jakoalueella. Edellä kuvatut asetukset
toimivat parhaiten, kun satelliittikaiutin ja subwoofer ovat lähekkäin ja olennaisesti samalla etäisyydellä
kuulijakunnasta.
PVXP SUBIN SÄÄTÖJEN ASETTAMINEN KÄYTTÖÄ VARTEN MUIDEN SATELLIITTIKAIUTTIMIEN
KANSSA
CrossoverFrequency Control (9): Yleensä kun käytetään pienempiä koko äänialueen kaiuttimia satelliitteina,
aseta CrossoverFrequency Control (9) korkeammalle taajuusasetukselle. Aseta isommille koko äänialueen
kaiuttimille CrossoverFrequency Control (9) pienemmälle taajuusasetukselle. Enimmäkseen CrossoverFrequency
Controlin asettaminen huomattavasti alle kello 12:n asentoon ei ole tarpeen, sillä alle 100 Hz:n jakotaajuudella
PVXp Sub ja satelliittikaiutin eivät pelaa kovin hyvin jakoalueella yhteen.
Napaisuuskytkin (7): Kokeile napaisuuskytkimen asettamista edestakaisin jokaisen valitun jakotaajuuden
kohdalla, jolloin voit määrittää, mikä kytkimen asento tuottaa jakoalueella parhaimman bassotoiston
Tasonsäätimet (6): Aloita PVXp Subin tasonsäätö kello 12:n asennossa ja säädä satelliittikaiuttimet vastaamaan
sen tasoa. Huomaa, että jos subwooferin voi kuulla selvänä erillisenä äänilähteenä, se on luultavasti säädetty
liian korkealle tasolle.
KOSMOS® C:N BASSOVAHVISTUSSÄÄDÖN ASETUS (10)
Kosmos® C:n bassovahvistussäätö voi lisätä näennäistä basson laajentamista ja lähtöä toistettuun ääneen,
etenkin kun ohjelmamateriaalissa on paljon sisältöä PVXp Subin katkaisutaajuuden alapuolella.
Tarvittaessa järkevä käyttö voi parantaa musiikkinautintoa ja lisätä iskua ja jytinää miksaukseen. Säädön
asettaminen optimitasoa korkeammalle voi kuitenkin aikaansaada tuntuvan häiriön aistimisen tai vähemmän
selkeät bassoäänet. Säädön kääntäminen täysille on harvoin hyödyllistä.
Tyypillinen käyttö edellyttää säätönupin asettamisen jonnekin pois- (täysin vastapäivään) ja kello 12-asennon
(puoliväli) väliin. Silloin lisätty vaikutus on hienovaraisempi ja vähemmän haitallinen tietyissä kohtaa musiikkia,
mutta se tuottaa silti tervetulleen parannuksen äänentoistoon kokonaisuudessaan.
Page 88

Huomaa, että täysin myötäpäivään asetuksissa subwooferin todellinen vahvistus kasvaa, joten mikäli se
oli ennen juuri leikkautumisillaan, BassEnhance Controlin kääntäminen täysille voi aiheuttaa siirtymisen
leikkautumiseen.
VAIHTOVIRRAN IRROTTAMINEN PVX
Suosittelemme, että laite sammutetaan ensin virtakytkimestä (3) ja virtajohto irrotetaan vasta sen jälkeen.
™
P SUBISTA
VIANMÄÄRITYS
ÄÄNTÄ EI KUULU OLLENKAAN
Varmista ensin että laitteeseen tulee AC-virtaa ja se on PÄÄLLÄ. Varmista, että tehovahvistimen moduulissa
palaa merkkivalo.
Jos näin ei ole, varmista, että ON/OFF-kytkin (3) on ON-asennossa, ja tarkista, että IEC-virtajohdon liitos (2) on
täysin kiinni ja paikallaan. Varmista, että AC-virtajohto on kytkettynä toimivaan AC-pistorasiaan.
Tarkista lopuksi katkaisija (1). (Katso takapaneeli: Katkaisija-osasta turvallisuusohjeet.)
Kun on varmaa, että laite saa AC-virtaa, tarkista seuraavaksi, että signaali menee PVX™pSubiin. Irrota
tilapäisesti syöttökaapeli ja kytke se johonkin toiseen laitteeseen, joka voi toistaa signaalin (ts.
päätevahvistimeen ja kaiuttimeen). Jos signaali kuuluu, varmista, että kaikki käytössä olevat tasonsäätimet on
säädetty riittävälle tasolle (noin yhteen kolmasosaan–puoleen).
Jos PVXp Sub on ollut suorassa auringonvalossa tai lämminnyt liikaa, sisäinen lämpösuoja on voinut laueta. Jos
näin on käynyt, sammuta PVXp Sub ja anna sen jäähtyä riittävän pitkään.
Jos ääntä ei vieläkään kuulu, ota yhteyttä valtuutettuun Peavey-jälleenmyyjään tai Peavey International Service
Centeriin.
HUMINAA TAI SURINAA
Jos PVXp Sub tuottaa huminaa tai surinaa, syy voi liittyä AC-pistorasiaan. Yritä kytkeä PVXp Sub toiseen
AC-pistorasiaan. Jos mikseri ja PVXp Sub on kytketty eri piireihin (katkaisijaan), seurauksena voi olla
huminaongelmia. Jos mahdollista, kannattaa käyttää samaa pistorasiaa (katkaisijaa) sekä mikserin että
aktiivikaiuttimen virransyötössä.
Varmista, että signaali on ohjattu PVXp Subin syöttöön suojakaapeleilla. Jos kaiutinkaapeleina käytetään
syöttöjohtoja 1/4 tuuman liittimillä suojattujen kaapeleiden sijaan, huminaa tai surinaa esiintyy herkemmin.
Humina voi liittyä maasilmukkaan. Suojamaan (napa nro 1) nostaminen balansoituun johtoon PVXp Subin
puolelta voi auttaa. Se tapahtuu helposti aktivoimalla PVXp Subiin sisällytetty GroundLift -kytkin (10). Tarkista
tulojen muutokset huolellisesti kääntämällä tasonsäädin alas ennen kaapeleiden kytkemistä ja irrotusta tai
suojamaan nostamista Subissa.
Varmista, ettei PVXp Subin, mikserin tai lähdelaitteiden kanssa samassa virtapiirissä ole valojen himmentimiä.
Jos himmentimiä on käytössä, ne pitää mahdollisesti kääntää kokonaan PÄÄLLE tai POIS, jotta humina voidaan
poistaa tai vähentää. Tämä on tyypillinen AC-johdotuksen ja valojen himmentimien välinen häiriöongelma, ei
PVXp Subin suunnitteluvirhe.
AC-tulpan kolmatta johtoa (maatulppaa) ei saa KOSKAAN poistaa tai katkaista, sillä se aiheuttaa potentiaalisen
vaaratilanteen.
VÄÄRISTYNYT TAI EPÄSELVÄ ÄÄNI
Varmista ensin, että mikseri (signaalilähde) ei leikkaa eikä sitä yliohjata. Varmista, että PVXp Subin tasonsäätöä
(6) ei ole asetettu liian alhaiseksi. Tarkista, että tuloliitin on täysin paikallaan tulopistokkeessa PVXp Subin
takapaneelissa. Varmista, että tehovahvistinta ei ole kytketty PVXp Subin tuloliitäntään. Jos laitteeseen
syötetään AC-virtaa jatkojohdolla, varmista että sen virrankesto on riittävä ja ettei sitä käytetä syöttämään
virtaa johonkin toiseen laitteeseen.
PVXp Subissa on sisäänrakennettu bassokorostus, joka laajentaa ja tasaa luonnollista kaiutinvastetta
järjestelmässä, joten se vaatii vähän, jos lainkaan, lisää EQ:ta. Jos PVXp Subiin asetetaan liiallinen ulkoinen
basso- tai diskanttikorostus, se voi korkeilla SPL:illä aiheuttaa ennenaikaisen ylikuormituksen. Vähennä
ulkoisen (mikseristä tai räkistä säädetyn) EQ:n määrää ja katso, vähentääkö se säröä.
Page 89

Ota lopuksi huomioon, että vaikka PVXp Sub on tehokas laite, silläkin on rajansa ja riittävän äänimäärän
saamiseen voidaan tarvita lisää aktiivi-subwoofer-yksiköitä. Kokeile tällöin pienentää mikserin tasoja vähän
ja katso, parantaako se tilannetta. Jos kaikki nämä seikat ja muut turvallisesti tarkistettavissa olevat asiat on
käyty läpi, eikä laite edelleenkään toimi oikein, kirjaa tilanne huolellisesti muistiin ja ota yhteyttä Peavey-
jälleenmyyjääsi.
HUOLTO JA KUNNOSSAPITO
PVXp Sub on luja ja kestävä tuote, joka oikein hoidettuna toimii luotettavasti vuosien ajan. Vältä vaarallisia
käyttötilanteita käyttämällä tervettä järkeä ja lukemalla varoitukset.
Laite tulee irrottaa AC-virtalähteestä, ennen kuin sille tehdään mitään toimenpiteitä. Huoltaminen tulee jättää
pätevän huoltohenkilöstön tehtäväksi.
AURINGONVALO/LÄMPÖ
Vältä pitkää altistusta suoralle auringonvalolle, koska tämä voi saada laitteen ylikuumenemaan, jolloin
lämpösuojaus sammuttaa sen.
Myös erittäin kuumat toimintaolosuhteet voivat aiheuttaa lämpösuojan laukeamisen.
Älä varastoi laitetta erittäin kuumaan, kylmään tai kosteaan ympäristöön. Anna laitteen aina mukautua
huoneenlämpöön ennen käyttöä.
PUHDISTUS
Älä koskaan puhdista PVXp Subia, kun pistoke on kiinni tai laite on PÄÄLLÄ! Kun laite on irrotettu
AC-virtalähteistä, poista hiekka ja muu lika kuivalla kankaalla. Älä koskaan käytä PVXp Subiin vahvoja
liuottimia, sillä ne voivat vahingoittaa koteloa. Älä anna MINKÄÄN nesteen valua PVXp Subin sisään.
KORJAILU
PVXp Subin mustaksi maalattuun pintaan tulleeseen vahinkoon voidaan käyttää mustaa ruiskumaalia,
esim. Peavey Commercial Sound, Black Touch-UpPaint, Peavey, osanumero 00052110. Paras tulos saadaan
turvallisesti noudattamalla purkissa olevia ohjeita.
TARKISTA LAITTEISTON TURVALLISUUS
Tarkista muutaman ensimmäisen käyttökuukauden jälkeen ja sen jälkeen määräajoin PVXp Subin
kiinnitysten tiukkuus, mukaan lukien takapaneelin ruuvit sekä ruuvit, joilla ritilä on kiinni kotelossa.
Laite värisee huomattavan paljon, jolloin kiinnitykset voivat löystyä.
Page 90

MITAT
16.749
1.591
40.41
2.923
74.25
8
7
6
5
4
143.94
5.667
219.66
8.648
219.66
8.648
212.71
8.375
220.14
292.10
11.500
8.667
357.30
14.067
613.96
24.172
601.50
23.681
425.41
469.54
18.486
34.06
1.341
Page 91

8.648
219.66
8.667
220.14
8.648
219.66
5.667
143.94
UNLESS OTHERWISE SPECIFIED,
3
2
1
G
F
E
D
C
B
MITAT
2
1
G
F
E
D
C
B
Tyypillinen käyttö
Lähtö Tulot
143.94
5.667
Kosketinsoitin
219.66
8.648
219.66
8.648
Mikseri
Dynaaminen mikro-
foni (ei Electrets)
Kitara
220.14
8.667
PVXp 12 tai PVXp 15
Lähtö Tulot
Mikseri
Dynaaminen mikro-
foni (ei Electrets)
Kosketinsoitin
Kitara
PVXp 12 tai PVXp 15
PVXp 12 tai PVXp 15
Tulo 1:een
subwoof-
eriin
Daisy-Chain -liitäntä (useita subwoofereita)
Page 92

TEKNISET TIEDOT
Taajuusalue (-10 dB, puoliavaruus):
43 Hz – 180 Hz*
* Jakosäädin täysin CW
Taajuusvaste 1 metrin päässä akselilla, sinipyyhkäisy
kaiuttomassa ympäristössä (-6 dB):
48 Hz – 138 Hz*
* Jakosäädin täysin CW
Päätevahvistimen kokonaisteho:
800 W huipputeho
Jatkuva teho: 470 wattia 4 ohmin kuormaan
Sähköisen tulon impedanssi (nimellinen):
Tuloliitäntä: 2,2 kilo-ohmia balansoituna (XLR tai 1/4 tuumaa),
10 kilo-ohmia balansoimaton 1/4 tuumaa
Äänenpainetaso, 1 watti, 1 metri kaiuttomassa ympäristössä:
97 dB SPL
Maksimi äänenpainetaso (1 metri):
123 dB SPL jatkuva
127 dB SPL huippu
Muutinlisä:
15 tuuman tukeva bassoelementti, 3 tuuman puhekela
Elektroninen jako
Portaaton 90–180 Hz.
Alipäästön kaltevuus: 24 dB/oktaavi
Ylipäästön lähdön kaltevuus: 18 dB/oktaavi
Infraäänisuodattimen kaltevuus:
36 dB/oktaavi
Vahvistimen nimellinen taajuusvaste:
+0, –3 dB, 20 Hz...20 kHz
Humina ja kohina:
Yli 90 dB alle ilmoitetun tehon
DDT:n dynaaminen alue:
Yli 21 dB
THD ja IM:
Yleensä alle 0,5 %
Vaimennuskerroin:
Yli 100, 1000 Hz, 4 ohmia
™
PeaveyPVX
pSub -järjestelmän tehontarve:
Nimellinen 160 wattia, 100-120 VAC 50-60 Hz (sisäinen)
220-240 VAC 50-60 Hz (vienti)
Kotelon viritystaajuus:
50 Hz
Tuloliitännät:
Yksi yhdistelmäliitin, naaras-XLR / 1/4 tuuman kuulokeliitin;
balansoitu tai balansoimaton käyttö.
Lähtöliitännät:
Kaksi ylipäästölähtöä, itsenäisesti sähköisesti puskuroitu,
vaihdettava lähtötason vaimennin.
Yksi koko äänialueen läpimeno, sähköisesti puskuroitu.
Säätimet:
Taso: +/– 20 dB:n vahvistuksen säätö
CrossoverFrequencyAdjust: Säätää sähköisen jakotaajuuden
välillä 90–180 Hz, portaaton.
®
Kosmos
C: Bassokorostuksen käsittely.
PolaritySwitch: Säätää subwooferille joko 0 tai 180 asteen
napaisuuden
GroundLiftSwitch: Tulolle
Kotelomateriaalit ja pinnoite:
Musta akryyli maalattu kotelo ja 15 mm MDF, täyspitkä,
jauhemaalattu, musta rei'itetty terässäleikkö.
Mitat (k x l x s)
Käyttöasennossa:
24,25" x 16,75" x 23,00"
(ilman pyöriä, 4,06" syvä)
616 mm x 425 mm x 584 mm
Kuljetusasennossa:
27,06" x 16,75" x 24,25"
687 mm x 425 mm x 616 mm
Nettopaino:
76 lbs. (34,5 kg)
Kiinnitystarvikkeet:
1 3/8 tuuman tankokiinnitys, jossa M20 kierteinen tanko
sopivan kaiuttimen kiinnittämistä varten subwooferin päälle ja
alla neljä suurta kumijalkaa lattiakäyttöön.
Page 93

ESPAÑOL
PVX™p Sub
Gracias por haber comprado el sistema eléctrico Peavey® PVX™p Sub. El PVXp Sub cuenta con una sección eléctrica ultra
confiable que proporciona un total de 800 vatios de pico con una compresión de DDT™. Esta unidad eléctrica también cuenta
con un woofer de alta resistencia de 15” con bobina de voz de 3”. El PVXp Sub brinda una entrada balanceada a través de
una combinación de conectores que aceptan una entrada balanceada TRS de 1/4" y una entrada balanceada XLR. Hay dos
salidas balanceadas a través de XLR de paso alto y una salida XLR de rango amplio. Hay un Control de nivel ajustable y una
combinación de indicador LED que se ilumina cuando la unidad está encendida y cuando el circuito de “limitador suave” DDT
está activado.
Características
• Unidad de subwoofer, eléctrica, de graves, ventilada
• 800 watts de potencia pico disponible
• Woofer de alta resistencia de 15”
• El amplificador de potencia fuerza la refrigeración de aire para una mayor confiabilidad
• Red de frecuencia con nivel de la línea interna de paso bajo/alto
• Kosmos
• Enchufe de entrada XLR de 1/4"
• Dos salidas XLR de paso alto y una salida XLR de rango amplio
• Interruptor de polaridad para la inversión de polaridad en el subwoofer
• Interruptor de levantamiento a tierra para blindar el cable de levantamiento desde la tierra
• Ruedas grandes, con traba, de alta resistencia con cojinetes con amortiguación
• Parrilla de acero perforado de alta resistencia de cobertura completa
• Manijas de acero
• Dimensiones compactas para un sub basado en un woofer de 15”
• Montaje de pie roscado con altavoz de pie incluido
®
C completamente ajustable para impacto de graves mejorado
DESCRIPCIÓN
El Peavey
de 15”, acoplado a un amplificador de potencia, con potencias pico disponibles de 800 watts. La parrilla de acero perforada,
negra brinda protección total y una apariencia profesional, junto con las manijas de acero resistente y las ruedas altas de alta
resistencia de 4” para el transporte.
Cruce interno a nivel de línea con dos salidas de paso alto, amortiguadas eléctrica e independientemente; y un rango completo
a través de la salida, también amortiguado eléctricamente.
Se incorporan graves Kosmos
baja para brindar mayor versatilidad.
El sistema de polo montado roscado brinda una plataforma resistente y estable para montar un sistema de altavoces sobre el
sub woofer. Las series de altavoces eléctricos de dos vías PVXp son un excelente modelo para el PVXp Sub.
El amplificador de potencia del sistema de altavoces PVXp Sub que brinda la potencia es una unidad refrigerada por
ventilador, muy confiable, de baja distorsión que proporciona un total de 800W de potencia pico disponible para el sistema.
La fuente de alimentación para el amplificador es de tipo de interruptor para un bajo peso y alta eficiencia. Los amplificadores
poseen compresión DDT, que virtualmente elimina la sujeción audible del amplificador de potencia. La refrigeración la brinda
un ventilador no muy ruidoso, para que pueda funcionar correctamente en cualquier circunstancia.
La entrada es a través de un enchufe hembra XLR y un enchufe de teléfono TRS de 1/4” con entrada balanceada al
preamplificador/componentes electrónicos de EQ y control de nivel.
Un par independiente de Salidas de paso alto brinda una señal de salida amortiguada y balanceada para un par de altavoces
satélite para lograr alto rango de música, a través de un par de enchufes XLR machos.
®
PVXp Sub es un sistema de subwoofer eléctrico, ventilado, compacto que utiliza un woofer de alta resistencia
®
C mejorados exclusivos de Peavey para mejores golpes de graves desde una frecuencia muy
Page 94

El Rango completo a través de la salida tiene un conector macho XLR. Estas salidas permiten unir los sistemas
de altavoces adicionales, o alimentar la señal a otros dispositivos, etc. En el panel de entrada se incluye una
bahía para módulos funcionales adicionales tales como un receptor inalámbrico, entrada de audio digital o un
EQ de 10 bandas.
APLICACIONES
El Peavey PVX
de graves de sistemas de altavoces pequeños de amplio rango para refuerzo de sonido, anuncios públicos,
sistema de llenado lateral, karaoke y reproducción musical.
Una fuente típica de señal para las entradas a nivel de línea del Peavey PVXp Sub sería una consola de
mezclado con refuerzo de sonido (mezcladora) o la salida de un reproductor de CD, reproductor de MP3 o
equipo de cinta. La señal filtrada de alto paso desde el PVXp Sub se enviará al sistema de altavoz eléctrico de
rango completo, algo que disminuye el riesgo de bajos profundos desde el sistema de altavoces.
™
p Sub posee una variedad de aplicaciones, dentro de las que se incluye extender el rendimiento
PARTE INFERIOR DEL PANEL POSTERIOR
1
2
3
DISYUNTOR (1)
La unidad es una línea de corriente AC protegida contra sobrecargas y condiciones de falla con un disyuntor
de 5 amp. Este disyuntor no debe desconectarse a menos que haya una falla en el circuito del amplificador o
una condición anormal de funcionamiento que ocasione un flujo excesivo de electricidad. Si el disyuntor se
desconecta, coloque el interruptor de encendido (3) en APAGADO, espere un breve periodo para que se enfríe el
disyuntor y luego reinícielo.
Si el disyuntor se desconecta, el botón central saldrá aproximadamente 1/4" y se podrá reiniciar presionando
hacia arriba y adentro. En condiciones normales (no desconectado) el botón central está relativamente plano.
Si la unidad continúa desconectando el disyuntor, o se desconecta inmediatamente después de su reinicio, no
continúe reiniciándolo. Deberá llevar al equipo a un Centro de servicios calificados de Peavey para su reparación.
CONEXIÓN DEL CABLE DE ALIMENTACIÓN IEC (2)
Este receptáculo es para el cable de línea IEC (provisto) que suministra energía AC a la unidad. Es muy
importante asegurarse de suministrar el voltaje de línea AC correcto al PVXp Sub. Podrá encontrar el voltaje
adecuado para su PVXp Sub impreso al lado del cable de la línea IEC (potencia) en el panel posterior de la
unidad.
Lea esta guía atentamente para asegurar su seguridad personal y la seguridad de sus equipos. Nunca retire la
conexión a tierra en ningún equipo. Se incluye para su seguridad. Si el enchufe usado no cuenta con conexión
a tierra, se debe usar un adaptador adecuado y el tercer cable se debe conectar a tierra correctamente. Para
prevenir el riesgo de descarga eléctrica o incendio, siempre asegúrese de que el mezclador y los demás
equipos asociados tengan una conexión a tierra adecuada.
Page 95

INTERRUPTOR DE ENCENDIDO-APAGADO (3)
Este interruptor suministra energía CA al PVX™p Sub cuando se coloca en la posición ENCENDIDO. La posición
de ENCENDIDO queda con el lado izquierdo del interruptor presionado casi al nivel del panel posterior.
PARTE SUPERIOR DEL PANEL TRASERO
PANEL DE ACCESO PARA MÓDULO DE EXPANSIÓN OPCIONAL
Este panel SOLO se extrae al instalar una de las variedades de los módulos de expansión opcional que estarán
disponibles próximamente para el PVXp Sub.
Estos Módulos de expansión opcional trabajarán conjuntamente con la entrada ya presente en el PVXp Sub, o
proporcionarán una función en línea para la entrada 1, tal como el 10-band EQ, etc. Consulte con su distribuidor
de Peavey® disponibilidad y precio.
Si no instala el Modelo de expansión opcional, no retire esta cubierta; las instrucciones para instalar un Modelo
de expansión opcional vienen con cada Módulo de expansión y son específicas para ese Módulo.
5
9
6
11-12
7
4
13
8
10
ARRIBA - CONTROLES DE OPERACIÓN, ENTRADAS Y SALIDAS
ENTRADA (4)
La entrada a nivel de línea es de tipo balanceada con impedancia media. El enchufe es un conector combinado
hembra XLR y un conector TRS 1/4”.
LED (5)
Se ilumina en VERDE cuando el interruptor está conectado y hay alimentación.
Se pone ROJO cuando el amplificador de potencia activa el circuito de “limitador suave" DDT
parpadeo ocasional de la luz, pero no una iluminación constante o distorsión ya que serán excesivas.
™
. Se acepta el
También hay un LED en el bafle delantero del Sub que se pone AZUL cuando recibe alimentación y ROJO cuando
el amplificador de potencia activa el circuito de “limitador suave" DDT.
NIVEL (6)
Controla el nivel de ganancia o salida de la señal de entrada. Se usa para configurar directamente el nivel de
salida del sistema para una señal de entrada dada.
El uso normal es con la perilla a la mitad; esto es equivalente en ganancia a la entrada de un amplificador de
potencia típico.
Page 96

INTERRUPTOR DE POLARIDAD (7)
Brinda una polaridad de sub woofer ya sea de 0 u 8 grados
Este interruptor se usa junto con el Crossover Frequency Control (9) para brindar la mejor combinación entre la
salida del Subwoofer y la salida de altavoz satélite en la región de frecuencia.
INTERRUPTOR DE LEVANTAMIENTO DE TIERRA (8)
Para levantar el blindaje del cable desde el chasis a tierra, para romper bucles potenciales de la conexión a
tierra y reducir el zumbido.
CROSSOVER FREQUENCY CONTROL (9)
Varía la frecuencia de transición entre el Subwoofer y las Salidas de paso alto enviadas a los altavoces de los
satélites (11 y 12). Varía la frecuencia de transición eléctrica de 90 Hz a 180 Hz.
¡PRECAUCIÓN! ¡SI ESTE CONTROL SE CONFIGURA MUY BAJO, EL ALTAVOZ SATÉLITE PODRÁ ESTAR
SOBRECARGADO POR GRAVES PROFUNDOS!
™
Si se configura el control más bajo, NO se aumentará la salida de graves profundos del PVX
configuración de media (12 hs) a superior es mejor para la mayoría de los altavoces.
p Sub; una
MEJORA DE GRAVES DE KOSMOS® C (10)
Proporciona capacidad para agregar armonías de graves para mejorar la percepción de graves profundos en el
material del programa sin sobrecargar el altavoz del Subwoofer.
Este control funciona mejor si se usa con moderación; si se lo pone al máximo puede hacer que el material del
programa suene distorsionado o poco natural.
SALIDAS DE PASO ALTO (11 Y 12)
Estas salidas brindan una señal filtrada de paso alto para ser alimentada a un sistema de altavoz eléctrico de
rango completo, como el PVXp 10, PVXp 12 o PVXp 15. Se pueden utilizar otros altavoces eléctricos, y altavoces
pasivos de rango completo junto con un amplificador de potencia adecuado para hacerlo funcionar.
Estas salidas están electrónicamente amortiguadas y aisladas de la entrada y entre ellas, y su nivel no se ve
afectado por el Control de nivel PVXp Sub (6).
RANGO COMPLETO A TRAVÉS DE LA SALIDA (13)
Esta salida brinda una señal de rango completo para ser enviada a cualquier otro dispositivo que requiera de
una señal de rango completo como otro PVXp Sub, y algún otro dispositivo de audio de nivel de línea. Esta
salida está electrónicamente amortiguada y aislada de la entrada y de otras salidas.
INSTRUCCIONES DE FUNCIONAMIENTO
PRECAUCIONES
La unidad se debe desconectar de la fuente de alimentación CA antes de realizar trabajos en ella. Derive las
tareas de servicio a personal de servicio calificado.
La placa posterior se puede volver caliente al tacto. No bloquee ni cubra el ventilador o la rejilla de escape
de ventilación. Debe haber un espacio mínimo de 4" detrás del ventilador. No permita que el flujo de aire
quede bloqueado por objetos tales como cortinas o tapizados, aislamiento térmico de construcción, etc. Se
recomienda que la parte posterior del PVXp Sub no se coloque en un espacio cerrado o un espacio que no tenga
un flujo de aire fresco o frío.
NO conecte las entradas del PVXp Sub a la salida de un amplificador de potencia. Las entradas están destinadas
a ser accionadas desde una señal con intensidad a nivel de línea.
NO retire las parrillas de metal de protección.
¡ADVERTENCIA! ¡El PVXp Sub es muy eficiente y potente! ¡Este sistema de sonido puede dañar la audición de
forma permanente! ¡Use extrema precaución al ajustar el nivel máximo de volumen general!
Page 97

El nivel de sonido aparente del PVX
™
p Sub puede ser engañoso debido a su salida de sonido claro y limpio. La
falta de distorsión o deformación obvia puede hacer que el nivel de sonido parezca mucho menor que lo que es
en realidad. ¡Este sistema tiene una capacidad de SPL superior a 127 dB a 1 metro del altavoz!
CÓMO COLOCAR EL SISTEMA DE VOZ SATÉLITE SOBRE EL PVX
™
P SUB
El PVXp Sub tiene un montaje de pie roscado sobre la parte superior de la unidad, diseñado para combinar con
un pie roscado M20 de aproximadamente 32" de largo o menos. Este pie está específicamente diseñado para
ser utilizado con los siguientes sistemas de altavoces:
Peavey PVXp 10
Peavey PVXp 12
Peavey PVXp 15
No coloque un sistema de altavoz más alto/grande o pesado que el PVXp 15 sobre este pie, o podrá ser
inseguro ya que se puede volcar.
El PVXp Sub se debe colocar sobre suelo nivelado y firme, para que el altavoz montado al pie sea seguro y no
vuelque.
Cuando instala o desinstala el altavoz en el pie, es aconsejable contar con la ayuda de un asistente. Puede ser
difícil hacer coincidir el pie en el orificio del Subwoofer mientras se sostiene el sistema de altavoz a la distancia
del brazo.
Al usar el PVXp Sub y los pies en el exterior, nunca coloque carteles ni banderas a los pies o al sistema de
altavoz, ya que los vientos fuertes pueden ocasionar la caída del altavoz. Si existe la posibilidad de condiciones
ventosas, puede ser prudente considerar retirar el altavoz del pie para evitar que el PVXp Sub y el sistema de
altavoz montado al pie se caigan.
CÓMO CONECTAR LA ENERGÍA AC AL PVXP SUB
El PVXp Sub viene con un cable de conexión AC de conexión IEC de 6 pies. Si usa un cable de extensión
o bloque de enchufes con este altavoz eléctrico, asegúrese de que sea de buena calidad y de suficiente
capacidad de corriente como para mantener la seguridad y maximizar la capacidad de salida de potencia del
PVXp Sub. Para una máxima salida sin distorsión, no conecte ningún otro dispositivo al mismo cable al que se
conectó el PVXp Sub. No exceda la capacidad de la corriente nominal del cable de extensión con la suma total
de todas las unidades conectadas al mismo.
Cuando enchufa por primera vez el cable de AC del PVXp Sub, asegúrese de que el interruptor de energía esté
en posición de apagado, y luego enciéndalo una vez que ha conectado el cable de energía. El silenciamiento
incorporado se activará cuando se tome la secuencia de pasos apropiada.
NOTA ESPECIAL PARA INSTALACIÓN PERMANENTE
Al instalar el PVXp Sub, se usarán conexiones de energía AC por lo que se debe consultar a un electricista
certificado para asegurarse de que todos los cables AC cumplan con los códigos y reglamentaciones locales.
También se recomienda usar un gancho para cables correctamente sujeto al gabinete para aliviar la tensión
en el cable de alimentación IEC conectado al módulo del amplificador en (2) de tal forma que el cable de
alimentación no quede tirante ni vibre.
CÓMO CONECTAR LA SEÑAL AL PVXP SUB
Existen diferentes formas de entrar una señal al PVXp Sub.
La entrada (4) proporciona una entrada balanceada de nivel de línea, que permite el uso de un enchufe TRS
tipo teléfono de 1/4" (manga con punta de anillo) o un enchufe XLR macho. Por supuesto, también se puede
utilizar un enchufe de teléfono de 1/4" no balanceado pero no tendrá los beneficios del rechazo de conexiones
balanceadas de interferencia exterior, como zumbido y RFI.
¡No conecte los cables a los enchufes mientras la unidad está ENCENDIDA y la perilla de Nivel esté alta! Si bien
un cable estándar de un extremo equipado con un enchufe de teléfono de 1/4" funcionará bien y los circuitos
de entrada balanceada proporcionarán un cierto rechazo a las interferencias, un cable balanceado que usa
un enchufe de teléfono balanceado TRS de 1/4" o el enchufe XLR proporcionará un rechazo de interferencia y
rendimiento superior.
Page 98

En ocasiones, con difíciles problemas de interferencia, será útil levantar la conexión a tierra blindada (Conector
No. 1 de un XLR) en un cable balanceado en el extremo del PVX
p Sub. Esto se puede realizar fácilmente, al
activar el Interruptor de levantamiento de tierra (10) dentro del PVXp Sub. Verifique con cuidado los cambios en
la entrada, siempre bajando el Control de nivel antes de enchufar y desenchufar cables o elevar la conexión a
p Sub, ya que usualmente tienen un mejor blindaje
y los materiales proporcionarán una mayor confiabilidad a largo plazo. La mejor opción es un cable blindado
y balanceado que no sea más largo de lo necesario para llegar al PVXp Sub. Usualmente se recomienda dejar
un cierto exceso en la entrada al PVXp Sub y también encintar los cables o pasarlos por debajo de un conducto
pasa cables para evitar que las personas se tropiecen con ellos o hagan caer el PV®1015D cuando tiene un
aplicaciones diferentes. Con el Control de nivel ajustado totalmente en el sentido de las agujas del reloj, la
ganancia está en máximo y la sensibilidad de entrada es de 0,24 V RMS para la salida de valor completo.
preamplificador. Con esta configuración, la sensibilidad de entrada es de aproximadamente 2,4 voltios RMS
para la salida de valor completo. El PVXp Sub ahora se asemejará más a un amplificador de potencia típico.
Si el tablero de mezcla indica sujeción de sus señales de salida, toda la capacidad de potencia del PVXp Sub no
está siendo utilizada limpiamente. La sujeción de la señal antes del ingreso al PVXp Sub no es óptima. Reduzca
y un indicador LED para mostrar que el PVXp Sub DD
se ha conectado. Si el sonido parece estar altamente comprimido, verifique estos indicadores; si parpadea en
ROJO con mayor frecuencia, el nivel de accionamiento desde la mezcladora (o el control de nivel en el PVXp
Cuando se enciende el sistema de sonido por primera vez, encienda primero todos los equipos electrónicos
ascendentes, luego el PVXp Sub con su Control de nivel totalmente en el sentido contrario a las agujas del
reloj (hacia abajo). Comience por verificar los niveles con los controles de nivel de salida de la mezcladora
hacia abajo, y aumente lentamente el nivel con el control/es de nivel del PVXp Sub en el ajuste deseado (se
No se recomienda girar el Control de nivel en el PVXp Sub totalmente hacia arriba y luego intentar controlar
el nivel solamente desde el mezclador, ya que este enfoque tendería a aumentar el ruido en exceso. La mejor
práctica sería conducir una señal "caliente" desde la mezcladora por el cable hasta el PVXp Sub, y luego
subir el Control de nivel del PVXp Sub sólo lo necesario para llegar a la salida deseada. Con este enfoque, es
El método preferido para conectar el sistema de altavoz satélite de rango completo a las salidas de paso alto
del PVXp Sub (11 y 12) es un cable XLR balanceado no más largo de lo necesario para poder llegar al sistema de
Si el altavoz del satélite está sobre un pie sobre el PVXp Sub, un cable de 6 pies será demasiado largo. También
se podrá utilizar un cable de 10 o 20 pies, pero los cables de mayor longitud sólo producirán mayor captación
de interferencia y comenzarán a perder información de alta frecuencia. Se recomienda el uso de cables de alta
calidad para el PVXp Sub, ya que usualmente tienen un mejor blindaje y los materiales proporcionarán una
mayor confiabilidad a largo plazo. Usualmente se recomienda dejar un cierto exceso en la entrada al PVXp Sub
y también encintar los cables o pasarlos por debajo de un conducto pasa cables para evitar que las personas se
p es sobre el pie del
PVXp Sub. Al estar cerca, las siguientes configuraciones proporcionarán los mejores resultados en la región de
Observe que las salidas XLR (11 y 12) se han acolchado con 12 dB para permitir el uso de las entradas XLR en
PVXp 12 y PVXp 15. En general, estos son considerados las entradas de nivel del micrófono, pero con las salidas
™
tierra.
Se recomienda el uso de cables de alta calidad para el PVX
™
altavoz sobre el pie.
AJUSTE DE CONTROL DE NIVEL
El PVXp Sub está equipado con un Control de nivel (6) en la salida para facilitar el uso en numerosas
Se recomienda que el Control de nivel del PVXp Sub esté en posición 12 hs, o 0 dB de ganancia de
el nivel de salida de la mezcladora y suba el control de nivel del PVXp Sub.
El amplificador del PVXp Sub está equipado con DDT
Sub) se debe reducir.
™
recomienda mitad de la potencia como punto de partida).
necesario verificar que la salida de la mezcladora no esté en clipping.
CABLES DESDE SALIDAS DE PASO ALTO (11 Y 12)
altavoz satélite cómodamente.
tropiecen con ellos o hagan caer el PVXp Sub cuando está montado sobre las patas.
CONFIGURACIONES RECOMENDADAS PARA USAR EL PVXP SUB CON LOS ALTAVOCES
ELÉCTRICOS PVX
La ubicación ideal para colocar los altavoces eléctricos de rango completo serie PVX
frecuencia y un balance de tonos.
P SERIES
™
acolchadas de PVXp Sub, es posible el uso de entradas XLR en los altavoces eléctricos PVXp.
Page 99

PVXp 10
Interruptor de polaridad en Sub (7): Normal o IN
Crossover Frequency Control (9): Desde las 12 hs hasta haber completado el giro en sentido de las agujas del reloj.
Esto representa un rango de aproximadamente 110 HZ a 160 HZ para el punto de frecuencia. La configuración óptima
recomendada es la posición de giro completo en sentido de las agujas del reloj.
™
Niveles de control (6): Control de nivel PVXp
Sub en las 12 hs (0 dB), Control de nivel PVXp10 en las 12 hs.
PVXp 12
Interruptor de polaridad en Sub (7): Normal o IN
Crossover Frequency Control (9): Desde las 12 hs hasta haber completado el giro en sentido de las agujas del reloj. Esto
representa un rango de aproximadamente 110 HZ a 160 HZ para el punto de frecuencia.
La configuración óptima recomendada es marcando 2 tics pasadas las 12 hs.
Niveles de control (6): Control de nivel PVXp sub en las 12 hs (0 dB), Control de nivel PVXp10 – 2 tics antes de las 12 hs.
PVXp 15
Interruptor de polaridad en Sub (7): Normal o IN
Crossover Frequency Control (9): Desde las 12 hs hasta haber completado el giro en sentido de las agujas del reloj. Esto
representa un rango de aproximadamente 110 HZ a 160 HZ para el punto de frecuencia.
La configuración óptima recomendada es marcando las 12 hs.
Niveles de control (6): Control de nivel PVXp sub en las 12 hs (0 dB), Control de nivel PVXp 12 – 2 tics antes de las 12 hs.
¡PRECAUCIÓN! ¡SI ESTE CONTROL DE FRECUENCIA DE CRUCE SE CONFIGURA MUY BAJO, EL ALTAVOZ DE SATÉLITE PODRÁ
ESTAR SOBRECARGADO POR GRAVES PROFUNDOS EN SPL ELEVADOS!
Si se configura el control más bajo, NO se aumentará la salida de graves profundos del PVXp Sub; una configuración de
media (12 hs) a superior es mejor para la mayoría de los altavoces.
Si los altavoces serie PVXp no están sobre el Subwoofer en el pie, las configuraciones del interruptor de polaridad deberán
ser diferentes a lo que se brinda aquí. El Crossover Frequency Control puede ser que necesite estar configurado en un punto
inferior para que el Subwoofer y los satélites sumen bien a través de la región de frecuencia. La configuración anterior
funcionará mejor cuando el altavoz satelital y el Subwoofer están más cerca y esencialmente a la misma distancia del
público.
CÓMO CONFIGURAR LOS CONTROLES DEL PVXP SUB PARA UTILIZARLOS CON OTROS ALTAVOCES
SATÉLITE
Crossover Frequency Control (9): En general, para los altavoces satélites de rango completo, más pequeños, configure el
Crossover Frequency Control (9) a una configuración de frecuencia más alta. Para los altavoces satélites de rango completo,
más grandes, configure el Crossover Frequency Control (9) a una configuración de frecuencia más baja. En general, no se
necesitará configurar el Crossover Frequency Control mucho más abajo de las 12 hs, ya que una frecuencia de transición
inferior a 100 Hz no permitirá que el PVXp Sub y el altavoz satélite suenen bien juntos en la frecuencia de transición.
Interruptor de polaridad (7): Intente configurar el Interruptor de polaridad hacia atrás y adelante en cada frecuencia de
transición seleccionada, para así determinar qué posición del interruptor brinda la mejor salida de graves en la región de
transición.
Niveles de control (6): Comience con el Control de nivel del PVXp Sub en posición de las 12 hs, y ajuste el sistema de altavoz
satélite para coincidir con su nivel. Observe que si el Subwoofer se puede escuchar como una fuente de sonido separada,
entonces es probable que esté configurada en un nivel muy alto.
CÓMO CONFIGURAR EL CONTROL DE MEJORA DE GRAVES DE KOSMOS® C (10)
El Control de mejora de graves de Kosmos® C puede agregar salida y extensión de graves aparente al sonido reproducido,
especialmente cuando el material del programa tiene componente significativo por debajo de la frecuencia de corte de PVXp
Sub’s.
Cuando sea apropiado, el uso con criterio puede mejorar el disfrute de la música, y agregar golpes y boom a la mezcla.
Sin embargo, configurar el control a un nivel más alto que el óptimo puede traer aparejada distorsión o sonidos de graves
menos claros. En algunas ocasiones, será útil girar el control al máximo.
El uso típico incluye una configuración de la perilla de control entre la posición de Apagado (totalmente en sentido
antihorario) y la posición de 12 en punto (a mitad del recorrido hacia arriba). Entonces el efecto agregado es más sutil y
menos intrusivo durante ciertos momentos en la música, al tiempo que aún proporciona una mejora del sonido general.
Page 100

Observe que en la configuración extrema en sentido horario, la ganancia efectiva del Subwoofer aumenta, por lo que si
estuvo en el borde de la sujeción anteriormente, girar el Bass Enhance Control hacia arriba para causar la sujeción.
DESCONEXIÓN DE LA CORRIENTE CA DEL PVX
Recomendamos el uso del interruptor de corriente (3) para apagar la unidad en primer lugar, y luego puede
desconectarse el cable de corriente CA; esto minimiza la tensión en los amplificadores de corriente y los
transductores de la transición del apagado.
™
P SUB
RESOLUCIÓN DE PROBLEMAS
SIN RESOLUCIÓN DE PROBLEMAS
Primero asegúrese de que la unidad reciba corriente CA y esté ENCENDIDA. Verifique que el LED en el módulo
de amplificación de corriente esté encendido.
De lo contrario, asegúrese de que el interruptor de ENCENDIDO/APAGADO (3) esté en la posición ENCENDIDO y
verifique la conexión del cable de alimentación IEC (2) asegurando que esté totalmente conectado y asentado.
Asegúrese de que el cable de la línea CA esté enchufado en una salida de CA que funcione.
Finalmente, inspeccione el disyuntor (1). (Vea el panel posterior: disyuntor para obtener instrucciones de seguridad).
Una vez que haya verificado que la unidad recibe energía de CA, verifique que el PVX™p Sub reciba señal.
Temporalmente desconecte el cable que conduce a las entradas y conéctelo a otro dispositivo que pueda
reproducir la señal (es decir, un amplificador de potencia y altavoz). Si esto produce una señal, asegúrese de
que todos los controles de nivel usados estén subidos a un nivel satisfactorio (un tercio a la mitad).
Si el PVXp Sub ha sido sometido a la luz directa del sol o calor excesivo, se puede haber disparado la protección
térmica incorporada. En tal caso, apague el PVXp Sub y permita que se enfríe por un tiempo suficiente.
Si aún no hay salida, contacte a su distribuidor autorizado de Peavey o al centro de servicio internacional de Peavey.
ZUMBIDO O SILBIDO
Si elPVXp Sub produce un zumbido o silbido, puede relacionarse con la salida de CA. Intente enchufar el PVXp
Sub a una salida de CA diferente. En ocasiones, si se usa un disyuntor disyuntor diferente para la mezcladora
y elPVXp Sub, puede ocasionar problemas de zumbidos. A menos que no sea práctico, es mejor usar el mismo
enchufe de pared (disyuntor) para suministrar energía a la mezcladora y al altavoz eléctrico.
Asegúrese de que se usen cables blindados para conducir la señal a las entradas del PVXp Sub. Si se usan
cables de altavoz con enchufes de 1/4" como cables de entrada en lugar de cables blindados, tenderán a
producir un zumbido o silbido.
El zumbido puede relacionarse con un bucle de la conexión a tierra. Puede ser útil levantar la tierra blindada
(Clavija N.° 1) en el cable balanceado en el extremo del PVXp Sub. Esto se realiza fácilmente, al activar el
Interruptor Ground Lift (10) dentro del PVXp Sub. Verifique con cuidado los cambios en la entrada, siempre
bajando el Control de nivel antes de enchufar y desenchufar cables o elevar la conexión a tierra en el Sub.
Inspeccione para asegurarse de que los difusores de luz no estén en el mismo circuito que el PVXp Sub, la
mezcladora o un dispositivo de origen. Si se usan difusores de luz, puede ser necesario ENCENDERLOS o
APAGARLOS por completo para eliminar o reducir el zumbido. Este es un problema típico de interferencia del
cable de CA/difusor de luz, no una falla de diseño del PVXp Sub.
El tercer cable (enchufe a tierra) del enchufe de CA NUNCA se debe retirar ni quebrar, ya que representa un
potencial daño de seguridad.
SONIDO DISTORSIONADO O DIFUSO
Primero asegúrese de que la mezcladora (fuente de señal) no esté en sujeción ni funcione en exceso. Asegúrese
de que el control de nivel (6) en elPVXp Sub no esté configurado demasiado bajo. Verifique que el enchufe de
entrada esté completamente asentado en el toma de entrada en el panel trasero del PVXp Sub. Verifique que
no se haya enchufado un amplificador de potencia en el toma de entrada del PVXp Sub. Si se usa un cable de
extensión para suministrar corriente AC a la unidad, verifique que sea de capacidad suficiente y que no se use
también para suministrar corriente a otro dispositivo.
El PVXp Sub posee un refuerzo incorporado de bajos para extender y suavizar la respuesta natural de los
altavoces en el sistema, por lo que debe requerir poco o ningún EQ. Si se agrega externamente un aumento de
bajos excesivo al PVXp Sub, podría ocasionar la sobrecarga prematura a SPL. Reduzca la cantidad de EQ externa
(mezcladora, rack) y compruebe si se soluciona la distorsión.
 Loading...