

Page 1

CENTURY SERIES
GTx
OWNER’S MANUAL
Page 2

Congratulations on your purchase of a Century Series console. All of us at Crest Audio in Paramus, New
Jersey, USA, support your decision, knowing your console contains the finest combination of design and
manufacture in the industry.
While your new Century Series console is one of the most feature-packed available, great effort has been
put into making it simple to operate.
This manual explains the functions of your new console, how they operate and how they relate to each
other. If properly cared for, your new console will provide you with trouble-free, sonically accurate mixing
clear into the next Century and beyond.
Please keep the following contact information on hand:
Crest Audio Customer Service Dept.
100 Eisenhower Drive
Paramus NJ 07652 USA
TEL 201.909.8700 FAX 201.909.8744
http://www.crestaudio.com
Crest Audio Inc.
100 Eisenhower Dr., Paramus NJ 07652 USA
TEL: 201.909.8700 FAX: 201.909.8744
http://www.crestaudio.com
Printed in USA
Page 3

TABLE OF CONTENTS
Feature Overview 2
GTx
A brief description of the Vx design, features and functions.
Wiring Conventions 3
GTx
Contains diagrams indicating how connectors for Crest consoles are wired.
Rear Panel Connections 4
GTx
Details the rear panel input and output connections to be made to the GTx console.
Power Supply 6
GTx
A brief description of the rack-mountable Century Series consoles power supply.
Power Connections 7
GTx
A brief description of Crest console power connections.
Console Cooling 7
GTx
A brief description of the dual-fan cooling setup.
System Connections 8
GTx
Contains diagrams illustrating conventional system connections.
Input Module 10
GTx
Profiles the GTx input module. The module is illustrated and described.
Stereo Input Module 12
GTx
Profiles the GTx stereo input module. The module is illustrated and described.
Group Modules 15
GTx
Profiles the GTx group module. The module is illustrated and described.
Matrix Module 17
GTx
Profiles the GTx matrix module. The module is illustrated and described.
Master Section 19
GTx
Profiles the GTx master section. Modules are illustrated and described.
Meter Bridge 21
GTx
This section profiles the GTx meter bridge.
Technical Information Appendix A
GTx
Includes dimensions, specifications, console access details,
user options, console block diagram, and rear panel layout.
Glossary Appendix B
GTx
The specific details of console operation are described here.
Schematics Appendix C
GTx
Lists available schematics for all GTx Console Modules & Power Supply
PAGE 1
Page 4

GTX
Feature Overview
CENTURY SERIES
• Extensive Meter bridge provides signal level metering of
LEFT, RIGHT, CENTER/MONO, SOLO LEFT, SOLO
RIGHT, and 8 SUBGROUPS. The LEFT, RIGHT, CENTER/MONO and SOLO meters are of a larger size and are
centered on the meter bridge. For 64 and 52 positions frames
sizes only, metering is also provided for the 8 AUX SENDS.
All level meters are of the mechanical moving coil type, are
referenced to +4 dBu, and are illuminated by long-life LED’s.
• Variable Hi-Pass filter on input channels allows for precise
control over a signal’s unwanted low frequency content.
• Channel inserts are implemented using separate 1/4" TRS
jacks for send and return. An insert switch with indicator LED
allows A/B comparisons and signal processor bypass.
• Switchable Q on Hi Mid and Lo Mid EQ bands adds more
flexibility to an EQ circuit that already offers four sweepable
bands and selectable peak/shelving on the Hi and Lo bands.
• Dual concentric send controls for auxes 1&2, and 3&4, in
addition to sends 5-8 allow each input to send onto any or all
of the 8 aux buses, while occupying a minimal amount of module space.
• AUX pre/post switches. The first four aux sends can be
selected to be pre or post by the Aux 1-4 pre/post switch. In
addition, Aux pairs 5&6 and 7&8 each have designated
pre/post switches. The Pre source is internally selectable to
Pre-EQ or Pre-Fader.
• Discreet bus assignments and L-C-R (Left-Center-Right)
panning. Input channels and Effects Returns incorporate an
uncompromised bus assignment section. Features include true
L-C-R panning, standard panning, clean mono bus, discrete
bus assigns, and panable stereo bus assigns.
• Each input channel features a five-segment LED array,
including a signal present LED, three signal level LEDs and a
peak indicator.
• SSM/PMI high-quality preamplifiers on balanced microphone/line inputs for uncompromised audio quality and reliability. All IC’s within the audio path are socket mounted for
easy upgrade or service.
• 48 Volt switchable phantom power on all microphone inputs.
• Optional transformers available on all microphone inputs and
on Group, Left/Right, Mono, Aux, and Matrix outputs.
• Mono/Stereo PFL (Pre-Fader-Listen) and AFL (After-FaderListen) system. When a stereo module is used, the signal is
monitored in stereo while mono modules are monitored in
mono. Selected outputs may be monitored in mono or as stereo
pairs.
• Standard frame sizes include 44, 52, and 64 positions. The
Master section occupies four positions and Groups occupy
eight positions.
• Any frame size may be ordered short loaded for later expansion.
• Direct access to Group Mix buses allows expander mixers to
be easily patched into the console.
• Full facility effects return section includes Gain Control to
handle a wide range of input levels, High and Low frequency
EQ, Aux Sends, expanded bus assignment section, and level,
pan, PFL and Mute controls.
• Mute system on input channels is designed to mute both preand post-fader signals including those Aux sends used as monitors. When muted, PFL circuitry, Peak, Level, and Dynamic
Signal Present LED indicators remain fully operational.
• Twin power supply capability with automatic changeover
backup for uncompromised reliability. Second power supply
optional.
• Optional Matrix modules available, useful for the creation of
independent mixes using the main outputs and External Input
as signal sources.
• Optional Stereo Input modules available, useful for remote
feeds, effects inputs, and other mic or line level signals requiring stereo handling.
• Comprehensive Talkback section allows access to all primary
console outputs. Additional access provided to an external
location such as an on-stage monitor mixer system. External
signals can also be assigned into the talkback system including
Oscillator and Pink Noise source inputs.
• Left/Right summing switches to Aux 1-2 and Aux 3-4 allow
for simple setups of mixes by allowing Left/Right signals to be
blended with auxiliary mixes when used in recording applications. In contracting applications, this feature allows these Aux
outputs to act as additional distribution amplifiers for the
Left/Right signals.
PAGE 2
Page 5

CENTURY SERIES
Crest consoles are wired with connectors that are used throughout the professional audio industry. Wiring is as follows:
GTX
Wiring Conventions
INPUT XLR
1
3
2
TIP - POSITIVE
RING - NEGATIVE
PIN 1
PIN 3
PIN 2
PIN 1 = GROUND
PIN 2 = POSITIVE
PIN 3 = NEGATIVE
OUTPUT XLR
PIN 2
PIN 3
PIN 1
TIP - SEND
RING - RETURN
INPUT
SLEEVE - GROUND
Standard TRS
(Tip - Ring - Sleeve)
1/4" Plug
Input / Output Insert
INSERT
SLEEVE - GROUND
Standard TRS
(Tip - Ring - Sleeve)
TIP - LEFT
RING - RIGHT
SLEEVE - COMMON
1/4" Plug
ST. INPUT
Standard TRS
(Tip - Ring - Sleeve)
1/4" Plug
Stereo Program In
PAGE 3
Page 6
GTX
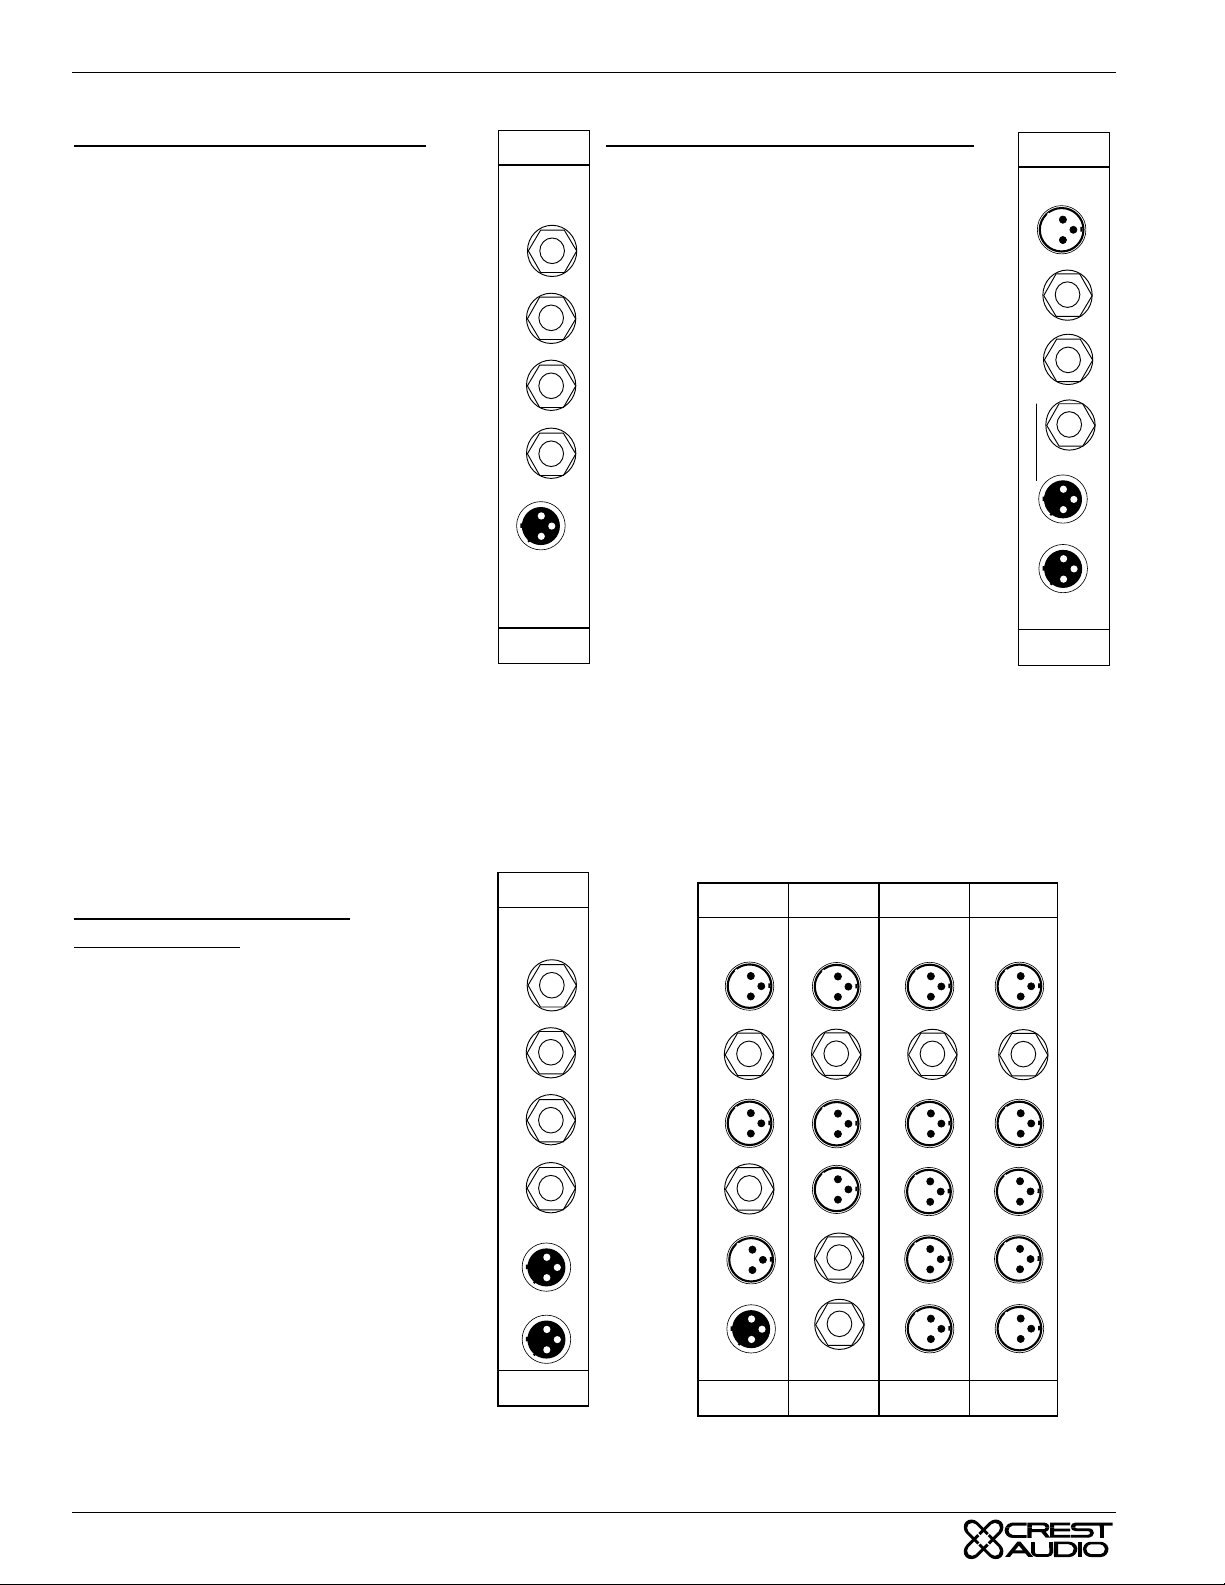
REAR PANEL CONNECTIONS
CENTURY SERIES
Input Module Connections
Direct Out
This 1/4-inch balanced TRS jack delivers the direct
output signal (post fader & post mute) from the
associated input channel.
DIR OUT
INSERT SEND
Insert Send
This 1/4-inch jack is used for sending a post-input
preamp, post Hi Pass Filter, pre-EQ signal to an
outboard processor. The signal at this jack is unbalanced and always active regardless of the Insert
Switch setting.
Bal Insert Return
This 1/4-inch balanced TRS jack receives it's signal from an outboard processor. It can also be used
to bring a signal into the channel, bypassing the
input preamp and gain circuit. The return input is
balanced and must be enabled by depressing the
channel Insert switch.
Bal Line In
This 1/4-inch balanced TRS jack accepts an balanced or unbalanced line level input, and delivers it
into the associated input channel.
BAL INSERT RETURN
BAL LINE IN
BAL MIC IN
1
3
2
GTx
Input
Module
Mic In
This XLR connector accepts balanced microphone inputs for
the associated input channel.
Group Module Connections
Group Out
This XLR connector carries the post-fader output
signal from the associated group module.
GROUP OUT
GRP INS SEND
Group Ins Send
This 1/4-inch TRS jack allows for the group signal to be sent to an effect or signal processor.
Bal Ins Return
This 1/4-inch balanced TRS jack allows for the
return of the effected and/or processed group signal back into the associated group.
EFX Return
These two connectors allow for effect signals to
be brought back into the board. The 1/4-inch balanced TRS jack accepts a balanced or unbalanced
signal at -10 dB level and delivers the signal to
the EFX return section. The female XLR connector accepts a balanced signal at +4dB level and
delivers the signal to the EFX return section of
the group. Signals from both jacks are mixed
together.
BAL INSERT RTN
EFX RETURN
-10
+4
1
3
2
BUS IN
1
3
2
GTx
Group
Module
Bus In
This XLR connector accepts a balanced signal at +4dB level,
and then sums it with all the other signals assigned to the associated groups.
Stereo Input Module
Connections
Insert L / Insert R
These ‘combined send & return’ TRS jacks are
used to insert effects or signal processing into the
Left and Right channels of the Stereo Input module.It can also be used to bring a signal into the
channel, bypassing the input preamp and gain circuit. The return input is enabled by depressing the
channel Insert switch.
Bal Line In L / Bal Line In R
These 1/4-inch balanced TRS jacks accept balanced or unbalanced line level inputs, and delivers
them into the associated (Left or Right) input channels of the Stereo Input.
Bal Mic In L / Bal Mic in R
These XLR connectors accept balanced microphone inputs, and delivers them into the associated
(Left or Right) input channels of the Stereo Input.
PAGE 4
INSERT L
INSERT R
BAL LINE IN L
BAL LINE IN R
BAL MIC IN L
1
3
2
BAL MIC IN R
1
3
2
GTx
Stereo
Input
Module
MATRIX A OUT
INSERT A
MATRIX B OUT
INSERT B
EXT TB OUT
EXT TB IN
1
3
2
MONO OUT
MONO INSERT
MONITOR L OUT
MONITOR R OUT
STR PGM IN
OSC/PINK IN
Master
Modules
GTx
RIGHT OUT
RIGHT INSERT
AUX 3 OUT
AUX 4 OUT
AUX 7 OUT
AUX 8 OUT
LEFT OUT
LEFT INSERT
AUX 1 OUT
AUX 2 OUT
AUX 5 OUT
AUX 6 OUT
Page 7
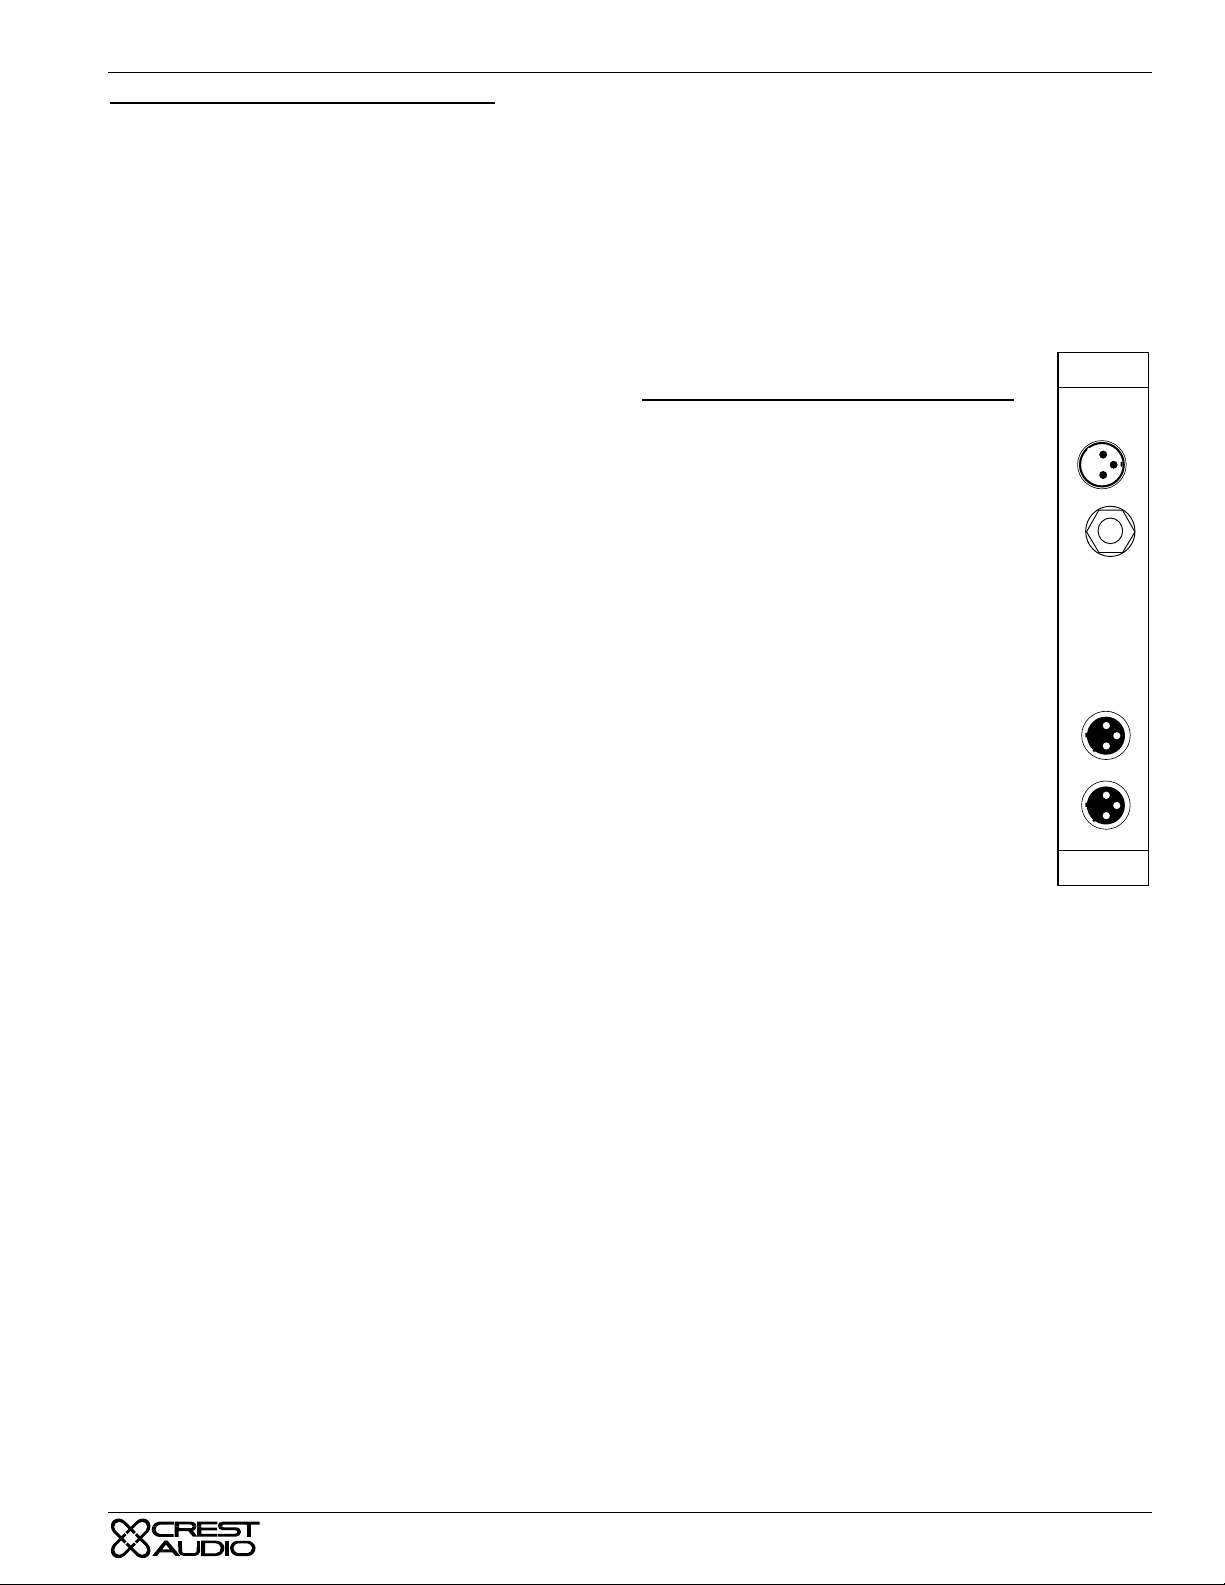
CENTURY SERIES
GTX
Master Module Connections
Matrix Out (A&B)
These two XLR connectors deliver a balanced signal from the
associated matrix sends.
Mono Out
This XLR connector delivers a balanced post-fader signal containing all signals assigned to the Mono clean bus.
Right Out
This XLR connector delivers a balanced post-fader signal containing all signals assigned to the right output.
Left Out
This XLR connector delivers a balanced post-fader signal containing all signals assigned to the left output.
Matrix Insert (A&B)
This ‘combined send & return’ TRS jack allows for the insertion of an effect or signal processor into the audio path of the
associated matrix.
Stereo Program In
This 1/4-inch jack accepts an unbalanced stereo line level signal. Polarity is as follows: Tip=Left, Ring=R,
Sleeve=Common.
Oscillator / Pink Noise In
This 1/4-inch TRS connector accepts a balanced or unbalanced
signal from an oscillator or pink noise generator. This signal is
assignable via the talkback assignment switches. Plugging into
this jack disables the internal 1kHz oscillator.
Matrix Module Connections
Matrix Out
MATRIX OUT
This XLR connector delivers a balanced signal
from the matrix module.
MTX INSERT
Matrix Insert
This ‘combined send & return’ TRS jack allows
for the insertion of an effect or signal processor
into the audio path of the matrix output.
Mono Insert
This ‘combined send & return’ TRS jack allows for the insertion of a signal processor into the path of the mono sub-mix.
Right Insert
This ‘combined send & return’ TRS jack allows for the insertion of an effect or signal processor into the audio path of the
right sub-mix.
Left Insert
This ‘combined send & return’ TRS jack allows for the insertion of an effect or signal processor into the audio path of the
left sub-mix.
Monitor Out (R&L)
These two XLR connectors provide a balanced signal for the
left and right local monitor.
Aux 1-8 Out
These eight XLR connections provide the balanced output signals from their respective auxiliary buses.
Ext. Talkback Out
This XLR connector provides an external balanced signal from
the selected talkback source.
Aux In 1
This XLR connector accepts a balanced signal at
+4dB level, which can be summed with all the
other signals in the matrix output.
Aux In 2
This XLR connector accepts a balanced signal at
+4dB level, which can be summed with all the
other signals in the matrix output.
AUX IN 1
1
3
2
AUX IN 2
1
3
2
Matrix
Module
Ext. Talkback In
This XLR connector accepts a balanced signal which is assignable to any of the locations in the talkback system.
PAGE 5
Page 8
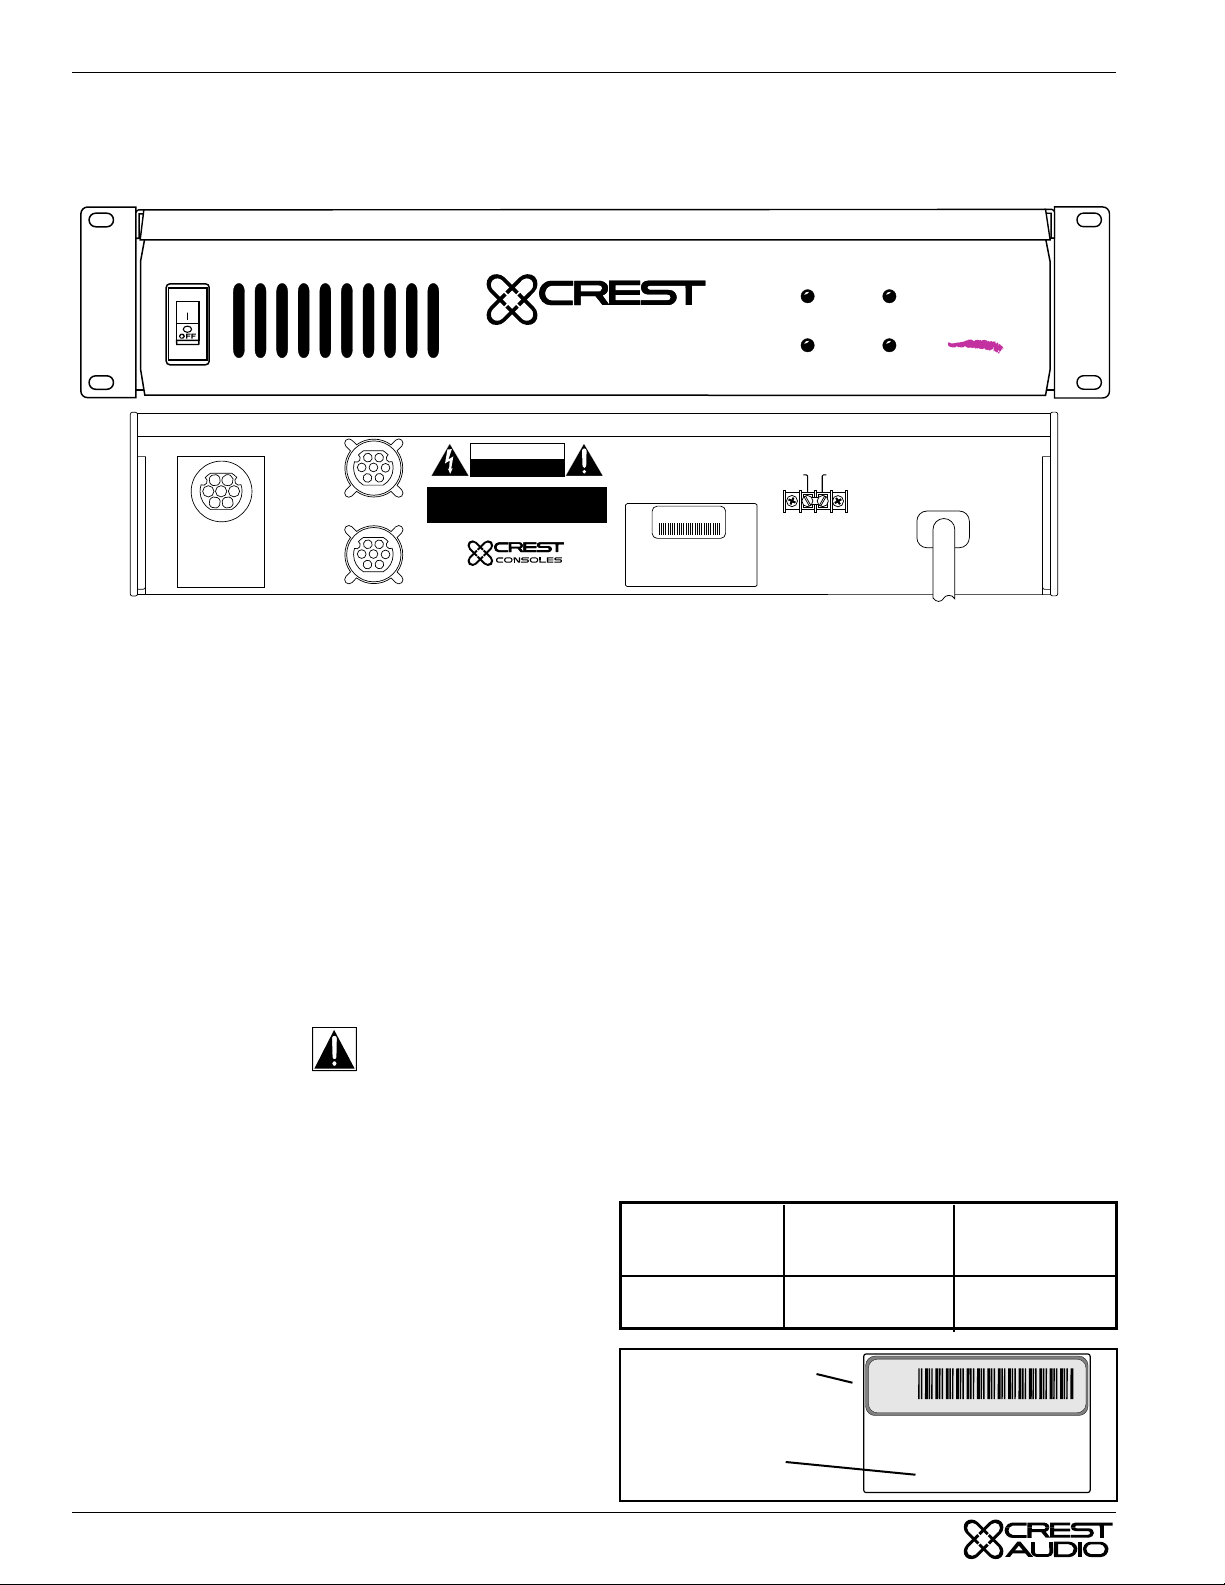
GTX
CENTURY SERIES
Century Series Console Power Supply
Century Series consoles use a separate rack-mountable power supply which provides the specific voltages used by each console.
Crest Consoles’ Century Series makes use of two different power supplies. All frame sizes (44, 52, 64) of the GTx console use
the Model XCVA06 Power Supply.
Press to Reset
ON
C O N S O L E S
Power Supply
CAUTION
RISK OF ELECTRIC SHOCK
AVIS : RISQUE DE CHOC ÉLECTRIQUE—NE PAS OUVRIR
WARNING TO REDUCE THE RISK OF FIRE OR ELECTRIC SHOCK DO NOT
ÉLECTRIQUE, NE PLACEZ PAS CET APPAREIL SOUS LA PLUIE OU Á
DO NOT OPEN
EXPOSE THIS EQUIPMENT TO RAIN OR MOISTURE.
ATTENTION! POUR ÉVITER LE RISQUE D'INCENDIE OU DE CHOC
L'HUMIDITÉ
Designed & manufactured in the USA by:
A division of Crest Audio Inc.
100 Eisenhower Dr.
Paramus, New Jersey 07652 USA
1
2
3
4
5
7
6
Pin 1 +24V
Pin 2 +20V
Pin 3 Analog
Pin 4 Analog
Pin 5 Digital
Pin 6 +48V
Pin 7 -20V
POWER OUT
POWER OUT
Supply Identification
The type of power supply can be identified by the model number shown on the back of the chassis and panel label..
Power Requirements
The Century Series power supplies have certain electrical
requirements to operate properly. If possible the power supply
should be connected to a dedicated circuit. Should any other
appliance on the same circuit draw enough current to overload
the circuit, the breaker or fuse will trip causing loss of power
to the console. Note the maximum current draw specifications
at right. Be sure that the circuit to which you connect the supply can handle the draw.
The power switch on the supply front panel is also a circuit
breaker, there is no power fuse. Should the supply ever shut
down, or trip at start up, simply push the switch to the off position and then on again.
Ground Linking
Safety Considerations -
Each new power supply is shipped with the AC third wire
ground connected to the console chassis ground. The connection is made at the rear of the power supply unit. This is necessary for safety reasons so that exposed metal parts are grounded. In the event of a live conductor making contact with the
console chassis or the power supply chassis then the current
will flow to ground without a safety hazard arising. Note that
when the console is disconnected from the power supply the
chassis ground connection to AC third wire ground is broken
and safety protection is lost. For uninterruptible grounding, in
a fixed installation for example, make a connection directly to
the console chassis from the safety ground. Disconnect the
ground link on the rear of the power supply. This disconnects
console ground from power supply AC third wire ground
which would otherwise create a hum-loop.
+20V
+48V
Model XCVA04
S/N
± 20V @ 4
+ 24V @ 4
+ 48V @ 1
+ 24V @ 6
± 20V @ 6
Model XCVA06
CONSOLE
GROUND
-20V
CHASSIS
GROUND
+24V
MAXIMUM AC IN:
XCVA04: 415 WATTS
XCVA06: 825 WATTS
6A
Twin Supply Operation
When twin supplies are in use for automatic back-up, then the
ground links on both supplies should be fitted.
In a situation where the safety ground to the console chassis
has been connected and the ground path via the power supply
is causing a hum-loop, then disconnect the ground links on
BOTH power supplies.
Console and Power Supply Grounding
Console chassis ground is electrically connected to audio
ground, pin 1 of XLR connectors and 1/4" sockets and to the
terminal 'CONSOLE GROUND' at the rear of the power supply. The AC third wire connection in the power supply cable
connects the metal chassis of the power supply to safety
ground. This connection should never be disturbed. Hazardous
voltages exist inside the power supply which require the case
to be grounded. When rack-mounted, the power supply ground
may transfer to the rack case thru the front fixing screws,
though this connection is not reliable. When a console is configured within a complete sound system the grounding requirements may call for the ground link to be disconnected. This is
permissible only when an alternative ground path has been
provided. If in doubt seek the advice of an experienced electrical engineer.
Power Supply
Model
XCVA06
Serial Number Tag
Model Number
Max Current
Draw @ 120V
9 Amps
S/N
Max Current
Draw @ 240V
5 Amps
Model XCPS-40
±20V @ 4
+24V @ 4
+48V @ 1A
+24V @ 6A
±20V @ 6A
XCVA06
Model
PAGE 6
Page 9
CENTURY SERIES
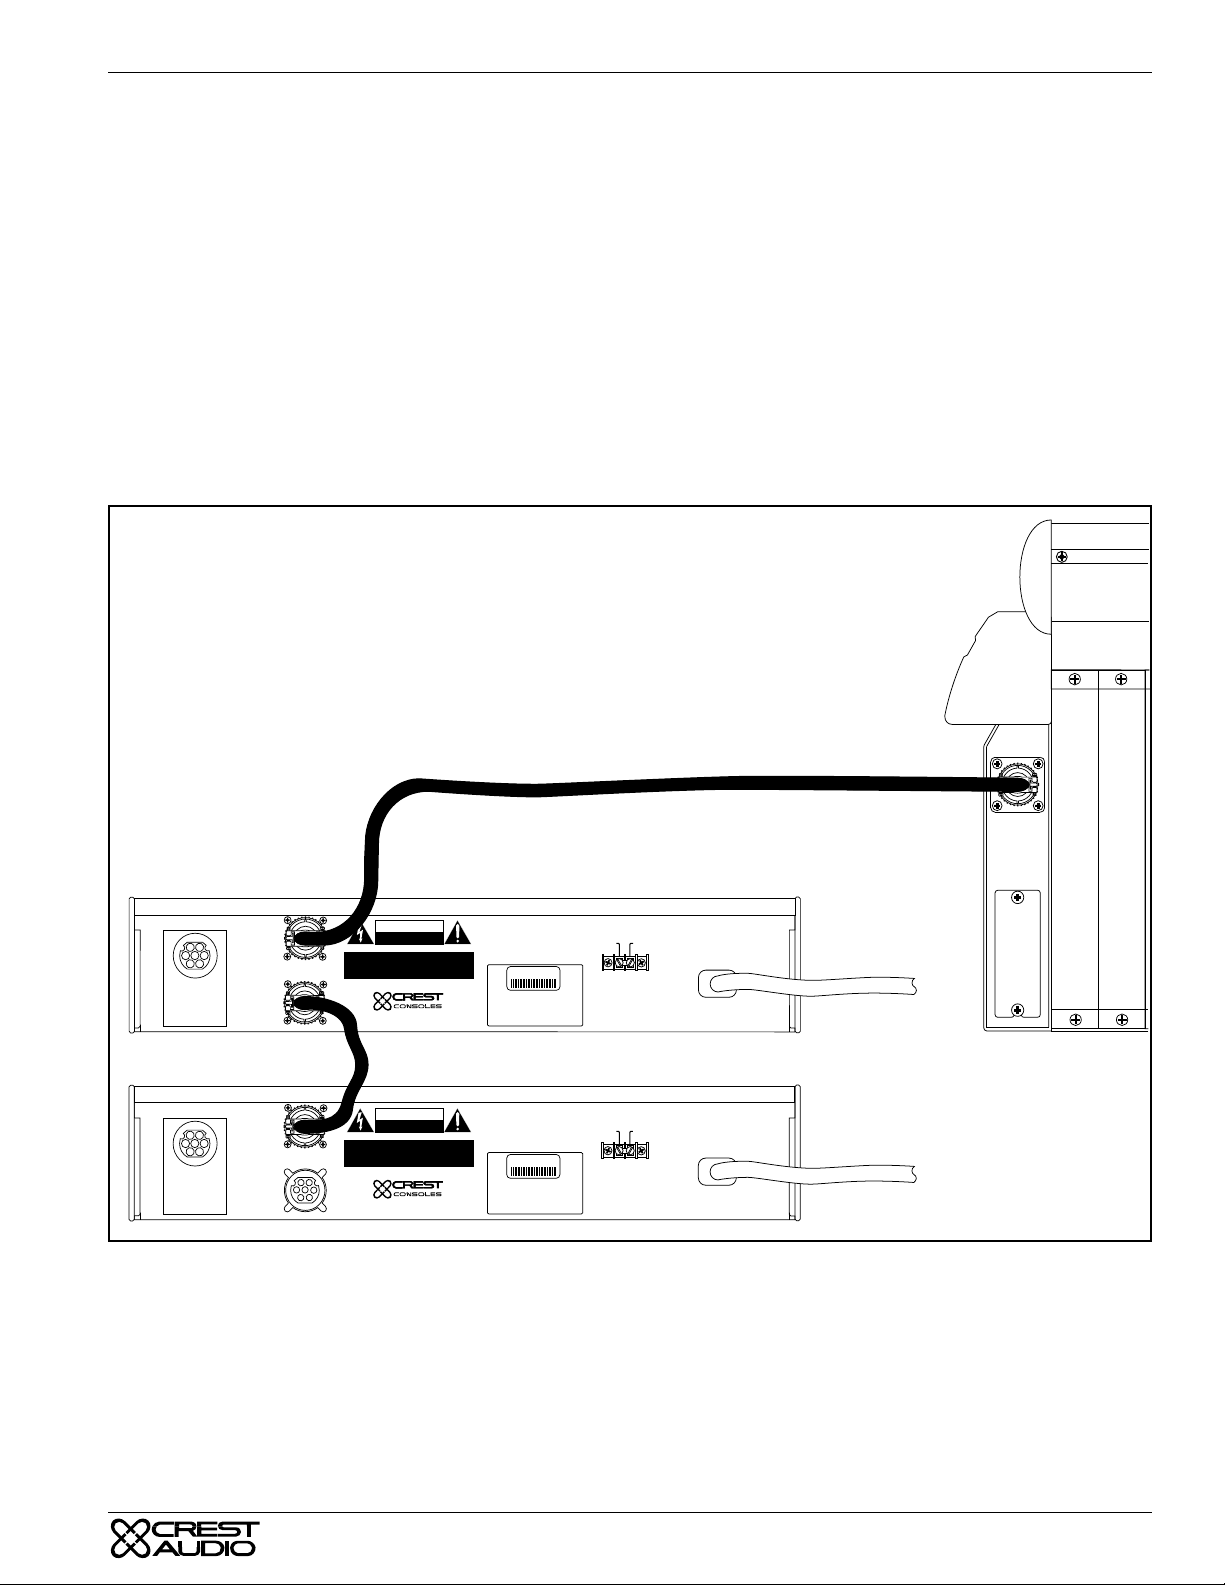
Power Connections
The connections to and from the power supply vary depending
on your specific configuration. Before setting up the console,
always check to make sure the AC voltage marked on the
power supply agrees with the local supply. Always connect the
console to the power supply before switching on the power
supply. Do not run the power supply if it is not connected to
the console.
Multiple power supplies can be daisy-chained to provide failsafe protection in the event of a supply failure. When two or
more supplies are used, both power supplies run all the time. In
the event of supply failure, the remaining power supply(s) will
take over the entire load.
GTX
NOTE: Although both of the multi-pin connectors on the back
of the power supply are labeled “POWER OUT”, it is necessary (and acceptable) to link two power supplies together as
shown in the diagram below.
ADDITIONAL NOTE: The multi-conductor cable used for
power supply-to-power supply connection is different than that
used for a conventional power supply-to-console connection,
and must be specified when the second power supply is
ordered.
Ground Link
To Console
CAUTION
RISK OF ELECTRIC SHOCK
DO NOT OPEN
AVIS : RISQUE DE CHOC ÉLECTRIQUE—NE PAS OUVRIR
WARNING TO REDUCE THE RISK OF FIRE OR ELECTRIC SHOCK DO NOT
EXPOSE THIS EQUIPMENT TO RAIN OR MOISTURE.
ATTENTION! POUR ÉVITER LE RISQUE D'INCENDIE OU DE CHOC
ÉLECTRIQUE, NE PLACEZ PAS CET APPAREIL SOUS LA PLUIE OU Á
L'HUMIDITÉ
Designed & manufactured in the USA by:
A division of Crest Audio Inc.
100 Eisenhower Dr.
Paramus, New Jersey 07652 USA
Model XCVA04
S/N
± 20V @ 4
+ 24V @ 4
+ 48V @ 1
+ 24V @ 6
± 20V @ 6
Model XCVA06
CONSOLE
GROUND
CHASSIS
GROUND
MAXIMUM AC IN:
XCVA04: 415 WATTS
XCVA06: 825 WATTS
To AC Mains
1
2
4
5
6
7
Pin 1 +24V
Pin 2 +20V
Pin 3 Analog
Pin 4 Analog
Pin 5 Digital
Pin 6 +48V
Pin 7 -20V
POWER OUT
3
POWER OUT
Interface Cable
POWER OUT
1
2
3
4
5
6
7
Pin 1 +24V
Pin 2 +20V
Pin 3 Analog
Pin 4 Analog
Pin 5 Digital
Pin 6 +48V
Pin 7 -20V
POWER OUT
Console Cooling
A cooling fan configuration is included in all GTx consoles. Two fans (one at each end of the console) draw air in through the
sides of the chassis (under the sidebars). Air is distributed through the chassis via a “vortex pan”, then proceeds up through the
console modules, where the heated air exits the console chassis.
Once the console is powered up, cooling fans remain on. A rear panel switch permits the fans to be set at low, medium or high
speeds.
There are no filters to change or clean. As with any console, use in dusty/unclean environments should be avoided.
CAUTION
RISK OF ELECTRIC SHOCK
DO NOT OPEN
AVIS : RISQUE DE CHOC ÉLECTRIQUE—NE PAS OUVRIR
WARNING TO REDUCE THE RISK OF FIRE OR ELECTRIC SHOCK DO NOT
EXPOSE THIS EQUIPMENT TO RAIN OR MOISTURE.
ATTENTION! POUR ÉVITER LE RISQUE D'INCENDIE OU DE CHOC
ÉLECTRIQUE, NE PLACEZ PAS CET APPAREIL SOUS LA PLUIE OU Á
L'HUMIDITÉ
Designed & manufactured in the USA by:
A division of Crest Audio Inc.
100 Eisenhower Dr.
Paramus, New Jersey 07652 USA
Model XCVA04
S/N
± 20V @ 4
+ 24V @ 4
+ 48V @ 1
+ 24V @ 6
± 20V @ 6
Model XCVA06
CONSOLE
GROUND
CHASSIS
GROUND
MAXIMUM AC IN:
XCVA04: 415 WATTS
XCVA06: 825 WATTS
To AC Mains
PAGE 7
Page 10
GTX
CENTURY SERIES
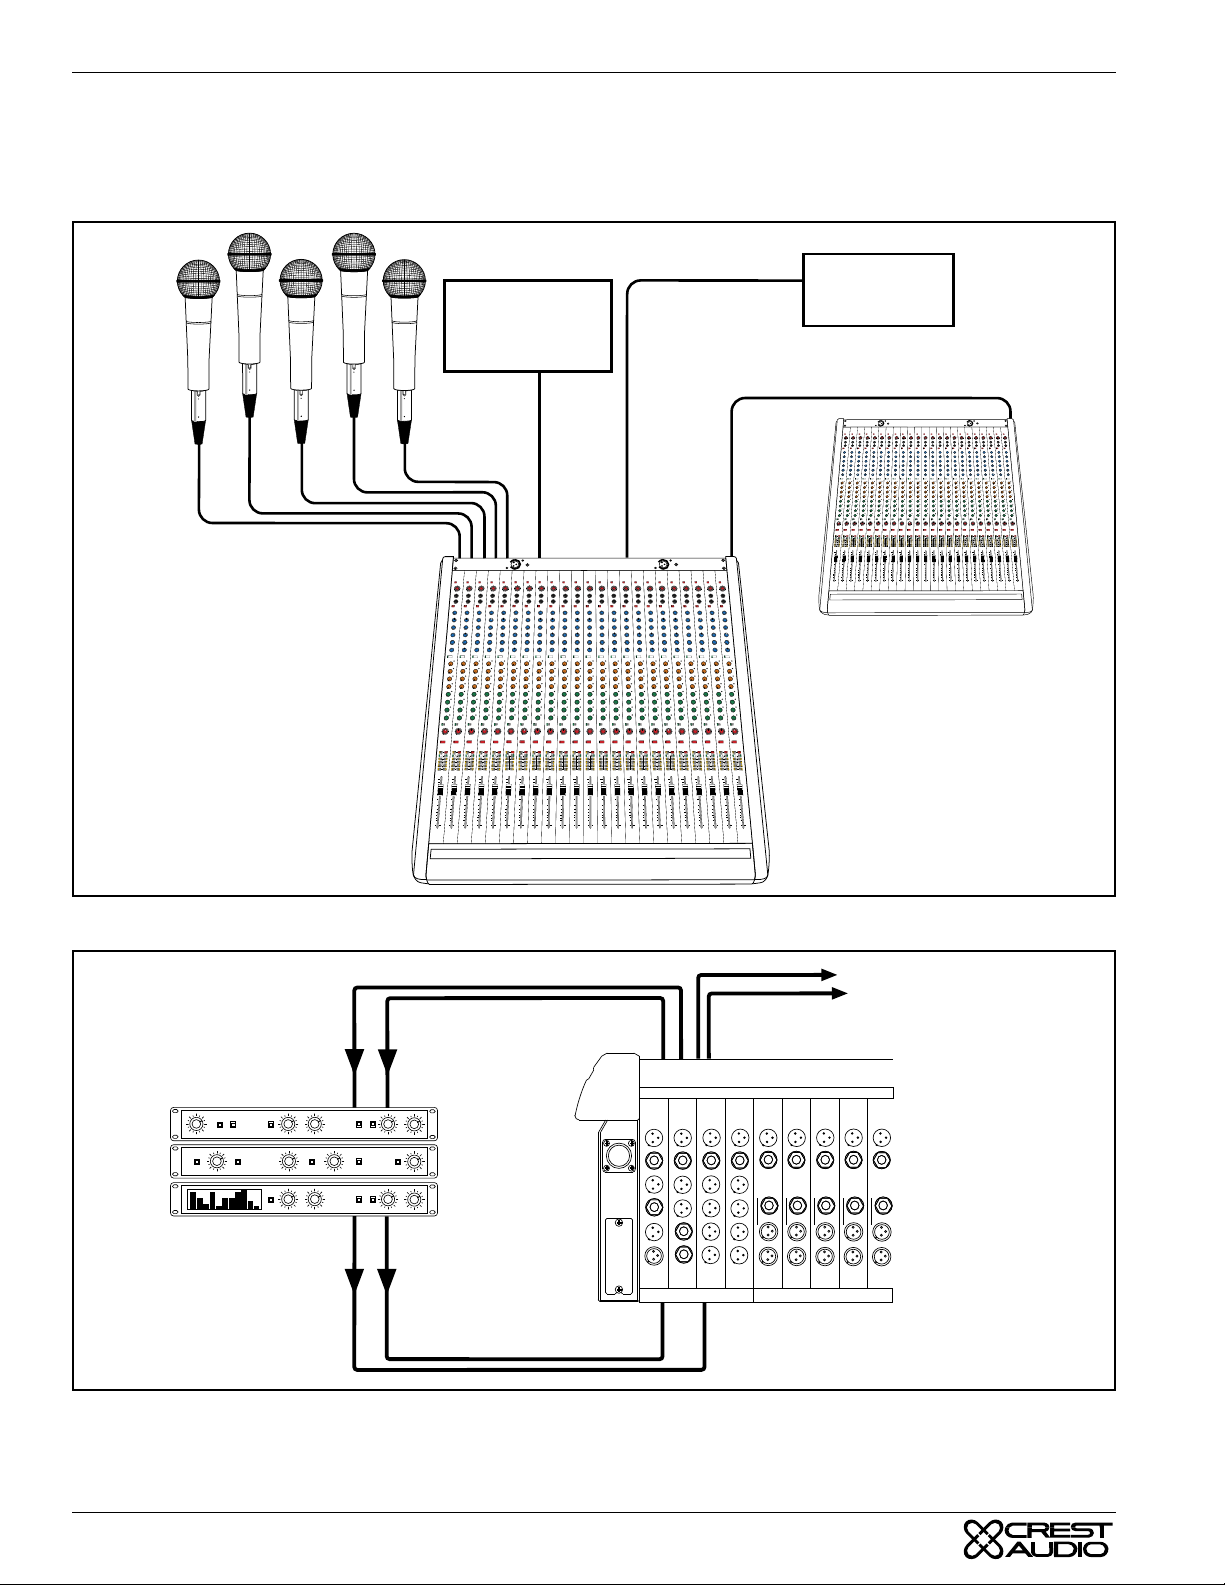
System Connections
The console is the hub of a sound system. Because it controls most of the variables within a system, proper connection and component relationships are vital to assure accurate operation and results. The following diagrams illustrate conventional system connections.
Balanced Mic Inputs
Input Processing,
via Input Module
Insert Send and Return
Connections
CENTURY
10
10
10
10
10
10
10
10
0
5
10
15
20
30
40
60
0
0
0
0
0
5
5
5
5
5
10
10
10
10
10
15
15
15
15
15
20
20
20
20
20
30
30
30
30
30
40
40
40
40
40
60
60
60
60
60
10
10
10
10
0
0
0
0
0
0
5
5
5
5
5
5
10
10
10
10
10
10
15
15
15
15
15
15
20
20
20
20
20
20
30
30
30
30
30
30
40
40
40
40
40
40
60
60
60
60
60
60
Balanced Line Inputs
10
10
10
10
10
10
10
10
10
0
0
0
0
0
5
5
5
5
5
10
10
10
10
10
15
15
15
15
15
20
20
20
20
20
30
30
30
30
30
40
40
40
40
40
60
60
60
60
60
10
0
0
0
0
0
5
5
5
5
5
10
10
10
10
10
15
15
15
15
15
20
20
20
20
20
30
30
30
30
30
40
40
40
40
40
60
60
60
60
60
Drum Machines
External Mixer
Input via Group Bus In
10
0
5
10
15
20
30
40
60
Keyboards,
Samplers,
10
10
10
10
10
10
10
10
10
0
0
0
0
0
0
0
0
0
5
5
5
5
5
5
5
5
5
10
10
10
10
10
10
10
10
10
15
15
15
15
15
15
15
15
15
20
20
20
20
20
20
20
20
20
30
30
30
30
30
30
30
30
30
40
40
40
40
40
40
40
40
40
60
60
60
60
60
60
60
60
60
CENTURY
10
10
0
0
5
5
10
10
15
15
20
20
30
30
40
40
60
60
10
10
10
10
10
10
10
10
10
10
10
0
0
0
0
5
5
5
5
10
10
10
10
15
15
15
15
20
20
20
20
30
30
30
30
40
40
40
40
60
60
60
60
10
0
0
0
0
0
0
0
0
5
5
5
5
5
5
5
5
10
10
10
10
10
10
10
10
15
15
15
15
15
15
15
15
20
20
20
20
20
20
20
20
30
30
30
30
30
30
30
30
40
40
40
40
40
40
40
40
60
60
60
60
60
60
60
60
Input Connections
Signal Processors
Aux Connections
In
Out
From Aux 5-8 out
To effects returns
MONO OUT
MATRIX A OUT
MONO INSERT
INSERT A
MONITOR L OUTMATRIX B OUT AUX 3 OUT AUX 1 OUT
INSERT B
MONITOR R OUT AUX 4 OUT AUX 2 OUT
EXT TB OUT
STR PGM IN
OSC/PINK IN
EXT TB IN
Aux 1-4 out to
monitor amplifiers
GROUP OUT
RIGHT OUT LEFT OUT
LEFT INSERTRIGHT INSERT
GROUP INSERT
EFX RETURN
-10
AUX 7 OUT AUX 5 OUT
+4
AUX 8 OUT AUX 6 OUT
BUS IN
Master
GROUP OUT
GROUP INSERT
EFX RETURN
-10
+4
BUS IN
GROUP OUT
GROUP INSERT
EFX RETURN
-10
+4
BUS IN
GROUP OUT
GROUP INSERT
EFX RETURN
-10
+4
BUS IN
Groups
GROUP OUT
GROUP INSERT
EFX RETURN
-10
+4
BUS IN
PAGE 8
Page 11

CENTURY SERIES
GTX
Clip/Limit
Signal
Temp/DC
Active
-6
-6
-10
-10
-3
-3
-15
-15
-1
-1
-30
-30
-80
-80
0dB
0dB
Ch B
Ch A
Input Channel
Direct Outs
feed to remote
mixer/recorder
8001 Professional Power Amplifier
Left Out
Local Monitor L
Clip/Limit
Signal
Temp/DC
Active
-6
-6
-10
-3
-10
-3
-15
-15
-1
-1
-30
-30
-80
0dB
-80
0dB
Ch A
Ch B
Monitor Out
10
10
10
0
0
0
5
5
5
10
10
10
15
15
15
20
20
20
30
30
30
40
40
40
60
60
60
Clip/Limit
Signal
Temp/DC
Active
-6
-6
-10
-10
-3
-15
-15
-1
-30
-30
-80
-80
0dB
Ch B
Ch A
7001 Professional Power Amplifier
From Local
10
10
10
10
0
5
10
15
20
30
40
60
10
10
0
0
0
0
0
5
5
5
5
5
10
10
10
10
10
15
15
15
15
15
20
20
20
20
20
30
30
30
30
30
40
40
40
40
40
60
60
60
60
60
-3
-1
0dB
CENTURY
10
10
0
0
5
5
10
10
15
15
20
20
30
30
40
40
60
60
8001 Professional Power Amplifier
Local Monitor R
Center
Out
Right Out
Clip/Limit
Signal
Temp/DC
Active
-6
-6
-10
-10
-3
-3
-15
-15
-1
-1
-30
-30
-80
-80
0dB
0dB
Ch B
Ch A
8001 Professional Power Amplifier
Matrix Outputs
to remote
location, mixer,
or recorder
10
10
10
10
10
10
10
10
10
10
10
0
0
0
0
0
0
5
10
10
15
15
20
20
30
30
40
40
60
60
0
5
5
5
5
5
5
10
10
10
10
10
15
15
15
15
15
20
20
20
20
20
30
30
30
30
30
40
40
40
40
40
60
60
60
60
60
10
0
0
0
0
0
5
5
5
5
5
10
10
10
10
10
15
15
15
15
15
20
20
20
20
20
30
30
30
30
30
40
40
40
40
40
60
60
60
60
60
Output Connections
Headphone Outputs:
1 under armrest,
1 in Master Module
PAGE 9
Page 12
GTX
40
30
205070
80
40
20
8
3
1.5K
2
1K
6
400
6
4
2
100
200
100
40
5
46
3
2
1
0
5
46
3
2
1
0
5
46
3
2
1
0
5
46
3
2
1
0
5
46
3
2
1
0
5
46
3
2
1
0
AUX SENDS
+48V
LINE
PAD
150
400
INSERT
20K
PEAK
4
Q
Q
4
800
PEAK
EQ IN
10
10
PRE
PRE
10
10
10
10
AUX 8
DIRECT
PRE
GAIN
300
HPF
Ø
15
HM
8K
LM
1K
2K
6
7
9
7
9
7
8
9
7
8
9
7
8
9
7
8
9
CENTURY SERIES
7
3
1
0
10
5
46
3
1
0
10
PRE
5
46
3
2
1
10
0
5
46
3
2
1
10
0
5
46
3
2
1
10
0
5
46
3
2
1
10
0
AUX 8
DIRECT
PRE
PRE
8
9
3
4
7
8
9
5
7
8
9
6
7
8
9
7
7
8
9
8
7
8
9
2
2
HF
6
AUX SENDS
PAN
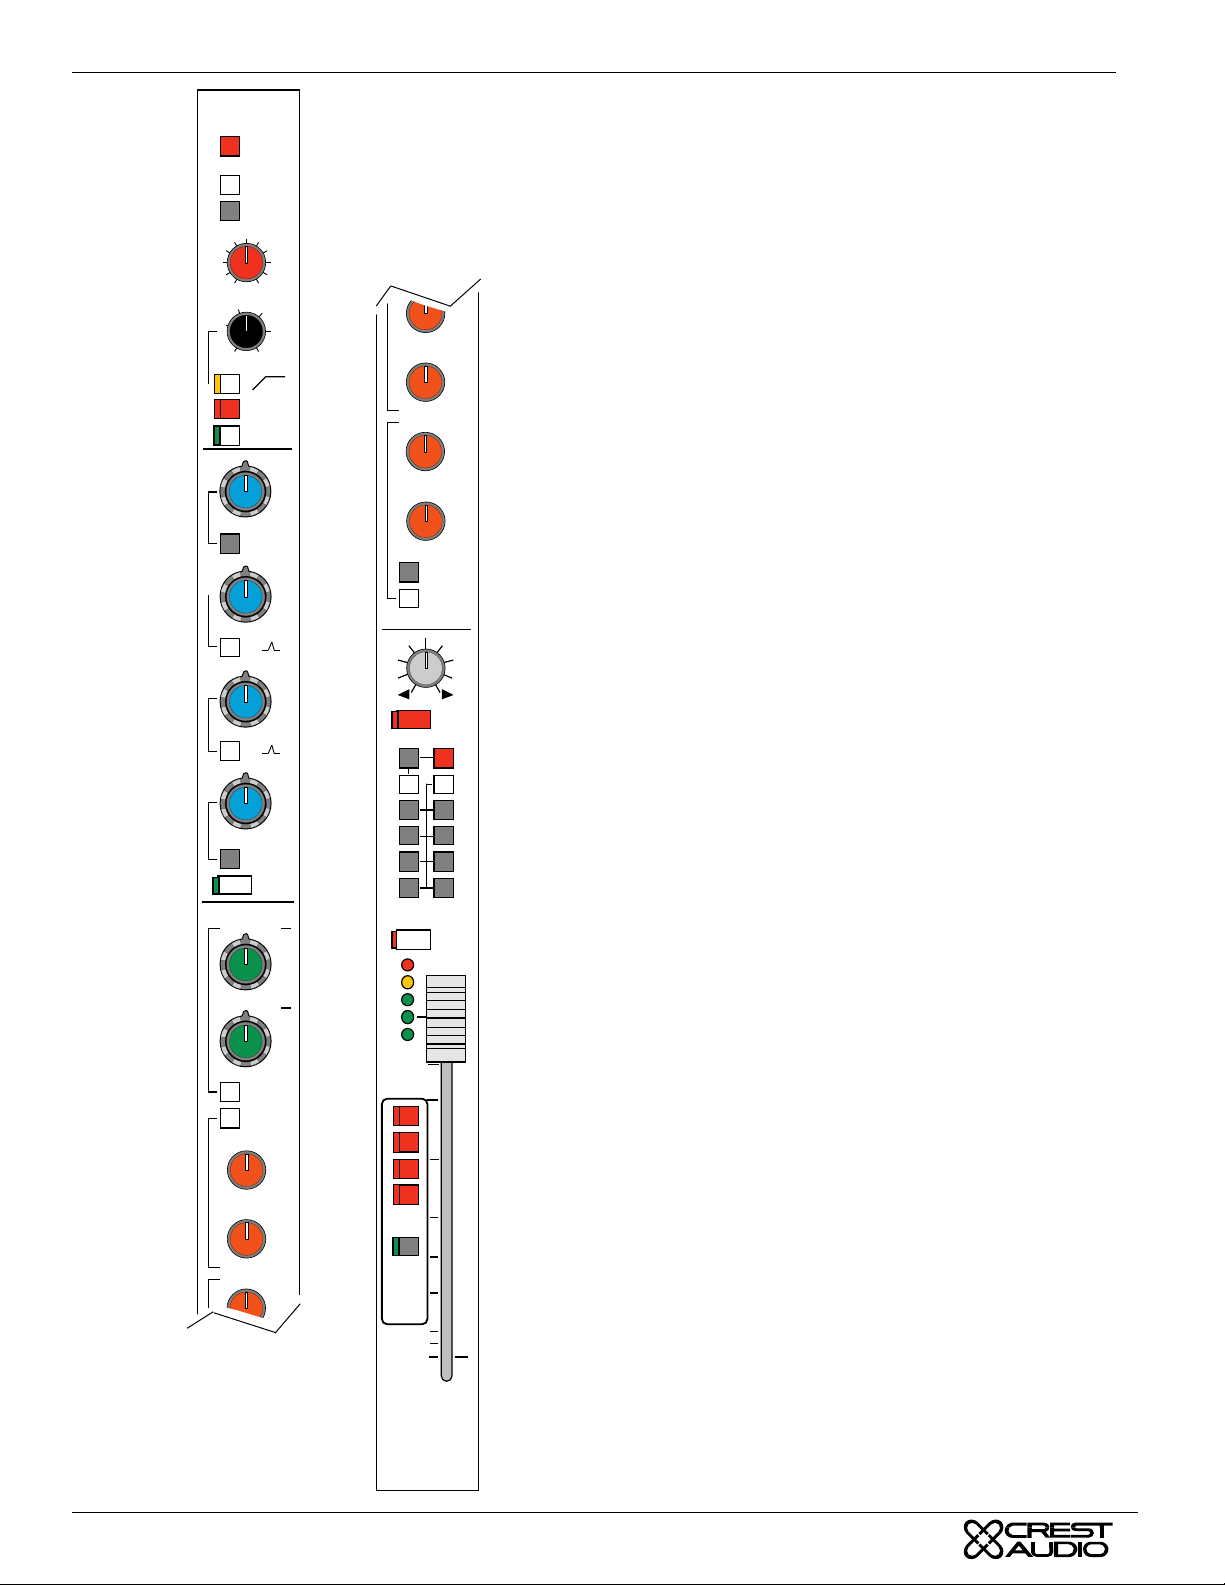
GTx Input Module
The input module is the main method by which input signals
are brought into the console. The GTx input module brings
several new features to the Century Series, including a 5-segment LED signal meter array, Adjustable Hi Pass filter, Insert
switch, four-band sweep EQ (with selectable peak/shelving
on HF & LF EQ bands and selectable Q on HM & LM EQ
bands), 8 discrete AUX sends, and L-C-R (Left-CenterRight) bus assignment section.
48V Phantom Power Switch
Applies 48 Volts DC to pins 2 & 3 of the microphone input
XLR jack for microphones requiring phantom power.
LINE Switch
Switches between the balanced female XLR microphone
Input connector and the balanced Line Input 1/4" TRS connector.
PAD Switch
Introduces a -15 dB attenuation to the mic input signal, useful
when handling high-gain signals.
GAIN Control
Adjusts input gain for proper signal level. Maximum gain is
70 dB.
Adjustable High Pass Filter
MUTE
PFL
L
C
R
P
A
N
2
4
6
8
10
5
0
5
10
15
20
30
LF
1
2
8
3
4
8
5
6
7
8
M
LR
1
3
5
7
PK
+8
0
-6
SIG
SCENE
MUTE
SELECT
SAFE
A - D
Reduces all low frequency content at a -12db per octave rate
adjustable from 20 to 400 Hz (-3db point). Yellow LED illuminates when switch is down.
Polarity Reverse Switch
Inverts the polarity of both the microphone and line inputs.
The red LED illuminates when switch is down.
INSERT Switch
Switches any signal processing patched into the Input module
(via the rear panel Send/Return jacks) in and out of the signal
path. Associated green LED is illuminated when switch is
down.
Four-Band Sweep Equalizer Controls
There are two knobs for each of the four bands. The inner
knob controls the boost or cut (15 dB); the outer knob controls the center frequency. Center frequencies are indicated
around the outer knob.
PEAK/SHELVE HF Switch
Used for switching the high frequency EQ between the normal shelving setting to a peak setting.
SWITCHABLE Q on HI MID and LO
MID EQ
Q is switchable between .8 (switch up) and 1.8 (switch
down).
PEAK/SHELVE LF Switch
Used for switching the low frequency EQ between the normal shelving setting to a peak setting.
PAGE 10
Page 13

CENTURY SERIES
GTX
EQ IN Switch
Inserts the EQ section into the input channel (post insert, pre
fader). An associated green LED illuminates when the switch
is down.
AUX SENDS 1&2 and 3&4 Individual
Level Controls
Adjusts signal level sent to respective Aux buses. The signal
source for these mixes may be selected pre or post fader by an
associated switch. AUX pairs 1&2 and 3&4 are configured as
dual concentric pots with the inner knobs controlling the odd
sends (1&3), and the outer knobs controlling the even sends
(2&4).
PRE/POST Switch
Switches the Aux 1&2 and Aux 3&4 signal sources between
pre and post fader positions.
AUX SENDS 5-8
Individual Level Controls
Adjusts signal level sent to respective Aux buses. The signal
source for these mixes may be selected pre or post fader by the
associated AUX 5&6 PRE/POST or AUX 7&8 PRE/POST
switches.
Aux 8 Direct Switch
Removes the Aux 8 signal from the Aux 8 bus, and assigns the
signal to the direct out 1/4" connector on the rear panel, instead
of the normal post fader Dir Out signal.
AUX 5&6 PRE/POST Switch
Switches the Aux 5 & 6 signal sources between pre and postfader.
AUX 7&8 PRE/POST Switch
Switches the Aux 7 & 8 signal sources between pre and postfader
PAN CONTROL
Positions the channel image between left and right or between
left-center-right. (See L-C-R Switch)
MUTE Switch with LED
Mutes the channel and all send functions. Mute does not affect
the PFL switch or the Peak and Signal Present LED indicators.
Red LED illuminates when the channel is muted.
PAN Switch / Group Assign
Switches (1-8)
With PAN switch down, the PAN control varies the level of
the group assignments with odd numbered groups on the left
and even numbered groups on the right. With PAN switch up,
groups can be individually selected and are unaffected by the
PAN control. Group assign switches route signals to the Group
buses.
PFL Switch
Samples the channel’s signal (pre-fader) and allows for monitoring within the master section of the console. This signal is
not affected by the Mute switch. When depressed, the signal
level can be seen on the Solo meters (which brighten in intensity), and can be heard via the mixer’s headphone or local
monitor output. When this PFL switch is depressed, the associated yellow LED illuminates.
5-Segment LED Array
The signal is monitored pre-fader. Signal Present LED (green)
responds to levels as low as -30 dB and comes to full brightness at -8dB, varying in intensity according to level. -6dB LED
(green), 0dB LED (green), and +8 dB (yellow) illuminate
accordingly. The Peak (red) LED responds to overloads at
three points in the module; pre-EQ, post-EQ, and post-fader.
100mm Fader
Used for control of all outputs of the channel except those Aux
output sections selected by the PRE/POST switch to a prefader position. (The Insert output level is not affected by the
fader position.)
Scene Mute Assignment Buttons
Assigns input channels to any of the four Scene Mute groups.
Scene Mute combines with the module’s local Mute button,
and actuates the local Mute LED.
Scene Mute Safe Switch
Disables any selected Scene Mute assignments. An associated
green LED indicates the channel is in a Safe state.
MONO Bus Assign Switch
Assigns the input signal directly to the Center / Mono bus.
L-C-R Switch
Configures Left/Right and Center/Mono assignments for L-CR panning. To enable L-C-R panning, L-R and Mono assign
switches must be down.
PAGE 11
Page 14

GTX
7
3
CENTURY SERIES
1
10
0
5
46
3
1
0
10
PRE
PRE
5
46
3
1
10
0
5
46
3
1
10
0
5
46
3
1
10
0
5
46
3
1
10
0
STEREO
7
8
9
7
8
9
7
8
9
7
8
9
PRE
WIDTH
MUTE
9
7
9
BAL
8
3
4
8
5
6
7
8
P
A
N
2
4
6
8
STEREO
—
+48V
30
205070
80
40
20
LINE
PAD
40
GAIN
150
300
400
HPF
2
2
2
2
Ø
INSERT
–O+
88
16 16
HF
8K
12K
6K
4K 16K
–O+
88
16 16
MF
400
250
LF
100
1
8K
300
–O+
88
16 16
150
300
40
1K
EQ IN
6
2
2
AUX SENDS
M
LR
1
3
5
7
GTx Stereo Input Module
The GTx Stereo Input module is essentially two GTx Input
modules packaged to fit into a one-module space. This module is very useful for accepting remote feeds, effects outputs
and other signals that require stereo handling.
48V Phantom Power Switch
Applies 48 Volts DC to pins 2 & 3 of the both L and R XLR
inputs, for microphones requiring phantom power.
LINE Switch
Switches between the balanced XLR Microphone Input connector and the balanced Line Input 1/4" TRS connector for
both L and R channels.
PAD Switch
Introduces a -20 dB attenuation to the mic input signal for
both L and R XLR inputs.
L GAIN & R GAIN Controls
These concentric controls adjust input gain for proper signal
level for both Left and Right inputs. Maximum gain is 70 dB.
Inner knob is for L GAIN, outer knob is for R GAIN.
Adjustable High Pass Filter
For both Left and Right inputs, reduces all low frequency
content at a -12db per octave rate adjustable from 20 to 400
Hz (-3dB point). Yellow LED illuminates when switch is
down.
Polarity Reverse Switch
For both input channels, inverts the polarity of both the
microphone and line inputs. An internal jumper selects
between Left channel only (default) or both Left & Right
channels. When this switch is pushed, an associated LED
lights.
INSERT Switch
5
46
3
2
1
0
10
5
46
3
2
1
0
10
PRE
PRE
5
46
3
2
1
10
0
5
46
3
2
1
10
0
5
46
3
2
1
10
0
5
46
3
2
1
10
0
PRE
STEREO
AUX SENDS
1
2
7
8
9
3
4
7
8
9
5
7
8
9
6
7
8
9
7
7
8
9
8
7
8
9
BAL
PK
+8
SIG
0
-6
SAFE
SCENE
MUTE
SELECT
A - D
PFL
10
5
0
5
10
15
20
30
Switches signal processor in and out of L and R signal paths.
Associated green LED is illuminated when switch is down.
Three-Band Sweep Equalizer
Controls
The equalization controls in this module act upon both L and
R stereo channels at once. All three EQ bands are set up as
sweep EQ’s: the upper knob controls the gain or cut (15 dB);
while the lower knob controls the center frequency adjusted
by the inner knob. Center frequencies are indicated around
the lower knob.
EQ IN Switch
Inserts the EQ section into both L and R input channel signals at once. An associated green LED illuminates when the
switch is down.
AUX Level 1&2 / 3&4
Adjusts signal level sent to respective Aux buses. The signal
source for this mix may be selected pre or post fader by an
associated switch. The left channel is sent to the odd-numbered Auxes, and the right channel is sent to the even-numbered Auxes.
PAGE 12
Page 15

CENTURY SERIES
GTX
PRE/POST Switch (1&2 / 3&4)
Selects the Aux 1&2 and Aux 3&4 signal sources between post
and pre-fader positions.
PRE/POST Switch (5&6)
Selects the Aux 5&6 signal sources between post and pre-fader
positions.
AUX 5 - 8 Individual Level Controls
Adjusts audio level of a mix for use as a monitor or an effect
send. The signal source for these mixes may be selected pre or
post-fader by an associated switch.
STEREO Switch
AUX 7&8 Individual Level Controls normally send a summed
(L+R) signal to the AUX outputs. When the STEREO switch
is depressed, AUX 7 and 8 become a send ‘left’ and ‘right’
send respectively. This can be used for a stereo effects send.
PRE/POST Switch (7&8)
Selects the Aux 7&8 signal sources between post and pre fader
positions.
WIDTH Control
When used together with the BAL(ance) control, the WID(th)
control provides a unique way to configure stereo panning.
When turned all the way counter-clockwise, this control conventionally assigns the left signal to the left (odd) channel
assignment, and the right signal to the right (even) channel
assignment. When adjusted to the ‘twelve o’clock’ position,
left and right signals are panned straight up the middle, effectively summing them to mono. When this knob is turned all the
way clockwise, the left and right signals are ‘flip-flopped’, left
being assigned to the right (even) side, and the right side being
assigned to the left (odd) side.
PFL Switch
Samples the channel’s signal pre-fader and allows for monitoring within the master section of the console. This signal is not
affected by the Mute Switch. When depressed, the signal level
can be seen on the Solo meters, and heard via the mixer’s
headphone or local monitor output. When this PFL Switch is
depressed, the channel PFL LED indicator illuminates.
PEAK LED Indicator
Illuminates RED when any of the points monitored come within 3db of the clipping point. Signal is sampled after the input
preamplifier stage, after the EQ section, and after the fader.
5-Segment Dual-Ladder LED Array
This dual LED array monitors the stereo signals pre-fader.
Signal Present LED (green) responds to levels as low as -30
dB and comes to full brightness at -8dB, varying in intensity
according to level. -6dB LED (green), 0dB LED (green), and
+8 dB (yellow) illuminate accordingly. The Peak (red) LED
responds to overloads at three points in the module; pre-EQ,
post-EQ, and post-fader.
100mm Fader
Used for control of all outputs of the channel except those Aux
output sections selected by switch to a pre-fader position. (The
Insert output level is not affected by the fader position.)
Scene Mute Assignments
Assign the input channel to any of the four Scene Mute groups.
Scene Mute combines with the module’s local Mute button,
and actuates the local Mute LED.
Scene Mute Safe Switch
Disables any selected Scene Mute assignments. An associated
green LED indicates the channel is in a Safe state.
BAL Control
Positions the entire channel image between the left (odd) and
right (even) channel assignment. Together with the WID control, this gives total control of the stereo image.
MUTE Switch with LED
Mutes the channel and all send functions. This switch does not
affect the PFL switch or the Peak and Signal Present LED indicators. The LED illuminates when the channel is muted.
MONO Bus Assign Switch
Assigns the input signal directly to the Mono bus.
Bus Assign Switches (L/R, 1-8)
Assigns the post Pan signals to mix bus in odd/even-numbered
pairs. Pan controls assignment between these two mix buses
with extreme left pan assigning signal exclusively to the oddnumbered mix bus and extreme right pan assigning signal
exclusively to the even-numbered mix buses. When the pan is
in its center position, signal is fed equally to the odd (left) and
even (right) mix buses. When used in stereo applications, the
channel signal may be located anywhere within the stereo
image as controlled by the Pan control.
PAGE 13
Page 16

GTX
3
7
1
10
0
EFFECTS
ASSIGNMENT
5
46
3
2
1
10
0
MUTE
PFL
PEAK
SIG
MUTE
MONO
L-R
LCR
Matrix
Post
Fader
Reverse
PFL
PEAK
SIG
9
PAN
LEV
7
8
9
PAN
8
L
C
R
P
A
N
2
4
6
8
10
GROUP
—
2
M
LR
1
5
46
A
3
7
8
2
9
1
10
0
5
46
B
3
7
8
2
9
1
10
0
MATRIX
GAIN
5
46
7
3
8
2
9
1
10
0
–O+
HF
88
16 16
–O+
LF
88
16 16
1
5
46
3
2
1
2
7
8
9
0
10
3
5
7
EFX RETURN
5•6
PRE
7•8
3
5
46
3
2
1
4
7
8
9
0
10
PAN
CENTURY SERIES
PAGE 14
EFFECTS
ASSIGNMENT
M
LR
1
3
5
7
5
46
3
2
1
10
0
MUTE
PEAK
SIG
EFX RETURN
PFL
5
0
L
C
R
P
A
N
5
2
4
10
6
8
LEV
7
8
9
SAFE
SCENE
MUTE
EFX
RETURN
A - D
15
20
30
Page 17

CENTURY SERIES
GTX
GTx Group Modules
The Group Module is where input signals are combined and
configured for grouped output; effects & aux assignment/routing are also accomplished here. Fully loaded GTx consoles
have eight group modules. Group number is indicated on PFL
switch.
Group Meter
Located on the meter bridge, it indicates the post-fader output
level of the group.
Matrix Levels (A, B)
Adjusts the level of group signal sent to the respective matrix.
Effect Return Gain
Controls gain on the signal returning from the attached effect.
Effect Return EQ Controls
Alter the effect return signal pre-fader by providing 16 dB of
boost and cut. Upper control is centered at 80Hz, while the
lower control is centered at 10 kHz.
Effect Aux Sends 1/2 (5/6)
A dual-concentric pot is used to control the level of effect
return signal sent to Aux Sends 1(center knob) and 2(outer
knob).
Aux 5•6 Switch
Switches function of Effect Aux Sends control between Auxes
1&2 and Auxes 5&6.
Pre/Post Switch
Switches effect return signal between pre & post Effect Level
Control.
Effect Aux Sends 3&4 (7/8)
A dual concentric pot is used to control the level of effect
return signal sent to Aux Sends 3(center knob) and 4(outer
knob).
Aux 7•8 Switch
Switches function of Effect Aux Sends control between Auxes
3&4 and Auxes 7&8.
Effects Assignment L-C-R Switch
Configures Left/Right and Center/Mono assignments for Left Center - Right Panning. L-R and Mono assign switches must
be down
Effects Assignment Pan Switch /
Group Assign Switches (1-8)
With PAN switch down, PAN control varies the level of the
group assignments with odd numbered groups on the left and
even numbered groups on the right. With PAN switch up,
groups can be individually selected and are unaffected by PAN
control. Group Assign switches assign signals to Group buses.
Effects (EFX) Return Pan
Positions the EFX Return signal between left & right, between
left-center-right, or between odd & even-numbered assigned
groups.
Effects (EFX) Return Level
Adjusts the final effect return signal level.
Effects (EFX) Mute
Mutes the effect return signal.
Effects (EFX) PFL
Allows for Pre-fader listening of the effect return signal.
Effects (EFX) Peak & Signal LED’s
The red LED indicates that the effect signal is within 3dB of
the clipping point. The green LED constantly displays the level
of signal activity by varying in intensity.
Group Pan
Positions group image between Left & Right output assignments.
Group Mute
Mutes the group signal except for the group insert send.
Group Mono Assign
Assigns the associated Group signal to the Mono bus.
Group L-R Assign
Assigns the associated Group signal to the Left and Right
buses. Exact assignment will be dependent upon the position of
the Group Pan control.
Group LCR Switch
Configures Left/Right and Center/Mono assignments for L-CR Panning. For L-C-R panning, Group L-R and Group Mono
assign switches must be down.
Matrix Pre/Post
Switches the Matrix send between pre and post-fader settings.
Fader Reverse w/LED
Swaps functions between the Effect Level control and the
group fader; one becomes the other.
Group PFL
Allows for Pre-fader Listening of the Group signal.
Group Peak & Signal LED’s
The red LED indicates that the group signal is within 3dB of
the clipping point. The green LED constantly displays the level
of group signal activity by varying in intensity.
Group Fader
Controls all post-fader group signal outputs.
EFX Return Scene Mute
Assignments
Assign the EFX return signal to any of the four scene mute
groups. Scene Mute combines with the effect’s local Mute button, and actuates the local Mute LED.
EFX Return Scene Mute Safe Switch
Disables all selected EFX Scene Mute assignments. An associated green LED indicates the return is in a Safe state.
PAGE 15
Page 18

GTX
MATRIX
—
+9
+6
+3
0
-3
-6
-9
-12
-15
-18
5
46
3
7
2
1
9
10
0
5
46
3
7
2
1
9
0
10
MATRIX AUX IN
MAINS
LEFT
5
46
3
7
2
1
9
0
10
RIGHT
5
46
3
7
2
1
9
10
0
MONO
5
46
3
7
2
1
9
10
0
5
46
3
7
2
1
9
0
10
STR
PGM IN
LEFT
|
MONO
|
RIGHT
5
46
3
7
2
1
9
0
10
5
46
3
7
2
1
9
0
10
5
46
3
7
2
1
9
0
10
5
46
3
7
2
1
9
0
10
GROUPS 1-4
GROUPS 5-8
5
46
3
7
2
1
9
0
10
5
46
3
7
2
1
9
0
10
5
46
3
7
2
1
9
10
0
5
46
1
8
2
8
8
8
8
8
1
8
2
8
3
8
4
8
5
8
6
8
7
8
8
5
46
3
2
1
0
10
5
46
3
2
1
0
10
5
46
3
2
1
0
10
5
46
3
2
1
0
10
GROUPS 1-4
GROUPS 5-8
5
46
3
2
1
0
10
5
46
3
2
1
0
10
5
46
3
2
1
10
0
5
46
3
2
1
0
10
MUTE
ENABLE
PEAK
SIG
CENTURY SERIES
1
7
8
9
2
7
8
9
3
7
8
9
4
7
8
9
5
7
8
9
6
7
8
9
7
7
8
9
8
7
8
9
TB
PFL
1
5
0
5
10
20
30
40
PAGE 16
Page 19

CENTURY SERIES
GTX
Matrix Module
The Matrix module allows the creation of an independent mix
using the Main outputs and an external inputs as signal
sources.
Matrix Meter
Shows output level of matrix module, 0dB=+4dBu.
Matrix AUX IN Controls
Controls level of external balanced input signals.
L & R MAINS Controls
Controls level of post fader L & R signals from main section.
MONO MAINS Control
Controls the level of post fader Mono signal from main section.
STR PGM IN Control
Controls level of Stereo Program being input into the matrix
from the mono master module circuit.
LEFT/MONO/RIGHT Switches
Selects which stereo program in signals are introduced into the
matrix.
GROUPS 1-4 Controls
Adjusts the level of Group signals 1-4 introduced into the
matrix.
PEAK LED Indicator
Illuminates RED when any of the points monitored come within 3db of the clipping point. Signal is sampled after the summing stage and after the fader. This LED also serves as a PFL
ON indicator, but at a much lower intensity than when it is
used to indicate clipping.
SIGNAL PRESENT LED
Constantly displays level activity of the matrix by varying in
intensity.
MATRIX OUTPUT LEVEL
Used for control of the Matrix output of the channel.
GROUPS 5-8 Controls
Adjusts the level of Group signals 5-8 introduced into the
matrix.
MUTE Switch with LED
Mutes the output. This switch does not affect the PFL switch
or the Peak and Signal Present LED indicators.
TB ENABLE Control
Injects the talkback signal from the Master section into the
matrix.
PFL Switch
Samples the matrix signal pre-fader and allows for monitoring
within the master section of the console. This signal
affected by the Mute switch. When depressed, the signal level
can be seen on the Solo meters, and heard via the mixer’s
headphone or local monitor output. When this PFL switch is
depressed, the PEAK LED illuminates at a lower intensity.
When used as a status indicator of switch position, the Peak
LED indicating circuit remains fully operational by illuminating at a much higher intensity than its use as a PFL status indicator.
is not
PAGE 17
Page 20

GTX
PFL
LR
LEFT
—
AUX
5
46
3
2
1
0
5
46
3
2
1
0
MATRIX
CENTURY SERIES
ON
RIGHT
—
AUX
MONO
LAMP DIM
+20
-20
+48
+24
—
POWER
MASTER
—
TB
MIC
ADDITIONAL JACKS
DC
LOCATED BELOW
ARMREST
AFL
5
46
3
2
1
0
5
46
3
2
1
0
10
10
AFL5
5
7
8
9
6
7
8
9
AFL6
PFL ON
5
A
7
8
9
10
B
7
8
9
10
46
3
2
1
0
46
3
2
1
0
A
7
8
9
10
5
B
7
8
9
10
MATRIX
5
46
3
2
1
0
5
46
3
2
1
0
MATRIX
10
10
HEADPHONES
A
7
8
9
5
B
7
8
9
46
3
2
1
0
7
8
9
10
PHONES
AFLON
AUX
MASTERS
MUTE
AFL
5
46
3
2
1
0
5
46
3
2
1
0
AFLON
AUX
MASTERS
ON
10
10
AFL7
AFL8
MUTE
7
7
8
9
8
7
8
9
PEAK
SIG
STEREO
PROGRAM
5
46
3
7
2
1
9
0
10
1•2
3•4
BLEND
L/RTO AUXES
MUTE
LEV
8
GROUPS
AUX
IN
1•2
3•4
5•6
7•8
MATRIX
A
B
ON
BACK
TALK
CONTROL
5
A
46
3
7
2
8
1
9
0
1
MUTE
AUX MUTE
ACTIVE
AUX
MUTES
5
46
3
2
1
0
5
46
3
2
1
0
AFL
5
46
3
2
1
0
10
10
AFL1
AFL2
ON
10
PEAK
SIG
MATRIX
MASTERS
PEAK
SIG
5
46
3
2
1
0
10
AFL
MUTE
AFL
7
8
9
B
PEAK
SIG
MONO
MATRIX
POST
LEFT
PFL
10
GAIN
5
46
3
AUX MUTE
ACTIVE
1
2
88
3
4
88
2
1
0
-0+
16 16
-0+
7
8
9
10
HF
LF
5
46
3
2
1
0
10
LOCAL
MONITOR
7
8
9
PFL
DEFEAT
DIM
16 16
PFL
MONITOR
CONTROL
MONO
MUTE
ON
5
6
AUX
MUTES
7
8
MONO
L- R
AUX
1•2
AUX
3•4
MATRIX
A- B
PEAK
SIG
MONO
MATRIX
POST
RIGHT
PFL
MATRIX
POST
MONO
CENTER
PFL
PEAK
SIG
10
10
A
OSC
5
46
3
2
1
0
ON
EXT TB
INPUT
LEV
7
8
9
10
EXT TB
OUTPUT
MONO
L- R
GROUPS
AUX
1•2
3•4
5•6
1
7
8
9
2
7
8
9
46
3
2
1
0
46
3
2
1
0
5
5
10
10
AFL3
3
7
8
9
4
7
9
2
8
5
46
3
1
10
0
7
9
BAL
LEV
8
MUTE
AFL4
PFL
AFL
ON
5
7
8
9
46
3
2
1
0
5
7
8
9
10
7
PEAK
SIG
STEREO
PROGRAM
IN
15
20
30
40
50
15
20
30
40
50
15
30
40
SCENE MUTE
50
B
C
D
AUX
MASTERS
PAGE 18
Page 21

CENTURY SERIES
GTX
GTx Master Section
The master section is the control center for the GTx console.
Monitoring, talkback, PFL, Stereo Program In, Master Aux &
Matrix, L-C-R, internal oscillator and Scene Muting functions
are all controlled here.
Lamp Dim Control
Controls the intensity of the lighting devices plugged into the
XLR sockets on the back of the meter bridge.
Talkback Mic Input
Allows for a microphone to be plugged in for use with the talkback system. An additional Talkback Mic Input jack can be
found next to the headphone jack on the front-right of the console under the arm rest.
Power Indicators
These four LED’s indicate the status of the four voltages used
by Century Series consoles.
Headphone Jack
Delivers right and left output, unless a PFL switch is
depressed. Whenever any signal is in PFL mode, the headphone jack will deliver that signal. An additional headphone
jack is located beneath the hand rest on the right-front part of
the console.
Headphone Level Control
Controls the signal level delivered to the headphone jacks.
L, R & Mono Matrix Sends
Controls level of Right, Left and Mono signals sent to the two
matrices.
Local Monitor Level Control
Controls level of signal delivered to the monitor outputs.
Auxiliary Mutes
Mutes the respective auxiliary sends.
PFL Defeat
Disables PFL function to the local monitor, allowing local
monitor output to function as an additional left/right output.
Dim Switch
This switch introduces a -12 dB attenuation into the local monitor and headphone outputs. It is disabled when PFL defeat is
depressed, auto-active when TB is on.
Mono Switch
Switches the local monitor output from standard stereo mode
to a mono mode.
Stereo Program In Gain
Adjusts the gain of the Stereo Program In signal.
Stereo Program In EQ
Two-band fixed frequency (10kHz and 80Hz) EQ that affects
the Stereo Program In signal.
Stereo Program In Assignments
Assigns the Stereo Program to the associated buses.
Local Monitor Mute
Mutes the local monitor signal output.
Aux Master Controls
Controls final output signal level of the auxiliary outputs.
Aux AFL Switches
Switch the eight auxiliary outputs to After Fader Listening
mode, via normal PFL signal path. Aux outputs can be monitored as stereo pairs if both AFL switches are depressed. If
only one is depressed, that AUX is monitored in mono.
External Oscillator Switch
Turns on the internal oscillator or accepts signal from the1/4"
TRS Oscillator input jack.
External Talkback Input Switch
Selects the external talkback input XLR as an input signal to
the talkback section and overrides the Oscillator.
Stereo Program Balance
Adjusts balance of stereo signal from Stereo Program input.
Stereo Program Level
Controls final output signal level of the Stereo Program.
Talkback Level Control
Controls the level of the selected talkback source.
External Talkback Output Switch
Turns on the external talkback XLR.
Stereo Program Mute
Mutes the output of the stereo program.
Stereo Program PFL
Allows Pre-fader Listening of the Stereo Program signal.
Talkback Assignment Switches
Assigns talkback signal to outputs, groups and/or auxes.
Blend Level
Controls level of L & R signal blended to assigned auxes.
Blend Assignment Switches
Assigns the Left and Right signals to the respective auxes thru
blend-level pot.
Talkback On/Off Switch
Turns the talkback system on and off.
Matrix Master Levels (A&B)
Controls the final output level of the respective matrix.
Matrix Master Mutes (A&B)
Mutes the respective matrix signal.
Matrix Master AFL (A&B)
Allows After-Fader Listening of the respective matrix signal.
Matrices A&B can be monitored as a stereo pair if both AFL's
are pressed; if one button is pressed, only one of them is monitored.
Scene Mute Master Switches
Turn on and off the four Scene Mutes.
Aux Scene Mute On/Off Switch
Turns the Aux Scene Mute system on and off.
L/R/Mono Mute Switches
Mute outputs of Left, Right and Mono signals respectively.
PAGE 19
Page 22

GTX
L&R Mono Assignment Switches
Assign the Left and Right signals to the Mono output.
L/R/Mono Matrix Post Switches
Switches the Left, Right and Mono matrix feed signals between
pre and post-fader.
L/R/Mono PFL Switches
Allow for Pre-Fader Listening of the Left, Right and Mono signals respectively.
L/R/Mono Peak & Signal LED’s
The red LED indicates that the signal is within 3dB of the clipping point. The green LED constantly displays the level of signal activity in the mix bus by varying in intensity.
L/R/Mono Faders
Adjust final output signal level of Right, Left and Mono outputs.
CENTURY SERIES
PAGE 20
Page 23

CENTURY SERIES
GTX
GTx Meter Bridge - 52 & 64 Frame Models
1
2
-3
-1
-5
0
-7
+1
-10
+2
-20
+3
Level
3
-3
-1
-5
0
-7
-7
+1
-10
-10
+2
-20
-20
+3
Level
GROUP Meters
Indicate the post-fader output of Group buses.
GROUPS
4
5
6
7
-3
-3
-3
-1
-1
-5
-5
0
0
-7
+1
+1
-10
+2
+2
-20
+3
+3
Level
Level
-3
-1
-1
-5
-5
0
-7
0
-7
+1
+1
-10
-10
+2
-20
+2
-20
+3
+3
Level
Level
8
-3
-3
-1
-1
-5
-5
0
-7
0
-7
+1
+1
-10
-10
+2
+2
-3
-3
-1
-20
-20
+3
Level
-5
-7
+3
-10
-20
Level
LEFT
-1
-5
0
0
-7
+1
+1
-10
+2
-20
+3
Level
-10
+2
-20
+3
Level
CENTER
RIGHT
SOLO L & SOLO R Meters
Indicate level of any signal selected for PFL.
LEFT, RIGHT & CENTER/MONO Meters
Indicate the post-fader output of the Left, Right, Center/Mono channels.
GTx Meter Bridge - 44 Frame Model
1
2
-3
-1
-5
0
-7
+1
-10
+2
-20
+3
Level
3
-3
-1
-5
0
-7
-7
+1
-10
-10
+2
-20
-20
+3
Level
GROUPS
4
5
6
7
-3
-3
-3
-1
-1
-5
-5
0
0
-7
+1
+1
-10
+2
+2
-20
+3
+3
Level
Level
-3
-1
-1
-5
-5
0
-7
0
-7
+1
+1
-10
-10
+2
-20
+2
-20
+3
+3
Level
Level
8
-3
-3
-1
-1
-5
-5
0
-7
0
-7
+1
+1
-10
-10
+2
-20
+2
-20
+3
+3
Level
Level
1
2
-3
-1
-5
0
-7
+1
-10
-3
-1
-5
-5
0
-7
-7
+1
-10
+2
-20
+3
Level
SOLO L
MONO
-3
-3
-1
-5
0
-7
+1
-10
+2
-20
+3
Level
SOLO R
+2
-1
-20
+3
0
+1
+2
+3
Level
Level
3
-3
-1
-5
-5
0
-7
-7
+1
-10
-10
+2
-20
-20
+3
Level
AUXES
4
5
6
7
-3
-3
-3
-1
-1
-5
0
0
-7
+1
+1
-10
+2
+2
-20
+3
+3
Level
Level
-3
-1
-1
-5
-5
0
-7
0
-7
+1
+1
-10
-10
+2
-20
+2
-20
+3
+3
Level
Level
-10
-20
C
ENTURY
8
-3
-3
-1
-1
-5
-5
0
-7
0
-7
+1
+1
-10
+2
+2
-20
+3
+3
Level
Level
AUX Meters
Indicate the 8 Aux output levels.
-3
-3
-1
-5
-5
0
-7
-7
+1
-10
-10
+2
-20
-20
+3
Level
RIGHT
LEFT
-3
-3
-1
-1
-5
-5
0
0
-7
+1
-10
+2
-20
+3
Level
CENTER
MONO
-7
+1
-10
+2
-20
+3
Level
SOLO L
-3
-1
-1
-5
0
0
-7
+1
+1
-10
+2
+2
-20
SOLO R
+3
Level
+3
Level
GROUP Meters
Indicate the post-fader output of Group buses.
LEFT, RIGHT & CENTER/MONO Meters
Indicate the post-fader output of the Left, Right, Center/Mono channels.
SOLO L & SOLO R Meters
Indicate level of any signal selected for PFL.
PAGE 21
Page 24

Page 25

GTx
Appendix A
Technical Information
Page 26

GTX
CENTURY SERIES
General Specifications GTx Console
The following are the technical specifications for the Century
GTx console.
Frequency Response
+0.0, -0.5dB, 20Hz to 20 kHz (referenced to 1kHz)
Total Harmonic Distortion
Mic input to Group output
20Hz to 20 kHz at +15dBu <0.01%
Noise (22Hz to 22kHz)
Mic EIN -129 dBu
Mix bus Output Noise (20 ch routed) - 80 dBu
Aux bus Output Noise (20 ch routed) - 80 dBu
Crosstalk (Measured at 1kHz)
Channel Mute >102 dB
Channel Fader Attenuation > 96 dB
Channel Routing > 85 dB
Channel Aux Send Attenuation > 93 dB
Input/Output Impedances
Mic Input 4kΩ balanced
Line Input >10kΩ balanced
Outputs 140Ω balanced
Input/Output Levels (0VU = +4 dBu, 1.23V RMS)
Mic Input Sensitivity + 4 to -62 dBu
Line Input Sensitivity + 12 to -38 dBu
Input Insertion Point Level + 4 dBu
Output Insertion Point Level - 2 dBu
Nominal Output Level + 4 dBu
Maximum Balanced Output Level +28 dBu
Configurations
Century GTx consoles are available in the following eight-bus
configurations:
32 inputs (44 Frame)
40 inputs (52 Frame)
52 inputs (64 Frame)
All Century GTx consoles are available with stereo input
modules and additional matrix modules.
Architect’s & Engineer’s
Specifications
The following text should be used when specifying a Century
GTx in a bid or proposal.
The GTx live sound console shall be constructed in a modular fashion and be housed
in a steel frame of (44, 52, 64) module positions. The console shall be usable in
either a 'tabletop' set up or with optional stands. A standard output module configuration will occupy 12 module positions including a standard 2 channel output matrix
system. The console shall be black with white labeling and utilize XLR lighting
device connectors with dimmer system. A meter bridge shall be included that monitors console signals using mechanical meters with solid state illumination. Signals to
be monitored include Left output, Right output, Mono (Center) output, Stereo PFL
signal and 8 group output signals. On 52 and 64 module position frames, 8 auxiliary
output meters are also to be provided. The console shall have a pair of XLR talkback
mic and headphone jack connectors, with one set being located beneath the far right
side of the armrest and a second pair on the top panel of the console. The GTx live
sound console shall feature a defeatable Left-Center-Right (LCR) panning system.
On each input channel: All microphone inputs shall be electronically balanced and
accessed via 3-pin XLR connectors and have an EIN of -129 dBm. All input channel
line inputs shall be electronically balanced and accessed via 1/4" TRS jacks. Input
module insert and return points shall be via individual 1/4" jacks and controlled by a
front panel switch with LED. Additional input controls include: a +48 volt phantom
power switch, a -15 dB pad switch (-20 dB for stereo input channels), adjustable
high pass filter control (20-400Hz) with on switch and LED, a polarity reverse
switch with LED, and 4-band sweep EQ (LF- 40-800Hz, LMF- 100Hz-2kHz, HMF400Hz-8kHz, HF- 1.5k-20kHz) with peak/shelve switches on the high and low EQ
bands, switchable bandwidth on low-mid and high-mid bands, and an EQ In switch
with LED. Each input channel shall also have a FET controlled (10 millisecond
ramp) mute switch with LED, affecting all assigned outputs including auxiliary
sends. Assignment switching is provided to the following output sections:
Left/Right, Mono, Subgroup 1, Subgroup 2, Subgroup 3, Subgroup 4, Subgroup 5,
Subgroup 6, Subgroup 7 and Subgroup 8. An LCR switch reconfigures the
Left/Right and Mono assignment system to a true Left/Center/Right mix system. A
Pan On switch allows conventional panning between any odd and even subgroup
assignment regardless of the position of the LCR configuration switch. A 5-segment
signal level LED indicator is provided to monitor signal levels, and a multiple sample point peak LED is provided to monitor potential overload situations. Input modules also include a PFL switch with LED indicator, 4 scene mute preset switches,
scene mute safe switch with LED, and a 100mm long throw fader. Each input channel shall have eight auxiliary send level controls. The aux send section shall include
three pre/post fader switches: one for auxes 1-4, one for 5&6, and one for 7&8. The
aux sends shall be internally selectable pre or post EQ and pre or post mute. There
shall be an Aux 8 direct switch that shall allow the Aux 8 rotary knob to directly
control the output of the 1/4" direct output connector. Optional stereo input modules
will be available. The console shall be configured in an eight bus arrangement. The
effect return section of each group module shall have a gain control, a two-band
fixed EQ, sub-group assignment switches, L/R and Mono assignment switches with
an LCR configuration switch, aux send level controls for Auxes 1 through 4 with 1-2
switchable to 5-6, and 3-4 switchable to 7-8, a pan control, a level control, a dynamic signal present LED and peak LED, and a PFL switch. 4 scene mute switches (AD) with scene mute safe switch with LED will be available on each return section.
The group mix section of the module shall have a pan control, a FET controlled (10
millisecond ramp) mute switch with LED, assignment switches for Left/Right and
Mono with an LCR configuration switch. Each group mix section will have balanced
(XLR) group insert connections. There will be a send level control for two Matrix
mixes (A & B) on each group module with source selection matrix post fader switch.
It shall also have a fader reverse switch with LED that allows the group fader to control the level of the modules effect return. A PFL switch, dynamic signal present
LED and peak LED, and a 100mm long throw fader shall also be provided on the
group module. The master section shall have the following features: eight aux master
controls with associated AFL switches and eight aux scene mute switches with
LED's, a 100mm long throw fader for each of the Left, Right, and Mono (Center)
master outputs, balanced (XLR) insert connections for Left, Right, and Mono
(Center) master outputs, an assignable comprehensive talkback system, monitor control (with balanced XLR output), stereo program input section with Stereo EQ, lamp
dimming control, and four+two aux scene mute master switch section, each with
LED. Two master matrix output sections include level control, Mute switch with
LED, AFL monitor switch and peak and signal present LED indicators. The two
Matrix output signals are to be derived from the consoles group output signals, left,
right, and mono output signals. Additional matrix output modules may be installed in
the console frame if unused space is available. The power supply shall be housed in
a 14 ga. steel chassis that shall occupy two 19" rack spaces. The power supply shall
have the ability to be daisy-chained to additional power supplies to provide a failsafe operating environment. Connection of two or more power supplies shall not
require additional interface hardware other than interface cable. The live sound console shall be: the Crest Audio Century GTx.
APPENDIX A
Page 27

CENTURY SERIES
GTX
GROUP
BAL OUT
INSERT SEND
BAL INSERT RTN
OPTION
XFORMER
+10
FADER AMP
GROUP
MUTE
M
GTx GROUP MODULE (1 OF 8)
PFL
GROUP
SIGNAL
PRESENT
PFL DC
PFL LEFT
PFL RIGHT
∑
BAL
GROUP
MIX AMP
RIBBON CABLES
3 5 7
1
BUS ASSIGN
PFL DC
PFL LEFT
MONO L-R
PFL RIGHT
PFL
PAN
FADER AMP
EQ IN
LF L MID H MID HF
FREQ
LEVEL
GTx INPUT MODULE
Ø
INSERT
HPF
HPF
20 - 400HZ
GAIN
20 - 70DB
S
LINE
P
PAD
15dB
OPTION
XFORMER
+48V
BAL MIC IN
FADER
REVERSE
PEAK
SWITCHES
& CONTROL
+10
M
PEAKPEAK
QQ
FOUR BAND EQ
INPUT
PREAMP
P
BAL LINE IN
BUS IN
TO METER BRIDGE
GROUP OUTPUT LEVEL
MATRIX
MATRIX
PAN
LCR
GROUP
SWITCHES
BUS ASSIGN
& CONTROL
MONO L-R
2 4 6 8LCR PAN
ABCD
SCENE MUTES
SAFE
MUTE
PRE
MUTE ?
NO YES
PEAK
+80-6SIG
INPUT METER
INSERT SEND
POST
SENDS
FDR
EQ
METER
A
M
PRE
SELECT
PRE-AMP
EFX RETURN
HFLF GAIN
B
MONO L-R 1 3 5 7
PRE SOURCE AMP
SELECT
SOURCE
POST
PRE
BAL INSERT RTN
EFX EQ
EFX
LEVEL
M
+10
PAN
BUS ASSIGN
& CONTROL
EFFECTS RTN
1
234
1-4
PRE
DIRECT OUT
SIGNAL
FADER
REVERSE
2 4 6 8LCR PAN
SWITCHES
PRESENT
AUX
PRE
AUX
SENDS
1
5-6
AUX
AUX SENDS
567
5-6
PRE
PEAK
M
EFX SCENE MUTES
2
7-8
PRE
D
M
P
PFL LEVEL
TO METER BRIDGE
PFL
EFX
MUTE
GTx LEFT (RIGHT) MODULE
B C D SAFE
A
3
7-8
AUX
FET DIM
FET MUTE
FADER
USER
OPTION
SWITCH
BAL DRIVER
POT
DUAL
POT PAD LED AMP
ROTARY
8
PFL
4
PFL DC
PFL LEFT
PFL RIGHT
PFL DC
PFL LEFT
PFL RIGHT
AFL
AUX 8
DIRECT
GTx MASTER MODULE
LEGENDS
PIN 2 HOT ON ALL XLRS
TIP IS SEND, RING RETURN ON ALL SINGLE-JACK INSERTS
USER OPTIONS IMPLEMENTED WITH REMOVABLE SHUNTS
INSERT
∑
INSERT
∑
SIGNAL
FADER AMP
SIGNAL
PRESENT
MIX AMP
MATRIX A
PRESENT
MUTE
MATRIX A
L (R)
MUTE
MIX AMP
L (R) BAL
MATRIX A
PEAK
LEVEL
MATRIX A
BAL OUT
PEAK
OPTION
XFORMER
L (R)
OPTION
XFORMER
BAL OUT
L/R OUTPUT LEVEL
MONO
PFL DC
AFL
TO METER BRIDGE
POST
MATRIX
A
B
PFL LEFT
PFL RIGHT
TO METER BRIDGE
AUX OUTPUT LEVEL
SENDS
MATRIX
X-FEED
AFL
PFL DC
PFL LEFT
∑
MIX AMP
MATRIX B
SIGNAL
PRESENT
MATRIX B
INSERT
AUX
BAL OUT
OPTION
XFORMER
FROM AUX 2
PFL RIGHT
MUTE
MATRIX B
1-2, 5-6 ON LEFT, 3-4, 7-8 ON RIGHT
1 OF 4 AUXES PER MODULE SHOWN
M
AUX
AUX
MUTE
∑
AUX
MIX AMP
PFL MIX L
TO L & R METERS
PEAK
LEVEL
MATRIX B
PFL
LOCAL
OPTION
XFORMER
BAL OUT
SCENE
CONTROL?
NO YES
∑
D
DEFEAT
MON LEVEL
MUTE
LOCAL
PFL DC
PFL
SW
MONO
MON LEFT
SIGNAL
FADER AMP
MUTE
MONO
PRESENT
MIX AMP
MONO BAL
MATRIX
AUXES
PEAK
AB
OPTION
XFORMER
SIGNAL
PRESENT
TB ASSIGN
MONO
BAL OUT
SWITCHES
INSERT
TO METER BRIDGE
MONO OUTPUT LEVEL
GTx MONO MODULE
PFL
PFL DC
PFL LEFT
PFL RIGHT
∑
∑
LEFT
RIGHT
PFL MIX R
D
MONO L-R 1-2 3-4 5-6 7-8GRPS
TB ON
DIM
TB
LEVEL
IN
EXT TB
ON
OSC
LEVEL
PHONES
+48v
LOCAL
MON RIGHT
PHONES
(TOP PANEL)
(FRONT)
PHONES
Century GTx Block Diagram
MATRIX
A
PEAK
POST
STEREO
RETURN
LF HF
BAL
LEVEL
MUTE
STEREO
SENDS
B
MATRIX
A-B
MATRIX
AUX
1-2 3-4
MONO L-R
A
SCENE
MUTE MASTERS
OUT
EXT TB
MIC PRE
TB MIC
(TOP PANEL)
GAIN
∑∑
LF HF
ASSIGN
SWITCHES
STEREO RETURN
BCD
TB MIC
(FRONT)
AUXES
BLEND TO
LEFT/RIGHT
1-2
AUX
OUT
EXT TB
EXT TB IN
PFL
RTN
STATUS LEDS
AUX
OSC IN
ON
PFL
+20V -20V +48V +24V
LAMP
DIMMER
3-4
AUX
OSC
1KHZ
APPENDIX A
Page 28

GTX
4.8125"
122mm
4.5625"
116mm
2.25"/57mm
1.30"/ 33mm
CENTURY SERIES
The following diagram illustrates the depth and height dimen-
sions (from the side) for all Century GTx consoles.
Side Dimensions
35°
29.5625" / 751mm
28.0" / 711mm
SUPPORT ACROSS THIS DIMENSION IS RECOMMENDED
24.75" / 629mm
2.375"/ 60mm
SUPPORT ACROSS
THIS AREA IS
RECOMMENDED
Crest Consoles Engineering,
All information per
May 5, 1997
KNOB HEIGHT, .75"/19mm & 1.25"/32mm
19" / 483mm
31.14" / 791mm
30.21"/767mm
APPENDIX A
DO NOT APPLY ANY
LOADS TO METER
BRIDGE ASSEMBLY
.65"/17mm
10°
130mm
5.125"
12.5625"
319mm
12.6875"
322mm
Page 29

CENTURY SERIES
INSERT B
EXT TB OUT
EXT TB IN
MONITOR L OUTMATRIX B OUT AUX 3 OUT AUX 1 OUT
MONITOR R OUT AUX 4 OUT AUX 2 OUT
STR PGM IN
OSC/PINK IN
Master
AUX 8 OUT AUX 6 OUT
AUX 7 OUT AUX 5 OUT
EFX RETURN
+4
+4
+4
+4
+4
+4
+4
+4
AUX IN 1
AUX IN 1
AUX IN 1
AUX IN 1
BAL MIC IN
BAL MIC IN
BAL MIC IN
BAL MIC IN
BAL MIC IN
BAL MIC IN
BAL MIC IN
BAL MIC IN
BAL MIC IN
BAL MIC IN
BAL MIC IN
BAL MIC IN
BAL MIC IN
BAL MIC IN
BAL MIC IN
BAL MIC IN
BAL MIC IN
BAL MIC IN
BAL MIC IN
BAL MIC IN
BAL MIC IN
BAL MIC IN
BAL MIC IN
BAL MIC IN L
BAL MIC IN L
BAL MIC IN L
BAL MIC IN L
BAL MIC IN L
BAL INSERT RTN
-10
BAL INSERT RTN
EFX RETURN
-10
EFX RETURN
BAL INSERT RTN
-10
BAL INSERT RTN
EFX RETURN
-10
BAL INSERT RTN
EFX RETURN
-10
BAL INSERT RTN
EFX RETURN
-10
BAL INSERT RTN
EFX RETURN
-10
EFX RETURN
BAL INSERT RTN
-10
BAL INSERT RTN
BAL LINE IN
BAL INSERT RTN
BAL LINE IN
BAL INSERT RTN
BAL LINE IN
BAL INSERT RTN
BAL LINE IN
BAL INSERT RTN
BAL LINE IN
BAL INSERT RTN
BAL LINE IN
BAL INSERT RTN
BAL LINE IN
BAL INSERT RTN
BAL LINE IN
BAL INSERT RTN
BAL LINE IN
BAL INSERT RTN
BAL LINE IN
BAL INSERT RTN
BAL LINE IN
BAL INSERT RTN
BAL LINE IN
BAL INSERT RTN
BAL LINE IN
BAL INSERT RTN
BAL LINE IN
BAL INSERT RTN
BAL LINE IN
BAL INSERT RTN
BAL LINE IN
BAL INSERT RTN
BAL LINE IN
BAL INSERT RTN
BAL LINE IN
BAL INSERT RTN
BAL LINE IN
BAL INSERT RTN
BAL LINE IN
BAL INSERT RTN
BAL LINE IN
BAL INSERT RTN
BAL LINE IN
BAL INSERT RTN
BAL LINE IN
BAL LINE IN L
BAL LINE IN R
BAL LINE IN L
BAL LINE IN R
BAL LINE IN L
BAL LINE IN R
BAL LINE IN L
BAL LINE IN R
BAL LINE IN L
BAL LINE IN R
BUS IN
BUS IN
BUS IN
BUS IN
Groups
BUS IN
BUS IN
BUS IN
BUS IN
AUX IN 2
Matrix (optional)
AUX IN 2
AUX IN 2
AUX IN 2
Inputs
BAL MIC IN R
Stereo Inputs (optional)
BAL MIC IN R
BAL MIC IN R
BAL MIC IN R
BAL MIC IN R
INSERT A
MONO INSERT
LEFT INSERTRIGHT INSERT
GRP INS SEND
GRP INS SEND
GRP INS SEND
GRP INS SEND
GRP INS SEND
GRP INS SEND
GRP INS SEND
GRP INS SEND
MTX INSERT
MTX INSERT
MTX INSERT
MTX INSERT
INSERT SEND
INSERT SEND
INSERT SEND
INSERT SEND
INSERT SEND
INSERT SEND
INSERT SEND
INSERT SEND
INSERT SEND
INSERT SEND
INSERT SEND
INSERT SEND
INSERT SEND
INSERT SEND
INSERT SEND
INSERT SEND
INSERT SEND
INSERT SEND
INSERT SEND
INSERT SEND
INSERT SEND
INSERT SEND
INSERT SEND
INSERT R
INSERT R
INSERT R
INSERT R
INSERT R
MATRIX A OUT
MONO OUT
RIGHT OUT LEFT OUT
GROUP OUT
GROUP OUT
GROUP OUT
GROUP OUT
GROUP OUT
GROUP OUT
GROUP OUT
GROUP OUT
MATRIX OUT
MATRIX OUT
MATRIX OUT
MATRIX OUT
DIR OUT
DIR OUT
DIR OUT
DIR OUT
DIR OUT
DIR OUT
DIR OUT
DIR OUT
DIR OUT
DIR OUT
DIR OUT
DIR OUT
DIR OUT
DIR OUT
DIR OUT
DIR OUT
DIR OUT
DIR OUT
DIR OUT
DIR OUT
DIR OUT
DIR OUT
DIR OUT
INSERT L
INSERT L
INSERT L
INSERT L
INSERT L
.75in.
19mm
RearViews & Dimensions
C
A
1.5in./38mm
B
GTX
Size A B C
44 57.55" 55.80" 54.25"
52 67.15" 65.40" 63.85"
64 81.55" 79.80" 78.25"
Size A B C
44 1462mm 1417mm 1378mm
52 1706mm 1661mm 1622mm
64 2071mm 2027mm 1988mm
Crest Consoles Engineering,
May 5, 1997
APPENDIX A
Page 30

GTX
CENTURY SERIES
GTx USER-OPTIONS
GTx consoles are shipped having standard configuration unless specified at time of order. These are ways that the console configuration may be varied after manufacture. The items listed are internal options selected by gold jumper links.
Default is marked with a line on the board and is usually pins 1&2 of the three pin header.
In addition there are links for module function assignment. Take care to not disturb these when using USER OPTION links.
MODULE LOCATION OPTION TITLE FUNCTION
M = Main board
C = Connector (Shipped with the option underlined)
All Inputs M Pre Source (SRC)Mute Aux sends with or without Mute
M Pre Source Select Pre & Post EQ
M Input Meter Source Preamp, Prefader, Postfader
Left/Right Out M J8, Aux local Mute Fit links to enable Aux local mutes
Mono Output M Matrix Post Mute? Y/N Send Mono Post Mute Y/N
Monitor Master C Talkback Phantom Power On or Off
Optional modules
GTX Stereo In C Polarity Reverse L only or L+R
M J2, L Pre source Pre EQ or Prefader
M J3, R Pre source Pre EQ or Prefader
M J4, Aux Pre Mute ? Yes or No ?
M Switch 1 Aux 1-4 Select source: Mono sum or Stereo
M Switch 2 Aux 5-6 Select source always Mono sum,
(overides user switch 'Aux Stereo', Aux 5 & 6 )
Matrix Module M Cue (PFL switch) PFL or AFL
IMPORTANT
Group, Left and Right modules are pre-assigned at the Crest factory
These modules must always be installed in the correct positions. They are NOT interchangeable without being properly re-
assigned. Please contact the Crest Audio Service Department for more information.
APPENDIX A
Page 31

CENTURY SERIES
T
GTX
Console Disassembly
Though you shouldn’t have to disassemble the console, it is necessary to remove modules to change the jumper and switch settings associated with the internally selectable options. The following steps detail the tasks involved when taking the console
apart.
ONE • Open the armrest.
To properly remove one or many modules, the black painted
armrest must first be opened. To do this, the two thumbscrews (see diagram at right) must be loosened from below.
Once these screws are loose, slide both of them a few inches to
the side (they will only move in one direction). Once the
screws have been moved the armrest will easily roll back
exposing the module screws beneath.
Opening the
Armrest
TWO • Remove front module
screw
Once the armrest has been opened, there will be a single screw
at the front edge of the module panel holding each module in
place. Remove the screw from the module(s) you want to
remove.
Thumbscrews
THREE • Remove rear screws
On the back panel of the console there are two screws holding
each module in place (see diagram at right) Remove both
screws from each module you wish to remove.
FOUR • Lift the module(s) out
As you lift the module out of the chassis three wires must be
detached before the module can be completely removed: 2
flat-wires (ribbon cables) and one ground wire.
The flat-wires are removed by flipping the latches on the ends
of the connectors. Once the tabs have been flipped the connector should pull off easily.
The ground wire (green) is a spade lug which pulls off.
Lower Screw
Upper Screw
BAL OUT
BAL OUT
INSERT SEND
INSERT SEND
INSERT RETURN
INSERT RETURN
MONITOR A LEFT
MONITOR B LEFT
MONITOR B RIGHT
MONITOR A RIGHT
OSC IN
EXT TB IN
EXT TB OUT
BAL OUT
INSERT SEND
INSERT RETURN
RETURN 1
RETURN 2
BAL OUT
INSERT SEND
INSERT RETURN
Light Bar
BAL OUT LEFT
BAL OUT LEFT
INSERT SEND
INSERT SEND
INSERT RETURN
INSERT RETURN
BAL OUT RIGHT
BAL OUT RIGHT
INSERT SEND
INSERT SEND
INSERT RETURN
INSERT RETURN
DIR OUT
INSRT SND
BAL INSRT R
BAL LINE IN
LIFT
PIN 1
BAL MIC IN
BAL MIC OUT
FIVE • Putting it all back together
Re-assembling a Century Series console is as easy as taking it apart, but only if you know where everything goes. If you are
going to be removing a number of modules, consider replacing the first before removing the second. Reversing the above steps
should result in the console being as well put together as it was when it left the factory.
IMPORTANT
Group, Left, and Right modules are pre-assigned at the Crest factory
These modules must always be installed in the correct positions. They are NOT interchangeable without being properly re-
assigned. Please contact the Crest Audio Service Department for more information.
PAGE 29
Page 32

Page 33

GTx
Appendix B
Glossary
Page 34

GTX
CENTURY SERIES
Glossary
100mm Fader
See
Fader
48 Volt Phantom Power
This switch turns on the +48V DC used to power some microphones. Always operate the 48V Phantom Power switch with
the input channel muted. See XLR Microphone Input for more
information.
5-Segment LED Array (Input Meter)
This LED array (located next to each input module fader) provides visual monitoring of the input module signal, post EQ,
pre fader. (On the GTx Stereo Input module, there are two 5segment LED arrays.) There are three green LED’s (SIGnal
present, -6, 0) one yellow LED (+8) and one red LED (PK
‘peak’ LED). Under normal operation with proper gain setup,
the LED array should indicate a level between -6 and +8.
When monitoring drum or percussion-type signals, occasional
illumination of the red PK LED is generally acceptable.
In encountering distortion or feedback, this array is handy
when attempting to isolate the source of any problems that may
exist. If the module’s GAIN pot is turned all the way down,
and distortion is still present (indicated by steadily lit red PK
LED), check to see if the PAD switch is pushed down.
Channels which are feeding back show a higher and steadier
meter level. Peak LED on all the time = an overloaded channel. Use the PAD switch when a gain pot is already at minimum.
2-Segment LED Signal Indicators
This LED array provides simple in-module visual monitoring
of the Group, Matrix, and Master module signals. The green
LED is the ‘signal present’ indicator, and the red LED is the
‘peak’ LED. The ‘peak’ LED also doubles as a PFL-on indicator. Signal is sampled pre and post fader to reveal any source
of overload.
Adjustable Hi Pass Filter
This input module control (actually two controls: a rotary pot
to adjust frequency, and the on/off HPF switch) permits the
exclusion of all signals below the dialed-in frequency. An
associated yellow LED is illuminated when the HPF switch is
down. the rotary pot adjusts the Hi Pass frequency from 20 to
400 Hz, with a slope/roll off of 12 dB per octave. This is useful
in dealing with unwanted ‘rumble’, often encountered in live
mixing as a result of microphone movement or bumping. On
the GTx Stereo Input module, the Hi Pass Filter acts upon both
channels.
AFL (After-Fader-Listen)
See SOLO
Aux Meters
Located on the GTx 64-frame and 52 frame meter bridges,
these VU-type meters indicate the 8 Aux output levels. On the
GTx 44 frame model, Aux monitoring is accomplished via the
Solo (AFL) circuit.
Auxiliary Pre/Post Switches
Configured in three groups (1-4, 5-6, 7-8) these switches permit the associated Aux sends to be either pre-fader or postfader. A typical application would be to use one group of aux
sends pre-fader as monitor sends, and to use another group
post-fader as effects sends. Note that if the Aux 8 Direct switch
is pushed, the Aux 8 send will be a pre-fader direct out send,
regardless of the Aux 7&8 Pre/Post switch selection. Pre-fader
aux sends may be affected by the MUTE switch. Refer to User
Options.
Auxiliary 8 Direct Switch
This switch disconnects the Aux 8 level control from the Aux
8 mix bus and instead is used to control the Direct Output of
the channel. Normally the Direct Out jack is post-fader. When
the Aux 8 Direct switch is pressed, the Aux 8 level control
assumes output control of the direct out signal, and the Aux 8
control is fed pre-fader.
Auxiliary Bus 1-8
The Aux bus carries signal from the Aux Send controls to the
Aux outputs on the rear panel of the Master Section. A typical
setup would entail using the Aux 1-4 sends for monitor mixes
while Aux 5-8 are used for effect sends. If a separate monitor
mixer were being used, Auxes 1-4 could be used for additional
effect sends. Effects can be returned via the EFX Return section of the group modules or through spare input modules.
Auxiliary Master Mute Switch
Enables the four Aux Send Mutes. Associated LED indicates
selection.
Auxiliary Mute Switches
The Master Section of the GTx consoles has mute switches for
each Aux output. When pressed, this switch mutes the corresponding Aux Send Master. When the mute is engaged no signal leaves the associated Aux out jack and a red LED illuminates to the left of the switch. These mute switches are active
only if the Aux Mute Master switch on the Master module is
pressed.
Auxiliary Send Controls
The GTx console employs eight discrete Aux Sends per input
channel which send signal to the Aux bus. These sends are
controlled via the eight level controls on each input module.
Aux Sends 1-4 (orange colored, dual concentric) are typically
used for monitor sends. Aux Sends 5-8 (green) are typically
used for effect sends. Each effect return section has Aux 1-4
Send controls, which could be used for adding effect return
signal to the monitor mix.
Balanced Insert Return Jacks (Group
Module)
See GROUP INSERT SEND/BALANCED INSERT
RETURN JACKS.
Balanced Insert Return Jacks (Input
Module)
See INSERT SEND/BALANCED INSERT RETURN JACKS.
Blend to L/R Mixes
Permits ‘blending’ of the Left & Right signals to Auxes 1&2
and/or Auxes 3&4. Two controls are provided: Rotary level
control, & two push buttons to select Auxes 1&2 and/or Auxes
3&4. The Blend feature is useful when it is necessary to send
the Left & Right bus signals to monitor mixes or remote feeds.
APPENDIX B
Page 35

CENTURY SERIES
GTX
Bus Assignment Switches
Wherever these switches occur, they connect signals to any or
all of the following buses: Group buses, even/odd Group
buses, Left bus, Center (Mono) bus, and Right bus. The following list shows the various Bus Assignment switches and
their effect upon bus assignment:
M - Signal is sent to the Center (Mono) Bus.
LR - Signal is sent to the Left and Right Buses, via pan.
LCR - Configures Left/Right and Center/Mono assignments for L-C-R pan-
ning. To enable L-C-R panning, L-R and Mono assign switches must be down.
PAN Switch / Group Assign Switches (1-8) - With PAN switch down, the
PAN control varies the level of the group assignments with odd numbered
groups on the left and even numbered groups on the right. With PAN switch
up, groups can be individually selected and are unaffected by the PAN control.
Group assign switches route signals to the Group buses.
It is a common practice to assign all effect return channels to a
group module. This enables the overall amount of effect signal
to be controlled from a single fader location. It is then possible
to turn off the effects with this group fader or group mute
switch or to vary the amount of overall effect return in reference to the dry original signals, using the group fader control.
CENTER Meter
Located on the meter bridge, this VU-type meter indicates signal level sent to the Center (Mono) bus.
DC Power Indicators
Each Century Series console uses a variety of electrical voltages which are fed to the console from the power supply. The
status of each operating voltage (+20, -20, +48, +24) is indicated by four LED’s on the master module. If the console ever
behaves abnormally, first check these LED’s to make sure that
the power supply is providing the proper voltages.
Dim Switch
This GTx Master Section switch produces a -12dB attenuation
in signal to the local monitor. This feature is useful for temporary lowering of local monitor levels without actually adjusting
any pots or faders.
Direct Out Jack
Each input module has an unbalanced 1/4" direct out jack. The
output from this jack is post-fader unless the AUXILIARY 8
DIRECT switch is pressed. When this switch is down the output is controlled by the Aux 8 pot. See AUXILIARY 8
DIRECT SWITCH for more information.
Effect Return EQ
Located in the GTx Master section, each effect return section
has a two-band fixed EQ. These High and Low frequency controls are centered at 10kHz and 80Hz respectively. Center position is flat.
Effect Return Gain
Located in the GTx Master section, this control adjusts the
gain on the signal returning from the effect. Use the effect
return signal present and peak LED’s to set the gain properly.
Effect Return Subgroup Assignments
These switches assign the corresponding effect return to any or
all subgroups. See BUS ASSIGNMENT SWITCHES for more
information.
EQ In Switch
This GTx input module (and stereo input module) switch,
when pressed, inserts the EQ section into the signal path and
illuminates a green LED to the left of the switch. With the
switch in the up position, the input signal bypasses the EQ section and continues unmodified.
EQ Sections
These controls are used to modify the tonal quality of an audio
signal. Within the input modules, the EQ section will affect the
signal only if the EQ IN button is pressed.
The GTx standard input module has a four-band sweep EQ
section, including concentric adjustment of frequency and
boost/cut, selectable peak/shelving EQ on the high and low frequency bands, and selectable Q on the two middle frequency
bands, switchable between .8 (Q switch up) and 1.8 (Q switch
down).
The GTx stereo input module has a three-band sweep EQ section, with individual controls within each band for adjustment
of frequency and boost/cut.
The effect return sections, within the group modules, have
two-band EQ sections, with fixed EQ controls.
External Talkback Inputs
Located at the top of the GTx Master section and under the
front right console armrest, the External Talkback Inputs permit connection of talkback microphones to be used with talkback functions. Only one microphone should be connected;
using both inputs at once is not recommended. Note: the inter-
nal jumper default for this input is +48V DC!
External Talkback Input Switch
Located in the Talkback Control section (Master Section), this
switch disconnects the two regular talkback microphone inputs
and switches on the external talkback input XLR found on the
rear panel of the GTx master section. Note: the Talkback
Control Button must be on for this switch to function.
External Talkback Output Switch
Located in the Talkback Control section (Master Section), this
switch activates the external talkback output XLR. The signal
fed to the connector is the same signal being sent to the talkback assignments. Note: the Talkback Control Button must be
on for this switch to function.
Fader
The fader is used for primary level control of the channel,
except those Aux output sections selected to a pre-fader position. (The Insert send level is not affected by the fader position.) Optimum noise performance is achieved when the fader
is operated near the 0 fader position, with pad switches and all
gain controls properly set. This does not mean that all channels
should be set at 0. Proper mixing requires varying of at least
some of the faders. The 0 point should be considered a reference, with all volume changes taking place between the -10
and +10 reference points at normal desired levels. For effect,
faders may be operated below this level, provided no faders
within the group or master section are increased in level to
compensate for the input’s lower fader setting. (See also
FADER REVERSE SWITCH).
APPENDIX B
Page 36

GTX
CENTURY SERIES
Fader Reverse Switch
This switch swaps roles between the Effect Return Level pot
and the Group Fader. When pressed, this switch causes the
Effect Return Level to be controlled by the group fader, and
the group level to be controlled by the Effect Return Level pot.
If you want fader control when setting effect returns, this
switch is particularly helpful. A red LED indicator is provided
to the left of the switch and illuminates when the switch is
pressed (reverse mode).
Gain Control
This knob (-20 to 70 dB) adjusts input gain circuitry for proper
electrical operation with any input signal level. Adjust this
control by monitoring the input meter LED’s for bright intensity, with peak (red) LED flashing only occasionally when the
loudest program material is present. When using this method
for adjustment of the Gain Control, normal signal level should
be adjusted to show a level between -6 and +8. Constant distortion on an input channel could mean that the input channel is
being overdriven. Check for improper input gain adjustment
first. (When a PFL switch is pressed on an input channel, this
signal can also be observed on the Left/Right Solo monitor
meters within the GTx meter bridge.)
Ground
Console chassis and audio ground are connected together. The
console power supply includes an external link that connects
console ground to AC power ground. This link is provided for
user selection when optimising system ground requirements.
Group Assignment
(See Bus Assignment)
Group Insert Send/Balanced Insert
Return Jacks (Group Module)
These jacks allow you to access a point in the group module’s
electrical circuit for inserting an external signal processor. The
output level of this connector is designed to drive the inputs of
most external signal processing equipment and to accept the
resulting output signal. When properly wired TRS plugs are
inserted in these jacks, the patched devices are inserted into the
signal path immediately pre-fader. See the Connections and
Conventions section in the front of the manual for specific
information on plug polarity and signal assignments.
Group Meters 1-8
Located within the meter bridge, these VU-type meters monitor the post-fader output of the groups. Similar meters on the
Master Section monitor Left, Center (Mono) and Right outputs. 0 Level = +4dBu output level.
Headphone Jacks
Located at the top of the master section and under the right
side of the arm rest, these jacks provide a stereo headphone
level output of the Left, Center (Mono), and Right outputs.
When L-C-R panning is enabled, the Center Bus will not be
audible in the headphones; the Center Bus must be PFL'd to
monitor it audibly.
Headphone Level Control
This control (marked PHONES and located in the upper right
Master section) adjusts the level of the signal fed to the two
headphone jacks; one of these jacks is located next to the
PHONES control, and another is just below the armrest on the
far right side.
HF Peak/Shelve Switch
This switch is used for switching the high frequency EQ control between the normal shelving setting to a peak setting. A
shelving setting would be used to boost or cut all frequencies
above the dialed-in frequency. A peak setting would be used to
boost or cut the specific dialed-in frequency.
High Pass Filter (Adjustable)
See ADJUSTABLE HIGH PASS FILTER
Insert Send/Balanced Insert Return
Jacks (Input Module)
These jacks allow you to access a point in the channel’s electrical circuit for inserting an external signal processor. The output level of the Insert Send jack is designed to drive the inputs
of most external signal processing equipment and to accept the
resulting output signal. When a properly wired TRS plug is
inserted in these jacks and the Insert switch is down, the input
signal path is broken after the gain stage and the high pass filter. The Balanced Insert Return jack feeds the return signal to a
point just before the EQ section. See the Connections and
Conventions section in the front of the manual for specific
information on plug polarity and signal assignments. (With the
Insert switch down, the insert return jack may be used as a line
level input to the channel that bypasses the mic preamp,
mic/line switch, pad, gain control, and hi pass filter.)
Insert Switch w/LED
This switch, located on the GTX Input (and GTX Stereo Input)
modules, introduces into the signal path any processing that is
patched into the Insert Send and Balanced Insert Return jacks
on the rear panel. An associated green LED is illuminated
when the Insert switch is down.
Internal Oscillator
The GTx master section has a 1 kHz internal oscillator. This
oscillator can be used as signal source to run tests, diagnostics
or calibrations. The oscillator can be assigned to all Groups,
Auxes and Matrices via the Talkback assignment switches.
Lamp Dim Control
This control adjusts the brightness of whatever lighting devices
are plugged into the XLR sockets on the meter bridge.
(Standard 12V DC power is provided on pins 2 & 3).
L-C-R Switch
Provides true L-C-R pan to the main mix outputs. When this
switch is released, the pan operates on L&R in the normal
fashion. See also PAN CONTROL.
Left Meter
Located on the GTx meter bridge, this VU-type meter indicates
the Left output level, post fader.
LF Peak/Shelve Switch
This switch is used for switching the low frequency EQ control
between the normal shelving setting and a peak setting. A
shelving setting would be used to boost or cut all frequencies
APPENDIX B
Page 37

CENTURY SERIES
GTX
below the dialed-in frequency. A peak setting would be used to
boost or cut the specific dialed-in frequency.
Line Input Jack
This is a balanced, high impedance input which is designed to
accept both balanced and unbalanced line level inputs. To
select this input source, press the front panel LINE switch. See
the Connections and Conventions section for specific information on plug polarity and signal assignments.
Line Switch
This switch, when pressed, selects the balanced Line Input as
opposed to the default balanced XLR Mic input.
Local Monitor Level Control
This control adjusts the level of the signal to the Local Monitor
Outputs on the back of the Master Section. Note that the DIM
switch can be used to introduce a -12 dB attenuation to the
local monitor.
Matrix AFL
See SOLO
Matrix Level Control
These controls adjust the amount of group, L, R or Mono signal fed to the respective matrix.
Matrix Master Control
These controls adjust the final signal level for the associated
matrix output.
Matrix Post Switch
This button switches the group, L, R or Mono matrix send
between pre and post fader. Up position is pre.
Meter Bridge
The GTx 52 and 64-frame consoles include 21 mechanical
moving-magnet type indicators (44 frame: 13 meters) which
show the output levels. These indicators are VU-type and are
calibrated during manufacturing to 0 = +4dBu, 1.23V RMS
1kHz. The VU-type characteristic averages the signal level
over short time periods (about 300mSec) so that the ‘beat’ is
visible. Short duration peaks (snare drum and other signals
with similar transient peaks) are under-indicated. Meters are
illuminated by amber LED's which do not require attention or
adjustment.
When faders are set a ‘0’ calibration positions, then the optimum signal to noise and overload margin conditions are
obtained. In this situation, signal peaks up to +3 are usually
undistorted. The recommended normal range is between -10
and 0; operation with channel and output levels below -10 is
not recommended - headroom is wasted at the expense of signal-to-noise ratio. The solo L - R meter pair shows the PFL or
AFL level of the selected source. When no PFL or AFL is
selected, the headphone and monitor output is the main stereo
output. The solo meter is inactive when no PFL or AFL is
selected. For GTx Level Meter calibration information, consult
the GTx Service Manual or your Crest Audio dealer/service
center. (The range of meter adjustment is approximately +1 /1dB.)
Mono Bus Assign Switch
Assigns signal directly to the Mono (Center) bus. This signal is
unaffected by the position of the Pan Control, unless L-C-R
panning is enabled. (See BUS ASSIGNMENT for more L-C-R
information). This is useful when it is necessary to add input
signal to the Mono mix without going through the Stereo section of the mixer. (An example would be a center vocal cluster
configuration). In addition to the many mono output uses, this
output could be used as an additional send.
Mute Switch
Turns off all send/output functions (except insert send) of the
associated module including those being used as monitors.
This switch does not affect the PFL switch or the LED indicators, enabling monitoring of input channel activity regardless
of mute switch position. The mute LED illuminates when the
channel is muted, either from the local mute switch or from
any activated mute group. When muting a group, the group
meter (on the meter bridge) level will reflect the muting. Note:
the Mute switch may not affect pre signals, depending on internal jumper settings. Refer to User Options.
Oscillator/Pink In Connector
This connector accepts a balanced or unbalanced signal from
an oscillator or pink noise generator. This signal is assignable
via the talkback assignment switches. Plugging into this jack
disables the internal 1kHz oscillator.
PAD Switch
This -15dB pad (-20dB on Stereo Input module) attenuates the
signal presented to the first stage of the input module. It is
important to note that the Pad Switch acts only upon the balanced XLR input signal; it has no effect upon the 1/4" input
signal. The input GAIN control should be positioned somewhere within its center 80% of travel. In the event that the
Gain control is set in its lower 10% of travel, and the Peak
LED is indicating more than an occasional short illumination,
the PAD Switch should be pressed and the Gain re-adjusted as
above. In the case where the GAIN control is set to its upper
range of travel (3 o’clock position or above) with the PAD
switch pressed, the Gain Control should initially be lowered
and the PAD switch released. The gain should then be
increased and adjusted as above.
Pan Control
Pan Control is a dual device having two functions. Main Mix
Pan operates with Left/Right/Mono assigns. When LCR is
selected, then true LCR panning is provided. Otherwise, L-R
panning is provided. Group Pan operates with the 1-8 group
assigns. When PAN is selected, the odd-even assign panning is
provided.
With LEFT, RIGHT, and MONO assign switches down, and
LCR switch up, LEFT and RIGHT assign signals are proportionally varied by the PAN control, with LEFT and RIGHT
signals being equal in level when PAN is in the center. The
MONO assign signal is unaffected by the PAN control.
With LEFT, RIGHT, and MONO assign switches down and
the LCR switch down, the LEFT and RIGHT assign signals
decrease in level as the PAN control is rotated to its center
position. The PAN control also governs the post fader MONO
APPENDIX B
Page 38

GTX
CENTURY SERIES
assign level, providing maximum level when in the center
position and continuously decreasing in level when turned to
the left or right. This makes true LEFT-CENTER-RIGHT (LC-R) panning possible. (See also BUS ASSIGNMENT, PAN
Switch)
PAN Switch
With the PAN switch up, groups can be individually selected
and are unaffected by the PAN control. With PAN switch
down, the PAN control varies the level of the group assignments with odd numbered groups on the left and even numbered groups on the right.
PEAK LED
See 5-SEGMENT LED ARRAY
PFL (Pre-Fader Listen)
See SOLO
Phantom Power
See 48V PHANTOM POWER
Phase
All console connections are in phase with each other, including
insertion sends & returns. XLR pin 2 and jack tip are the positive (+) phase connectors.
Polarity Reverse Switch
This post insert return, pre-EQ switch reverses the phase of the
line and microphone input signals in the GTx input modules
(on the stereo input module, this switch acts upon one channel
only). This feature can be used to adjust phase cancellation
between microphones when more than one microphone is picking up the same acoustical signal. See also User Options.
Pre/Post (Aux) Fader Switches
Switches the Aux signal sources between pre-fader and postfader positions. The pre-fader position is usually used for monitor sends, so that any movement of fader level does not affect
these outputs. When in the post-fader position, signal output
level from the Aux sends will proportionally follow the main
signal level. The result is maintenance of an effect in proportion to the main signal level. When an input signal is faded to
0dB, the post-fader Aux Send signals are also decreased to
0dB. In some cases, it may be desirable to derive effect sends
pre-fader for special effects, such as those generated by a vocal
doubler or harmonizer. The choice of switch position should be
determined by the actual situation; though as a general rule,
choose the pre-fader position for monitor sends and post-fader
position for effect sends.
Q SWITCH (Hi Mid & Lo Mid EQ)
See EQ SECTIONS
RETURN JACK
(See INSERT/RETURN JACKS)
Right Meter
Located on the GTx meter bridge, this VU-type meter indicates
the Right output level, post fader.
Scene Mute Assignment Switches
On input modules, the scene mute switches assign the input to
one or more of the master scene mutes. On the group modules,
the scene mute switches assign the Effects Return to one or
more of the master scene mutes. These mutes are activated via
the scene mute master switches found on the master section.
Any combination of mutes is allowed.
Scene Mute Master Switches
Found on the GTx Master Section, these switches
activate/deactivate the four scene mutes. Associated red LED's
indicate status.
Scene Mute Safe Switch w/LED
This switch, found on input and group modules beneath the
Scene Mute Assignment Switches, disables any selected scene
mutes, and is generally used to prevent accidental channel muting. A green LED indicates that the Safe switch has been
engaged.
Signal Present LED’s
See 5-SEGMENT LED ARRAY
SOLO LEFT/SOLO RIGHT Meters
Located on the GTx meter bridge, these VU-type meters indicate PFL/AFL signal level. Inherently, they also reflect the
headphone signal level. When PFL or AFL is engaged anywhere on the console, the SOLO LEFT and SOLO RIGHT
level meters go from being dimly lit to being the same bright-
ness as the other level meters.
Soloing (PFL/AFL)
Both methods of soloing allow for monitoring within the master section of the console
When soloing input channels, optional matrix inputs, groups
and main outputs, monitoring is done pre-fader, or PFL. The
PFL (Pre Fader Listen) switch enables the operator to listen to
channel signals before the fader or main channel level control
(PFL). This signal IS NOT affected by the Channel Mute
Switch.
When soloing Matrix Masters or Aux sends, monitoring is
done after-fader (AFL); the associated AFL (After Fader
Listen) switches enable the operator to listen to Matrix Master
and AUX signals after the rotary Matrix Master /Aux level
controls. When soloing a single Matrix Master or Aux signal
individually, monitoring is done in ‘mono’; when soloing more
than one Matrix Master or Aux signal, solo monitoring will be
heard as a stereo ‘split’, odd on left, even on right.
When either an AFL or PFL switch is pressed, the solo signal
level can be seen on the Solo Left/Right meters, and can be
heard both in the mixer’s headphone output and on the rear
panel monitor output of the console.
When PFL or AFL is engaged anywhere on the console, the
SOLO LEFT and SOLO RIGHT level meters go from being
dimly lit to being the same brightness as the other level meters,
and two red LED's on the console panel illuminate.
APPENDIX B
Page 39

CENTURY SERIES
GTX
Stereo Program In
The Stereo Program In section (on the GTx Master section)
controls the way in which the Stereo Program In signal is routed through the console. Controls for gain, HF/LF EQ, bus
assignment (Mono, L/R, Aux 1/2, Aux 3/4, and Matrix A/B
buses), balance, level, muting, and PFL are included. Red Peak
and green Signal Present LED’s are located next to the PFL
switch.
Stereo Program In Connector
This 1/4-inch jack, usually used for stereo program music,
accepts an unbalanced stereo line level signal. Polarity is as
follows: Tip=Left, Ring=R, Sleeve=Ground
Talkback Assignment Switches
These switches assign the talkback signal to the outputs and/or
auxes. Switches exist for External Talkback Output, Mono
(Center) Bus, Left/Right Buses, Groups, Auxes 1-8 (in pairs),
and Matrices A and B. The same routes are also used when the
oscillator is selected. This overrides the talkback source.
Talkback Level Control
This knob controls the final level of the talkback signal.
Talkback Microphone Input
Found on the top of the master section and under the arm rest
on the right side, these balanced XLR inputs allow for a microphone or other balanced mic-level source to be connected to
the talkback system. Default for this connector is +48V DC. It
is advised to connect only one talkback microphone at a time.
XLR Microphone Input Connector
Balanced XLR Input is designed to receive professional Low
Impedance microphone signals. The input Gain controls on the
front panel adjust for most input levels. In the event of excessive input levels, the front panel input pad switch should be
pressed. Front panel selection of 48 Volt Phantom power
enables most types of condenser microphones that require such
power to be used. See your device’s operating manual for correct operation. (If in doubt that your non-condenser microphone may be damaged by using Phantom Power, please make
sure that the front panel phantom power switch on that input
channel is in the off [out] position. Operate this switch with the
channel muted to avoid sending ‘thumps’ to your speakers.)
This input may also be used for low level line input signals,
provided the source (instrument) is able to drive a 5k Ohm or
higher load. (See your instruments or electronics owner’s manual for output impedance.) When line output devices such as
tape players are plugged into the microphone input, special
care should be observed that the phantom power is turned off
on that channel, as damage may result. Because of this, it is
recommended that the 1/4" line input connector be used when
connecting a line level device. 48 Volt Phantom power is not
present on these input connectors, and the impedance of the
line input connector is high enough to accept any line level
device.
Talkback Enable Switch
This switch activates the entire talkback system including the
internal oscillator.
XLR Balanced Outputs
These outputs are designed to drive both balanced and unbalanced input devices without adaptation. Signals are normally
balanced on this output connector. The output will drive all
load impedances from 600 ohms upwards with full performance specifications. The output is designed so that if either
pin 2 or pin 3 were intentionally shorted (as in connecting to an
unbalanced input of your next stage of electronics) or accidentally shorted, the output level of the non-shorted connector pin
increases by 6db. This is an amount equal to the normal loss of
a balanced output when one pin of a balanced output is shorted. The result is no need for external gain make up.
APPENDIX C
Page 40

Page 41

GTx
Appendix C
Schematics
SCHEMATIC NAME # NOTES
MODULES
STANDARD INPUT CONNECTOR PCB 1 GTx INPUT CONNECTOR PCB
STANDARD INPUT MAIN PCB 2 GTx INPUT MAIN PCB
LCR SUB PCB 3 LCRSUB01 GTx LCR SUB PCB
STEREO INPUT CONNECTOR PCB 4 GTx STEREO INPUT CONNECTOR PCB
STEREO INPUT MAIN PCB 5 GTx STEREO INPUT MAIN PCB
GROUP CONNECTOR PCB 6 GTx GROUP CONNECTOR PCB
GROUP MAIN PCB 7 GTx GROUP MAIN PCB
L / R CONNECTOR PCB 8 GTx LEFT/RIGHT CONNECTOR PCB
L / R MAIN PCB 9 GTx LEFT/RIGHT MAIN PCB
MONO CONNECTOR PCB 10 GTx MONO CONNECTOR PCB
MONO MAIN PCB 11 GTx MONO MAIN PCB
MASTER CONTROL CONNECTOR PCB 12 GTx MASTER CONNECTOR PCB
MASTER CONTROL MAIN PCB 13 GTx MASTER CONNECTOR PCB
MATRIX CONNECTOR PCB 14 GTx MATRIX CONNECTOR PCB
MATRIX MAIN PCB 15 GTx MATRIX MAIN PCB
METER BRIDGE Vx/GTx Power-Dimmer-Demux PCB:
DIM-MUX1 16 DIMMER CIRCUIT
DIM-MUX2 17 POWER - DIMMER CIRCUIT
MTRDMUX1 18 METER DEMUX
MTRINTR1 19 METER DRIVER BOARD
GROUP / AUX METER PCB 20 GTx/Vx GROUP/AUX METER LED PCB
MST-LED1 21 GTx/Vx MASTER METERS LED PCB
POWER SUPPLY
FRONT MODULE / LED PCB 22 PSU1 FRONT MODULE
REAR MODULE PCB 23 PSU2 REAR POWER MODULE PCB
CHASSIS WIRING 24 PSPLYBLK
CENTURY POWER SUPPLY
TRANSFORMER 25 WIRING OPTIONS FOR 100/120, 220, 240V
Page 42

Crest Audio Inc.
100 Eisenhower Dr., Paramus NJ 07652 USA
TEL: 201.909.8700 FAX: 201.909.8744
http://www.crestaudio.com
Printed in USA
*D7000003*
GTx Owner's Manual
Copyright © 1997 Crest Audio Inc.
v 2.3 11/3/97 D7000003
 Loading...