

Peavey CLASSIC 50, CLASSIC 212, CLASSIC 410 Operating Manual

--
--
-
-
212
Single Unit Guitar Amp
A
Intended to alert the user to the presence of uninsulated “dangerous voltage” within the product’s enclosure
that may be of sufficient magnitude to constitute a risk of electric shock to persons.
A
Intended to alert the user to the presence of important operating and maintenance (servicing) instructions in the literature accompanying the product.
CAUTION Risks of electrical shock
-
DO NOT OPEN
CAUTION To reduce the risk of electric shock, do not remove cover. No user serviceable parts inside. Refer
Servicing to qualified service personnel.
WARNING
To prevent electrical shock or fire hazard, do not expose this appliance to rain or moisture. Before
using this appliance, read the operating guide for further warnings.
A
Este simbolo tiene el
proposito
de alertar al usuario de la presencia de instrucciones importantes
sobre la operation y mantenimiento en la literatura que viene con el
producto.
A
Este simbolo tiene el
proposito
de alertar al usuario de la presencia de
“(voltaje)
peligroso” que no
tiene aislamiento dentro de la
caja de1 product0
que puede tener una magnitud suficiente
coma
para
constituir riesgo de corrientazo.
PRECAUCION Riesgo de corrientazo
-
No
abra.
PRECAUCION
Para
disminuir el riesgo de corrientazo, no
abra
la cubierta. No hay piezas adentro que el usuario
pueda reparar. Deje
todo
mantenimiento a
10s tecnicos
calificados.
ADVERTENCIA
Para
evitar corrientazos o peligro de incendio, no deje expuesto a la lluvia o humedad este aparato.
Antes de usar este aparato, lea
mas
advertencias en la guia de
operation.
A
Ce symbole est
utilise
pour indiquer a l’utilisateur qu’il ou qu’elle trouvera d’importantes instructions
sur l’utilisation et l’entretien (service) de l’appareil dans la litterature accompagnant le produit.
A
Ce symbole est
utilize’
pour indiquer a l’utilisateur la presence a
l’interieur
de ce produit de tension
non-
isolee
dangereuse pouvant
etre d’intensite
suffisante pour constituer un risque de
choc electrique.
ATTENTION Risques de
choc
electrique - NE PAS OUVRIR!
ATTENTION
Afin
de reduire le risque de
choc
electrique, ne pas enlever le couvercle. 11 ne se trouve a l’interieur
aucune piece pouvant
etre reparee
par l’utilisateur. Confier l’entretien a un personnel
qualifie.
AVERTISSEMENT
Afin
de
prevenir
les risques de
decharge electrique
ou de feu, n’exposez pas cet appareil
a
la pluie ou a l’humidite. Avant d’utiliser cet appareil,
iisez
les avertissements supplementaires
situ&
dans le
guide d’utilisation.
A
Dieses Symbol
sol1
den Benutzer auf wichtige Instruktionen in der Bedienungsanleitung aufmerksam
machen,
die Handhabung und Wartung des Produkts betreffen.
A
Dieses Symbol
sol1
den Anwender vor unisolierten gefahrlichen Spannungen innerhalb des
Gehauses
warnen,
die von Ausreichender
Starke
sind,
urn
einen elektrischen Schlag verursachen zu
konnen.
VORSICHT Risiko
-
Elektrischer Schlag!
Nicht iiffnen!
VORSICHT
Urn
das Risiko eines elektrischen Schlages zu vermeiden,
nicht
die Abdeckung enfernen. Es befinden
sich
keine Teile darin, die vom Anwender repariert werden
konnten.
Reparaturen nur von qualifiziertem
Fachper-
sonal durchfiihren lassen.
ACHTUNG
Urn
einen elektrischen Schlag oder Feuergefahr zu vermeiden, sollte dieses
Gerat nicht
dem Regen
oder Feuchtigkeit ausgesetzt werden. Vor Inbetriebnahme unbedingt die Bedienungsanleitung lesen.
2

FRONT PANEL
3
12 13
NORMAL -
@
s~~~LE~~~~~~~:~~~:~~~~~~~~~~~~~:~~a~~~~~*~~~~~
1 12 1 12 1 12 1 12 1 12 1 12 1 12 1 12 1 12B&O&
ON
ON
PILOT
PRESENCE VOLUME TREBLE MIDDLE
BASS REVERB
POST
PRE
NORMAL INPUTS
1
2 4
5
6
7
8
9
10
11
POWER SWITCH (1)
Switch to “on” position to turn on.
STANDBY SWITCH (2)
Allows amp to be placed in standby or active mode. In standby mode the tubes remain hot, but the amplifier
is not operational.
CHANNEL SELECT SWITCH (3)
Allows selection of the Lead or Normal Channel.
NOTE:
Channel selection may also be accomplished by the remote footswitch. If remote selection is desired
the channel switch must be in the “in” (Lead) position.
PILOT LIGHT LED (4)
Illuminates when AC power is being supplied to the amp.
PRESENCE (5)
An active tone control that boosts the extreme high frequencies by 6
dB.
MASTER VOLUME (6)
Controls the overall volume level of the system.
TREBLE, MIDDLE, AND BASS EQ (7)
Passive tone controls that regulate high, mid, and low frequencies respectively.
REVERB (8)
Reverberation is an echo effect. Rotate clockwise to increase the effect. Remote footswitch can control On/Off.
POST GAIN (9)
Controls the overall volume level of the Lead channel. The final level adjustment should be made after the
desired sound has been achieved.
PRE GAIN (10)
Controls the input volume level of the Lead channel.
NORMAL GAIN (11)
Controls the volume level of the Normal channel.
BRIGHT INPUT (12)
Input for instrument-level signals. This input produces enhanced high frequency response (treble), similar
to a bright switch when compared to the normal input.
NORMAL INPUT (13)
Input for instrument-level signals. For brighter frequency response (highs) see Bright Input No. 12.
3
REAR PANEL
16
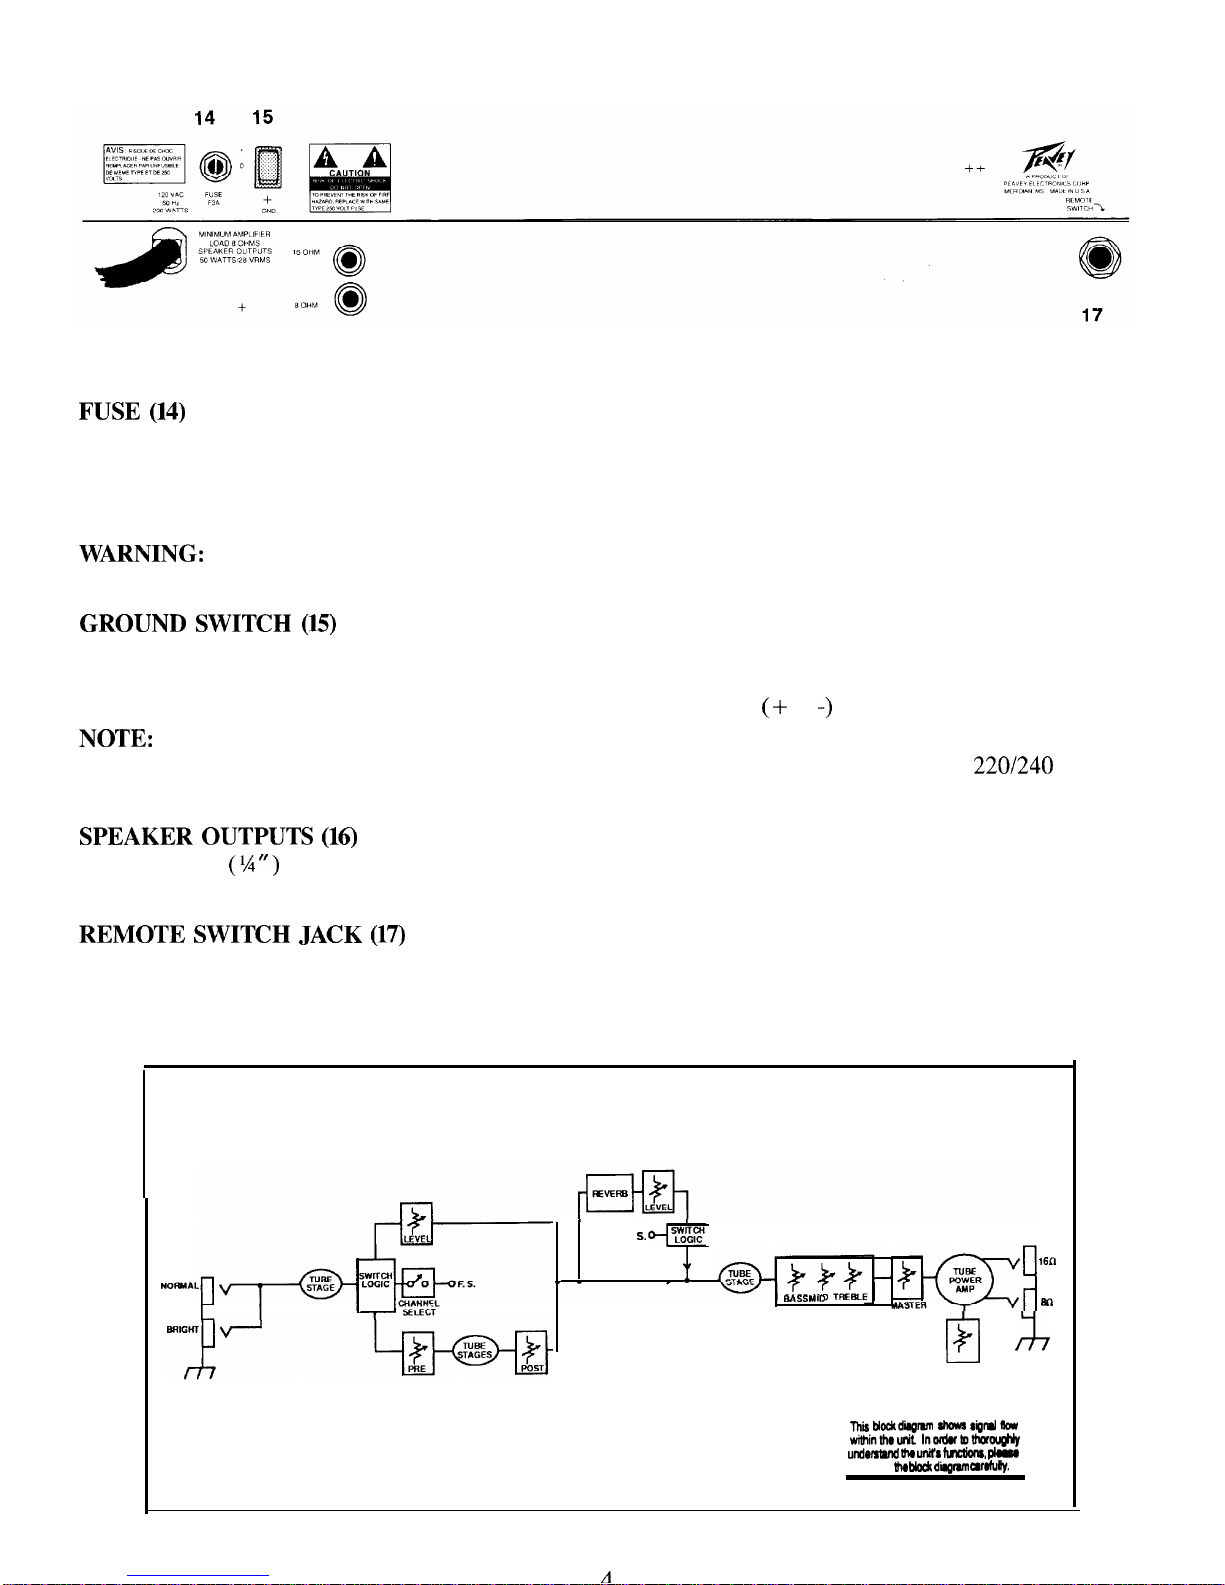
FUSE (14)
The fuse is located within the cap of the fuseholder. If the fuse should fail, IT MUST BE REPLACED WITH
THE SAME TYPE AND VALUE IN ORDER TO AVOID DAMAGE TO THE EQUIPMENT AND TO PREVENT VOIDING THE WARRANTY. If the amp repeatedly blows fuses, it should be taken to a qualified
service center for repair.
WARNING:
THE FUSE SHOULD ONLY BE REPLACED WHEN THE POWER CORD HAS BEEN
DISCONNECTED FROM ITS POWER SOURCE.
GROUND SWITCH (15)
Three position rocker-type switch which, in most applications, should be operated in its center or zero position. There may be some situations when audible hum and/or noise will come from the loudspeaker. If this
situation arises, position the ground switch to either positive or negative ( + or -) or until the noise is minimized.
NOTE:
Should the noise problem continue, consult your Authorized Peavey Dealer, the Peavey Factory, or
a qualified service technician. THE GROUND SWITCH IS NOT FUNCTIONAL ON 220/240 VOLT
MODELS.
SPEAKER OUTPUTS (16)
Speaker output (% “) jacks are provided for 16 and 8 ohms. When both jacks are engaged, amplifier impedance
is 8 ohms.
REMOTE SWITCH JACK (17)
Provided for the connection of the optional remote footswitch. Footswitch is used to select the Lead or Normal channels and defeat reverb. When using remote footswitch, always insert the plug fully (second click)
to ensure proper operation.
BLOCK DIAGRAM
INPUTS
NOFWAL
I
F. S.
f
so
BASS
,“I0
TREBLE
Ex2
El J7
PRESENCE
lhii blockd~r4m
3Kms signd nw
wtlhinthrunit Inofdutottwoughly
undowand the unlh fwdorm, pIme
study
TV
bbck dbgmm
cafofuhrlly.
A
SPECIFICATIONS
POWER AMPLIFIER SECTION
4 - 6BQYEL84’s with
12AX7
driver
Rated Power & Load:
50 W RMS into 16 or 8 ohms
Power @ Clipping: (Typically)
(5% THD, 1 kHz,
120 V AC line)
50 W RMS into 16 or 8 ohms
(Bias must be reduced
to measure)
Frequency Response:
+0, -2
dB,
50 Hz to 15 kHz,
@
40 W RMS into 16 ohms
Hum & Noise:
Greater than 80 dB below
rated power
Power Consumption:
200 watts, 50/60 Hz,
120 V AC (Domestic)
PREAMP SECTION
2 -
12AX7’s
The following specs are measured
@
1 kHz with the controls preset as follows:
Pre & Post (lead) @ 0
Reverb Level @ 0
Bass & Treble EQ @ 12
Middle EQ @ 0
Master Volume @ 12
Presence @ 6
Nominal level is with Input
Gain @ 6
Minimum levels is with Input
Gain @
12
Preamp Normal Input:
Impedance: Very high Z,
470 K ohms
Lead Channel
(Post gain @ 10)
Nominal Input Level: -40
dBV,
10 mV RMS
Minimum Input Level: -70
dBV,
0.3 mV RMS
TONE SETTING
Normal Channel:
Nominal Input Level : -17
dBV,
140 mV RMS
Minimum Input Level: -28
dBV,
40 mV RMS
Maximum Input Level : 0
dBV,
1.0 V RMS
Preamp Bright Input:
Impedance: Very high Z, 470 K
ohms
+12 dB
boost @ 2 kHz
Equalization:
(Lead & Normal Channels)
Custom bass, middle & treble
passive type EQ
External Footswitch Function:
Reverb Defeat
(when reverb control is raised)
Normal/Lead Channel Select
(when Lead activated)
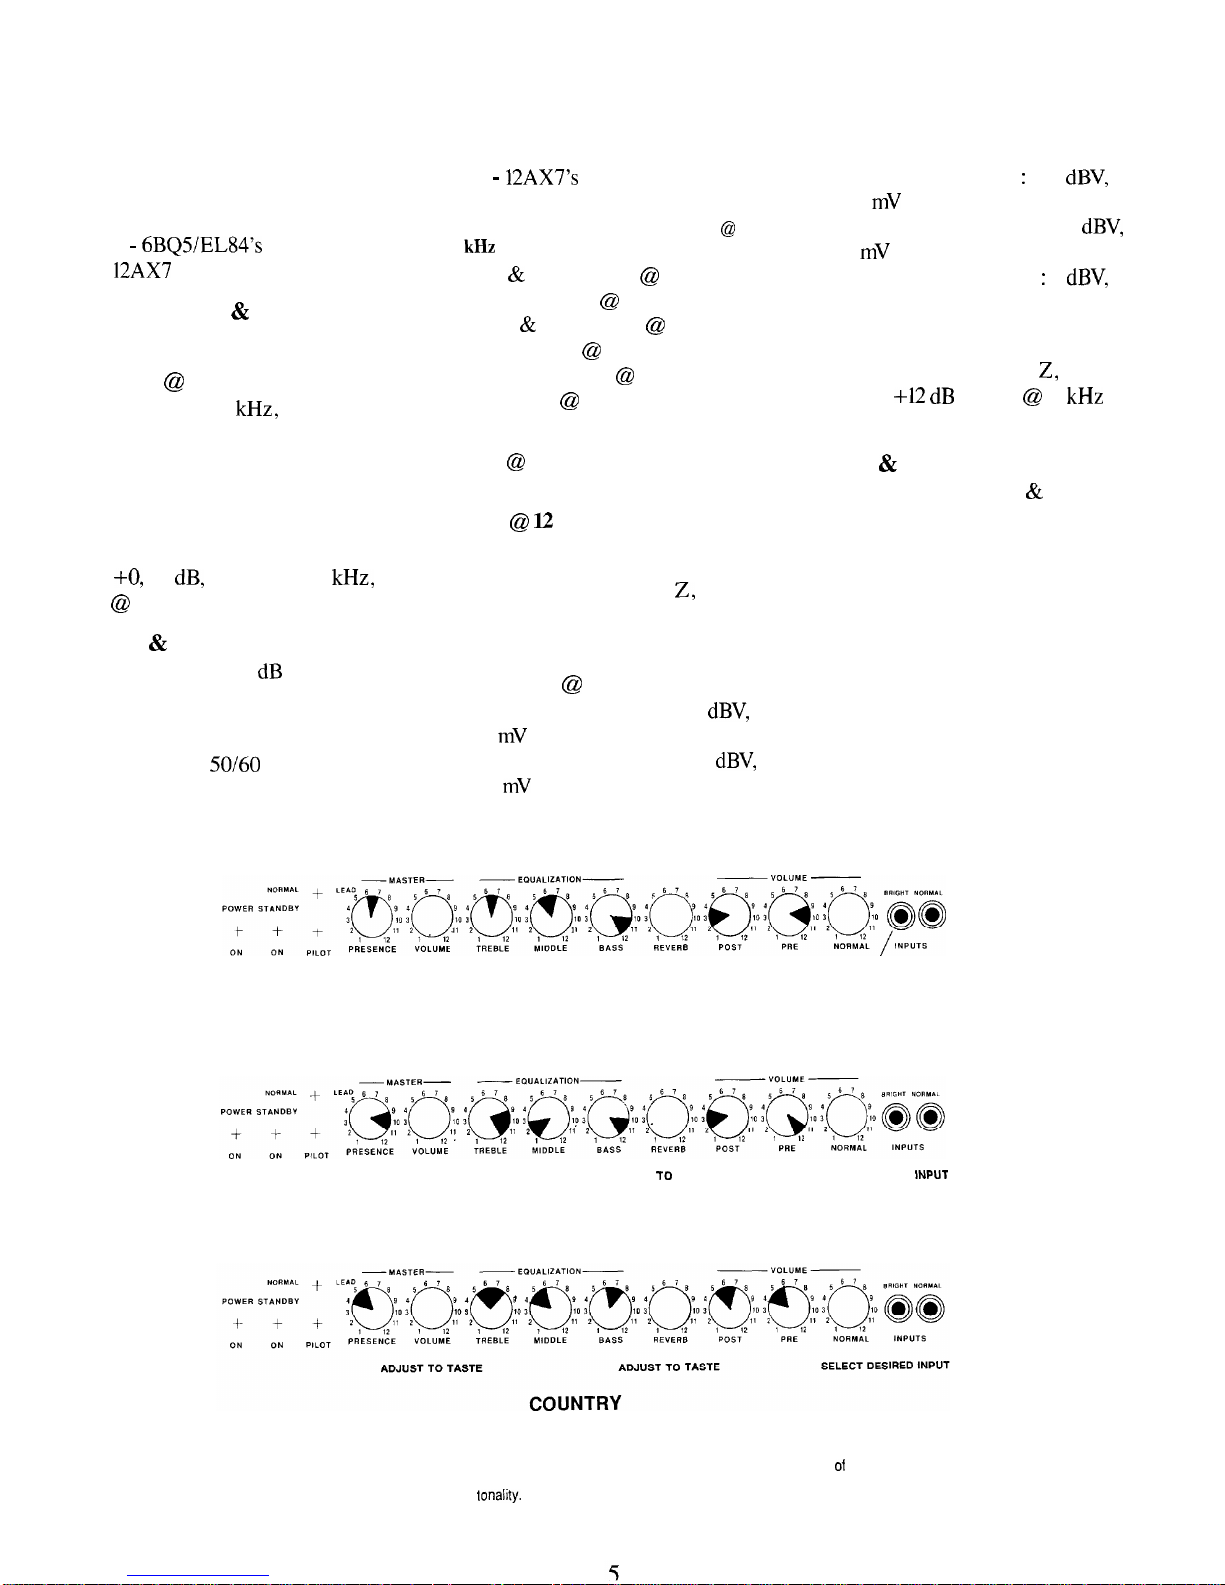
ADJUST TO TASTE
ADJUST TO TASTE
USED FOR BRIGHTER
SOUND WITH
ENHANCED HIGHS
ROCK
ADJUST TO TASTE
ADJUST TO TASTE
SELECT DESIRED iNPUT
METAL
Tone settings given are general and will vary according to type of guitar, type and guages
of
strings, type of pickup and even type of pick. Personal taste, playing style, and type of music
greatly contribute to desired
tonahty.
 Loading...