

Page 1
INSTALLATION AND OPERATING INSTRUCTIONS
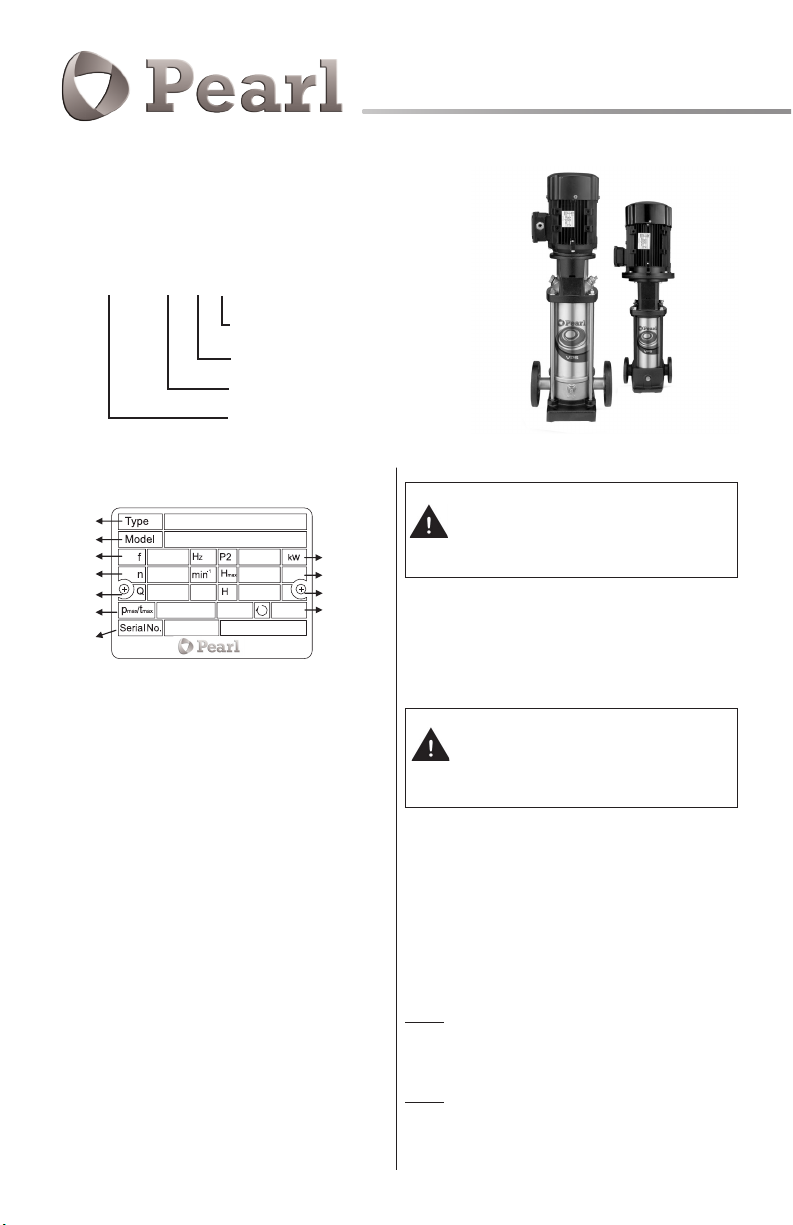
1. MODEL NUMBERING AND NAMEPLATE INFORMATION
1.1 Model numbering
VPC/VPS 5 16 SQQE
Code for
Shaft Seal
Number of Stages
Nominal Flow
Type Ranges
1.2 Nameplate format
1
2
3
5
7
9
11
1. Pump Type – Seal Type
2. Pump Model
3. Frequency
4. Rated Power
5. Speed
6. Maximum Head
7. Capacity
8. Head Range
9. Maximum Operating Pressure
10. Rotating Direction
11. Serial Number
GPM
psi/˚F
4
ft
6
ft
8
10
2. HANDLING
Read these instructions carefully before beginning installation.
Lift and handle these pumps carefully. VPC & VPS series are
vertical multi-stage non-self priming pumps coupled with
standard electric motors. This manual applies to standard version pumps and for standard applications. Contact your supplier
or the factory for information about special pump versions and
applications.
3. APPLICATIONS
VPC & VPS series in-line pumps booster pumps are designed
for a wide range of applications in various industries – for water
treatment, water boosting, water supply, cooling, cleaning, etc.
3.1 Pumped liquids
The pumps are designed for use with clean, viscous and nonexplosive liquids that do not contain abrasive matter.
Vertical Multistage Centrifugal In-line
These pumps are not designed to be used
with abrasive, solid containing, explosive
and corrosive liquids.
For special application, please contact
your supplier or the factory.
4. TECHNICAL DATA
4.1 Temperatures
Ambient temperature: 32 F to +104 F
If ambient temperatures are above +104° F
or if the pump is located at elevations more
than 3,000 feet above sea level, the motor’s
output must be decreased to compensate
for less eective cooling, and may have to
be replaced with a stronger motor.
Liquid temperature: -5 F to +248 F
4.2 Maximum operating pressure
Refer to page 8
4.3 Minimum inlet pressure-NPSH
To avoid cavitation, make sure that there is a minimum pressure
on the suction side of the pump.
NPSHA: Net Positive Suction head Available
The net positive suction head available is a function of the pump
suction system.
NPSHR: Net Positive Suction head required
The net positive suction head required is a function of the pump
design at the operating point on the pump performance curve.
Pumps Spare Parts
VPC-VPS
Page 2
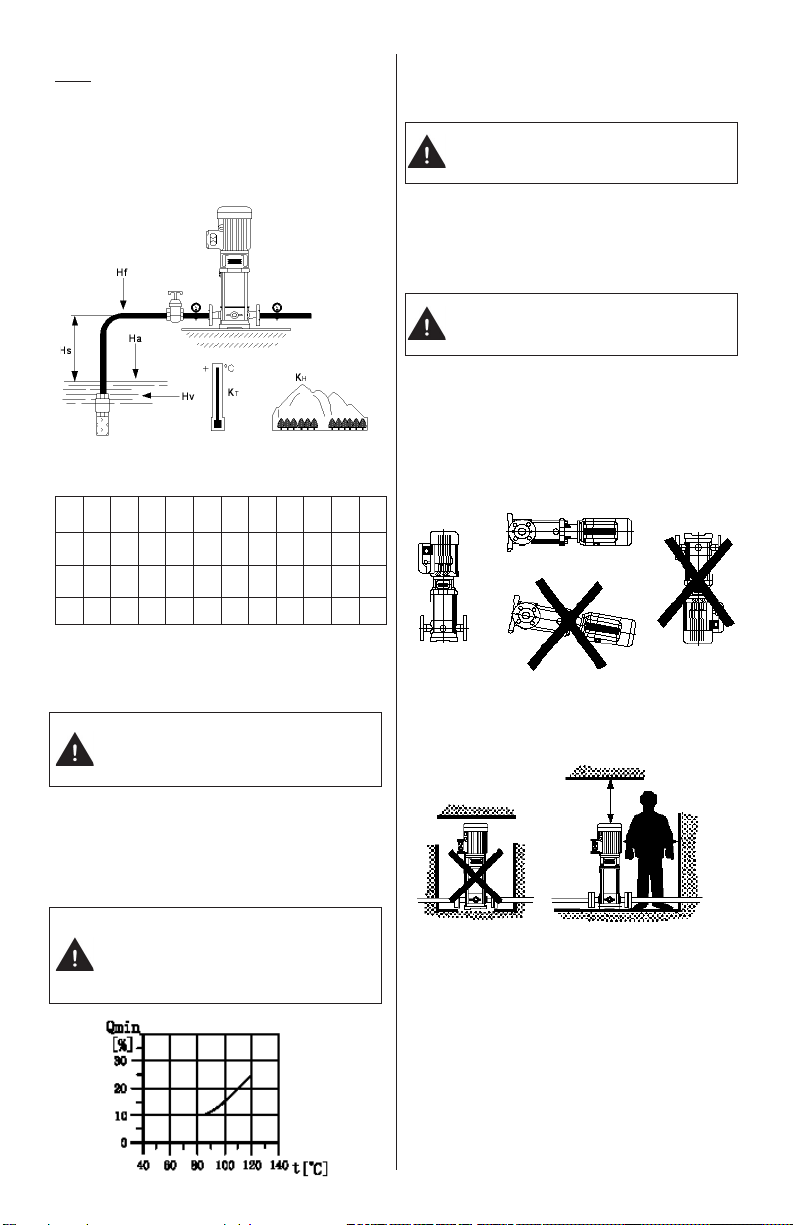
NPSHA=Ha-Hs-Hf-Hv-Hst (in meters head)
Ha: Barometric pressure. (That can be set to 15 psi.)
Hs: Suction lift.
Hf: Friction loss in suction pipe.
Hv = KT+KH: Vapor pressure
KT: Flow resistance due to liquid temperature.
KH: Flow resistance due to elevation above sea level.
If the liquid is water, you can consult the tables to determine the
values of KT and KH.
T(F) 68 86 104 122 140 158 176 194 212 230 248
KT
0.7 1.3 2.6 4.3 7.2 11 16.4 24 36 49 72
(Ft)
H
0 1640 3280 4921 6461 8202 9842
(Ft)
KH
0 1.80 3.61 5.41 7.22 9.02 10.8
(Ft)
Hst: Safety margin. (minimum: 7 FEET head)
>
NPSHA = NPSHR: Pump running will be fine.
NPSHA < NPSHR: The pump will be dry running or cavitating.
Stop operation of the pump if cavitation
occurs. Cavitation will cause pump damage
and the resultant damage is not subject to
warranty
4.6 Electrical data
See the motor nameplate.
Make sure that the supply voltages, phase
and frequencies correspond to the motor
specications.
4.7 Number of starts per hour
Motors up to and including 5 HP: Maximum 100 times per hour.
Motors of 7.5 HP and up: Maximum 40 times per hour.
If you use another brand of motor then check
the manufacturer’s instructions for the
maximum frequency of starts.
5. INSTALLATION
Always refer to the local or national regulations and codes relating to the selection of the installation site, the water and power
connections, etc.
5.1 Position
Pumps should be installed in a protected environment – not
exposed to weather. Make sure that there are no obstructions to
prevent proper motor cooling.
4.4 Minimum nominal flow rate
To prevent overheating of the internal pump components, the
pump should not be used at flows below the minimum flow
rate.
Do not run the pump against a closed discharge valve for longer than a few seconds.
The curve below shows the minimum ow
rate as a percentage of the nominal ow rate
in relation to the liquid temperature.
5.2 Anchoring
The pump must be secured to a solid foundation by bolts
through the holes in the flange or base plate. An illustration of
page 9 shows the bolt location and the pipe connections.
5.3 Installation example
When positioning and installing the pump, follow the installation
examples next page in order to avoid damaging the pump.
Page 3
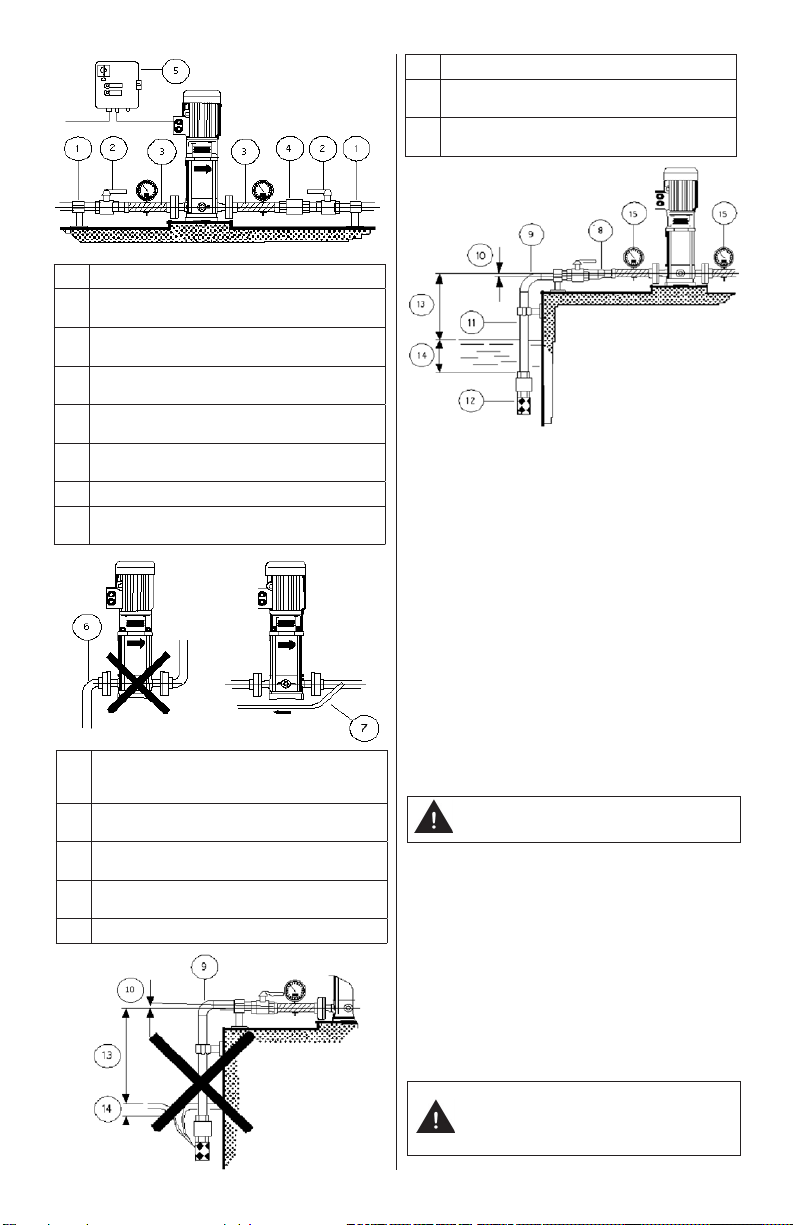
Pos. DESCRIPTION
1 Pipe support: Support piping system properly to avoid stresses
on connections.
2 On-off valves: Install on-off valves for easy access- before the
pump intake and after the pump discharge.
3 Use flexible piping on both input and output sides of the pump
to reduce vibration and transmission of noise.
4 Check valves will prevent return flow of pumped liquid when
pump is stopped, reducing the danger of pump damage.
Control Panel: Use high quality components. Make sure that
5
the panel conforms to local standards and regulations.
6 Do not place elbows next to the pump intake and discharge.
If pump needs to be operated with on-off valve closed, install a
7
by-pass line to avoid damaging the pumping system.
13 Size pump for correct head.
Place the intake of the suction pipe so that the intake is always
14
submerged to prevent entry of air.
Install a compound gauge at the pump suction and a pressure
15
gauge at the pump discharge.
6. ELECTRICAL CONNECTION
• All electrical connection should be in accordance with the
local regulations and made by a qualified electrician.
• Make sure that the supply voltages and frequencies, and
phase are suitable for the motor used.
• Before proceeding, make sure that all the connections are
grounded and well insulated.
• Overload protection should be provided.
• To connect, proceed as shown on the inside of the terminal
board cover.
• The terminal box can be turned to four positions.
• Check the direction of rotation (Three-phase motor only).
• Make sure that the controls are properly grounded.
• To avoid the possibility of dry running, we strongly
recommend installing dry running protection.
If it is necessary to increase the diameter of the suction pipe,
8
place an eccentric reducer between the check valve and the
flexible pipe section.
Using elbows will increase the flow resistance. Wide bends will
9
result in lesser flow resistance.
The piping must have a level or positive gradient to prevent the
10
formation of air pockets.
The diameter of the drop pipe must be bigger than the diam-
11
eter of the pump’s suction port.
12 Use a foot valve in case of negative suction head.
7. START-UP
The pump and suction pipe should be filled with the liquid to be
pumped before start-up to prevent dry running at start-up.
Dry running can damage the pump bearing
and shaft seal.
7.1 Operation
• Start the pump and check the direction of rotation of the
motor (Three –Phase motors).
• Start the pump, keeping the on-off valve of the discharge
side of the pump closed. Then, open the on-off valve
slowly. The pump must run smoothly and noiselessly. If
not, then it may be necessary re-prime the pump.
• Check the current drawn of the motor. If necessary, adjust
the setting of the thermal relay.
• Any air pockets trapped inside the pump may be released
by adjusting the air screw.
If the pump is installed in a location where it
is subject to freezing when not in operation,
then the pump and the pipe system should
be drained to prevent damage from freezing.
Page 4

7.2 Others (Only for VPC, VPS 1, 3, 5 series)
• For these pumps, it is advisable to open the bypass valve
during start-up. The bypass valve connects the suction
and discharge sides of the pump, thus making the filling
procedure easier. When the operation is stable, the bypass
valve can be closed.
• If the pumped liquids contain air, it is advisable to leave the
bypass valve open if the operating pressure is lower than
85 psi. If the operating pressure constantly exceeds 85 psi,
the bypass valve must be closed. Otherwise the material at
the opening will be worn because of the high liquid velocity.
8. MAINTENANCE
Before starting maintenance work on the
pump, the motor, or other parts of the system,
make sure that the power supply has been
switched o.
• The pump does not have a recommended scheduled
maintenance schedule.
• If the motor is fitted with grease nipples, then the motor
should be lubricated with a high temperature lithiumbased grease. If not, then the motor does not require
regular maintenance.
• If the pump and motor are used infrequently with long
intervals of non-operation, then we recommend that the
motor be greased.
• Coupling adjustment: Refer to page 7.
Page 5

9. TROUBLESHOOTING
PROBLEM POSSIBLE CAUSE REMEDY
Supply failure or no power supply. Check connections or restart the power supply.
Pump does not run when
the motor starter is
activated.
Starter overload trips
immediately when the
power is switched on.
The pump starts but, after
a short time, the thermal
protector trips out or the
fuses blow.
The pump starts up but,
after a period of time, the
thermal protector trips.
Main contacts in motor starter are not making
contact or the motor coils are defective
Pump or auxiliary circuits protection fuses
blown.
Pump or piping system may be obstructed
causing a jam.
Motor may have failed. Replace the motor.
Motor protector or thermal relay has tripped
out.
Tripping of anti-dry running protection.
Overload setting is too low. Set the motor starter correctly.
The cable connection is loose or faulty. Fasten or replace the cable connection.
One fuse is blown. Replace fuse and try starting again.
Pump is jammed by an obstruction Check and clean obstruction from system.
Contacts in overload are faulty. Replace motor starter contacts.
The motor winding is defective. Replace the motor.
Low voltage (Especially at peak time). Check the power supply.
The voltage is not within the motor’s operating limits.
The control panel is situated in an excessively
heated area or is exposed to direct sunlight.
A phase in the power supply is missing. Check the power supply.
Worn motor bearings causing motor to
overheat.
The pump’s delivery rate is higher than the
specified rate on the pump nameplate.
There are obstructions inside the pump or
pumping system.
Less viscous liquids may cause the motor to
work too hard and overload the motor, causing the motor to overheat
Reconnect or replace contacts or magnetic coil.
Replace fuses.
Clean the obstruction and restart pump.
Reset the motor or thermal protector.
Check the water level in the tank or the water
system pressure. If everything is in order, check
the protection device and its connection cables.
Check the operating conditions of the pump.
Protect the control panel from heat sources and
from the sun.
Replace motor bearings.
Partially close the on-off valve located
discharge side until the delivery rate returns to
within the specified limits.
Disassemble and clean the pump and piping.
Check the actual power requirements based on
the characteristics of the liquid being pumped,
and replace the motor accordingly.
Page 6

PROBLEM POSSIBLE CAUSE REMEDY
Pump is not primed with liquid. Fill the pump with the liquid to be pumped.
Pump runs but no water
delivered.
The pump capacity is not
constant.
The system’s general
protection cuts in.
The pump, suction or discharge pipes are
blocked by solids in the liquid being pumped.
The foot or check valve is blocked or has
failed.
The suction pipe leaks. Repair or replace the suction pipe.
The air is in the suction pipe or pump. Remove trapped air from system..
Motor operating in wrong direction (threephase motor).
The pump draws in air or the inlet pressure
is too low.
The pump or the suction side of the piping
system partly blocked by foreign bodies.
Short circuit. Check electrical system.
Clean the pump, suction or discharge pipe.
Replace the foot or check valve.
Change the direction of rotation of the motor by
reversing motor connections.
Improve the suction conditions.
Clean the pump or suction pipe.
... troubleshooting cont.
The pump rotates in the
wrong direction when
switched off.
The frequency of
Pump start-up is too high.
Vibration and noise
The foot or the check valve has failed. Check and replace check valve.
Leakage in the suction pipe. Repair or replace the suction pipe.
Leakage in the foot valve, check valve or
system.
Ruptured membrane or no air pre-charge in
surge tank.
Cavitation
Make sure that pump and motor shafts are
properly aligned.
Worn motor bearings. Replace the bearings or the motor.
Operation with frequency converter.
Check vibration and noise damping devices Replace vibration & noise dampers, if worn.
Repair or replace the components.
See relevant instructions in surge tank’s
manual.
Reduce the required flow or improve the operating conditions of the pump (suction conditions, head, flow resistance, liquid temperature,
viscosity,…etc.).
Adjust the pump and/or motor shafts.
Consult a qualified engineer form the supplier
of the frequency converter.
Page 7

Maximum Operating Pressures Maximum Inlet Pressures
STAGES
VPS-VPC 1 2-27 350
VPS-VPC 3
VPS-VPC 5 2-24 350
VPS-VPC 10
VPS-VPC 15
VPS-VPC 20
VPS-VPC 32
VPS-VPC 45
VPS-VPC 64
VPS-VPC 90
VPS-VPC 120 1 - (5-2) 425
VPS-VPC 150
2-25 350
1-10 230
12-17 350
1-8 230
9-12 350
1-7 230
8-10 350
(1-1)-5 230
(6-2)-(10-2) 425
(1-1)-4 230
(5-2)-7 425
(1-1)-3 230
(4-2)-(5-2) 425
(1-1)-3 230
(4-2) 425
(1-1) - (4-2) 425
MAXIMUM OPERATING
PRESSURE
[ PSI ]
VPS-VPC 1
VPS-VPC 3
VPS-VPC 5
VPS-VPC 10
VPS-VPC 15
VPS-VPC 20
VPS-VPC 32
VPS-VPC 45
VPS-VPC 64
VPS-VPC 90
VPS-VPC 120
VPS-VPC 150
DIN Flange Connections
STAGES
2-25 142
27 210
2-15 142
17-25 210
2-9 142
10-24 210
1-5 110
6-18 142
1-2 110
3-12 142
1 110
2-10 142
(1-1)-(2) 55
(3-2)-(6) 142
(7-2)-(10-2) 210
(1-1)-1 55
(2-2)-3 142
(4-2)-7 210
(1-1) 55
1-(2-1) 142
2-(5-2) 210
(1-1)-(2-2) 142
(2-1)-(4-2) 210
1 142
(2-2) - (3-1) 210
3 - (5-2) 280
(1-1) 142
(1-2) 210
(3-2) - (4-2) 280
MAXIMUM INLET
PRESSURES
[ PSI ]
Pump
Type
VPC 1 9.8 3.0 1/1 ¼ 3.94 5.55 7.09 8.66 0.55
VPS 1 9.8 3.0 1/1 ¼ 3.94 5.91 7.09 8.66 0.55
VPC 3 9.8 3.0 1/1 ¼ 3.94 5.55 7.09 8.66 0.55
VPS 3 9.8 3.0 1/1 ¼ 3.94 5.91 7.09 8.66 0.55
VPC 5 9.8 3.0 1/1 ¼ 3.94 5.55 7.09 8.66 0.55
VPS 5 9.8 3.0 1/1 ¼ 3.94 5.91 7.09 8.66 0.55
VPC 10 11.0 3.1 1 ½ 5.12 6.81 8.46 10.08 0.57
VPS 10 11.0 3.5 2 5.12 7.87 8.46 9.76 0.55
VPC 15 11.8 3.5 2 5.12 6.81 8.46 10.08 0.59
VPS 15 11.8 3.5 2 5.12 7.87 8.46 9.76 0.55
VPC 20 11.8 3.5 2 5.12 6.81 8.46 10.08 0.59
VPS 20 11.8 3.5 2 5.12 7.87 8.46 9.76 0.55
VPC 32 12.6 4.1 2 ½ 6.69 8.86 9.45 11.69 0.55
VPS 32 12.6 4.1 2 ½ 6.69 8.94 9.45 11.77 0.55
VPC 45 14.4 5.6 3 7.40 9.72 10.55 12.99 0.55
VPS 45 14.4 5.5 3 7.48 9.88 10.43 12.99 0.55
VPC 64 14.4 5.6 4 7.40 9.72 10.55 12.99 0.55
VPS 64 14.4 5.5 4 7.48 9.88 10.43 12.99 0.55
VPC 90 15.0 5.5 4 7.83 10.35 11.02 13.62 0.55
VPS 90 15.0 5.5 4 7.83 10.24 11.02 13.58 0.55
VPS 120 15.0 5.5 5 7.83 10.24 15 18.56 0.69
VPS 150 15.0 7.1 5 10.81 10.24 15 18.56 0.69
L H DN L1 L2 B1 B2 Ø
[inch] [inch] [inch] [inch] [inch] [inch] [inch] [inch]
Page 8

VPC-VPS 1, 3, 5 coupling adjustments VPC-VPS 10, 15, 20 Coupling adjustments
VPC-VPS 32, 45, 64, 90 Coupling adjustments
WATER SYSTEMS
PD WATER SYSTEMS - 3000 W. 16 Ave. Miami, FL 33012. TEL: (954) 474 9090 FAX: (954) 889 0413
www.pdwatersystems.com | pdwatersystems
 Loading...