

Page 1
PEARL DRUM PEDAL
P-932/P-932L/931
Instruction Manual
Congratulations on your purchase!
To get optimum performance from your P-932 / P-932L / P-931 Drum Pedal,
please read this Instruction Manual before playing.
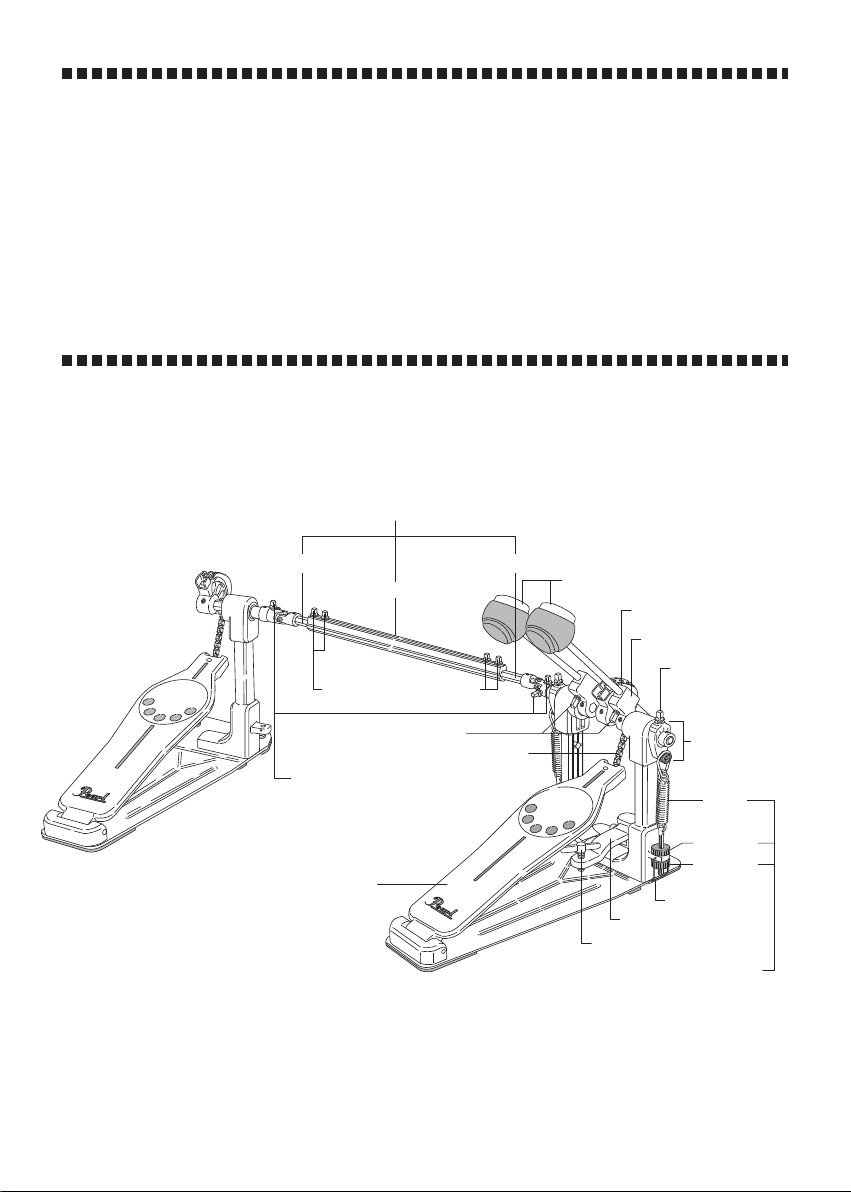
Drive Shaft Assembly
Drive Shaft Drive Shaft
Center Connecting Tube
Key Bolts
(for Adjusting Pedal Spacing)
(for Beater Setting)
Key Bolts
(for Drive Shaft Attachment)
Footboard
Key Bolt
Chain
DuoBeat Beater (2-Surface Beater)
Interchangeable Cam
Beater Holder Link
Key Bolt
(for Beater Angle
Adjustment)
Beater Angle Cam
Spring
Upper Nut
Lower Nut
Click Lock
Hoop Clamp
Wing Bolt
Spring Assembly
Page 2
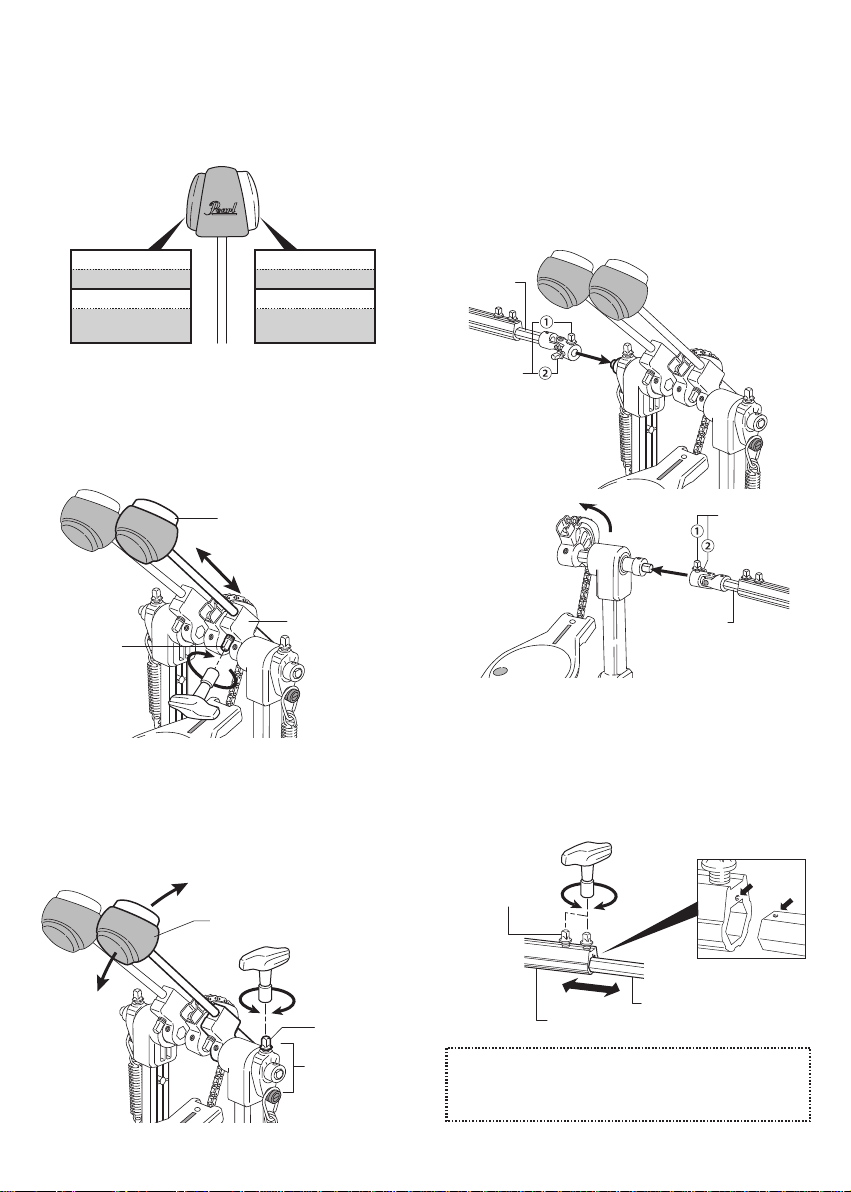
DuoBeat Beater (2-Surface Beater)
The DuoBeat Beater features a Felt Surface (A) for a full,
warm sound and a Plastic Surface (B) for a sharper,
punchier sound. Use the side that best suits your playing
style (Fig.1).
AB
Connecting the Drive Shaft Assembly
Connect the ends of the Drive Shaft (A) to the short
extensions (B) on the Main and Slave Side Pedals. You may
need to rotate the Cam on the Slave Side Pedal to bring the
footboard of the Slave Side (left) Pedal to the proper playing
height (angle) before attaching the Drive Shaft Joints (A) to
both pedals. Tighten Key Bolt ① with the provided Drum
Key and then Key Bolt ② (Figs.4, 5).
Surface Material
Plastic Surface
Sound
Sharper,
Punchier Sound
Surface Material
Felt Surface
Sound
Full,
Warm Sound
Fig. 1
Beater Setting
Insert the shaft of the DuoBeat Beater into the Beater
Holder Link and tighten the Key Bolt with the provided
Drum Key to secure the Beater at the desired height.
Experiment with different Beater heights to find the best
combination of power and speed (Fig.2).
DuoBeat Beater
Beater Holder Link
Key Bolt
Fig. 2
Beater Angle Adjustment
Depending on your preference, the Beater can be
positioned closer or farther away from the Bass Drum Head.
This is accomplished by loosening the Key Bolt on the
Beater Angle Cam and swinging the Beater to the desired
angle. Re-tighten the Key Bolt to secure the angle (Fig.3).
DuoBeat Beater
Drive Shaft
Main Pedal
A
B
Fig. 4
Key Bolt
Drive Shaft
Slave Side Pedal
Fig. 5
Key Bolt
To adjust the length of the Drive Shaft, loosen the Key
Bolts on the Center Connecting Tube of the Drive Shaft
Assembly with the provided Drum Key and adjust the
distance between the Main Pedal and the Slave Side
Pedal to your liking. Make sure to re-tighten the Key Bolts
after making the adjustment (Fig.6-A).
Fig. 6-B
Key Bolt
Key Bolt
Beater Angle Cam
Fig. 3
Fig. 6-A
Center Connecting Tube
Drive Shaft
NOTE
If the Drive Shafts are extended too far, they will separate
from the Center Connecting Tube. Reassemble them with the
dots aligned as shown in Fig.6-B.
Page 3

Spring Tension Adjustment
The P-932 Drum Pedal features Pearl’s patented Click
Lock spring tension retention system. To increase the
spring tension, disable the Click Lock by lifting the lever
upward, loosen the Upper Nut and press downwards.
Keep the position of the Upper Nut and tighten the Lower
Nut until the desired tension is achieved (Fig.7). To
decrease spring tension, disable the Click Lock by lifting
the lever upward, loosen the Upper Nut and loosen the
Lower Nut until the desired tension is achieved. When the
desired spring tension is achieved, tighten the Upper Nut
to keep the spring tension from loosening then press the
Click Lock lever down to engage the grooves around the
Lower Nut until you feel the lever "Click" (Fig.7-A). Before
playing, make sure that both Upper and Lower Nuts are
tight and the Click Lock lever is in a vertical position with
both sides of the lever engaged in the grooves around the
Lower Nut.
PowerShifter
The P-932 Drum Pedal is equipped with Pearl's patented
PowerShifter Function that changes the leverage of the
Footboard and thus the feel of your pedal. By default, it's
set to the (A) position (Fig.9-A). To change to the (B)
position, remove the two Flat Head Screws under the
Base Plate using the provided Hex Wrench (3mm). Move
the Footboard toward the front of the pedal and insert the
guides under the Heel into the appropriate holes in the
Base Plate. Make sure the Heel is flush with the Base
Plate and reattach the Flat Head Screws (Fig.9-B). Tighten
the Screws securely with the provided Hex Wrench.
A
Light Feel
Footboard
B
Heavy Feel
Footboard
Spring
Upper Nut
Lower Nut
Click Lock
Fig. 7
Fig. 7-A
Hoop Clamp Wing Bolt
Place the Pedal on the Bass Drum Hoop and square the
Pedal to the floor. Tighten the Wing Bolt to clamp the
Pedal firmly in place (Fig.8).
Hoop Clamp
Wing Bolt
Fig. 8
Base Plate
Flat Head
Screw
Fig. 9-A Fig. 9-B
Base Plate
Flat Head
Screw
Anchor Bolt
The Slave Side Pedal is
equipped with Anchor
Bolts with spikes for slip
resitance. Turn the
Bolts clockwise to
expose the spikes
(Fig.10).
Anchor Bolt
CAUTION
The Spikes on the Anchror Bolts are sharp. Be careful not to
hurt yourself or others when using them. Use them only on
thick carpeted surface to prevent damage to the flooring
underneath.
Fig. 10
NOTE
Make sure to remove the Pedal when moving the Bass Drum
to prevent damage to the Bass Drum and the Pedal.
Page 4

Interchangeable Cam System
The P-932 Drum Pedal is equipped with Pearl's Patented
Interchangeable Cam system which allows you to change
the feel and action of the pedal. It comes from the factory
with the Orange Cam installed, which is an "Off-Centered"
cam design with light feel in the beginning that accelerates with power and speed at impact. Removing the
Orange Cam reveals Pearl's "Perfect Circle" Cam that's
renown for its power and natural, balanced action.
To remove the Orange Cam, insert the provided Hex
Wrench (2.5mm) into the center of the Orange Cam
between the gap of the Chain and loosen the Screw
(Fig.11-A). Pull the Orange Cam straight up and away
from the Chain (Fig.11-B). Reverse the steps to reattach
the Orange Cam.
*******************************************
The P-931 Add-on Pedal Converts
Your P-930 Single Pedal into a
Double Pedal.
*******************************************
The P-931 includes the following components:
・ Main Pedal
・ DuoBeat Beater
・ Drive Shaft Assembly
Main Pedal
DuoBeat Beater
Hexagonal Wrench (2.5mm)
Orange Cam
Screw
Fig. 11-A Fig. 11-B
TIP
The Orange Cam can be attached with either end up.
Chain
Drive Shaft Assembly
TIP
The P-931 includes only one DuoBeat Beater.
Page 5

Converting Your P-930 Single Pedal to the
Slave Pedal
Loosen the Key Bolt on the Beater Holder Link with the
provided Drum Key and remove the DuoBeat Beater and
the Key Bolt. Disengage the Click-Lock (A)and remove
the Lower Nut from the Bolt (B). Take the Hook off from
the Cam Roller (C) and remove the Spring Assembly from
the Post (D). Gently spread the Click-Lock apart and
remove it from the Post (E).
Please refer to (Figs.4-6) to attach the Drive Shaft.
DuoBeat Beater
Spring Assembly
NOTE
Periodically apply lube to parts such as the Chain, Bolts and
Nuts, Footboard Hinge and Bearings.
Key Bolt
Beater Holder Link
Cam Rollert (C)
(D)
(E)
Click-Lock
Hook
Bolt
Lower Nut (B)
Click-Lock (A)
TIP
Please retain the parts that were removed from the P-930
(Key Bolt, Click-Lock, Spring Assembly) should you decide to
restore it to a Single Pedal.
Optional Items (sold separately)
・Pedal Stabilizer (PS-85)
Products and specifications are subject to change without notice.
http: //www.pearldrum.com
Printed in China
-1212-
 Loading...