


1
Searchlight System
Operation Manual
Table of Contents
Overview ..........................................................................................................................................2
Characteristics
Applications
Theory of Operation
Warnings ..........................................................................................................................................3
Searchlight Operation .......................................................................................................................4
General Operation
Programming
Remote Control Operation
Searchlight Maintenance...................................................................................................................9
Focusing the Lamp
Lamp Replacement
Lithium-Ion Battery Systems ..........................................................................................................10
Powering the Searchlight
Recharging the Li-Ion Battery
NiCad Battery Systems ...................................................................................................................11
Powering the Searchlight
Recharging with 5200 Series Chargers
Recharging with 5600 Series Chargers
Recharging with 3100 Series Chargers
Optical Filters .................................................................................................................14
Troubleshooting..............................................................................................................................17
Warranty and Returns to Factory.....................................................................................................19
Equipment and Accessories.............................................................................................20
Appendix – NEW PRODUCTS ......................................................................................................21
Maxa Beam Crew-Served Weapons Light (CSWL)
Computer-Controlled (RS-232) Searchlight Systems
© 2009 Peak Beam Systems, Inc.

2
Overview
Characteristics:
The Maxa Beam 400 series handheld searchlights are lightweight, compact, high intensity
illuminators which use a field replaceable 75 Watt Xenon short arc lamp and a precision
electroformed reflector to provide the ultimate source for long range and wide angle portable
illumination. System features include:
• Color rendition similar to daylight (6000°K)
• All functions controlled with one hand
• Searchlight with Li-Ion Battery weighing just 5.3 lbs.
• Field-programmable operational characteristics (start-up beam width, strobe rate, etc.)
• Three levels of illumination intensity
• 1° to 40° motorized zoom focus
• Visible (white) and Infrared illumination capability
• 12VDC Operation; 24V and 48V-12VDC Converters available
• Weather resistant
• Snap on battery modules with built-in charger
• Rechargeable battery belts
• Up to 130 minutes of operation on one Li-Ion battery
• Built-in battery charger recharges Li-Ion batteries in just 3 hours
• Charger operates directly from 11-29VDC or 100-240VAC
• Direct power from 12VDC, 24-48VDC (with converter), or 100-240VAC
• Customizable strobe function
• Flexible mounting options
• Remote models (MBS-430/450) allowing remote control of:
Beam Intensity
Beam Size
Strobe Function
Programming
The 400 series consists of three searchlight models:
• MBS-410 Handheld Searchlight
• MBS-430-Y Remote Control Only Searchlight with Reinforced Spyder Lens
• MBS-450 Handheld Searchlight with Remote Control Capability
Applications:
For over 20 years users in locations ranging from the Sahara Desert to the AlCan Pipeline have come
to rely on the Maxa Beam Searchlight system for:
• Force Protection • Search and Rescue
• Perimeter Security • Tactical Operations
• Infrared/Covert Surveillance • Maritime Navigation
• Night Vision System Enhancement • Still & Motion Picture Photography

3
Theory of Operation:
The Maxa Beam Searchlight produces light by passing an arc of electricity between two electrodes
in a quartz tube filled with a pressurized atmosphere of Xenon gas. An extremely precise plasma
ball is formed and precisely positioned within an electroformed reflector by an internal
microprocessor controlling a servo motor.
When the ignition button is momentarily pressed, a high voltage RF igniter produces up to 20,000
volts to ionize the Xenon gas within the lamp, allowing 12.5 to 14VDC operating voltage to bridge
the arc gap and form a steady state. Once the arc is established, gas temperature and pressure start to
climb, forcing the Xenon into a plasma state. The light will come on with a constant high beam for
approximately 3 seconds to assure reliable ignition of a cold lamp and will then go to the
programmed intensity and mode. After ignition of the lamp is complete, the internal microprocessor
takes control of the operation of the electronic focus, power settings and the user programmable
options.
The searchlight contains no internal, user-serviceable parts. The switch mode power supply is
factory set and requires no adjustment (even after a lamp change has occurred) as the control
circuitry is self-calibrating. Internal power regulation keeps both the intensity and color of the beam
constant as the voltage from the battery drops.
Warnings
Do not operate this light in an explosive environment.
Do not look directly into the light at close distances.
Do not immerse the light in water allowing water to enter the case. While the Maxa
Beam is weather resistant, submersion will cause permanent damage to the light.
Do not operate the searchlight if the front lens is damaged or removed.
Do not allow the concentrated beam of light to be focused on flammable materials at
close distances for prolonged periods of time.
Do not touch the Xenon lamp connections during operation or ignition as high voltage
is present.
Do not touch the clear portion of the Xenon lamp. If the lamp is accidentally touched,
clean with alcohol or the solution supplied in the replacement lamp kit.
Always wear protective eyewear if removing the front lens cover. The lamp is under
positive pressure and should be handled with care.
To prevent accidental activation of the light, always disconnect it from the power cord
when it is not in use, placed in storage or being transported.
4
Searchlight Operation
General Operation
Setup:
1) Locate light, battery and power cable.
2) Inspect items for physical damage.
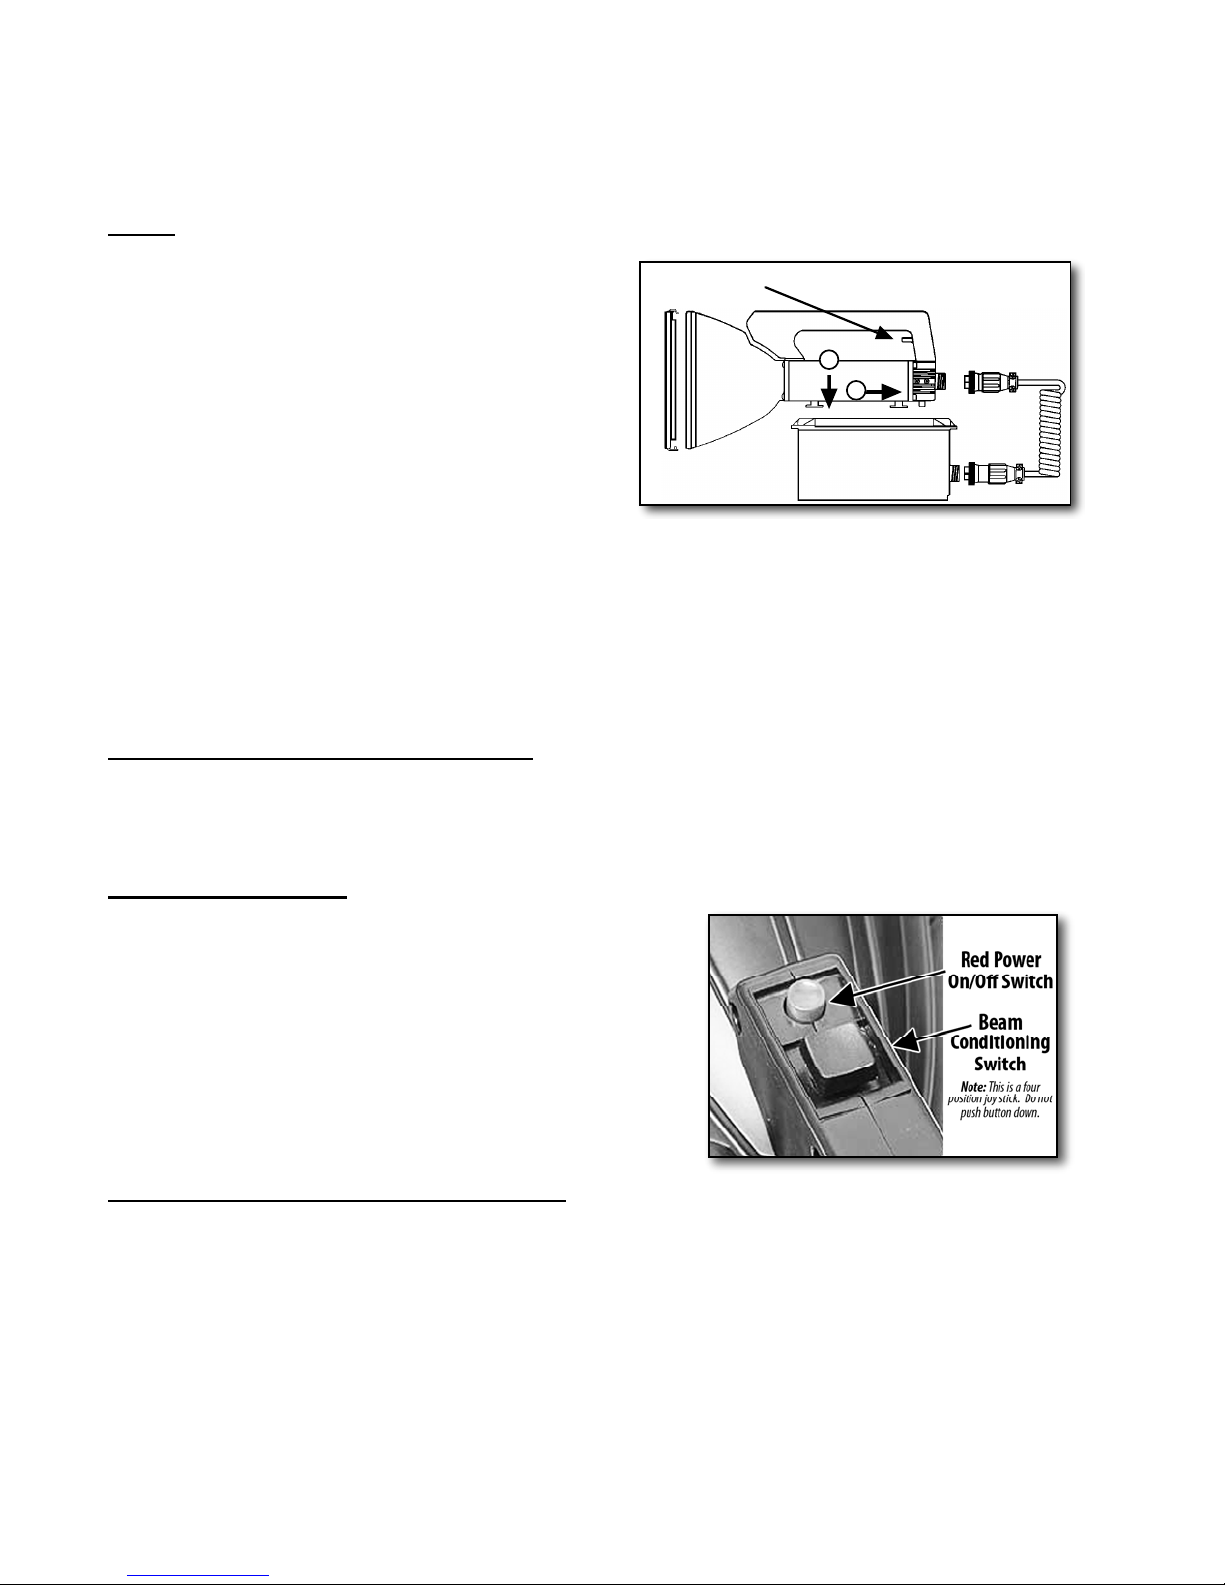
3) Attach searchlight to battery by lining up
round feet of searchlight over round holes
on the top of the battery (a). Lower the
searchlight into the holes and then slide the
searchlight towards the connector end of
the battery (b). Check for positive lock by
sliding searchlight away from connector
end of battery. If properly locked, it should
not slide.
4) If desired, attach a battery shoulder strap to diagonally opposite ears on battery.
5) Attach male end of power cable to connector on battery. These are keyed; never force cable
connections. To lock rotate only the locking ring clockwise.
6) Attach female end of power cable to 4-pin male connector on searchlight. These are keyed;
never force cable connections. To lock rotate only the locking ring clockwise.
To release searchlight from battery pack:
1) Lift lock release lever under searchlight handle (located at the rear of handle).
2) Slide searchlight forward, away from connector end of battery.
To turn searchlight on:
1) Momentarily press the red power on/off switch
located on the handle at front. If the light does not
light in 5 seconds, press the red button again to stop
the starting process and see the troubleshooting
section of this manual.
2) The searchlight will light at high beam and hold this
setting for 3 seconds. The intensity will then drop
to the programmed power setting.
To change the size of the searchlight’s beam:
1) Rock the beam conditioning switch to the rear to widen beam. Rock the beam conditioning
to the front to narrow beam. When you reach the desired beam width, release switch.
a
b
Lock Release Lever
Lock Release Lever

5
To set searchlight beam intensity:
1) To increase the intensity of the searchlight to high beam, rock and hold the beam
conditioning switch once to the right. When you release the beam conditioning switch the
intensity will return to its previous setting. (This function can be programmed, see page 6.)
2) To decrease the intensity of the searchlight to battery saver mode, check that this function
has been activated (this position is shared with the strobe function; see programming section
for more information). After activation, rock the beam conditioning switch to the left. This
will set the light into battery saver mode. To return to normal intensity, rock the beam
conditioning switch to the left again.
To override low voltage protection – NiCad Batteries Only:
1) The searchlight will automatically shut down before it discharges a NiCad battery enough to
damage it. At this point, there are usually several minutes of power left in the battery that
can be accessed in an emergency.
2) To access the remaining power in the battery push and hold the power button. Please note
that this procedure may damage the battery to the point that it will no longer accept a charge.
To attach a Maxa Beam optical filter:
1) The Maxa Beam filters utilize a quick disconnect snap lock feature for ease and speed of
installation or removal. To attach a filter, first line up the 3 tabs on the filter with the slots on
the searchlight’s front lens ring.
2) Place filter over front of searchlight.
3) Turn filter counter-clockwise until it is fully seated. Filter will lock in place.
Programming
The Maxa Beam Searchlight provides you with a great deal of operational flexibility by allowing
you to modify the operational characteristics of the searchlight with some simple programming
sequences. This capability allows you to customize the light for a specific application.
For example, if you want to use the light for an extended search operation in a wooded area, you can
program the light to automatically start up in battery saver mode with the beam width at full flood.
Other scenarios include: a surveillance operation where you want the light to start up at normal
power with the beam set to the size of the area under surveillance or a tactical application where the
user programs the light to start up in strobe mode at a narrow beam spread.
Factory Settings:
When you receive your searchlight from the factory it will operate as follows:
Automatic Beam Intensity at Start Up: Normal Power Mode
Rock Conditioning Switch Forward: Decrease Beam Width to Spot
Rock Conditioning Switch Backward: Increase Beam Width to Flood
Rock Conditioning Switch Right: Momentary High Beam
Rock Conditioning Switch Left: Battery Saver (Low Beam) Mode
To modify these characteristics follow the instructions shown on the following pages.

6
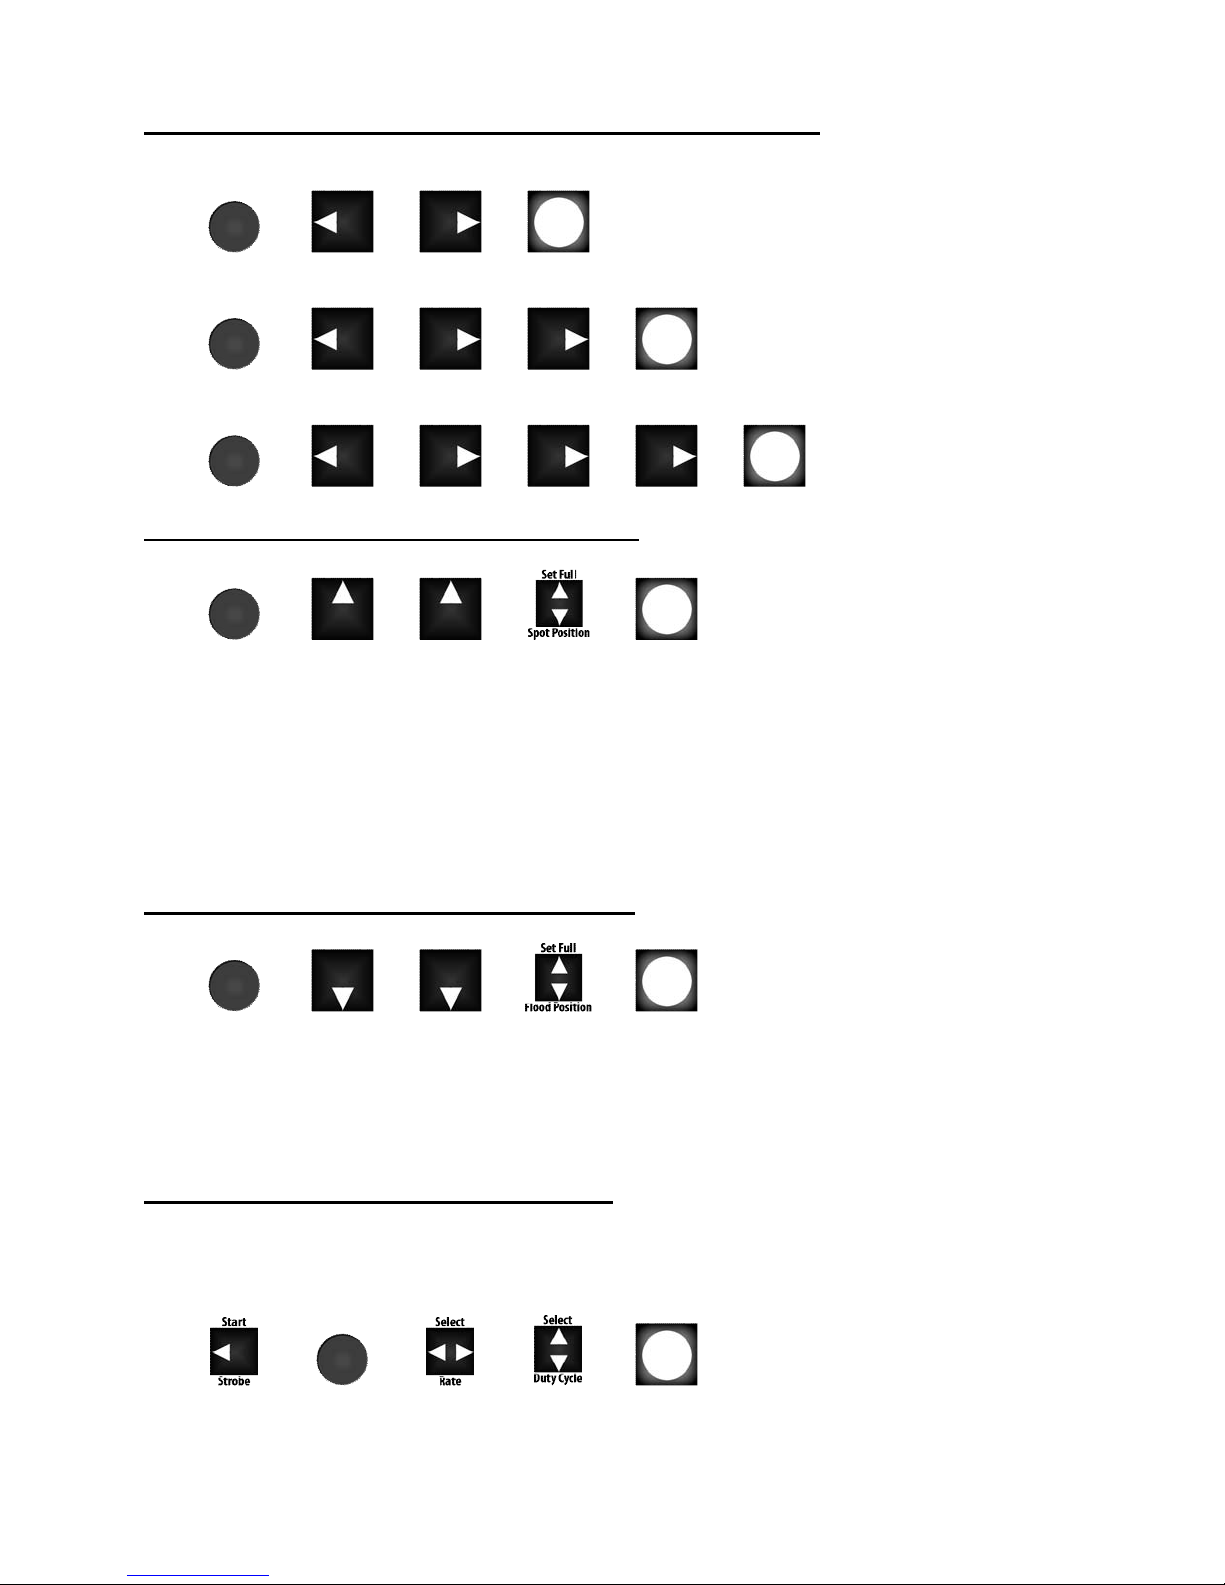
Explanation of Programming Symbols:
= With searchlight already turned on, press and hold the red power switch down.
= Rock the beam conditioning switch in the indicated direction, then release.
= Release power switch, light will go out. New setting is now saved.
(A) Changing High Beam from Momentary to Timed Mode:
Factory default activates high beam while the conditioning switch is held to the right. To change
function to timed high beam mode follow the below sequence. Once this sequence is performed, the
light will stay at high beam for 16 seconds when switch is rocked to the right.
Repeat this sequence to re-activate the momentary high beam mode.
(B) Changing from Battery Saver Mode to Momentary and Continuous Strobe Modes:
Factory default activates battery saver mode when the conditioning switch is rocked to the left. To
change function to momentary strobe mode follow the below sequence.
To change to continuous strobe mode, repeat the above. Repeating the sequence a third time will
return you to battery saver mode. Note: You may activate either the strobe modes or the battery
saver mode, but not both at the same time. Changing this function will reset the start up power
setting to normal power.
IMPORTANT: When searchlight is running in continuous strobe mode, all other programming
steps will not function (except for (G), below – Changing Strobe Rate or Duty Cycle). To change
programming, first take searchlight out of continuous strobe mode by rocking the beam conditioning
switch once to the left.
(C) Setting Beam Width on Start Up:
7
(D) Setting Beam Intensity on Start Up (after 3 second warm up):
To set light to start up in battery saver mode (also sets the left function to battery saver on/off):
To set light to start up in normal mode (factory default setting):
To set light to start up in strobe mode (also sets the left function to continuous strobe mode):
(E) Setting the Smallest Spot of the Searchlight:
Note: If you notice a delay before the lamp starts moving when rocking the beam conditioning
switch backward to move out of the full spot position, this means that the spot position is set beyond
the point at which the lamp is physically able to move. If this occurs, the spot position should be
reset to a point at or within the physical limits of the lamp’s travel. It is also possible to focus the
lamp “beyond” spot to the point at which the beam begins to widen past the reflector’s focal point.
Rock the beam conditioning switch backward to move of this unfocused position and return back to
desired spot position.
(F) Setting the Widest Flood of the Searchlight:
Note: If you notice a delay before the lamp starts moving when rocking the beam conditioning
switch forward to move out of the full flood position, this means that the flood position is set beyond
the point at which the lamp is physically able to move. If this occurs, the flood position should be
reset to a point at or within the physical limits of the lamp’s travel.
(G) Changing the Strobe Rate or Duty Cycle:
To follow this procedure the searchlight must be set in the continuous strobe mode (see section (B)
above).

8
(H) To Lock Out Programming Function:
This will prevent modifications to be made to a set of functions after it has been preset.
To unlock you must use the procedure shown below to restore the factory settings. This will restore
all functions to their factory defaults.
(I) Restore Factory Settings:
This procedure restores all of the programmable functions to their factory defaults. It is very useful
to set the searchlight back to a known state for troubleshooting purposes.
Remote Control Operation
The MBS-430 and MBS-450 models of the Maxa Beam
searchlight both have an 8-pin connector installed on the left rear
corner of the light next to the power connector.
These remote control capable searchlights allow the operator to
hard wire the searchlight to an MBA-8406 or MBA-8425 remote
control handle or to an auxiliary control panel. This allows remote
programming and operation of all standard functions. Power and
remote extension cables are available in 10’, 25’ and 50’ lengths.
All contact closures (switches) used for remote operation must be
momentary, normally open. During operation, the microprocessor
is constantly scanning the status of all input lines from the remote
control input connector. When the closure of one of the remote
switches is detected, the microprocessor executes the appropriate
command. Input lines 3, 4, 5, 6 and 7 are active high. These lines
have internal pull down resistors.
Line 1 (pin 1) is an output line that provides power for the on/off and other remote functions.
Caution: There is power applied to line 1 (pin 1) at any time there is power supplied to the light,
even when the light is off. This line is tied directly to the power input connector. When wiring the
on/off switch and remote control switches, line 1 (pin 1) must be tied to one side of all switches in
parallel. Line 2 (pin 2) is chassis ground and should be wired to the cable shield for long cable runs.
Line 3 (pin 3) from the on/off switch is also scanned during the operation. When the on/off switch is
closed again after the light has been turned on, the microprocessor disables all normal operational
modes and is then in the programming mode. Then, if one of the other remote switches is closed
while the on/off switch is closed, one of the user functions will be reprogrammed.

9
Searchlight Maintenance
The only maintenance required on the Maxa Beam Searchlight is to periodically clean the body with
a damp cloth and to keep the front lens cover clean. Clean the front lens with window cleaner.
Focusing the Lamp
If the searchlight is dropped or receives a heavy impact from transportation or shipping, it may be
necessary to refocus the lamp to insure proper operation and maximum output. Refocusing of the
lamp requires centering the lamp within the reflector.
To Refocus the Lamp:
1) Use a 1/16” allen driver to remove the 2 focus access screws. One screw is located on the
right front side of the main light housing and the other is located just left of the front of the
handle.
2) Shine the light beam onto a flat surface about 50 feet away.
3) Insert the allen driver into one of the focus access holes. A slight rotation and/or side to side
movement may be required until the allen driver is properly seated into the adjustment screw.
4) After the allen driver has been inserted into the adjustment screw, turn the allen driver to
center the hotspot of the beam.
5) Repeat this procedure for the other adjustment screw.
6) Replace the focus access screws when focusing is complete. Do not over tighten screws.
Lamp Replacement
See instructions provided with MBA-2400 Lamp Replacement Kit or MBA-2400N Combination
Lamp, Front Lens and Power Connector Replacement Kit.

10
Lithium-Ion Battery Systems
The NEW MBP-1307 Lithium-Ion Battery features a longer run time than traditional NiCad batteries
and offers the added benefits of a built-in multi-voltage charging system and a five-level LED fuel
gauge. The Li-Ion is compatible with all Maxa Beam Searchlights and weighs just 2.1 pounds.
Maxa Beam 12V batteries are for use with Maxa Beam searchlights only. Do not use these batteries
with any other device. Do not attempt to use a battery that has a damaged case. Contact the factory
about our re-casing service. Proper precautions should be taken when batteries are discarded.
Maxa Beam 12V batteries are sealed in a weather tight enclosure. Maxa Beam searchlights have
protective circuitry incorporated in their design to prevent excessive discharging of the batteries.
This protective circuitry allows the operator to override it if the situation warrants risking damage to
the batteries (see “To Override Low Voltage Protection,” p. 5).
There are no user-serviceable components in Maxa Beam batteries. Maxa Beam batteries
incorporate an internal self-resetting thermal breaker that will disconnect the searchlight from the
battery to prevent damage due to excessive charge or discharge rates or severe environmental heat.
When the internal battery temperature returns to normal the breaker will automatically reset.
Powering the Searchlight
1) Locate battery, searchlight and power cord. Your power cord may be a 5’ coiled cord or an
8” straight cord depending on package configuration.
2) Attach searchlight to battery by lining up round feet of searchlight over round holes on the
top of the battery. Lower the searchlight into the holes and then slide the searchlight towards
the connector end of the battery. Check for positive lock by sliding searchlight away from
connector end of battery.
3) Plug the male end of the power cord into the female connector on the battery.
4) Plug the female end of the power cord into the male connector on the searchlight.
5) Searchlight is now ready for battery-operated portable use. The Li-Ion battery will power the
searchlight on normal power for 110 minutes.
Recharging the Li-Ion Battery
1) Locate Battery and MBP-5003 3 Amp 100-240 VAC 50/60 Hz AC Adapter or MBP-5230
11-29 VDC Vehicle Adapter.
2) Plug the female end of the power adapter into the male connector on the battery.
3) Connect the power adapter to the appropriate power source (100-240 VAC or 11-29 VDC).
The battery will automatically begin to charge. The Li-Ion will recharge in approx. 3 hours.
4) When charge is complete the battery fuel gauge lights will turn off. The battery is now ready
to power the light.
Note: The Li-Ion battery may be left connected to the power source for a prolonged period of time
with no adverse affects.

11
NiCad Battery Systems
The MBP-1207 NiCad Rechargeable Battery Pack has been used in the field for more than a decade.
These batteries are rated at 1000 cycles and can be conditioned for optimum performance on the
MBP-5200 and MBP-5600 Series chargers. The NiCad battery weighs 5.5 pounds and powers the
Maxa Beam searchlight for 90 minutes on normal power.
Maxa Beam 12V batteries are for use with Maxa Beam searchlights only. Do not use these batteries
with any other device. Do not attempt to use a battery that has a damaged case. Contact the factory
about our re-casing service. Proper precautions should be taken when batteries are discarded.
Maxa Beam 12V batteries are sealed in a weather tight enclosure. As with all Nickel-based
batteries, these batteries should not be stored in a discharged condition and may be permanently
damaged if excessively discharged. Maxa Beam searchlights have protective circuitry incorporated
in their design to prevent excessive discharging of the batteries. This protective circuitry allows the
operator to override it if the situation warrants risking damage to the batteries (see “To Override
Low Voltage Protection,” p. 5).
There are no user-serviceable components in Maxa Beam batteries. Maxa Beam batteries
incorporate an internal self-resetting thermal breaker that will disconnect the searchlight from the
battery to prevent damage due to excessive charge or discharge rates or severe environmental heat.
When the internal battery temperature returns to normal the breaker will automatically reset.
Powering the Searchlight
1) Locate Battery, Searchlight and power cord.
2) Attach searchlight to battery by lining up round feet of searchlight over round holes on the
top of the battery. Lower the searchlight into the holes and then slide the searchlight towards
the connector end of the battery. Check for positive lock by sliding searchlight away from
connector end of battery.
3) Plug the male end of the power cord into the female connector on the battery.
4) Plug the female end of the power cord into the male connector on the searchlight.
5) Searchlight is now ready for battery-operated portable use. The NiCad battery will power the
searchlight on normal power for 90 minutes.
Recharging with 5200 Series Chargers
MBP-5200 Multi-Voltage Chargers are designed to charge the MBP-1200 Series NiCad Batteries
only. Do not use this charger to charge the MBP-1307 Li-Ion Battery or any other device. Only use
this charger with Maxa Beam power cables and adapters. For mobile and vertically mounted
applications, always use the safety strap to secure battery or battery and searchlight to charger. This
model charger can be powered from any DC supply voltage in the range of 11-36 VDC or an AC
voltage of 100-240 VAC 50/60 Hz.
Batteries can be charged at either a trickle charge rate by placing them on top of the charger or a
quick charge rate through the charger’s pigtail output connector. The NiCad battery will trickle
charge in 18 hours and will quick charge in 2.5 hours. An optional conditioning cycle discharges the

12
battery before quick charging it. Whenever battery is fully charged on charger, a maintenance cycle
maintains a full charge without damaging the battery.
CAUTION: Do not attempt to charge two batteries at the same time with one charger. Make sure
there is not another battery resting on top of the charger before plugging the pigtail output connector
into a battery. Charging two batteries at one time may damage the charger.
To Recharge a NiCad Battery with an MBP-5200 Charger:
1) Locate battery, charger, and AC or DC power
adapter.
2) Make sure that the proper external power
cable or adapter is used to match local voltage.
3) Plug the charger into external power; the
indicator lights will turn red.
4) For a slow 18 hour trickle charge, place the
battery, with or without searchlight attached,
on top of the charger by lowering it straight
down. Do not slide battery in horizontally.
The indicator lights will flash amber and will
turn solid green when the battery is charged.
For standby use, the battery may be left on the
charger.
5) For a quick 2.5 hour charge, connect the pigtail output connector to the battery. The
indicator lights will turn amber and then will turn green when the battery is charged. For
standby use, leave the battery on the charger with or without the pigtail connected.
6) For a conditioning charge, connect the pigtail output connector to the battery and press the
green recessed button on the charger. The indicator lights will flash green until the battery is
discharged and will then turn solid amber while the battery is quick charged. Indicator lights
will turn solid green when battery is fully charged. The charger will become very warm
during this cycle, which may take up to 24 hours.
7) If the red indicator light is on when a battery is connected to or on top of the charger, the
searchlight power cord or the internal battery circuit is open. Flashing red lights signify a
fault in the charger. See the Troubleshooting section of this manual.
Recharging with 5600 Series Chargers
MBP-5600 Multi-Voltage Chargers and Direct Power Supplies are designed to charge the MBP1200 Series NiCad Batteries only. Do not use this charger to charge the MBP-1307 Li-Ion Battery
or any other device. Only use this charger with Maxa Beam power cables and adapters. For mobile
and vertically mounted applications, always use the safety strap to secure battery or battery and
searchlight to charger. This model charger can be powered from any DC supply voltage in the range
of 11-36 VDC or an AC voltage of 100-240 VAC 50/60 Hz.
Batteries can be charged at either a trickle charge rate by placing them on top of the charger or a
quick charge rate through the charger’s pigtail output connector. The NiCad battery will trickle
charge in 18 hours and will quick charge in 2.5 hours. An optional conditioning cycle discharges the
battery before quick charging it. Whenever battery is fully charged on charger, a maintenance cycle
maintains a full charge without damaging the battery.

13
The MBP-5600 Charger also acts as a power supply and can directly power the light from a 100-240
VAC or an 11-36 VDC source. The MBP-5600 will automatically discontinue the charging of the
battery if an attached searchlight is turned on. Once the attached searchlight is turned off, the
charger will automatically resume recharging the battery.
CAUTION: Do not attempt to charge two batteries at the same time with one charger. Make sure
there is not another battery resting on top of the charger before plugging the pigtail output connector
into a battery. Charging two batteries at one time may damage the charger.
To Recharge a NiCad Battery with an MBP-5600 Charger:
1) Locate battery, charger, and AC or DC power adapter.
2) Make sure that the proper external power cable or adapter is used to match local voltage.
3) Plug the charger into external power; the indicator lights will turn red.
4) For a slow 18 hour trickle charge, place the battery, with or without searchlight attached, on
top of the charger by lowering it straight down. Do not slide battery in horizontally. The
indicator lights will flash amber and will turn solid green when the battery is charged. For
standby use, the battery may be left on the charger.
5) For a quick 2.5 hour charge, connect the pigtail output connector to the battery. The
indicator lights will turn amber and then will turn green when the battery is charged. For
standby use, leave the battery on the charger with or without the pigtail connected.
6) For a conditioning charge, connect the pigtail output connector to the battery and press the
green recessed button on the charger. The indicator lights will flash green until the battery is
discharged and will then turn solid amber while the battery is quick charged. Indicator lights
will turn solid green when battery is fully charged. The charger will become very warm
during this cycle, which may take up to 24 hours.
7) If the red indicator light is on when a battery is connected to or on top of the charger, the
searchlight power cord or the internal battery circuit is open. Flashing red lights signify a
fault in the charger. See the Troubleshooting section of this manual.
8) To directly power the light, connect the female end of the light’s power cord to the male
connector on the light. Connect the male end of the power cord to the female receptacle on
the body of the MBP-5600 unit.
CAUTION: If using a 5200 or 5600 Series in a marine environment where salt water can splash onto
the surface of the charger, wipe the charger thoroughly to remove any pooled water where the
battery will sit and wipe the battery’s charging contacts dry before attempting to charge the battery.
Recharging with 3100 Series Chargers
The MBP-3100 NiCad Drop-In Trickle Charger and MBP-3110 Plug-In Trickle Charger are
designed to charge the MBP-1200 Series NiCad Batteries only. Do not use this charger to charge the
MBP-1307 Li-Ion Battery or any other device. This series of chargers may be used with either a 110
or 220 VAC power input supply. The 3100 series chargers will recharge a NiCad battery in 18
hours.
CAUTION: Do not leave the battery on the MBP-3100 or plugged into the MBP-3110 for more than
48 hours as this may cause permanent damage to the battery.

14
To Recharge a NiCad Battery with a Drop-In Trickle Charger:
1) Set input supply voltage switch to the desired voltage.
2) Plug the wall adapter into an outlet and connect its output connector to the drop-in charger.
3) Place the NiCad battery (with or without searchlight attached) into the charger. The battery
will be charged through the contacts on the bottom of the battery.
4) The battery will recharge in approximately 18 hours.
5) Disconnect the battery from the charger.
To Recharge a NiCad Battery with a Plug-In Trickle Charger:
1) Set input supply voltage switch to the desired voltage.
2) Plug the wall adapter into an outlet and connect its output connector directly to the NiCad
battery.
3) The battery will recharge in approximately 18 hours.
4) Disconnect the battery from the charger.
Maxa Beam Optical Filters
A full line of selective band-pass filters and alternate beam pattern filters are available for the Maxa
Beam searchlight. Each filter is securely mounted in a high impact copolymer ring that attaches
over the front lens of the searchlight. The ring is held in place by a positive locking technique that
requires no tools and is easy to install or remove in seconds with only a quarter turn.
MBA-1500 Amber Smoke/Fog Filter: This filter has been optimized to produce an intense amber
beam for maximum penetration in fog, haze and smoke.
MBA-1715 Semi-Covert Infrared Filter (715nm): This filter has a sharp cut-on at 715nm and
passes the greatest amount of infrared energy of all of the Maxa Beam filters. When this filter is
attached, a red glow is visible to the naked eye. It is useful for nature studies, extreme long range
surveillance and search applications where total covertness is not required. It is compatible with
Gen. 2 & 3 night vision equipment and IR sensitive cameras. With this filter attached, the Maxa
Beam has an effective range of up to 2,500m.
MBA-1850 Covert Infrared Filter (850nm): This filter has a sharp cut-on at 850nm and better
than 90% pass efficiency above 850nm. A red glow can only be seen if the light is boresighted and
observed against a dark background at close range. It is useful for surveillance and search
applications where background lights (such as those in urban areas) will mask its glow. It is
compatible with Gen. 2 & 3 night vision equipment and IR sensitive cameras. With this filter
attached, the Maxa Beam has an effective range of up to 1,200m.
MBA-1900 Fully Covert Infrared Filter (900nm): This filter has a sharp cut-on at 900nm. It is
compatible with IR sensitive cameras and is virtually undetectable to the naked eye. With this filter
attached, the Maxa Beam has an effective range of up to 500m.
MBA-1950 Fully Covert Infrared Filter (945m): This filter has a sharp cut-on at 945nm. It is
compatible with IR sensitive cameras and is virtually undetectable to the naked eye and most night
vision equipment. With this filter attached, the Maxa Beam has an effective range of up to 250m.

15

16
MBA-2100 Ultraviolet (UV) Filter: This filter blocks out all infrared and most visible light. With
this filter attached, the Maxa Beam will have a faint blueish-purple color to it. The UV energy that
the filter will pass through is in the 300-400nm range. This range includes UVA (black light) which
makes certain pigments fluoresce.
MBA-3000 Full Diffusion Filter: This filter provides a wide, evenly lit field of light when the
searchlight is in the flood mode and a narrower, brighter, evenly lit field of light when the light is in
the spot position. It is useful for temporary site lighting and short range search applications. This
filter can also be used with any of the Maxa Beam Infrared filters for evenly lit short range covert
surveillance applications.
MBA-3015 Collimating Lens: This lens uses
plano convex lens technology to collimate the
Maxa Beam’s beam of light and redirect the
spill light back into the beam. This results in an
even field of view free from any dark spots.
The effects of this lens differ from those of the
MBA-3000 Diffusion Filter because the lens is
focusing the excess light inward rather than
diffusing the light outward. This lens is useful
for longer range use of the light in flood mode.
MBA-3020 Peripheral Vision Filter: This filter provides a hot center beam with a wide band of
light extending to either side. It is useful for wide area search applications as it cuts down on the
amount of light that is reflected back at the operator due to atmospheric conditions. This filter can
also be used with any of our covert IR filters for surveillance applications.
MBA-3075 Filter Stacking Adapter: This option allows any filter to be stacked on top of the
adapted filter. It can be installed on any filter except for the MBA-2143 and MBA-2150 filters.
MBA-2143 22.5° Sharp Cut-Off Filter: This filter blocks the view and retroflections of the
searchlight’s lens from an observer who is viewing at an off-axis angle greater than 22.5°. Its
application is to shield the position of the searchlight from a subject’s view until they have entered
the illuminated area.
MBA-2150 11.25° Sharp Cut-Off Filter: This filter blocks the view and retroflections of the
searchlight’s lens from an observer who is viewing at an off-axis angle greater than 11.25°. Its
application is to shield the position of the searchlight from a subject’s view until they have entered
the illuminated area.
For the most up-to-date information, beam shots, and photos of Maxa Beam optical filters, please
visit the Peak Beam web site: www.peakbeam.com.

17
Troubleshooting
Symptom
Probable Cause
Remedy
400 Series Searchlight
Light ignites but goes out
after a second or two
Low Battery
Charge Battery
Light ignites but goes out
when switched to high beam
Low Battery
Charge Battery
Lamp strikes but does not
ignite
Bad Lamp
Change Lamp
Nothing happens when power
button is pressed
No Power
Check Power Source & Cable
Light comes on but focus will
not work
Limits not set correctly OR
Defective Servo or Controller
Restore factory settings OR Call
Factory for an RMA #
Light comes on but high/low
beam and focus will not work
Defective Controller
Call Factory for an RMA #
Light beam will not focus to
the full flood position
Lamp is not seated in socket
completely OR Limits not set
correctly
Call Factory for Instructions on
Reseating Lamp OR Call Factory
for Instructions
Light comes on but will not
change power level
Supply voltage too high
Reduce Supply Voltage
5200 & 5600 Series Chargers
Indicator does not light
No power OR Reversed
polarity
Check power source OR Check
fuse in vehicle power adapter
Indicator flashes red with no
battery connected
Incorrect Voltage
Check power source OR Check
fuse in vehicle power adapter
Indicator flashes red when a
battery is connected
Battery is shorted OR Battery
has bad cells
Try another Battery
Indicator alternates between
red and amber when battery is
connected
Insufficient Power
Check Line Voltage if using AC
adapter; Try different AC adapter
OR Make sure socket is clean on
DC Vehicle Adapter
Indicator stays red when a
battery is connected or set on
top
Battery is bad OR has
overheated
If battery is warm, allow it to
cool and try again
Indicator stays red when
battery set on top & turns
amber when pigtail connected
Dirty trickle charge contacts
OR battery is turned in the
wrong direction
Clean contacts OR Turn Battery
around
Indicator turns solid amber
instead of flashing amber
when battery is set on top
without its tail connected
Defective Charger
Call Factory for an RMA #

18
Symptom
Probable Cause
Remedy
The fast charge cycle ends
before battery is fully charged
Battery is out of balance OR
Over-discharged
Allow Battery to slow charge for
one cycle (place battery on top &
do not connect pigtail) and wait
for flashing amber indicator to
turn solid green (takes about 14
hours)
5600 Series Chargers Only
The indicator flashes red
when powered up with
something connected to the
searchlight power jack
Something other than a
searchlight is connected OR
Red button is pressed on light
OR Shorted light or coil cord
Only power Maxa Beam
searchlights with MBP-5600 OR
Allow MBP-5600 to power up
before pressing red button on
searchlight OR Try another light
and/or cord
Searchlight occasionally
strobes or blinks once when
starting if it is cold
Normal
Contact Factory is this happens
consistently or if this is a
problem for your application
Searchlight jack is out-putting
20 volts
Normal
Output will instantly drop to 13V
when light is turned on
Searchlight continuously
strobes and the indictor light
does not go out when
attempting to turn on
searchlight
Defective MBP-5600
Call Factory for an RMA #; Do
not attempt to use with a
searchlight until MBP-5600 is
repaired
1200 Series NiCad Batteries
Battery hot and will not run
searchlight
Internal thermal circuit
breaker in battery is tripped
Disconect battery from
searchlight; Allow to cool until
breaker auto resets
Battery runs light for shorter
and shorter duration
Battery has developed
memory
Discharge battery until light turns
off & then recharge; Repeat cycle
until no improvement in run time
is observed OR Run a
conditioning cycle on 5200 or
5600 Series Charger OR Return
battery to Factory for
computerized evaluation
MBA-7100 Vehicle Power
Adapter
Will not run light
No power OR Fuse in
adapter blown
Check Power Source OR Replace
fuse located in plug with new
3AG 15 amp fuse

19
Warranty and Returns to Factory
Warranty
Peak Beam Systems, Inc. warrants that for a period of 12 months from the date of purchase that its
products (except as listed below) shall be free of defects in materials and workmanship under normal
use and that Peak Beam Systems, Inc. shall, at its option, repair or replace any defective product
upon the prepaid return of the product to its factory. In the case of any lamp, light bulb or other form
of light source and the battery, the warranty period shall be 90 days.
The warranty only applies to defects in materials and workmanship and not to damage incurred in
shipping or handling, damage due to abuse, misuse, alteration or improper application of the
equipment. Damage incurred in return shipping and handling due to improper packaging is not
covered.
In order to be eligible for coverage under the warranty, the equipment must have the original Peak
Beam Systems, Inc. label with a legible serial number attached.
The foregoing warranty is in lieu of any and all other warranties whether expressed or implied. This
warranty contains the entire warranty. Peak Beam Systems, Inc. authorizes no other person or
organization to modify this warranty or to assume for it any other warranty or liability concerning its
products. The remedies of the buyer set forth hereon are exclusive and the liability of Peak Beam
Systems, Inc. whether arising out of contract, negligence, strict tort, any warranty or otherwise shall
not, except as expressly provided, exceed the price of the goods upon which such liability is based.
In no event shall Peak Beam Systems, Inc. be liable for direct, indirect or consequential damages,
loss of anticipated profits, loss of time or any other losses incurred by the buyer in connection with
the purchase, installation, operation or failure of operation of the product.
Returns to the Factory
All factory returns must have a Return Material Authorization (RMA) number. Peak Beam Systems
is not responsible for items returned without an authorization number. All warranty returns without
an RMA number will be returned at the customer’s expense. RMA numbers can be obtained by
calling 1-610-353-8505. Please have the following information available when you call:
• Serial number(s) of unit(s) to be returned
• Date and location of purchase (if known)
• Reason for return
• For service returns, a description of the problem
• Method of payment for non-warranty service and freight
Product returned must be sent freight prepaid along with return shipping instructions and a brief
description of the problem to:
Peak Beam Systems, Inc.
3938 Miller Road
Edgemont, PA 19028

20
Domestic warranty returns will be returned freight prepaid by Peak Beam Systems, Inc.’s choice of
freight carrier. The customer will pay any additional freight costs for special handling or expedited
freight. All repairs must be prepaid unless other arrangements have been made.
Non-U.S. warranty returns will be returned by the customer’s choice of freight carrier with the
freight charges paid by the customer.
Returns of non-defective goods will only be accepted from the original buyer within 90 days of sales
and must be in “like new” condition. These returns are subject to a minimum restocking charge of
20% plus freight out and must be returned freight prepaid. Custom equipment is not returnable.
Maxa Beam Equipment and Accessories
Peak Beam Systems, Inc. offers a full line of accessories to enhance the performance of the Maxa
Beam searchlight. For a complete, up-to-date listing of all new products, accessories and optional
equipment, please visit www.peakbeam.com.
Batteries:
MBP-1207 7AH NiCad Rechargeable Battery Pack
MBP-1207-V 7AH NiCad Rechargeable Battery Pack with Vertical Mounting Clips
MBP-1307 Lithium-Ion Battery with Built-In Charger (AC/DC Adapters sold separately)
Chargers & Power Adapters:
MBP-5200-M Multi-Voltage Smart Charger with AC & DC Adapters (NiCad Batteries Only)
MBP-5600-M Multi-Voltage Smart Charger and Power Supply with AC & DC Adapters (NiCad
Batteries Only)
MBP-5003 3 Amp AC Power Adapter, 100-240 VAC 50/60 Hz (For use with Li-Ion Batteries;
Included with MBP-5200-M Chargers)
MBP-5230 Vehicle Power Adapter, 11-29 VDC (For use with Li-Ion Batteries; Included with
MBP-5200-M Chargers)
MBP-7100 Vehicle Power Adapter (For powering Searchlight directly from 12 VDC)
Filters:
MBA-1500 Amber Smoke/Fog
MBA-1715 750nm Semi-Covert IR
MBA-1850 850nm Covert IR
MBA-1900 900nm Fully-Covert IR
MBA-1950 950nm Ultra-Covert IR
MBA-3000 Full Diffusion
MBA-3015 Collimating Lens
MBA-3020 Peripheral Vision
MBA-3075 Filter Stacking Adapter
MBA-2005 Protective Lens
MBA-2143 22.5° Sharp Cut-Off
MBA-2150 11.25° Sharp Cut-Off
Maintenance Kits:
MBA-2400 Replacement Lamp Kit
MBA-2400N Replacement Lamp, Front
Lens & Power Connector Kit
MBA-2410 Power Connector Kit
MBA-2420 Front Lens Kit
MBA-2430 Power Cord Male Connector
Kit
MBA-2435 Power Cord Female
Connector Kit
MBA-2440 Remote Cord Male
Connector Kit
MBA-2445 Remote Cord Female
Connector Kit

21
Appendix – NEW PRODUCTS
Maxa Beam Crew-Served Weapons Light (CSWL)
The Maxa Beam Crew-Served Weapons Light (CSWL) is a version of the MBS-430 Maxa Beam
Searchlight that has been specially ruggedized for shock and vibration compensation. The Maxa
Beam CSWL has a built-in 1913 “Picatinny” rail grabber and mil. spec. metal connectors.
Operation of the Maxa Beam CSWL is fundamentally similar to operation of any standard handheld
or remote-controlled Maxa Beam Searchlight. The operator remotely controls the CSWL with mil.
spec. switches that mimic the commands of the standard Red Power On/Off Switch and Beam
Conditioning Switch [see page 4]. The CSWL operator can program the searchlight with the mil.
spec. switches using the commands listed on pages 5-8. CSWL maintenance requirements are
identical to those of the standard Maxa Beam Searchlight models [see page 9].
Depending on specific user requirements, CSWL systems are powered from either 24VDC vehicles
and/or rechargeable or DoD battery systems. The instructions below outline basic installation
instructions. Please consult the detailed Installation Card that shipped with your equipment if you
have any questions regarding CSWL set-up.
Direct Powered CSWL Systems with Rechargeable Battery Back-Up: (MBPKG-WM System)
1) Attach Maxa Beam CSWL to 1913 rail on weapon. If you are using a custom rail system (sold
separately), please see instructions provided with rail system to ensure proper installation.
2) Connect Maxa Beam CSWL to desired power source. The MBPKG-WM System offers three
powering options: Rechargeable NiCad Batteries, Dual BA-5590 Military Batteries, and Direct
24VDC Vehicle Power.
a. To power searchlight from a Rechargeable NiCad Battery, located the MBA-8110-W 10’
Coil Cord and an MBP-1207-V Battery. Connect female end of 10’ coil cord to
searchlight; connect male end of cord to battery. Fully charged battery run time: 45 min.
b. To power searchlight from Dual BA-5590 Military Batteries, located the MBA-8110-W
10’ Coil Cord, the MBA-7500 BA-5590 Adapter, and two fully charge BA-5590 Military
Batteries (sold separately). Connect female end of 10’ coil cord to searchlight; connect
male end of cord to MBA-7500. Connect each pigtail of the MBA-7500 to a fully
charged BA-5590 battery. Fully charged battery run time: >210 min.
c. To power searchlight from the vehicle’s 24VDC source, located the MBA-8225-W 25’
Power Cord, the MBP-5600-V Charger/Power Supply, and the MBA-7406 NATO
Adapter. Connect female end of 25’ cord to searchlight; connect male end to charger’s
12VDC output receptacle. Connect the MBA-7406 to the charger’s 24VDC input
receptacle and plug the NATO Adapter into the vehicle’s universal NATO receptacle. To
recharge a NiCad Battery while directly powering the searchlight, follow instructions
listed on “tray” of MBP-5600-V charger or see pages 12-13 of this manual.
3) Connect the MBA-8406-MM Remote Control to Maxa Beam CSWL. Searchlight is now ready
for operation.

22
Direct Powered CSWL Systems: (MBPKG-WM2 System)
1) Attach Maxa Beam CSWL to 1913 rail on weapon. If you are using a custom rail system (sold
separately), please see instructions provided with rail system to ensure proper installation.
2) Connect Maxa Beam CSWL to desired power source. The MBPKG-WM2 System offers two
powering options: Dual BA-5590 Military Batteries and Direct 24VDC Vehicle Power.
a. To power searchlight from Dual BA-5590 Military Batteries, located the MBA-8110-W
10’ Coil Cord, the MBA-7500 BA-5590 Adapter, and two fully charge BA-5590 Military
Batteries (sold separately). Connect female end of 10’ coil cord to searchlight; connect
male end of cord to MBA-7500. Connect each pigtail of the MBA-7500 to a fully
charged BA-5590 battery. Fully charged battery run time: >210 min.
b. To power searchlight from the vehicle’s 24VDC source, located the MBA-8225-W 25’
Power Cord, the MBP-4024-S 24V-12VDC Converter, and the MBA-7406 NATO
Adapter. Connect female end of 25’ cord to searchlight; connect male end to converter’s
12VDC output receptacle. Connect the MBA-7406 to the converter’s 24VDC input
receptacle and plug the NATO Adapter into the vehicle’s universal NATO receptacle.
3) Connect the MBA-8406-MM Remote Control to Maxa Beam CSWL. Searchlight is now ready
for operation.
Computer-Controlled (RS-232) Searchlight Systems
Several Maxa Beam Searchlights are now available with a built-in RS-232 interface. With this
capability, a searchlight can be mounted in a fixed position and remotely controlled via computer
either as a stand-alone illuminator or as part of an integrated computer-controlled surveillance
system on a pan and tilt device.
A full Interface Control Document (ICD) with ASCII Commands and Connector Pin-Outs will be
shipped with your equipment and is available upon request. RS-232-enabled Searchlights can be
controlled using either HyperTerminal (standard) or Peak Beam’s new Graphical User Interface
(GUI). For more information on the Maxa Beam GUI, visit our web site and type “GUI” into the
search field.
The following searchlight models are RS-232-enabled:
MBPKG-E
MBPKG-E-A
MBPKG-E-24
MBPKG-48
MBPKG-E-24A
MBPKG-E-48A
MBPKG-E2
MBPKG-E2-A
MBPKG-E2-24
MBPKG-E2-48
MBPKG-E2-24A
MBPKG-E2-48A
MBS-430-RSY
MBS-430-ARSY
MBS-430-RSMY
MBS-430-ARSMY
Watertight Enclosure Systems (part numbers starting with MBPKG-E) consist of a specially
engineered Aluminum housing that provides a secure, weatherproof environment for the Maxa Beam
Searchlight inside. To access the searchlight for maintenance, simply remove the six screws from
the back panel and extract the searchlight by pulling straight back on the enclosure handle. Once
searchlight is removed, regular maintenance (focusing of the lamp, lamp replacement, etc.) can be
performed [see page 9].
Peak Beam’s software engineers can work closely with you to determine the exact requirements of
your RS-232-controlled searchlight system. Please contact us at 610-353-8505 for more
information.
 Loading...