

Page 1

PEAK
MIDI SWITCHING PRODUCTS
FCB4X
PROGRAMMABLE MIDI FOOT CONTROLLER
OWNER’S MANUAL
Document Rev.1.0.0
Oct.04.2014
www.peak2005.com
Page 2

Table of contents
INTRODUCTION .......................................................................................................................................... 3
Overview .................................................................................................................................................. 3
Top Panel ................................................................................................................................................. 3
Back Panel ............................................................................................................................................... 4
Specification ............................................................................................................................................ 5
Power Connection ................................................................................................................................... 5
BASIC OPERATION ..................................................................................................................................... 6
Bank and Preset selection ..................................................................................................................... 6
SETUP MODE AND PRESET PROGRAMMING .......................................................................................... 7
Programming Mode Entry ...................................................................................................................... 7
Setup Mode .............................................................................................................................................. 9
LCD Backlight adjustment ................................................................................................................. 9
LED Intensity adjustment ................................................................................................................ 10
Expression pedal calibration ............................................................................................................ 11
Midi device setting ................................................................................................................................ 13
Preset programming ............................................................................................................................. 15
Copy .................................................................................................................................................... 15
Midi messages ................................................................................................................................... 17
Edit Title ............................................................................................................................................. 22
LED Color ........................................................................................................................................... 23
Expression Pedal (Exp1 and Exp2) assignment ........................................................................... 25
Expression Pedal Input ........................................................................................................................... 26
Factory Restore ........................................................................................................................................ 27
MIDI Implementation ................................................................................................................................ 27
MIDI Cable Support ................................................................................................................................. 27
2
Page 3
INTRODUCTION
Overview
The FCB4X is a programmable MIDI foot controller that supports all standard MIDI devices. This is a new
model with more features that can be programming up to 16 MIDI messages and saved to EPROM
memory. Up to 128 memory presets can be arranged in 32 banks of 4 presets. You can assign any MIDI
Program Change (PC), Continuous Controller messages (CC) and MIDI Note On/Off messages into each
preset (all 16 midi messages on different MIDI channels). Displayed by blue color backlight 16 characters
x 2 lines LCD with big character size and RGB colors LED with independent color programmable. The
FCB4X has up/down bank and 4 patch selection buttons, all with high quality heavy duty foot switches
that you can feel when pressed. The chassis is made of aluminum, folded by a laser cutting process and
finished with a black anodized coating. It is a compact, rugged, simple to use, fully programmable MIDI
foot controller.
Top Panel
BANK UP/DOWN SWITCH: This is used to increase the bank up or decrease the bank down from the
current state. The current bank starts from bank#1 up to a maximum of
bank#32. You also use these switches in programming mode to edit
parameter inside the menu selection.
3
Page 4

PRESET SWITCH: The FCBX has 4 patches in a bank labeled as S1, S2, S3 and S4. You
also use these switches in programming mode to edit parameter inside
the menu selection.
BLUE SCREEN LCD: The LCD display has 16 characters x 2 lines showing Bank number, Patch
button and Preset name when you are in operation mode or display
menu when you are in programming mode.
RGB LED DISPLAY: This is Red, Green, Blue LED with programmable to illuminate preset
status.
Back Panel
EXP1, EXP2: Expression Pedal input1 (EXP1) and Expression Pedal input2 (EXP2) for external
pedal control. You can assign any midi control change message and any midi
channel to call up both expression pedal inputs arrange 128 presets (32 banks x
4 presets)
MIDI OUT: MIDI out port is used to transmit MIDI messages from the FCB4X to other MIDI
device/s. It is a 7 pin MIDI connector so you can supply phantom power to the
FCB4X by supply voltage 9V to pin 6, 7 (AC or DC, it does not matter)
9VDC IN: Connect to supply external voltage 9Vdc with current 100mA minimum (Polarity
is not important)
Note: Do not plug into the external power supply socket if you are phantom powering the unit via a
MIDI cable.
4
Page 5

Specification
• 1 MIDI OUT with 7-pin DIN connector supports phantom power on pin 6, 7. (Polarity is not
important)
• Flexible power requirements: 9Vdc-12Vdc, or 9Vac, at 100mA via a 5.5mm/2.1mm barrel
connector. (Power Adapter is not included)
• 2 bank switches, 4 patch switches with heavy duty foot switch.
• Programmable mode with 128 presets, arranged in 32 banks of 4 presets.
• Program Change message (PC), Control Change message (CC) and midi Note On/Off messages
support (16 midi messages per preset, all on different MIDI channels)
• Blue color LCD display 16 characters x 2 lines with big character size.
• RGB multi colors LED programmable to illuminate preset status.
• 2 Expression pedal inputs EXP1 and EXP2 assignable to any Control Change Number on any MIDI
channel for each PATCH (arrange in 128 presets with 32 banks x 4 presets)
• Housed in a sleek aluminum chassis and brushed finish with black anodized coating.
• Dimensions approx. : 10.3"W x 4.7"D x 2.0"H (26.2cm x 12.0cm x 5.0cm)
•
Weight approx. : 2.2lb (1.0kg)
Power Connection
The FCB4X has flexible power requirements between 9Vdc-12Vdc, or 9Vac, 100mA. You can plug in your
power adapter to the 5.5mm/2.1mm barrel connector.
Do not use voltage over 12Vdc or 9Vac otherwise the unit will be damaged.
5
Page 6
BASIC OPERATION
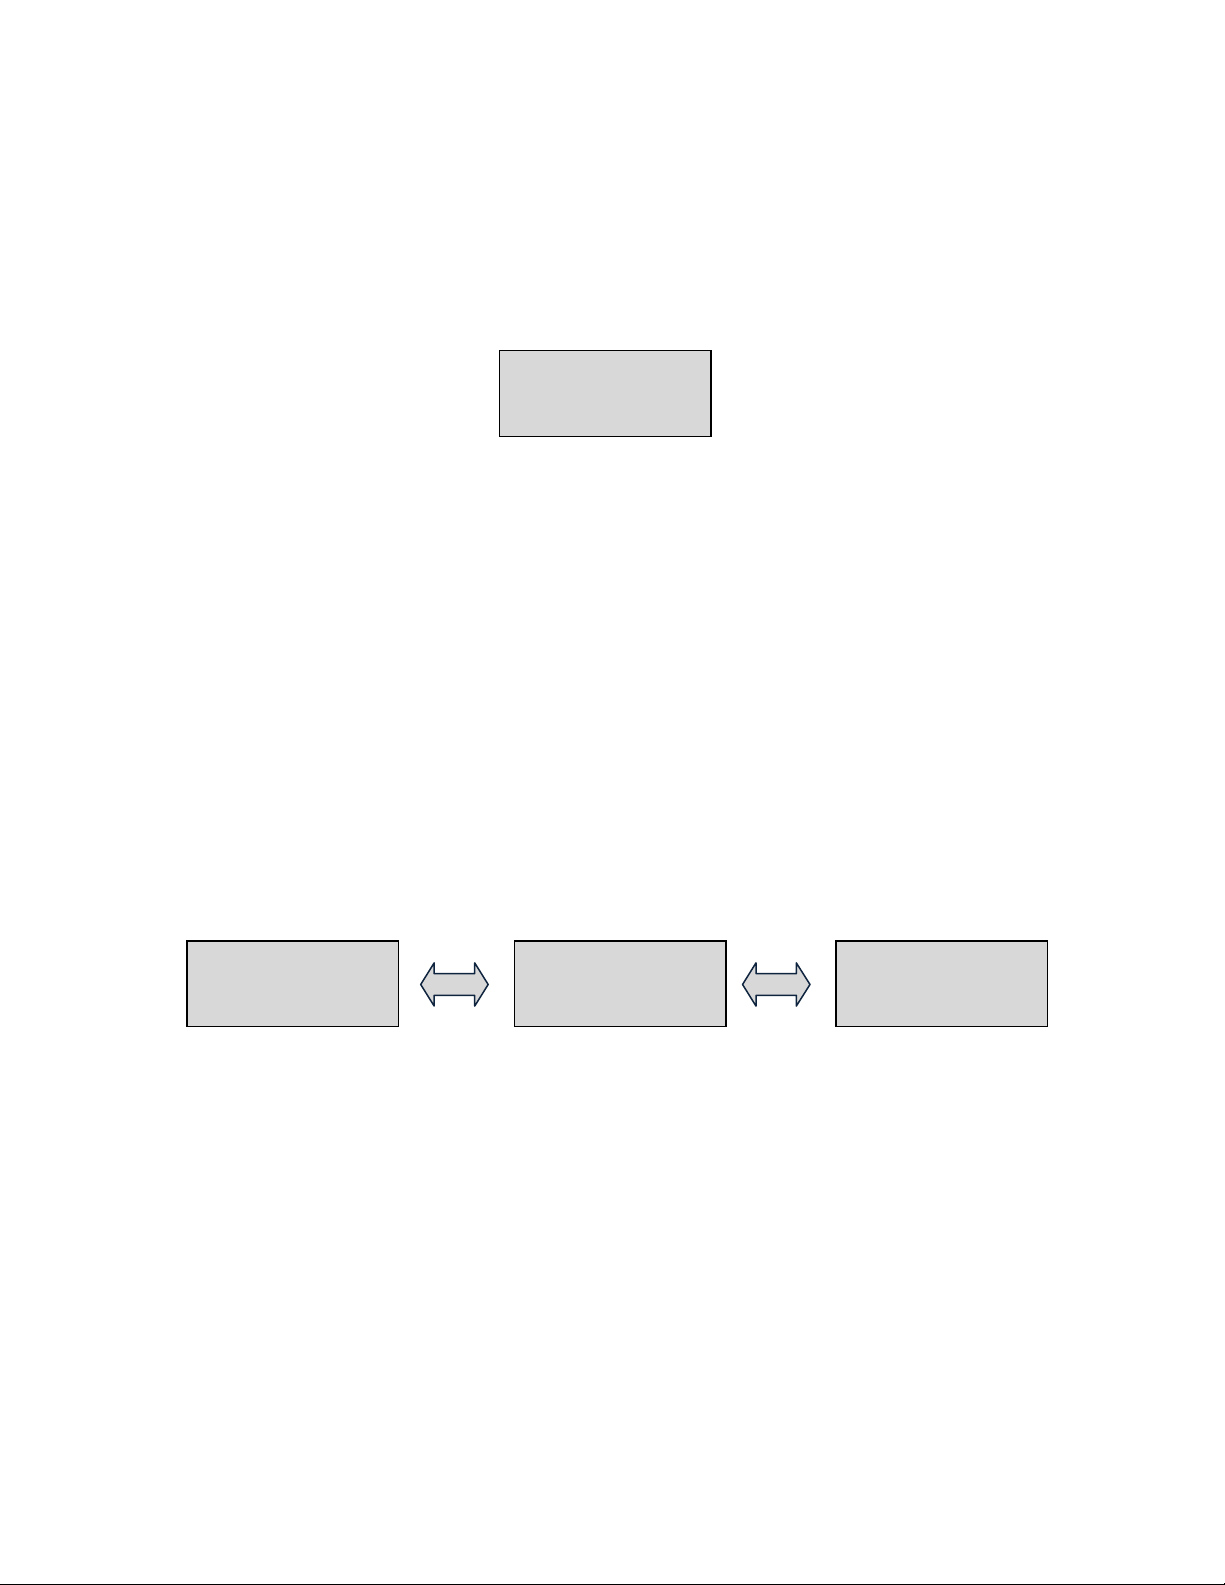
BANK: 1
S1
USER
PRESET
# 000
BANK:
32
BANK: 1
BANK: 2
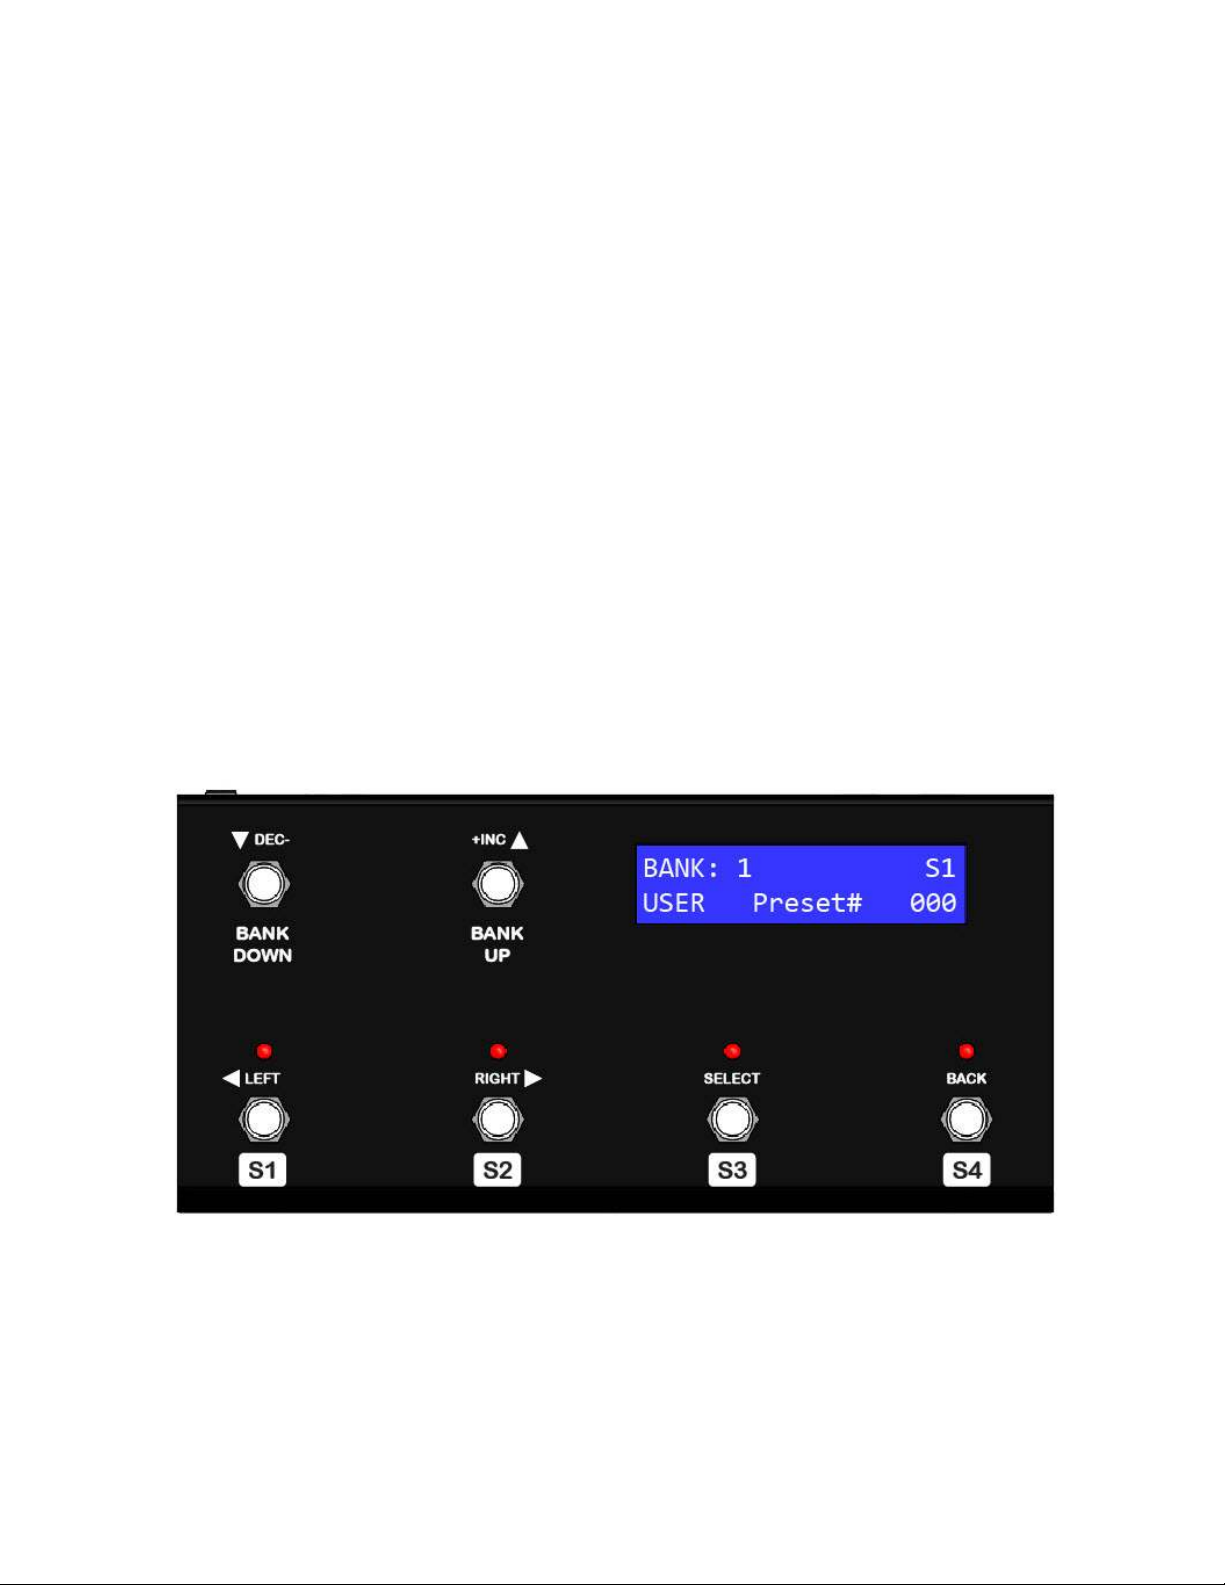
Please refer to the text that appears under the switches when you are going to use the FCB4X unit in the
basic operation mode. On power up, the latest preset will be selected and transmitted as a MIDI message
via MIDI out (Initial value is Bank#1, preset#1 [01-S1]).
In the operation mode the LCD will display bank number, patch button and preset name of the selected
preset.
Bank and Preset selection
Press the BANK UP or BANK DOWN button to move/scroll from the current bank to another. The LCD
display will flash with the number of bank and no MIDI message will be transmitted until a patch button
is selected (S1, S2, S3 or S4 button). You can hold on the BANK UP or BANK DOWN switches to scroll
past the current bank continuously and the LCD display will loop once it reaches bank #32.
You can select a preset by press the S1, S2, S3 or S4 button, The LED above the selected PATCH button
will illuminate and the stored MIDI messages for that PATCH will be transmitted.
6
Page 7

SETUP MODE AND PRESET PROGRAMMING
[Sel] to Program
[Bac] to Exit
Programming Mode Entry
When you supply power to the FCB4X unit it goes in to operating mode automatically. If you want to
program a preset then you need to enter programming mode by following these steps:
1. Select the preset that you want to configure by using the BANK Up/Down and PATCH S1-S4
buttons. This means you have to select the preset you wish to program before entering to
programming mode.
2. Press both BANK UP and BANK DOWN buttons together and hold on until the LCD display
shows the characters below. Please do not care if the bank number is moving, just simply press
BANK UP and BANK DOWN buttons and hold both buttons until the LCD display shows the
characters below;
3. The LCD display as shown above means
UP and BANK DOWN buttons.
4. Now, you can program or configure the selected preset. Please refer to the label above each
buttons when you have entered to programming mode.
-DEC : Decrease the current value
INC+ : Increase the current value
< LEFT : Move menu to left or scroll the cursor to left
RIGHT > : Move menu to right or scroll the cursor to right
SELECT : Select and enter to the selected menu
BACK : Move back and exit from the selected menu
“Programming Mode Entry”
then release the BANK
5.
As you selected a preset already now you can enter to programming mode by pressing a
“SELECT” button or exit from the programming mode and back to operating mode by pressing a
“BACK” button
6. In Programming mode, the menu and sub menu items will show you as the following diagram;
You can scroll menu to left by pressing “<LEFT” button or scroll menu to right by pressing
“RIGHT>” button. If you need to enter to the selected menu, you can press a “SELECT”
button to enter to the selected menu.
7
Page 8
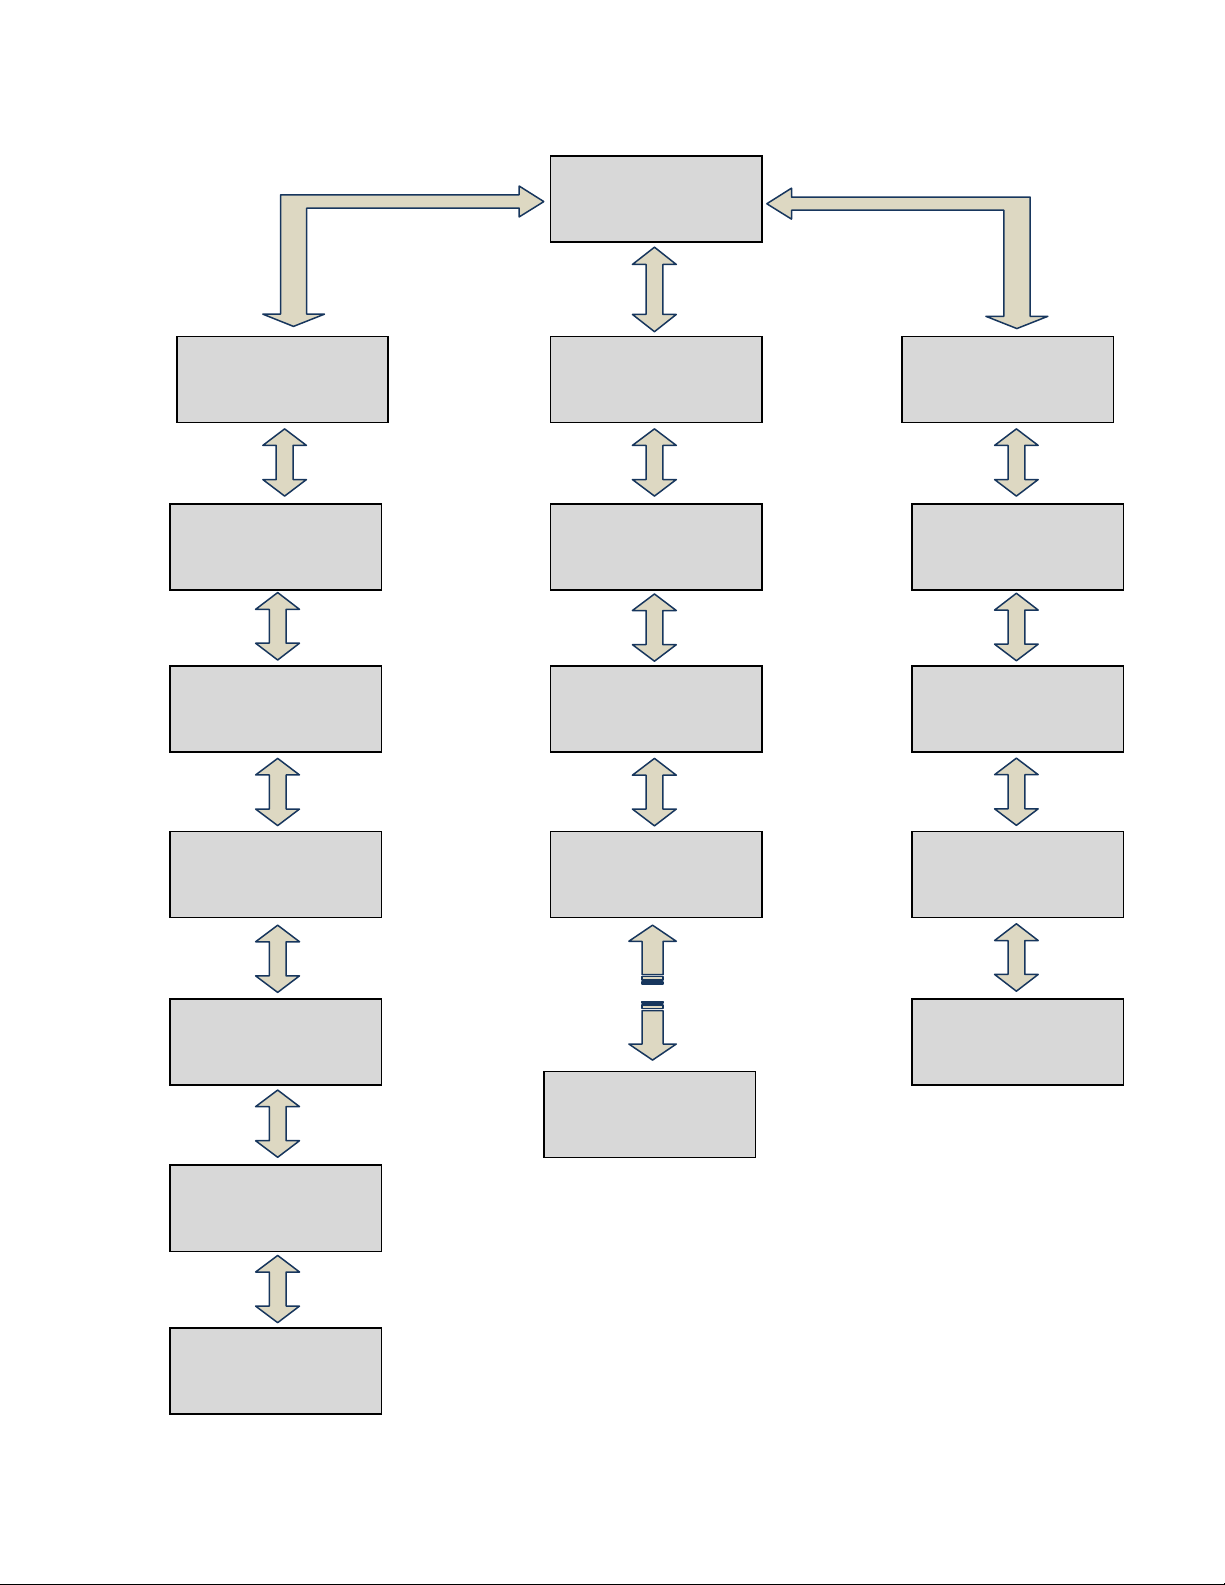
[Sel] to Program
[Bac] to Exit
1) P
reset [01
-
S1]
2) Midi Device
3) Setup
1) P
reset [01
-
S1]
Copy
1) P
reset [01
-
S1]
Midi
Messages
1) P
reset [01
-
S1]
Title
1) P
reset [01
-
S1]
LED Color
1) P
reset [01
-
S1]
Exp1
1) P
reset [01
-
S1]
Exp2
2) Midi Device
CH-1: Midi Ch#1
2) Midi Device
CH-2: Midi Ch#2
2) Midi Device
CH-3:
Midi Ch#3
2) Midi Device
CH-16: Midi Ch#16
3) Setup
LCD Backlight
3) Setup
LED Intensity
3) Setup
Exp1 Calibration
3) Setup
Exp2 Calibration
8
Page 9
Setup Mode
3) Setup
[Sel] to Program
[Bac] to Exit
3) Setup
LCD Backlight
3) Setup
[Sel] to Program
[Bac] to Exit
LCD Backlight
||||||||
LCD Backlight
||||||||
LCD Backlight
||||||||||||||||
LCD Backlight
||
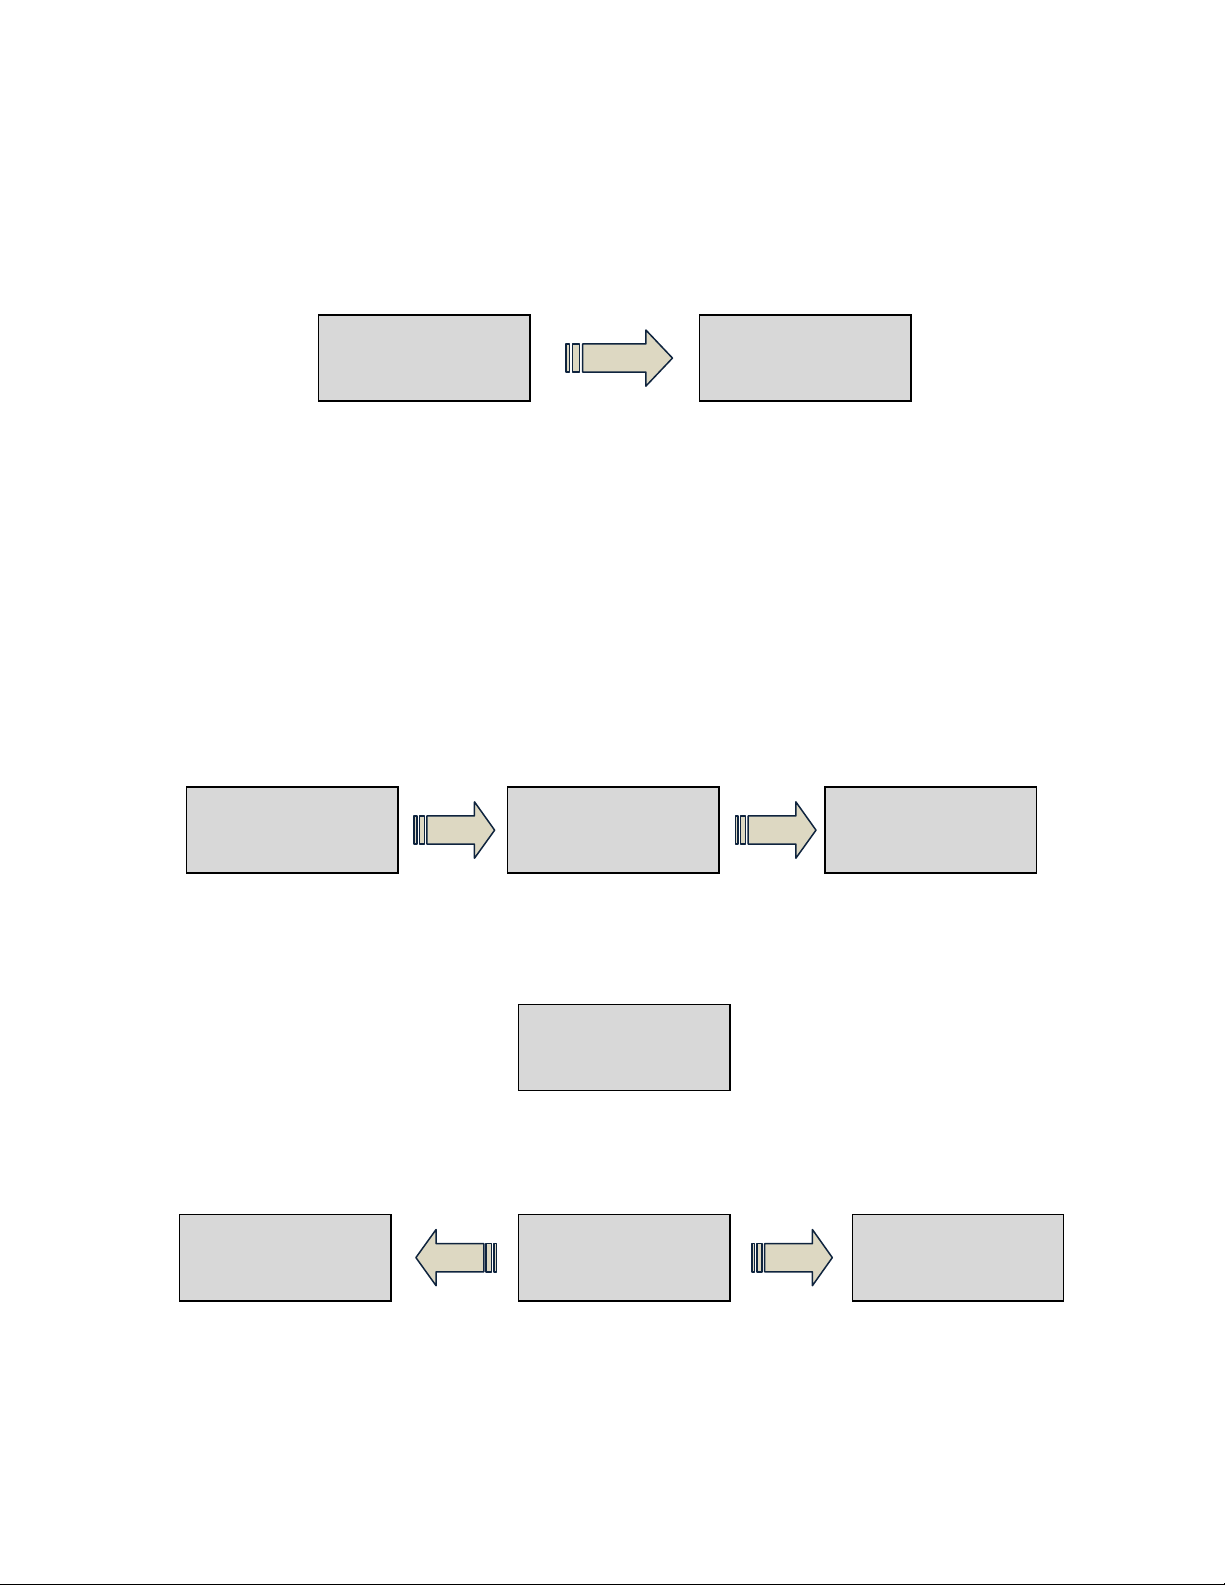
Once you have entered to programming mode, you can go to setup mode by scroll the menu to ”3)
SETUP” menu, the LCD display shows the characters below;
Now you can enter to setup menu by pressing “SELECT” button, the LCD display will move to sub-menu
items. You can scroll sub-menu to left by pressing “<LEFT” button or scroll sub-menu to right by
pressing “RIGHT>” button. If you need to enter to the selected sub-menu, you can press a “SELECT”
button to enter to the selected sub-menu. If you want to go back to main menu, you can press “BACK”
button. It will move back to main menu.
LCD Backlight adjustment
You can go to adjust the LCD display backlight by enter to sub-menu item as following;
Now you can press a “SELECT” button to enter to LCD Backlight sub menu item, the LCD display will
show you as the following characters;
You can press “<LEFT” to decrease the LCD display backlight or press “RIGHT>” to increase the LCD
display backlight.
You can exit from the LCD display backlight adjustment by pressing “BACK” button. Your setting will be
saved and the LCD display will go back to the setup menu.
9
Page 10

LED Intensity adjustment
3) Setup
LED Intensity
3) Setup
[Sel] to
Program
[Bac] to Exit
LED Intensity
||||||||
LED Intensity
||||||||
LED Intensity
||||||||||||||||
LED Intensity
||
You can go to adjust the LED intensity by enter to sub-menu item as following;
Now you can press a “SELECT” button to enter to LCD Backlight sub-menu item, the LCD display will
show you as the following characters;
All S1 – S4 LEDs will be light on with mixing Red, Blue and Green colors. You can press “<LEFT” button
to decrease the LED intensity or press “RIGHT>” button to increase the LED intensity.
You can change LED color while adjust the intensity level by pressing “+INC” or “DEC-” button. The
LED color will be changed by mixing the RGB colors. You can exit from the LED intensity adjustment by
pressing “BACK” button. Your setting will be saved and the LCD display will go back to the setup menu.
10
Page 11

Expression pedal calibration
3) Setup
Exp1 Calibration
3) Setup
[Sel] to Program
[Bac] to
Exit
3) Setup
Exp2 Calibration
3) Setup
[Sel] to Program
[Bac] to Exit
Move Exp DOWN
|||||||
Exp1 Calibration
Move Exp DOWN
|||||||
Exp2 Calibration
Move Exp DOWN
|||||||
Move Exp DOWN
|
You can calibration the Exp#1 or Exp#2 by enter to sub-menu item as following; Please be sure you have
inserted expression pedal to the Exp#1 or Exp#2 jack before enter to the calibration process. It will be
saved an incorrect calibration data.
OR
You can press a “SELECT” button to enter to Exp#1 or Exp#2 Calibration sub-menu item, the LCD
display will show you as the following characters;
OR
You have to move the Exp#1 or Exp#2 down (heel down) to the position that you wish to make it as a
lowest position and wait moment. The FCB4X will be saved new lowest value as a heel down position.
11
Page 12

After the FCB4X has calculated for the heel down position and already saved it the memory, the LCD
Move Exp UP
|
Move Exp UP
||||||||||||||||
Move Exp UP
|
display will show you as following characters;
You have to move the Exp#1 or Exp#2 up (heel up) to the position that you wish to make it as a highest
position and wait moment. The FCB4X will be saved new highest value as a heel up position.
The lowest value is 000 and the highest value is 127. These values will be saved as the heel position that
you have been calibrated. The LCD display will go back to the setup menu automatically once the
calibration data have been saved to the memory.
If you want to exit or cancel from the calibration process, you can press a “BACK” button. The LCD
display will go back to the setup menu without saving calibration data.
12
Page 13

Midi device setting
2) Midi Device
[Sel] to Program
[Bac] to Exit
2) Midi Device
CH-1: Midi CH#1
2) Midi Device
[Sel] to Program
[Bac] to Exit
Before programming your preset, you have to add your midi devices first. You can go to midi device
setting by scroll the menu to “2) Midi Device” menu the LCD display shows the characters below;
Now you can enter to midi device menu by pressing “SELECT” button, the LCD display will move to submenu items. You can scroll sub-menu to left by pressing “<LEFT” button or scroll sub-menu to right by
pressing “RIGHT>” button. If you need to enter to the selected sub-menu, you can press a “SELECT”
button to enter to the selected sub-menu. If you want to go back to main menu, you can press “BACK”
button. It will move back to main menu.
You can press “<LEFT” button to scroll down the midi channel setting or press “RIGHT>” button to
scroll up the midi channel setting. This is base on your midi device midi channel setting, you can save the
name of your midi device to the midi channel. It defaults as the following table.
Midi Channel Default name
CH-1 Midi Ch#1
CH-2 Midi Ch#2
CH-3 Midi Ch#3
CH-4 Midi Ch#4
CH-5 Midi Ch#5
CH-6 Midi Ch#6
CH-7 Midi Ch#7
CH-8 Midi Ch#8
CH-9 Midi Ch#9
CH-10 Midi Ch#10
CH-11 Midi Ch#11
CH-12 Midi Ch#12
CH-13 Midi Ch#13
CH-14 Midi Ch#14
CH-15 Midi Ch#15
CH-16 GCX
13
Page 14

Regarding to the above table, you can replace name of your midi device by go the midi channel sub-
[ Midi CH
-
1 ]
Name:
M
idi Ch#1
2) Midi Device
CH-1: Midi Ch#1
[ Midi CH
-
1 ]
Name:
A
BC ch.1
[ Midi CH
-
1 ]
Name:
M
idi
Ch#1
2) Midi Device
CH-1: ABC ch.1
menu by pressing “<LEFT” or “RIGHT>” button then press “SELECT” button to enter to the selected
midi channel you wish to set. Below is an example to save new name of midi device to midi channel#1.
Once you have entered to midi channel#1, the cursor will be flashing at the name of midi device
(line#2). You can replace a new name of your midi device max to 10 characters. You can move the
cursor to left or right by pressing “<LEFT” or “RIGHT>” button and you can change character at the
cursor position by pressing “+INC” or “DEC-” button.
Below is an example to naming midi device of midi channel#1 to “ABC ch.1”
You can press “BACK” button to save this setting and back to midi device menu. The new name will be
saved and shown at the midi device menu.
In preset programming mode, this name will call as midi channel#1. You can easy to program midi
message to send to this midi device base on midi channel#1.
14
Page 15

Preset programming
1) Preset [
]
[Sel] to
Program
[Bac] to Exit
1) Preset [01
-
S1]
[Sel] to Program
[Bac] to Exit
1) Preset [01
-S1]
Copy
1) Preset [01
-
S1]
[Sel] to Program
[Bac] to Exit
In the preset programming menu, this will explain how to program midi message of the selected preset.
This means, you have to select preset of the FCB4X before entering to preset programming mode.
You can go to preset programming menu by scroll the menu to “1) Preset [BB-SS]” menu the LCD
display shows the characters below;
BB is a selected bank and SS is a selected patch button. All are called as a selected preset.
If you came from Bank#1 and S1 patch button, this will show as [01-S1] which is a selected preset. The
selected preset [01-S1] will show at the preset menu as following;
Everything you did in the preset programming will be saved only for this preset [01-S1]. This means, all
32 banks x 4 patches = 128 presets can be saved with different programming data.
BB-SS
Copy
Copy sub-menu will be copied all programming data of the selected preset to another preset. The
destination preset will be having same programming data as the selected preset. You can enter to Copy
sub-menu by pressing “SELECT” button. If you want to go back to main menu, you can press “BACK”
button. It will move back to main menu. When you enter to copy sub-menu, the LCD display shows the
characters below;
15
Page 16

This will copy programming data from a selected preset [01-S1] to another preset.
Save
-
> To
[01-S1] [01
-
S1]
From
-
> To
[01-S1] [
02-S?]
Save
-> To
[01-S1] [02
-
S4]
1) Preset [02
-
S4]
Copy
Copying…
Save
-
> To
[01-S1]
[02-S4]
You can press “BANK UP” or “BANK DOWN” button to move a destination preset to another bank. If
the destination preset and the selected preset are the same preset, it will be exit without copying. For the
above display, you can press “S1” button to exit without copying.
If you move a destination preset that you wish to copy to bank#2, the LCD display will be flashing as
following;
Now you can press a patch button S1 – S4 to be a destination copy preset. Below example to show you
the destination preset is Bank#1 – S4 by pressing “S4” button. The S4 LED will be illuminated when
you press “S4” as a destination copy preset.
You have to press “S4” button again to copy data from [01-S1] to [02-S4] preset. The LCD display will
show you as following;
Right now, the selected preset is changed to preset [02-S4]. You can go back to operating mode by
pressing a “BACK” button. Midi data will be transmitted from the new selected preset [02-S4]
16
Page 17

Midi messages
1) Preset [01
-
S1]
Midi Messages
1) Preset [01
-
S1]
[Sel] to Program
[Bac] to Exit
Msg1:
M
idi
Ch#1
PC,000
This will explain about midi messages to be programming to the selected preset. You can enter to Midi
messages sub-menu by pressing “SELECT” button. If you want to go back to main menu, you can press
“BACK” button. It will move back to main menu. When you enter to midi messages sub-menu, the LCD
display shows the characters below;
The FCB4X support to send midi messages max to 16 midi messages with different midi channel. The
default message has programmed to send only one message on midi program change (PC). Default
messages has programmed as following table;
Message number Default midi command
Msg1 MIDI Channel#1, PC000-127
Msg2 Off
Msg3 Off
Msg4 Off
Msg5 Off
Msg6 Off
Msg7 Off
Msg8 Off
Msg9 Off
Msg10 Off
Msg11 Off
Msg12 Off
Msg13 Off
Msg14 Off
Msg15 Off
Msg16 Off
You can program midi command to all 16 midi messages (Msg1 – Msg16) and the midi commands will be
transmitted from Msg1 – Msg16 serially. When you have already entered to midi messages menu, you
will see the LCD as following characters;
Note: the display above if you came from preset [01-S1]
17
Page 18

The cursor will be flashing in midi channel position. If you have setting midi device, it will show you midi
Msg1:
A
BC Ch.1
PC,000
Msg1:
A
BC Ch.1
PC,000
Msg1:
A
BC Ch.1
P
C,000
Msg1:
A
BC Ch.1
PC,000
Msg1:
A
BC Ch.1
P
C,000
Msg1:
A
BC Ch.1
C
C,000,000
Msg1:
A
BC Ch.1
N
oteOn,000,000
Msg1:
A
BC Ch.1
N
oteOff,000,000
device name as following;
Note: if you have setting midi channel#1 as ABC ch.1
If the cursor is flashing at midi channel, you can change midi channel to another midi channel by
pressing “-DEC” or “INC+” button. You can move the cursor to midi command, midi value and midi
channel by pressing “SELECT” button.
You can change midi commands of the Msg1 by moving the cursor to midi command position (2nd line)
and press “-DEC” or “INC+” button to change midi command.
18
Page 19

Midi Program Change command (PC)
Msg1:
Midi Ch#1
PC,000
Msg1: Midi Ch#1
PC,127
Msg1: Midi Ch#1
CC,000,000
Msg1: Midi Ch#1
CC,127,000
Msg1: Midi Ch#1
CC,000,
127
Msg1: Midi Ch#1
C
C,000,T
oggle.
On
Msg1: Midi Ch#1
C
C,000,
Togle.
Off
Msg1: Midi Ch#1
C
C,000,
T
oggle
Msg1: Midi Ch#1
CC,
127,127
Msg1: Midi Ch#1
CC,127,Toggle.
On
Msg1: Midi
Ch#1
CC,127,Togle.
Off
Msg1: Midi Ch#1
CC,127,T
oggle
In midi program change command (PC), you can scroll midi program change number between 000 – 127
by pressing “-DEC” or “INC+” button. When the midi program change number is changing, the midi
program change command will be transmitted to your midi device base on the midi channel setting. For
the below setting, midi program change command will be transmitted on midi channel#1
Midi Control Change command (CC)
In midi control change command (CC), you can scroll midi control change number between 000 – 127 by
pressing “-DEC” or “INC+” button. For the midi control change value, it can be programming to send
fix value between 000 – 127, Toggle.On value, Toggle.Off value, Toggle value, TAP1 value or TAP2 value.
19
Page 20

Msg1: Midi Ch#1
C
C,000,
TAP1
Msg1: Midi Ch#1
C
C,000,
TAP2
Msg1: Midi Ch#1
CC,127,TAP1
Msg1: Midi Ch#1
CC,127,TAP2
Msg1: Midi Ch#1
NoteOn,
0
00,000
Msg1: Midi Ch#1
NoteOn,
1
27,000
Msg1: Midi Ch#1
NoteOn
,000,
127
Msg1: Midi Ch#1
NoteOn
,
127,127
You can change the control change value by pressing “-DEC” or “INC+” button. The meaning of control
change value is;
000 – 127 : midi control change will be transmitted with control change value between 000 –
127.
Toggle.On : midi control change will be transmitted with control change value 127.
Togle.Off : midi control change will be transmitted with control change value 000.
Toggle : midi control change will be transmitted with control change value 127 for ON
state or 000 for OFF state base on the current status of the control change
number in the memory. New control change value will be saved to the memory.
TAP1 : midi control change will be transmitted with control change value 127 every time
when the selected preset button is pressed.
TAP2 : midi control change will be transmitted control change value 127 when the
selected preset button is pressed at the 1st time and transmit control change
value 000 when the selected preset button is pressed at the 2nd time.
Midi Note On command
You can scroll midi note on number between 000 – 127 by pressing “-DEC” or “INC+” button. For the
midi note on value, it can be programming to send fix value between 000 – 127.
20
Page 21

Midi Note Off command
Msg1: Midi Ch#1
NoteOff,
0
00,000
Msg1: Midi Ch#1
NoteOff,
1
27,000
Msg1: Midi Ch#1
NoteOff
,000,
127
Msg1: Midi Ch#1
NoteOff
,
127,127
Msg16: Midi Ch#16
PC,127
Msg15: Midi Ch#15
PC,127
Msg14: Midi Ch#14
PC,127
Msg13: Midi Ch#13
PC,127
Msg12: Midi Ch#12
PC,127
Msg11: Midi Ch#11
PC,127
Msg10: Midi Ch#10
PC,127
Msg9: Midi Ch#9
PC,127
Msg8: Midi Ch#8
PC,127
Msg7: Midi Ch#7
PC,127
Msg6: Midi Ch#6
PC,127
Msg5: Midi Ch#5
PC,127
Msg4: Midi Ch#4
PC,127
Msg3: Midi Ch#3
PC,127
Msg2: Midi Ch#2
PC,127
Msg1: Midi Ch#1
P
C,001
Msg3:
-- OFF
--
PC,127
Msg2: Midi Ch#2
PC,127
Msg1: Midi Ch#1
P
C,123
Msg3:
-- OFF
--
PC,127
Msg2: Midi Ch#2
PC,127
Msg1: Midi Ch#5
CC
,80,Toggle.On
Preset : [01
-
S1]
Preset : [01
-S2]
Preset : [01
-S3]
Same as the mido note on command, you can scroll midi note on number between 000 – 127 by pressing
“-DEC” or “INC+” button. For the midi note off value, it can be programming to send fix value between
000 – 127.
16 midi messages
You can scroll up/down to all 16 midi messages by pressing “<LEFT” or “RIGHT>” button. Next midi
message will default setting to OFF then you have to turn it on by entering midi command.
Example below is data programming of preset [01-S1], [01-S2] and [01-S3]
21
Page 22

Edit Title
1) Preset [01
-
S1]
Title
1) Preset [01
-
S1]
[Sel] to Program
[Bac] to Exit
All preset can be naming title max to 16 characters. You can edit title of the selected preset by going to
title sub-menu, the LCD display shows the characters below. If you want to go back to main menu, you
can press “BACK” button. It will move back to main menu.
Default title name of all presets are showing as below table;
Preset [Bank:Patch button] Title (name)
000 [01:S1] User Preset# 000
001 [01:S2] User Preset# 001
002 [01:S3] User Preset# 002
003 [01:S4] User Preset# 003
004 [02:S1] User Preset# 004
005 [02:S2] User Preset# 005
006 [02:S3] User Preset# 006
007 [02:S4] User Preset# 007
008 [03:S1] User Preset# 008
009 [03:S2] User Preset# 009
010 [03:S3] User Preset# 010
011 [03:S4] User Preset# 011
012 [04:S1] User Preset# 012
013 [04:S2] User Preset# 013
014 [04:S3] User Preset# 014
015 [04:S4] User Preset# 015
. .
. .
. .
. .
124 [32:S1] User Preset# 124
125 [32:S2] User Preset# 125
126 [32:S3] User Preset# 126
127 [32:S4] User Preset# 127
22
Page 23

Below is an example to edit title of preset [01-S1]
Edit Title :
U
ser Preset# 000
1) Preset [01
-
S1]
Title
Edit Title :
M
y Clean Channel
Edit Title :
U
ser Preset# 000
Bank:1 S1
My Clean Channel
1) Preset [01
-
S1]
LED Color
1) Preset [01
-
S1]
[Sel] to Program
[Bac] to Exit
Once you have entered to edit title of preset [01:S1], the cursor will be flashing at the title name of
preset [01:S1] (line#2). You can replace a new title name max to 16 characters. You can move the
cursor to left side or right side by pressing “<LEFT” or “RIGHT>” button and you can change character
at the cursor position by pressing “+INC” or “DEC-” button. You can press “SELECT” button to add a
space character.
Below is an example to edit title of preset [01-S1] to “My Clean Channel”
You can press “BACK” button to save this title and back to preset menu. The new title will be saved and
shown when you back to operation mode.
LED Color
You can program LED display of each preset by going to LED Color sub-menu, the LCD display shows the
characters below. If you want to go back to main menu, you can press “BACK” button. It will move back
to main menu.
Default LED Color is setting to Blue color.
23
Page 24

The LED is RGB color, it can be mixed between all colors as showing in below table;
Color:
B
lue
Msg: 1)PC,000
1) Preset [01
-
S1]
LED Color
RGB Color mixing Color name
Red Blue
Green Green
Blue Blue
Red + Green Yellow
Red + Blue Purple
Green + Blue Cyan
Red + Green + Blue White
Below is an example to edit LED color of preset [01-S1]
Once you have entered to edit LED Color of preset [01:S1], the cursor will be flashing at color of preset
[01:S1] (line#1). You can change color by pressing “+INC” or “DEC-” button.
The LED display will show status of the midi message base on the preset you have programmed. You can
press “SELECT” button to choose midi message of the selected preset. The LED will illuminate status of
the selected midi message. Below is showing LED illuminate status;
Selected midi message LED status
Midi Program Change command - ON when midi PC command is transmitted.
- OFF when midi PC command of another preset is transmitted.
Midi Control Change command - Always ON when midi CC value is setting to Toggle.On.
- Always OFF when midi CC value is setting to Togle.Off.
- ON or OFF if midi CC value is setting to Toggle.
(Base on toggle CC value in memory)
- ON then OFF when midi CC value is setting to TAP1 or TAP2.
Note:
- LED status of another preset will not change if setting to midi
PC command.
- LED status of another preset will be changed if setting to midi
CC command.
Midi Note ON command
Midi Note OFF command
- OFF when midi Note command is transmitted. LED status of
another preset will not change
24
Page 25

Expression Pedal (Exp1 and Exp2) assignment
1) Preset [01
-
S1]
Exp1
1) Preset [01
-
S1]
[Sel] to Program
[Bac] to Exit
1) Preset
[01-S1]
Exp2
1) Preset [01
-
S1]
[Sel] to Program
[Bac] to Exit
Msg1:
-- OFF
--
CC,064,000
1) Preset [01
-
S1]
Exp1
Msg1:
-- OFF
--
CC,064,000
1) Preset [01
-
S1]
Exp2
Msg1:
M
idi Ch#1
CC,064,000
Msg1:
--
OFF
--
CC,064,000
Exp1 or Exp2 sub-menu, the LCD display shows the characters below. If you want to go back to main
menu, you can press “BACK” button. It will move back to main menu.
OR
Press “SELECT” button to enter to edit expression pedal midi control change data.
OR
Once you have entered to expression pedal programming, the cursor will be flashing at midi channel
position. You can scroll up/down to change midi channel by pressing “-DEC” or “INC+” button. You can
move to select control change number by pressing “SELECT” button.
Example below is turning on expression pedal to send midi control change on midi channel#1
25
Page 26

Example below is setting control change number to CC#123
Msg1: Midi Ch#1
CC,123,000
Msg1: Midi Ch#1
CC,064,000
Msg1: Midi Ch#1
CC,123,127
Msg1: Midi Ch#1
CC,123,000
If you move up/down the expression pedal that has been inserted to the exp port. Midi control change
value will be changed.
Press “BACK” button to save this setting and move back to preset menu. For this example, this
expression pedal setting will be saved only for the selected preset [01-S1]. You can assign any midi
control change number with different midi channel to all presets.
Expression Pedal Input
Expression pedal input EXP1 and EXP2 available to call in all preset arrange 128 presets (32 Banks x 4
Presets) You can enable or disable the expression pedal for each PATCH. The expression pedal inputs can
be programmed to send any Control Change on any MIDI channel for each PATCH. Please refer to Preset
Programming Mode for details.
EXP1 and EXP2 Inputs require either a standard expression pedal wired directly with a stereo ¼”
(6.35mm) TRS cable or a volume pedal using a Y insert cable. The stereo end of the Y-cable plugs into
the EXP1 and the two mono ends plug into the input and output of the volume pedal as showing in below
diagram.
Plug into FCB4X EXP1 or EXP2
NOTE: Disconnect the power from the FCB4X before plugging in the expression pedal EXP1 or EXP2.
Failure to do so could result in damage to the unit.
26
Page 27

Factory Restore
Factory Restore…
You can reset the FCB4X to the factory default settings. The data that you saved in the EEPROM memory
will be erased and the unit returned back the factory default settings. You can restore the factory default
by following these steps:
1. Unplug the power from the FCB4X unit.
2. Press and hold S4 button if you want to start from MIDI PC#0 at first in the Bank1-S1 or press
and hold S3 button if you want to start from MIDI PC#1 at first in the Bank1-S1 (ie: POD2.0
needed).
3. Plug the power into the FCB4X unit.
4. The LCD display will be flashing with characters below, it is processing a restore.
5. Once you see the LCD display on the unit is processing, now you can release your finger from the
S4 button (or S3 button).
6. Wait for a moment until restore process has completed. The FCB4X will be rebooted and
initialized with the factory default settings.
MIDI Implementation
MIDI Channel: Default: 1 (Transmitted) Changed: 1 - 16
Program Change#: 0 – 127
Controller#: 0 – 127
Control Change Value: 0 – 127
Note On/Off:
0 – 127
MIDI Cable Support
The FCB4X is a standard MIDI foot controller that can be connected to any MIDI equipment via a
standard 5 pin MIDI cable. Phantom power into the FCB4X unit via a standard 7 pin midi cable requires
pins 6 and 7 for the power supply. The polarity is not important.
27
 Loading...