

Page 1
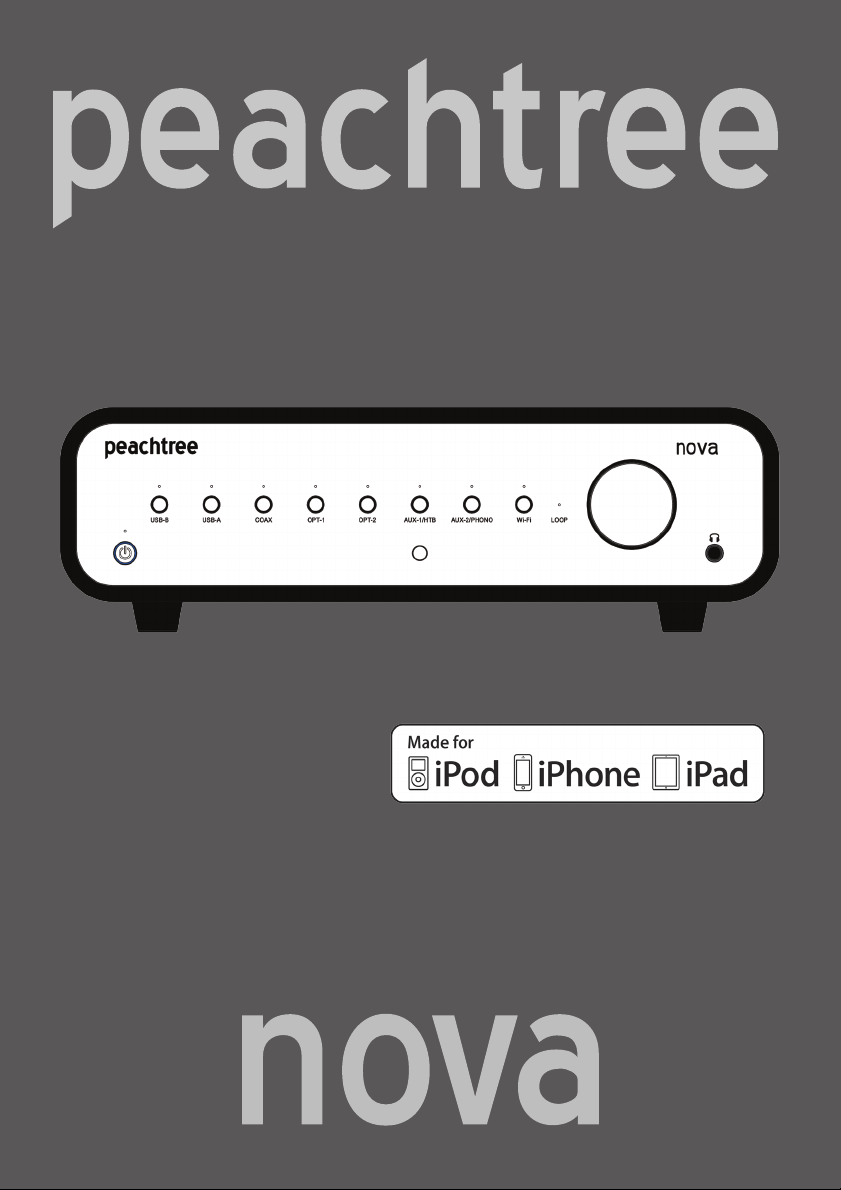
Page 2

IMPORTANT SAFETY INSTRUCTIONS
Read these instructions – All the safety and operating instructions should be read
B
before this product is operated.
Keep these instructions – The safety and operating instructions should be retained for future
C
reference.
Heed all warnings – All warnings on the appliance and in the operating instructions should
D
be adhered to.
Follow all instructions.
E
Do not use this apparatus near water – The appliance should not be used near water or
F
moisture – for example, in a wet basement or near a swimming pool, and the like.
Clean only with dry cloth.
G
Do not block any ventilation openings. Install in accordance with the manufacturer’s
H
instructions.
Do not install near any heat sources such as radiators, heat registers, stoves, or other
I
apparatus (including amplifiers) that produce heat.
Do not defeat the safety purpose of the polarized or grounding plug. A polarized plug has
J
two blades with one wider than the other. A grounding plug has two blades and a third
grounding prong. The wide blade or the third prong is provided for your safety. If the
provided plug does not fit into your outlet, consult an electrician for replacement of the
obsolete outlet.
Protect the power cord from being walked on or pinched particularly at the plugs,
K
convenience receptacles, and at the point where they exit from the apparatus.
L Only use attachments/accessories specified by the manufacturer.
Use only with the cart, stand, tripod, bracket, or table specified by the
M
manufacturer, or sold with the apparatus. When a cart is used, use caution
Unplug this apparatus during lightning storms or when unused for long periods of time.
N
Refer all servicing to qualified personnel. Servicing is required when the apparatus has been
O
damaged in any way such as the power cord or plug is damaged. Other damage may occur
if liquid or objects have been dropped or spilled into the apparatus. Dropping the apparatus,
exposure to rain, and excessive moisture may cause additional damage.
Please keep the unit in a good ventilation environment.
P
CAUTION: These servicing instructions are for use by qualified service personnel only. To
Q
reduce the risk of electric shock, do not perform any servicing other than that contained in
the operating instructions unless you are qualified to do so.
WARNING: To reduce the risk of fire or electric shock, do not expose this apparatus to rain
R
or moisture. The apparatus shall not be exposed to dripping or splashing and objects filled
with liquids, such as vases, shall not be placed on apparatus.
when moving the cart/apparatus combination to avoid injury from tip-over.
Page 3
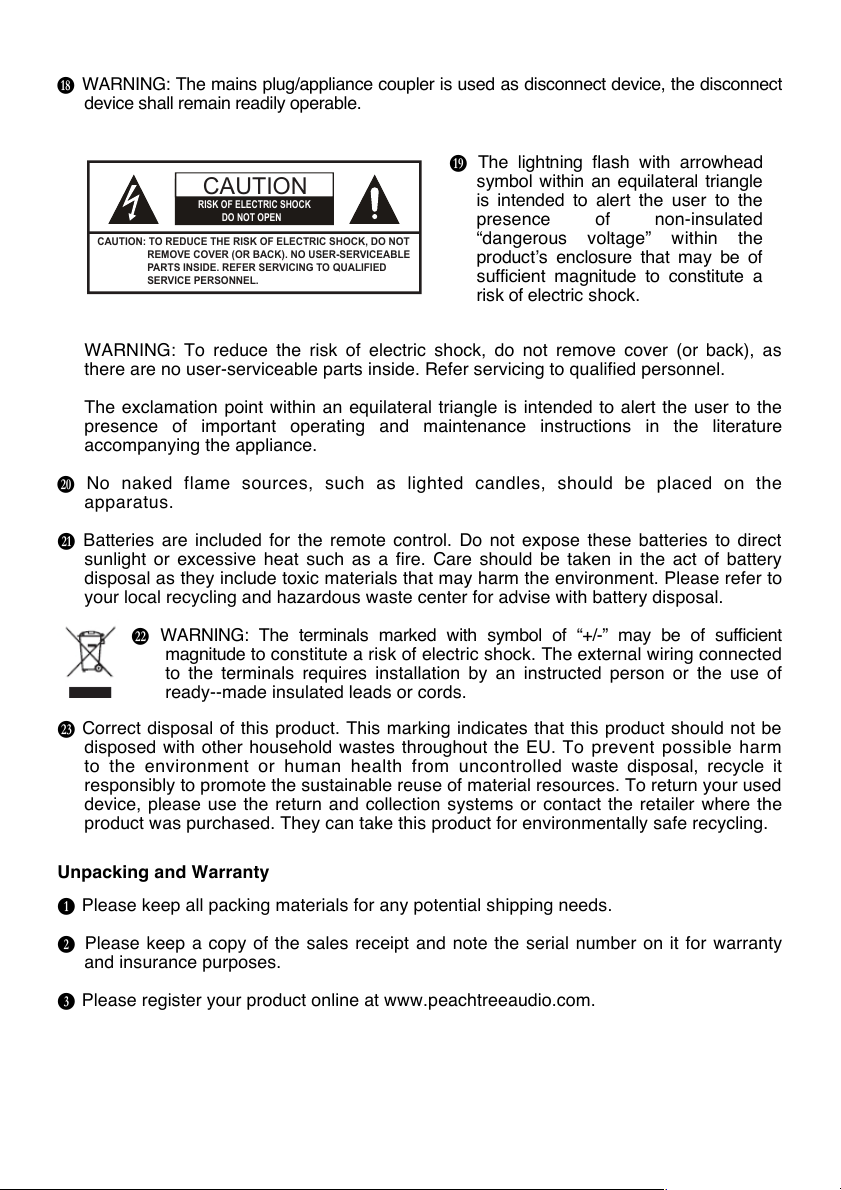
CAUTION: TO REDUCE THE RISK OF ELECTRIC SHOCK, DO NOT
REMOVE COVER (OR BACK). NO USER-SERVICEABLE
PARTS INSIDE. REFER SERVICING TO QUALIFIED
SERVICE PERSONNEL.
CAUTION
RISK OF ELECTRIC SHOCK
DO NOT OPEN
The lightning flash with arrowhead
WARNING: The mains plug/appliance coupler is used as disconnect device, the disconnect
S
device shall remain readily operable.
T
symbol within an equilateral triangle
is intended to alert the user to the
presence of non-insulated
“dangerous voltage” within the
product’s enclosure that may be of
sufficient magnitude to constitute a
risk of electric shock.
WARNING: To reduce the risk of electric shock, do not remove cover (or back), as
there are no user-serviceable parts inside. Refer servicing to qualified personnel.
The exclamation point within an equilateral triangle is intended to alert the user to the
presence of important operating and maintenance instructions in the literature
accompanying the appliance.
No naked flame sources, such as lighted candles, should be placed on the
U
apparatus.
Batteries are included for the remote control. Do not expose these batteries to direct
V
sunlight or excessive heat such as a fire. Care should be taken in the act of battery
disposal as they include toxic materials that may harm the environment. Please refer to
your local recycling and hazardous waste center for advise with battery disposal.
WARNING: The terminals marked with symbol of “+/-” may be of sufficient
W
magnitude to constitute a risk of electric shock. The external wiring connected
to the terminals requires installation by an instructed person or the use of
ready-made insulated leads or cords.
Correct disposal of this product. This marking indicates that this product should not be
X
disposed with other household wastes throughout the EU. To prevent possible harm
to the environment or human health from uncontrolled waste disposal, recycle it
responsibly to promote the sustainable reuse of material resources. To return your used
device, please use the return and collection systems or contact the retailer where the
product was purchased. They can take this product for environmentally safe recycling.
Unpacking and Warranty
Please keep all packing materials for any potential shipping needs.
B
Please keep a copy of the sales receipt and note the serial number on it for warranty
C
and insurance purposes.
Please register your product online at www.peachtreeaudio.com.
D
Page 4
Marking by the “CE” symbol (shown left) indicates compliance of this device
Note: This equipment has been tested and found to comply with the limits for
instructions, may cause harmful interference to radio communications.
Compatible iPod/iPhone Models
Made for
iPhone 6s Plus, iPhone 6s, iPhone 6 Plus, iPhone 6, iPhone 5s, iPhone 5c, iPhone 5, iPad
Pro, iPad mini 4, iPad Air 2, iPad mini 3, iPad Air, iPad mini 2, iPod touch (6th generation),
iPod touch (5th generation).
Legal Notice
“Made for iPod,” “Made for iPhone,” and “Made for iPad” mean that an electronic accessory
has been designed to connect specifically to iPod, iPhone, or iPad, respectively, and has
been certified by the developer to meet Apple performance standards. Apple is not
responsible for the operation of this device or its compliance with safety and regulatory
standards. Please note that the use of this accessory with iPod, iPhone, or iPad may affect
wireless performance.
Trademark Notice
AirPlay, iPad, iPhone, iPod, iPod classic, iPod nano, iPod touch, and Retina are trademarks of
Apple Inc., registered in the U.S. and other countries. iPad Air, iPad mini, and Lightning are
trademarks of Apple Inc.
with the EMC (Electromagnetic Compatibility) and LVD (Low Voltage
Directive) standards of the European Community.
a class B digital device, pursuant to part 15 of the FCC Rules. These limits
are designed to provide reasonable protection against harmful interference
in a residential installation. The equipment generates, uses and can radiate
radio frequency energy and, if not installed and used in accordance with the
However, there is no guarantee that interference will not occur in a particular
installation. If this equipment does cause harmful interference to radio or
television reception, which can be determined by turning the equipment off
and on, the user is encouraged to try to correct the interference by one or
more of the following measures:
• Reorient or relocate the receiving antenna
• Increase the separation between the equipment and the receiver
• Connect the equipment into an outlet on a circuit different from that
to which the receiver is connected
• Consult the dealer or an experienced radio/TV technician for help
Page 5

Introduction
Back Panel
Front Panel
Remote Control
Home Theater Bypass Input Mode
Volume Control Bypass Input Mode
Loop Feature
Useful Tips
Troubleshooting
Warranty and Repair
Specifications
(Rev. 1/2016)
Page 6
Thank you for choosing nova! The nova project began as a simple idea with high
expectations: to build a new integrated amplifier platform that connects to every
type of popular Hi-Fi source, plays every type of file input into it, drives any
speaker, fills any room, looks great doing it, doesn’t cost a small fortune and,
most importantly, sounds better than anything we have made before. No easy
task, but our team accepted the challenge and set out on a mission to completely
re-imagine nova from the ground up. The team poured their heart and soul into
every detail, no stone was left unturned and we hope you enjoy using nova as
much as we enjoyed creating it!
The nova is several audio components in one. It’s a Digital-to-Analog Converter
(DAC), line-level preamplifier, phono preamplifier, headphone amplifier and power
amplifier all wrapped in an attractive and simple to use package. Each function
has been specifically designed to provide the ultimate listening experience,
regardless of the input source or the listening method. Each individual function
provides a listening experience that compares favorably with dedicated audio
components that only perform single functions and cost many times more than
the entire nova.
The nova DAC is a reference 32-bit/384kHz design that is capable of accepting all
of the major file formats currently available in the market today including PCM up
to 32-bit/384kHz and DSD up to 5.6MHz. This includes compressed audio,
uncompressed audio, high-resolution audio and ultra-high resolution audio. The
nova accepts them all! Built around the DAC chip is an extensive, multi-point,
regulated power supply that keeps the DAC chip operating optimally and
remaining faithful to the input signal, providing the most natural sounding and
musical DAC we have ever made!
The preamplifier in nova is a full analog design with extremely flexible input and
configuration capability. It accepts input from a computer, digital audio devices,
analog audio devices, mobile devices and even has a built-in phono preamplifier
for connecting a turntable. In addition, there is an optional Peachtree Wi-Fi
Module that can be installed to add a wireless connection. The two analog inputs
are user-switchable so they can be configured 4 different ways: 2 standard line-
level analog inputs, 1 Home Theater Bypass (HTB) input + 1 line-level input, 1
line-level input + 1 phono input, or 1 HTB input + 1 phono input. Your system,
your choice! The digital inputs include a user selectable feature called volume
control bypass that allows you to control overall system volume right from your
connected source device – essentially bypassing the preamplifier in the nova to
make it work like a stand-alone power amplifier. This is especially useful if you
enjoy using an application on your computer or mobile device to select your music
AND to control the volume level. And last, but not least, there is a loop feature
INTRODUCTION
Page 7

that allows an external processor to be integrated with the nova and switched in
and out of the signal path by simply pressing a button on the remote control!
The headphone amplifier in nova was specifically designed to be a primary part of
the nova design. It is a fully-discrete circuit that is designed to provide the ultimate
listening experience, easily drive any type of headphone, play as loud as you
would ever want to, and allows you to hear “further” into your music than you have
ever heard before. When compared to dedicated headphone amplifiers costing
many times more than the entire nova, the nova represents an amazing value.
When you consider that the nova offers so much more than just a headphone
amplifier, the overall value of the nova is undeniable.
The power amplifiers in the nova are some of the cleanest, neutral, and most
powerful units available today. At an impressive 150 Watts-Per-Channel (WPC)
into 8 ohms, the nova150 has plenty of power to satisfy the majority of speakers,
rooms and listeners. However, there is no such thing as “too much power” so we
also created the nova300 that packs an amazing 300WPC and the over-the-topof-the-line nova500 that offers a staggering 500WPC that recreates the natural
power and dynamics of music with ease! All of the nova power amplifiers are fullydifferential designs that are extremely faithful to the source, musical and flexible.
The new novas have no problems driving speakers from 2.5Ω to 16Ω.
Please take the time to read this manual and visit www.peachtreeaudio.com to
register your nova. We will extend the standard warranty if you do and your
information will not be shared with anyone. We will only contact you with news
that is relevant to your nova purchase! If you have additional questions or
feedback please contact your reseller or Peachtree Audio directly.
We sincerely hope that you love your nova and that it brings you many years of
enjoyment. It represents the very best of everything we do. Thank you again for
choosing Peachtree Audio and happy listening!
- Your friends at Peachtree Audio
Page 8
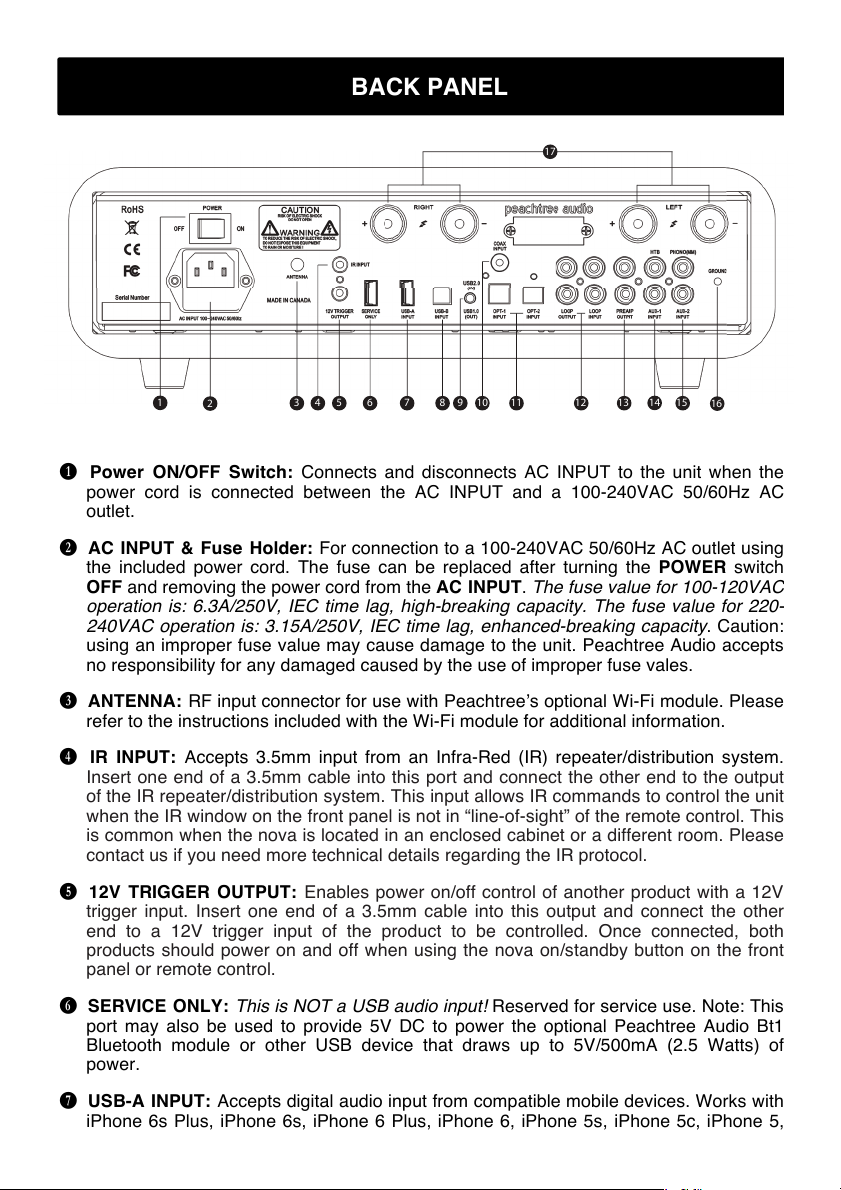
B
Power ON/OFF Switch: Connects and disconnects AC INPUT to the unit when the
power cord is connected between the AC INPUT and a 100-240VAC 50/60Hz AC
outlet.
C
AC INPUT & Fuse Holder: For connection to a 100-240VAC 50/60Hz AC outlet using
the included power cord. The fuse can be replaced after turning the POWER switch
OFF and removing the power cord from the AC INPUT. The fuse value for 100-120VAC
operation is: 6.3A/250V, IEC time lag, high-breaking capacity. The fuse value for 220-
240VAC operation is: 3.15A/250V, IEC time lag, enhanced-breaking capacity. Caution:
using an improper fuse value may cause damage to the unit. Peachtree Audio accepts
no responsibility for any damaged caused by the use of improper fuse vales.
D
ANTENNA: RF input connector for use with Peachtree’s optional Wi-Fi module. Please
refer to the instructions included with the Wi-Fi module for additional information.
E
IR INPUT: Accepts 3.5mm input from an Infra-Red (IR) repeater/distribution system.
Insert one end of a 3.5mm cable into this port and connect the other end to the output
of the IR repeater/distribution system. This input allows IR commands to control the unit
when the IR window on the front panel is not in “line-of-sight” of the remote control. This
is common when the nova is located in an enclosed cabinet or a different room. Please
contact us if you need more technical details regarding the IR protocol.
F
12V TRIGGER OUTPUT: Enables power on/off control of another product with a 12V
trigger input. Insert one end of a 3.5mm cable into this output and connect the other
end to a 12V trigger input of the product to be controlled. Once connected, both
products should power on and off when using the nova on/standby button on the front
panel or remote control.
G
SERVICE ONLY: This is NOT a USB audio input! Reserved for service use. Note: This
port may also be used to provide 5V DC to power the optional Peachtree Audio Bt1
Bluetooth module or other USB device that draws up to 5V/500mA (2.5 Watts) of
power.
H
USB-A INPUT: Accepts digital audio input from compatible mobile devices. Works with
iPhone 6s Plus, iPhone 6s, iPhone 6 Plus, iPhone 6, iPhone 5s, iPhone 5c, iPhone 5,
1
2
3 4 5 6 7 8 9 1110 12 13 15
16
14
17
BACK PANEL
1
2
3 4 5 6 7 8 9 1110 12 13 15
16
14
17
BACK PANEL
Page 9

iPad Pro, iPad mini 4, iPad Air 2, iPad mini 3, iPad Air, iPad mini 2, iPod touch (6th
generation), and iPod touch (5th generation).
I
USB-B INPUT: Accepts digital audio input up to 32-bit/384kHz PCM and 5.6MHz DSD
from a computer when the USB button is set to USB 2.0 (recommended for all Mac
users and Windows users with music files above 96kHz or DSD). Accepts digital audio
input up to 96kHz from a computer when the USB button is set to USB 1.0
(recommended for all Windows users with music files that do NOT exceed 96kHz or
DSD). Windows users note: For playback of files above 96kHz, Windows requires
installation of the USB 2.0 driver on your PC before it will be compatible with the USB
2.0 setting. Please visit http://www.peachtreeaudio.com/support/usb-drivers.html/ to
download the latest version.
J
USB 2.0/1.0 Button: Toggles the USB-B input between USB 2.0 and USB 1.0
compatibility. All Mac users should set this to USB 2.0 (in). Windows PC users should
set this to USB 1.0 (out) if using music files that do NOT exceed 96kHz. Windows users
should set this to USB 2.0 (and must install the Windows USB 2.0 driver) if using any
music files that exceed 96kHz. Note: changing the setting while the unit is on will not be
active until the unit is cycled through standby mode. It is recommend that the unit be
put into standby mode prior to changing this setting.
K
COAX INPUT: Accepts S/PDIF digital audio input from a coaxial (RCA style) output up
to 192kHz. Coaxial digital audio output is available on many digital audio sources
including disc players and some streaming audio devices.
OPT-1 & OPT-2 INPUT: Accepts S/PDIF digital audio input from a optical (Toslink style)
L
output up to 192kHz. Optical digital audio outputs are common on digital audio sources
including; streaming audio devices, disc players, cable boxes and HDTVs.
M
LOOP OUTPUT & LOOP INPUT: This is a loop feature (similar to a processor or tape
monitor loop) with an output and input that are tied together to allow an audio
processing device to be inserted into the signal path. The loop is active when the LOOP
LED on the front panel is lit blue. The loop can only be engaged and disengaged using
the LOOP button on the remote control. This makes it easier to compare the original
audio signal to the modified audio signal when using the connected device. Please note
that when the loop is active, the audio signal from the nova is output on the LOOP
OUTPUT connectors and the audio signal output from the connected device is looped
back into the LOOP INPUT connectors on the nova. Improper wiring or use of this
feature may result in no audio when the loop is engaged. When the loop is disengaged,
the circuit is completely bypassed to shorten the audio signal path and minimize
potential interference.
N
PREAMP OUTPUT: Provides analog audio output to connect to a powered subwoofer
or an external power amplifier. Note: the RIGHT and LEFT speaker outputs remain
active when the PREAMP OUTPUT is used and both sets of outputs are automatically
muted when the mute function is engaged or when headphones are connected to the
front panel.
O
AUX-1/HTB INPUT: Accepts line-level input from an analog audio (RCA style) source.
Also, accepts line-level analog audio output from a Surround Sound Processer (SSP) or
Audio/Video Receiver (AVR) when set to Home Theater Bypass (HTB). Please see the
Home Theater Bypass instructions elsewhere in this manual for more detail.
P
AUX-2/PHONO INPUT: Accepts line-level input from an analog audio (RCA style)
source. Also, accepts analog audio output from a phonograph/turntable with a Moving
Page 10

Magnet (MM) cartridge. Please note that when using a phonograph/turntable with a
Moving Coil (MC) cartridge, this input should be set to AUX-2 and an external phono
preamp designed specifically for Moving Coil cartridges used.
Q
GROUND: Accepts the ground connection from a connected a phonograph/turntable.
R
RIGHT & LEFT SPEAKER Outputs: Speaker binding post outputs that accept banana
style or bare wire speaker cable terminations. The binding posts are clearly marked
RIGHT and LEFT with red (+) and black (-) for proper connections with the speakers.
Please check that all of the ends of the speaker cables are connected with the correct
polarity; positive-to-positive and negative-to-negative. Wiring positive-to-negative or
negative-to-positive should not cause any damage but it does alter the phase and
therefore the sound the speakers create. Note: the RIGHT and LEFT speaker outputs
remain active when the PREAMP OUTPUT is used and both sets of outputs are
automatically muted when the mute function is engaged or when headphones are
connected to the front panel.
Page 11
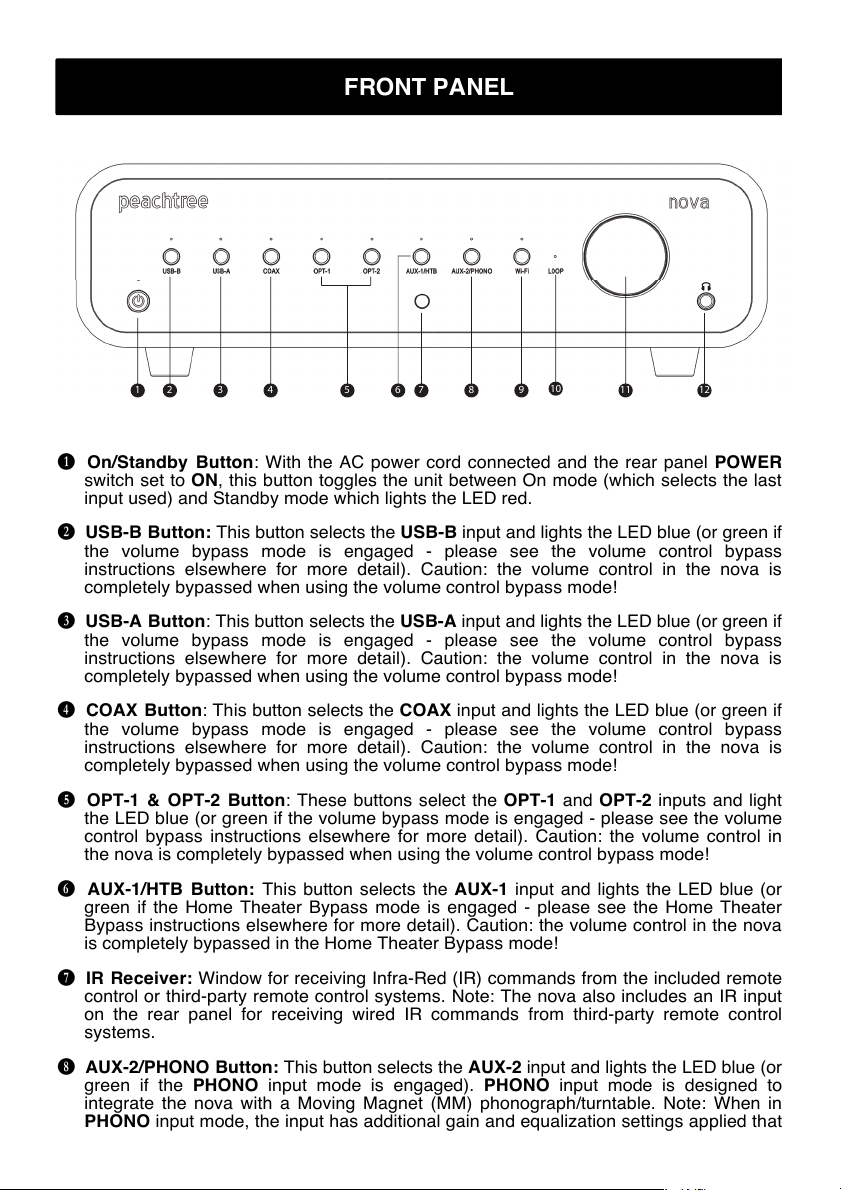
B
On/Standby Button: With the AC power cord connected and the rear panel POWER
switch set to ON, this button toggles the unit between On mode (which selects the last
input used) and Standby mode which lights the LED red.
C
USB-B Button: This button selects the USB-B input and lights the LED blue (or green if
the volume bypass mode is engaged - please see the volume control bypass
instructions elsewhere for more detail). Caution: the volume control in the nova is
completely bypassed when using the volume control bypass mode!
D
USB-A Button: This button selects the USB-A input and lights the LED blue (or green if
the volume bypass mode is engaged - please see the volume control bypass
instructions elsewhere for more detail). Caution: the volume control in the nova is
completely bypassed when using the volume control bypass mode!
E
COAX Button: This button selects the COAX input and lights the LED blue (or green if
the volume bypass mode is engaged - please see the volume control bypass
instructions elsewhere for more detail). Caution: the volume control in the nova is
completely bypassed when using the volume control bypass mode!
F
OPT-1 & OPT-2 Button: These buttons select the OPT-1 and OPT-2 inputs and light
the LED blue (or green if the volume bypass mode is engaged - please see the volume
control bypass instructions elsewhere for more detail). Caution: the volume control in
the nova is completely bypassed when using the volume control bypass mode!
G
AUX-1/HTB Button: This button selects the AUX-1 input and lights the LED blue (or
green if the Home Theater Bypass mode is engaged - please see the Home Theater
Bypass instructions elsewhere for more detail). Caution: the volume control in the nova
is completely bypassed in the Home Theater Bypass mode!
H
IR Receiver: Window for receiving Infra-Red (IR) commands from the included remote
control or third-party remote control systems. Note: The nova also includes an IR input
on the rear panel for receiving wired IR commands from third-party remote control
systems.
I
AUX-2/PHONO Button: This button selects the AUX-2 input and lights the LED blue (or
green if the PHONO input mode is engaged). PHONO input mode is designed to
integrate the nova with a Moving Magnet (MM) phonograph/turntable. Note: When in
PHONO input mode, the input has additional gain and equalization settings applied that
2 3 4 5 6 8 9
10
11 121 7
FRONT PANEL
2 3 4 5 6 8 9
10
11 121 7
FRONT PANEL
Page 12

are specifically designed for MM cartridges. Please note that when using a
phonograph/turntable with a Moving Coil (MC) cartridge, this input should be set to
AUX-2 and an external phono preamp designed specifically for Moving Coil cartridges
used. Press and hold this button for ~5 seconds to toggle the input between the AUX-2
(blue LED) and PHONO (green LED) input modes.
J
Wi-Fi Button: This button selects the Wi-Fi input (if the optional Peachtree Wi-Fi
Module is installed) and lights the LED blue (or green if the volume bypass mode is
engaged - please see the volume control bypass instructions elsewhere for more
detail). Caution: the volume control in the nova is completely bypassed when using the
volume control bypass mode! If the Wi-Fi module is not installed, this button has no
function.
LOOP LED: Indicates if the LOOP OUTPUT/LOOP INPUT is engaged (lit blue) or
K
disengaged (off). Note: the loop can only be engaged and disengaged using the LOOP
button on the remote control.
Volume Knob: Rotate clockwise to increase and counter-clockwise to decrease output
L
level. Press to toggle mute on and off. Note: the volume level will be indicated for ~2
seconds using the 8 blue input LEDS on the front panel. Each one represents ~12.5%
of the volume range. Note: the currently selected blue or green input LED will flash
slowly while the unit is muted. Whenever the nova is making output level changes
automatically, the input LEDs will blink. The blinking stops when the nova reaches the
correct output level. This occurs when mute is disengaged, volume control bypass is
selected and or home theater bypass is selected. This is to minimize the chance of
sudden, unexpected output level changes.
Headphone Output: 1/4” headphone output connection. Inserting a headphone
M
connection automatically mutes the RIGHT & LEFT Speaker and PREAMP
OUTPUTS. Removing a headphone connection automatically un-mutes the RIGHT &
LEFT Speaker and PREAMP OUTPUTS. Caution: Please lower the output level when
inserting or removing headphone connections as headphone sensitivity varies widely
and a comfortable speaker listening level may be extremely loud when switching to
headphones.
Page 13
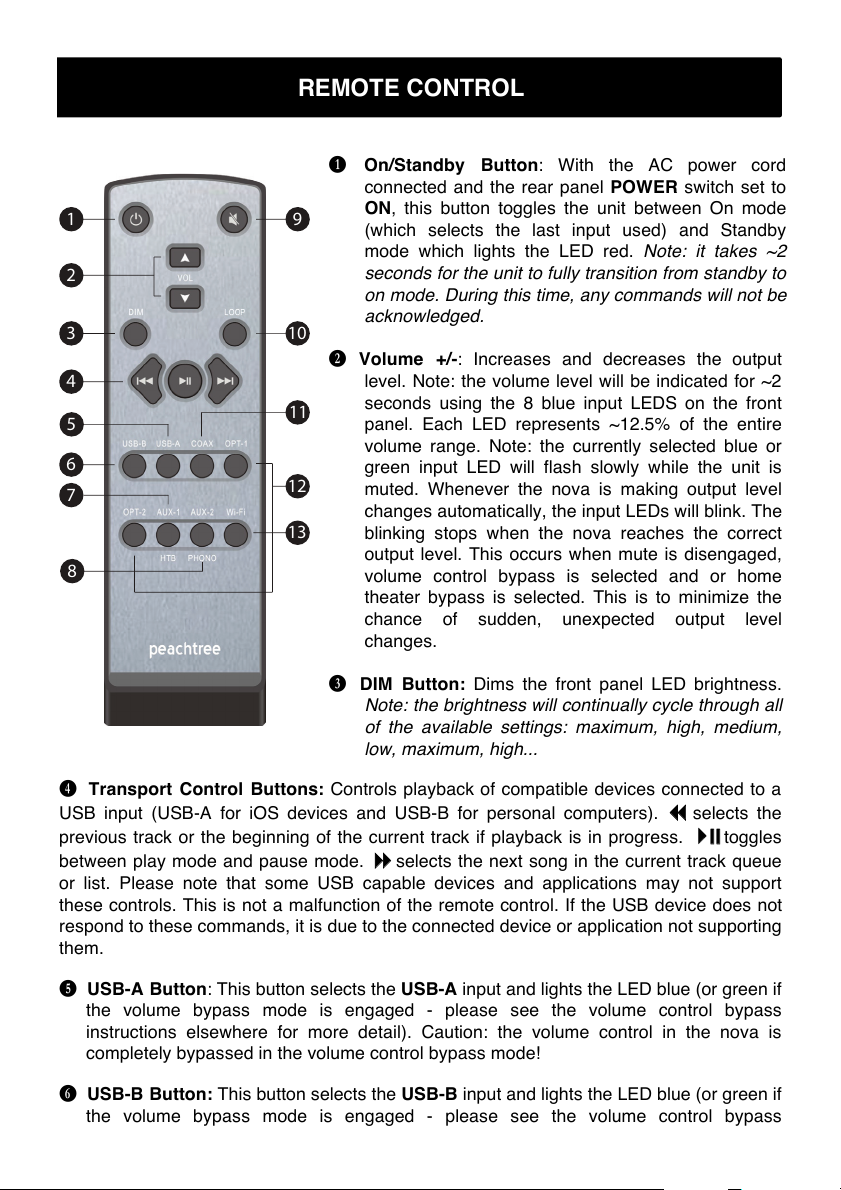
B
On/Standby Button: With the AC power cord
connected and the rear panel POWER switch set to
ON, this button toggles the unit between On mode
(which selects the last input used) and Standby
mode which lights the LED red. Note: it takes ~2
seconds for the unit to fully transition from standby to
on mode. During this time, any commands will not be
acknowledged.
C
Volume +/-: Increases and decreases the output
level. Note: the volume level will be indicated for ~2
seconds using the 8 blue input LEDS on the front
panel. Each LED represents ~12.5% of the entire
volume range. Note: the currently selected blue or
green input LED will flash slowly while the unit is
muted. Whenever the nova is making output level
changes automatically, the input LEDs will blink. The
blinking stops when the nova reaches the correct
output level. This occurs when mute is disengaged,
volume control bypass is selected and or home
theater bypass is selected. This is to minimize the
chance of sudden, unexpected output level
changes.
D
DIM Button: Dims the front panel LED brightness.
Note: the brightness will continually cycle through all
of the available settings: maximum, high, medium,
low, maximum, high...
E
Transport Control Buttons: Controls playback of compatible devices connected to a
USB input (USB-A for iOS devices and USB-B for personal computers).
!selects the
previous track or the beginning of the current track if playback is in progress.
"# toggles
between play mode and pause mode.
$selects the next song in the current track queue
or list. Please note that some USB capable devices and applications may not support
these controls. This is not a malfunction of the remote control. If the USB device does not
respond to these commands, it is due to the connected device or application not supporting
them.
F
USB-A Button: This button selects the USB-A input and lights the LED blue (or green if
the volume bypass mode is engaged - please see the volume control bypass
instructions elsewhere for more detail). Caution: the volume control in the nova is
completely bypassed in the volume control bypass mode!
G
USB-B Button: This button selects the USB-B input and lights the LED blue (or green if
the volume bypass mode is engaged - please see the volume control bypass
REMOTE CONTROL
1
2
3
4
6
7
9
10
11
12
13
5
8
Page 14

instructions elsewhere for more detail). Caution: the volume control in the nova is
completely bypassed in the volume control bypass mode!
AUX-1/HTB Button: This button selects the AUX-1 input and lights the LED blue (or
H
green if the Home Theater Bypass mode is engaged - please see the Home Theater
Bypass instructions elsewhere for more detail). Caution: the volume control in the
nova is completely bypassed in the Home Theater Bypass mode!
AUX-2/PHONO Button: This button selects the AUX-2 input and lights the LED blue (or
I
green if the PHONO input mode is engaged). PHONO input mode is designed to
integrate the nova with a Moving Magnet (MM) phonograph/turntable. Note: When in
PHONO input mode, the input has additional gain and equalization settings applied that
are specifically designed for MM cartridges. Please note that when using a
phonograph/turntable with a Moving Coil (MC) cartridge, this input should be set to
AUX-2 and an external phono preamp designed specifically for Moving Coil cartridges
used. Press and hold this button for ~5 seconds to toggle the input between the AUX-2
(blue LED) and PHONO (green LED) input modes.
MUTE Button: Mutes and un-mutes the RIGHT & LEFT Speaker, PREAMP and
J
headphone outputs. Note: the currently selected blue or green input LED will flash
slowly while the unit is muted.
LOOP Button: Engages and disengages the LOOP OUTPUT/LOOP INPUT. Note: The
K
LOOP LED on the front panel is lit blue whenever the loop is engaged.
COAX Button: This button selects the COAX input and lights the LED blue (or green if
L
the volume bypass mode is engaged - please see the volume control bypass
instructions elsewhere for more detail). Caution: the volume control in the nova is
completely bypassed in the volume control bypass mode!
M OPT-1 & OPT-2 Button: These buttons select the OPT-1 and OPT-2 inputs and light
the LED blue (or green if the volume bypass mode is engaged - please see the volume
control bypass instructions elsewhere for more detail). Caution: the volume control in
the nova is completely bypassed in the volume control bypass mode!
N Wi-Fi Button: This button selects the Wi-Fi input (if the optional Peachtree Wi-Fi
Module is installed and ignored if it isn’t) and lights the LED blue (or green if the volume
bypass mode is engaged - please see the volume control bypass instructions
elsewhere for more detail). Caution: the volume control in the nova is completely
bypassed in the volume control bypass mode!
Page 15
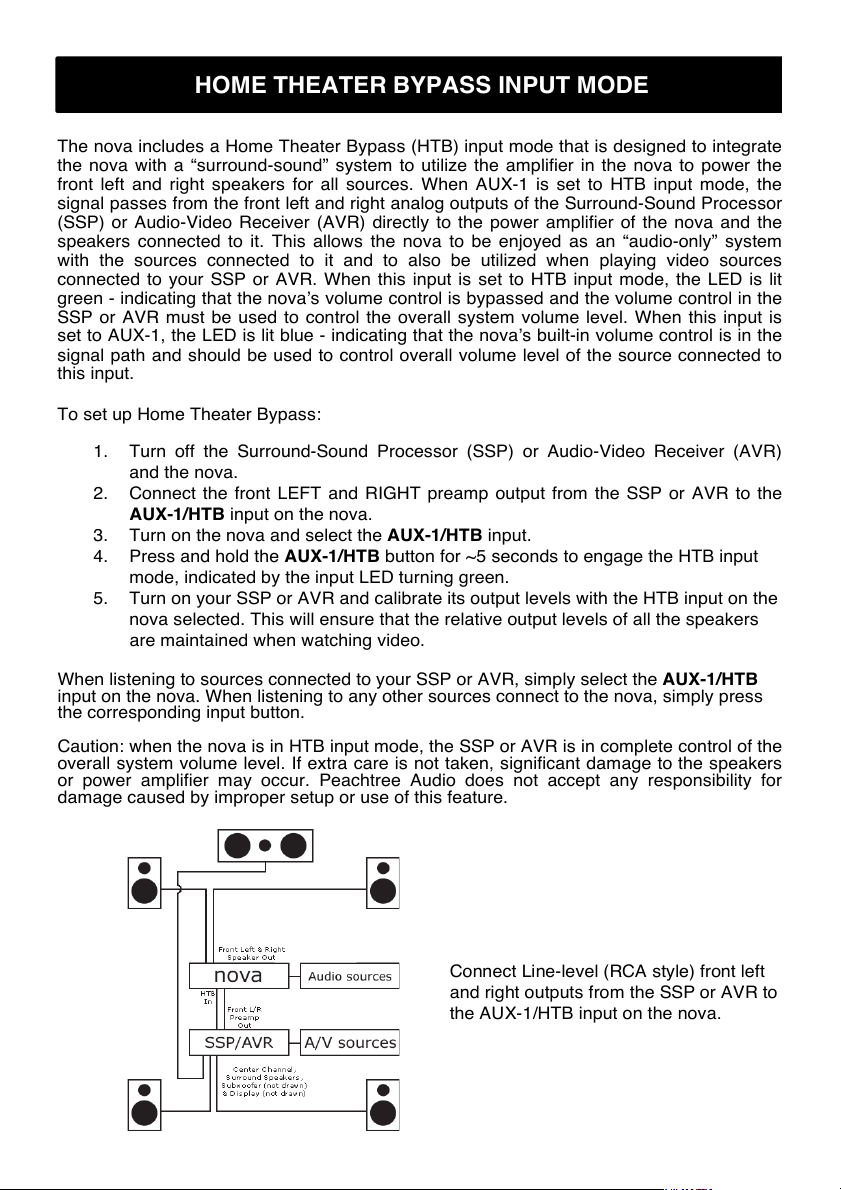
The nova includes a Home Theater Bypass (HTB) input mode that is designed to integrate
the nova with a “surround-sound” system to utilize the amplifier in the nova to power the
front left and right speakers for all sources. When AUX-1 is set to HTB input mode, the
signal passes from the front left and right analog outputs of the Surround-Sound Processor
(SSP) or Audio-Video Receiver (AVR) directly to the power amplifier of the nova and the
speakers connected to it. This allows the nova to be enjoyed as an “audio-only” system
with the sources connected to it and to also be utilized when playing video sources
connected to your SSP or AVR. When this input is set to HTB input mode, the LED is lit
green - indicating that the nova’s volume control is bypassed and the volume control in the
SSP or AVR must be used to control the overall system volume level. When this input is
set to AUX-1, the LED is lit blue - indicating that the nova’s built-in volume control is in the
signal path and should be used to control overall volume level of the source connected to
this input.
To set up Home Theater Bypass:
1. Turn off the Surround-Sound Processor (SSP) or Audio-Video Receiver (AVR)
and the nova.
2. Connect the front LEFT and RIGHT preamp output from the SSP or AVR to the
AUX-1/HTB input on the nova.
3. Turn on the nova and select the AUX-1/HTB input.
4. Press and hold the AUX-1/HTB button for ~5 seconds to engage the HTB input
mode, indicated by the input LED turning green.
5. Turn on your SSP or AVR and calibrate its output levels with the HTB input on the
nova selected. This will ensure that the relative output levels of all the speakers
are maintained when watching video.
When listening to sources connected to your SSP or AVR, simply select the AUX-1/HTB
input on the nova. When listening to any other sources connect to the nova, simply press
the corresponding input button.
Caution: when the nova is in HTB input mode, the SSP or AVR is in complete control of the
overall system volume level. If extra care is not taken, significant damage to the speakers
or power amplifier may occur. Peachtree Audio does not accept any responsibility for
damage caused by improper setup or use of this feature.
HOME THEATER BYPASS INPUT MODE
Connect Line-level (RCA style) front left
and right outputs from the SSP or AVR to
the AUX-1/HTB input on the nova.
Page 16
The nova includes a Volume Control Bypass (VCB) input mode that removes the built-in
output level control from the signal path. This is useful when using digital sources that have
their own volume control built in that you prefer to use for convenience. When an input is
selected, the LED will light blue if VCB mode is disengaged (the built-in volume control is in
the signal path) or green if VCB mode is engaged (the volume control in the source device
must be used).
To set up Volume Control Bypass mode:
1. Make sure the connected device is set to a low volume level!
2. Press and hold the desired input button for ~5 seconds to engage the VCB input
mode, indicated by the input LED turning green. Note: repeat this step to
disengage the VCB input mode, indicated by the input LED turning blue. VCB
input mode disengaged is the factory default setting.
The Volume Control Bypass feature is not available on the AUX-2/PHONO input. Pressing
and holding the AUX-2/PHONO input button for ~5 seconds toggles the input mode
between AUX-2 and PHONO. This feature is unique to the AUX-2/PHONO input.
Caution: when the nova is in VCB input mode, the source device is in complete control of
the output level sent to the power amplifier and speakers. If extra care is not taken,
significant damage to the speakers or power amplifier may occur. Peachtree Audio does
not accept any responsibility for damage caused by improper setup or use of this feature.
LOOP OUTPUT & LOOP INPUT:
This is a loop feature (similar to a processor or tape
monitor loop) with an output and input that are tied together to allow an audio processing
device to be inserted into the signal path of the currently selected input. The loop is active
when the LOOP LED on the front panel is lit blue. The loop is engaged and disengaged
using the LOOP button on the remote control. This makes it easier to compare the original
audio signal to the modified audio signal from the connected device from your listening
position. Please note that when the loop is active, the audio signal from the nova is output
on the LOOP OUTPUT connectors and the audio signal output from the connected device
is looped back into the LOOP INPUT connectors on the nova. Improper wiring or use of
this feature may result in no audio when the loop is engaged. When the loop is
disengaged, the circuit is completely bypassed to shorten the audio signal path and
minimize potential interference.
To set up the loop feature:
1. Turn off the nova and the device to be connected.
2. Connect the LOOP OUTPUT connections on the nova to the input connections on
the external processing device.
3. Connect the output connections on the external processing device to the LOOP
INPUT connections on the nova.
4. Turn on the nova and the connected device.
5. Using the nova remote control, press the LOOP button to engage and disengage
the connected device from the signal path.
VOLUME CONTROL BYPASS INPUT MODE
LOOP FEATURE
Page 17
At Peachtree Audio we believe all products should be easy to use, but sometimes getting
the audio to stream out of a computer’s USB port requires a few extra steps. See
instructions below. Some minor changes may occur with Windows or Apple OS updates,
but the basics are the usually the same.
USB Connections
Windows PC
B
Connect the USB-B input on the nova to an open USB port on your computer.
C
Your computer should “recognize” the nova as a USB device. You might even get a
pop-up window notifying you.
D
Right click the speaker icon on your screen.
E
Select the “AUDIO” tab.
F
Using the drop-down menu, choose the Peachtree Audio option.
G
Click “OK.”
H
You will need to install the included USB 2.0 driver for playback of music files that
exceed 96kHz when using a Windows PC.
Launch your music application and enjoy!
Mac
B
Open System Preferences.
C
Click on Sound.
D
In the output tab you should see Peachtree as one of the choices.
E
Select it.
Launch iTunes or other music application and enjoy!
Once you set up your computer using the instructions above, it should automatically
recognize the nova each time you use it. If you unplug the USB connection or re-boot your
computer, you may have to repeat some of the steps above. This is typical.
Other useful tips...
For the best sound when listening to music from your computer, set your computer and
music program volume controls to maximum and use the nova volume knob or remote
control as the master volume control.
For critical listening to music from your computer, avoid keeping multiple programs open. It
can compromise the sound quality and even cause signal dropouts.
Provide adequate ventilation above the nova so it can “breathe.”
Please checkwww.peachtreeaudio.com
periodically for additional tips and articles.
Interested in the Green Movement?
• The nova meets European RoHS standards for non-hazardous metals
• The nova draws less than half a watt of power in standby mode
• The internal power amplifier is set to minimize power consumption when headphones
are used
• We are committed to continue exploring additional methods for making our products
even more environmentally friendly
USEFUL TIPS
Page 18
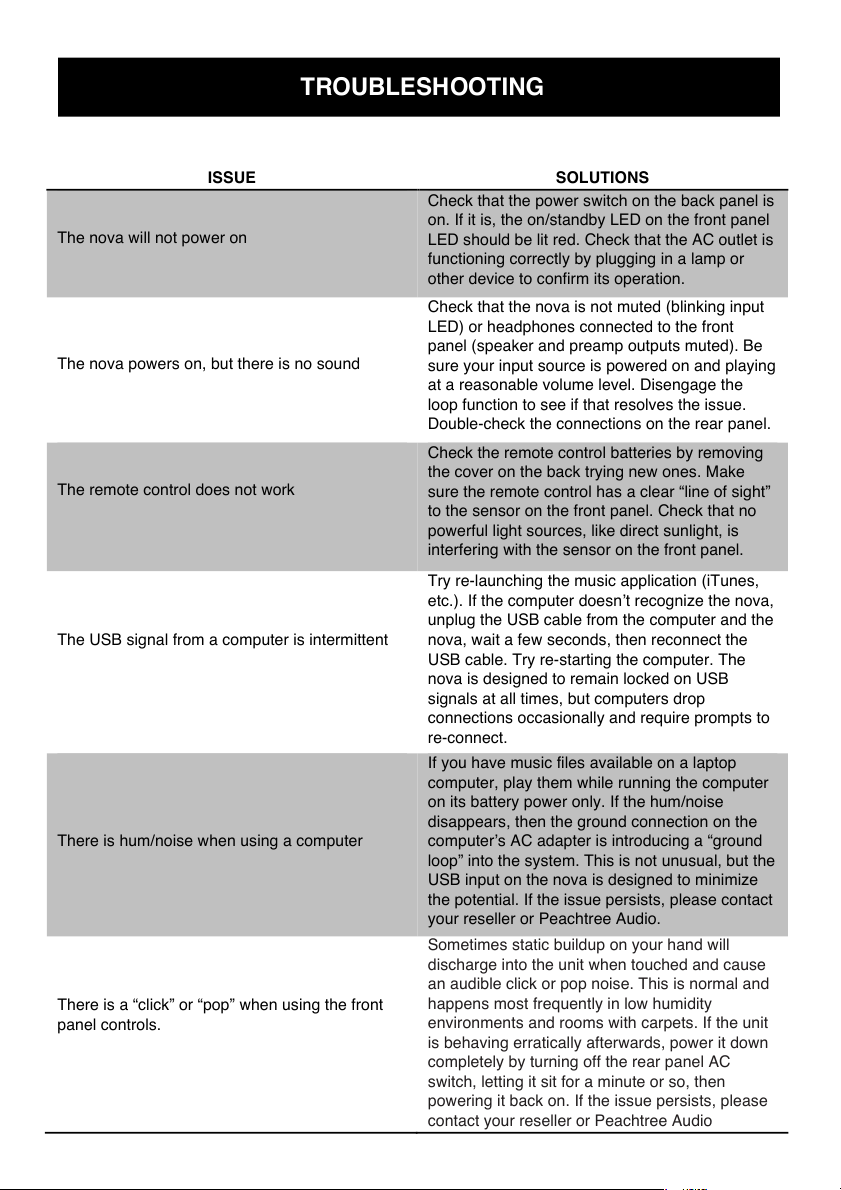
ISSUE
SOLUTIONS
The nova will not power on
Check that the power switch on the back panel is
on. If it is, the on/standby LED on the front panel
LED should be lit red. Check that the AC outlet is
functioning correctly by plugging in a lamp or
other device to confirm its operation.
The nova powers on, but there is no sound
Check that the nova is not muted (blinking input
LED) or headphones connected to the front
panel (speaker and preamp outputs muted). Be
sure your input source is powered on and playing
at a reasonable volume level. Disengage the
loop function to see if that resolves the issue.
Double-check the connections on the rear panel.
The remote control does not work
Check the remote control batteries by removing
the cover on the back trying new ones. Make
sure the remote control has a clear “line of sight”
to the sensor on the front panel. Check that no
powerful light sources, like direct sunlight, is
interfering with the sensor on the front panel.
The USB signal from a computer is intermittent
Try re-launching the music application (iTunes,
etc.). If the computer doesn’t recognize the nova,
unplug the USB cable from the computer and the
nova, wait a few seconds, then reconnect the
USB cable. Try re-starting the computer. The
nova is designed to remain locked on USB
signals at all times, but computers drop
connections occasionally and require prompts to
re-connect.
There is hum/noise when using a computer
If you have music files available on a laptop
computer, play them while running the computer
on its battery power only. If the hum/noise
disappears, then the ground connection on the
computer’s AC adapter is introducing a “ground
loop” into the system. This is not unusual, but the
USB input on the nova is designed to minimize
the potential. If the issue persists, please contact
your reseller or Peachtree Audio.
There is a “click” or “pop” when using the front
panel controls.
Sometimes static buildup on your hand will
discharge into the unit when touched and cause
an audible click or pop noise. This is normal and
happens most frequently in low humidity
environments and rooms with carpets. If the unit
is behaving erratically afterwards, power it down
completely by turning off the rear panel AC
switch, letting it sit for a minute or so, then
powering it back on. If the issue persists, please
contact your reseller or Peachtree Audio
TROUBLESHOOTING
Page 19
International Warranty
Peachtree Audio warrants this product for two (2) years, parts and labor, from the
original date of purchase from an authorized Peachtree Audio re-seller. If you
register your product online at www.peachtreeaudio.com/support/product-
registration.html/, the warranty is extended to three (3) years, parts and labor.
Peachtree Audio reserves the right to refuse any warranty claims if coverage
cannot be verified by a valid proof of sale or serial number.
Peachtree Audio assumes no responsibility for product failures caused by
accident, neglect, misuse, modification or unauthorized repair.
Warranty does not cover shipping costs.
Visit www.peachtreeaudio.com for complete warranty details.
Repair Process
In the event that a product fails, please repack it in its original carton and contact
an authorized Peachtree reseller for further instructions. If the reseller is unable to
assist, please contact Peachtree Audio directly at service@peachtreeaudio.com
or +1-704-391-9337 to obtain a Return Authorization (RA) number prior to
shipping the product.
Any products received without an RA number may be misdirected and repair
delayed.
If a RA number is issued by Peachtree Audio, please ship the product using
FedEx or UPS. Do not ship using a Postal Service.
Peachtree Audio assumes no responsibility for products in transit. Please insure
the shipment for the product’s replacement value in the unlikely event it is lost,
stolen or damaged in transit.
US Shipping Address:
Peachtree Audio
2045 120th Avenue N.E.
Bellevue, WA 98005
USA
RA#
www.peachtreeaudio.com
WARRANTY AND REPAIR
Page 20
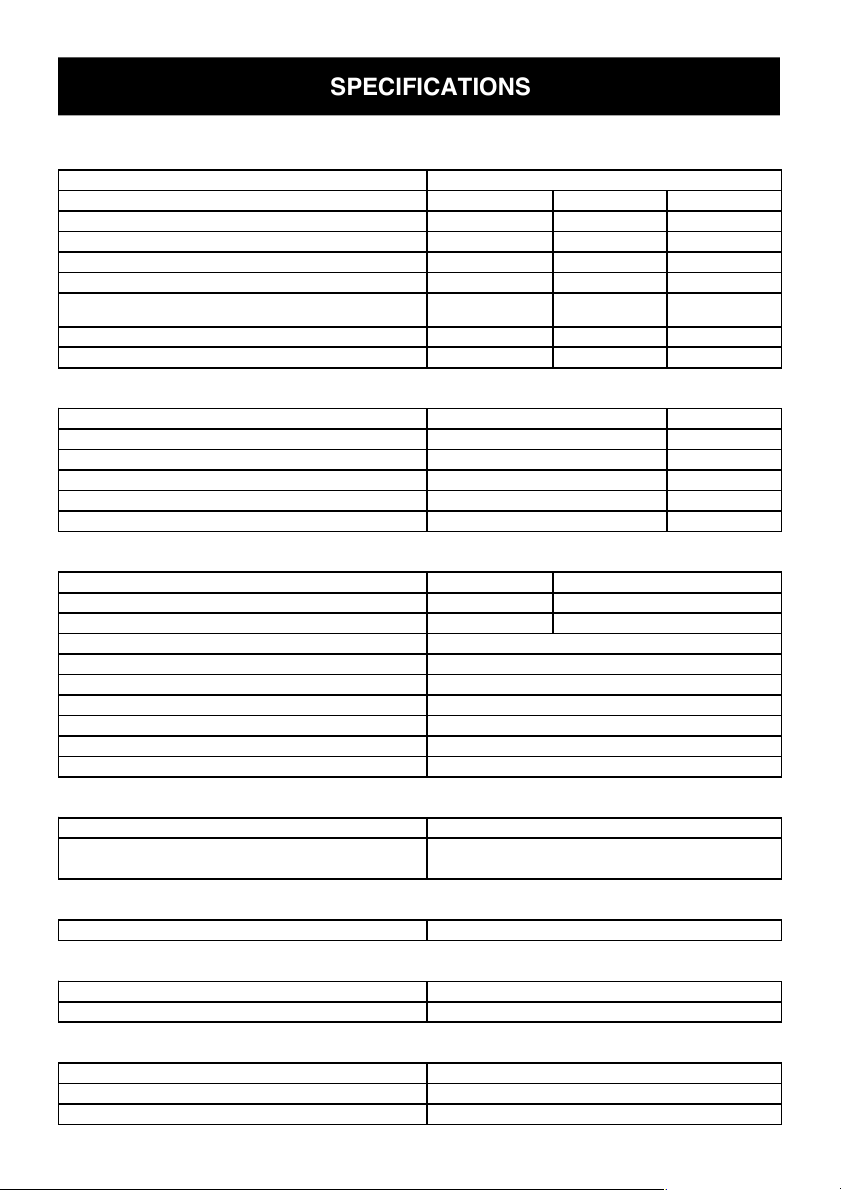
SPECIFICATIONS
SPEAKER OUTPUT
nova150 nova300 nova500
>80dB below
fundamental
COAX and OPT Inputs
Compatible Speakers
Output Power (WPC, 8Ω | 4Ω, 1% THD+N, AES17) 150 | 250 350 | 700 600 | 1200
Dynamic Range (A-weighted) 105dB TBD TBD
Damping Factor (1kHz, 8Ω) 700 TBD TBD
Damping Factor (1kHz, 4Ω) 350 TBD TBD
Frequency Response (20 - 20kHz) <+/-0.1dB TBD TBD
Inter-Modulation Distortion (TBD)
Total Harmonic Distortion (AES17, 1kHz, 4Ω) 0.008% TBD TBD
Channel Separation (1kHz, 8Ω) >90dB TBD TBD
PREAMP OUTPUT
Output Voltage (rms) TBD
Output Impedance TBD
Signal-to-Noise Ratio (Analog | Digital Source, un-weighted) TBD
Channel Separation (1kHz) TBD
Frequency Response (Analog | Digital Source, 8Hz-20kHz) TBD
Total Harmonic Distortion (2V rms, 1kHz, un-weighted) TBD
HEADPHONE OUTPUT
Output Power (32Ω, rms | peak) 755mW | 1660mW
Output Power (300Ω, rms | peak) 130mW | 275mW
Output Power (600Ω, rms | peak) 64mW | 135mW
Output Impedance
Signal-to-Noise Ratio (Analog | Digital Source, un-weighted)
Dynamic Range (Analog | Digital Source, un-weighted)
Channel Separation (1kHz)
Frequency Response (Digital source, 8Hz-20kHz)
Frequency Response (Analog source, 8Hz-100kHz)
Total Harmonic Distortion (2V rms, 1kHz, un-weighted)
111dB | 105dB
>120dB at 1kHz
<0.1dB | <0.5dB
2.5-16Ω
TBD TBD
3.8V
100Ω
0.0003%
1200mW | 2770mW
330mW | 700mW
170mW | 350mW
1Ω
107dB | 106dB
107dB | 100dB
>120dB at 1kHz
<0.5dB
<0.1dB
0.0003%
USB-B Input
Formats
PCM Sampling Rate and DSD Frequency Rate
Formats
AUX Inputs
Maximum Voltage (rms | peak-to-peak)
Impedance
PHONO Input
Maximum Input Voltage (rms)
Impedance
RIAA EQ
PCM and DSD
16-32 Bit, 44.1-384kHz PCM
2.8224-5.6448MHz DSD
16-24 Bit, 44.1-192kHz PCM
3.5V | 10V
100kΩ
120mV
47kΩ
No rumble filter used
Page 21
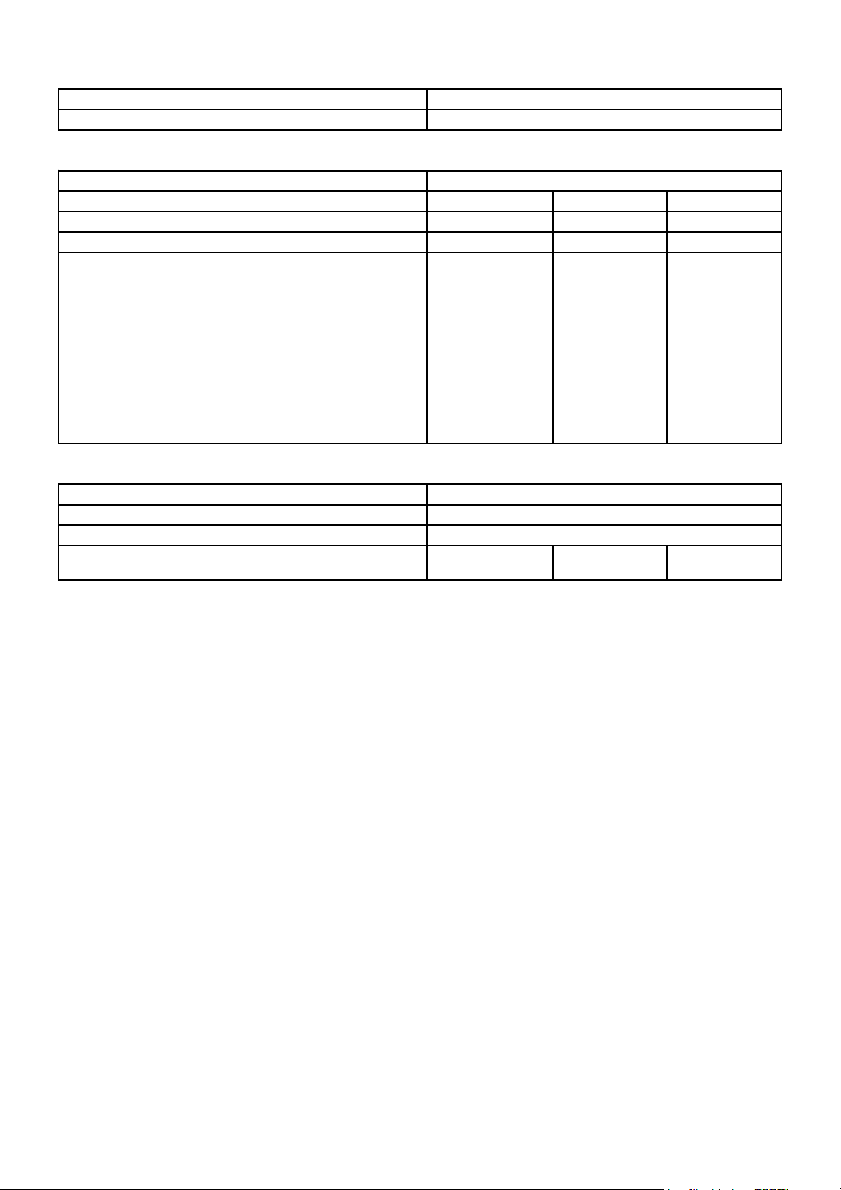
SPEAKER OUTPUT nova150 nova300 nova500
Compatible Speakers
Output Power (WPC, 8Ω | 4Ω, 1% THD+N, AES17) 150 | 250 350 | 700 600 | 1200
Dynamic Range (A-weighted) 105dB TBD TBD
Damping Factor (1kHz, 8Ω) 700 TBD TBD
Damping Factor (1kHz, 4Ω) 350 TBD TBD
Frequency Response (20 - 20kHz) <+/-0.1dB TBD TBD
Inter-Modulation Distortion (TBD)
>80dB below
fundamental
TBD TBD
Total Harmonic Distortion (AES17, 1kHz, 4Ω) 0.008% TBD TBD
Channel Separation (1kHz, 8Ω) >90dB TBD TBD
PREAMP OUTPUT
Output Voltage (rms) TBD
Output Impedance TBD
Signal-to-Noise Ratio (Analog | Digital Source, un-weighted) TBD
Channel Separation (1kHz) TBD
Frequency Response (Analog | Digital Source, 8Hz-20kHz) TBD
Total Harmonic Distortion (2V rms, 1kHz, un-weighted) TBD
HEADPHONE OUTPUT
Output Power (32Ω, rms | peak) 755mW | 1660mW
Output Power (300Ω, rms | peak) 130mW | 275mW
Output Power (600Ω, rms | peak) 64mW | 135mW
Output Impedance
Signal-to-Noise Ratio (Analog | Digital Source, un-weighted)
Dynamic Range (Analog | Digital Source, un-weighted)
Channel Separation (1kHz)
Frequency Response (Digital source, 8Hz-20kHz)
Frequency Response (Analog source, 8Hz-100kHz)
Total Harmonic Distortion (2V rms, 1kHz, un-weighted)
USB-B Input
Formats
PCM Sampling Rate and DSD Frequency Rate
COAX and OPT Inputs
Formats
AUX Inputs
Maximum Voltage (rms | peak-to-peak)
Impedance
PHONO Input
Maximum Input Voltage (rms)
Impedance
RIAA EQ
Loop Output and Input
15 lbs (19 lbs)
6.8 kg (8.6 kg)
111dB | 105dB
<0.1dB | <0.5dB
>120dB at 1kHz
<0.1dB
1Ω
107dB | 106dB
107dB | 100dB
<0.5dB
>120dB at 1kHz
47kΩ
120mV
No rumble filter used
3.5V | 10V
100kΩ
16-32 Bit, 44.1-384kHz PCM
2.8224-5.6448MHz DSD
16-24 Bit, 44.1-192kHz PCM
PCM and DSD
3.8V
0.0003%
2.5-16Ω
100Ω
0.0003%
1200mW | 2770mW
330mW | 700mW
170mW | 350mW
Maximum Voltage (rms | peak-to-peak)
Impedance (input | output)
AC Power
AC Input
Maximum Power Consumption 400W TBD TBD
On Mode (Idle) Power Consumption 15W TBD TBD
Standby Mode Power Consumption <0.5W TBD TBD
100-120VAC: 6.3
A/250V
IEC time lag
high breaking
capacity
Fuse
220-240VAC:
3.15A/250V
IEC time lag
enhanced breaking
capacity
Physical
Height (including feet)
Width
Depth (including volume knob and speaker binding posts)
Weight (shipping)
3.5V | 10V
100kΩ | 100Ω
100-240VAC, 50/60Hz
TBD TBD
111 mm | 4.37 inches
356 mm | 14.02 inches
336.55 mm | 13.25 inches
TBD TBD
Final nova150 specications
Preliminary nova300 and nova500 specications
All specications subject to change without notice
Page 22
 Loading...