


User Manual
Benutzerhandbuch
XSeries

Announcements | Hinweise
Copyright | Urheberrechte
Pe2M © 2017. All rights reserved. |
Copyright notice
Users must comply with the copyright regulations applicable in their own country. This manual must not be reproduced,
translated, photocopied, transmitted or any kind to be duplicated in whole or in part, for any reasons and by any
electronic or mechanical means whatsoever without the express a written consent of Pe2M. All the information
contained in this document is subject to changed without prior notice. Pe2M cannot be held liable for any errors that
may be found in this manual, or for any loss or damage arising accidentally or as a result of the use of this manual.
Hinweis zum Urheberrecht
Nutzer sind für die Einhaltung der in ihrem Land geltenden Urheberrechtsgesetze verantwortlich. Diese Bedienungsanleitung darf nicht ohne unsere schriftliche Zustimmung reproduziert, übersetzt, fotokopiert, übermittelt oder in
irgendeiner Weise ganz oder teilweise, mechanisch oder elektronisch dupliziert werden. Alle Informationen, die in
dieser Bedienungsanleitung enthalten sind, können ohne Ankündigung geändert werden.
Knowing your new printer
We thank you for choosing the 2X Series card printer. Please ensure to use the original consumables from Pe2M.
Please take time to read through this carefully and complete the installation before start operating. This will save
you time during installation and use, help you to understand more about this printer and its features.
Lernen Sie Ihren neuen Plastikkartendrucker kennen
Vielen Dank, dass Sie sich für den Kauf eines Pe2M 2X Series Plastikkartendruckers entschieden haben. Stellen Sie
durch die Verwendung des originalen Pe2M-Verbrauchsmaterials sicher, dass Ihr Plastikkartendrucker lange unter
optimalen Bedingungen genutzt werden kann. Bitte nehmen Sie sich die Zeit, diese Kurzanleitung sorgfältig und vollständig zu lesen, bevor Sie mit der Installation beginnen. Diese Vorgehensweise spart Zeit während der Installation
und dem Betrieb und hilft Ihnen, Ihren Drucker und seine Funktionen besser kennenzulernen.
Assistant Icons | Markierung "wichtiger Hinweise"
The following assistant icons will show up in this guide to indicate important information to be noticed.
Die folgenden Icons markieren wichtige Hinweise, die Sie unbedingt lesen und befolgen sollten.
Alle Rechte vorbehalten.
Special warning notice More in-depth information notice
Wichtige Warnhinweise Tiefergehende Information(en)
1

Contents | Inhalt
Announcements, Knowing your new printer 01
Contents 02
Chapter 1. Getting ready
1.1 Checking box contents 03
1.2 Appearance of the printer and key functions 04
1.3 Printer driver installation 06
1.3 Print Settings 06
1.5 Ribbon Installing 07
1.6 Printer Connecting 08
Chapter 2. Start Printing
2.1 Card Loading 09
2.2 Collecting 10
2.3 Adjusting 10
2.4 Printing positions 11
Chapter 3. Printer maintenance
3.1 General warranty information notice announcement 12
3.2 Routine / Regular printer cleaning 12
3.3 Using cleaning card 13
3.4 Using dust arrester 14
3.5 Cleaning TPH (Thermal Print Head) 15
Chapter 4. Help diagnosis
4.1 Warnings / Error messages and diagnosis 16
4.2 LCM control panel 16
4.3 Control panel warning messages 17
4.4 Printing problems 18
4.5 Card jams 19
Technical Specifications 20
Hinweise, Lernen Sie Ihren neuen Plastikkartendrucker kennen 01
Inhalt 02
Kapitel 1. Vorbereitung
1.1 Lieferumfang 21
1.2 Druckerbeschreibung/Hauptfunktionen 22
1.3 Druckertreiber installieren 24
1.4 Druckereinstellungen 24
1.5 Einlegen des Farbbandes 25
1.6 Anschluss des Druckers 26
Kapitel 2. Drucken
2.1 Karten einlegen 27
2.2 Kartenausgabe 28
2.3 Einstellung der Kartenstärke 28
2.4 Druckpositionen 29
Kapitel 3. Druckerwartung
3.1 Wichtige Informationen zur Herstellergarantie 30
3.2 Intervalle/Vorgaben zur regelmässigen Druckerreinigung 30
3.3 Verwendung der Reinigungskarte 31
3.4 Verwendung der Reinigungsrolle 32
3.5 Reinigung des Druckkopfes 33
Kapitel 4. Hilfe/Fehlersuche/Diagnose
4.1 Warnungen / Fehlermeldungen und Diagnose 34
4.2 Kontrollanzeige/Bedientasten 34
4.3 Kontrollanzeige/Warnmeldungen 35
4.4 Druckprobleme lösen 36
4.5 Kartenstau beheben 37
Technische Spezifikationen 38
2

Chapter 1. Getting ready
1.1 Checking box contents
The different 2X Series Card Printers are supplied with several accessories. Please do take time to check them closely.
The accessories contents list may vary depending on your printer type.
If any of below item is missing, please contact your nearest customer support facility of your local card printer distributor.
Accessories provided with your 2X Series card printer:
3
Card output hopper Weight module USB cable Power adaptor
Power cord Master CD Dust arrester
Card input hopper
(not with 2Xpress/2XCR100)
with cleaning roller
Cleaning kit
User manual
Crystal Rod
(not with 2Xpress)
Screw Driver
(not with 2Xpress)

1.2 Appearance of the printer and key functions
Top cover opening lever
Card output hopper
2Xpress
Card input hopper
2Xpress
Manual releasing card
jam screw socket
(flathead screwdriver)
Spec. label
Card output hopper
2XL, XCR100, 2Xtended
LCM control panel
Card input hopper
2XL, 2Xtended
Smart IC encoding
expansion socket
(Optional)
Ethernet
expansion socket
(Optional)
Power socket
ON / OFF
hard power
switch button
USB cable
connection
socket
4

Chapter 1. Getting ready
Thermal print head
Ribbon spool fitting position
(color coded)
Ribbon ID key socket
Card thickness adjustor
LED for print positioning
(2XL and 2XCR100)
Dust arrester socket
5
1.3 Printer driver installation
To begin installing a print driver, please insert the CD into your computer* and select the printer driver menu.
A program will start and guide you through the entire configuration and settings process step by step.
Please refer to printer connecting section for USB connecting procedure in this user guide for more details.
Some version of Microsoft Windows may require the user to have administration rights to install the driver.
After completing the driver installation, connect the USB cable to your printer.
* Or download the latest Driver
version from our website.
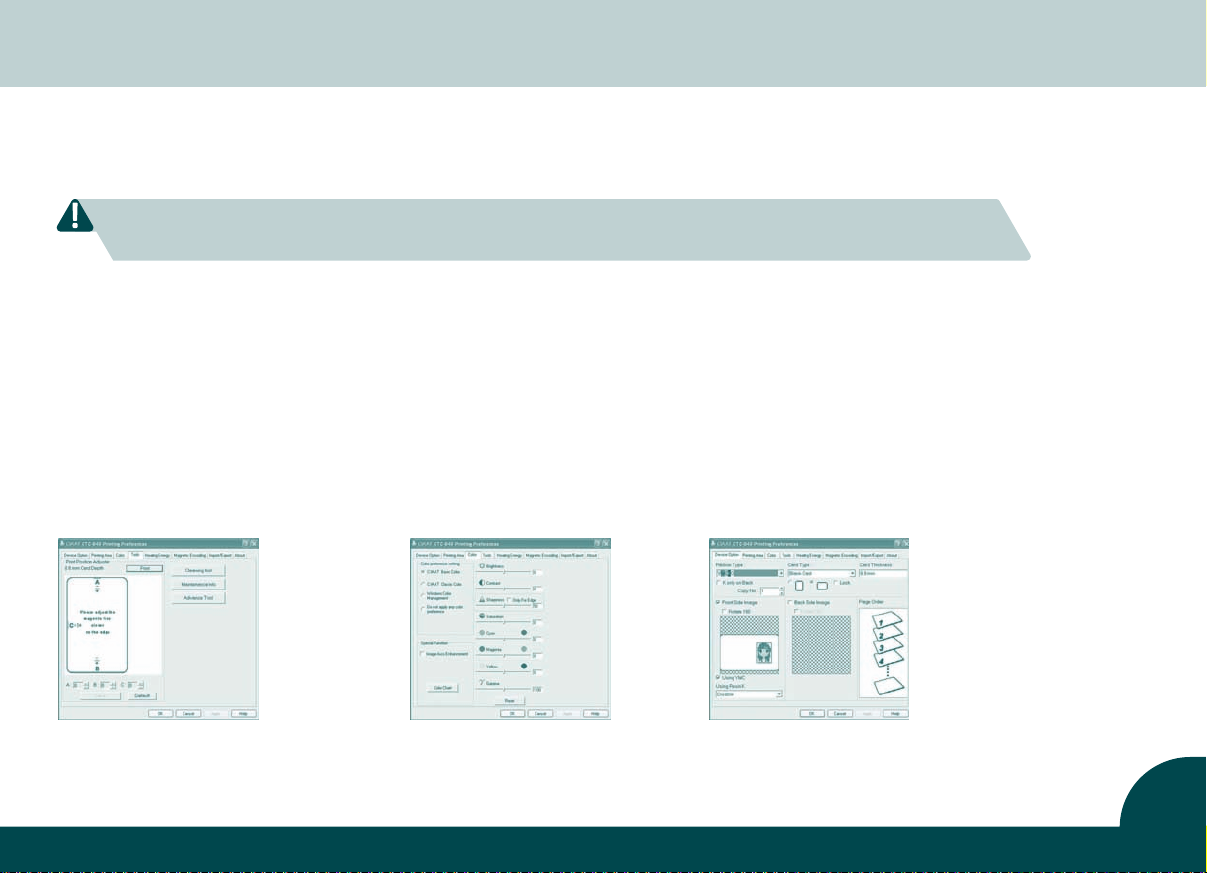
1.4 Print settings
The settings of the driver can be accessed from the following instructions:
•
From the Start button (located bottom-left on the Windows task bar), select “Printers and Faxes”
• Select your CIAAT CTC-940 card printer and then follow by a click on right button of the mouse
• From the Printer menu, select “Printing Preference”
• A pop up configuration screen for the card printer appears
• The main menu tabs include Device Option, Printing Area, Color, Tools, Heating Energy, Magnetic Encoding, Import/Export & About
The most frequent use in print settings are Device Option, Color and Tools.
Device Option Tab Color Tab Tools Tab
• Ribbon type • Front & back image • Color preference setting • Printer position adjuster • Advance option
• Card type • Page order • Special function • Cleaning tool option • Heating energy option
• Card thickness • Using Resin K • Color adjustment • Maintenance info
6
Chapter 1. Getting ready
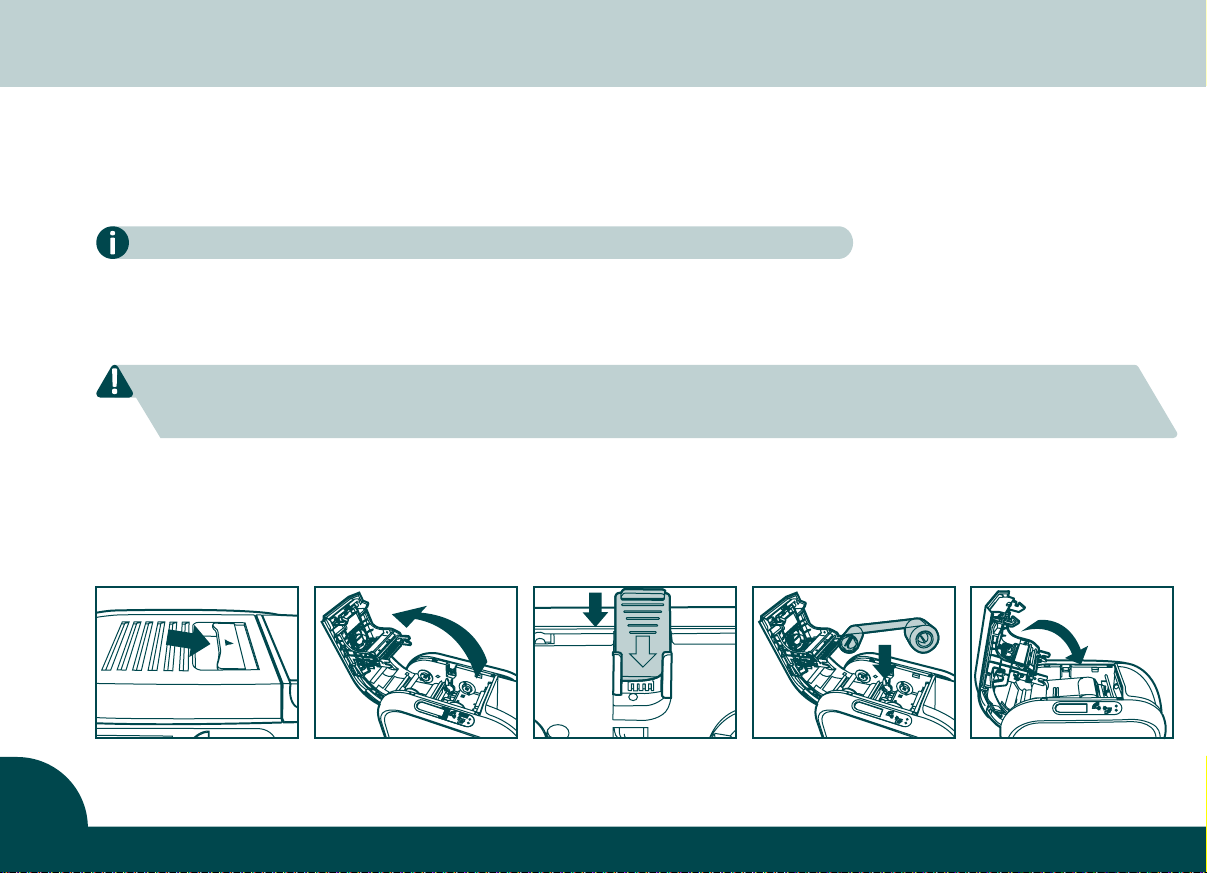
1.5 Ribbon Installing
Using the original 2X Series Card Printer Ribbon consumables will optimize your printer’s performance and avoid
causing damages to it. Use of non Pe2M original consumables will void the manufacturer’s warranty policy for
the printer.
To optimize printing quality, please clean the printer every time the ribbon is changed.
Open the top cover.
a.
b. Place the ribbon ID key into ID key socket.
c. Insert the ribbon as shown.
Please ensure your ribbon format corresponds to the installed ribbon ID key.
Please make sure your ribbon film is facing top side during installation and also ensure the color of ribbon spool/core is
matching to the ribbon adapter/holder (blue to blue / orange to orange).
d. Close the top cover slowly and press until a click sound is heard.
a b c d
7
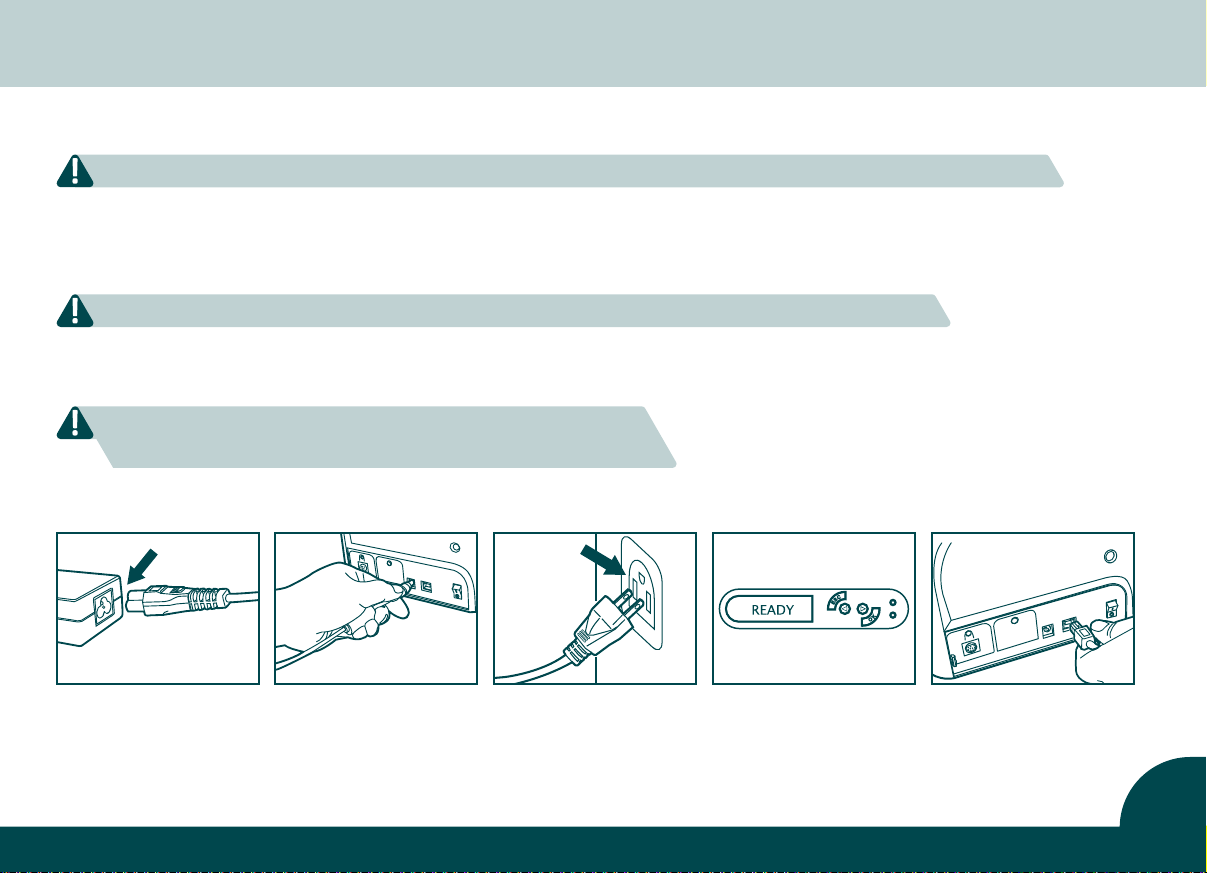
1.6 Printer Connecting (Power & USB)
Please make sure the print driver software is fully installed before connecting the USB cable to your printer device.
Power
Connect power cable to power adaptor, then plug the power connector to printer’s power socket.
a.
b. Plug the power plug to an earthed power socket.
Please make sure the power plug is connected into a properly protected and earthed electrical source.
c. Switch ON from the ON/OFF button to power up the printer, then the LCM control panel should light up
and display “ready” message which indicates the printer is under working condition.
For your own safety, please make sure the power cable is always
unplugged before attempting any service maintenance work.
a b c USB
USB
Refer to the print driver installation section at Chapter 1.3 on page 6 of this user guide for more details, and
follow the instructions carefully.
8
Chapter 2. Start printing
2.1 Card Loading
Loading (Automatic)
For optimum printing quality, please ensure all cards are the exact width of the printer specs.
Please do not touch the printable surface and do not use any dusty, damaged, folded or embossed cards in your printer.
a. Place card input hopper. | 2Xpress: open card input hopper.
b. Place the cards into card input hopper.
c. Place the weight module upon the top laying card. | 2Xpress: Close card input hopper.
a b c
9
2.2 Collecting
When the printing and/or encoding cycle is completed, the printed
and/or encoded card will be will be moved into the output hopper,
which can hold up to 50 0.8 mm cards.
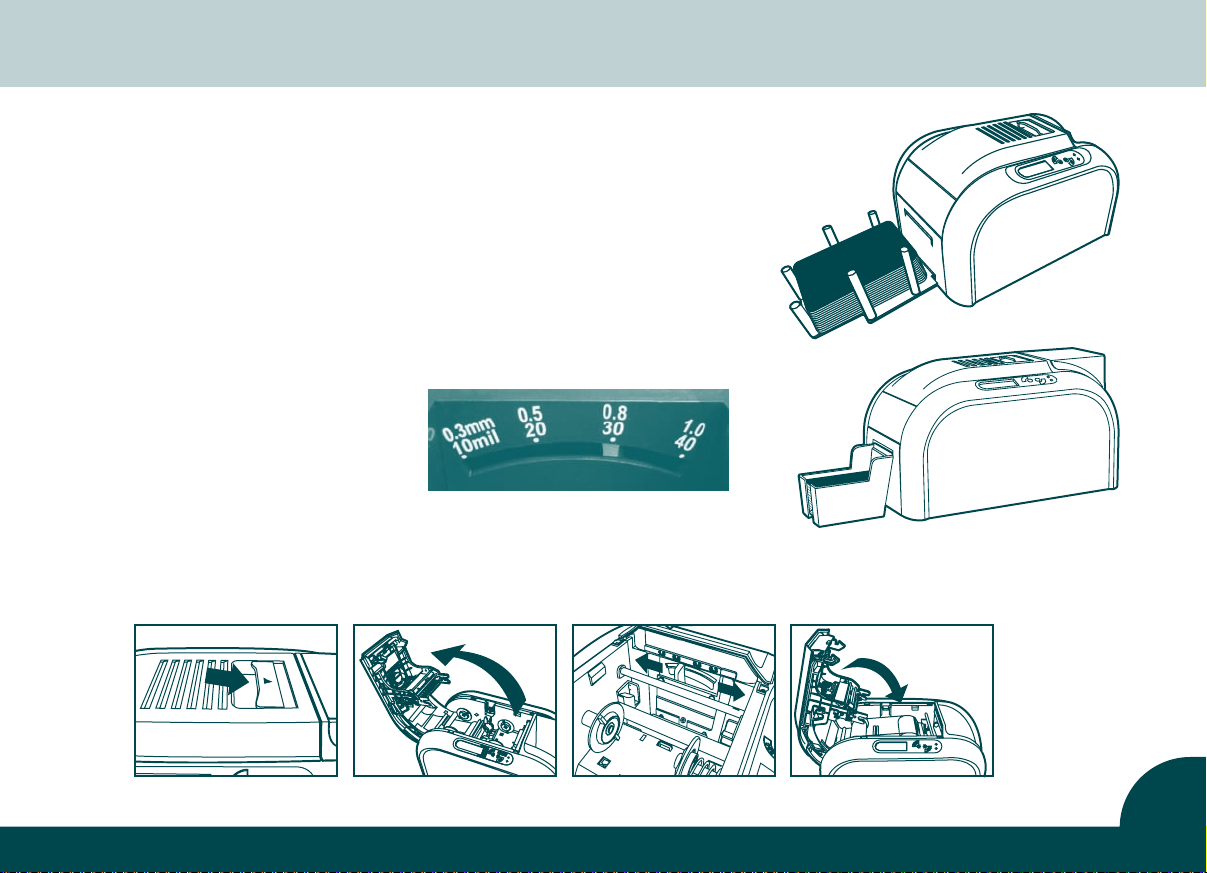
2.3 Adjusting
The printer has a manual adjustable card thickness mechanism which
is located inside the printer unit when the top cover is open.
The thickness level accepts from 0.3mm to 1.0mm, and the factory
setting is at 0.8mm.
a. Open the top cover.
b. Adjust the thickness level by
moving the lever from left to
right to the preferred thickness
setting.
c. Close the top cover.
a b c
Card thickness adjustor
10

Chapter 2. Start printing
2.4 Printing positions for 2XL and 2XCR100 versions
There are three selectable positions of the 85.6 x 53.98 mm printing
area on the XXL cards and two positions on the CR100 cards.
You can select the printing position by pressing the button inside the
printer near the card inlet next to an LED with the crystal rod as shown.
First hold the button until the LED blinks, then press shortly until the required colour appears and release the button immediately. The LED will
blink some more times and then stop. The position is now saved.
The colour of the LED displays the printing position as following:
2XL-Printers
Blue: central position with 140 mm / 5,51 “ card length
Green: central position with 124 mm / 4,88 “ card length
Red: bottom or top position with both card lengths
2XCR100-Printers
Green: central position
Red: bottom or top position
Central
Position
at 140 mm
card lenght
Bottom
Position
Top
Position
Central
Position
Central
Position
at 124 mm
card lenght
Top Position
at
124/140 mm
card lenght
Bottom
Position
at
124/140 mm
card lenght
11
possible printing positions on CR100 cards
possible printing positions on XXL cards

Chapter 3. Printer maintenance
3.1 General warranty information notice announcement
The 2X Series card printers are professionally designed to operate with minimum regular maintenance.
Therefore please do comply with the instructions given in below to ensure your printer unit is covered by
warranty condition.
IT’S IMPORTANT TO STAY COVERED BY YOUR WARRANTY
Any failure of the following required servicing and maintenance job
duties mentioned in this chapter may void the print head warranty.
he thermal print head (TPH) is an extremely sensitive as well as a wearing and tearing component. The life
T
expectancy is heavily depending on the presence of solids, dust or liquids in the environment, either on the print
head or cards. The frequency and quality of the cleaning and maintenance will not only extend the print head’s
life expectancy, but also maintain the output printed quality.
Use of non Pe2M original consumables/ribbons may affect the quality and reliability of print job, low quality
printed output and may also affect the printer’s physical functions. The manufacturer’s warranty does not cover
any physical damages, quality problems and print head warranty when using non Pe2M original consumables/ribbons.
3.2 Routine / Regular printer cleaning
Cleaning is required after 400 card sides have been printed.
Proactive reminder of cleaning is given by the driver, and it is required
to go with the instruction, or else the warranty on TPH may be invalid.
12

Chapter 3. Printer maintenance
3.3 Using cleaning card
Each pack/box of an 2X Series printer original consumables contains one single piece of cleaning card.
a
. Remove any remaining cards from input card feeder.
b. Remove protection film from the cleaning card and then place it in the middle of the card input hopper.
c. Go to print settings in the driver, and access Printing Preference. Choose tab Tools, then apply Cleaning Tool.
a b c
13

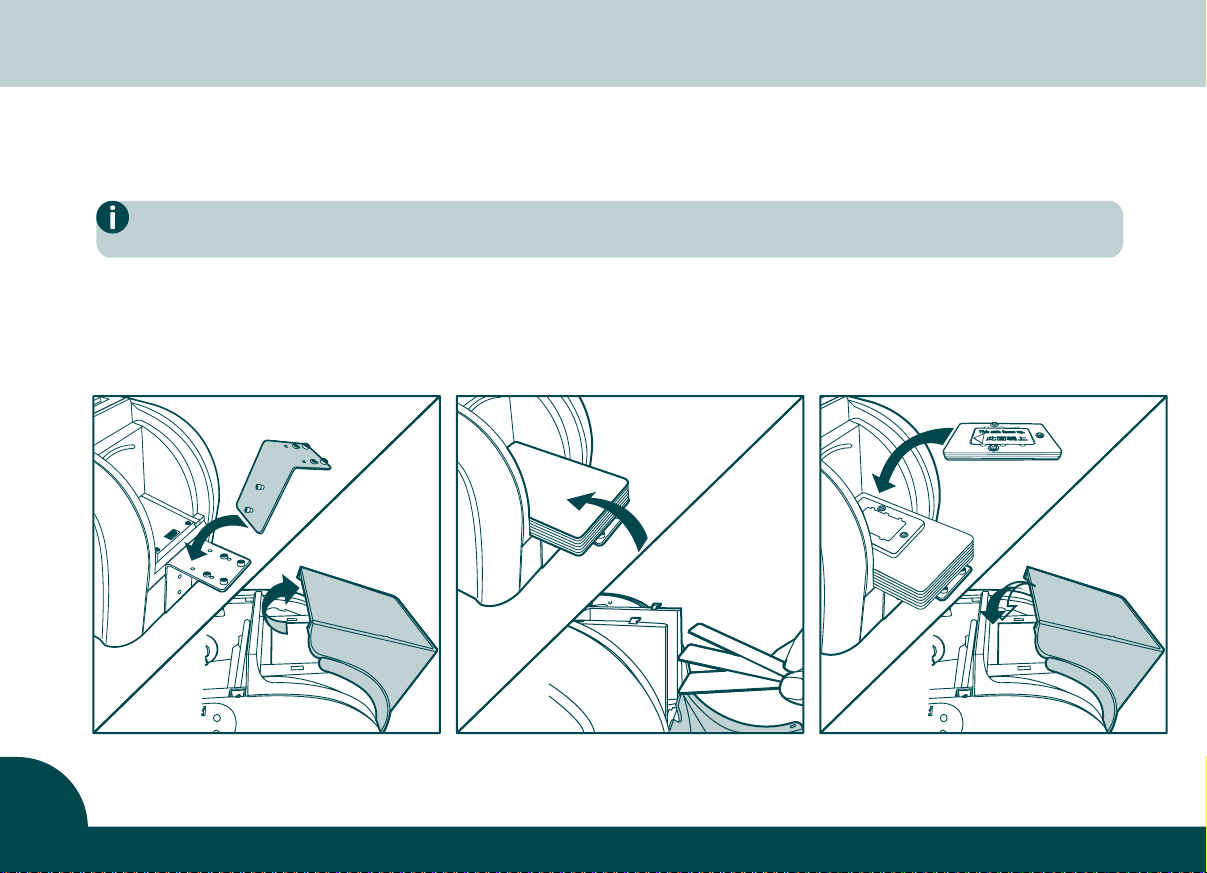
3.4 Using dust arrester
Each pack/box of an 2X Series printer original consumables contains a dust arrester (with cleaning roller).
If first to use... a. Take the dust arrester with cleaning roller from the accessory box of printer carton.
b. Remove adhesive film protection from the cleaning roller, and then put dust arrester into the printer.
If need to change cleaning roller of dust arrester:
used
Open the cover gently
new
Put the metal shaft into
new cleaning roller
Take dust arrester from printer
Assembly the roller and dust
arrester
Remove used cleaning roller
Remove adhesive film protection from cleaning roller
Place dust arrester back
to the printer
14

Chapter 3. Printer maintenance
3.5 Cleaning TPH (Thermal Print Head)
Please unplug the power cable from printer before start doing TPH cleaning process.
Try not to make any direct physical contact to TPH with any metal/sharp objects or your fingers.
The TPH and its components must be kept away from any discharge of static electricity.
In order to maintain original print out quality, it is highly recommended
to perform this process every time when a ribbon is changed.
a. Lift opening lever to open cover gently. The TPH is attached under the cover.
b. Please use the sponge stick to clean the TPH.
a
b
15

Chapter 4. Help Diagnosis
4.1 Warnings / Error messages and diagnosis
The 2X Series card printers are designed to get user involvement down to a minimum level. It is advised to gain
some familiarity with basic warning messages knowledge during the operation.
4.2 LCM control panel
Basic descriptions
The printer is equipped with a LCD display with four buttons to give the access to printer menu and two LED
lights to show conditional status. All printing status and warning/error messages will be displayed in this LCD
screen.
Return to home page
Page switch Enter / Set / Confirm
Page switch
Green Light / Normal status
Red Light / Error status
16

Chapter 4. Help Diagnosis
4.3 Control panel warning messages
Messages Displayed
Cover Open
IC Chip Missing
Ribbon Missing
Ribbon Mismatch
Ribbon Type Error
Ribbon Out
Print Fail
Card Out
Cam Error
Ribbon Error
Description Solutions
Top cover door is opened
Ribbon IC chip is not inserted
Ribbon is not installed
Installed ribbon does not match with ribbon IC chip ID
Unsupported ribbon type
Failing to searching ribbon
End of ribbon usage
Fail to start printing process
Card runs out
Inconsistency between card thickness adjustor and card used
Adsorption force among cards
Internal mechanical cam platen error
Ribbon’s IC chip error
Close the top cover door.
Install ribbon IC chip into printer’s IC chip socket.
Install ribbon with corresponded IC chip into printer.
Check ribbon type and install the corresponded IC chip.
Check ribbon’s region code with matching printer’s region code.
Reinstall the ribbon again with correct installation procedure.
Reinstall a new ribbon with IC chip.
Check the ribbon to see if it’s snapped.
Place more cards with card’s weight module.
Get the setting of adjustor and card used consistent.
Move cards apart and then arrange them to input hopper for retry.
Contact your local service center for professional advice.
Reinsert IC chip again or change a new IC chip if it´s required.
17

4.4 Printing problems
• Check the printer driver to see if it is truly, well installed
Nothing in action
Printed a blank card
Partial or incorrect printing
Printed some small blemishes
Printed horizontal white lines
Printed vertical white lines • TPH may be impaired. Contact the distributor or dealer nearest to you for help
Printed blurred images
• Check the printer power supply and USB cable
• Check the ribbon and card
• Print a demo chart
• Check the ribbon
• Check value A setting of “Printing Area” in the driver. To define value A as default to retry
• Check the card to see if it carters to the printers specification
• Check the printer settings
• Check the interface cable and ribbon
• Make sue the printer’s cleaning roller is clean
• Check the printing card is clean
• Check the print head
• The card surface may be dirty or work on cleaning via dust arrestor
• Print head clogged
• Check the roller of dust arrester to see if there’s need to replace it
• Check, if ribbon is fitted correctly
• Check, if printhead is dirty or damaged
• Check the ribbon to see if is fitted correctly
• Check the print head to see if there’s need to do the cleaning
• Check the cleaning roller of dust arrester to see if there’s need to replace i
• Check, if card is compatible or not
t
18

Chapter 4. Help Diagnosis
4.5 Card jams
With 2Xl printers do not open the top cover! Instead please remove the
jammed card by the following instruction displayed on LCM control panel
of the printer before continuing the printing job.
• Do not open the printer cover.
• Turn the screw on the backside of the printer clockwise until the
card comes out.
• Now open the printer cover.
• Follow the instruction on the LCM control panel with three options:
Auto removal, Semi-auto removaland Manual removal.
Opening the top cover by force will result in severe printer damage.
Twist clockwise
19
During semi-auto removal and manual removal process,
please do not put your hands into the card printer.
You can also perform the following steps to prevent card jams:
• Do not print a card twice!
• Check the card thickness settings is correctly adjusted from the printer driver option and thickness gauge.
• Check the card thickness is fitted under specified specification in this manual.
• Check the cards are flat in horizontal position.
• Check the cards are not stuck together, and shuffle cards is required before loading.
Flathead
screwdriver

Technical Specifications
General Technical Features • Color printing module, 300dpi print head
• USB connection, Ethernet TCP/IP connection as an optional module (Availability to be updated)
• 32MB RAM / 1MB Flash
• 4 buttons and 2 LED control panel
Printing Modes
Performance
(various from card design & settings)
Operating Systems • Windows 2000, XP, Vista, Windows 7, 8, 10 (32/64-bit), Mac OS 10.5-10.8
Ribbon Types
Options
(Easy Add Modules)
Card formats
General Information
• Color sublimation and monochrome thermal transfer
• A.I smart ribbon saving for monochrome printing
• Color: 1 side (YMCKO) = around 20 sec (under lab testing environment)
• Monochrome: 1 side = 5 sec
• YMCKO (200 prints, 400 prints 2Xpress and 2Xtended only)
• K (2000 prints)
• Further monochrome ribbons with the colors white, blue, red, green, silver, gold
• Contactless/RFID encoding module (ISO 14443A, B, ISO 15693, Mifare, DesFire, VHF)
• Ethernet connection module
• 2Xpress: CR80 / ISO 7810 85.6 x 53.98 mm (2.125 x 3.375 “)
• 2Xtended: CR80 / ISO 7810 85.6 x 53.98 mm (2.125 x 3.375 “),
variable lengths of 85.6 to 140 x 54 mm (3.38 to 5.51 x 2.16 “)
• 2XCR100: CR100 98.5 x 67 mm (2.63 x 3.88 “)
• 2XL: 124 x 88 mm (4.88 x 3.46 “) and 140 x 88 mm (5.51 x 3.46 “)
• Card types /thickness: PVC cards from 0.25mm to 1.0mm (10mil~40mil)
• Hoppers: input: 50 cards (0.8mm/30mil), output: 50 cards (0.8mm/30mil)
• Dimensions without hoppers: 197.8mm (W) x 354mm (L) x 204mm (H), Weight: 4.9kg
• Connections: USB port, Ethernet TCP/IP port as an option (Ethernet 10/100 Mbps)
• Power supply: AC input: 100~240V~2.5A, 50~60Hz / DC output: 24V = 4.16A
• Operating environment: +15ºC to +32ºC / 20% to 85% RH (without condensation)
• Storage environment: -20ºC to +60ºC / 20% to 90%RH (without condensation)
• Operating ventilation: open cooled air area
20

Kapitel 1. Vorbereitung
1.1 Lieferumfang
Die 2X Series Plastikkartendrucker werden mit diversem Zubehör ausgeliefert. Bitte prüfen Sie den Lieferumfang
sorgfältig und zeitnah. Die Zubehörliste kann je nach Druckertyp variieren.
Wenn Bestandteile des unten gezeigten Lieferumfangs fehlen sollten, nehmen Sie bitte umgehend Kontakt mit uns auf.
Zubehör, das mit Ihrem 2X Series Plastikkartendrucker geliefert wird:
Kartenausgabemagazin Gewicht für
Power cord Treiber-CD (Master) Reinigungsmodul
Kartenzuführung
(nicht bei 2Xpress/2XCR100)
21
Karteneinzug
mit Reinigungsrolle
USB-Kabel Netzteil (220V)
Reinigungs-Set
Bedienungsanlanleitung
transparenter Stab
(nicht bei 2Xpress)
Schraubendreher
(nicht bei 2Xpress)

1.2 Druckerbeschreibung/Hauptfunktionen
Öffnungshebel der
Druckerklappe
Kartenausgabemagazin
2Xpress
Kartenzuführung
2Xpress
Öffnung zur Behebung von
Kartenstaus mittels
Flachschlitz-
Schraubendreher
Typenschild
Kartenausgabemagazin
2XL, 2XCR100, 2Xtended
Kartenzuführung
2XL, 2Xtended
LCD-Kontrollanzeige/Bedientasten
Optionaler Steckplatz
für ein Chipmodul
Optionaler Steckplatz
für Ethernet-Anschluss
Ein-/Ausschalter
USB-Anschluss
Stromanschluss
22

Kapitel 1. Vorbereitung
Druckkopf (TPH)
Aufnahmen für das Farbband
(farbcodiert)
Chip-Steckplatz für
Farbband-Chip
Einstellhebel Kartenstärke
LED/Schalter für
Druckpositionierung
bei 2XL und 2XCR100
Steckplatz für das
Reinigungsmodul
23

1.3 Druckertreiber installieren
Um mit der Installation des Druckertreibers zu beginnen, legen Sie bitte die CD in Ihr CD-Laufwerk* und wählen
Sie das Menü "printer driver" (Druckertreiber) aus. Das Startprogramm führt Sie nun Schritt-für-Schritt durch
die komplette Installation und die notwendigen Einstellungen.
Bitte lesen Sie auch den Abschnitt über den USB-Anschluss. Bei einigen Windows-Versionen wird
vorausgesetzt, dass die Installation des Druckertreibers mit Administratorrechten erfolgt.
* bzw. laden Sie vorab die aktuellste
Treiberversion von unserer Website.
Nach Abschluss der Treiberinstallation schließen Sie das USB-Kabel an den Drucker an.
1.4 Druckeinstellungen
Das Menü für die Treibereinstellungen kann wie folgt aufgerufen werden:
Unten links auf "Start" klicken und dann unter "Einstellungen" den Punkt "Drucker und Faxgeräte" wählen.
•
• Klicken Sie mit der rechten Maustaste auf "CIAAT CTC-940" (das ist Ihr 2X Series Drucker).
• Wählen Sie "Druckeinstellungen" aus. Das Fenster "Druckeinstellungen" öffnet sich.
• Im Hauptmenü finden Sie die Untermenüs "Device Option" (Geräteoptionen), "Printing Area" (Druckbereich), "Color" (Farbe),
"Tools" (Werkzeuge), "Heating Energy" (Drucktemperatur), "Magnetic Encoding" (Codierung), "Import/Export" und "About"
(aktuell steht der Treiber nur in englischer Sprache zur Verfügung).
Am häufigsten werden die Untermenüs "Device Option", "Color" und "Tools" benötigt:
Device Option Tab Color Tab Tools Tab
• Ribbon type • Front & back image • Color preference setting • Printer position adjuster • Advance option
• Card type • Page order • Special function • Cleaning tool option • Heating energy option
• Card thickness • Using Resin K • Color adjustment • Maintenance info
24

Kapitel 1. Vorbereitung
1.5 Einlegen des Farbbandes
Die Verwendung der originalen Farbbänder für Ihren Xpress Drucker stellt sicher, dass der Drucker immer unter
optimalen Bedingungen betrieben wird. Der Einsatz von anderen als original Pe2M-Materialien wird nicht
empfohlen und kann die Garantie für Ihren Drucker beeinträchtigen.
Optimieren Sie die Druckqualität, indem Sie den Drucker bitte regelmäßig reinigen.
a. Öffnen Sie die Druckerklappe.
b. Stecken Sie den Farbband-Chip in den Chip-Steckplatz.
c. Legen Sie das Farbband wie unten in Abbildung "c" gezeigt ein.
Bitte stellen Sie sicher, dass Sie immer den zum Farbband passenden Farbband-Chip in den Chip-Steckplatz gesteckt und
das Farbband richtig herum eingelegt haben und dass die Farbcodierung der Farbbandrollen mit der Farbcodierung der
Aufnahmen im Drucker übereinstimmt.
d.
Schließen Sie die Druckerklappe langsam und drücken Sie sie herunter bis Sie ein Klicken hören.
a b c d
25

1.6 Anschluss des Druckers (Strom & USB)
Bitte stellen Sie sicher, dass der Druckertreiber vollständig installiert ist, bevor Sie das USB-Kabel an Ihren Drucker anschließen.
Stromanschluss
a.
Verbinden Sie das Netzkabel mit dem Netzteil und stecken Sie den den Hohlstecker in die Buchse des Druckers.
b. Stecken Sie den Netzstecker in eine geeignete Netzsteckdose.
Stellen Sie sicher, dass der Netzstecker nur an eine ordnungsgemäß gesicherte und geerdete Stromquelle angeschlossen wird.
c. Schalten Sie den Drucker ein, indem Sie die Ein-/Austaste drücken. Wenn die LCD-Kontrollanzeige aufleuchtet
und "PRINTER READY" angezeigt wird, ist der Drucker einsatzbereit.
Zu Ihrer eigenen Sicherheit achten Sie bitte immer darauf, dass das Netzkabel von
der Stromquelle getrennt wird, BEVOR Wartungsarbeiten am Drucker erfolgen.
a b c USB
USB-Anschluss
Die Installation des Druckertreibers wird im Kapitel 1.3 auf Seite 24 beschrieben.
Bitte befolgen Sie die dortigen Anweisungen genau.
26

Kapitel 2. Drucken
2.1 Karten einlegen
Kartenzuführung (automatisch)
Um eine optimale Druckqualität zu erreichen, stellen Sie bitte sicher, dass die Kartengrösse den Druckerspezifikationen entspricht.
Berühren Sie nicht die bedruckbare Oberfläche und verwenden Sie keine staubigen, beschädigten, geknickten oder geprägten
Karten in Ihrem Drucker.
a. Platzieren Sie die Kartenzuführung. | 2Xpress: Öffnen Sie die Abdeckung der Kartenzuführung.
b. Legen Sie die Karten in die Kartenzuführung.
c. Legen Sie das Gewicht auf die Karten. | 2Xpress: Schließen Sie die Abdeckung.
a
b c
27

2.2 Kartenausgabe
Nach dem Druck- und/oder Codiervorgang wird die Karte im Kartenausgabemagazin abgelegt. Dieses Ausgabemagazin kann bis zu 50
Karten mit einer Stärke von 0,80 mm aufnehmen.
2.3 Einstellung der Kartenstärke
Der Drucker ist manuell auf die verwendete Kartenstärke einzustellen.
Der abgebildete Mechanismus befindet sich nach Öffnen der Druckerklappe rechts innerhalb des Druckers und kann auf Kartenstärken
von 0,30 bis 1,00 mm eingestellt werden. Ab Werk ist eine Kartenstärke
von 0,80 mm voreingestellt.
a. Öffnen Sie die Druckerklappe.
b. Stellen Sie die Kartenstärke durch
Verschieben des Hebels von links
nach rechts auf die gewünschte
Stärke ein.
c. Schließen Sie die Druckerklappe.
a b c
Einstellung Kartenstärke
28

Kapitel 2. Drucken
2.4 Druckpositionen bei den Druckern 2XL und 2XCR100
Es gibt drei wählbare Positionen der 85.6 x 53.98 mm grossen Druckfläche auf XXL-Karten und zwei Positionen auf CR100-Karten.
Sie können die gewünschte Druckposition mit der Drucktaste rechts im
Innern des Druckers neben der LED nahe des Karteneinzugs mit dem mitgelieferten transparenten Stab einstellen. Halten Sie die Drucktaste
solange gedrückt, bis die LED blinkt. Dann drücken Sie kurz bis die gewünschte Farbe erscheint und lassen die Taste unmittelbar los. Die LED
blinkt kurz weiter und hält dann die gewählte Farbe.
Die Farbe der LED zeigt dabei die gewählte Druckposition wie folgt an:
2XL-Drucker
Blau: Mittelposition bei 140 mm Kartenlänge
Grün: Mittelposition bei 124 mm Kartenlänge
Rot: Randpostion oben/unten bei beiden Kartenlängen
2XCR100-Drucker
Grün: Mittelposition
Rot: Randpostion oben/unten
Mittel-
position
bei 140 mm
Kartenlänge
Rand-
position
unten
Rand-
position
oben
Mittel-
position
Mittel-
position
bei 124 mm
Kartenlänge
Rand-
position
unten
bei
124/140 mm
Kartenlänge
Rand-
position
oben
bei
124/140 mm
Kartenlänge
29
mögliche Druckpositionen auf CR100-Karten
mögliche Druckpositionen auf XXL-Karten

Kapitel 3. Druckerwartung
3.1 Wichtige Informationen zur Herstellergarantie
Ihr 2X Series Plastikkartendrucker wurde mit besonderer Sorgfalt von Branchenprofis entwickelt, um Ihnen ein
langlebiges und wartungsarmes Produkt zur Verfügung zu stellen. Bitte beachten Sie die folgenden Voraussetzungen,
die erfüllt sein müssen, um die Herstellergarantie in Anspruch nehmen zu können:
WICHTIG FÜR DEN ERHALT DER HERSTELLERGARANTIE
Bei Nichteinhaltung der im Folgenden als notwendig beschriebenen Wartungs und Pflegeaufgaben kann die Herstellergarantie für den Druckkopf erlöschen.
Der thermische Druckkopf ist ein extrem sensibles sowie der Abnutzung und hoher Belastung unterworfenes
Bauteil des Druckers. Somit wird die anzunehmende maximale Lebensdauer eines Druckkopfes stark von Verunreinigungen (z.B. Schmutzpartikeln, Staub, Flüssigkeiten etc.) auf dem Druckkopf und der Karte beeinflusst.
Der Bediener sollte deshalb alle nötigen Vorkehrungen treffen, um nur sauberes Kartenmaterial im Drucker zu
verwenden. Die Häufigkeit und die Sorgfältigkeit der Wartung und Pflege des Druckers verlängert nicht nur die
Lebensdauer des Druckkopfes, sondern sorgt auch für eine gleichbleibend hohe Druckqualität.
Die Verwendung von nicht originalen Pe2M Verbrauchsmaterial/Farbbändern kann die Qualität und Zuverlässigkeit
des Druckergebnisses und möglicherweise auch die physische Funktion des Druckers beeinträchtigen. Die Herstellergarantie deckt physische Defekte, Probleme bei der Druckqualität und Druckkopfprobleme nicht ab, die auf
die Verwendung von Fremdmaterialien zurückzuführen sind.
3.2 Intervalle / Vorgaben zur regelmäßigen Druckerreinigung
Die Reinigung ist erforderlich, nachdem 400 Kartenseiten gedruckt wurden.
Der Druckertreiber meldet automatisch, wenn ein Reinigungszyklus notwendig wird. Wird die an-
geforderte Reinigung nicht durchgeführt, ist die Herstellergarantie für den Druckkopf gefährdet.
30

Kapitel 3. Druckerwartung
3.3 Verwendung der Reinigungskarte
Jedes Paket mit 2X Series Original-Verbrauchsmaterial enthält eine einzelne Reinigungskarte.
. Entfernen Sie alle Karten aus dem Kartenzuführmagazin.
a
b. Entfernen Sie die Schutzfolie(n) von der Reinigungskarte und legen Sie sie in das Kartenzuführmagazin.
c. Gehen Sie in das Menü Treibereinstellungen und wählen Sie im Untermenü Tools dann Cleaning tool.
a b c
31

3.4 Verwendung der Reinigungsrolle
Jedes Paket mit 2X Series Original-Verbrauchsmaterial enthält ein Reinigungsmodul inkl. Reinigungsrolle.
Erstmaliger Einsatz...
a. Nehmen Sie das Reinigungsmodul inkl. Reinigungsrolle aus der Zubehörbox des Druckerkartons.
b. Entfernen Sie die Schutzfolie von der Reinigungsrolle und stecken Sie das Reinigungsmodul in den Drucker.
Wenn Sie nur die Reinigungsrolle tauschen wollen:
alt
Druckerklappe öffnen
neu
Metallstift aus der alten in
neue Reinigungsrolle
die
stecken
Reinigungsmodul entnehmen
Neue Reinigungsrolle in das
Reinigungsmodul stecken
Alte Reinigungsrolle entnehmen
Schutzfolie von der
Reinigungsrolle entfernen
Reinigungsmodul zurück in
den Drucker stecken
32

Kapitel 3. Druckerwartung
3.5 Reinigung des Druckkopfes (Thermal Print Head, TPH)
Trennen Sie das Netzkabel des Druckers vom Stromnetz, BEVOR Sie den Druckkopf reinigen.
Vermeiden Sie den direkten Kontakt mit dem Druckkopf mittels metallischen/scharfen Gegenständen und Fingern. Schützen Sie den Druckkopf vor statischen elektrischen Aufladungen.
Wiederholen Sie die Druckkopfreinigung regelmäßig,
um eine konstant gute Druckqualität sicherzustellen.
a. Öffnen Sie die Druckerklappe. Der Druckkopf ist unter der Druckerklappe befestigt.
b. Nutzen Sie einen Reinigungsstick, um den Druckkopf wie abgebildet zu reinigen.
b
a
33

Kapitel 4. Hilfe / Fehlersuche / Diagnose
4.1 Warnungen / Fehlermeldungen und Diagnose
Ihr 2X Series Plastikkartendrucker wurde so konzipiert, dass im Fehlerfall nur ein Minimum an Benutzereingriffen
notwendig wird. Der Benutzer kann durch wenige Meldungen auf der LCD-Kontrollanzeige jederzeit den Status
des Druckers erkennen und erhält alle nötigen Informationen zur Problemlösung.
4.2 LCD-Kontrollanzeige / Bedientasten
Der Drucker verfügt über eine LCD-Kontrollanzeige und vier Tasten, um in das interne Druckermenü zu gelangen.
Zwei LED-Lämpchen signalisieren zusätzlich den Betriebszustand des Druckers. Alle Meldungen zum Druckstatus,
zu Warnungen und Fehlern werden über die Kontrollanzeige ausgegeben.
Zurück zum Startmenü
Seite zurück Enter / Einstellen /
Seite vor
Bestätigen
Grün = Normalbetrieb
Rot = Fehlerstatus
34

Kapitel 4. Hilfe / Fehlersuche / Diagnose
4.3 Kontrollanzeige / Warnmeldungen
Anzeige
Cover Open
IC Chip Missing
Ribbon Missing
Ribbon Mismatch
Ribbon Type Error
Ribbon Out
Print Fail
Card Out
Cam Error
Ribbon Error
Beschreibung Lösung
Druckerklappe ist offen
Farbband-Chip fehlt
Farbband fehlt
Farbband und Farbband-Chip passen nicht zueinander
Farbband wird nicht unterstützt
Farbband nicht gefunden
Farbband verbraucht
Fehler im Druckprozess
keine Karte mehr auf dem Karteneinzughalter
Fehler bei der Kartenstärke?
Haften die Karten aneinander?
Interner mechanischer Fehler
Fehler im Farbband-Chip
Schließen Sie die Druckerklappe
Stecken Sie den Farbband-Chip (richtig) in den Chip-Steckplatz
Legen Sie das Farbband und den richtigen Farbband-Chip ein
Legen Sie das Farbband und den richtigen Farbband-Chip ein
Prüfen Sie, ob Drucker und Farbband wirklich zueinander passen
Prüfen Sie, ob Sie das Farbband richtig eingelegt haben
Legen Sie ein neues Farbband und den richtigen Farbband-Chip ein
Prüfen Sie, ob Sie das Farbband richtig eingelegt haben
Karten auffüllen und ggf. das mitgelieferte Gewicht auflegen
Prüfen Sie, ob die Kartenstärke richtig eingestellt ist
Karten vom Einzughalter nehmen, auffächern und wieder einlegen
Nehmen Sie Kontakt zu unserer Serviceabteilung auf
Chip erneut einlegen oder anderen Chip verwenden
35

4.4 Druckprobleme
Es erfolgt kein Druck
Eine Blankokarte wird
ausgegeben
Fehler im Druckbild
• Prüfen Sie, ob der Druckertreiber vollständig und ordnungsgemäß installiert wurde
• Prüfen Sie die Stromversorgung und das USB-Datenkabel auf Fehler
• Prüfen Sie, ob Farbband und Karte(n) richtig eingelegt sind
• Drucken Sie eine Testkarte aus dem Druckertreiber heraus (Untermenü Tools)
• Prüfen Sie, ob das Farbband richtig eingelegt ist
Prüfen Sie im Treiber unter Printing Area den Wert für value A und setzen Sie ihn ggf. auf default
•
• Prüfen Sie, ob diese Blankokarte tatsächlich den Vorgaben des Druckers entspricht
• Prüfen Sie die Druckereinstellungen (im Treiber)
• Prüfen Sie das USB-Datenkabel und das Farbband auf richtigen Sitz
• Prüfen Sie, ob die Reinigungsrolle bereits zu stark verschmutzt ist und ersetzen Sie sie ggf.
• Prüfen Sie, ob die bedruckte Karte sauber war und versuchen Sie es mit einer anderen Karte
• Reinigen Sie den Druckkopf mit einem Reinigungsstick
Druckbild mit kleinen Flecken
und/oder Fehlern
Druckbild mit horizontalen
weißen Linien
Druckt vertikale weiße Linien • Druckkopf möglicherweise defekt. Kontaktieren Sie unsere Serviceabteilung
Druck ist "unscharf"
und/oder "verschoben"
• Kartenmaterial kann verunreinigt sein; ggf. Reinigung durchführen
• ggf. Reinigungsrolle erneuern
• Druckkopf kann verschmutzt sein; ggf. Reinigung durchführen (Reinigungsstick)
• Prüfen Sie, ob das Farbband richtig eingelegt ist
• Prüfen Sie, ob der Druckkopf verschmutzt oder beschädigt ist; ggf. reinigen oder austauschen
• Prüfen Sie, ob das Farbband richtig eingelegt ist
• Prüfen Sie, ob der Druckkopf gereinigt werden muss
• Prüfen Sie, ob die Reinigungsrolle ersetzt werden muss
• Prüfen Sie, ob die bedruckte Karte tatsächlich den ISO/DIN-Vorgaben entsprach
36

Kapitel 4. Hilfe / Fehlersuche / Diagnose
4.5 Kartenstau beheben
Bei 2XL Druckern nicht die obere Abdeckung öffnen! Stattdessen entfernen
Sie die gestaute Karte, indem Sie den Anweisungen auf der LCD-Kontrollanzeige folgen, bevor Sie Ihren Druckauftrag fortsetzen.
• Öffnen Sie
• Drehen Sie die Schraube auf der Rückseite des Druckers mit dem mitgelieferten
Schraubendreher im Uhrzeigersinn, bis die Karte aus dem Drucker kommt.
• Öffnen Sie nun die Druckerklappe. Nachdem die Karten entfernt wurde,
lässt sich Sie der Gehäusedeckel des Druckers öffnen.
• Folgen Sie den Anweisungen auf der Kontrollanzeige, indem Sie aus drei
Auswurfoptionen wählen:
Auto removal (automatisch), Semi-auto removal (halbautomatisch)
oder Manual removal (manuelle Entnahme).
Das Öffnen der oberen Abdeckung mit Gewalt führt zu schweren Druckerschäden.
Während die Optionen Semi-auto removal oder Manual removal
ausgeführt werden, greifen Sie bitte NICHT in den Drucker.
Die folgenden Maßnahmen helfen, einen Kartenstau zu vermeiden:
nicht die Druckerklappe.
Im Uhrzeigersinn drehen
Flachkopfschraubendreher
37
• Prüfen Sie die Einstellung der Kartenstärke im Drucker und im Treiber. Beide Einstellungen müssen identisch
sein und zum Kartenmaterial passen.
• Prüfen Sie, ob das Kartenmaterial den Vorgaben dieser Anleitung hinsichtlich der zulässigen Kartenstärken entspricht.
• Prüfen Sie, ob das Kartenmaterial plan (horizontal nicht gewölbt) ist.
• Prüfen Sie, ob die Karten nicht aneinander haften und fächern Sie sie auf, bevor Sie sie auf den Karteneinzughalter legen.

Technische Spezifikationen
Generelle technische Daten • Farbdruckmodul (Thermo), 300dpi Druckkopf
• USB-Anschluss, Ethernet TCP/IP Anschluss als optionales Modul
• 32 MB RAM / 1 MB Flashspeicher
• 4 Bedientasten, LCD-Kontrollanzeige, 2 LED-Leuchtanzeigen
Druckmodus
Druckleistung
(von Design und Einstellung abhängig)
unterstützte Betriebssysteme
Farbbandtypen
Options
(Easy Add Modules)
Kartenformate
Weitere Informationen
• Farbsublimation und monochromes Thermotransferverfahren
• A.I. smart ribbon saving (intelligente Farbbandsparfunktion) für den monochromen Druck
• Farbdruck: ca. 20 Sekunden pro Druckseite (unter Laborbedingungen)
• Monochromdruck: ca. 5 Sekunden pro Druckseite
• Windows 2000, XP, Vista, Windows 7, 8, 10 (32/64-bit), Mac OS 10.5-10.8
• YMCKO (Farbdruck plus Overlay, für bis zu 200 pro Rolle, 400 Drucke für 2Xpress und 2Xtended)
• K (Schwarz, für bis zu 2000 Drucke pro Rolle)
• weitere monochrome Farbbänder in den Farben Weiß, Blau, Rot, Grün, Silber, Gold
• RFID-Codiermodul für kontaktlose Chipkarten (ISO 14443A, B, ISO 15693, Mifare, DesFire, VHF)
•
Ethernet-Anschlussmodul
• 2Xpress: CR80 / ISO 7810 85.6 x 53.98 mm (2.125 x 3.375 “)
• 2Xtended: CR80 / ISO 7810 85.6 x 53.98 mm (2.125 x 3.375 “),
variable Längen von 85.6 bis 140 x 54 mm (3.38 bis 5.51 x 2.16 “)
• 2XCR100: CR100 98.5 x 67 mm (2.63 x 3.88 “)
• 2XL: 124 x 88 mm (4.88 x 3.46 “) und 140 x 88 mm (5.51 x 3.46 “)
• Kartentyp /-stärke: PVC Karten mit einer Stärke von 0,25 bis 1,0 mm (10 mil - 40 mil)
• Kapazität: Zuführung für bis zu 50 Karten (0,8 mm), Ausgabe für 50 Karten (0,8 mm)
• Abmessungen ohne Ein-/Ausgabe: 197, 8 mm (B) x 354 mm (L) x 204 mm (H), Gewichtt: 4.9 kg
• Anschlüsse: USB, Ethernet TCP/IP optional (Ethernet 10/100 Mbps)
• Stromanschluss:100 - 240 V, 2.5 A, 50-60 Hz / Ausgang: 24 V = 4.16 A
• Betriebsbedingungen: + 15º C bis + 32º C / 20 % bis 85 % RF (nicht kondensierend)
• Lagerbedingungen: - 20º C bis + 60º C / 20 % bis 90 % RF (nicht kondensierend)
• Lüftung im Betrieb durch eingebauten Lüfter
38

Most common mistakes avoided:
Häufigste Fehler vermeiden:
• Install the driver first, then connect the USB cable of the
printer!
• Do not print twice with YMCKO (color) on a card surface.
The ribbon will get stuck, tear or cause a card jam.
• Never open the cover with force in case of
a
card jam in an 2XL and 2XCR100 printer!
Open it ever so slightly and press “next”!
• Only use quality PVC cards or quality cards with a PVC surface!
Cards must not have rough edges! Keep cards clean! Do not use
dirty cards! If your cards fell down, don´t use them anymore! They
are a magnet for dust and debris! Shuffle the cards so they don´t
stick together! If needed, use compressed air to get the static out!
• Feed the cards correctly! The first card must always be a little bit
further in behind the outer bumps on the input hopper of the
2XL, 2XCR100 and Xtended printer. The rest of the cards must
rest on these bumps!
• Installieren Sie zuerst den Treiber und schließen Sie dann das USBKabel des Druckers an!
• Drucken Sie nicht zweimal mit YMCKO (Farbe) auf einer Kartenoberfläche. Das Band kann kleben bleiben, reissen oder einen Kartenstau verursachen.
• Öffnen Sie die Abdeckung eines 2XL- oder 2XCR100-Druckers bei
Kartenstau niemals mit Gewalt! Öffnen Sie sie ganz vorsichtig
etwa 1 cm weit und drücken Sie dann "next" auf dem Bedienfeld!
• Verwenden Sie ausschließlich hochwertige PVC-Karten oder
Qualitätskarten mit PVC-Oberfläche! Karten dürfen keine rauen
Kanten haben! Halten Sie die Karten sauber! Verwenden Sie keine
schmutzigen Karten! Wenn Ihre Karten auf den Boden gefallen
sind, verwenden Sie sie nicht mehr! Sie sind ein Magnet für Staub
und Schmutz! Fächern Sie die Karten auf, damit sie nicht zusammen
kleben! Wenn nötig, Druckluft verwenden, um die Oberflächenstatik zu entfernen!
• Führen Sie die Karten richtig ein! Die erste Karte muss immer ein
wenig weiter hinter den äußeren Auflagepunkten des Eingabefachs
des 2XL, 2XCR100 und Xtended Druckers liegen. Der Rest der
Karten muss auf diesen Punkten ruhen!
 Loading...