

Page 1
ENGLISH
WIRELESS KEYBOARD
904-005
Page 2

Congratulations on your purchase of the Rock Candy
Wireless Keyboard!
FEATURING
ADVANCED FEATURES
• Washable and waterproof (IP66 and IP67 certied) • Durable impact resistant housing
• Multi-device shareable nano USB receiver • 30-ft range 2.4 GHz wireless technology
• Windows/Mac compatible • Bright, fun colors
• Plug and play user-friendly
• Advanced Power Saving Mode – The Rock Candy Wireless Keyboard will go into standby
mode when no keypresses are detected for ve seconds, extending the life of your batteries.
The keyboard immediately exits out of standby mode as soon as a key is pressed.
• Low Battery LED Indicator – Receive advance warning when the battery is beginning to
lose charge. Includes the following indicator modes:
When reaching a low power state, the LED will blink slowly, allowing for additional
time to replace batteries.
When reaching a critical power state, the LED will blink rapidly and the keyboard will
not be operational until batteries are replaced.
Note: If the user continues to use the keyboard, the LED will ash 10 times before turning o.
• 1 Rock Candy Wireless Keyboard • 1 USB Receiver
• 2 AAA Batteries • 1 Quick Start Guide (QSG)
ENGLISH
IMPORTANT / CAUTION STATEMENTS
Choking Hazard: Contains small parts that can be a choking hazard for children
under 3 years old.
Do not mix different battery types. Risk of explosion may occur.
Do not mix new and old batteries.
Do not expose this product in extreme heat.
Keep the batteries and USB receiver out of reach of children.
For longer battery life, please use non-rechargeable alkaline batteries.
Modifications to this product could void your warranty and your right to operate
this product by the FCC.
1
Contents
Page 3
The keyboard USB receiver is already paired with the keyboard at the factory. However, if
you have a replacement USB receiver, you will need to pair it with your keyboard. To pair the
keyboard using the USB receiver, please follow these steps:
1) Ensure that the USB receiver is unplugged.
2) Press and hold the “Esc” key, then press the “=” key. The LED for Low Battery will
temporarily light up solid to indicate pairing mode.
3) Plug the USB receiver into a USB port on your computer.
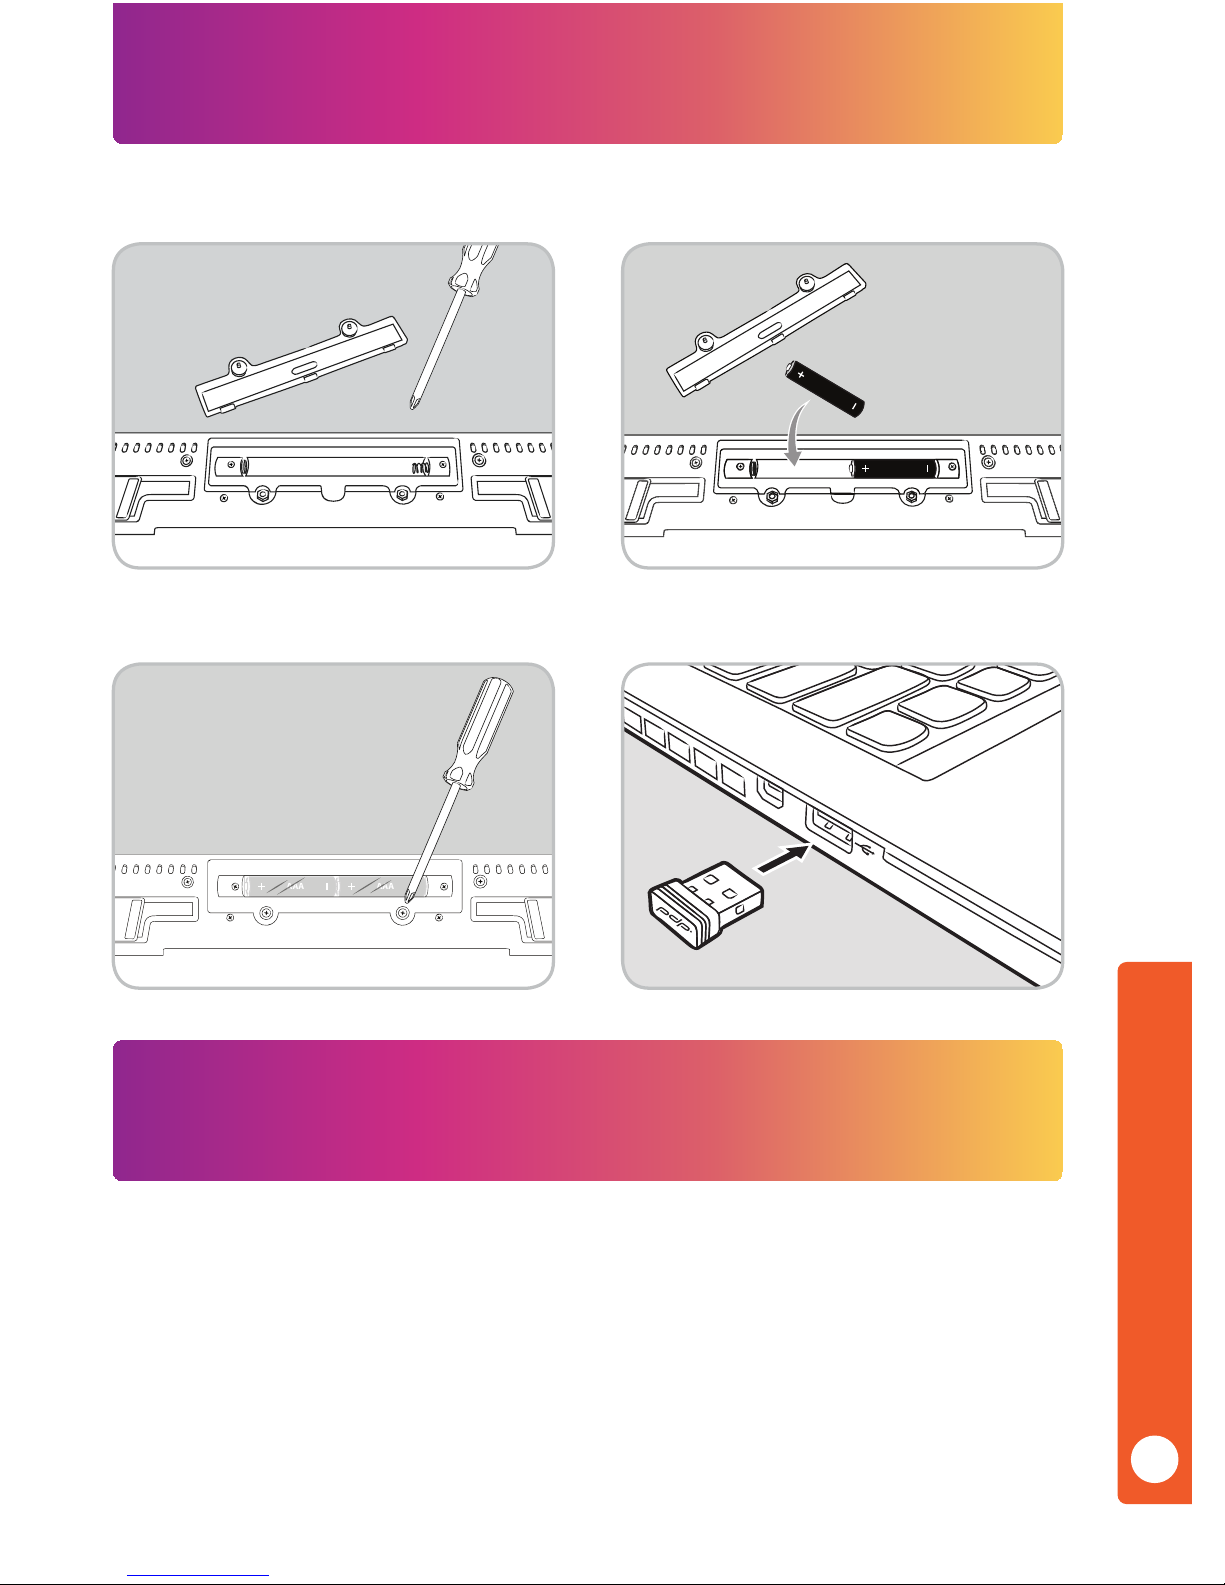
Use a Philips screwdriver to remove the two
screws from the battery door as shown:
Insert two AAA alkaline (included)
batteries with the polarities as shown:
1 2
ENGLISH
2
Connecting Your Keyboard
AAA
AAA
AAAAAA
Close the battery door and securely
tighten the screws.
Plug the included USB receiver into any
available USB port on your computer.
3 4
Pairing Your Keyboard
Page 4

ENGLISH
3
Keyboard Anatomy
Rubber Feet
Rubber Feet
Rubber FeetFold-out Tilt Leg Fold-out Tilt LegBattery Compartment
Num Lock LED
Caps Lock LED
Numeric KeypadDirectional KeysMenu KeyFunction Key
Low Battery LED
Windows Key (For PC)
Command Key (For Mac)
PC Shortcut Buttons (Used with Fn key)Media Control Buttons (Used with Fn key)
Page 5

ENGLISH
4
PC / Mac Media and Shortcut Function Keys
Multi-Device Receiver Wireless Connection
The receiver can sync with multiple wireless Rock Candy Wireless USB devices (such as the
Rock Candy Wireless Mouse), allowing you to free up a USB port on your computer. If you have
purchased a Rock Candy Wireless Mouse, you can pair the Rock Candy Wireless Keyboard to the
Mouse USB receiver by following these steps:
1) Ensure all USB receivers are unplugged.
2) Press the “Esc” and “=” at the same time until the Low Battery LED lights up solid
on the keyboard.
3) Reconnect the mouse USB receiver. The LED on the keyboard will turn o, indicating
that the keyboard has successfully paired with the mouse using the same USB receiver.
4) Move the mouse cursor to verify connection with the mouse.
To use the media and shortcut function keys, press the “Fn” key and the corresponding Function
key (F1, F2, F3, etc) per the table below:
Fn + Function Key Function Description PC Mac
Launch Media Player
Y N
Volume Down
Y Y
Volume Up
Y Y
Mute
Y Y
Skip – Back
Y Y
Skip – Forward
Y Y
Play / Pause
Y Y
Stop
Y N
Launch Web Browser
Y N
Launch Email Client
Y N
Launch Explorer/Finder
Y N
Open/Close Favorites/Bookmark
Y N
Page 6

ENGLISH
5
Warranty
2 year limited warranty. See www.pdp.com for details.
If the keyboard is not working, please check for the following possible causes:
• Are the batteries installed using the correct polarity?
• Is the USB receiver connected to your computer and the drivers nished installing?
• If the computer is in sleep mode, and the mouse does not respond, simply click any key on the
keyboard to wake from sleep mode. Depending on the speed of your computer, it may take a
few seconds to a few minutes to go from sleep to wake mode.
If you still experience problems and further issues arise, please contact PDP Customer Support
at www.pdp.com or call toll-free (800) 331-3844 (USA and Canada only).
Troubleshooting
Maintaining Your Keyboard
The Rock Candy Wireless Keyboard is specically designed to be washed or soaked (as it has
passed stringent industry standards for water resistance and water proong) and ready to be
used immediately after a wash. However, please observe the following guidelines for worry-free operation of this product:
• Do not submerge the keyboard deeper than 1 meter (3.3 feet) for more than 30 minutes.
• Do not use a dishwasher or electric dryer for this product – hand wash and air dry ONLY.
• Avoid using detergents, alcohol based cleaning solutions, or chemical solvents.
• For best results, use distilled lukewarm water when washing to prevent residue.
• Do not wash or soak the USB receiver, as it is neither washable nor waterproof.
• For longer battery life, please use non-rechargeable alkaline batteries.
• After replacing batteries or before a wash, always securely tighten the battery door screws
(without stripping them).
Page 7

Regulatory Statements
FCC STATEMENTS:
CAUTION: Changes or modifications to this equipment not expressly approved by the manufacturer could void the user’s authority to operate the equipment. The equipment complies
with FCC RF exposure limits set forth for an uncontrolled environment. The equipment must
not be co-located or operating in conjunction with any other antenna or transmitter.
This equipment has been tested and found to comply with the limits for a Class B digital device,
pursuant to part 15 of the FCC Rules. These limits are designed to provide reasonable protection against harmful interference in a residential installation.
This equipment generates, uses and can radiate radio frequency energy and, if not installed and
used in accordance with the instructions, may cause harmful interference to radio communications. However, there is no guarantee that interference will not occur in a particular installation.
If this equipment does cause harmful interference to radio or television reception, which can be
determined by turning the equipment off and on, the user is encouraged to try to correct the
interference by one or more of the following measures:
• Reorient or relocate the receiving antenna.
• Increase the separation between the equipment and receiver.
• Connect the equipment into an outlet on a circuit different from that to which the
receiver is connected.
• Consult the dealer or an experienced radio/TV technician for help.
FCC ID: X5B-904005T (Keyboard), X5B-904005R (USB Receiver)
This device complies with FCC radiation exposure limits set forth for an uncontrolled
environment and it also complies with Part 15 of the FCC Rules. Operation is subject to the
following two conditions:
(1) this device may not cause harmful interference, and
(2) this device must accept any interference received, including interference that may cause
undesired operation
INDUSTRY CANADA:
IC ID: 8814A-904005T (Keyboard), 8814A-904005R (USB Receiver)
This device complies with Industry Canada licence RSS standard(s). Operation is subject to the
following two conditions:
(1) this device may not cause interference, and
(2) this device must accept any interference, including interference that may cause undesired
operation of the device.
The device meets the exemption from the routine evaluation limits in section 2.5 of RSS 102
and
compliance with RSS-102 RF exposure, users can obtain Canadian information on RF exposure
and compliance.
ENGLISH
6
Page 8

© 2015 Performance Designed Products, LLC. Performance Designed Products, PDP, Rock
Candy, Pick Your Flavor, Color is Expression, the flavor names and their respective logos
are trademarks and/or registered trademarks of Performance Designed Products, LLC.
All other trademarks are the property of their respective owners. Our goods come with
guarantees that cannot be excluded under the Australian Consumer Law. You are entitled
to a replacement or refund for a major failure and compensation for any other reasonably
foreseeable loss or damage. You are also entitled to have the goods repaired or replaced
if the goods fail to be of acceptable quality and the failure does not amount to a major
failure. All rights reserved.
“Le present appareil est conforme aux CNR d’Industrie Canada applicables aux appareils radio
exempts de licence.L’exploitationestautorisée aux deux conditions suivantes:
(1) l’appareil ne doit pas produire de brouillage, et
(2) l’utilisateur de l’appareildoit accepter tout brouillage radio électrique subi, mêmesi le
brouillage est susceptible d’encompromettre le fonctionnement.
This device complies with part 15 of the FCC Rules. Operation is subject to the
following two conditions: (1) This device may not cause harmful interference, and
(2) This device must accept any interference received, including interference that may
cause undesired operation.
RE V. B
WWW.PDP.COM
www.pdp.com/support
MADE IN CHINA
Keyboard:
Model No.: 904-005T
FCC ID: X5B-904005T
IC: 8814A-904005T
Rating: 3VDC/5mA
USB Receiver:
Model No.: 904-005R
FCC ID: X5B-904005R
IC: 8814A-904005R
Rating: 5VDC/20mA
ENGLISH
7
Warranty
Regulatory Statements
(cont.)
 Loading...