

Page 1
Document Number: PD196-040 Rev4
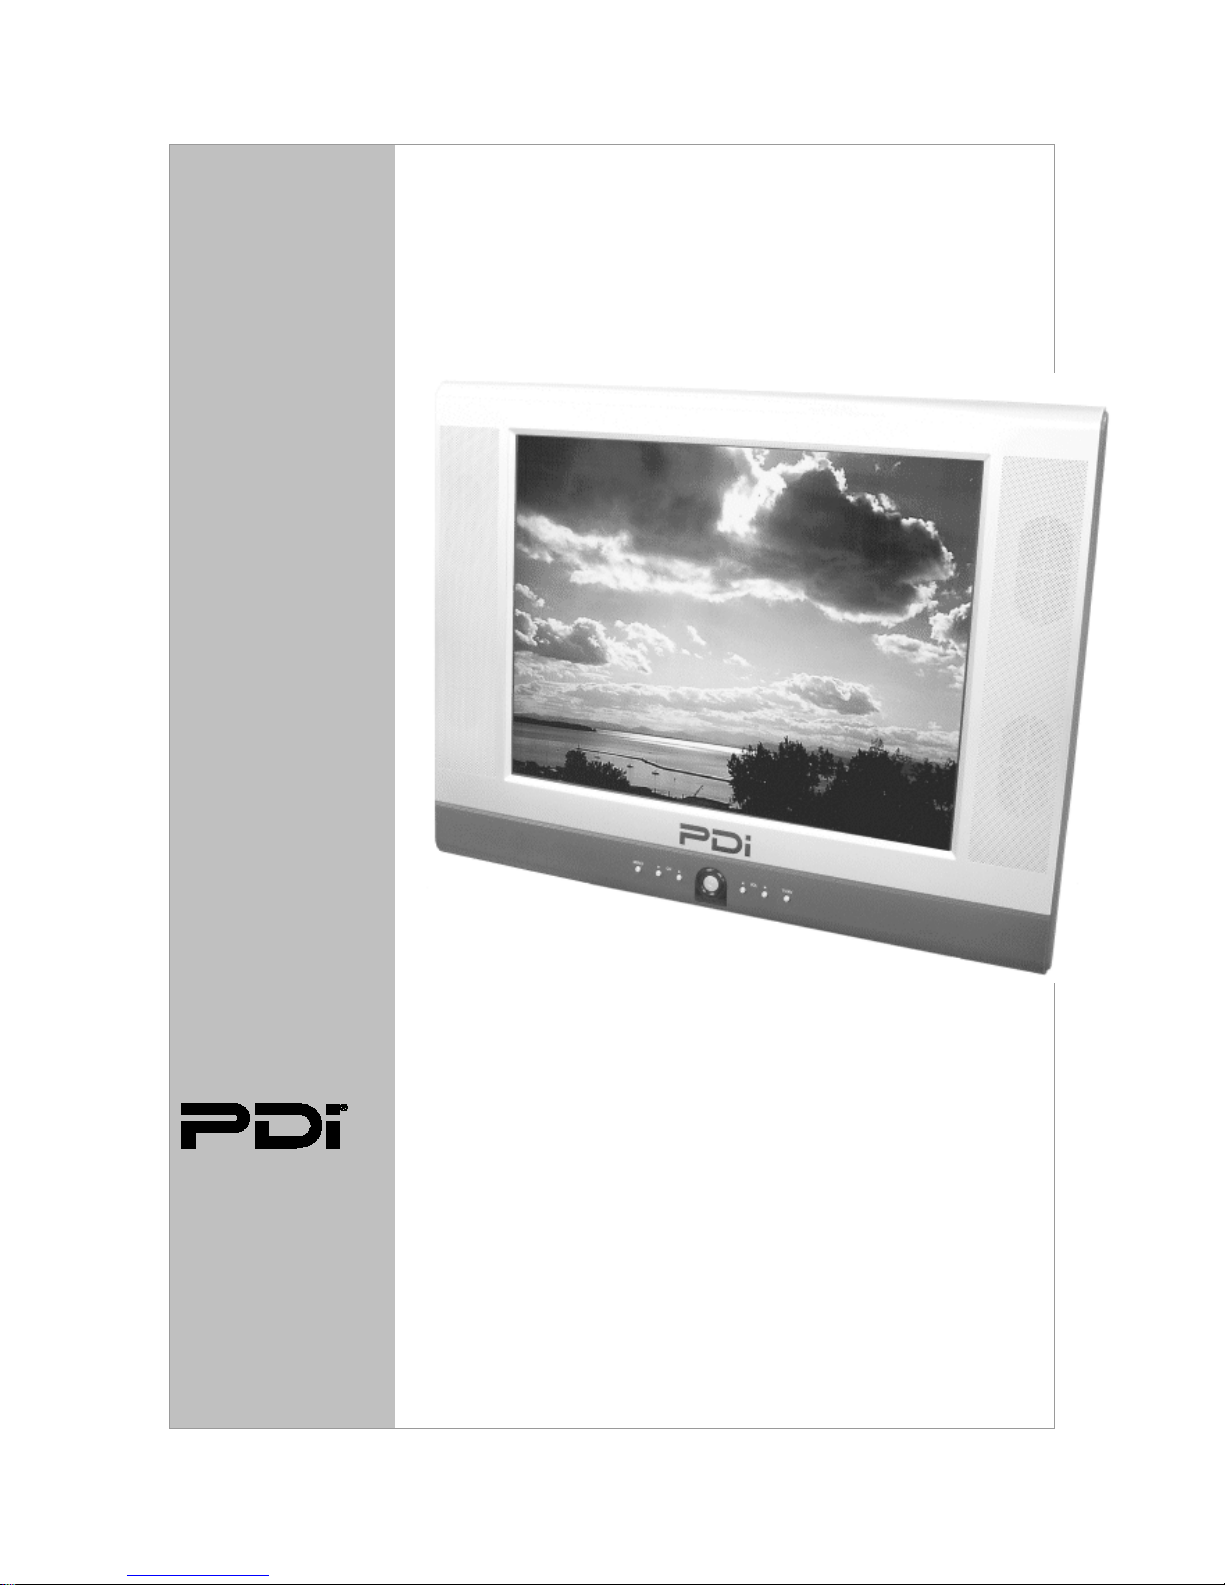
PDI-P20LCD TV
PDI-P20LCD User Manual
User
Manual
Communication
Systems, Inc.
40 Greenwood Lane
Springboro, Ohio
45066
PH: 937-743-6010
FX: 937-743-5664
http://www.pdiarm.com
Pillow Speaker Controlled
Model PDI-P20LCD
Hospital Grade LCD TV
Better Solutions Are Within Reach
®
- 1 -
Page 2
Document Number: PD196-040 Rev4
PDI-P20LCD User Manual
Warnings
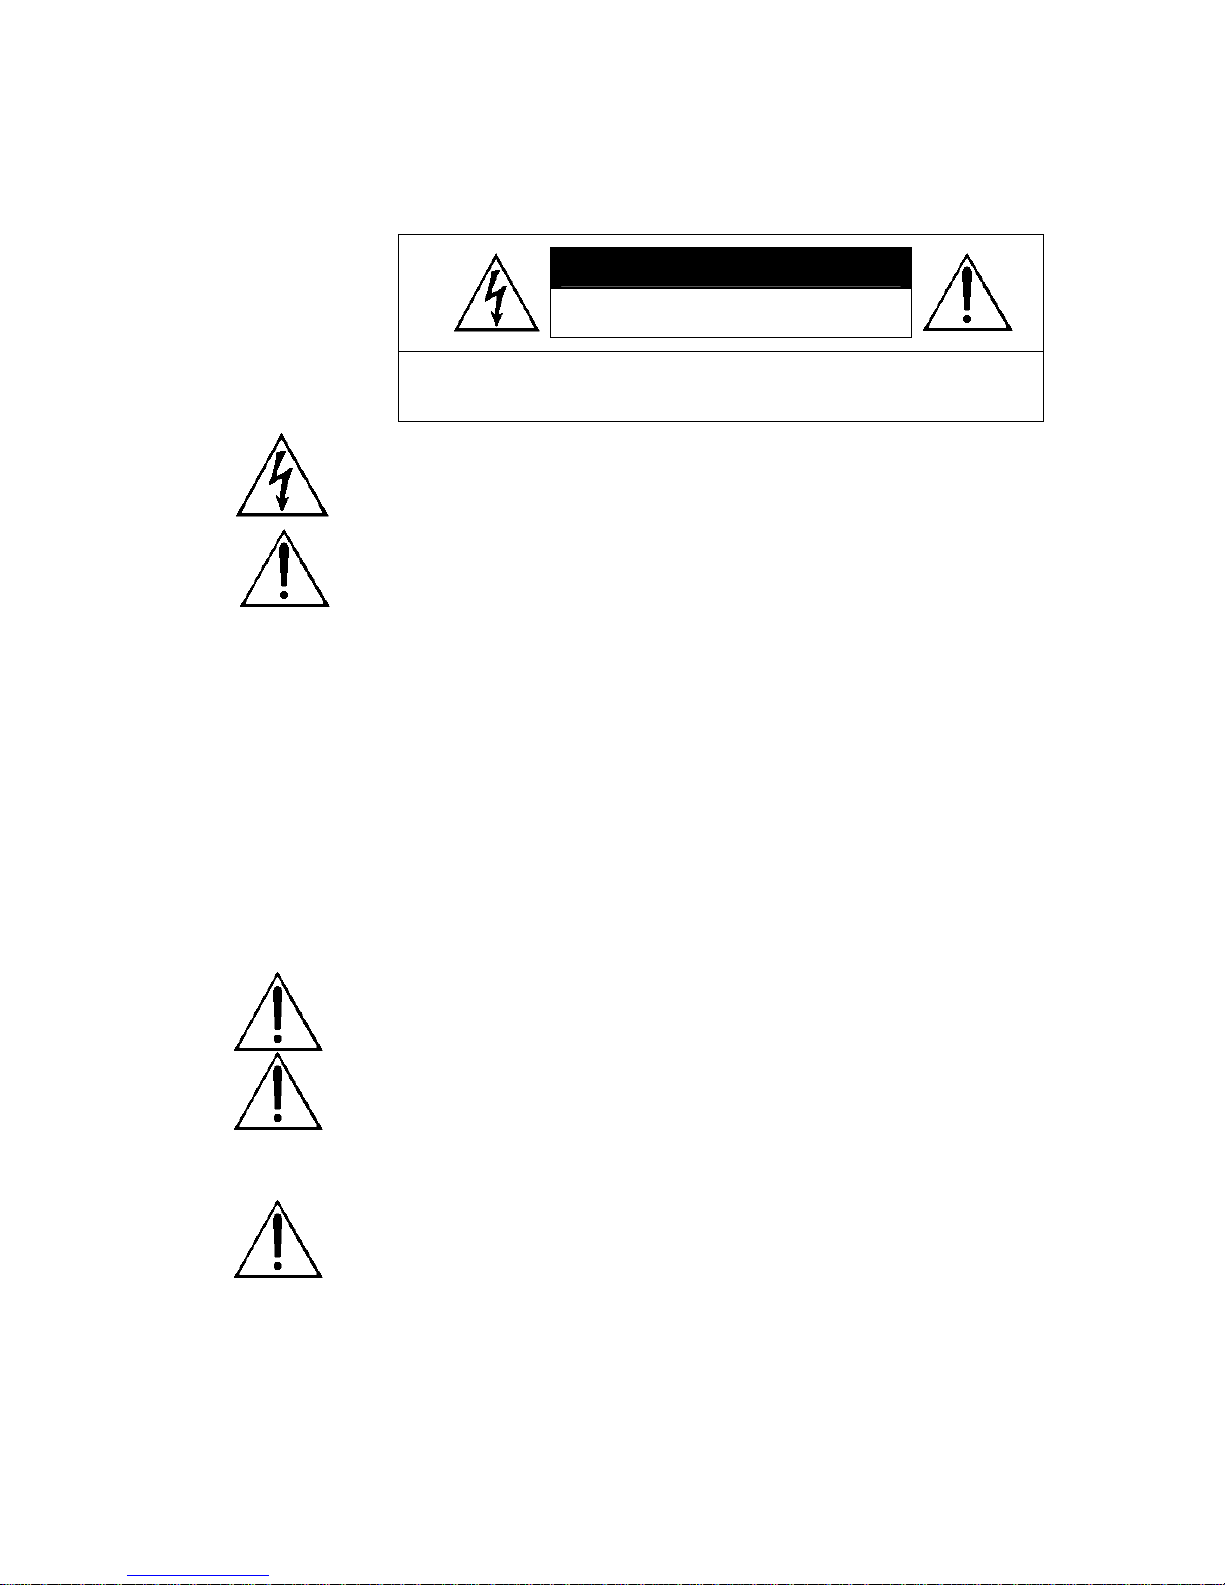
CAUTION: To reduce the risk of electric shock do not remove
cover (or back). No user serviceable parts inside. Refer servicing
to qualified service personnel.
This symbol is intended to alert the user of the presence of uninsulated
“dangerous voltage” within the product’s enclosure that may be of sufficient
magnitude to constitute a risk of electric shock to persons.
This symbol is intended to alert the user of the presence of important
operating and maintenance (servicing) instructions in the literature
accompanying the appliance.
NOTE TO CABLE TV INSTALLER
This reminder is provided to call the cable TV systems installer’s attention to Article
820-40 of the National Electrical Code. The code provides guidelines for proper
grounding and, in particular, specifies that the cable ground shall be connected to the
grounding system of the building, as close to the point of the cable entry as practical.
MAINTENANCE AND SERVICING
Never remove the back cover of the TV; this can expose you to high voltage and other
hazards. If the TV does not operate properly, unplug it and call an authorized service
center or PDI.
CLEANING AND DISINFECTING
Clean the exterior of this television by removing dust with a lint-free cloth.
CAUTION: To avoid damage to the surface of the television, do
not use abrasive or chemical cleaning agents.
RAIN AND MOISTURE
WARNING: To avoid the hazards of fire or electrical shock, DO NOT
expose this television to rain or moisture.
OXYGEN ENVIRONMENT
WARNING: Do not use in any oxygen tent or oxygen chamber. Such use may cause
a fire hazard.
COMPUTER MONITOR
The PDI-P20LCD can not be used as a computer monitor.
WET LOCATION
Apparatus shall not be exposed to dripping or splashing and no objects filled with
liquids, such as vases, shall be placed on the apparatus.
SERVICE INSTRUCTIONS
CAUTION: These servicing instructions are for use by qualified service personnel only.
To reduce the risk of electric shock, do not perform any servicing other than contained
in the operating instructions unless you are qualified to do so.
CAUTION
RISK OF ELECTRIC SHOCK
DO NOT OPEN
- 2 -
Page 3

Document Number: PD196-040 Rev4
PDI-P20LCD User Manual
PRODUCT MODIFICATION
Do not attempt to modify this product in any way without written authorization.
Unauthorized modification could void the user’s authority to operate this
product.
POWER
This set operates on a DC voltage provided by the AC-DC adaptor, the
voltage is as indicated on the label on the back cover. Use only the AC-DC
adaptor supplied with the set and never apply AC wall outlet voltage to the set
directly. The AC-DC adaptor operates from an AC wall outlet.
a. Connect the DC plug of the AC-DC adaptor to the15V socket on back
of the set.
b. Connect the AC-DC adaptor and its power cord.
c. Connect the hospital-grade power cord to an AC outlet.
In the event of thunderstorms or power outages, please unplug the AC-DC
adaptor from the wall outlet and unplug the cable TV coax. Do not allow
anything to rest upon or roll over the power cord, and do not place the power
cord were it is subject to damage.
REGULATORY INFORMATION
FCC
This equipment has been tested and found to comply with the limits for a
Class B digital device, pursuant to part 15 of the FCC Rules. These limits are
designed to provide reasonable protection against harmful interference when
the equipment is operated in a residential or commercial installation. If this
equipment does cause harmful interference to radio or television reception,
which can be determined by turning the equipment off and on, the user is
encouraged to try to correct the interference by one of more of the following
measures:
• Reorient or relocate the receiving antenna.
• Increase the separation between the equipment and receiver.
• Connect the equipment into an outlet on a circuit different from that to
which the receiver is connected.
• Consult the dealer or an experienced radio/TV technician for help.
Underwriters Laboratories
The model PDI-P20LCD Hospital Grade LCD TV is a specialized LCD
television. This TV is intended for entertainment and educational purposes
for use in a hospital, a nursing home, a medical-care center, or a similar
health-care facility in which installation is limited to a non-hazardous area in
accordance with the National Electrical Code, ANSI/NFPA 70.
This device is safety tested and listed by the Underwriters Laboratories as a
product suitable for use in health care facilities in both the United States and
Canada.
- 3 -
Page 4

IMPORTANT SAFETY INSTRUCTIONS
1. Read these instructions.
2. Keep these instructions.
3. Heed all warnings.
4. Follow all instructions.
5. Do not use this apparatus near water.
6. Clean only with dry cloth.
7. Do no block any ventilation openings.
Install in accordance with the
manufacturer’s instructions.
8. Do not install near any heat source such
as radiators, heat registers, stove, or other
apparatus (including amplifiers) that
produce heat.
9. Do not defeat the safety purpose of the
hospital grounding-type plug. A hospital
plug has two blades and a third grounding
prong. The third prong is provided for
your safety. If the provided plug does not
fit into your outlet, consult an electrician
for replacement of the obsolete outlet.
10. Protect the power cord from being walked
on or pinched particularly at plugs,
convenience receptacles, and the point
where they exit from the apparatus.
11. Only use attachments/accessories specified
by the manufacturer.
12. Use only with the cart,
stand, tripod, bracket or
table specified by the
manufacturer, or sold with
the apparatus. When a
cart is used, use caution
when moving the
cart/apparatus
combination to avoid
injury from tip-over.
13. Unplug this apparatus during lightning
storms or when unused for long period of
time.
14. Refer all servicing to qualified service
personnel. Servicing is required when the
apparatus has been damaged in any way,
such as power-supply cord or plug is
damaged, liquid has been spilled or objects
have fallen into the apparatus, the
apparatus has been exposed to rain or
moisture, does not operate normally, or has
been dropped.
Document Number: PD196-040 Rev4
PDI-P20LCD User Manual
Copyright, Disclaimer, and Trademarks
COPYRIGHT
PDI Communication Systems, Inc. claims proprietary right to the material disclosed in this user
manual. This manual is issued for user information only and may not be used to manufacture
anything shown herein. Copyright © 2005 by PDI Communication Systems, Inc. All rights
reserved.
DISCLAIMER
The author and publisher have used their best efforts in preparing this manual. PDI
Communication Systems, Inc. make no representation or warranties with respect to the accuracy
or completeness of the contents of this manual and specifically disclaim any implied warranties or
merchantability or fitness for any particular purpose and shall in no event be liable for any loss of
profit or any other damages. The information contained herein is believed accurate, but is not
warranted, and is subject to change without notice or obligation.
TRADEMARKS
All brand names and product names used in this manual are trademarks, registered trademarks,
or trade names of their respective holder. PDI and Better Solutions Are Within Reach are
registered trademarks of PDI Communication Systems, Inc., Springboro, Ohio.
- 4 -
Page 5
Document Number: PD196-040 Rev4
A
PDI-P20LCD User Manual
INSTALLATION
LOCATION GUIDELINES
The model PDI-P20LCD Hospital Grade LCD TV is a specialized LCD television. This TV is
intended for entertainment and educational purposes for use in a hospital, a nursing home, a
medical-care center, or a similar health-care facility in which installation is limited to a nonhazardous area in accordance with the National Electrical Code, ANSI/NFPA 70.
The PDI-P20LCD is capable of being mounted with several commercially available mounting
brackets utilizing the 100 mm VESA hole pattern. The PDI-P20LCD TV is able to be wall
mounted at the foot of a patient’s bed with the supplied bracket. Select a location that is near a
AC wall outlet and that does not expose the TV to bright room lights or sunlight if possible. The
LCD TV also requires connection of both CATV cable signal and across-room wiring for the pillow
speaker.
OSHPD (State of California Only)
The combined weight of the PDI-P20LCD TV, wall mount, and power supply totals less than 20
pounds. At the time of this writing, the involvement of a written, submitted, reviewed, and
approved plan by OSHPD is not required to install the PDI-P20LCD TV in the state of California.
CABLE SYSTEM GROUNDING
The coax cable system connected to the PDI-P20LCD TV should be grounded in accordance with
the National Electrical Code, ANSI/NFPA 70. The code provides guidelines for proper grounding
and, in particular, specifies that the cable ground shall be connected to the grounding system of
the building, as close to the point of the cable entry as practical.
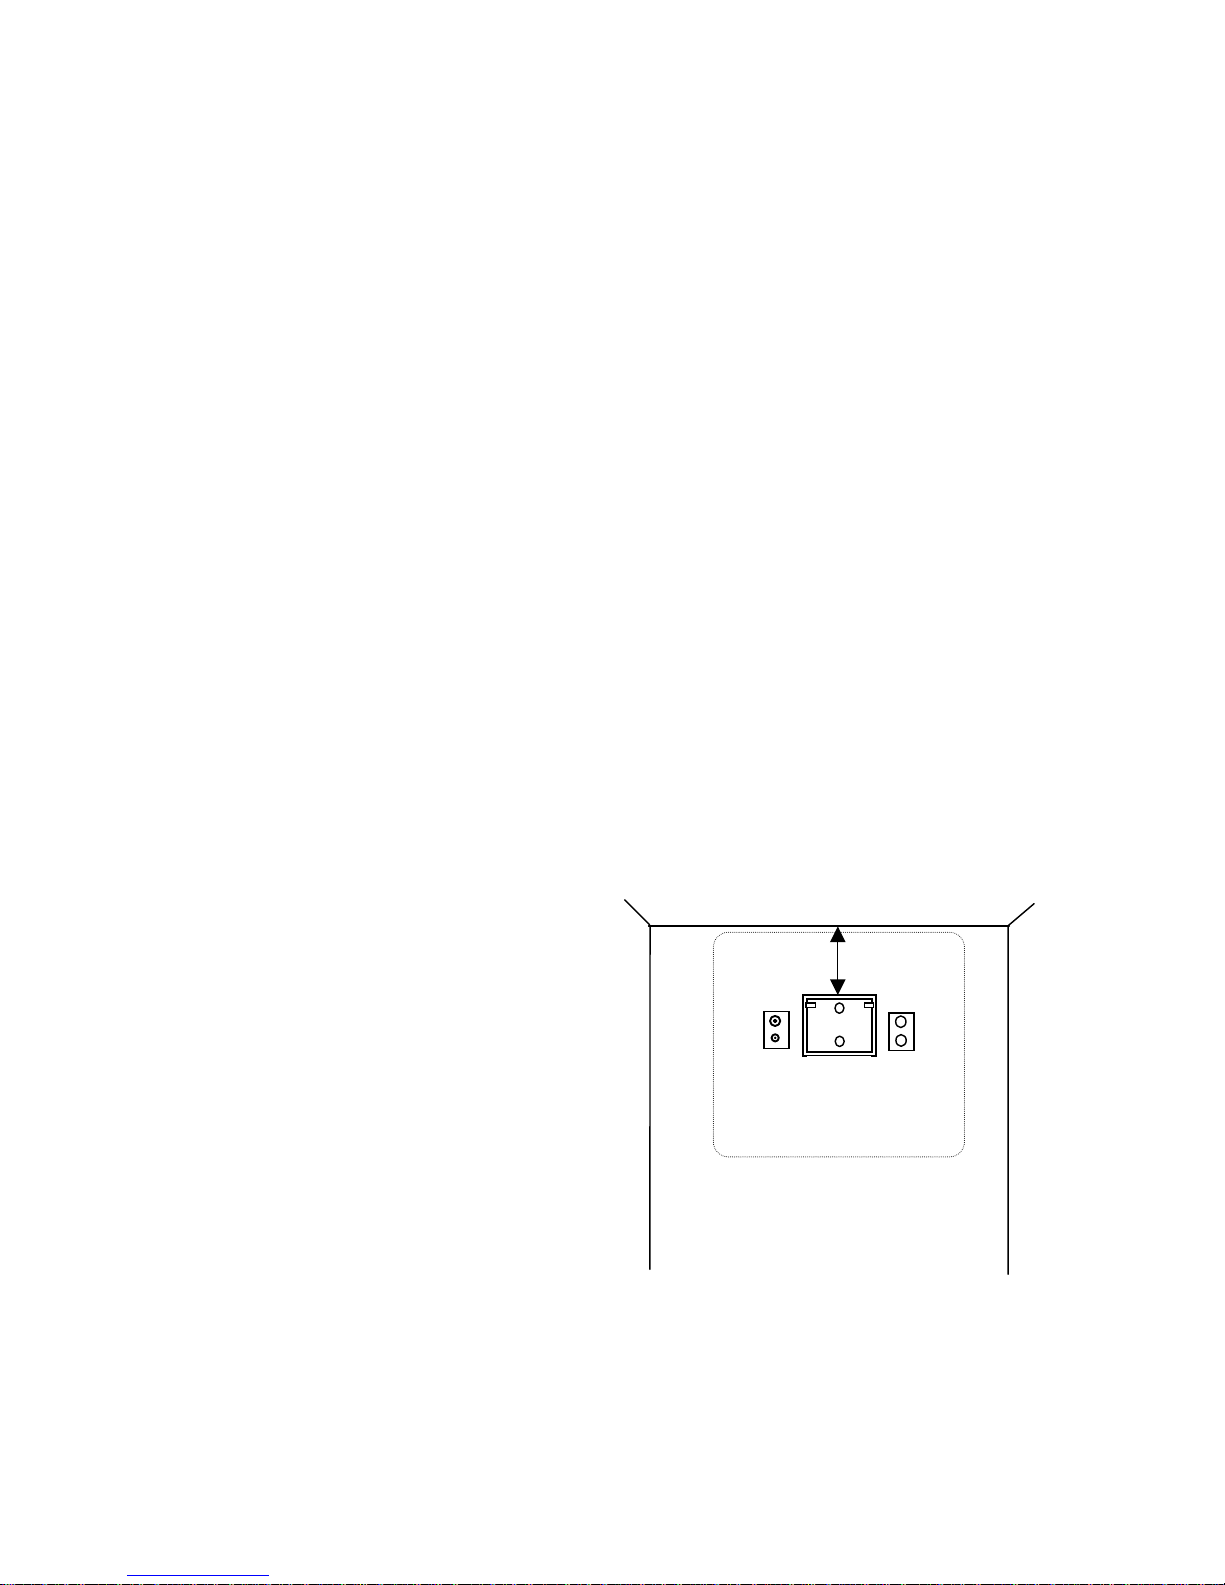
WALL MOUNTING THE LCD TV WITH THE SUPPLIED BRACKET
1. Select a location on the wall
approximately 9 inches below the
ceiling. Position the Wall Bracket and
locate two mounting holes. Secure the
bracket to the wall (mounting hardware
is not included).
2. Position the Back Mount on the LCD
TV cabinet. Attach with four M4
screws provided.
3. Mate the Back Mount to the Wall
Bracket making sure the pivot bolts are
retained in the “L” shaped slot.
Secure with two 10x32 pilfer screws.
4. Slide the Power Pack into the metal
holster. Connect the DC Power Plug
into the “DC 15V” connector on the
back of the TV.
Connect the AC line cord.
5. The TV’s tilt can be adjusted by
loosening both Pilfer Screws, adjusting
tilt, and then tighten.
CABLE
CROSS-ROOM
WIRING
P20LCD 20” Vert x 23” Horiz
Wall Bracket
9”
C
NOT TO SCALE
- 5 -
Page 6
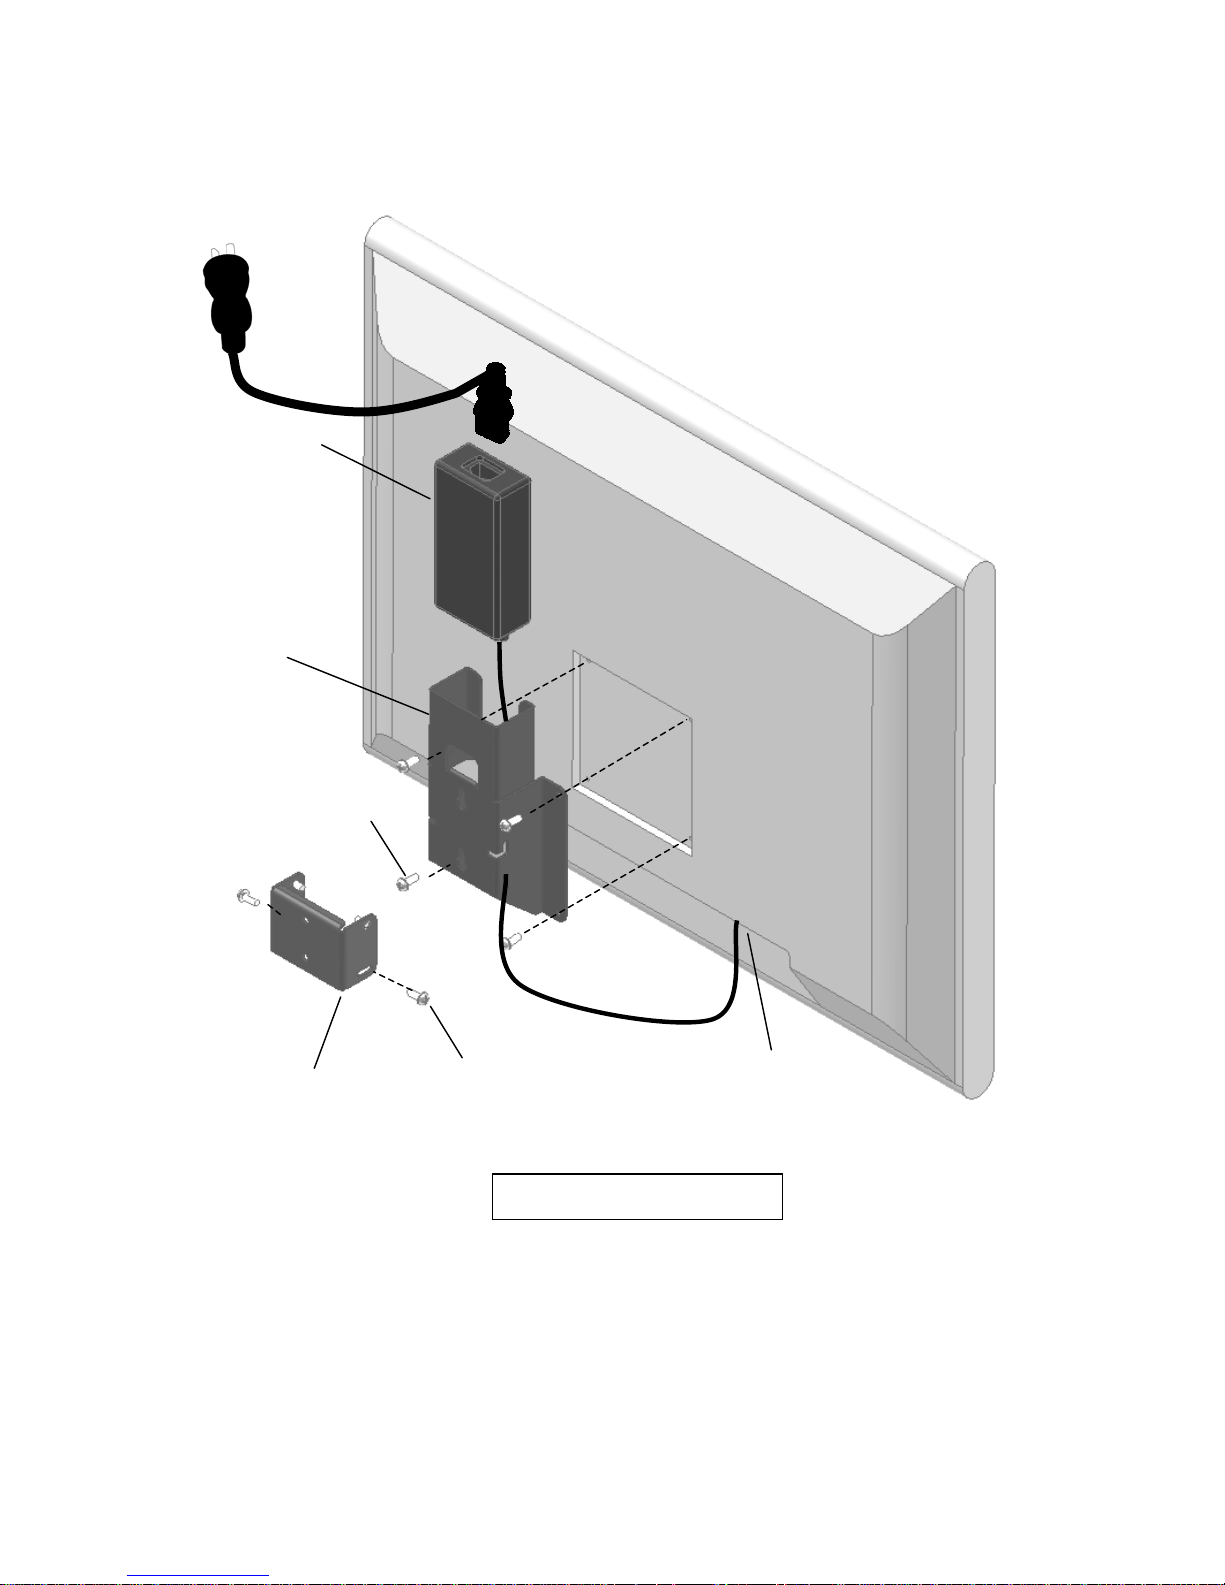
Back Mount
Wall Bracket
Power Pack
M4 Screws (4)
Pilfer Screws (2)
Installation Exploded View
Document Number: PD196-040 Rev4
DC Power Plug
PDI-P20LCD User Manual
- 6 -
Page 7
Document Number: PD196-040 Rev4
PDI-P20LCD User Manual
ACROSS-ROOM WIRING
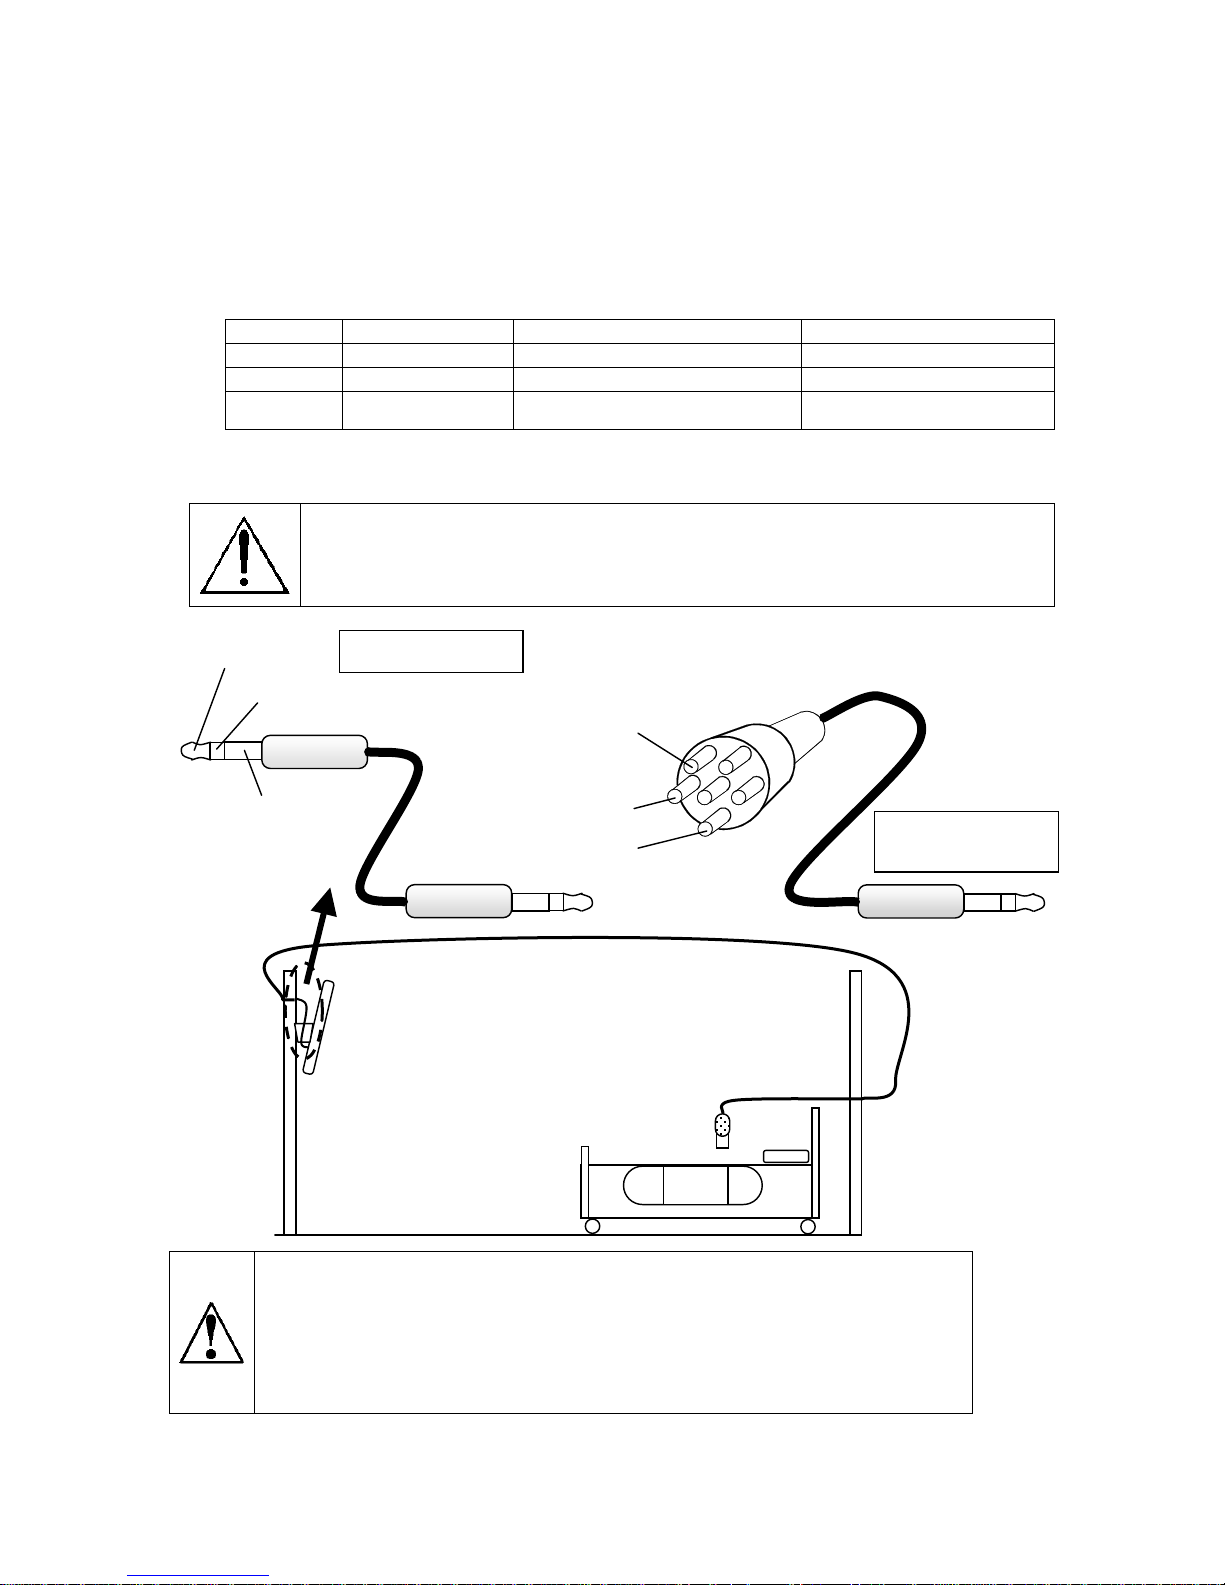
A ¼” stereo style pillow speaker (pendant control) jack is located on the TV’s connector panel on
the backside. The PDI-P20LCD is designed to work with either a digital pillow speaker or a
single-button analog (switch-style) pillow speaker. The PDI-P20LCD also supports certain style
pillow speakers with a number pad for direct channel access. The following pillow speakers have
been tested with the PDI-P20LCD. Please contact the pillow speaker vendor directly for an
additional listing of models and available options.
Make Analog Digital Digital Direct Access
Curbell
Medtek
Crest
3103-001 3D0103096000ZM0-001 D0108-A0Z-R0001
A1833-087 A1871-085T A1552-087D, A1871-087D,
XL031E0AXXXZ1N1
XL031E1AJ00Z1N1
XL031X0AXXXZ1N1
XL031X1AJ00Z1N1
Use type SJ cord or better for the across room wiring between the TV and the bedside pendant
control. A pin-out is provide below.
WARNING: DO NOT connect the pillow speaker circuit Common to earth ground.
Grounding of the Common will defeat the isolation circuitry of the PDI-P20LCD and
possibly expose the patient to harmful shock currents should a wiring fault occur.
SPEAKER
DATA / SWITCH
Optional Jumper
SPEAKER
COMMON
COMMON
DATA / SWITCH
Jumper Supplied
with TV
CAUTION Installer. This product is not provided with a pendant control. It is
expected that the institution (or hospital) will provide one for attachment to the
Pillow Speaker Jack on the back of the TV. As part of the installation,
examine the pendant control to verify whether a marking similar to the one
below appears on it:
‘CAUTION – Risk of fire if used in oxygen-enriched atmosphere – return to
hook or holder after use.’
- 7 -
Page 8
Document Number: PD196-040 Rev4
PDI-P20LCD User Manual
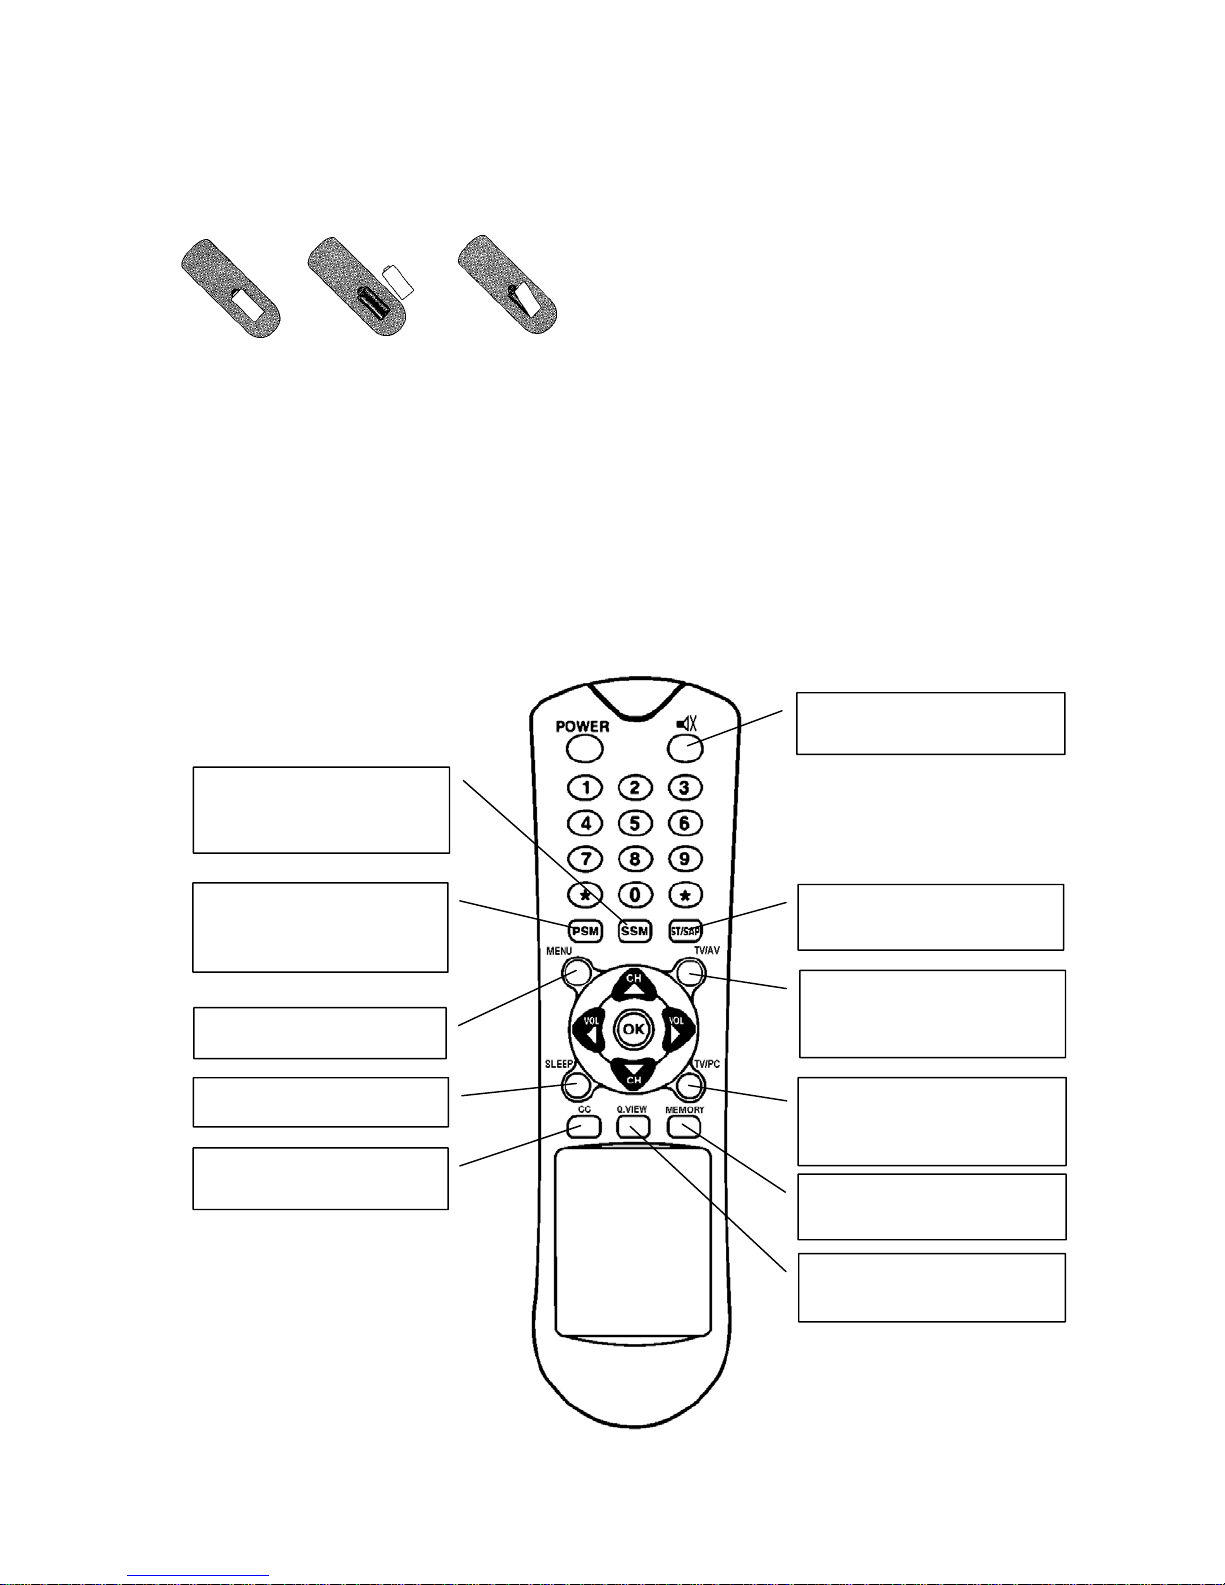
REMOTE
BATTERY INSTALLATION
1. Pull the battery cover upward in the
arrow direction to remove.
2. Insert two “AAA” batteries. Observe
USING THE REMOTE
1. Make sure there are no objects between the remote control and its sensor.
2. Don’t store the remote control near a heater or damp place.
3. A strong impact to the remote control may cause damage and operational failure to the
remote.
4. Fluorescent lights, sunlight, or other strong light directed on the front of the TV may
interrupt the remote signal. In this case, position the TV away from the light in another
direction to restore operation of the remote control.
FUNCTIONS
All TV functions can be controlled using the remote control.
Sound Status Memory –
Recalls your preferred
Sound Setting
Picture Status Memory –
Recalls your preferred
Picture Settings
Displays a Main Menu
Sets the Sleep Timer
Sets the Closed Caption
Function
the correct polarity.
3. Replace the battery cover.
Turns the Speaker Sound
OFF and ON.
Adjusts the MTS-Stereo,
Mono, and SAP Audio
Selects between TV,
Component, Video, or SVideo
Disabled – PDI-P20LCD
does not support PC
Inputs
Stores or Deletes the
Current Channel
Returns to Previous
Viewed Channel
- 8 -
Page 9
Document Number: PD196-040 Rev4
V
A
PDI-P20LCD User Manual
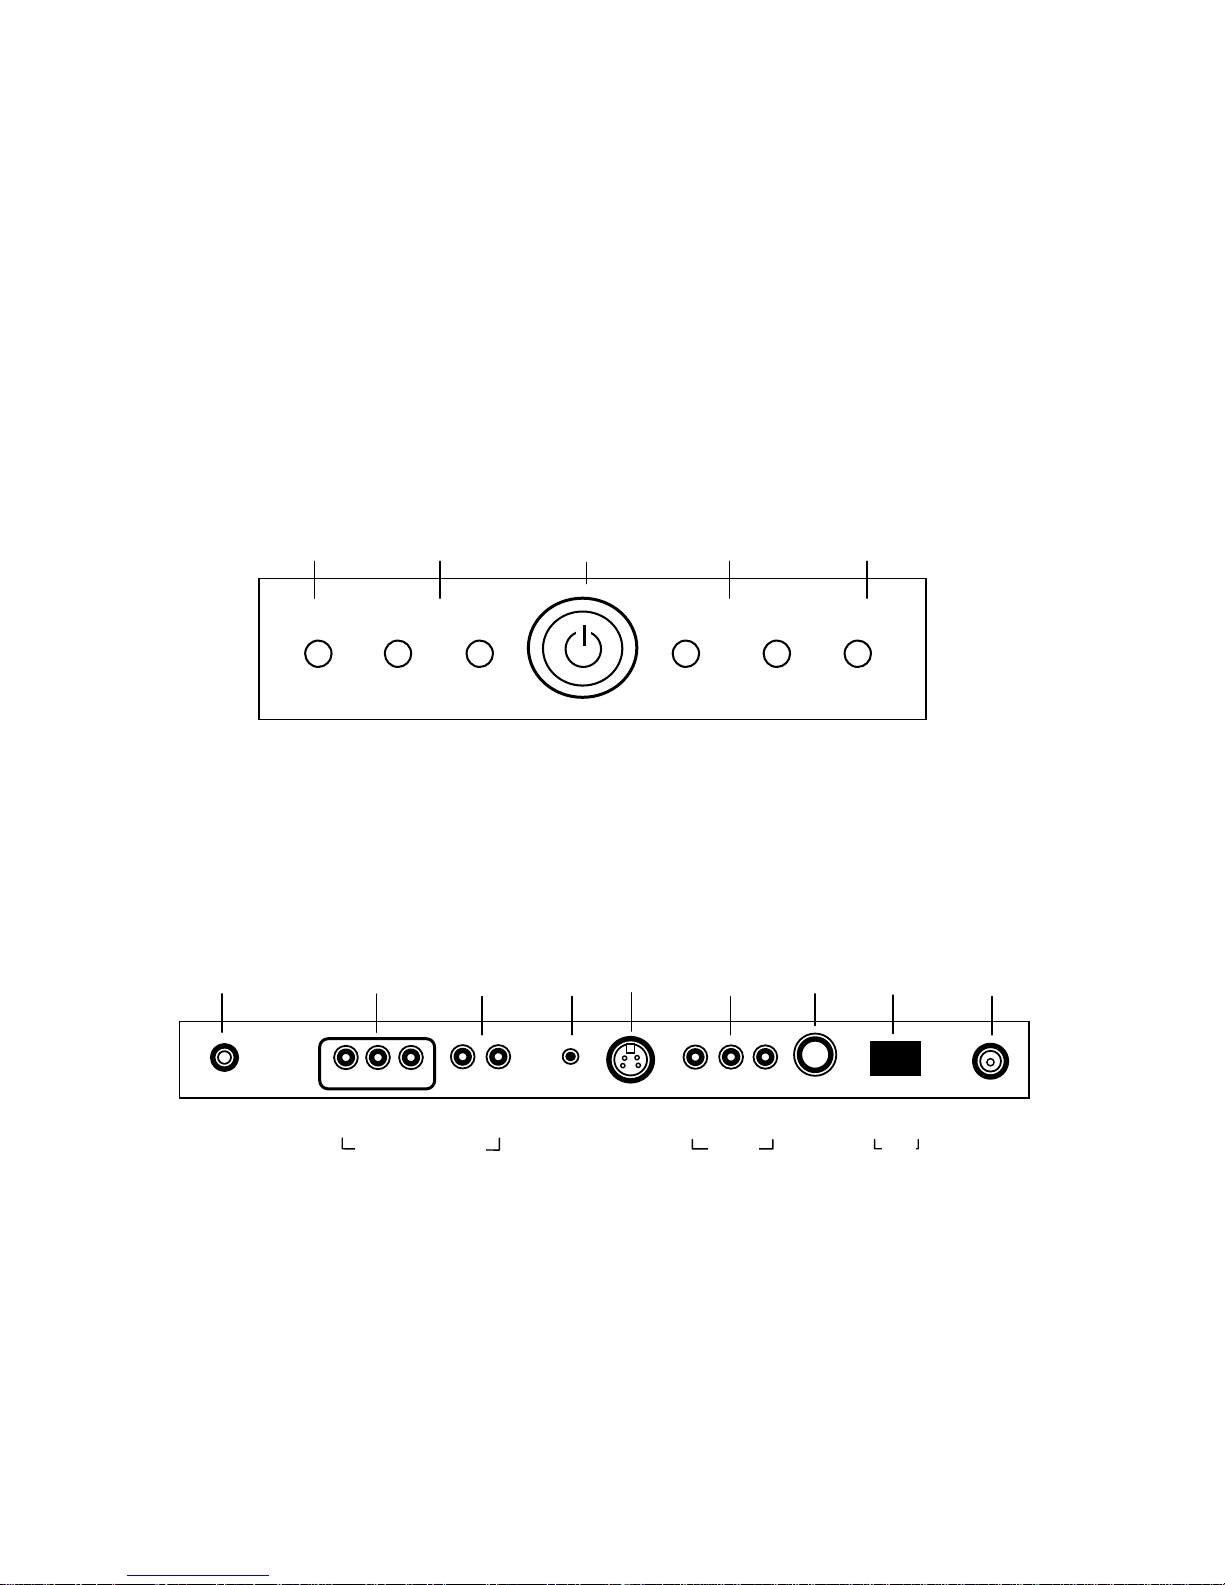
Controls
1. MENU – Displays on-screen menu. The MENU button can be disabled using the remote
control to prevent patient and visitor tampering – see the “Special” menu and “Lock”
instructions elsewhere in this manual for details.
2. ▼CH ▲ – Selects a TV channel or a MENU item when the on-screen menu is active.
3. POWER – Turns the TV On and Off. Illuminates red when the TV is Off. Illuminates
green when the TV is On. Flashes when an IR remote control signal is detected by the
TV.
4. ◄ VOL ► - Adjusts the internal TV speaker or external pillow speaker volume up or
down. Also adjusts a selected menu item when the on-screen menu is active.
5. TV/AV – Selects either TV, COMPONENT, VIDEO, or S-VIDEO. The TV/AV button can
be disabled using the remote control to prevent patient and visitor tampering – see the
“Special” menu and “Lock” instructions elsewhere in this manual for details.
1 2 3 4 5
▼ CH ▲ ◄ VOL ►MENU
TV/A
Connections
Connection Panel
The connection panel is located on the back of the TV below the back wall mount and provides
connections to external equipment.
1 2 3 4 5 6 7 8 9
DC 15V
▲
▲ ▲ ▲
Y CB CR
COMPONENT IN
▲ ▲
L R
▲
H/P
▲
S-VIDEO
▲ ▲ ▲
VIDEO L(MONO) R
/V IN
1. DC 15V – Connection point for the external power supply.
2. COMPONENT IN – Component video input.
3. L R – Component audio input.
4. H/P – Stereo Headphone output.
5. S-VIDEO – S-Video input.
6. A/V IN – VCR video and audio input.
7. PILLOW – Digital pillow speaker output.
8. SPK – On Off switch for the internal TV speakers and H/P jack.
9. ANT. – CATV RF cable input.
▲
PILLOW
0 I
▲ ▲
OFF ON
SPK
▲
ANT.
- 9 -
Page 10
Document Number: PD196-040 Rev4
A
A
PDI-P20LCD User Manual
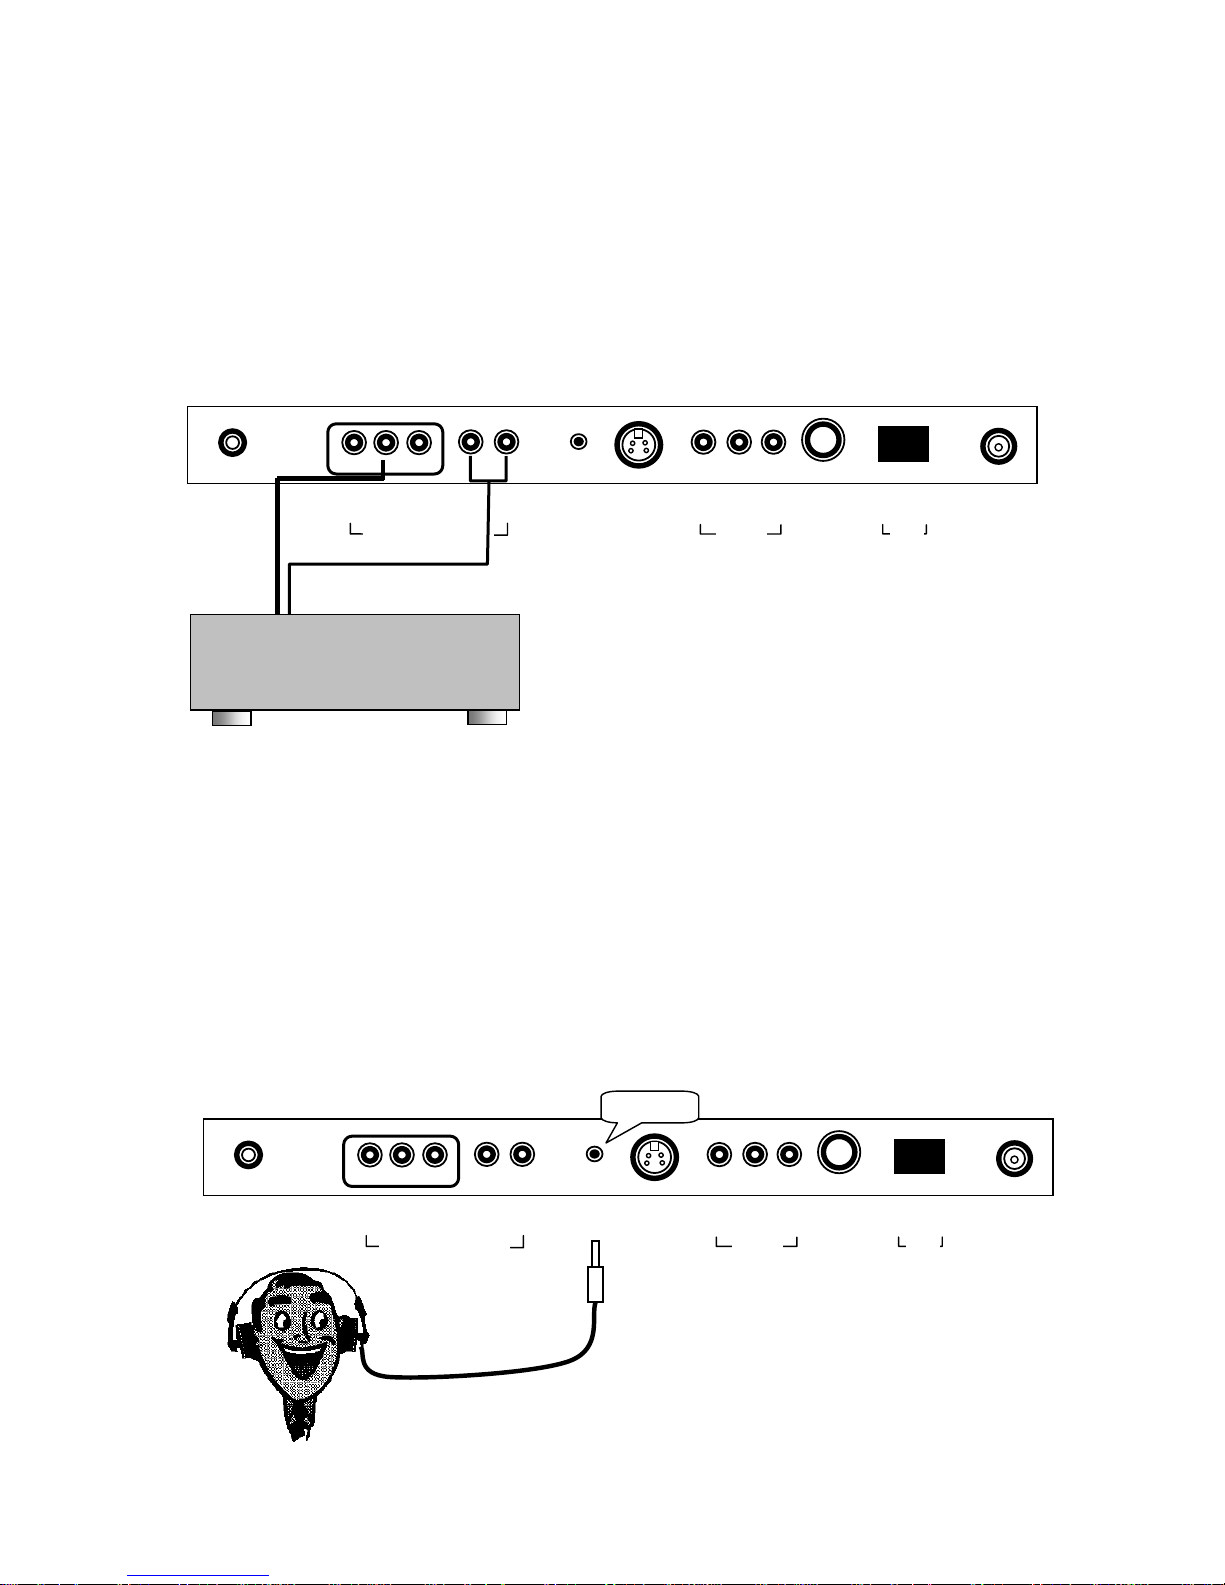
COMPONENT IN (DVD)
1. Connect the Video outputs (Y CB CR) on a DVD to the COMPONENT IN of the TV.
Note: The cable and connectors are color coded – just match the colors.
2. Press the TV/AV button to select Component mode. The mode is displayed at the top
right of the screen. The TV’s TV/AV button may be disabled to prevent patient or visitor
tampering – see the “Special” menu and “Lock” instructions elsewhere in this manual for
details.
3. Press the PLAY button on the DVD.
▲
DC 15V
▲ ▲ ▲
Y CB CR
COMPONENT IN
▲ ▲
L R
▲
H/P
▲
S-VIDEO
▲ ▲ ▲
VIDEO L(MONO) R
/V IN
▲
PILLOW
0 I
▲ ▲
OFF ON
SPK
▲
ANT.
DVD PLAYER
H/P (Headphones)
You can listen to the sound using headphones.
NOTE: The SPK switch must be ON for the headphones to operate. If the SPK switch is OFF,
the headphones will also be turned off.
1. Insert the headphone plug into the headphone jack on the TV.
Note: the TV speakers will be shut off whenever a headphone is plugged into the
headphone jack.
2. Adjust the headphone volume by press on the VOL◄► button.
3. Press the MUTE button on the remote control to silence the headphone.
HEADPHONE
▲
DC 15V
▲ ▲ ▲
Y CB CR
COMPONENT IN
▲ ▲
L R
▲
H/P
▲
S-VIDEO
▲ ▲ ▲
VIDEO L(MONO) R
/V IN
▲
PILLOW
0 I
▲ ▲
OFF ON
SPK
ANT.
▲
- 10 -
Page 11
Document Number: PD196-040 Rev4
A
A
PDI-P20LCD User Manual
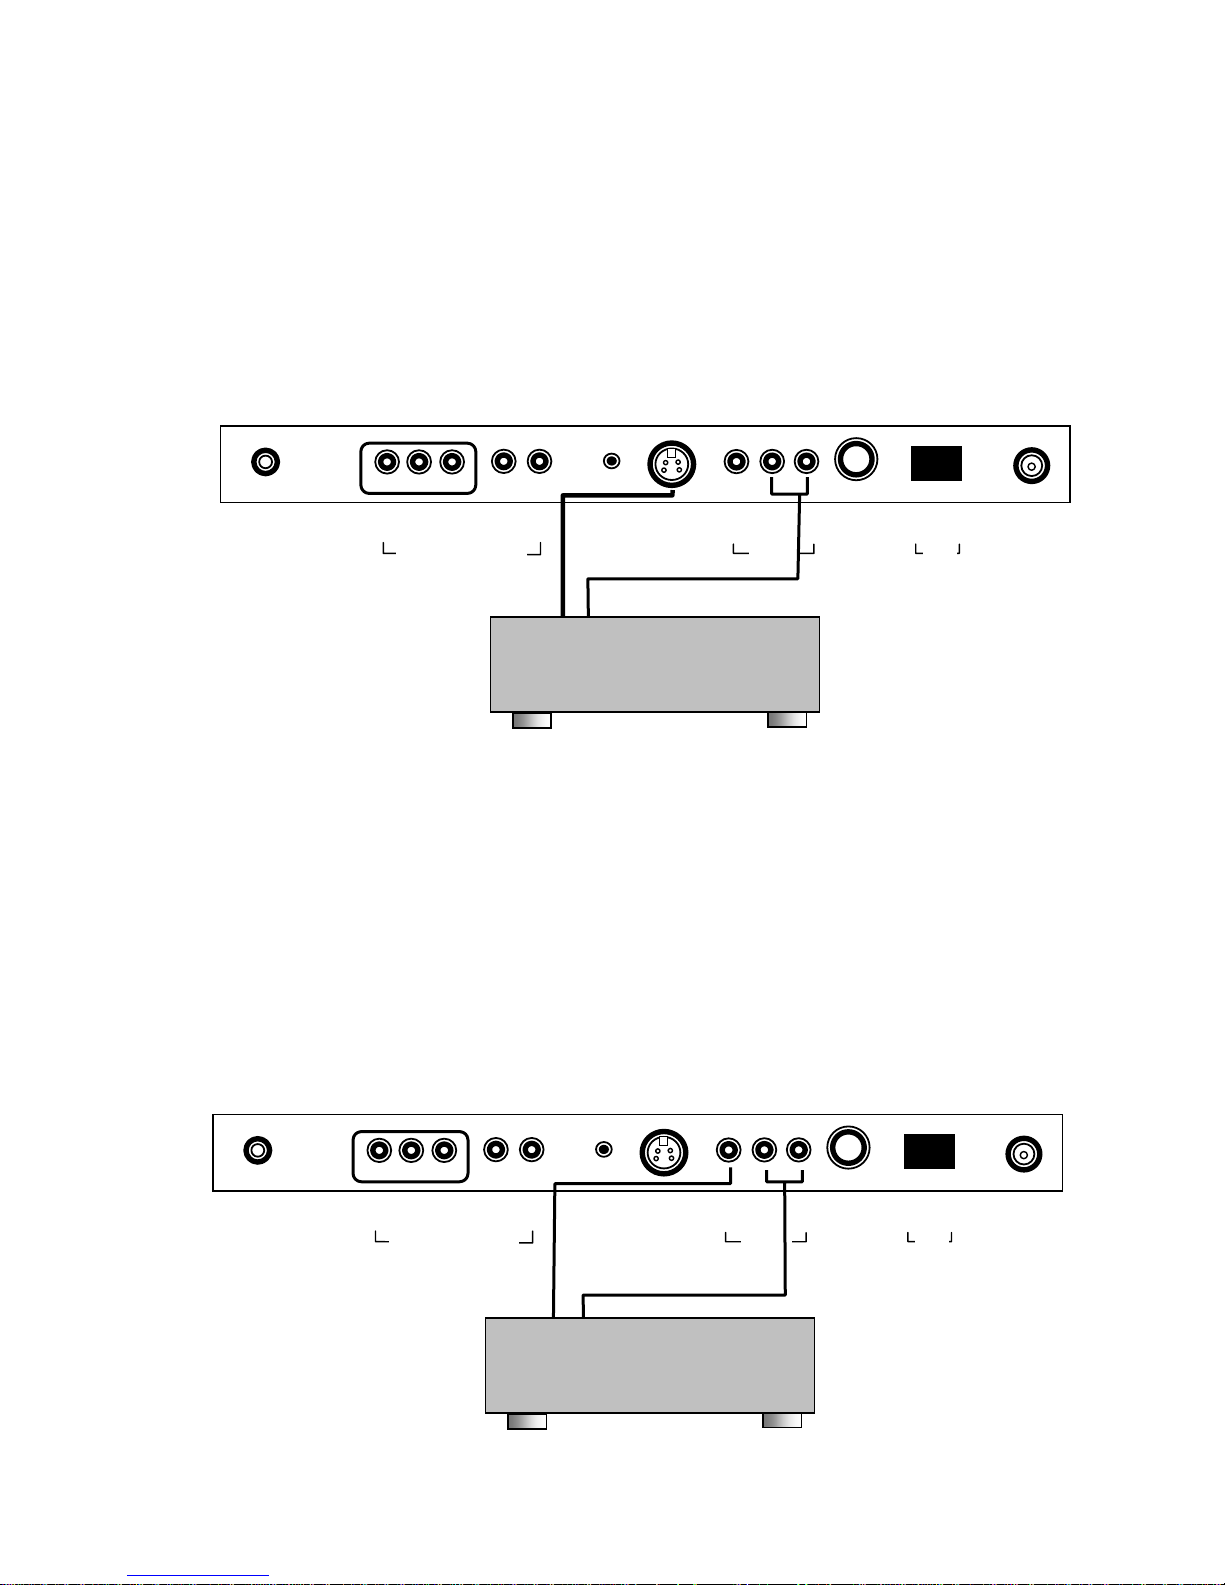
S-VIDEO (VCR or DVD)
Many VCRs provide S-Video signals for improved picture quality.
1. Connect the S-VIDEO output of a VCR to the S-VIDEO input on the TV.
2. Connect the audio cables from the S-VIDEO VCR to the L(MONO) R inputs of the TV.
3. Select S-VIDEO mode by pressing the TV/AV button repeatedly. The TV’s TV/AV button
may be disabled to prevent patient or visitor tampering – see the “Special” menu and
“Lock” instructions elsewhere in this manual for details.
4. Press the PLAY button on the VCR.
▲
DC 15V
▲ ▲ ▲
Y CB CR
COMPONENT IN
▲ ▲
L R
▲
H/P
▲
S-VIDEO
▲ ▲ ▲
VIDEO L(MONO) R
/V IN
▲
PILLOW
0 I
▲ ▲
OFF ON
SPK
S-VIDEO VCR or DVD
A/V IN (VCR)
1. Connect the audio outputs from the VCR (L, R) to the A/V in on the TV.
Connections are color code.
2. Connect the video output from the VCR to the A/V in on the TV.
Connection is color-coded.
3. Select VIDEO mode by pressing the TV/AV button repeatedly. The TV/AV button can be
disabled using the remote control to prevent patient or visitor tampering – see the
“Special” menu and “Lock” instructions elsewhere in this manual for details.
4. Press the PLAY button on the VCR.
▲
DC 15V
▲ ▲ ▲
Y CB CR
COMPONENT IN
▲ ▲
L R
▲
H/P
▲
S-VIDEO
▲ ▲ ▲
VIDEO L(MONO) R
/V IN
▲
PILLOW
0 I
▲ ▲
OFF ON
SPK
VCR
▲
ANT.
▲
ANT.
- 11 -
Page 12
Document Number: PD196-040 Rev4
A
PDI-P20LCD User Manual
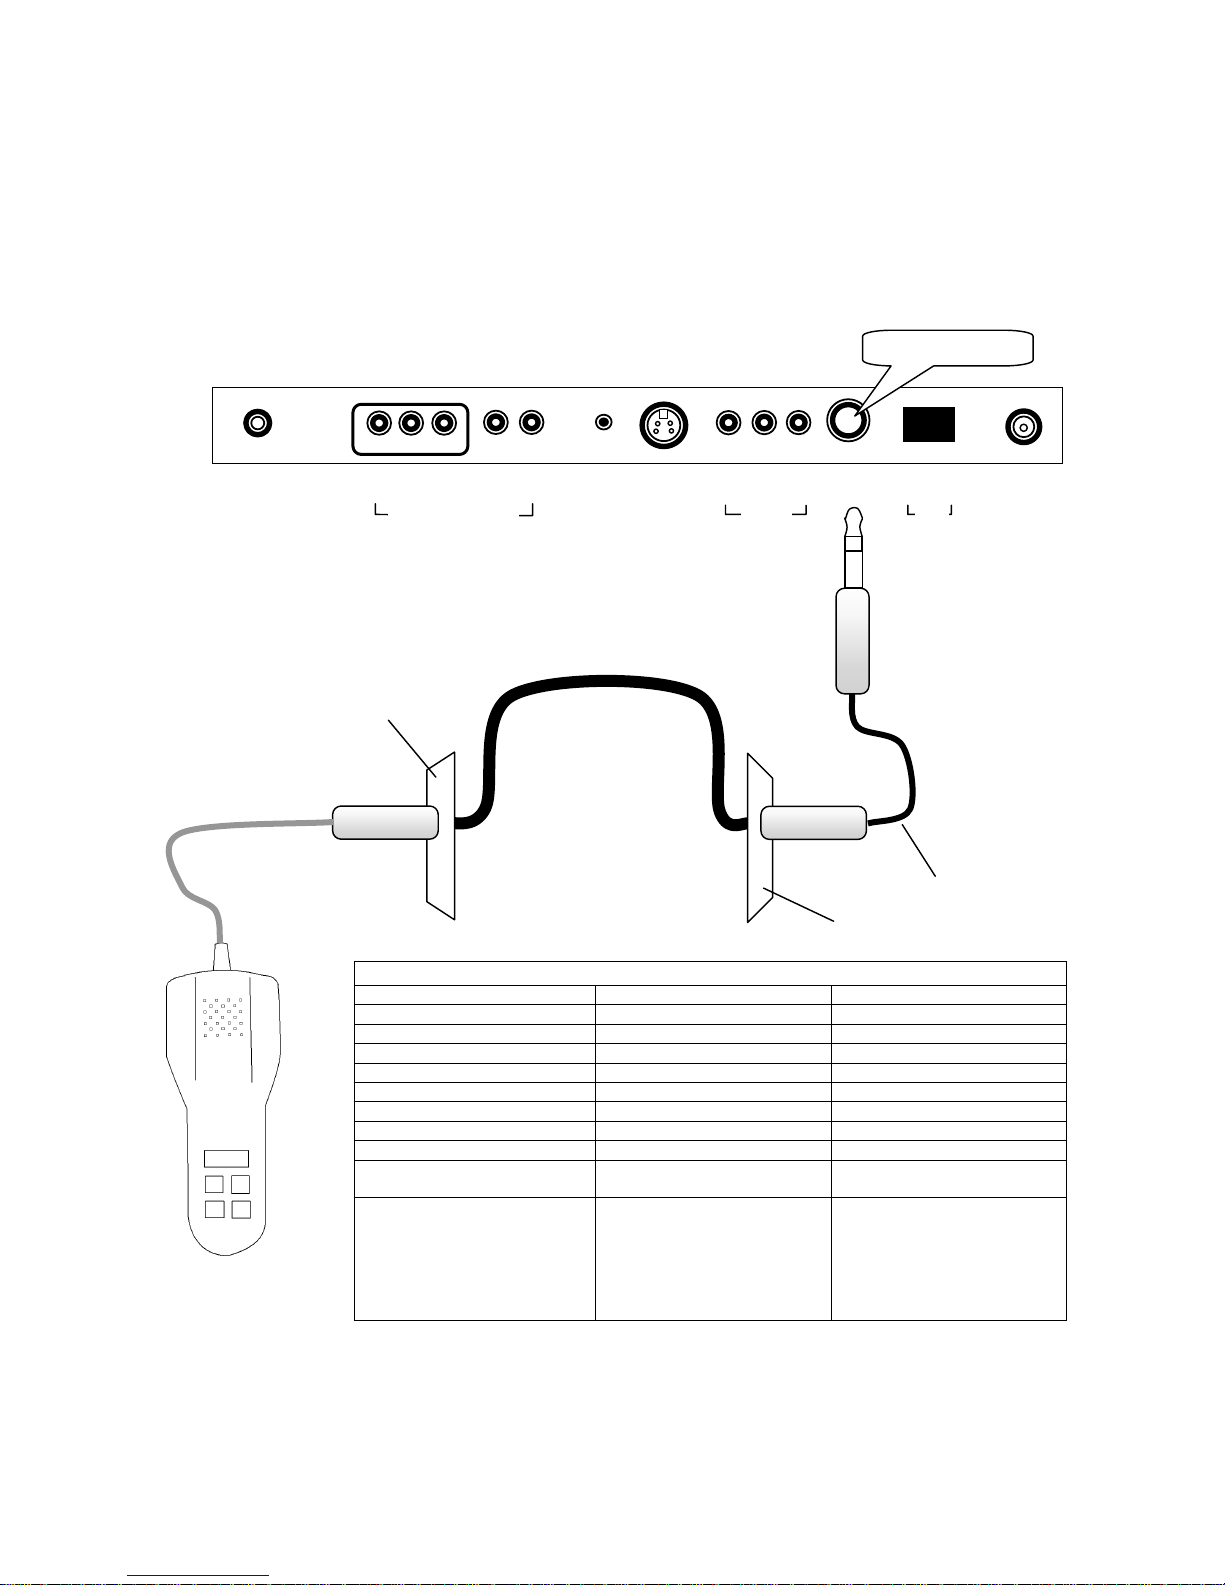
PILLOW
A ¼” stereo style pillow speaker (pendant control) jack is located on the TV’s connector panel on
the backside. See Page 7 for a partial list of compatible pillow speakers. Please contact the
pillow speaker vendor directly for an additional listing of models and available options.
1. Connect the pillow speaker to the PILLOW jack.
2. Simple control of the TV is now possible using the pillow speaker.
NOTE: If the pillow speaker’s volume is too low, increase the volume on the TV using the
VOL◄► buttons.
PILLOW SPEAKER
0 I
▲
DC 15V
Bedside Wall Plate
▲ ▲ ▲
Y CB CR
COMPONENT IN
▲ ▲
L R
▲
S-VIDEO
H/P
Across Room
Wiring
▲
VIDEO L(MONO) R
▲ ▲ ▲
/V IN
▲
PILLOW
Wall Plate Behind TV
▲ ▲
OFF ON
SPK
Jumper
▲
ANT.
SUPPORTED TV FUNCTIONS
DIGITAL DIRECT ACCESS DIGITAL PILLOW SPEAKER SINGLE BUTTON (SWITCH)
POWER ON/OFF POWER ON/OFF POWER ON/OFF
CHANNEL UP CHANNEL UP CHANNEL UP
CHANNEL DOWN CHANNEL DOWN
VOLUME UP VOLUME UP
VOLUME DOWN VOLUME DOWN
CAPTIONS CAPTIONS
MUTE MUTE
Numbers 0-9
DIRECTIONS DIRECTIONS DIRECTIONS
Enter desired channel number
directly on Number Pad of
Direct Access type pillow
speakers.
Press each individual pillow
speaker button to operate
respective TV function.
1. Press the Button once to
turn TV ON.
2. Press the Button again
to channel up.
3. Press and Hold Button
down to turn TV OFF.
- 12 -
Page 13
Document Number: PD196-040 Rev4
A
A
PDI-P20LCD User Manual
SPK
The internal TV’s speakers can be turned OFF for privacy. TV sound will only be heard using the
pillow speaker. NOTE: The SPK switch also turns OFF the H/P headphone jack as well.
1. To turn Off the TV’s speakers, press the “O”.
2. To turn On the TV’s speakers, press the “I”.
Note: Pillow Speaker sound is always present.
0 I
DC 15V
▲
▲ ▲ ▲
Y CB CR
COMPONENT IN
▲ ▲
L R
▲
H/P
▲
S-VIDEO
▲ ▲ ▲
VIDEO L(MONO) R
/V IN
▲
PILLOW
▲ ▲
OFF ON
SPK
▲
ANT.
ANT.
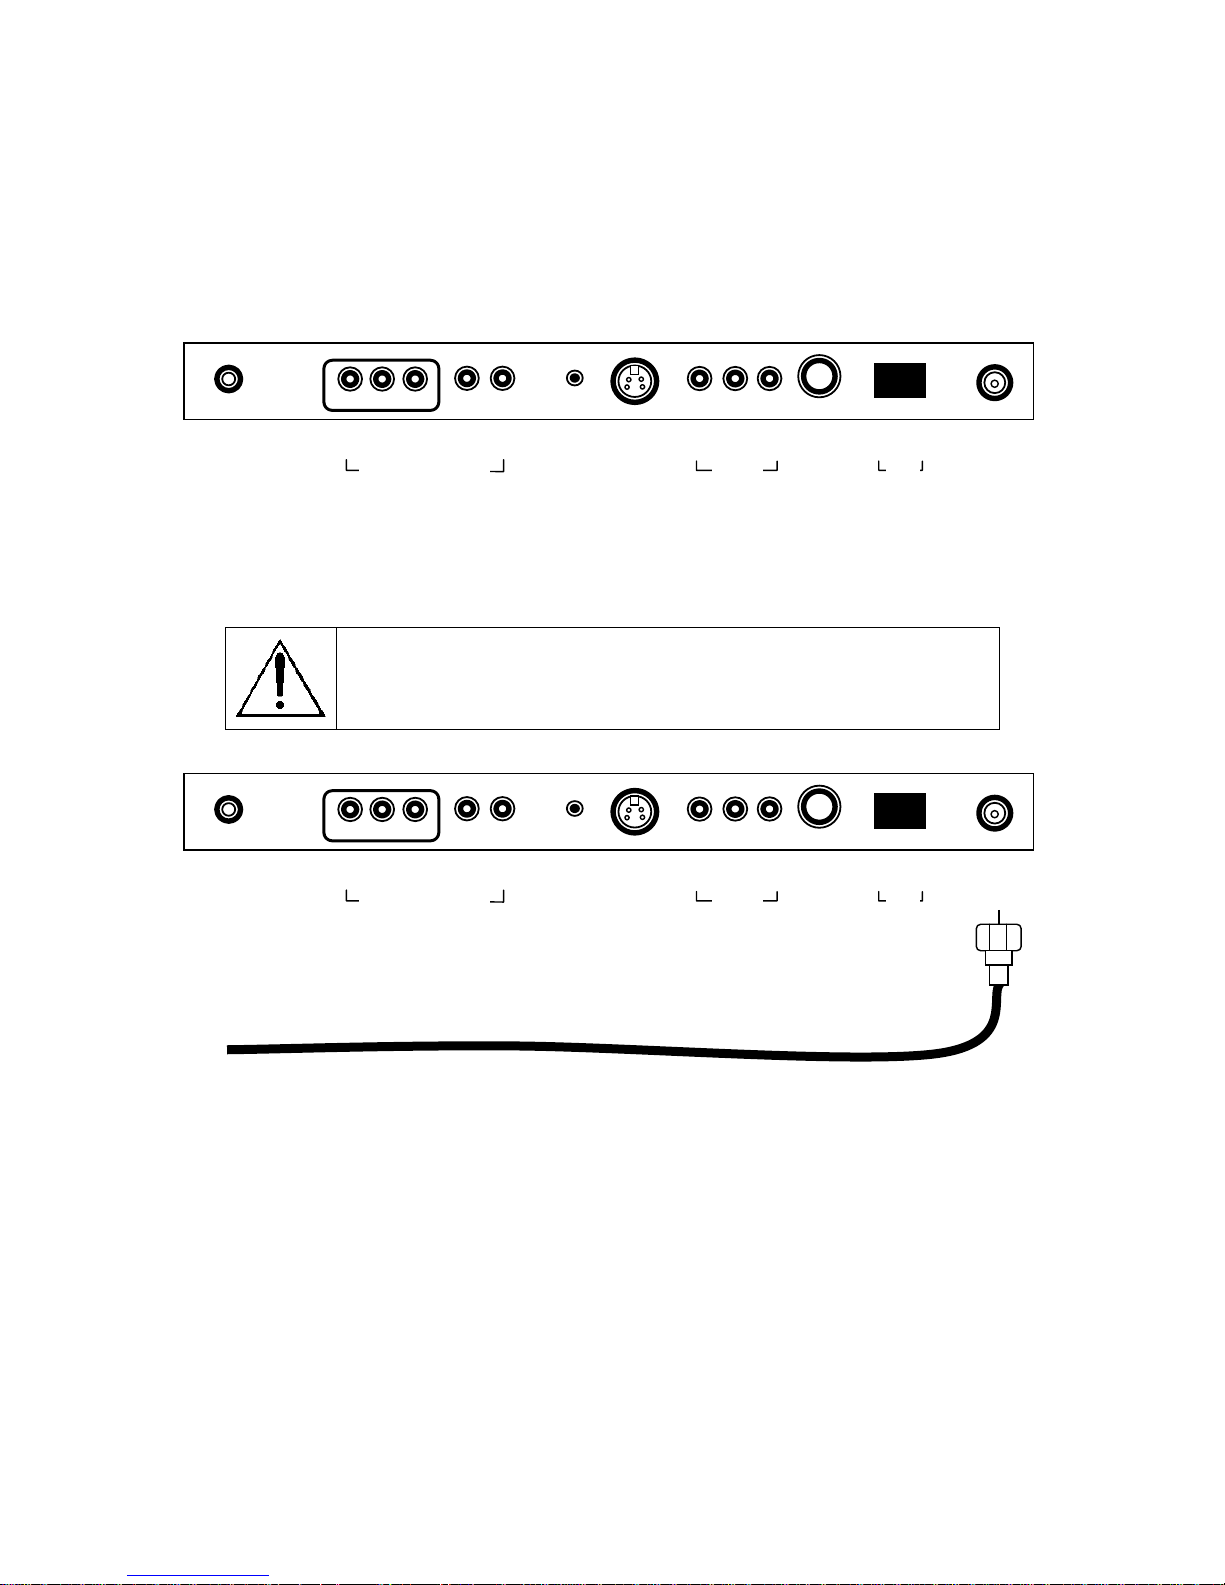
Connect the hospital’s cable to this fitting.
CAUTION: Some hospital cable systems provide power voltage on the
coaxial cable. The PDI-P20LCD is NOT designed to be powered via a
coaxial cable. Do not connect to a powered coaxial cable. Damage will
result to the TV.
0 I
DC 15V
▲
▲ ▲ ▲
Y CB CR
COMPONENT IN
▲ ▲
L R
▲
H/P
▲
S-VIDEO
▲ ▲ ▲
VIDEO L(MONO) R
/V IN
▲
PILLOW
▲ ▲
OFF ON
SPK
▲
ANT.
- 13 -
Page 14
MENUS
A
A
A
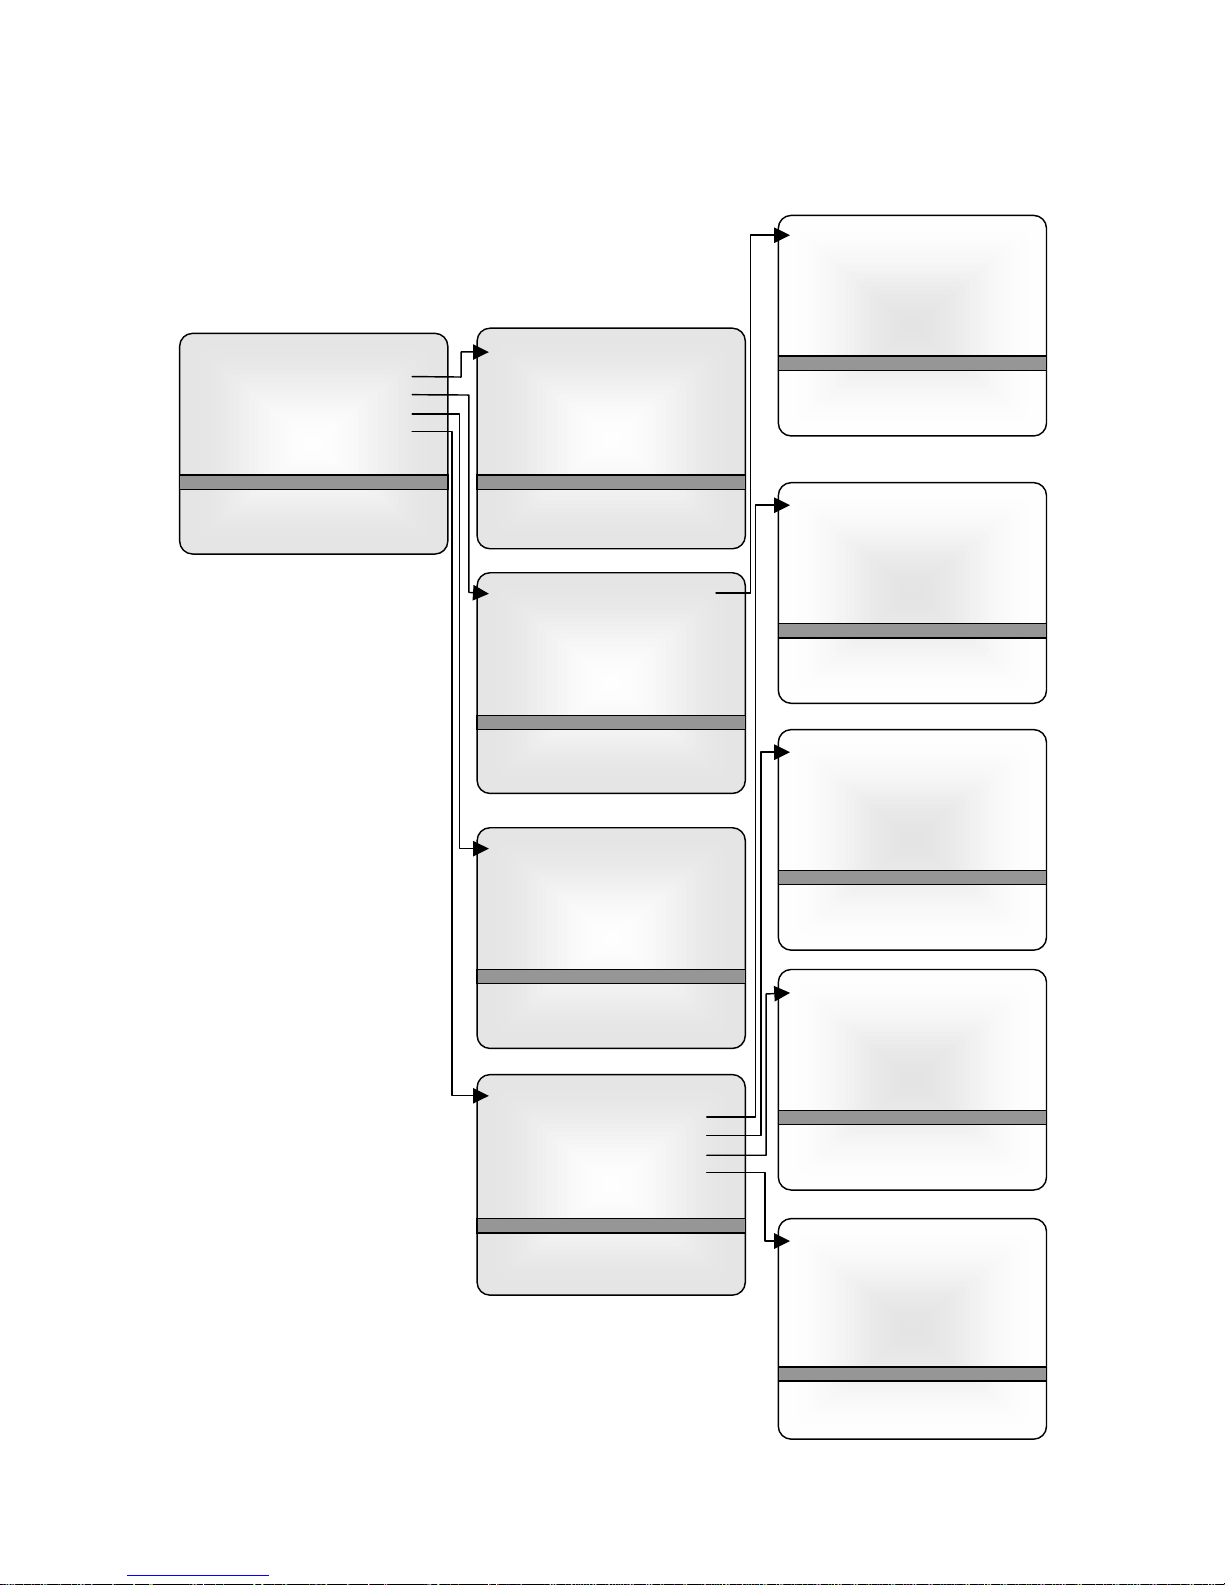
MENU TREE
The on-screen menus are navigated by first pressing the MENU
button on the remote and then using the CH ▲▼ button to
select the desired menu.
Main Menu
Picture ►
Sound ►
Special ►
Setup ►
▲▼:Move ◄►: Adjust
MENU:Return TV/AV Exit
Picture
Contrast 90
Brightness 75
Color 70
Sharpness 50
Tint 0
▲▼:Move ◄►: Adjust
MENU:Return TV/AV Exit
Sound
Equalizer ►
Balance 0
VL Off
MTS MONO
▲▼:Move ◄►: Adjust
MENU:Return TV/AV Exit
Special
Input TV
uto Sleep Off
Blue Back Off
Lock Off
▲▼:Move ◄►: Adjust
MENU:Return TV/AV Exit
Setup
uto program ►
Manual program ►
Language ►
Parental Control ►
Captions OFF
▲▼:Move ◄►: Adjust
MENU:Return TV/AV Exit
Document Number: PD196-040 Rev4
PDI-P20LCD User Manual
Equalizer
Flat ■■
Music ■■■
Movie ■■■■
Speech ■■■■■
User ■■■■■■■
▲▼:Move ◄►: Adjust
MENU:Return TV/AV Exit
0.1 0.5 1.5 5.0 10Khz
Auto Program
Tuner mode TV
Start
▲▼:Move ◄►: Adjust
MENU:Return TV/AV Exit
Manual Program
Fine ►►►
Storage On
▲▼:Move ◄►: Adjust
MENU:Return TV/AV Exit
Language
English
Français
Espaňol
▲▼:Move ◄►: Adjust
MENU:Return TV/AV Exit
Parental Control
Movie rating ►
MPAA Unblock
Ect. Sources Unblock
Block Hour 00 Hours
Password To Set ◄►
Parental Lock Off
▲▼:Move ◄►: Adjust
MENU:Return TV/AV Exit
- 14 -
Page 15

Document Number: PD196-040 Rev4
PDI-P20LCD User Manual
AUTO PROGRAM
Automatically memorizes all of the receivable channel on a hospital’s cable TV system.
Press the MENU button on the remote.
1. Select the Setup menu.
2. Select Auto Program.
3. Press the CH▲▼ button and select Tuner Mode.
4. Select the TV cable system in your hospital with the
VOL◄► button.
NOTE: Tuner Mode = TV is used for a cable system that
has a master antenna and usually can only receive local
TV Stations.
Tuner Mode = CATV is used when a hospital cable
system has both local and satellite TV channels
Auto Program
Tuner mode TV
Start
▲▼:Move ◄►: Adjust
MENU:Return TV/AV Exit
available. CATV tuner mode is most common in
hospital TV cable systems.
5. Select the Start menu with the CH▲▼ button.
6. Press the VOL◄► button to start Auto Programming. The TV will now search all
available channels looking for signals and memorizing those channels that are active.
Occasionally, strong over-the-air stations sneak onto the cable system. To remove
unwanted channels see Manual Program.
7. Press the MENU button to finish auto programming.
8. Press the TV/AV button to return to normal TV viewing.
HINTS
• Press the CH▲▼ buttons to check the memorized channels after auto programming is
finished.
• If you press the MENU button during auto programming, the function will stop and only
channels programmed up to that point in time would remain.
• The auto programming function can memorize only those channels that are active at the time
of programming. For example, a hospital educational channel may not be actively playing a
tape and would not be memorized using auto program. See the Manual Program section for
adding and deleting channels.
MANUAL PROGRAM
Manual Program allows you to manually add or delete channels.
1. Tune to the channel you wish to add or delete.
Press the MENU button.
2. Select the Setup menu.
3. Select the Manual Program menu.
4. To fine tune the channel, select the Fine menu and
adjust the received signal with the VOL◄►. Note:
Fine tuning is usually not required with today’s modern
cable TV equipment. This adjustment is best left alone.
5. Select Storage On or Off with the VOL◄►
button.
Manual Program
Fine ►►►
Storage On
▲▼:Move ◄►: Adjust
MENU:Return TV/AV Exit
With Storage On, the current channel will be stored into the TV’s memory and made
available for viewing by the patient. With Storage Off, the current channel will be
removed from the TV’s memory and not be available for viewing by the patient.
However, the deleted channel can still be viewed by directly entering the channel’s
number using the IR remote’s keypad.
6. Press the TV/AV button to return to normal TV viewing.
HINT: For quick channel programming, use the remote control’s dedicated “MEMORY” button to
directly delete a channel. To add a channel not currently in memory, enter the channel number
using the remote control’s keypad and then press the “MEMORY” button to add the channel.
- 15 -
Page 16
Document Number: PD196-040 Rev4
PDI-P20LCD User Manual
Picture
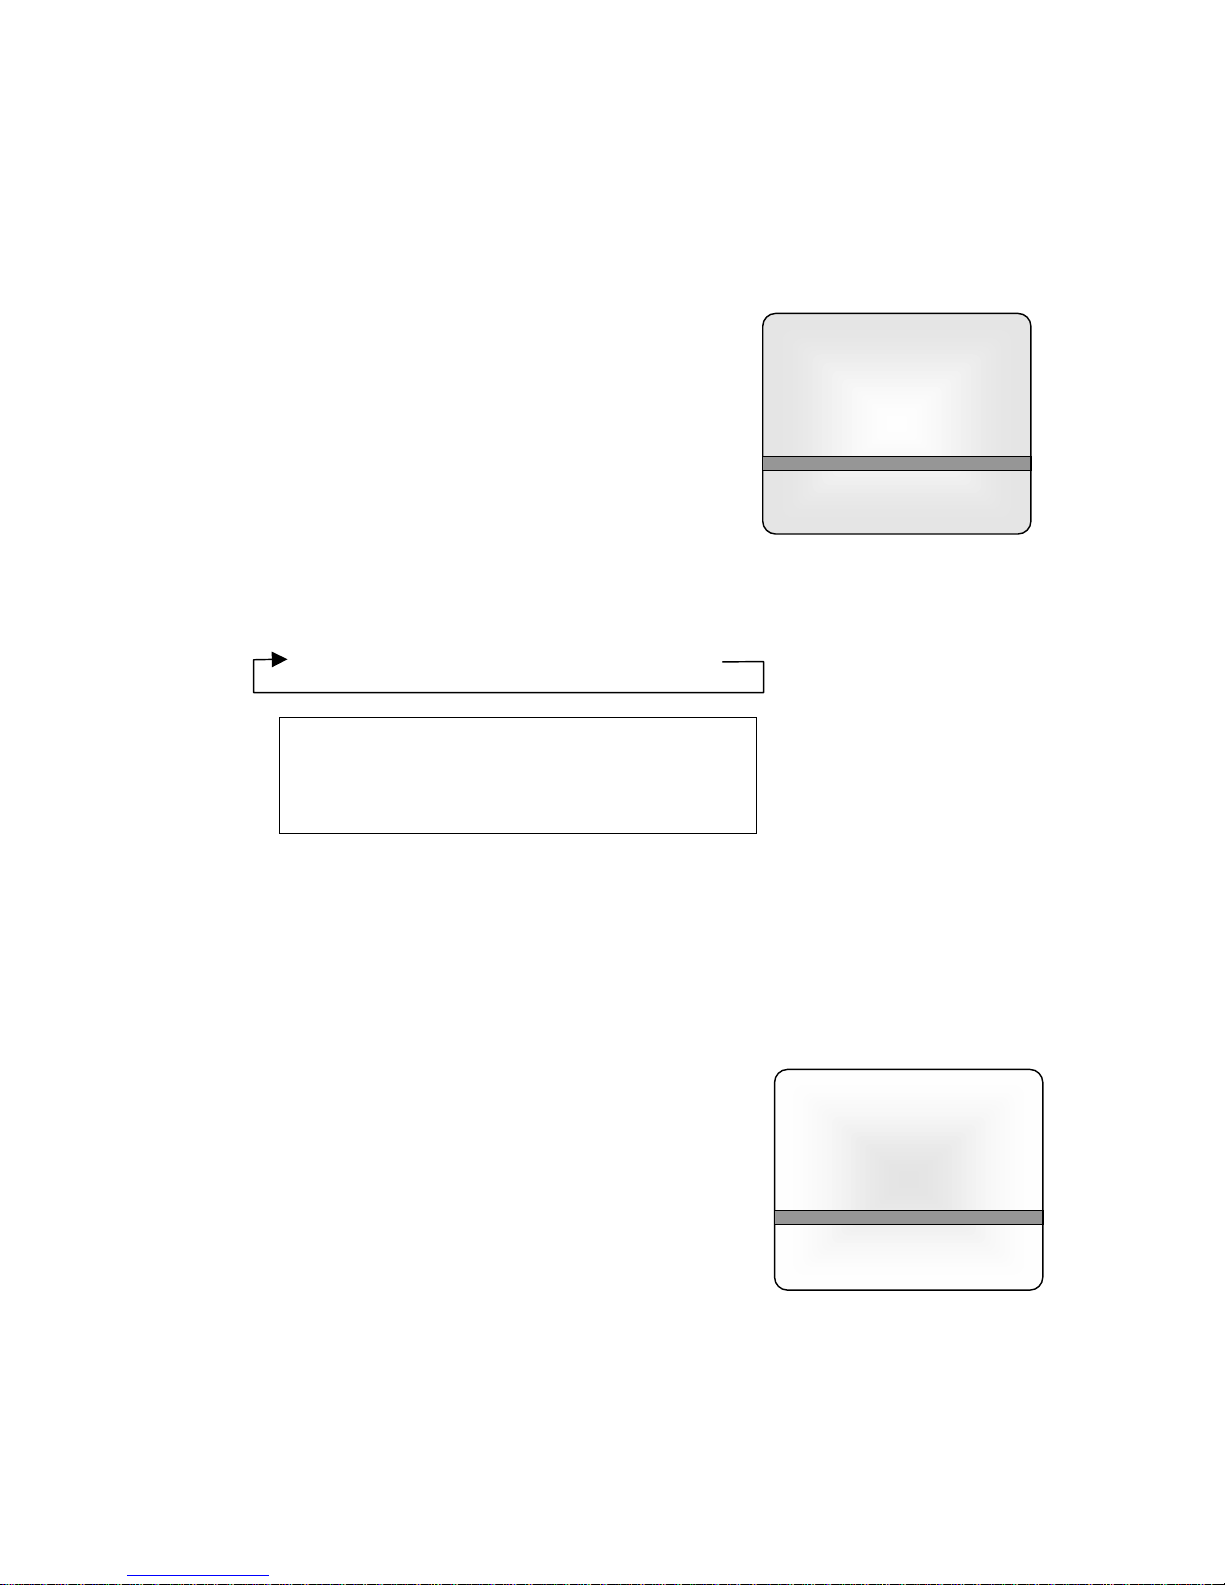
You can adjust picture Contrast, Brightness, Color, Sharpness and Tint to the levels you prefer
using the on-screen menus or select PDI factory preset picture modes using the remote control.
USER PICTURE CONTROL
1. Press the MENU button.
2. Select the Picture Menu.
3. Press the CH▲▼ button to select a picture item.
4. Press the VOL◄► button to adjust the picture item to
the desired level.
5. Press the TV/AV button to store the picture values in
the User mode.
PSM – PICTURE STATUS MEMORY
1. Press the PSM button on the remote to view the current picture mode.
2. Press the PSM button repeatedly to select another PSM setting. The PSM setting will
cycle and the picture’s factory parameter settings will change accordingly.
Dynamic → Standard → Mild →Game → User
Dynamic
Standard
Mild
Game
User
Vivid Picture Appearance
Standard Picture Appearance
Softer Picture Appearance
External Video Game Appearance
Manual Picture Setup
3. Press the OK button on the remote to select the currently displayed picture mode.
Picture
Contrast 90
Brightness 75
Color 70
Sharpness 50
Tint 0
▲▼:Move ◄►: Adjust
MENU:Return TV/AV Exit
Sound
You can adjust the sound using Equalizer levels via the on-screen menus or select PDI factory
preset sound modes using the remote control.
EQUALIZER
1. Press the MENU button on the remote.
2. Select the Sound menu.
3. Press the CH▲▼ button and select Equalizer. A listing
of available frequency bands and current settings will be
displayed. The Flat, Music, Movie, and Speech settings
are factory preset sound modes and cannot be adjusted.
Select User to adjust and customize the sound
equalization.
4. Press the VOL◄► button to select the desired sound
band.
5. Press the CH▲▼ button to adjust the strength of sound for that particular sound band.
Alternately, press VOL◄► to select the next desired sound band and adjust with the
CH▲▼ button.
6. Press the MENU button to return to the preceding Menu and the TV/AV button to return
to normal TV viewing.
- 16 -
Equalizer
Flat ■■
Music ■■■
Movie ■■■■
Speech ■■■■■
User ■■■■■■■
▲▼:Move ◄►: Adjust
MENU:Return TV/AV Exit
0.1 0.5 1.5 5.0 10Khz
Page 17
Document Number: PD196-040 Rev4
PDI-P20LCD User Manual
AUTO SOUND CONTROL
Selection of the factory preset sound modes and user mode is available directly using the remote
control.
1. Press the SSM button to display the current Sound Equalizer setting.
2. Press the SSM button repeatedly to advance and select a different equalizer setting.
Flat → Music → Movie → Speech → User
3. Press the OK button to accept the current selection.
BALANCE
Adjusts the sound balance from the left and right speakers mounted in the TV. Balance has no
effect on the pillow speaker.
1. Press the MENU button.
2. Select Sound from the menu.
3. Press the CH▲▼ button and select Balance.
4. Press VOL◄► to adjust the sound balance from the TV.
5. Press the MENU button to return to the preceding Menu and the TV/AV button to return
to normal TV viewing.
AVL
Automatic Volume Level control is available through this setting. With the AVL set to On, the
TV’s volume will be limited to two-thirds of maximum loudness. This feature prevents sound
blasting during commercials.
1. Press the MENU button.
2. Select Sound from the menu.
3. Press the CH▲▼ button and select Balance.
4. Press VOL◄► to adjust the sound balance from the TV.
5. Press the MENU button to return to the preceding Menu and the TV/AV button to return
to normal TV viewing.
MTS
You can select the type of sound generated by the television.
1. Press the MENU button.
2. Select Sound from the menu.
3. Press the CH▲▼ button and select
MTS.
4. Press VOL◄► to select the type of sound generated by the television TV.
Stereo
Mono
Discrete left and right audio channels heard through
both the left and right TV speakers.
Single channel of sound heard through both the left
and right TV speakers.
Secondary Audio Program – Used for Bi-lingual
SAP
programs. Note: The viewed program channel must be
encoded with a SAP signal for this mode to work.
5. Press the MENU button to return to the preceding Menu and the TV/AV button to return
to normal TV viewing.
Alternately, the type of sound can be set using the remote control’s ST/SAP button.
- 17 -
Page 18

Document Number: PD196-040 Rev4
A
PDI-P20LCD User Manual
Closed Captions
Captions is a process that converts the audio portion of a television program into written words
which than appear on the television screen in a form similar to subtitles. Closed captions allow
viewers to read the dialogue and narration of TV programs.
To activate Closed Captioning:
1. Press the MENU button.
2. Select the Setup menu.
3. Press the CH▲▼ buttons to select the Caption menu.
4. Each time you press the VOL◄► button, the caption mode is displayed one by one as
show below.
OFF → CC1 → CC2 → CC3 → CC4
TEXT4 ← TEXT 3 ← TEXT2 ← TEXT1
5. Press the TV/AV button to exit and return to normal TV viewing.
Alternately, the captions can be set using the remote control’s CC button.
HINTS
• Closed captions will only appear if the TV program has been encoded with closed
captioning information.
• Text modes may display a solid black box in the center of the TV’s screen when
activated.
• C1 is the most common closed caption setting.
Special
This menu provides access to special functions.
INPUT
Input allows selection of Component, Video, or S-Video modes
when using externally connected DVD or VCR equipment.
1. Press the MENU button.
2. Select the Special menu.
3. Press the CH▲▼ button to select Input.
4. Press the VOL◄► button to select TV, Component,
Video, S-Video. The TV picture will change to show the
appropriate input.
Alternately you can select the TV, Component, Video, or S-Video mode by pressing the TV/AV
button.
AUTO SLEEP
If you select Auto Sleep = On, the set will automatically switch itself Off approximately ten
minutes after a TV channel stops broadcasting.
1. Press the MENU button.
2. Select the Special menu.
3. Press the CH▲▼ button to select Auto Sleep.
4. Press the VOL◄► button to select On.
5. Press the TV/AV button to return to normal TV viewing.
Special
Input TV
uto Sleep Off
Blue Back Off
Lock Off
▲▼:Move ◄►: Adjust
MENU:Return TV/AV Exit
- 18 -
Page 19
Document Number: PD196-040 Rev4
PDI-P20LCD User Manual
BLUE BACK
Channels that are empty without any signal will be expressed as a blue screen rather than a
snowy picture.
1. Press the MENU button.
2. Select the Special menu.
3. Press the CH▲▼ button to select Blue Back.
4. Press the VOL◄► button to select On.
5. Press the TV/AV button to return to normal TV viewing.
LOCK
Lock disables the television’s MENU and TV/AV buttons and prevents patient and visitors from
tampering with the TV. Once a TV is locked, the only way to gain access to the MENU or TV/AV
controls is by using the remote control.
1. Press the MENU button.
2. Select the Special menu.
3. Press the CH▲▼ button to select Lock.
4. Press the VOL◄► button to select On.
5. Press the TV/AV button to return to normal TV viewing.
Parental Control
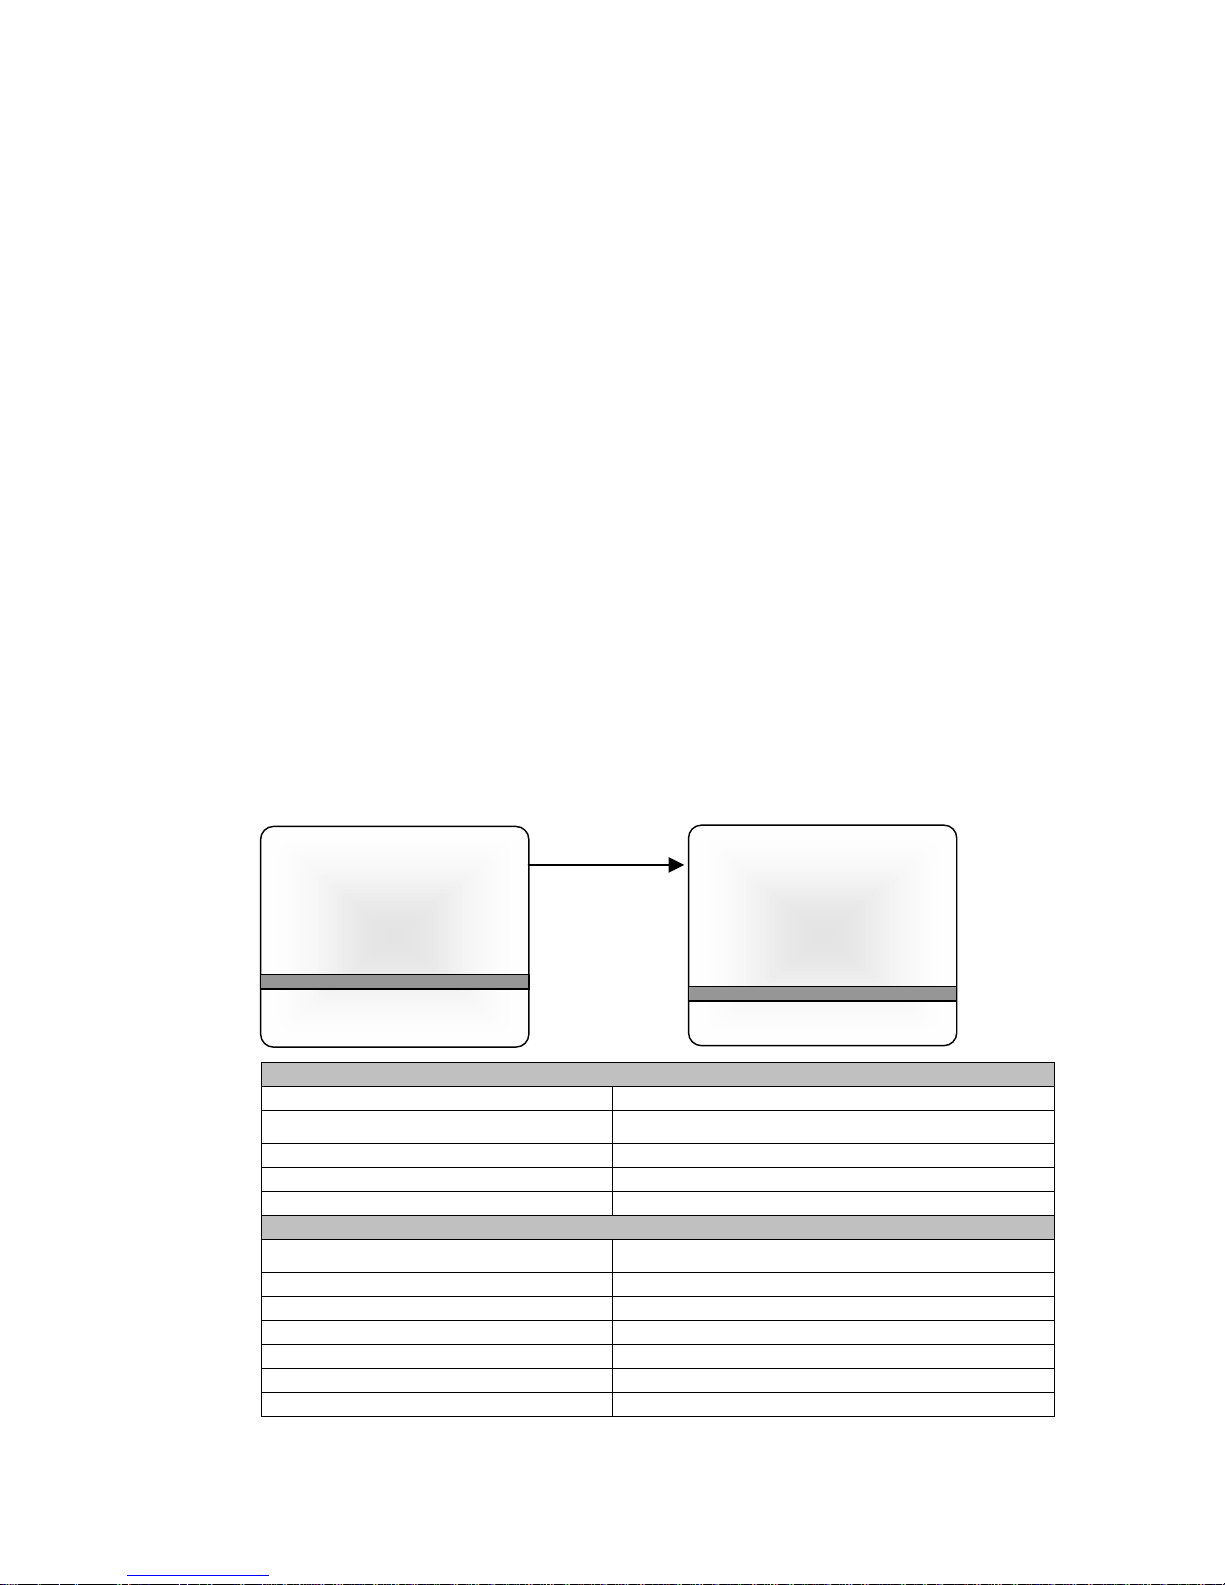
A parental control feature is available to restrict or block undesirable programs from appearing on
the TV. This feature is of particular importance for TVs installed in pediatric wards.
1. Press the MENU button.
2. Select the Setup menu.
3. Select the Parental Control Menu.
4. Press the CH▲▼ button to select.
5. Adjust each item with VOL◄► buttons.
Parental Control
Movie rating ►
MPAA Unblock
Ect. Sources Unblock
Block Hour 00 Hours
Password To Set ◄►
Parental Lock Off
▲▼:Move ◄►: Adjust
MENU:Return TV/AV Exit
Parental Control
Selected Item Setting Change
MPAA
Ect.Sources
Block Hours
Parental Lock
Unblock ↔ G and Above ↔ PG and Above ↔ PG-13 and Above ↔
R and Above ↔NC-17 and Above ↔X
Unblock ↔ Block
00 ~ 99 hours
On ↔ Off
Movie Rating
General
Children
Dialog
Language
Sex Scenes
Violence
F-Violence
Unblocked ↔TV-G and Above↔ TV-PG and Above ↔ TV-14 and
Above ↔ TV-MA
Unblock ↔ TV-Y and Above ↔ TV-7
Unblock ↔ TV-Y and Above ↔ TV-14
Unblock ↔ TV-PG and Above ↔ TV-14 and Above ↔ TV-MA
Unblock ↔ TV-PG and Above ↔ TV-14 and Above ↔ TV-MA
Unblock ↔ TV-PG and Above ↔ TV-14 and Above ↔ TV-MA
Unblock ↔ TV-Y7
Parental Control
General Unblock
Children Unblock
Dialog Unblock
Language Unblock
Sex Scenes Unblock
Violence Unblock
F-Violence Unblock
▲▼:Move ◄►: Adjust
MENU:Return TV/AV Exit
- 19 -
Page 20

Document Number: PD196-040 Rev4
PDI-P20LCD User Manual
6. As shown above, with the Parental Control menu on-screen, use VOL◄► and CH▲▼
buttons to select and adjust or set the rating for the Age Block or Content Block. For Sex
Scenes for example, use the “From TV-PG” setting. (See the Mini Glossary, Ratings
Charts on this and the next page for rating definitions).
7. After you have selected and adjusted the Parental Control menu options to your
preferences:
• Set the hours you want Parental Control Active.
• Set a 4 number password.
• Set the Lock On/Off option to either on or off.
Hints for Setting Parental Control
• Determine which rating you consider acceptable to the viewer. For example, if you
choose TV-PG, all the more restrictive ratings will be automatically blocked; the viewer
will not be able to see TV-PG, TV-14, or TV-MA rated programming.
• Do you want to block the auxiliary video source entirely? When Aux is set to Block the
signal sent by equipment such as a VCR or DVD connected to the A/V IN input jacks
would not be available.
• How many hours do you want Parental Control to be active? You can set the hours
option for up to 99 hours.
• Select a secret password in the Set Password option. Use the number keys on the
remote. Don’t forget the password, it is the only way you can access the parental control
menu and change rating selections, or turn Parental Control off.
• Do you want Parental Control to be active all the time? If not, you can turn it on or off
with the Lock On/Off option.
• You can set different Parental Control viewing restrictions for general audiences and for
children, both can be active at the same time.
• Simply specifying one content block such as Sex Scenes will not automatically block
another content in the programs form appearing.
• Even if you choose to leave the Aux inputs unblocked, the ratings you specify will
automatically restrict the program that appears from the video sources.
• You cannot disable Parental Control by disconnecting the TV from power. Block hours
will automatically reset to the original block time setting specified if power is
disconnected.
- 20 -
Page 21
GLOSSARY AND RATINGS
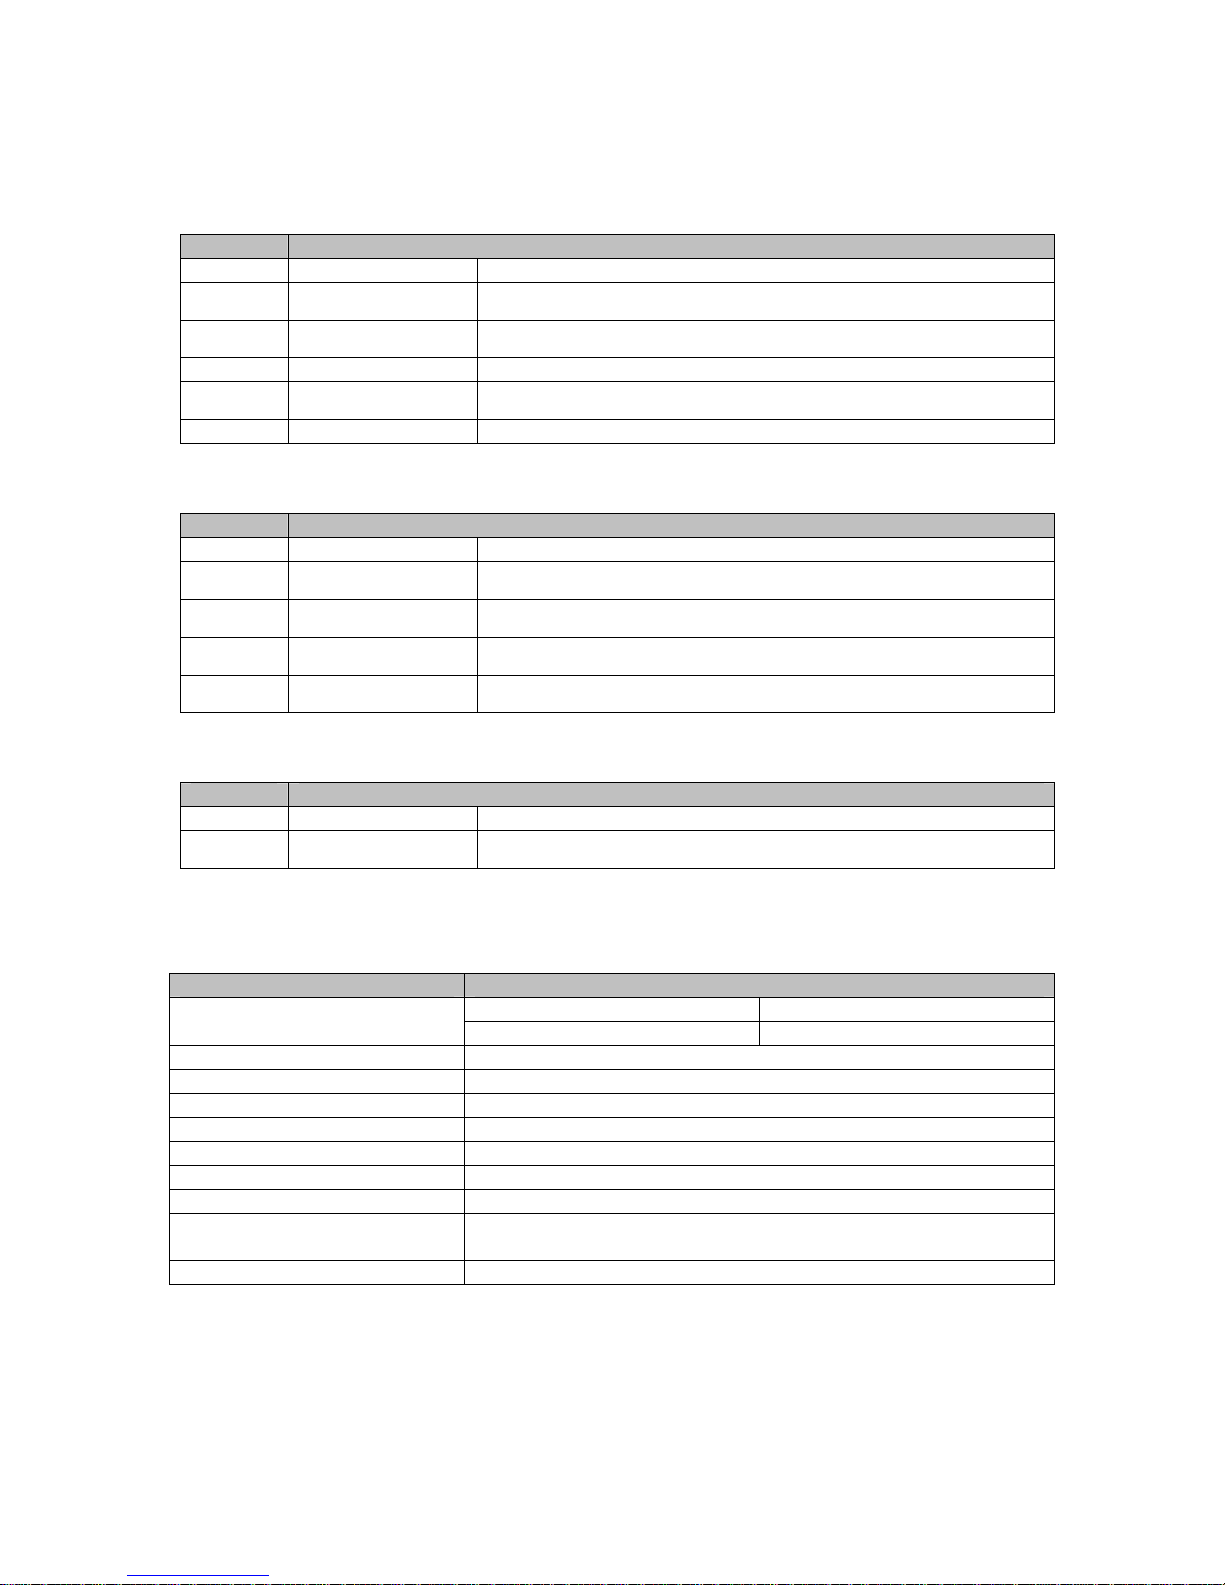
MOTION PICTURE ASSOCIATION OF USA (MPAA) RATING SYSTEM
Grade Meaning
G
PG
PG-13
R
NC-17
X
TV PARENTAL GUIDELINE RATING SYSTEM
Grade Meaning
TV-G
TV-PG
TV-14
TV-17
TV-MA
MOTION PICTURE ASSOCIATION OF USA (MPAA) RATING SYSTEM
Grade Meaning
TV-Y
TV-Y7
General Audiences Content not offensive to most viewers.
Parental Guidance
Suggested
Parental Guidance
Suggested
Restricted Viewing Not for children under age 17. Strong elements of sex and/or violence.
Restricted Viewing
Hard Core Films Same as NC-17 rating.
General Audience Considered suitable for all audiences: children may watch unattended.
Parental Guidance
Parents Strongly
Cautioned
Parents Strongly
Cautioned
Mature Audience Only
Children Considered suitable for all children under 7 years old.
Children 7 and over
Content is such that parents may not want their children to view the program.
Program is inappropriate for preteens, with a greater degree of offensive
material suggested than a PG rated program.
Not for children under age 17 under any circumstances. Strong sexual
content.
Suggested Unsuitable for younger children, may contain: Suggestive Dialog,
Bad Language, Sex, and Violence Scenes
Unsuitable for children under 14, may contain: strong Dialog, Bad Language,
Sex, and Violence Scenes.
Unsuitable for children under 17, may contain: strong Dialog, Bad Language,
Sex, and Violence Scenes.
Adults only, may contain: Strong Dialog, Bad Language, Sex, and Violence
Scenes.
Considered suitable for children over 7, may contain Fantasy Violence
Scenes.
Document Number: PD196-040 Rev4
PDI-P20LCD User Manual
Product Specifications
Model PDI-P20LCD
Size
Power Requirements
Television System
Channels
Display Panel
Power Consumption
Antenna Impedance
Audio Output
External Inputs
AC Power Adaptor
Horizontal 23 Inches Thickness 2 7/8 Inch
Height 17 3/4” Inches Weight 19 lbs.
DC 15V at 4.5A maximum
NTSC
VHF (2 ~ 13), UHF (14 ~ 69), CABLE (01 ~ 125)
20.1 Inches, TFT-LCD
70 Watts
75 Ohms Unbalanced
3 Watts per Channel
DC 15V, S-Video In, Headphone Jack, Component In, AV In,
Antenna In
AC IN: 115 V, 50/60Hz Output: 15VDC at 4.5A
- 21 -
Page 22
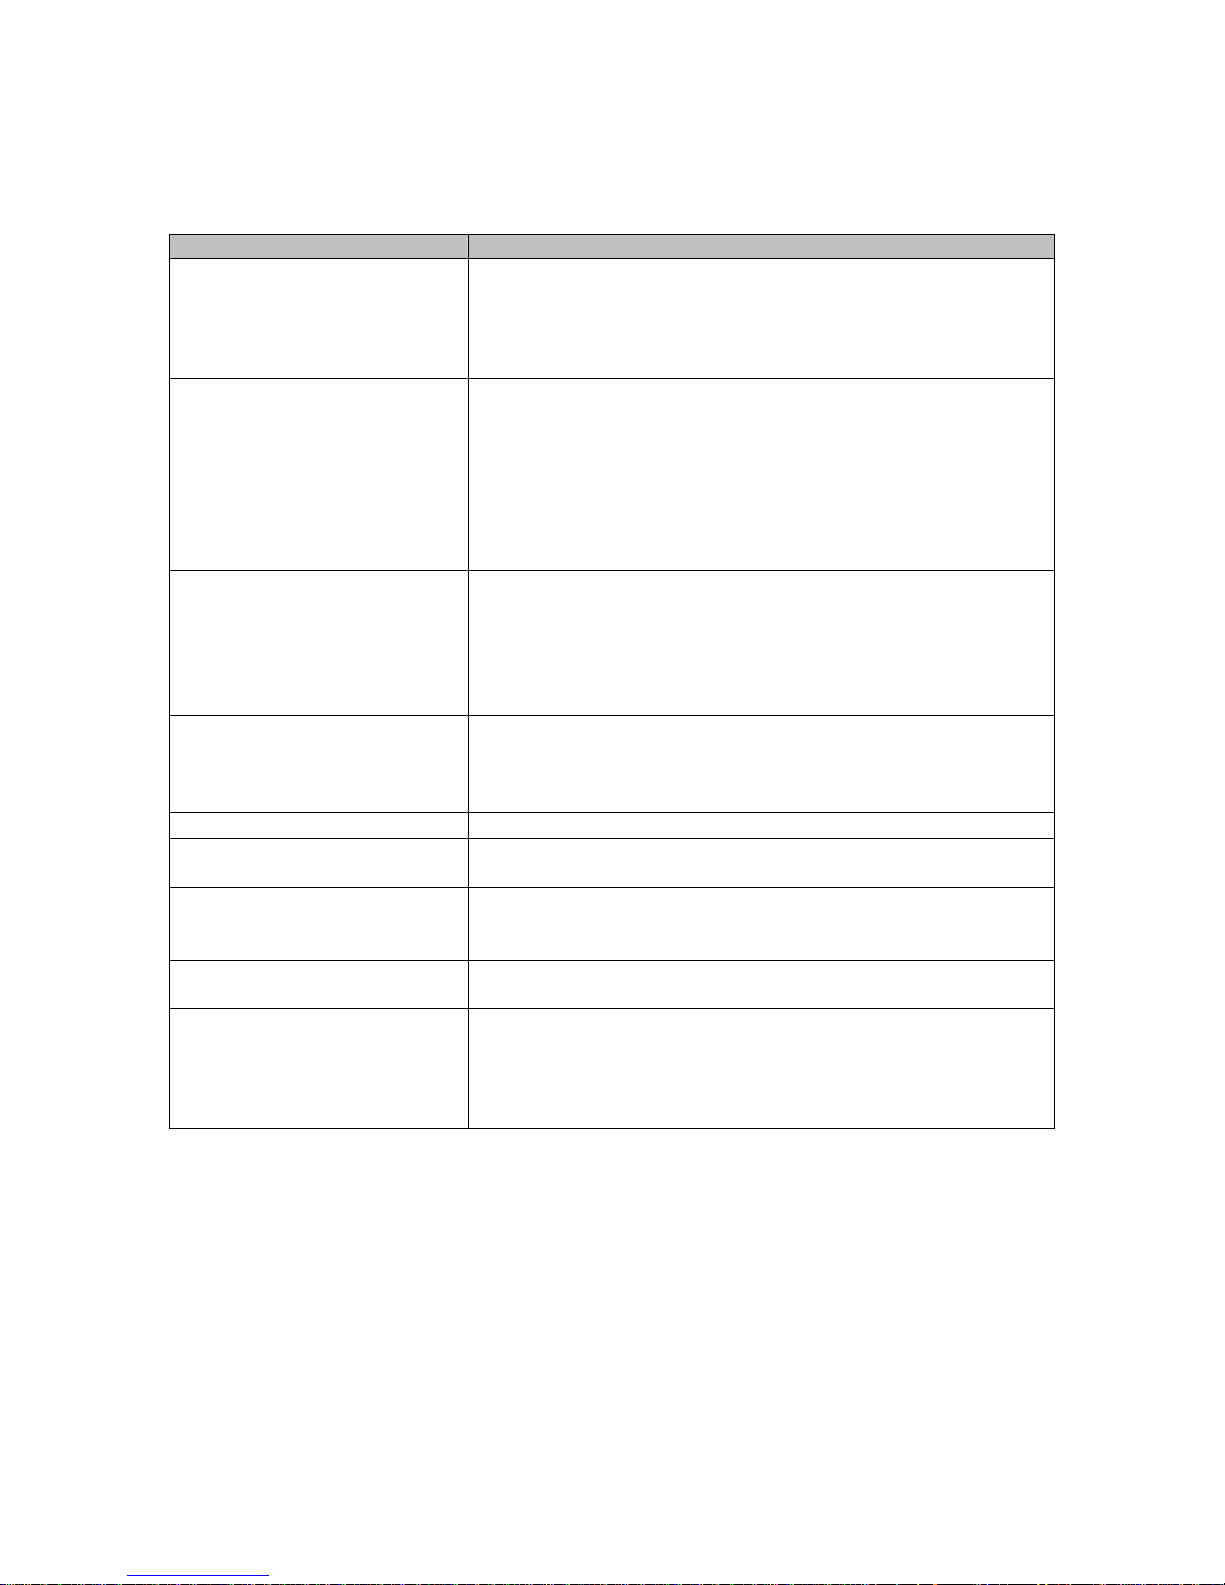
Troubleshooting
Problem Check Item
• Insert the AC power cord plug securely in AC power outlet.
No Picture on screen and no
sound from speakers
No picture and No picture from
external source (VCR, DVD)
Picture OK, but no sound from
TV speakers
Picture OK, but no sound from
the pillow speaker
Picture is too light
Picture is too dark
Remote control does not work
The picture is spotted
Pillow Speaker does not
control the TV
• Make sure the TV is not turned off. The front power button
will illuminate RED if the TV is off.
• Turn on the power button. The front power button will
illuminate GREEN if the TV is ON.
• Check the brightness setting of the TV.
• TV Lamp may have malfunctioned.
• Select the External source using the TV/AV button on the
TV.
• Make sure the external source is connected correctly and is
playing.
• Verify external source is not being blocked by a Parental
Control setting.
• Check the sound setting.
• Verify the sound is not muted.
• Verify that a pair of headphones is not connected.
• Verify the TV SPK switch is turned on.
• If an external source is connected, verify that it is
connected correctly.
• Verify that the pillow speaker is plugged in.
• Set the pillow speaker thumbwheel volume control to
maximum.
• Adjust the VOL► button on the TV to increase the volume.
• Check and adjust the COLOR and CONTRAST settings.
• Verify BRIGHTNESS setting is not too low.
• TV lamp may have failed.
• Change the batteries.
• Make sure the TV’s infrared window is not receiving strong.
light from fluorescent lamps.
• There may be interference from hospital equipment.
Try connecting the AC plug into a different wall socket.
• Verify the pillow speaker is plugged in. Usually the pillow
speaker will have sound if it is plugged in.
• Connect the pillow speaker directly to the TV and verify that
the across-room or bedside wiring is not faulted.
• Try another pillow speaker.
Document Number: PD196-040 Rev4
PDI-P20LCD User Manual
- 22 -
Page 23

Document Number: PD196-040 Rev4
PDI-P20LCD User Manual
MODEL PDI-P20LCD TV Limited Warranty
PDI Communication Systems Inc., (“PDI”) warrants, to the original purchaser only, that the PDIP20LCD will be free from defects in materials and workmanship, under normal use, for 2 years
(730 days) from the date of original purchase. This warranty does not cover any other equipment
that may have been included with PDI’s shipment of this product.
After receipt of written notice of a defect or malfunction occurring during the warranty period, PDI
will repair or replace goods returned to its Springboro, Ohio location, at its discretion, free of
charge to the original purchaser, the whole or any component part of any product manufactured
by PDI and found by PDI to be defective.
As a condition to obtaining warranty service, written notification must be received by PDI within at
least ten (10) days after defect is first observed. Repair of said product requires it to be shipped
to the PDI factory in Springboro, Ohio. All shipments shall be F.O.B. Springboro, Ohio, and all
shipping and freight charges to PDI’s factory shall be paid by the customer.
This warranty shall not apply to any PDI products subjected to improper use, negligence or
accident; nor to tampering, alterations, or repairs by others, without PDI’s specific prior written
authorization. For information regarding authorized servicing and all other information pertaining
to this warranty, please contact PDI COMMUNICATION SYSTEMS at 40 Greenwood Lane,
Springboro, Ohio 45066 or phone 937-743-6010.
This warranty gives specific legal rights and you may also have other rights which vary from state
to state.
PDI’s liability under this warranty is limited to repair or replacement of defective products and
parts as provided above. PDI shall not be liable for incidental or consequential damages.*
The warranty contained herein is in lieu of all other expressed or implied warranties, including any
implied warranty of merchantability or fitness for any particular purpose. PDI neither assumes nor
authorizes any person to assume, on its behalf, any other obligation or liability.
*Some states do not allow the exclusion of limitation of incidental or consequential damages or a
disclaimer of warranties implied by law, so the above limitation or exclusion may not apply.
- 23 -
Page 24

Document Number: PD196-040 Rev4
PDI-P20LCD User Manual
Communication
Systems, Inc.
40 Greenwood Lane
Springboro, Ohio 45066 USA
PH: 937-743-6010
FX: 947-743-5664
- 24 -
 Loading...