

Page 1
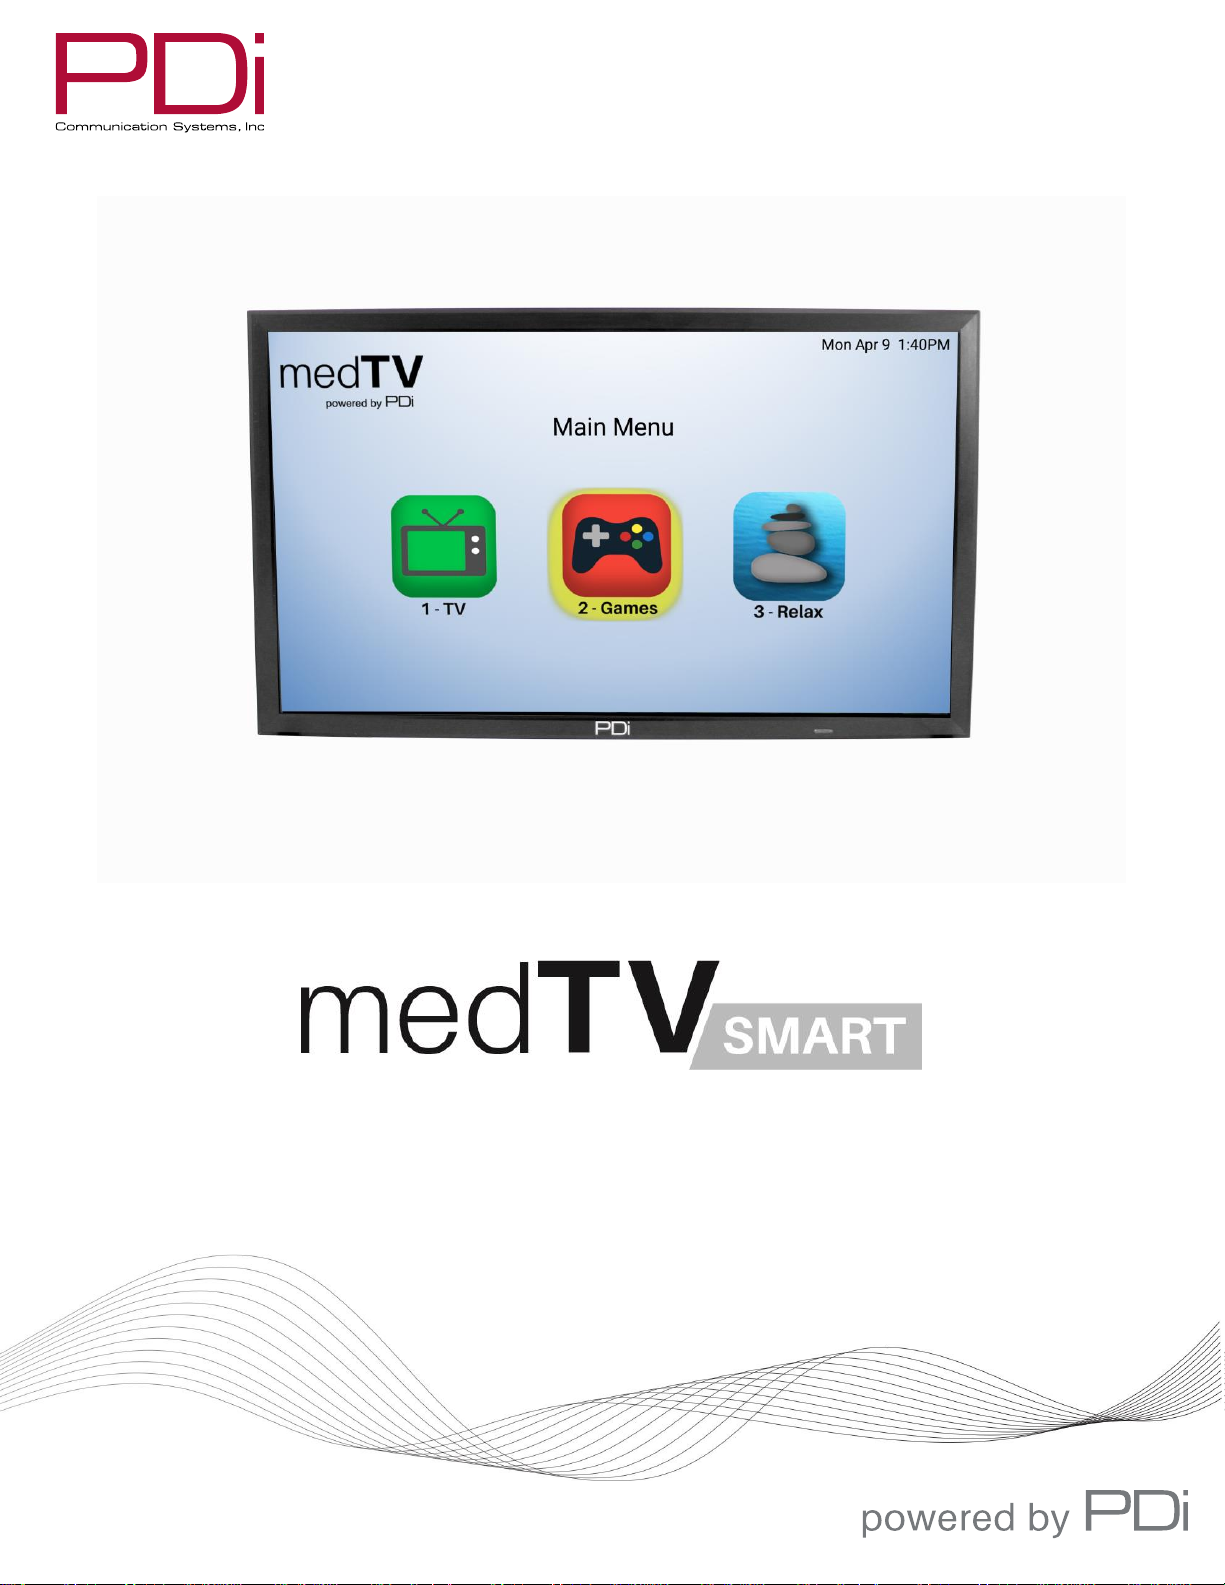
QUICK START GUIDE
Document Number: PD196-392R2
mymedTV.com
PDi A-Series Televisions
A24, A32, A42, A43, A55
Page 2
MODEL:
PDi A-Series
Document Number:
PD196-392R2
Quick Start Guide
Page 2 of 10
PDi Communication Systems, Inc. ▪ 40 Greenwood Ln ▪ Springboro, Ohio 45066 USA ▪ www.pdiarm.com and www.mymedTV.com ▪ Phone 800.628.9870
Overhead Falling Hazard
TV can pose a striking hazard when mounted at an
elevated position. Use only PDi mounting brackets,
support arms, and appropriate hardware to assure TV
will not fall from the mounted position. Failure to do so
may cause injury or death.
Rain and Moisture
WARNING: To avoid the hazards of fire or electrical
shock, DO NOT expose this television to rain or
moisture.
Oxygen Environment
WARNING: Do not use in any oxygen tent or oxygen
chamber. Such use may cause a fire hazard.
Wet Locations
Do not use this television near water. Television shall
not be exposed to dripping or splashing and no objects
filled with liquids, such as vases, shall be placed on the
television.
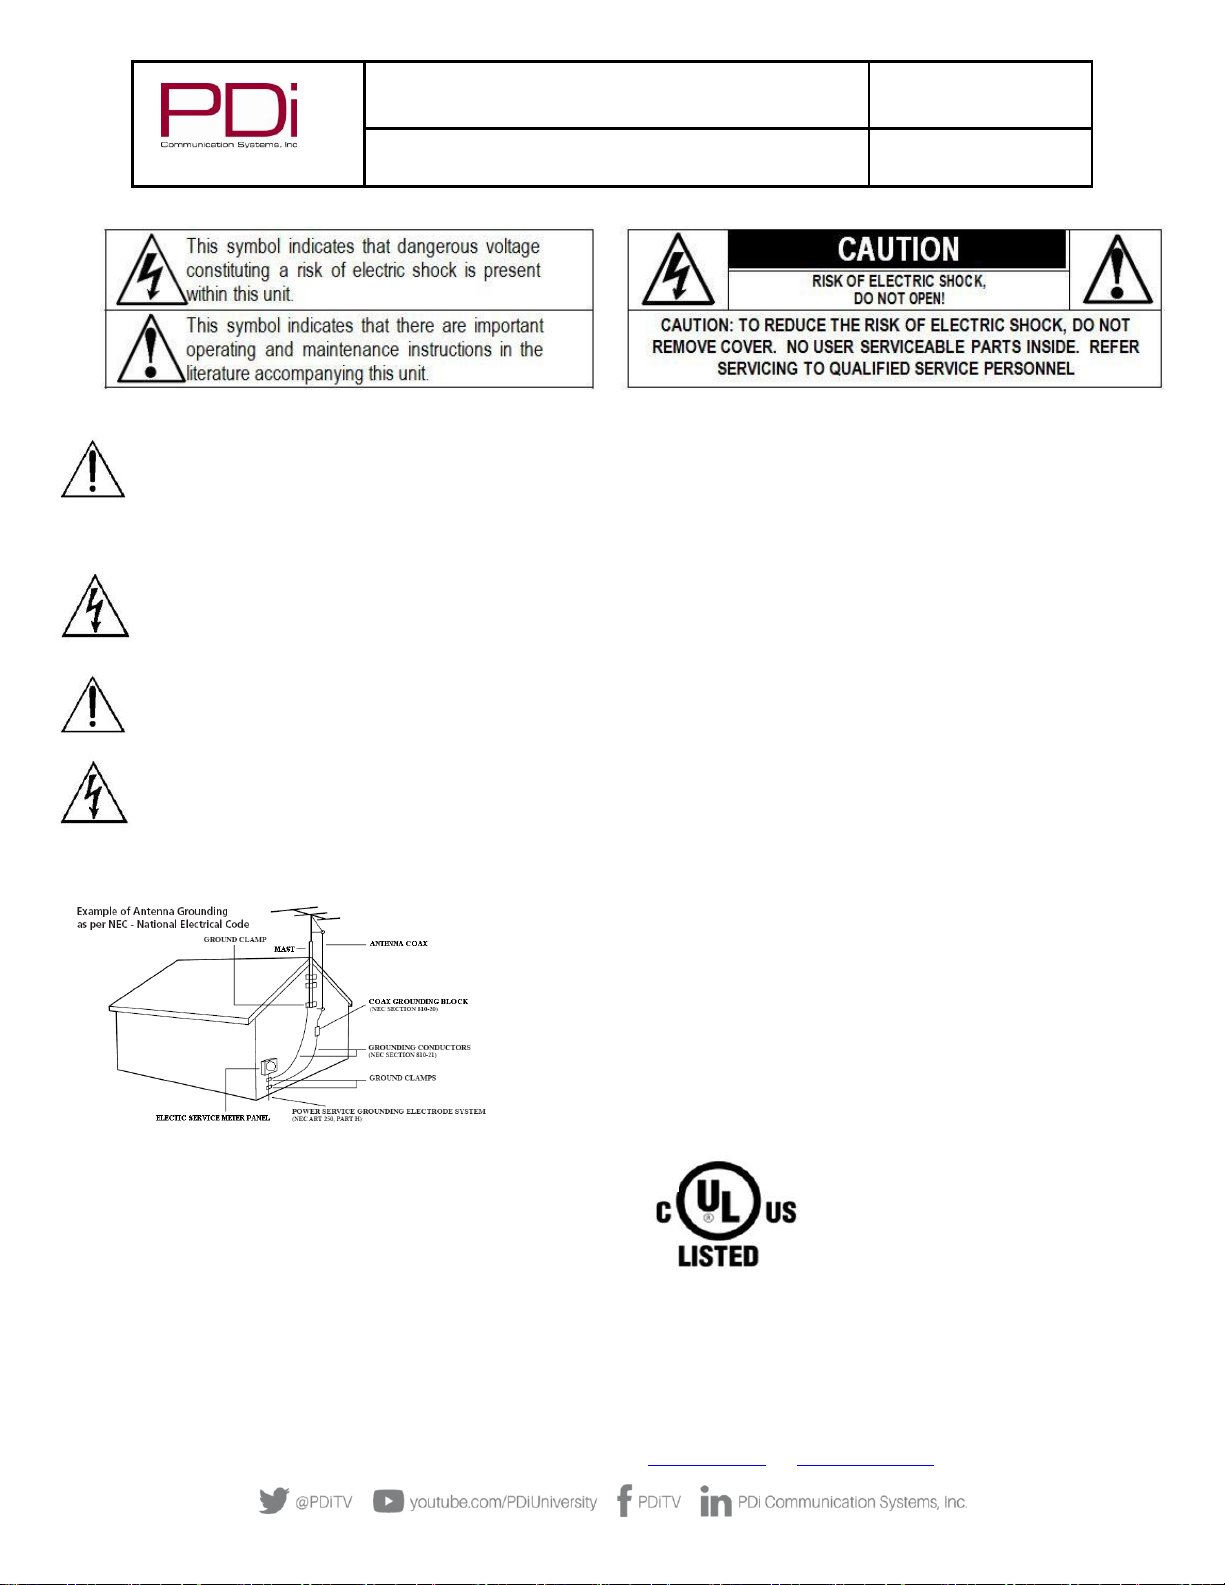
Note to Cable TV Installer
This
reminder is
provided to
call the
cable TV
system
installer’s
attention to
Article 82040 of the
National
Electrical Code. The code provides guidelines for proper grounding
and specifies that the cable ground shall be connected to the
grounding system of the building, as close to the point of the cable
entry as practical. Canadian installations shall be properly grounded
in accordance with the Canadian Electrical Code, Part 1
FCC
This equipment has been tested and found to comply with
the limits for a Class A digital device, pursuant to part 15 of
the FCC Rules. These limits are designed to provide
reasonable protection against harmful interference when
the equipment is operated in residential or commercial
installation. If this equipment does cause harmful
interference to radio or television reception, which can be
determined by turning the equipment off and on, the user is
encouraged to try to correct the interference by one or
more of the following measures:
•
Reorient or relocate the receiving antenna.
•
Increase the separation between the
equipment and receiver.
•
Connect the equipment into an outlet on a
circuit different from that to which the receiver is
connected.
•
Consult the dealer or an experienced radio/TV
technician for help.
Cleaning and Disinfection
Clean the exterior of this television by removing dust with a lintfree cloth. Suggested cleaning agent is 5% Bleach and Water
solution. CAUTION: To avoid damage to the surface of the
television, do not use abrasive or chemical cleaning agents. Spot
test a new disinfectant by test cleaning a non-obvious small spot
on the TV’s back cabinet, keypad, and LED panel. Allow the
disinfectant to soak per its instructions and then wipe clean. Do
not use the disinfectant if the TV’s surfaces show any sign of
discoloration or softening. Do not immerse this TV.
Trademarks
Manufactured under license from Dolby Laboratories, all
other brand names and product names used in this
manual are trademarks, registered trademarks, or trade
names of their respective holder. “PDi” is a registered
trademark of PDi Communication Systems, Inc. All
rights reserved.
Underwriters Laboratories
The A Series Model Hospital Grade TV is a specialized LED TV
and should be installed to National Electrical
Code specifications. This device is safety
tested and listed by the Underwriters
Laboratories as a product suitable for use in
health-care facilities in both the United
States and Canada.
Page 3
MODEL:
PDi A-Series
Document Number:
PD196-392R2
Quick Start Guide
Page 3 of 10
PDi Communication Systems, Inc. ▪ 40 Greenwood Ln ▪ Springboro, Ohio 45066 USA ▪ www.pdiarm.com and www.mymedTV.com ▪ Phone 800.628.9870
IMPORTANT SAFETY NSTRUCTIONS
THIS INSTALLATION SHOULD BE MADE BY A QUALIFIED SERVICE PERSON AND SHOULD
CONFORM
TO ALL
LOCAL CODES. READ AND FOLLOW THE SAFETY INSTRUCTIONS BEFORE ATTEMPTING
THIS INSTALLATION
1. Read these Instructions – All the safety and operating
instructions should be read before the product is
operated.
2. Keep these Instructions – The safety and operating
instructions should be retained for future reference.
3. Heed all warnings – All warnings on the product and
in the operating instructions should be adhered to.
4. Follow all instructions – All warnings on the product
and in the operating instructions should be followed.
5. Do not use this apparatus near water – for example,
near a bath tub, wash bowl, in a wet basement; or
near a swimming pool; and the like.
6. Clean only with dry cloth. Do not use liquid cleaners
or aerosol cleaners.
7. Do not block any ventilation openings. Install in
accordance with the manufacturer’s instructions. The
openings should never be blocked by placing the
product on a bed, sofa, rug, or other similar surface.
8. Do not install near any heat sources such as
radiators, heat registers, stoves, or other apparatus
(including amplifiers) that produce heat.
9. DO NOT defeat the safety purpose of the polarized or
grounding-type plug. This product is equipped with a
three-wire grounding-type plug, a plug having a third
(grounding) pin. This plug will only fit into a
grounding-type power outlet. This is a safety feature.
If you are unable to insert the plug into the outlet,
contact your electrician to replace your obsolete
outlet.
10. Protect the power cord from being walked on or
pinched particularly at plugs, convenience
receptacles, and the point where they exit from the
product.
11. Attachments only use attachments/accessories
specified by the manufacturer.
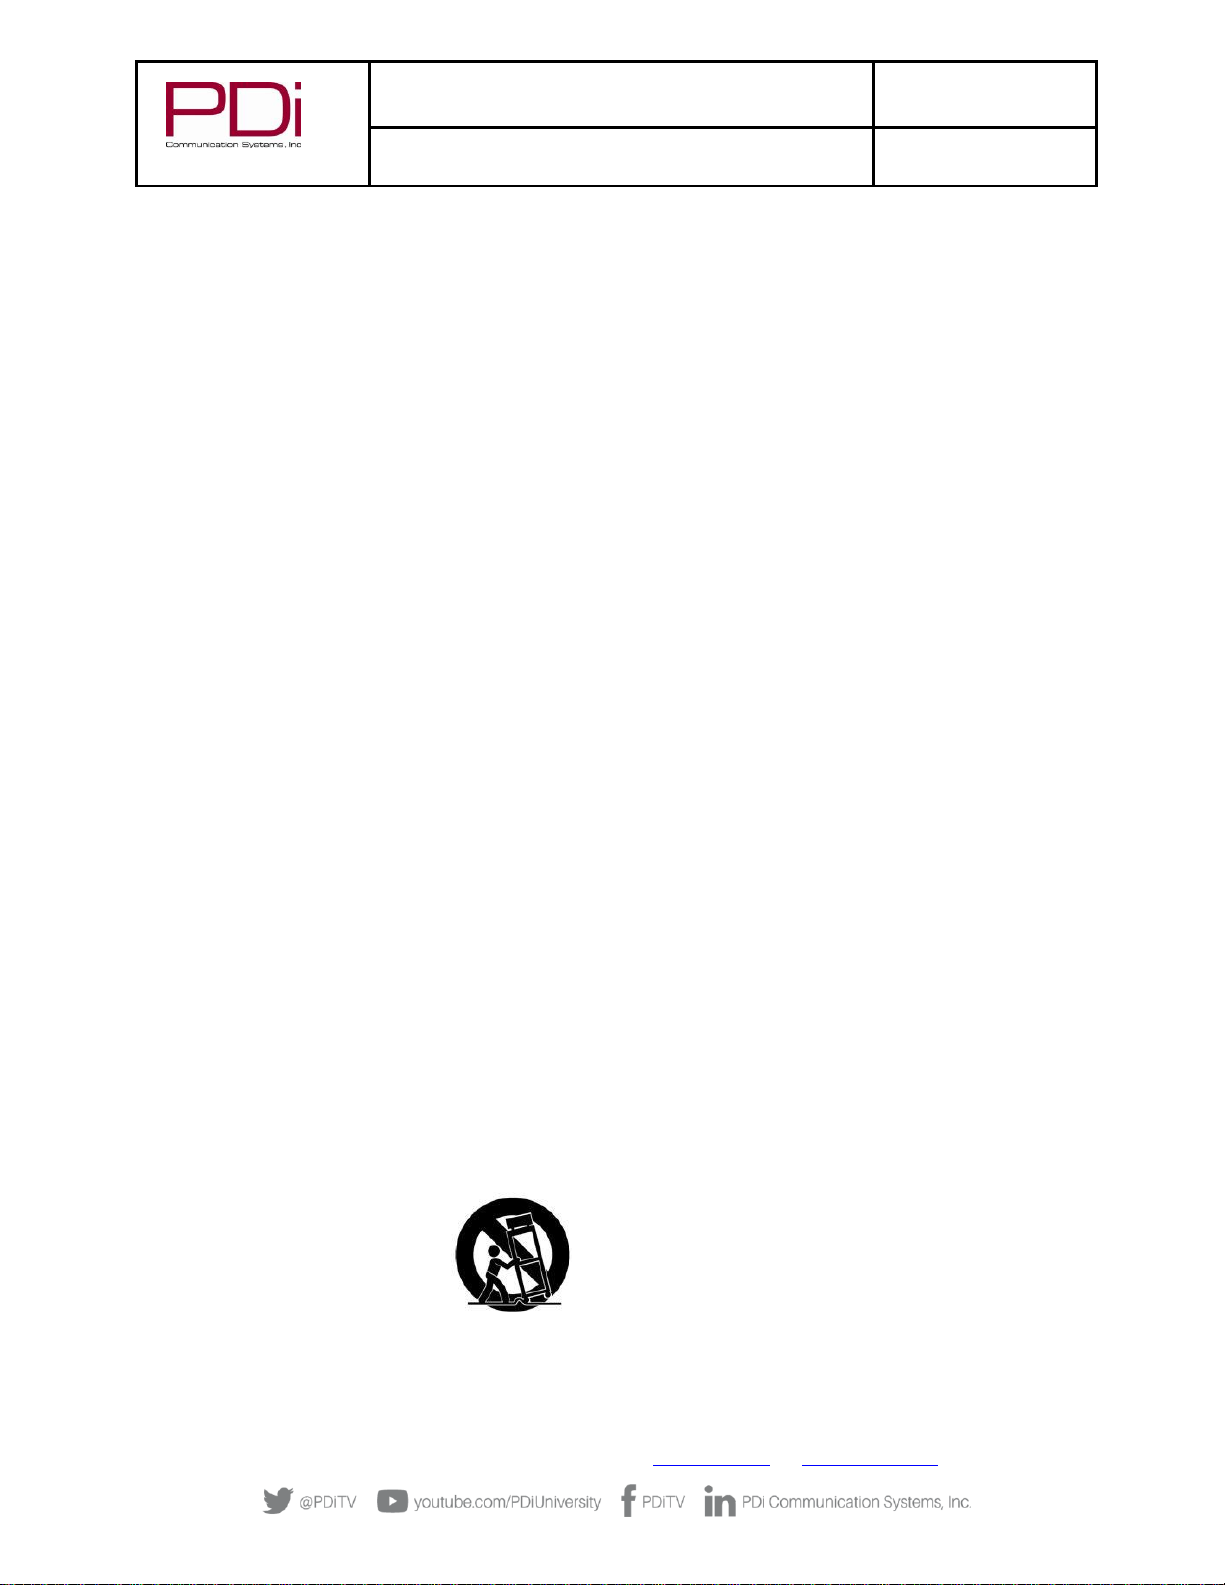
12. Use only with the cart, stand, tripod,
bracket, or table specified by the
manufacturer, or sold with the
apparatus. When a cart is used, use
caution when moving the
cart/apparatus combination to avoid
injury from tip-over.
13. Unplug this apparatus during lightning storms or
when unused for extended periods of time.
14. Refer all servicing to qualified service personnel.
Servicing is required when the apparatus has been
damaged in any way, such as power-supply cord or
plug is damaged, liquid has been spilled or objects
have fallen into the apparatus, the apparatus has
been exposed to rain or moisture, does not operate
normally, or has been dropped.
15. Power Sources – This product should be operated
only from the type of power source indicated on the
marking label. If you are not sure of the type of
power supply to your home, consult your product
dealer or local power company. For products
intended to operate from battery power, or other
sources, refer to the operating instructions.
16. Oxygen Environment – Do not use in an oxygen
tent or oxygen chamber. Such use may cause a
fire hazard.
17. Lightning – For added protection for this product
during a lightning storm, or when it is left
unattended and unused for extended periods of
time, unplug it from the wall outlet and disconnect
the antenna or cable system. This will prevent
damage to the product due to lightning and powerline surges.
18. Servicing – Do not attempt to service this product
yourself as opening or removing covers may
expose you to dangerous voltage or other
hazards. Refer all servicing to qualified service
personnel.
Page 4
MODEL:
PDi A-Series
Document Number:
PD196-392R2
Quick Start Guide
Page 4 of 10
PDi Communication Systems, Inc. ▪ 40 Greenwood Ln ▪ Springboro, Ohio 45066 USA ▪ www.pdiarm.com and www.mymedTV.com ▪ Phone 800.628.9870
SAFETY INSTRUCTIONS (FRENCH)
Danger chute d’objets
AVERTISSEMENT: Afin d’éviter toute blessure, cet
appareil doit être solidement fixé au sol/mur
conformément aux instructions d'installation. Les
télévisions peuvent présenter un risque de heurt
lorsqu’elles sont montées en position élevée. Utiliser uniquement
des supports de montage, des bras de support et le matériel
approprié de PDi afin d’assurer que la télévision ne tombe pas de
sa position de montage. Le non-respect de ces instructions peut
causer des blessures ou la mort.
Pluie et humidité
AVERTISSEMENT: Afin d’éviter les risques d'incendie ou
de choc électrique, NE PAS exposer cette télévision à la
pluie ou à l'humidité ou l’utiliser dans un endroit humide.
Environnement d'oxygène
AVERTISSEMENT: Ne pas utiliser dans une tente à
oxygène ou chambre à oxygène. Une telle utilisation peut
causer un risque d'incendie.
CONSIGNES DE SÉCURITÉ IMPORTANTES
CETTE INSTALLATION DOIT ÊTRE EFFECTUÉE PAR UN TECHNICIEN QUALIFIÉ ET DOIT ÊTRE CONFORME À TOUS LES CODES
LOCAUX. LIRE ET SUIVRE LES CONSIGNES DE SÉCURITÉ AVANT DE PROCÉDER À L’INSTALLATION.
1. Lire ces instructions. Toutes les consignes de sécurité et
d’utilisation doivent être lues avant d'utiliser le produit.
2. Conserver ces instructions. Les consignes de sécurité et
d’utilisation doivent être conservées pour référence future.
3. Respecter tous les avertissements. Tous les avertissements sur
le produit et dans les consignes d'utilisation doivent être
respectés.
4. Suivre toutes les instructions. Tous les avertissements sur le
produit et dans les consignes d'utilisation doivent être suivis.
5. Ne pas utiliser cet appareil près de l'eau - par exemple près
d'une baignoire, d'un lavabo, dans un sous-sol humide, ou près
d'une piscine ou similaire.
6. Nettoyer avec un chiffon sec. Ne pas utiliser de nettoyants
liquides ou en aérosol.
7. Ne pas obstruer les ouvertures de ventilation.Installer
conformément aux instructions du fabricant. Les ouvertures ne
doivent jamais être obstruées en plaçant le produit sur un lit,
uncanapé, un tapis ou toute autre surface similaire.
8. NE PAS installer près de sources de chaleur telles que
radiateurs, registres de chaleur, poêles ou tout autre appareil
(y compris les amplificateurs) qui produit de la chaleur.
9. NE PAS neutraliser le dispositif de sécurité de la fiche polarisée
ou de terre. Ce produit est équipé d'une prise de terre à trois
fils, une fiche ayant une troisième broche (mise à la terre). Cette
fiche ne peut s'insérer que dans une prise de courant avec mise
à la terre. Il s'agit d'une caractéristique de sécurité. Si vous êtes
incapable d’insérer la fiche dans la prise, contacter votre
électricien pour remplacer votre prise obsolète.
10. Protéger le cordon d'alimentation pour qu’il ne soit pas piétiné
ni pincé, en particulier au niveau des fiches, des prises de
courant et au point de sortie de l’appareil.
11. Accessoires - Utiliser uniquement les attaches/accessoires
recommandés par le fabricant.
12. Utiliser uniquement avec un chariot, stand, trépied, support
ou table recommandé par le fabricant ou vendu avec
l'appareil. Lorsqu’un chariot est utilisé, faire attention lors du
déplacement de l'ensemble chariot/appareil afin d’éviter des
blessures en cas de basculement.
13. Débrancher cet appareil en cas d'orages ou lorsqu'il reste
inutilisé pendant de longues périodes.
14. Confier toute réparation à un personnel de service qualifié. Des
réparations sont nécessaires si l'appareil est endommagé d'une
façon quelconque, par exemple : cordon ou prise d'alimentation
endommagé, liquide renversé ou des objets sont tombés dans
l'appareil, l'appareil a été exposé à la pluie ou à l'humidité, ne
fonctionne pas normalement ou s'il est tombé.
15. Sources d'alimentation - Ce produit doit être utilisé uniquement
à partir du type de source d'alimentation indiqué sur l'étiquette.
Si vous n'êtes pas sûr sur le type d'alimentation de votre
domicile, consultez le détaillant de votre produit ou la
compagnie d'électricité locale. Pour les produits proposés de
fonctionner par piles, ou autres sources d’alimentation,
reportez-vous aux consignes d’utilisation.
16. Environnement d’oxygène - Ne pas utiliser sous une tente à
oxygène ou chambre à oxygène. Une telle utilisation peut
causer un risque d'incendie.
17. Foudre - Pour une protection supplémentaire pour ce produit
lors d’un orage, ou lorsqu'il est laissé sans surveillance et
inutilisé pendant de longues périodes de temps, le débrancher
de la prise murale et déconnecter l'antenne ou le système de
câble. Cela permettra d’éviter tout dommage à l'appareil causé
par la foudre et par les surtensions des lignes électriques
Page 5
MODEL:
PDi A-Series
Document Number:
PD196-392R2
Quick Start Guide
Page 5 of 10
PDi Communication Systems, Inc. ▪ 40 Greenwood Ln ▪ Springboro, Ohio 45066 USA ▪ www.pdiarm.com and www.mymedTV.com ▪ Phone 800.628.9870
Introduction
The PDi A-Series TV, medTV Smart patient television system provides enhanced entertainment out of the box with built-in
pillow speaker compatible games and relaxation apps, no internet required, no subscription fees, and no ADT integration
necessary. When ready to connect to the internet via Wi-Fi or Ethernet, contact PDi for information on how to provide
patients with a user interface that allows patients to enjoy a web browser and URL links direct to news, social media or other
online information.
Contact PDi for instructions on safe TV mounting options
Coax Connection
CAUTION: Some hospital cable systems provide power voltage on the coaxial cable. This TV is NOT designed to be powered
via a coaxial cable. DO NOT connect to a powered coaxial cable. Damage will result to the TV.
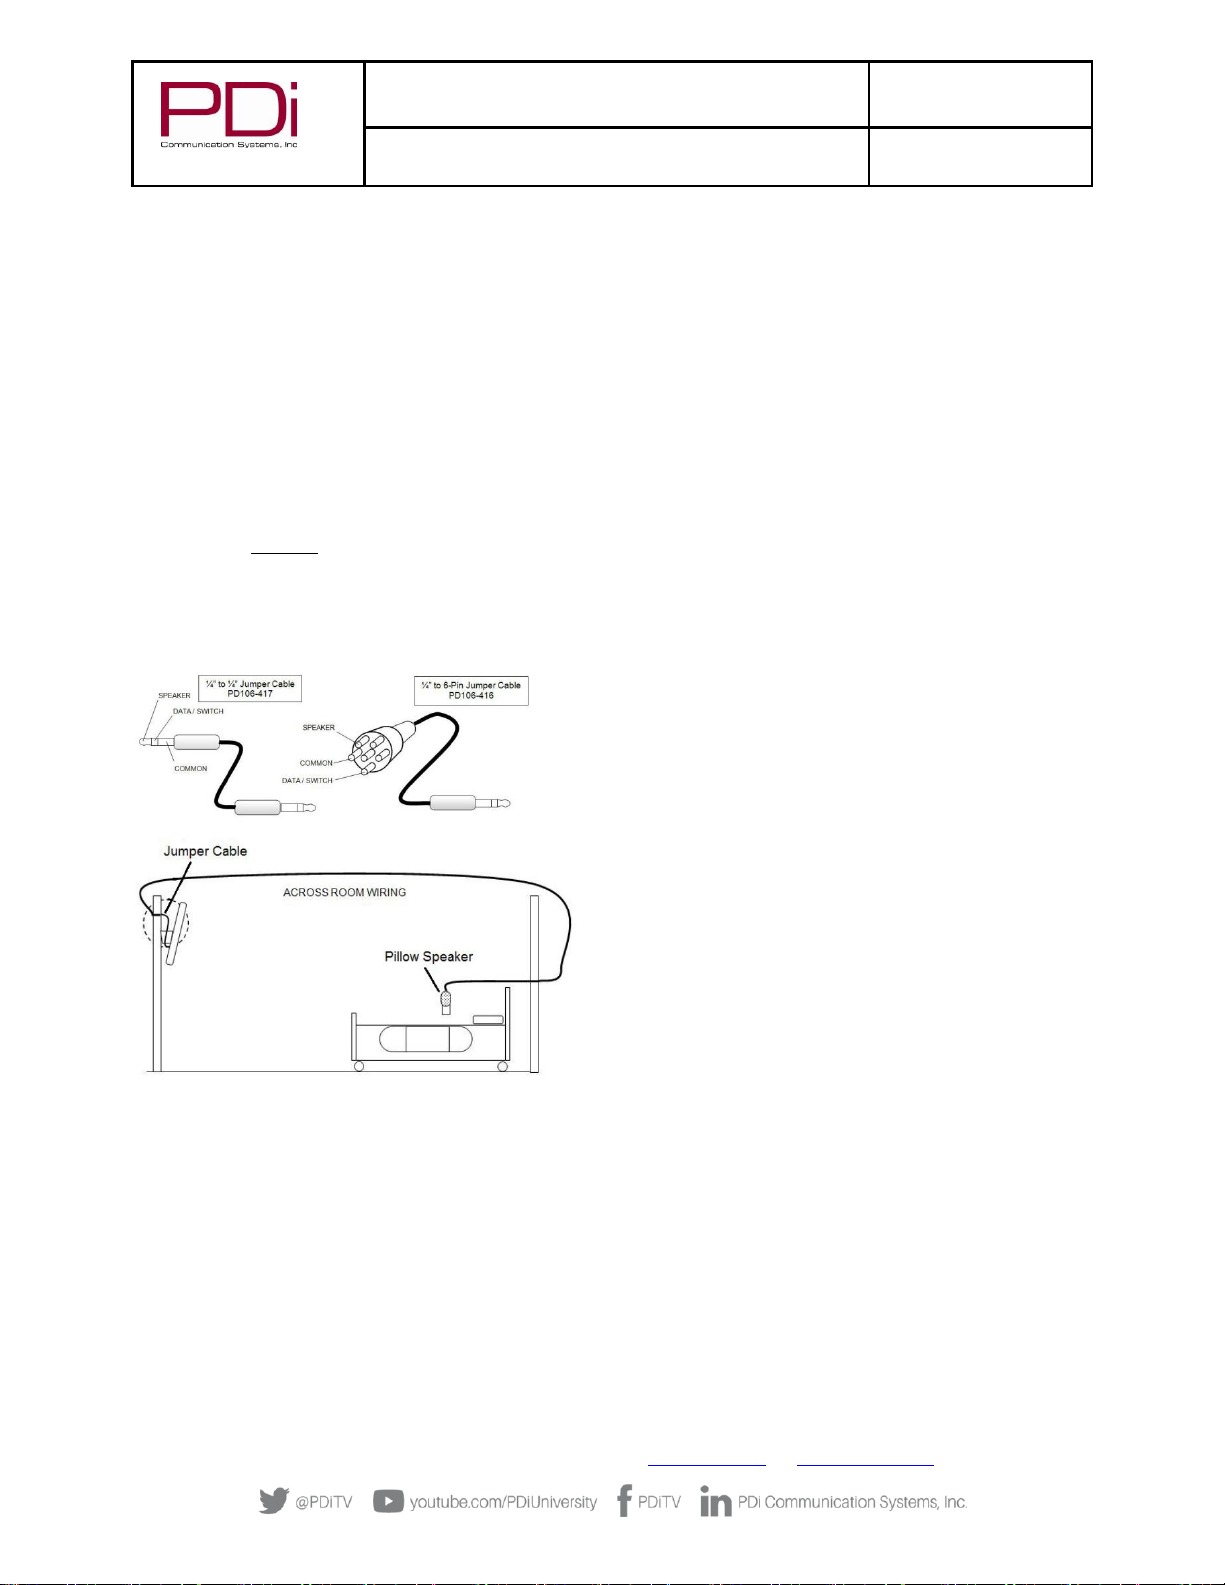
Across-Room Wiring & Pillow Speakers
Note: A jumper cable is NOT supplied with the TV and must be ordered separately.
A ¼” stereo-style pillow speaker (pendant control) jack is located
on the TV’s connector panel on the back side. This TV is designed
to work with either a digital pillow speaker that generates
digital-style control codes or a single-button analog (switch-style)
pillow speaker. A rear panel mounted switch allows use of
different brands of pillow speakers and supports the major
codesets: Zenith, Philips, and RCA.
medTV Enhanced Entertainment with Games and Relaxation is
compatible with any pillow speaker so long as it has
Menu/Guide/Home button and/or a Back/Last button. The
medTV user interface can be navigated with navigation arrows or
with numeric buttons.
CAUTION: Confirm the pillow speaker type and set the slide
switch appropriately BEFORE connecting the pillow speaker to
the TV. Failure to follow this procedure could result in damage to
the pillow speaker and/or TV.
Setup Wizard
The first time the TV is powered up you will be prompted to use the Setup Wizard to help with initial set up. Setup wizard will
set the language, go through USB or RF cloning process (if applicable), set the time zone, setup network connection (Wi-Fi or
Ethernet (if applicable)), set the main menu, and begin auto channel scan (if desired).
With the PD108-420 PDi set up remote, use the navigation arrows ▲ or ▼ to navigate the setup wizard. To proceed to the
next menu in the setup wizard, press ► to continue.
To access the setup wizard after the initial power on, you must perform a factory reset by entering the System Recovery menu.
Page 6
MODEL:
PDi A-Series
Document Number:
PD196-392R2
Quick Start Guide
Page 6 of 10
PDi Communication Systems, Inc. ▪ 40 Greenwood Ln ▪ Springboro, Ohio 45066 USA ▪ www.pdiarm.com and www.mymedTV.com ▪ Phone 800.628.9870
DVD Connection (Module)
The A Series televisions are made to accept the PDi DVD module PD251-043-1. This mounts on the back of the television with
access to the DVD from the side or bottom of the TV. Detailed installation instructions are available with the DVD module.
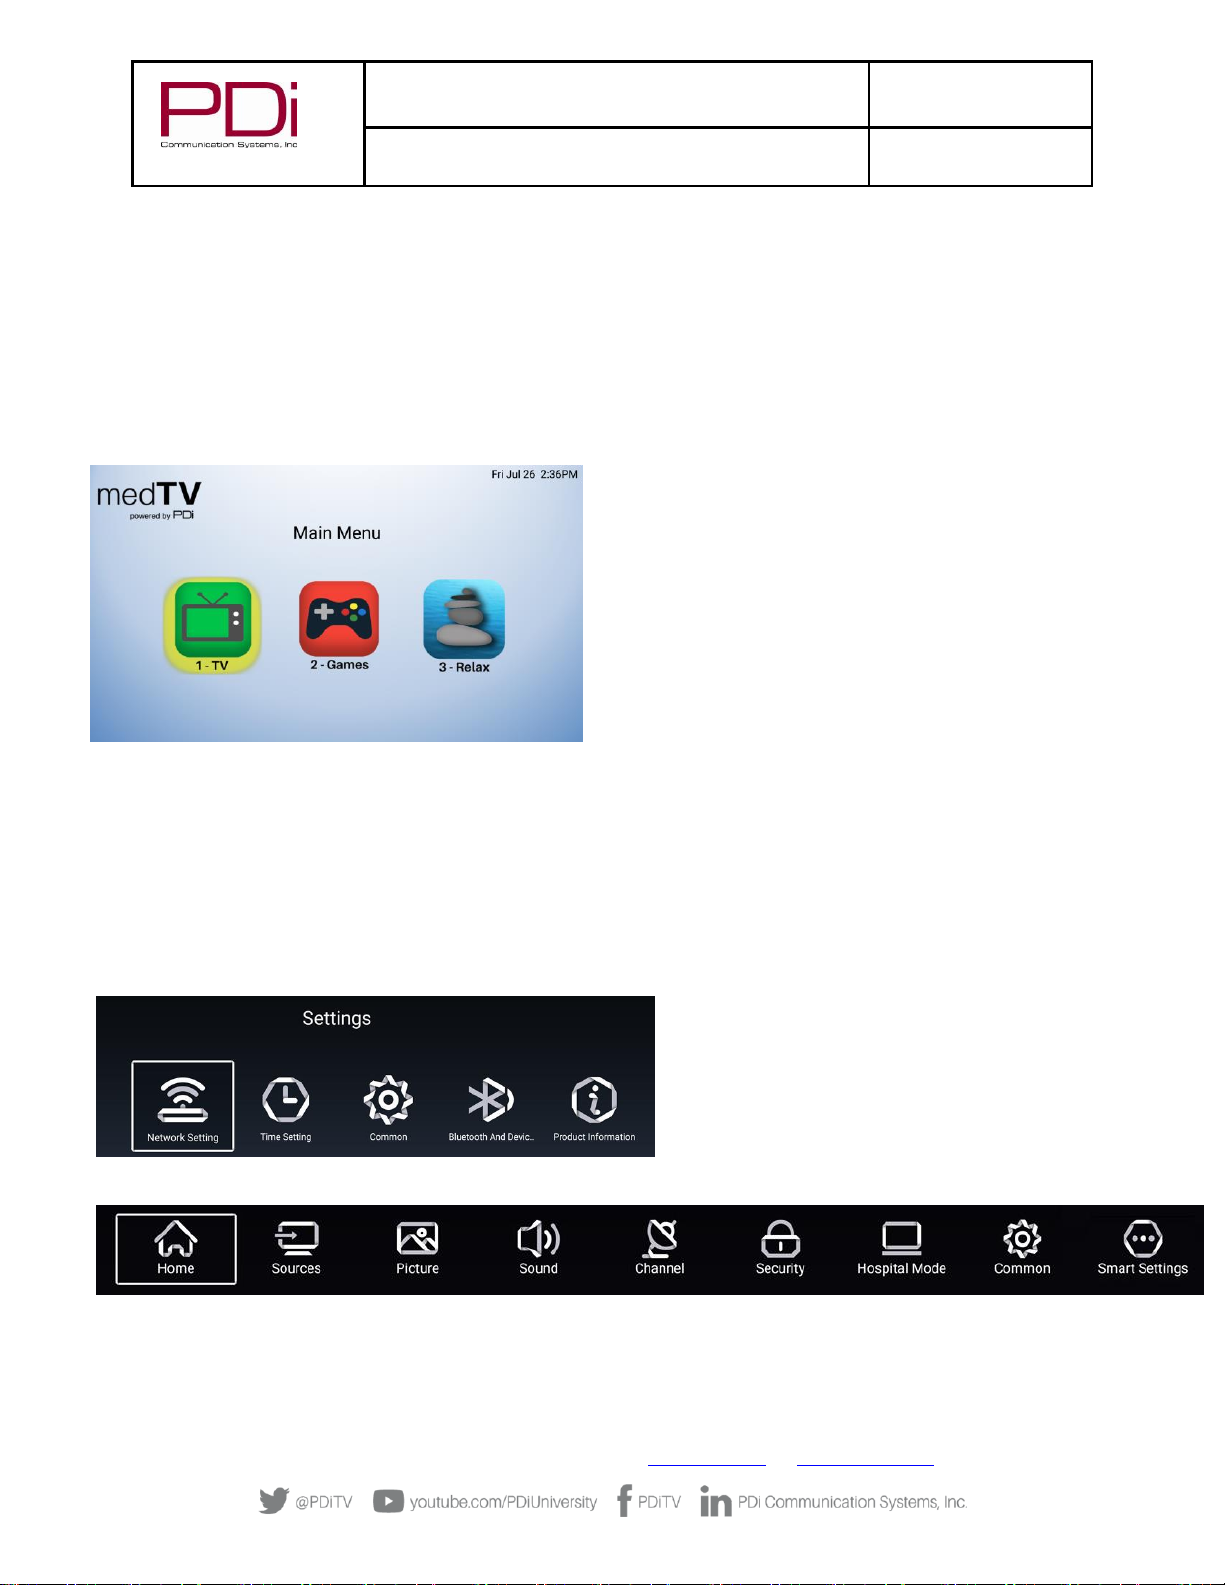
Main Menu Screen (medTV experience)
If medTV enhanced entertainment with TV, Games, and Relaxation was selected in the setup wizard, then when the television
is powered on the Main Menu screen will appear. medTV is designed to be compatible with as many pillow speakers as
possible.
Press “1” or navigate and select the green TV icon to watch TV.
Press “2” or navigate and select the red games icon to play 8
preinstalled, pillow speaker compatible games.
Press “3” or navigate and select the blue relax icon to enjoy 3
preinstalled relaxation apps
To return to the Main Menu, use home/guide/menu or
back/last/exit. You can also press TV/AV and select HOME or use
the * key on the setup remote to go back.
Programming
This section explains how to setup the features of the PDI A-Series LED TV. The following instructions assume you have a PDi
programming remote (PD108-420), have correctly mounted the TV, and connected power and RF signal. The A-series TV’s run
an Android operating system. Therefore, they have 2 configuration menus: one that applies to the entire system and a
separate menu just for television. Most of the settings are found in the television menus.
Access the menus by pressing SETUP on the PDi setup remote. If the main menu is being shown, pressing SETUP brings up the
system configuration menu:
If a television channel is being shown, pressing SETUP brings up the television setup menu:
Page 7
MODEL:
PDi A-Series
Document Number:
PD196-392R2
Quick Start Guide
Page 7 of 10
PDi Communication Systems, Inc. ▪ 40 Greenwood Ln ▪ Springboro, Ohio 45066 USA ▪ www.pdiarm.com and www.mymedTV.com ▪ Phone 800.628.9870
TV Setup – Channel Setup & Auto Program
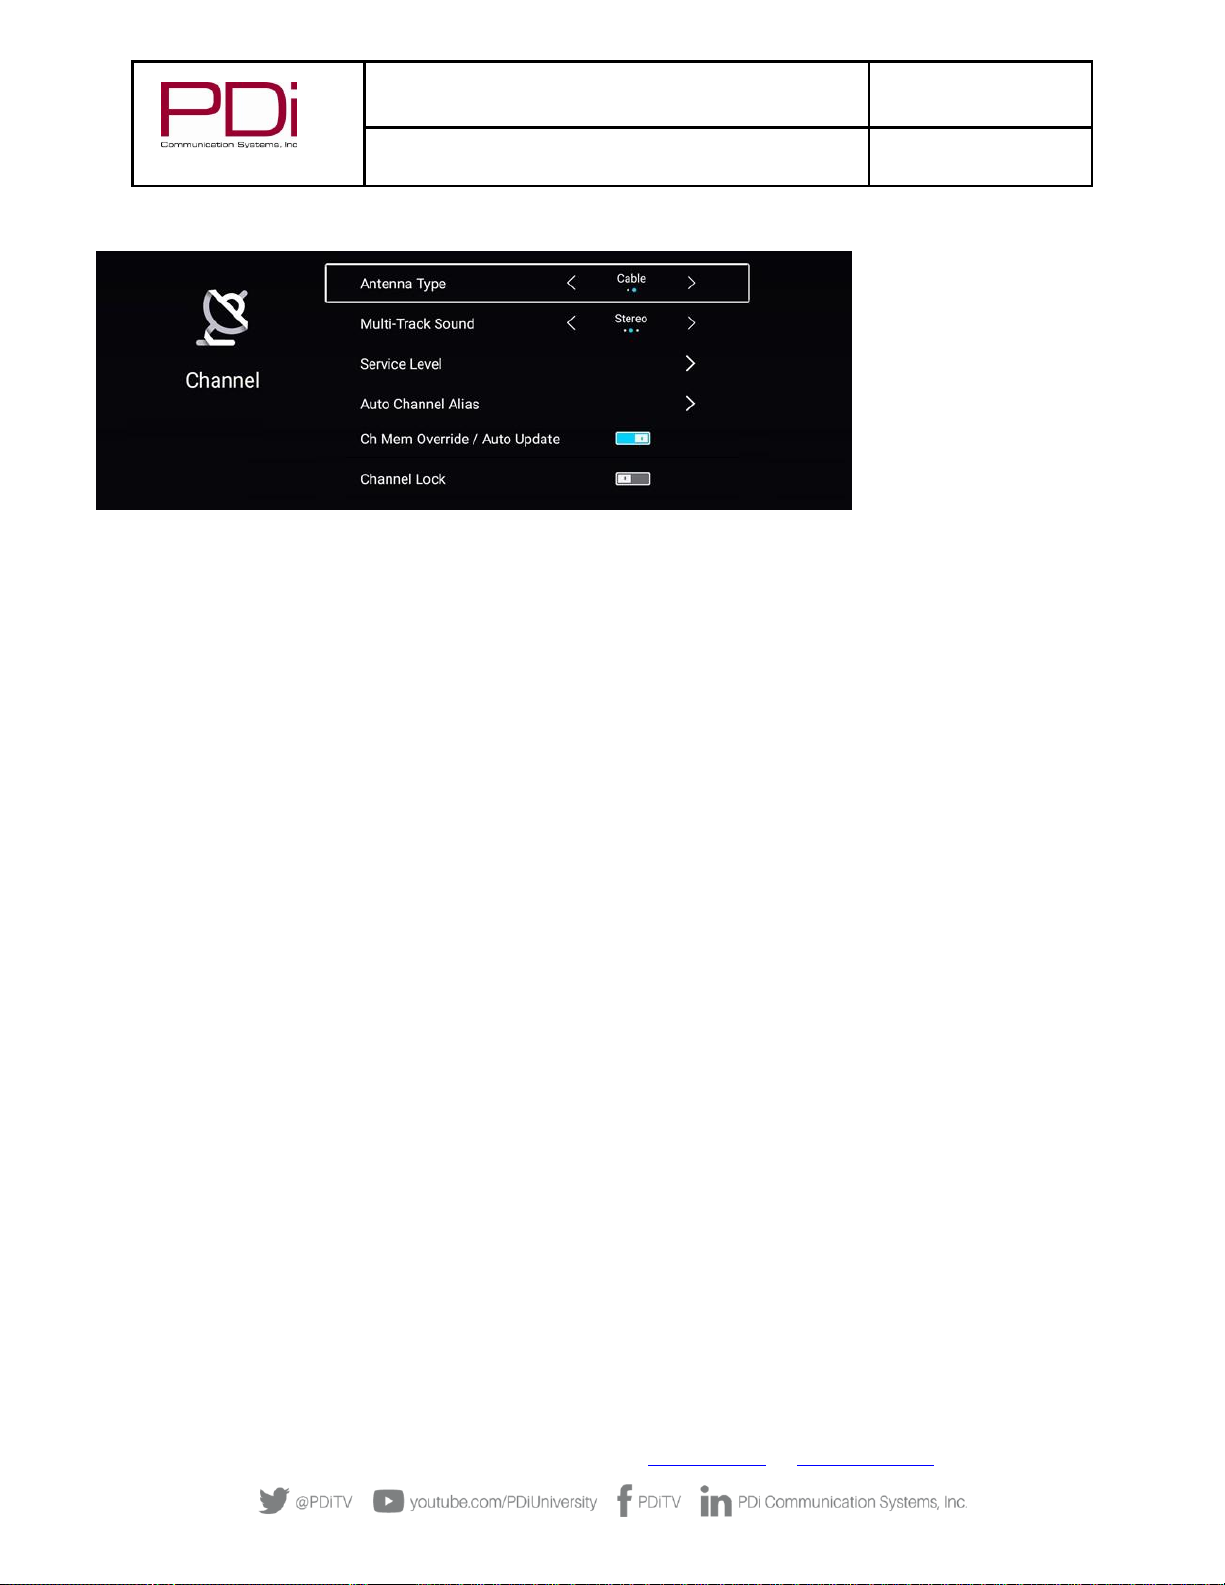
Antenna Type
Two different tuning types are available, Air and Cable. Selection of the correct signal type is required for the TV to recognize
all possible channels and before any channel programming can begin.
To set Antenna Type, open TV Setup Menu, select Channel
1. Navigate ( ▲ or ▼ ) to Antenna Type
2. Press ◄ or ► to select Air or Cable
3. Press SETUP to exit/return to the previous menu or proceed to Service Levels & Auto Program
NOTE: Most hospitals use Cable signal style. If Cable is selected, Air can also be added to the channel lineup during Auto
Program
Service Levels
This TV offers three different programmable service levels: Free, Basic and Premium allowing the hospital to offer up to 3
different tiers of programming. Only one service level is usable at a time. The current Service Level can be determined by
accessing the TV SETUP menu using the remote control. The Service Level can be changed to any of the 3 levels (or to disabled)
at any time by entering the TV SETUP menu and changing the Service Level menu items.
To set Service Level, open TV Setup Menu, select Channel
1. Navigate ( ▲ or ▼ ) to Service Level. Press Ok or ►
2. Press ◄ or ► to select Free, Basic, Premium or Disable
3. Press SETUP to exit/return to the previous menu or proceed to Auto Program
Auto Program
The TV automatically scans each available channel for activity. Channels that display activity are memorized into the selected
Service Level. Auto scan is part of the setup wizard but can also be done through the menus.
To Auto Program, open the TV Setup Menu, select Channel
1. Set the Antenna Type (Air or Cable)
2. After setting Antenna Type, navigate (▼) to Service Level. Press OK or ►.
3. Press ◄ or ► to set the desired Service Level (Free, Basic, or Premium) you wish to auto program.
4. If using Cable as the Antenna Type, Digital Air channels can be added to the channel map by navigating (▲ or ▼) to
“Auto Scan Cable + Digital Air”. If no Digital Air channels are available, or if Air was set as the Antenna Type,
navigate (▲ or ▼) to Auto Scan
5. Press Ok or ► to start the Auto Scan
6. A screen will show the progress of the channel search. Auto scan requires several minutes to complete. Digital
Page 8
MODEL:
PDi A-Series
Document Number:
PD196-392R2
Quick Start Guide
Page 8 of 10
PDi Communication Systems, Inc. ▪ 40 Greenwood Ln ▪ Springboro, Ohio 45066 USA ▪ www.pdiarm.com and www.mymedTV.com ▪ Phone 800.628.9870
channel auto scan may take longer than 10 minutes to complete.
7. Press the SETUP button to return to normal TV viewing.
Auto Channel Alias
This setting automatically assigns a sequential channel number to the channels in the list.
To Auto Channel Alias the channel map, open the TV Setup Menu, select Channel
1. Navigate ( ▲ or ▼ ) to Auto Channel Alias. Press Ok or ►
2. Navigate to the desired Auto Channel Alias setting: enabled channels only, all channels, or all aliased channels.
Press Ok or ►
3. Navigate to the OK button and press OK on the remote to complete the Auto Alias
Additional Channel Settings
Please see the user manual, available at https://www.pdiarm.com/document-library-access for instructions on additional
channel configurations and settings.
Sound Programming
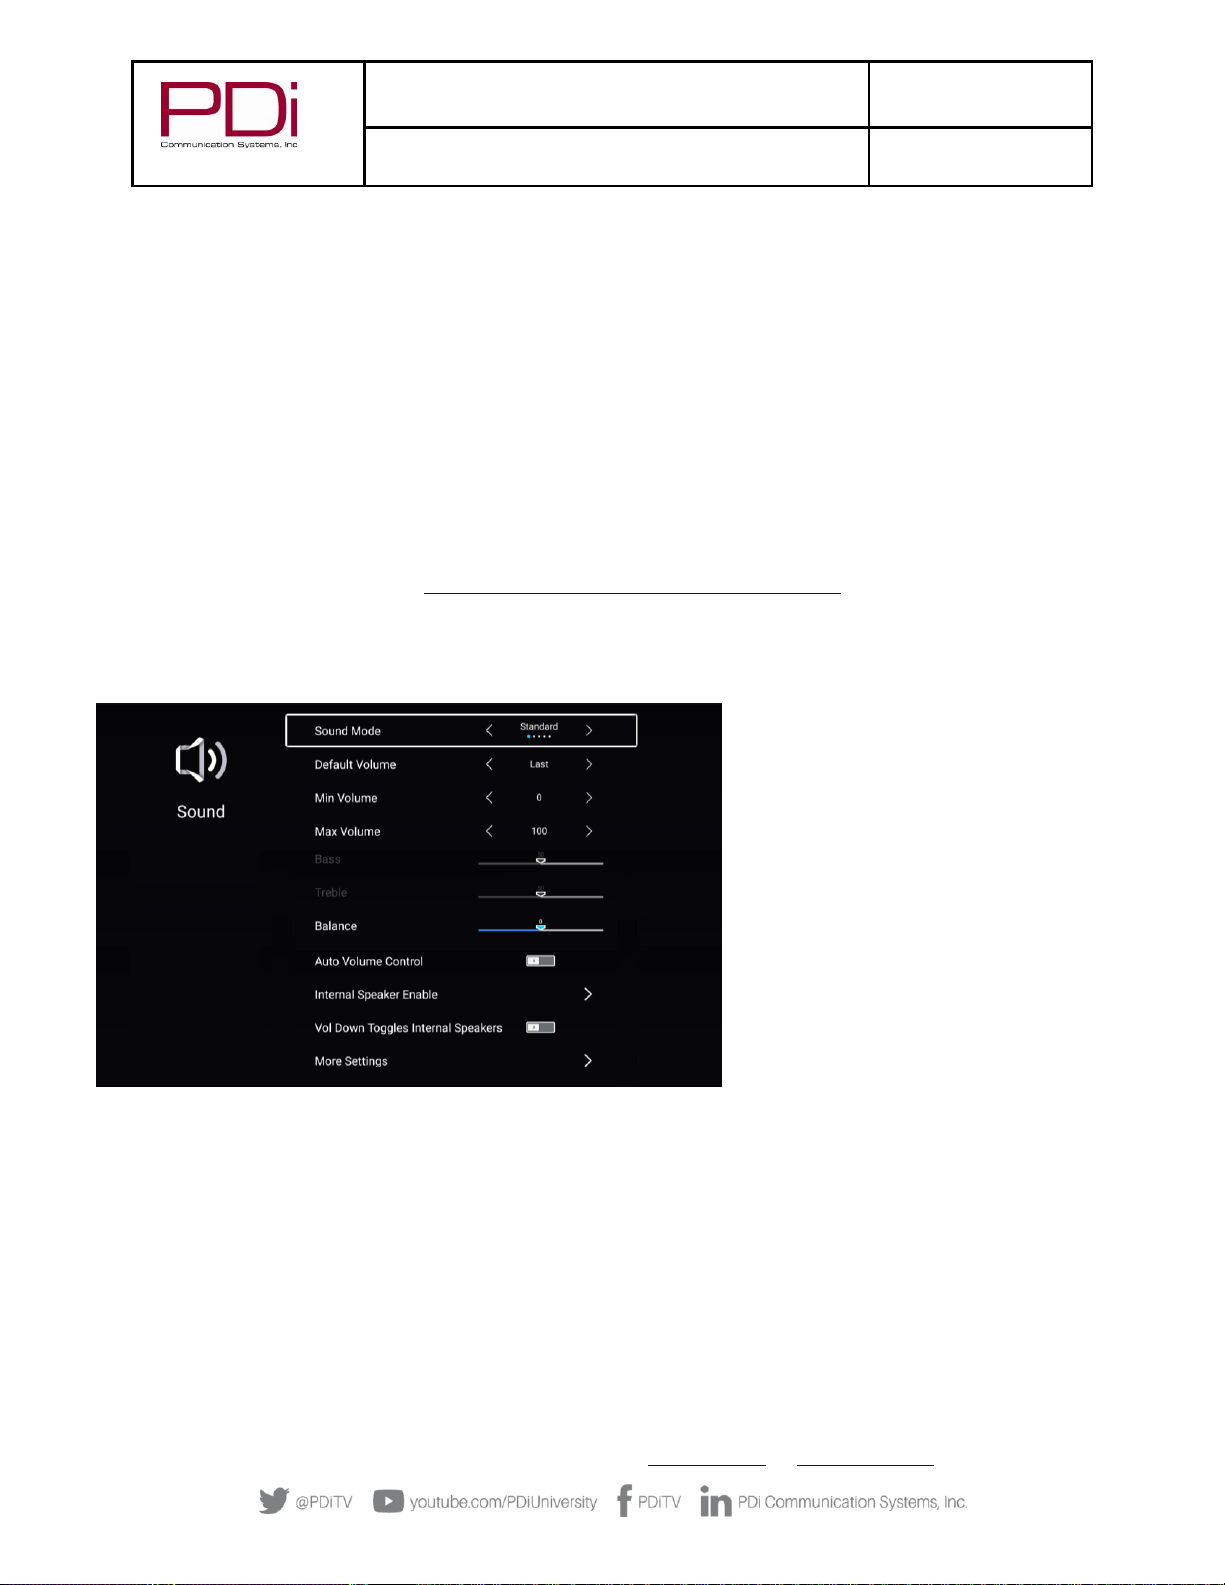
Internal Speaker Enable/Disable
The TV’s internal speakers can be enable or disabled by source, requiring the use of a pillow speaker for private listening.
To disable the internal speakers, open the TV Setup Menu, select Sound
1. Navigate ( ▲ or ▼ ) to Internal Speaker Enable. Press Ok or ►
2. A menu displaying all enabled sources will appear. Navigate to each source for which you want to disable the
internal speakers and press OK to uncheck the source
3. When finished, navigate to the OK button and press OK on the remote to complete
Page 9
MODEL:
PDi A-Series
Document Number:
PD196-392R2
Quick Start Guide
Page 9 of 10
PDi Communication Systems, Inc. ▪ 40 Greenwood Ln ▪ Springboro, Ohio 45066 USA ▪ www.pdiarm.com and www.mymedTV.com ▪ Phone 800.628.9870
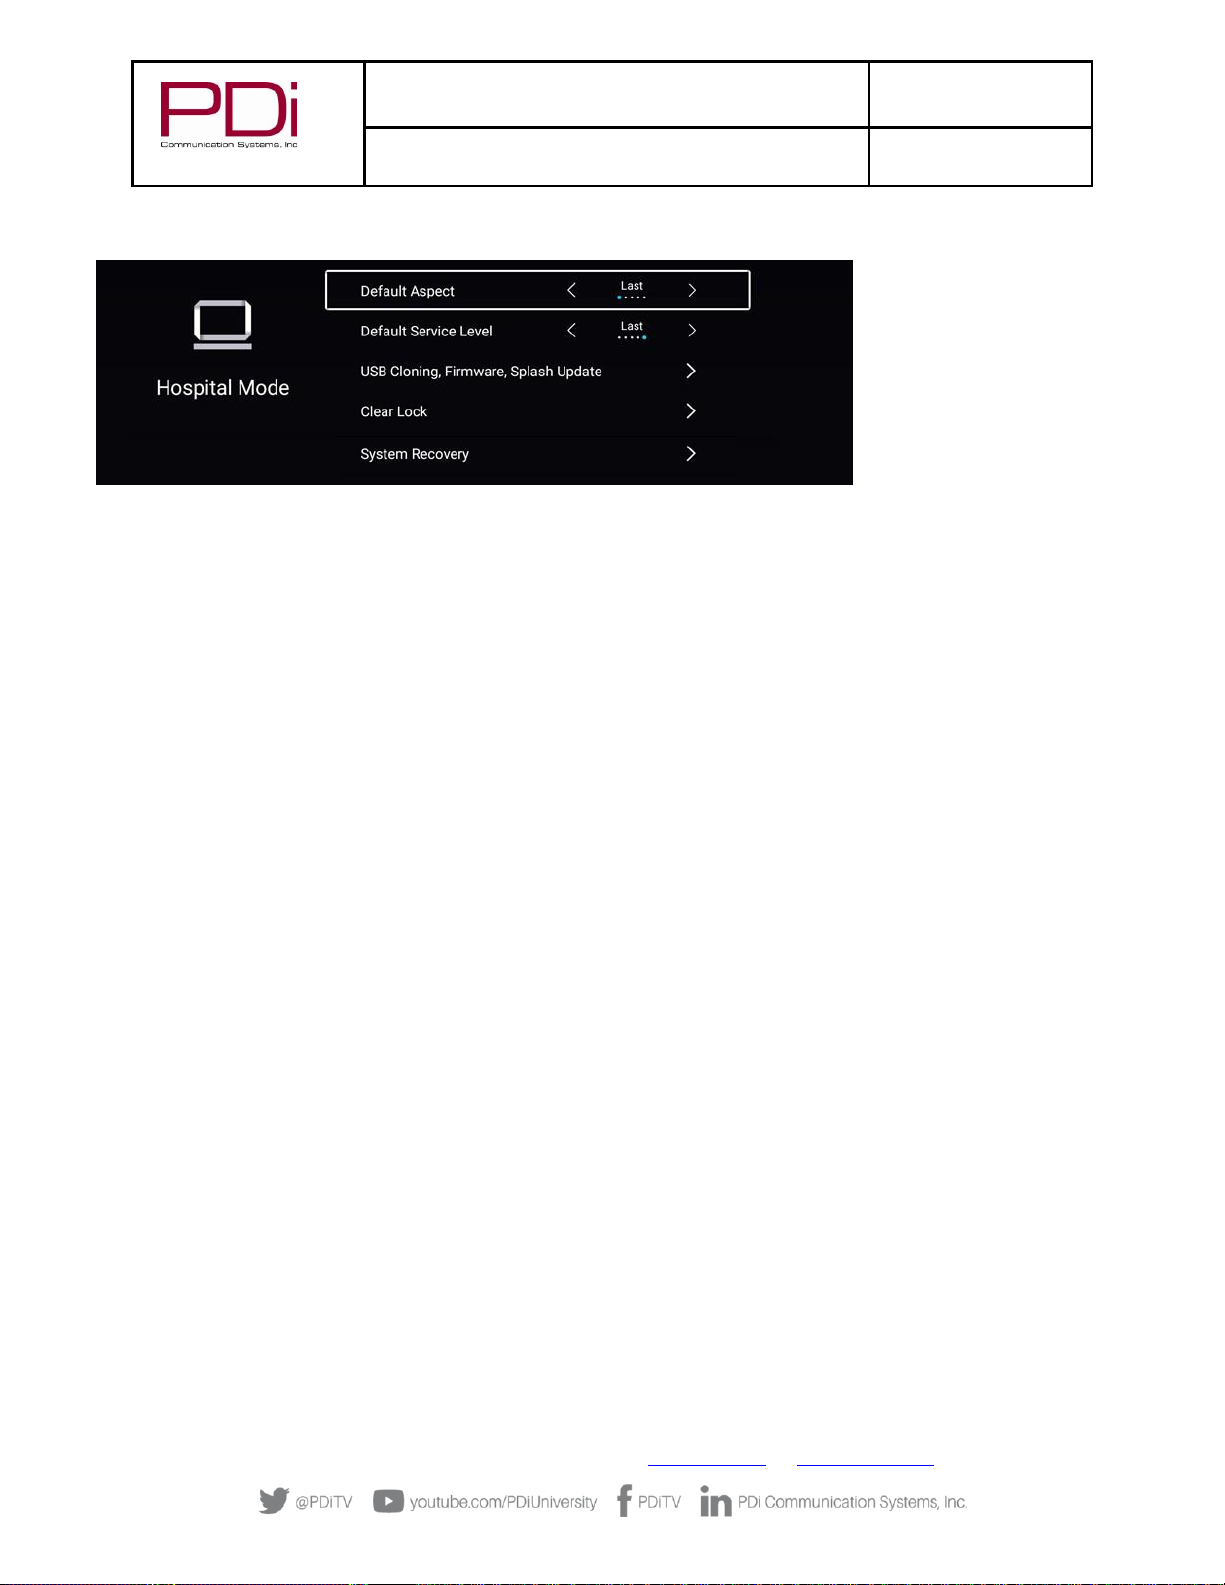
Hospital Mode
USB Cloning
Cloning allows the settings and programming of one TV to be quickly and easily copied over to other TVs by a USB flash drive or
by the PDi RF-HEMiS. Please see the user manual for instructions on cloning with the PDi RF-HEMiS.
To clone by USB flash drive, you must first export the setup information from a programmed host TV to a USB flash drive and
then import that setup information to the other TVs. Cloning can be used to re-program a previously programmed TV.
To clone by USB flash drive, on the TV from which you want to copy the settings/programming, insert a USB flash drive into
any unused USB port on the rear of the TV. Open the TV Setup Menu, select Hospital Mode
1. Navigate ( ▲ or ▼ ) to USB Cloning, Firmware, Splash Update. Press Ok or ►
2. Navigate to Save to USB. Press OK or ►
3. A message box will appear with the default clone file name. Navigate to the confirm button and press OK on the
remote
4. A second message box will appear asking you to wait while the clone file is saved to the USB drive. This message
will automatically disappear when the clone file has been created
5. Remove the USB drive
Next, go to the TV(s) where you would to place the clone file just created. Insert the USB flash drive into any unused USB port
on the rear of the TV. Open the TV Setup Menu, select Hospital Mode
1. Navigate ( ▲ or ▼ ) to USB Cloning, Firmware, Splash Update. Press Ok or ►
2. Navigate to Restore to TV. Press OK or ►
3. A message box will appear with the available clone files. Navigate to the desired clone file and press OK on the
remote
4. A message box will appear telling asking you to please wait while the clone file is restored to the TV and that that TV
will automatically reboot when finished
5. Remove the USB drive and proceed to the next TV
Page 10
MODEL:
PDi A-Series
Document Number:
PD196-392R2
Quick Start Guide
Page 10 of 10
PDi Communication Systems, Inc. ▪ 40 Greenwood Ln ▪ Springboro, Ohio 45066 USA ▪ www.pdiarm.com and www.mymedTV.com ▪ Phone 800.628.9870
Limited Warranty
PDi Communication Systems Inc., (“PDi”) warrants, to the original purchaser only, that the product will be free from defects in
materials and workmanship, under normal use, for 2 years from the date of original purchase. This warranty does not cover any
other equipment that may have been included with PDi’s shipment of this product.
After receipt of written notice of a defect or malfunction occurring during the warranty period, PDi will repair or replace goods
returned to its Springboro, Ohio location, at its discretion, the whole or any component part of any product manufactured by
PDi and found by PDi to be defective. If the decision is made to replace the product, PDi will exchange the model for the same
model or a model similar in form and function, new or reconditioned.
As a condition to obtaining warranty service, written notification of the defective product must be received by PDi within ten
(10) days of noticing the defect. Repair of said product requires it to be shipped to the PDi factory in Springboro, Ohio. All
shipments shall be F.O.B. Springboro, Ohio, and all shipping and freight charges to PDi’s factory shall be paid by the customer.
For information regarding authorized servicing and all other information pertaining to this warranty, please contact PDi
COMMUNICATION SYSTEMS at 40 Greenwood Lane, Springboro, Ohio 45066 or phone 800-628-9870 and ask for Service.
This warranty gives specific legal rights and you may also have other rights which vary from state to state.
Exclusions from Warranty
• Products damaged by any catastrophe, accident, or from neglect, misuse, fault, improper assembly, improper
maintenance, inadequate return packaging, or negligence by the customer or any third party. They will be treated as
out of warranty for external cause to the Products, such as, but not limited to, failure of or faulty electric power, air
conditioning, operator error, failure or malfunction of any data communications system. Such conditions will be
determined by PDi at its sole unfettered discretion.
• Service and repair of accessories, apparatus, attachments or any other devices which are not PDi products or options.
• Defacing of product, revision control and PDi labeling (label alterations, serial number missing, serial number no
longer discernible and serial number invalid). All serial numbers are recorded and tracked for warranty purposes.
• Unauthorized changes, modifications or alterations in or to the Products not installed by PDi.
• Damage to or loss of any programs, data, or removable storage media.
• Damage incurred during installation, relocation or removal of the Products or any accessories, apparatus,
attachments or other devices.
• Normal wear.
• The furnishing of accessories or supplies.
• Damage by shipping carrier.
• Incompatibility issues.
• Damages of any kind including, but not limited to, direct or indirect damages, lost profits, lost saving, or other special
incidental, exemplary or consequential damages whether for breach of contract, tort or otherwise, or whether arising
out of the use of or inability to use the product, even if PDi or any distributor, dealer, or authorized service provider
has been advised of the possibility of such damages, or any claim by any other party
• Damage caused by any software or application not installed at the factory.
PDi’s liability under this warranty is limited to repair or replacement of defective products and parts as provided above. PDi
shall not be liable for incidental or consequential damages.*
The warranty contained herein is in lieu of all other expressed or implied warranties, including any implied warranty of
merchantability or fitness for any particular purpose. PDi neither assumes nor authorizes any person to assume, on its behalf,
any other obligation or liability.
*Some states do not allow the exclusion of limitation of incidental or consequential damages or a disclaimer of warranties
implied by law, so the above limitation or exclusion may not apply.
The information and technical data in this manual is believed accurate, but is not warranted and is subject to change without
notice or obligation. PDi reserves the right to change this policy without advance notice.
 Loading...