

Page 1
PCRmax Alpha Cycler 1,2 and 4
Operation Manual
PCRmax rev 10
Page 2

Contents
Introduction 4
Alpha Cycler configurations 4
Before Use 5
Unpacking 5
Fuse removal and replace 5
Safety Information 8
Consignes de sécurité 10
Sicherheitsinformationen 12
Informazioni sulla sicurezza 14
Información de seguridad 16
Contact Information 18
Alpha Cycler specification 19
Installation and operation 21
Installation 21
Operation 22
General software features 23
Introduction 23
Basic Android commands and data/text input 24
Template programs 25
Gradient 26
Creating user Profiles 27
Creating a new user account 27
To log in as an existing user 27
Logging out 27
Changing a user password 27
Creating USB Login 28
Programming 29
Using the Program Wizard 29
Manual program entry 33
Adding a stage 33
Editing step parameters 35
Adding a gradient step 35
Adding a temperature or time increment or decrement 36
Deleting a step or stage 37
Saving the program 38
Running a Program 41
Running a program from the short cut list 41
Running a program from the instrument memory 42
Viewing a running program 42
QR code and Alpha Track App 46
Stopping a program 48
Pausing a program 49
2
Page 3

Contents
Using the File Manager 50
Search for a file 50
Reports 51
Deleting a program or report from the File Manager 52
Copying and transferring Programs and reports 53
Copying a program to a USB memory stick 53
Transferring a program from a USB memory stick to the Alpha Cycler 53
Instrument settings and defaults 54
Preferences 54
Instrument settings 55
Temperature log 55
Auto-restart 55
Date and time 56
Program defaults 56
Updating the Alpha Cycler software 59
Procedure 59
Technical support and servicing 60
Replacing blocks 60
Additional information 61
User maintenance 61
Fault Finding 61
Fuses 61
Insulation testing 61
3
Page 4

Introduction
The Alpha Cycler thermal cyclers are standalone systems with flexible block options (96 or 384 well
formats being available). The range includes both a single block, the AC-1, a dual block variant, the AC-2
and a quad block variant, the AC-4.
The Alpha Cyclers range of block options allow for use of the most commonly used consumables including
0.2ml x 96 well plates, 0.2ml tubes, 0.2ml strip tubes and 384 well plates.
All combinations of base unit and block include a gradient feature, manually adjustable heated lid and
programming features such as touchdown, active sample cooling, advanced reporting and health check
options as standard to allow for most applications to be performed easily.
ALPHA CYCLER CONFIGURATIONS
The Alpha Cycler systems can be configured with any combination of 96 or 384 well format blocks in the
AC-1, AC-2 and AC-4 chassis, see below.
Part code Configuration
AC196 96 well
AC1384 384 well
AC296 2 x 96 well
AC2196 1 x 96 / 1 x 384 well
AC2384 2 x 384 well
AC496 4 x 96 well
AC4384 4 x 384 well
AC4296 2 x 96 / 2 x 384 well
AC4396 3 x 96 / 1 x 384 well
AC4196 1 x 96 / 3 x 384 well
4
Page 5

Before use
Before using the Alpha Cycler please ensure you have read this manual carefully. If there is any doubt
relating to the proper use of this equipment, please contact your local distributor or Cole-Parmer Ltd via
the website: www.coleparmer.com or email CPtechsupport@coleparmer.com.
UNPACKING
When unpacking the unit please ensure that the following have been removed from the packaging:
Alpha Cycler with block(s).
Mains cables (UK, EU, China and US).
USB stick containing operator’s manual and default protocols.
AC-4 2x 15A Fuse which must be changed in certain territories and power supplies, see below.
AC-2 2x 12.5A Fuse which must be changed in certain territories and power supplies, see below.
The user is advised to keep the original packaging in case the instrument ever needs to be returned
for service or repair. Cole-Parmer Ltd accepts no responsibility for damage incurred unless the unit is
correctly packed and transported in its original packaging.
IMPORTANT NOTE:
IF USING THE AC-2 / AC-4 AT 120V, BEFORE THE UNIT IS
CONNECTED TO THE MAINS AND SWITCHED ON FOR THE FIRST
TIME REPLACE THE FUSES.
FOR AC4 REPLACE 8A FUSES WITH 15A ANTI-SURGE FUSES.
FOR AC2 REPLACE 5A FUSES WITH 12.5A ANTI-SURGE FUSES.
THE FUSE HOLDERS ARE LOCATED BESIDE THE POWER SWITCH OF THE UNIT.
IF THE AC-4 IS INTENDED TO BE USED IN AUSTRALIA THE UNIT MUST BE A FIXED INSTALLATION
AND CONNECTED DIRECTLY TO THE MAINS.
FUSE REMOVAL AND REPLACE
The anti-surge fuses are located on the right side of the system towards the rear, beside the power
switch.
• Unscrew the fuse cover, using a flat head screwdriver or similar, and remove the fuse holder.
• Pop out the two fuses that the system is shipped with and replace with AC-2 (12.5A) or AC-4 (15A).
THIS MUST BE COMPLETED BEFORE CONNECTING THE SYSTEM TO THE LIVE MAIN AND POWERING
UP THE UNIT.
NOTE:
A 250mm air space should be kept free at each side of the AC-2 / AC-4 unit (left and right). If two AC-2
/ AC-4 units have to be positioned next to one another, a total of 500mm should be free between both
units. If the systems have to be wracked the shelves should be 600mm apart from each other vertically,
this promotes the correct airflow and heat distribution from the units. As air flow with the AC-2 / AC-4
is in thought the front of the unit and out the sides, caution should be taken to not block the path of
air in and out of the unit.
5
Page 6

Before use
REMARQUE IMPORTANTE :
EN CAS D’UTILISATION DES MODÈLES AC-2 OU AC-4 SOUS UNE TENSION DE 120
V, REMPLACEZ LES FUSIBLES AVANT DE BRANCHER L’APPAREIL À L’ALIMENTATION
SECTEUR ET DE LE METTRE SOUS TENSION POUR LA PREMIÈRE FOIS.
POUR LE MODÈLE AC-4, REMPLACEZ LES FUSIBLES 8 A PAR DES FUSIBLES
TEMPORISÉS 15 A.
POUR LE MODÈLE AC-2, REMPLACEZ LES FUSIBLES 5 A PAR DES FUSIBLES
TEMPORISÉS 12,5 A.
LES PORTE-FUSIBLES SONT SITUÉS À CÔTÉ DU BOUTON MARCHE/ARRÊT DE
L’APPAREIL.
En cas d’utilisation du modèle AC-4 en Australie, l’appareil doit être installée de manière fixe
et définitive, et directement connectée à l’alimentation secteur.
Retrait et remplacement des fusibles
Les fusibles temporisés sont situés du côté droit en partie arrière de l’appareil, à côté du bouton marche/arrêt.
• Dévissez le couvercle des fusibles à l’aide d’un tournevis plat ou d’un outil similaire, puis retirez le
porte-fusibles.
• Retirez les deux fusibles déjà présents dans l’appareil et remplacez-les par des fusibles de 12,5 A (AC-2)
ou de 15 A (AC-4).
LES FUSIBLES DOIVENT ÊTRE REMPLACÉS AVANT LE BRANCHEMENT DE L’APPAREIL À L’ALIMENTATION
SECTEUR ET SA MISE SOUS TENSION.
WICHTIGER HINWEIS:
WENN SIE DEN AC-2 / AC-4 BEI 120 V VERWENDEN, TAUSCHEN SIE DIE SICHERUNGEN
AUS, BEVOR DAS GERÄT AN DIE STROMVERSORGUNG ANGESCHLOSSEN UND
DAS ERSTE MAL ANGESCHALTEN WIRD.
BEIM AC4 ERSETZEN SIE DIE 8-A-SICHERUNGEN MIT TRÄGEN 15-A-SICHERUNGEN.
BEIM AC2 ERSETZEN SIE DIE 5-A-SICHERUNGEN MIT TRÄGEN 12,5-A-SICHERUNGEN.
DIE SICHERUNGSFASSUNGEN BEFINDEN SICH NEBEN DEM NETZSCHALTER DES
GERÄTS.
Wenn der AC-4 für die Verwendung in Australien vorgesehen ist, muss das Gerät fest installiert
und direkt mit der Stromversorgung verbunden werden.
Entfernen und Austauschen einer Sicherung
Die trägen Sicherungen befinden sich nach hinten gerichtet auf der rechten Seite des Systems, neben
dem Netzschalter.
• Schrauben Sie die Sicherungsabdeckung mit einem Flachschraubenzieher oder Ähnlichem ab und
entfernen Sie die Sicherungsfassung.
• Ziehen Sie die zwei Sicherungen heraus, die im Lieferumfang des Systems enthalten sind, und
ersetzen Sie sie mit AC-2 (12,5 A) oder AC-4 (15 A).
DIESER SCHRITT MUSS ABGESCHLOSSEN SEIN, BEVOR DAS SYSTEM MIT DER SPANNUNGSVERSORGUNG
VERBUNDEN UND DAS GERÄT ANGESCHALTEN WIRD.
6
Page 7

Before use
NOTA IMPORTANTE:
SE SI UTILIZZA L’AC-2 / L’AC-4 A 120 V, PRIMA CHE L’UNITÀ SIA COLLEGATA
ALL’ALIMENTAZIONE DI RETE E ACCESA PER LA PRIMA VOLTA, SOSTITUIRE I
FUSIBILI.
PER L’AC4 SOSTITUIRE I FUSIBILI DA 8 A CON I FUSIBILI RITARDATI DA 15 A.
PER L’AC2 SOSTITUIRE I FUSIBILI DA 5 A CON FUSIBILI RITARDATI DA 12,5 A.
I PORTAFUSIBILI SONO SITUATI VICINO ALL’INTERRUTTORE DI ALIMENTAZIONE
DELL’UNITÀ.
Se l’ac-4 viene utilizzato in australia, l’unità deve essere collegata direttamente e in modo
permanente all’alimentazione di rete.
Rimozione e sostituzione dei fusibili
I fusibili ritardati sono situati sul lato destro del sistema verso il retro, accanto all’interruttore di alimentazione.
• Svitare il coprifusibile, usando un giravite a testa piatta o simile, e rimuovere il portafusibile.
• Estrarre i due fusibili con cui viene fornito il sistema e sostituirli con AC-2 (12,5 A) o AC-4 (15 A).
QUESTA OPERAZIONE DEVE ESSERE COMPLETATA PRIMA DI COLLEGARE IL SISTEMA ALLA RETE E DI
ACCENDERE L’UNITÀ.
NOTA IMPORTANTE:
SI UTILIZA EL AC-2 / AC-4 A 120 V, ANTES DE CONECTAR LA UNIDAD A LA RED Y
ENCENDERLA POR PRIMERA VEZ, SUSTITUYA LOS FUSIBLES.
PARA EL AC4 SUSTITUYA LOS FUSIBLES DE 8 A POR FUSIBLES PROTECTORES DE
SOBRETENSIÓN DE 15 A.
PARA EL AC4 SUSTITUYA LOS FUSIBLES DE 5A POR FUSIBLES PROTECTORES DE
SOBRETENSIÓN DE 12,5A.
LOS SOPORTES DE LOS FUSIBLES SE ENCUENTRAN AL LADO DEL INTERRUPTOR DE
ALIMENTACIÓN DE LA UNIDAD.
Si el AC-4 se va a usar en Australia, la unidad debe ser una instalación fija y estar directamente
conectada a la red.
Retirada y sustitución de los fusibles
Los fusibles protectores de sobretensión están situados en el lado derecho del sistema tocando a la parte
trasera, al lado del interruptor de alimentación.
• Destornille la tapa de los fusibles con un destornillador de punta plana o similar, y retire el soporte
del fusible.
• Saque los dos fusibles con los que se suministra el sistema y sustitúyalos por AC-2 (12,5 A) o AC-4 (15 A).
ESTO DEBE REALIZARSE ANTES DE CONECTAR EL SISTEMA A LA RED ELÉCTRICA Y ENCENDER LA UNIDAD.
7
Page 8

Safety information
Please read all the information in this manual before using the Alpha Cycler.
WARNING
HIGH TEMPERATURES ARE DANGEROUS: they can cause serious burns to operators and ignite combustible
material. Users should be aware of the following potential hazards:
• USE CARE AND WEAR PROTECTIVE GLOVES TO PROTECT HANDS.
• DO NOT use combustible substances near hot objects.
• DO NOT operate the instrument in the vicinity of inflammable liquids or gases.
• DO NOT place any liquid directly into the instrument.
• DO NOT touch the heated lid when system is running or within 10 minutes of the
system completing a run.
• DO NOT touch the block when the system is running or within 10 minutes of the system
completing a run.
OPERATOR SAFETY
All operators of PCRmax equipment must have available the relevant literature needed to ensure their
safety. It is important that only suitably trained personnel operate this equipment, in accordance with the
instructions contained in this manual and with general safety standards and procedures. If the equipment
is used in a manner not specified by Cole-Parmer Ltd. the protection provided by the equipment to the
operator may be impaired.
All PCRmax instruments are designed to conform to international safety requirements and are fitted with
an over-temperature cut-out. If a safety problem should be encountered, switch off the unit at the mains
socket and remove the plug from the electricity supply.
INSTALLATION
The instrument should be carried using both hands. Never move or carry the instrument when in use or
connected to the mains electricity supply.
The AC-2 / AC-4 have a weight of 30kgs / 47kgs respectively; it is advised that two people lift and carry
the AC-2, and three people lift the AC-4.
1. All PCRmax instruments are supplied with a power cable; this may be integral or plug-in.
2. Before connecting the instrument to the mains electricity supply, check the voltage
against the rating plate (located on the back of the unit). Please note that the unit
must be earthed to ensure proper electrical safety.
3. The units are rated to operate at: for the AC-1 100-230V, 50/60Hz and for the AC-2 / AC-4 100230V 50/60Hz.
4. Do not allow the Alpha Cycler to overhang the bench.
5. Ensure the bench for the AC-2 / AC-4 can withstand 30kgs / 47kg of weight.
6. Place the unit on a suitable flat and level bench or in a fume cupboard if required, ensuring that the
air inlet and outlet vents on the underside and rear are free from obstruction.
7. Ensure that the feet of the instrument do not overhang the side of the bench.
8. Plug the mains cable into the socket on the back (side in AC-2 / AC-4) of the instrument.
9. Switch on the instrument using the switch located on the back (side in AC-2 / AC-4 of the unit.
8
Page 9

REPLACEMENT CABLE
Should the mains lead need replacement, a cable of 1.5 mm2 of harmonized code H05VV-F 3G connected
to an IEC320 plug should be used. IF IN DOUBT CONSULT A QUALIFIED ELECTRICIAN.
ENVIRONMENTAL CONDITIONS
The Alpha Cycler is designed operate under the following conditions:
• Indoor use
• Ambient temperature range +5°C to +35°C
• Altitude to 2000m
• Relative humidity not exceeding 80%
• Mains supply fluctuations not exceeding 10%
• Over voltage category II IEC 60364-4-443
• Pollution degree 2
Note: The control specifications are quoted at an ambient temperature of 20°C ±2°C.
The instrument has been tested for radio frequency interference and is certified under EN61326.
WARRANTY
Cole-Parmer Ltd warrants this instrument to be free from defects in material and workmanship, when
used under normal laboratory conditions for two (2) years. In the event of a justified claim, Cole-Parmer
Ltd will replace any defective component or replace the unit free of charge. This warranty does not
apply if damage is caused by fire, accident, misuse, neglect, incorrect adjustment or repair, damage by
incorrect installation, adaption, modification, fitting of non-approved parts or repair by unauthorised
personnel. Cole-Parmer Ltd liability is limited to the cost of repair or replacement of the product and
excludes in particular, indirect and consequential loss, damage, costs or expenses, including but not
limited to wasted time, materials and expenditure or loss of use, profit, production, revenue, expected
savings or goodwill. To make a claim please contact the supplier of the instrument. This warranty is in
addition to, and does not affect any statutory rights.
This manual has been prepared for the convenience of Cole-Parmer’s customers and nothing in
this manual shall be taken as a warranty, condition or representation concerning the description,
merchantability, fitness for purpose or otherwise of the unit or components.
Notwithstanding the description and specification(s) of the instruments contained in the operator’s
manual, Cole-Parmer Ltd reserves the right to make such changes as it sees fit to the instruments or to
any of the components.
9
Page 10

Consignes de sécurité
Veuillez lire toutes les informations contenues dans ce manuel avant d’utiliser l’appareil Alpha Cycler.
AVERTISSEMENT
LES TEMPÉRATURES ÉLEVÉES SONT DANGEREUSES : elles peuvent être à l’origine de graves brûlures
et enflammer les matériaux combustibles. Les utilisateurs doivent tenir compte des dangers potentiels
suivants :
• FAITES PREUVE DE PRUDENCE ET PORTEZ DES GANTS DE PROTECTION.
• N’UTILISEZ PAS de substances combustibles à proximité d’objets chauds.
• N’UTILISEZ PAS l’appareil à proximité de gaz ou de liquides inflammables.
• NE PLACEZ AUCUN liquide directement dans l’appareil.
• NE TOUCHEZ PAS le couvercle chauffant lorsque le système est en marche ou dans les
10 minutes qui suivent son utilisation.
• NE TOUCHEZ PAS le bloc lorsque le système est en marche ou dans les 10 minutes qui
suivent son utilisation.
SÉCURITÉ DE L’UTILISATEUR
Tous les utilisateurs de matériel Cole-Parmer Ltd doivent avoir accès aux documents pertinents concernant
leur sécurité. Il est important que seul le personnel ayant suivi une formation adéquate utilise ce matériel,
conformément aux instructions figurant dans ce manuel, ainsi qu’aux normes et aux procédures de
sécurité de base. Dans le cas d’une utilisation du matériel selon une procédure non spécifiée par ColeParmer Ltd., la protection intégrée à l’appareil est susceptible d’être compromise.
Tous les appareils Cole-Parmer Ltd sont conçus de manière à répondre aux exigences de sécurité
internationales et sont équipés d’un coupe-circuit de surchauffe. En cas de problème de sécurité, éteignez
l’appareil au niveau du connecteur d’alimentation et débranchez son cordon de l’alimentation secteur.
INSTALLATION
Transportez l’appareil à l’aide des deux mains. Ne déplacez et ne transportez jamais l’appareil en cours
d’utilisation ou lorsqu’il est relié à l’alimentation électrique secteur.
Les modèles AC-2 et AC-4 pèsent respectivement 30 kg et 47 kg. Il est recommandé de faire appel à
deux personnes pour soulever et transporter l’AC-2 et de faire appel à trois personnes pour soulever et
transporter l’AC-4.
1. Tous les appareils Cole-Parmer Ltd sont fournis avec un cordon d’alimentation. Celui-ci peut être
intégré ou amovible.
2. Avant de relier l’appareil à l’alimentation, assurez-vous que la tension correspond à la
tension indiquée sur la plaque signalétique (située à l’arrière de l’appareil).
Veuillez noter que l’appareil doit être relié à la terre pour assurer une
sécurité électrique adéquate.
3. L’appareil est conçu pour fonctionner avec les alimentations suivantes : 100-230 V, 50/60 Hz pour le
modèle AC-1 et 100-230 V, 50/60 Hz pour les modèles AC-2 et AC-4.
4. L‘appareil Alpha Cycler ne doit pas dépasser hors des limites de la paillase.
5. Assurez-vous que la paillasse utilisée pour les modèles AC-2 et AC-4 est capable de supporter un poids
de 30 kg / 47 kg.
10
6. Placez l’appareil sur une paillasse plane et horizontale adaptée ou dans une hotte, le cas échéant, en
veillant à ce que les entrées et sorties d’air des faces inférieure et arrière soient libres de toute obstruction.
7. Assurez-vous que les pieds de l’appareil ne dépassent pas des bords de la paillasse.
8. Branchez le cordon d’alimentation au connecteur situé à l’arrière de l’appareil. Le connecteur
d’alimentation des modèles AC-2 / AC-4 est situé sur le côté de l’appareil.
9. Allumez l’appareil à l’aide du bouton marche/arrêt situé à l’arrière. Le bouton marche/arrêt des modèles
AC-2 / AC-4 se trouve sur le côté de l’appareil.
Page 11

CÂBLE DE REMPLACEMENT
Lorsque le cordon d’alimentation doit être remplacé, utilisez un câble constitué de conducteurs d’1,5
mm2 de type H05VV-F 3G harmonisé, connecté à une fiche IEC320. EN CAS DE DOUTE, CONSULTEZ
UN ÉLECTRICIEN QUALIFIÉ.
CONDITIONS D’UTILISATION
L’appareil Alpha Cycler est conçu pour fonctionner dans les conditions suivantes :
• Utilisation en intérieur
• Température ambiante comprise entre +5 °C et +35°C
• Altitude jusqu’à 2 000 m
• Humidité relative ne dépassant pas 80 %
• Variations d’intensité de l’alimentation secteur ne dépassant pas 10 %
• Catégorie de surtension II CEI 60364-4-443
• Degré de pollution 2
REMARQUE : les caractéristiques de contrôle sont indiquées pour une température ambiante de 20 °C
± 2 °C.
L’appareil a fait l’objet de tests d’interférences radioélectriques et a reçu une certification EN61326.
GARANTIE
Cole-Parmer Ltd France garantit cet appareil contre tout défaut de pièces et de fabrication, dans des
conditions d’utilisation normale en laboratoire, pour une période de deux (2) ans. En cas de réclamation
dûment justifiée, Cole-Parmer Ltd France s’engage à remplacer gratuitement la pièce défectueuse ou
l’appareil. Cette garantie ne s’applique pas en cas de dommages provoqués par un incendie, un accident,
une utilisation inappropriée, une négligence, un réglage incorrect, une réparation inadéquate, une
installation, une adaptation ou une modification inappropriée, l’installation de pièces non approuvées
ou la réalisation de réparations par un personnel non autorisé. La responsabilité de Cole-Parmer Ltd
France se limite au coût de réparation ou de remplacement de l’appareil et exclut en particulier les
pertes indirectes ou consécutives, les coûts ou dépenses et dommages, incluant, sans s’y limiter, les
pertes de temps, de matériaux et de dépenses, les pertes de jouissance, de profit, de production, de
revenus, d’économies prévues ou de clientèle. Pour toute réclamation, veuillez contacter le fournisseur
de l’appareil. Cette garantie s’ajoute à vos droits prévus par la lois, sans les modifier.
Ce manuel est fourni aux clients de Cole-Parmer Ltd pour des raisons de commodité et rien dans ce
document ne doit être considéré comme une garantie, une condition ou une déclaration quant à la
description, la qualité marchande, l’adéquation ou autre de l’appareil ou de ses composants.
Nonobstant la description et les caractéristiques des appareils figurant dans le manuel d’utilisation,
Cole-Parmer Ltd se réserve le droit d’apporter toutes les modifications jugées nécessaires à l’appareil ou
à ses composants.
11
Page 12

Sicherheitsinformationen
Bitte lesen Sie vor der Verwendung dieses Alpha Cycler alle Informationen in diesem Handbuch.
WARNUNG
HOHE TEMPERATUREN SIND GEFÄHRLICH: Sie können zu schweren Verbrennungen des Bedieners führen
und brennbare Materialien entzünden. Die Benutzer sollten die folgenden möglichen Gefahren kennen:
• SEIEN SIE AUFMERKSAM UND TRAGEN SIE SCHUTZHANDSCHUHE, UM IHRE HÄNDE
ZU SCHÜTZEN.
• Verwenden Sie KEINE brennbaren Stoffe in der Nähe heißer Objekte.
• Bedienen Sie das Gerät NICHT in der Nähe brennbarer Flüssigkeiten oder Gase.
• Füllen Sie KEINE Flüssigkeiten direkt in das Gerät.
• Berühren Sie den beheizten Deckel NICHT während des Betriebs des Systems oder
innerhalb von 10 Minuten nach Betrieb des Geräts.
• Berühren Sie den Block NICHT während des Betriebs des Systems oder innerhalb von 10
Minuten nach Betrieb des Geräts.
BEDIENERSICHERHEIT
Alle Bediener von Cole-Parmer Ltd-Geräten müssen Zugang zu den Dokumenten haben, die für die
Gewährleistung der Sicherheit relevant sind. Es ist wichtig, dass nur entsprechend geschultes Personal
diese Ausrüstung gemäß den Anweisungen in dieser Gebrauchsanweisung und den allgemeinen
Sicherheitsstandards und -verfahren bedient. Wenn die Ausrüstung auf eine nicht von Cole-Parmer Ltd.
spezifizierte Weise verwendet wird, kann der Schutz des Bedieners beeinträchtigt werden.
Alle Cole-Parmer Ltd-Geräte erfüllen internationale Sicherheitsanforderungen und sind mit einem
Übertemperatur-Ausschalter ausgestattet. Sollte ein Sicherheitsproblem auftreten, schalten Sie das Gerät
an der Netzsteckdose aus und entfernen Sie den Stecker aus der Stromversorgung.
INSTALLATION
Das Gerät sollte mit beiden Händen getragen werden. Transportieren Sie das Gerät unter keinen
Umständen, wenn es in Betrieb ist, oder während das Gerät noch am Netz angeschlossen ist.
Die Geräte AC-2 / AC-4 haben ein Gewicht von 30 kg bzw. 47 kg. Es wird empfohlen, dass der AC-2 von
zwei Personen und der AC-4 von drei Personen getragen wird.
1. Im Lieferumfang aller Cole-Parmer Ltd-Geräte ist ein Stromkabel enthalten. Dies ist entweder integriert
oder eine steckbare Kabelverbindung.
2. Bevor Sie das Gerät mit der Stromversorgung verbinden, überprüfen Sie die
Spannung mit dem Typenschild (auf der Rückseite des Geräts). Bitte beachten
Sie, dass das Gerät geerdet sein muss, um eine einwandfreie elektrische
Sicherheit zu gewährleisten.
3. Die Geräte werden bei 100-230 V und 50/60 Hz (AC-1) bzw. 100-230 V und 50/60 Hz (AC-2 / AC-4)
betrieben.
12
4. Der Alpha Cycler darf nicht über die Tischkante hinausragen.
5. Stellen Sie sicher, dass der Tisch für den AC-2 / AC-4 einem Gewicht von 30 kg bzw. 47 kg standhalten
kann.
6. Positionieren Sie das Gerät auf einem geeigneten flachen und ebenen Tisch oder ggf. in einen
Abzugsschrank, sodass gewährleistet wird, dass die Öffnungen für den Lufteinlass und -auslass auf der
Unterseite und auf der Rückseite frei sind.
Page 13

7. Stellen Sie sicher, dass der Fuß des Geräts nicht über die Tischkante hinausragt.
8. Stecken Sie das Stromkabel in die Anschlussdose auf der Rückseite des Geräts. An den Geräten AC-2
und AC-4 befindet sich die Dose an der Seite des Geräts.
9. Schalten Sie das Gerät mit dem Schalter auf der Rückseite des Geräts an. An den Geräten AC-2 und
AC-4 befindet sich der Schalter an der Seite des Geräts.
ERSATZKABEL
Bei einem eventuellen Austausch des Netzkabels wird ein Kabel vom Typ H05VV-F 3G mit 1,5 mm²
Adernquerschnitt und Europastecker (IEC 320) benötigt. IM ZWEIFEL EINEN QUALIFIZIERTEN
ELEKTRIKER ZU RATE ZIEHEN.
UMGEBUNGSBEDINGUNGEN
Der Alpha Cycler kann unter den folgenden Bedingungen arbeiten:
• Verwendung in Innenräumen
• Umgebungstemperatur zwischen +5°C und +35°C
• Höhenlage bis zu 2000 m
• Relative Luftfeuchtigkeit maximal 80 %
• Netzspannungsschwankungen maximal 10 %
• Überspannungskategorie II IEC 60364-4-443
• Verschmutzungsgrad 2
Hinweis: Die Steuerspezifikationen sind mit einer Umgebungstemperatur von 20°C ±2°C angegeben.
Das Gerät wurde auf Funkfrequenzstörungen getestet und gemäß EN61326 zertifiziert.
Garantie
Cole-Parmer Ltd. garantiert, dass dieses Gerät frei von Material- und Herstellungsfehlern ist. Bei Einsatz
unter normalen Laborbedingungen wird eine Garantie von zwei (2) Jahren gewährt. Im Falle eines
berechtigten Anspruchs wird Cole-Parmer Ltd das fehlerhafte Teil oder das gesamte Gerät kostenlos
austauschen. Diese Garantie gilt jedoch nicht, wenn der Schaden durch Feuer, Unfall, unsachgemäße
Verwendung, Nachlässigkeit, falsche Einstellung oder Reparatur, falsche Installation, Anpassung oder
Modifikation sowie durch das Anbringen von nicht genehmigten Teilen oder durch eine Reparatur
von dazu nicht autorisiertem Personal verursacht wurde. Die Haftung von Cole-Parmer Ltd. ist auf die
Reparatur- oder Austauschkosten des Produkts begrenzt und schließt insbesondere direkte und indirekte
Verluste, Schäden, Kosten oder Aufwände aus, einschließlich unter anderem verschwendete Zeit,
Materialien und Aufwendungen oder der Ausfall der Nutzung, Gewinne, Produktion, des Umsatzes,
erwarteter Einsparungen oder Firmenwerte. Um Ansprüche geltend zu machen, wenden Sie sich bitte
an den Lieferanten dieses Geräts. Diese Garantie gilt als Ergänzung und beeinflusst keinerlei gesetzliche
Ansprüche.
Diese Gebrauchsanweisung soll die Verwendung durch die Kunden von Cole-Parmer Ltd erleichtern und
kein Abschnitt in dieser Gebrauchsanweisung gilt als Garantie, Bedingung oder Erklärung hinsichtlich
der Beschreibung, Marktgängigkeit, Gebrauchstauglichkeit oder in anderer Weise des Geräts der
Komponenten.
Unbeschadet der in der Bedienungsanleitung enthaltenen Beschreibung und Spezifikation(en) der Geräte
behält sich Cole-Parmer Ltd das Recht vor, solche Änderungen an den Geräten oder den Komponenten
nach eigenem Ermessen vorzunehmen.
13
Page 14

Informazioni sulla sicurezza
Si prega di leggere tutte le informazioni contenute in questo manuale prima di utilizzare l’Alpha Cycler.
AVVERTENZA
LE TEMPERATURE ELEVATE SONO PERICOLOSE: possono provocare bruciature gravi agli operatori
e causare l’accensione di materiale combustibile. Gli utenti devono essere a conoscenza dei seguenti
pericoli potenziali:
• PRESTARE ATTENZIONE E INDOSSARE GUANTI PER PROTEGGERE LE MANI.
• NON usare sostanze combustibili in prossimità di oggetti caldi.
• NON mettere in funzione lo strumento in prossimità di liquidi o gas infiammabili.
• NON collocare alcun tipo di liquido direttamente nello strumento.
• NON toccare il coperchio riscaldato quando il sistema è in funzione o nei 10 minuti
successivi al completamento di un ciclo.
• NON toccare il blocco quando il sistema è in funzione o nei 10 minuti successivi al
completamento di un ciclo.
SICUREZZA DELL’OPERATORE
Gli operatori di attrezzature Cole-Parmer Ltd devono avere a disposizione la documentazione necessaria
a garantire la loro incolumità. È importante che solo personale adeguatamente addestrato utilizzi questo
apparecchio, in conformità con le istruzioni contenute in questo manuale e con le normative e procedure
generali di sicurezza. Se l’apparecchio è utilizzato in modo non conforme a quanto specificato da ColeParmer Ltd. la protezione offerta all’operatore potrebbe risultare compromessa.
Tutti gli strumenti Cole-Parmer Ltd sono progettati in conformità con i requisiti internazionali di sicurezza
e sono equipaggiati con un dispositivo di interruzione anti surriscaldamento. Se si dovesse verificare
qualche problema di sicurezza, disconnettere la presa di corrente e rimuovere la spina.
INSTALLAZIONE
Questo strumento deve essere trasportato usando entrambe le mani. Non spostare né trasportare lo
strumento quando è in funzione o collegato all’alimentazione di rete.
L’AC-2 e l’AC-4 hanno un peso rispettivamente di 30 kg e 47 kg; si consiglia di far sollevare e trasportare
l’AC-2 da due persone e di far sollevare e trasportare l’AC-4 da tre persone
1. Tutti gli strumenti Cole-Parmer Ltd sono forniti con un cavo di alimentazione; questo può essere
incorporato o da collegare.
2. Prima di collegare lo strumento all’alimentazione elettrica di rete, controllare la
tensione confrontandola con la targhetta riportante i valori nominali (situata
sul retro dell’unità). Notare che occorre che l’unità sia messa a terra al fine di
garantire la corretta sicurezza elettrica.
3. Le unità sono stimate per funzionare a: per l’AC-1 100-230 V, 50/60 Hz e per l’AC-2 / AC-4 100-230
V 50/60 Hz.
4. Evitare che l’Alpha Cycler sporga dal banco.
14
5. Assicurarsi che il banco per l’AC-2 e l’AC-4 possa sostenere rispettivamente 30 kg e 47 kg di peso.
6. Collocare l’unità su un banco sufficientemente piano o in una cappa aspirante se necessario, assicurando
che le bocchette di ingresso e di uscita sul lato inferiore e posteriore siano libere da ostruzioni.
7. Assicurarsi che i piedini dello strumento non sporgano dal lato del banco.
8. Inserire il cavo di alimentazione nella presa sul retro dello strumento. Per l’AC-2 e l’AC-4 la presa di
ingresso è sul lato dello strumento.
9. Accendere lo strumento usando l’interruttore situato sul retro dello strumento. Per l’AC-2 e l’AC-4
l’interruttore è sul lato dello strumento.
Page 15

Cavo di ricambio
Qualora occorra sostituire il cavo di rete, si dovrà utilizzare un cavo di 1,5 mm2 armonizzato H05VV-F 3G,
collegato ad una spina IEC320. IN CASO DI DUBBI, RIVOLGERSI A UN ELETTRICISTA QUALIFICATO.
Condizioni ambientali
L’Alpha Cycler è progettato per operare nelle seguenti condizioni:
• uso interno
• temperatura ambiente compresa tra +5°C e +35°C
• altitudine massima 2000 m
• umidità relativa non superiore all’80%
• oscillazioni dell’alimentazione di rete non superiori al 10%
• categoria di sovratensione II IEC 60364-4-443
• grado di inquinamento 2
Nota: le specifiche di controllo sono indicate per una temperatura ambiente di 20°C ± 2°C.
Lo strumento è stato collaudato per interferenze da radiofrequenze ed è certificato secondo la norma
EN61326.
Garanzia
Cole-Parmer Ltd garantisce questo strumento da difetti di materiali e fabbricazione per un periodo
di due (2) anni, se utilizzato in normali condizioni di laboratorio. In caso di reclamo giustificato, ColeParmer Ltd. sostituirà gratuitamente qualsiasi componente difettoso o l’intera unità. Questa garanzia
non copre i danni provocati da incendi, incidenti, uso non conforme, negligenza, errori di regolazione o di
riparazione, danni dovuti a installazioni, adattamenti e modifiche non corretti, montaggio di componenti
non approvati o riparazioni effettuate da personale non autorizzato. La responsabilità di Cole-Parmer Ltd
è limitata al costo della riparazione o della sostituzione del prodotto ed esclude in particolare qualsiasi
perdita indiretta o secondaria, danno, costo o spesa, ivi inclusi, a titolo di esempio e in modo non
esaustivo, perdite di tempo, materiali e spese oppure perdite di utilizzo, profitto, produzione, ricavo,
risparmio atteso o avviamento. Per usufruire della garanzia, contattare il fornitore dello strumento.
Questa garanzia è in aggiunta ai diritti di legge e non ha alcun effetto su di essi.
Il presente manuale è stato preparato ad uso dei clienti di Cole-Parmer Ltd e niente di quanto in esso
contenuto costituisce garanzia, condizione o rappresentanza riguardo la descrizione, la commerciabilità,
l’idoneità allo scopo o altro dell’unità o dei componenti.
Nonostante la descrizione e le specifiche dello strumento contenute nel manuale dell’operatore,
Cole-Parmer Ltd si riserva il diritto di apportare le modifiche ritenute opportune agli strumenti o a
qualsiasi loro componente.
15
Page 16

Información de seguridad
Lea toda la información incluida en este manual antes de usar el Alpha Cycler.
ADVERTENCIA
LAS TEMPERATURAS ELEVADAS SON PELIGROSAS: pueden causar quemaduras graves a los operarios
y prender fuego aL material combustible. Los usuarios deberían ser conscientes de los posibles peligros
indicados a continuación:
• TENGA CUIDADO Y USE GUANTES PROTECTORES PARA PROTEGER LAS MANOS.
• NO utilice sustancias combustibles cerca de objetos calientes.
• NO utilice el instrumento cerca de líquidos o gases inflamables.
• NO coloque ningún líquido directamente en el instrumento.
• NO toque el bloque cuando el sistema esté funcionando o durante los 10 minutos
siguientes a la finalización de la serie por parte del sistema.
• NO toque el bloque cuando el sistema esté funcionando o durante los 10 minutos
siguientes a la finalización de la serie por parte del sistema.
SEGURIDAD DEL OPERARIO
Todos los operarios del equipo Cole-Parmer Ltd deben tener a su disposición la bibliografía pertinente
necesaria para garantizar su seguridad. Es importante que este equipo solo sea usado por personal
debidamente formado, de acuerdo con las instrucciones contenidas en este manual y con las normas
y procedimientos de seguridad generales. Si se usa el equipo de una manera no especificada por ColeParmer Ltd. la protección que el equipo proporciona al operario puede resultar alterada.
Todos los instrumentos de Cole-Parmer Ltd han sido diseñados para ajustarse a los requisitos de seguridad
internacionales y están equipados con un cortacircuitos por sobretemperatura. Si se produce un problema
de seguridad, desconecte la unidad de la toma de red y desenchúfela del suministro eléctrico.
INSTALACIÓN
El instrumento debería transportarse con las dos manos. No mueva ni transporte nunca el instrumento
cuando esté en funcionamiento o conectado al suministro eléctrico.
Los AC-2 / AC-4 tienen un peso de 30 kg / 47 kg respectivamente; se recomienda emplear a dos
personas para levantar y transportar el AC-2, y tres personas para el AC-4.
1. Todos los instrumentos de Cole-Parmer Ltd son suministrados con un cable de alimentación; puede
estar integrado o ser enchufable.
2. Antes de conectar el instrumento a la red de suministro eléctrico, compruebe la
tensión que figura en la placa de especificaciones (situada en la parte trasera
de la unidad). No olvide que para garantizar la seguridad eléctrica apropiada,
es imprescindible que la unidad esté conectada a tierra.
3. Las unidades están clasificadas para funcionar a: para el AC-1 100-230 V, 50/60 Hz, y para el AC-2 y
AC-4 100-230 V, 50/60 Hz
4. No permita que el Alpha Cycler sobresalga de la mesa de trabajo.
16
5. Asegúrese de que la mesa de trabajo para el AC-2 / AC-4 pueda soportar 30 kg / 47 kg de peso.
6. Coloque la unidad sobre una mesa de trabajo plana y nivelada adecuada o en una campana extractora
si es necesario, y compruebe que la entrada de aire y los respiraderos de salida situados en la parte
inferior y la parte posterior no estén obstruidos.
7. Asegúrese de que las patas del instrumento no sobresalen por los lados de la mesa de trabajo.
Page 17

8. Conecte el cable de red en la toma de la parte trasera del instrumento. Para el AC-2 / AC- 4 la toma
de entrada se encuentra en un lado del instrumento.
9. Encienda el instrumento usando el interruptor ubicado en la parte trasera del instrumento. Para el
AC-2 / AC- 4 el interruptor está un lado del instrumento.
CABLE DE SUSTITUCIÓN
En caso de que sea necesario sustituir el cable de alimentación, utilice un cable de 1,5 mm2 de código
armonizado H05VV-F 3G conectado a un enchufe IEC320. EN CASO DE DUDA, PÓNGASE EN
CONTACTO CON UN ELECTRICISTA CUALIFICADO.
CONDICIONES AMBIENTALES
El Alpha Cycler ha sido diseñado para funcionar en las siguientes condiciones:
• Uso interior
• Intervalo de temperatura ambiente +5 °C a +35°C
• Altitud máxima de 2 000 m
• Humedad relativa no superior al 80%
• Fluctuaciones de corriente no superiores al 10%
• Categoría de sobrevoltaje II IEC 60364-4-443
• Grado de contaminación 2
Nota: Las especificaciones de control se indican a una temperatura ambiente de 20°C ±2°C.
El instrumento ha sido sometido a las pruebas de interferencia por radiofrecuencia y está certificado
según la norma EN61326.
GARANTÍA
Cole-Parmer Ltd. garantiza que este equipo se encuentra libre de defectos de material o de fábrica,
siempre que se utilice en condiciones normales de laboratorio, durante un plazo de dos (2) años. Si la
reclamación es justificada, Cole-Parmer Ltd sustituirá cualquier componente defectuoso o cambiará
la unidad gratuitamente. Esta garantía no se aplicará si el daño ha sido causado por un incendio,
accidente, mal uso, negligencia, ajuste o reparación incorrecta, daños por una instalación incorrecta,
adaptación, modificación, montaje de piezas no aprobadas o reparación por personal no autorizado. La
responsabilidad de Cole-Parmer Ltd se limita al coste de reparación o sustitución del producto y excluye
en particular, pérdidas, daños, costes o gastos indirectos y emergentes, incluidos aunque no limitados a
tiempo perdido, materiales y desembolso o pérdida de uso, beneficios, producción, ingresos, ahorros o
crédito mercantil esperados. Para realizar una reclamación, póngase en contacto con el proveedor del
instrumento. Esta garantía es además de los derechos legales y no les afecta en absoluto.
Este manual se ha elaborado para comodidad de los clientes de Cole-Parmer Ltd y nada de lo que
figura en este manual debe interpretarse como garantía, condición o declaración relacionadas con la
descripción, comerciabilidad, adecuación al propósito u otro de la unidad o los componentes.
No obstante, la descripción y las especificaciones de los instrumentos contenidas en el manual
del operador, Cole-Parmer Ltd se reserva el derecho a realizar los cambios que considere apropiados
para los instrumentos o para cualquiera de los componentes.
17
Page 18

Contact Information
For technical, sales or servicing information, contact your local PCRmax distributor or Cole-Parmer Ltd
directly at:
Cole-Parmer Ltd
Beacon Road
Stone
Staffordshire
ST15 0SA
UK
Tel: +44 (0)1785 812121
Fax: +44 (0)1785 810405
Technical Support email: CPtechsupport@coleparmer.com
Sales email: cpenquiries@coleparmer.com
Web: www.coleparmer.com
18
Page 19

Alpha Cycler Specification
Temperature
Block temperature range 4°C (10°C during cycling) to 100°C
Block uniformity (at 55°C) ≤±0.3°C
Temperature accuracy (at 55°C) ≤±0.25°C
Gradient availability Between 10°C and 100°C
Maximum gradient 29°C on a 96 well block and 19°C on a 384 well block
Minimum gradient 1°C
Column uniformity with a 10°C gradient ≤±0.3°C
Final store 4°C to 100°C
Temperature set point adjustment 0.1°C
Heating/Cooling Rate
Maximum heating rate 3.4°C/s
Minimum heating rate 0.1°C/s
Maximum cooling rate 1.0ºC/s
Minimum cooling rate 0.1ºC/s
Heated lid
Selectable heated lid temperature 35 to 115°C or off
Lid uniformity ±5°C
Pre-heat lid Yes
Warm up time from ambient <2 min
Over-temperature cut-out Yes
Regulated heated lid pressure Manually adjustable
The heated lid is only operational if the block temperature is set above 35°C. Above figures are quoted
at an ambient temperature of 20°C ±2°C
Programming
Program interface 10” and 7” HD touch screen
Operation system Android
Maximum number of programs stored 1000
Maximum number of stages per program 25
Maximum number of steps 10
Maximum number of cycles per stage 99
Programmable ramp rate Yes, 0.1°C/s steps
Maximum hold time 4h 59m 59s
Minimum hold time 1s
Program Wizard Yes
Active sample cooling Yes, 4°C
Advanced reporting options Yes
Touchdown Yes
19
Page 20

Incremented/decremented temperature Yes
Incremented/decremented time Yes
Pause facility Yes
Program naming Alpha numeric plus symbols
Password protection Yes
Keyword selection Yes
Run completion time Yes
Auto resume on power failure Yes, always, never or user-defined
Oligonucleotide Tm calculator Yes, based on the Nearest-Neighbour method
Software updates Free of charge from www.coleparmer.com
Communication ports
USB port on the front of the AC-1 Connection for USB memory stick
USB port on side of the AC-2 / AC-4 Connection for USB memory stick
Type B USB port on rear of unit For Internal use only.
Dimensions
AC-1 AC-2 AC-4
Height (mm) 330 330 330
Width (mm) 260 535 535
Length (mm) 430 470 700
Weight (kg) 10 30 47
1
Power
AC-1 AC-2 AC-4
Voltage 100-230V, 50/60Hz 100-230V, 50/60Hz 100-230V, 50/60Hz
Power 425W 900W 1,600W
Fuse ratings 220V: 5 Amp x 2 220V: 8 Amp x 2
120V: 12.5 Amp x 2 120V: 15 Amp x 2
1
Breslauer, K.J.; Frank, R.; Blocker, H. and Marky, L.A. (1986) Proc. Natl. Acad. Sci. USA 83,
pp 3746-3750.
20
Page 21

Installation and operation
See also the Safety Information sections on pages 5 to 15.
Front view
1. Heated lid pressure knob
2. Lid release.
3. Android HD touchscreen interface
4. USB port for memory stick.
Rear view
1. Mains cable inlet.
2. On/Off rocker switch
2
1
1
2
3
3
4
4
Note: On the AC-2 / AC-4 the mains cable inlet,
On/Off rocker switch and USB port are situated
on the side of the instrument for easier access.
INSTALLATION
1. Place the unit on a suitable flat and level bench, ensuring that the air inlet vents on the sides are free
from obstruction, as per the guidelines in the Safety Information sections.
Note: Ensure a 250mm gap to the side of the AC-2 / AC-4 power lead to allow disconnect of the
electrical supply from the chassis if required, 100mm is sufficient for AC-1.
2. Note that block removal can only be performed by a qualified service engineer.
3. Plug the mains cable into the mains cable inlet of the unit.
4. Connect to the mains electricity supply with the plug provided or one wired correctly for the supply.
Switch the power ON using the switch located on the rear (AC-1) or side (AC-2 / AC-4) of the unit.
The front display will then light up.
NOTE:
A 250mm air space should be kept free at each side of the AC-2 / AC-4 unit (left and right). If two AC-2
/ AC-4 units have to be positioned next to one another, a total of 500mm should be free between both
units. If the systems have to be wracked the shelves should be 600mm apart from each other vertically,
this promotes the correct airflow and heat distribution from the units. As air flow with the AC-2 / AC-4
is in thought the front of the unit and out the sides, caution should be taken to not block the path of
air in and out of the unit.
1
2
21
Page 22

OPERATION
1. Release the heated lid by pressing the blue
circular button located towards the front edge
of the lid. The lid is sprung and should open to
around 45 degrees with little assistance. To close
the lid, lower the lid onto the block and press
until you hear a click.
2. Place the samples in the block. If individual tubes
or strip tubes are being used, space these out
evenly across the block to equalise the pressure
from the heated lid.
3. The heated lid has a rotating knob to adjust
the lid pressure on the samples, allowing for a
variety of consumables to be used. To adjust the
pressure:
a. Rotate the knob anti-clockwise to raise the lid to
the highest position.
b. Place the samples in the block and close the lid.
c. Rotate the knob clockwise until resistance is felt
then give a further quarter of a turn; this will
give the correct pressure. Do not over-tighten.
4. Once the pressure has been set it should not need
to be adjusted unless a different consumable is
used. Good standard practice is to check the
pressure of the heated lid is adjusted correctly
every time the system is run.
5. Keep fingers clear of rear hinged part of the lid
while opening or closing.
22
Page 23

General software features
INTRODUCTION
The Alpha Cycler software is aimed at being consistent with all the instruments in the PCRmax range.
The common themes of simplicity and performance are echoed in all PCRmax thermal cyclers. The
software will boot automatically when the system is switched on.
The Alpha Cycler software allows the user to quickly and easily create thermal cycling programs using
a simple and clear touch screen format. The software is structured into six modules which are accessed
from the Home Screen. The Home Screen has the following buttons and associated features.
• Run a program allows the user to run an existing program, selecting from templates or programs
saved on the unit.
• New program allows the user to manually build a custom thermal cycling program.
• Program wizard allows the user to automatically generate a protocol based on primer sequences,
Tm’s and template size.
• Edit program gives access to the File Manager and allows the user to search for programs and
reports stored on the unit and to edit existing programs.
• Block status allows the user to monitor the progress of the program running on one or more of
the blocks.
• Settings allows the user to define default states of the system e.g. temperatures for cycling steps,
language and response to power outages etc.
The Recent Programs panel displays the most recent protocols which have been run on the system.
Note: The Recent Programs panel will allow users to quickly access and run common programs without
the need to navigate the File Manager.
23
Page 24

BASIC ANDROID COMMANDS AND DATA/TEXT INPUT
The Alpha Cycler system interface is Android based and as such responds and operates similarly to other
Android devices.
The standard Android navigation bar is located at the bottom of all Alpha Cycler screens:
• Back: This will take you back to the previous page. Repeatedly press this button to go back multiple
screens.
• Home: This will take you back to the Home Screen for the Alpha Cycler.
• Recent: This will allow you to toggle between recent pages you have open. End users can also close
open pages by swiping the windows left or right, as you would normally with Android interfaces.
Note: If you have opened multiple pages, for example you been in settings, started writing a protocol
and had a protocol running, selecting the recent button allows you to easily toggle between these open
pages.
When users are required to input data, either an Android keyboard will open in the screen or a scrolling wheel
may appear (the scrolling wheel is used more for defining values such as number of cycles and time).
Example keyboard
24
Example time wheel during step duration input
Page 25

TEMPLATE PROGRAMS
To help with programming, a number of program templates are provided on the USB memory stick
supplied with the system. These are available to copy and edit or can be run directly without changes.
Details of the installed program templates are given below.
Instrument and program defaults
Parameter Gradient 50 to 60 deg. 3 Step Template RT PCR Template
Heated Lid 110°C 110°C 110°C
Heated lid before program On On On
Sample cooling On On On
Polymerase activation 95°C, 05m00s 95°C, 05m00s 95°C, 05m00s
Final extension 72°C, 05m00s 72°C, 05m00s 72°C, 07m00s
Final store 10°C for infinite time 10°C for infinite time 10°C for infinite
time
Thermal cycling conditions
Parameter Gradient 50 to 60 deg. 3 Step Template RT PCR Template
Stage 1
Number of cycles 35 35 1
Step 1 95°C, 00m30s 95°C, 00m30s 45°C, 40m00s
Step 2 50 to 60°C, 00m30s 56°C, 00m30s 95°C, 05m00s
Step 3 72°C, 00m30s 72°C, 00m30s
Stage 2
Number of cycles 40
Step 1 95°C, 01m00s
Step 2 55°C, 00m50s
Step 3 72°C, 01m00s
Note: There is also an Ice Bucket program which is a simple temperature hold at 4°C: the heated lid is
switched off and the polymerase activation and final extension functions are disabled.
25
Page 26

GRADIENT
The gradient feature of the Alpha Cycler can be useful in optimising the annealing conditions for
reactions. A gradient can be set around a temperature in any step of a program. The set temperature
is the temperature in the middle columns and the range around the set point defines the gradient’s
minimum and maximum temperatures, see diagram below.
The maximum temperature gradient range which can be set is 29°C (depending on block type) and the
minimum is 1°C; within the temperature range of 10°C and 100°C. Examples are given in the table below:
Gradient Set temperature Lowest temperature Highest temperature
(°C) (°C) Column 1 (°C) Column 12 (°C)
10 55 50 60
15 55 47.5 62.5
29 55 40.5 69.5
To program a gradient step see section Manual program entry.
The red circles in the below diagram illustrate the A1 well position of each block in an AC4.
26
FRONT
Page 27

Creating user profiles
The Alpha Cycler system allows for individual user profiles to be created, simplifying file management
and controlling access to certain programs.
CREATING A NEW USER ACCOUNT
• To create a new user account tap the LOGIN button located at the top of the Home Screen.
• Select Create an account.
• Complete the details: User name, Password and Re-enter password.
• Tap on Create Account to save the profile.
Note: Programs written by a logged in user will only be available to that user unless the user chooses to
share these programs with everyone; see the programming section.
TO LOG IN AS AN EXISTING USER
• Select LOGIN from the top of the Home Screen.
• Select Log in from the login screen.
• Log in with your user-specific name and password.
• Tap on Log in.
Note: Each Alpha Cycler has a administration level user accessed by logging in with the following:
Username: admin - Password: admin
LOGGING OUT
To log out simply tap the user name on the Home Screen and select Log out.
CHANGING A USER PASSWORD
To change a password, while logged in, tap the user name button on the Home Screen and select
Change Password from the login screen.
• Type in your current password.
• Type in a new password.
• Re-enter the new password.
• Tap on Change Password to confirm.
27
Page 28

Creating USB Login
The Alpha Cycler system allows for individual user profiles to be created, simplifying file management
and controlling access to certain programs.
CREATING A USB LOGIN
• To create a USB LOGIN device click on the login button located at the top of the home screen.
• LOGIN with existing account.
• Return to the login screen
• Insert a USB drive and click Authorize USB drive.
28
Note: Any USB drive can be authorised as the users login device. When logging in via USB all specified
user defaults will be carried forward and applied. Removing the USB drive will logout the user.
• To log in with the authorised USB drive, simply insert the authorised / USB into the Alpha Cycler
• When a program is started from a logged in user and the user then logs out the running program
can only be interrupted or stopped by inputting the specific users login details.
• Removing the USB drive will automatically log the user out.
Page 29

Programming
This section gives instructions for the two methods of programming the Alpha Cycler systems. The first
method uses the Program Wizard to automatically generate a program based on a few user defined
parameters. The second method is accessed through the New program button from the Home Screen
and allows the user to control every element of the program.
Note: When programming an Alpha Cycler protocols are built with a steps and stages structure.
Individual steps can be created and a collection of those steps make up a stage. Stages have a number of
cycles applied to them and all steps in a stage will cycle the specified number of times before progressing
to the next stage. Protocols can have multiple stages comprising multiple temperature steps.
USING THE PROGRAM WIZARD
The Program wizard allows users to automatically generate a protocol based upon the following
criteria:
• Primer Sequence or Tm’s
• Length of amplicon
• Template source (bacterial, eukaryote or plasmid)
• Special considerations
Special considerations has a series of options which accommodate for the use of hot start Taq polymerases,
adjusts the temperatures based upon the amplicons A/T and G/C bias and will allow for the user to add
a touchdown PCR stage as a means of improving specificity.
• From the Home Screen select Program wizard.
The Program wizard consists of four steps which require user input in order to generate a suitable
protocol. The first step is to specify the melting temperature either from the primer sequences of from
the Tm values.
29
Page 30

• If selecting the primer sequences, tap “I’d like the melting temperatures calculated for me
from the primer sequences” to input the sequence of each primer.
• Tap on the line Primer Sequence 1; a keyboard will appear on the screen. Type in the sequence of
the first primer then tap on Next.
• Type in the sequence of the second primer then tap on Done. Primer sequences can be uploaded
direct from the root of a USB drive.
• To input your own primer Tm values, tap “I’d like to provide the melting temperatures myself”.
• Tap on the line Primer 1 (°C); a keyboard will appear on the screen. Type in the melting temperature
of the first primer then tap on Done.
• Type in the melting temperature of the second primer then tap on Done.
• After completing either step, tap NEXT PAGE at the top right of the screen to progress to the next
step. To go back, tap on PREVIOUS PAGE.
30
Page 31

The next step is to input the length of the PCR product in kb.
• Either tap the line next to Product length (Kb) to enter the size of the PCR product (in kb) or drag
the slider to the right or left to select the size.
Note: values of between 0-5kb are valid: all values below 0.5kb will be given an extension time of 30
seconds.
• Tap NEXT PAGE at the top right of the screen to progress to the next step. To go back, tap on
PREVIOUS PAGE.
The next step is to select the source of the DNA.
• Select one of the three options.
• Tap NEXT PAGE at the top right of the screen to progress to the next step. To go back, tap on
PREVIOUS PAGE.
Finally, use the check boxes to take into account any special considerations as listed on the final screen.
31
Page 32

• When finished, tap FINISH WIZARD at the top right of the screen.
Once you have completed the Program wizard, the final program will be displayed based upon the
answers/data given in the previous steps.
32
Note: all parameters of a Program wizard-generated program can be adjusted either before or after it
is saved. Ensure that heated lid is set how you wish it to be and add any special stages such as a final
extension or a store step at this point.
• To save the program, tap SAVE at the top right of the screen.
• Select whether the program will be available to Everyone or Just me (current logged-in user) and
assign a name.
• Tap Save.
Page 33

MANUAL PROGRAM ENTRY
The Alpha Cycler will also allow users to manually create a protocol by inputting the individual temperatures
and hold durations for each step. Where a temperature or hold time is visible/required the user will be
able to tap to select that step and either edit or input a time/temperature.
• From the Home Screen select New program.
The basic program will contain the defaults as set by the user in the Settings (see section on Settings).
A. Toggle on and off the Heated Lid.
B. Toggle on/off Preheat Lid.
C. Toggle on/off Sample Cooling before the run begins.
D. Add a new stage - adds a stage with one temperature step plus the option to add further
temperature steps within the same stage. The stage can be cycled up to 99 times.
E. Add a special step - including Touchdown, Final Extension and Final Store steps.
ADDING A STAGE
Tap on Add a new stage to create the first stage and step in the program. You will initially need to
define the parameters for the first temperature step:
33
Page 34

To change the step temperature, tap on the default temperature value and enter the desired value
followed by Done.
To change the steps hold temperature, click on the hold temperature and a window will open, scroll the
temperature in that window and select Change to update to the new hold temperature. To change step
hold time, the same applies but to the duration not temperature.
Note: Alpha Cycler Temperature steps carry an inherent hold time of 30 sec and temperature of 95˚C,
56˚C and 72˚C for a three step stage.
Tap Add stage to complete adding the first stage and step.
34
Page 35

Continue by adding further steps and stages as required in the same way.
Note: If a protocol has several stages it may appear to extend beyond the screen; simply swipe the screen
to the left or the right to view the whole protocol.
To adjust the number of cycles of a stage, tap on the cycle button at the bottom of each stage area; a
scrolling selector will appear. Select the desired number of cycles followed by Change.
As the program is written, the total duration of the protocol is displayed at the bottom of the programming
screen.
EDITING STEP PARAMETERS
To edit the parameters of a step e.g. the temperature, hold time, ramp rate etc. tap on the grey shaded
area of the step. The Change step parameters window (see below) will open. Make any changes to
the parameters then tap on Change to accept.
Note: The ramp rate (heating/cooling rate from the previous step to the current step) can be defined
between 0.1 ºC/sec up to 3 ºC/sec or MAX.
ADDING A GRADIENT STEP
Select the step on which you wish to add a gradient and tap on the grey shaded area. The Change
step parameters window will open. Toggle ON the parameter Gradient around step temperature.
Next, define the range of temperature you wish to run the gradient over. Tap on Change to accept the
changes.
The gradient and range will then be displayed within the program.
35
Page 36

Note: After running a gradient protocol to optimise a reaction, the program can be easily modified to
set the annealing temperature to that of the column in which the optimal reaction occurred. Simply tap
on the gradient step to edit it then select Convert to fixed temperature °C. A window showing the
actual temperature in each column of the block is displayed. Select the column which gave the optimal
reaction conditions to re-set the annealing temperature.
36
ADDING A TEMPERATURE OR TIME INCREMENT OR DECREMENT
Select the step on which you wish to add the increment or decrement and tap on the grey shaded area.
The Change step parameters window will open. Toggle ON the parameter Temperature change per
cycle or Time change per cycle as desired. Next, define the increment or decrement temperature or
time. Tap on Change to accept the changes.
Note: The maximum allowed temperature increment/decrement is between -10 °C and + 10°C/cycle
and the maximum time increment/decrement -30 seconds and +30 seconds/cycle. This will also be
dependent on the number of cycles in the stage and the limits of the thermal block.
Page 37

The temperature/time changes will be displayed with the program.
DELETING A STEP OR STAGE
To delete a step, tap in the area just below or above the step (not in the grey boxed area) so that the step
is highlighted. Multiple steps may be selected. Next, tap on DELETE at the bottom of the screen. The
step(s) will be deleted. To delete a complete stage, all steps within the stage must be deleted, this can
be done by highlighting the temperature steps, press the screen underneath the temperature step box
to highlight and then press DELETE.
Note: At the top of the screen there is an UNDO button to undo the last series of commands if a mistake
such as unintentionally deleting a step/stage is made.
SAVING THE PROGRAM
To complete writing a program and to store it to the cycler memory, tap SAVE on the top right corner of
the program window. The Save program window will appear.
37
Page 38

Define who will have access to the program:
• Everyone, meaning all users of the system will have access to this protocol, or
• Just me, meaning only the current logged-in user will have access.
Add a name for the program for future identification then tap on Save.
Programs can also be password protected. Click on the box marked “Protect the program from further
changes’ and assign a password. To alter the program the password must be known. Programs with
password protection can not be interrupted/stopped mid cycle without applying the password.
Note: The RUN AND SAVE button allows you to start the protocol from the programing screen without
the need to first save and then go into the File Manager to run the protocol. Run and save can be useful
for when you are modifying an existing protocol.
38
Page 39

Special steps
When writing a protocol there is an option to add a special step, these include:
• Polymerase Activation
• Touchdown
• Final Extension
• Final Store
Tap on Add a special step and the Add a special step or stage window will open.
Polymerase Activation allows for a one off temperature/time step to activate the polymerase, this step
will not cycle.
Touchdown stage allows users to generate a touchdown protocol which will change the temperature
uniformly across the entire block each cycle between two set temperatures (high to low) over a defined
number of cycles.
Define the starting (maximum) annealing temperature and the end (minimum) annealing temperature.
The temperature change per cycle will be equal to the difference in temperature between the maximum
and minimum divided by the number of cycles -1.
39
Page 40

Note: The software allows the user to either increment or decrement the time and/or temperature
of a step within a cycling stage. These features are used with applications such as touchdown PCR
where the annealing temperature is gradually decreased during the cycling process and long range PCR
amplification, where due to the size of the product, long annealing/extension times are required and the
extension time is increased by, for example, 15 to 20s per cycle during the final stages of the reaction.
Final extension allows users to add a final temperature step at the end of normal cycling.
Final store allows users to store the PCR reactions in the system at a set temperature until they are
ready to be taken out for further analysis. The default temperature is 10°C as this is suitable for storing
DNA for prolonged periods of time.
Note: Colder temperatures can be set, down to 4°C, but this is not essential for DNA work. It is advised
to never store RNA for prolonged periods in a thermal cycler, at 4°C or any temperature.
40
Page 41

Running a program
There are two main options for running a program; either selecting the program from the Home Screen
Recent Programs shortcut list or by searching through the system’s File Manager accessed through
either Run a program or Edit program.
RUNNING A PROGRAM FROM THE SHORTCUT LIST
When a program has been run on the Alpha Cycler it will appear in the Recent Programs list.
To re-run the same program, tap to select one of the programs from this list. The Pre-run screen will be
displayed.
The Pre-run Screen shows a graphical representation of the program allowing for a rapid check of the
temperature parameters. Any of the parameters can be edited at this point.
• Touch any stage or step to edit the program.
• Touch RUN AND SAVE to start the program. Note that this will over-write the existing program if
any edits have been made.
• Touch Back to return to the previous screen.
Note: With the AC-2 / AC-4 you will be asked at this point on which block(s) the program is to be run.
Any number of the available blocks can be selected. Select the required block(s) by tapping to display YES.
41
Page 42

Tapping on Run will send the program to the thermal cycler and it will begin automatically.
Note: AC-2 only has left/right block option.
RUNNING A PROGRAM FROM THE INSTRUMENT MEMORY
If the program required is not present in the Recent programs list it must be located using the File
Manager.
From the Home Screen, tap on Run a program to open the File Manager. Select the required program
by tapping to highlight it.
Note: With the AC-2 / AC-4 you will be asked on which block(s) the program is to be run. Any number
of the available blocks can be selected. Select the required block(s) by tapping to display YES.
Tapping on Run will send the program to the thermal cycler and it will begin automatically.
Note: This route of selecting a program does not allow you to view the thermal profile before it is run.
An alternative way of accessing the File Manager is to go through Edit program. Using this route you
will be able to view the program in the Pre-run screen and make any changes before sending it to the
thermal cycler. Once you are satisfied the program is correct, tap RUN AND SAVE to start the program
as described above.
Note: With the AC-2 / AC-4 you can run any number of blocks simultaneously with the same program
or select different programs to run on each individual block.
VIEWING A RUNNING PROGRAM
Once the program has been started, the Home Screen will display information about which program is
running and how long it has left to run.
42
With the AC-1 this display is across the top of the screen. It shows the program name and end time.
Page 43

CREATING A FAVOURITE PROGRAM.
A program can become a favourite by pressing on the start icon in the Edit Programs menu or by
pressing the three stacked boxes icon while writing a program and selecting favourite as images below.
In Edit programs check the Star icon to Favourite a Program.
In New Program press the three stacked boxes icon and check Favourite to assign it as such.
NOTE: Favourite programs can then be visualised together on the home screen, see instrument setting
section for how to display Favourites on the home screen.
43
Page 44

There is also an option to display the countdown clock in full screen while the system is running. This
feature is only available in the AC-1 and is accessed by clicking on the four arrow icon in the status bar.
With the AC-2 / AC-4, status of each block is shown separately across the bottom of the screen.
To view the running program in more detail, from the Home Screen tap on Block status.
Note: With the AC-2 / AC-4, the status of all blocks will be displayed.
44
Page 45

To view an individual block, tap on the full screen icon close to program name. This will expand the run
screen of the selected block to fit the entire screen.
Note: If a protocol has several stages which extend beyond the screen; simply slide the screen to the left
or the right to view the protocol.
When a program is running the Track This Program button will appear. This button when pressed,
with create an on screen QR code which can then be scanned with the Alpha Track Mobile Device
Application. This can be downloaded free from the App store (Android and iOS).
When viewing an individual program there is the option to toggle between viewing the real time
temperature of the block and the program display.
To view the block temperature, tap on DISPLAY REAL-TIME TEMPERATURE at the top right of the screen.
Note: see settings too toggle between displaying the average temperature across the block or the actual
temperature recorded at the four temperature sensors.
When Real Time Temperature is selected the user is shown the current temperature of the block as
it progresses though the program. Approximately 5 minutes of temperature profile is shown on the
display.
To return to the program, tap on DISPLAY PROGRAM.
45
Page 46

QR code and Alpha Track App
Download the Alpha Track App from the iOS/Android App store and install it upon a device with a
camera function such as a mobile phone or tablet.
The Alpha Track App can be used to scan a QR code and inform the user about:
• Run time until completion, countdown clock
• User who started the run
• Serial number of the system being used (block for the AC-2 / AC-4)
• Health report on the system.
Upon first using the App you will be asked to provide an email address so you can be contacted by your
local service centre if the they find an error in the systems health report.
How to Use the Alpha Track App
To scan the QR code, start a program on the Alpha Cycler, ask it to display the QR code, see Pg42, launch
the Alpha Track App, click the QR code reader button, bottom right of the screen and position over the
displayed QR code such that the centre of the screen is positioned over the QR code.
46
Page 47

The countdown clock can be configured to alert the end user a specific time period before the run
completes and can be changed by selecting the running protocol and then selecting the time remaining
and setting that to what is required.
(Running Program) (instrument report)
When the system detects a fault the QR code will automatically contain that information and generate
an instrument report which is visible on the Alpha Track home screen the end user can select to send this
report to the Bibby Technical Team for review. Should the system require a visit/repair/further diagnostics
to be carried out the end user will be contacted using the details provided in the App.
NOTE: For the multiblock AC-2 / AC-4 systems one QR code can be scanned which represents all
running blocks. This is accessed through Block Status and then clicking on Track All Programs and
scanning the QR code displayed.
47
Page 48
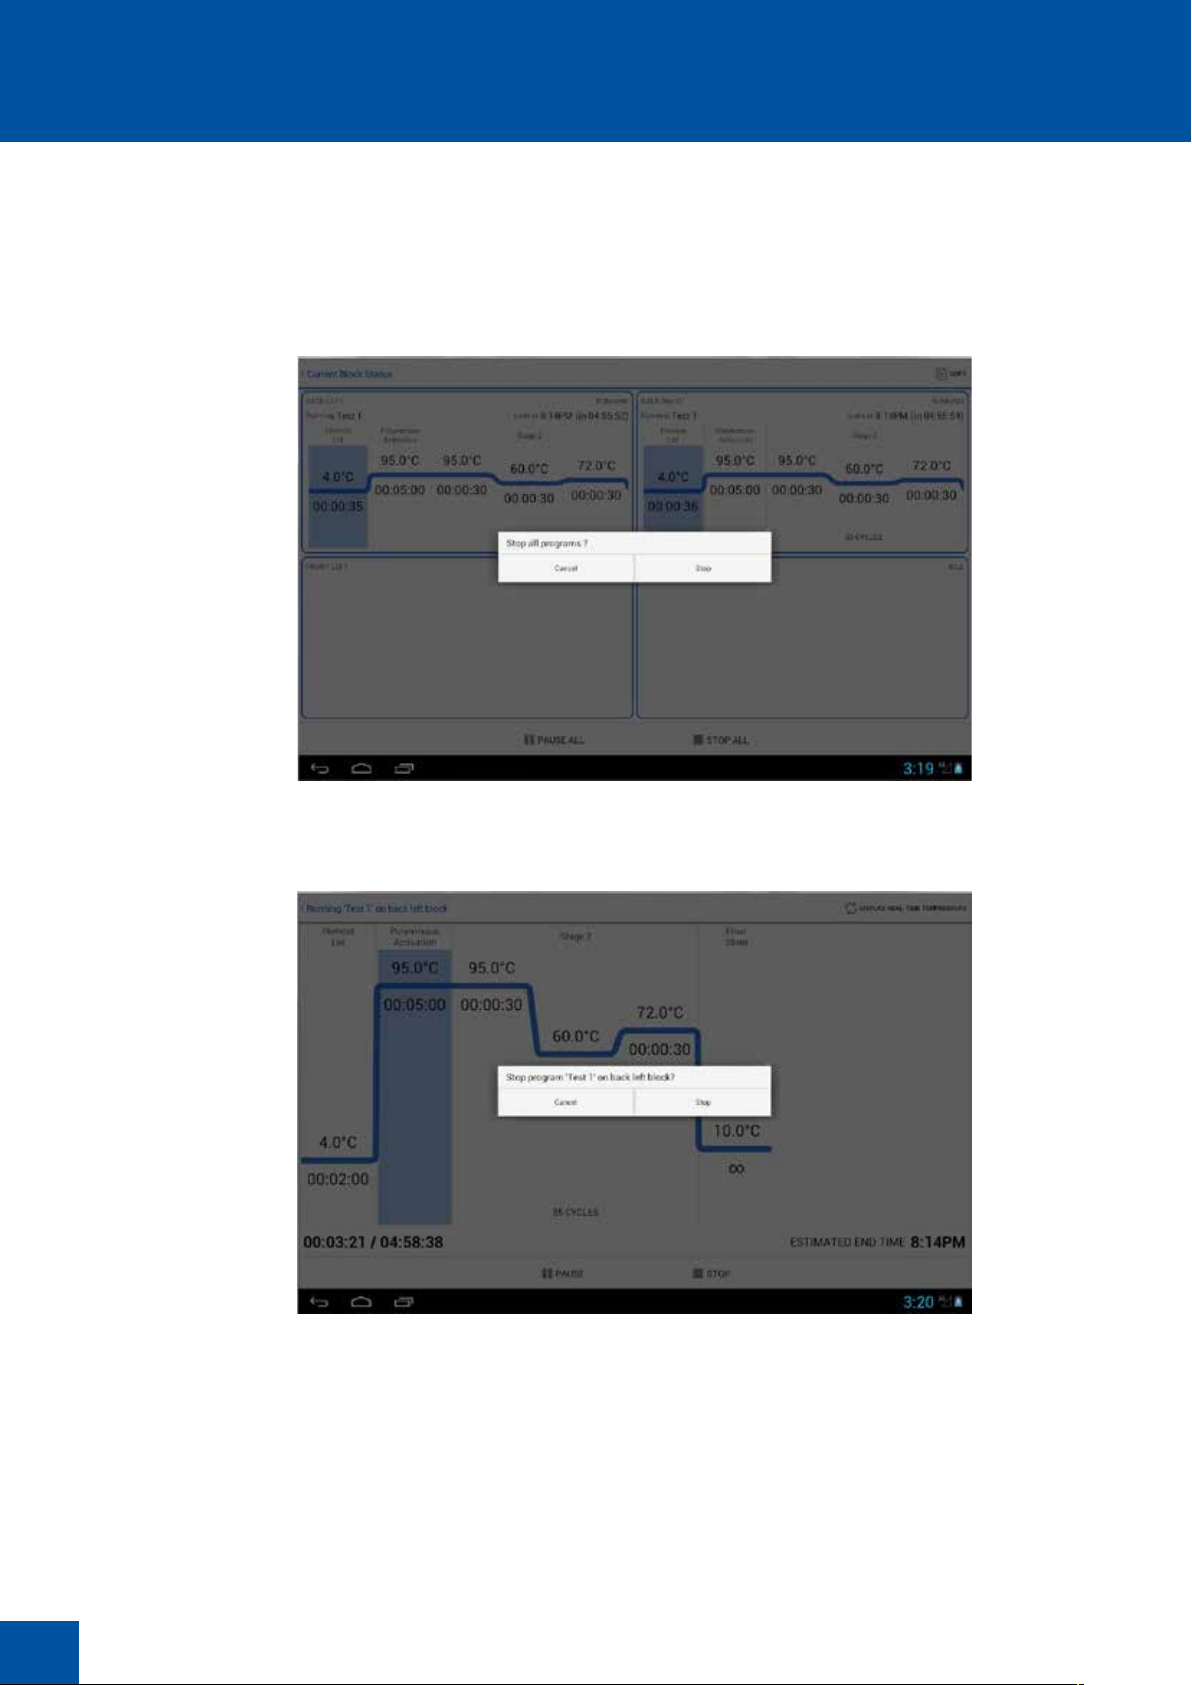
STOPPING A PROGRAM
When in the full screen display, tap STOP to stop the program. A prompt will ask you to confirm the
stop.
Note: For the AC-2 / AC-4 all active blocks can be stopped together from the block status screen.
To stop an individual program, first select the full screen display by tapping on the block area close to
program name to open up the full screen.
Alternatively, programs can be stopped from the Home Screen by tapping on the status bar. This will
open up the run screen.
48
Page 49

PAUSING A PROGRAM
A program can be paused in the same way as stopping a program. After a program has been paused, it
can be resumed by tapping on RESUME.
Note: It is possible to access all modules of the software while the unit is running a program. Simply use
the Return button or Home button at the bottom of the screen to access other areas of the software.
Program finished
When a program has completed, a Summary Report will be displayed on the screen.
• Click on OK to close the report.
Note: With the AC-2 / AC-4 a report will be presented for each individual block as each program
finishes.
49
Page 50

Using the File Manager
The File Manager is used to find and view programs and reports stored in the system memory or on an
external device such as a USB memory stick.
• To access the File Manager, tap on Edit program from the Home Screen.
• Touch PROGRAMS or REPORTS to view all those saved under the current profile (shown in the top
right of the screen).
• To view the files belonging to different profiles, tap the Profiles icon (head and shoulders of a
person) at the top right of the screen.
• Select whether to view the files available to Everyone or just the currently logged-in user.
50
Note: If a USB memory stick has been inserted into the USB port, A USB icon will also be visible at the
top right of the screen.
• To view files stored on the USB memory stick, tap on the USB icon.
SEARCH FOR A FILE
• Tap on the magnifying glass icon to enable a search for a particular program or report.
• Use the keypad to type in a keyword on which to search and then tap the magnifying glass symbol
on the keypad. Only programs or reports containing the search term will be shown.
• To cancel the search tap on the X symbol.
Page 51

REPORTS
Reports of runs performed on the Alpha Cycler are stored in the unit memory and can be accessed any
time.
• To view the report lists, from the File Manager select REPORTS.
• Select a program name. All reports for that program will be displayed in chronological order.
• Tap on a report from the list and the individual Summary Report will be displayed. Tap OK to exit.
Note: It is not possible to view the temperature log contained within the report on the Alpha Cycler
itself, it must first be copied to a USB memory stick then viewed on a PC using Excel®. The file will be
saved as a .csv file. See the directions given in the next section for copying files to a USB memory stick.
51
Page 52

DELETING A PROGRAM OR REPORT FROM THE FILE MANAGER
Programs and reports can be deleted from the File Manager.
• Tap the command button (
• Select the file(s) you wish to delete; selected files will be highlighted blue. Tap again to deselect.
• Touch the delete icon (large X) at the top right of the screen.
• A prompt will appear to confirm the delete; once confirmed the selected files will be deleted from
the system’s memory.
) at the top right of the screen.
• If you choose not to delete a file, touch Cancel.
• Touch the tick icon next to Done to return to the File Manager.
52
Page 53

Copying and transferring Programs and reports
COPYING A PROGRAM TO A USB MEMORY STICK
To copy a program from the system’s memory to an external memory device such as a USB drive, first
search for the desired program using the File Manager accessed through Edit program on the Home
Screen.
• Insert a USB memory stick into the port on the Alpha Cycler. A USB icon will appear at the top right
of the screen.
• Tap the Command button (
• Select the file(s) you wish to copy; selected files will be highlighted blue. Tap again to deselect.
• Touch the Copy icon at the top right of the screen.
• A prompt will appear indicating that the selected files are ready for copy.
) at the top right of the screen.
• To copy the files to the USB memory stick, tap on the USB icon to select the destination then tap
the Paste icon (clip board).
TRANSFERRING A PROGRAM FROM A USB MEMORY STICK TO THE ALPHA CYCLER
Transferring programs from one Alpha Cycler to another avoids the user having to re-write new programs
for each additional instrument and is an easy way to share optimised protocols with other Alpha Cycler
users.
• From the Home Screen select Edit program.
• Insert a USB memory stick into the port on the Alpha Cycler. A USB icon will appear at the top right
of the screen.
• Select the USB icon to view any files saved on the device.
• Tap the command button (
• Select the files you wish to copy to the system memory (highlighted items will go blue)
• Define the destination of the files by clicking on the Profiles icon (head and shoulders of a person)
• Select the users you wish to make the copied programs available too and then tap the Paste icon
(clip board).
) at the top right of the screen.
53
Page 54

Instrument settings and defaults
The Settings button on the Home Screen gives access to the instrument settings and allows you to
set up your own preferences and defaults for writing programs. Tap the Settings button on the Home
Screen to access the instrument Settings menu.
Note: The system must be restarted for the system settings and defaults to be applied. If the settings are
changed, always restart the system.
Touch any of the headings on the left hand side to view and edit those settings. Once all the settings
and defaults have been set as required, touch the Back button at the bottom of the screen to return to
the Home Screen.
PREFERENCES
This allows you to select the preferred operation language. The options are:
• English
• French
• Spanish
• Italian
• German
54
Page 55

INSTRUMENT SETTINGS
These allow setting of temperature logs, auto restart and date and time.
TEMPERATURE LOG
When set to ON the temperature log will record the block temperatures for every run and save them as
a Report. If temperature logs are not required, set to OFF.
AUTO-RESTART
This determines whether the unit will restart after a power failure. Setting Auto-restart to Always will
allow the unit to re-start irrespective of the length of the power failure. Selecting Never will mean the
system will not auto-restart after a power outage. In addition, the user can select a time in which, if
the power comes back on in that window, then the system will resume. The options are shown below.
Note: the time periods in the auto-restart allow the end user to select windows of power loss which
they deem acceptable for the power to be disrupted during their protocols. Example: if the system is
set to 10 minutes and the power is out for 8 minutes the system will resume, if the power is out for 12
minutes the system will not auto-restart.
55
Page 56

DATE AND TIME
This allows you to set the current date, time and format. Check the required boxes then tap the back
button to return.
PROGRAM DEFAULTS
This section allows you to define a number of parameters as defaults which will be applied to all protocols
created on the system.
Note: Defaults are merely a starting point and are not fixed, if the default value is not appropriate for
your reaction simply edit that value here or during programing.
56
Use the heated lid
Use this to set the heated lid temperature to approximately 10°C higher than the hottest block temperature
in the program.
• Touch ON/OFF to toggle between settings.
• Touch the temperature button to set the required lid temperature (35°C to 115°C).
Page 57

Preheat lid before program starts
Set to ON to pre-heat the lid to the set temperature before the thermal cycling program begins
(recommended, especially if the first step involves a high block temperature).
• Touch ON/OFF to toggle between settings.
Cool the block whilst heating the lid
Set to ON to cool the block to 4°C while the lid preheats.
• Touch ON/OFF to toggle between settings.
Include a polymerase activation
This will automatically program an initial denaturation/polymerase activation step at the beginning of a
program.
• Touch ON/OFF to toggle between settings.
• Set the required activation temperature.
• Set the required activation time.
Note: The temperature and activation time may need to be altered for different reagents. This can be
changed by editing an individual program.
Add a pause after polymerase activation
This will cause the unit to pause at the same temperature as the polymerase activation step. The program
will only continue when the user manually touches the resume button. This step can be useful when
additions need to be made to the samples prior to the run i.e. hot start.
Include a final extension
This will automatically add a final extension step to the program to ensure complete amplification of
the products.
• Touch ON/OFF to toggle between settings.
• Set the required extension temperature.
• Set the required extension time.
SERVICE SETTINGS
The service settings are for the use of authorised service engineers only. A service engineer’s password
is required to access these settings.
Note: Password 2401
57
Page 58

Administrator Level
The Alpha Cycler software has an administrator level which allows the administrator to reset passwords
for users and delete accounts which are no longer required.
Default Admin Login Details
User: admin
Password: admin
58
Page 59

Updating the Alpha Cycler software
The Alpha Cycler software can be updated by downloading the latest version from the Cole-Parmer
website www.coleparmer.com or by contacting your local distributor. You will need a USB memory stick
on which to save the update.
PROCEDURE
• Save the update file to the root folder on the USB device.
• Insert the USB device into the USB port on the Alpha Cycler.
• On the Home Screen select the Update icon on the top right of the page, (icon of three stacked
vertical dots).
• Select Check for updates.
• A dialogue box will open in which information about the upgrade will be provided and the user will
be given the option to carry out the update or not.
• If Yes is selected the installer will describe the process on screen.
• The user will be asked to confirm the installation of the new Alpha Cycler App and a confirmation
note will assure end users that existing files and data will not be over written.
• Android will ask the user to confirm the install and show the access the Alpha Cycler App has. Select
Install to begin the installation of the new software.
• A progress screen will appear showing the installation, when complete the user may be prompted
to open the new updated software. Select Open at this point.
• The installation will open and the user will be taken to the Home Screen.
• To confirm the installation of the new software check the version listing, this can be found in the
lower left corner of the Settings page.
59
Page 60

Technical support and servicing
If you require further technical or application assistance please contact your local distributor or ColeParmer Ltd. at:
E-mail: CPtechsupport@coleparmer.com
Phone: +44 (0) 1785 810433
Fax: +44 (0)1785 810405
For servicing information please contact your local distributor or contact Cole-Parmer Ltd. at:
Service Department
Cole-Parmer Ltd
Beacon Road
Stone
Staffordshire
ST15 0SA
E-mail: cpservice.@coleparmer.com
Phone: +44 (0) 1785 810475
We are continually striving to improve our products and software. If you have any comments or
suggestions on how we can do things better please send them to us at:
sales@coleparmer.com
REPLACING BLOCKS
Please note that thermal blocks in Alpha Cycler thermal cyclers are not interchangeable.
Thermal blocks can be replaced under warranty in case of product breakdown and mechanical or
electrical failure, but this must be performed by a qualified PCRmax trained service engineer and may in
some instances require the unit to be returned to the factory.
60
Page 61

Additional information
USER MAINTENANCE
Before cleaning your unit, disconnect it from the power supply. The outer case of the Alpha Cycler may
be cleaned with a cloth dipped in water or ethanol: hexane or 50% methanol can also be used. No
part of the case or cover should be immersed in the solvents. Do not use aggressive solvents such as
acetone or abrasive cleaners. The block may be wiped with water, ethanol or propan-2-ol and may be
decontaminated by wiping with 2% Neutracon® or 1% bleach solution.
Before using any cleaning or decontamination method except those recommended here, the responsible
person should check with Cole-Parmer that the proposed method will not damage the equipment.
Max Strength
70% IPA
2% neutracon detergent
FAULT FINDING
Note that this equipment should only be dismantled by properly trained personnel. Removing the outer
cover exposes potentially lethal mains voltages. There are no user serviceable parts within this
equipment.
Should you have any problems with your Alpha Cycler which cannot be easily remedied, you should
contact your supplier and return the unit if necessary. Please include details of the fault observed and
remember to return the unit in its original packing. Cole-Parmer Ltd. accepts no responsibility for damage
to units which are not properly packed for shipping. If in doubt, contact your supplier, providing the serial
number of the unit.
FUSES
If the display on the front panel is not lit, one of the two fuses may have blown. Check that there is no
external cause, such as a faulty plug or lead. Check both fuses and replace the faulty fuse with a new
one of the correct value. Note that fuses should only be replaced by a qualified electrician.
The holder for the two fuses is built into the mains input socket. With the AC-4 the fuse holder is next
to the mains On/Off rocker switch. First remove the power cable and then gently prise the fuse drawer
open with a flat-bladed screwdriver or similar tool. Each fuse can be removed by using the screwdriver
as a lever.
Exchange the faulty fuse in the fuse holder for a working fuse of the correct value. Finally, replace the
fuse drawer in the fuse compartment and push the drawer shut. Fuses which blow repeatedly indicate a
serious fault and you should contact your supplier for repair.
INSULATION TESTING
This equipment is fitted with RFI suppression circuitry. Any check of the electrical insulation by means of
high voltage dielectric testing (for example as in BS EN 61010-1) must be carried out using only a DC
voltage.
This unit contains semiconductor components which may be damaged by electric field effects.
61
Page 62

Notes
62
Page 63

Notes
63
Page 64

Contact Us
UK T: +44 (0) 1480 272279 E: info@coleparmer.co.uk W: coleparmer.co.uk
Germany T: +49 (0) 9377 92030 E: sales@coleparmer.de W: coleparmer.de
France T: +33 (0) 1486 37800 E: cpcontact@coleparmer.com W: coleparmer.fr
Italy T: +39 (0) 1313 89513 E: itsales@coleparmer.com W: coleparmer.it
USA T: +1 847 549 7600 E: sales@coleparmer.com W: coleparmer.com
CP-EMEA-PM-0001 0520 PCRmax_Manual
©2020 Cole-Parmer Instr ument Company, LLC. All r ights reser ved. For a listing of Cole-Parmer owned trademarks, go to ColeParmer.com/trademarks.
All other trademarks, servicemarks, tradenames, or other logos of third parties are and remain the property of such third parties.
 Loading...