

Page 1
PC*MILER
|AS/400
MULTIPLE VERSION SWITCH
®
USER’S GUIDE
1000 Herrontown Road • Princeton, NJ 08540
ALK Technologies, Inc.
Page 2

ALL RIGHTS RESERVED
You may print one (1) copy of this document for your personal use.
Otherwise, no part of this document may be reproduced, transmitted,
transcribed, stored in a retrieval system, or translated into any language,
in any form or by any means electronic, mechanical, magnetic, optical, or
otherwise, without prior written permission from ALK Technologies, Inc.
Windows is a trademark of Microsoft Corporation.
PC*MILER is a registered trademarks of ALK Technologies, Inc.
ALK Technologies, Inc. reserves the right to make changes or
improvements to its programs and documentation materials at any time
and without prior notice.
© Copyright 1994-2003 ALK Technologies, Inc.
1000 Herrontown Road, Princeton, NJ 08540
Page 3

Table of Contents
PC*MILER|AS/400 Version 17 Notes – Please Read........................................1
1.0 Introduction..................................................................................................3
2.0 Hardware and Software Requirements......................................................4
2.1 PC*MILER Graphics .........................................................................4
3.0 Installation....................................................................................................5
3.1 Installation Overview...........................................................................6
3.2 AS/400 Side Installation......................................................................6
3.3 PC Side Installation.............................................................................9
4.0 Starting an Instance of PC*MILER|TCP/IP Connect................................19
5.0 Starting and Stopping the Mileage Server...............................................20
6.0 Using PC*MILER for the AS/400...............................................................22
7.0 Using PC*MILER|AS/400 Multiple Version Switch With Other
Transportation Software............................................................................28
7.1 Technical Overview...........................................................................32
7.2 Request and Response Field Parameters........................................33
7.2.1 PC*MILER Versions Available (MV) Request and
Response.................................................................................34
7.2.2 Stop Validation (VA) Request and Response...........................35
7.2.3 Point-to-point Miles (MI) Request and Response.....................36
7.2.4 State Miles (SM) Request and Response.................................39
7.2.5 Detailed Route Information (HS) Request and Response........42
7.2.4.1 Upgrade Notice......................................................................45
7.2.5 Sample Request and Response Records.................................47
8.0 Using the PC*MILER AS/400 Mileage Server and Map Window.............48
8.1 Menus...............................................................................................48
9.0 Common Questions and Installation Problems......................................51
10.0 Technical Support....................................................................................53
Appendix A: Backward Compatibility .............................................................55
Appendix B: Configuring an N/S Router For Use With PC*MILER
AS/400.........................................................................................56
Appendix C: Configuring AnyNet On the AS/400...........................................60
Page 4

Appendix D: Configuring Client Access Express To Work With
PC*MILER AS/400.......................................................................61
Appendix E: The Sleep Feature For NS Router Installations........................66
Appendix F: PC*MILER|AS/400 Multiple Version Switch INI Settings.........68
Appendix G: AS400.LOG Error Codes ............................................................72
Page 5

PC*MILER|AS/400 MVS User’s Guide
1
PC*MILER®-AS/400
Important Changes for Version 17, Please Read
For Version 17, PC*MILER now offers two basic route types, Practical
and Shortest, that may be combined with one or more of the other three
route types that PC*MILER users a re fam iliar with (Toll Discouraged and
National Network or 53’ Trailer Routing). Users of the PC*MILER
interactive program who want to obtain Toll Discouraged, National
Network, or 53’ Trailer routing will additionally have to specify either the
Practical or Shortest Route type. (Previous to Version 17, all Toll
Discouraged, National Network, or 53’ Trailer routes were based on the
Practical route type.)
This new functionality gives you the option to run 12 diferent route types:
• Practical
• Shortest
• Practical/Toll Discouraged
• Shortest/Toll Discouraged
• Practical//National Network
• Shortest /National Network
• Practical /53 Foot Trailer
• Shortest /53 Foot Trailer
• Practical/Toll Discouraged/National Network
• Shortest/Toll Discouraged/National Network
• Practical/Toll Discouraged/53’ Trailer
• Shortest/Toll Discouraged/53’ Trailer
Note that National Network and 53’ Trailer Routing cannot be combined,
they are mutually exclusive.
Third Party or In-house Transportation Software Must Be
Modified to Utilize PC*MILER Version 17
If you are using PC*MILER with other transportation software, that
software will have to be modified to utilize the new functionality. Without
modifications to your third party or in-house software, you will have only
the following routing types available:
Page 6

2
PC*MILER|AS/400 MVS User’s Guide
• Shortest
• Practical
• Practical/Toll Discouraged
• Practical//National Network
• Practical/53’ Trailer
See Chapter 7, Using PC*MILER With Other Transportation Software, for
more information.
Note for Users Upgrading from PC*MILER|Streets
If you are upgrading from PC*MILER|Streets, note that the Light/Heavy
vehicle option has been renamed to ‘Override Restrictions’. The
parameter codes have changed from L (Light) to Y (Override Restrictions)
and H (Heavy) to N (Obey Restrictions). Use of L and H is still supported.
Page 7

PC*MILER|AS/400 MVS User’s Guide
3
1.0 Introduction
Congratulations! By purchasing a PC*MILER product, you have made a
cost-effective investment in high quality software that is simple to learn
and easy to use. PC*MILER for the AS/400 uses simple-to-follow menus
and requires minimal keystrokes to generate routing and mileage
information. Shortest, Practical, National Network, Toll-Discouraged, and
53’ Trailer routes can be calculated in a matter of seconds and can
include up to 30 stops.
PC*MILER for the AS/400 includes all the standard features found in the
PC version, including the Hub Distance Generator, Spelling Helper, route
resequencing, and user-defined time and cost estimates. You are
referred to the main PC*MILER User’s Guide for a more thorough
discussion of these features. With PC*MILER-AS/400, you can quickly
and easily generate point-to-point miles, driving instructions, and mileage
summaries broken down by toll roads and freeways. A route map of a trip
can be viewed and printed from a PC with PC*MILER|Mapping installed.
In-house software can be customized to draw the ETA status of a truck’s
current location during a trip.
PC*MILER for the AS/400 utilizes a unique distributed processing
solution. This solution maximizes the efficiency of your AS/400 by
"farming out" repetitive mileage calculations to a PC. With PC*MILERAS/400, you can benefit from having a seamless mileage interface with
your management system. Interfaces have been developed for Innovative
Computing Corporation, Qualcomm, McCormick & Associates, and
others.
Use PC*MILER for the AS/400 to audit driver logs and supplement your
fuel tax reports. Increase driver productivity by using PC*MILER's driving
instructions, ETA's with graphical truck display and trip sequencing. In
addition, your purchase of PC*MILER-AS/400 will eliminate the high costs
of leasing mileage systems or paying exorbitant transaction fees.
Page 8

4
PC*MILER|AS/400 MVS User’s Guide
2.0 Hardware and Software Requirements
Because PC*MILER-AS/400 employs a Client server solution, the
following hardware and software is required. The AS/400 server uses SNA
APPC data queues to communicate.
For PC*MILER-AS/400:
• A PC with a Pentium processor (300 MHz clock speed or higher)
and 128 MB of RAM. The hard disk should have 200 MB of space
available, running Windows NT, 2000, or XP-Pro.. For best
performance, use a Pentium PC 400 MHz or higher, or use two
PCs.
For PC*MILER|Streets-AS/400
• A PC with a Pentium processor (300 MHz clock speed or higher)
and 128 MB of RAM. The hard disk should have 2 gigabytes of
space available, running Windows NT, 2000, or XP-Pro. High
performance disk drives are recommended. For best performance,
use a Pentium PC 500 MHz or higher, or use two PCs.
PC to AS/400 Connectivity Options (Not Provided by ALK)
• Netsoft’s NS/Router 3.0 or higher. NS/Router 3.0 comes bundled in
Client Access V3R2.
• Client Access Express V4R4MO. (Recommended)
⇒
⇒ NOTE: Netmanage is now only supporting their NS Router on a limited
⇒⇒
basis, you are strongly encouraged to use Client Access Express as your
PC-to-AS/400 connectivity tool.
2.1 PC*MILER Graphics
PC*MILER map graphics are not supported in PC*MILER|AS/400 Multiple
Version Switch.
Page 9

PC*MILER|AS/400 MVS User’s Guide
3.0 Installation
PC*MILER for the AS/400 works by connecting a 32-bit Windows PC to
your AS/400. The PC provides mileage lookups to the AS/400 via data
queues. Generally, there is one common input or request queue that all
users write to, with each user having their own output queue. The PC
listens to the input queue for mileage request packets. Within each
mileage request packet is the name of the user’s output queue. The PC
does a destructive read of the request packet, processes the request, and
writes to the specified user’s output queue.
Multiple PC*MILER versions are made available via a bundling of one or
more instances of PC*MILER|TCP/IP Connect (pcmsock.exe). AS/400
users communicate only with the PC mileage server (as400.exe). The PC
mileage server handles the communication with the various instances of
PC*MILER|TCP/IP Connect. These instances can be run on a single PC
or a group of PC’s.
PC*MILER for the AS/400 was developed using the data queue facilities
of Netmanage’s NS Router and IBM’s Client Access Express. You must
have one of these two connectivity products installed and properly
configured on the mileage server PC. ALK Technologies recommends
you use Client Access Express.
If you want to use NS Router, it is bundled in many releases of Client
Access, or it can be purchased directly from Netmanage at
www.netmanage.com or 408-973-7171. The NS Router is no longer
being produced as a separate package, but is being sold under
Netmanage’s Legacy Program. Netmanage provides limited support for
their Legacy products. The NS Router is bundled in several Netmanage
packages. For your PC*MILER for the AS/400 installation, you need only
the NS Router. The NS Router must be configured to use the Anynet or
Twinax protocols. Connecting via Anynet requires the creation of an
Anynet Controller on the AS/400.
If you are using NS Router, you need the NS Router 3.0 or higher for
PC*MILER AS/400 Version 17. Client Access 3.2 has the 3.0 Router
bundled with it. Do not patch your router without talking to ALK first.
The PC*MILER for the AS/400 system was developed on a nonpatched Router, and installing any patch may cause unpredictable
behavior.
5
Page 10

6
PC*MILER|AS/400 MVS User’s Guide
3.1 Installation Overview
You should have received two CD’s with your purchase of PC*MILERAS/400:
• The PC*MILER Product Line CD which includes the complete
PC*MILER application and the PC*MILER-AS/400 Mileage Server
(PC*MILER|Connect-AS/400).
• The second CD contains the 400 side ALKMVS Library.
⇒
⇒ NOTE: Required PC to AS/400 Connectivity Software is not provided
⇒⇒
by ALK. You need either IBM’s Client Access Express or the NS Router,
from either IBM’s Client Access Bundle or Netmanage.
3.2 AS/400 Side Installation
First install the resident AS/400 software on your AS/400. Sign on to
QSECOFR or an account with equivalent authorities. Place the CD in the
optical drive and follow the instructions below.
⇒
⇒ NOTE For Upgrades:
⇒⇒
ALK increased the length of the Highway Segment (HS – Turn By Turn
Driving Instructions) by 25 characters. Failure to upgrade your current
ALKMVS Library will cause the program to crash if HS requests are us ed.
1. Create a library with the CRTLIB command. Type CRTLIB ALKMVS.
2. Add the library to the current library list. Type ADDLIBLE ALKMVS.
For Innovative Computing Corporation installations, you will also need
your ICC WORK and FILE libraries in your current library list. For
Version R6, type ADDLIBLE I93FILE or ITSR6FILE and then
ADDLIBLE I93WORK or ITSR6WORK. The ICC Version 7 libraries
are IESR7WORK and IESR7FILE. (Call ICC if you don’t know which
version you are running.)
⇒
⇒ NOTE For Updates Only: Type config from the AS/400 command line
⇒⇒
and print screen your current mileage settings. These settings will be
overwritten during the library restore. After the restore of the library, reenter these settings by running the ALKMVS/CONFIG command. Make
sure there are no users working in PC*MILER or PC*MILER|Streets.
Page 11

PC*MILER|AS/400 MVS User’s Guide
3. Command for restoring from CD:
rstlib savlib(ALKMVS) dev(opt01) vol(ALKMVS)
Label(ALKMVS)
mbropt(*all) alwobjdif(*all) rstlib(ALKMVS)
where opt01 is your CD-ROM drive.
Make sure all objects were restored. You can ignore security
warning messages. It is okay if MIDQUE does not restore because
this file is created later on.
⇒
⇒ NOTE: The ALKMVS Library CD was created using Kisco
⇒⇒
Information Systems’ BlueCD, which allows you to create AS/400
readable SAVLIBs on a PC CD writer. A small percentage of users
may have difficulty restoring the ALKMVS Library with the above
command. If you experience problems:
Type RSTLIB, then:
7
a. Specify the library ALKMVS and the appropriate optical
device
b. Press <F10> for more options
c. Specify *ALL on database member options
d. Specify *ALL on allow object differences.
4. The system administrator should make the library ALKMVS available
to users at sign-on time. There are two ways to insert ALKMVS into
the library list:
a. The WRKSYSVAL command can be used by typing
WRKSYSVAL, and then searching for the QUSRLIBL entry.
Insert ALKMVS.
b. If your users are using a job description in their user profiles,
then use the CHGJOBD command (type CHGJOBD) and
insert ALKMVS.
For Innovative Computing installations, a command is available to help
insert a library into the library list. ALKMVS should be the first library
in the library list. (NOTE: Run this command from a typical ICC
user account or profile, not QSECOFR). Enter the following:
ADDLIBLE ILPGMR *LAST
CHGLIBLS
(insert) ALKMVS
Page 12

8
5. To grant object authority to library ALKMVS, enter the following:
GRTOBJAUT (press <F4>)
object = *ALL
library = ALKMVS
objtype = *ALL
users = *public
authority = *ALL
⇒
⇒ NOTE: For ICC Users only (Be su re to d o t hi s!) Type ‘config’ from
⇒⇒
the AS/400 command line after the restore of the library, then
change the library for the location of mileage data queues from
ALKMVS to your ICC Work library and change the ICC Support
Short Code names flag from ‘N’ to ‘Y’. Depending on the version
of your ICC software, your library will be I93W ORK, ITSR6 WORK,
or IESR7WORK. Check with ICC for this name.
⇒
⇒ NOTE Also: The AS/400 side and the PC Side must match which
⇒⇒
Library the Mileage Request or Input data queue resides in. You
will be prompted during the PC Side Installation for your data
queue location or there is an option to change it under the PC|ConnectAS/400 Control Menu.
PC*MILER|AS/400 MVS User’s Guide
Input Data
Queue Library
Page 13

PC*MILER|AS/400 MVS User’s Guide
9
3.3 PC Side Installation
The PC Side of the PC*MILER|AS/400 Multiple Version Switch installation
is a multi-faceted process. The installation varies depending on the
number of versions of PC*MILER and PC*MILER|Streets involved and the
number of mile a ge server PCs that will be used.
Generally installations can be performed in less than half an hour if you
strictly follow the instructions. Failure to follow instructions can result in
hours of trouble-shooting with the possibility of multiple reboots.
The installation and operation of the product is made easier if you use of
one quality desktop PC dedicated to running only PC*MILER|AS/400
Multiple Version Switch. Configuration time is minimized and the product
can be launched automatically.
For multiple PC installatio ns, the increase in network traf fic is minimal for
mileage requests: less than 0.3KB per request and generally no larger
than 35KB for turn-by-turn Driving Directions. Performance between
versions is not equal. ALK’s highway networks have become more
detailed over time, which has slowed down processing a bit. Version 17 is
the slowest, followed by 16.x. Versions 14 & 15 are roughly egual.
Depending on lookup volume, you may be able to combine versions 14
and 15 on one PC and dedicate one PC each to versions 16 and 17.
Another thing to consider is that when starting the product, as described
below, you will have to launch an instance of PC*MILER|TCP/IP Connect
on every PC.
PC Side
Essentially the PC side of the PC*MILER|AS/400 Multiple Version Switch
installation can be broken down into two parts:
PC*MILER|AS/400 Multiple Version Switch (as400.exe) which reads
mileage requests from a request data queue on the AS/400, and at least
one instance of PC*MILER|TCP/IP Connect (pcmsock.exe) which
provides the mileage and routing information for as400.exe to return to a
response data queue on the AS/400.
Each instance of PC*MILER|TCP/IP Connect needs its own copy of the
PC*MILER desktop application. This installation provides the highway
network database and a mechanisim for editing custom routing features.
Page 14

10
PC*MILER|TCP/IP Connect is itself built on another PC*MILER product
called PC*MILER|Connect – ALK’s mileage and routing dynamic link
library (dll).
PC*MILER|Connect is a version specific product; for example, Connect
Version 15.x will not work with Version 16 PC*MILER. The normal
installation of PC*MILER|Connect involves installation of our milage and
routing dlls to a computer’s \Winnt folder. For PC*MILER|AS/400 Multiple
Version Switch these dlls are installed to the working directory for
pcmsock.exe underneath the top level of that version’s PC*MILER for
Windows installation.
Note: If you are installing PC*MILER|AS/400 Multiple Version Switch on
a PC that previously was used to produce PC*MILER mileages, you will
first have to manually remove PC*MILER|Connect dlls from the
computer’s \Winnt folder. See the chart of file names by version below.
Installation Overview
Install a copy of PC*MILER for Windows for each version you will be
accessing. Versions 14.0. 15.1, 16.1 and 17 are bundled on the
PC*MILER|AS/400 Multiple Version Switch PC Side CD. Install only
compatible add-ons from the list below.
You can install the data add-ons listed below if you have licensed them.
If you licensed any of these add-on products, you will have to contact ALK
at 609-683-0220 x301 to obtain a product key code to unlock them. If you
aren’t installing any add-ons, you won’t need a product key code.
PC*MILER|AS/400 Multiple Version Switch Compatible Add-ons:
Do not install:
PC*MILER|AS/400 MVS User’s Guide
• Standard Position Location Codes (SPLCs)
• Canadian Postal Codes
• PC*MILER|HazMat
• PC*MILER|Streets
• PC*MILER|Connect aka PC*MILER Server
• PC*MILER|TCP/IP Connect
• PC*MILER|AS/400 Connect (PC*MILER Black Box or
PC*MILER for the AS/400 interface)
• PC*MILER|Mapping
• PC*MILER|SpreadSheets
Page 15

PC*MILER|AS/400 MVS User’s Guide
Note: Pre-Version 16 SPLC’s and CanPosts were mutually exclusive, you
could install one or the other. In Version 16 and higher, both can be
installed together.
For installing PC*MILER|Streets Versions 16.x or 17.x you will need the
Street Level Data CD, which is not automatically provided with the
PC*MILER|AS/400 Multiple Version Switch shipment. If the product was
previously licensed you will have a Street Level Data CD with that
shipment.
For new purchases of PC*MILER|Streets to be used with
PC*MILER|AS/400 Multiple Version Switch, you will receive a second set
of disks which will contain the Street Level Data CD.
You can reuse product key codes from previous installations if you have
them. Do not intall any add-ons but the ones listed above as being
compatible (SPLC’s, CanPosts, Hazmat routing, and Street Level routing).
For Version 17, do not attempt to license the installation when you are
prompted at the end of the installation.
Once the various PC*MILER|TCP/IP installations are complete, install
PC*MILER|AS/400 Multiple Version Switch (ALKMVS).
Step-by-Step Installation Instructions
1) Install PC*MILER for Windows and any of the following licensed data
add-ons:
• SPLCs
• CanPosts
• PC*MILER|HazMat
• PC*MILER|Streets
You will need product key codes to unlock these add-ons, please
contact ALK at 609-683-0220 x301.
The currently supported Versions of PC*MILER are:
V14.x
V15.x
V16.x
V17.x
2) For PC’s previously used for PC*MILER products, check the \Winnt
folder for old dll’s and INI files (see file list in Step 4.6 below).
11
Page 16

12
3) Install the correct version of PC*MILER|TCP/IP Connect for each
version of PC*MILER that you will be using. Pay strict attention to
which version you are installing.
4) Install PC*MILER|AS/400 Multiple Version Switch (ALKMVS) by
following the steps below.
PC*MILER|AS/400 MVS User’s Guide
Step 1:
Make sure the Netsoft Router or Client Access Express is installed and working
on the PC (see Appendix B: Configuring an N/S Router for Use wi th PC*MILER
AS/400 or Appendix D: Confiquring Client Access Express for Use with
PC*MILER AS/400).
⇒
⇒ NOTE For NS Router Users: PC*MILER for the AS/400 is built on a
⇒⇒
specific Netmanage Data Queue DLL. This DLL, E32DQW.DLL dated
12/18/98, is only on the PC*MILER CD. If you install any Netmanage
software after installing the PC*MILER for the AS/400 interface software,
you run the risk of getting the wrong version of this critical file, and
unpredictable behavior may result.
Step 2:
Insert the PC*MILER|AS/400 Multiple Version Switch Windows Install
Disk.
On the CD are the following folders:
MVSInst
V14
V151
V161
V17
You can install a ny version you are licensed f or. If you are installing the
PC*MILER|Streets add-on you will need a Street Level Data CD (not
automatically shipped with PC*MILER|AS/400 Multiple Version Switch).
You can install all four versions of PC*MILER on one PC, or you can
install each version on its own PC (the PC’s must be networked).
Page 17

PC*MILER|AS/400 MVS User’s Guide
13
Step 2.1
For Version 14:
• Run <cdrom>\v14\setup.exe
• If you are installing just PC*MILER 14.0 you will not need a product
key code.
• If you are intalling an approved PC*MILER|AS/400 Multiple Version
Switch data add-on, you will need a product key code.
• Without a product key code, check only the PCMILER 14.0 box and
then use Pcd1400001 for the serial number.
The default install location is C:\Pmw140. If you change this, you will need
to make adjustments later in the installation. Remember your installation
location. You do not need to reboot the PC as directed.
Step 2.2
For Version 15.1:
• Run <cdrom>\v151\setup.exe
• If you are installing just PC*MILER 15.0 you will not need a product
key code.
• If you are intalling an approved PC*MILER|AS/400 Multiple Version
Switch data add-on, you will need a product key code.
• Without a product key code, check only the PCMILER 15.0 box .
The default install location is C:\Pmw150. If you change this, you will need
to make adjustments later in the installation. Remember your installation
location. You do not need to reboot the PC as directed.
Step 2.3
Version 16.1:
• Run <cdrom>\v161\setup.exe
• If you are installing just PC*MILER 16.1 you will not need a product
key code.
• If you are intalling an approved PC*MILER|AS/400 Multiple Version
Switch data add-on, you will need a product key code.
• Without a product key code, enter ‘Trial’ in the Registration Number
dialog.
Do not choose PC*MILER|Streets unless you have previously licensed it
from ALK and have the Street Level Data CD.
Page 18

14
The default install location is C:\Program Files\Alk Technologies\
Pmw160. If you change this, you will need to make adjustments later in
the installation. Remember your installation location.
Step 2.4
Version 17.0:
Do not choose PC*MILER|Streets unless you have previously licensed it
from ALK and have the Street Level Data CD.
The default install location is C:\Program Files\Alk Technologies\Pmw170.
If you change this, you will need to make adjustments later in the
installation. Remember your installation location.
Do not choose to Activate the License as prompted at the end of the
installation.
STEP 3:
Install PC*MILER|AS/400 Multiple Version Switch:
On the PC*MILER|AS/400 Multiple Version Switch Windows Install Disk
is a folder called MVSInst. Within the folder are the following selfextracting zip files:
alkmvs.exe Æ Contains PC*MILER|AS/400 Mutiple Version Switch Install
For16App.exe Æ V16.1 Mileage and Routing Support Files
For17App.exe Æ V17.0 Mileage and Routing Support Files
v14tcpip.exe Æ V14 PC*MILER|Tcpip Connect
v15tcpip.exeÆ V15 PC*MILER|Tcpip Connect
v16tcpip.exeÆ V16 PC*MILER|Tcpip Connect
v17tcpip.exeÆ V17 PC*MILER|Tcpip Connect
Step 3.1
Run alkmvs.exe, it is set to unzip to C:\ALKMVS.
You can redirect the path in the Unzip window if necessary.
PC*MILER|AS/400 MVS User’s Guide
• Run <cdrom>\v17\setup.exe
• If you are installing just PC*MILER 17.0 you will not need a product
key code.
• If you are intalling an approved PC*MILER|AS/400 Multiple Version
Switch data add-on, you will need a product key code from ALK.
• Without a product code, enter ‘Trial’ in the Registration Number
dialog.
Page 19

PC*MILER|AS/400 MVS User’s Guide
15
Step 3.2
Unzip the correct version of the TCP/IP file for your version. The selfextracting zip files are set to unzip to the default locations. If you installed
your PC*MILER to non-default locations, you will have to redirect the
extractions In the winzip windows. If you redirect the extractions, be sure
to include a folder called ‘Tcpip’ below the top level of your PC*MILER
installation.
Step 3.3
For Versions 16.1 and 17.0 extract the correct support files.
For16App.exe and for17App.exe.
If you installed your PC*MILER to non-default locations you will have to
redirect the extractions in the winzip windows. These files must be
extracted to the App subfolder of your PC*MILER V16.1 or V17.0
installation.
Step 4: Configuring PC*MILER|AS/400 Multiple Version
Switch
Step 4.1: Edit \AlkMvs\Srv32.ini
You will need to complete the following with the IP Address or System
Name of your AS/400 and the User Profile and Password that the PC will
be using for the AS/400 signon.
; IP Address or System Name of AS/400
system=
;User Profile
user=
;Password
pass=
Save your changes and exit srv32.ini.
Step 4.2: Edit \AlkMvs\pcmmv.ini to set default PC*MILER
Version
Set the default version of PC*MILER under the Default Key. The default
version is necessary for starting PC*MILER|AS/400 Multiple Version
Page 20

16
Switch. Mileages will only be returned if the PC*MILER Version trip
parameter is valid. The default name must match one of the key names.
Be careful of editing the Key Names like [PCMiler 150], these values have
to match those set in srv32.ini under [multiversion].
Step 4.3: Edit \AlkMvs\Pcmmv.ini to point to your various
If you are going to run each instance of PC*MILER|TCP/IP Connect on a
single PC, you can skip this step.
Pcmmv.ini is used to locate the various instances of PC*MILER|TCP/IP
Connect. By default Pcmmv.ini is pointing to local copies via the loop
back address. If you are using multiple PCs you will have to change the
loop back (127.0.0.1) to the IP address or the computer name of the
remote PC. If you are having trouble connecting on a computer name, you
will have to map that computer’s name to its IP address in
C:\winnt\system32\drivers\etc\hosts.
If your system has a conflict with the default port num ber, you will have to
change the port number in pcmmv.ini and in the batch file that is used to
start up PC*MILER|TCP/IP Connect.
(See Step 4.4).
Step 4.4.
The various instances of PC*MILER|TC/PIP Connect need to be started
before starting the PC*MILER|AS/400 Multiple Version Switch executable.
The best way to do this is via a batch file. A working copy of one is
installed in C:\AlkMvs called StartMvs.bat.
StartMvs.bat is setup for running all four versions of PC*MILER on the
same PC. If you do not have a particular version, you will have to remove
it from StartMvs.bat.
Note: Each version of pcmsock.exe has been renamed with its version
number appended so that the versions are distinguishable in the Windows
Task Manager.
Note: The second parameter passed to pcmsock1x.exe is the Port
Number, if you change these values you must change the values in
\alkmvs\pcmmv.ini.
PC*MILER|AS/400 MVS User’s Guide
instances of PC*MILER|TC/PIP Connect.
Page 21

PC*MILER|AS/400 MVS User’s Guide
17
Note: In StartMvs.bat you will find the commands to start AS400.exe
commented out. To have PC*MILER|AS/400 Multiple Version Switch
started automatically, simply uncomment the CD and the Start lines.
Once you have StartMvs.bat configured properly, you can create a short
cut for it in your Startup folder.
Step 4.5: Icons
There is an icon for PC*MILER|AS/400 Multiple Version Switch installed
in \alkmvs. You can copy it to other locations.
Note for NetSoft Users:
If you are forced to use the NetSoft Router instead of Client Access
Express, you will have to change the icon properties. Change the third
parameter from ‘2’ to ‘3’ so that the target will be:
c:\alkmvs\as400.exe<space>3<space>2<space>1.
Step 4.6: Removing DLL’s from \Winnt
If you are using PC’s that previously were used for PC*MILER products,
check the \Winnt fo lder on each one for old dll’s and INI files. The files
listed below for each version of PC*MILER|Connect (formerly
PC*MILER/Server) must not be in the \Winnt folder.
Version Files that can not be in \Winnt Folder.
14.x pcmdsrv.dll
pcmfav.dll
pcmgcode.dll
pcmgnet.dll
pcmnet.dll
pcmreng.dll
pcmsrv32.dll
pcmtcp.dll
pcmxtra.dll
pcmserve.ini
15.x pcmdsrv.dll
pcmfav.dll
pcmgcode.dll
pcmgnet.dll
pcmnet.dll
pcmreng.dll
pcmsrv32.dll
pcmtcp.dll
Page 22

18
16.x pcmsrv32.dll
17.x pcmsrv32.dll
PC*MILER|AS/400 MVS User’s Guide
pcmxtra.dll
pcmserve.ini
pcmtcp.dll
pcmserve.ini
pcmtcp.dll
pcmserve.ini
Page 23

PC*MILER|AS/400 MVS User’s Guide
19
4.0 Starting an Instance of PC*MILER|TCP/IP Connect
PC*MILER|TCP/IP Connect can be started from a command or from a
batch file. Within the PC*MILER|AS/400 Multiple Version Switch
installation, each copy of PC*MILER|TCP/IP Connect (pcmsock.exe) has
been renamed to reflect the PC*MILER version it is returning mileage and
routing information for. The format is pcmsockxx.exe where xx is the
PC*MILER version. This enables identification of a particular version
within the Windows Task Manager.
Pcmsock.exe takes two parameters, the PC*MILER package, and the port
number.
The PC*MILER package is PC_MILER. You should use Ports in the 8000
range, with the last two digits corresponding to the version of PC*MILER
that is being used.
For example:
Pcmsock14.exe<space>PC_MILER<space>8014
would be the command to start Version 14 PC*MILER|TCP/IP Connect.
Note: There has to be agreement between the Port number that an
instance of PC*MILER|TCP/IP Connect is listening to and that version’s
entry in ..\AlkMvs\Pcmmv.ini.
It is best to use a batch file to start the various services. See Step 4.4 of
the installation instructions.
Within the batch file you must change directories to the installation
directory of PC*MILER|TCP/IP Connect before launching the start
command.
Note: If you are using a multiple PC setup, you will need to have a batch
file on each PC.
Page 24

20
PC*MILER|AS/400 MVS User’s Guide
5.0 Starting and Stopping the Mileage Server
At least one instance of PC*MILER|TCP/IP Connect must be running
before you can start PC*MILER|AS/400 Multiple Version Switch
(as400.exe). AS400.exe while running maintains a list of available
PC*MILER versions. It will find a newly started instance of
PC*MILER|TCP/IP Connect and will remove a version which has stopped
responding.
If you edit StartMvs.bat and create a shortcut for it in your startup folder as
described in installation Step 4.4, the software you installed on your
dedicated PC will cause the interface to start automatically when the PC is
turned on. If Client Access Express or Netsoft Router is running on the
PC, then click on the PC*MILER AS/400 icon or reboot the PC. Client
Access Express or the NetSoft Router must automatically sign on with a
user ID and password, if unattended startups of the mileage server PC
are desired. (To automate the sign-on process by supplying a user ID and
password, see Appendix D for Client Access Express or Appendix B for
the N/S Router.)
When the mileage server (as400.exe) starts, it displays the connection
status in the mileage server’s log window. You can bring up this window
by clicking on the mileage server’s Window menu and choosing Display
Server Log.
Page 25

PC*MILER|AS/400 MVS User’s Guide
21
The Name of Mileage Request or Input data queue, and the library in
which the queue resides, are logged. The number underneath the data
queue name and library is the connection status return code. Good
returns are:
0 Connection Good Created Data Queue
2 Connection Good Found Data Queue
Return codes of 1 or 3 are generic error codes that indicate problems with
your NS Router or Client Access Express connections.
⇒
⇒ NOTE: Both the PC and the AS/400 must agree on the location of the
⇒⇒
Input or Request data queue. To change the location on the PC, click
on the mileage server’s File menu. Choose AS/400 Control, then
Change Library/Queue. The change is made on the AS/400 by running
the ALKMVS/config command and filling out the library field.
The server log only notes incoming requests. If you need to see the
mileage server’s outputs, turn on the Log to File feature by selecting the
mileage server’s File menu and choosing AS400 Control > Highlight Log
to File. This will create a file called c:\ALKMVS\as400.log It is
recommended to only use logging for diagnostic purposes, otherwise the
log files tend to grow large.
Stopping the Interface
To close PC*MILER|TCP/IP Connect, click Exit in the File menu. From
the PC*MILER|AS/400 Multiple Version Switch window, choose Exit from
the File menu.
⇒
⇒ NOTE: If you are closing your router, remember to disconnect the
⇒⇒
AS/400 beforehand. Please be patient, the PC*MILER mileage server
can take a minute or two to exit. Be sure to disconnect the Netsoft Router
from the AS/400 before closing the router. Failure to do so may result in
having to reboot the PC before you can reconnect to the AS/400. It is not
necessary to manually disconnect a Client Access Express connection.
Page 26

22
PC*MILER|AS/400 MVS User’s Guide
6.0 Using PC*MILER for the AS/400
To use PC*MILER for the AS/400, issue the command PCMVS from the
command line. The following screen will appear:
⇒ NOTE: The PCMVS command contacts the mileage server to read the
data that the mileage server is using. If the PCMVS command doesn’t
respond or the PC*MILER screen comes up with ”PC DOWN” in the
screen title, there is a problem with the connection to the mileage server
PC.
At the top of the main entry screen are several control settings. These include:
PC*MILER Version: Available Versions are returned from the mileage
server PC. This will be a list of three digit numbers like
140<space>150<space>160<space>170. This list is updated only at
PCMVS Startup. If no versions are available, the word “Trouble” or some
nonsensical word will be listed.
Page 27

PC*MILER|AS/400 MVS User’s Guide
23
Note: The requirements for commas between the city name and the j urisdi ction
code vary with the r eq uested PC *M ILER Ver s i on. For Ver s i on 14.x and 15.x a
comma is required, e.g. Princet on,NJ. For Versions 16.x and 17.x you can
use a comma or a space, e.g. Princeton, NJ or Princeton<space>NJ.
Request Type: “MI”, the default entry, will cause PC*MILER (or
PC*MILER|Streets) to generate only point-to-point mileage look-ups.
“SM” will cause PC*MILER to generate a summary of miles traveled
through each state, broken down by toll roads and free roads, in addition
to the point-to-point mileage. “HS” will cause PC*MILER to generate
detailed driving instructions, in addition to the state mileage summary and
point-to-point mileage look-up.
Graphics requests: Are not supported in PC*MILER|AS/400 Multiple
Version Switch.
Routing Type: Varies with the Version Requested.
For Versions 14.x & 15.x the options are:
P (Practical) S (Shortest) N (National Network) T (Toll Discouraged)
For Version 16.x:
P (Practical) S (Shortest) N (National Network) T (Toll Discouraged)
5 (Fifty-three Foot Trailer)
For Version 17.x:
Either Practical or Shortest routing can now be combined with other
available PC*MILER routing options (Toll Discouraged, National Network,
or 53’ Trailer). You must specify either P (Practical ) or S (Shortest) for all
routes. (Refer to the main PC*MILER User’s Guide for more detailed
descriptions of these routing options.) See Chapter 7, Using PC*MILER
With Other Transportation Software for details on using this new
functionality with other software packages.
Route options are described below:
•••• Toll Discouraged: Version 17 Only “T” will cause PC*MILER to
generate miles which avoid long stretches of toll roads. You will receive
either a Practical Toll Discouraged Route, or a Shortest Toll
Discouraged Route depending on how you have your “Routing Type”
set.
Page 28

24
PC*MILER|AS/400 MVS User’s Guide
•••• National/53 Foot: Version 17 Only “N” will cause PC*MILER to
generate miles calculated using the National Network, which is designed
for larger trucks. “5” will generate miles suitable for 53’ trailer routing.
National Network or 53 Foot Trailer will be generated using either the
“Practical” or “Shortest” routing type. You can also combine National
Network and 53 Foot Trailer routing with the Toll Discouraged option.
For example you can generate a “Practical/Toll Discouraged/National
Network” route. See Chapter 7, Using PC*MILER With Other
Transportation Software for details on using this new functionality with
other software packages.
•••• Custom Routing: “C” will use custom routing preferences (avoids
and favors) set in PC*MILER or PC*MILER|Streets. When this position
is blank, routing preferences will be disabled.
•••• Hub or Optimize: A blank space is the default entry and is used for
the standard PC*MILER operation. “H” is used to initiate the hub
distance generator. “R” is used to initiate route sequencing with the
origin fixed and the remaining stops reordered. “F” is used to initiate
route sequencing with both the origin and destination fixed and the
remaining stops reordered. These options are described in more
detail in the main PC*MILER User’s Guide.
•••• Ovrd (Override) Restrictions:
(Version 17.x and 16.x with optional Street Level Add-on Only) In
addition to the five basic PC*MILER route types, a Heavy and Light
Vehicle routing option is now offered. W hen Ovrd Restrictions is set to
“Y”, the Light Vehicle option is activated. With Light Vehicle routing
active, truck-prohibited roads will always be avoided, but truckrestricted roads are considered for a route. (PC*MILER normally gives
preference to Interstates, major highways, and major thru-roads where
possible.)
With Ovrd Restrict ion s set to “N”, Heavy Vehicle routing is in effect, so
both truck-prohibited and truck-restricted roads will always be
avoided. In addition, Heavy Vehicle routing takes nationwide 13’ 6”
height restrictions into account. A heavy vehicle is one weighing at
least 80,000 pounds; a light vehicle weighs less than 80,000 pounds.
•••• Miles/Kilometers: “M” will cause PC*MILER to generate distances in
miles. “K” will cause PC*MILER to generate distances in kilometers.
•••• HazMat (Hazardous Material Type): (optional add-on data module)
Types of hazardous material routing that can be generated are: “G” for
General, “E” for explosive, “I” for Inhalant, and “R” for Radioactive
Page 29

PC*MILER|AS/400 MVS User’s Guide
25
•••• Region (Continent): Regions in which mileages can be generated
are: “A” for Asia; “E” for Europe; “F” for Africa; “N” for North America;
“O” for Oceania; or “S” for South America. (Regions outside North
America require PC*MILER|Worldwide.
FOR AN ON-SCREEN DISPLAY OF THESE DEFINITIONS, press the
Help key on your keyboard. For Terminal Emulation sessions on PC’s,
this is typically the Scroll Lock key or Right Mouse Click > Help.
In the middle of the screen are the stop entry fields. Enter the city names
and state abbreviations for the stop-off locations desired, their ZIP codes,
or their latitude/longitude positions. Both the Spelling Helper and ZIP
Code Helper described in the main PC*MILER User’s Guide are available
for use with PC*MILER-AS/400. You may enter up to 30 stop-offs.
⇒ NOTE: PC*MILER-AS/400 only supports Degree-Minute-Second lat/long
format; e.g. 0333716N,1142709W.
⇒ NOTE For PC*MILER|Streets Users: An address should directly follow the
city/state or ZIP code entry, separated by a semicolon (e.g. “Princeton, NJ;
1000 Herrontown Road”).
You can also purchase separate add-on data modules for Canadian postal
codes or SPLC codes. A Canadian postal code is entered in the same
manner as a ZIP code, but in the following format: L#L<space> #L#. (e.g.
“K7L 4E7”). A SPLC is a six- or nine-digit number, preceded by the letters
‘SPLC’ (e.g. “SPLC908601”) .
At the bottom of the screen, the function keys used with PC*MILER for the
AS/400 are described. These include:
F2 State help. Displays a list of all state and province abbreviations.
F3 Exit. Exits the program and returns to the main AS/400 screen.
F7 Ins stop. Allows you to insert a new stop-off where the cursor is
positioned.
F8 Del stop. Allows you to delete a stop-off where the cursor is
positioned.
F10 Process request. Sends the request to PC*MILER on the
dedicated PC.
F11 Restart. Clears the screen, and lets you start making data entries
on the screen again.
Page 30

26
F12 Main Screen. Returns to the main stop entry screen from the
F22 Reverse. Reverses the order of stops entered.
F23 Load a saved trip. In the screen that comes up, typing “X” (with
F24 Save a trip. Enter a trip identifier of up to 10 characters in the
Help Pressing the key labeled “Help” on your keyboard will bring up
Once you have entered stops on the main screen and initiated a mileage
inquiry by pressing <F10>, the following screen will appear:
PC*MILER|AS/400 MVS User’s Guide
mileage report screens.
the cursor on a trip identifier in the pick list) will load that trip; typing
“D” will delete the trip.
entry field that appears.
detailed instructions for using various features of PC*MILER for the
AS/400. If you are using an emulator, the Help key on your
keyboard will usually be the Scroll Lock key or Right Mouse Click
> Help.
This report contains leg and cumulative miles for each segment of your
trip. The time and cost estimates are based on the values contained in
the copy of PC*MILER (or PC*MILER|Streets) installed on your dedicated
Page 31

PC*MILER|AS/400 MVS User’s Guide
27
PC. (Refer to the main PC*MILER User’s Guide for instructions on how to
alter these values.) <F3> will exit the program. <F9> will print the screen.
<F11> will return you to the previous screen and will clear it. <F12> will
return you to the previous screen, without clearing it.
Page 32

28
PC*MILER|AS/400 MVS User’s Guide
7.0 Using PC*MILER|AS/400 Multiple Version Switch With
Other Transportation Software
PC*MILER|AS/400 Multiple Version Switch is a modified version of
PC*MILER|AS/400-Connect. PC*MILER|AS/400 Multiple Version Switch
has an additional trip parameter available that enables the user to specify
or “Switch” between various versions of PC*MILER. Currently PC*MILER
versions 14.x, 15.x, 16.x, and 17.x are supported.
PC*MILER|AS/400 Multiple Version Switch is licensed in addition to any
PC*MILER versions a company has purchased. All supported versions
may not be available. You will have to make use of the “MV” request to
verify what versions are available. Pa ssing Blanks will result in the return
of an error. There is no support for a default version.
Notes for All Users:
• Changes to route types and jurisdiction codes are not unified (see
chart below).
• Use of Comma between city and jurisdiction code not unified (see
chart below).
• All HS (highway segment) turn by turn driving instructions are
uniform at the Version 16.x level.
• Override Route Restrictions option not uniformly available(see
chart below).
• Versions 16.x and 17.x have more detailed highway networks and
therefore have slower response times. You may have to adjust your
wait times accordingly.
Notes For Existing PC*MILER|AS/400 Connect Users:
• A set of 10 new trip parameters has been inserted into all of the
request and response packets.
• Output Data Queues sizes were lengthened from 1024 to 1034.
• Data Area “Comalk” was modified to store a default PC*MILER
version.
• “Old mode” or short city names (22 characters) are not supported.
• Graphics (maps) are not supported.
⇒ NOTE: For Version 17, the routing type options have changed for National
Network, Toll Discouraged, and 53’ Trailer routing. These three ‘special’
Page 33

PC*MILER|AS/400 MVS User’s Guide
29
routing options now can be generated in combination with the ‘Practical’
or ‘Shortest’ options. Additionally, National Network and 53’ Trailer
routing can be combined with the Toll Discouraged options. The only way
to take advantage of this new functionality is to pass in the new code in
position 1 of the Request Options.
Previously the five available codes were:
P = Practical
S = Shortest
N = National Network
T = Toll Discouraged
5 = 53 Foot Trailer
New Codes:
P = Practical
S = Shortest
B = Toll Discouraged/Practical
C = National Network/Practical
D = 53 Foot Trailer/Practical
E = Toll Discouraged/National Network/Practical
F = Toll Discouraged/53 Foot Trailer/Practical
G = Toll Discouraged/Shortest
H = National Network/Shortest
I = 53 Foot Trailer/Shortest
J = Toll Discouraged/National Network/Shortest
K = Toll Discouraged/53 Foot Trailer/Shortest
Use of the old codes is still supported, no changes are required. Old
codes for National Network (N), Toll Discouraged (T), and 53 Foot Trailer
(5) will be generated using the Practical network. Changing this default to
the Shortest network is not possible.
⇒
⇒ NOTE: For users upgrading from PC*MILER|Streets, the Light/Heavy
⇒⇒
vehicle option has been renamed to ‘Override Restrictions’. Parameter
codes have changed from L (Light) to Y (Override Restrictions) and H
(Heavy) to N (Obey Restrictions). Use of L and H is still supported.
Page 34

30
⇒
⇒ NOTE: For Version 16, the HS (Turn-by-Turn Driving Instructions) return
⇒⇒
PC*MILER|AS/400 MVS User’s Guide
packet was changed from previous versions. The fields for Route and
Interchange were lengthened and the number of sets of route information
was reduced from 4 sets per packet to 3. See section 7.2.4.1 for full
details.
⇒ IMPORTANT REMINDER: Users of PC*MILER Versions 14 and 15, and
PC*MILER|Streets Versions 1, 2000, 3, and 4 must type a comma between
the city and the state or province. For Version 16 and 17 the comma
between the city and state or province is optional.
Version Specific Routing and City Format Information
Version Route Types Available City Entry Jurisdiction Info
PC*MILER 14.x P(ractical) S(hortest) Comma required Quebec = PQ
T(oll Discouraged) between city and Newfoundland = NF
N(ational Network) jurisdiction code
PC*MILER 15.x P(ractical) S(hortest) Comma required Quebec = PQ
T(oll Discouraged) between city and Newfoundland = NF
N(ational Network) jurisdiction code
PC*MILER 16.x P(ractical) S(hortest) Comma or space Quebec = QC
T(oll Discouraged) required Newfoundland = NF
N(ational Network) between city and
5(FiftyThree Foot) jurisdiction code
PC*MILER 17.x P(ractical) Comma or space Quebec = QC
S(hortest) required Newfoundland = NL
N(ational Network)(prac) between city and
5(FiftyThree Foot)(prac) jurisdiction code.
T(oll Discouraged)(prac)
B = Toll Discouraged/Practical
C = National Network/Practical
D = 53 Foot Trailer/Practical
Page 35

PC*MILER|AS/400 MVS User’s Guide
E = Toll Discouraged/National Network/Practical
F = Toll Discouraged/53 Foot Trailer/Practical
G = Toll Discouraged/Shortest
H = National Network/Shortest
I = 53 Foot Trailer/Shortest
J = Toll Discouraged/National Network/Shortest
K = Toll Discouraged/53 Foot Trailer/Shortest
Restriction Overrides by Version
PC*MILER 14.x Feature not available
PC*MILER 15.x Feature not available
PC*MILER 16.x Available with Street Level Add-on Only
PC*MILER 17.x Available all versions
31
Codes For PC*MILER Versions
Must be 3 characters:
PC*MILER 14.0 = 140
PC*MILER 14.1 = 141
PC*MILER 15.0 = 150
PC*MILER 15.0 = 151
PC*MILER 16.0 = 160
PC*MILER 16.1 = 161
PC*MILER 17.0 = 170
PC*MILER 17.1 = 171
Page 36

32
7.1 Technical Overview
The PC*MILER-AS/400 system uses distributed processing techniques
(i.e. the processing is split into two). The user interface or interactive
software is written in RPG and runs on the AS/400. The mileage
calculation software is written in C++ and runs on a PC in the Windows
environment. The RPG programs communicate with the PC mileage
calculation software through N/S Router or Client Access Express. The
interactive software on the AS/400 allows multiple users to look up pointto-point mileages and routes for up to thirty stop-off points. The Windows
server application creates a data queue on the AS/400 at startup called
MIDQUE. The server application waits for mileage requests and
processes them when received. The server application responds to an
output queue specified within the request packet.
Files Description
PC*MILER|AS/400 MVS User’s Guide
AS/400 Programs
MVSIINQ Main AS/400 inquiry program that sends request to MIDQUE data queue
CITALK RPG program that verifies city ZIP spelling
CITHLP RPG program that displays city help screen with pick list
CRTQ CL program that creates an output data queue based on the job number
DELQ CL program that deletes the queue created by CRTQ
GETLAT Sample RPG Program that converts City, Jurisdiction pairs o r ZIP codes to Lat/longs
GETLATC CL program that creates output queue and starts GETLAT RPG
GETMILV Sample RPG Program performs point-to-point mileage lookups
GETMILVC CL program that creates output queue and starts GETMIL RPG
GETQNAME RPG Program that determines library and data queue name for sending requests
VALDR RPG Program that validates ZIP codes, place names, and street addresses; also
provides pick lists of ZIP codes, names and addresses when partial name, ZIP or
address is passed in RPG parameters.
MIDQUE Data queue that contains input mileage lookup records
MVSIINQC CL program that creates output data queue and starts MIINQ rpg
QUEUE CL program that writes to the MIDQUE request data queue
NWSEND External data structure for sending mileage requests
NWRESP External data structure for receiving mileage output
The program MSVIINQ contains two subroutines that can be used to
integrate miles with othe r transportation software. The subroutine SNDREQ
sends mileage requests to PC*MILER and the subroutine RSLT receives
mileage results from PC*MILER.
Page 37

PC*MILER|AS/400 MVS User’s Guide
33
The PC Mileage Server can respond to a total of five types of Mileage
Requests:
Mileage:
VN = Version of PC*MILER|AS/400 Multiple Version Switch being used
by the server
NewÆÆÆÆ MV = Versions of PC*MILER Highway Data available.
VA = Validation that a stop (City, ZIP code, etc.) is recognized by
PC*MILER or a list of possible matches to a partial city or ZIP code
MI = Total mileage for up to 30 stops
SM = Total mileage for up to 30 stops broken down by state or province
HS = Turn-by-turn driving instructions for up to 30 stops
The PC Mileage Server responds with the following types of returns:
VR – Version of PC*MILER or PC*MILER|Streets running on the PC
NewÆÆÆÆ NS – Version(s) of PC*MILER running available.
PL – Good/Bad Stop or a ‘pick list’ of potential matches
CP – Total Miles for a trip
SR – Total Miles for a trip broken down by state or province
HR – Turn-by-turn driving instructions or “highway segments”
VN returns a VR
MV returns a NS
VA returns a PL
MI returns a CP
SM returns a CP and an SR.
HS returns a CP, an SR and an HR
7.2 Request and Response Field Parameters
The following sections specify the field parameters for the request types
defined in section 7.1 and the responses to each request type.
IMPORTANT NOTE: When using PC*MILER|Streets, the best matching
for address location lookups can be accomplished using the guidelines
stated below. These rules apply to batch or interactive integration. It is
recommended that a validation (VA) request always precede each
mileage request, especially where street addresses are included, in
order to avoid misleading or incomplete output.
• When you input a street address, use a city and state abbreviation
whenever possible.
Example: Princeton, NJ;1000 Herrontown Road – The comma
between the city and state is optional. The semicolon between the
state abbreviation and the street address is required.
Page 38

34
PC*MILER|AS/400 MVS User’s Guide
• Use a street number.
Example: Princeton, NJ;1000 Herrontown Road as opposed to
“Princeton, NJ;Herrontown Road”. In this example, if Herrontown
Road is 50 miles long and no address is included, the returned
mileages could be very inaccurate.
• When a street address is not supplied, do not send a semi-colon.
Example: Send 08540 as opposed to “08540;” – a semi-colon will
cause the server to look up a blank address which is not
necessary.
Three examples of correct input:
Trenton, NJ;21 Olden Avenue
New York, NY;118 Broadway
20001
7.2.1 PC*MILER Versions Available (MV) Request and Response
It is recommended that you maintain a list of available versions via the MV
request type. Within the NV return is a space-delimited list of available
versions. For instance: 140 150 161 170
Note: The PC*MILER|AS/400 Multiple Version Switch PC mileage Server
is designed such that if the Mileage Server (as400.exe) loses connection
to a particular version of PC*MIL ER, the affecte d version will be removed
from the list.
Version Request:
Var Name Len Value Description
REQ-TYPE 2 MV PC*MILER Versions Available
REQ-REF 10 Output Queue Name
(ALK uses “Q” plus job number)
REQ-PARMS 10 Optional
REQ-SEQUENCE 4 Optional
REQ-ERROR 2
REQ-MVS 3 Optional
REQ-FILL 237 Blank Fill
Total 268
Version Response
Var Name Len Value Description
RESP-TYPE 2 NV Stop pick list
RESP-REF 10 Output Queue Name
RESP-PARMS 10 Trip Parms
RESP-SEQUENCE 4 Always 0001
RESP-ERR 2 Pos 27-28 Error Code
:
Page 39

PC*MILER|AS/400 MVS User’s Guide
RESP-MVS 3 Pos 29-31) PC*MILER Version
RESP-FILL 7 Pos 32-38) Not Used
RESP-VERSIONS 228 Array of space delimited, left justified, 3 character
35
Versions.IE:140<space>150<space>161
7.2.2 Stop Validation (VA) Request and Response
The following are field parameters for stop and (for PC*MILER|Streets
users) street address validation. A stop can be a city/state pair separated
by a comma, a ZIP code, a latitude/longitude point or (with optional addon modules) a Canadian Postal code or SPLC (Standard Position
Location Codes). PC*MILER|Streets users may include street addresses.
Validation requests are important because error reporting in mileage
requests is limited to the first two stops of a trip. If your bad stop is lower
in the list of stops, you will not be told which is the nonvalid stop, you will
get a generic “Can’t Run Trip” message. The VA request type can be
used to produce lists of potential matches to partial spellings or ZIP
codes.
Validation Request:
Var Name Len Value Description
Extended Format
REQ-TYPE 2 VA Validate Stop or Address
REQ-REF 10 Output Queue Name
(ALK uses “Q” plus job number)
Filler-8 8
Force Pick List 1 P=Force Pick List or Blank (Position 20)
Filler-7 7
NewÆÆÆÆ MVS Parms 10 (positions 29-31) 3 bytes PC*MILER Version
7 bytes not used
REQ-CIT 70 70 bytes each left justified
38 byte maximum city name
1 byte comma (optional)
2 byte state abbrev
1 byte comma (optional)
13 byte county name (optional)
or for Streets
1 byte semicolon ; followed by street address
Examples
Warminster,PA,BUCKS
Warminster,PA;1174 NASSAU ROAD
18974
Lat/long format should be 1234567N,1234567W
5 digit zips only
Canadian Postal Codes use the format L#L<space>
#L# (add-on data module)
For Standard Positio n Lo cation Codes SPLC plus
the number (add-on data module)
Filler-CIT 630 blank
Page 40

36
Validation Response:
PC*MILER|AS/400 MVS User’s Guide
Var Name Len Value Description
RESP-TYPE 2 PL Stop pick list
RESP-REF 10 Output Queue Name
Filler-3 3 3 blanks
RESP-MORE 1 Pos 16) M = more data to follow
Filler-3 3
Match 1 Pos 20)
L List of Cities
Y Exact match
N No match
Filler-2 2 2 blanks
RESP-Seq 4 Pos 23-26 ) Sequence for multiple responses
RESP-ERR 2 Pos 27-28 Error Code
E2 Place not found
NewÆÆÆÆ RESP-MVS 3 Pos 29-31 (3 character PC*MILER Version)
Pos 32-38) Not Used
RESP-CIT 980 Array of 14 places 70 bytes each left justified
or
Error message if there is a problem
Filler 15
Extended Format
7.2.3 Point-to-point Miles (MI) Request and Response
1. (Request) The following are field parameters for requesting miles. The
purpose of the Mileage request is to allow the host application to retrieve
point-to-point miles. This type of request could be used for a quick mile
lookup from a host inquire program or for running several stop-off points in
a batch environment. The host dispatching software could generate this
request when a new trip is established.
Var Name Len Value Description
Extended Format
REQ-TYPE 2 MI Miles request
REQ-REF 10 Output Queue Name
(ALK uses ‘Q’ + the job number)
Trip Options Positions 13-22 Request Position
REQ-OPTION 1 Pos 1) S=Shortest
P=Practical
N=National/Practical
T=Toll Discouraged/Practical
5=53’ Trailer/Practical
B=Toll Discouraged/Practical
C=National Network/Practical
D=53 Foot Trailer/Practical
E=Toll Discouraged/National
Network/Practical
F=Toll Discouraged/53 Foot
Trailer/Practical
G=Toll Discouraged/Shortest
Page 41

PC*MILER|AS/400 MVS User’s Guide
37
H=National Network/Shortest
I=53 Foot Trailer/Shortest
J=Toll Discouraged/National
Network/Shortest
K=Toll Discouraged/53 Foot
Trailer/ Shortest
1 Pos 2) M or K for miles or kilometers
1 Pos 3) R=resequence stops
H=hub leg miles
F=resequence stops fixed destination
blank=otherwise
REQ-MORE 1 Pos 4) M=more data to follow
1 Pos 5) Reserved by DR request
REQ-FMT 1 Pos 6) E =Extended Format
(Required, see Appendix A)
REQ-REGION 1 Pos 7) A=Asia
(Worldwide Only) E=Europe,
F=Africa
N=NorthAmerica
O=Oceania
S=South America
REQ-CUSTOM 1 Pos 8) C=Custom, blank=default
REQ-Ovrd Restrictions 1 Pos 9) Y=Override Restrictions or L=Light
N=Obey Restrictions or H=Heavy
REQ-Hazmat (Data Add-on) 1 Pos 10) G = General Restriction
E = Explosive Restriction
I = Inhalant Restriction
R = Radioactive Restriction
REQ-SEQ 4 Sequence for multiple responses
REQ-ERR 2 Error Code
New ÆÆÆÆ REQ-MVS 3 Requested PCMILER Version
(Position 29-31) 140=PC*MILER Version 14
141=PC*MILER Version 14.1
150=PC*MILER Version 15.0
151=PCMILER Version 15.1 et cetera
New ÆÆÆÆ REQ-FILL 7 Blank Fill
REQ-CIT 700 Array of 10 places 70 bytes each left justified
3 sets of 700 when using the more flag
38 byte maximum city name
1 byte comma
2 byte state abbrev
1 byte comma (optional)
13 byte county name (optional)
or
1 byte semicolon ; followed by street address
Examples
Warminster,PA,BUCKS
Warminster,PA;1174 NASSAU ROAD
18974
Lat/long format should be 1234567N,1234567W
5 digit zips only
Canadian Postal Codes use L#L<space> #L#
Standard Position Location Code use SPLC+number
Page 42

38
PC*MILER|AS/400 MVS User’s Guide
2. (Response) The following are field parameters for output miles. The
City Pair response returns an output to the host application that contains
city names and ZIP codes along with miles, cost and time estimates. The
CP response is always returned first for all three request types (MI, SM,
and HS).
Var Name Len Value Description
RESP-TYPE 2 CP City pair returned output
RESP-REF 10 Output Queue Name
(ALK uses ‘Q’ + the job number)
Request Options 13-22
RESP-NET 1 Pos 1) S=Shortest
P=Practical
N=National/Practical
T=Toll Discouraged/Practical
5=53’ Trailer/Practical
B=Toll Discouraged/Practical
C=National Network/Practical
D=53 Foot Trailer/Practical
E=Toll Discouraged/National
Network/Practical
F=Toll Discouraged/53 Foot
Trailer/Practical
G=Toll Discouraged/Shortest
H=National Network/Shortest
I=53 Foot Trailer/Shortest
J=Toll Discouraged/National
Network/Shortest
K=Toll Discouraged/53 Foot
Trailer/ Shortest
RESP-MIL-TYPE 1 Pos 2) M or K for miles or kilometers
RESP-OPTION 1 Pos 3) R = resequence stops
H = hub leg miles
F = resequence stops fixed destination
blank = otherwise
RESP-MORE 1 Pos 4) M = more data to follow
Pos 5) Reserved by DR request
1 Pos 6) E=Extended Format
RESP-REGION 1 Pos 7) A=Asia,E=Europe,F=Africa,N=North
America,O=Oceania,S=South America
RESP-Custom Routing 1 Pos 8) C=Custom, blank=default
RESP-Ovrd Restrictions 1 Pos 9) Y=Override Restrictions or L=Light
N=Obey Restrictions or H=Heavy
RESP-Hazmat 1 Pos 10) G = General Restriction
E = Explosive Restriction
I = Inhalant Restriction
R = Radioactive Restriction
RESP-SEQ 4 Sequence for multiple responses
RESP-ERR 2 Error Code
E1 First state not found
E2 First city not found
E3 Second state not found
Extended Format
Page 43

PC*MILER|AS/400 MVS User’s Guide
E4 Second city not found
E5 Unable to resequence
E6 Unable to calculate route
E9 Disconnected Highway Network
NewÆÆÆÆ RESP-M VS 3 PC*MILER Version (Pos 29-31)
NewÆÆÆÆ RESP-Fill 7 PC*MILER Version (Po s 3 2 -38)
RESP-CIT1 39 39 bytes
All stop information including
Zip and\or city\state and\or county and\or
Street address
or
If there is error the pcmiler error code
RESP-CIT2 39 39 bytes
All stop information including
Zip and\or city\state and\or county and\or
Street address
RESP-MILE 5 Total miles returned or PC*MILER 3-digit error code
RESP-HOUR 4 Total time in hours (0031) = 3.1 hours
RESP-COST 7 Total cost for city pair (0052295) = 522.95
FILL134 134 Blank Fill
Total 266 Bytes
39
7.2.4 State Miles (SM) Request and Response
1. (Request) The following are field parameters for a state miles request.
The purpose of this request is to attain the state-by-state mileage
information associated with a trip.
REQ-TYPE 2 SM Miles request
REQ-REF 10 Output Queue Name
(ALK uses ‘Q’ + the job number)
Var Name Len Value Description
Request Options 13-22
REQ-OPTION 1 Pos 1) S=Shortest
P=Practical
N=National/Practical
T=Toll Discouraged/Practical
5=53’ Trailer/Practical
B=Toll Discouraged/Practical
C=National Network/Practical
D=53 Foot Trailer/Practical
E=Toll Discouraged/National
Network/Practical
F=Toll Discouraged/53 Foot
Trailer/Practical
G=Toll Discouraged/Shortest
H=National Network/Shortest
I=53 Foot Trailer/Shortest
Extended Format
Page 44

40
J=Toll Discouraged/National
Network/Shortest
K=Toll Discouraged/53 Foot
Trailer/ Shortest
1 Pos 2) M or K for miles or kilometers
1 Pos 3) R = resequence stops
H = hub leg miles
F = resequence stops fixed destination
blank = otherwise
REQ-MORE 1 Pos 4) M = more data to follow
1 Pos 5) Reserved by DR request
REQ-FMT 1 Pos 6) E = Extended Format
(Required see appendix A)
REQ-REGION 1 Pos 7) A=Asia
(Worldwide Only) E=Europe,
F=Africa
N=NorthAmerica
O=Oceania
S=South America
REQ-Custom Routing 1 Pos 8) C=Custom, blank=default
REQ-Ovrd Restrictions 1 Pos 9) Y=Override Restrictions or L=Light
N=Obey Restrictions or H=Heavy
REQ-Hazmat 1 Pos 10) G = General Restriction
E = Explosive Restriction
I = Inhalant Restriction
R = Radioactive Restriction
REQ-SEQ 4 Sequence for multiple responses
REQ-ERR 2 Error Code
New ÆÆÆÆ REQ-MVS 3 Requested PCMILER Version
(Position 29-31) 140=PC*MILER Version 14
141=PC*MILER Version 14.1
150=PC*MILER Version 15.0
151=PCMILER Version 15.1 et cetera
New ÆÆÆÆ REQ-FILL 7 Blank Fill
REQ-CIT 700 Array of 10 places 70 bytes each left justified
3 sets of 700 when using the more flag
38 byte maximum city name
1 byte comma
2 byte state abbrev
1 byte comma (optional)
13 byte county name (optional)
or
1 byte semicolon ; followed by street address
Warminster,PA,BUCKS
Warminster,PA;1174 NASSAU ROAD
18974
Lat/long format should be 1234567N,1234567W
5 digit zips only
Canadian Postal Codes use the format L#L #L#
PC*MILER|AS/400 MVS User’s Guide
Examples
Page 45

PC*MILER|AS/400 MVS User’s Guide
41
2. (Response) The following are field parameters for the state miles
output. The PC will respond with the miles (or kilometers) for the stops
indicated in the "SM" request. There will be 10 state miles returned for
each record. If additional records are needed, an "M" in the "MORE"
parameters field is used to indicate that there is more data to follow.
⇒
⇒ NOTES: A “CP” (city pair, point-to-point miles) response is always
⇒⇒
returned first for all three request types (MI, SM, and HS), and an "SR"
(state miles) output record follows the “CP” response to an "HS" (highway
system, detailed route information) request (see section 7.2.4).
REQTYPE 2 SR State miles summary
REFNUM 10 Output Queue Name
(ALK uses ‘Q’ + the job number)
Request Options 13-22
1 Pos 2) M or K for miles or kilometers
1 Pos 3) R = resequence stops
H = hub leg miles
F = resequence stops fixed destination
blank = otherwise
RESP-MORE 1 Pos 4) M = more data to follo w
1 Pos 5) Reserved by DR request
RESP-FMT 1 Pos 6) E = Extended Format
(Required see Appendix A)
RESP-Custom Routing 1 Pos 8) C=Custom, blank=default
RESP-Ovrd Restrictions 1 Pos 9) Y=Override Restrictions or L=Light
N=Obey Restrictions or H=Heavy
E = Explosive Restriction
Response from PC Len Value Description
PARMS 1 Pos 1) S=Shortest
P=Practical
N=National/Practical
T=Toll Discouraged/Practical
5=53’ Trailer/Practical
B=Toll Discouraged/Practical
C=National Network/Practical
D=53 Foot Trailer/Practical
E=Toll Discouraged/National
Network/Practical
F=Toll Discouraged/53 Foot
Trailer/Practical
G=Toll Discouraged/Shortest
H=National Network/Shortest
I=53 Foot Trailer/Shortest
J=Toll Discouraged/National
Network/Shortest
K=Toll Discouraged/53 Foot
Trailer/ Shortest
RESP-REGION 1 Pos 7) A=Asia,E=Europe,F=Africa,N=North
America,O=Oceania,S=South America
RESP-Hazmat 1 Pos 10) G = General Restriction
Page 46

42
I = Inhalant Restriction
R = Radioactive Restriction
RESP-SEQNUM 4 Sequence for multiple responses
RESP-ERROR 2 Error Code
E1 First state not found
E2 First city not found
E3 Second state not found
E4 Second city not found
E5 Unable to resequence
E6 Unable to calculate route
E9 Disconnected Highway Network
NewÆÆÆÆ RESP-MVS 3 PC*MILER Version (Pos 29-31)
NewÆÆÆÆ RESP-Fill 7 PC*MILER Version (Pos 32-38)
STATEMIL 220 10 elements each element will consist of:
2 for state code
5 for total miles
4 for toll miles
FILLER 118
PC*MILER|AS/400 MVS User’s Guide
7.2.5 Detailed Route Information (HS) Request and Response
1. (Request) Following are parameters for a route and state miles request.
The purpose of this request is to allow the Host to retrieve detailed route
information based on the city pair stop-off points.
Var Name Len Value Description
REQ-TYPE 2 HS Miles request
REQ-REF 10 Output Queue Name
(ALK uses ‘Q’ + the job number)
Request Options 13-22
REQ-OPTION 1 Pos 1) S=Shortest
P=Practical
N=National/Practical
T=Toll Discouraged/Practical
5=53’ Trailer/Practical
B=Toll Discouraged/Practical
C=National Network/Practical
D=53 Foot Trailer/Practical
E=Toll Discouraged/National
Network/Practical
F=Toll Discouraged/53 Foot
Trailer/Practical
G=Toll Discouraged/Shortest
H=National Network/Shortest
I=53 Foot Trailer/Shortest
J=Toll Discouraged/National
Network/Shortest
Extended Format
Page 47

PC*MILER|AS/400 MVS User’s Guide
K=Toll Discouraged/53 Foot
Trailer/ Shortest
1 Pos 2) M or K for miles or kilometers
1 Pos 3) R = resequence stops
H = hub leg miles
F = resequence stops fixed destination
blank = otherwise
REQ-MORE 1 Pos 4) M = more data to follow
1 Pos 5) Reserved by DR request
REQ-FMT 1 Pos 6) E = Extended Format
(Required see appendix A)
REQ-REGION 1 Pos 7) A=Asia,E=Europe,F=Africa,N=North
REQ-Custom Routing 1 Pos 8) C=Custom, blank=default
REQ-Ovrd Restrictions 1 Pos 9) Y=Override Restrictions or L=Light
N=Obey Restrictions or H=Heavy
REQ-Hazmat 1 Pos 10) G = General Restriction
E = Explosive Restriction
I = Inhalant Restriction
R = Radioactive Restriction
REQ-SEQ 4 Sequence for multiple responses
REQ-ERR 2 Error Code
REQ-CIT 700 Array of 10 places 70 bytes each left justified
3 sets of 700 when using the more flag
38 byte maximum city name
1 byte comma
2 byte state abbrev
1 byte comma (optional)
13 byte county name (optional)
Lat/long format should be 1234567N,1234567W
5 digit zips only
Canadian Postal Codes use the formal L#L #L#
43
America, O=Oceania,S=South America
or
1 byte semicolon ; followed by street address
Examples
Warminster,PA,BUCKS
Warminster,PA;1174 NASSAU ROAD
18974
Page 48

44
PC*MILER|AS/400 MVS User’s Guide
2. (Response) Following are field parameters for a response to the route
and state miles request. The PC response record has all of the required
detailed route information. There are four route list records\response
records. Therefore, if there are more than four records for the route,
additional response records must be returned. Multiple returned records
are designated by the "M" in the "MORE" parameter field.
⇒
⇒ REMEMBER: A “CP” and “SR” output record will always precede the
⇒⇒
“HR” response record.
Response from PC Len Value Description
REQTYPE 2 HR Route highway information returned
REFNUM 10 Output Queue Name
(ALK uses ‘Q’ + the job number)
Request Options 13-22
REQ-OPTION 1 Pos 1) S=Shortest
P=Practical
N=National/Practical
T=Toll Discouraged/Practical
5=53’ Trailer/Practical
B=Toll Discouraged/Practical
C=National Network/Practical
D=53 Foot Trailer/Practical
E=Toll Discouraged/National
Network/Practical
F=Toll Discouraged/53 Foot
Trailer/Practical
G=Toll Discouraged/Shortest
H=National Network/Shortest
I=53 Foot Trailer/Shortest
J=Toll Discouraged/National
Network/Shortest
K=Toll Discouraged/53 FootTrailer/
1 Pos 2) M or K for miles or kilometers
1 Pos 3) R = resequence stops
H = hub leg miles
F = resequence stops fixed destination
blank = otherwise
REQ-MORE 1 Pos 4) M = more data to follow
1 Pos 5) Reserved by DR request
REQ-FMT 1 Pos 6) E = Extended Format
(Required see appendix A)
REQ-REGION 1 Pos 7) A=Asia,E=Europe,F=Africa,N=North
REQ-Custom Routing 1 Pos 8) C=Custom, blank=default
REQ-Ovrd Restrictions 1 Pos 9) Y=Override Restrictions or L=Light
REQ-Hazmat 1 Pos 10) G = General Restriction
E = Explosive Restriction
I = Inhalant Restriction
R = Radioactive Restriction
Shortest
America,O=Oceania,S=South America
N=Obey Restrictions or H=Heavy
Page 49

PC*MILER|AS/400 MVS User’s Guide
REQ-SEQNUM 4 Sequence for multiple responses
REQ-ERROR 2 Error code
E1 First state not found
E2 First city not found
E3 Second state not found
E4 Second city not found
E5 Unable to resequence
E9 Disconnected Highway Network
NewÆÆÆÆ RESP-MVS 3 PC*MILER Version (Pos 29-31)
NewÆÆÆÆ RESP-Fill 7 PC*MILER Version (Pos 32-38)
RouteInfo 300 3 Sets of 100 Each
ROUTEINFO 2 indicates end of route data for stop
2 state code
1 toll indicator
35 route number
4 leg mileage
38 for intersection city or junction
6 for cumulative leg miles
6 for cumulative stop miles
FILLER 2
NOTES: The PC will send CP response records for MI requests.
The PC will send CP and SR response recor ds for SM requests.
The PC will send CP, SR, and HR response recor ds for HS requests
3 sets
45
6 directional (North, Turn L, etc)
7.2.4.1 Upgrade Notice
All HR returns regardless of requested PC*MILER Version return the
larger V16 + format.
In Version 16 and 17, the ROUTEINFO portion of the HS return was
increased by 25 characters and the number of ROUTEINFO Sets per
response packet was decreased from four sets to three. Route Number
was increased 15 characters from 20 to 35 (Highway , Road or Street
Name), and Interchange City or Junction was increased 10 characters
from 28 to 38.
The previous format is shown on the next page.
Page 50

46
PC*MILER|AS/400 MVS User’s Guide
Format in previous versions:
ROUTEINFO 2 indicates end of route data for stop
2 state code
1 toll indicator
20 route number
4 leg mileage
28 for intersection city or junction
8 for cumulative leg miles
6 for cumulative stop miles
4 sets
6 directional (North, Turn L, etc)
Page 51

PC*MILER|AS/400 MVS User’s Guide
(MI)
47
7.2.5 Sample Request and Response Records
Sample records are shown below.
Sample State Miles (SM) request record:
State Mile request type
Output Queue Name
(“Q” plus job number)
SMQ208684 PM EN Y 0001 170 princeton,nj;1000 herrontown
road
san diego,ca
Destination city name and
state abbreviation
Practical routing | Report distances in Miles
Extended Format (required)
Region = N
orth America
Y = Override Restrictions (Light)
Sequence # for multiple responses
Origin city name and state
abbreviation;
street address only with
PC*MILER|Streets
*
Sample State Miles (SR) response record:
CP response record
precedes SR response
CPQ208684 PM M N L 0001 170 Princeton, NJ;1000 Herrontown Road
92138 San
Diego, CA, San Diego 0279104250306987
SRQ208684 PM M N L 0002 170
AZ004900000CA001690000IL001720000IN001570000MO002860000NJ000160000NM0037300
00OH002330000OK003550195PA003470
SRQ208684 PM N L 0003
TX001790000WV000130000
More State Miles in second SR output
record: TX, WV
“M” for “More”
indicates more
than one SR
record needed,
record to follow
State Miles: AZ, CA, IL, IN, etc.
Total miles, total time, total cost – see Miles
request and response description
Page 52

48
PC*MILER|AS/400 MVS User’s Guide
8.0 Using the PC*MILER AS/400 Mileage Server and Map
Window
Maps are not available in PC*MILER|AS/400 Multiple Version Switch.
8.1 Menus
All menu commands in PC*MILER for the AS/400 are described on the
following pages.
The File Menu
Using the File menu, you can open, close, save and duplicate routes;
print graphics and reports; and exit the PC*MILER program.
Delete AS/400 Input Queue
Exit
AS/400 Control
When a queue becomes corrupted,
creates a new queue and deletes the
corrupted one.
Exit PC*MILER AS/400. When you
exit, all active windows are saved as
they appear on your screen for the
next time PC*MILER AS/400 is
opened.
Configure the Mileage server for
different purposes. Choose from the
sub-menu:
Change Library/Queue: Location of
request/input queue. Default Library
is ALKMVS. Default Data Queue
Name is MIDQUE. Innovative users
use your ICC work library, IE:
ITRS6WORK or IESR7WORK. If you
want to display routes/trucks for
requests coming from this one PC
rather than for all requests, use your
Page 53

PC*MILER|AS/400 MVS User’s Guide
The Map View Menu
Not Available in PC*MILER|AS/400 Multiple Version Switch.
The Window Menu
Use the Window menu to control and organize the active windows in your
display.
Tile Vertical
49
AS/400 display name instead of
MIDQUE.
Mapping on: Not Available
Graphics for Mile Requests: Not
Available.
Log to File: Turn diagnostics on/off.
This is useful for debugging problems.
When on, diagnostics are written to a
file called as400.log, located in the
directory that the software is running
from (srv32.exe).
Host Polling Timer: Use faster time
slice to poll the AS/400 more often for
faster interactive response time, or
slower time slice for smoother graphic
display.
Force Pick List: Turns AS/400 pick
lists off/on for duplicate city names.
Activates lists for both large cities with
multiple ZIP codes and duplicate city
names.
Active windows will fit your screen,
running vertically.
Page 54

50
PC*MILER|AS/400 MVS User’s Guide
Tile Horizontal
Active windows will fit your screen,
running horizontally.
Display Serve Log
Restore the Serve Log window if
minimized.
Display Map
Restore the Display Map window if
minimized.
Page 55

PC*MILER|AS/400 MVS User’s Guide
51
9.0 Common Questions and Installation Problems
Question: PC*MILER works correctly when using the PCMILER command
on the AS/400, but my Innovative software does not work.
Answer: Run the CONFIG command on the AS/400 (which is
described in the manual) and type the Innovative work library
name I93WORK or ITSR5W012 (check with ICC). After this is
complete, check the File menu in the AS/400 Mileage Server,
choose AS/400 Control>Change Library Queue. Or you can
edit the PCMSERVE.INI or PMWSSRV.INI for Streets,
changing the LIBRARY=ALKMVS to LIBRARY=I93WORK and
then restart the AS/400 Mileage Server. Or re-install the
AS/400 windows CD and type I93WORK. Restart the
SERVER.
Question: PC*MILER works correctly when using the PCMILER
command but my McCormick software does not use the same
routing options such as Practical or Shortest.
Answer: The McCormick software was enhanced so that it uses the
mileage parameters that are set by our CONFIG utility. Some
McCormick sites do not have these enhancements. The user
should call McCormick about this problem.
Question: The Interactive PC*MILER screen crashes when I type in an
ICC Short City Code.
Answer: PC*Miler does a lookup in an ICC Cities database when you
use Short City Codes, a component program of PC*Miler
needs to be compiled with access to your Cities database.
The compile will fail unless you have ALKMVS and your
Innovative work and file libraries in your library list. Get a 400
command line and do a DSPLIB, make sure you have
ALKMVS and your two Innovative Libraries in your list. The
Innovative libraries are different from release to release. They
can be I93WORK and I93DATA, or ITSR4WORK and
ITSR4FILE, or ITSR5WORK and ITSR5FILE, or
ITSR6WORK and ITSR6FILE, or IESR7WORK and
IESR7FILE. If the necessary libraries are not in your list use
the ADDLIBLE command to add them. Then do a
WRKOBJPDM<space>ALKMVS. Do a 12 on QRPGSRC and
then a 14 on CITICC, say yes to replace existing member.
Page 56

52
Question: PC*MILER works correctly but my Innovative Print Missing
Answer: T he city spellings in the Innovative city file are different than in
Question: Some of the mileage returned from PC*MILER is different from
Answer: The city spelling or ZIP being used by the other software is
Question: When I change my queue name to "MIDQUE", my PC can't
PC*MILER|AS/400 MVS User’s Guide
Tariff miles is not returning miles for a few cities.
PC*MILER. Use the report from the Print Missing Tariff Miles
(which lists the city discrepancies) and type PCMILER from
the AS/400 command line. Now type the city code in, e.g.
OCOK (should be Oklahoma City OK) and press <ENTER>.
PC*MILER will indicate that it is not found. Now use the long
spelling of the city, for example ok* OK, to determine the
PC*MILER spelling. Press <F16> to invoke the ICC city
update program and correct the spelling for Oklahoma City
OK. After all the corrections are made, re-run the ICC Print
Missing Tariff Miles utility to update those missing miles.
the mileage returned by my other tr anspor tation softwar e.
probably not correct. To verify what place name is being sent
to PC*MILER, click on the Pick Pins icon and then on the
stop-off point in the mapping window. Now correct your
AS/400 cities file.
receive anything from the AS/400.
Answer: Make sure that you exit and restart the PC*MILER interactive
software on the AS/400. The PC*MILER program on the
AS/400 will detect the presence of the new queue and it will
send requests to this queue.
Question: The interactive response time has become slower on the
AS/400 since we have added several more users. Can we
improve the performance?
Answer: Yes. You can run multiple copies of the PC*MILER AS/400
program on the same PC if you have enough memory. Or if
you have another available PC, you can start up PC*MILER
AS/400 on the other PC.
Question: How can I run PC*MILER AS/400 on more than one PC?
Answer: Make sure that PC*MILER AS/400 is installed properly on
each PC. Additionally, set the queue name to MIDQUE so
that the multiple PC's are servicing the same queue.
Page 57

PC*MILER|AS/400 MVS User’s Guide
53
10.0 Technical Support
Technical support is available to registered users of PC*MILER AS/400
from 9:00am to 5:00pm EST, Monday through Friday. Call
(609) 683-0220, x303. Or e-mail us at pcmsupport@alk.com (type
“PCM/AS400” in the subject line).
Page 58

PC*MILER|AS/400 MVS User’s Guide
55
Appendix A: Backward Compatibility
ALK Technologies does support backward compatibility with previous
versions of PC*MILER and PC*MILER for the AS/400. However, it is not
advisable to develop new applications that use these short city name
structures, because you lose access to county information which is
necessary for resolving duplicate city name problems. Over time, this
backward compatibility becomes increasingly difficult for ALK
Technologies to maintain. Future backward compatibility is not
guaranteed.
If you would like more information about backward-compatible formats,
please contact the ALK technical support staff (see Chapter 10).
Page 59

56
PC*MILER|AS/400 MVS User’s Guide
Appendix B: Configuring an N/S Router For Use With
PC*MILER AS/400
Unless you have a twinax connection, configure your router using the
AnyNet protocol. AnyNet needs to be enabled on the AS/400 (see
Appendix D: Configuring AnyNet on the AS/400).
For PC*MILER Version 14 (or higher) and any PC*MILER|Streets version,
you must have the N/S Router version 3.0 or higher.
Check by selecting HELP > About in the NS/Administrator or the midrange
workspace. NOTE: If you need to upgrade your NS Router, you must
reinstall the PC*MILER AS/400 interface afterwards. The PC*MILER
interface is built on a specific Netsoft Data Queue DLL that is available
only on the PC*MILER interfaces CD.
To start the configuration, go to the N/S Administrator, right click on the
N/S Router, and choose Properties.
Page 60
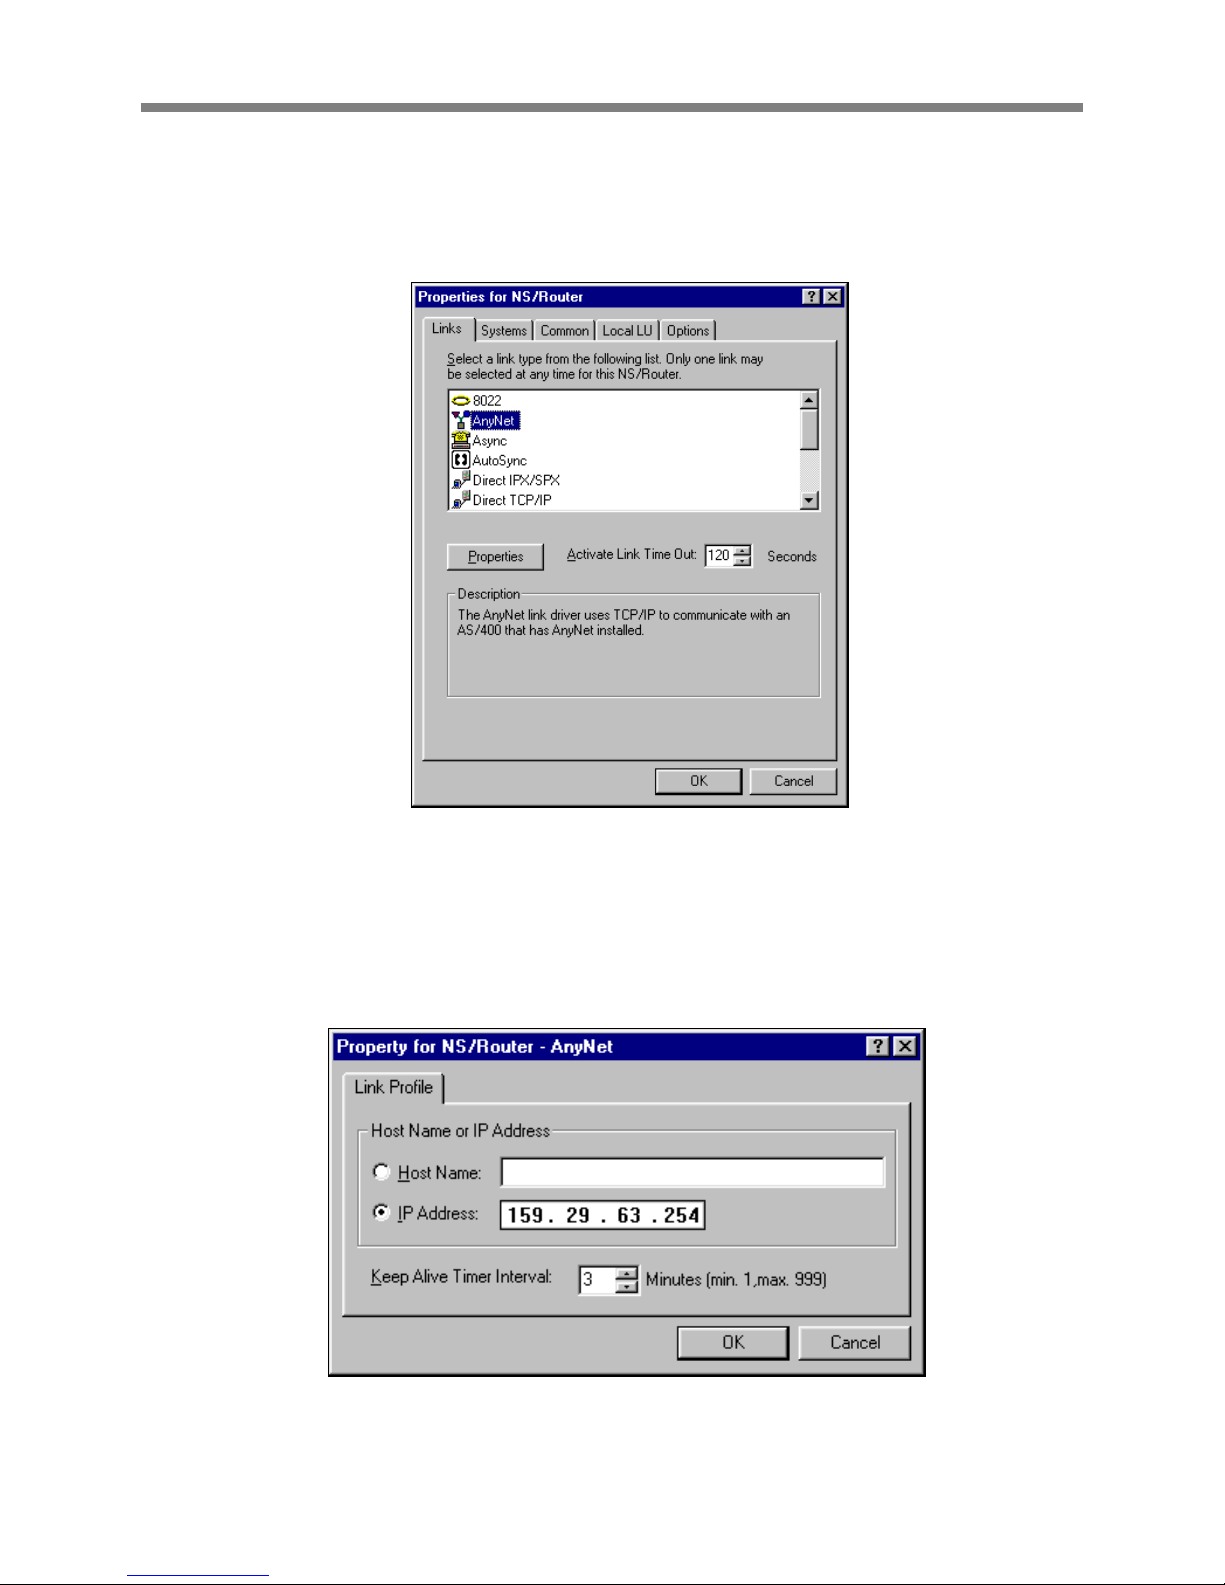
PC*MILER|AS/400 MVS User’s Guide
Then do the following:
1. In the Links Tab, highlight AnyNet, and then choose Properties.
57
2. In Properties, fill in the AS/400’s IP address. You can use a
system name, but if your host tables are not filled in properly,
you will be able to connect to the AS/400, but PC*MILER won’t
be able to create a Data Queue.
Page 61
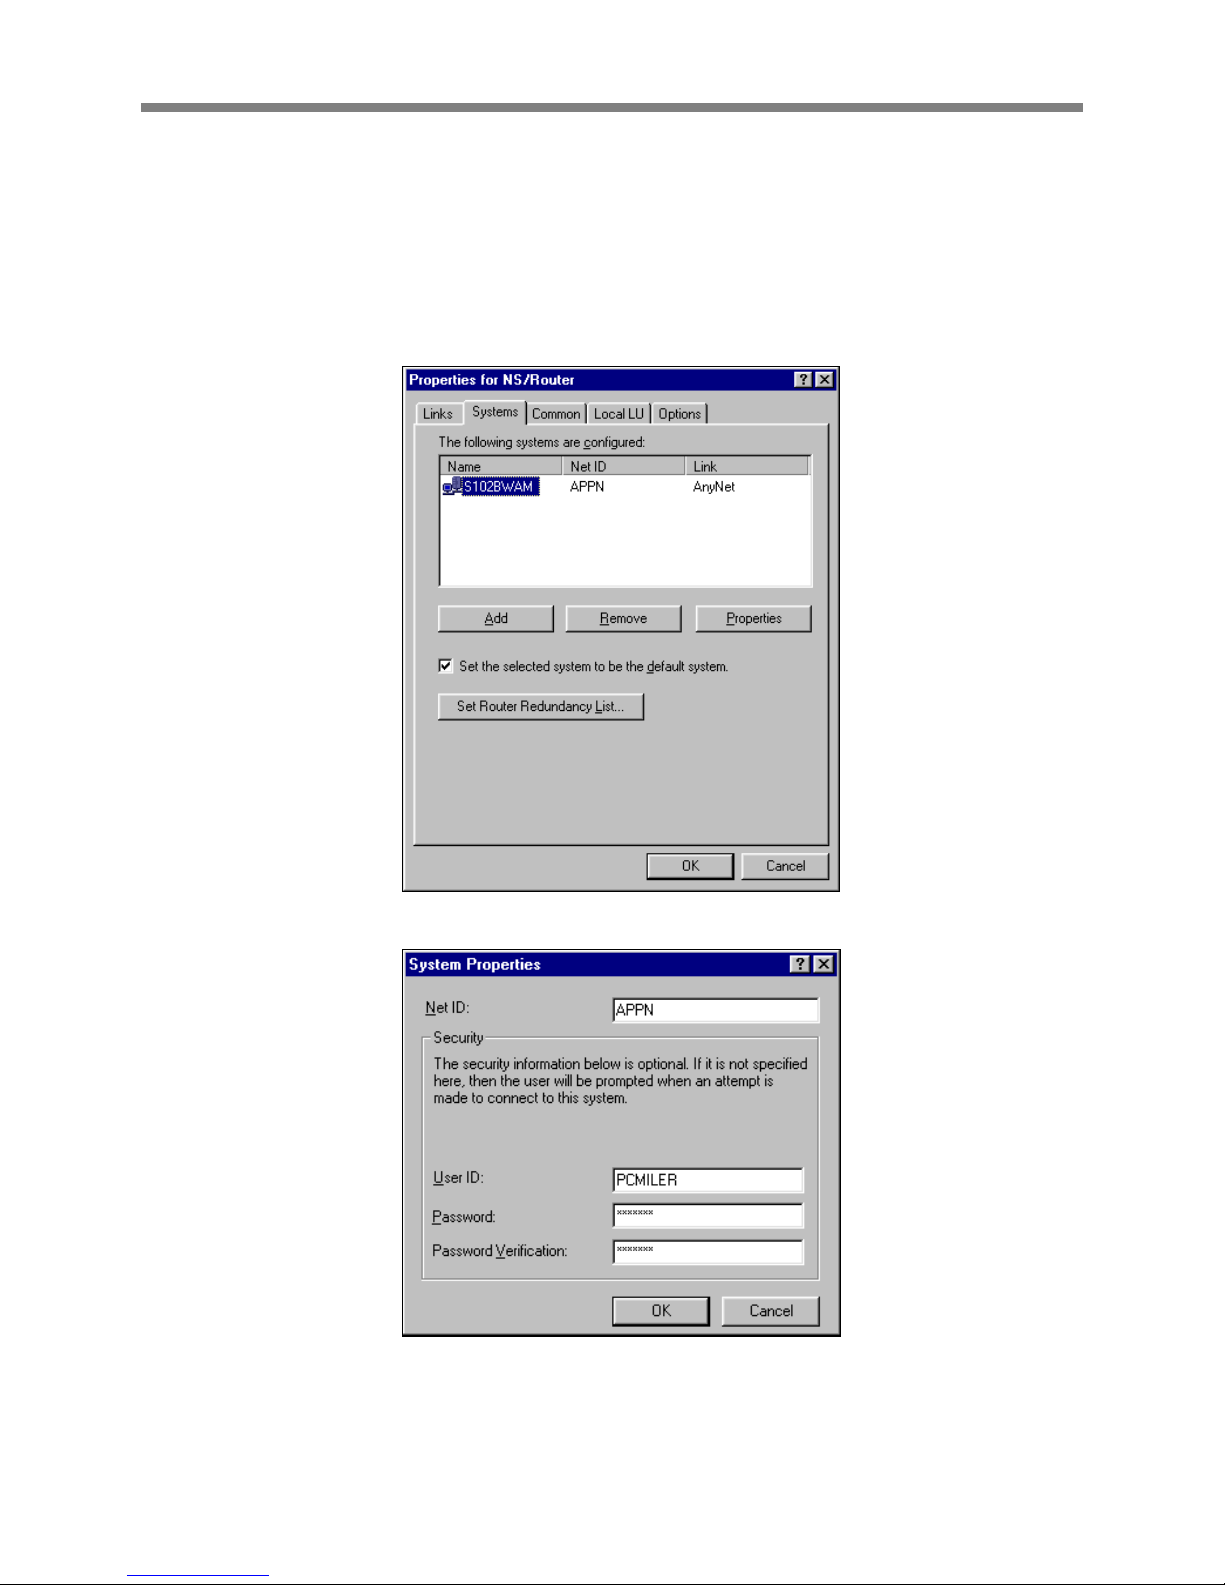
58
PC*MILER|AS/400 MVS User’s Guide
3. The Systems tab adds the AS/400’s system name. This is
where you set the password with which the router signs in.
Make sure that the password has not expired, and that the
account has object authority to the library where your mileage
request Data Queue will reside (usually ALKMVS or an
Innovative Work Library).
Page 62

PC*MILER|AS/400 MVS User’s Guide
4. In the local LU tab use the second option, Use a local specific
value.
59
These are the only changes you need to make. Leave the other settings
on the defaults.
Page 63

60
PC*MILER|AS/400 MVS User’s Guide
Appendix C: Configuring AnyNet On the AS/400
The following instructions are provided by NetManage.
1. Type the following command at the AS/400 command prompt:
CHGNETA ALWANYNET(*YES)
This value can only be changed when the AnyNet controller is
varied off. Vary on the controller to make the change effective.
You can check this attribute with the DSPNETA command, and
page down to the bottom.
2. Type the following command at the AS/400 command prompt:
CRTCTLAPPC CTLD(controller name) LINKTYPE(*ANYNW)
RMTCPNAME(same as controller name)
RMTNETID(*NETATR)
For (controller name), any name can be used. Only create
one AnyNet controller per 255 users. If multiple AnyNet
controllers are created, unpredictable results may occur.
For any further questions, see your AS/400 System Administrator’s User’s
Guide.
Page 64

PC*MILER|AS/400 MVS User’s Guide
61
Appendix D: Configuring Client Access Express To Work
With PC*MILER AS/400
1. Install Client Access Express on your mileage server PC by running the
setup.exe that is in the Express folder on your Client Access Express CD.
2. Go to the AS/400 Operations Navigator. For new installations, the
Navigator will prompt to ask if you want to add a connection. You will need
to know the IP Address of your AS/400 and the System Name if you want
to configure your connection using the AS/400 System name. You will
have to make a table entry in the PC’s Hosts File. For NT or Windows
2000, the file is C:\winnt\system32\drivers\etc\hosts. For 95/98,
c:\windows\hosts.sam.
Here we are adding an AS/400 called S102BWAM, you can also use the
IP address of your AS/400.
Page 65

62
For existing installations of Client Access Express, go into the AS/400
Operations Navigator and right mouse click on your AS/400 connection.
Choose Properties to make changes or Verify to verify a connection.
PC*MILER|AS/400 MVS User’s Guide
The Connection Properties Window is used for changing existing
connections or changing the Restart Settings for new connections.
⇒
⇒ NOTE: Client Access Express has the ability to change passwords in the
⇒⇒
user profile. If you are prompted for a new password, you will be making
a permanent change in that user profile.
Page 66

PC*MILER|AS/400 MVS User’s Guide
63
3. Password Considerations - There are several areas to consider with a
Client Access Express installation. Client Access Express offers three
Password options. You can choose to have the PC logged on manually to
the AS/400, have Client Access Express use the Windows User Name
and Password, or you can specify a user profile and have the password
typed in as needed.
The default user ID is the User Profile that the mileage server PC will be
signing on to. This user will need the authority to create and delete data
queues in either the ALKMVS Library or your Innovative Work Library.
If you choose to use the Windows User and Password, you have to have
the Windows User Name and Password match the user profile and
Password that you will be using f or your mileage server PC to sign onto
the 400 with. The Windows User and password must exactly match those
in the user profile you are using.
In the event of a power loss, the PC will not connect to the AS/400 until
someone manually types in the Windows password. To get a PC to restart
without prompting for a password, you have to set the Windows Password
to nothing. AS/400 security does not allow a null password. So if you
want the mileage server PC to reconnect automatically after a power
outage, you cannot use the Windows Password option.
Page 67

64
If you want to have an unattended restart, your only option with Client
Access Express is to store the User Profile Name and Password in the
mileage server’s .ini file. At this time, the password is not encrypted, but it
is stored as text.
PC*MILER|AS/400 MVS User’s Guide
For auto-restart, you will also have to make the above settings in the
Connection Properties dialog. (For new connections, right mouse click on
your connection in the AS/400 Operation Navigator, and choose
properties to get this screen.)
Page 68

PC*MILER|AS/400 MVS User’s Guide
65
4. Verify the connection. If a connection cannot be made, contact IBM for
assistance.
Page 69

66
PC*MILER|AS/400 MVS User’s Guide
Appendix E: The Sleep Feature For NS Router Installations
The Sleep Feature has been added to correct an issue in which the NS
Router does not reliably reconnect to the AS/400 after an IPL or power
down. There should be no need to use this feature when you are using a
Client Access Express connection.
To activate the sleep feature, you need to send a message to the PC
mileage server (SRV32.exe).
Included in your ALKMVS Library is a CL program called “queue”. For
queue to work you must have ALKMVS in your library list. You may have
to compile the queue if you do not have the program – use the command
WRKOBJPDM, with 12 on QCLSRC and 14 on queue.
The syntax for queue is:
Queue<space>(’SP60’)
where 60 is the number of seconds that you want the mileage server to
sleep for. (NOTE: Queue is case sensitive, the SP has to be in caps.)
To put the mileage server to sleep for a 3-hour period before an IPL, you
would have to run this command (with ALKMVS in your library list):
Call ALKMVS/queue<space>(‘SP10800’)
The sleep process only works if the only thing using the NS Router is one
mileage server. You can’t be running Netsoft Green Screens, or more
than one mileage server. The sleep feature sends a message to the NS
Router to disconnect its conversations with the AS/400. The sleep
command can only disconnect its own connections, having other active
connections causes the process to fail.
You will need to test the sleep feature. On your mileage server, set up
your screen so you can watch both the Router (Midrange Workspace) and
the mileage server’s Server Log (SRV32.exe).
To get the Midrange Workspace up, double-click the small overlapping
white & purple squares icon that resides by the system clock. You can
also press and hold down the ALT key and press and release the TAB key
until the Midrange Workspace NS/Router Icon is selected, and then
release both keys.
Page 70

PC*MILER|AS/400 MVS User’s Guide
67
To get the AS/400 mileage server screen, you can click on SRV32 on
your tool bar. You can also press and hold down the ALT key, and press
and release the TAB key until the AS/400 Server – PC*MILER icon is
selected, and then release both keys. To bring up the Server Log, click
on the Bart’s Windows pull-down menu, or press ALT-W and choose
Display server Log.
From a green screen on another PC or terminal, run PC*MILER and run a
route from 10001 to 90009 to make sure that it is working. Watch the
PC*MILER AS/400 Server’s server log. You should see those ZIP codes
show up in a line that starts out “input=…” This test is to ensure that you
are working with the correct mileage server, and that it is working properly.
Now exit the green screen PC*MILER and send a 60-second sleep
command:
Call queue<space>(‘SP60’) press <ENTER>.
Watch the server log to see that it catches the sleep message. Also
watch in the Midrange Work Space that the number of conversations
drops to zero. Finally, the mileage server should wake up and reconnect
with the mileage server; the number of conversations in the Midrange
Work Space should go up to 2.
Now go back to the green screen PC*MILER and send another mileage
request to test that the re-established connection is working properly. If it
is working now, you can use this feature before your ipl’s or power downs.
Be sure to put it to sleep for a long enough period of time. If Bart wakes
up too early (before the AS/400 is back up) it won’t be able to connect.
Be sure to leave enough time between sending the sleep command and
starting the ipl or power down. Bart needs time to disconnect the router
before the router senses the AS/400 dropping out or the process fails.
Page 71

68
PC*MILER|AS/400 MVS User’s Guide
Appendix F: PC*MILER|AS/400 Multiple Version Switch INI
Settings
PC*MILER|AS/400 Multiple Version Switch uses multiple INI files.
AS400.exe uses Srv32.INI and Pcmmv.INI.
Each instance of PC*MILER|TCP/IP Connect uses its own Pcmserve.INI
Srv32.INI is used for startup information. Pcmmv.INI is used to store the locations of
your various instances of PC*MILER|TCP/IP Connect.
Srv32.INI and Pcmmv.INI have to be kept in synch at all times. Changes to the values
under the [MultiVersion] Key in Srv32.INI have to be mirrored in Key names in
Pcmmv.INI.
For example, from Srv32.INI:
[MultiVersion]
Product0=PCMiler 140 ÅMaps to [PCMiler 140] in Pcmmv.INI
Product1=PCMiler 150 ÅMaps to [PCMiler 150] in Pcmmv.INI
Product2=PCMiler 160 ÅMaps to [PCMiler 160] in Pcmmv.INI
Product3=PCMiler 170 ÅMaps to [PCMiler 170] in Pcmmv.INI
In Pcmmv.INI:
[default]
product=PCMiler 150 Å This must match one of the Products listed above.
The default instance of PC*MILER|TCP/IP Connect is only used if a mileage request
Has no version specifed (blanks in MVS parameter). An error will be returned for any
other
Invalid version request.
SRV32.INI Explained:
[Defaults]
; Default values: valid values are listed after the description
; Leave values blank to use the following internal defaults:
; CalcType=Practical ÅRoute Type
; Units=Miles ÅDistance Units Miles or Kilometers
; ChangeDest=TRUE ÅRoute Through All on Trip Resequence
; HubMode=FALSE Å Lock in Hub mode. (Use with Caution)
; AlphaOrder=TRUE ÅList States alphabetically versus in drive through order in
reports.
; IP Address or System Name of AS/400
system=
;User Profile
user=
Page 72

PC*MILER|AS/400 MVS User’s Guide
69
;Password
pass=express
library=ALKMVS <Location of request Queue (Midque) and Temporary Response
Queues
qname=MIDQUE
PICKLIST=FALSE Å Force Pick list for cities with multiple zip codes and for partial
matches
SLEEPTIME=300 Å Used for NS Router Connects during IPL’s
FrameTrip=FALSE ÅNot used
DIAG=TRUE Å Turn on logging
Borders=FALSE ; ÅFalse Cross International Borders only for International Stops
Timer= Å Time between reads of request queue.
Mapping=FALSE ÅNot Supported
ExpMap= ÅNot Supported
ExitWin= ÅNot Supported
[Options]
CustomRoute= ÅObey Avoids/Favors and Restriction Overrides set in pcmwin32.exe.
[Default]
Region=NA
ProductName=MultiVersion AS400
ProductVersion=1.0
; Must Point to the location of pcmmv.dll
DLLPath=C:\alkmvs
[MultiVersion]
; Values Here Must Match Key Names in PCMMV.INI..............
; Values Must Be Formatted as
; Name<space>###
; Where ### is 040 for Streets 4.0 and as follows
; 140 141 150 151 160 161 170 171 et cetera
Product0=PCMiler 140
Product1=PCMiler 150
Product2=PCMiler 160
Product3=PCMiler 170
Each instance of PC*MILER|TCP/IP connect has it’s own pcmserve.ini
file in that version’s ..\Tcpip folder. Values specified in pcmserve.ini will be
used unless they are otherwise specified in the mileage request packet
(included at the bottom of the chart).
Page 73

70
These values will only be used if they are not specified by the calling
application.
Valid values for default and option settings in the pcmserve.ini that can be
changed by the user are described below.
Key
PC*MILER|AS/400 MVS User’s Guide
Valid Values
Description
(Defaults)
[Defaults]
CalcType Practical
Units Miles
Kilometers
ChangeDest TRUE
FALSE
Borders TRUE
FALSE
HubMode TRUE
FALSE
AlphaOrder TRUE
FALSE
Set In Srv32.InI
What unit of measure should
distance be shown in.
When optimizing the route,
should the trip’s destination
be optimized also.
Set in Srv32.InI
Should the engine try to keep
routes within the United
States (F), or can they cross
and recross the borders at will
(T).
Calculate the routes from the
origin to each stop (T), not
through each stop (F).
List the states in the State
Report in alphabetical order,
or in the order driven.
FerryMiles
[Options]
OnRoad TRUE
FavorMajor
Roads
TRUE
FALSE
FALSE
TRUE
FALSE
Use ferry distances in
mileage and cost calculations
(T), or don’t use (F).
Show latitude/longitudes on
the nearest road segment, or
at their true locations.
Attach latitude/longitudes to
larger, more important roads,
or to the nearest road
segment.
Page 74

PC*MILER|AS/400 MVS User’s Guide
71
CustomRoute TRUE
FALSE
HazRoute
(for
PC*MILER|
Hazmat addon only)
None
General
Explosive
Inhalant
Radioactive
Should PC*MILER|Connect
use Custom routing.
The default hazardous routing
type: disabled, general
material, explosive material,
inhalant material, or
radioactive material.
Pcmmv.INI
[PCMiler 140]
address=127.0.0.1 ÅIp Addpress of Computer Name
port=8014 Å Port Number that specified when PC*MILER|Tcpip Connect was
started.
[PCMiler 150]
address=127.0.0.1
port=8015
[PCMiler 160]
address=127.0.0.1
port=8016
[PCMiler 170]
address=127.0.0.1
port=8017
[default] Å Used if Version Parm populated with blanks.
product=PCMiler 150
Page 75

72
PC*MILER|AS/400 MVS User’s Guide
Appendix G: AS400.LOG Error Codes
To create a log file of all mileage server input and outputs, click on the
mileage server’s File menu>AS/400 Control and choose Log to file. The
file created is c:\pmw170\as400\as400.log. AS400.log displays requests
and responses in the exact format as they are received and sent by the
mileage server. It is recommended that logging only be used for
diagnostic purposes, as the log files get quite large.
PC*MILER Error Codes:
Error Codes Value Message
PCMS_INVALIDPTR 101 Invalid pointer
PCMS_NOINIFILE 102 The INI file was not found
PCMS_LOADINIFILE 103 Could not load the INI file
PCMS_LOADGEOCODE 104 Could not load location database
PCMS_LOADNETWORK 105 Could not load the network database
PCMS_MAXTRIPS 106 Too many open trips (limit of 8)
PCMS_INVALIDTRIP 107 Invalid trip ID
PCMS_INVALIDSERVER 108 Invalid server ID
PCMS_BADROOTDIR 109 Could not find RootDir setting in INI
file
PCMS_BADMETANETDIR 110 Invalid PCMNetDir setting
PCMS_NOLICENSE 111 License infraction: too many users, or
licenses not found
PCMS_TRIPNOTREADY 112 The trip is not ready to calculate
PCMS_INVALIDPLACE 113 Invalid place name (city, state not
found)
PCMS_ROUTINGERROR 114 Calculation failed: portions of trip are
invalid
PCMS_OPTERROR 115 Optimization failed: portions of the
trip are invalid
PCMS_OPTHUB 116 Cannot optimize a trip in HUB mode
PCMS_OPT2STOPS 117 Not enough stops to optimize the trip
PCMS_OPT3STOPS 118 Not enough stops to optimize without
changing destination
PCMS_NOTENOUGHSTOPS 119 Not enough stops to calculate the trip
PCMS_BADNETDIR 120 Bad network directory
PCMS_LOADGRIDNET 121 Error loading gridded network
PCMS_BADOPTIONDIR 122 Bad option directory
PCMS_DISCONNECTEDNET 123 Disconnected network
PCMS_NOTRUCKSTOP
PCMS_INVALIDREGIONID
124
125
Truck inaccessible stop
Invalid region ID
Page 76

PC*MILER|AS/400 MVS User’s Guide
PCMS_CLOSINGERROR 126 Server did not shut down
PCMS_NORTENGINE 127 Server could not properly
PCMS_NODATASERVER 128 Server could not properly
PC*MILER|Streets Error Codes:
Error Codes Value Message
PCMS_INVALIDPTR 101 Invalid pointer
PCMS_NOINIFILE 102 The INI file was not found
PCMS_LOADINIFILE 103 Could not load the INI file
PCMS_LOADGEOCODE 104 Could not load location database
PCMS_LOADNETWORK 105 Could not load the network database
PCMS_MAXTRIPS 106 Too many open trips (limit=8)
PCMS_INVALIDTRIP 107 Invalid trip ID
PCMS_INVALIDSERVER 108 Invalid server ID
PCMS_BADROOTDIR 109 Invalid RootDir setting in INI file
PCMS_BADMETANETDIR 110 Invalid MetaNetDir setting in INI file
PCMS_NOLICENSE 111 License infraction: too many users, or
PCMS_TRIPNOTREADY 112 The trip is not ready to calculate
PCMS_INVALIDPLACE 113 Invalid place name (city, state not found)
PCMS_ROUTINGERROR 114 Calculation failed: portions of trip are
PCMS_OPTERROR 115 Optimization failed: portions of the trip
PCMS_OPTHUB 116 Cannot optimize a trip in HUB mode
PCMS_OPT2STOPS 117 Not enough stops to optimize the trip
PCMS_OPT3STOPS 118 Not enough stops to optimize without
PCMS_NOTENOUGHSTOPS 119 Not enough stops to calculate the trip
PCMS_BADNETDIR 120 Bad network directory
PCMS_LOADGRIDNET 121 Error loading gridded network
PCMS_BADOPTIONDIR 122 Bad option directory
PCMS_DISCONNECTEDNET 123 Disconnected network
PCMS_NOTRUCKSTOP
PCMS_INVALIDREGIONID
PCMS_CLOSINGERROR 126 Closing error
73
properly
initialize internal routing
component
initialize internal routing
component
licenses not found
invalid
are invalid
changing destination
124
125
Truck inaccessible stop
Invalid region ID
 Loading...