

Page 1

Gloss Meter
Do not use the device in inammable and
PCE Americas Inc.
OPERATION MANUAL
GLOSS METER
PCE-IGM / SGM Series
711 Commerce Way
Suite 8
Jupiter
FL-33458
USA
From outside US: +1
Tel: (561) 320-9162
Fax: (561) 320-9176
[email protected]
www.pce-instruments.com/english
www.pce-instruments.com
Safety Instructions
Attention: The instrument is a safe device. Before operating, please read the
safety instructions and strictly comply with the following terms to avoid
unexpected damages. We shall not be liable for any losses by incorrect
operation.
Battery The device congures a built -in battery.
Please use the original one. Do not use
other batteries to prevent unnecessary
damages.
Do not dis assemble, extrude or heat the
battery.
When fully charged, please cut o the
external power supply in time.
Please charge the battery biweekly if long
time not use. Otherwise, it may cause the
damage of the battery.
For the rst three times, please run out the
power and charge full to ensure the
battery reach the optimal state.
External Power
Source
Please use the original power adapter
when charging. Otherwise, it will shorten
the battery life or cause explosion.
Please cut o the external power sour ce if
you don't use it for a long time.
PCE Instruments UK Ltd.
Units 12/13
Southpoint Business Park
Ensign way
Hampshire / Southampton
United Kingdom, SO31 4RF
From outside UK: +44
Tel: (0) 2380 98703 0
Fax: (0) 2380 98703 9
explosive environment.
Do not disassemble the device which will
cause damage explosion.
Please stop using the machine when you
smell something burning and send it back
to repair center.
Page 2

Content
Introduction
Cautions
1 External Structure Description
2 Operating Instruction
2.1 Turning On/Off
2.2 Calibration
2.2.1 Calibration
2.2.2 Change Calibration Value
2.3 Measurement
2.3.1 Basic Mode
2.3.2 Statistical Mode
2.3.3 Continuous Mode
2.4 Connecting to PC
2.5 Print
3 System Function Description
3.1 Data Management
3.1.1 Check Record
3.1.2 Delete Record
3.2 Mode Selection
3.3 Mode Parameter
3.3.1 Average Measure under Basic Mode
3.3.2 Statistical Mode Parameter
3.3.3 Continuous Mode Parameter
3.4 Angle Selection
3.5 Tolerance Setting
3.6 Function Setting
3.6.1 Auto Save
3.6.2 Time Setting
3.6.3 Language Setting
3.6.4 Backlight Time
3.6.5 Backlight Brightness
3.6.6 Operation Habit
3.6.7 Buzzer Switch
3.6.8Restore Factory Settings
4 Routine Maintenance
5 Technical Specifications
Page 3

Introduction
The gloss meter is in accordance with IS0 2813(International Standard) and
GB/T 9754(China National Standard). The gloss meter features with large
tough screen and QC software. It has the characters of easy to use, stable
performance and precise measurement. This instrument is powered by built-in
Li-ion battery.
Advantages
1. Large touch screen (3.5inch), high resolution (480*320), full-view display.
2. Comply with ISO 2813, ASTM D 523, GB/T 9754 standards.
3. Aesthetic design perfectly combined with ergonomics structure.
4. Three measurement angles (20°, 60°, 85°) , can measure
simultaneously(except the single-angle gloss meter).
5. Three operating modes, multi-functions setting.
6. QC software with powerful extending function.
7. Input standard data manually, easy to operate.
8. High hardware configuration with multiple innovative technologies.
9. Auto power-off function to save electricity consumption.
Cautions
1. The gloss meter is a precise measuring instrument. Please avoid dramatic
change of external environment when measuring. Those changes including
the flicker of surrounding light, the rapid change of temperature and humidity
will affect the measuring accuracy.
2. Keep the instrument balanceable. Make sure the measuring aperture cling
to the test sample, and no shaking or shifting when measuring. Please prevent
the gloss meter from fierce collision or crash. This device is not water-proof.
Do not use it in the environment of high humidity or in the mist.
3. Keep the device clean. Avoid dust, powder or solid particles entering the
measuring aperture and the devices.
4. After using, please turn it off. Keep the instrument and calibration board in
the instrument case.
5. Users can not do any changes on the device without permission. Since it
may affect measuring accuracy or even damage the device.
Page 4

1. External Constructions
Indicator Light
RS-232/USB
ProtectiveCover
LCD Screen
Switch/Measure
Button
Interface
(Calibration Plate)
Figure 1 External Constructions
Button Function Instruction
LCD Screen: Display measuring data and instrument operation navigation.
Switch/Measure button: Long-press the button 3 seconds to turn on or turn off
the gloss meter. Short press the button is to measure.
Indicator Light: When turning on, it will show green light. After startup, the light
is off. Low power and charging status will show red light. Fully charged will
show green light.
USB interface: This interface is a common interface. The instrument
automatically judges the connection status. USB interface is used to connect
transfer data to PC. RS-232 interface is used to connect to the printer. USB
cable can connect power adapter and computer for charging the gloss meter
(specification for external adapter is: 5V=2A).
Protective Cover (Calibration plate): It is to protective the measuring aperture.
Built-in calibration plate is used for instrument calibrating.
Attention: The method to separate the protective cover from the instrument is
shown in figure 2. Hold the instrument with one hand, the other hand hold the
protective cover, and then separate it according to the “Open” mark. You only
need to separate it from one side. Do not separate it from two sides.
Page 5
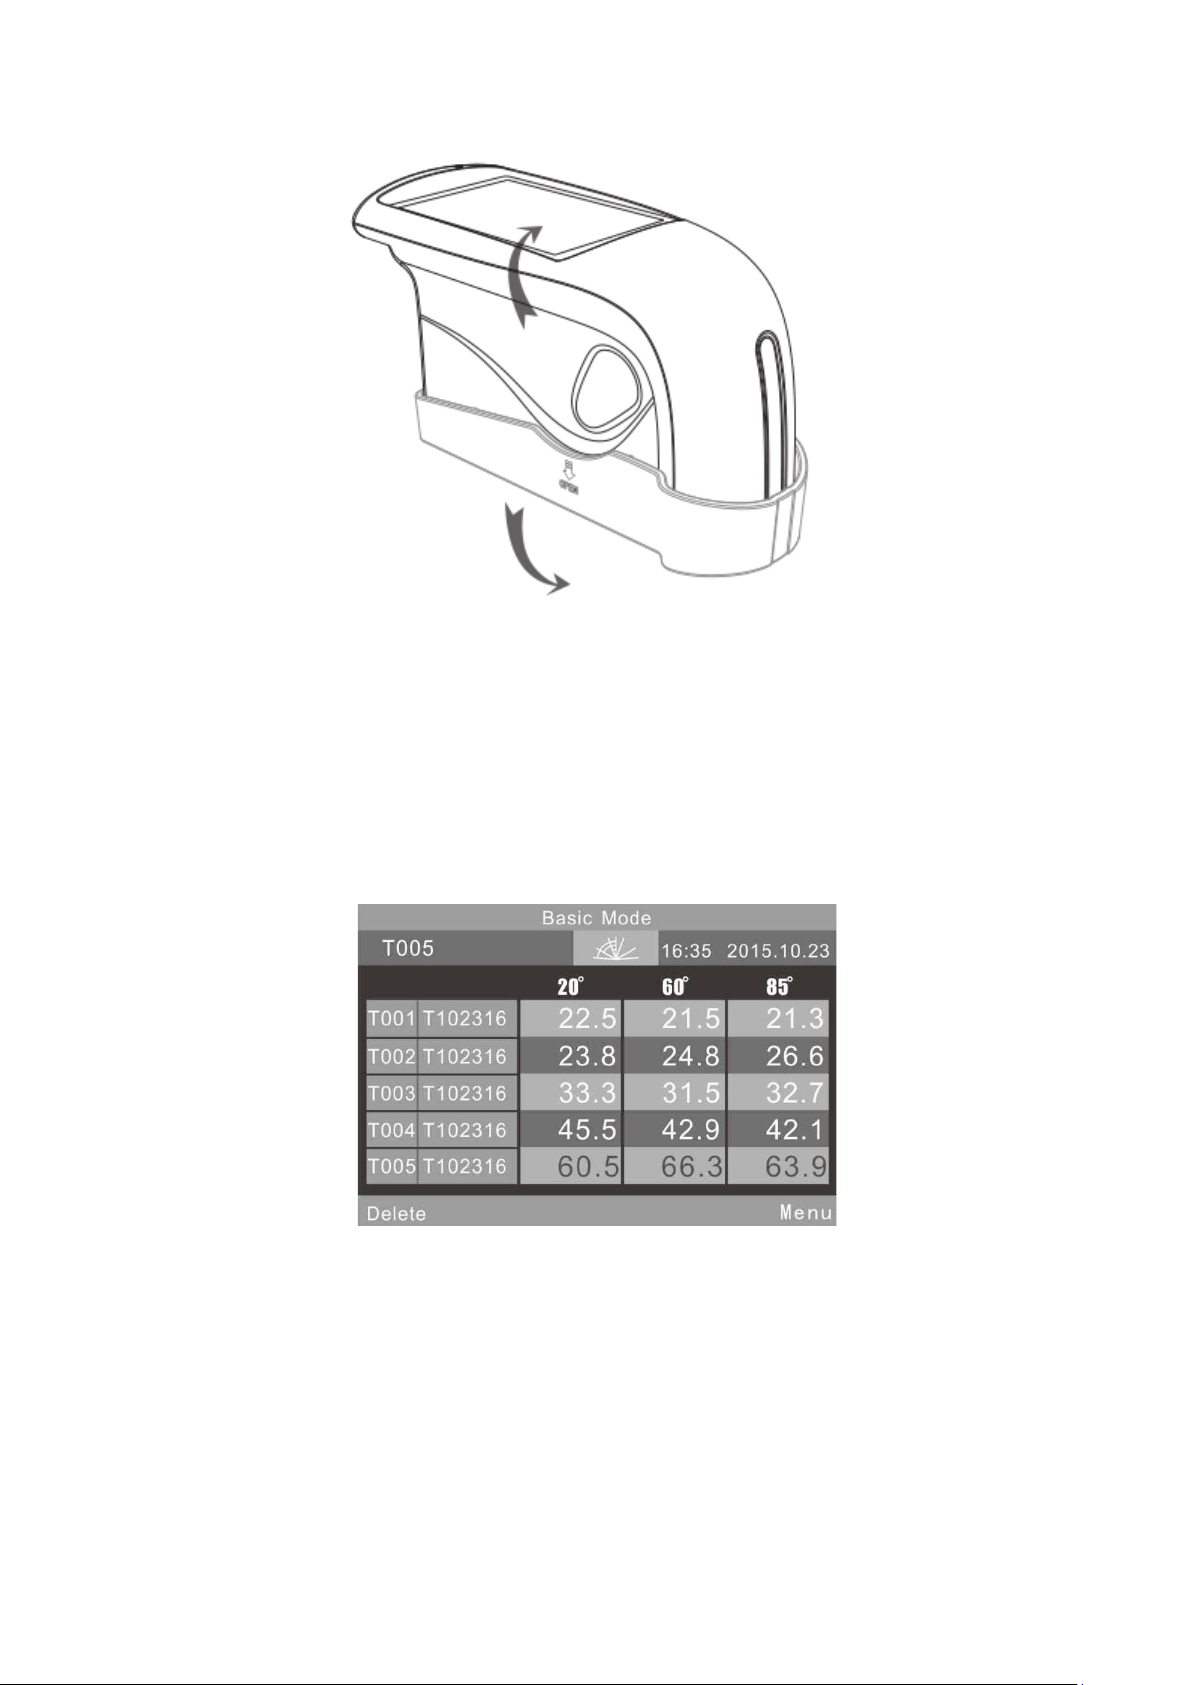
Figure 2 Separation Method
2. Operating Instruction
2.1Turn on/off
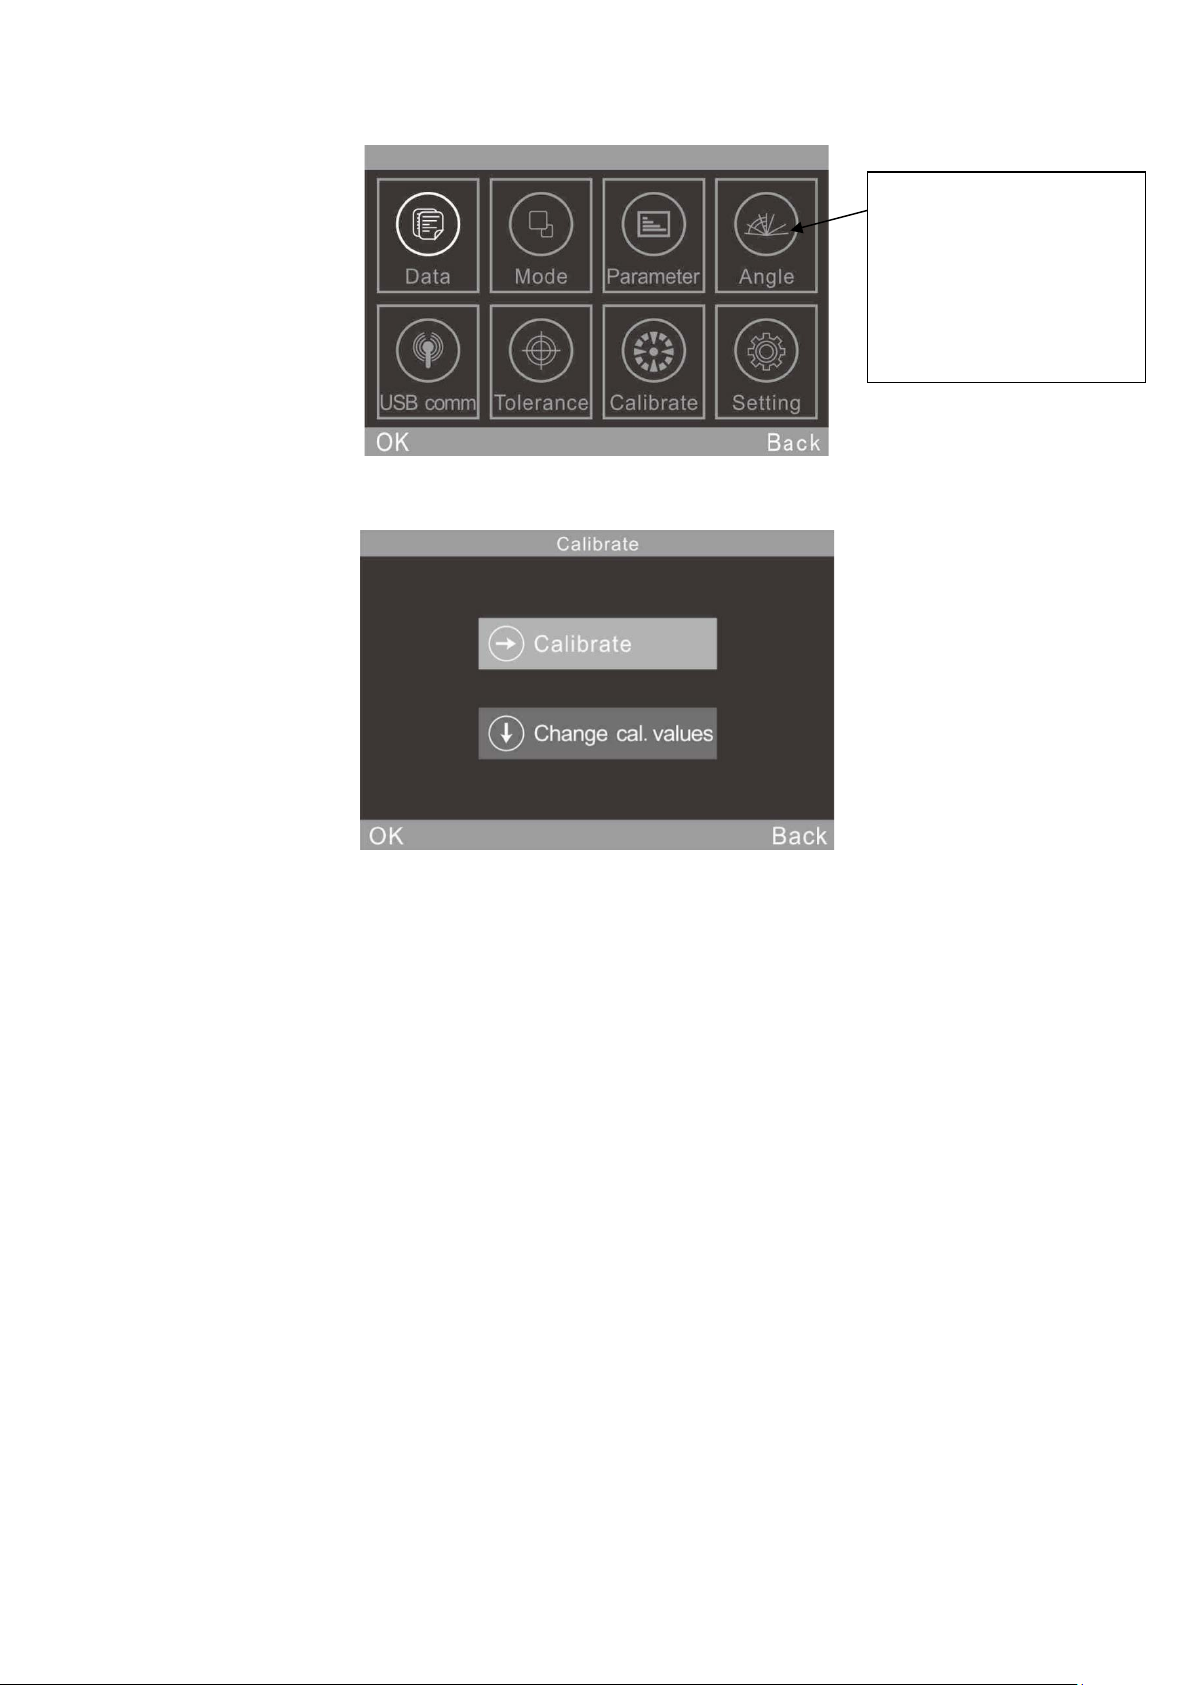
Long-press the switch button 3 seconds to turn on the instrument. The LCD
screen will display boot logo. After a few seconds, it will enter into the
measurement interface automatically, as shown in figure 3. Long-press the
switch button 3 seconds again, it will be turn off.
Figure 3 Standard Mode Measurement
2.2 Calibration
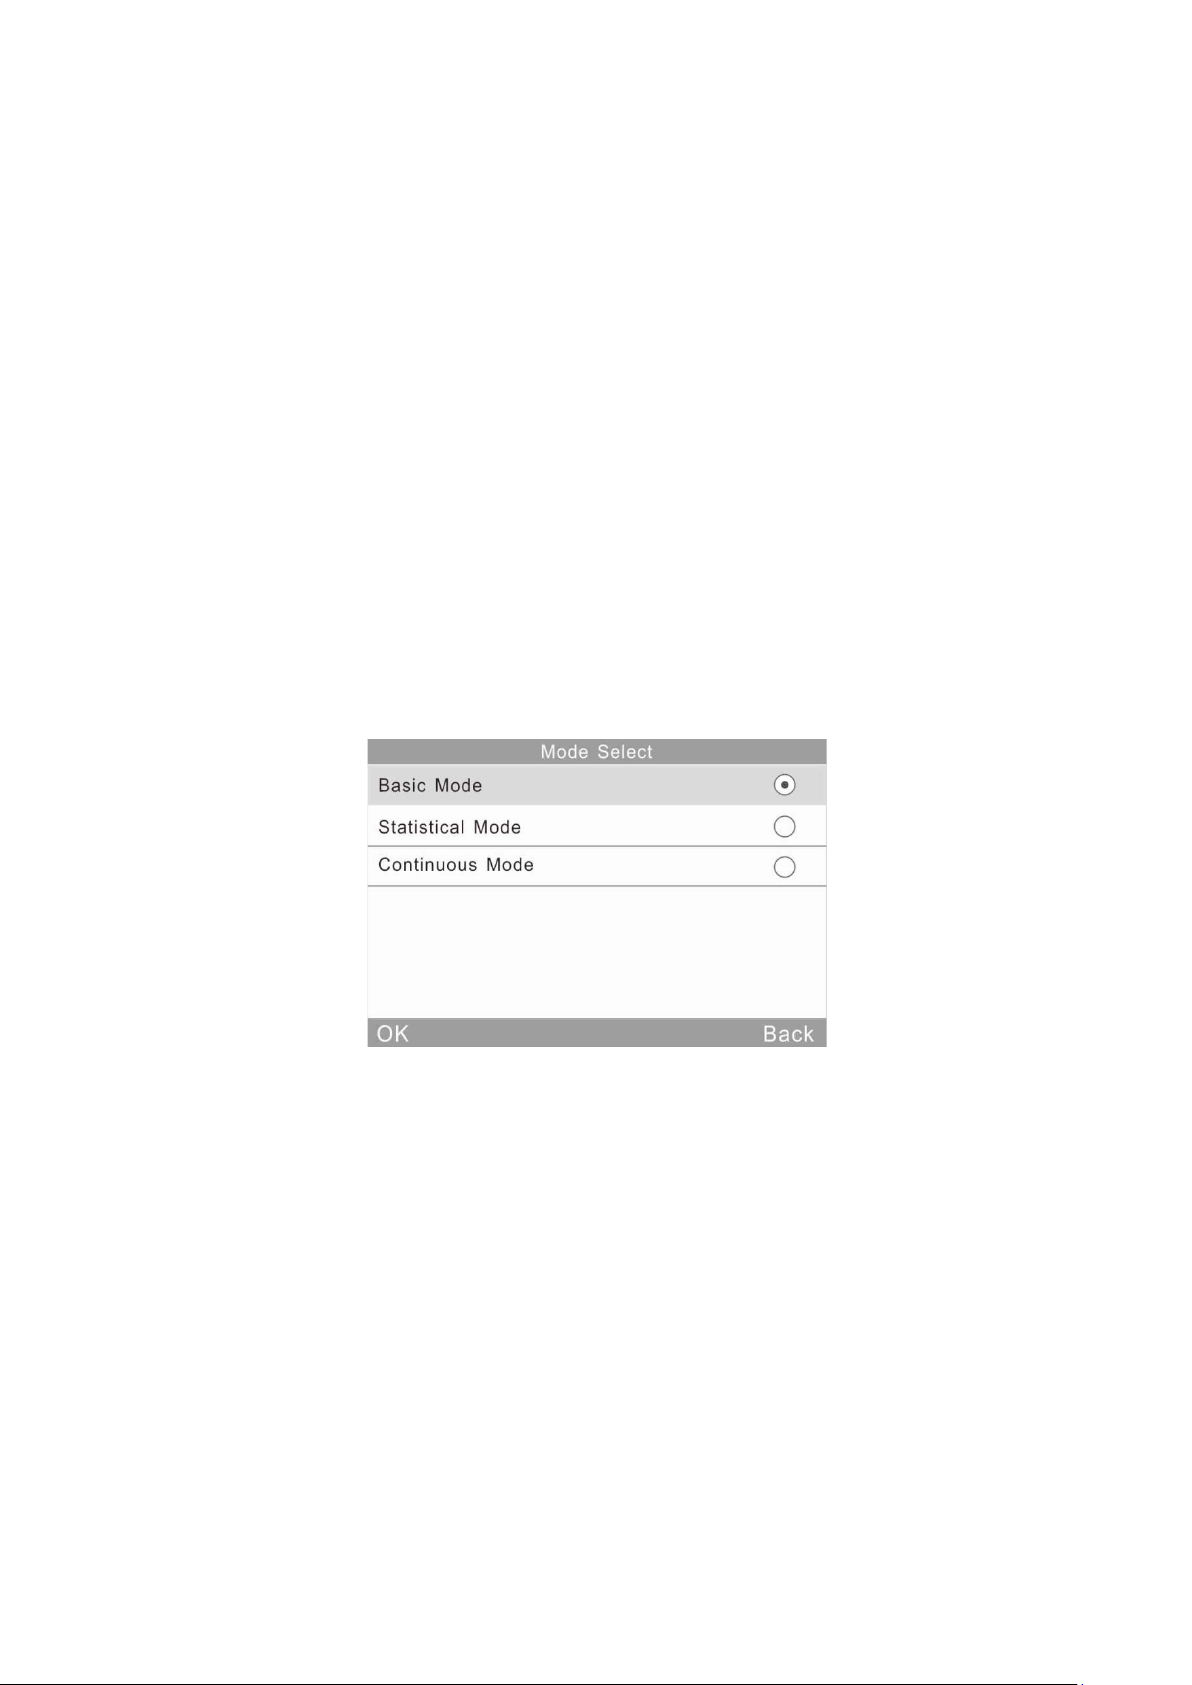
In figure 3, click “Menu” to get into main menu as shown in figure 4.
Select “Calibration” to enter into Calibration interface as shown in figure 5.
Page 6
Remarks: Single angle
gloss meter doesn’t
have angle selection
option. The substitute
option is basic mode
2.2.1 Calibration
Click “Calibrate”, it will remind you to put away the calibration plate. Make sure
the calibration plate is installed well on the instrument. Click “OK” or press
measure button to start calibration.
When operating environment change (such as the rapid change of
temperature, altitude and humidity), it must do calibration. In order to ensure
the accuracy, please use the original standard plate for calibration. The dust on
the standard plate will affect calibration accuracy. Please clean the standard
plate and ensure it’s clean when calibrating.
The Standard plate is a precise optical component. Please avoid it from strong
light. Due to environment factors, the gloss value of standard plate will change
over time. Therefore, it’s better to send it back to the factory or qualified local
National Institute of Metrology for the calibration. (Once a year)
Attention: The SN code (serial number) corresponds to the internal number of
the instrument. In the calibration interface, it will show the “Calibration Plate
Number”. It is more important when you have 2pcs or more gloss meters in
average measurement.
Figure 4 Main Menu
Figure 5 Sub-menu Interface for Calibration
Page 7
hand.
2.2.2 Change Calibration Values
Click “Change cal. values”, users can select “Change 20° cal. value”, “Change
60° cal. value” and “Change 85° cal. value”.
Attention:
1. Take caution in operating this function. It’s better to operate by
manufacturer or qualified metrology institutes. The calibration value needs to
be modified only when it is different from the actual calibration plate value.
Before modifying the standard value, please backup the original standard
value.
2.Single angle instrument only can modify one angle value.
2.3 Measurement
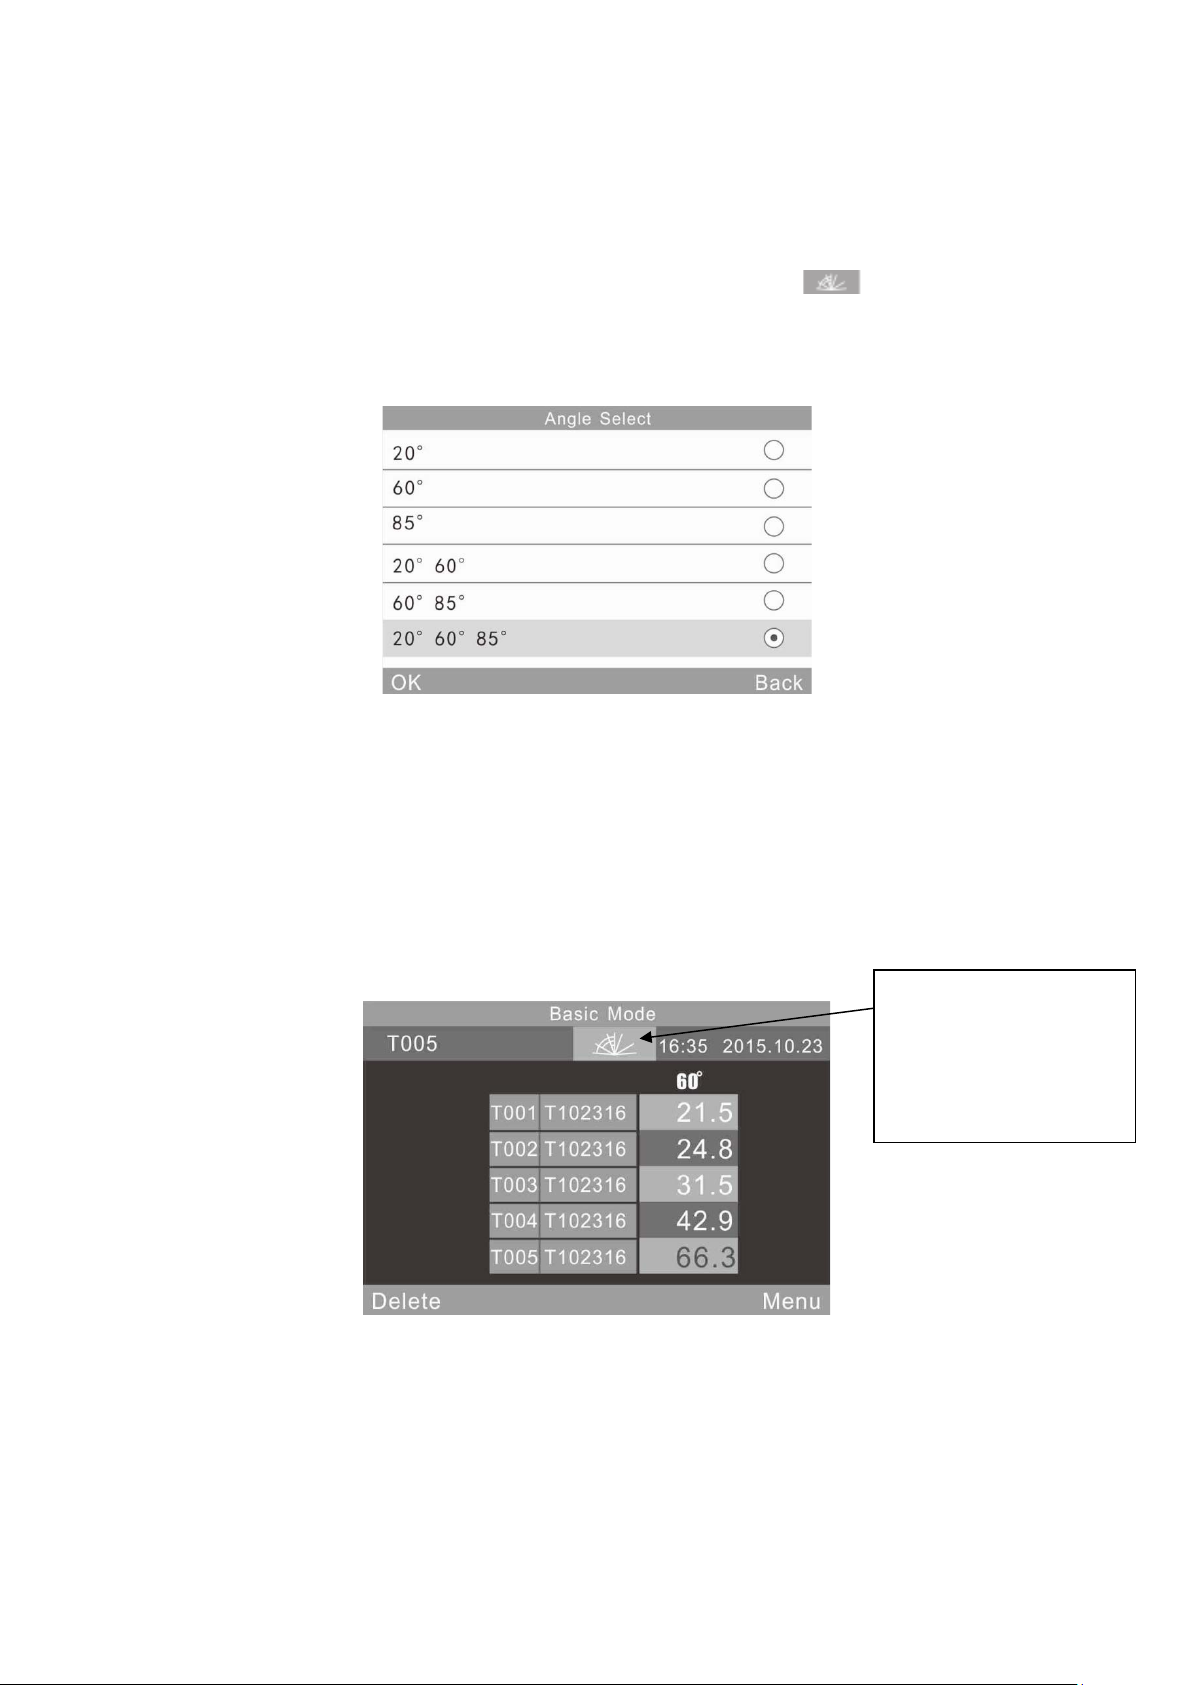
The instrument has three measurement modes: “Basic Mode”, “Statistical
Mode” and “Continuous Mode”. Click “Mode” in main menu, entering into the
interface as shown in figure 6.
Figure 6 Mode Selection
Basic Mode: It is a basic sample test mode which belongs to single
measurement. The results will be saved automatically each time. Those data
can be used as the standard in Statistic Mode. It can display 5 sets test data
simultaneously.
Statistical Mode: It has statistical evaluation function and can multi-measure a
single sample. If open the difference switch, you can get the results comparing
with standard sample.
Continuous Mode: The continuous measuring times can be set to 99 and you
can set interval time. When press “Test” button, the instrument starts to
measure automatically and will stop measurements according to the settings.
If press “Test” button during the test, it will pause or end the current
Page 8
measurement. This mode is used to measure large area samples and evaluate
and cannot click for
homogeneity of large-area samples.
The Instrument has three measurement angles: 20°, 60° and 85°. You can
select it by clicking “Mode” in Main Menu or click icon ( ) to enter the
interface as shown in figure 7. (Remarks: Single angle gloss meter doesn’t
have this option)
Figure 7 Angle Selection
2.3.1 Basic Mode Measurement
This mode also comes with average measurement function. Details will
present on chapter 3.3.1 Basic Mode Average.
(1) Single angle measurement in Basic Mode: e.g.: 60°. Press “Test” button
will measure the gloss value under 60°, as shown in figure 8.
Remarks: This icon in
single angle gloss meter
will only show one angle
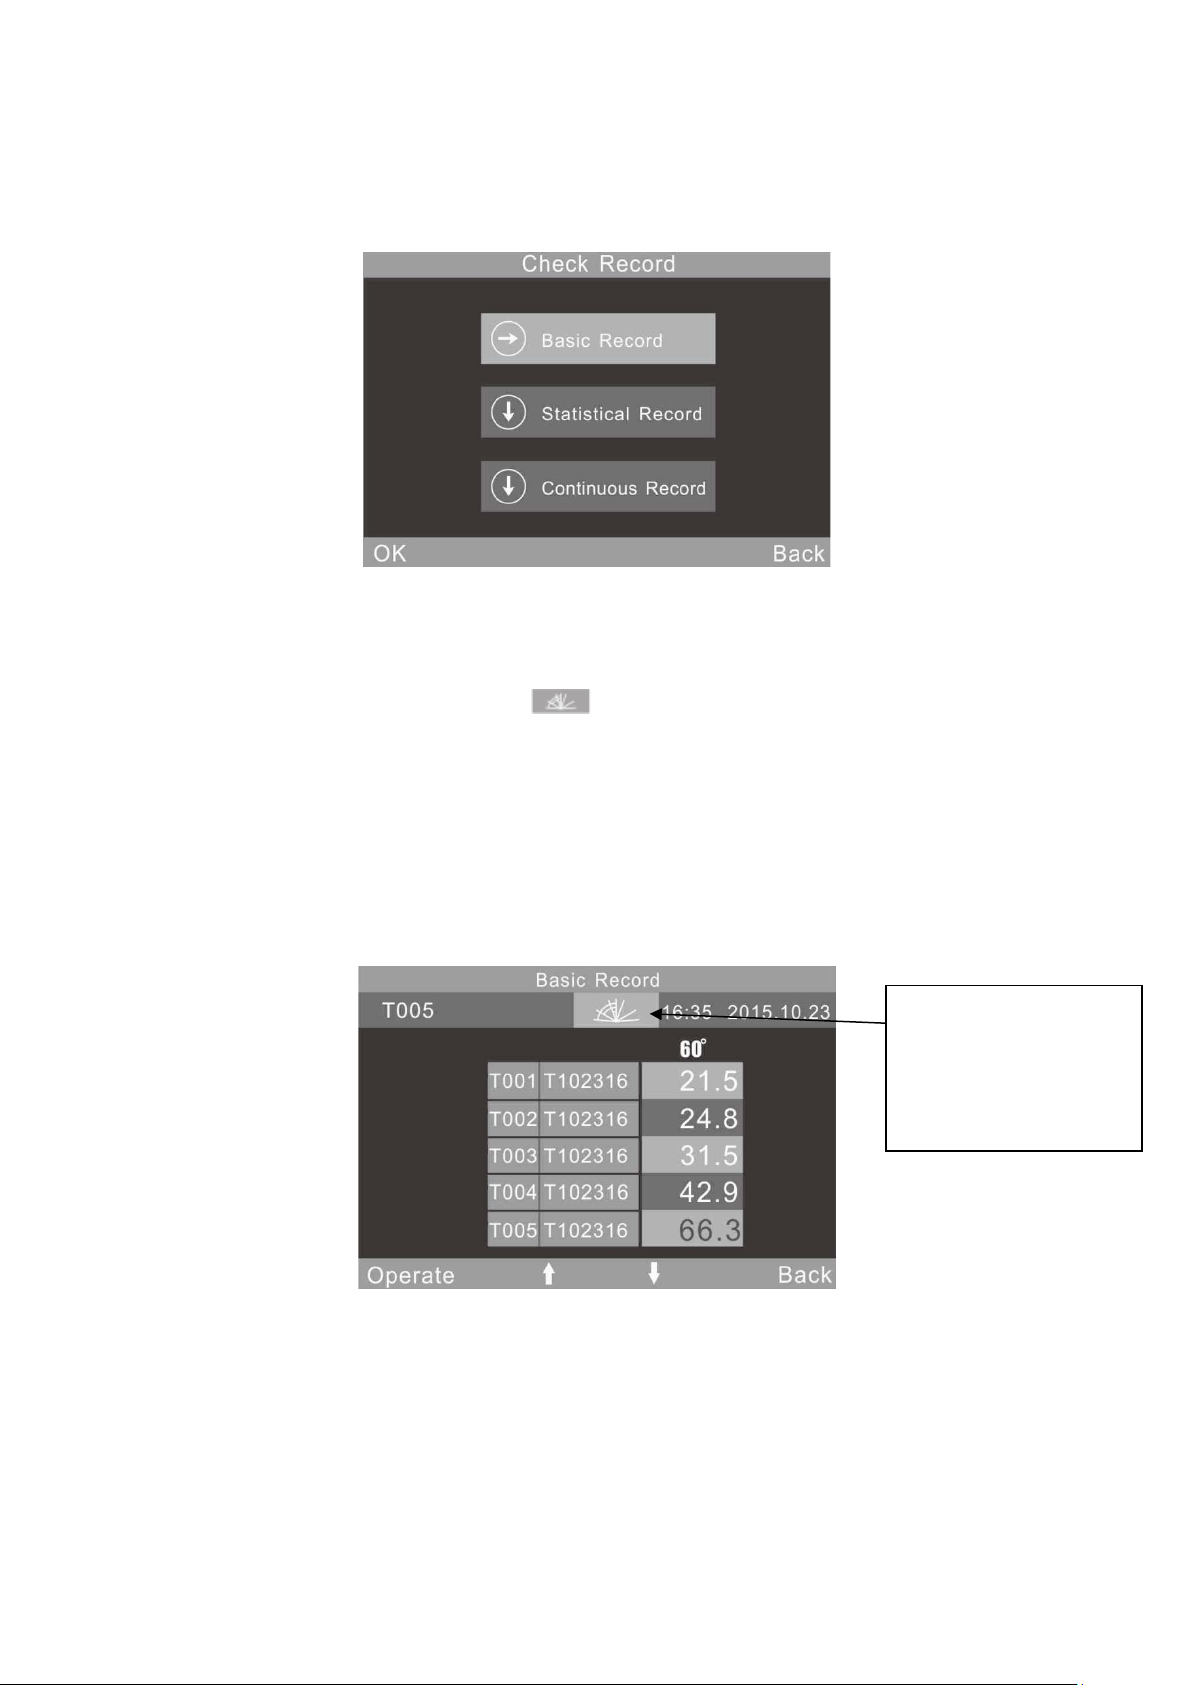
Click “Basic Mode” at the top of the interface. It will enter average
measurement interface directly.
“T005” at the upper left means the record number of current measurement.
selection.
Figure 8 Single angle measurement under Basic Mode
Page 9
The number begins with letter “T”. The icon ( ) is a shortcut key for
angle selection. (Remarks: Single gloss meter doesn’t have this option.) “16:33”
and “2015.10.23” are time and date.
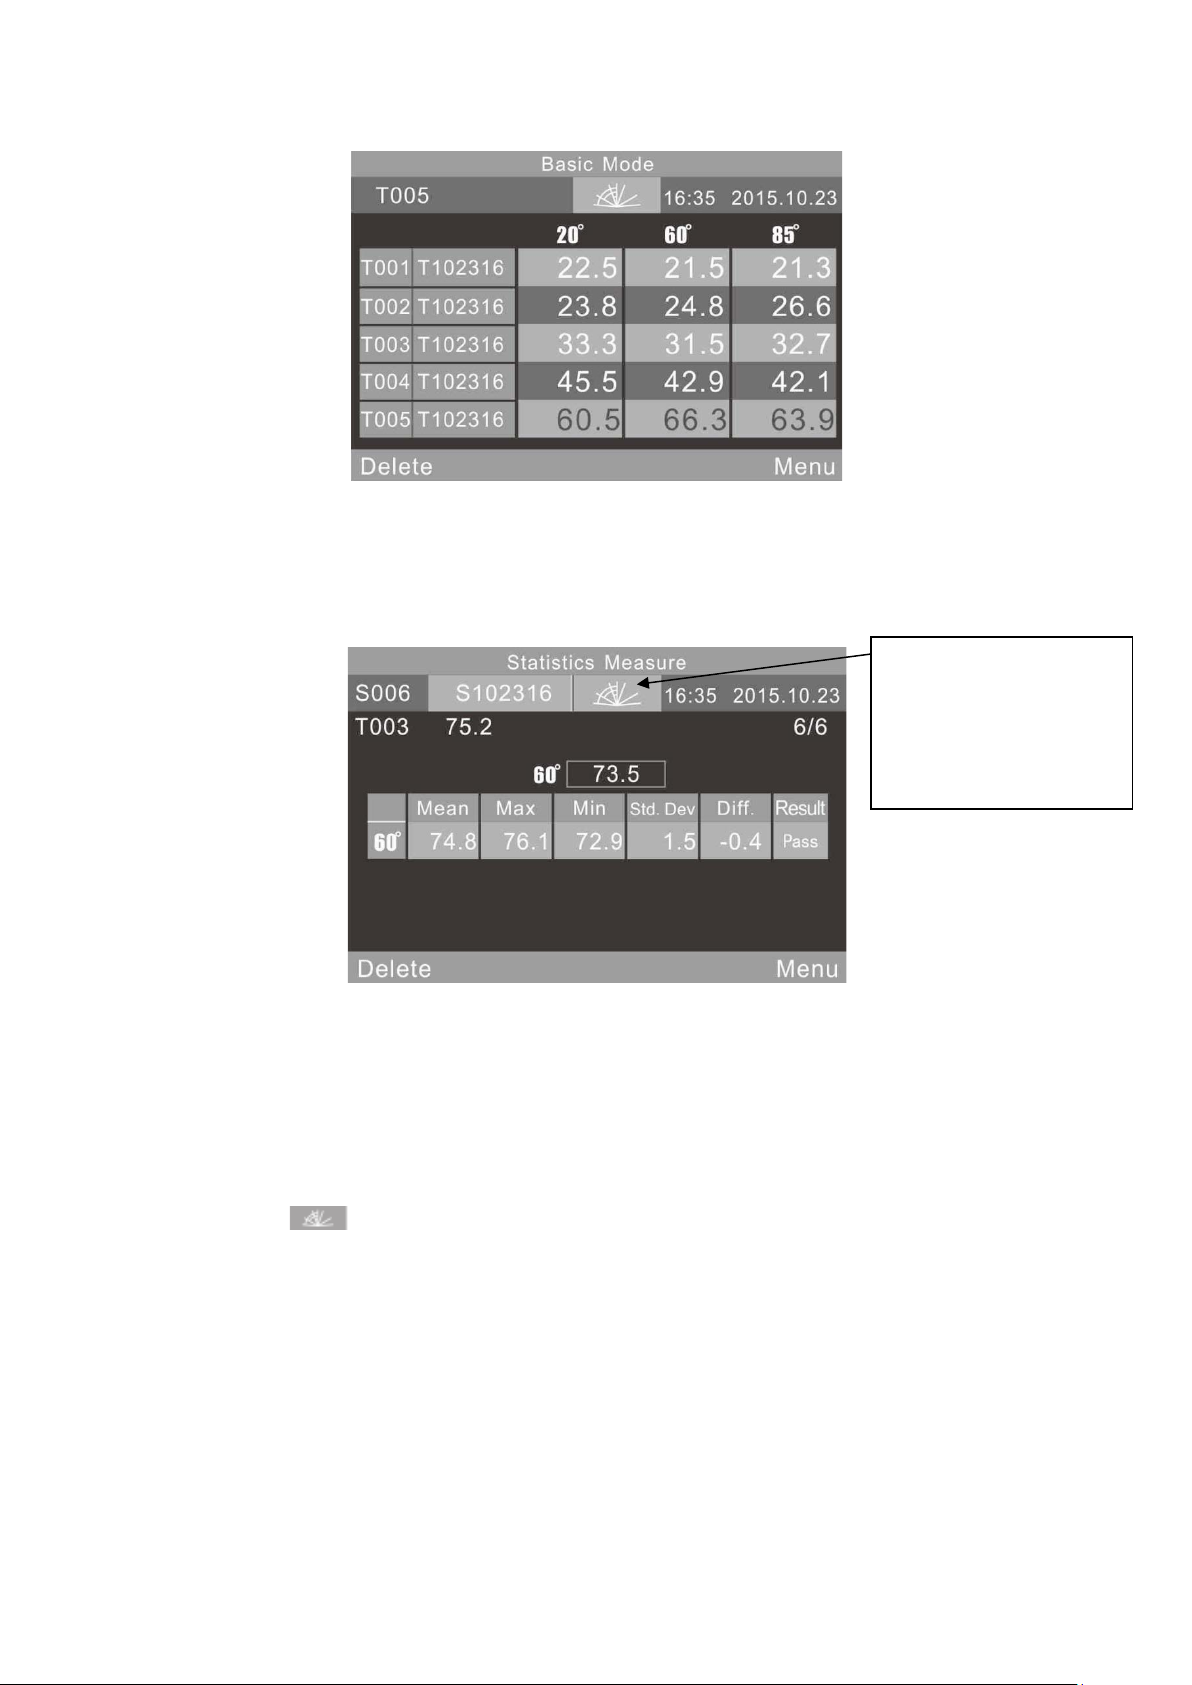
“T001-T005” is the record number of five measurements.
“T102316” is a default name of measuring record. It is making up of
“T”+”month”+”day”, “T” means basic record, “102316” means the measuring
record at16:00 pm on 23th October.
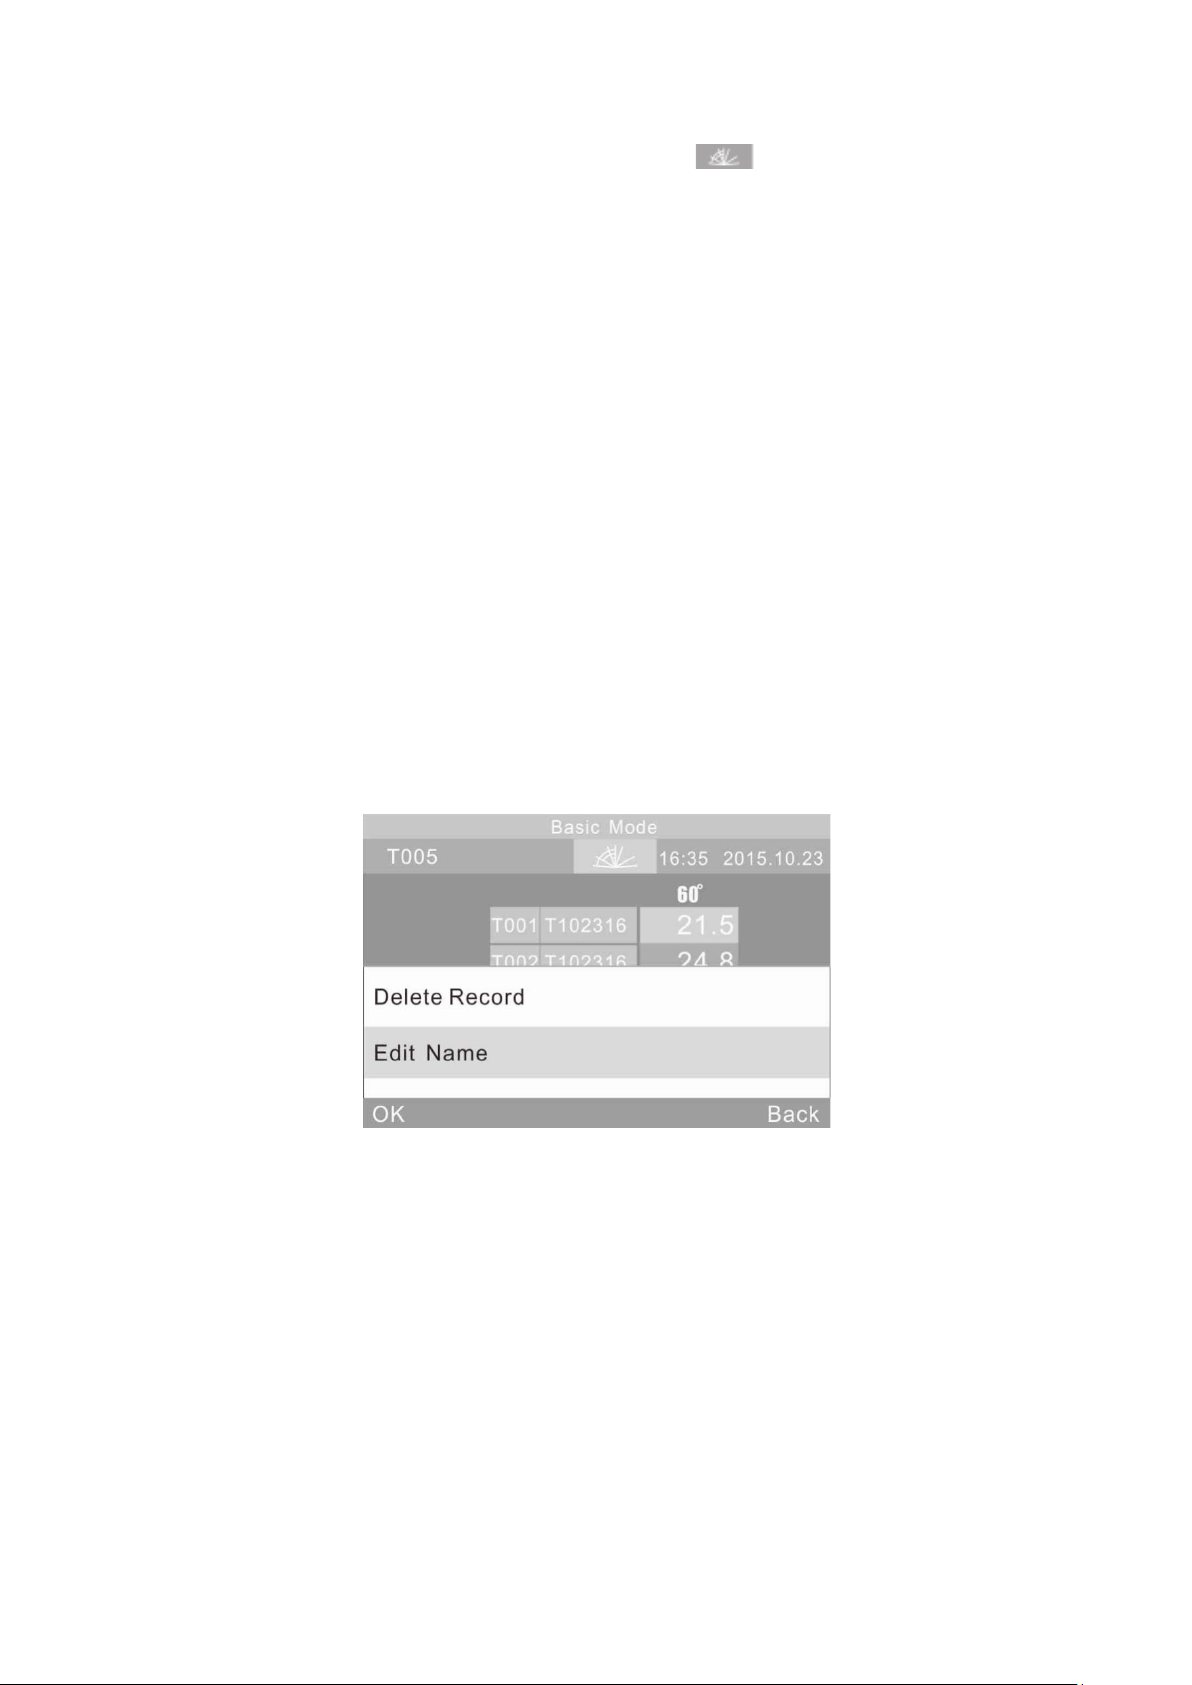
Click any name. It will pop up a dialog box with two options “Delete Record”
and “Edit Name” as shown in figure 9. If click “Delete Record”, it will display a
warning interface as shown in figure 22. Click “Ok”, this record will be deleted.
If click “Edit Name”, you can modify the name with maximum eight-bit
character (only numbers or letters) as shown in figure 23.
Click “Delete” at lower-left corner to delete the current record.
“60°” means the current measurement is under angle 60°.
The last record “66.3” in yellow is the current test data.
Click “Menu” at lower-right corner to enter the main menu interface.
Figure 9 Click Name to Enter the Operation Interface
(2) Multi-angle measurement under Basic Mode: as shown in figure 10, the
angles are “20°60°85°”. (Remarks: Single gloss meter doesn’t have this
option.)
Page 10
Remarks: This icon in
and cannot click for
Figure 10 Multi-angle Measurement
2.3.3 Statistical Mode Measurement
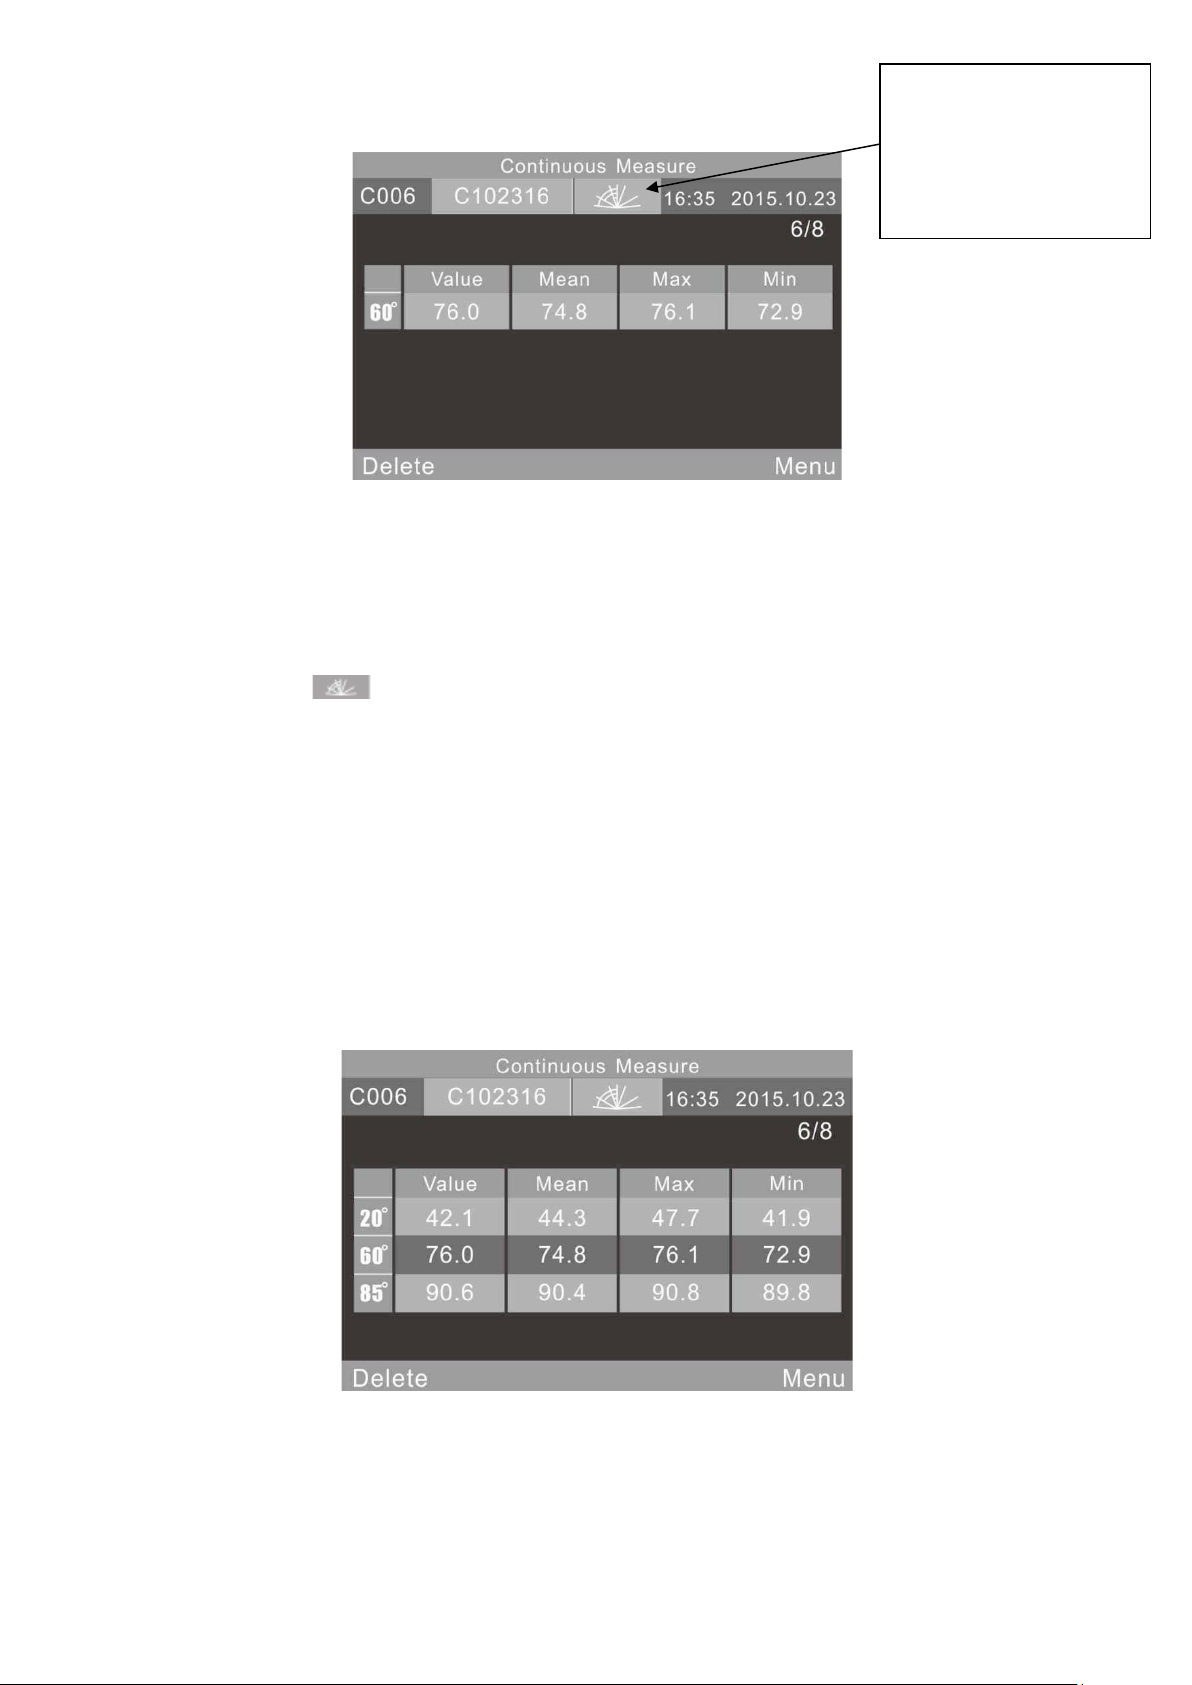
(1) Statistical Mode: A single angle measurement is shown in figure 11.
single angle gloss meter
will only show one angle
selection.
Figure 11 Single Angle Measurement under Statistical Mode
Click “Statistics Measure” at the top of the interface. It will enter statistical
mode parameter settings directly.
“S006” means the record number of current measurement which begins with
letter “S”.
The icon ( ) is a shortcut key for angle selection. (Remarks: Single gloss
meter doesn’t have this option.)
“6/6”: The first “6” means you have finished the 6th measurement, the second
“6” means the statistical measurement times is 6. How to set times for
measurements will explain on chapter 3.3.2 Statistics Mode Parameter. When
finished all measurements, those value will be saved as a complete statistics
record automatically.
“75.2” means the last measuring value.
Page 11

“74.8,76.1,72.9,1.5,-0.4” means average value, max value, min value,
standard deviation, difference value respectively.
Standard Deviation: the formula is
Difference: The difference between the sample and the target value.
Result: “Pass” means the sample is qualified and the result is in the tolerance
range. “Fail” means the sample is unqualified and the result is not in the
tolerance range (Tolerance setting is explained in chapter 3.5).
After completing the current testing, click “Delete” will delete this record.
Attention: Only when the difference switch is open, the standard value,
standard deviation and difference will display.
(2) Multi-angle measurement in Statistical Mode: as shown in figure 12, the
angles are “20°60°85°”. (Remarks: Single angle gloss meter doesn’t have this
option).
Figure 12 Multi-angle measurement under Statistical Mode
“T003 44.5 75.2 89.8” is the standard value of Statistics Measure (T003 is the
Standard record number, 44.5 is the value under angle 20°, 75.3 is the value
under angle of 60°, 89.8 is the value under angle of 85°)
2.3.3 Continuous Mode
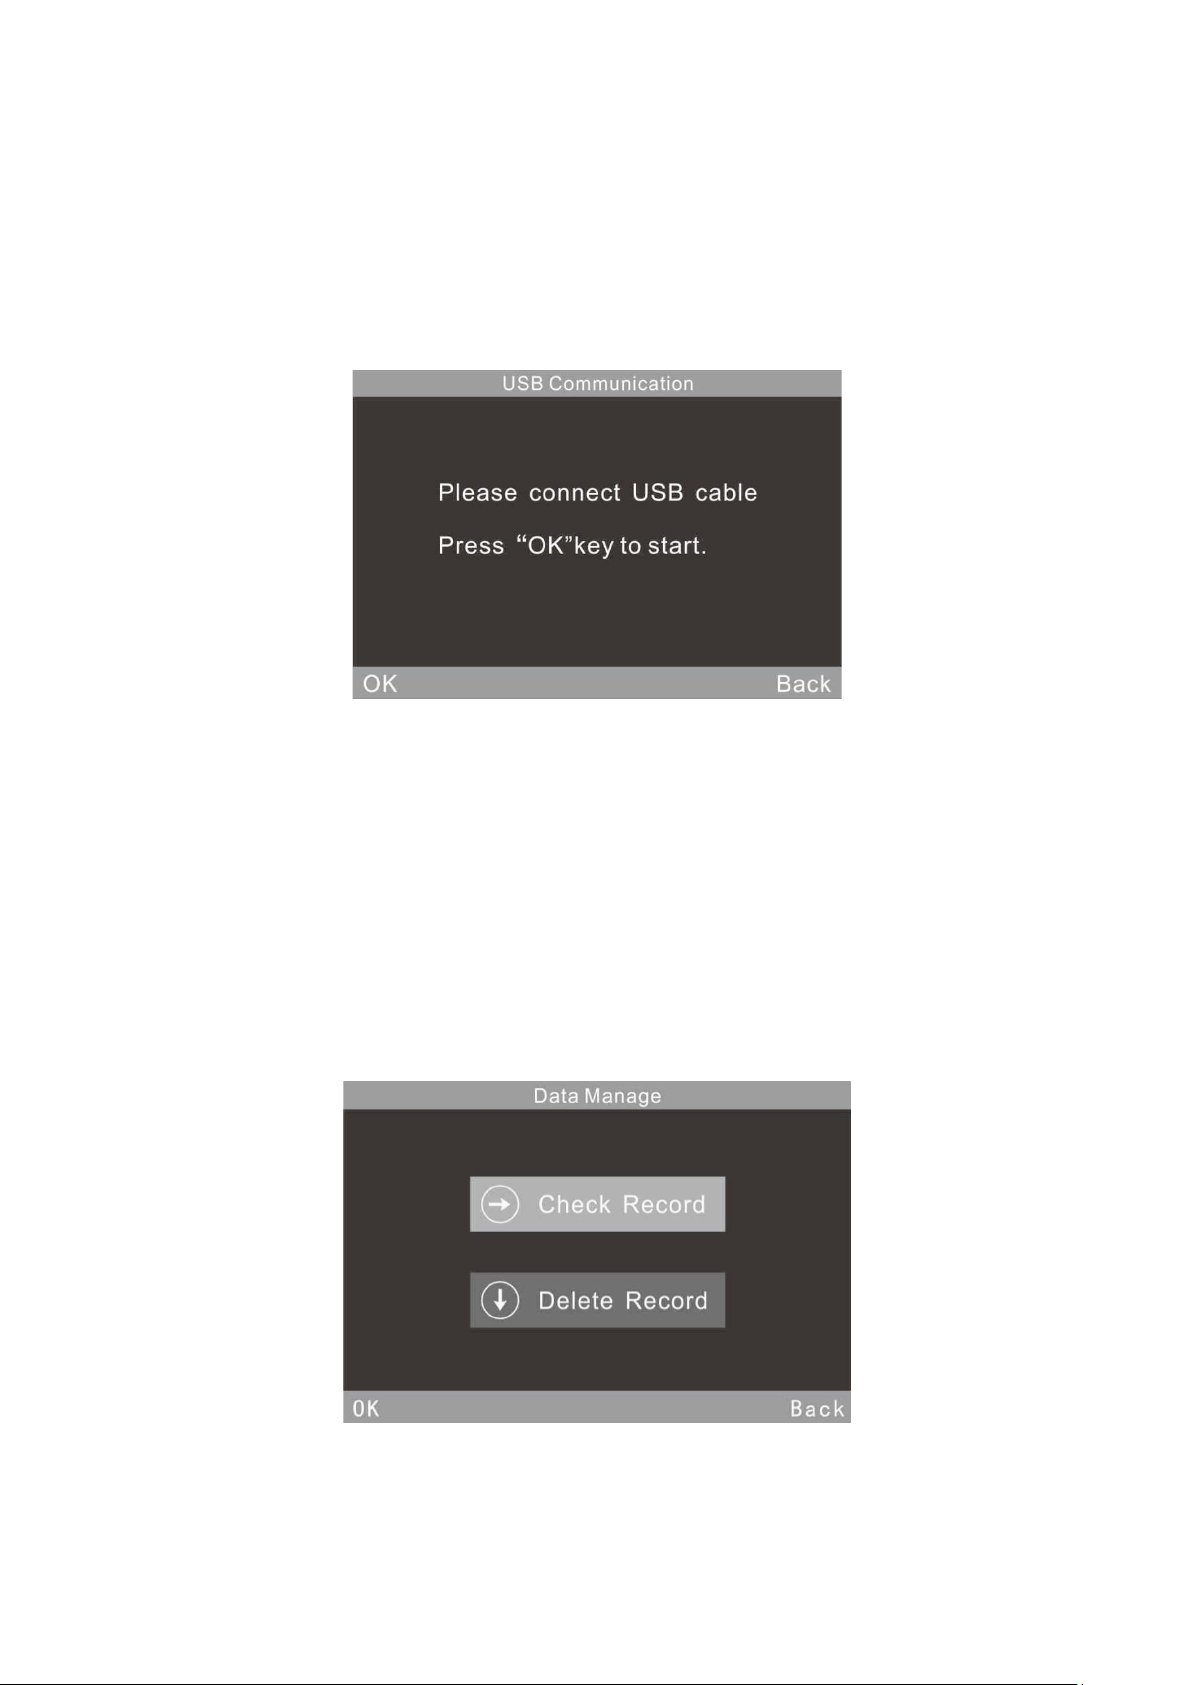
(1)Single angle measurement: as shown in figure 13.
Page 12
Remarks: This icon in
single angle gloss meter
one angle
and cannot click for
only shows
selection.
Figure 13Continuous Mode-Single Angle Measurement
Click “Continuous Measure” at the top of the interface. It will enter continuous
mode parameter settings directly.
“C006” is the current measurement number which begins with the letter “C”.
The icon ( )is a shortcut key for angle selection. (Remarks: Single
angle gloss meter doesn’t have this option)
“C102316” is a default name for measurement record. It is made up of
“C”+”month”+”day”, “C” means continuous record, “102316” means it’s
measuring at 16:00 pm on 23th October. Click the record name, you can
modify it (Max: 8-bit numbers or characters), as shown in Figure 23.
(2) Multi-angles measurement: as shown in figure 14. The angles are
“20°60°85°” (Remark: single angle gloss meter doesn’t have this option).
2.4 Connecting to PC
Figure 14 Multi-angles measurement
Page 13
Click “Comm” to enter the interface shown in figure 15. Follow the tips to
connect instrument to PC. Use USB cable to connect the instrument with PC
first. Click “OK”, the instrument will enter “Communicating...”, and then you can
control the instrument through the software.(Precondition: please install the
software on your PC properly. The software and installation instruction are in
CD.)
Figure 15 Communicating
2.5 Print
Connect the instrument to mini printer. It will print measurement data
automatically when measuring.
3 System Function Description
3.1 Data Management
Click “Data” in main menu to enter data management interface as shown in
figure 16. Data management is mainly for checking and operating the records.
3.1.1 Check Record
Figure 16 Data Management
Page 14
Click “Check Record”, shown in figure 17, you can check basic record,
: This icon in
one angle
click it for
selection.
statistical record and continuous record. (此处单词间要注意空格)
Figure 17 Check Record
You can check records in single angle mode, double angle mode and tri-angle
mode. Click the shortcut icon ( )to select angels directly, as shown in
figure 7. (Remarks: Single angle gloss meter don’t have this option)
(1) Check Basic Record
There are 5 record one page on the screen. When choose angle 60°, please
see Figure 18. When choose tri-angle “20°60°85°”, please see Figure 19.
Remarks
single angle gloss meter
only shows
and cannot
Figure 18 Single Angle Record in Basic Mode
Page 15
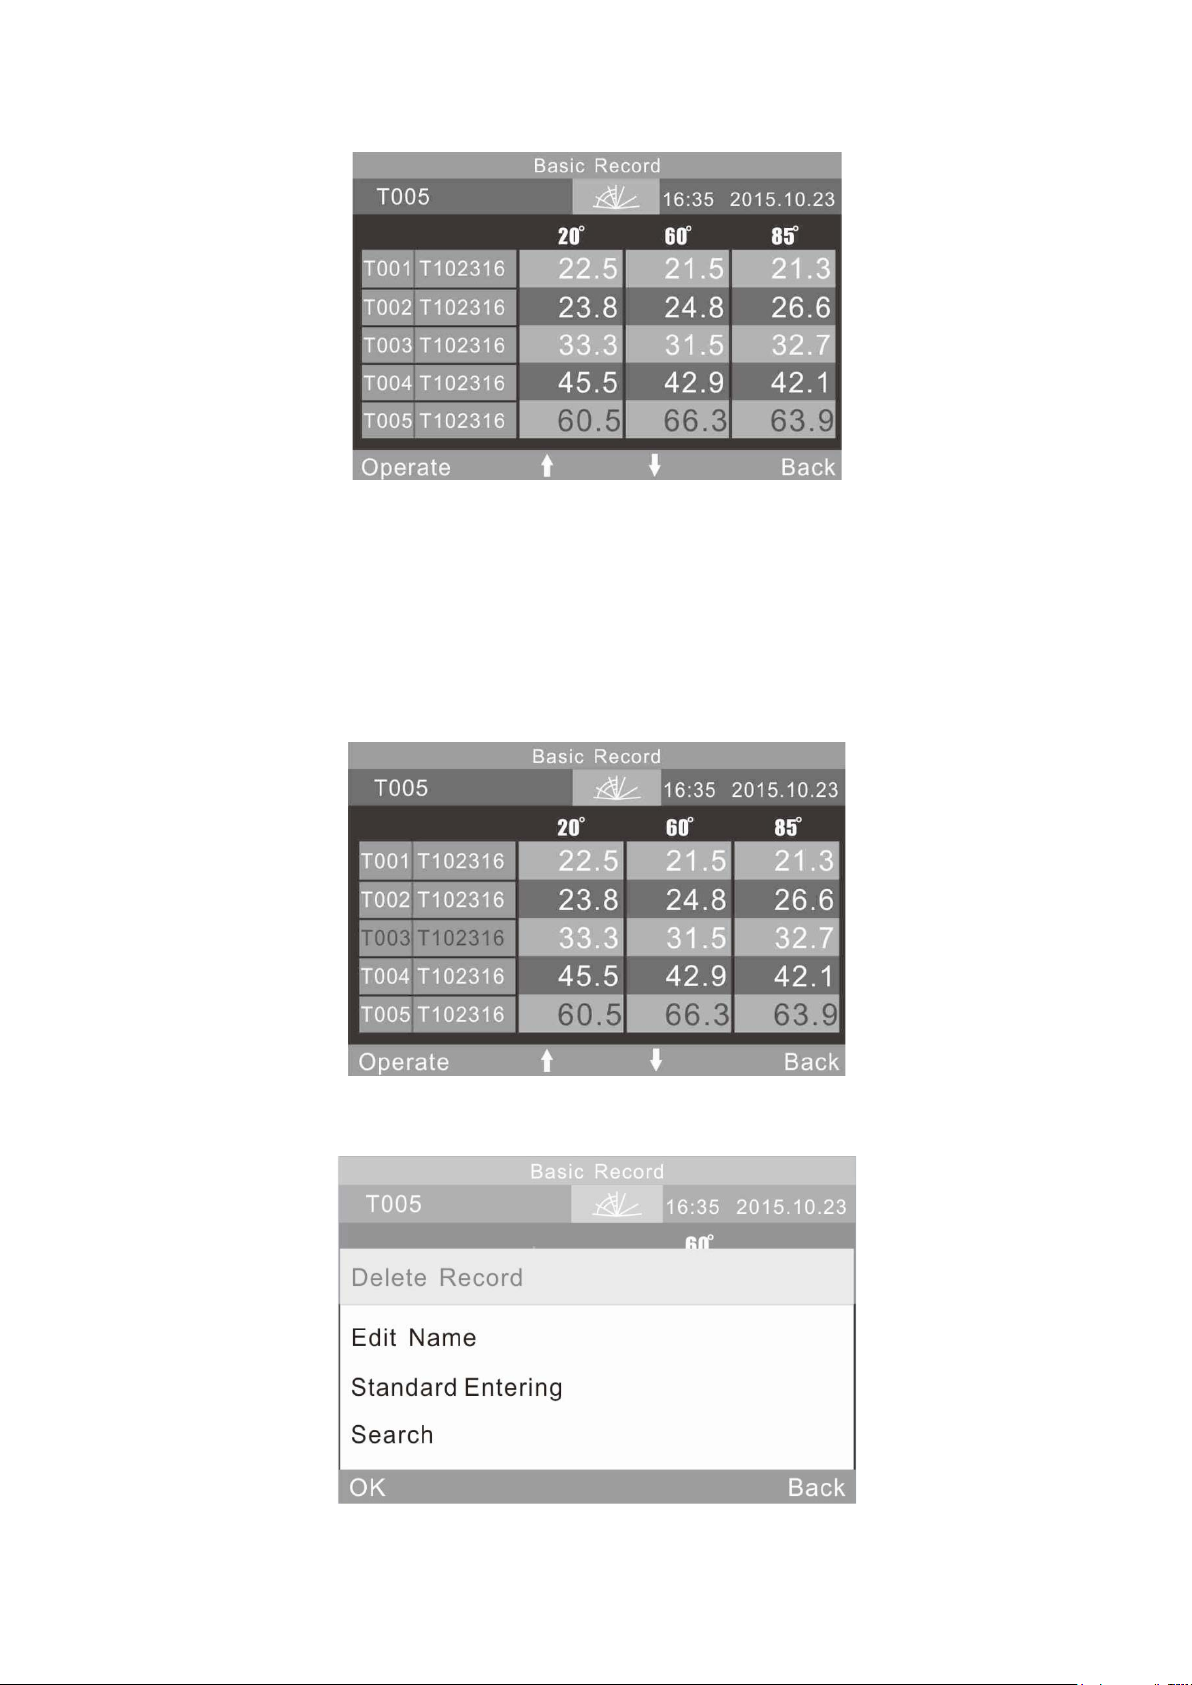
Figure 19 Tri-angle Record in Basic Mode
You can check record by clicking “↑” and“↓”. When click one record before
release, the No. and name of this record will become yellow, as shown in figure
20. After release, it will enter the operation interface as shown in figure 21.
When click “Operation”, you can operate the last record.
Figure 20 Select Basic Record
Page 16
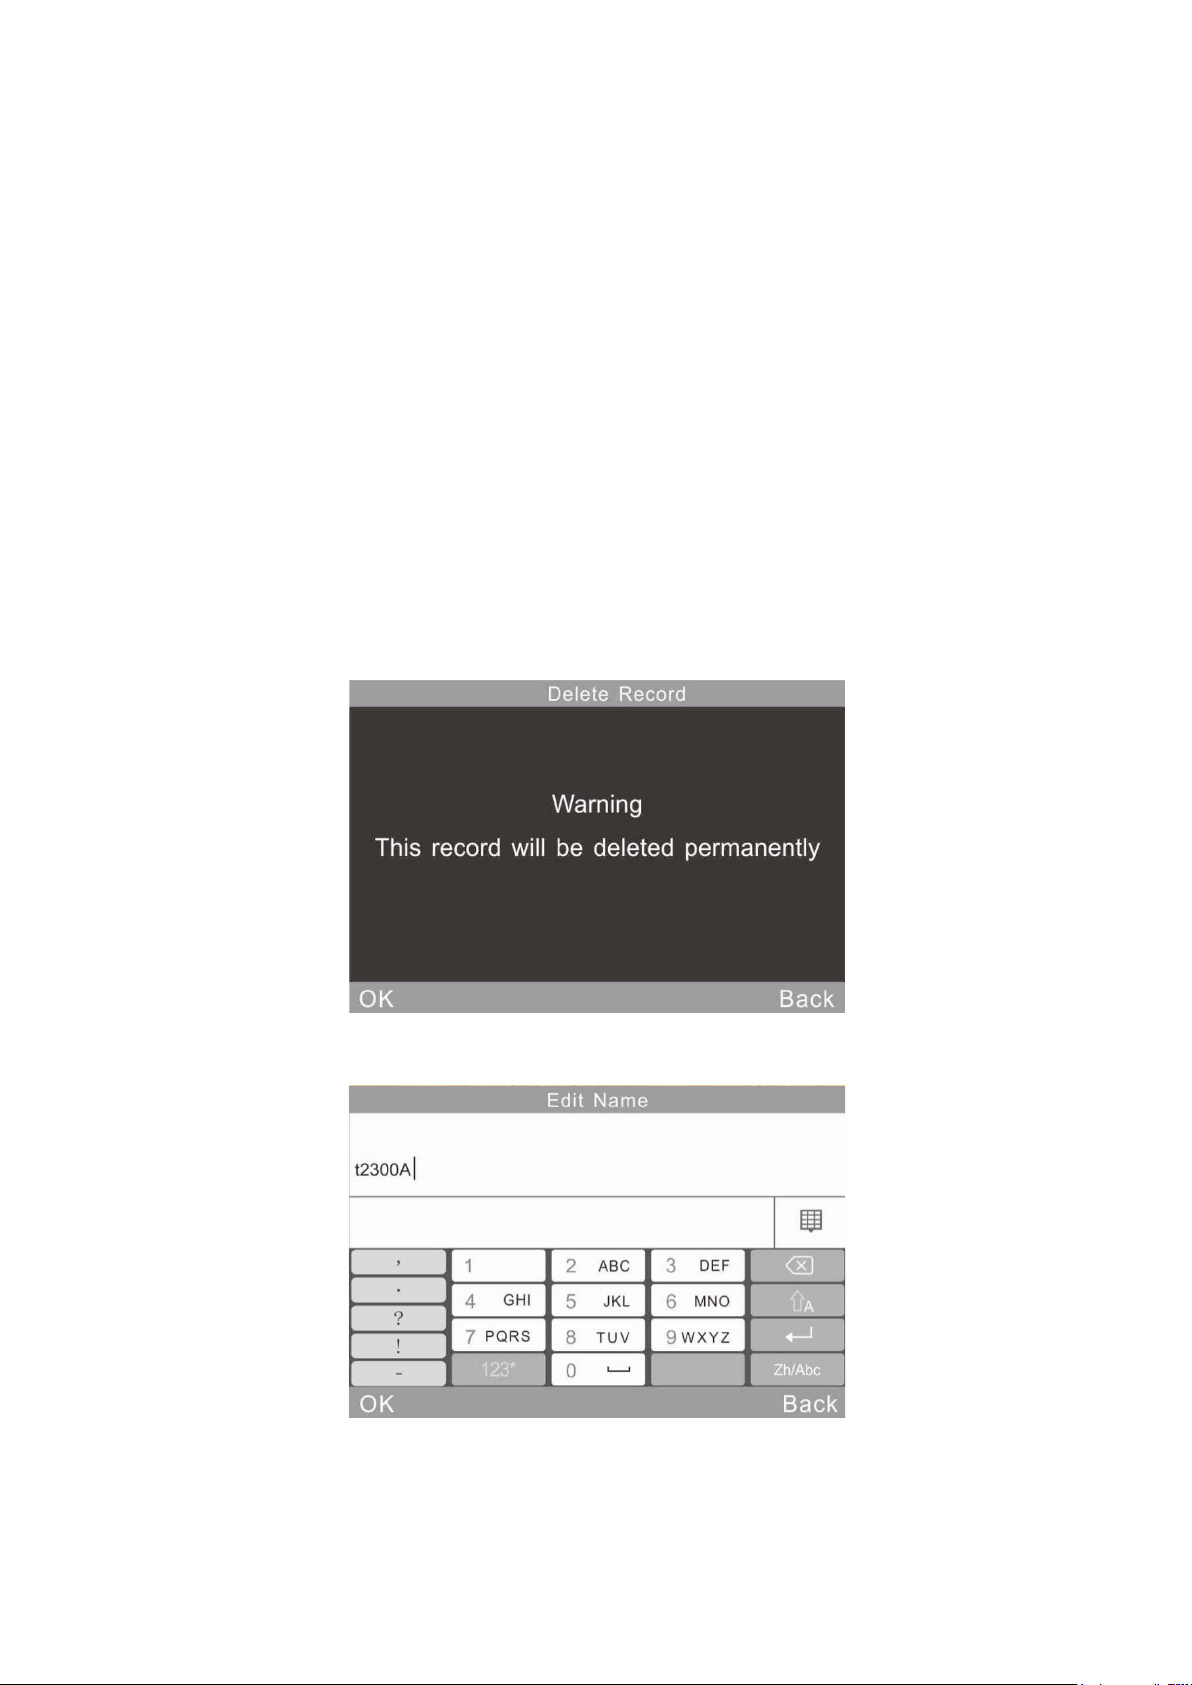
Figure 21 Basic Record Operation (此处图片更换)
Delete Record: Click “Delete Record”, it will pop up a warning interface as
shown in figure 22. Click “OK”, the selected record will be deleted. Click “Back”
to give up the current operation.
Edit Record Name: Click “Edit Name” to edit the current record name (Max:
8-bit characters). After completing it, click “OK”, then the modified name will be
saved.
Standard Entering: Click “Standard Entering”, the selected record will be
transferred as a standard record of statistic measurement.
Search: Users can search the record by “Search Index” and “Search Name” if
the instrument has stored too much data.
Figure 22 Warning for Deleting Record
(2) Check Statistical Record
Figure 23 Edit Name
Page 17
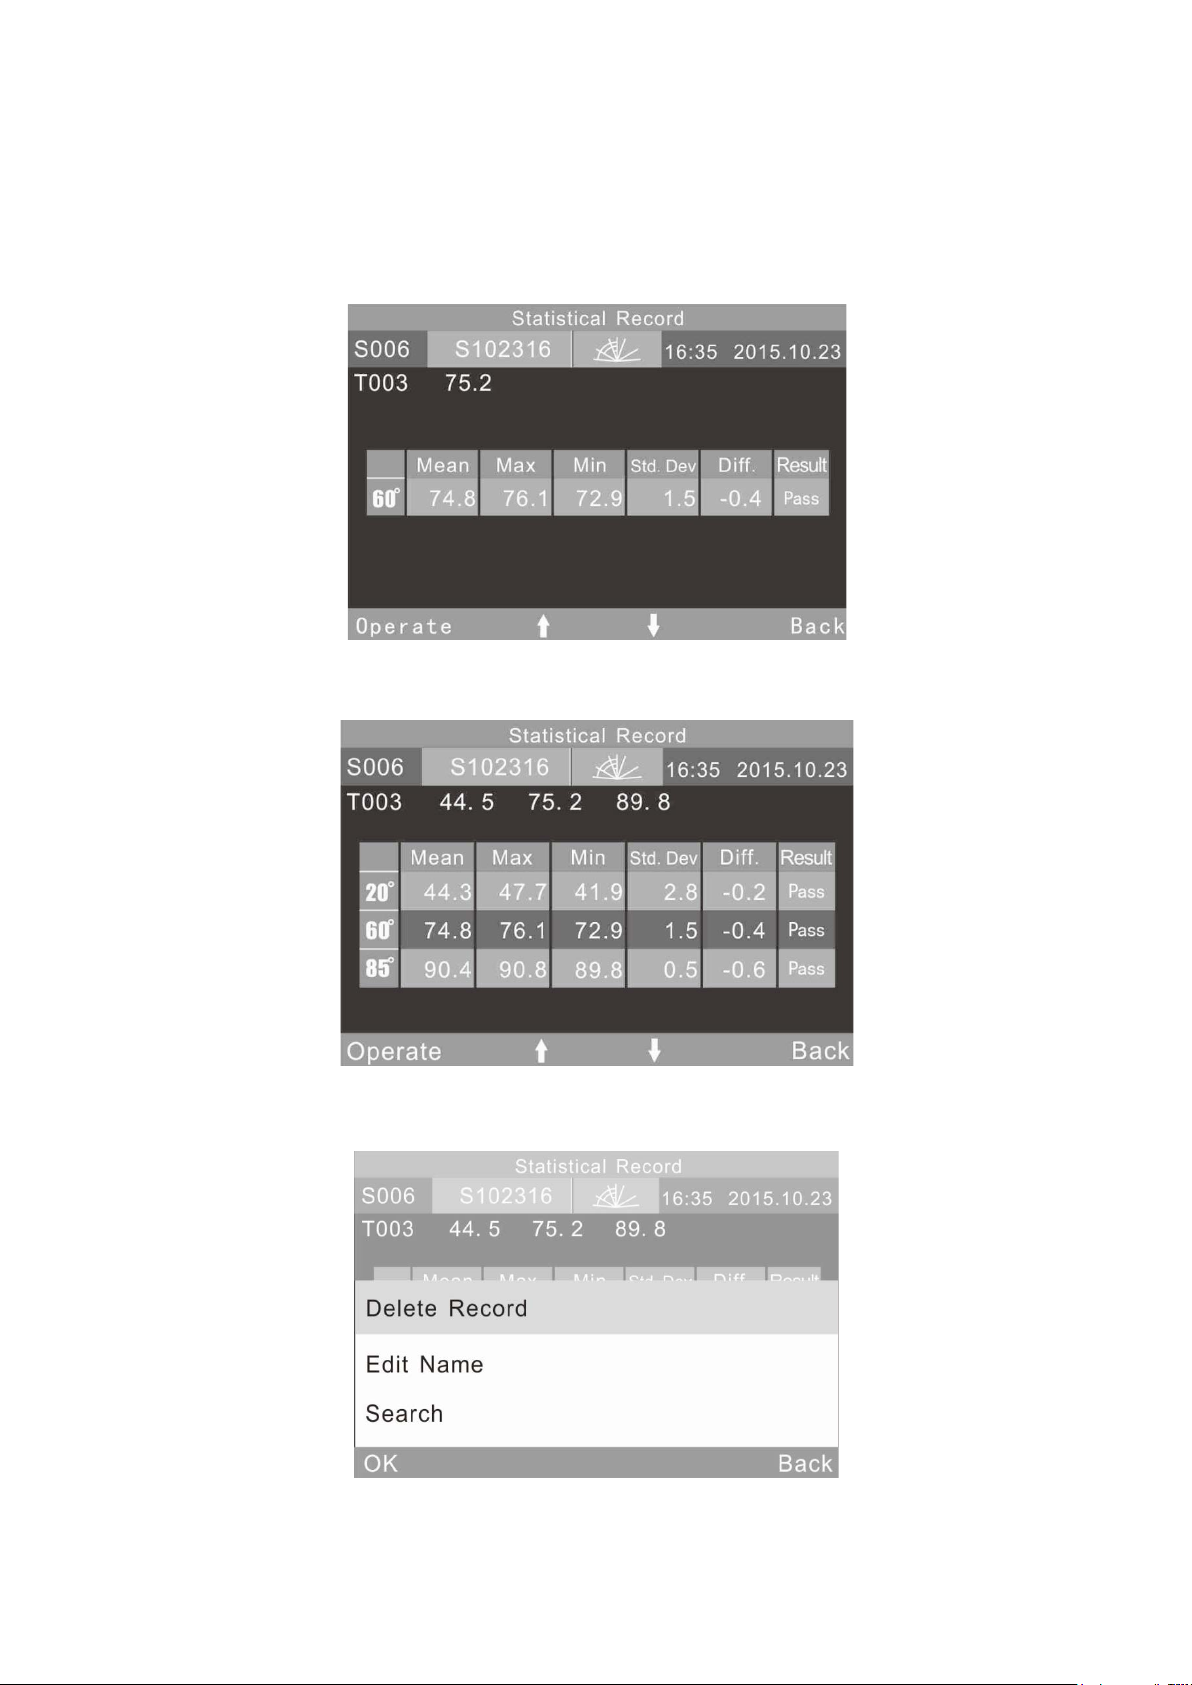
When choose the angle 60°, it will display only one record, shown in Figure 24.
When choose the angle 20°60°85°, please see Figure 25.
Click the record name “S102316”, you can modify it, shown in Figure 23.
Figure 24 Single Angle Measurement in Statistical Mode
Figure 25 Tri-angle Measurement in Statistical Mode
Figure 26 Operation Menu of Statistical Record (此处图片更换)
Page 18

(3) Check Continuous Record
This operation is same with Check Statistical Record, please refer to the
former description.
3.1.2 Delete Record
Click “Delete Record” in “Data”, shown in figure 27. There are three modes:
“Delete Basic Record”, “Delete Statistical Record” and “Delete Continuous
Record”.
Figure 27 Delete Record
Figure 28 Warning Interface
3.2 Mode Selection
Click “Mode” to select different measurement mode according to requirements,
as shown in Figure 6.
3.3 Mode Parameter
Click “Parameter” to set the mode parameters, as shown in Figure 29.
Or click the name at the top of the interface to enter corresponding mode
parameters setting interface directly.
Page 19
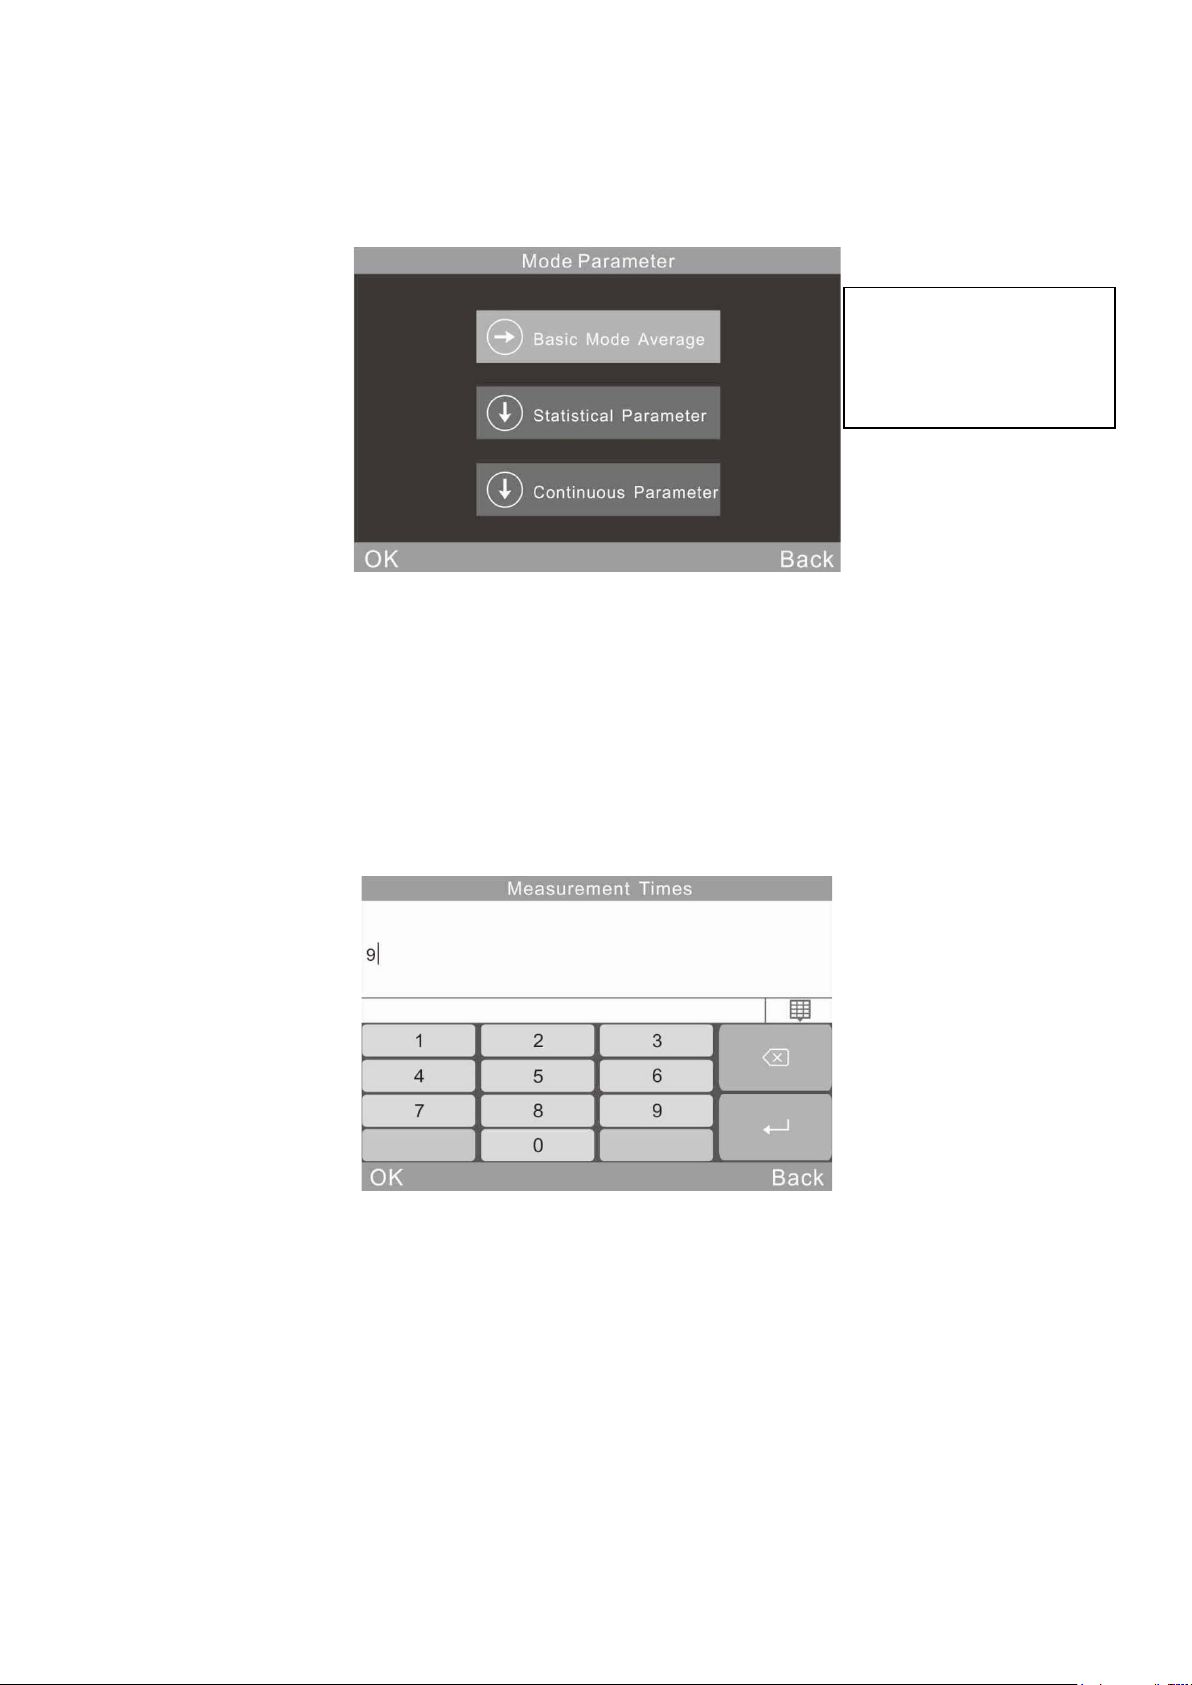
Remarks: Basic Mode
Average function of single
angle gloss meter is in the
main menu.
Figure 29 Sub-menu of Mode Parameter
3.3.1Average Measurement in Basic Mode
This is an additional functional for Basic Mode. Click “Basic Mode Average” to
set measurement times, as shown in figure 30. The number range is 0-99.
Users can modify measurement angle, edit name and delete record in this
mode. All testing data will be saved in basic record.
Figure 30 Measurement Times Setting
Page 20
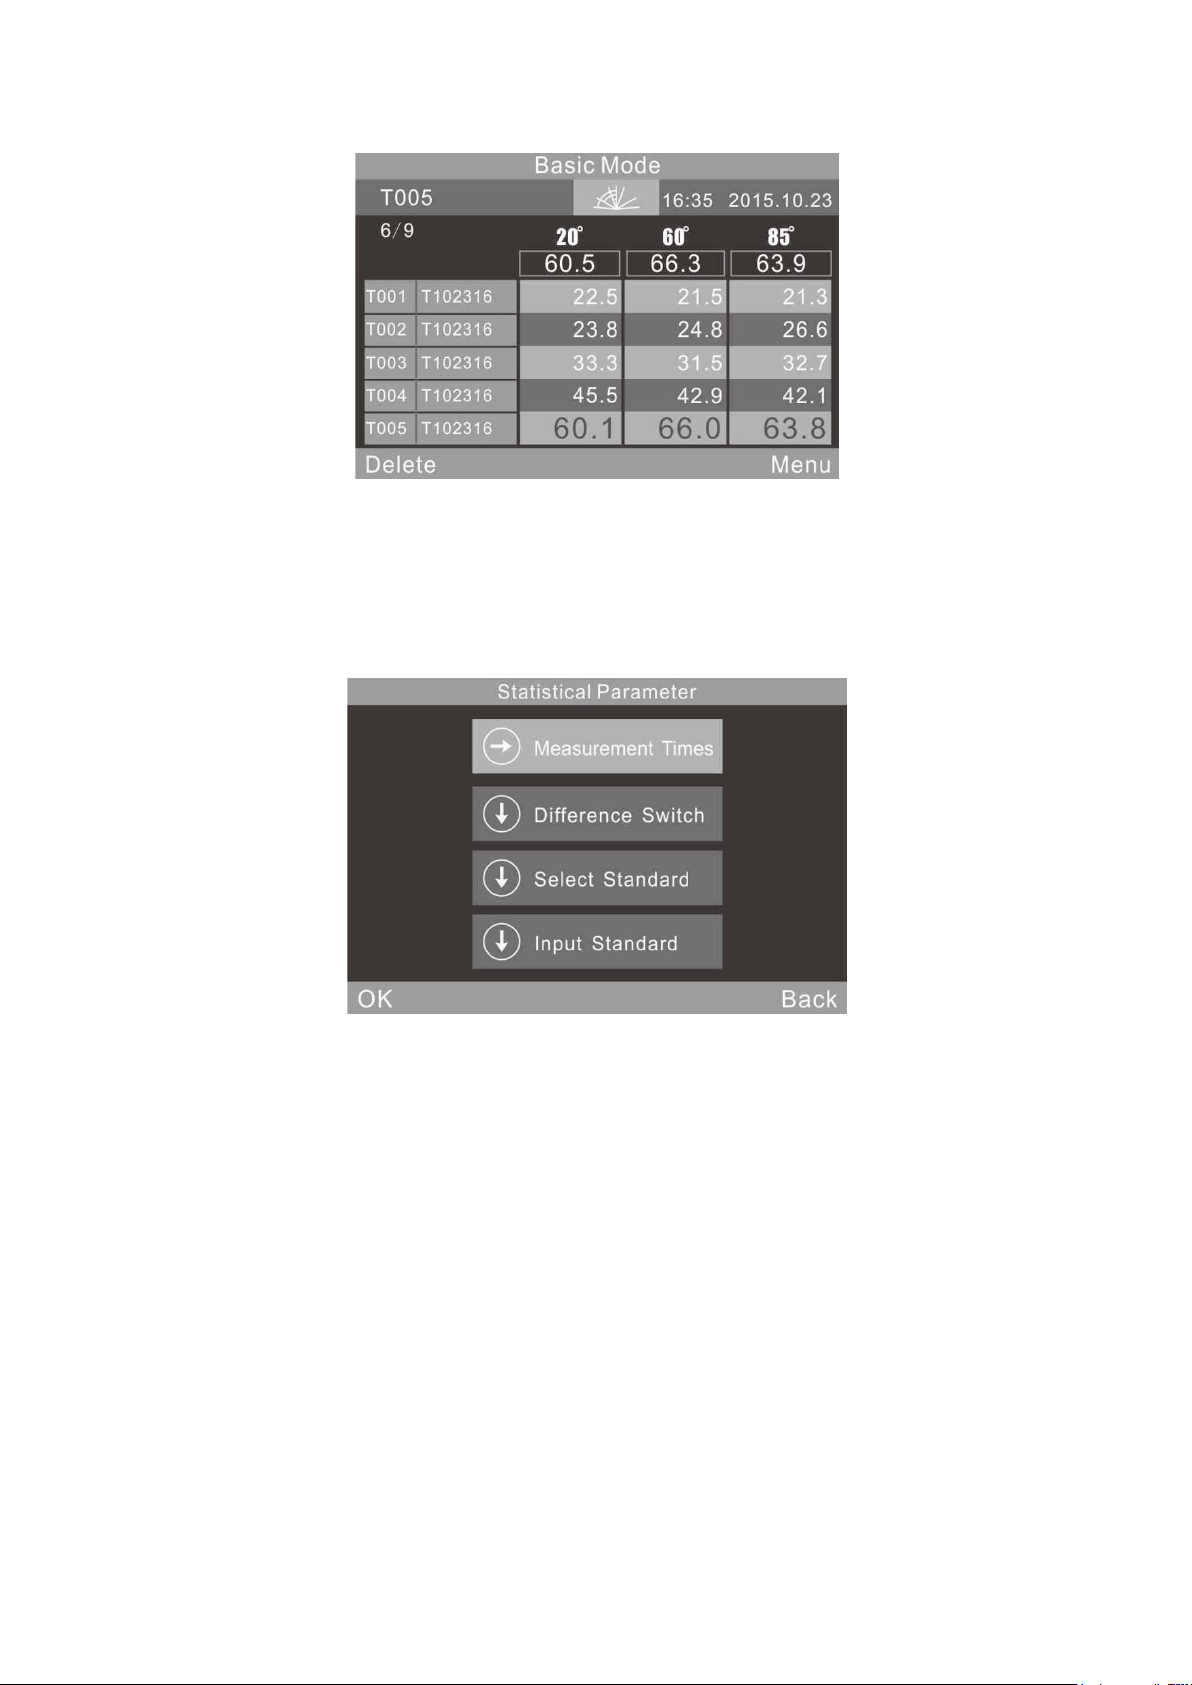
Figure 31 Multi-angle Measurement in Basic Mode Average
3.3.2 Statistical Mode Parameter
Users can set measurement times, difference switch, select standard and
input standard.
Figure 32 Sub-menu of Statistical Mode Parameter
(1) Measurement Times
You can set measurement times (range 1 to 99).
The instrument will calculate automatically and display average value (mean),
Max value, Min value. If open the difference switch, it will also display standard
deviation, difference value and results.
(2) Difference Switch
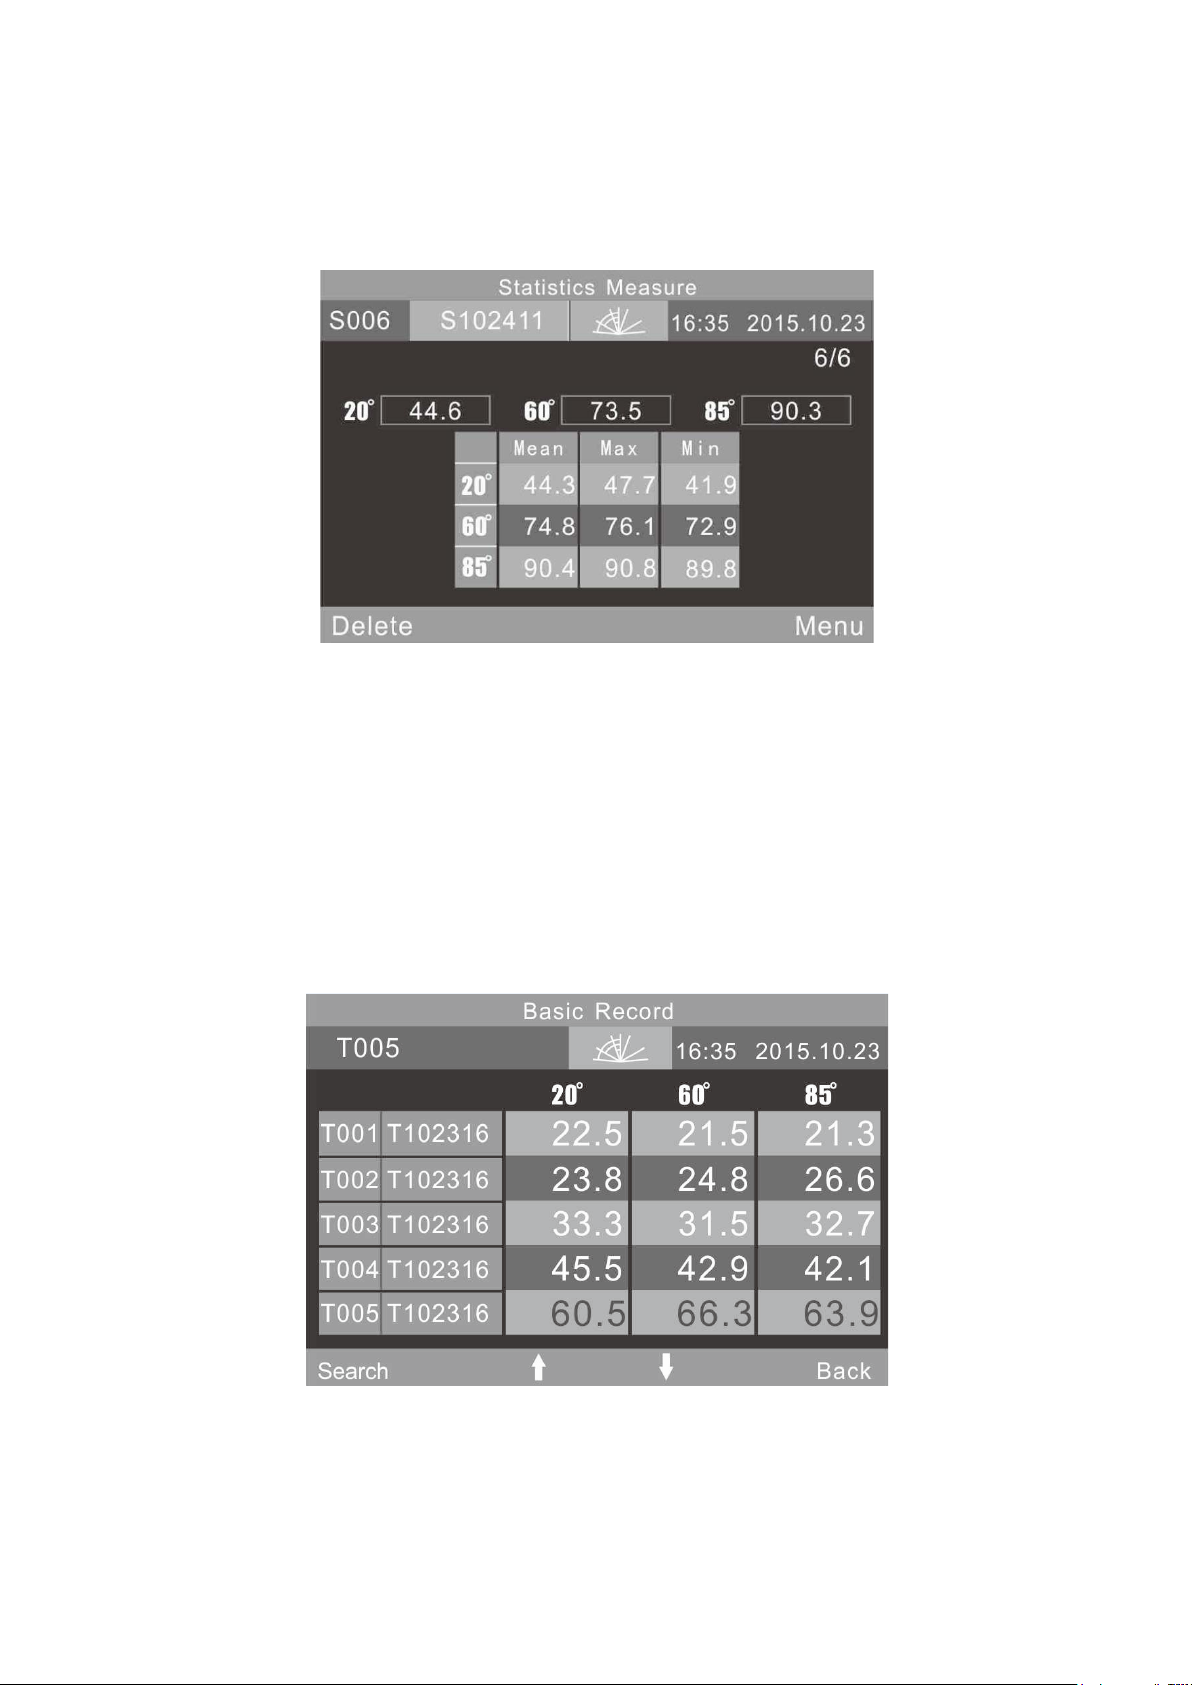
When the difference switch is closed, statistic measurement only evaluates the
average value, Max value and Min value. It will not show the comparative
function. In figure 33, upper-left part doesn’t show the standard data, only
show the Mean value, Max value and Min value.
Page 21
When open the difference switch, it will have the function of comparing data
with standard sample, as shown in figure 11 or figure 12(Attention: Single
angle gloss meter only shows single angle value)
Figure 33 Statistic Measurement When Difference Switch Closed
(3) Select Standard
The standard of statistics measurement defaults to the last record of basic
record. If need to select other records as the standard, click “Select Standard”
and click arrow to turn the page.
Eg: Click “Search”, users can search the record by “Search Index” and “Search
Name”. Click the searched record to choose it as an entering standard.
Figure 34 Multi-angle Standard Entering (此处图片更换)
(4)Input Standard
Input a new basic record data as the standard of statistical mode. This new
record will be automatically saved in basic record database.
Page 22
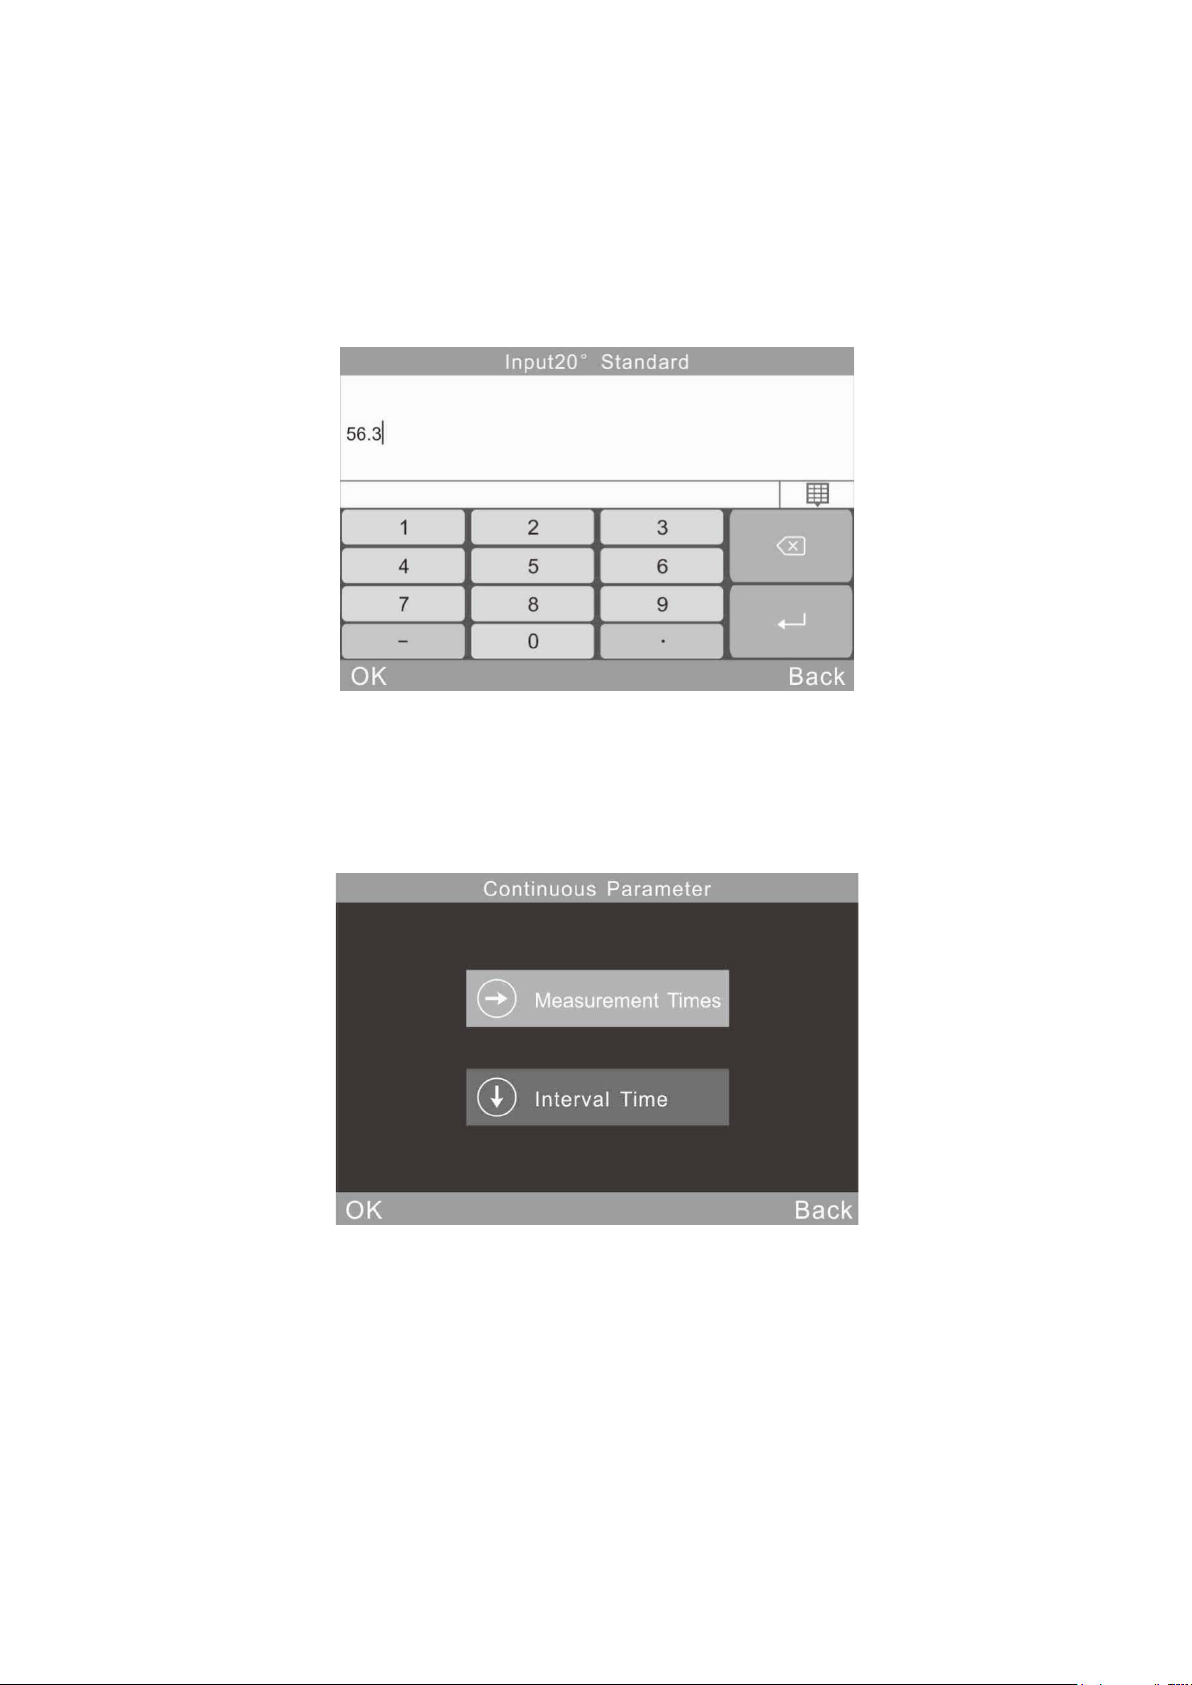
Click “Input Standard” as shown in figure 35. In the interface “Check Basic
Record”, if you select single angle mode, you can only input the corresponding
single angle standard. If you select multi-angle mode, you can input the
multi-angle standard in order. Then click “OK” to edit name as shown in figure
23.
Figure 35 Input Standard
3.3.3 Continuous Mode Parameter
There are two functions: Measurement Times and Interval Time, shown in
figure 36 and 37.
Figure 36 Sub-menu of Continuous Mode Parameter
Page 23
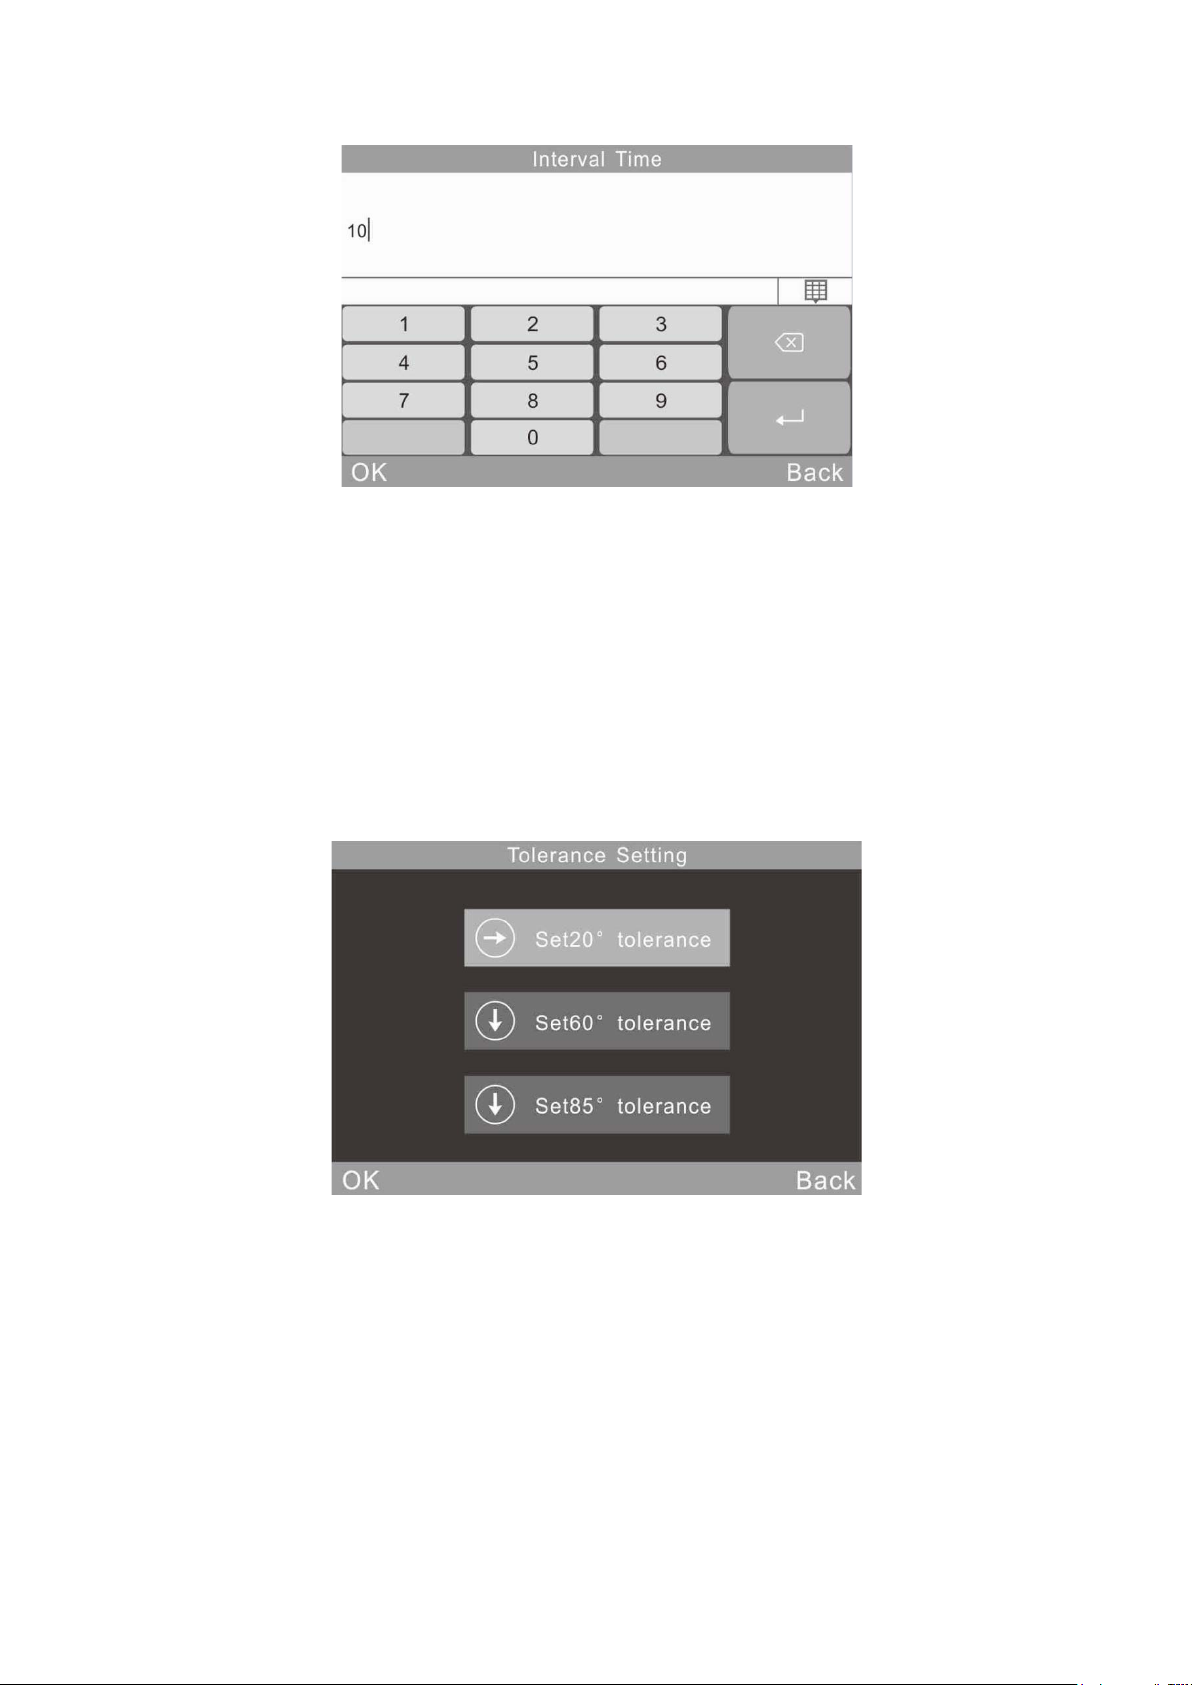
Figure 37 Interval Time Setting in Continuous Mode
3.4 Angle Selection
Click “Angle” to choose measurement angles according to requirements,
shown in figure 7.
3.5 Tolerance Setting
Click “Tolerance”, shown in figure 38.Tolerance data is the standard of
judgment to compare difference between statistical record and standard record.
If the difference is within the tolerance range, the sample is qualified.
Otherwise, the sample is unqualified.
Figure 38 Tolerance Setting
3.6 Function Setting
Click “Setting” to set other functions as shown in figure 39. Function setting
includes “Auto save”, “Time Setting”, “Language Setting”, “Backlight Time”,
“Operation Habit”, “Screen Brightness”, “Buzzer Switch”, “Restore Factory”
(增加操作习惯,并注意所以引号方向)
Page 24

Figure 39 Function Setting (该处更换图片)
3.6.1 Auto Save
Click “Auto Save”. It has two options: “On” and “Off”. If select “Off”, you have to
save the data manually when measuring. If select “on”, the instrument will save
data automatically.
Figure40 Auto Save
3.6.2 Time Setting
Click “Time Setting” to set time and date, shown in figure 41.
Page 25
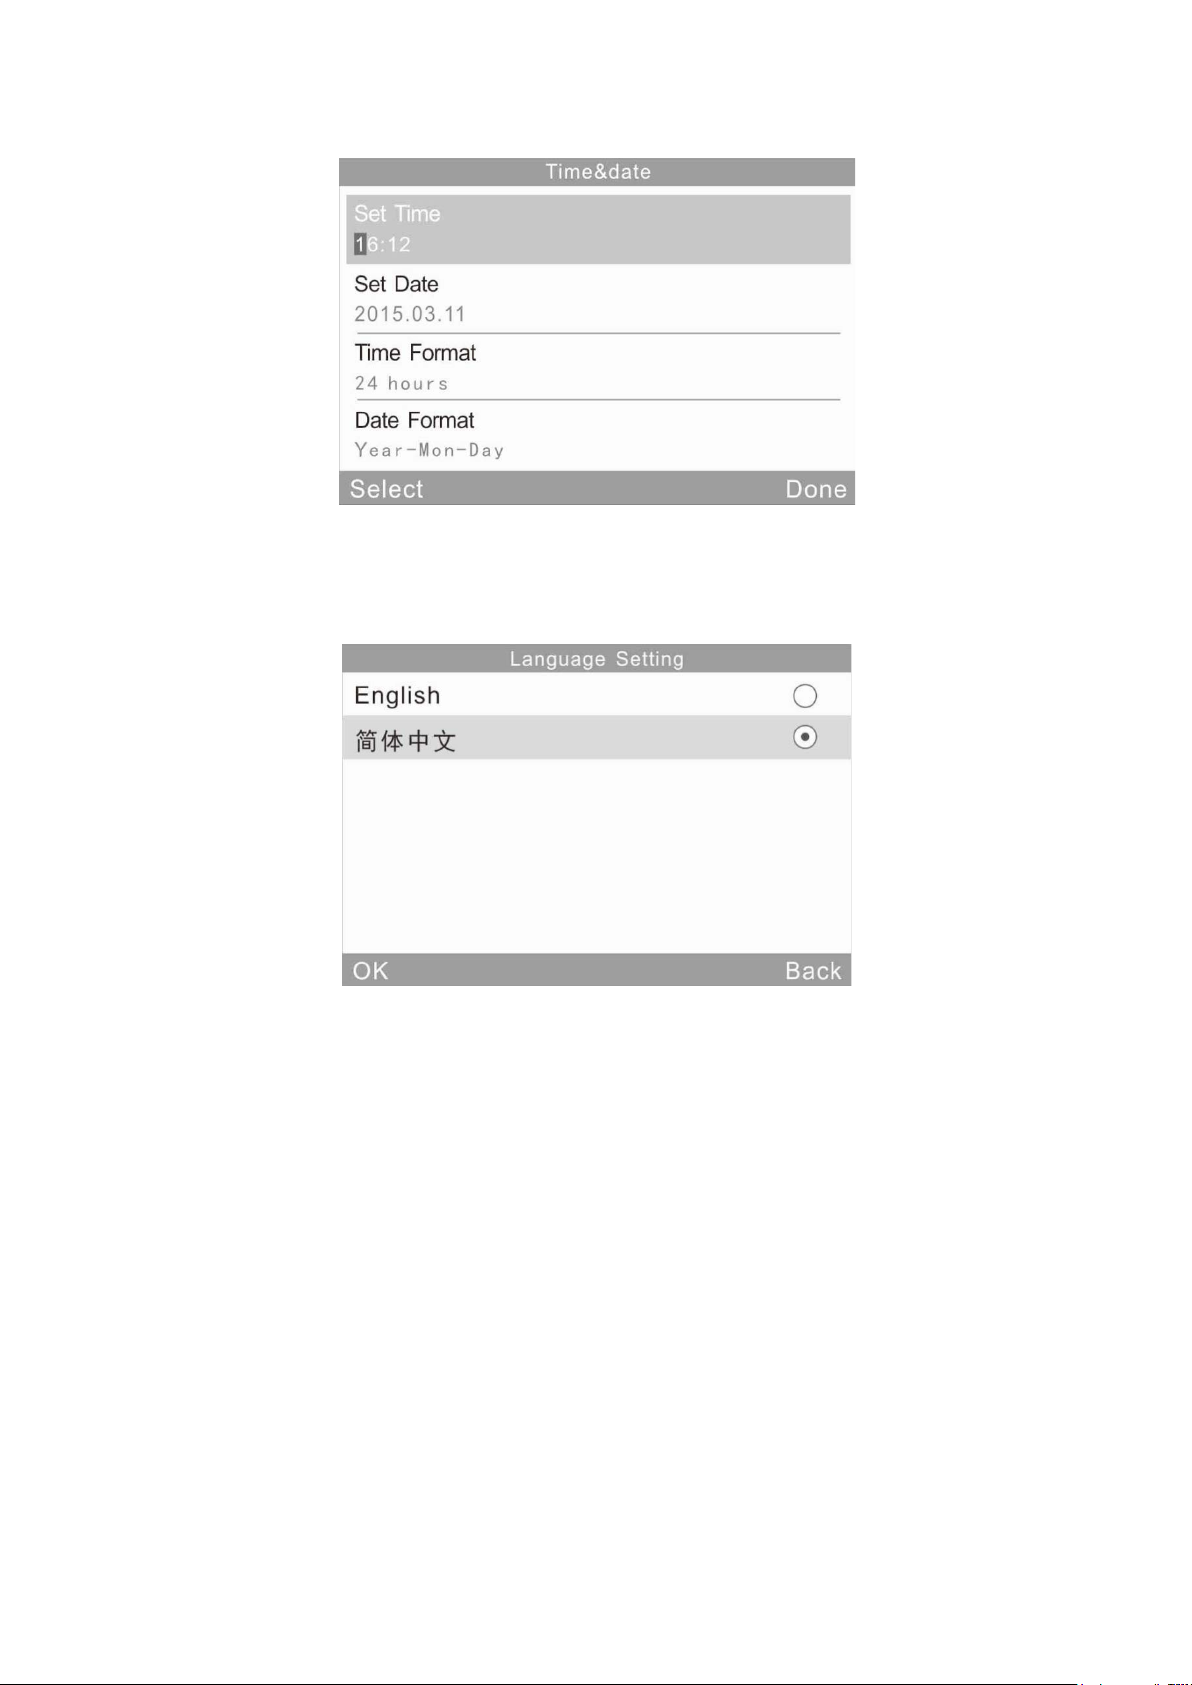
Figure 41 Time Setting
3.6.3 Language Setting
Click “Language Setting” to set English or Chinese.
Figure 42 Language Setting
3.6.4 Backlight Time
Click “Backlight Time” to set the backlight time according to the requirements
Remarks: The instrument will turn off after one minute when the backlight goes
out.
3.6.5 Screen Brightness
Click “Screen Brightness” to adjust the brightness by “+” and “-”.
3.6.6 Operation Habit
Click “Operation Habit”. If you want to use the instrument by right hand, you
can choose “Right”. If want to use the instrument by left hand, then you can
choose “Left”.
3.6.7 Buzzer Switch
Page 26
Click “Buzzer Switch” in “Settings”. When click “Off”, it will not make a sound
when measuring. When click “on”, it will make a sound when measuring.
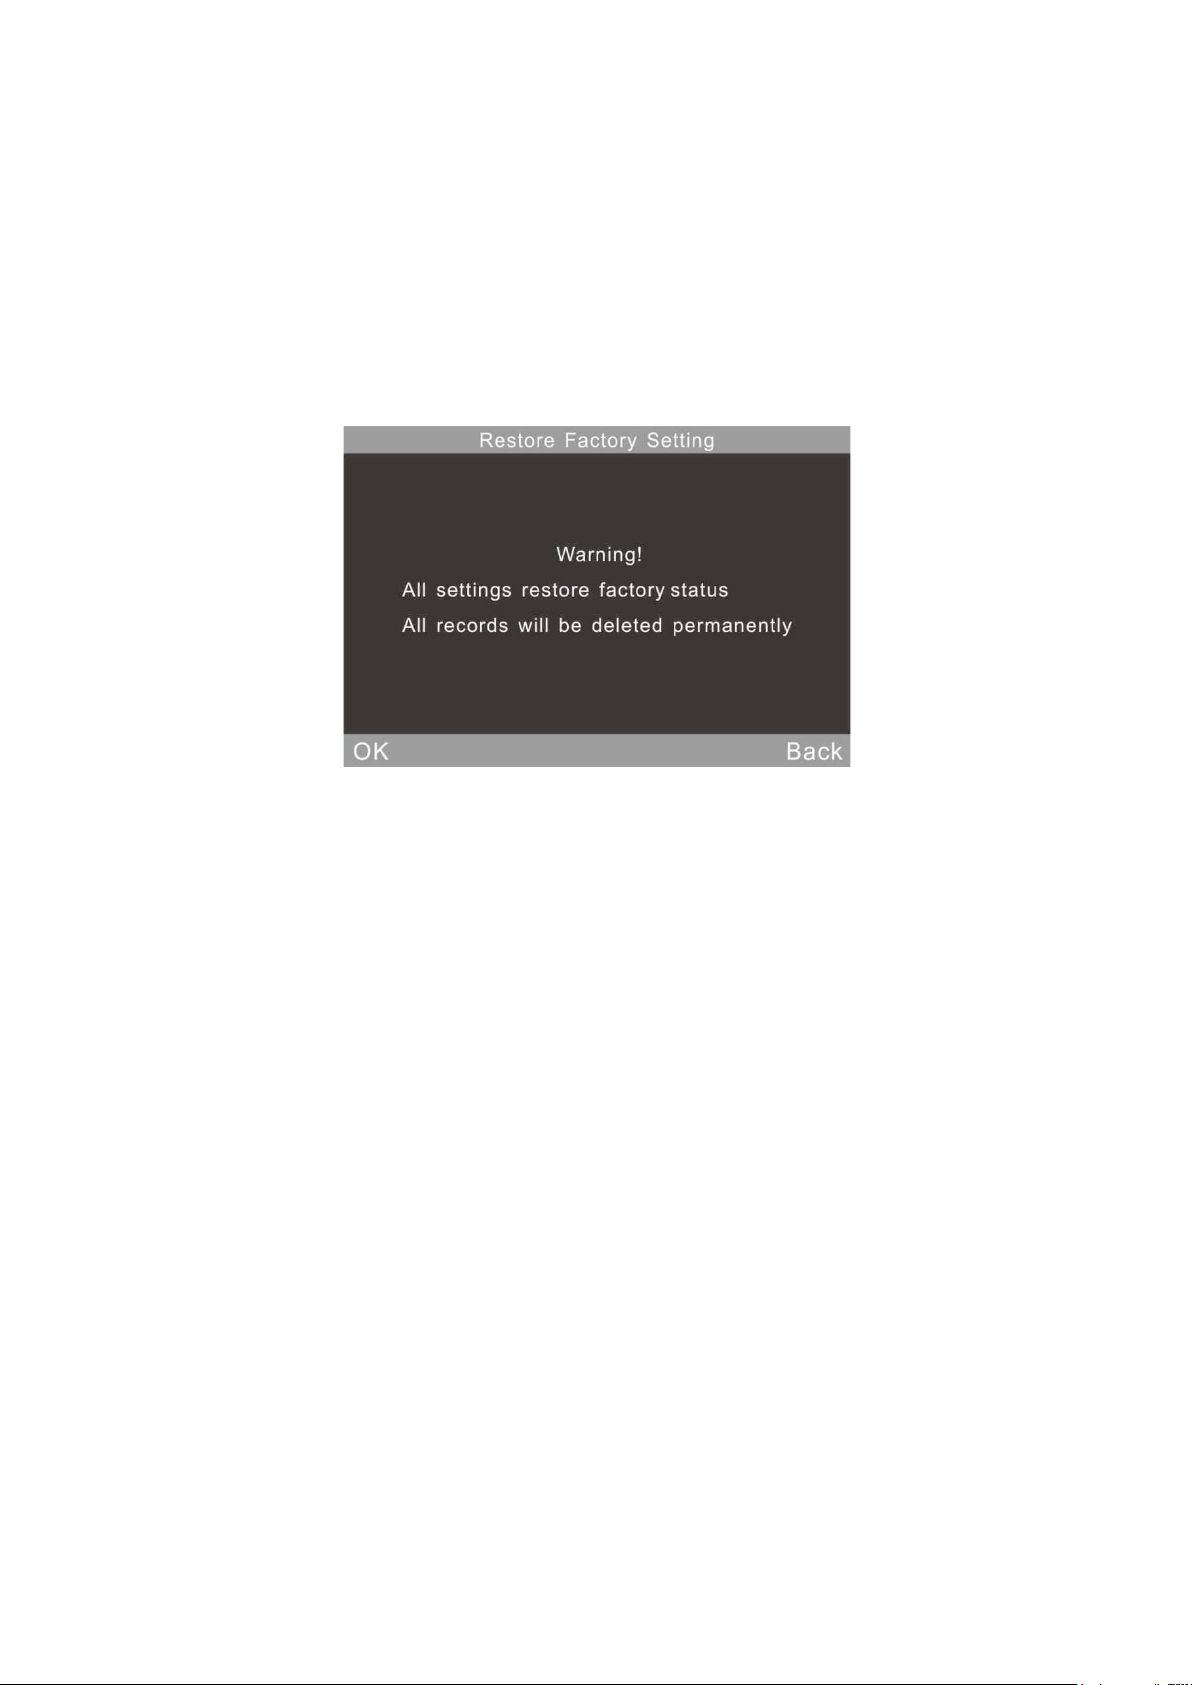
3.6.8 Restore Factory
Click “Restore Factory” in “Settings”, there will pop up a warning interface as
shown in figure 43. Click “OK”, the instrument will restore factory settings and
all records will be cleared.
Note: When set it, there will be a warning. Please operate it carefully! If you
don’t want to restore factory settings, please click “Back”.
Figure 43 Restore Factory Settings
4 Routine Maintenance
(1) The gloss meter is a precise instrument. Please operate and store it in
standard laboratory environment (Temperature: 20℃,Standard
atmospheric pressure, Humidity: 50~70%RH). Please avoid to use it in
humid environment, strong electromagnetic interface environment, high
light intensity environment and dusty environment.
(2) Standard plate is a precise optical component. Avoid being damaged by
sharp object, avoid dirtying the board and avoid exposing it to sun.
Regularly clean the standard plate by using soft cloth with alcohol in one
direction. Ensure there are no tiny particles or sundries on the soft cloth.
Before calibrating, clean the standard plate to make accurate calibration.
Attention:Forbid to use acetone solvent!
(3) In order to ensure the accuracy of the instrument, it is better send it back to
the factory or qualified Local National Institute of Metrology for calibration.
(Once a year)
(4) It needs to modify calibration value when the calibration value is different
from practical measurement value. View chapter 2.2.2 for details.
(5) The gloss meter is powered by built-in battery. When long time not using
Page 27
this instrument, please charge it biweekly in order to protect the battery and
Measurement Angle
20°/60°/85°/20°60°85°
Standard
ISO 2813, GB/T 9754, ASTM D 523, ASTM D
2457
Measuring Area(mm)
20°: 10x10, 60°: 9x15 (small aperture: 1.5x2),
85°: 5x36
Measuring Range
20°: 0-2000GU, 60°: 0~1000GU, 85°:
0~160GU
Division Value
0.1 GU
Range
0-10GU
10-100GU
100-2000GU
Repeatability
±0.1GU
±0.2GU
±0.2%GU
Reproducibility
±0.2GU
±0.5GU
±0.5%GU
Chromaticity Corresponding
Corresponding with CIE 1931(2°) under CIE
C light source
Measuring Time
0.5 second
Dimension
L*W*H : 160mm*75mm*90mm
Weight
350g
Battery
3200mAh Li-ion Battery, >10000 times(within 8
hours)
Display
TFT 3.5inch, touch screen, resolution:
320*480
Interface
USB/RS-232
Storage
Basic mode: 1000, Statistical Mode:5000,
Continuous Mode: 5000
Software
GQC6 Quality Control Software with QC report
printing function and more extended functions.
Operation Temperature
0~40℃ (32~104°F)
Storage Temperature
-20~50℃ (-4~122°F)
Humidity
<85% relative humidity, no condensation
Standard Accessories:
Power Adapter, USB cable, User Manual, CD
Calibration Plate
Optional Accessories:
Miniature Printer
Note
The specifications are subject to change
without notice.
extend the battery life.
(6) The internal clean work of the instrument should be finished by
manufacturer (suggest once a year). Do not use cleaning tools to clean the
internal instrument. Otherwise it will cause irreversible damage.
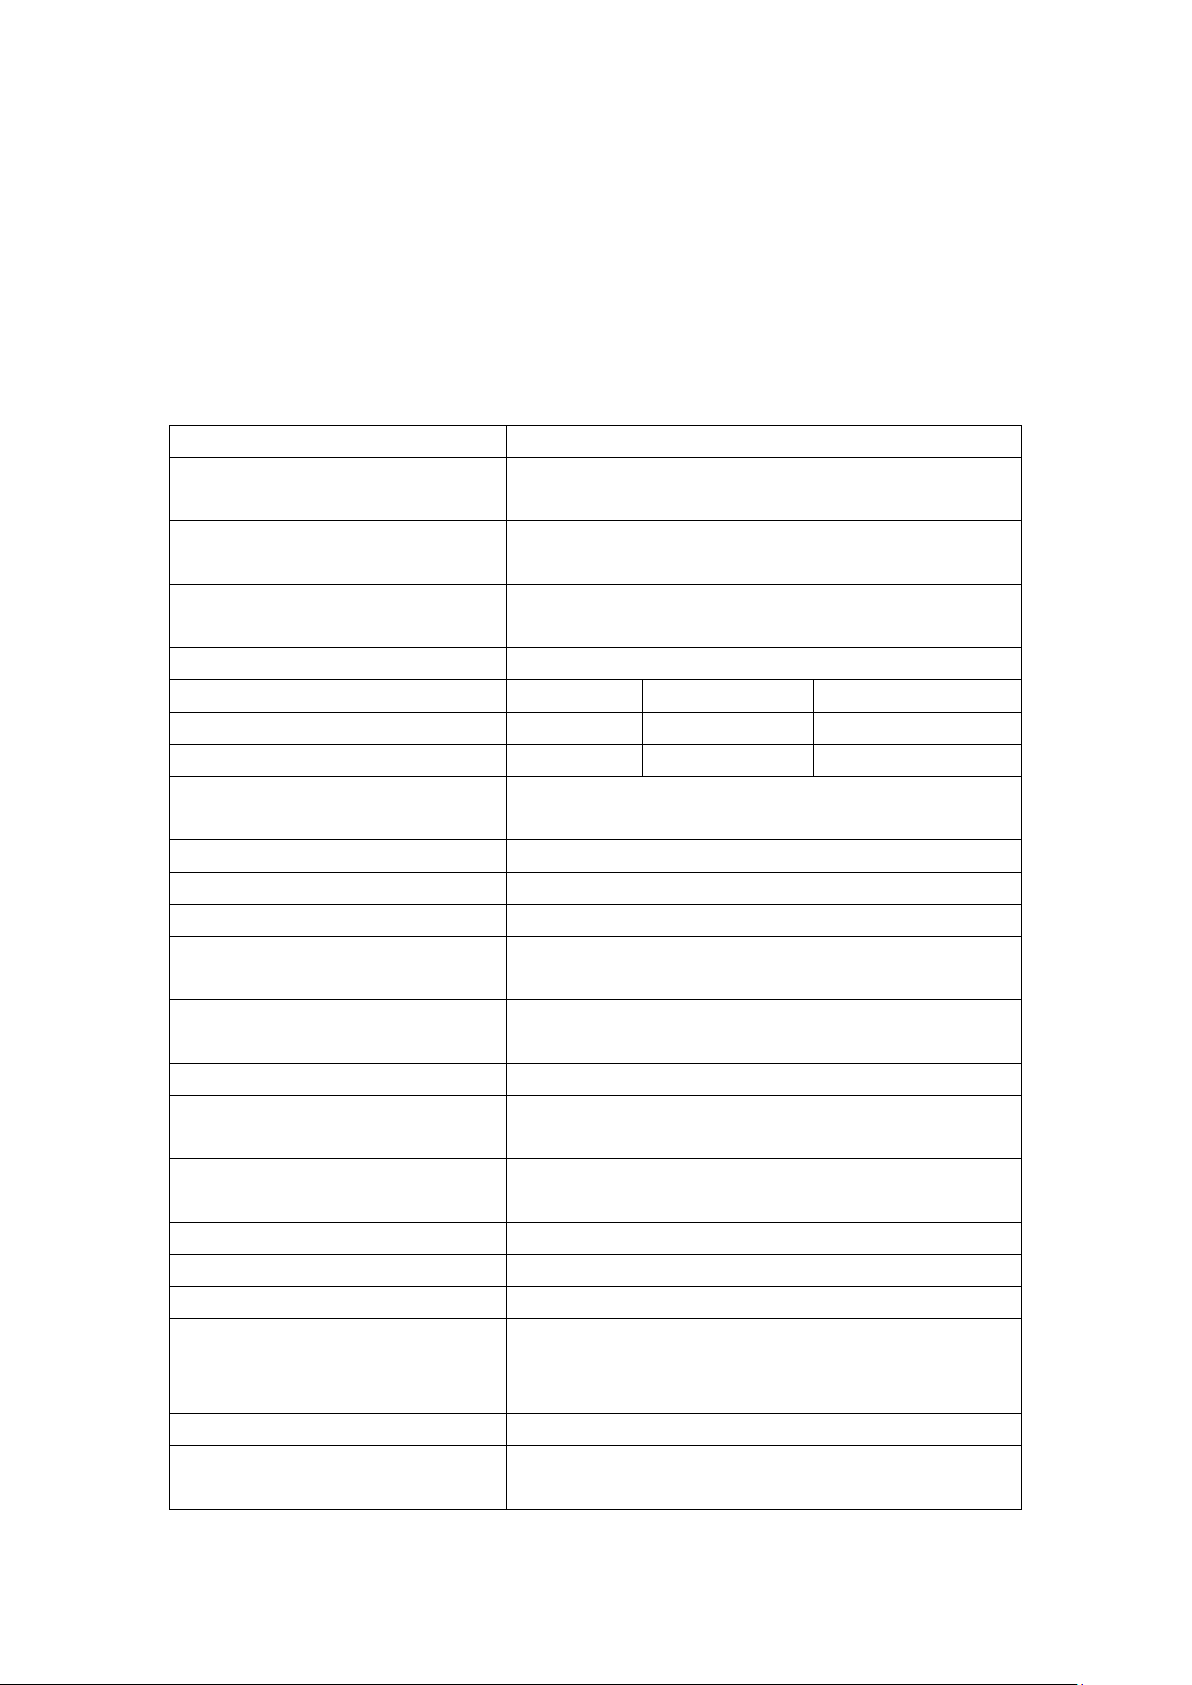
5. Technical Specifications
(Including QC software), Wiping Cloth,
 Loading...