

Page 1

User Manual
User manuals in various languages (français,
italiano, español, português, nederlands, türk, polski,
русский, 中文) can be found by using our
product search on: www.pce-instruments.com
Last change: 22 October 2019
v1.0
English
PCE-PTR 200N Dynamometer
© PCE Instruments
Page 2

Contents
1 Safety notes ........................................................................................... 1
2 Specifications ........................................................................................ 2
3 Important information before use ....................................................... 2
4 Introduction ........................................................................................... 3
5 Characteristics ...................................................................................... 3
6 Delivery contents .................................................................................. 3
7 Device description ................................................................................ 4
7.1 Keys and adaptor ............................................................................................................. 4
7.2 Dimensions ...................................................................................................................... 5
7.3 Circuit diagram of 3.5 mm jack ......................................................................................... 5
7.4 Display ............................................................................................................................. 6
7.5 Keys ................................................................................................................................. 7
8 Operation ............................................................................................... 8
9 Options ................................................................................................. 10
10 Alarm .................................................................................................... 11
11 Calibration by using weights ............................................................. 11
12 Rechargeable battery ......................................................................... 11
13 Measurement ....................................................................................... 11
13.1
Choosing the sample
13.2
Preparation of the sample
13.3 Important information about the measurement ................................................................12
..........................................................................................................11
................................................................................................12
14 Contact ............................................................................................... 14
15 Disposal ............................................................................................... 14
© PCE Instruments
Page 3

© PCE Instruments
1
1 Safety notes
Please read this manual carefully and completely before you use the device for the first time. The
device may only be used by qualified personnel and repaired by PCE Instruments personnel.
Damage or injuries caused by non-observance of the manual are excluded from our liability and
not covered by our warranty.
• The device must only be used as described in this instruction manual. If used otherwise,
this can cause dangerous situations for the user and damage to the meter.
• The instrument may only be used if the environmental conditions (temperature, relative
humidity, …) are within the ranges stated in the technical specifications. Do not expose
the device to extreme temperatures, direct sunlight, extreme humidity or moisture.
• Do not expose the device to shocks or strong vibrations.
• The case should only be opened by qualified PCE Instruments personnel.
• Never use the instrument when your hands are wet.
• You must not make any technical changes to the device.
• The appliance should only be cleaned with a damp cloth. Use only pH-neutral cleaner,
no abrasives or solvents.
• The device must only be used with accessories from PCE Instruments or equivalent.
• Before each use, inspect the case for visible damage. If any damage is visible, do not
use the device.
• Do not use the instrument in explosive atmospheres.
• The measurement range as stated in the specifications must not be exceeded under
any circumstances.
• Non-observance of the safety notes can cause damage to the device and injuries to
the user.
We do not assume liability for printing errors or any other mistakes in this manual.
We expressly point to our general guarantee terms which can be found in our general terms of
business.
If you have any questions please contact PCE Instruments. The contact details can be found at
the end of this manual.
Page 4
© PCE Instruments
2
2 Specifications
Measuring range
0 ... 200 N
Calibration
0.1 N
Pressure calibration
1 Mpa
Load cell
integrated load cell with M6 connection
Measuring range
1 ... 100 % f. s.
Measurement
accuracy
±0.5 %
Units
n, kg, lb
Display
LCD
Operating
temperature
+10 ... +30 °C
Relative humidity
15 ... 80 %
Working conditions
The device must not be located near sources of vibration or corrosive
substances
Weight
1 kg / 2.2 lb
3 Important information before use
• Wear protective mask and gloves.
• Do not use damaged or bent fixtures.
• If “Err-1” appears on the LCD, it indicates that the test load the sensor measures is 110
% larger than the rated load. Decrease the load immediately. Make sure the load
applied is smaller than 105 % the rated load after the meter is restarted.
• Make sure the force gauge is not overloaded. Overload may damage the sensor.
• Do not use sharp tools to press buttons.
• Keep the meter away from liquids and store it in a cool, dry place and away from
sources of vibration.
• Only use the charger delivered with the force gauge for charging.
• Connect the meter to the computer in line with the instructions to avoid problems.
• Only connect the charger to an intact socket as damaged sockets can cause fire.
• Make sure the charger is securely inserted into a socket if the product needs to be
charged. Looseness may cause short circuit, resulting in electric shock or fire.
• Remove the charger after charging to avoid accidents.
• Do not touch the power adaptor with wet hands.
• Do not bend or twist the test head. A measurement may only be made perpendicularly
to the meter.
Page 5

© PCE Instruments
3
4 Introduction
The penetrometer PCE-PTR 200N is a practical handheld meter to check the degree of
ripeness of different types of fruit. This penetrometer is more accurate than most other models.
The penetrometer will provide some valuable information about the ideal harvest time. The
meter will also help monitoring the quality during storage, transport and sales. The penetrometer
is equipped with an internal load cell controlled by a microprocessor. This microprocessor
makes a quick and accurate readout possible. The meter has a mounting fixture for a test stand.
This reduces possible user error to a minimum and makes series of measurements possible.
5 Characteristics
Display
LCD / 180 ° rotatable / backlit
Interface
USB
Alarm
Fracture alarm, upper / lower offset, limit
alarm
Open Collector Transistor
12 V / 50 mA
Memory
10 measurements
Peak value measurement
yes
6 Delivery contents
1 x Penetrometer PCE-PTR 200N
1 x Penetration tip Ø 6 mm
1 x Penetration tip Ø 8 mm
1 x Penetration tip Ø 11 mm
1 x Flathead adapter
1 x Hook adapter
1 x Ball head adapter
1 x Chisel head adapter
1 x Notch head adapter
1 x Extension rod (65 mm / 2.55")
1 x USB cable
1 x Power plug
2 x Locking ring
1 x Equipment case
1 x Operation manual
The evaluation software can be downloaded here: https://www.pce-
instruments.com/deutsch/download-win_4.htm.
Page 6
© PCE Instruments
4
7 Device description
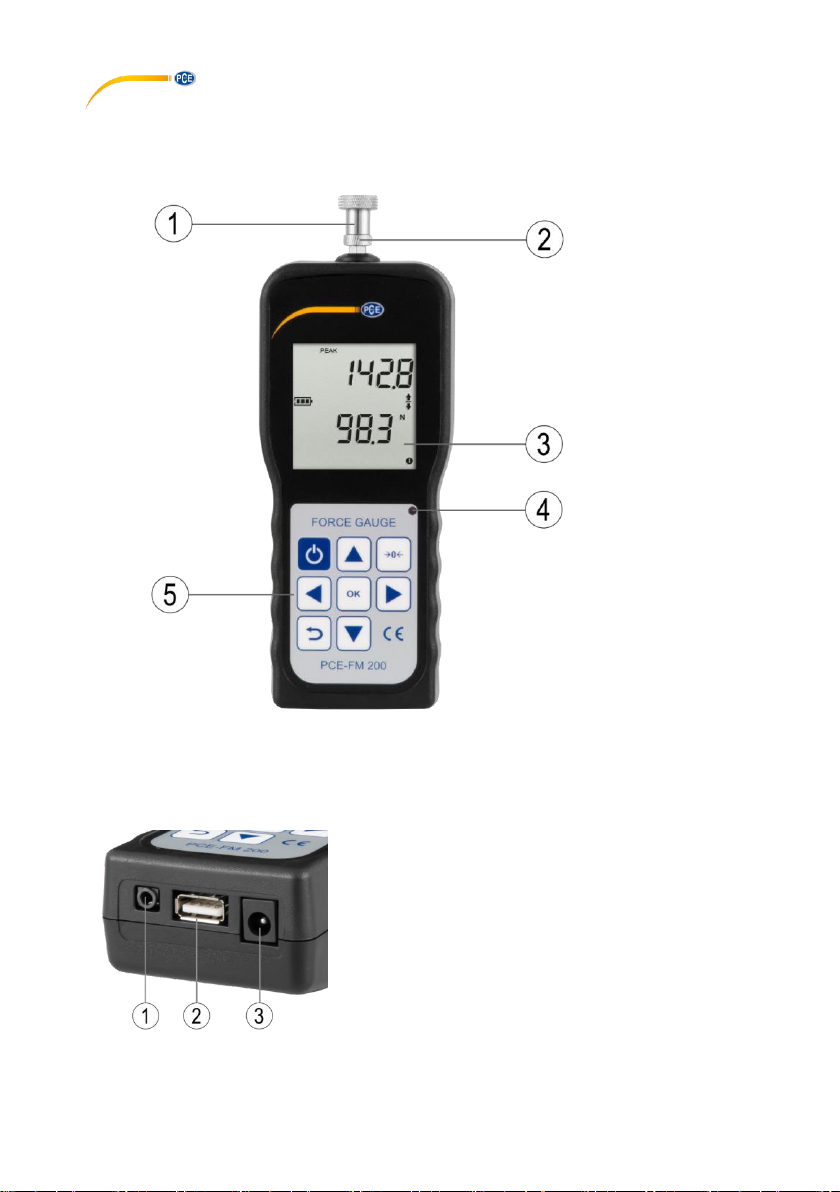
7.1 Keys and adaptor
1. Measuring adaptor
2. Clamping nut
3. LCD
4. LED
5. Control panel
1. Switched output
2. USB interface
3. Power connection
Page 7
© PCE Instruments
5
7.2 Dimensions
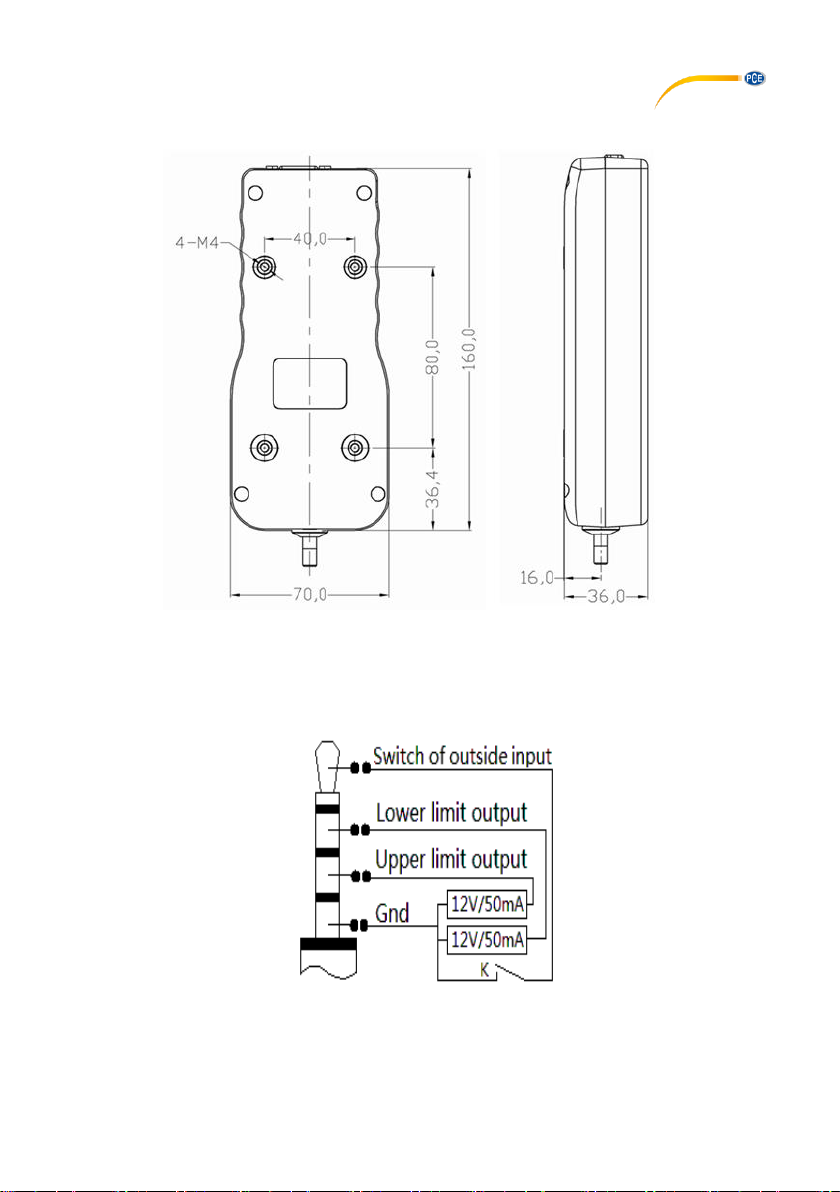
All dimensions in mm
7.3 Circuit diagram of 3.5 mm jack
Here you can find the circuit diagram for connecting a 3.5 mm jack in order to establish a
connection to the switched outputs.
Page 8
© PCE Instruments
6
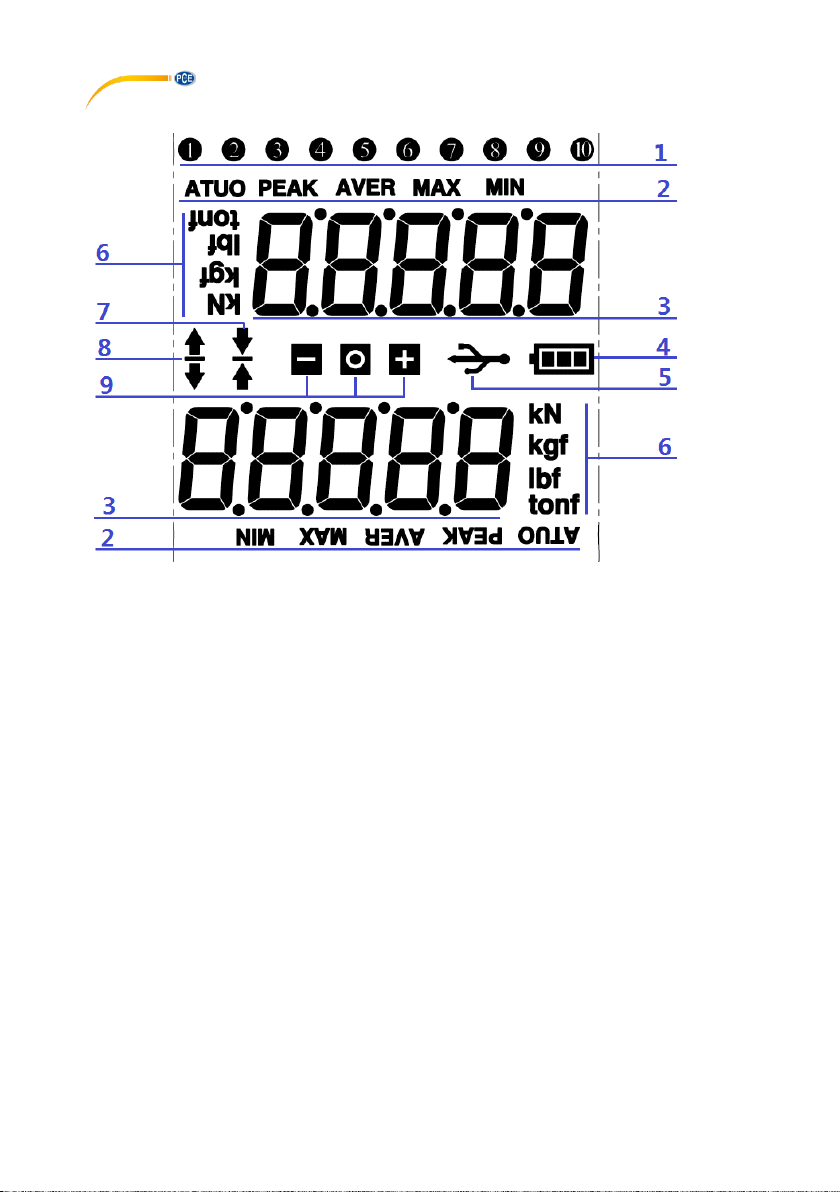
7.4 Display
1. Number of values saved (these do not turn when the display does)
2. ATUO: Automatic peak clearing
PEAK: Manual peak clearing
AVER: Average of saved peak values
MAX: highest value measured
MIN: lowest measured value
3. Displays current the peak value or current measurement value in real time, depending on
display orientation
4. Battery level indication
5. PC connection
6. Measuring unit
7. Push (compression) icon
8. Pull (tension) icon
9. “—” the displayed value is smaller than the set limit
“○” Measurement successful or interrupted
“+” the displayed value exceeds the set limit
Page 9
© PCE Instruments
7
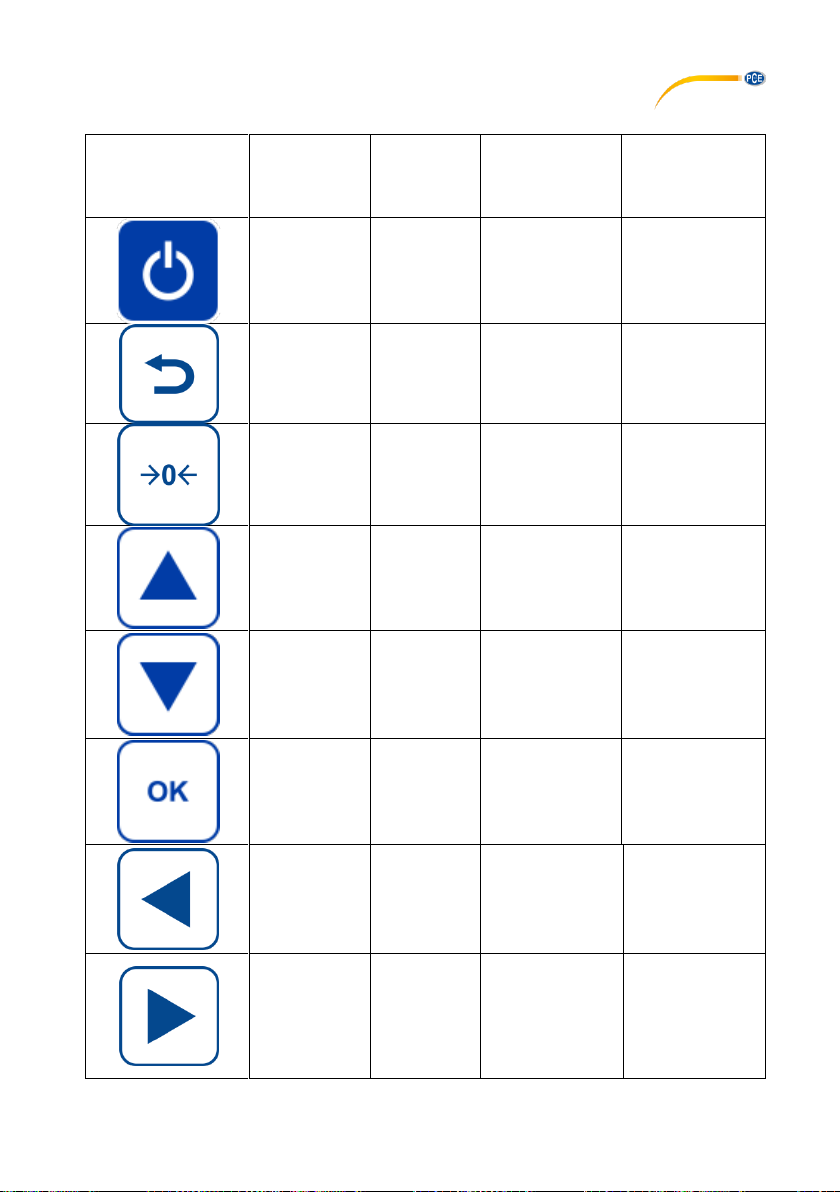
7.5 Keys
Key
Test mode
Online test
mode
(USB
connected)
Storage mode
Menu
On / off
On / off x x
Unit
x
Exit mode
Leave option
Zeroing
Zeroing
Memory is
cleared
x
Reading
and unit are
sent
x
Data are sent
Up
Saved
readings
are qeried
x
Switch
between
AVER, MAX
and MIN
Down
Menu is
opened
Invalid
Back to
measurement
mode
Selected
option is
opened
Displayed
value is
saved
Displayed
value is
saved
Left
x
Peak value
is deleted
Peak value
is deleted
Right
x
Page 10
© PCE Instruments
8
8 Operation
Power on and off:
- Press to power on/off.
Open menu and select an option:
- In test mode, press to open the settings menu and to select individual options.
Zero and delete a saved value:
- In test mode, press to reset the measured value to zero.
- In storage mode, press to delete individual memory items. These individual
memory items flash and can be selected by means of the arrow keys and
and deleted individually.
Change unit and leave a mode:
- In test mode, press to change the unit.
- In the menu, you can use to leave a selected option or menu.
- In storage mode, you can use to leave this mode and return to test mode.
Navigate through the options:
- In the menu, you can use the arrow keys and to navigate through the
options.
Save:
- In test mode, you can reset the peak value by using the key.
- Also in test mode, you can save the peak value by using the key.
- In storage mode, you can navigate to the right through the memory items by using the
key.
- Also in storage mode, you can navigate to the left through the memory items by using
the key.
Page 11

© PCE Instruments
9
Querying saved values, AVER, MAX, MIN:
- In test mode, you can open storage mode with the key.
- In storage mode, you can press to switch between AVER, MAX and MIN.
USB interface:
- Please observe the instructions in the separate software manual.
Page 12

© PCE Instruments
10
9 Options
Option
Name
Options
Meaning
Default setting
F-0
code
code
Analogue code
x
F-1
ast
close/1d/2d/3d
Auto zero
from 1/2/3 digits
1 d
F-2
speed
6~200Hz
Measuring frequency
50 Hz
F-3
cal
Two- or three-
point
Calibration
x
F-4
old_g
9. 7000~9. 9000
Gravity value at
calibration location
9. 7833
F-5
new_g
9. 7000~9. 9000
Gravity value at user
location
9. 7833
F6
j-out
inter/outer/cut/ off
Alarm settings
Inter (within the alarm
limit)
Outer (outside the alarm
limit)
Cut (material fracture
alarm)
Off (alarm deactivated)
outer: outside
alarm limit
F-7
lo Lower alarm limit
0
F-8
hi Upper alarm limit
Maximum
F-9
cut
10~90 %
Overload alarm
50 %
F-10
peak
key/3~60 sec
Display time of peak
value
Remove by
pressing key
F-11
bps
4800~57600
Bandwidth
38400 bps
F-12
print
key/stabl/chang/co
nti
Key: data transfer when
key is pressed
Stabl: data transfer when
value is stable
Chang: data transfer
when value changes
Conti: permanent data
transfer
Key: data
transfer when
key is pressed
F-13
angle
0 °/180 °
Display orientation
0 °
F-14
off_t
no/3~60 min
Auto Power Off
Off: Auto power
Off deactivated
F-15
Led
on/off/auto
Backlight
On (always on)
Off (always off)
Auto: automatic (5
seconds)
Auto: automatic
F-16
reset
no/yes
Factory settings
No
Page 13

© PCE Instruments
11
10 Alarm
- Inter: This option triggers an audible signal when the measured value is between the
lower and the upper alarm limit. „+“ and „-“ will flash in the display.
- Outer: This option triggers an audible signal when:
A: the measured value is below the lower limit („-“ will flash in the display)
B: the measured value is above the upper limit („+“ will flash in the display)
- Off: This option deactivates the alarm.
11 Calibration by using weights
You can select either „cal=2“ (2-point calibration) or „cal=3“ (3-point calibration).
Go to the menu F-3 and either select „cal=2“ or „cal=3“ by means of the arrow keys. Confirm your
selection with OK. Remove all attachments from the device that affect the measuring cell. Confirm
the zero calibration by pressing the OK key. To calibrate the second point, you can use the preset weight or select the desired weight by using the arrow keys. Confirm with the OK key. Attach
the chosen weight to the device and confirm with OK. The indication in the display will start
flashing. When the calibration is finished, the display will “CAL”.
The procedure for the 3-point calibration is the same as for the 2-point calibration, just with one
more calibration point.
12 Rechargeable battery
This product is configured with a 1600 mAh 6 V Ni-Hi rechargeable battery. If it is fully charged,
the product can be running uninterruptedly for 10 hours. When shut down, the battery will
discharge in 3 months. Make sure the battery level is always sufficient. In case of power
shortage, use the delivered DC 12 V/1000 mA power adaptor to charge the product. It will be
fully charged within 8 ~ 10 hours. Remove the power adapter immediately after the product
prompts full charge. Otherwise, longtime charging may cause the battery to overheat. Only
charge the battery when it is completely flat. Frequent charging shortens the battery life.
13 Measurement
13.1
Choosing the sample
Following this procedure before making a measurement is very important to ensure valid readings
which are helpful when it comes to determining the best harvest time. Make sure the samples
represent a typical part of the total harvest (minimum number of samples, sizes, quality, etc.). It
is recommended to create your own sampling protocol. The samples should come from various
areas of the harvest. It is important that the selected fruit has equal average sizes as the firmness
also depends on the size (the firmness increases with the size). I is also crucial that the chosen
samples are completely flawless and undamaged. The measuring interval should be about every
3 … 5 days and approx. 10 pieces of fruit should be measured.
Page 14

© PCE Instruments
12
13.2
Preparation of the sample
2 measurements of the centre of each piece of fruit (one per side) should be made. The mean
value will then be calculated from both measurements.
Choose the measuring spots and remove the skin at the selected spots. The peeled area should
be a bit larger than the diameter of the penetration tip. The penetration tip to be selected mainly
depends on the type of fruit and the degree of ripeness. The smaller tips are normally used for
relatively firm or small samples. The larger tips, on the other hand, are used for softer and larger
samples. It is very important to get reproducible and comparable readings. However, it is also
important that the samples have the same temperature. The temperature is decisive for the
firmness of fruit, i. e. the higher the temperature, the softer the fruit will be.
13.3 Important information about the measurement
After preparing the sample and selecting the right tip, you can measure the firmness at both
measuring spots. To get a correct firmness value, the following must be observed:
During the measurement, firmly hold the sample on a flat and hard surface such as a table or a
plate to make sure the force can be exerted correctly.
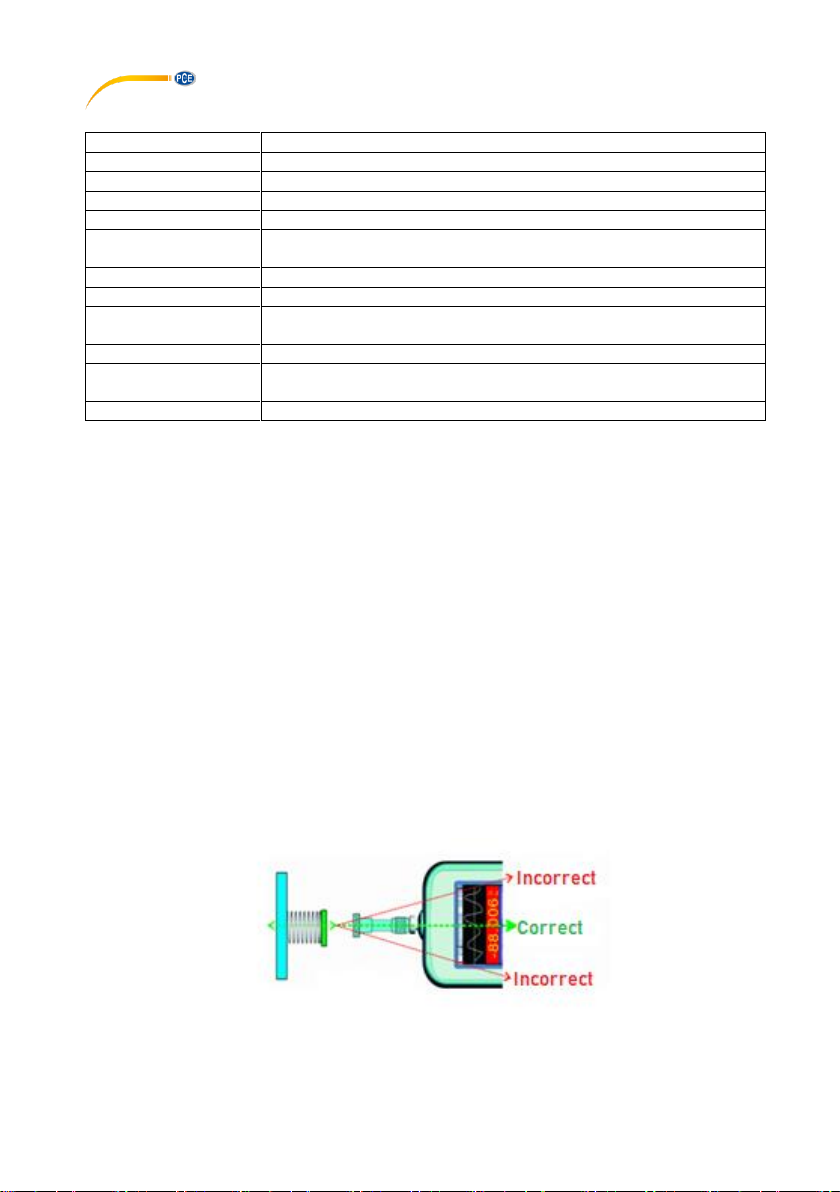
Make sure that the head of the meter, the penetration tip and the sample point at the same
direction during the complete measurement. Avoid movement or turning of the measuring tip
during the measurement. Always apply pressure perpendicularly. Different measuring angles are
not allowed.
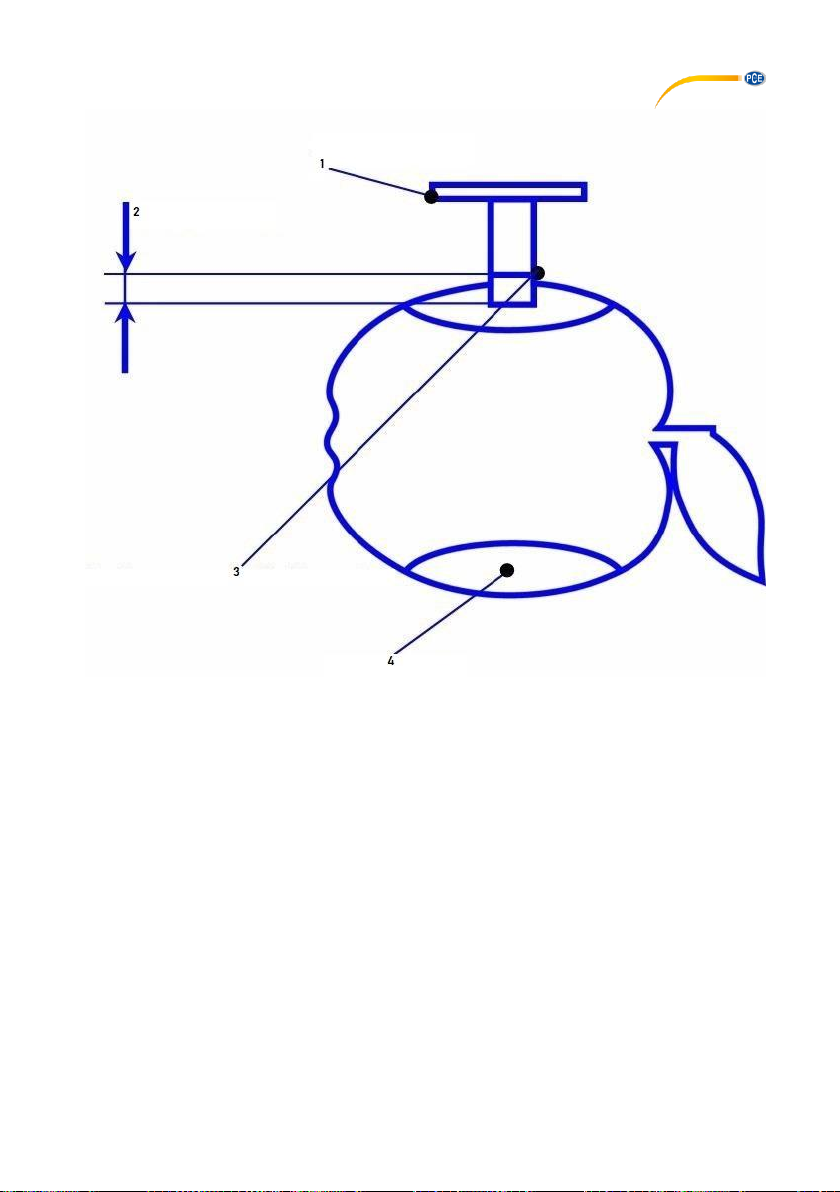
Apply SLOW AND EQUAL pressure with the penetration tip up to the recess that is marked on
the tip. Irregular pressure can falsify the measurement. The complete procedure should take
approx. 2 seconds.
Page 15
© PCE Instruments
13
1 Locking ring
2 t = 2 seconds
3 Mark on penetration tip
4 Peeled zone
Try to make all measurements under equal conditions to ensure reproducible values for
comparative and statistical purposes.
To achieve high accuracy, use a test stand which enables you to apply regular pressure at a
constant penetration angle.
Page 16

14 Contact
If you have any questions, suggestions or technical problems, please do not hesitate to contact
us. You will find the relevant contact information at the end of this user manual.
15 Disposal
For the disposal of batteries in the EU, the 2006/66/EC directive of the European
Parliament applies. Due to the contained pollutants, batteries must not be disposed of as
household waste. They must be given to collection points designed for that purpose.
In order to comply with the EU directive 2012/19/EU we take our devices back. We either reuse them or give them to a recycling company which disposes of the devices in line with law.
For countries outside the EU, batteries and devices should be disposed of in accordance
with your local waste regulations.
If you have any questions, please contact PCE Instruments.
© PCE Instruments
14
Page 17

© PCE Instruments
15
PCE Instruments contact information
Germany France Spain
PCE Deutschland GmbH PCE Instruments France EURL PCE Ibérica S.L.
Im Langel 4 23, rue de Strasbourg Calle Mayor, 53
D-59872 Meschede 67250 Soultz-Sous-Forets 02500 Tobarra (Albacete)
Deutschland France España
Tel.: +49 (0) 2903 976 99 0 Téléphone: +33 (0) 972 3537 17 Tel. : +34 967 543 548
Fax: +49 (0) 2903 976 99 29 Numéro de fax: +33 (0) 972 3537 18 Fax: +34 967 543 542
[email protected] [email protected] [email protected]
www.pce-instruments.com/deutsch www.pce-instruments.com/french www.pce-instruments.com/espanol
Germany United Kingdom Italy
PCE Produktions- und PCE Instruments UK Ltd PCE Italia s.r.l.
Entwicklungsgesellschaft mbH Unit 11 Southpoint Business Park Via Pesciatina 878 / B-Interno 6
Im Langel 26 Ensign Way, Southampton 55010 Loc. Gragnano
D-59872 Meschede Hampshire Capannori (Lucca)
Deutschland United Kingdom, SO31 4RF Italia
Tel.: +49 (0) 2903 976 99 471 Tel: +44 (0) 2380 98703 0 Telefono: +39 0583 975 114
Fax: +49 (0) 2903 976 99 9971 Fax: +44 (0) 2380 98703 9 Fax: +39 0583 974 824
[email protected] [email protected] [email protected]
www.pce-instruments.com/deutsch www.pce-instruments.com/english www.pce-instruments.com/italiano
The Netherlands China Hong Kong
PCE Brookhuis B.V. PCE (Beijing) Technology Co., Limited PCE Instruments HK Ltd.
Institutenweg 15 1519 Room, 6 Building Unit J, 21/F., COS Centre
7521 PH Enschede Zhong Ang Times Plaza 56 Tsun Yip Street
Nederland No. 9 Mentougou Road, Tou Gou District Kwun Tong
Telefoon: +31 (0)53 737 01 92 102300 Beijing, China Kowloon, Hong Kong
[email protected] Tel: +86 (10) 8893 9660 Tel: +852-301-84912
www.pce-instruments.com/dutch [email protected] [email protected]
www.pce-instruments.cn www.pce-instruments.cn
United States of America Turkey
PCE Americas Inc. PCE Teknik Cihazları Ltd.Şti.
711 Commerce Way suite 8 Halkalı Merkez Mah.
Jupiter / Palm Beach Pehlivan Sok. No.6/C
33458 FL 34303 Küçükçekmece - İstanbul
USA Türkiye
Tel: +1 (561) 320-9162 Tel: 0212 471 11 47
Fax: +1 (561) 320-9176 Faks: 0212 705 53 93
[email protected] [email protected]
www.pce-instruments.com/us www.pce-instruments.com/turkish
 Loading...