


PCE-MSM 4 Schallpegelmessgerät / sound level meter
Bedienungsanleitung
User Manual
User manuals in various languages (français,
italiano, español, português, nederlands, türk, polski,
русский, 中文) can be downloaded here:
www.pce-instruments.com
Letzte Änderung / last change: 16 February 2017
v1.0
Deutsch
English

© PCE Instruments
16
English
1 Safety notes
Please read this manual carefully and completely before you use the device for the first time.
The device may only be used by qualified personnel and repaired by PCE Instruments
personnel. Damage or injuries caused by non-observance of the manual are excluded from our
liability and not covered by our warranty.
The device must only be used as described in this instruction manual. If used
otherwise, this can cause dangerous situations for the user and damage to the meter.
The instrument may only be used if the environmental conditions (temperature,
relative humidity, …) are within the ranges stated in the technical specifications. Do
not expose the device to extreme temperatures, direct sunlight, extreme humidity or
moisture.
Do not expose the device to shocks or strong vibrations.
The case should only be opened by qualified PCE Instruments personnel.
Never use the instrument when your hands are wet.
You must not make any technical changes to the device.
The appliance should only be cleaned with a damp cloth. Use only pH-neutral
cleaner, no abrasives or solvents.
The device must only be used with accessories from PCE Instruments or equivalent.
Before each use, inspect the case for visible damage. If any damage is visible, do not
use the device.
Do not use the instrument in explosive atmospheres.
The measurement range as stated in the specifications must not be exceeded under
any circumstances.
Non-observance of the safety notes can cause damage to the device and injuries to
the user.
We do not assume liability for printing errors or any other mistakes in this manual.
We expressly point to our general guarantee terms which can be found in our general terms of
business.
If you have any questions please contact PCE Instruments. The contact details can be found at
the end of this manual.

© PCE Instruments
17
English
2 Specifications
2.1 Technical specifications
Measuring ranges
Lo: 30 … 80 dB
Med: 50 … 100 dB
Hi: 80 … 130 dB
Auto: 30 … 130 dB
Accuracy
± 1.4 dB
Resolution
0.1 dB
Dynamic range
50 dB
Frequency range
31.5 Hz … 8 kHz
Frequency weighing
A/C
Sampling rate
FAST: 125 ms
SLOW: 1 s
Standard
IEC 61672-1 class 2
Microphone
½ “ electret condenser microphone
Display
4 digit LCD
Display update rate
2 times/second
Functions
MIN/MAX hold, hold, automatic power-off
Interfaces
Analogue output (3.5 mm phone jack), USB
Power supply
1 x 9 V battery
Mains adaptor 9 V DC (Jack: 3.5 mm outer Ø;
1.35 mm inner Ø)
Battery life
Approx. 30 hours
Operating conditions
0 … +40 °C, 10 … 90 % RH
Storing conditions
-10 … +60 °C, 10 … 75 % RH
Dimensions
278 x 76 x 50 mm
Weight
350 g
2.2 Delivery contents
1 x sound level meter PCE-MSM 4
1 x microphone wind screen
1 x screw driver
1 x USB cable
1 x Software
1 x 9 V battery
1 x instruction manual

© PCE Instruments
18
English
3 System description
3.1 Device
1. Microphone wind screen
2. Display
3. “REC”-key
4. “SETUP”-key
5. “FAST/SLOW”-key
6. “MAX/MIN”-key
7. “LEVEL”-key
8. key
9. “A/C”-key
10. “HOLD”-key
11. “On/Off”-key
1 2 3
4
5
6 7 8 9 10
11
© PCE Instruments
19
English
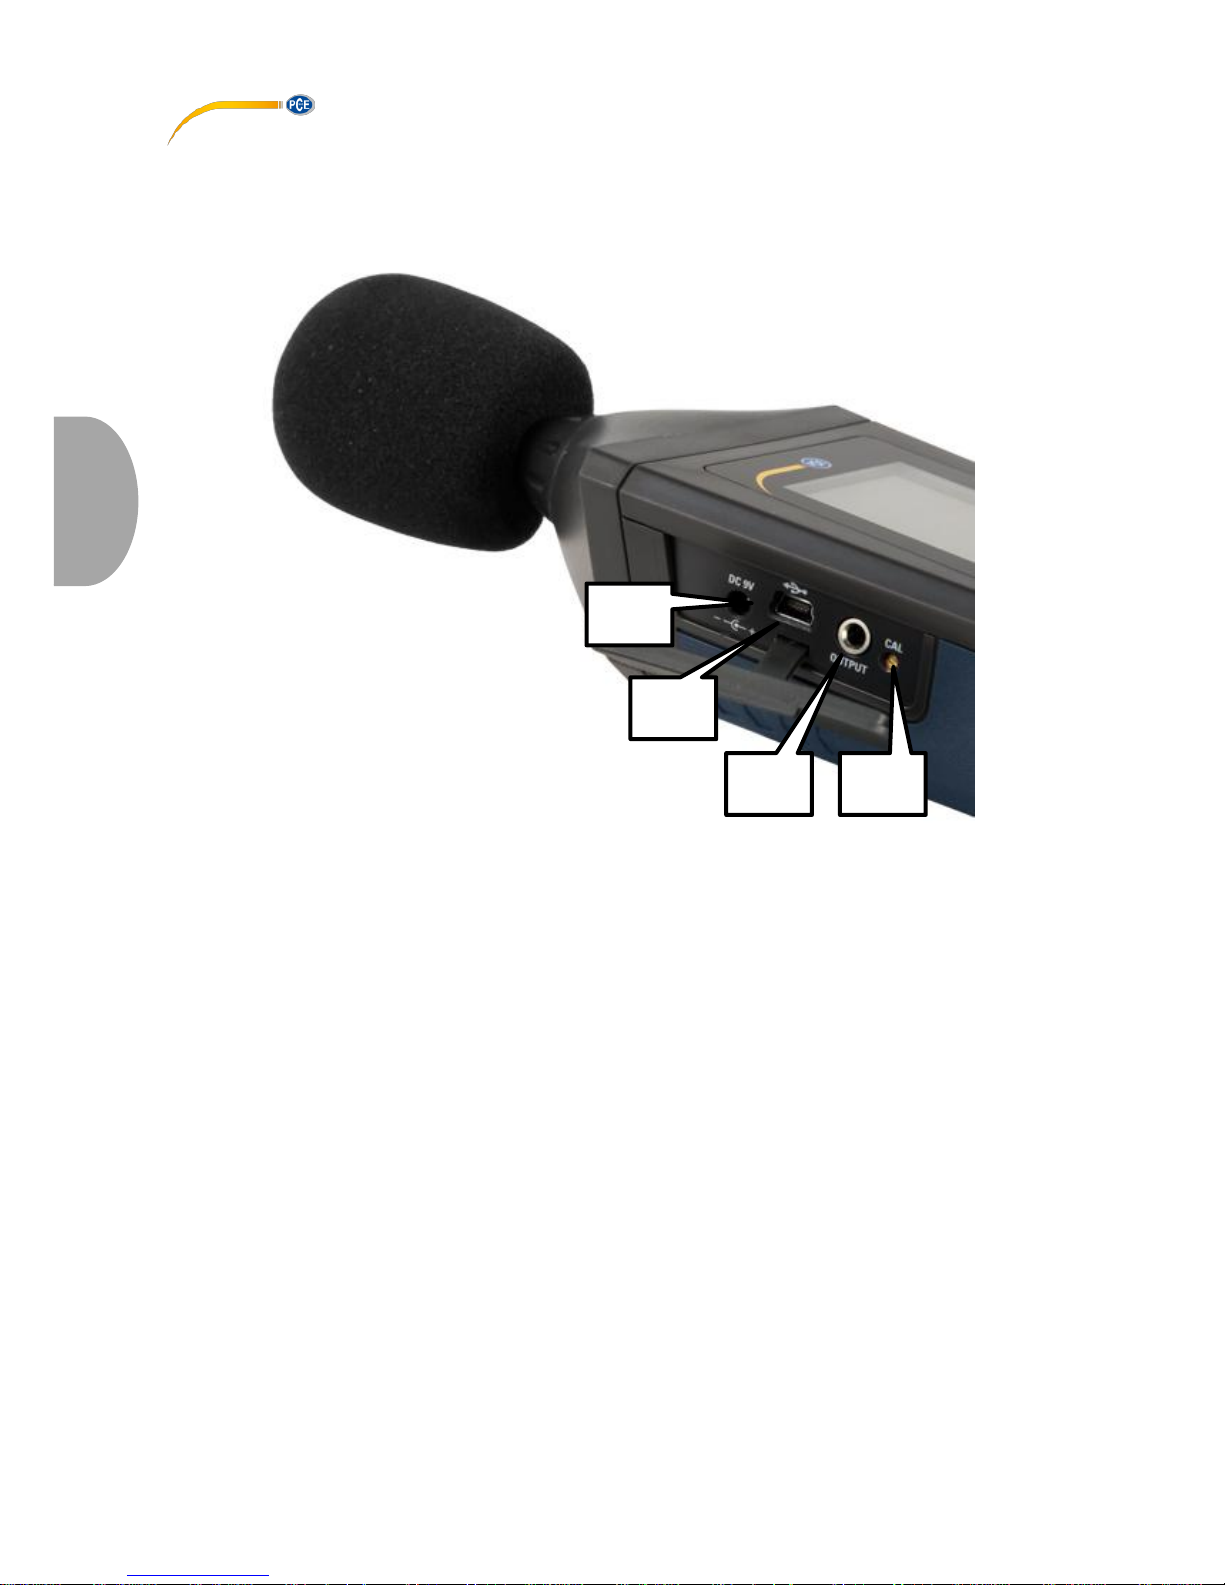
12. Connector for mains adaptor
13. USB interface
14. Analogue output
15. Calibration screw
12
13
14
15

© PCE Instruments
20
English
3.2 Interfaces
Connector for mains adaptor (12)
Voltage: 9 V DC
Jack: outer Ø: 3.5 mm; inner Ø: 1.35 mm
USB interface (13)
Data rate: 9600 bps
Analogue output (14)
OUTPUT
GROUND
OUTPUT
AC
DC
AC: output voltage: 1 V RMS (corresponding to maximum value of the selected measuring
range)
Resistance: 100 Ω
DC: output voltage: 10 mV/dB
Resistance: 1 kΩ
Potentiometer (15)
The potentiometer is used for calibrating the sound level meter in combination with a sound
calibrator.

© PCE Instruments
21
English
3.3 Display
Indication
Meaning
UNDER // OVER
Measuring range exceeded(OVER) or undercut (UNDER)
MAX // MIN
Maximum value (MAX) or minimal value (MIN) is frozen on
the display
FAST // SLOW
Fast or slow sampling rate selected
88 – 188 and scale
Display of the selected measuring range
Automatic power-off function is active
Battery voltage is low
REC
Data transmission enabled
FULL
Internal memory is full
dBA
A weighing active
dBC
C weighing active
AUTO
Automatic measuring range selection
HOLD
Hold function is active

© PCE Instruments
22
English
3.4 Function keys
Key
Function
REC (3)
Data transmission enabled/disabled
SETUP (4)
Activate/deactivate auto power-off function
Press and hold before turning on the device to get to the
date/time settings
FAST/SLOW (5)
Switch between fast and slow sampling rate
MAX/MIN (6)
Activate/deactivate max and min hold
LEVEL (7)
Switch between the different measuring ranges
(8)
Activate/deactivate display backlight
A/C (9)
Switch between A and C weighing of the sound level
HOLD (10)
Freeze/unfreeze the current reading on the display
On/Off (11)
Turn the sound level meter on/off
4 Getting started
Insert the battery
To insert the battery, follow these steps:
1. Open the battery compartment on the back of the device.
2. Connect a 9V battery to the connector and place it in the battery compartment.
3. Close the battery compartment
If the battery voltage is low, an indication appears on the display. Please replace the
battery when this happens.
Mains adaptor
If you want to use a mains adaptor, connect it to the power connector on the side of the device
(12). Make sure that the output voltage of the mains adaptor is 9 V DC.
The jack of the mains adaptor has to have the following dimensions:
Outer Ø: 3.5 mm
Inner Ø: 1.35 mm

© PCE Instruments
23
English
5 Operation
5.1 Measurement
To take a measurement, turn on the device by pressing the “On/Off” key. Once the device gets
to the main screen, it measures the sound level continuously.
To select one of the available measuring ranges, press the “LEVEL” key. You can choose
between the following options: Lo (30 … 80 dB), Med (50 … 100 dB), Hi (80 …130 dB), Auto
(automatic measuring range selection).
Make your choice depending on the ambient sound level. If the ambient sound level falls below
the selected measuring range, the display shows “UNDER”. If the ambient sound level exceeds
the selected measuring range, the display shows “OVER”.
To change the frequency weighing of the sound level measurements, press the “A/C” key. You
can switch between A-weighing and C-weighing.
To change the sampling rate, press the “FAST/SLOW” key. You can switch between “FAST” (1
measurement / 125 ms) and “SLOW” (1 measurement / 1 s).
5.2 Further functions
5.2.1 MIN/MAX hold function
You can freeze the maximum and minimum values on the display. To do so, press the
“MAX/MIN” key. Now, a “MAX” indication appears on the display, which means that the
maximum value (since the activation of the function) is shown on the display.
Press the “MAX/MIN” key again to activate the MIN hold mode. Now, the display shows a “MIN”
indication and the minimum value (since activation of the function) is shown on the display.
Press the “MAX/MIN” key again to deactivate the function and to return to normal measuring
mode.
5.2.2 Hold function
You can freeze the current reading on the display at any time by pressing the “HOLD” key. To
unfreeze it, press the “HOLD” key again.

© PCE Instruments
24
English
5.3 Settings
5.3.1 Date and time settings
To change the date and time settings, follow these steps:
1. While holding down the "SETUP" button, turn the unit on. Release the "SETUP"
button when the "TIME" icon appears on the display. Now you get to the date and
time settings. The display shows the date.
2. Press the "SETUP" button to enter the minute settings. The display now shows "nn"
and above that the set value. You can change the value by pressing the "LEVEL"
button. Then press the “SETUP” button to go to the hour settings.
3. The display now shows “h-A” or “h-P” with the set value above. To change the value,
press the “LEVEL” button. “h-A” stands for AM while “h-P” stands for PM. After that,
press the “SETUP” button to go to the date setting.
4. Now you are in the day settings. The display shows “DATE – d –” and the set day
afterwards. To change the value, press the “LEVEL” button. Then press the “SETUP”
button to go to the month settings.
5. In the month settings, the display shows “DATE – H – ” and the set month. To change
the value, press the “LEVEL” button. Then press the “SETUP” button to go to the year
settings.
6. In the year settings, the display shows “DATE – Y – ” and after that the last two digits
of the year. To change the value, press the “LEVEL” button.
Note: You can confirm and exit the settings at any time by pressing and holding the
“HOLD” button.
To restore the date and time default settings, follow these steps:
1. While holding down the "SETUP" button, turn the unit on. Release the "SETUP"
button when the "TIME" icon appears on the display. Now you get to the date and
time settings. The display shows the date.
2. Press the “SETUP” button until the display shows “rSt”.
3. Press and hold the “HOLD” button to restore default settings.
5.4 Software
5.4.1 Install the USB drivers
To install the USB drivers, follow these steps:
1. Put the supplied CD in the CD-ROM drive of your PC.
2. Access your CD-ROM drive and open the “USB Driver” folder. There are two different
folders in it: “Windows_2K_XP_S2K3_Vista” and “Windows_7”.
3. Open the folder which matches your Windows version and run the
“CP210xVCPInstaller.exe” file.
If you do not know which Windows you are using go to the desktop, right-click on “My
Computer” and select “Properties”. A new window appears where you can see your
Windows version.
4. Click on “Install” in the software installer to start the installation.

© PCE Instruments
25
English
5.4.2 Install the software
To install the software, follow these steps:
1. Put the supplied CD in the CD-ROM drive of your PC.
2. Wait for the Windows AutoPlay function or access the CD-ROM drive and run the
“setup.exe” file.
3. The software installer appears. Follow the instructions on the screen and install the
software.
5.4.3 Software operation
Start the software. Now you get to the main screen:
1. Menu bar
2. Real-time measurement information
3. Real-time display of the device
4. Marker display
5. Real-time graph
1
2
4 3 5

© PCE Instruments
26
English
Establish connection to the device
To let the software establish the connection automatically, follow these steps:
1. Make sure, that the device is connected to the PC.
2. Click on “COM Port(C)” in the menu bar and select “Auto(A)” the software now tries to
establish the connection automatically.
3. Press the “REC” button on the device to enable data transmission. The real-time
display becomes active.
You can also select the COM port manually:
1. Make sure, that the device is connected to the PC.
2. Open the Windows device manager and click on “Connections (COM & LPT)” to look
for the proper COM port.
3. Click on “COM Port(C)” in the menu bar and select “Manual(M)”. Now you can type in
the COM port number.
4. Press the “REC” button on the device to enable data transmission. The real-time
display becomes active.

© PCE Instruments
27
English
Start a real-time measurement
Adjust the settings:
1. Click on “Real Time(R)” in the menu bar and select “Setup(U)”.
2. The following window appears:
Here you can set the number of measurements (“The Group Number of Real-Time
Record Data”) and the sampling rate (“Real-Time Sampling Rate”). The software
calculates the measuring duration, start and end time depending on the settings.
3. Click on “Start” to start the real-time measurement.
Start the real-time measurement:
1. Click on “Real Time(R)” in the menu bar and select “Run(R)” or click on the start
symbol (lightning) below the menu bar. The real-time measurement starts with the last
saved settings. The data is shown as a real-time graph. There is also additional
information in the real-time measurement information display (2), such as MIN/MAX
values and average value.
2. Click on “Real Time(R)” in the menu bar and select “Stop(S)” or click on the stop
symbol below the menu bar to stop the real-time measurement.

© PCE Instruments
28
English
Set markers
After taking a measurement, you can set markers and compare different measuring points to
each other.
To do so, follow these steps:
1. Double-click at any point of the real-time graph.
2. The cursor now transforms into a violet vertical line. Move the line to the measuring
point you want to compare. The measuring value and time appear in the marker
indication (3) at “CursorA”. Left-click on the measuring point in the graph to select it.
3. When you have set the first marker the cursor transforms into a green vertical line.
Select the position of the second marker. The measuring value and time appear in the
marker indication (3) at “CursorB”. Left-click on the measuring point in the graph to
select it.
4. Once both markers are set, the software shows the MIN/MAX and average values, as
well as the number of measuring points between both markers.
Save data
To save the measured data, follow these steps:
1. Click on “File(F)” in the menu bar and select “Save as”.
2. A new window appears where you can set the saving path and file name.
3. Click on “Save” to save the data at the set location. The data is saved in *.txt format.
Export data to Excel
To export the data to Excel click on “File(F)” and select “Export To Excel(E)”. An Excel file with
the measured data opens automatically.
Print data
To print the measured data, follow these steps:
1. Click on “File(F)” in the menu bar and select “Print Graph(G)” to print out the graph or
select “Print Data(D)” to print out the measured data as table.
2. A new window appears where you can adjust the printing settings.
3. Click on “OK” to print out the data.

© PCE Instruments
29
English
Load data
To load saved data, follow these steps:
1. Click on “File(F)” in the menu bar and select “Open”.
2. A new window appears where you can select the file to be opened. After that, click on
“Open” to load the file.
3. The following window appears:
Here you can view the saved real-time graph. The file appears in the table on the left
side of the window.
4. You can export the data to Excel, save the data and print it by using the menu bar of
the window.
5. You can also set markers as described before.

© PCE Instruments
30
English
6 Calibration
To perform a calibration, you need a suited sound level calibrator which has a ½ inch opening
for microphones.
To calibrate the device, follow these steps:
1. Adjust the device to the following settings:
Frequency weighing: A
Sampling rate: FAST
Measuring range: 50 … 100 dB
2. Put the end of the microphone in the ½ inch opening of the calibrator. Make sure that
the output signal of the calibrator lies within the set measuring range (for example 94
dB @ 1 kHz).
3. Turn on the calibrator and use the potentiometer on the side of the sound level meter
to adjust the displayed value to the output signal of the calibrator (for example 94.0
dB).
The sound level meter comes with a factory calibration.
We recommend calibrating it once a year.

© PCE Instruments
31
English
7 Warranty
You can read our warranty terms in our General Business Terms which you can find here:
https://www.pce-instruments.com/english/terms.
8 Disposal
For the disposal of batteries in the EU, the 2006/66/EC directive of the European Parliament
applies. Due to the contained pollutants, batteries must not be disposed of as household waste.
They must be given to collection points designed for that purpose.
In order to comply with the EU directive 2012/19/EU we take our devices back. We either re-use
them or give them to a recycling company which disposes of the devices in line with law.
For countries outside the EU, batteries and devices should be disposed of in accordance with
your local waste regulations.
If you have any questions, please contact PCE Instruments.

© PCE Instruments
32
English
PCE Instruments contact information
Germany France Spain
PCE Deutschland GmbH PCE Instruments France EURL PCE Ibérica S.L.
Im Langel 4 76, Rue de la Plaine des Bouchers Calle Mayor, 53
D-59872 Meschede 67100 Strasbourg 02500 Tobarra (Albacete)
Deutschland France España
Tel.: +49 (0) 2903 976 99 0 Téléphone: +33 (0) 972 3537 17 Tel. : +34 967 543 548
Fax: +49 (0) 2903 976 99 29 Numéro de fax: +33 (0) 972 3537 18 Fax: +34 967 543 542
info@pce-instruments.com info@pce-france.fr info@pce-iberica.es
www.pce-instruments.com/deutsch www.pce-instruments.com/french www.pce-instruments.com/espanol
United States of America United Kingdom Italy
PCE Americas Inc. PCE Instruments UK Ltd PCE Italia s.r.l.
711 Commerce Way suite 8 Units 12/13 Southpoint Business Park Via Pesciatina 878 / B-Interno 6
Jupiter / Palm Beach Ensign Way, Southampton 55010 LOC. GRAGNANO
33458 FL Hampshire CAPANNORI (LUCCA)
USA United Kingdom, SO31 4RF Italia
Tel: +1 (561) 320-9162 Tel: +44 (0) 2380 98703 0 Telefono: +39 0583 975 114
Fax: +1 (561) 320-9176 Fax: +44 (0) 2380 98703 9 Fax: +39 0583 974 824
info@pce-americas.com info@industrial-needs.com info@pce-italia.it
www.pce-instruments.com/us www.pce-instruments.com/english www.pce-instruments.com/italiano
The Netherlands Chile Hong Kong
PCE Brookhuis B.V. PCE Instruments Chile SA PCE Instruments HK Ltd.
Institutenweg 15 RUT 76.423.459-6 Unit J, 21/F., COS Centre
7521 PH Enschede Calle Santos Dumont N° 738, Local 4 56 Tsun Yip Street
Nederland Comuna de Recoleta, Santiago, Chile Kwun Tong
Telefoon: +31 (0) 900 1200 003 Tel. : +56 2 24053238 Kowloon, Hong Kong
Fax: +31 53 430 36 46 Fax: +56 2 2873 3777 Tel: +852-301-84912
info@pcebenelux.nl info@pce-instruments.cl jyi@pce-instruments.com
www.pce-instruments.com/dutch www.pce-instruments.com/chile www.pce-instruments.cn
China
Turkey
Pingce (Shenzhen) Technology Ltd. PCE Teknik Cihazları Ltd.Şti.
West 5H1,5th Floor,1st Building Halkalı Merkez Mah.
Shenhua Industrial Park, Pehlivan Sok. No.6/C
Meihua Road,Futian District 34303 Küçükçekmece - İstanbul
Shenzhen City Türkiye
China Tel: 0212 471 11 47
Tel: +86 0755-32978297 Faks: 0212 705 53 93
lko@pce-instruments.cn info@pce-cihazlari.com.tr
www.pce-instruments.cn www.pce-instruments.com/turkish

© PCE Instruments
User manuals in various languages
(français, italiano, español, português, nederlands, türk, polski,
русский, 中文)
can be downloaded here: www.pce-instruments.com
Specifications are subject to change without notice.
 Loading...