

Page 1
PCE Americas Inc.
711 Commerce Way
Suite 8
Jupiter
FL-33458
USA
From outside US: +1
Tel: (561) 320-9162
Fax: (561) 320-9176
info@pce-americas.com
PCE Instruments UK Ltd.
Units 12/13
Southpoint Business Park
Ensign way
Hampshire / Southampton
United Kingdom, SO31 4RF
From outside UK: +44
Tel: (0) 2380 98703 0
Fax: (0) 2380 98703 9
info@pce-instruments.com
www.pce-instruments.com/english
www.pce-instruments.com
Manual
Gas Detector PCE-FHM 10
Version 1.0
Date of creation: 15.12.2015
Date of last change: 12.05.2016
Page 2

Manual
2
Contents
1 Introduction ............................................................................................................. 4
2 Safety notes ............................................................................................................. 4
3 Specifications .......................................................................................................... 5
3.1 Technical specifications .............................................................................................................. 5
3.2 Delivery ....................................................................................................................................... 5
4 System description ................................................................................................. 6
4.1 Button Functions ......................................................................................................................... 6
4.2 Power Supply ............................................................................................................................. 6
4.3 Automatic shutdown ................................................................................................................... 7
4.4 Backlight ..................................................................................................................................... 7
5 Measuring functions ............................................................................................... 7
5.1 Standard measuring mode ......................................................................................................... 7
5.2 Storage of the sensor ................................................................................................................. 7
5.3 MIN / MAX / TWA / STEL modes ............................................................................................... 7
5.4 Alarm and beeper functions........................................................................................................ 8
5.5 Hold function ............................................................................................................................... 8
5.6 Self calibration (HCHO) .............................................................................................................. 8
5.6.1 Calibration settings......................................................................................................................... 9
5.7 Data logger ................................................................................................................................. 9
5.7.1 Setting up the PC software ............................................................................................................ 9
5.7.2 Data logger settings ..................................................................................................................... 13
5.7.3 Software functions........................................................................................................................ 15
5.7.4 Import the data to Excel ............................................................................................................... 16
6 Disposal ................................................................................................................. 17
7 Contact ................................................................................................................... 17
7.1 PCE Instruments UK ................................................................................................................ 17
7.2 PCE Americas .......................................................................................................................... 17
Page 3

Manual
3
Page 4

Manual
4
1 Introduction
Thank you for purchasing a formaldehyde data logger of PCE Instruments.
The formaldehyde data logger is used to measure concentrations of formaldehyde in the air and provides
such a memory option as to store the measured values. In this case, the formaldehyde data logger can
be used as a mobile device. In addition to that, the formaldehyde data logger has threads on the handset
and on the measuring probe. These threads do not only make the mobile application possible, but also
mounting on a tripod. Thus, it is possible to conduct long-term measurements with the formaldehyde data
logger. After turning the device on, a self-calibration is performed by the device. Thereafter, a
measurement can be made. In addition to formaldehyde (HCHO), the formaldehyde data logger also
measures temperatures in ° C and ° F and relative humidity. During the measurement, the measuring
units °C and ° F can be changed. Additionally, the device provides, besides the HOLD function, a peak
measurement function. After a measurement with the formaldehyde data logger has been carried out,
there is a possibility to transfer the data for analysis via USB to a computer.
2 Safety notes
Do not try to open the measuring instrument or the sensor probe. This leads to the loss of
warranty.
Before turning on, make sure that the probe and the instrument are connected to each other.
Before every use make sure that you have inserted the batteries (AAA) and that they are
charged. Non-compliance may lead to false results.
Remove the batteries when the device is not in use.
Formaldehyde belongs to the volatile organic compounds (VOCs). However, the sensor of the
formaldehyde data logger can detect only formaldehyde and no other VOCs, but has a much
higher resolution than the majority of VOC sensors. So, if you notice a very distinct smell, but the
device does not display HCHO, there are probably some other volatile organic compounds.
Poorly ventilated places can lead to measurement errors. The hotter the temperature, the more
HCHO gas is emitted.
Stay away from alcohol if an HCHO concentration has been determined.
Please, read this manual carefully and completely before you use the device for the first time. The device
may only be used by thoroughly qualified personnel and repaired by PCE Instruments personnel.
This user’s handbook is published by PCE Instruments without any guarantee.
We expressly point to our general guarantee terms which can be found in our terms and conditions.
If you have any questions, please contact PCE Instruments.
Page 5

Manual
5
3 Specifications
3.1 Technical specifications
Measurement parameters
formaldehyde concentration, temperature, humidity
Measuring range
formaldehyde: 0 … 5 ppm
temperature: -10 … +50 °C
rel. humidity: 15 … 90 % RH
Resolution
formaldehyde: 0.01 ppm
temperature: 1 °C
relative humidity: 1 % RH
Measurement accuracy
formaldehyde: ±5 %
temperature: ±1 °C
relative humidity: ±5 % RH
Units
°C / °F
% RH
HCHO
Memory
32,000 readings
Power supply
6 x 1.5 V AAA battery
optional: mains adaptor 500 mA / 9V
Interface
USB
Display
LCD backlit
Response time
T90: <30 s
Sensor
electrochemical sensor
Sensor lifetime
approx. 3 years
PC software
included in delivery
Dimensions
meter: 162 x 57 x 32 mm
probe: 145 x 33 x 33 mm
LCD: 42 x 33.5 mm
Repeatability
<±2 %
Silicone hose
30 mm
3.2 Delivery
- 1 x formaldehyde data logger PCE-FHM 10 with a probe
- 6 x 1.5 V AAA batteries
- 1 x flexible tube (30 cm)
- 1 x USB cable for data transfer
- 1 x CD with PC Software
- 1 x user manual
- 1 x carrying case
Page 6

Manual
6
4 System description
4.1 Button Functions
HOLD: - Freezes current measured values (HOLD is displayed at the bottom of the LCD screen)
- Increases the value (when setting the calibration value and HCHO alarm thresholds)
- Pressing and holding the button deletes all the recorded MMAX / MIN / TWA / STEL values.
MODE: - Press and hold this button to start a self-calibration.
- Move one space to the left.
PWR: - Turning on
- Turning off (hold pressed for more than 2 seconds)
- Disable the automatic shutdown together with the HOLD button.
- Press briefly to activate or deactivate the alarm
MAX / MIN: - Switch between the MAX and MIN values of HCHO, TWA and STEL or view them
- Move one space to the right.
SET: - Press and hold this button for more than 2 seconds to enter the alarm threshold. Hold again for
2 seconds to save the entry.
- Short pressing turns the fan off. "fnOF" appears on the display and the red LED lights up.
Shortly push the button one more time to turn the fan on ("FnOn") again and the red LED begins
to flash.
UNIT: - Press shortly to change the unit for temperature measurement from °C to °F (and vice versa).
- Long pressing changes the unit for the HCHO concentration measurement from ppm to mg / m³
(and vice versa).
BKLT: - Adjusting the alarm threshold, when you are in the alarm settings.
- Activating the backlight.
4.2 Power Supply
There are the following options for power supply :
a) 6 x 1.5 V AAA batteries
b) charger (not supplied)
a) When the battery voltage is low, a corresponding battery icon appears on the display. Replace the
batteries as quickly as possible, since an insufficient voltage that can affect the displayed measurement
results.
b) If you want to use the data logger functions of the PCE-FHM 10, in certain circumstances you may
need a power supply to provide the unit with electricity for an extended period of time. For that you may
use a 500 mA / 9 V power supply with 3.5 x 1.3 mm coaxial power connector.
Page 7

Manual
7
4.3 Automatic shutdown
The meter turns off automatically after 15 minutes, if you have not touched any button during this time. To
deactivate this setting, press PWR and HOLD when the device is off. A sign "n" appears on the screen.
After that you can then continue normal operation.
The automatic shutdown is enabled by default. Remember to deactivate this function if you want to use
the data logger functions for a longer period of time.
4.4 Backlight
Press BKLT to turn on the backlight for working in dark areas. Turn the device off or press BKLT once
more to turn the backlight off again.
5 Measuring functions
5.1 Standard measuring mode
When you turn the device on, it takes a while until the unit is ready. The display shows 0..0..0..0 .. and
then counts down from 99998888 ...... 0000.
Then you are in the standard measuring mode.
Now the display shows the HCHO concentration in ppm. The temperature and humidity readings will also
alternate on the display.
5.2 Storage of the sensor
After each measurement, the sensor must be stored in the closable bag which is included.
5.3 MIN / MAX / TWA / STEL modes
Press the button MAX / MIN to see the MIN / MAX values, TWA-value (Time Weighted Average –
concentration in 8 hours), STEL-value (Short Time Exposure Limit –in 15 minutes) or a one-hour average
value.
In this mode, you can press and hold the HOLD button in order to delete all maximum and minimum
values. Only for 2 seconds the device displays "CLr" at the bottom of the screen and returns automatically
to the normal measurement mode. After that the recording of the values starts again.
Page 8

Manual
8
5.4 Alarm and beeper functions
The default alarm threshold is 0.08 HCHO for different applications. Press and hold the SET button to
adjust a threshold value / -alarm. With the buttons MODE and MAX / MIN you can navigate between the
individual digits of the alarm value. With the HOLD and BKLT buttons you can increase or decrease each
digit. Press and hold the SET button to save the changes. The screen displays "SAVE" and then
automatically returns to normal state.
While you are setting an alarm, "SET" is displayed on the screen. After you have set the alarm threshold,
a small bell can be seen in the upper left part of the screen. As soon as the measured value exceeds the
threshold, an alarm sound will be heard. Press the PWR button shortly to turn off the signal tone. When
you do this, the bell symbol disappears from the screen. In order to turn on the alarm function, press the
PWR button once more.
5.5 Hold function
Press HOLD to "freeze", i.e. to hold all the current readings during the normal operation. In the HOLD
function all the other functions are void, as well as the MAX / MIN function, the unit selection or the setting
of alarm thresholds. The button is also used to increase a value when an alarm threshold is set.
If you hold down the button while viewing the MIN, MAX, TWA or STEL values, they will be deleted.
5.6 Self calibration (HCHO)
Turn on the device and press and hold the MODE button to enter the calibration mode. Now "CAL"
appears in the lower part of the screen. Temperature and humidity are still displayed. The default
calibration time is 15 seconds.
Note: Make sure that during the calibration no formaldehyde is in the room. Otherwise, please do not
perform any self-calibration.
Page 9
Manual
9
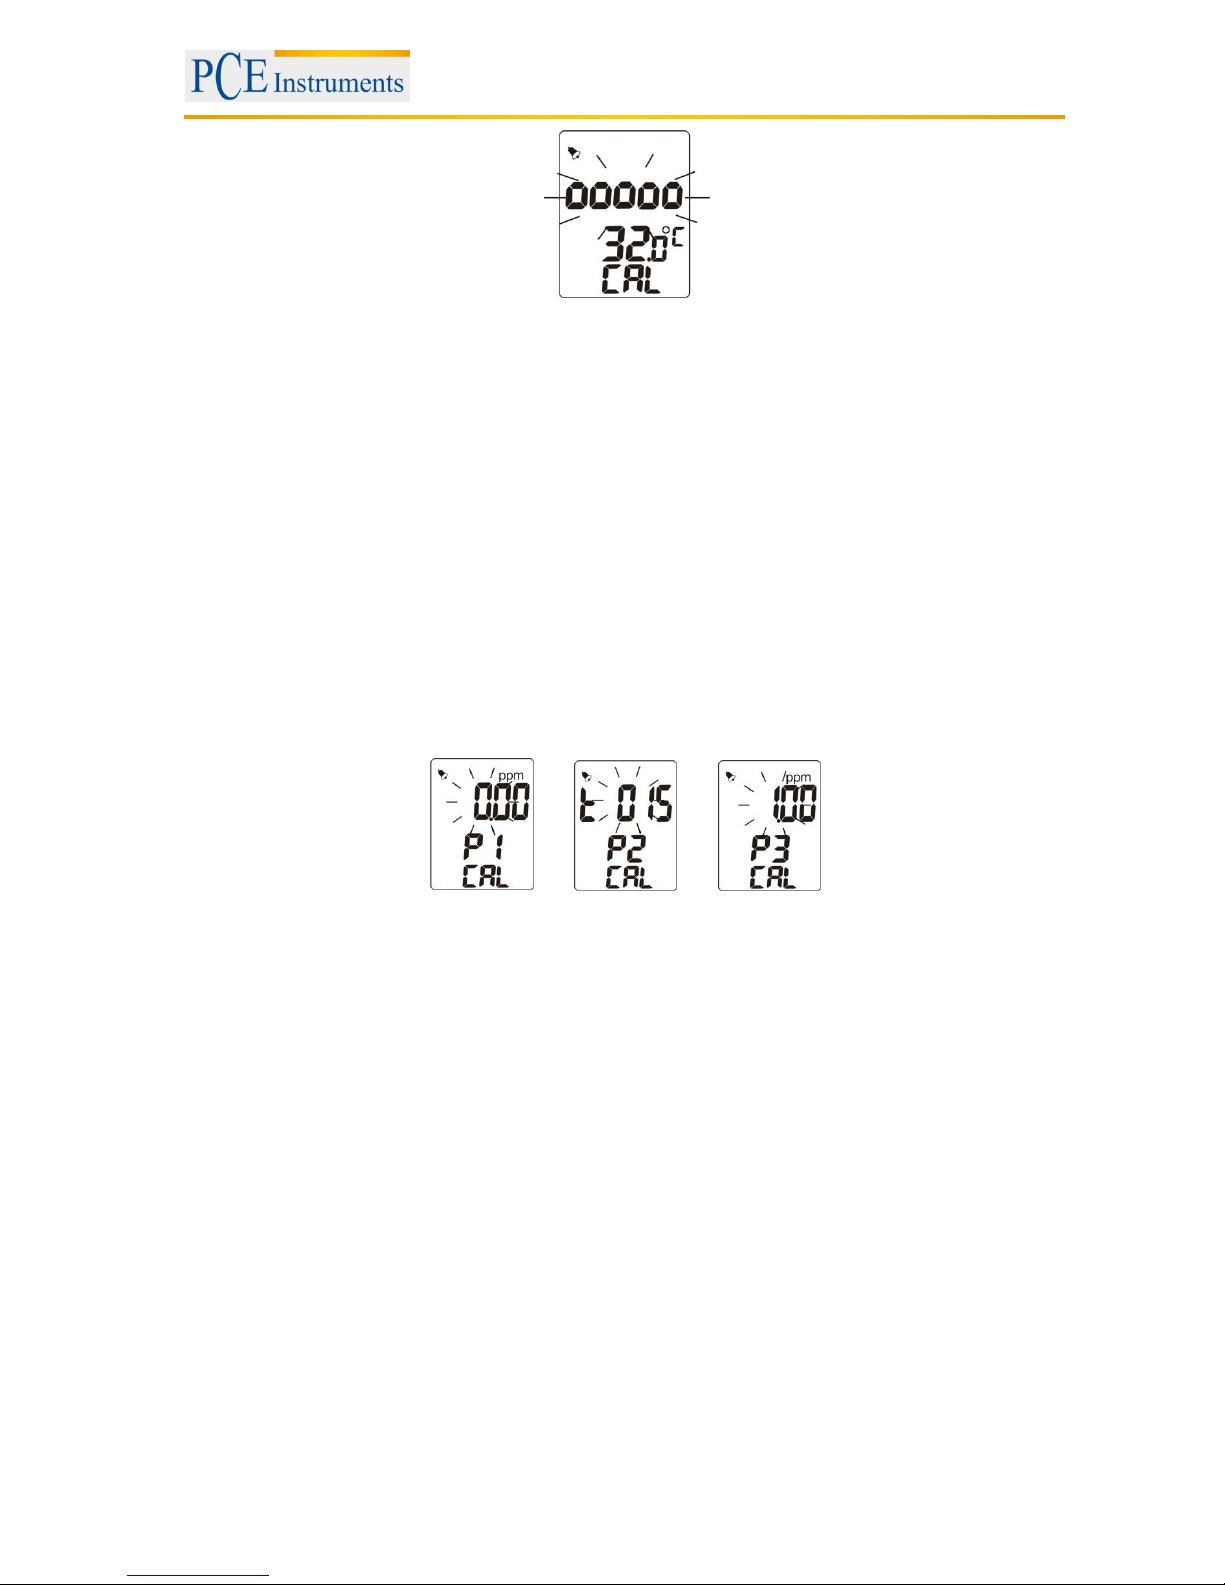
5.6.1 Calibration settings
If desired, the default calibration time of 15 seconds, and the standard for calibration value for gas can be
changed. This feature is designed for experienced users and for professional use only.
Please follow the steps as mentioned:
1. When the device is off, press the BKLT + MODE + PWR buttons simultaneously.
3. Within one second, the LCD display shows CAL and then counts the normal countdown to the standard
measuring mode.
4. Press and hold the SET button to get to the CAL P1 screen. Here you can reset or change the
standard HCHO gas value. Press HOLD to increase the value and BKLT to decrease it. With the MODE
and MAX / MIN buttons, you can switch back and forth between the individual digits.
5. Then press SET once again to get to the CAL P2 screen. Here you can adjust the calibration time to a
value between 1 second and 9999 seconds (the default time is 15 seconds).
6. Press SET again to get to the CAL P3 screen. This value is by default "1". Please do not change this.
7. Press and hold the SET button to exit the CAL screen again.
5.7 Data logger
The device has a data logger function which can be configured via the supplied PC software. For this
purpose, the device must be connected to the PC via the USB interface. The display will show a USB
symbol, when there is a connection.
In the software, the measured values can be displayed as a graph or in tabular form, and saved. It is also
possible to print the data or export them as Excel data. A status field at the bottom of the screen indicates
when data is downloaded from the device. Warnings are also displayed.
There are five different selectable data logger modes:
Immediately: immediate start of data recording
Schedule: sets the start time of the recording with date and time
Real-time: real-time display of the measured values in the PC software
Key-start: start of recording by long pressing the BKLT button, another long pressing stops the
recording
Roll-over: the device starts recording and overwrites the recorded data in case the memory is
full.
In addition, the measuring interval can be set between 1 and 6 seconds.
The memory of the device comprises up to 32.400 points. However, it is possible to assign a definite
memory volume between 1,000 and 32,400 points, to separate data records. A recording symbol on the
display of the device shows that the recording is in process and also gives information on whether the
memory is full.
5.7.1 Setting up the PC software
Page 10

Manual
10
In order to be able to connect the device to a PC, you must first install the USB driver. To do this, follow
these steps:
1. Insert the included CD into your CD-ROM drive.
2. Run the file PL2303_Prolific_DriverInstaller_v110.exe file in the folder "Step1 - USB Driver".
3. Click on "Next" when the installation window appears.
4. Finally, click "Finish" to complete the installation.
In order to configure the data logger functions and evaluate the data, you need to install the PC software.
To do so, follow these steps:
1. Insert the included CD into your CD-ROM drive.
2. Run the file setup.exe file in the folder "STEP2 DatalogV1_5Q1 (English Version)".
3. Select the destination folder where you want to install the program and then click "Next".
4. Accept the license agreement by ticking "I accept the License Agreement:" and then click "Next".
5. Click one more time on "Next" and then click "Finish" to complete the installation.
6. Restart your PC.
Now you can start the program. Make sure beforehand that the meter is connected to the PC via USB
cable.
You will find a shortcut to the program in the Windows start menu under Programs in the folder "Data
Logger”.
The measuring instrument is recognized automatically and the main screen of the program appears:
Attention! If the device is not recognized automatically, an error message and a note in the status bar of
the programme appears
Page 11

Manual
11
Page 12

Manual
12
In this case, proceed as follows:
1. Check if the device is connected to the PC.
2. Check if the USB driver is installed properly. To do this, open the Control Panel and then the Device
Manager. If you see this, the device is properly installed:
3. Memorize the displayed COM port (in this example "COM 8"). Now click "Setting" in the menu bar of
the PC software to and select "Comm.Port". Here, under "Port No." you can set the corresponding port (in
this example "COM 8").
Now the software should recognize the device. If this does not happen, please contact the Support.
Page 13

Manual
13
5.7.2 Data logger settings
Click “Setting" and then "Log Setting" in the menu bar of the software to get to the data logger settings.
There are 3 different tabs in which you can configure settings
Logger's ID
Here you can change the name of the instrument. To
do this, enter the desired name and click Ok. Maximum
20 characters are allowed
Logger date
Change the date settings of the device. To do this,
enter the desired date in the format MM-DD-YYYY and
confirm with Ok.
Logger time
Change the time settings of the device. To do this,
enter the desired time in the format hh: mm: ss and
confirm with Ok.
Alarm setting
Here you can set the thresholds, i. e. an alarm will be
triggered when they are exceeded (Hi.Alarm for
exceeding upper limit) or (Lo.Alarm – when it goes
below the limit). They can be set for the HCHO
concentration and humidity. To do this, select the
desired alarm through the corresponding checkbox and
enter the desired threshold.
Logger's data selection
Here you can choose which values the data logger
should record. You can select temperature (Temp.),
humidity (Humidity) and the HCHO concentration.
Page 14

Manual
14
Rate (h: m: s)
Here you can set the time interval at which the data
logger saves the measured values. Values between
1 second and 6 hours are possible.
Start mode
Here you can choose between 5 different logger
modes.
Start Rec. Date/Time & Stop Rec. Date/Time
These options are only available if you have selected
the schedule mode. It allows you to set the start and
stop time of the recording. To do so, enter the date in
the format MM-DD-YYYY and the time in the format
hh : mm :ss.
Sample Points
Here you can set the maximum number of memory
points to be recorded. Values between 1000 and
32400 can be entered.
Unit
Here you can choose between metric and imperial
system.
Logger modes
Immediate: Data recording starts with the confirmation of the Logger settings. The meter must not be
connected to the PC during the recording. To transfer the data to your PC, connect your device to the
PC and click Download in the software. This stops the recording and downloads the data.
Real-time: The data recording also starts with the confirmation of the Logger settings. In contrast to
immediate mode, however, the measurement curves can be tracked in real time, and do not have to
be downloaded first. For that, however, the instrument must always be connected to the PC. Clicking
on the stop button will stop the recording. You can then download the data by clicking on download
once.
Key Start: In this mode, you can start and stop the data recording by pressing and holding the BKLT
button. The meter does not have to be connected to the PC. However, after the recording you need to
download the data with the help of the software before you begin another recording. The data are
otherwise lost.
Roll-over: This mode starts the recording when the logger settings have been confirmed. If the
allocated space on the meter is full, in this mode it starts to overwrite the data which have been stored
at the beginning. By pressing BKLT, you can stop the recording. Then you need to download the data
with the help of the software. You can then start a new recording with the same settings by again
pressing and holding the BKLT button.
Schedule: For this mode, in the Logger settings you can set the start and end time of the data
recording. Make sure that the system time of the instrument coincides with the time of the PC,
because the timings are determined by the PC clock. After the confirmation of the logger settings, the
meter can be disconnected from the PC. To transfer the data, the device must be reconnected to the
PC. Then click Download in the software to download the data.
Page 15

Manual
15
5.7.3 Software functions
Overview
Zoom in and out and change the colors
Zoom In: Hold Ctrl and press the left mouse button to zoom in the graph view.
Zoom Out: Hold Ctrl and press the right mouse button to zoom out the graph view.
Moving graph: Hold Ctrl and Shift and click and hold the left mouse button to move the graph.
Change colors: Click on the color box near the temperature, humidity or the HCHO
concentration of the selected measuring point to change the color of the respective measuring
line.
Download Data
Click Download to download the recorded data. Depending on the amount, this may take a few seconds.
Afterwards, the measuring curves are automatically displayed.
Warning: Clicking Download interrupts the current recordings! Therefore, wait until the recording is
finished. The number of measuring points can be read via the logger status function.
Logger status
If you click Logger Status on the main screen, you can read the device name (here: "ID1 = Test"), the
recorded points (here: "93 Points"), the recorded parameter (here: "(Temp. Humidity HCHO).") and the
storage rate (here: "Sample rate = 1 sec.).
Logger
status
Temperature/
humidity
HCHO
concentration
Selected
measuring
Temperature,
humidity and HCHO
value of the selected
measuring point
Time of the
measurement
Download
button
Date and
time
Page 16

Manual
16
Open File
To open a file, proceed as follows:
1. Click "File" and then "Open File" in the menu bar.
2. Select the desired file and open it by clicking OK.
Save File
To save a recording as a file, proceed as follows:
1. Click "File" and then "Save File" in the menu bar.
2. Enter the desired file name and select the desired storage location.
3. Click OK to complete the saving process.
It is also possible to save the graph as an image (in .png format). To do this, click "Print" and then "Print
graph as PNG". Then proceed as described in point 2 and 3.
DataTable
You can switch to the table view by clicking "View" and then "Data table" in the menu bar. The table view
will appear in a new window.
Print Graph / Table
If you want to print the data as a graph or table, proceed as follows:
1. Click "Print" and then "Print graph" if you want to print the graph, or click "Print Data Table" if you want
to print the table.
2. When you have clicked "Print DataTable" the table view opens and you must enter which rows you
want to print. If you leave the field empty, you print all the lines. Then click Ok.
3. In the next window, select the appropriate printer, and make adjustments, if necessary.
Note: With the help of the appropriate programs the table or graph can be converted at this point into a
.pdf file.
4. When finished, click OK to print.
5.7.4 Import the data to Excel
The measurement data are saved in .csv format, which can be opened by Excel. However, the individual
parameters are separated only by commas and are not located in separate columns. This can be
changed by making the following steps:
1. Select the column in which the values are, and click "Text to Columns " in the tab "Data".
2. A new window opens. Select "Separate" and click Next.
3. Activate the desired delimiter. Activate also "treat consecutive delimiters as one character" and select
the same delimiter. Now click Next.
4. Now mark the columns "Temp", "Humidity" and "HCL" and click More. In a new window set a
point/comma as the decimal sign and comma/point as 1000th delimiter. Click OK to confirm and then click
"Finish".
Page 17

Manual
17
6 Disposal
For the disposal of batteries, the 2006/66/EC directive of the European Parliament applies. Due to the
contained pollutants, batteries must not be disposed of as household waste. They must be given to
collection points designed for that purpose.
In order to comply with the EU directive 2012/19/EU we take our devices back. We either re-use them or
give them to a recycling company which disposes of the devices in line with law.
If you have any questions, please contact PCE Instruments.
7 Contact
If you have any questions about our range of products or measuring instruments please contact PCE
Instruments.
7.1 PCE Instruments UK
By post:
PCE Instruments UK Ltd.
Units 12/13 Southpoint Business Park
Ensign Way, Southampton
Hampshire
United Kingdom, SO31 4RF
By phone:
02380 987 035
7.2 PCE Americas
By post:
PCE Americas Inc.
711 Commerce Way
Suite 8
Jupiter
33458 FL
USA
By phone:
561 320 9162
 Loading...