

Page 1
PCE Americas Inc.
711 Commerce Way
Suite 8
Jupiter
FL-33458
USA
From outside US: +1
Tel: (561) 320-9162
Fax: (561) 320-9176
[email protected]
PCE Instruments UK Ltd.
Units 12/13
Southpoint Business Park
Ensign way
Hampshire / Southampton
United Kingdom, SO31 4RF
From outside UK: +44
Tel: (0) 2380 98703 0
Fax: (0) 2380 98703 9
www.pce-instruments.com/english
www.pce-instruments.com
Manual
Version 1.0
Date of creation: 05.10.2015
Date of last change: 12.04.2016
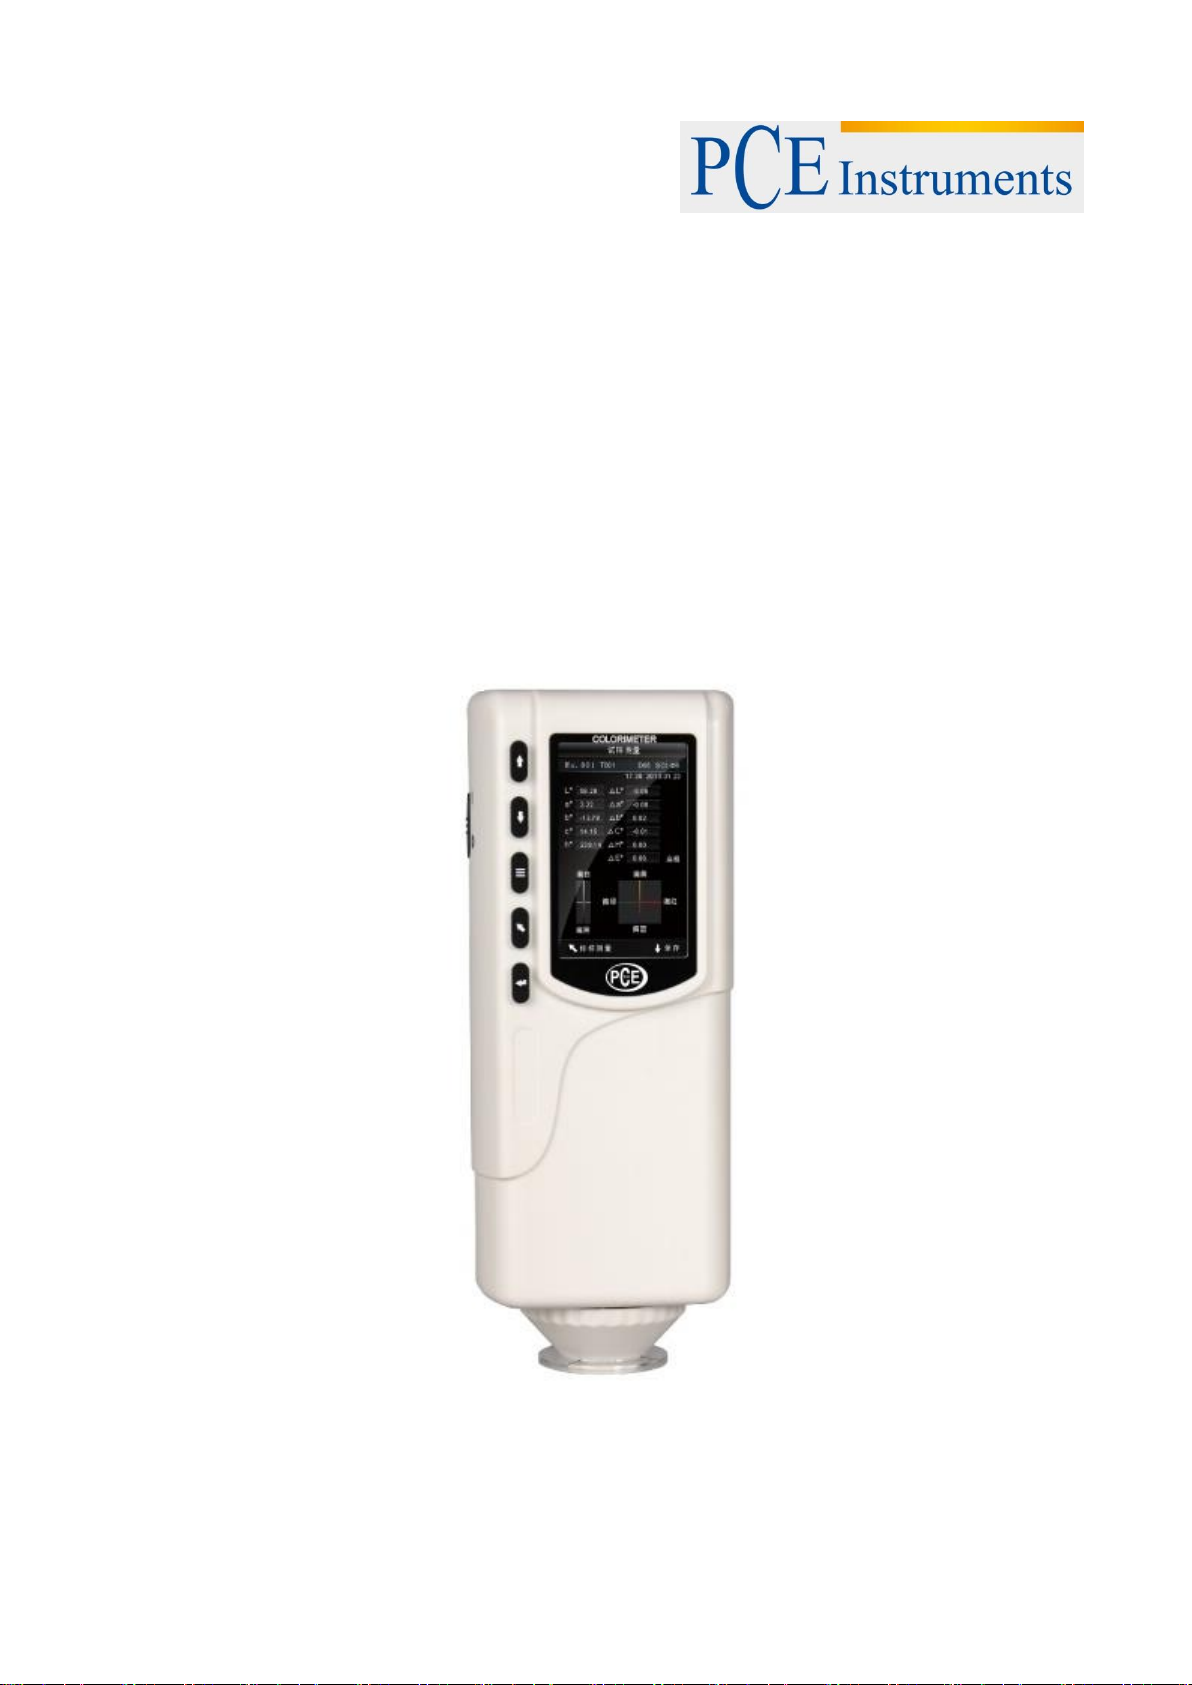
Colour Meter PCE-CSM 5
Page 2

Manual
Contents
1 Introduction ............................................................................................................. 3
2 Safety notes ............................................................................................................. 3
3 Specification ............................................................................................................ 4
3.1 Technical specifications .............................................................................................................. 4
3.2 Contents of delivery .................................................................................................................... 5
4 System description ................................................................................................. 5
4.1 Button description ....................................................................................................................... 5
4.2 Interfaces .................................................................................................................................... 6
4.3 Akku ............................................................................................................................................ 6
4.4 Change the measuring aperture ................................................................................................. 7
5 Operation ................................................................................................................. 8
5.1 Turn on the device ...................................................................................................................... 8
5.2 Take a measurement .................................................................................................................. 8
5.3 Additional functions .................................................................................................................. 10
5.3.1 Records ........................................................................................................................................ 10
5.3.2 Calibration .................................................................................................................................... 11
5.3.3 Connection to a PC or printer ...................................................................................................... 11
5.3.4 Tolerances ................................................................................................................................... 12
5.3.5 Delete recorded data.................................................................................................................... 12
5.3.6 Select the light source .................................................................................................................. 12
5.3.7 Select the colour space ................................................................................................................ 13
6 Settings .................................................................................................................. 14
6.1 Average .................................................................................................................................... 14
6.2 Aperture setting ........................................................................................................................ 14
6.3 Auto save .................................................................................................................................. 14
6.4 Language .................................................................................................................................. 14
6.5 Time setting .............................................................................................................................. 15
6.6 Color Diff Formula .................................................................................................................... 15
6.7 Contrast .................................................................................................................................... 15
6.8 Restore factory ......................................................................................................................... 15
7 Optional Accessories............................................................................................ 16
7.1 Powder test box PCE-CSM PTB .............................................................................................. 16
7.1.1 Construction ................................................................................................................................. 16
7.1.2 Operation ..................................................................................................................................... 16
8 Disposal ................................................................................................................. 17
9 Contact ................................................................................................................... 17
9.1 PCE Instruments UK ................................................................................................................ 17
9.2 PCE Americas .......................................................................................................................... 17
2
Page 3

Manual
1 Introduction
Thank you for purchasing a colorimeter from PCE Instruments.
The colorimeter PCE-CSM 5 is the ideal measuring device for application in quality control and offers a
high accuracy. When using the colorimeter, there are two different colour spaces available (CIE LAB,
XYZ, LCh, RGB, LUV). The PCE-CSM 5 also comes with two different measuring apertures (Ø4 mm and
Ø8 mm) for different applications. After a measurement with the PCE-CSM 5, the reading can be used as
a standard value. Other readings can be recorded as a sample and later be compared to the reference
value. In addition to the individual colour space coordinates, the deviation between the readings is also
displayed. On the internal memory of the colorimeter, you can store up to 100 reference values and up to
20000 samples. The measured data can also be transferred to a PC via USB and analysed with the
included PC software.
2 Safety notes
Please read this manual carefully and completely before you use the device for the first time. The device
may only be used by qualified personnel and repaired by PCE Instruments personnel. There is no
warranty of damages or injuries caused by non-observance of the manual.
This colorimeter is a precise measuring device. Please avoid strong changes in the
environmental conditions. This includes flickering lights as well as changes of the air temperature
or air humidity.
The device may only be used in the approved temperature range.
Make sure the device is standing right on the measuring spot. Do not move it while the measuring
procedure is in progress. Avoid shocks.
Do not expose the device to water. Only use it in areas which fulfil the permitted environmental
conditions.
Keep the device clean and prevent dust or other particles from entering the measuring aperture.
To clean the device, use a damp cloth. Do not use solvent-containing materials for cleaning.
The case should only be opened by qualified personnel of PCE Instruments.
You must not make any technical changes to the device.
The instrument should never be placed with the user interface facing an object (e. g. keyboard
side on a table).
Only use the battery which is included in the package (3.7 V, 0.5 A).
If you do not need the device for a longer period of time, please reset the white calibration and
store it in in the carrying case.
This user's handbook is published by PCE Instruments without any guarantee.
We expressly point to our general guarantee terms which can be found in our general terms of business.
If you have any questions please contact PCE Instruments.
3
Page 4
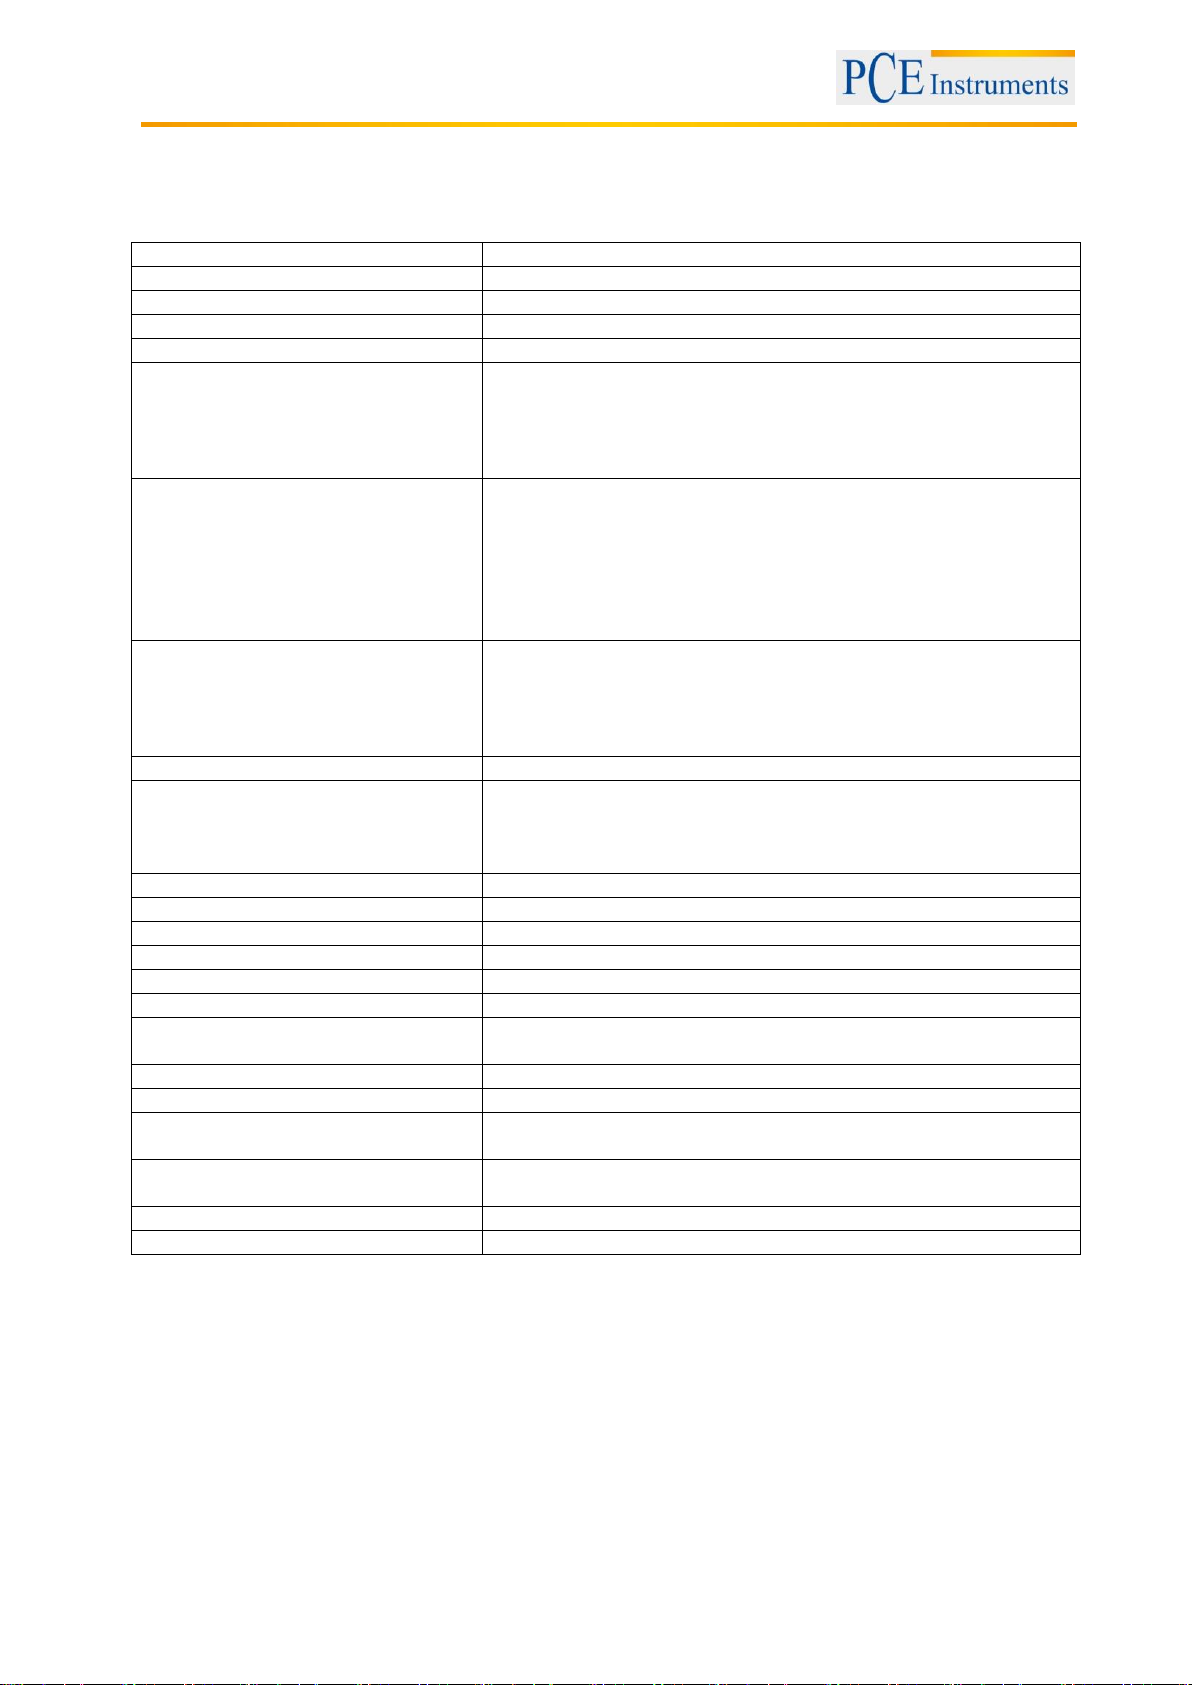
3 Specifications
Measuring aperture
Ø 8 mm, Ø 4 mm (exchangeable)
Measuring geometry
8 °/d
Sensor
Silicon photoelectric diode
Observation angle
CIE 10 °
Measurement time
0.4 s
Colour spaces
CIE L*a*b
CIE XYZ
CIE RGB
CIE L*u*v
CIE*C*H
Other colour parameters
WI (E313, CIE, AATCC, Hunter)
YI (D1925, 313)
Colour fastness
Staining fastness
J PC79
BFD (1.5 : 1)
FMCI I
Colour difference formula
ΔE*ab
ΔL*ab
ΔE*C*H
ΔECIE94
ΔEHunter
Light source
D65, D50, A, C, F2, F6, F7, F8, F10, F11, F12
Data on display
Colorimetric value
Colour difference (value/graph)
PASS/FAIL result
Colour offset
Errors between each equipment
≤0.50 ΔE*ab
Repeatability
Average of 30 measurements of standard white plate
Standard deviation
Within ΔE*ab 0.05
Storage
100 reference values (standards), 20,000 samples
Interface
USB / RS-232
Display
TFT 2.8” (16:9)
Power supply
Rechargeable lithium-ion battery
3.7 V at 3,200 mAh
Battery life
>5,000 measurements
Lamp life
5 years, more than 1.6 million measurements
Operating conditions
Temperature: 0 … +40 °C
Humidity: 0 … 85 % RH, non-condensing
Storage conditions
Temperature: -20 … +50 °C
Humidity: 0 … 85 % RH, non-condensing
Dimensions
205 x 67 x 80 mm
Weight
500 g
3.1 Technical specifications
Manual
4
Page 5
1
2 3 4 5 6
7
3.2 Contents of delivery
1 x colorimeter PCE-CSM 5
1 x 4 mm measuring aperture
1 x 8 mm measuring aperture
1 x USB cable
1 x aluminium carrying case
1 x battery
1 x mains adaptor
1 x wrist band
1 x calibration plate (white)
1 x PC software
1 x instruction manual
4 System description
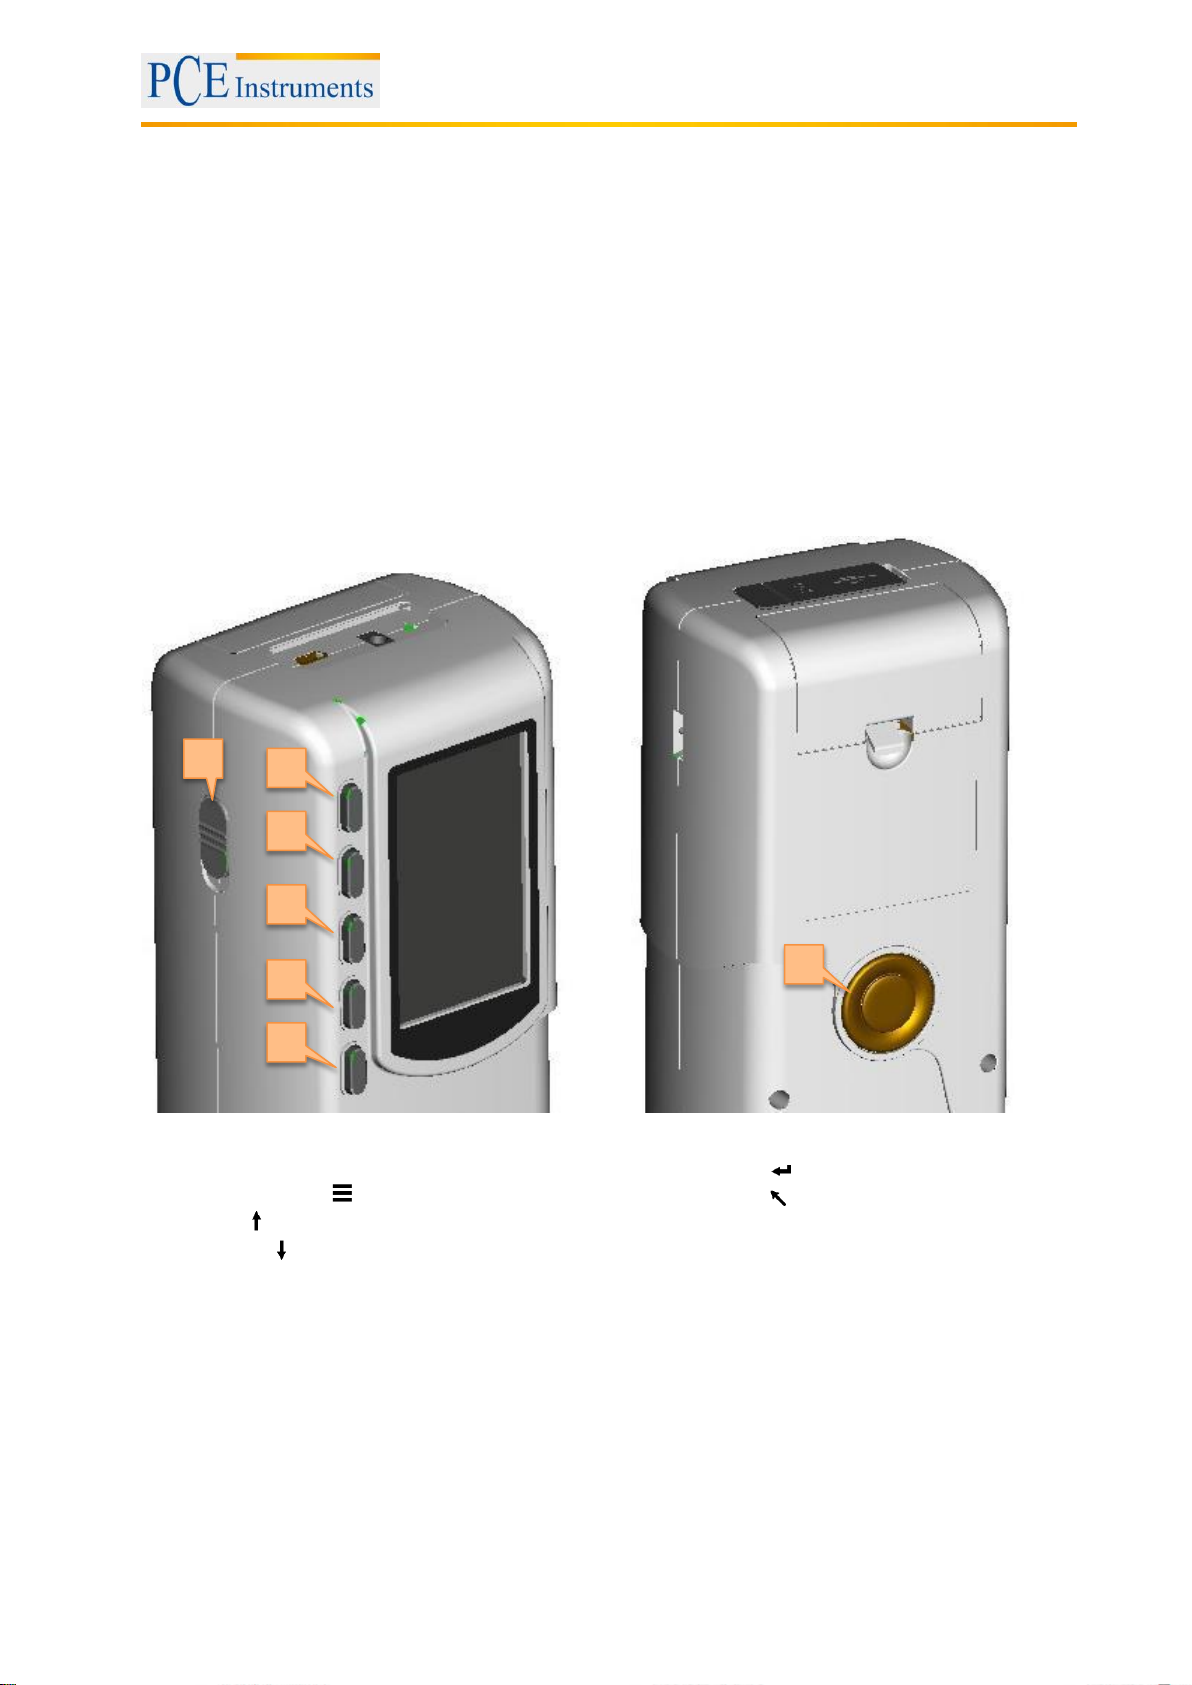
4.1 Button description
Manual
Front view rear view
1. ON/OFF switch
2. Menu button
3. Up
4. Down
5. Enter
6. Back
7. Testing button
5
Page 6
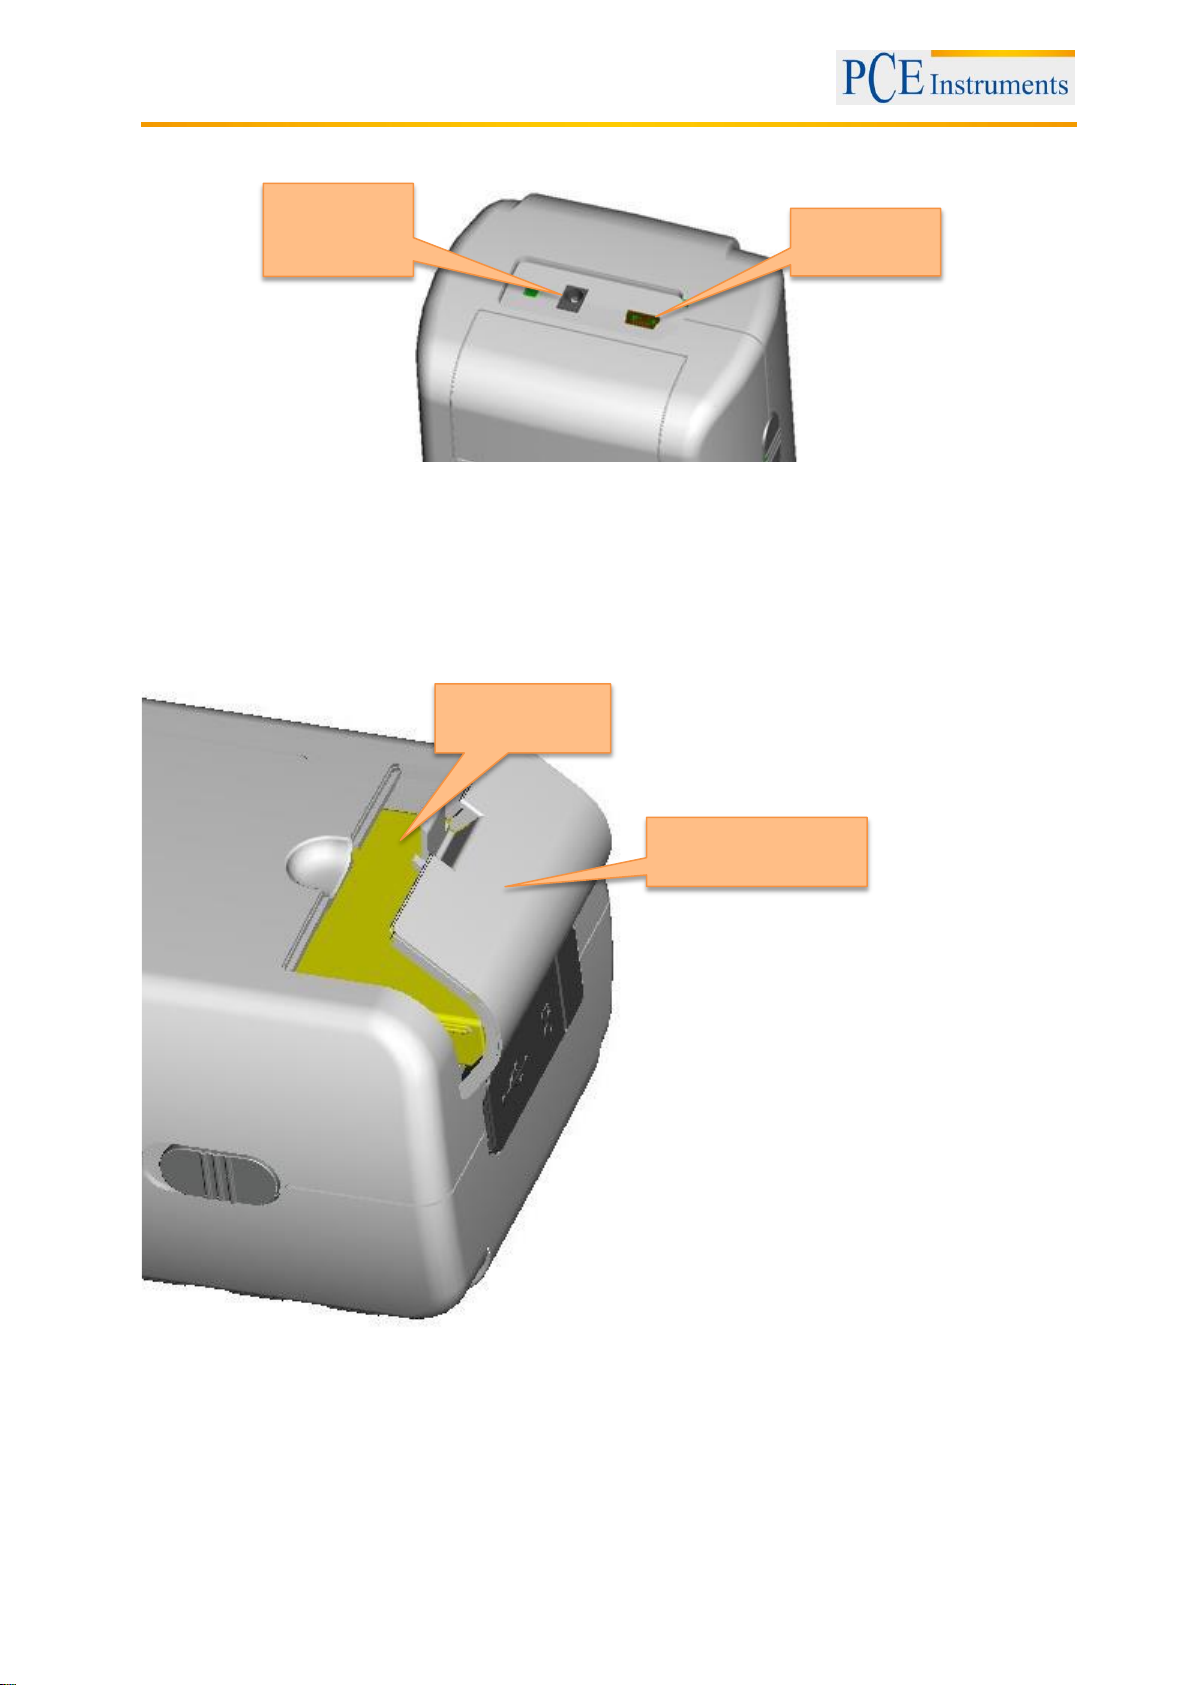
4.2 Interfaces
Connector
for mains
adaptor
USB
interface
Lithium-ion
battery
Battery compartment
cover
Manual
interfaces
Connector for mains adaptor: Only use the mains adaptor which is included in the package. If it
breaks down, use substitutions with the following characteristics: 5 V DC, 2 A.
USB interface: By using the USB interface, you can transfer data from the colorimeter to a PC.
The baud rate is 115,200 bps. The colorimeter can also be connected to a printer via RS-232.
4.3 Akku
6
Page 7
Manual
Installing the battery
1. Make sure that the colorimeter is turned off.
2. Open the cover of the battery compartment.
3. Insert the battery into the allocated space.
4. Close the cover of the battery compartment.
Charging the battery
The battery can only be charged when the colorimeter is connected to a PC or to the mains adaptor.
Note: If the battery is damaged, the device can still be used via an external power source (PC / mains
adaptor).
4.4 Change the measuring aperture
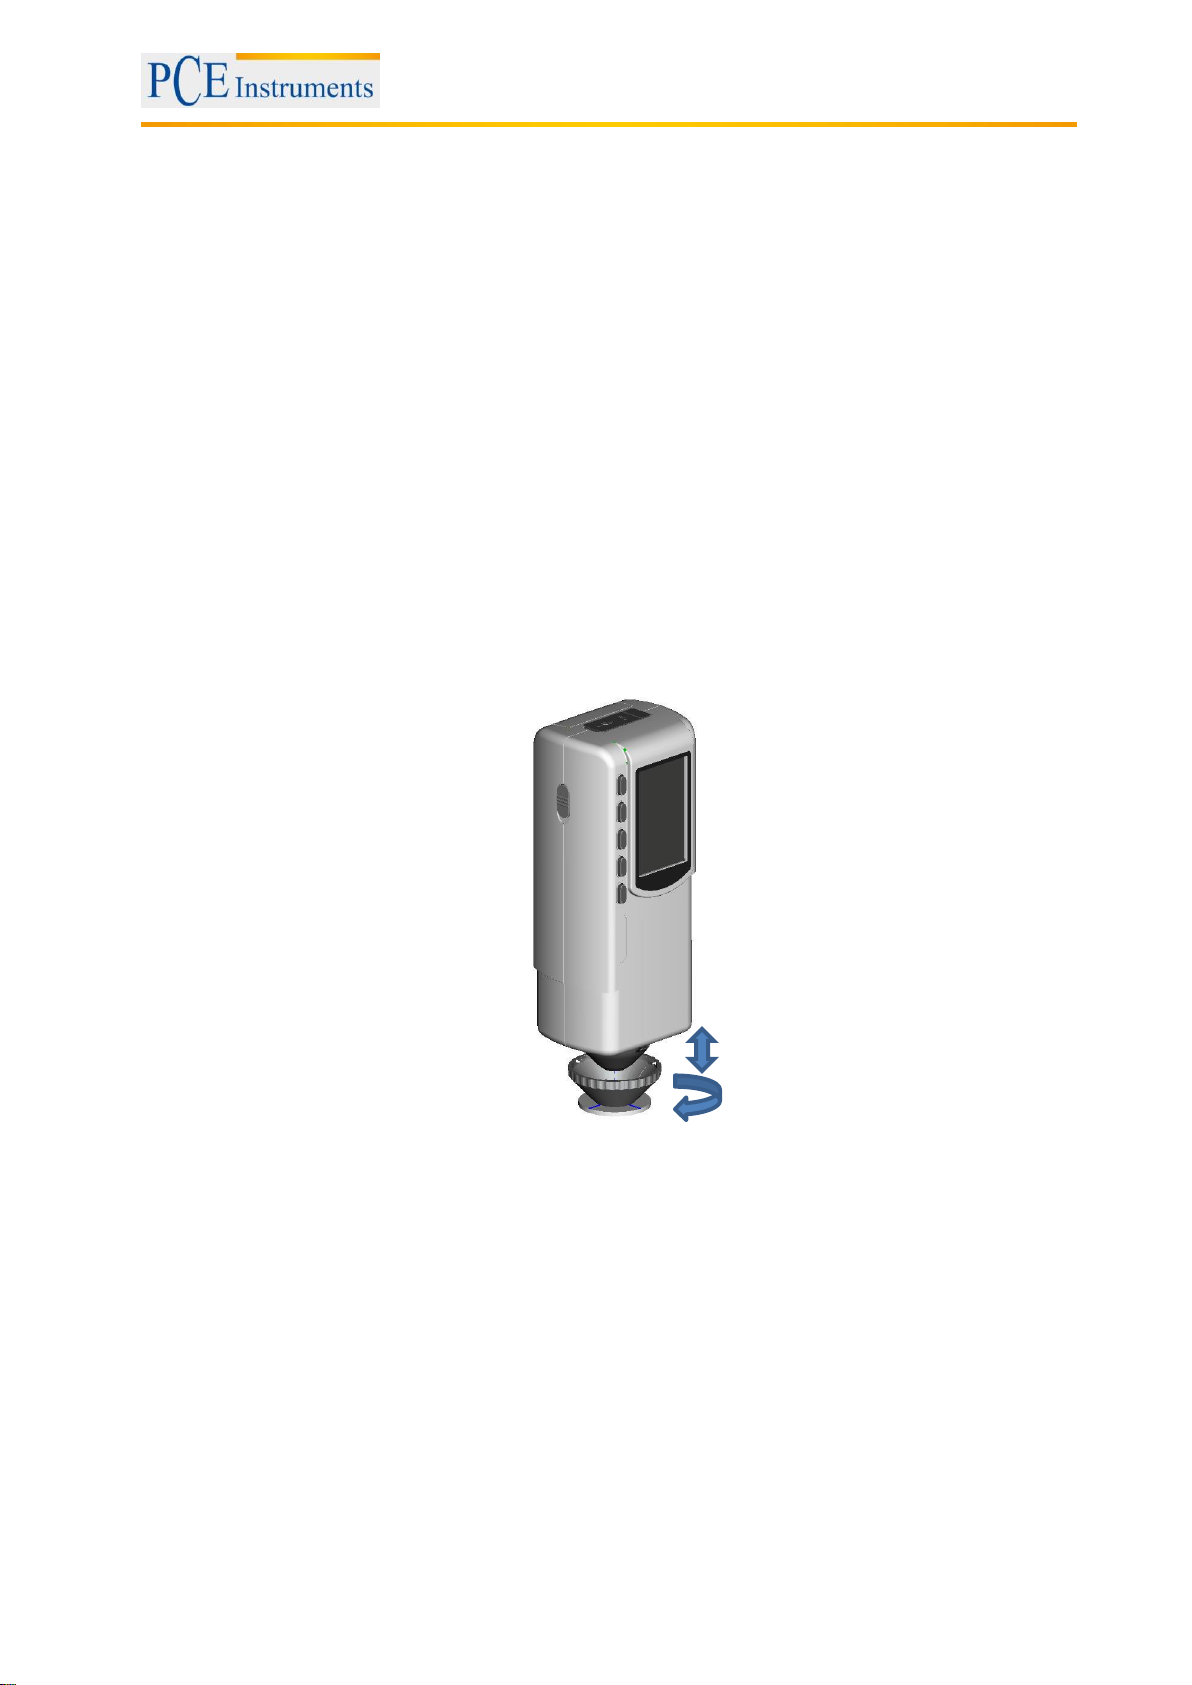
Installing the measuring aperture
To install the measuring aperture, first put it in the allocated space (see picture below). Now turn it
counter-clockwise until you hear a clicking sound. This means that the measuring aperture is now
attached properly.
Detaching the measuring aperture
To dismantle the measuring aperture, turn it clockwise until you hear a clicking noise. This means, it is
now detached.
7
Page 8
Manual
5 Operation
5.1 Turn on the device
1. Make sure the battery is installed or the device is connected to an external power source.
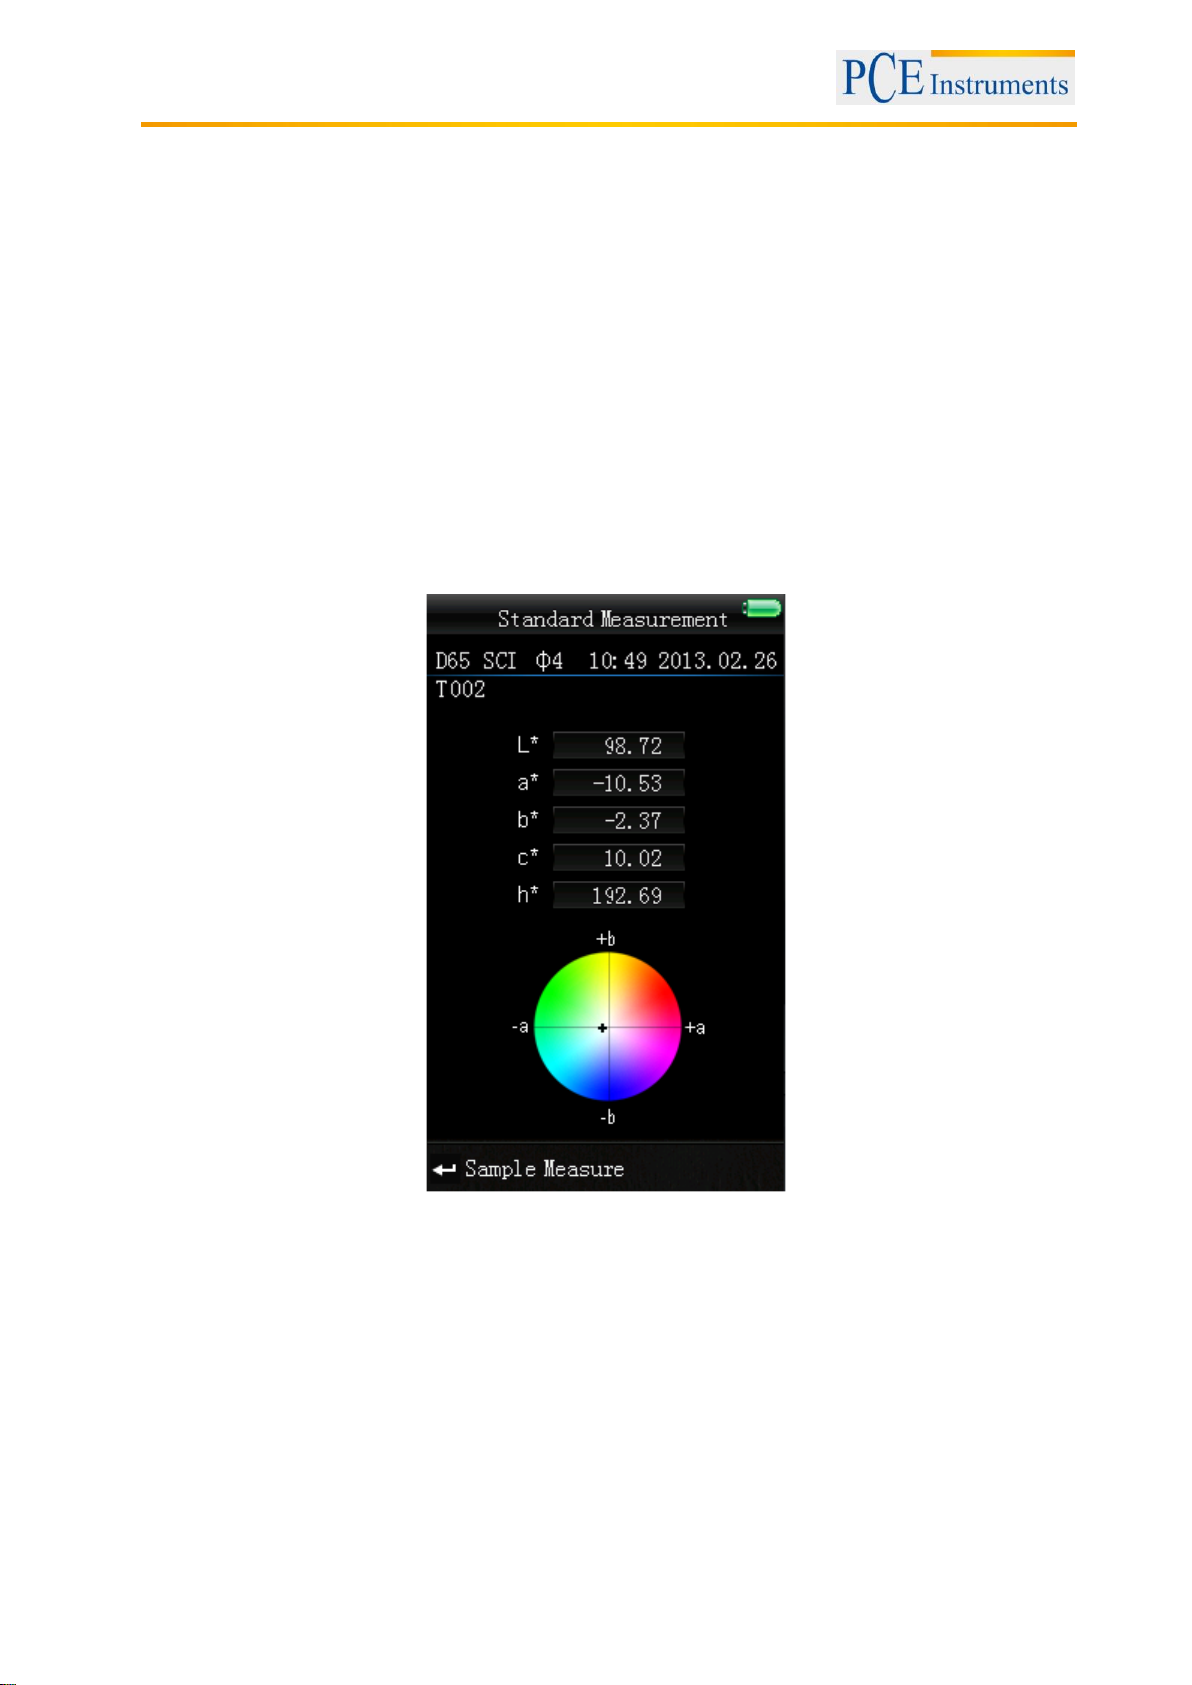
2. Turn on the device by pressing the ON/OFF switch. After a few seconds, you are automatically
directed to the “Standard Measurement” screen. The default setting for this measuring mode is
L*a*b*C*h.
5.2 Take a measurement
When you turn on the device, you are directed to the “Standard Measurement” screen. To take a
measurement, follow these steps:
1. Press and hold the testing button (see chapter 4.1). Next, a light cone appears to help you aim at
the measuring point.
2. Move the device as close to the measuring point as possible.
3. Release the testing button. The colorimeter now takes a measurement.
After the measuring procedure is finished, you can see the results on the following screen:
A reading which has been determined by using the “Standard Measurement” automatically serves as a
reference value.
8
Page 9
Manual
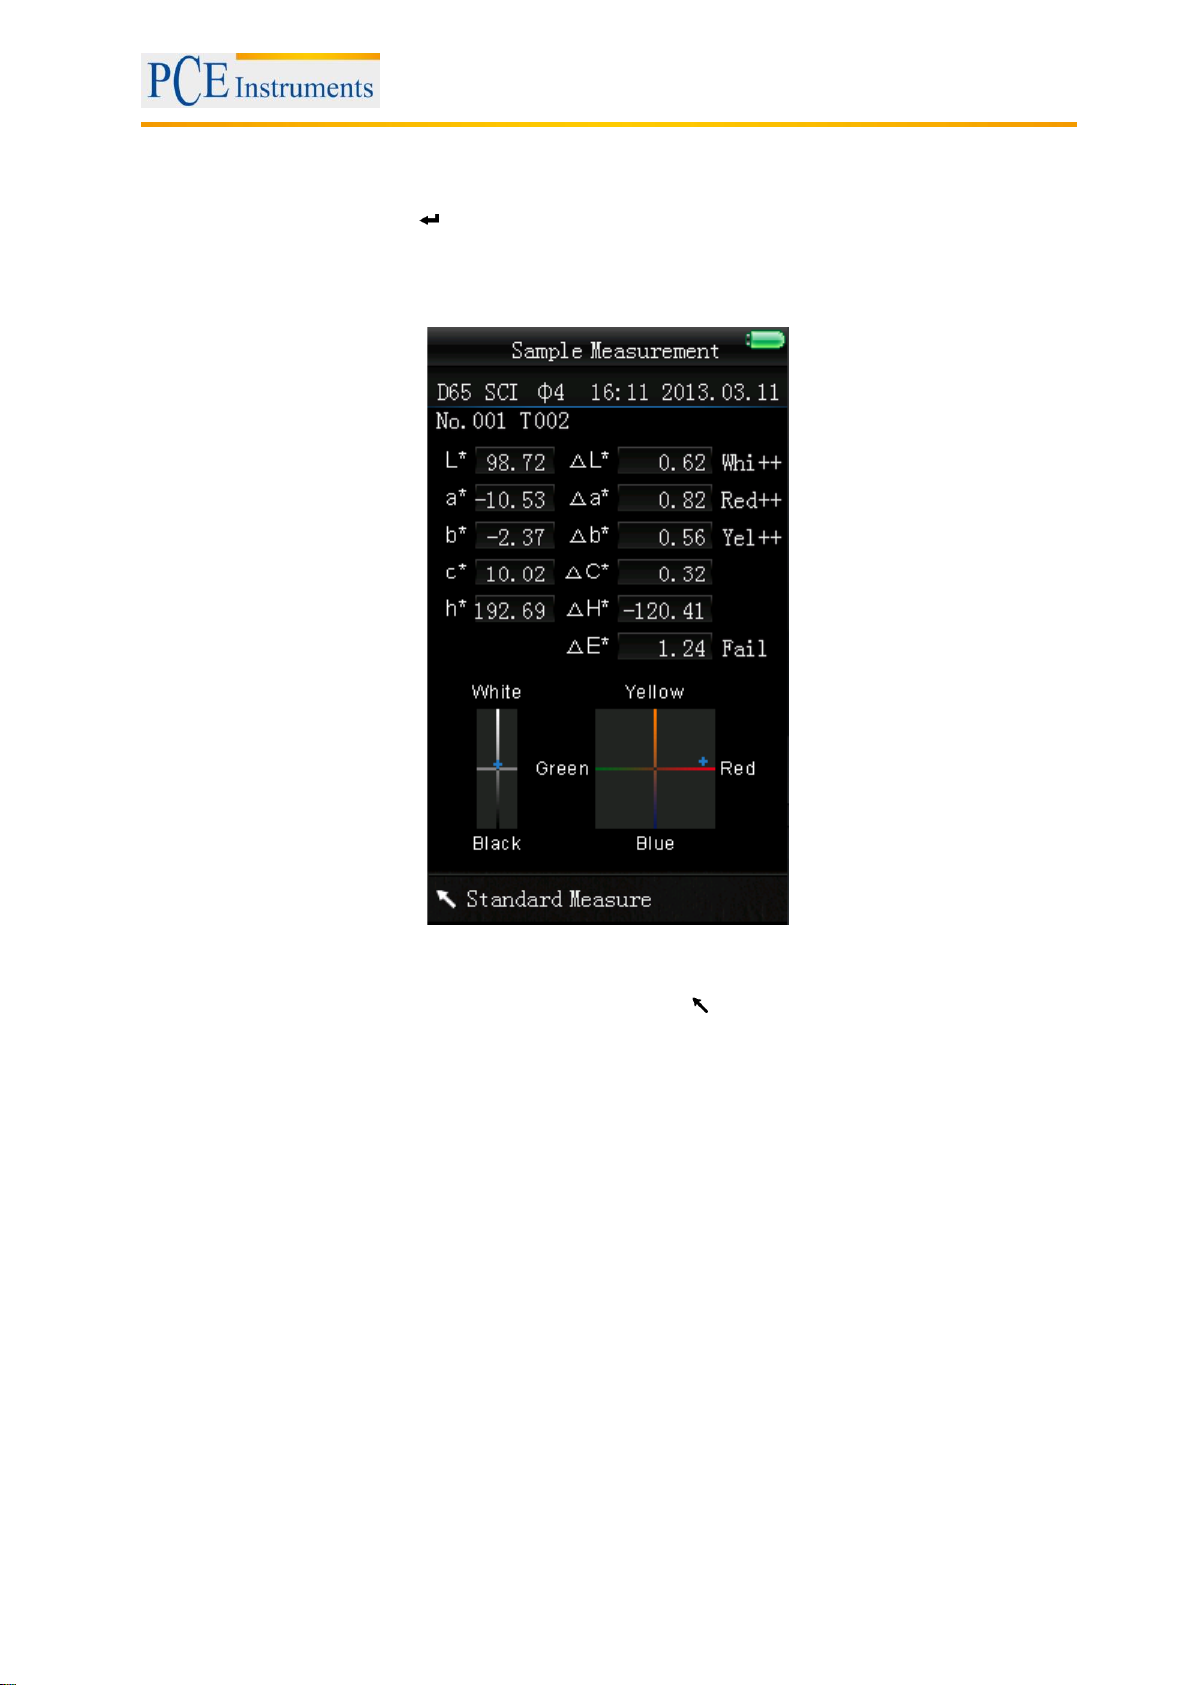
You can add one or more sample measurements to this reading. To do so, you have to switch to the
“Sample Measurement” screen:
1. Press the Enter button when you are in the result screen of the standard measurement
function. Now you get to the “Sample Measurement” screen.
2. Take a measurement (just like you took one in the standard measurement).
3. Now you can see the results and the deviation from the standard in the following screen:
Note: While the measurement is in progress (time duration: ~ 1 second), all buttons are inactive.
To go back to the standard measurement screen, press Back .
9
Page 10
Manual
5.3 Additional functions
5.3.1 Records
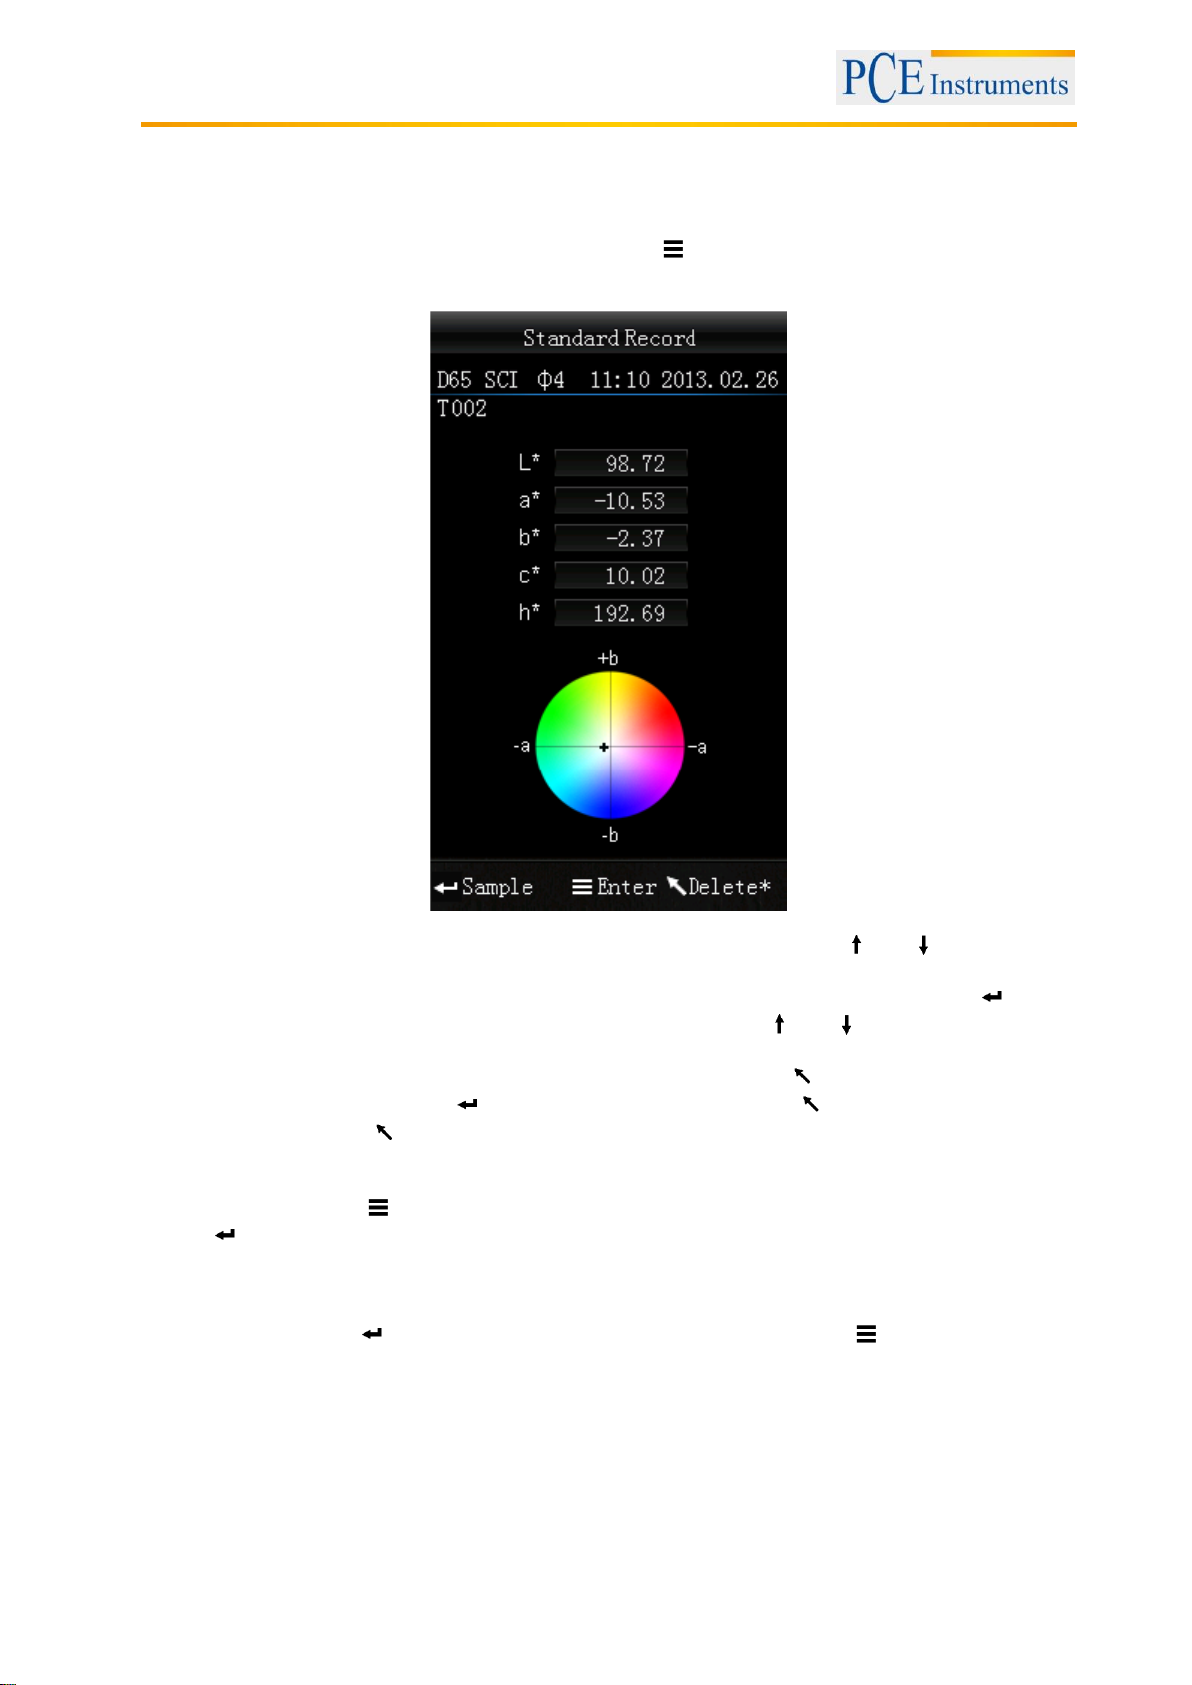
All measuring results are recorded and saved to the internal memory of the colorimeter (if auto save is
active). To view the recorded data, press the Menu button , select “Record” and press Enter to
confirm. Now, you get to the following screen:
Here you can navigate between the different readings by using the arrow keys ( and ).
If there are any samples attached to a standard, you can view those by pressing Enter .
If there is more than one sample, you can use the arrow keys ( and ) for selection.
If you want to delete a sample, select it and hold the Back button , until a confirmation screen
appears. Now, press Enter to delete the sample or press Back to cancel.
If you press Back shortly, you get back to the main screen of the record function.
If you want to subsequently add samples to an existing standard, select the standard and press
the Menu button . You are now redirected to the standard measurement screen. Press Enter
to go to the sample measurement screen. Now you can perform a sample measurement,
which will be automatically added to the selected standard.
If you want to turn a sample into a standard, select the standard which the sample is attached to
and press Enter . Now, select the sample and press the Menu button . The sample has now
turned into a standard.
10
Page 11
Manual
5.3.2 Calibration
To get to the calibration menu, press the Menu button , select “Calibrate“ and press Enter.
Here you can select between white and black calibration. Use the arrow keys ( and ) to select and
press Enter to confirm. A confirmation screen with instructions will appear.
White calibration
If you want to perform a white calibration, place the white calibration plate on the measuring aperture.
After that, press the Testing button to start the calibration.
Black calibration
If you wish to perform a black calibration, remove the calibration plate and place the device with the
measuring aperture oriented upwards. Make sure that this calibration is carried out in a dark environment.
Additionally, keep the device at least 1 meter away from reflecting objects like walls, tables or other
objects. To start the calibration process, press the Testing button.
Note: A calibration is only reasonable in the following cases: when first using the device, after strong
changes in the environmental conditions, when the device has been used for a long time or when the
measurement results are inaccurate.
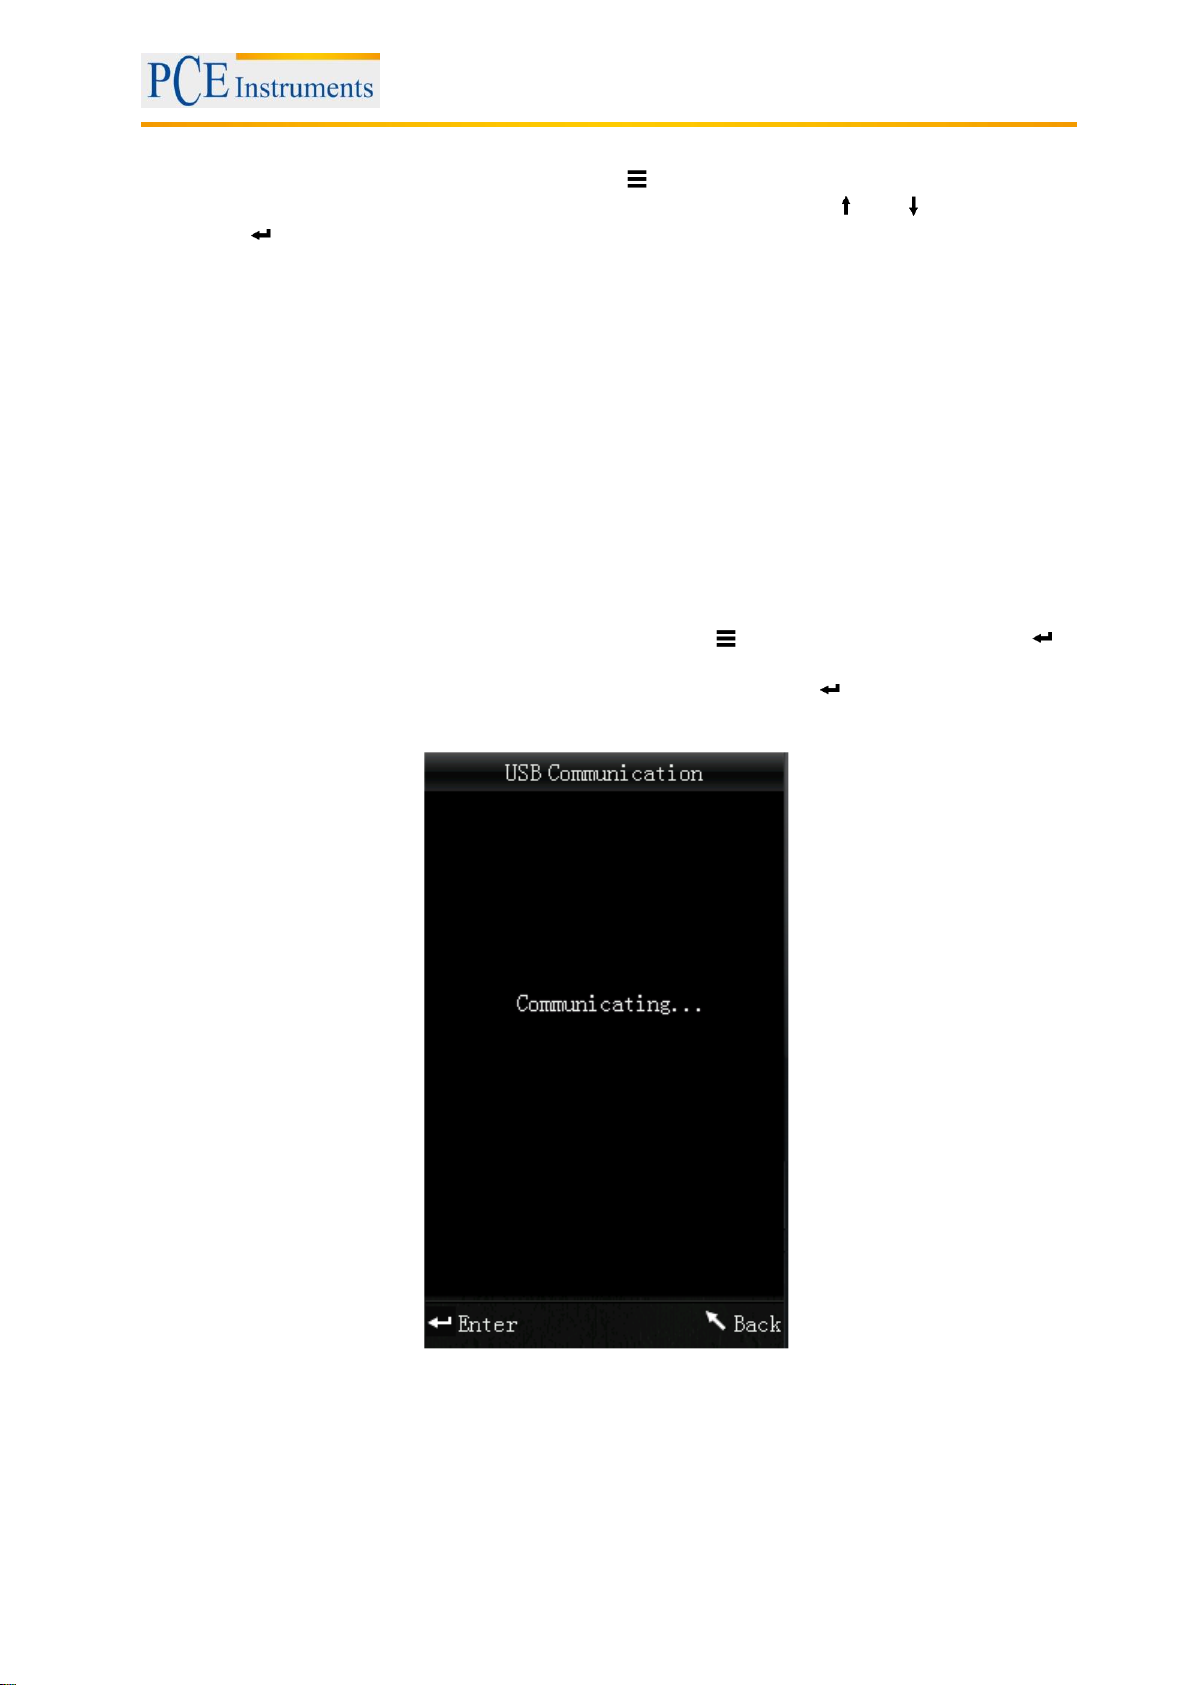
5.3.3 Connection to a PC or printer
To connect the device to a PC or printer, press the Menu button , select “Comm“ and press Enter .
Now, you will get to the communication screen.
After that, use the USB cable to connect the device to a PC and press Enter . If the connection was
successful, the screen shows “Communicating…”
The device can also be connected to a printer. In this case, all measuring results are printed
automatically.
11
Page 12

Manual
5.3.4 Tolerances
To set up or adjust tolerances, press the Menu button , select “Tolerance“ and press Enter . Now
you get to the tolerance screen.
Here you can set up tolerances. Select an option by using the arrow keys ( and ) and press Enter
to confirm.
Now you get to an entry screen. By using the arrow keys ( and ), you can adjust the selected digit.
Press Enter to go to the next digit. After confirming the last digit by pressing Enter , the tolerance is
set up.
Note: The threshold value refers to the „ΔE*“ value in the sample measurement display. It specifies the
maximum acceptable value of the deviation. If the measured value exceeds the threshold value, you can
see a “Fail” indication in the display. Otherwise, the display will show “Pass”.
5.3.5 Delete recorded data
To delete the recorded data, press the Menu button , select “Delete“ and press Enter . Now, you get
to the deletion screen.
You have two different options here. You can either delete all sample measurements (“Delete ALL
Samples”) or all records (“Delete ALL Records”).
Select the desired option by using the arrow keys ( and ) and press Enter . A confirmation screen
appears. Press Enter to confirm or Back to cancel.
Note: If you delete all records, all sample measurements will be deleted as well.
5.3.6 Select the light source
To select the light source, press the Menu button , select “Light“ and press Enter . Now you get to
the light source settings.
Here you can choose between the following options: D65, D50, A, C, F2(CWF), F6, F7(DLF), F8,
F10(TPL5), F11(TL84), F12(TL83/U30).
Use the arrow keys ( and ) to select a light source and press Enter to confirm.
12
Page 13
Manual
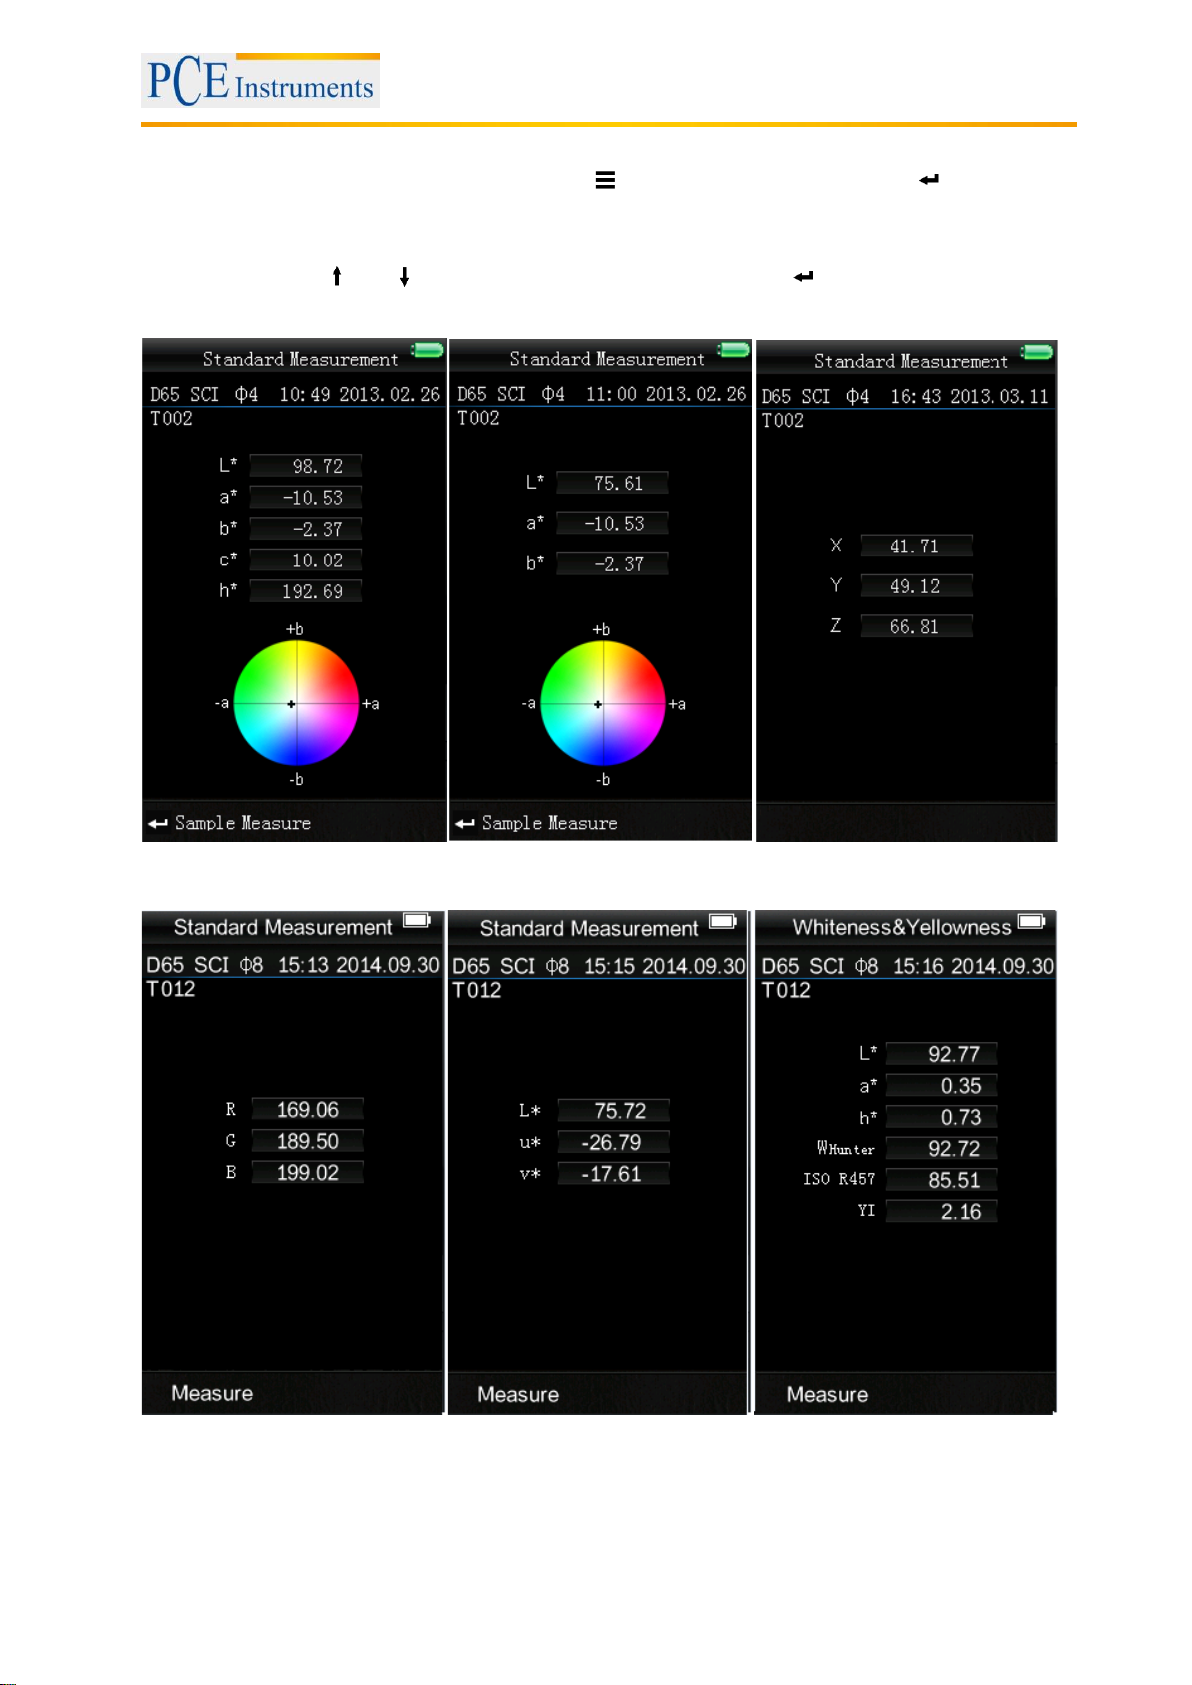
5.3.7 Select the colour space
To select the colour space, press the Menu button , select “Display” and press Enter . Now you get
to the colour space settings.
Here you can choose between the following options: CIE L*a*b*C*H*, CIE L*a*b*, CIE XYZ, CIE RGB,
CIEL*U*V, L*a*b* Whiteness&Yellowness, Color Fastness und Staining Fastness.
Use the arrow keys ( and ) to select a colour space and press Enter to confirm.
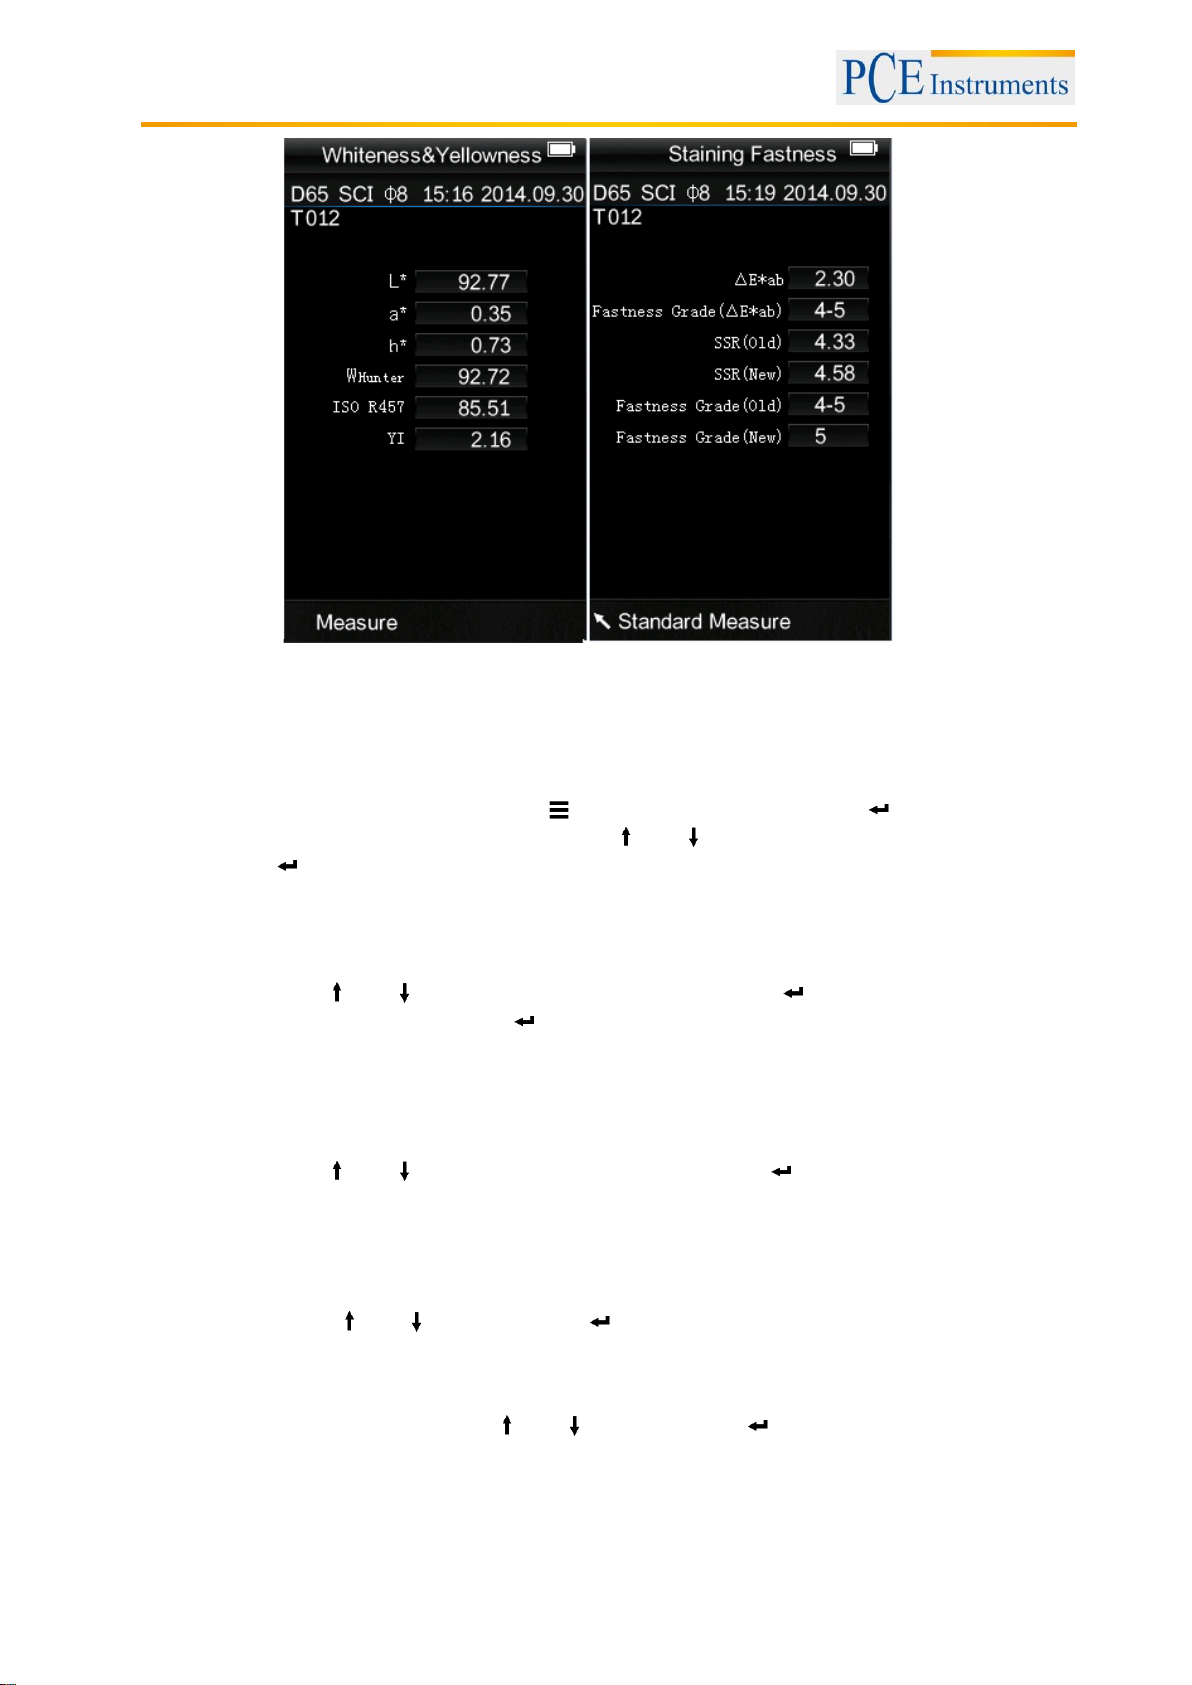
The following images show the Standard Measurement screen for all options:
CIE L*a*b*C*H* CIE L*a*b* CIE XYZ
(set by default)
CIE RGB CIE L*U*V* Whiteness and Yellowness
13
Page 14
Manual
Colour fastness Staining fastness
Note: When the option CIE XYZ, CIE RGB or CIE L*U*V is active, you can only take standard
measurements.
6 Settings
To get to the settings, press the Menu button , select “Setting“ and press Enter .
Here you have different options. Use the arrow keys ( and ) to navigate and confirm the selection by
pressing Enter .
6.1 Average
You can set the number of measurements which are performed during the measuring procedure. From
these particular measurement results, the average value is generated.
Use the arrow keys ( and ) to adjust the selected digit. Press Enter to go to the next digit. After
confirming the last digit by pressing Enter , the averaging is set.
Note: If you set “00” or “01”, there will be no averaging.
6.2 Aperture setting
Here you can choose between the two measuring apertures which are included in the package.
Use the arrow keys ( and ) to select the aperture and press Enter to confirm.
Note: After changing the aperture, a black and white calibration is necessary.
6.3 Auto save
Here you choose if the measured data is recorded automatically or not. Choose the desired option by
using the arrow keys ( and ) and press Enter to confirm.
6.4 Language
Here you can set the language of the menu. You can choose between English and Chinese. Select the
desired option by using the arrow keys ( and ) and press Enter to confirm.
14
Page 15

Manual
6.5 Time setting
Here you can set the time (“Set time”), date (“Set date”) and how time and date are displayed (“Time
format” / “Date format”). Select the desired option by using the arrow keys ( and ) and press Enter
to confirm.
Set time / date
Here you can set the individual digits of the time and date. Adjust the selected digit by using the arrow
keys ( and ) and press Enter to get to the next digit. After confirming the last digit by pressing
Enter , the time / date is set.
Time format
Here you can choose between 24 h format and 12 h format. Use the arrow keys ( and ) for selection
and press Enter to confirm.
Date format
Here you can choose between year-month-day, month-day-year and day-month-year. Use the arrow keys
( and ) for selection and press Enter to confirm.
6.6 Color Diff Formula
Here you can select the colour difference formula. You can choose between the following options: CIE94,
Hunter, CMC(2:1), CMC(1:1), ISO, JPC79, BFD(1.5:1), FMCII, CIE Luv1976 und CIE DE2000.
Choose the desired option by using the arrow keys ( and ) and press Enter to confirm.
6.7 Contrast
Here you can adjust the contrast of the display. Use the arrow keys ( and ) to adjust the scroll bar
and press Enter to confirm.
6.8 Restore factory
Here you can restore the factory settings. To do so, press Enter in the confirmation screen. Press
Back to cancel.
15
Page 16
Manual
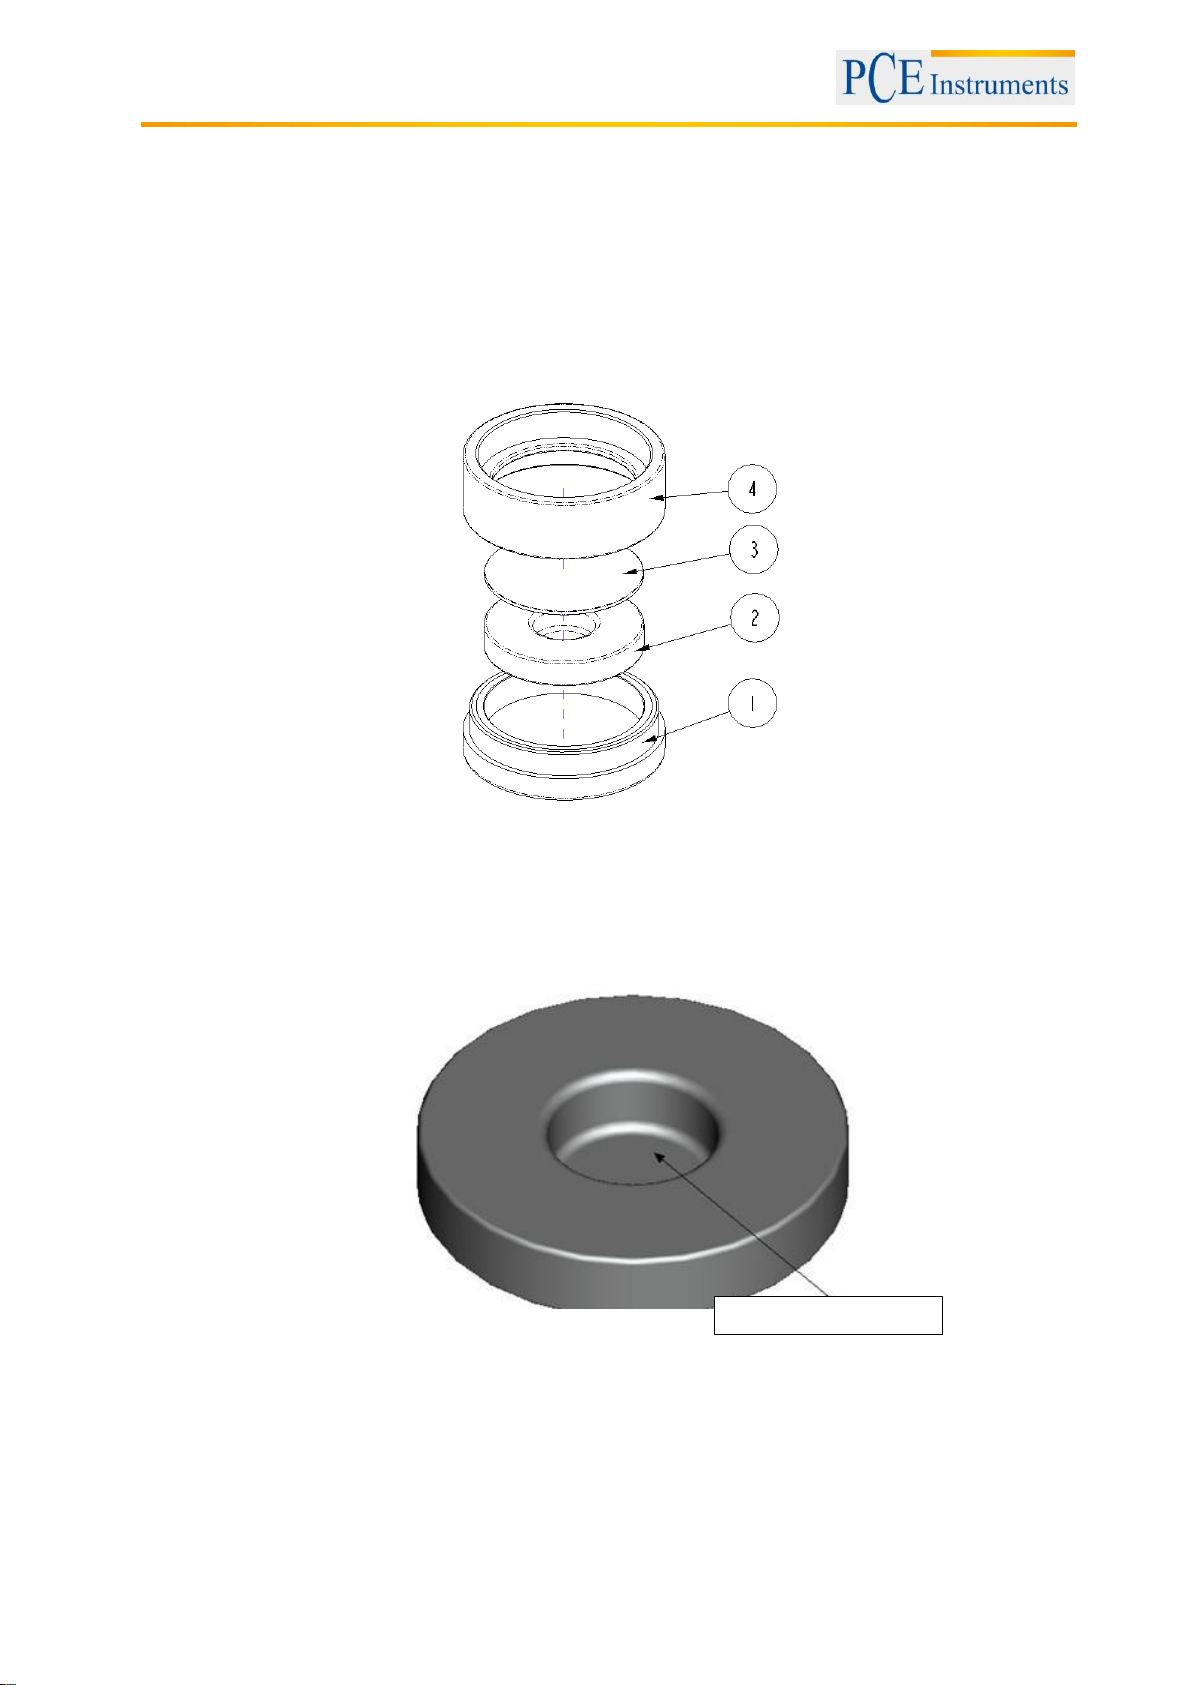
Powder compartment
7 Optional Accessories
7.1 Powder test box PCE-CSM PTB
With the optional powder test box PCE-CSM PTB you can determine the colorimetric parameters of
powders.
7.1.1 Construction
The PCE-CSM PTB consists of a base plate (1), a measuring plate with a powder compartment (2), a
lens (3) and a mounting ring (4).
7.1.2 Operation
1. Calibration: Put the lens on the white calibrations plate and perform a white calibration. After
that, perform a black calibration.
2. Fill in the powder: Fill the powder into the powder compartment of the measuring plate.
After that, put the powder test box back together (see 7.1.1). Make sure the screw joint is straight.
3. Measure: Place the measuring hole of the colorimeter on the hole of the powder test box and
perform a measurement. Make sure the colorimeter is stable.
Clean the test box: After using the powder test box, disassemble and clean it. If needed, you can use
alcohol for cleaning. After the cleaning, let the box dry and store it properly until the next use.
16
Page 17

Manual
8 Disposal
For the disposal of batteries, the 2006/66/EC directive of the European Parliament applies. Due to the
contained pollutants, batteries must not be disposed of as household waste. They must be given to
collection points designed for that purpose.
In order to comply with the EU directive 2012/19/EU we take our devices back. We either re-use them or
give them to a recycling company which disposes of the devices in line with law.
If you have any questions, please contact PCE Instruments.
9 Contact
If you have any questions about our range of products or measuring instruments please contact PCE
Instruments.
9.1 PCE Instruments UK
By post:
PCE Instruments UK Ltd.
Units 12/13 Southpoint Business Park
Ensign Way, Southampton
Hampshire
United Kingdom, SO31 4RF
By phone:
02380 987 035
9.2 PCE Americas
By post:
PCE Americas Inc.
711 Commerce Way
Suite 8
Jupiter
33458 FL
USA
By phone:
561 320 9162
17
 Loading...