

Page 1
© PCE Instruments
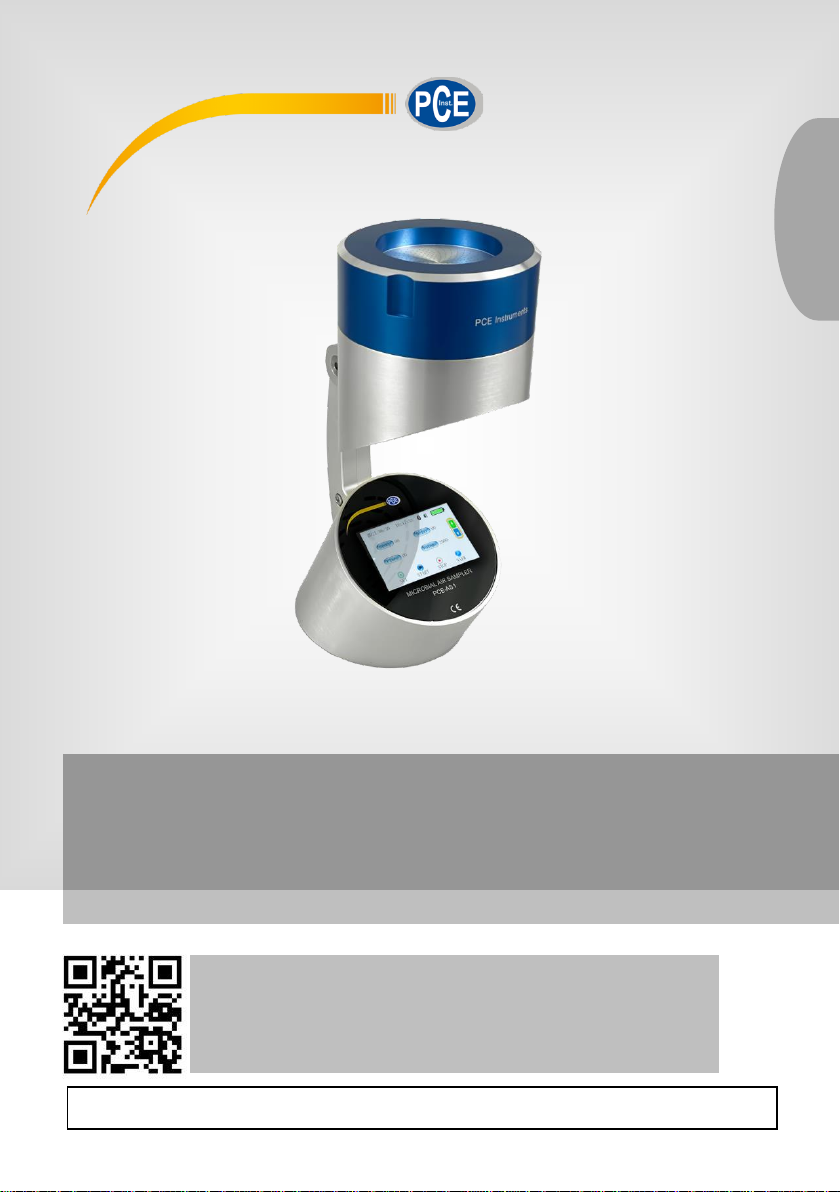
Air Sampler PCE-AS1
User Manual
User manuals in various languages (français,
italiano, español, português, nederlands, türk, polski,
русский, 中文) can be found by using our
product search on: www.pce-instruments.com
Last change: 16 July 2021
v1.0
English
Page 2

Contents
1 Safety notes ........................................................................................... 1
2 Applications ........................................................................................... 2
3 Features ................................................................................................. 2
4 Specifications ........................................................................................ 3
4.1 Delivery contents .............................................................................................................. 3
5 Device description ................................................................................ 3
6 Operating instructions ......................................................................... 5
6.1 Key description................................................................................................................. 5
6.2 Menu ................................................................................................................................ 6
7 Maintenance and precautionary measures ...................................... 10
8 Troubleshooting .................................................................................. 11
9 Contact ............................................................................................... 11
10 Disposal ............................................................................................... 11
© PCE Instruments
Page 3

© PCE Instruments
1
1 Safety notes
Please read this manual carefully and completely before you use the device for the first time. The
device may only be used by qualified personnel and repaired by PCE Instruments personnel.
Damage or injuries caused by non-observance of the manual are excluded from our liability and
not covered by our warranty.
• The device must only be used as described in this instruction manual. If used otherwise,
this can cause dangerous situations for the user and damage to the meter.
• The instrument may only be used if the environmental conditions (temperature, relative
humidity, …) are within the ranges stated in the technical specifications. Do not expose
the device to extreme temperatures, direct sunlight, extreme humidity or moisture.
• Do not expose the device to shocks or strong vibrations.
• The case should only be opened by qualified PCE Instruments personnel.
• Never use the instrument when your hands are wet.
• You must not make any technical changes to the device.
• The appliance should only be cleaned with a damp cloth. Use only pH-neutral cleaner,
no abrasives or solvents.
• The device must only be used with accessories from PCE Instruments or equivalent.
• Before each use, inspect the case for visible damage. If any damage is visible, do not
use the device.
• Do not use the instrument in explosive atmospheres.
• The measurement range as stated in the specifications must not be exceeded under
any circumstances.
• Non-observance of the safety notes can cause damage to the device and injuries to
the user.
We do not assume liability for printing errors or any other mistakes in this manual.
We expressly point to our general guarantee terms which can be found in our general terms of
business.
If you have any questions please contact PCE Instruments. The contact details can be found at
the end of this manual.
Page 4

© PCE Instruments
2
2 Applications
- Pharmaceutical industry:
Monitoring the number of microorganisms under the laminar flow hood;
Analysis of the cleanliness of a clean room;
Testing the effectiveness of sterilization.
- Food and beverage industry:
Detection of microbial contamination in clean rooms according to the HACCP concept.
- Hospitals:
Detection of pathogenic microorganisms in operating theatres, as well as in the
pharmacy, store room or ICU.
- Electrical industry:
Measuring particles and micro-bacterial contamination in clean rooms.
3 Features
1. ISO/DIS 14698-1;
2. Reliable air sampling design, the sampling head has up to 300 0.6mm micropores
(standard for 100l / min sampling flow sampler) or 300 0.8mm micropores (standard for
200l / min sampling flow sampler), so that the collected microorganisms can be evenly
distributed on the surface of the culture medium, reducing the overlap of dust bacteria
and improving the accuracy rate;
3. With real-time flow monitoring, automatic adjustment of sampling flow rate to ensure
the accuracy of sampling volume.
4. High-definition LCD touch screen, rich display content, user-friendly menu settings,
simple and intuitive operation;
5. The starting time and sampling quantity of the automatic air sampler can be set directly
through the operation panel;
6. The sampler can be controlled by Bluetooth function on mobile phone;
NOTE: An App is NOT available!
7. The calibration operation is simple and the flow can be calibrated by adjusting the
power of the sampling fan directly through the menu options;
8. Fully automatic cycle sampling function, can achieve up to 99 continuous sampling
times within 100 hours;
9. It is easy to realize the traceability of equipment operation. It can automatically record
4000 groups of sampling data (including the set sampling location number, sampling
group number, sampling quantity and sampling time) and query the sampling record
data at any time;
10. Built in high-capacity rechargeable lithium battery, precise display of battery power,
battery can work continuously for more than 15 hours when fully charged;
11. Intelligent charging mode, in order to effectively extend the service life of the battery
and to realize long-term continuous sampling of the equipment, it can be connected to
the power charger all the time during operation;
12. The shell of the whole machine is made of high-quality aviation aluminium, and the
sampling head can be used for steam sterilization or 75% alcohol wiping sterilization;
13. The standard universal culture dish is 90 × 13 ~ 15mm, without expensive special
consumables;
Page 5
© PCE Instruments
3
4 Specifications
Micropores in the sampling head
300
Pore size of sampling head
0.6/0.8(mm)
Sampling flow
100/200(l/min)
Cross section velocity of sampling port
0.38 (m/s) (valid under laboratory conditions)
Sampling volume
10~6000(l)set freely(In 10l)
Suitable culture dish
90×13~15mm standard culture dish
Display
Touch panel, high resolution 800×480
Bluetooth (remote control)
NOTE: An App is NOT available!
Audio alarm
Yes
Procedure cycle sampling
Up to 99 continuous sampling times within
100 hours
Sampling parameter setting
99 groups and 30 points
Recording function
4000 sets of sampling data records
Battery
7.4 V 6400 mA
Charging power supply
AC 110~240 V 50/60 Hz
transfer to DC 8.4 V
Standard
ISO 14698-1
Tripod
With standard photography tripod thread
Operating conditions
Temperature:0~60 ℃;
Relative humidity:0~90 %
Dimensions
approx. 120 × 300 mm
Weight
approx. 2.6 kg
4.1 Delivery contents
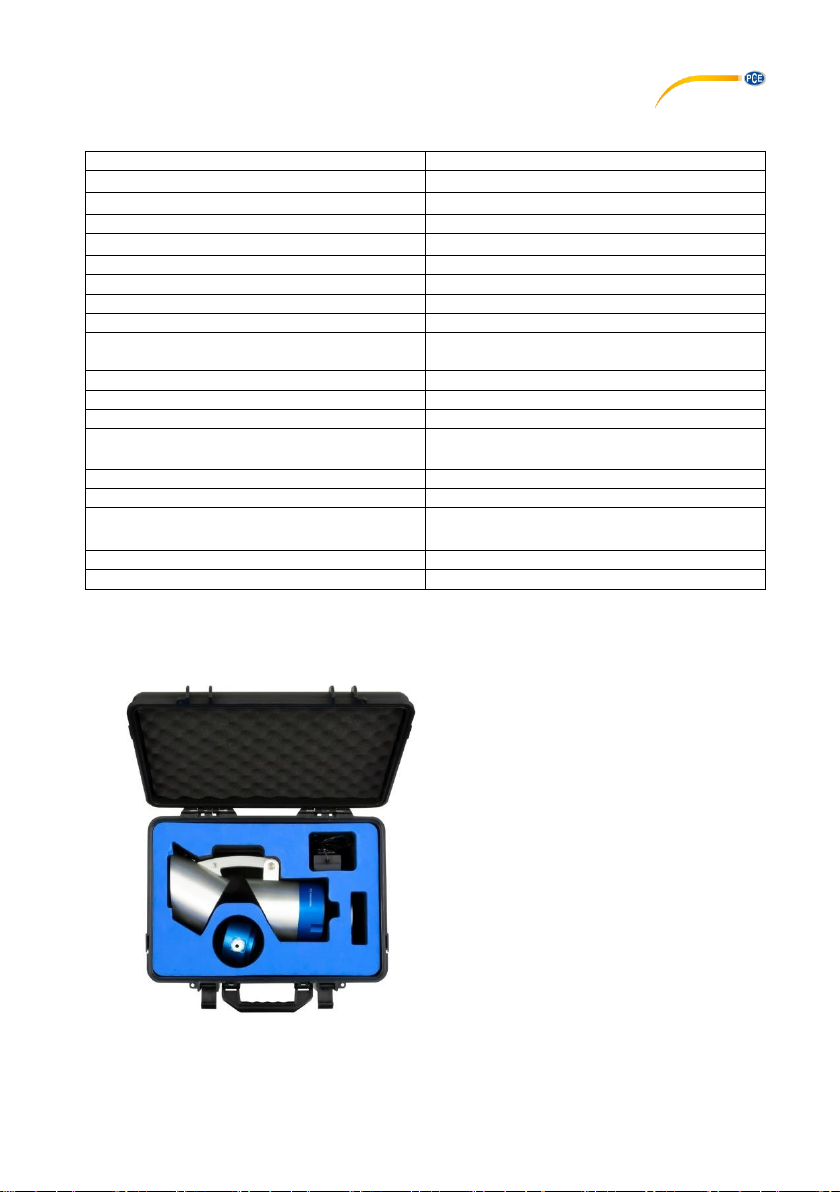
1 x Air Sampler PCE-AS1
1 x Calibration attachment
1 x Mains power adaptor
1 x Carrying case
1 x Instruction manual
5 Device description
Page 6
© PCE Instruments
4
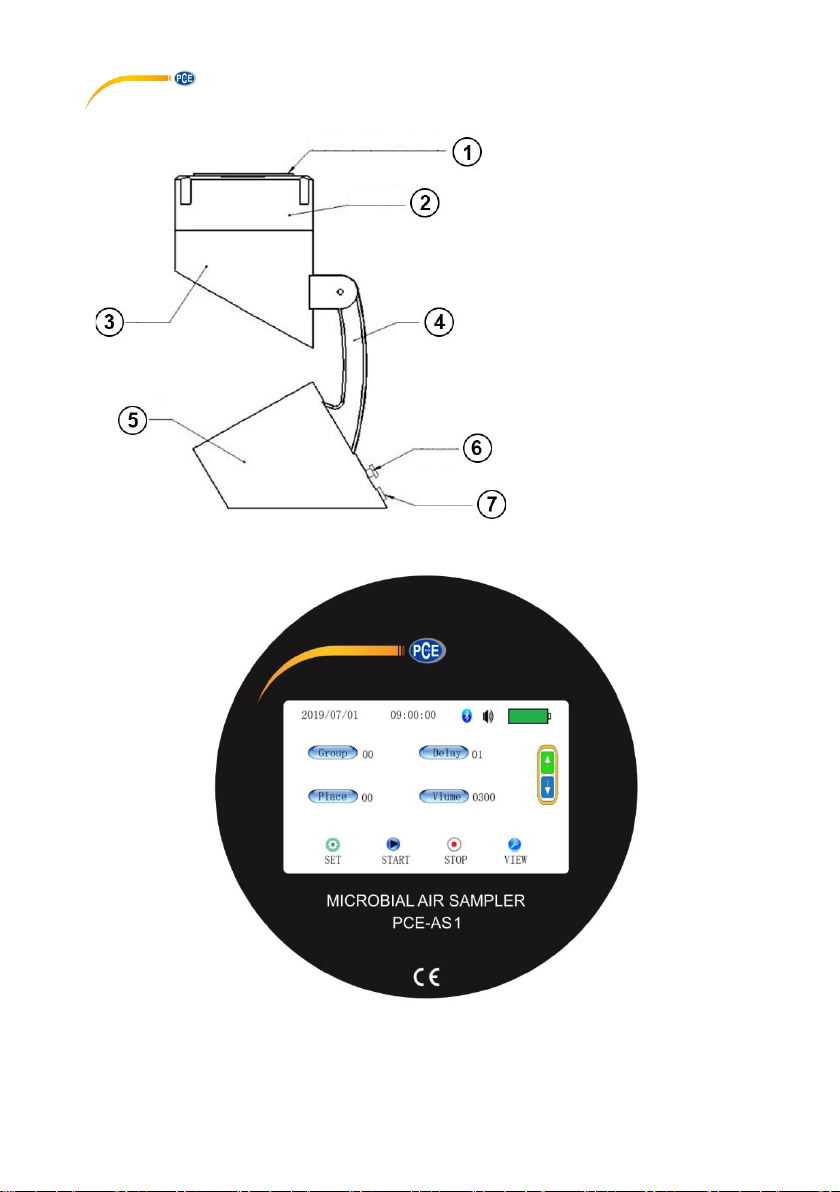
1. Cover of the collecting head
2. Specimen mount
3. Pump
4. Collecting head stand
5. Control panel with touch screen
6. Power supply
7. On / off switch
Page 7
© PCE Instruments
5
6 Operating instructions
6.1 Key description
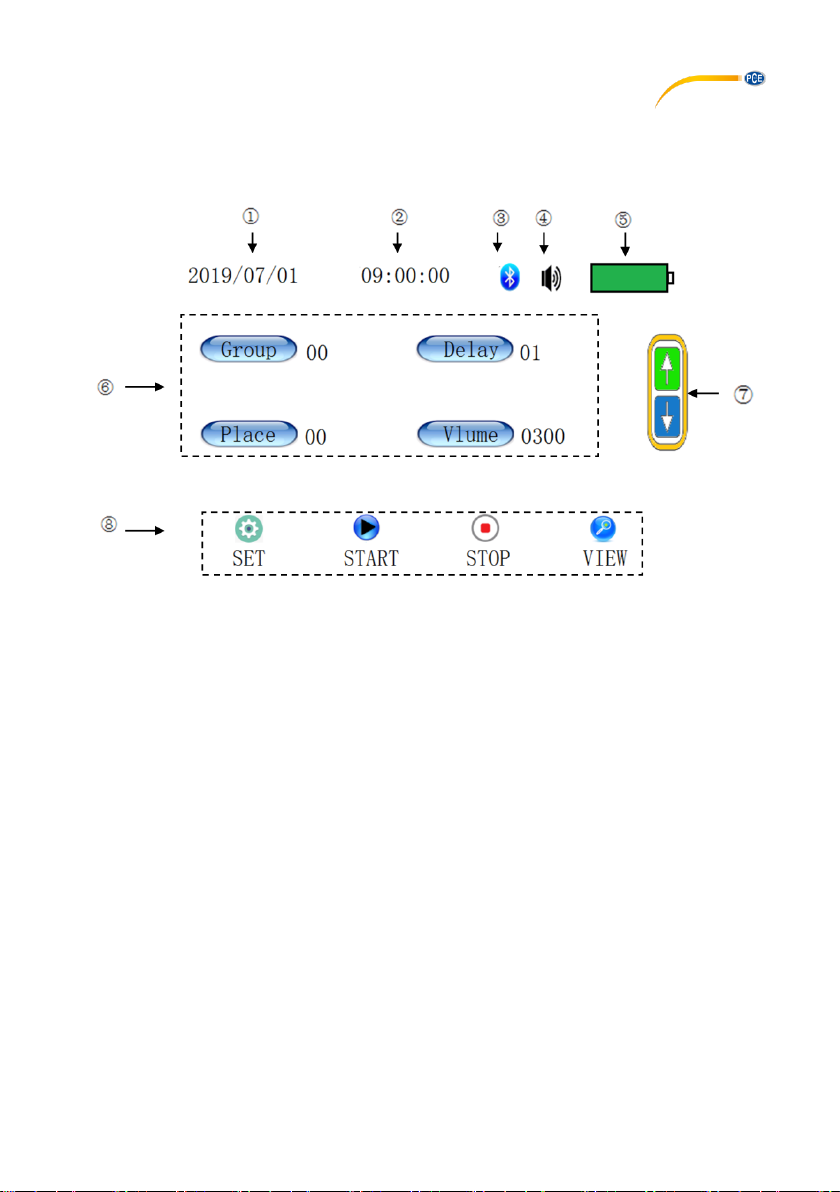
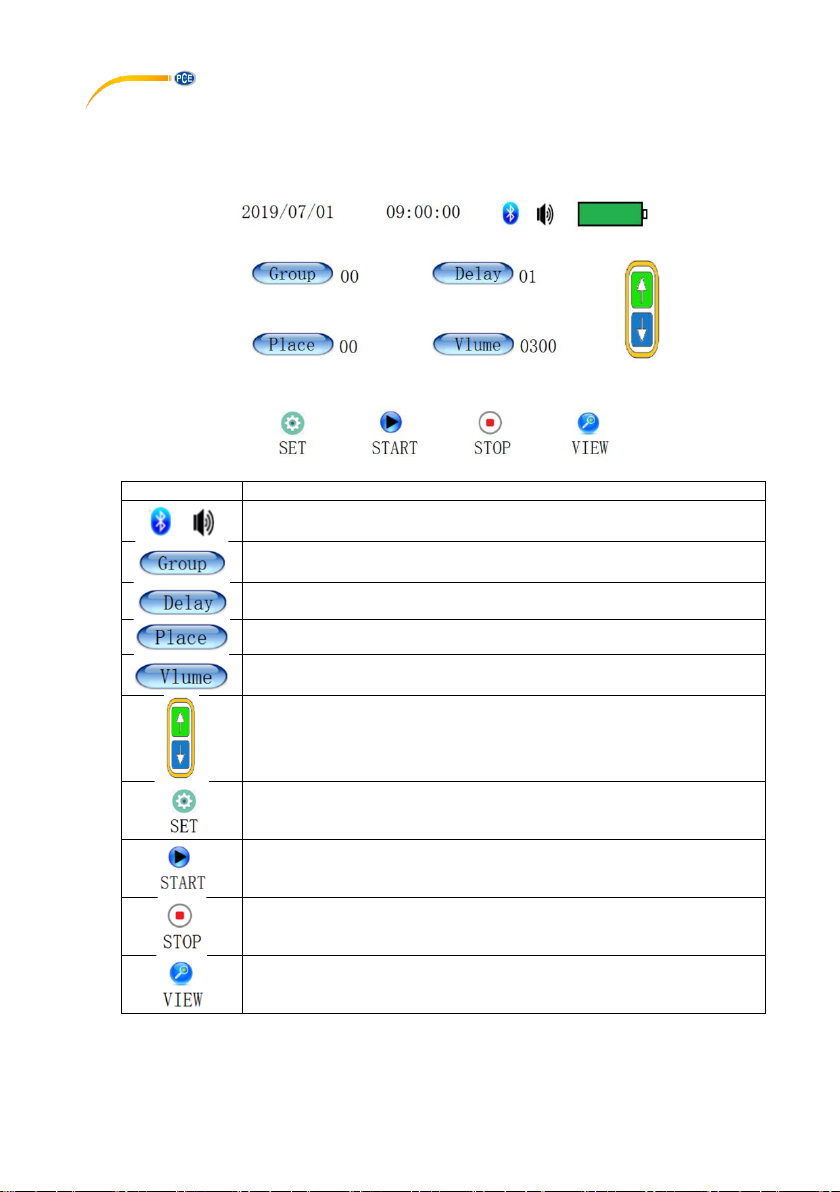
As shown in the figure above, the contents displayed in each label area are in accordance with
the following rules:
①:Current date
②:The current time is displayed in the non-sampling mode, and the remaining sampling time is
displayed when sampling.
③:Bluetooth connection status, colour means connected, gray means not connected.
④:When the buzzer is on, no diagonal line means on and a diagonal line indicates off.
⑤:Current battery power, the range is 1-10 bars.
⑥:Four quick setting touch buttons, and the horizontal line under the number indicates that the
value is modifiable.
⑦:Modify the selected value (number with horizontal line), up arrow for increase, down arrow
for decrease.
⑧:Main menu function keys
Page 8
© PCE Instruments
6
6.2 Menu
6.2.1 Main menu description:
Icon
Function
Bluetooth and buzzer status
Press to set the group, range: 0-99
Press to set the time delay, range: 0-99
Press to set the location, range: 0-29
Press to set the sampling amount, range: 0-6000l(In 10l)
Adjust the selected setting options. When a setting item is selected,
the key is valid.
Enter the setting menu of the instrument and set the corresponding
parameters in the corresponding interface.
Start sampling according to the set parameters. (In order to prevent
accidental touch during the sampling process, only the stop key on the
touch screen is effective).
Stops the current sampling. This key is only valid when the device is
sampling.
Enter to view the sampling data.
Page 9
© PCE Instruments
7
6.2.2 View data menu description
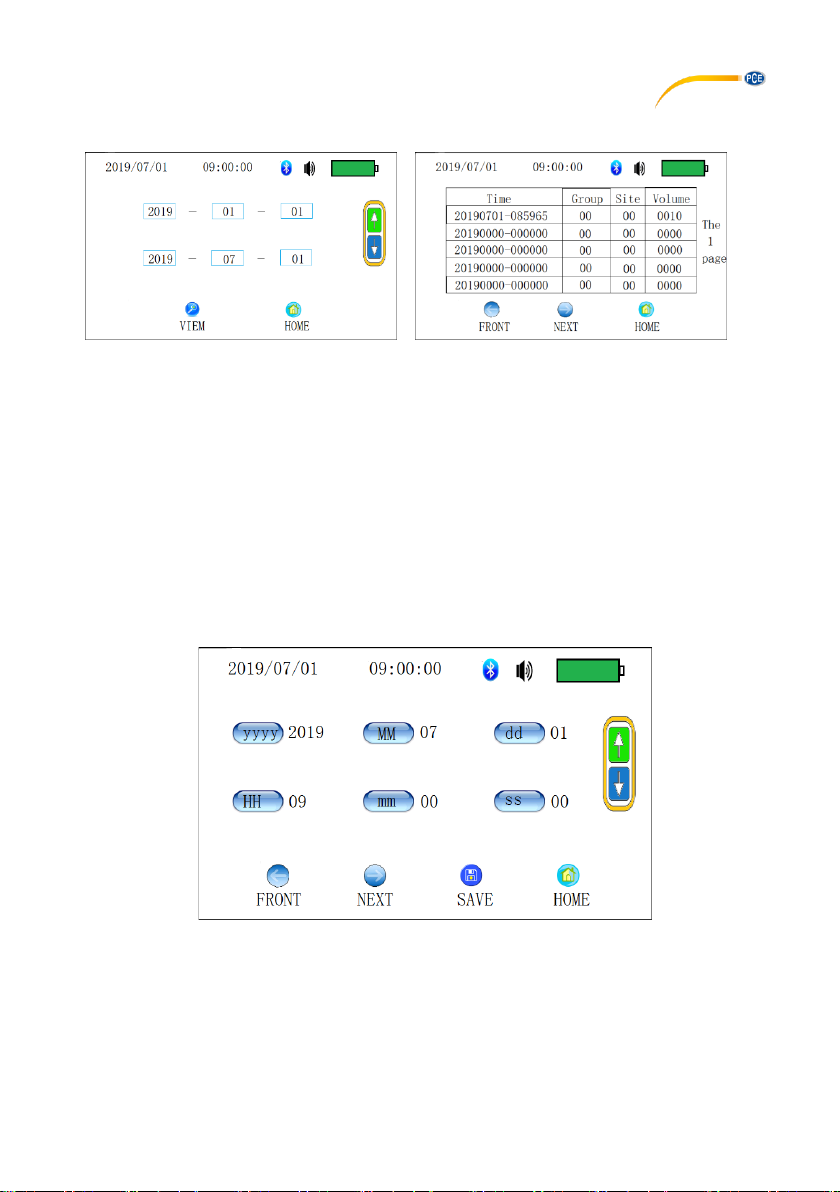
As shown in the first figure, select the month, year and day box to be adjusted and then you can
modify it by using the up and down keys. The upper row is the start date of the data to be viewed
and the lower row will automatically show the current date when entering the menu and can also
be modified.
After the date is selected, press “VIEW” to view the sampling data in the corresponding time
period, as shown in the second picture. If you press the HOME button, you will return to the home
page.
In the data display menu, each page can display up to five groups of sampling data. You can
press the up and down keys to turn the page. You can view the first 100 groups of sampling data
within the selected time range directly on the instrument at once. If you need to view other data,
you can set different viewing time periods for data viewing.
6.2.3 Description of time setting menu
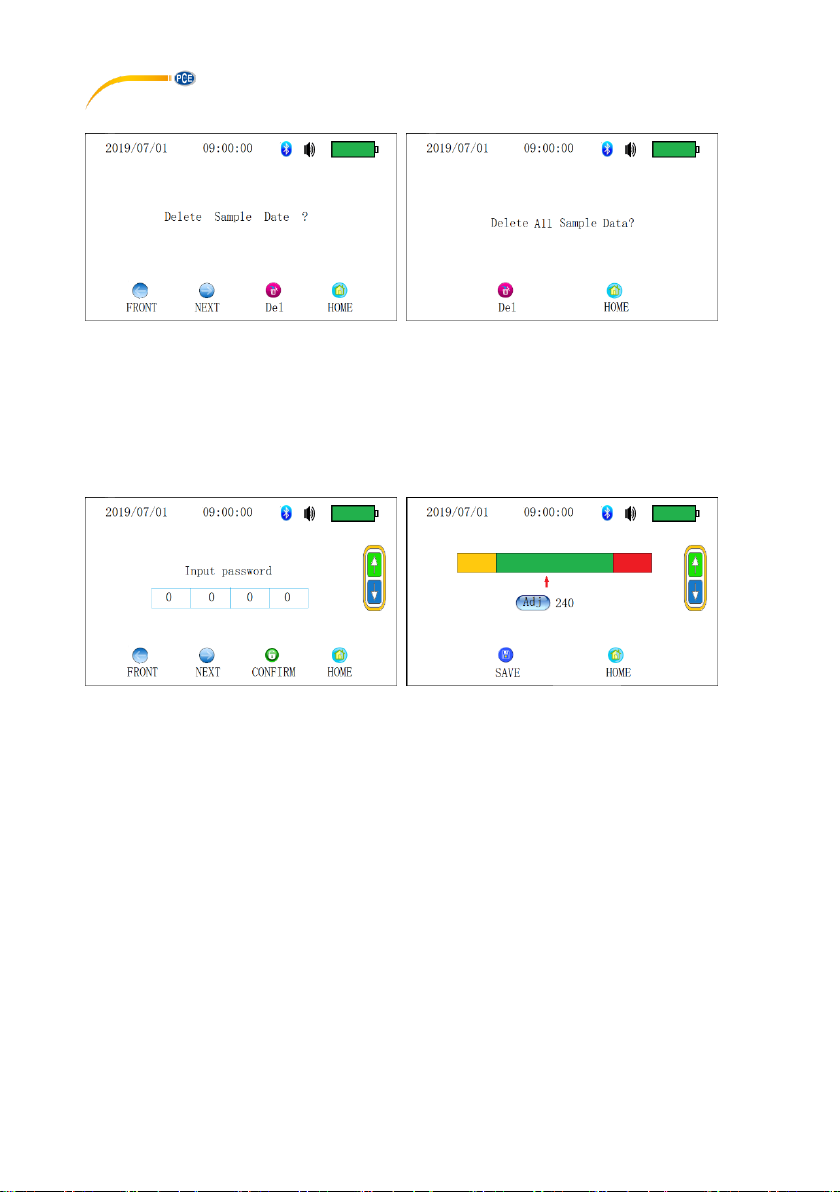
Press the key corresponding to year, month, day, hour, minute and second to select the
corresponding parameter to be modified. When the parameter is selected, it can can be modified
by using the up and down keys on the right.
If the modified parameters need to be saved, press the SAVE button. If you do not need to save
them, you can press the HOME button to return to the home page or press the up and down page
button to turn to the setting interface of other parameters.
Page 10
© PCE Instruments
8
6.2.4 Delete data menu description
Go to the second menu. Press the Del key in the second menu to delete all the saved sampling
data. Please operate with caution! If you do not want to delete the data, you can press the HOME
button to return to the main interface.
6.2.5 Flow calibration (password required) interface description
This menu is intended for trained personnel only.
In the flow calibration menu, press the corresponding password box to select it and then enter the
corresponding password by using the up and down buttons to the right. When the password is
correct, press the CONFIRM key to enter the flow calibration menu, as shown in the second figure.
When entering the flow calibration menu, the sampling pump is automatically started. Press the
CALIBRATION button to select the flow parameters. After selection, the corresponding values
can be modified by means of the up and down buttons. When the flow setting reaches the
standard value, press the SAVE button to save the current flow calibration value and then return
to the main menu. If you press the home page, you will not save the modified parameters and
return to the main interface.
Setting range of calibration parameters: 0-499.
Page 11
© PCE Instruments
9
6.2.6 Program sampling menu description
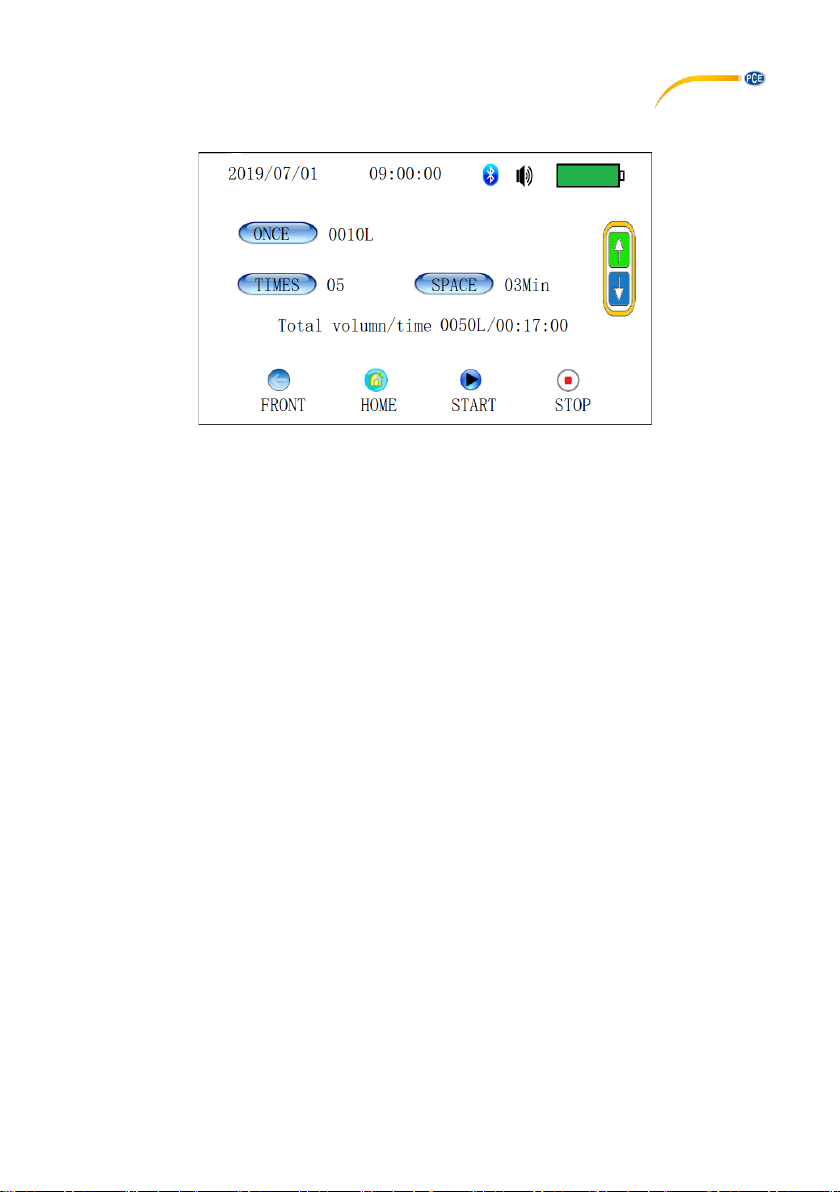
After setting the single sampling quantity, sampling times and sampling interval, press the START
button to start program sampling. The grouping, location and delay of program sampling are
saved by calling up the corresponding parameters of standard sampling directly. The total number
of samples will be displayed in the data in the next row after setting the values of single sampling
amount and sampling number.
After pressing START, the sampling delay is carried out first. After the delay is completed, a single
sampling is started and the sample size is equal to the set single sampling amount. After the
sampling of single sampling quantity is completed, the sampling times will be automatically
reduced by 1 and the sampling will stop. At the same time, the countdown of the sampling interval
starts. When the countdown of sampling interval changes to 0, a single sampling is started again.
Do this until the STOP button is pressed or the sampling number becomes 0.
Setting range of single sampling quantity: 10-3000 (minimum setting amount: 10)
Setting range of total sampling times: 0-99
Sampling interval setting range:0-99
Note 1
The value of single sampling amount * total sampling times should be less than 6000. If it is higher
than 6000, the set modification parameters will automatically change to the corresponding
minimum setting value.
Note 2
The total estimated time should be less than 99:59:59. If it is higher than this value, the set
modification parameter will automatically change to the corresponding minimum setting value.
Page 12
© PCE Instruments
10
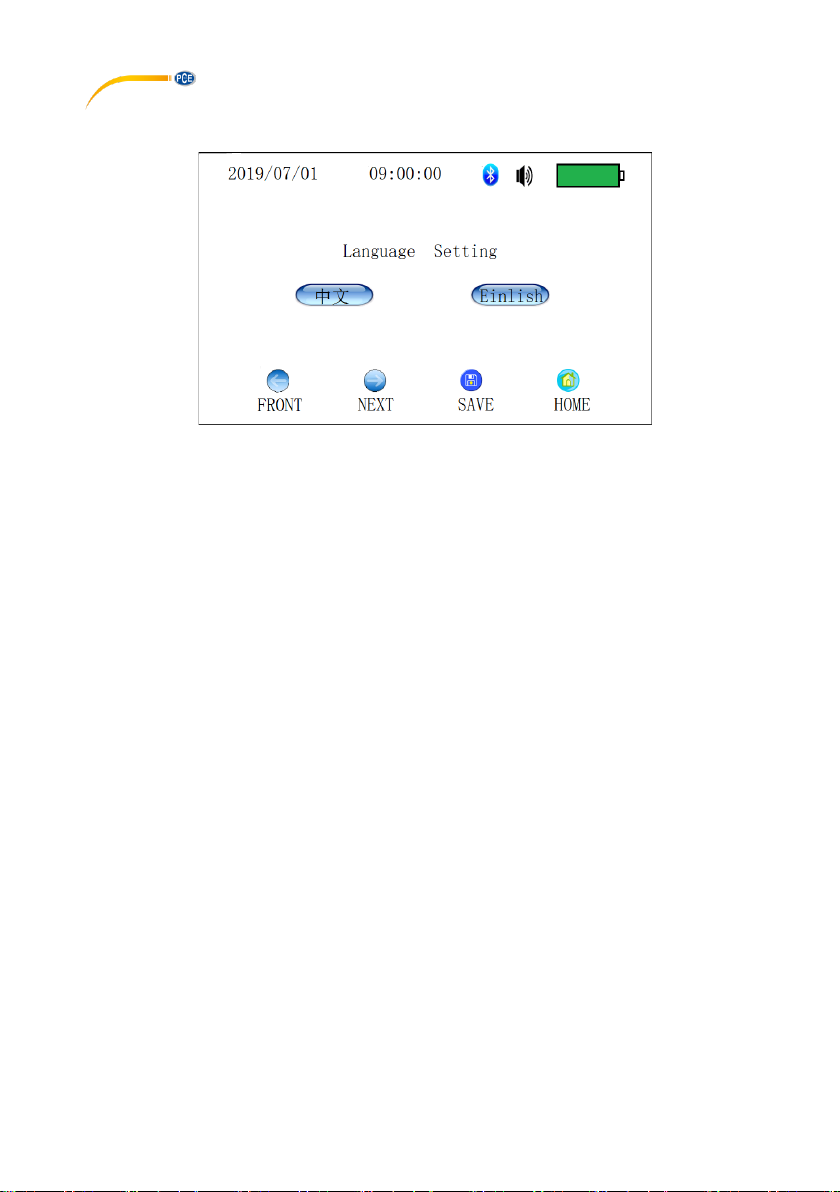
6.2.7 Description of language setting
Press the Chinese or English key to select the corresponding language. After the selection, press
the SAVE button to save the selected language and go back to the main interface. By pressing
the HOME button, you will directly return to the main interface and the set language has not been
saved.
7 Maintenance and precautionary measures
- Do not perform sampling with toxic corrosive gas. The device is also not intended for
use in acidic alkaline environments. It is not allowed in areas where there is fine dust
exceeding 0.3 mg/m³.
- Do not press the SAMPLE button before covering because the pump can overheat and
be destroyed.
- Completely charge the battery before each use to prevent damage.
- When the Petri dish is inserted, it should be placed solidly on the specimen mount.
- After each use, the collecting head and top should be cleaned with 75 % alcohol. Then
the cover must be placed back on the collecting head set.
Page 13
8 Troubleshooting
Problem
Possible reason
Solution
Display does not switch on /
remains dark even though
„On / Off“ key is pressed.
1. Battery low
2. Fuse faulty
1. Connect the charger.
2. Open the lower part of the
device and insert a new fuse.
Pump does not work when
„Sample“ key is pressed.
1. Cable in handle is loose or
broken
2. Pump output failed
3. Pump faulty
1. Connect the cables in the
grid correctly.
2. Restore the pump output.
3. Replace the pump.
Flow rate is too low.
1. Battery low
2. Holes in the collecting
head are partly or fully
clogged.
3. Dish excessively covered
with medium
1. Connect the charger.
2. Clean the clogged holes in
the collecting head.
3. Spread the medium
evenly.
After starting the device,
display shows something but
no clear letters or numbers or
display indicates that some
individual keys do not work.
The internal computer of the
sampler has detected a fault.
Use the key at the back to
turn off the meter. Wait 5
seconds until you switch it
back on. All parameters will
be reset.
9 Contact
If you have any questions, suggestions or technical problems, please do not hesitate to contact
us. You will find the relevant contact information at the end of this user manual.
10 Disposal
For the disposal of batteries in the EU, the 2006/66/EC directive of the European
Parliament applies. Due to the contained pollutants, batteries must not be disposed of as
household waste. They must be given to collection points designed for that purpose.
In order to comply with the EU directive 2012/19/EU we take our devices back. We either reuse them or give them to a recycling company which disposes of the devices in line with law.
For countries outside the EU, batteries and devices should be disposed of in accordance
with your local waste regulations.
If you have any questions, please contact PCE Instruments.
© PCE Instruments
11
Page 14

© PCE Instruments
12
PCE Instruments contact information
Germany France Spain
PCE Deutschland GmbH PCE Instruments France EURL PCE Ibérica S.L.
Im Langel 4 23, rue de Strasbourg Calle Mayor, 53
D-59872 Meschede 67250 Soultz-Sous-Forets 02500 Tobarra (Albacete)
Deutschland France España
Tel.: +49 (0) 2903 976 99 0 Téléphone: +33 (0) 972 3537 17 Tel. : +34 967 543 548
Fax: +49 (0) 2903 976 99 29 Numéro de fax: +33 (0) 972 3537 18 Fax: +34 967 543 542
[email protected] [email protected] [email protected]
www.pce-instruments.com/deutsch www.pce-instruments.com/french www.pce-instruments.com/espanol
United Kingdom Italy Turkey
PCE Instruments UK Ltd PCE Italia s.r.l. PCE Teknik Cihazları Ltd.Şti.
Unit 11 Southpoint Business Park Via Pesciatina 878 / B-Interno 6 Halkalı Merkez Mah.
Ensign Way, Southampton 55010 Loc. Gragnano Pehlivan Sok. No.6/C
Hampshire Capannori (Lucca) 34303 Küçükçekmece - İstanbul
United Kingdom, SO31 4RF Italia Türkiye
Tel: +44 (0) 2380 98703 0 Telefono: +39 0583 975 114 Tel: 0212 471 11 47
Fax: +44 (0) 2380 98703 9 Fax: +39 0583 974 824 Faks: 0212 705 53 93
[email protected] [email protected] [email protected]
www.pce-instruments.com/english www.pce-instruments.com/italiano www.pce-instruments.com/turkish
The Netherlands Hong Kong United States of America
PCE Brookhuis B.V. PCE Instruments HK Ltd. PCE Americas Inc.
Institutenweg 15 Unit J, 21/F., COS Centre 1201 Jupiter Park Drive, Suite 8
7521 PH Enschede 56 Tsun Yip Street Jupiter / Palm Beach
Nederland Kwun Tong 33458 FL
Telefoon: +31 (0)53 737 01 92 Kowloon, Hong Kong USA
[email protected] Tel: +852-301-84912 Tel: +1 (561) 320-9162
www.pce-instruments.com/dutch [email protected] Fax: +1 (561) 320-9176
www.pce-instruments.cn [email protected]
 Loading...