

Page 1
© PCE Instruments
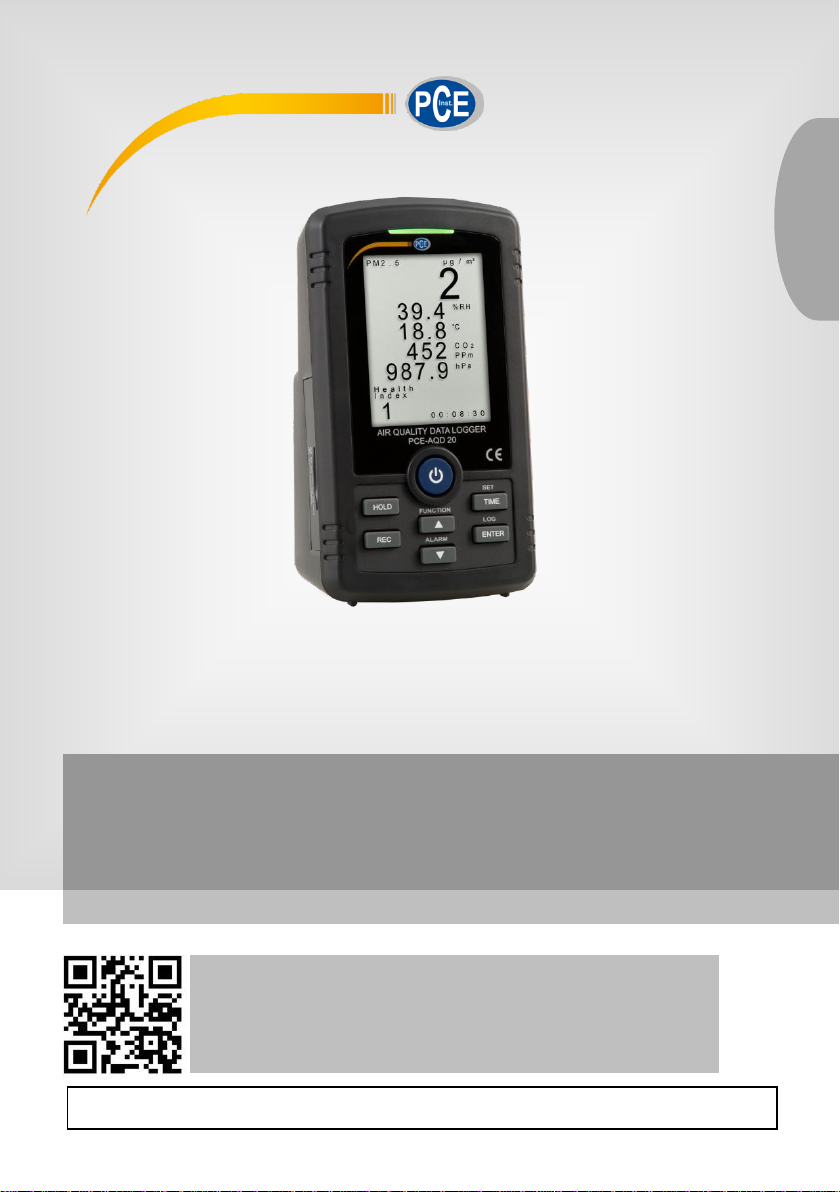
PCE-AQD 20 Particle Counter
User Manual
User manuals in various languages (français,
italiano, español, português, nederlands, türk, polski,
русский, 中文) can be found by using our
product search on: www.pce-instruments.com
Last change: 22 January 2020
v1.0
English
Page 2

© PCE Instruments
Contents
1 Safety notes ........................................................................................... 1
2 Technical specifications ...................................................................... 2
3 Device description ................................................................................ 3
4 Display description ............................................................................... 4
5 Functions ............................................................................................... 5
5.1 Data Hold ......................................................................................................................... 5
5.2 Holding Min/Max values ................................................................................................... 5
5.3 Backlight .......................................................................................................................... 5
5.4 Alarm function .................................................................................................................. 5
5.5 Auto data logger ............................................................................................................... 5
5.6 Manual data logger .......................................................................................................... 5
5.7 SD card / memory structure .............................................................................................. 6
5.8 Calibration ........................................................................................................................ 6
6 Settings .................................................................................................. 7
6.1 Formatting the SD card .................................................................................................... 7
6.2 Setting the date ................................................................................................................ 7
6.3 Setting the sampling time ................................................................................................. 7
6.4 Auto Power Off ................................................................................................................. 7
6.5 Key sound ........................................................................................................................ 8
6.6 Decimal setting................................................................................................................. 8
6.7 Selecting the temperature unit .......................................................................................... 8
6.8 Selecting the air pressure unit .......................................................................................... 8
6.9 Setting the alarm .............................................................................................................. 8
6.10 Setting TWA for PM2.5 ..................................................................................................... 8
6.11 Setting the sea level (for CO2 measurement) ................................................................... 8
7 RS232 interface ..................................................................................... 9
8 Battery .................................................................................................. 10
9 System Reset ....................................................................................... 10
10 Warranty ............................................................................................... 10
11 Disposal ............................................................................................... 10
Page 3

© PCE Instruments
1
1 Safety notes
Please read this manual carefully and completely before you use the device for the first time. The
device may only be used by qualified personnel and repaired by PCE Instruments personnel.
Damage or injuries caused by non-observance of the manual are excluded from our liability and
not covered by our warranty.
• The device must only be used as described in this instruction manual. If used otherwise,
this can cause dangerous situations for the user and damage to the meter.
• The instrument may only be used if the environmental conditions (temperature, relative
humidity, …) are within the ranges stated in the technical specifications. Do not expose
the device to extreme temperatures, direct sunlight, extreme humidity or moisture.
• Do not expose the device to shocks or strong vibrations.
• The case should only be opened by qualified PCE Instruments personnel.
• Never use the instrument when your hands are wet.
• You must not make any technical changes to the device.
• The appliance should only be cleaned with a damp cloth. Use only pH-neutral cleaner,
no abrasives or solvents.
• The device must only be used with accessories from PCE Instruments or equivalent.
• Before each use, inspect the case for visible damage. If any damage is visible, do not
use the device.
• Do not use the instrument in explosive atmospheres.
• The measurement range as stated in the specifications must not be exceeded under
any circumstances.
• Non-observance of the safety notes can cause damage to the device and injuries to
the user.
We do not assume liability for printing errors or any other mistakes in this manual.
We expressly point to our general guarantee terms which can be found in our general terms of
business.
If you have any questions please contact PCE Instruments. The contact details can be found at
the end of this manual.
Page 4
© PCE Instruments
2
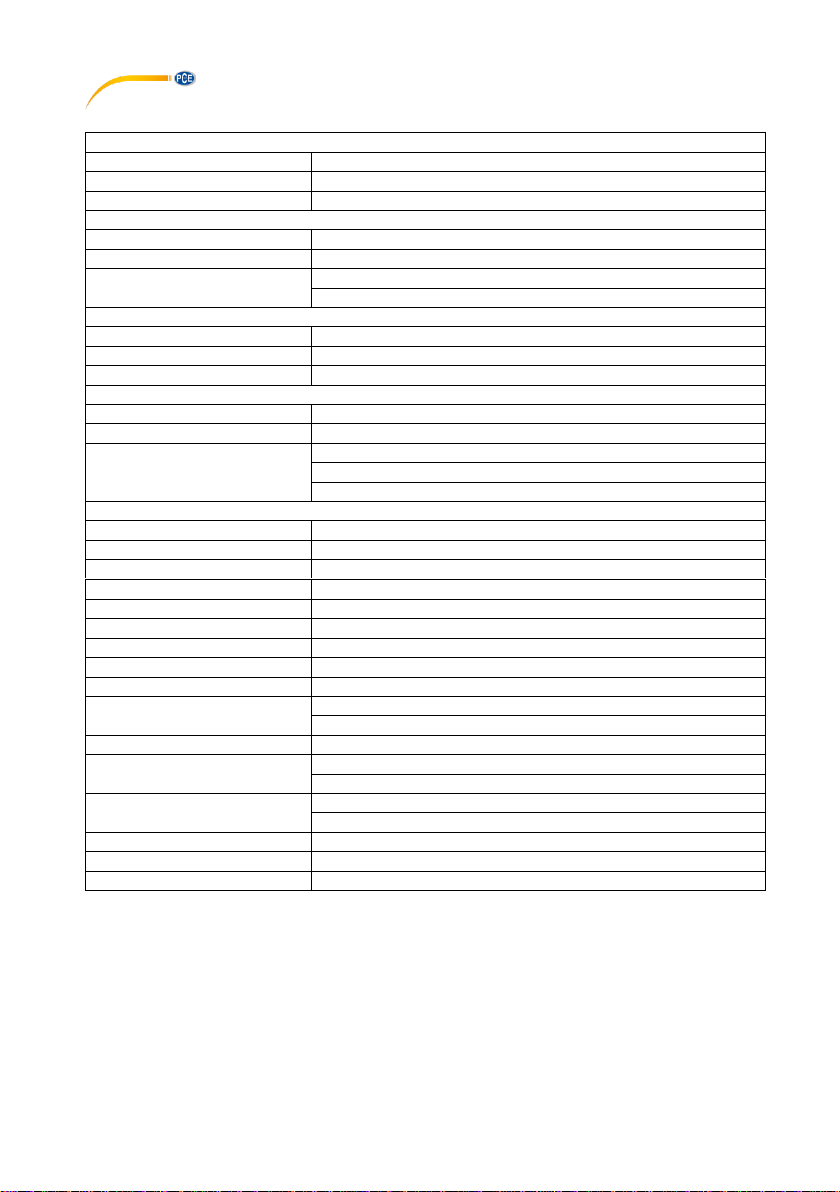
2 Technical specifications
Measurement function PM2.5
Measuring range
0 ... 250 μm / m³
Resolution
1 μm / m³
Accuracy
± (10% of rdg. + 15 μm)
Measuring function humidity
Measuring range
5 ... 95% rh
Resolution
0.1% RH
Accuracy
> 70% RH: ± (3% of the prev + 1% RH)
<70% RH: ± 3% RH
Measuring function temperature
Measuring range
0 ... 50°C / 32 ... 122°F
Resolution
0.1°C / 0.18°F
Accuracy
± 0.8°C / 1.44°F
Measurement function CO2
Measuring range
0 ... 10,000 ppm
Resolution
1 ppm
Accuracy
< 1000 ppm: ± 40 ppm
< 3000 ppm: ± (50 ppm + 3% of rdg.)
> 3000 ppm: ± (50 ppm + 5% of rdg.)
Measuring function air pressure
Measuring range
10 ... 1100 hPa
Resolution
0.1 hPa
Accuracy
± 1.5 hPa
Display
LCD display with backlight
Storage
SD card max. 32 GB
Sampling time
2 ... 3,600 s
Memory error
< 0.1% of the completely stored data
Display
Hold, Max, Min
Measuring rate
About 1 s
Interface
Serial for live visualization on computers
(Data cable SOFT-LUT-USB sold separately)
Alarm output
OC output 24V / 70-mA DC
Power supply
6 x 1.5V AA battery
9V / 1 A power adapter
Current consumption
230-mA without lighting
approx. 250-mA with lighting
Operating conditions
0 ... 50°C / 32 ... 122°F, max. 80% rh
Weight
About 387 g / < 1 lb
Dimensions
164 x 93 x 72 mm / 6.5 x 3.7 x 2.8 in
Page 5
© PCE Instruments
3
10
11
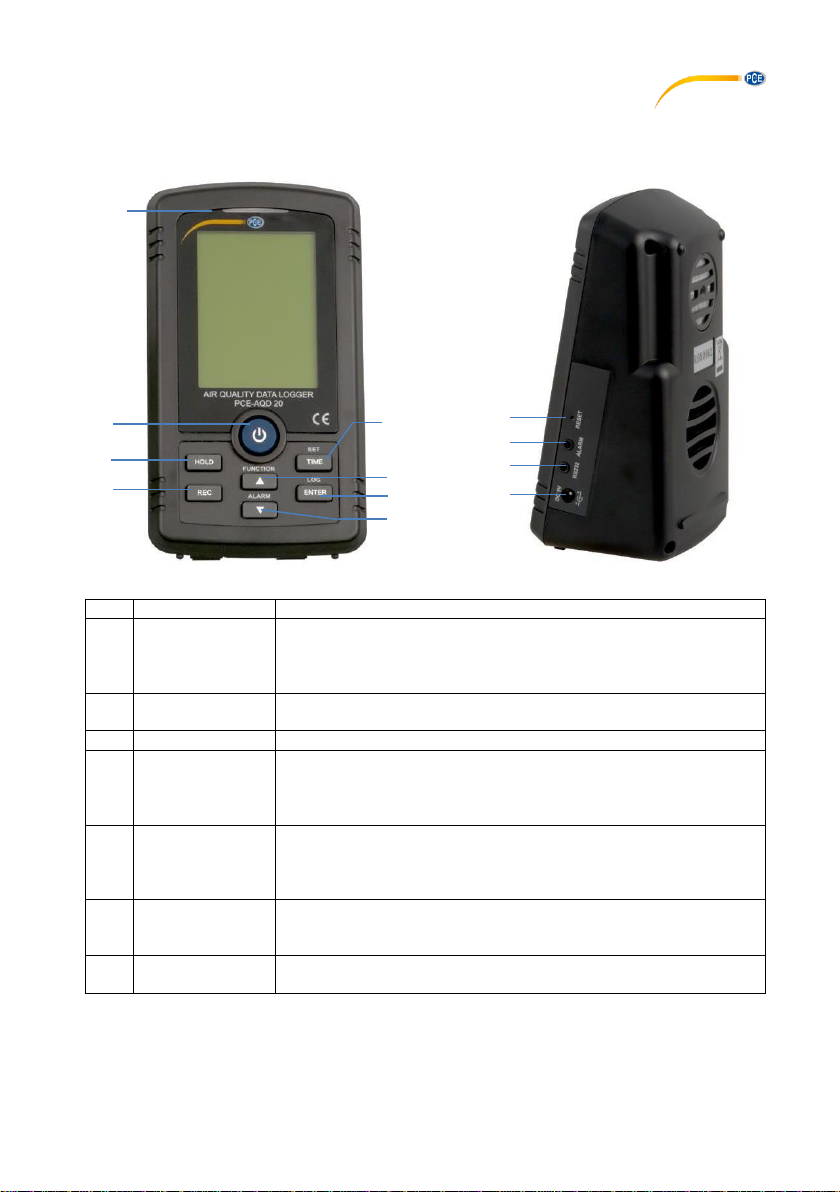
3 Device description
No.
Designation
Description
1
POWER key
The meter can be turned on and off by pressing and holding this
key.
The backlight can be activated or deactivated by pressing this key
for a short time.
2
HOLD key
This key is used to hold the displayed readings in the display.
In settings mode, this key is used to leave the settings menu.
3
REC key
With the REC key, the Max and Min key can be displayed.
4
TIME/SET key
When this key is pressed in measuring mode, the meter will display
the date and time.
The settings can be opened by pressing and holding this key. In
settings mode, this key can be used to make changes.
5
Up/FUNCTION
key
In the settings menu, you can change the values with this key. A
quicker selection can be made by pressing and holding this key.
In measuring mode, this key can be pressed for approx. 2 seconds
to view the TWA value.
6
ENTER/LOG key
In the settings menu, this key can be pressed to save the setting.
In measuring mode, press and hold this key for approx. 2 seconds
to activate the logger function.
7
Down/ALARM
key
In the settings menu, the values can be changed with this key.
Quicker changes are possible by pressing and holding this key.
1
2
7
3
5 6 4
8 9 12
Page 6

© PCE Instruments
4
4 Display description
To turn on the meter, press and hold the POWER key for approx. 2 seconds. The meter will then
initialise within 20 seconds and automatically enter measuring mode.
PM 2.5 measurement:
Dust concentrations between 0 and 250 µg/m³ are displayed. When a value exceeds 250 µg, ”OL“
is displayed. This means that the reading is not within the measurement range.
The health index shows the air pollution within a range of 0 … 9. If the value is or exceeds 5, it
flashes.
TWA (Time Weighted Average) shows the weighted average value in relation to the set time.
Press and hold the Up/FUNCTION key for approx. 3 seconds to view the TWA value.
Humidity measurement
The measured humidity is displayed in %RH.
Temperature measurement
The temperature value can be displayed in °C or °F.
CO2 measurement
The carbon dioxide concentration is displayed in ppm (parts per million).
Air pressure
The air pressure is displayed in hpa (hectopascal), mmHg (millimetres of mercury) or in inHG
(inches of mercury).
Time
During the measurement, the display will show the time. Press the TIME/SET key for a short
time to view the date followed by the sampling time for about 2 seconds.
8
Reset key
Meter reset – use a pointed object to press this key while turning on
the meter to reset the meter.
9
Alarm interface
3.5 mm open collector interface for an alarm relay
10
RS232 interface
3.5 mm serial jack interface
11
DC 9 V mains
adaptor
Power supply
12
LED status
Shows the current status of the meter; if the reading exceeds the
measurement range, the LED will turn violet.
Page 7

© PCE Instruments
5
5 Functions
5.1 Data Hold
By pressing and holding the HOLD key once, you can hold the values in the display. This
function can be deactivated by pressing the same key again.
5.2 Holding Min/Max values
Press the REC key for a short time. “REC“ will be displayed and the Max and Min values are
saved in the background.
Press the REC key for a short time. “REC MAX“ will be shown and the maximum values since
activation of the REC function are displayed.
Press the REC key again. “REC MIN“ will appear and the minimum values since the start of
recording will be displayed.
Again press the key for about 3 seconds to deactivate the REC function and return to normal
measuring mode.
5.3 Backlight
The backlight is activated by default when the meter is turned on. During the measurement, you
can enable or disable the backlight by short-pressing the POWER key.
5.4 Alarm function
Press the Down/ALARM key for approx. 3 seconds in order to enable the alarm function. When
the reading reaches or exceeds the set value, the alarm output will be activated.
5.5 Auto data logger
Note: The sampling time must be at least 2 seconds.
Press the ENTER/LOG key for about 3 seconds. “Logger“ will be displayed and the data are
saved at the set interval.
The function can be paused by short-pressing the ENTER/LOG key.
To deactivate the log function, press and hold the ENTER/LOG key for approx. 3 seconds.
5.6 Manual data logger
Note: The sampling time must be 0 seconds.
Press and hold the ENTER/LOG key for approx. 3 seconds. “Logger Pause” will be displayed
along with the number of currently saved values. To save the value currently displayed, press the
ENTER/LOG key for a short time. You can also save a “position“ along with the value. The position
is displayed as “P x“ and can be changed to a value between 1 and 99 with the arrow keys. This
enables you, for example, to assign the measurements to different places.
Page 8

© PCE Instruments
6
5.7 SD card / memory structure
It is recommended to insert an SD card of max. 4 GB. The data will be saved to the card in the
following structure:
Folder:
PAB01 The following files will be created in the folder:
PAB01001.XLS // After 30000 lines, the next file will be created
PAB01002.XLS
……………..
PAB01099.XLS
PAB02
PAB02001.XLS
PAB02002.XLS
……………..
PAB02099.XLS
PABXX // Maximum number of folders is10
To view and save the files to your computer, insert the SD card into your computer. The files can
be opened and processed in a spreadsheet program.
5.8 Calibration
The meter has a calibration function to calibrate all measured parameters. Only use this function
if you have a calibrated reference device. To open the calibration menu, press and hold the
HOLD and REC keys at the same time for approx. 3 seconds. Press the TIME/SET key to get to
the next measuring parameter.
5.8.1 PM 2.5 calibration
Press the ENTER/LOG key to view the lower calibration value (PML). The value can be
changed with the Up and Down keys. To save the value, press the ENTER/LOG key again.
You will now see the upper calibration value (PMH) which you can change.
Note: Wait for approx. 10 minutes until the measured values are the same as the set
values.
Note: The lower calibration value should be below 15 µg/m³ and the upper calibration value
should be above 60 µg/m³.
5.8.2 Humidity calibration
Press the ENTER/LOG key to calibrate the humidity value. You can change the value with
the arrow keys. Press the ENTER/LOG key to save the value.
5.8.3 Temperature calibration
Press the ENTER/LOG key to calibrate the temperature value. You can change the value
with the arrow keys. Press the ENTER/LOG key to save the value.
Page 9

© PCE Instruments
7
5.8.4 CO2 calibration
Press the ENTER/LOG key to calibrate the CO2 value. You can change the value with the
arrow keys. Press the ENTER/LOG key to save the value.
5.8.5 Air pressure calibration
Press the ENTER/LOG key to calibrate the measured air pressure. You can change the
value with the arrow keys. Press the ENTER/LOG key to save the value.
To leave the calibration menu, press and hold both the HOLD and the REC keys at the same time
for approx. 3 seconds.
To reset the calibration to the factory settings, press and hold the Down key when turning off the
meter, then turn the meter back on and release the Down key when “User Cal Clear” appears in
the lower part of the display.
6 Settings
To enter the settings menu, press and hold the TIME/SET key for about 5 seconds until “SET NO
SD F“ is displayed.
6.1 Formatting the SD card
Press the Up and Down keys to select “YES“ or “NO“. If you have selected “YES“, press the
ENTER/LOG key to start formatting. Press the TIME/SET key to go to the next setting.
6.2 Setting the date
Press the Up and Down keys to change the values. Press the ENTER/LOG key to save the entry
and get to the next setting. The settings can be made in the following order:
year/month/day/hour/minute/second. Go to the next setting by pressing the TIME/SET key.
6.3 Setting the sampling time
Use the Up and Down keys to set the sampling time. If the value is 0 s, manual saving via the
REC key is activated. Otherwise, the value can be changed to a value between 2 and 3600 s;
the date will then be saved at the set interval. You can go to the next setting with the SET key.
6.4 Auto Power Off
Press the Up and Down keys to select “YES“ or “NO“. If you have selected “YES“, press the
ENTER/LOG key to save the setting. You can go to the next setting with the SET key.
Note: When the meter is powered by the mains adaptor, Auto Power Off will be deactivated.
Page 10

© PCE Instruments
8
6.5 Key sound
Press the Up and Down keys to select “YES“ or “NO“. If you have selected “YES“, press the
ENTER/LOG key to save the setting. You can go to the next setting with the SET key.
6.6 Decimal setting
To set the decimal character for the data which will be saved to the SD card, select “Euro“ or
“USA“ with the Up and Down keys. Press the ENTER/LOG key to save the setting. You can go
to the next setting with the SET key.
6.7 Selecting the temperature unit
Press the Up and Down keys to select “°C“ or ”°F“. Press the ENTER/LOG key to save the
setting. You can go to the next setting with the SET key.
6.8 Selecting the air pressure unit
Press the Up and Down keys to select “mmHg“ or ”inHg“. Press the ENTER/LOG key to save
the setting. You can go to the next setting with the SET key.
6.9 Setting the alarm
Press the Up and Down keys to select “µg/m³“, ”%RH“, ”°C“, ”hPa“ or ”CO²-ppm“. Press the
ENTER/LOG key to open the alarm value. Set the desired value with the Up and Down keys.
Press the ENTER/LOG key to save the value automatically enter the lower alarm value setting.
You can go to the next setting with the SET key.
6.10 Setting TWA for PM2.5
Press the Up and Down keys to set a time between 1 and 24 h. Press the ENTER/LOG key to
save the setting. You can go to the next setting with the SET key.
6.11 Setting the sea level (for CO2 measurement)
Press the Up and Down keys to select “Meter“ or “Feet“. Confirm your selection with the
ENTER/LOG key. This will lead you directly to the window for the level entry. Use the Up and
Down keys to select the level of your current environment. Save this value by pressing the
ENTER/LOG key. To go to “SET ESC“ (leave settings), press the SET key. Press the same key
again to leave the settings and return to measurement mode.
Page 11
© PCE Instruments
9
7 RS232 interface
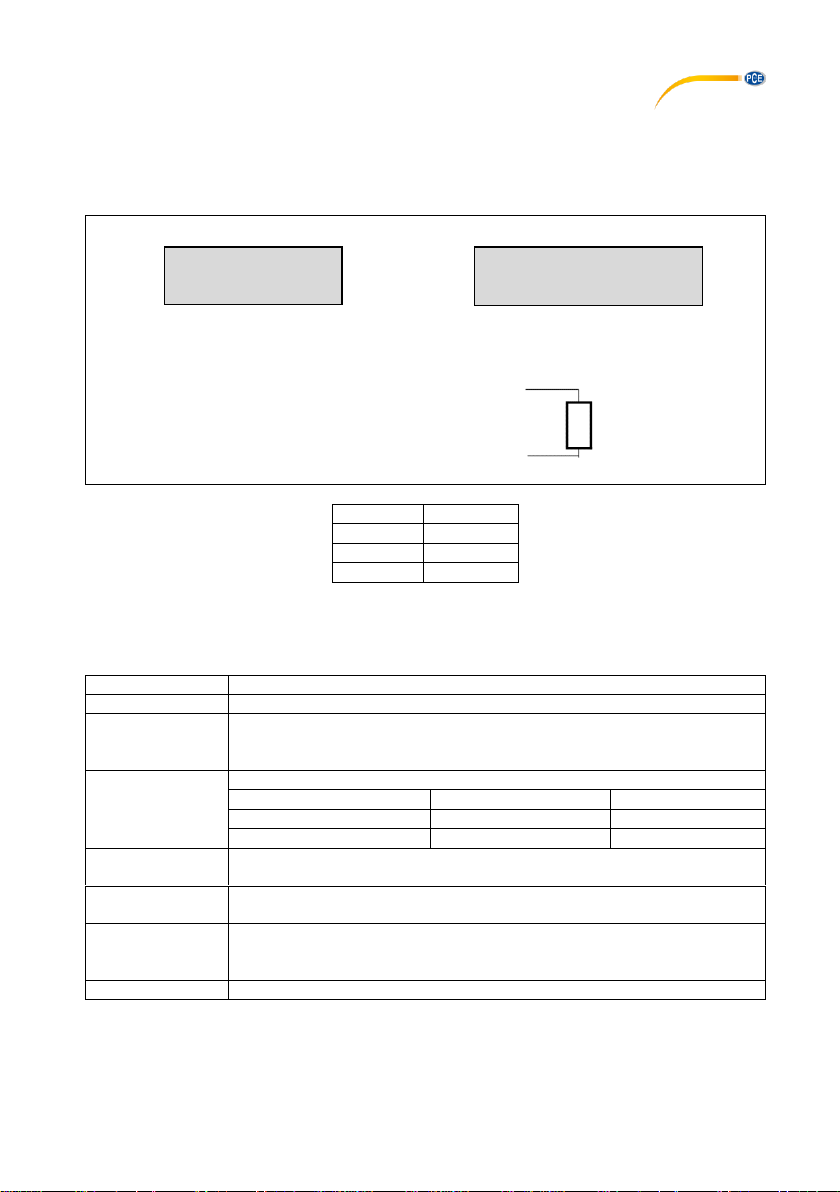
The instrument has a serial RS232 interface with a 3.5 mm output. Data are output via 16 digits
which can be used for your special applications. To connect the meter to a computer, the RS232
cable must be structured as follows:
Baud rate
9600
Parity
No parity
Data bits
8 data bits
Stop bits
1 stop bit
The data stream is displayed as follows:
D15 D14 D13 D12 D11 D10 D9 D8 D7 D6 D5 D4 D3 D2 D1 D0
The individual digits mean the following:
D15
Start word
D14
4
D13
When PM2.5 data are sent = 1
When %RH data are sent = 2
When Temp. data are sent = 3
D12, D11
Annunciator for Display
μg/m3 = H0
% RH = 04
℃ = 01
℉ = 02
CO2 = 19
hPa = 91
mmHg = 78
inHg = 80
D10
Polarity
0 = Positive 1 = Negative
D9
Decimal Point (DP), position from right to left
0 = No DP, 1= 1 DP, 2 = 2 DP, 3 = 3 DP
D8 … D1
Display reading, D1 = LSD, D8 = MSD
For example:
If the display reading is 1234, then D8 … D1 is: 00001234
D0
End word
Center Pin……………………………….
(3.5 mm jack plug)
Pin 4
Ground/shield…………………………...
Pin 2
2.2 kΩ
resistor
Pin 5
Meter
PC
(9W ´D“ Connector)
Page 12
© PCE Instruments
10
8 Battery
When the battery icon is displayed, the batteries should be replaced soon. To do so, slide the
battery compartment out to the rear and replace the 6 x 1.5 V AA batteries. Close the battery
compartment.
9 System Reset
If the meter got stuck or does not respond when keys are pressed, reset it by pressing the reset
key with a thin object while switching on the meter.
10 Warranty
You can read our warranty terms in our General Business Terms which you can find here:
https://www.pce-instruments.com/english/terms.
11 Disposal
For the disposal of batteries in the EU, the 2006/66/EC directive of the European Parliament
applies. Due to the contained pollutants, batteries must not be disposed of as household waste.
They must be given to collection points designed for that purpose.
In order to comply with the EU directive 2012/19/EU we take our devices back. We either re-use
them or give them to a recycling company which disposes of the devices in line with law.
For countries outside the EU, batteries and devices should be disposed of in accordance with
your local waste regulations.
If you have any questions, please contact PCE Instruments.
Page 13

© PCE Instruments
11
PCE Instruments contact information
Germany France Spain
PCE Deutschland GmbH PCE Instruments France EURL PCE Ibérica S.L.
Im Langel 4 23, rue de Strasbourg Calle Mayor, 53
D-59872 Meschede 67250 Soultz-Sous-Forets 02500 Tobarra (Albacete)
Deutschland France España
Tel.: +49 (0) 2903 976 99 0 Téléphone: +33 (0) 972 3537 17 Tel. : +34 967 543 548
Fax: +49 (0) 2903 976 99 29 Numéro de fax: +33 (0) 972 3537 18 Fax: +34 967 543 542
[email protected] [email protected] [email protected]
www.pce-instruments.com/deutsch www.pce-instruments.com/french www.pce-instruments.com/espanol
Germany United Kingdom Italy
PCE Produktions- und PCE Instruments UK Ltd PCE Italia s.r.l.
Entwicklungsgesellschaft mbH Unit 11 Southpoint Business Park Via Pesciatina 878 / B-Interno 6
Im Langel 26 Ensign Way, Southampton 55010 Loc. Gragnano
D-59872 Meschede Hampshire Capannori (Lucca)
Deutschland United Kingdom, SO31 4RF Italia
Tel.: +49 (0) 2903 976 99 471 Tel: +44 (0) 2380 98703 0 Telefono: +39 0583 975 114
Fax: +49 (0) 2903 976 99 9971 Fax: +44 (0) 2380 98703 9 Fax: +39 0583 974 824
[email protected] [email protected] [email protected]
www.pce-instruments.com/deutsch www.pce-instruments.com/english www.pce-instruments.com/italiano
The Netherlands China Hong Kong
PCE Brookhuis B.V. PCE (Beijing) Technology Co., Limited PCE Instruments HK Ltd.
Institutenweg 15 1519 Room, 6 Building Unit J, 21/F., COS Centre
7521 PH Enschede Zhong Ang Times Plaza 56 Tsun Yip Street
Nederland No. 9 Mentougou Road, Tou Gou District Kwun Tong
Telefoon: +31 (0)53 737 01 92 102300 Beijing, China Kowloon, Hong Kong
[email protected] Tel: +86 (10) 8893 9660 Tel: +852-301-84912
www.pce-instruments.com/dutch [email protected] [email protected]
www.pce-instruments.cn www.pce-instruments.cn
United States of America Turkey
PCE Americas Inc. PCE Teknik Cihazları Ltd.Şti.
711 Commerce Way suite 8 Halkalı Merkez Mah.
Jupiter / Palm Beach Pehlivan Sok. No.6/C
33458 FL 34303 Küçükçekmece - İstanbul
USA Türkiye
Tel: +1 (561) 320-9162 Tel: 0212 471 11 47
Fax: +1 (561) 320-9176 Faks: 0212 705 53 93
[email protected] [email protected]
www.pce-instruments.com/us www.pce-instruments.com/turkish
 Loading...