

Page 1
PCE Americas Inc.
711 Commerce Way
Suite 8
Jupiter
FL-33458
USA
From outside US: +1
Tel: (561) 320-9162
Fax: (561) 320-9176
[email protected]
PCE Instruments UK Ltd.
Units 12/13
Southpoint Business Park
Ensign way
Hampshire / Southampton
United Kingdom, SO31 4RF
From outside UK: +44
Tel: (0) 2380 98703 0
Fax: (0) 2380 98703 9
www.pce-instruments.com/english
www.pce-instruments.com
Manual
Data Logger
PCE-174
Version 1.1
Date of creation: 17.03.2016
Date of last change: 18.03.2016
Page 2

Contents
1 Introduction ............................................................................................................. 2
2 Safety notes ............................................................................................................. 2
3 Specification ............................................................................................................ 3
4 System description ................................................................................................. 3
5 Operation ................................................................................................................. 4
6 Set time and sampling rate ..................................................................................... 4
7 Manual save ............................................................................................................. 4
8 Data log storage ...................................................................................................... 4
9 Delete saved data .................................................................................................... 4
10 Battery replacement ................................................................................................ 5
11 Maintenance ............................................................................................................ 5
12 Classification of the measurement results ........................................................... 5
13 Spectral sensitivity characteristics ....................................................................... 6
14 Disposal ................................................................................................................. 10
15 Contact ................................................................................................................... 10
15.1 PCE Instruments UK ................................................................................................................ 10
15.2 PCE Americas .......................................................................................................................... 10
1 Introduction
Thank you for purchasing the PCE-174 from PCE Instruments.
The PCE-174 light intensity meter is a precision device to measure Lux and Footcandle readings. The
light intensity meter can be used to measure light levels in industry, agriculture and research.
2 Safety notes
Please read this manual carefully and completely before you use the device for the first time. The device
may only be used by qualified personnel and repaired by PCE Instruments personnel. There is no
warranty of damages or injuries caused by non-observance of the manual.
- The device may only be used in the approved temperature range.
- The case should only be opened by qualified personnel of PCE Instruments.
- The instrument should never be placed with the user interface facing an object (e. g. keyboard side on a
table).
- You should not make any technical changes to the device.
- The appliance should only be cleaned with a damp cloth / use only pH-neutral cleaner.
This user's handbook is published by PCE Instruments without any guarantee.
We expressly point to our general guarantee terms which can be found in our general terms of business.
If you have any questions please contact PCE Instruments.
Page 3
Manual
3
3 Specification
Measurement range
400.0 / 4000 / lux
40.00 / 400.0 klux
40.00 / 400.0 / 4000 / fc
40.00 kfc
Resolution
0.1 / 1 / 10 / 100 lux
0.01 / 0.1 / 1 / 10 FootCandle
Accuracy
± 5% of measurement value ± 10 digits (<10,000 lux)
± 10% of measurement value ± 10 digits (>10,000 lux)
Reproducibility
± 3 %
Storage
16,000 values
Storage Interval
Between 2 and 99 seconds
Over-range display
OL= overload
Display-update
1.5 per second
Environmental conditions
0 … 40°C / 80% RH
Display
3¾ digits LCD-display
Supply
9 V block battery
Dimensions
Device: 203 x 75 x 50 mm (W x H x D)
Light sensor : 115 x 60 x 20mm (W x H x D)
Cable length: 150 cm
Weight
280g
Standards
Safety: IEC- 1010- 1; EN 61010- 1
EMV: EN 50081- 1; EN 50082- 1 DIN
5031 ; DIN 5032
Delivery contents
1 x Lux-measuring device PCE-174, 1 x light sensor, 1 x software, 1 x USB-cable, 1 x battery,
1 x device case, 1 x operating manual
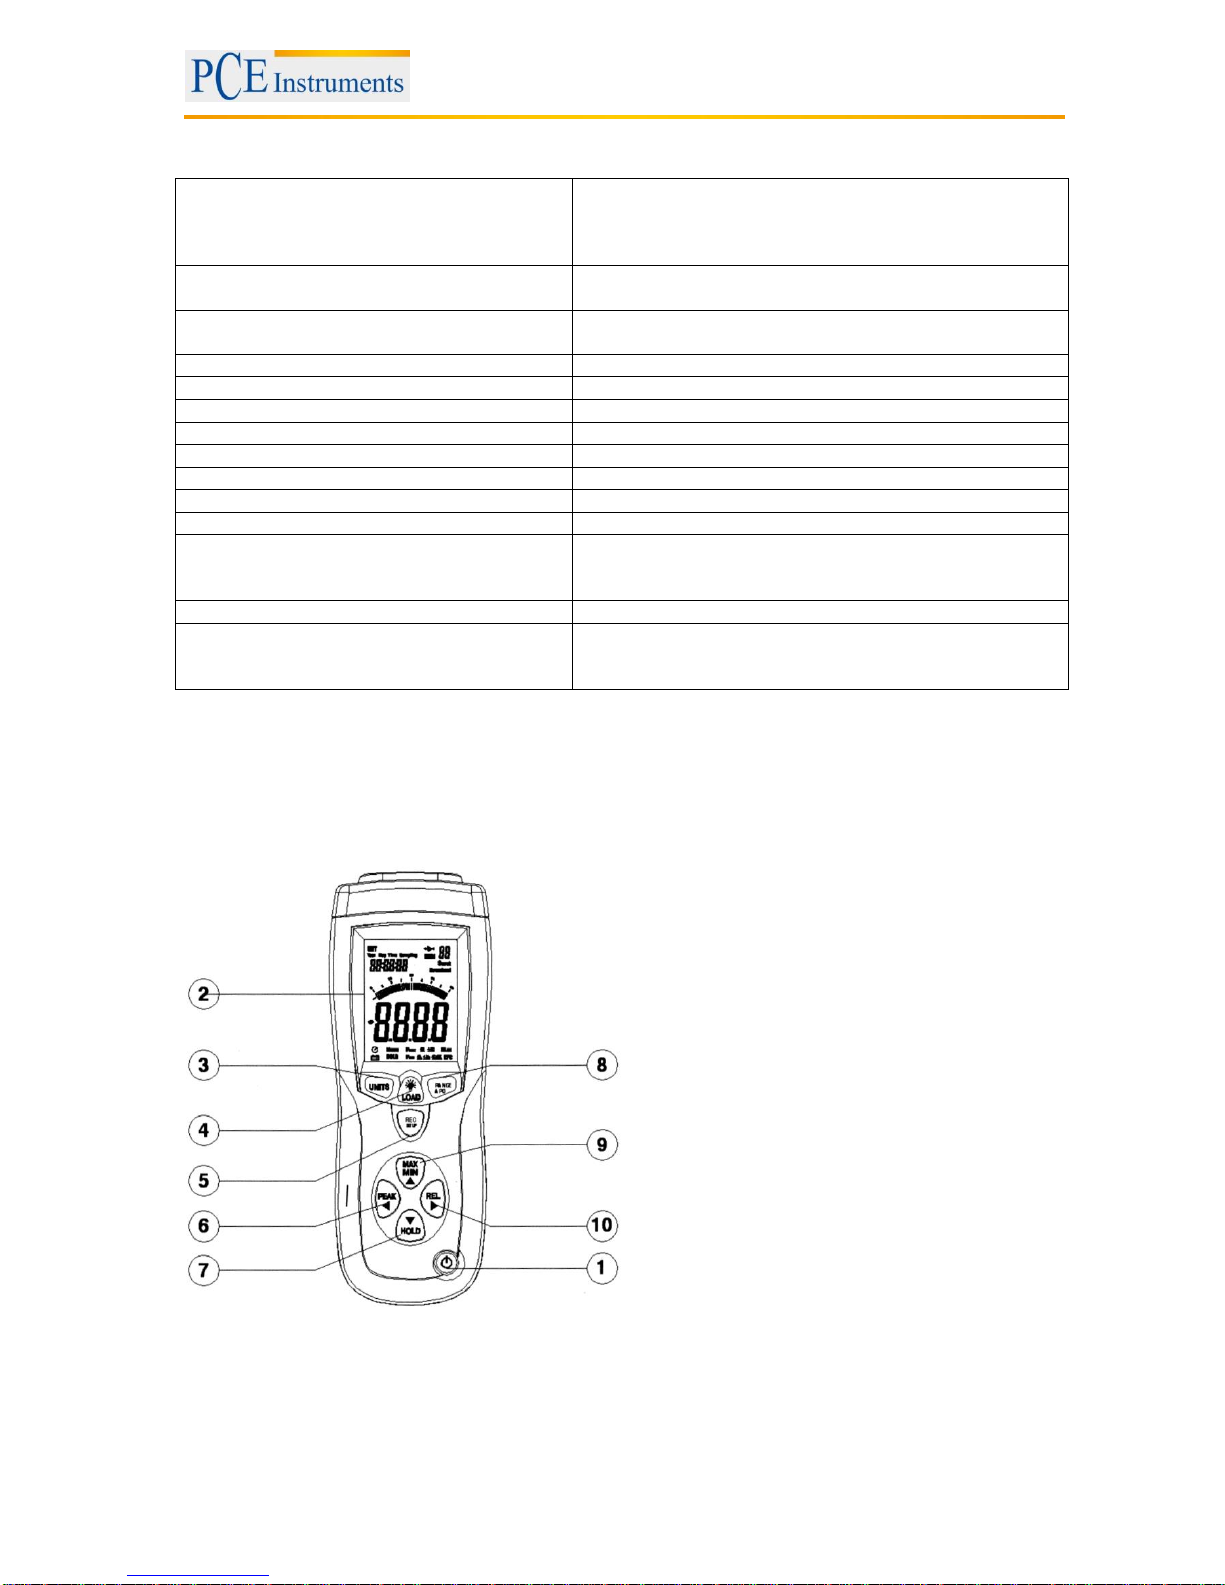
4 System description
1. On/Off key
2. Display: 3¾ digits display
3. UNITS key: Press this key to switch to the
measuring mode for footcandle (1 fc= 10.76 lux)
4. Backlight: Turn on and off
5. REC/SET key
6. PEAK key: Press this key to activate the peak
value display.
7. HOLD key: The current value on the screen is
frozen.
8. Range key: Press this key to select between
different measurement ranges (e. g. 400.0/4000
lux).
9. MAX/MIN key: Press this key to select the
maximum and minimum value.
10. REL key: Press this key to switch to
comparative readings (zeroing).
Page 4

Manual
4
5 Operation
1. Connect the device to the light sensor.
2. Press the on/off key to turn on the Lux-measuring device.
3. Remove the cover of the light sensor and hold it horizontally to the light source.
4. Select the desired unit, lux or fc.
5. The light intensity value is displayed on the screen. If “OL” appears, then the measurement value
is outside of the measurement range. Please select a higher measurement range.
6. The measurement range is selected by pressing the RANGE key (e.g. 400.0/4000 lux).
7. Switch between the measuring modules Lux and Footcandle (1 fc= 10.76 lux) by pressing the
UNITS key.
8. To freeze the current value on the screen, press the HOLD key. Press the key again to continue
with the measurement.
9. To record the peak value, press the PEAK key. By briefly pressing the PEAK key, the maximum
and minimum peak values can now be recorded.
10. Maximum and minimum values can be selected by pressing the MAX/MIN key.
11. To set the display to “0”, press the REL key. The device will now deduct the current
measurement value from the final value.
12. To turn the backlight on or off, press the LOAD key.
13. When the measurement procedure has been completed, put the cover back on the light sensor
and turn off the device
6 Set time and sampling rate
1. Press the REC and UNITS keys simultaneously. The first digit of the time will begin to flash.
2. By pressing the PEAK ◄ or REL ► key the appropriate selection may be selected (hour, minute,
second, sampling rate, month, day, week, year).
3. The value of the range selected can be changed by pressing the MAX/MIN ▲ key or the HOLD
▼ key.
4. To exit, press the REC key and UNITS key simultaneously.
7 Manual save
1. Press the REC/Setup key to save manually.
2. The saved values can be viewed by pressing the LOAD key for approx. 3 seconds.
3. The memory locations can be viewed by pressing MAX/MIN ▲ and HOLD ▼ key.
4. To switch back to the standard mode, press the LOAD key for approx. 3 seconds.
8 Data log storage
1. Set the sampling rate as described in point 6.
2. Press the REC/Setup for approx.3 seconds, until the MEM display begins to flash.
3. Press the REC/Setup for approx.3 seconds and the saving will be complete.
4. Connect the light intensity meter to a USB port and the data log will be selected using the
included software.
9 Delete saved data
Delete the manually saved data as follows:
Press the LOAD key and the REC/Setup key simultaneously until the symbol MEM CL appears on the
screen to delete the saved data.
Delete the automatically saved data as follows:
Press the REC/Setup key whilst the device is turned off and keep it pressed whilst turning on the
device until DEL-MEM appears on the screen.
Page 5

Manual
5
10 Battery replacement
A battery warning indicator will appear on screen when the battery power is low. To replace the battery,
remove the battery compartment cover with a screwdriver. Replace the 9V block battery with a new one
and screw the battery compartment cover back on.
11 Maintenance
1. The outer casing can be cleaned with a damp cloth.
2. Do not store the device in areas of high humidity.
12 Classification of the measurement results
PCE have provided the following table to be used as a guide when using the light intensity meter in
different environments. The table shows the standard settings to be used when using the light intensity
meter indoors. When using outdoors, considerably higher readings are to be expected (e.g. 30.000 lux or
100.000 lux in sunlight). These values are only approximate values and PCE cannot accept any liability
for their accuracy.
Lighting area
Type of work/ work room
luminous intensity range
School area
Carrying out experiments
700 - 1500 lux
Writing on the board
700 - 1500 lux
Graphical designs
700 - 1500 lux
Hallways
150 - 300 lux
General classrooms
150 - 300 lux
Reading room
700 - 1500 lux
Canteen
300 - 700 lux
Office area
Computer room, Computer work
1500 - 3000 lux
Technical drawings
1500 - 3000 lux
Holding of meetings
300 - 700 lux
Canteen
150 - 300 lux
Reception
300 - 700 lux
Factory area
Production hall
1500 - 3000 lux
Development office
700 - 1500 lux
Planning office
700 - 1500 lux
Laboratory studies
1500 - 3000 lux
Packing products
700 - 1500 lux
Warehouse
300 - 700 lux
Electrical rooms
150 - 300 lux
Hospital area
Visitors room
300 - 700 lux
Training
300 - 700 lux
Anatomical training
300 - 700 lux
First aid / Treatment room
700 - 1500 lux
Pharmacy sector
700 - 1500 lux
Reading in hospital bed
150 - 300 lux
Radiotherapy room
70 - 150 lux
Washroom
150 - 300 lux
Hotel area
reception
700 - 1500 lux
Entrance area
300 -700 lux
Banquet
300 - 700 lux
Offices
150 - 300 lux
Restaurant
150 - 300 lux
Toilet
150 - 300 lux
Washrooms
150 - 300 lux
Bar
70 - 150 lux
Hallways
70 - 150 lux
Page 6
Manual
6
Stairs
70 - 150 lux
Business area / shops
Shop window
1500 - 3000 lux
Exhibition room
1500 - 3000 lux
Packing area
700 - 1500 lux
Common room
300 - 700 lux
Meeting room
300 - 700 lux
Toilet
150 - 300 lux
Stairs
70 - 150 lux
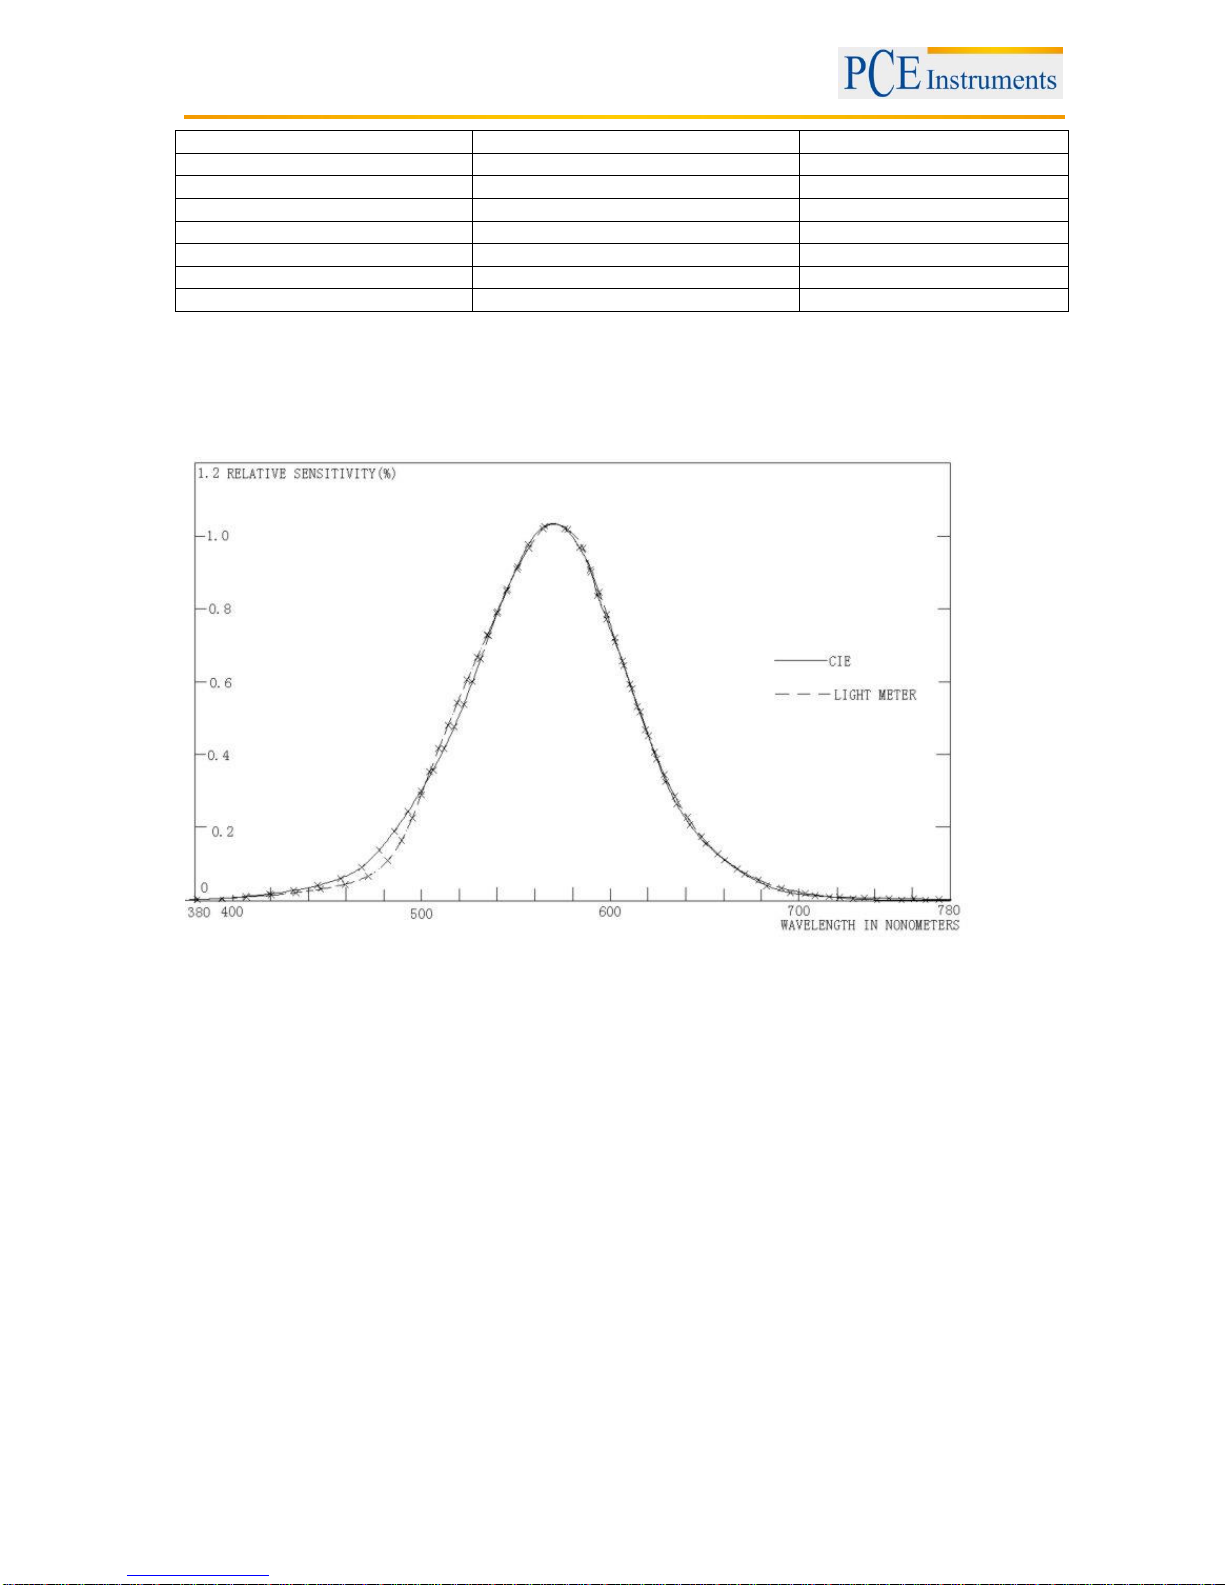
13 Spectral sensitivity characteristics
The devices light sensor fulfils the C.I.E (International Commission on Illumination) spectral curve as
displayed below:
Software installation
Place the software CD into the drive and double click “Setup”. The installation window appears. Click
“Next”. To install the software, click on the install button. After the software has been successfully
installed, click “Finish” to complete the installation.
Page 7
Manual
7
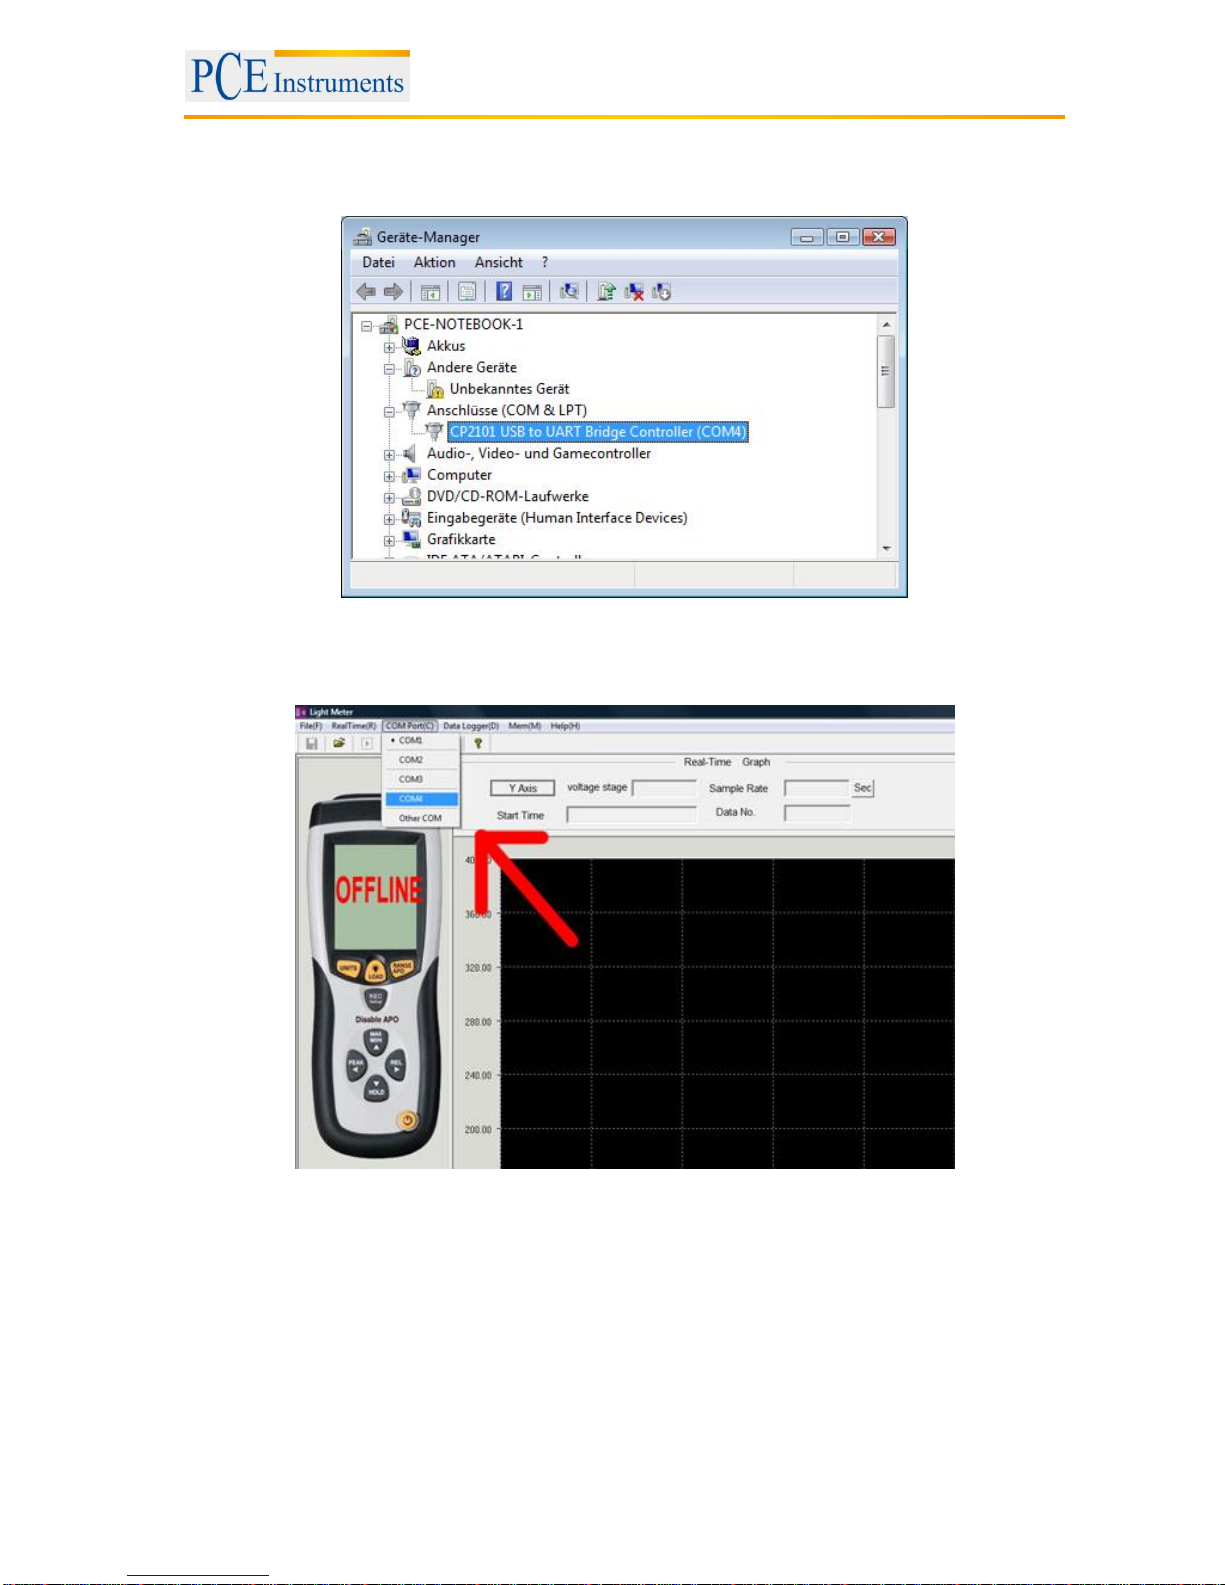
Launching the software
Open the software and connect the device with the provided USB cable to the computer. The software
shows that the device is offline. The current connection can be selected by clicking COM Port, to
establish a connection.
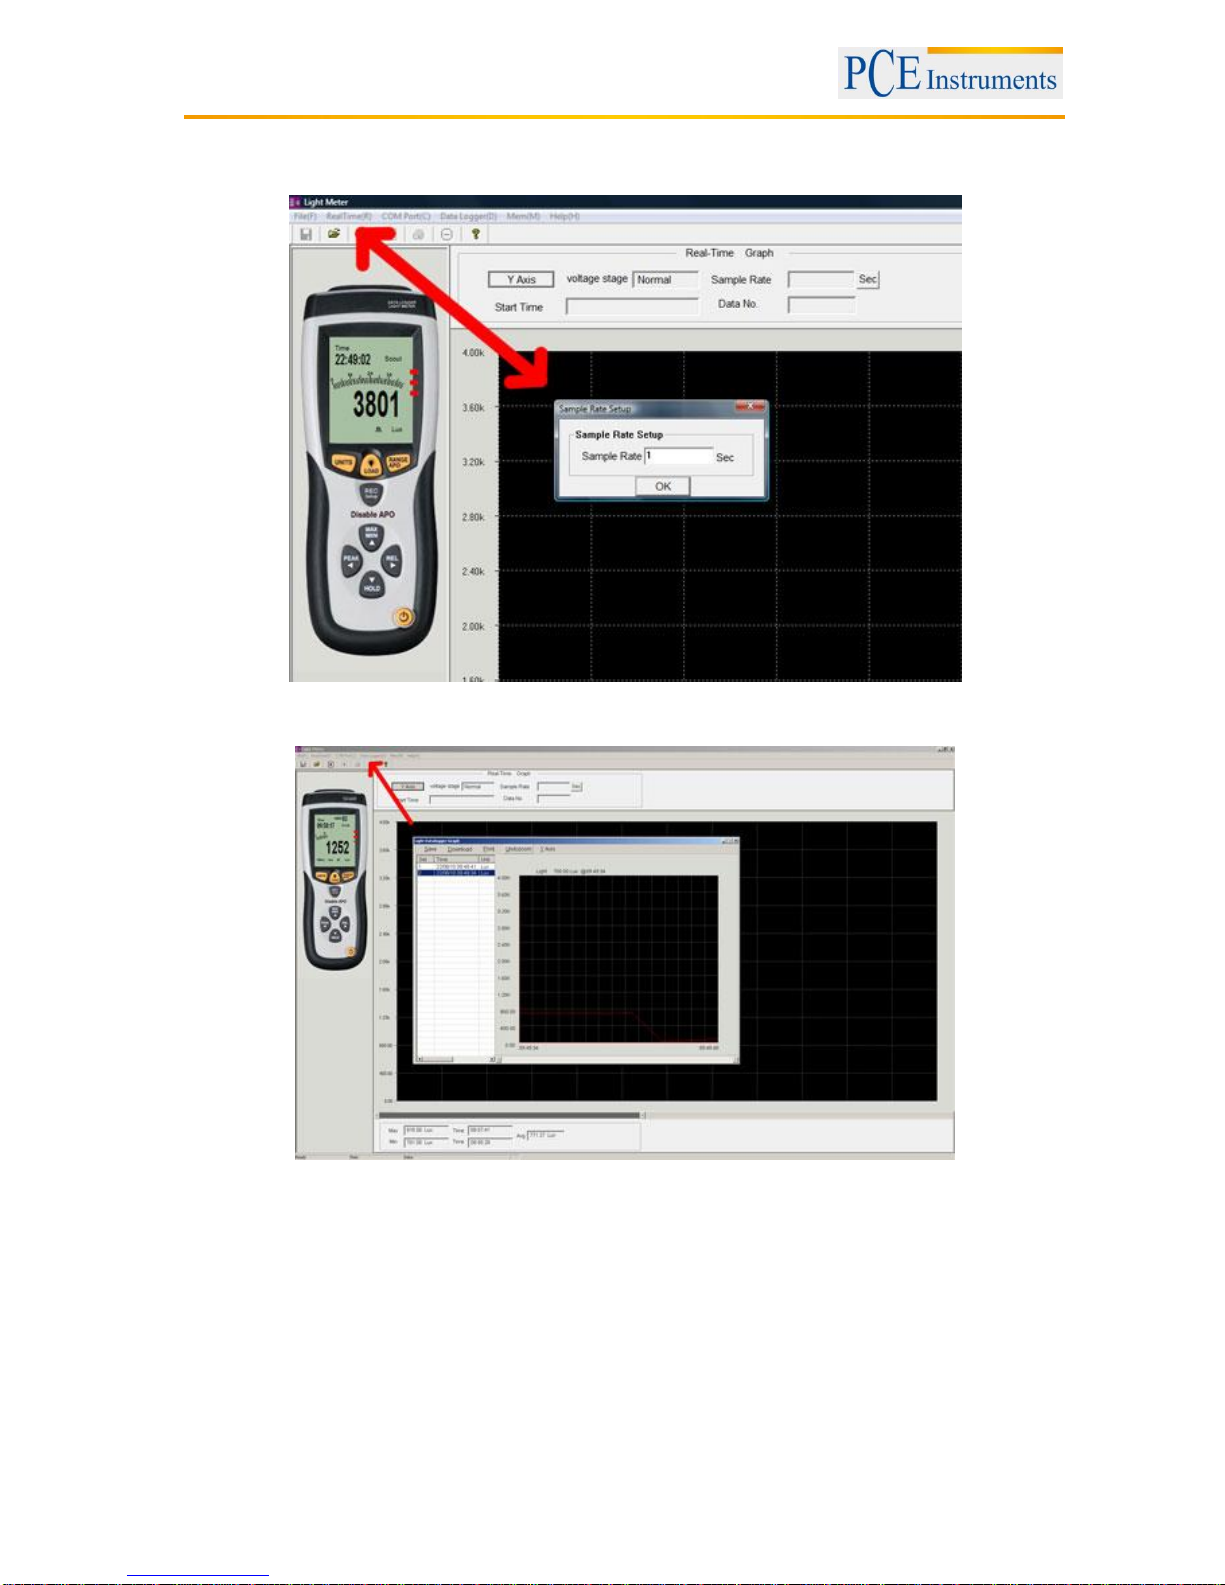
Select an appropriate COM Port on the PC for the measuring device. Then select the same COM Port
using the software on the measuring device.
Page 8
Manual
8
The real-time recording can be set by entering the measurement rate (e. g. measurement
every second).
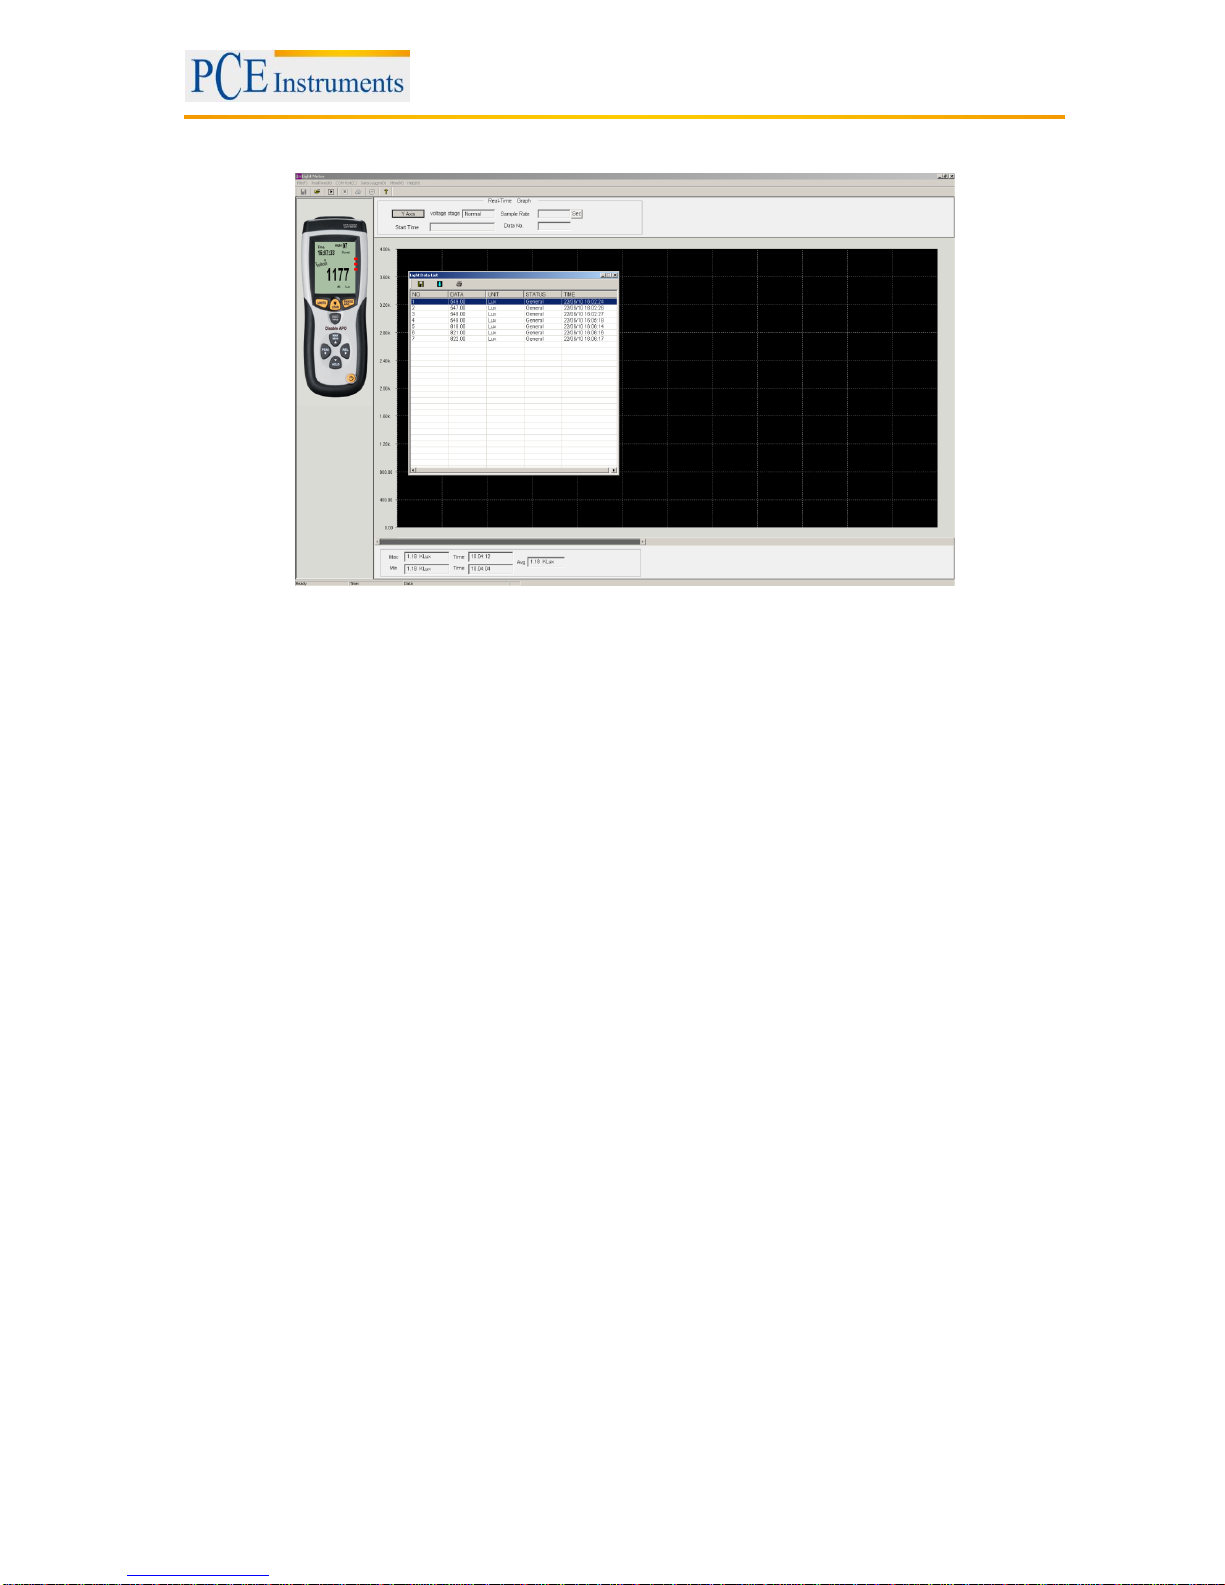
Data log read out:
Page 9
Manual
9
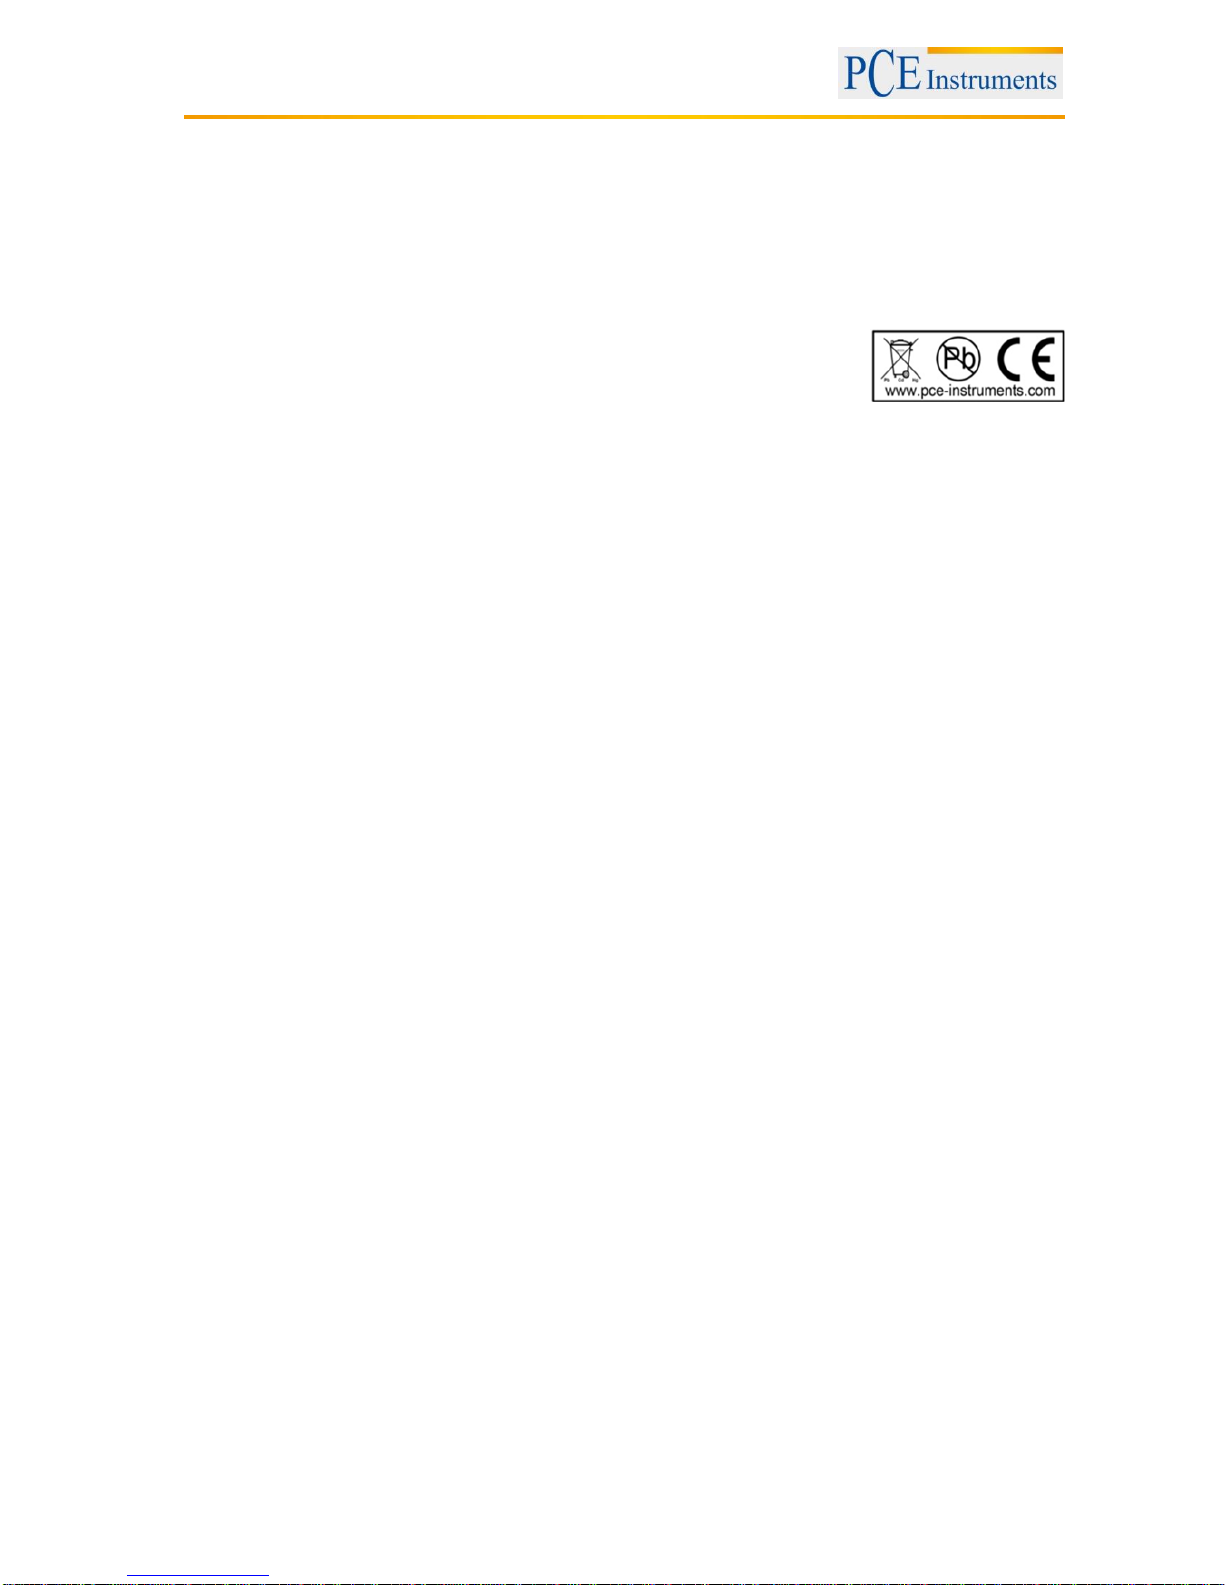
Read out of measurement data:
Page 10
Manual
10
14 Disposal
For the disposal of batteries, the 2006/66/EC directive of the European Parliament applies. Due to the
contained pollutants, batteries must not be disposed of as household waste. They must be given to
collection points designed for that purpose.
In order to comply with the EU directive 2012/19/EU we take our devices back. We either re-use them or
give them to a recycling company which disposes of the devices in line with law.
If you have any questions, please contact PCE Instruments.
15 Contact
If you have any questions about our range of products or measuring instruments please contact PCE
Instruments.
15.1 PCE Instruments UK
By post:
PCE Instruments UK Ltd.
Units 12/13 Southpoint Business Park
Ensign Way, Southampton
Hampshire
United Kingdom, SO31 4RF
By phone:
02380 987 035
15.2 PCE Americas
By post:
PCE Americas Inc.
711 Commerce Way
Suite 8
Jupiter
33458 FL
USA
By phone:
561 320 9162
Page 11
Version 1.1
16.06.2015
BEDIENUNGSANLEITUNG
Lichtstärkemessgerät
PCE-174
PCE Deutschland GmbH
Im Langel 4
D-59872 Meschede
Deutschland
Tel: 02903 976 99 0
Fax: 02903 976 99 29
www.pce-instruments.com/deutsch
Page 12

BETRIEBSANLEITUNG
____________________________________________________________________________________________________________________
2
Inhaltsverzeichnis
1.0 Einleitung ............................................................................................................ 3
2.0 Technische Daten ............................................................................................... 3
3.0 Bedienfeld ........................................................................................................... 4
4.0 Bedienung ........................................................................................................... 4
5.0 Uhrzeit und Samplingrate einstellen ................................................................... 5
6.0 Manuelle Speicherung ........................................................................................ 5
7.0 Datenlogger Speicherung ................................................................................... 5
8.0 Speicher löschen ................................................................................................ 5
9.0 Batteriewechsel ................................................................................................... 5
10.0 Wartung ............................................................................................................ 5
11.0 Einordnung der Messergebnisse ...................................................................... 6
12.0 Spektral Empfindlichkeit Charakteristik ............................................................. 7
Page 13
BETRIEBSANLEITUNG
3
1.0 Einleitung
Dieses Lichtstärkemessgerät ist ein Präzisions-Messgerät für Lux und FootCandle. Der Luxmesser dient
der Messung der Lichtverhältnisse in Industrie, Landwirtschaft u. Forschung. Vermehrt wird der
Luxmesser auch zur Prüfung der Beleuchtung an Arbeitsplätzen, bei der Dekoration von Schaufenstern
und von Designern verwendet. Er erfüllt alle deutschen und internationalen Normen für derartige
Lichtmessgeräte.
Die Bedienung ist sehr einfach, so dass dieser Luxmesser auch von nicht eingewiesenen Personen
benutzt werden kann. Es ist aber immer bei einer Luxmessung zu beachten, das bestimmte
Rahmenbedingungen eingehalten werden. So sollten Abstand und Winkel zwischen Luxmesser und zu
messendem Objekt möglichst festgelegt werden, um reproduzierbare Ergebnisse zu erziehlen.
2.0 Technische Daten
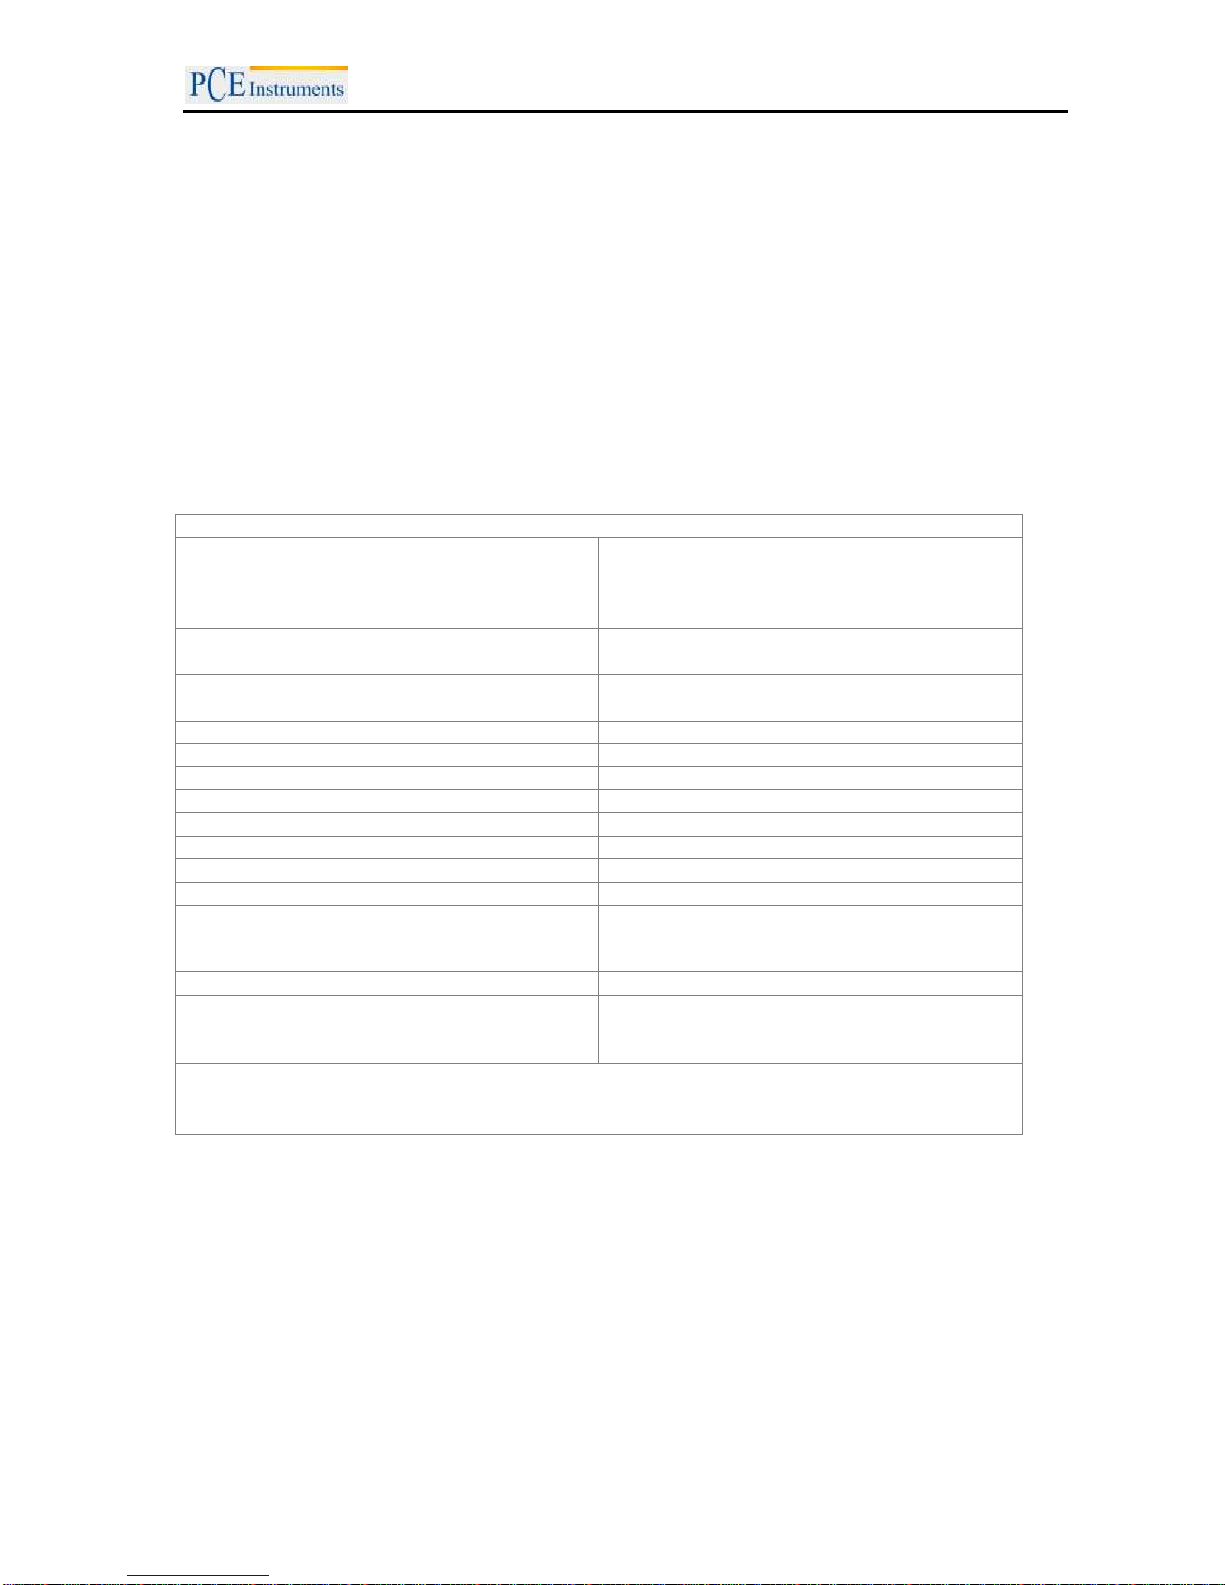
Technische Spezifikation
Bereich
400,0 / 4000 / lux
40,00 / 400,0 klux
40,00 / 400,0 / 4000 / fc
40,00 kfc
Auflösung
0,1 / 1 / 10 / 100 Lux
0,01 / 0,1 / 1 / 10 FootCandle
Genauigkeit
±5 % v.Messwert ±10 Digits (<10.000 Lux)
±10 % v.Messwert ±10 Digits (>10.000 Lux)
Reproduzierbarkeit
± 3 %
Speicher
16.000 Werte
Speicherintervall
zwischen 2 und 99 Sekunden
Überbereichsanzeige
OL = Overload
Anzeige-Update
1,5 pro Sekunde
Umweltbedingungen
0 ... 40 °C / 80 % r.F.
Anzeige
3¾-stelliges LCD-Display
Versorgung
9 V Block Batterie
Abmessung
Gerät: 203 x 75 x 50 mm (B x H x T)
Lichtsensor: 115 x 60 x 20 mm (B x H x T)
Kabellänge: 150 cm
Gewicht
280 g
Normen
Sicherheit: IEC- 1010- 1; EN 61010- 1
EMV: EN 50081- 1; EN 50082- 1 entspr. DIN
5031 ; DIN 5032
Lieferumfang
1 x Lux-Messgerät PCE-174, 1 x Lichtsensor, 1 x Software, 1 x USB - Kabel, 1 x Batterie, 1 x
Gerätetasche, Bedienungsanleitung
Page 14
BETRIEBSANLEITUNG
____________________________________________________________________________________________________________________
4
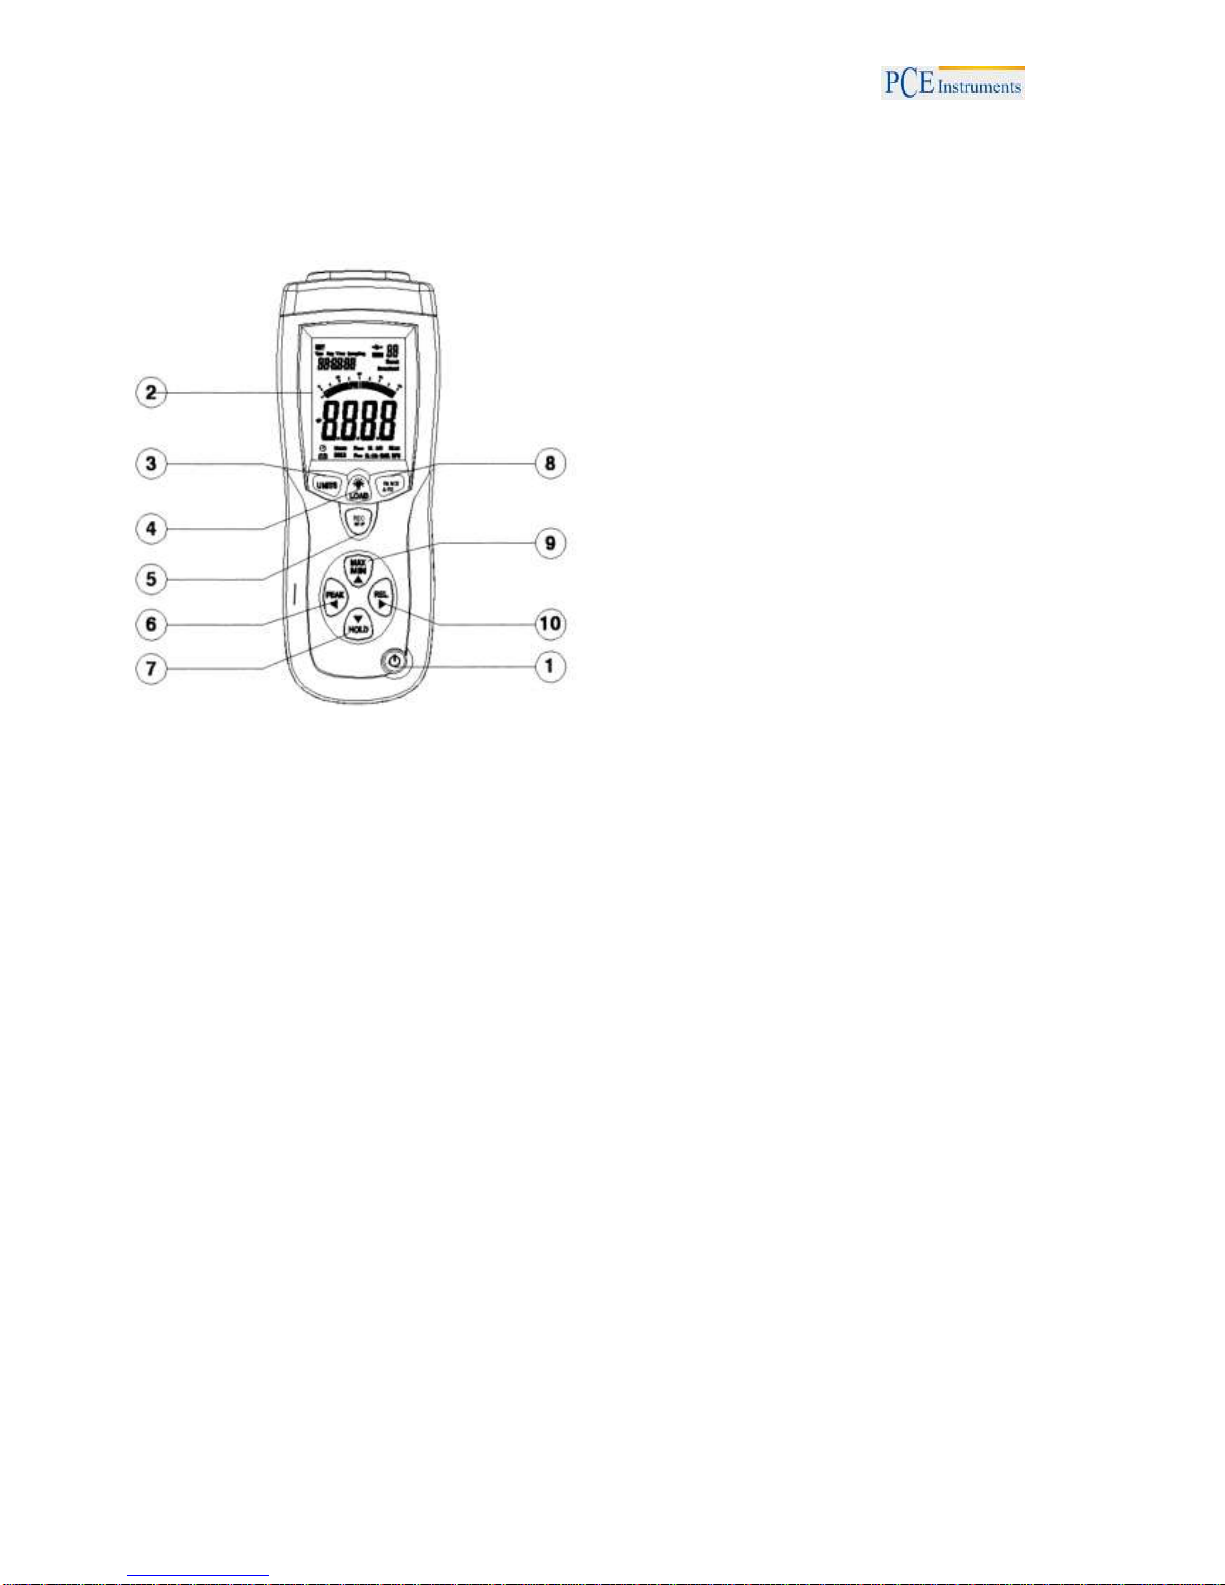
3.0 Bedienfeld
1. Ein/Ausschalter
2. Display: 3¾-stellige Anzeige
3 UNITS Taste: Durch Drücken dieser Taste
wechseln Sie in den Messmodus für Footcandle
(1 fc = 10,76 lux)
4. Hintergrundbeleuchtung: Ein- Ausschalten.
5 REC/SET Taste
6 PEAK Taste: Durch Drücken dieser Taste
aktivieren Sie die Spitzenwert anzeige.
7 HOLD Taste: Durch Drücken dieser Taste wird
der aktuelle Wert im Display eingefroren.
8 RANGE Taste: Durch Drücken dieser Taste
wählen Sie zwischen den verschiedenen
Messbereichen (z.B.400.0/4000 Lux).
9 MAX/MIN Taste: Durch Drücken dieser Taste
können Sie den Maximal und Minimal Wert
aufrufen.
10 REL Taste: Durch Drücken dieser Taste
wechseln Sie in den Modus zum relativen
Ablesen. (Nullen)
4.0 Bedienung
1. Verbinden Sie das Gerät mit dem Lichtsensor.
2. Drücken Sie die Ein/Austaste, um das Luxmeter einzuschalten.
3. Entfernen Sie die Abdeckung des Lichtsensors und halten Sie den Sensor horizontal zu der
Lichtquelle.
4. Wählen Sie die gewünschte Einheit, Lux oder Fc.
5. Lesen Sie den angezeigten Wert der Lichtintensität vom Display ab.
Wenn auf dem Display „OL“ angezeigt wird, befindet sich der Messwert außerhalb des
Messbereiches. Bitte wählen Sie in diesem Fall einen höheren Messbereich.
6. Durch Drücken der RANGE Taste wählen Sie zwischen den verschiedenen Messbereichen
(z.B.400.0/4000 Lux).
7. Durch Drücken der UNITS Taste wechseln Sie zwischen den Messmodulen Lux und
Footcandle (1 fc = 10,76 lux).
8. Drücken Sie die HOLD Taste, um den aktuellen Wert im Display einzufrieren. Drücken Sie
die Taste erneut um mit der Messung fortzufahren.
9. Um den Spitzenwert aufzunehmen drücken Sie die PEAK Taste. Nun können Sie durch
kurzes drücken der PEAK Taste die Minimum und Maximum Spitzenwerte aufnehmen.
10. Maximal und Minimalwerte können durch Drücken der MAX/MIN Taste aufgerufen werden.
11. Drücken Sie die REL Taste, um die Anzeige auf „0“ zu stellen. Nun zieht das Gerät den
aktuellen Messwert vom Endwert ab.
12. Um die Hintergrundbeleuchtung EIN und AUS zu schalten drücken Sie LOAD Taste.
13. Wenn Sie Ihre Messung beendet haben, bringen Sie die Abdeckung des Lichtsensors
wieder an und schalten Sie das Gerät ab.
Page 15

BETRIEBSANLEITUNG
5
5.0 Uhrzeit und Samplingrate einstellen
1. Drücken Sie die REC und UNITS Taste gleichzeitig. Die erste Stelle der Uhrzeit beginnt
zu blinken.
2. Durch Drücken der PEAK oder REL Taste können die entsprechenden Stellen
angewählt werden (Stunde, Minuten, Sekunden, Samplingrate, Monat, Tag, Woche,
Jahr).
3. Durch Drücken der MAX/MIN oder HOLD Taste kann der Wert des angewählten
Bereiches verändert werden.
4. Durch Drücken der REC und UNITS Taste gleichzeitig, verlassen Sie diesen Bereich.
6.0 Manuelle Speicherung
1. Drücken Sie die REC/Setup Taste um ein manuelle Speicherung zu erreichen.
2. Durch Drücken der LOAD Taste von ca. 3 Sekunden können die gespeicherten Werte
wieder aufgerufen werden.
3. Mit den Tasten MAX/MIN und HOLD können Sie die Speicherplätze aufrufen.
4. Um in den normalen Modus zurückzukehren, halten Sie die LOAD Taste erneut für ca. 3
Sekunden fest.
7.0 Datenlogger Speicherung
1. Stellen Sie als erstes die Samplingrate wie unter Punkt 5.0 beschrieben ein.
2. Halten Sie die REC/Setup Taste für ca. 3 Sekunden fest, bis die MEM Anzeige im
Display anfängt zu blinken.
3. Drücken Sie erneut die REC/Setup Taste für 3 Sekunden und die Speicherung wird
beendet.
3. Schließe Sie das Lichtstärkemessgerät an Ihre USB - Schnittstelle an und lesen Sie den
Datenlogger mit der mitgelieferten Software aus.
8.0 Speicher löschen
Um die manuell gespeicherten Messwerte zu löschen:
Drücken Sie die beiden Tasten LOAD und REC/Setup gleichzeitig, bis im Display das
Symbol MEM CL erscheint, um den Speicher zu löschen.
Um die automatisch gespeicherten Messwerte zu löschen:
Drücken Sie bei ausgeschaltetem Gerät die REC/Setup Taste und halten Sie diese
während des Einschaltens gedrückt, bis auf dem Display DEL – MEM erscheint.
9.0 Batteriewechsel
Wenndie Batterien nachlassen, wird dieses auf dem Display angezeigt. Zum Wechseln
der Batterien entfernen Sie bitte die Batterieabdeckung mit einem Schraubenzieher.
Wechseln Sie den 9V Block gegen einen neuen und bringen die Abdeckung wieder an.
10.0 Wartung
1. Das weiße Plastik Gehäuse des Sensors sollte bei Bedarf mit einem feuchten Lappen
gereinigt werden.
2. Lagern Sie das Gerät nicht an Orten, an denen die Temperatur oder Luftfeuchtigkeit
übermäßig hoch ist.
Page 16
BETRIEBSANLEITUNG
____________________________________________________________________________________________________________________
6
11.0 Einordnung der Messergebnisse
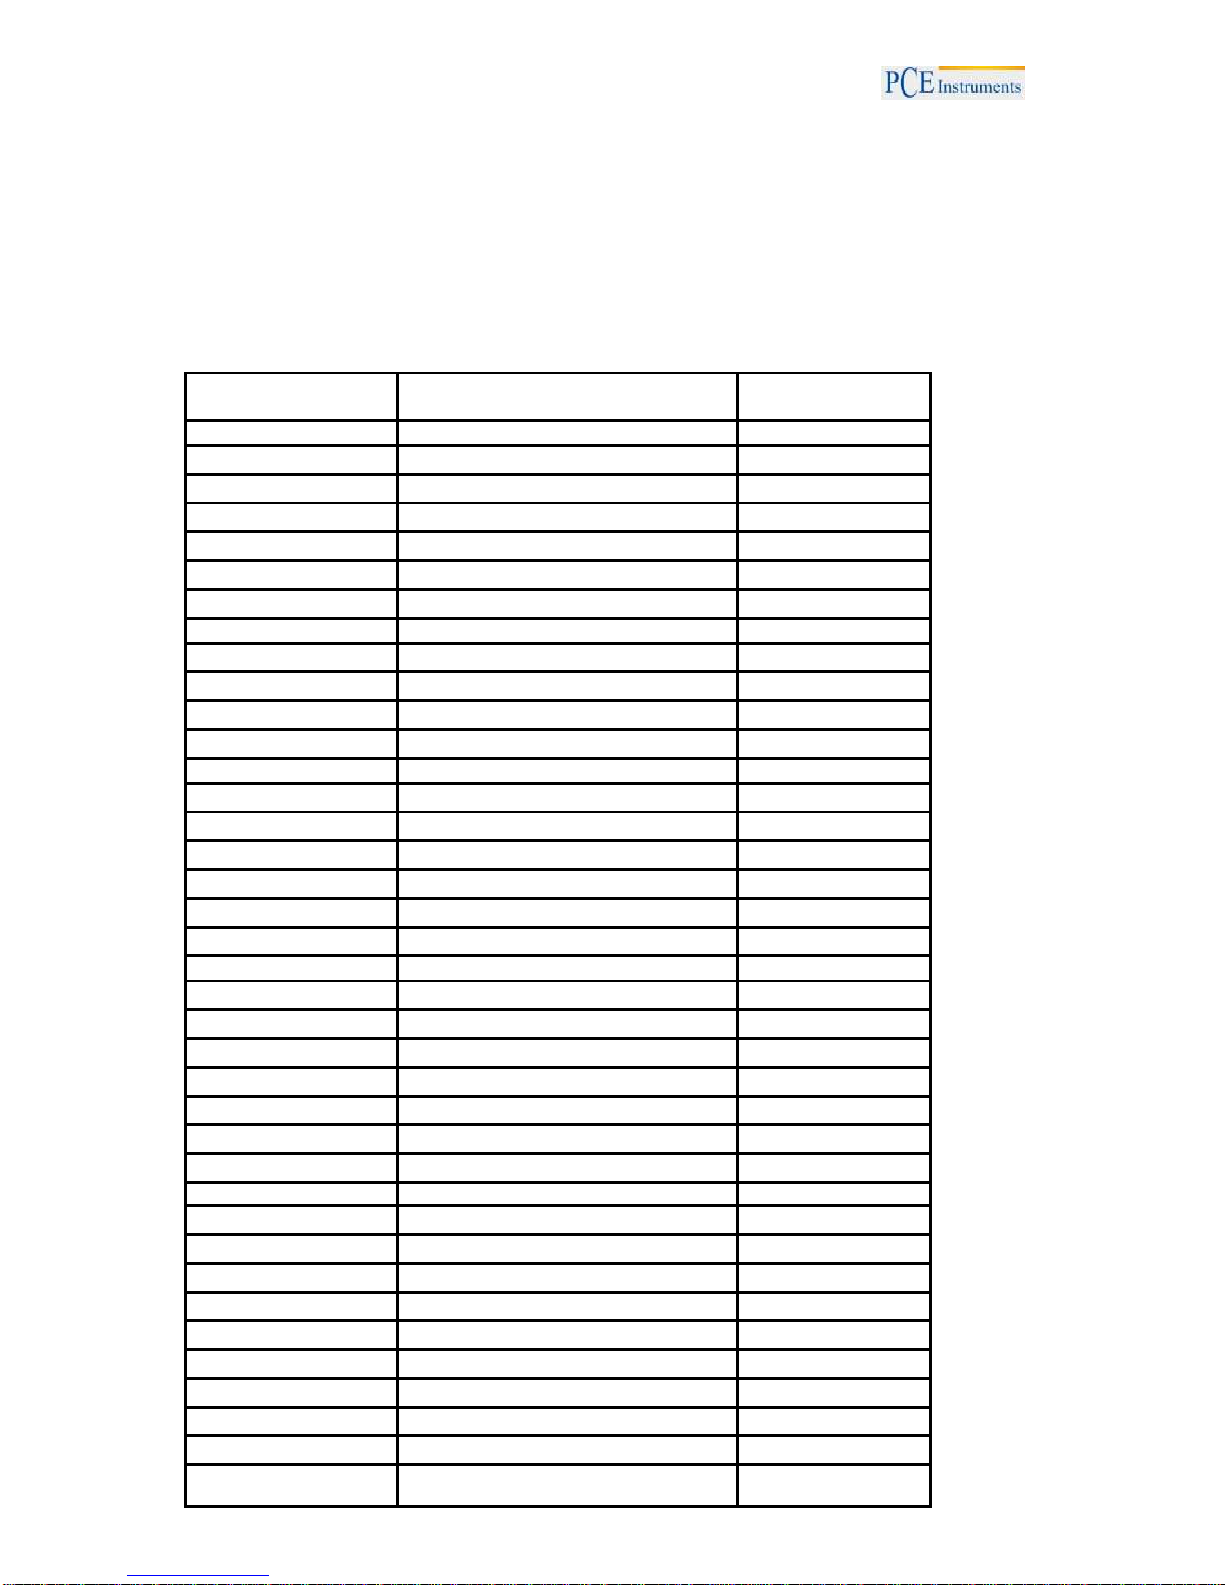
Aufgrund vieler Nachfragen zum Luxmessgerät und der Einstufung der
Messergebnisse haben wir Ihnen folgend Informationen zu den üblich
einzuhaltenden minimalen Lux-Messwerten für den Innenbereich tabellarisch
zusammengestellt. Im Aussenbereich sind wesentlich höhere Messwerte zu
erwarten (z.B. 30.000 lux oder 100.000 lux bei Sonnenlicht). Die Werte sind
orientierende Werte, für die seitens der PCE Inst. keine Garantie auf Richtigkeit
übernommen wird.
Beleuchtungsort
Arbeitsart/ Arbeitsraum
Bereich der
Beleuchtungsstärke
Schulbereich
Durchführung von Experimenten
700 - 1500 lux
Schreiben an der Tafel
700 - 1500 lux
Ausführen grafischer Zeichnungen
700 - 1500 lux
Flure
150 - 300 lux
Klassenzimmer allgemein
150 - 300 lux
Leseraum
700 - 1500 lux
Mensa
300 - 700 lux
Bürobereich
PC-Raum, PC-Arbeiten
1500 - 3000 lux
Ausführen technischer Zeichnungen
1500 - 3000 lux
Abhalten von Meetings
300 - 700 lux
Kantine
150 - 300 lux
Rezeption
300 - 700 lux
Fabriksbereich
Produktionshalle
1500 - 3000 lux
Entwicklungsbüro
700 - 1500 lux
Planungsbüro
700 - 1500 lux
Ausführen von Laborarbeiten
1500 - 3000 lux
Verpacken von Produkten
700 - 1500 lux
Lager
300 - 700 lux
Elektrische Räume
150 - 300 lux
Krankenhausbereich
Besucherraum
300 - 700 lux
Ausführen von Schulungen
300 - 700 lux
Anatomische Ausbildung
300 - 700 lux
Erste-Hilfe / Behandlungsräume
700 - 1500 lux
Apothekenbereich
700 - 1500 lux
Lesen im Krankenbett
150 - 300 lux
Strahlenbehandlungsraum
70 - 150 lux
Waschraum
150 - 300 lux
Hotelbereich
Rezeption
700 - 1500 lux
Eingangsbereich
300 -700 lux
Banquet
300 - 700 lux
Büros
150 - 300 lux
Restaurant
150 - 300 lux Toilette
150 - 300 lux
Waschräume
150 - 300 lux
Bars
70 - 150 lux
Flure
70 - 150 lux
Treppen
70 - 150 lux
Geschäftsbereich /
Läden
Schaufenster
1500 - 3000 lux
Page 17
BETRIEBSANLEITUNG
7
Ausstellungsräume
1500 - 3000 lux
Verpackungsbereich
700 - 1500 lux
Aufenthaltsraum
300 - 700 lux
Besprechungszimmer
300 - 700 lux
Toilette
150 - 300 lux Treppen
70 - 150 lux
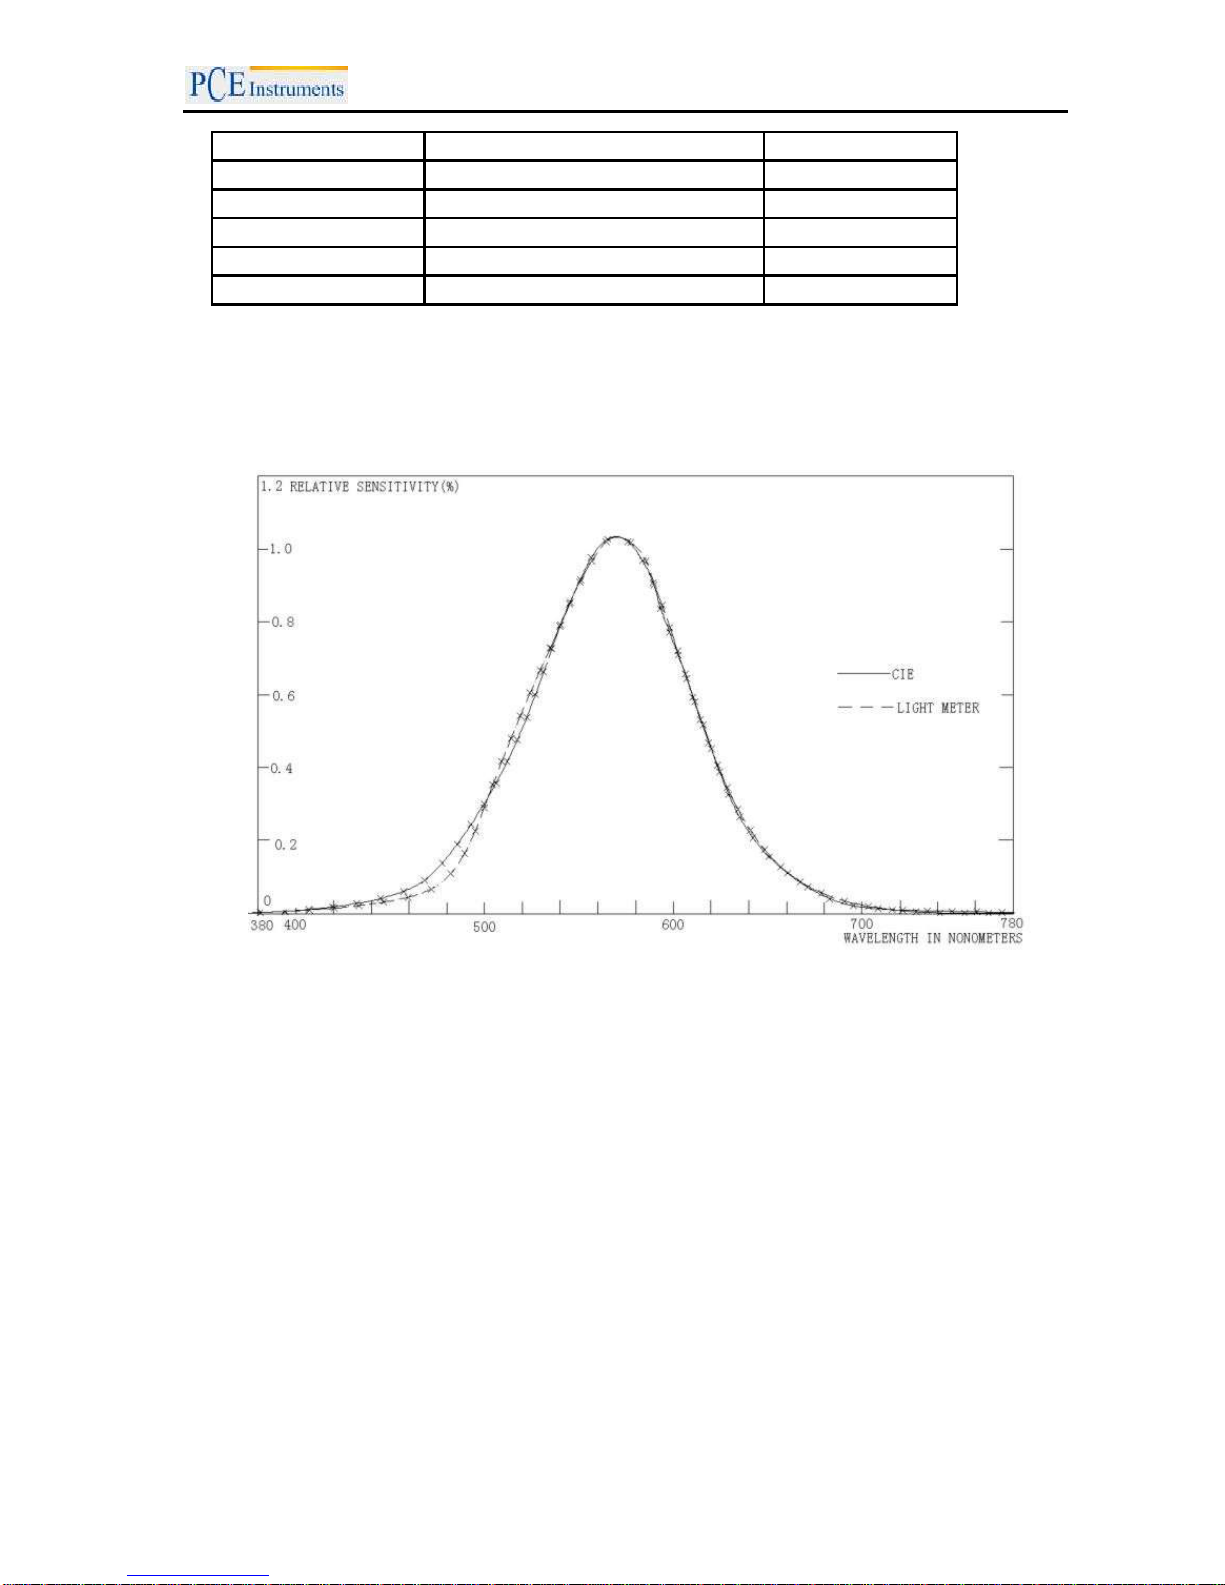
12.0 Spektral Empfindlichkeit Charakteristik
Der Lichtsensor des Gerätes erfüllt die C.I.E (International Commission on Illumination)
Spektralkurve wie unten gezeigt:
Page 18
BETRIEBSANLEITUNG
____________________________________________________________________________________________________________________
8
Software
Installation der Software:
Legen Sie die Software CD ins Laufwerk und machen Sie einen Doppelklick auf Setup. Das Fenster zur Installation
erscheint. Klicken Sie auf Next und durch klicken auf Install beginnt die Installation der Software. Nach dem
Installieren der Software klicken Sie auf Finish um die Installation zu beenden.
Starten der Software:
Öffnen Sie die Software und verbinden Sie jetzt das Gerät anhand des mitgelieferten USB Kabels mit dem PC. Die
Software zeigt an, dass das Gerät offline ist. Um die Verbindung herzustellen, müssen Sie den richtigen Anschluss
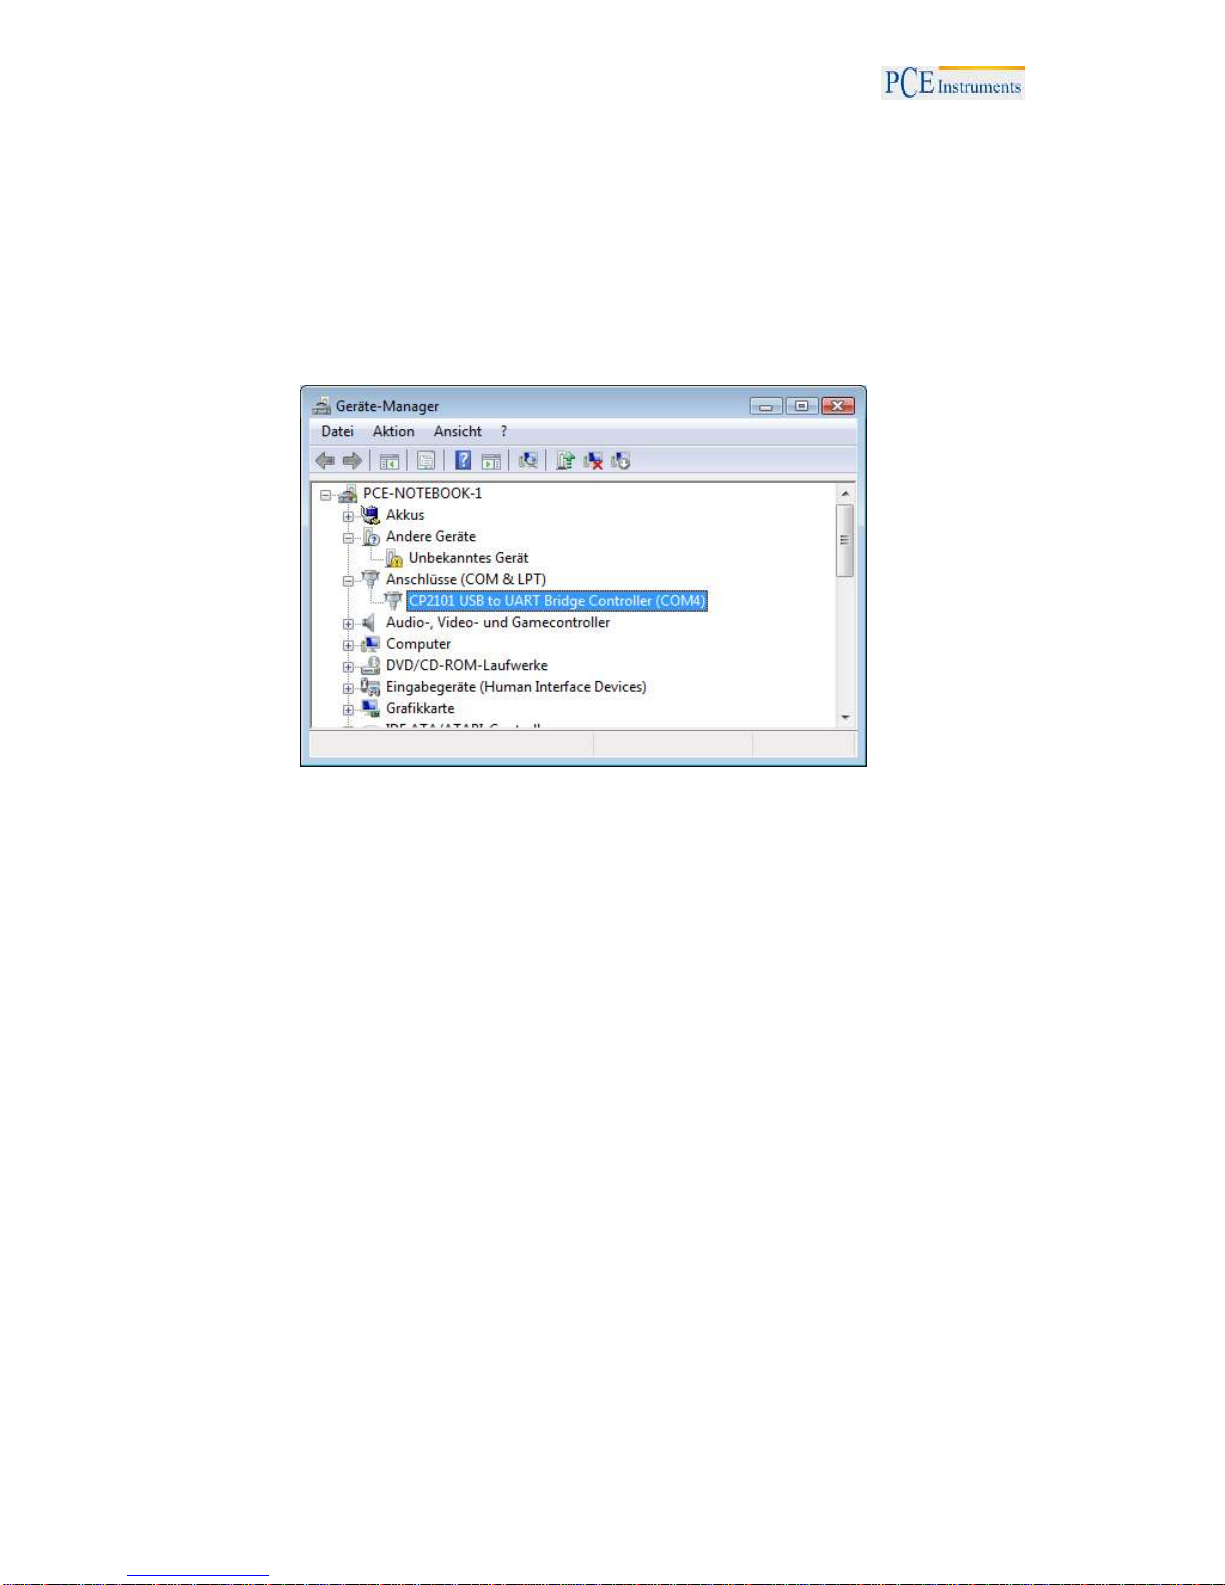
unter COM Port auswählen. Den Anschluss finden Sie unter Systemsteuerung / System / Geräte-Manager.
Page 19
BETRIEBSANLEITUNG
9
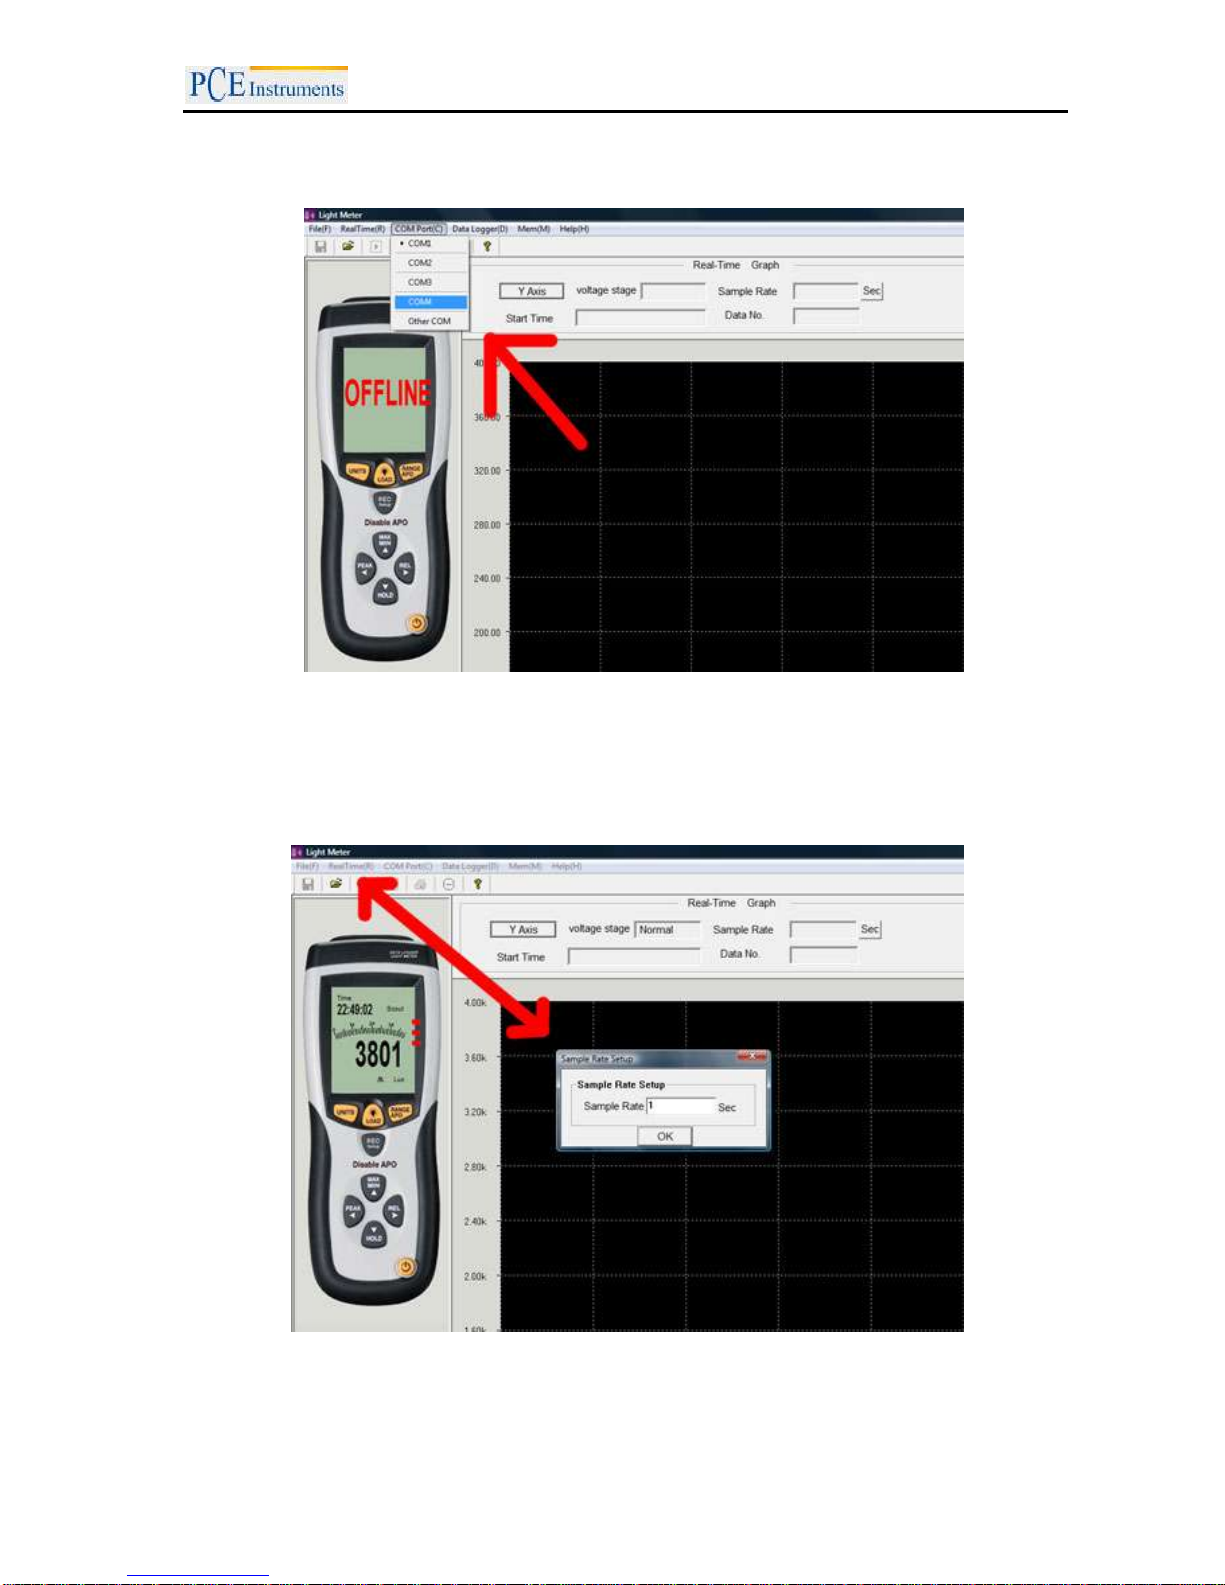
Nachdem Sie wissen welcher COM Port vom PC für das Messgerät vorgesehen ist wählen Sie den COM Port in der
Software des Messgerätes.
Hier können Sie die Echtzeitaufnahme unter Eingabe der Messrate (z.B. Messung jede sek.) einstellen.
Page 20
BETRIEBSANLEITUNG
____________________________________________________________________________________________________________________
10
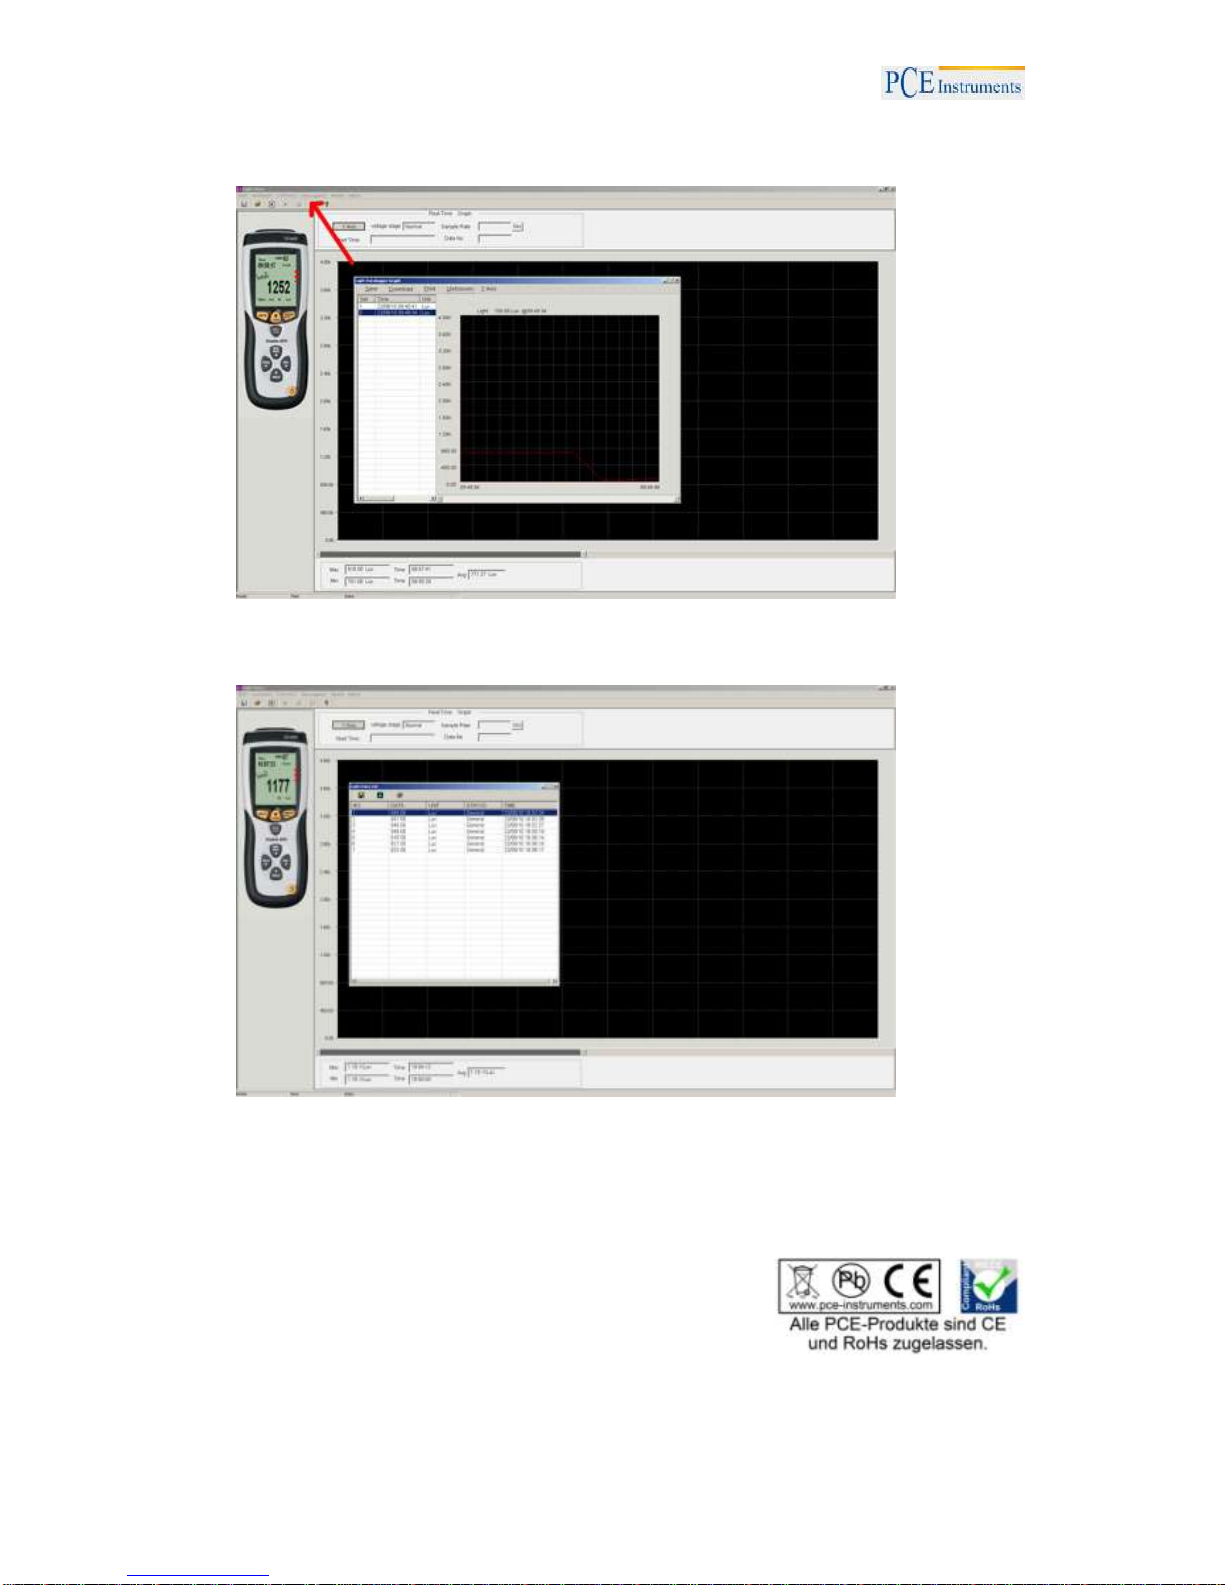
Auslesung des Datenloggers
Auslesung der einzelnen Messwerte
Für Rückfragen, sprechen Sie uns bitte an: PCE Deutschland GmbH
Zur Umsetzung der ElektroG (Rücknahme und Entsorgung von Elektro- und Elektronikaltgeräten) nehmen wir unsere Geräte zurück. Sie werden
entweder bei uns wiederverwertet oder über ein Recyclingunternehmen nach gesetzlicher Vorgabe entsorgt.
WEEE-Reg.-Nr. DE69278128
 Loading...