

PCE Health and Fitness PCE-ATP 1 User Manual
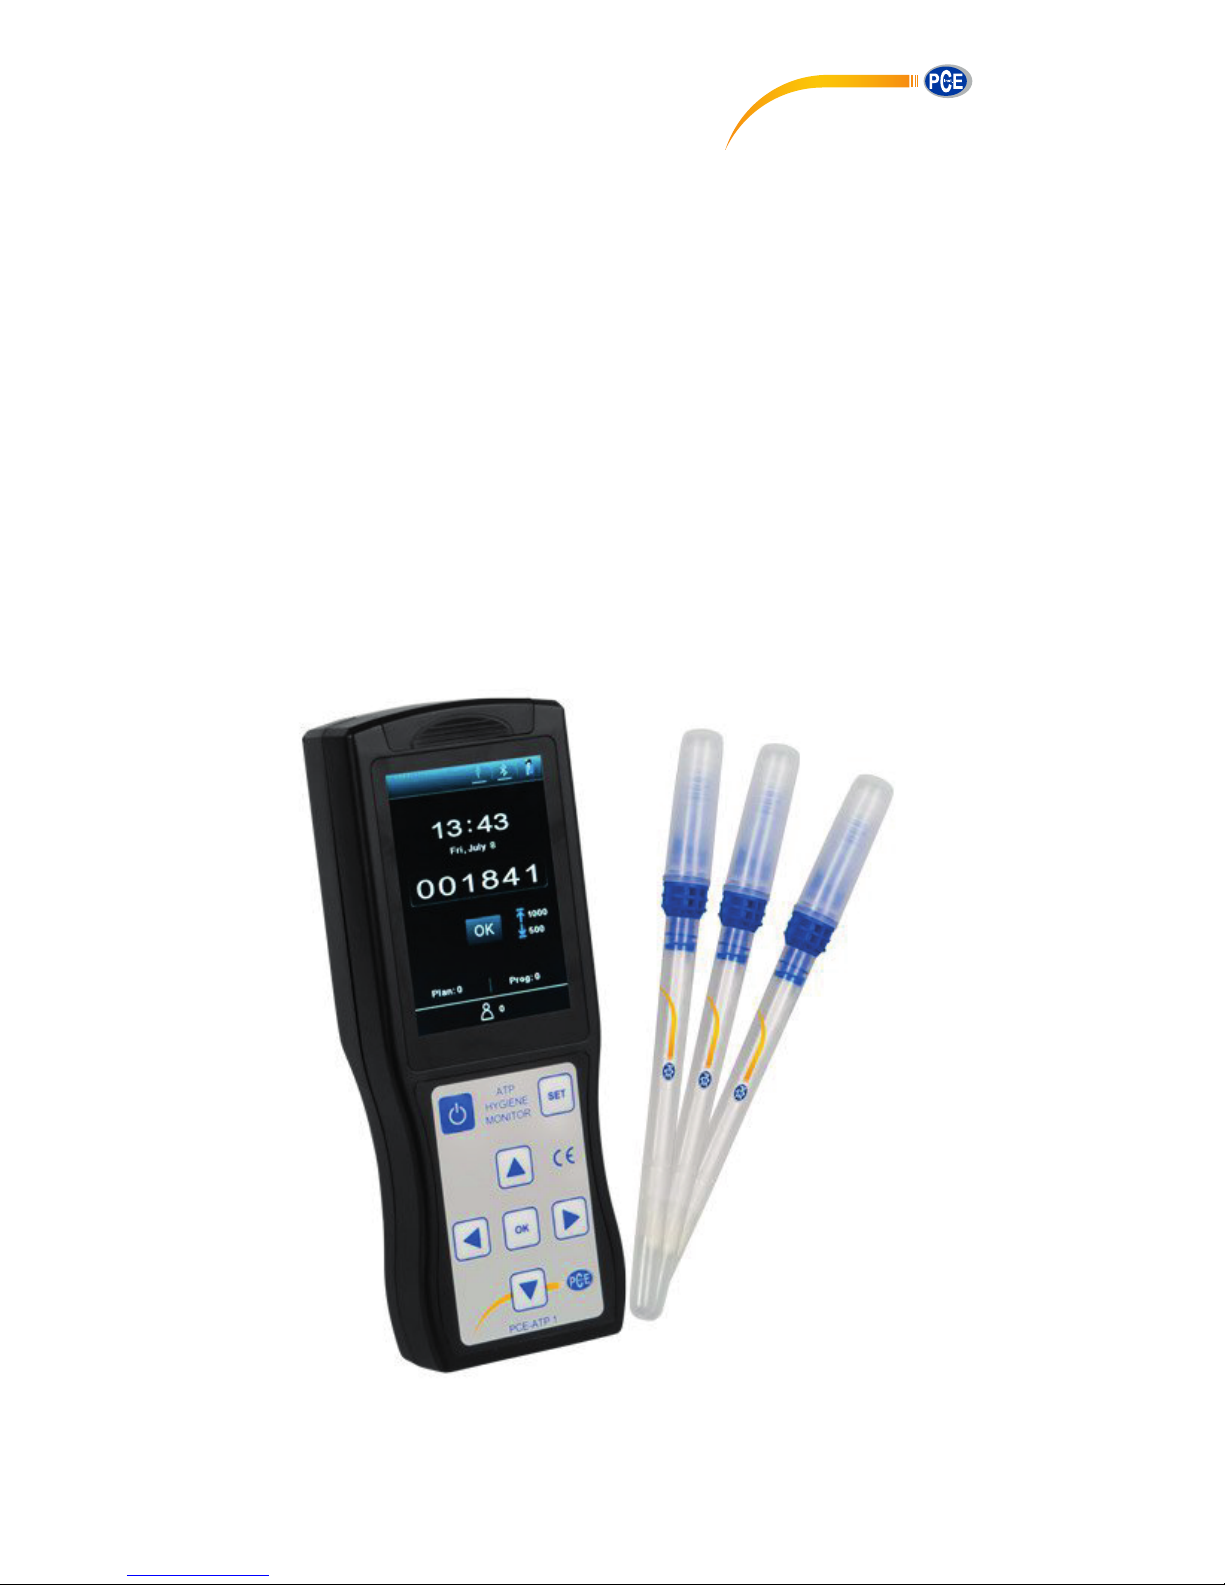
Test Instrument
PCE-ATP 1
Manual
PCE Americas Inc.
711 Commerce Way
Suite 8
Jupiter
FL-33458
USA
From outside US: +1
Tel: (561) 320-9162
Fax: (561) 320-9176
info@pce-americas.com
www.pce-instruments.com/english
www.pce-instruments.com
PCE Instruments UK Ltd.
Units 12/13
Southpoint Business Park
Ensign way
Hampshire / Southampton
United Kingdom, SO31 4RF
From outside UK: +44
Tel: (0) 2380 98703 0
Fax: (0) 2380 98703 9
info@industrial-needs.com

II
Disclaimer and Copyright
All contents of this manual (including but not limited to text,
trademark, logo, button icons, graphics, tables, data, etc.) shall not
be reproduced in any form, neither print nor electronic, nor
translated into any other languages.
This manual is subject to change without prior notice. The updated
version prevails.
Special Declaration
Please read this manual carefully before the usage of portable ATP
hygiene monitoring system!

III
Symbols Used in This Manual
Symbols used in this manual that directly refers to the safe and
proper operations of portable ATP hygiene monitoring system.
Icon
Description
Warning
Warning operation personnel pay attention to a certain
operation. Operating the portable ATP hygiene monitoring
system in any manner unspecified in this manual may
result in device damage or abnormal function.
Reminding
Providing important information that critical to the
success of the operation or use of the device, including the
information explained in further detail elsewhere in this
manual.
Prohibit
Prohibiting operation personnel from a certain dangerous
operation. Otherwise may result in device damage or
abnormal function.

IV
Conventions Used in This Manual
Convention
Meaning
Ordered list
Procedure steps must be performed follow
the list order.
Click/Double
click A
Click or choose A on the ATP PC software.
Press B
Press B key on the keyboard of the detector.
italic + Bold
Refers to the key/button or operation
instructions of the ATP PC software.
< Bold >
Refers to the key/button or options of the
detector.
[ ]
Refers to keys on the computer keyboard.

V
Safety and Regulatory Compliance
General Precautions:
1. The portable PCE-ATP1 hygiene monitoring system is safely and
reliably designed and manufactured. Personal injury can be
avoided if the product is operated properly (as instructed in
the manual) and the related precautions are strictly followed.
2. Users shall be aware of hazards that may be caused by the
portable PCE-ATP1 hygiene monitoring system and its accessories.
3. All operators shall be familiar with the safety precautions and
warnings described in this section before the usage of portable
PCE-ATP1 hygiene monitoring system.
4. Non-observance of the instruction provided or performing
any operations not stated in the manual may affect the safety
protection provided by the portable PCE-ATP1 hygiene monitoring
system.
Operation Environmental Precautions
Icon
Meaning
Prohibit
Never run the portable PCE-ATP1 hygiene monitoring system in
places that have or may have flammable and explosive
gas.
Warning
Do not place the portable PCE-ATP1 hygiene monitoring system
in an extreme temperature environment.

VI
ATP Quickswab Precautions
Icon
Meaning
Warning
Please carefully read the related information and
precautions of PCE-ATP1 Quickswab before the usage of
detector.
Reminding
Please follow national and local environment protection
regulations and laws for the usage of PCE-ATP1 Quickswab.
Warning
Do not insert any other articles into the detector except
the PCE-ATP1 Quickswab, and do not squeeze the PCE-ATP1
Quickswab while inserting.
Warning
Please make sure the outside surface of PCE-ATP1 Quickswab is
clean and dry before inserting it into the detector.
Battery Precautions
Icon
Meaning
Warning
Please use the supplied rechargeable lithium-ion battery
and adaptor. The recharging voltage is limited to 4.2 V.

VII
Warning
Please discard the used battery according to local
regulations
Keyboard and Keys Precautions
Icon
Meaning
Warning
Do not continuously press the keys on the keyboard of
detector.
USB Interface Precautions
Icon
Meaning
Warning
The computer that connected to the USB interface of the
detector shall comply with BSEN60950/IEC950 standard.
Device Parts Precautions
Icon
Meaning
Warning
The detector is not provided with spare parts. Do not
remove any part from the device without permission.

VIII
Use Restrictions
The detector is designed to following universality, safety and
EMC requirements:
Universality
► Low voltage indicator 73/23/EEC
► EMC indicator 89/336/EEC
Safety
► IEC 61010-1:2010
► IEC 61326-1:2013
► IEC 61326-2-6:2013
► IEC 61010-2-081:2015
► IEC 61010-2-101:2015

IX
Declaration
The design of detector conforms to and able by the requirements in
section 11 of low voltage specification 73/23/EEC. The design of
detector also accords with the regulation that the design of
electronic products should be work under specified voltage
regulation and the requirements of BS EN 61010-1: 2001.

X
Content
1. Overview .......................................................................................... 1
1.1 Applications and Features ................................................................. 1
1.1.1 Scope of Application .................................................................. 1
1.1.2 Features .................................................................................... 3
1.2 Technical Specifications ..................................................................... 4
1.3 Terms and Abbreviations................................................................... 6
1.4 Accessories and Consumables ........................................................... 6
1.5 Working Principle .............................................................................. 6
1.6 Quick Operation Instructions ............................................................ 7
1.6.1 ATP Quickswab Structure Diagram ........................................... 8
1.6.2 ATP Quickswab Operating Procedures ...................................... 8
1.6.3 ATP Quickswab Storage .......................................................... 11
1.6.4 ATP Quickswab Safety ............................................................. 11
2. Basic Operation Instructions of Detector ........................................ 12
2.1 Structural Diagrams of Detector ...................................................... 12
2.2 Function of Keys ............................................................................... 13
2.3 Battery Installation .......................................................................... 14
2.4 Power-on Self-test ........................................................................... 14
2.5 Internal Calibration .......................................................................... 16
2.5.1 Power-on Calibration .............................................................. 16
2.5.2 Recalibration ........................................................................... 18
2.5.3 Auto-calibration ...................................................................... 18
2.6 Power-off ......................................................................................... 19
2.7 Power Saving Mode On and Resuming ........................................... 19

XI
2.8 Low Battery Alert ............................................................................. 20
2.9 Icons and Meanings ......................................................................... 21
3. Setting and Operation .................................................................... 22
3.1 Setting Interface .............................................................................. 22
3.2 User ................................................................................................. 23
3.3 Program ........................................................................................... 24
3.4 Plan .................................................................................................. 26
3.5 Records ............................................................................................ 27
3.6 Statistics .......................................................................................... 31
3.7 System Settings ............................................................................... 33
3.8 Template.......................................................................................... 33
3.9 Help ................................................................................................. 34
3.10 About………………………………………………………………………………………….34
4. Test and Test Result ....................................................................... 35
4.1 To-Be-Tested Interface .................................................................... 35
4.2 Program Selection and Setting ........................................................ 35
4.2.1 Selection and Setting of User-defined Program (Upper and
Lower Limit) ....................................................................................... 36
4.2.2 Plan Setting and Program Selection ........................................ 37
4.2.3 Calling of Template Program .................................................. 39
4.3 Start Test ......................................................................................... 39
4.4 Records Regarding Operations ........................................................ 41
4.4.1 View Records ........................................................................... 41
4.4.2 Print Records ........................................................................... 42
4.4.3 Delete Records ........................................................................ 42

XII
5. Connect Detector to PC or Other Terminals ................................... 43
5.1 Connect Detector to PC ................................................................... 43
5.2 Disconnect Detector from the connected PC .................................. 43
5.3 Connect Detector to Bluetooth Printer ........................................... 44
6. Operation and Maintenance .......................................................... 45
6.1 Daily Precautions ............................................................................. 45
6.2 Battery Charge or Replacement ...................................................... 45
6.3 Test Chamber Clean or Replacement .............................................. 46
7. Troubleshooting ............................................................................. 47
8. Commitment Statements of After-sale Services ............................. 51
8.1 Warranty Service ............................................................................. 51
8.2 Response Time ................................................................................ 52
8.3 Spare and Accessory Parts ............................................................... 52
8.4 Special Statement ............................................................................. 52
9. Portable ATP Hygiene Monitoring System Software Specification .. 53
9.1 Overview.......................................................................................... 53
9.2 Setup................................................................................................ 54
9.3 Remove ............................................................................................ 57
10. Software Interfaces and Features ................................................... 58
10.1 Software Interfaces ........................................................................ 58
10.2 Overview of Features ..................................................................... 58
10.2.1 Menu Bar................................................................................. 58
10.2.2 Tool Bar ................................................................................... 59
10.2.3 Function Options ..................................................................... 60

XIII
11. Operating Guidance ....................................................................... 61
11.1 Connect Device to PC ..................................................................... 61
11.2 Connect Device to Software. .......................................................... 61
11.3 Record ............................................................................................ 62
11.3.1 Description .............................................................................. 62
11.3.2 Records Editing........................................................................ 63
11.3.3 Records Deletion ..................................................................... 64
11.3.4 Records Export ........................................................................ 64
11.4 User ................................................................................................ 64
11.4.1 New User ................................................................................. 64
11.4.2 Edit User .................................................................................. 65
11.4.3 Delete User .............................................................................. 65
11.5 Program .......................................................................................... 65
11.5.1 New Program .......................................................................... 66
11.5.2 Edit Program ........................................................................... 66
11.5.3 Delete Program ....................................................................... 66
11.6 Plan ................................................................................................. 67
11.6.1 New Plan ................................................................................. 67
11.6.2 Edit Plan .................................................................................. 68
11.6.3 Delete Plan .............................................................................. 68
11.7 Report ............................................................................................. 68
11.8 Exchange ......................................................................................... 70
11.8.1 Activation Method .................................................................. 70
11.8.2 Device Firmware Upgrade ....................................................... 71
11.8.3 Synchronization ....................................................................... 71
11.8.4 Command Send ....................................................................... 72

1
1. Overview
The portable PCE-ATP1 hygiene monitoring system adopts the
PCE-ATP1 inescent theory to realize simple hygiene monitoring in to
order help reaching HACCP and food hygienic standard.
The portable PCE-ATP1 hygiene monitoring system is consisted of two
parts: ATP Quickswab and detector. This manual mainly introduces
the operation, maintenance and troubleshooting of the detector in
details. For details of ATP Quickswab, please refer to the user's
manual of ATP Quickswab.
Warning: The detector belongs to highly sensitive measuring
device that shall be used with due care and protected from
damp condition and impact.
Applications and Features 1.1
1.1.1 Scope of Application
The portable PCE-ATP1 hygiene monitoring system is intended for on-site
quick cleanliness (microbial content) test in various industries such
as food processing, catering, medical treatment, sanitation, daily
chemicals, paper making, water treatment, environmental
protection, water administration, entry-exit inspection and
quarantine and other law-enforcing departments.
Examples are as follows :
1. Food processing industry
The portable PCE-ATP1 hygi
ene monitoring
system is capable of
testing bacteria, microorganism or food residue in the
production environment of food, beverage and catering industry.
It is very suitable for HACCP system cleanliness test;

2
Cleanliness control during production; and the cleanliness test of
food production line;
Disinfection evaluation of food packages;
Microorganism contents measurement of finished products and
raw materials;
Hygiene monitoring of the processing environment, capable of
detecting organic matter residue and thus prevent growing
environment of microorganism.
2. Catering industry
Used by law-enforcing departments for hygienic security screening
for catering services.
Cleanliness control of kitchens, dining tables, work bench and
operating tools;
Disinfection evaluation of tableware as well as the disinfection
effect evaluation of one-off disinfection table-wear;
Disinfection control of tableware used in airline, train and
high-speed rail;
Sanitary control of quality control department;
Quick cleanliness test of large dining places such as Olympic
Games and World Expo.
3. Healthcare Industry
Used by infection control departments to detect hospital hygiene
and disinfection & sterilization conditions.
Object surface cleanliness detection of main department of the
hospital, such as disinfection center and ICU;

3
Hand cleanliness inspection of medical staff;
Cleanliness and disinfection detection of medical apparatus and
instruments, such as surgical instruments and endoscope;
Hospital environment cleanliness detection. Ensure the hospital
is entirely clean, safe and free of microbial contamination;
Disinfection effect evaluation of medial disinfection products.
Comparison of test result before and after disinfection to ensure
disinfection products are high quality and reliable.
4. Environment Protection
Biological contamination assessment of water or waste water
samples.
5. Other Industries
Daily chemicals manufacturing industry;
Quality supervision department;
Sanitary supervision of hotel and lodging industry;
Port supervision.
1.1.2 Features
Small in size: handheld design, total weight is less than 300g,
one-hand operation;
Low power consumption: lithium battery, duration time is up to
10 hours, standby time is up to 600 hours;
Auto operating mode: 3.5’ color screen, simple keys, and friendly
HMI;

4
Quantified result: the test result is accurate to 1×10
-18
mol ATP;
Quick test: 10 seconds per sample. The detector can be
connected to a thermal printer via Bluetooth. The test result can
be printed in real time;
Test protection: the detector possesses built-in inclinometer
which will stop the test in case the incline angle is out of range to
ensure test accuracy;
Control network: the detector can smartly check whether the
bacterial colony amount is out of limit. It can be connected to
electronic terminals such as PC;
Maximum storage capacity: the detector is capable of storing 256
Users, 256 Plans, 2000 Programs and 10000 Records;
Data template: the detector is integrated with data templates to
facilitate user for viewing or calling;
Intelligent software: test data can be uploaded to the dedicated
PC software after test. Combine with this software, users could
track, save the test results and analyze the trend of the tested
locations.
Open reagent: suitable for ATP test reagents from multiple
manufacturers. It is strongly recommended to use the supplied
consumables to ensure the test result accuracy.
Technical Specifications 1.2
Dimension: 189mm×70mm×35mm;
Weight: 280g;
Display screen: 3.5’ color screen, graphic HMI;
Start-up time: 15s and 60s available;

5
Test time: 10s;
Storage capacity: 256 Users, 256 Plans, 2000 Programs and
10000 Results;
Battery type: 3.7V rechargeable lithium battery, whose
recharging voltage is limited to 4.2 V;
Battery capacity: 2300mAh (duration time is up to 10 hours,
standby time is up to 600 hours);
Communication mode: the detector can be connected to your
PC via USB cable; and also can be connected to mobile, tablet PC
or printer via Bluetooth;
Real-time print: the detector can be connected to a printer via
Bluetooth, and the test result can be printed in real time;
Incline angle detection: this feature of detector ensures the test
accuracy. The test will stop processing if the device incline angle
is over 30°, and the screen will display icon as an alert;
Auto calibration: the detector possesses light source
auto-calibration system and temperature detection system that
can automatically be adapted to changes of environment;
Test range: 0-999999RLUs;
Test accuracy: 1×10
-18
mol ATP;
Test error: ±5% or ±5 RLUs;
Test repeatability: 8%-20%;
Correlation coefficient: ≥0.995;
Operating temperature range: 5℃-40℃;
Operating humidity range: 20-80%;
Storage temperature range: -10℃-40℃;
Storage humidity range: ≤ 60%.

6
Terms and Abbreviations 1.3
ATP: Adenosine tri-phosphate (energy transfer molecule)
RLU: Relative light unit (measuring unit)
USB: Communication port between the device and PC
Accessories and Consumables 1.4
Accessories include lithium battery, USB cable, USB charger, hang
rope, Bluetooth printer (optional).
.
For details about other accessories and consumables, please ask
local dealer for assistance.
Working Principle 1.5
The portable PCE-ATP1 hygiene monitoring system adopts the inescence
technique to convert invisible ATP concentration (ATP content in
sample) into visible light output, the basic working principle is as
shown in the Figure 1.1.
The software can be downloaded here:
https://www.pce-instruments.com/english/download-win_4.htm

7
Fig 1.1 Working principle
The portable PCE-ATP1 hygiene monitoring system takes the light energy
as reference to output the test value and displays the test result in
quantitative and qualitative form. The test result exhibits the
cleanliness of the tested specimen, which should be between 0 and
999999 relative light units (RLU, 1 RLU = 1× 10
-18
mol of ATP).
According to the user-de�ined upper & lower limits, the detector
will automatically offer the determination of the test result and
displ
ayed as < Pass > , < Fail > or < Caution > .
Quick Operation Instructions 1.6
The PCE-ATP1 Quickswab contains exclusive high-sensitivity liquid stable
integrative reagent. It is capable of detecting bacteria or other
microorganisms on object surfaces and total ATP activities within
food residues in order to quickly provide cleanliness test results.
The PCE-ATP1 Quickswab should be used together with the portable ATP
hygiene monitoring systems.
8
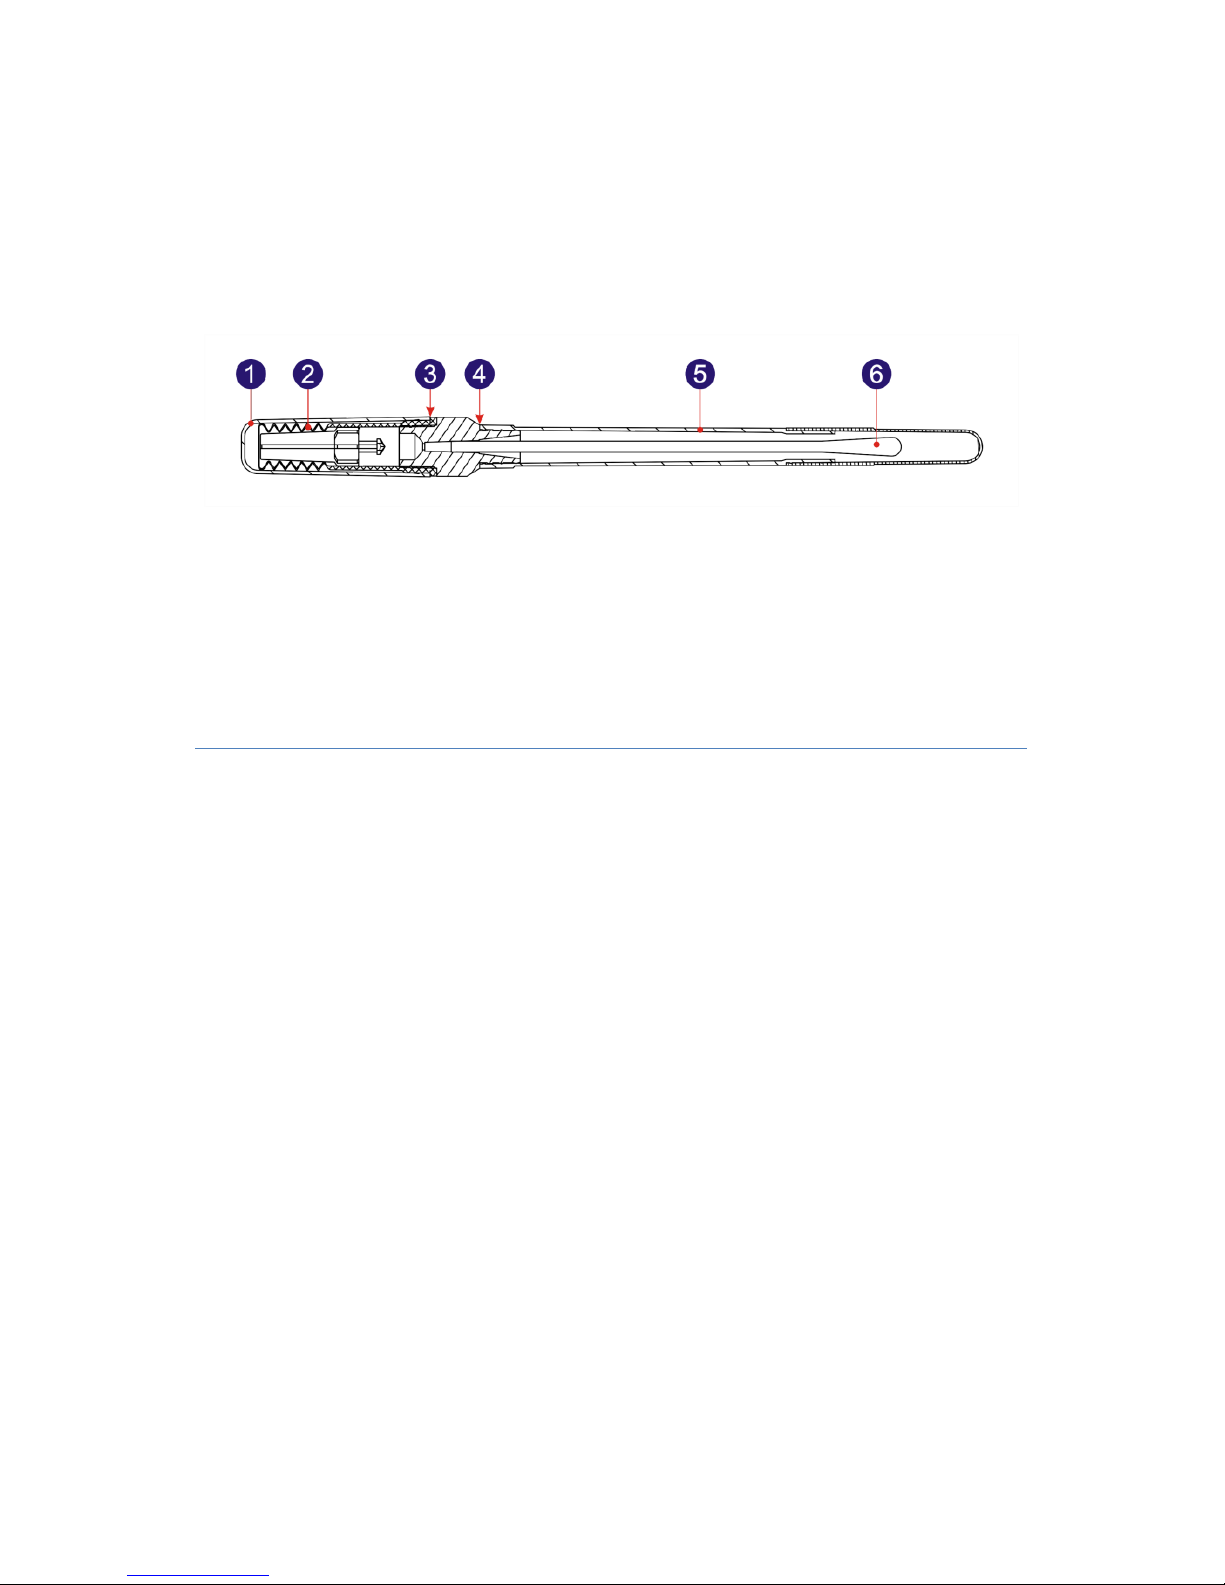
1.6.1 ATP Quickswab Structure Diagram
The structure diagram of the ATP Quickswab is as shown in figure
1.2.
Fig 1.2 ATP Quickswab Structure Diagram
1. Cap
2. Spring cap (inside)
3. Joint port
4. Unplug point
5.Test tube
6. Swab tip.
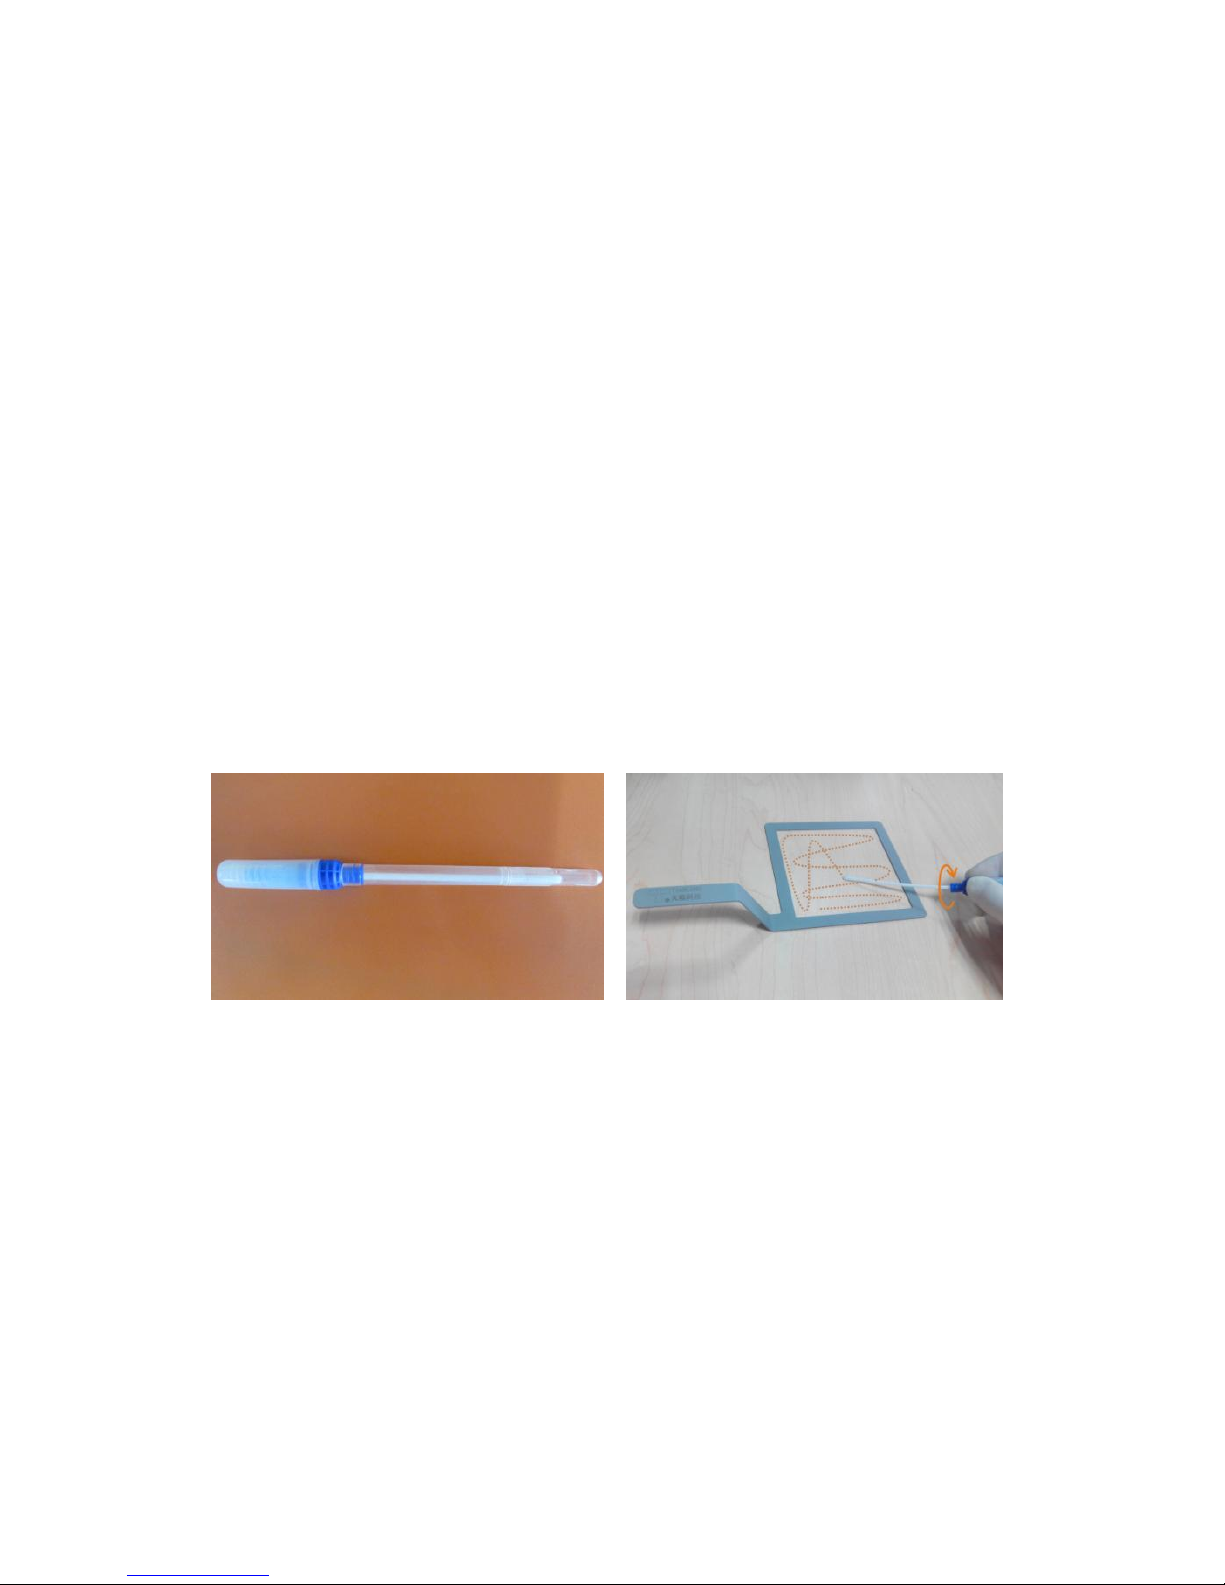
1.6.2 ATP Quickswab Operating Procedures
The operating procedures of the ATP Quickswab are shown in the
figure 1.3.
1. Unfreezing: Take out the ATP Quickswab from the refrigerator.
Wait about 10 to 20 minutes until the internal reagent reaches
the room temperature.
2. Sampling: Hold the joint port of the ATP Quickswab and unplug
the cap at the unplug point, as shown in figure 1.2. Remove the
test tube and pull out the pre-moistened swab tip. Keep 15 to 30
degrees angle of the swab tip and zigzag swab the sampling area,
please remember to rotate the swab tip while swabbing to
ensure the closely contact with the sampling area. (The sampling
area should be around 10x10 cm2 and it could be marked within
the sampling card).
9
3. Installation: After sampling, please hold the joint port of the
ATP Quickswab and insert the swab tip back into the test tube.
(The end face of the test tube should be aligned with the lower
end face of the blue joint port).
4. Injection: Remove the cap of the ATP Quickswab, make sure it is
griped in upright position, and forcibly press down the spring
cap several times to the reagent fully flows into the bottom of the
test tube and submerge the swab tip.
5. Mixing: Hold the upper spring cap of the ATP Quickswab and
swing 30 degrees to the left and right (for five seconds), allowing
the reagent to fully react with the sample.
6. Insertion: Insert the ATP Quickswab into the test camber of
detector which is on the To-be-Tested interface, close the top
cover and start the test.
Fig1.3-1 Unfreezing
Fig1.3-2 Sampling
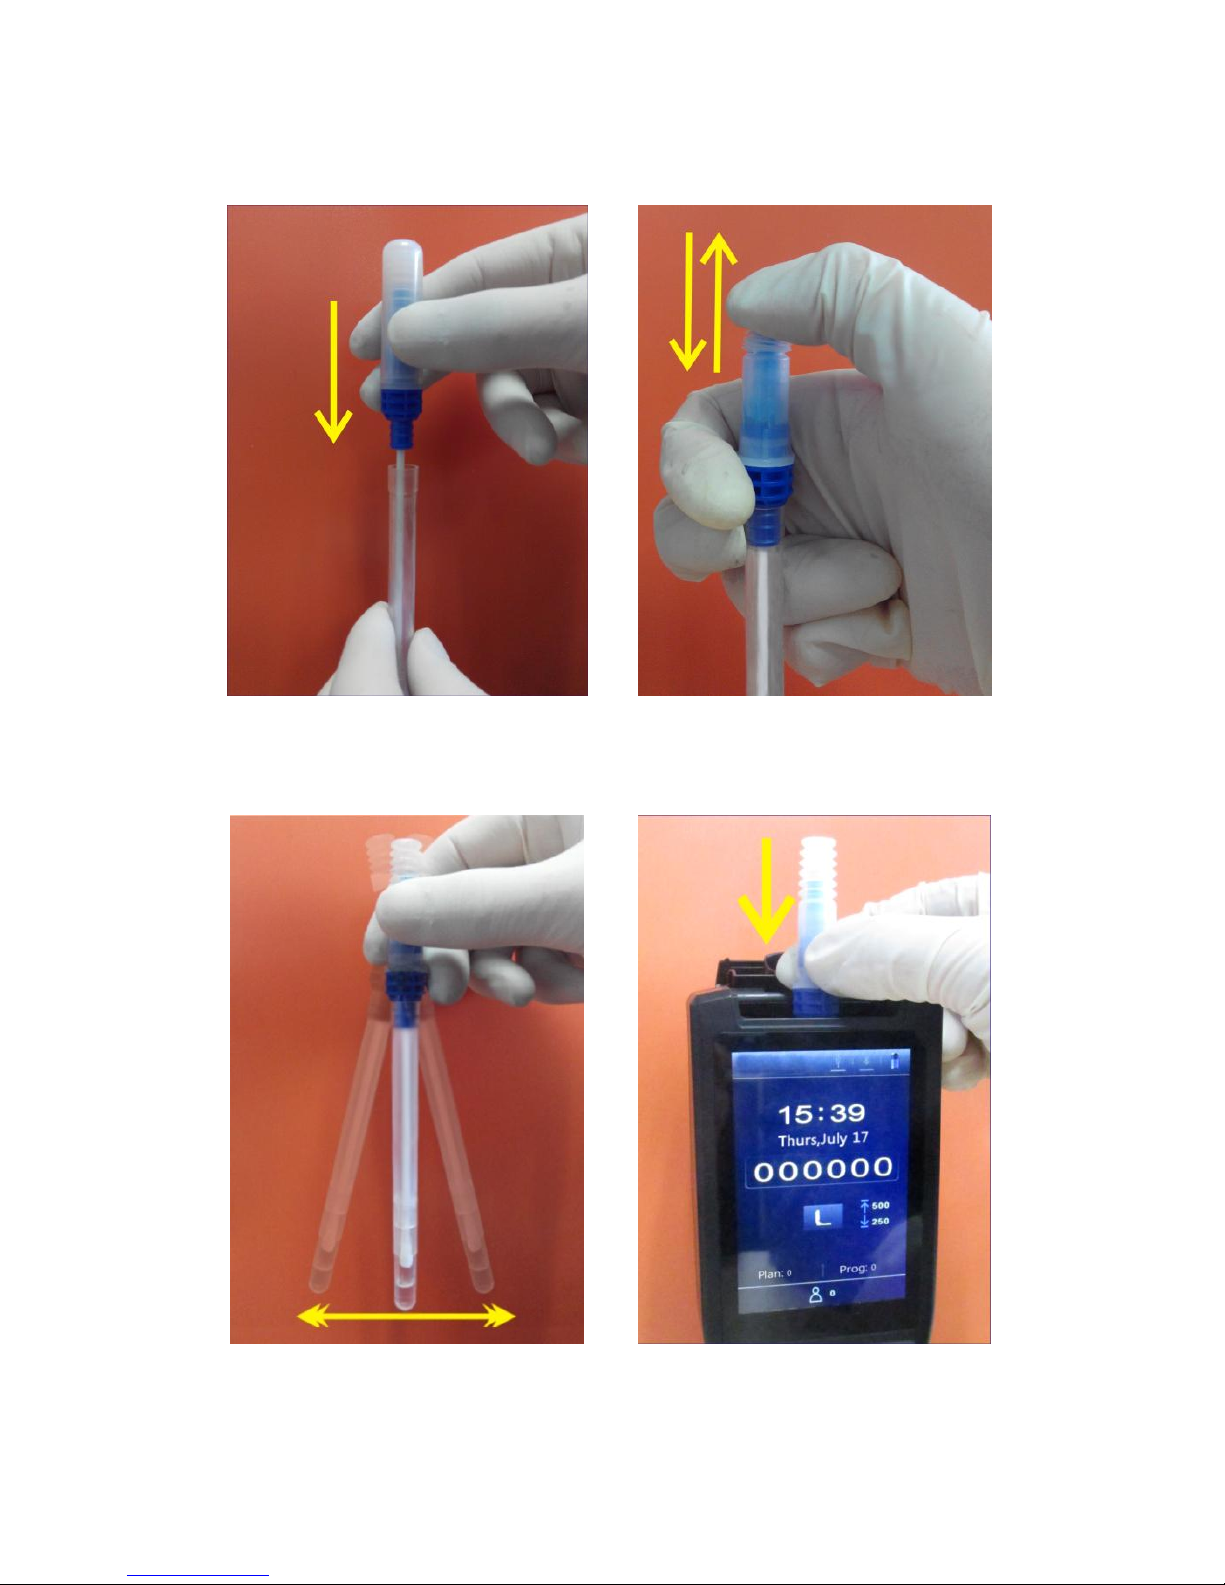
10
Fig1.3-3 Installation
Fig1.3-4 Injection
Fig1.3-5 Mixing
Fig1.3-6 Insertion

11
Warning:
a. The swab tip shall not contact any other object surfaces, in
order to avoid the test result from being affected;
b. Let the internal reagent fully reacts with the sample inside
the swab, and then insert the ATP Quickswab into the test
chamber and complete the test within 60s.
1.6.3 ATP Quickswab Storage
1. The ATP Quickswab test tube shall be stored under -10℃ to
-20℃, with shelf life of 12 months.
2. Direct sunshine shall be avoided. Please maintain the ATP
Quickswab with aluminized foil bag for storage. Do not use the
reagent beyond the warranty period.
1.6.4 ATP Quickswab Safety
1. The internal reagent of ATP Quickswab is diluted and can be
safely used for detection in food processing industry.
2. If standard lab operation procedures are strictly followed, the
compositions of ATP Quickswab will not be harmful for human
health. The internal reagent contains 0.05% w/v of Sodium azide
to exhibit its preservative effect. Please dilute the waste solution
with large amount of water before disposal.
Warning: In case the internal reagent of ATP Quickswab into
eyes or onto skin, please flush eyes or skin with plenty of water.
The material safety data sheet (MSDS) can be provided in
demand.

12
2. Basic Operation Instructions of
Detector
2.1 Structural Diagrams of Detector
The structural diagrams of Detector are as shown in figure 2.1-1/2.
Fig 2.1-1 Detector structural diagram
1.Test chamber
2. Screen
3. Keyboard
4. Top cover
5. Hang rope hole
6. USB interface
13
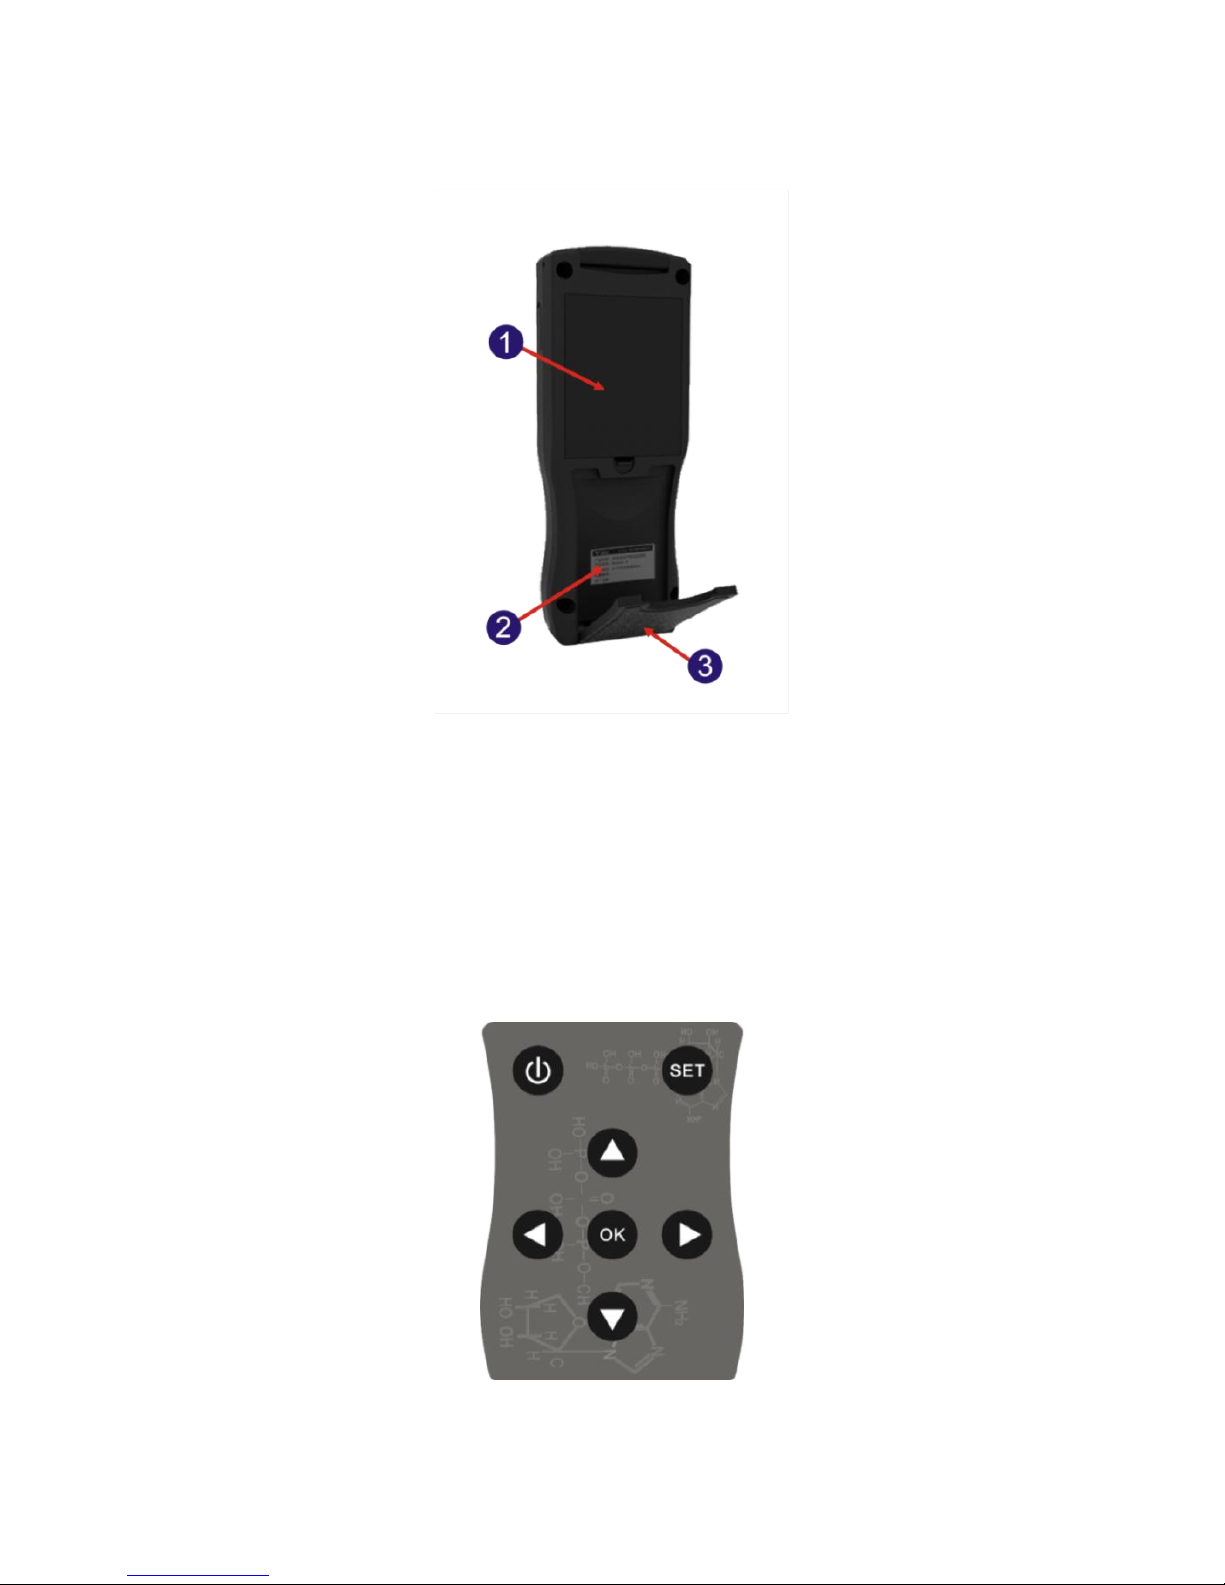
Fig 2.1-2 Detector structural diagram
1.Battery compartment
2. Label
3. Back scaffold
2.2 Function of Keys
The keyboard of detector is as shown in figure 2.2. The
corresponding key functions are listed in table 1.
Fig 2.2 Detector keyboard
 Loading...