

Page 1

PC-EFTPOS
i5100
Merchant
Operating
Guide
Page 2

PHONE NUMBERS.
THE FOLLOWING HELP DESK’S AND AUTHORISATION CENTRE’S ARE AVAILABLE TO
YOU 24 HOURS A DAY, 7 DAYS A WEEK.
BANKSA ELECTRONIC BANKING SERVICE CENTRE
Service and Sales Support Help Desk (including stationery orders) 1300 650 977
AUTHORISATIONS - FOR FALL BACK PURPOSES ONLY
Cardlink Authorisation Centre (credit cards only) 1300 301 831
EFTPOS Help Desk (debit cards only) 1300 650 977
American Express Authorisations 1300 363 614
JCB Authorisations 1300 363 614
Diners Club Authorisations 1800 331 112
THE FOLLOWING HELP DESK IS AVAILABLE TO YOU MONDAY TO FRIDAY 8.30AM TO
10.00PM (AEST) AND SATURDAY TO SUNDAY 10.00AM TO 3.00PM (AEST).
PC-EFTPOS HELP DESK
For General PC-EFTPOS Enquiries (02) 9998 9800
MERCHANT DETAILS.
Please complete the details below for your merchant facility.
Trading name:
Merchant number:
Terminal number(s):
Page 3

PC-EF TP OS i5100 M ERCH ANT O PERATING GUI DE
1
1.0 Introduction ............................ 3
1.1 Merchant Responsibility for
Equipment and Materials
Provided .................................. 3
1.2 Cancellation of Facility .............. 4
1.3 Damaged, Lost or Stolen
Equipment ............................... 4
1.4 Merchant Receipts ................... 4
1.5 EFTPOS Stationery ................... 4
2.0 Getting Started ....................... 5
2.1 PC-EFTPOS i5100 Terminal ....... 5
2.2 Keypad Layout ......................... 6
2.3 Connecting the PC-EFTPOS
i5100 Terminal ......................... 7
2.4 Communications ...................... 9
2.5 Terminal Configuration ............ 11
2.6 Printer and Paper
Load Function ........................ 12
3.0 Passwords ............................. 13
3.1 Refund Password ................... 13
3.2 Settlement Password ............. 13
3.3 Void Password........................ 13
4.0 Procedures ............................ 14
4.1 Inserting a Chip Card .............. 14
4.2 Swiping a Magnetic
Stripe Card ............................ 15
4.3 Damaged Cards ..................... 15
4.4 PIN Entry ................................ 16
4.5 Operating Training Mode ......... 16
4.6 Switching Between
Standalone Lite Mode
and Integrated Mode .............. 19
4.7 Store and Forward
Processing ............................. 21
5.0 Transaction Procedures ......... 22
5.1 How to Process a Purchase .... 22
5.2 How to Process a Purchase
with Cash Transaction ............ 25
5.3 How to Process a Cash Only
Transaction ............................ 27
5.4 How to Process a Refund ........ 29
5.5 How to Void a Transaction ...... 31
5.6 How to Process a
Sale with Tip ........................... 33
5.7 How to Process a
Tip Adjustment ....................... 36
5.8 How to Process a
Mail/Telephone
Order/e-Commerce
Transaction ............................ 39
5.9 How to Process a
Pre-Authorisation.................... 41
5.10 How to Process a
Pre-Authorisation Enquiry ........ 43
5.11 How to Process
a Completion ......................... 44
6.0 Reporting Functions .............. 48
6.1 Terminal Settlement ............... 48
6.2 How to Print a Pre-Settlement
Report ................................... 50
6.3 How to Reprint Last
Settlement ............................. 52
CONTENTS.
Page 4

PC-EF TP OS i5100 M ERCH ANT O PERATING GUI DE
2
7.0 Fall Back Sales Procedures ... 54
7.1 Electronic Fall Back ................ 54
7.2 Manual Fall Back .................... 56
8.0 Standalone Lite Mode ............ 57
8.1 Configuring Standalone
Lite Mode .............................. 57
8.2 Switching Between
Standalone Lite Mode
and Integrated Mode .............. 59
8.3 Standalone Lite
Function Menu ....................... 59
8.4 Terminal Logon using
Standalone Lite Mode ............ 60
8.5 Purchase using Standalone
Lite Mode .............................. 61
8.6 Cash Only using
Standalone Lite Mode ............ 62
8.7 Refund using Standalone
Lite Mode .............................. 64
8.8 Terminal Settlement using
Standalone Lite Mode ............ 65
8.9 Print a Pre-Settlement
Report using Standalone
Lite Mode .............................. 66
8.10 Print a Last Settlement
Report using Standalone
Lite Mode .............................. 66
8.11 Reprint the Last Transaction
using Standalone
Lite Mode .............................. 67
8.12 Print a Shift Report
using Standalone
Lite Mode .............................. 67
9.0 Contactless Payments .......... 67
9.1 Contactless Payments ............ 68
9.2 Getting Started ...................... 69
9.3 Transation Procedures ............ 75
10.0 Minimising Fraud ................... 79
10.1 CCV Security Codes ............... 79
11.0 Trouble Shooting ................... 81
11.1 Hardware Faults ..................... 81
11.2 Response Codes .................... 82
12.0 Glossary Of Common Terms ... 87
Contents (continued)
Page 5

PC-EF TP OS i5100 M ERCH ANT O PERATING GUI DE
3
INTRODUCTION
1.0 INTRODUCTION.
The PC-EFTPOS i5100 terminal enables online transactions to be processed for
Debit Cards (Savings and Cheque accounts), Credit Cards (Visa® and MasterCard®)
and Charge Cards (American Express®, Diners Club and JCB). To accept Charge Card
transactions please contact the Charge Card provider.
The features of the PC-EFTPOS i5100 terminal include:
Process Purchases
Process Purchases with Cash Out for Debit Cards
Process Refunds
Process Voids
Process Mail/Telephone Order Transactions (MOTO) and eCommerce (ECOM)
Transactions (approved merchants only)
Process Cash Out Transactions for Debit Cards
Process Pre-Authorisation and Completion Transactions (approved merchants only)
Process Tips (approved merchants only)
Training Mode supported
This PC-EFTPOS i5100 Merchant Operating Guide forms part of your Agreement with
the Bank.
1.1 Merchant Responsibility for Equipment and Materials Provided.
Imprinters, terminals, any other hardware or equipment and any unused stationery
and promotional materials supplied by the Bank, remain the property of the Bank.
• You must not sell, assign or in any way encumber them.
• You shall not part with possession of them to a third party or give access to a third
par ty.
• You must ensure that the terminals are covered by your business or contents
insurance.
Terminals must not be relocated without prior authorisation.
Terminals must be located where customers can use the pinpad without the risk of
other people seeing them key in their PIN.
* American Express® is a registered trademark of American Express Company.
* MasterCard
®
and the MasterCard Brand Mark are registered trademarks of MasterCard International Incorporated.
* Visa
®
is a registered trademark of Visa Worldwide PTe Limited.
Page 6

PC-EF TP OS i5100 M ERCH ANT O PERATING GUI DE
4
INTRODUCTION
1.2 Cancellation of Facility.
If your merchant facility is cancelled for any reason, this equipment and materials
must be returned to us. To make arrangements for return call the EFTPOS Helpdesk
on 1300 650 977. You must ensure that all equipment and materials are available to
be returned within five business days of our request.
Fees and charges will continue to be incurred until the equipment is returned to the
bank as instructed.
1.3 Damaged, Lost or Stolen Equipment.
You are responsible for your equipment. If equipment is damaged, lost or stolen, you
will be charged for their replacement.
1.4 Merchant Receipts.
You must retain all merchant receipts printed, in a secure manner for reconciliation
and in case of terminal failure.
You must provide the customer with a receipt unless he or she requests otherwise.
1.5 EFTPOS Stationery.
All items of stationery relating to fall back procedures can be ordered by phone or
online on the internet.
Please place your orders before running your stocks too low. Orders will be delivered
to you within five business days.
There are no additional fees for stationery supplies.
Ordering Stationery Online
Log on to http://www.banksa.com.au/business/payment-solutions/ to order
stationery online. Select ‘Order Merchant Stationery’ from the menu on the right of
the page, which will direct you to the stationery order page on the BankSA website
and enter the following details:
• Merchant Number (MID)
• Trading Address Postcode
then:
• Select your stationery items and quantities and follow the prompts.
Ordering Stationery By Phone
Call the EFTPOS Helpdesk on 1300 650 977 (available 24/7). Follow the prompts
and use your phone keypad to enter the following details:
• Select your stationery items and quantities
then:
• Merchant Number (MID)
• Trading Address Postcode
Page 7

PC-EF TP OS i5100 M ERCH ANT O PERATING GUI DE
5
GETTING STARTED
2.0 GETTING STARTED.
2.1 PC-EFTPOS i5100 Terminal.
The PC-EFTPOS i5100 terminal is a complete unit that operates as a pinpad for the
customer and has an internal thermal printer for fast quiet printing. The PC-EFTPOS
i5100 kit includes:
an i5100 terminal
a detachable power supply and cable
a telephone cable
an RS232 serial cable (DB9 to RJ12)
Page 8

PC-EF TP OS i5100 M ERCH ANT O PERATING GUI DE
6
GETTING STARTED
2.2 Keypad Layout.
Account Keys: The CHQ (Cheque), SAV (Savings) and CR (Credit) keys (also
referred to as Soft Function Keys) allow the user to access the
particular account type required when prompted. These keys
are also used to access the terminal function menus.
Paper Feed: The FEED key performs a 20mm paper feed.
Cancel Key: The CANCEL key is used to cancel the current function and
return the terminal to the idle state.
Clear Key: The CLEAR key is used to correct any invalid data entered. It is
also used to cycle backwards through the transaction steps if
an error is made.
Enter Key: The ENTER key is used to confirm data entered or displayed,
and to cycle forwards through the menus.
Function Key: The FUNCTION key is used to access the terminal functions.
3
def
6
mno
9
wxy
2
abc
5
jkl
8
tuv
1
Q Z
4
ghi
7
pqr
Cancel
Clear
E
N
T
E
R
0
Func
Feed
CHQSAV
CR
CHQ/SAV
(Soft Function Keys)
Function Key
Paper Feed Key
CREDIT
(Soft Function Key)
Cancel Key
Clear Key
Enter Key
Page 9

PC-EF TP OS i5100 M ERCH ANT O PERATING GUI DE
7
GETTING STARTED
2.3 Connecting the PC-EFTPOS i5100 Terminal.
The PC-EFTPOS i5100 terminal is connected to the PC using an RS232 serial cable
(DB9 to RJ12) connection.
v
Plug
It
Power Socket
Telephone Line
(RJ12)
COM Port 1
(RJ12)
COM Port 2
(RJ12)
Ethernet Socket
(RJ45)
Cable Management Clip
Page 10

PC-EF TP OS i5100 M ERCH ANT O PERATING GUI DE
8
GETTING STARTED
To connect the terminal:
1. Place the terminal on a clear, flat surface close to a mains power outlet and
telephone socket. The connectors are located underneath the terminal as shown.
2. Plug the RJ12 phone connector on the curly end of the Y powered curly cord into
the socket marked
.
3. Plug the opposite end of the RJ12 curly cord into the telephone cable adaptor,
which inserts into the telephone wall socket (Note: This step is only required
if the internal modem is being used for primary or secondary communications.
Refer section 2.4, Communications for more information).
4. Plug the DC connector on the curly end of the Y powered curly cord into the
terminals power socket.
5. Plug the opposite ends DC connector into the terminals power supply.
6. Plug the RJ12 end of the serial cable into the socket on the base of the terminal
marked RS232-1 (or COM1).
7. Plug the other end of the serial cable into a COM port on the back of the PC and
secure it in place.
8. Plug the power supply into a mains power outlet.
Y Powered Curly Cord
CAB321359b
Power Cord
CAB0092
Power Supply
ALI0142
Page 11

PC-EF TP OS i5100 M ERCH ANT O PERATING GUI DE
9
GETTING STARTED
2.4 Communications.
The PC-EFTPOS i5100 terminal is capable of using several different methods of
communication with the Bank. This will depend on the set up of your site and
your preference. The PC-EFTPOS i5100 terminal supports a primary method of
communication as well as secondary communication methods.
The terminal can communicate via:
• Dial up phone line (provided by your telephone service provider), using the internal
modem or a P68 modem (provided by the Bank)
• Argent ISDN (provided by Telstra)
• Internet Protocol (IP) Gateway (provided by PC-EFTPOS)
Connection to each communication method varies.
2.4.1 Dial up Connection.
The PC-EFTPOS i5100, using a dial up connection, requires the use of a dial up
phone line, supplied by you and the use of the internal modem (single terminal sites)
or the installation of a P68 modem (multiple terminal sites). The P68 modem (where
required) is supplied by the Bank and is installed by you or your POS vendor.
The P68 modem kit includes:
• the P68 modem
• a detachable power supply and cable
• a Y powered curly cord (power and telephone cable)
• a telephone cable adaptor
• a serial cable (DB9 to RJ12)
To connect the P68 modem:
1. Place the modem on a clear, flat surface close to a mains power outlet and
telephone socket. The connectors are located underneath the modem as shown.
2. Plug the RJ12 phone connector on the curly end of the Y powered curly cord into
the socket marked
.
3. Plug the opposite end of the RJ12 curly cord into the telephone cable adaptor,
which inserts into the telephone wall socket.
4. Plug the DC connector on the curly end of the Y powered curly cord into the
modems power socket.
5. Plug the opposite ends DC connector into the modem power supply.
6. Plug the RJ12 end of the serial cable into the socket on the base of the modem
marked RS232-1.
7. Plug the other end of the serial cable into a COM port on the back of the PC and
secure it in place.
8. Plug the power supply into a mains power outlet.
Page 12

PC-EF TP OS i5100 M ERCH ANT O PERATING GUI DE
10
GETTING STARTED
To connect the internal modem:
1. Plug the RJ12 phone connector on the curly end of the Y powered curly cord into
the socket marked
, if it is not already.
2. Plug the opposite end of the RJ12 curly cord into the telephone cable adaptor,
which inserts into the telephone wall socket.
3. Refer to section 8.1 for internal modem configuration.
2.4.2 Argent ISDN Connection.
The Telstra Argent ISDN connection is obtained by applying for this service direct
from Telstra.
The PC-EFTPOS i5100, using a Telstra Argent ISDN connection requires the
installation of a Telstra On Ramp and Telstra Argent Terminal Adaptor (ATA). This is
supplied and installed by Telstra.
Other equipment required:
• Serial cable (DB9 to DB9/DB25) (Note: the required cable is dependant on the
Argent ATA that has been installed and is either supplied by Telstra or you)
Base of i5100 terminal
RS232-1 RS232-2
Power
Page 13

PC-EF TP OS i5100 M ERCH ANT O PERATING GUI DE
11
GETTING STARTED
To connect the Telstra Argent ISDN service:
1. Plug the serial cable (DB9 or DB25 end) into the serial port on the Argent ATA and
secure it in place.
2. Plug the other end of the serial cable into a COM port on the back of the PC and
secure it in place.
3. If the connections are correct, the Argent ATA will display a steady dot on the
display panel, after a short while.
Telstra
On Ramp
Argent
Terminal
Adapter
Serial Port Com Port
Rear of PC
Serial Cable
(DB9 to
DB9/25)
RS232
Cable
2.4.3 Internet Protocol (IP) Gateway Connection.
The IP Gateway connection is obtained by applying for this service direct from
PC-EFTPOS.
The PC-EFTPOS i5100, using the IP Gateway, requires the use of an internet
connection, supplied by you; and the PC-EFTPOS IP Gateway software package,
supplied by PC-EFTPOS. It does not require any additional cables or equipment.
The software is installed by you, your POS vendor or PC-EFTPOS.
2.5 Terminal Configuration.
Once the PC-EFTPOS i5100 terminal is connected, the Merchant ID and Terminal ID
will need to be entered into the PC-EFTPOS EFT Client.
This is done via the Control Panel within PC-EFTPOS. Refer to your POS vendor or
PC-EFTPOS for assistance.
COM Port COM Port
Page 14

PC-EF TP OS i5100 M ERCH ANT O PERATING GUI DE
12
GETTING STARTED
2.6 Printer and Paper Load Function.
The PC-EFTPOS i5100 terminal has an in-built thermal printer. To load paper:
(a) Ensure the terminal is powered on
(b) Open the paper compartment cover by pressing the button located towards the
top of the terminal, above the metal blade, as shown below.
(c) Position the paper roll with the end of the roll protruding from underneath the roll.
(d) Pull the paper out slightly and close the cover.
(e) Test the operation of the printer by pressing the paper FEED button.
Paper
compartment
button
Press button in
this direction
Metal blade to
tear off paper
Paper
compartment
cover
Correct paper
position
Page 15

PC-EF TP OS i5100 M ERCH ANT O PERATING GUI DE
13
PASSWORDS AND CODES
3.0 PASSWORDS.
The following information describes the passwords and codes used in this guide.
Ensure that your passwords are changed regularly to prevent unauthorised use.
3.1 Refund Password.
This password is only required when the terminal is operating in standalone lite mode.
This password is a security measure to ensure only those personnel who are authorised
by you (as the authorised signatory) can process refunds through your terminal.
You are responsible for protecting this password against unauthorised use. Do not
key in your password in a manner that enables customers or unauthorised staff to
observe the number.
3.2 Settlement Password.
This password is only required when the terminal is operating in standalone lite mode.
This password is a general security password that allows you to restrict access to
the SETTLEMENT, PRE-SETTLEMENT and LAST SETTLEMENT functions. Automatic
settlement does not require a password.
Access to these settlement functions can be limited at your discretion.
3.3 Void Password.
This password is a general security password that allows you to restrict access to
the VOID function. Access to the void function can be limited at your discretion.
Refund, Settlement and Void passwords will have a default setting (unless
nominated by you at the time of application) when you receive your terminal(s).
You (as the authorised signatory) will need to contact the EFTPOS Helpdesk to
change your passwords on 1300 650 977.
Page 16

PC-EF TP OS i5100 M ERCH ANT O PERATING GUI DE
14
PROCEDURES
4.0 PROCEDURES.
4.1 Inserting a Chip Card.
When your terminal is enabled for chip card acceptance, chip cards are inserted into
the terminal and left there for the duration of the transaction.
The chip card reader is located at the bottom of the terminal below the keypad.
1. Check the terminal is displaying the message PRESENT CARD.
2. Hold the card face-up with the chip towards the terminal.
3. Insert the card as far as it will go into the reader and continue processing the
transaction.
4. Leave the card in the terminal until prompted to remove it.
5. If a chip card is swiped in error, the terminal will display the message CHIP CARD
INSERT CARD.
6. If a chip card is faulty or cannot be read, the terminal will display the message
CHIP ERROR REMOVE CARD. Retry inserting the card. If the chip card still cannot
be read, the terminal may display the message CHIP ERROR USE MAG STRIPE. If
this occurs, swipe the card.
Page 17

PC-EF TP OS i5100 M ERCH ANT O PERATING GUI DE
15
PROCEDURES
4.2 Swiping a Magnetic Stripe Card.
The magnetic stripe reader is located on the right hand side of the terminal.
1. Check the terminal is displaying the message PRESENT CARD.
2. Hold the card upside-down with the magnetic stripe facing inwards.
3. Swipe the card smoothly through the card reader, in either direction. Ensure the
whole magnetic stripe is swiped through the reader.
4. If there is no response from the terminal, or a CARD READ ERROR message is
displayed, swipe the card again. You might need to swipe faster or slower.
4.3 Damaged Cards.
If a credit card will not read, when inserted in the chip card reader or when swiped,
while performing a credit account transaction, the manual key process should not be
used.
Warning: Where the manual key process has been used to perform a credit card
transaction (contrary to the MOTO or ECOM instructions outlined in section 5.8,
How to Process a MOTO/ECOM Transaction), and that transaction is subsequently
disputed by the cardholder, the merchant will be liable for the amount of the
transaction.
A manual fall back voucher can be used to fulfil the sale as per the instructions
outlined in section 7.2, Manual Fall Back.
The option of completing a manual voucher ONLY applies to credit account
transactions where the credit card will not read.
In the following situations, the cardholder must be referred to their card issuer and
Page 18

PC-EF TP OS i5100 M ERCH ANT O PERATING GUI DE
16
PROCEDURES
an alternative form of payment requested:
- Credit account transaction DECLINED
- Savings/Cheque account transaction DECLINED
- Credit/Debit card will NOT READ when performing a Savings/Cheque account
transaction.
Note: The non compliance to the above procedure will be considered a serious breach
of the merchant agreement and may result in termination of your merchant facility.
4.4 PIN Entry.
There are three different PIN request messages that can be displayed on the terminal
when a transaction is being processed. The display shown will depend on the card
used.
The three PIN request messages are:
1. PIN AND ENTER for mandatory PIN entry
2. PIN OR ENTER for optional PIN entry
3. PRESS ENTER for no PIN entry
As the cardholder enters their PIN on the terminal, asterisk (*) characters will be
displayed for each digit entered. A minimum of four and maximum of twelve digits can
be entered. PIN entry is finalised by pressing the ENTER key on the terminal.
The CANCEL key on the terminal cannot be pressed to exit/cancel the transaction.
The transaction can be cancelled by pressing the CANCEL key on the POS if required.
If an incorrect digit is entered during PIN entry, it can be cleared by pressing the
CLEAR key on the terminal.
PIN entry will time out after sixty seconds if no keys are pressed.
For offline PIN on chip cards, the terminal will check the PIN attempt counter and if
there is only one attempt remaining, a warning will be displayed.
4.5 Operating Training Mode.
Training mode helps you train new staff members in the operation of the terminal.
Training mode can be initiated at any time during the day, from your POS, whenever
the terminal is in a READY state, without affecting live value totals. During training
mode the terminal will not connect to the host but will perform all transactions
offline. Transactions performed in training mode will not affect your settlement total.
Please Note:
• Training mode is not supported when the terminal is in standalone lite mode.
• The terminal will only display **TRAINING MODE** once a transaction is
initiated.
Page 19

PC-EF TP OS i5100 M ERCH ANT O PERATING GUI DE
17
PROCEDURES
• The terminal will NOT revert back to live mode by itself.
• Training mode can only be enabled when there are no reversals or advices
pending.
• In training mode, whole dollar amounts will generate an approved transaction.
Other amounts will result in a ‘response code’ corresponding to the number of
cents. For example an amount of $2.01 or $0.01 will result in a response code of
01 Declined, Contact Bank.
To start and operate training mode:
TERMINAL DISPLAY ACTION
READY
LOGO
hh:mm dd/mm/yy
Set the training mode flag on the POS and
initiate a transaction.
PURCHASE $X.XX
PRESENT CARD
**TRAINING MODE**
Insert the customer’s chip card into the chip
card reader.
Or:
Swipe the customer’s card through the card
reader.
Process transactions as per procedures in section 5.0. Receipts will display
**TRAINING ONLY** NOT A VALID TRANSACTION on them.
Page 20

PC-EF TP OS i5100 M ERCH ANT O PERATING GUI DE
18
PROCEDURES
Receipt in Training Mode
MERCHANT COPY
**TRAINING ONLY**
NOT A VALID
TRANSACTION
MasterCard
………….1234 (C)
ACCT TYPE CREDIT
TRANS TYPE PURCHASE
TERMINAL ID 28010101
POS REF 123456789876
INV/ROC NO 000473
DATE/TIME 22 JUN 09 16:14
AID A0000000041010
TC AF6702D8211E2290
AMOUNT $2.00
TOTAL AUD $2.00
AUTH 837514
APPROVED 00
CARDHOLDER SIGN HERE
X
CUSTOMER COPY
**TRAINING ONLY**
NOT A VALID
TRANSACTION
MasterCard
………….1234 (C)
ACCT TYPE CREDIT
TRANS TYPE PURCHASE
TERMINAL ID 28010101
POS REF 123456789876
INV/ROC NO 000473
DATE/TIME 22 JUN 09 16:14
AID A0000000041010
TC AF6702D8211E2290
AMOUNT $2.00
TOTAL AUD $2.00
AUTH 837514
APPROVED 00
Page 21

PC-EF TP OS i5100 M ERCH ANT O PERATING GUI DE
19
PROCEDURES
To exit training mode:
TERMINAL DISPLAY ACTION
READY
LOGO
hh:mm dd/mm/yy
Remove the training mode flag on the POS
and the terminal is now ready to process live
transactions again.
At the end of training mode all transactions will be reset and previous values are
restored to batch and ROC (Record of Charge) number.
4.6 Switching Between Standalone Lite Mode and Integrated Mode.
The terminal can be switched between standalone lite mode and integrated mode.
Standalone lite mode means that the terminal can operate independently of the POS.
Integrated mode means that the terminal operates with the POS.
To enter standalone lite mode:
TERMINAL DISPLAY ACTION
READY
LOGO
hh:mm dd/mm/yy
Press the FUNC key.
FUNCTION:
Key in 11112222 and press ENTER.
SWITCH TO STANDALONE
MODE?
[ENTER] = YES
[CLEAR] = NO
Press the ENTER key for standalone lite mode.
LOGO
PURC CASH RFND
The standalone lite mode idle screen is
displayed.
Note: Please refer to section 8.0, for further information about configuring and
using standalone lite mode.
Page 22

PC-EF TP OS i5100 M ERCH ANT O PERATING GUI DE
20
PROCEDURES
To exit standalone lite mode:
TERMINAL DISPLAY ACTION
LOGO
PURC CASH RFND
Press the FUNC key.
FUNCTION:
Key in 11112222 and press ENTER.
SWITCH TO INTEGRATED
MODE?
[ENTER] = YES
[CLEAR] = NO
Press the ENTER key for integrated mode.
READY
LOGO
hh:mm dd/mm/yy
The integrated mode idle screen is displayed.
Note: Please refer to section 8.0, for further information about configuring and
using standalone lite mode.
Page 23

PC-EF TP OS i5100 M ERCH ANT O PERATING GUI DE
21
PROCEDURES
4.7 Store and Forward Processing.
Transactions which are unable to be processed online at the time of the transaction
origination will be stored and forwarded later. These transactions will be stored in
the “SAF” until they can be processed.
TERMINAL DISPLAY ACTION
READY *
LOGO
hh:mm dd/mm/yy
An ‘
*
’ will be displayed in the top right hand
corner if SAF transactions are present.
SENDING SAF
TRANSACTIONS
This message will be displayed when the terminal
is sending SAF transactions.
Note: The terminal will attempt to process stored transactions in the following
instances:
Every 90 seconds when idle
After the next successful online transaction
After the terminal is logged on
Before settlement is processed
Page 24

PC-EF TP OS i5100 M ERCH ANT O PERATING GUI DE
22
TRANSACTION PROCEDURES
5.0 TRANSACTION PROCEDURES.
5.1 How to Process a Purchase.
TERMINAL DISPLAY PROCEDURE
READY
LOGO
hh:mm dd/mm/yy
Initiate a purchase transaction from the POS.
PURCHASE $X.XX
PRESENT CARD
If presented with a chip card, insert the customer’s
card into the chip card reader. Refer to Inserting a
Chip Card in section 4.1.
OR:
If presented with a magnetic stripe card, swipe the
customer’s card through the card reader. Refer to
Swiping a Magnetic Stripe Card in section 4.2.
PURCHASE $X.XX
SELECT ACCOUNT
CHQ SAV CR
Have the cardholder select their account type.
Note: The terminal will only display the available
accounts for the card entered.
CREDIT $X.XX
PIN AND/OR ENTER
Where prompted, have the cardholder key
in their PIN and press ENTER, or just press
ENTER
1
.
Refer to section 4.4, for the appropriate PIN entry
prompt that will be displayed.
DEBIT/CREDIT SALE
PROCESSING
The terminal is connecting to the bank and
processing the transaction
2
.
If a credit transaction is selected, the issuer’s
name (eg: MASTERCARD, VISA, AMEX) is
displayed. If a debit transaction (savings or
cheque) is selected, DEBIT is displayed.
REMOVE CARD
If a chip card was inserted, remove the card
from the reader.
Page 25

PC-EF TP OS i5100 M ERCH ANT O PERATING GUI DE
23
TRANSACTION PROCEDURES
VERIFY SIGNATURE
CORRECT?
If signature is required, remove the card from
the terminal: Have the customer sign the
receipt. If the signature matches the signature
on the card, press YES on the POS. Otherwise
press NO.
DEBIT/CREDIT SALE
APPROVED
This message will be displayed if the transaction
is approved.
Note:
1. The entering of PIN on credit is optional. Allow the cardholder to enter their PIN at
the terminal prompt. If the cardholder bypasses PIN entry a signature will need to
be obtained to authorise the transaction. The entering of PIN on debit is mandatory.
2. If the terminal reads ‘ENTER AUTH ID’, please refer to section 7.0 (where available).
Before completing the sale, check that the transaction was approved. Hand the
customer their copy of the transaction record and their card. If the transaction is
declined, the terminal will display an error message giving the reason. An explanation
of the error code is available in section 10.2, Response Codes.
Page 26

PC-EF TP OS i5100 M ERCH ANT O PERATING GUI DE
24
TRANSACTION PROCEDURES
Approved Purchase Receipt
(signature required)
Approved Purchase Receipt
(approved with PIN, no signature
required)
MERCHANT COPY
BANKSA TEST LAB
97 KING WILLIAM STREET
ADELAIDE SA 5000
MasterCard
................1111(C)
ACCT TYPE CREDIT
TRANS TYPE PURCHASE
TERMINAL ID 28010101
POS REF 123456789876
INV/ROC NO 000616
BANK REF 000123
DATE/TIME 23 JUN 09 16:56
AID A0000000041010
TC 244F234AC7FD7547
AMOUNT $28.00
TOTAL AUD $........
AUTH 123456
APPROVED 00
CARDHOLDER SIGN HERE
X
CUSTOMER COPY
BANKSA TEST LAB
97 KING WILLIAM STREET
ADELAIDE SA 5000
MasterCard
................1111(C)
ACCT TYPE CREDIT
TRANS TYPE PURCHASE
TERMINAL ID 28010101
POS REF 123456789876
INV/ROC NO 000616
BANK REF 000123
DATE/TIME 23 JUN 09 16:56
AID A0000000041010
TC 244F234AC7FD7547
AMOUNT $28.00
TOTAL AUD $........
AUTH 123456
APPROVED 00
Remember to always check the
receipt to verify if a transaction has
been approved.
Page 27

PC-EF TP OS i5100 M ERCH ANT O PERATING GUI DE
25
TRANSACTION PROCEDURES
5.2 How to Process a Purchase with Cash Transaction.
If ‘Cash’ is enabled on the terminal, customers can be given cash out. Cash is
available from cheque and savings accounts only.
TERMINAL DISPLAY PROCEDURE
READY
LOGO
hh:mm dd/mm/yy
Initiate a purchase with cash transaction from
the POS.
PUR/CASH $X.XX
PRESENT CARD
If presented with a chip card, insert the
customer’s card into the chip card reader. Refer to
Inserting a Chip Card in section 4.1.
OR:
If presented with a magnetic stripe card, swipe the
customer’s card through the card reader. Refer to
Swiping a Magnetic Stripe Card in section 4.2.
PUR/CASH $X.XX
SELECT ACCOUNT
CHQ SAV
Have the cardholder select their account type.
Note: Credit is not an option.
CHEQUE $X.XX
PIN AND ENTER
Have the cardholder key in their PIN and press
ENTER.
DEBIT SALE
PROCESSING
The terminal is connecting to the bank and
processing the transaction.
REMOVE CARD
If a chip card was inserted, remove the card
from the reader.
DEBIT SALE
APPROVED
This message will be displayed if the transaction
is approved.
Before completing the sale, check that the transaction was approved. Hand the
customer their copy of the transaction record and their card. If the transaction
is declined, the terminal will display an error message giving the reason. An
explanation of the error code is available in section 10.2, Response Codes.
Page 28

PC-EF TP OS i5100 M ERCH ANT O PERATING GUI DE
26
TRANSACTION PROCEDURES
Approved Purchase with Cash Receipt
CUSTOMER COPY
BANKSA TEST LAB
97 KING WILLIAM STREET
ADELAIDE SA 5000
DEBIT
123456....1234 (C)
ACCT TYPE CHEQUE
TRANS TYPE PUR/CASH
TERMINAL ID 28010101
POS REF 123456789876
INV/ROC NO 000520
BANK REF 000123
DATE/TIME 23 JUN 09 10:45
AMOUNT $13.00
CASH OUT $20.00
TOTAL AUD $33.00
AUTH ID 146557
APPROVED 00
Remember to always check the
receipt to verify if a transaction has
been approved.
Page 29

PC-EF TP OS i5100 M ERCH ANT O PERATING GUI DE
27
TRANSACTION PROCEDURES
5.3 How to Process a Cash Only Transaction.
If ‘Cash’ is enabled on the terminal, customers can be given cash out. Cash is
available from cheque and savings accounts only.
TERMINAL DISPLAY PROCEDURE
READY
LOGO
hh:mm dd/mm/yy
Initiate a cash out only transaction from the
POS.
CASH-OUT $X.XX
PRESENT CARD
If presented with a chip card, insert the
customer’s card into the chip card reader. Refer to
Inserting a Chip Card in section 4.1.
OR:
If presented with a magnetic stripe card, swipe the
customer’s card through the card reader. Refer to
Swiping a Magnetic Stripe Card in section 4.2.
CASH-OUT $X.XX
SELECT ACCOUNT
CHQ SAV
Have the cardholder select their account type.
Note: Credit is not an option.
CHEQUE $X.XX
PIN AND ENTER
Have the cardholder key in their PIN and press
ENTER.
DEBIT CASH
PROCESSING
The terminal is connecting to the bank and
processing the transaction.
REMOVE CARD
If a chip card was inserted, remove the card
from the reader.
DEBIT CASH
APPROVED
This message will be displayed if the transaction
is approved.
Before completing the transaction, check that the transaction was approved. Hand
the customer their copy of the transaction record and their card. If the transaction
is declined, the terminal will display an error message giving the reason. An
explanation of the error code is available in section 10.2, Response Codes.
Page 30

PC-EF TP OS i5100 M ERCH ANT O PERATING GUI DE
28
TRANSACTION PROCEDURES
Approved Cash Only Receipt
CUSTOMER COPY
BANKSA TEST LAB
97 KING WILLIAM STREET
ADELAIDE SA 5000
DEBIT
123456…234 (C)
ACCT TYPE CHEQUE
TRANS TYPE CASH-OUT
TERMINAL ID 28010101
POS REF 123456789876
INV/ROC NO 000522
BANK REF 000123
DATE/TIME 23 JUN 09 10:46
CASH OUT $20.00
TOTAL AUD $20.00
AUTH ID 146558
APPROVED 00
Remember to always check the
receipt to verify if a transaction has
been approved.
Page 31

PC-EF TP OS i5100 M ERCH ANT O PERATING GUI DE
29
TRANSACTION PROCEDURES
5.4 How to Process a Refund.
Refunds may only be processed where there was an initial valid transaction on the
same card. If a customer returns a purchase, or if an incorrect amount was charged,
process a refund as follows:
TERMINAL DISPLAY PROCEDURE
READY
LOGO
hh:mm dd/mm/yy
Initiate a refund transaction from the POS.
REFUND $X.XX
PRESENT CARD
If presented with a chip card, insert the
customer’s card into the chip card reader. Refer to
Inserting a Chip Card in section 4.1.
OR:
If presented with a magnetic stripe card, swipe the
customer’s card through the card reader. Refer to
Swiping a Magnetic Stripe Card in section 4.2.
REFUND $X.XX
SELECT ACCOUNT
CHQ SAV CR
Have the cardholder select their account type.
CREDIT $X.XX
PIN AND/OR ENTER
Where prompted, have the cardholder key
in their PIN and press ENTER, or just press
ENTER.
1
DEBIT/CREDIT RFND
PROCESSING
The terminal is connecting to the bank and
processing the transaction.
REMOVE CARD
If a chip card was inserted, remove the card
from the reader.
VERIFY SIGNATURE
CORRECT?
If signature is required: Have the customer sign
the receipt. If the signature matches the signature
on the card, press YES on the POS. Otherwise
press NO.
DEBIT/CREDIT RFND
APPROVED
This message will be displayed if the transaction
is approved.
Page 32

PC-EF TP OS i5100 M ERCH ANT O PERATING GUI DE
30
TRANSACTION PROCEDURES
Note:
1. The entering of PIN on credit is optional. Allow the cardholder to enter their PIN
at the terminal prompt. If the cardholder bypasses PIN entry a signature will
need to be obtained to authorise the transaction. A PIN on Debit is mandatory.
For a credit account, a signature may be required for a refund even when a PIN
has been entered.
Before completing the refund, check that the transaction was approved. Hand the
customer their copy of the transaction record and their card. If the transaction
is declined, the terminal will display an error message giving the reason. An
explanation of the error code is available in section 10.2, Response Codes.
Approved Refund Receipt
(signature required)
Approved Refund Receipt
(approved with PIN,
no signature required)
MERCHANT COPY
BANKSA TEST LAB
97 KING WILLIAM STREET
ADELAIDE SA 5000
MasterCard
................11234 (C)
ACCT TYPE CREDIT
TRANS TYPE REFUND
TERMINAL ID 28010101
POS REF 123456789876
INV/ROC NO 000549
BANK REF 000778
DATE/TIME 23 JUN 09 11:18
AMOUNT $201.00
TOTAL AUD $201.00
AUTH 25817
APPROVED 08
CARDHOLDER SIGN HERE
X
CUSTOMER COPY
BANKSA TEST LAB
97 KING WILLIAM STREET
ADELAIDE SA 5000
MasterCard
................11234 (C)
ACCT TYPE CREDIT
TRANS TYPE REFUND
TERMINAL ID 28010101
POS REF 123456789876
INV/ROC NO 000549
BANK REF 000778
DATE/TIME 23 JUN 09 11:18
AMOUNT $201.00
TOTAL AUD $201.00
AUTH 25817
APPROVED 00
Remember to always check the
receipt to verify if a transaction has
been approved.
Page 33

PC-EF TP OS i5100 M ERCH ANT O PERATING GUI DE
31
TRANSACTION PROCEDURES
5.5 How to Void a Transaction.
The Void function can be carried out on credit or charge cards to reverse a
transaction that has not yet settled (where available).
Note:
• Debit card and pre-authorisation transactions cannot be voided.
TERMINAL DISPLAY PROCEDURE
READY
LOGO
hh:mm dd/mm/yy
Initiate a void transaction from the POS.
ENTER ROC NO
ON POS
This message will be displayed, if the ROC (Record
of Charge) number was not entered on the POS.
Key in the ROC number of the transaction that
needs adjustment on the POS and press ACCEPT.
PASSWORD Key in the void password and press ENTER.
SCANNING BATCH
PLEASE WAIT
The terminal will search for the transaction.
VERIFY VOID
CORRECT?
The transaction details will be displayed on the
POS.
Press YES on the POS to confirm the void.
CREDIT VOID
APPROVED
This message will be displayed if the void is
approved.
Before completing the void, check that the transaction was approved. Hand the
customer their copy of the transaction record and their card. If the transaction
is declined, the terminal will display an error message giving the reason. An
explanation of the error code is available in section 10.2, Response Codes.
Page 34

PC-EF TP OS i5100 M ERCH ANT O PERATING GUI DE
32
TRANSACTION PROCEDURES
Approved Void Receipt
MERCHANT COPY
BANKSA TEST LAB
97 KING WILLIAM STREET
ADELAIDE SA 5000
MasterCard
………….1234 (C)
ACCT TYPE CREDIT
TRANS TYPE VOID REFUND
TERMINAL ID 28010101
POS REF 123456789876
INV/ROC NO 000473
BANK REF 001065
DATE/TIME 22 JUN 09 16:14
AID A0000000041010
TC AF6702D8211E2290
AMOUNT $73.00
TOTAL AUD $73.00
AUTH 837514
APPROVED 08
CARDHOLDER SIGN HERE
X
CUSTOMER COPY
BANKSA TEST LAB
97 KING WILLIAM STREET
ADELAIDE SA 5000
MasterCard
………….1234 (C)
ACCT TYPE CREDIT
TRANS TYPE VOID REFUND
TERMINAL ID 28010101
POS REF 123456789876
INV/ROC NO 000473
BANK REF 001065
DATE/TIME 22 JUN 09 16:14
AID A0000000041010
TC AF6702D8211E2290
AMOUNT $73.00
TOTAL AUD $73.00
AUTH 837514
APPROVED 08
Remember to always check the
receipt to verify if a transaction has
been approved.
Page 35

PC-EF TP OS i5100 M ERCH ANT O PERATING GUI DE
33
TRANSACTION PROCEDURES
5.6 How to Process a Sale with Tip.
This process is a sale with tip enabled. It is most commonly used by restaurants.
Note:
The Tip feature needs to be enabled on the terminal.
TERMINAL DISPLAY PROCEDURE
READY
LOGO
hh:mm dd/mm/yy
Set the enable tip flag on the POS and initiate a
transaction.
PURCHASE $X.XX
PRESENT CARD
If presented with a chip card, insert the customer’s
card into the chip card reader. Refer to Inserting a
Chip Card in section 4.1.
OR:
If presented with a magnetic stripe card, swipe the
customer’s card through the card reader. Refer to
Swiping a Magnetic Stripe Card in section 4.2.
PURCHASE $X.XX
SELECT ACCOUNT
CHQ SAV CR
Have the cardholder select their account type.
Note: The terminal will only display the available
accounts for the card entered.
Tips can only be added to transactions where
credit has been selected.
CREDIT $X.XX
PIN AND/OR ENTER
Where prompted, have the cardholder key
in their PIN and press ENTER, or just press
ENTER.
DEBIT/CREDIT SALE
PROCESSING
The terminal is connecting to the bank and
processing the transaction.
REMOVE CARD
If a chip card was inserted, remove the card
from the reader.
VERIFY SIGNATURE
CORRECT?
If signature is required, remove the card from
the terminal: Have the customer sign the
receipt. If the signature matches the signature
on the card, press YES on the POS. Otherwise
press NO.
Page 36

PC-EF TP OS i5100 M ERCH ANT O PERATING GUI DE
34
TRANSACTION PROCEDURES
TERMINAL DISPLAY PROCEDURE
DEBIT/CREDIT SALE
APPROVED
This message will be displayed if the transaction
is approved.
Before completing the sale, check that the initial transaction was approved.
Hand the customer their copy of the transaction record and their card. If the
transaction is declined, the terminal will display an error message giving the reason.
An explanation of the error code is available in section 10.2, Response Codes.
Page 37

PC-EF TP OS i5100 M ERCH ANT O PERATING GUI DE
35
TRANSACTION PROCEDURES
MERCHANT COPY
BANKSA TEST LAB
97 KING WILLIAM STREET
ADELAIDE SA 5000
MasterCard
…………1234(C)
ACCT TYPE CREDIT
TRANS TYPE PURCHASE
TERMINAL ID 28010101
POS REF 123456789876
INV/ROC NO 000580
BANK REF 001288
DATE/TIME 23 JUN 09 13:01
AID A0000000041010
TC 68A5AD0B8F422FE2
AMOUNT $24.00
TIP $..........
TOTAL AUD $..........
AUTH 535953
APPROVED 00
CARDHOLDER SIGN HERE
X
CUSTOMER COPY
BANKSA TEST LAB
97 KING WILLIAM STREET
ADELAIDE SA 5000
MasterCard
…………1234(C)
ACCT TYPE CREDIT
TRANS TYPE PURCHASE
TERMINAL ID 28010101
POS REF 123456789876
INV/ROC NO 000580
BANK REF 001288
DATE/TIME 23 JUN 09 13:01
AID A0000000041010
TC 68A5AD0B8F422FE2
AMOUNT $24.00
TIP $..........
TOTAL AUD $..........
AUTH 535953
APPROVED 00
Remember to always check the
receipt to verify if a transaction has
been approved.
Page 38

PC-EF TP OS i5100 M ERCH ANT O PERATING GUI DE
36
TRANSACTION PROCEDURES
5.7 How to Process a Tip Adjustment.
A tip adjustment is performed after the original transaction has been processed. The
customer verifies the base amount of the sale, offers a tip and signs the receipt. The
adjustment transaction is then processed.
Note:
• Tip Addition applies to credit and charge cards only.
• The original purchase must not yet have been settled.
• When tip addition is enabled, a signature must be obtained if the receipt reads
‘Approved with Signature’ or if the cardholder writes a tip addition on the receipt.
This applies even if the original purchase is approved with PIN. A signature does
not need to be obtained if the receipt shows the original purchase as ‘Approved’,
and no Tip is added.
TERMINAL DISPLAY PROCEDURE
READY
LOGO
hh:mm dd/mm/yy
Initiate a tip adjustment via the POS.
ENTER ROC NO
ON POS
This message will be displayed, if the ROC (Record
of Charge) number was not entered on the POS.
Key in the ROC number of the transaction that
needs adjustment on the POS and press ACCEPT.
SCANNING BATCH
PLEASE WAIT
The terminal will search for the transaction.
VERIFY TIP
CORRECT?
The transaction details will be displayed on the
POS.
Press YES on the POS to confirm the tip
addition.
CREDIT TIP
APPROVED
This message will be displayed if the tip addition
is approved.
Page 39

PC-EF TP OS i5100 M ERCH ANT O PERATING GUI DE
37
TRANSACTION PROCEDURES
MERCHANT COPY
BANKSA TEST LAB
97 KING WILLIAM STREET
ADELAIDE SA 5000
MasterCard
…………1234(C)
ACCT TYPE CREDIT
TRANS TYPE PURCHASE
TERMINAL ID 28010101
POS REF 123456789876
INV/ROC NO 000580
BANK REF 001288
DATE/TIME 23 JUN 09 13:01
AID A0000000041010
TC 68A5AD0B8F422FE2
AMOUNT $24.00
TIP $..........
TOTAL AUD $..........
AUTH 535953
APPROVED 00
CARDHOLDER SIGN HERE
X
CUSTOMER COPY
BANKSA TEST LAB
97 KING WILLIAM STREET
ADELAIDE SA 5000
MasterCard
…………1234(C)
ACCT TYPE CREDIT
TRANS TYPE PURCHASE
TERMINAL ID 28010101
POS REF 123456789876
INV/ROC NO 000580
BANK REF 001288
DATE/TIME 23 JUN 09 13:01
AID A0000000041010
TC 68A5AD0B8F422FE2
AMOUNT $24.00
TIP $..........
TOTAL AUD $..........
AUTH 535953
APPROVED 00
Page 40

PC-EF TP OS i5100 M ERCH ANT O PERATING GUI DE
38
TRANSACTION PROCEDURES
Approved Tip Addition Receipt
MERCHANT COPY
BANKSA TEST LAB
97 KING WILLIAM STREET
ADELAIDE SA 5000
MasterCard
…………1234(C)
ACCT TYPE CREDIT
TRANS TYPE TIP ADJUST
TERMINAL ID 28010101
POS REF 123456789876
INV/ROC NO 000580
BANK REF 001065
DATE/TIME 23 JUN 09 16:14
AID A0000000041010
TC AF6702D8211E2290
AMOUNT $24.00
TIP AMOUNT $1.00
TOTAL AUD $25.00
AUTH 837514
APPROVED 08
Remember to always check the
receipt to verify if a transaction has
been approved.
Page 41

PC-EF TP OS i5100 M ERCH ANT O PERATING GUI DE
39
TRANSACTION PROCEDURES
5.8 How to Process a Mail/Telephone Order/e-Commerce
Transaction.
Transactions initiated by mail or telephone are known as MOTO (Mail Order or
Telephone Order) transactions. ECOM (Electronic Commerce) transactions are those
initiated over the Internet.
MOTO and ECOM transactions can be processed on credit and charge cards only, as
the cardholder is not present.
For information on how to register as a MOTO or ECOM merchant, contact the
EFTPOS Helpdesk on 1300 650 977.
Note:
• Until registered as a MOTO/ECOM merchant you must not process MOTO or
ECOM transactions.
• An authorisation of a MOTO or ECOM transaction only establishes that the funds
are available in the cardholder’s account and that the card has not been reported
lost or stolen. It does not guarantee that the person whose name appears on
the card is making the purchase or that the purchase will not be subject to a
chargeback.
• You will be liable for all chargebacks on MOTO/ECOM transactions.
• You must retain all merchant receipts for at least eighteen months from the
transaction date.
TERMINAL DISPLAY PROCEDURE
READY
LOGO
hh:mm dd/mm/yy
Initiate a MOTO or ECOM transaction via the
POS.
ENTER CCV
ON POS
This message will be displayed if the CCV was not
entered when the transaction was initiated via
the POS. Key in the CCV on the POS and press
ACCEPT. Or, if the CCV is not available, just press
ACCEPT.
If CANCEL is selected the terminal will return to
the idle state.
Note: CCV is described in section 9.0, Minimising
Fraud.
CREDIT $X.XX
PRESS ENTER
Confirm the transaction amount and press ENTER.
Page 42

PC-EF TP OS i5100 M ERCH ANT O PERATING GUI DE
40
TRANSACTION PROCEDURES
TERMINAL DISPLAY PROCEDURE
CREDIT MOTO
PROCESSING
The terminal is connecting to the bank and
processing the transaction.
CREDIT MOTO
APPROVED
This message will be displayed if the transaction
is approved.
Before completing the sale, check that the transaction was approved. If the
transaction is declined, the terminal will display an error message giving the
reason. An explanation of the error code is available in section 10.2, Response
Codes.
Approved MOTO Receipt
MERCHANT COPY
BANKSA TEST LAB
97 KING WILLIAM STREET
ADELAIDE SA 5000
MasterCard
…………1234 (M)
ACCT TYPE CREDIT
TRANS TYPE MOTO PURCH
TERMINAL ID 28010101
POS REF 123456789876
INV/ROC NO 000524
BANK REF 001234
DATE/TIME 23 JUN 09 10:50
AMOUNT $14.00
TOTAL AUD $14.00
APPROVED 08
Remember to always check the
receipt to verify if a transaction has
been approved.
Note:
Only a merchant copy will be printed for MOTO and ECOM transactions.
Page 43

PC-EF TP OS i5100 M ERCH ANT O PERATING GUI DE
41
TRANSACTION PROCEDURES
5.9 How to Process a Pre-Authorisation.
This function is used to reserve funds for a sale to be processed at a later time. Car
rentals and hotels/motels most commonly use this function.
Note:
• Pre-authorisation transactions can only be performed on credit cards and charge
cards and only where you have been authorised to do so. Be sure to retain the
receipt as it might be required to process the completion transaction.
• The terminal retains pre-authorisations for seven calendar days only.
• The length of time funds are held on a customer’s card varies depending on the
rules set by the cardholder’s card issuer.
• Once obtained, a pre-authorisation cannot be cancelled except by the card
issuer, or until the authorisation expires.
TERMINAL DISPLAY PROCEDURE
READY
LOGO
hh:mm dd/mm/yy
Initiate a pre-authorisation transaction via the
POS.
PRE-AUTH $X.XX
PRESENT CARD
If presented with a chip card, insert the customer’s
card into the chip card reader. Refer to Inserting a
Chip Card in section 4.1.
OR:
If presented with a magnetic stripe card, swipe the
customer’s card through the card reader. Refer to
Swiping a Magnetic Stripe Card in section 4.2.
CREDIT $X.XX
PIN OR ENTER
Have the cardholder key in their PIN and press
ENTER, or just press ENTER.
CREDIT AUTH
PROCESSING
The terminal is connecting to the bank and
processing the transaction.
REMOVE CARD
If a chip card was inserted, remove the card
from the reader.
VERIFY SIGNATURE
CORRECT?
If signature is required: Have the customer
sign the receipt. If the signature matches the
signature on the card, press YES on the POS.
Otherwise press NO.
Page 44

PC-EF TP OS i5100 M ERCH ANT O PERATING GUI DE
42
TRANSACTION PROCEDURES
TERMINAL DISPLAY PROCEDURE
CREDIT AUTH
APPROVED
This message will be displayed if the transaction
is approved.
Before completing the authorisation, check that the transaction was approved.
Hand the customer their copy of the transaction record and their card. If the
transaction is declined, the terminal will display an error message giving the reason.
An explanation of the error code is available in section 10.2, Response Codes.
Approved Pre-Auth Receipt
(signature required)
Approved Pre-Auth Receipt
(approved with PIN, no signature
required)
MERCHANT COPY
BANKSA TEST LAB
97 KING WILLIAM STREET
ADELAIDE SA 5000
MasterCard
1111 1111 1111 1111(C)
ACCT TYPE CREDIT
TRANS TYPE PRE-AUTH
TERMINAL ID 28010101
POS REF 123456789876
INV/ROC NO 000580
BANK REF 001288
DATE/TIME 23 JUN 09 13:01
EXPIRY DATE 03/12
AID A0000000041010
TC 68A5AD0B8F422FE2
AMOUNT $24.00
TOTAL AUD $24.00
AUTH 535953
APPROVED 08
CARDHOLDER SIGN HERE
X
CUSTOMER COPY
BANKSA TEST LAB
97 KING WILLIAM STREET
ADELAIDE SA 5000
MasterCard
1111(C)
ACCT TYPE CREDIT
TRANS TYPE PRE-AUTH
TERMINAL ID 28010101
POS REF 123456789876
INV/ROC NO 000580
BANK REF 001288
DATE/TIME 23 JUN 09 13:01
AID A0000000041010
TC 68A5AD0B8F422FE2
AMOUNT $24.00
TOTAL AUD $24.00
AUTH 535953
APPROVED 00
Remember to always check the
receipt to verify if a transaction has
been approved.
Page 45

PC-EF TP OS i5100 M ERCH ANT O PERATING GUI DE
43
TRANSACTION PROCEDURES
5.10 How to Process a Pre-Authorisation Enquiry.
A pre-authorisation enquiry is used to view an earlier pre-authorisation transaction.
TERMINAL DISPLAY ACTION
READY
LOGO
hh:mm dd/mm/yy
Initiate a pre-authorisation enquiry via the POS.
ENTER ROC NO
ON POS
Key in the ROC number of the transaction that
you are enquiring about on the POS and select
ACCEPT.
SCANNING BATCH
PLEASE WAIT
The terminal will search for the transaction.
VERIFY AUTH
CORRECT?
The transaction details will be displayed on the
POS.
Press YES on the POS to confirm the
transaction enquiry.
AUTH ENQUIRY
APPROVED
This message will be displayed when the preauthorisation transaction is displayed.
Note:
No receipt is printed for pre-authorisation enquiry transactions.
Page 46

PC-EF TP OS i5100 M ERCH ANT O PERATING GUI DE
44
TRANSACTION PROCEDURES
5.11 How to Process a Completion.
A completion is used to complete an earlier pre-authorisation and charge the
cardholder. A completion may also be known as a checkout.
You can process a completion in one of two ways:
1. Using the ROC number from the pre-authorisation transaction.
2. Using the authorisation number of the pre-authorisation transaction
Note:
• The terminal retains pre-authorisations for seven calendar days only.
5.11.1 Using the ROC Number.
TERMINAL DISPLAY PROCEDURE
READY
LOGO
hh:mm dd/mm/yy
Initiate a completion transaction via the POS.
ENTER ROC NO
ON POS
Key in the ROC number of the transaction that
needs completing on the POS and press ACCEPT.
SCANNING BATCH
PLEASE WAIT
The terminal will search for the transaction.
VERIFY CHECK-OUT
CORRECT?
The transaction details will be displayed on the
POS.
Press YES on the POS to confirm the
completion.
VERIFY SIGNATURE
CORRECT?
Have the customer sign the receipt. If the
signature matches the signature on the card,
press YES on the POS. Otherwise press NO.
CREDIT C/O
APPROVED
This message will be displayed if the completion
is approved.
Before completing the sale, check that the transaction was approved. Hand the
customer their copy of the transaction record and their card. If the transaction
is declined the terminal will display an error message giving the reason. An
explanation of the error code is available in section 10.2, Response Codes.
Page 47

PC-EF TP OS i5100 M ERCH ANT O PERATING GUI DE
45
TRANSACTION PROCEDURES
Approved Completion Receipt (using ROC number)
MERCHANT COPY
BANKSA TEST LAB
97 KING WILLIAM STREET
ADELAIDE SA 5000
MasterCard
………… 1234(C)
ACCT TYPE CREDIT
TRANS TYPE CHECKOUT
TERMINAL ID 28010101
POS REF 123456789876
INV/ROC NO 000582
DATE/TIME 23 JUN 09 13:08
AID A0000000041010
TC FCB4E55B34C5EDCA
AMOUNT $26.00
TOTAL AUD $26.00
APPROVED 08
CARDHOLDER SIGN HERE
X
CUSTOMER COPY
BANKSA TEST LAB
97 KING WILLIAM STREET
ADELAIDE SA 5000
MasterCard
………… 1234(C)
ACCT TYPE CREDIT
TRANS TYPE CHECKOUT
TERMINAL ID 28010101
POS REF 123456789876
INV/ROC NO 000582
DATE/TIME 23 JUN 09 13:08
AID A0000000041010
TC FCB4E55B34C5EDCA
AMOUNT $26.00
TOTAL AUD $26.00
APPROVED 08
Remember to always check the
receipt to verify if a transaction has
been approved.
Page 48

PC-EF TP OS i5100 M ERCH ANT O PERATING GUI DE
46
TRANSACTION PROCEDURES
5.11.2 Using the Authorisation Number.
TERMINAL DISPLAY PROCEDURE
READY
LOGO
hh:mm dd/mm/yy
Initiate a completion transaction via the POS.
ENTER ROC NO
ON POS
Leave the input data field blank and press
ACCEPT.
ENTER AUTH NO
ON POS
Key in the authorisation number of the transaction
that needs completing on the POS and press
ACCEPT.
SCANNING BATCH
PLEASE WAIT
The terminal will search for the transaction.
CHECKOUT $X.XX
PRESENT CARD
If presented with a chip card, insert the
customer’s card into the chip card reader. Refer to
Inserting a Chip Card in section 4.1.
OR:
If presented with a magnetic stripe card, swipe the
customer’s card through the card reader. Refer to
Swiping a Magnetic Stripe Card in section 4.2.
CREDIT $X.XX
PIN OR ENTER
Have the cardholder key in their PIN and press
ENTER, or just press ENTER.
REMOVE CARD
If a chip card was inserted, remove the card
from the reader.
VERIFY SIGNATURE
CORRECT?
Have the customer sign the receipt. If the
signature matches the signature on the card,
press YES on the POS. Otherwise press NO.
CREDIT C/O
APPROVED
This message will be displayed if the completion is
approved.
Before completing the sale, check that the transaction was approved. Hand the
customer their copy of the transaction record and their card. If the transaction
is declined, the terminal will display an error message giving the reason. An
explanation of the error code is available in section 10.2, Response Codes.
Page 49

PC-EF TP OS i5100 M ERCH ANT O PERATING GUI DE
47
TRANSACTION PROCEDURES
Approved Completion Receipt (using authorisation number)
MERCHANT COPY
BANKSA TEST LAB
97 KING WILLIAM STREET
ADELAIDE SA 5000
MasterCard
………… 1234(C)
ACCT TYPE CREDIT
TRANS TYPE CHECKOUT
TERMINAL ID 28010101
POS REF 123456789876
INV/ROC NO 000582
BANK REF 001234
DATE/TIME 23 JUN 09 13:08
AMOUNT $26.00
TOTAL AUD $26.00
APPROVED 08
CARDHOLDER SIGN HERE
X
CUSTOMER COPY
BANKSA TEST LAB
97 KING WILLIAM STREET
ADELAIDE SA 5000
MasterCard
………… 1234(C)
ACCT TYPE CREDIT
TRANS TYPE CHECKOUT
TERMINAL ID 28010101
POS REF 123456789876
INV/ROC NO 000582
BANK REF 001234
DATE/TIME 23 JUN 09 13:08
AMOUNT $26.00
TOTAL AUD $26.00
APPROVED 08
Remember to always check the
receipt to verify if a transaction has
been approved.
Page 50

PC-EF TP OS i5100 M ERCH ANT O PERATING GUI DE
48
REPORTING FUNCTIONS
6.0 REPORTING FUNCTIONS.
6.1 Terminal Settlement.
Settlement for the terminal can occur via a programmed terminal settlement
(automatic settlement) either by the Bank or by the PC-EFTPOS software or by a
manual settlement. Failure to perform a settlement may result in split deposits for
settlements.
The terminal and POS must be powered on for settlement to occur at the
programmed time.
Note:
A settlement can only be performed once in a 24-hour period.
You cannot settle between 9.30pm and 11.00pm (AEST).
To enable an automatic settlement:
The terminal will have a default automatic settlement time (unless nominated by
you at the time of application), which can vary by business. You (as the authorised
signatory) may contact the EFTPOS Helpdesk to change the default automatic
settlement time.
Alternately, a scheduled task can be setup via the PC-EFTPOS EMS client, to
schedule an automatic settlement time. Refer to your POS vendor or PC-EFTPOS for
assistance.
To process a manual settlement:
TERMINAL DISPLAY PROCEDURE
READY
LOGO
hh:mm dd/mm/yy
Initiate a settlement via the POS.
SETTLEMENT
PLEASE WAIT
The terminal is connecting to the bank and
processing the settlement.
SETTLEMENT
APPROVED
This message is displayed if the settlement is
approved. A settlement report will be printed.
Page 51

PC-EF TP OS i5100 M ERCH ANT O PERATING GUI DE
49
REPORTING FUNCTIONS
Settlement Report
MERCHANT NAME
MERCHANT ADDRESS 1
MERCHANT ADDRES 2
SETTLEMENT
MERCHANT ID xxxxxxxx
TERMINAL ID xxxxxxxx
DATE/TIME 22JUN09 16:14
VISA
PURCHASE COUNT 999
REFUND COUNT 999
PURCHASE $99999.99
REFUND $99999.99
-----------TOTAL AUD $99999.99
MASTERCARD
PURCHASE COUNT 999
REFUND COUNT 999
PURCHASE $99999.99
REFUND $99999.99
----------TOTAL AUD $99999.99
DEBIT
PURCHASE COUNT 999
REFUND COUNT 999
PURCHASE $99999.99
REFUND $99999.99
----------TOTAL AUD $99999.99
BANK TOTALS
TOTAL PUR CNT 999
TOTAL PUR 999
PURCHASE $99999.99
TOTAL REFUND $99999.99
----------NET TOTAL AUD $99999.99
AMEX TOTALS
PURCHASE COUNT 999
REFUND COUNT 999
PURCHASE $99999.99
REFUND $99999.99
-----------TOTAL AUD $99999.99
Continued
DINERS TOTALS
PURCHASE COUNT 999
REFUND COUNT 999
PURCHASE $99999.99
REFUND $99999.99
-----------TOTAL AUD $99999.99
JCB TOTALS
PURCHASE COUNT 999
REFUND COUNT 999
PURCHASE $99999.99
REFUND $99999.99
-----------TOTAL AUD $99999.99
TERMINAL TOTALS
TOTAL PUR CNT 999
TOTAL REFUND CNT 999
TOTAL PUR $99999.99
TOTAL REFUND $99999.99
-----------NET TOTAL AUD $99999.99
PRE-AUTH TOTALS
PURCHASE COUNT 999
PURCHASE $99999.99
-----------TOTAL AUD $99999.99
SETTLEMENT COMPLETE X00*
------------------------
* X = T if the settlement is generated by the terminal
(manual or automated settlements). X = F if the
settlement is generated by the host system at the bank.
Page 52

PC-EF TP OS i5100 M ERCH ANT O PERATING GUI DE
50
REPORTING FUNCTIONS
6.2 How to Print a Pre-Settlement Report.
This function will print a report of all transactions performed since the last
settlement, without resetting the totals.
TERMINAL DISPLAY PROCEDURE
READY
LOGO
hh:mm dd/mm/yy
Initiate a pre-settlement via the POS.
PRE-SETTLEMENT
PLEASE WAIT
The terminal is connecting to the bank and
processing the pre-settlement.
PRE-SETTLEMENT
APPROVED
This message is displayed if the pre-settlement is
approved. A pre-settlement report will be printed.
Page 53

PC-EF TP OS i5100 M ERCH ANT O PERATING GUI DE
51
REPORTING FUNCTIONS
Pre-Settlement Report
MERCHANT NAME
MERCHANT ADDRESS 1
MERCHANT ADDRES 2
PRE-SETTLEMENT
MERCHANT ID xxxxxxxx
TERMINAL ID xxxxxxxx
DATE/TIME 22JUN09 16:14
VISA
PURCHASE COUNT 999
REFUND COUNT 999
PURCHASE $99999.99
REFUND $99999.99
-----------TOTAL AUD $99999.99
MASTERCARD
PURCHASE COUNT 999
REFUND COUNT 999
PURCHASE $99999.99
REFUND $99999.99
----------TOTAL AUD $99999.99
DEBIT
PURCHASE COUNT 999
REFUND COUNT 999
PURCHASE $99999.99
REFUND $99999.99
----------TOTAL AUD $99999.99
AMEX TOTALS
PURCHASE COUNT 999
REFUND COUNT 999
PURCHASE $99999.99
REFUND $99999.99
-----------TOTAL AUD $99999.99
DINERS TOTALS
PURCHASE COUNT 999
REFUND COUNT 999
PURCHASE $99999.99
REFUND $99999.99
-----------TOTAL AUD $99999.99
Continued
JCB TOTALS
PURCHASE COUNT 999
REFUND COUNT 999
PURCHASE $99999.99
REFUND $99999.99
-----------TOTAL AUD $99999.99
TERMINAL TOTALS
TOTAL PUR CNT 999
TOTAL REFUND CNT 999
TOTAL PUR $99999.99
TOTAL REFUND $99999.99
-----------NET TOTAL AUD $99999.99
PRE-AUTH TOTALS
PURCHASE COUNT 999
PURCHASE $99999.99
-----------TOTAL AUD $99999.99
Page 54

PC-EF TP OS i5100 M ERCH ANT O PERATING GUI DE
52
REPORTING FUNCTIONS
6.3 How to Reprint Last Settlement.
This function will reprint the the last settlement which has occurred.
TERMINAL DISPLAY PROCEDURE
READY
LOGO
hh:mm dd/mm/yy
Initiate a last settlement via the POS.
LAST SETTLEMENT
PLEASE WAIT
The terminal is connecting to the bank and
processing the last settlement.
LAST SETTLEMENT
APPROVED
This message is displayed if the last settlement is
approved. A last settlement report will be printed.
Page 55

PC-EF TP OS i5100 M ERCH ANT O PERATING GUI DE
53
REPORTING FUNCTIONS
Last Settlement Report
MERCHANT NAME
MERCHANT ADDRESS 1
MERCHANT ADDRES 2
LAST SETTLEMENT
MERCHANT ID xxxxxxxx
TERMINAL ID xxxxxxxx
DATE/TIME 25JUN09 15:54
CREDIT TOTALS
TOTAL COUNT 999
TOTAL AUD $99999.99
DEBIT TOTALS
TOTAL COUNT 999
TOTAL AUD $99999.99
CREDIT/DEBIT TOTALS
TOTAL COUNT 999
TOTAL AUD $99999.99
AMEX TOTALS
TOTAL COUNT 999
TOTAL AUD $99999.99
JCB TOTALS
TOTAL COUNT 999
TOTAL AUD $99999.99
DINERS TOTALS
TOTAL COUNT 999
TOTAL AUD $99999.99
SETTLEMENT COMPLETE X00*
* X = T if the settlement is generated by the terminal (manual or automated settlements). X = F if the settlement is generated
by the host system at the bank.
Page 56

PC-EF TP OS i5100 M ERCH ANT O PERATING GUI DE
54
FALL BACK SAL ES PRO CEDURES
7.0 FALL BACK SALES PROCEDURES.
7.1 Electronic Fall Back.
The Electronic Fall Back (EFB) facility is available only when enabled on the terminal,
and only for certain card types.
Electronic Fall Back is the ability to continue performing transactions on the terminal,
even when communication with the host system for on-line approval has been lost
or the card issuer is unavailable. In EFB mode, transactions are stored within the
terminal and manual vouchers are not required. After communication has been
restored, the terminal forwards the stored transactions to the Bank for processing.
Your Merchant Letter of Offer contains your debit and credit floor limits.
You are reminded that you must not “split” a sale in order to avoid obtaining
authorisation.
When processing in EFB Mode some differences apply to normal ‘on-line’ processing:
• For credit card transactions that are over your credit card floor limit, you will be
required to enter an authorisation number which you can obtain by calling 1300
301 831. Alternatively ask your customer for an alternate means of payment.
• Signature capture is required on all EFB transactions regardless of the account
selection or whether PIN was entered. The terminal will process the transaction in
accordance with the EFB floor limits and other validation settings.
• Cheque/Savings account transactions exceeding your debit card floor limit will be
declined. Ask your customer for an alternate means of payment.
When communication has been lost and the amount of the transaction is over your
floor limit, the terminal will display the following:
TERMINAL DISPLAY PROCEDURE
ENTER AUTH ID
ON POS
You will be required to enter an authorisation
number, which you can obtain by calling 1300 301
831.
Key in the authorisation number on the POS and
press ACCEPT.
VERIFY SIGNATURE
CORRECT?
Have the customer sign the receipt. If the
signature matches the signature on the card,
press YES on the POS. Otherwise press NO.
CREDIT SALE
APPROVED
This message will be displayed if the transaction
is approved.
Page 57

PC-EF TP OS i5100 M ERCH ANT O PERATING GUI DE
55
FALL BACK SAL ES PRO CEDURES
EFB Purchase Receipt
MERCHANT COPY
BANKSA TEST LAB
97 KING WILLIAM STREET
ADELAIDE SA 5000
MasterCard
1111 1111 1111 1111 (C)
ACCT TYPE CREDIT
TRANS TYPE PURCHASE
TERMINAL ID 28010101
POS REF 000000004647
INV/ROC NO 000625
BANK REF 00123
DATE/TIME 23 JUN 09 17:31
Exp Date 11/11
AMOUNT $80.00
TOTAL AUD $80.00
APPROVED *08
(P7)
CARDHOLDER SIGN HERE
X
CUSTOMER COPY
BANKSA TEST LAB
97 KING WILLIAM STREET
ADELAIDE SA 5000
MasterCard
…………1111 (C)
ACCT TYPE CREDIT
TRANS TYPE PURCHASE
TERMINAL ID 28010101
POS REF 000000004647
INV/ROC NO 000625
BANK REF 00123
DATE/TIME 23 JUN 09 17:31
AMOUNT $80.00
TOTAL AUD $80.00
APPROVED *08
(P7)
Remember to always check the
receipt to verify if a transaction has
been approved.
Note: The terminal is only able to convert to EFB mode if it has already performed a
successful logon and a successful transaction on that day.
Page 58

PC-EF TP OS i5100 M ERCH ANT O PERATING GUI DE
56
FALL BACK SAL ES PRO CEDURES
7.2 Manual Fall Back.
The EFTPOS terminal supplied to you is very reliable and BankSA is committed to
ensuring its smooth operation is maintained. Any problems should be promptly
reported to the EFTPOS Helpdesk on 1300 650 977.
If your terminal fails to function correctly you may revert to manual fall back.
Before Performing a Fall Back Transaction:
For credit cards, if the transaction is over your credit card floor limit, call Cardlink on
1300 301 831 for authorisation.
If you are unsure of your floor limit for credit cards please call the EFTPOS Helpdesk
on 1300 650 977.
For debit cards, if the transaction is over your debit card floor limit, call the EFTPOS
Helpdesk on 1300 650 977 for authorisation.
If you are unsure of your floor limit for debit cards please call the EFTPOS Helpdesk
on 1300 650 977.
Minimum Requirements:
You must complete all sales details on the voucher. The completed voucher must
be signed by the customer and the signature compared with that appearing on the
reverse of the card. If the signature does not match or you are in any doubt as to the
authenticity of the cardholder, another form of payment should be sought. You must
check the ‘to’ and ‘from’ dates to ensure the card has not expired. You must ensure
the card is presented and imprinted.
Banking:
To ensure you receive value for your fall back vouchers, they must be banked within
two business days. Vouchers can be charged back for late deposits.
Separate the completed credit vouchers from the debit vouchers. Complete an
EFTPOS Merchant Summary slip for each type of voucher. Place the Summary on top
of the vouchers and place each into a separate Merchant Summary Envelope.
Take the envelope(s) to BankSA and deposit them into your account as you would a
cheque.
If you bank with another financial institution, you will need to use the postal
arrangements i.e. use the Reply Paid envelopes provided in your EFTPOS kit.
Retain all of your merchant copies of the fall back vouchers and the merchant
summaries for a minimum of three years. These are your evidence of the transaction
in case the customer later disputes it.
If you require any additional information, please contact the EFTPOS Helpdesk on
1300 650 977.
Page 59

PC-EF TP OS i5100 M ERCH ANT O PERATING GUI DE
57
STANDALONE LITE MODE
8.0 STANDALONE LITE MODE.
Standalone lite mode is a configurable option which enables the terminal to operate
independently of the POS.
The terminal will have the ability to process the following transaction types and
reports when it is switched to standalone lite mode:
• Purchases
• Cash out
• Refunds
• Settlement
• Pre Settlement
• Last Settlement
• Receipt Reprint
The terminal also has the ability to use some of the standalone lite configurations
when it is switched to integrated mode. These are:
• Use the internal modem of the terminal
• Use the internal printer of the terminal
8.1 Configuring Standalone Lite Mode.
TERMINAL DISPLAY ACTION
READY
LOGO
hh:mm dd/mm/yy
Press the FUNC key.
FUNCTION:
Key in 11112223 and press ENTER.
INTERNAL PRINTER?
[ENTER] = YES
[CLEAR] = NO
Press ENTER to use the internal printer, or
press CLEAR to use an external printer.
Page 60

PC-EF TP OS i5100 M ERCH ANT O PERATING GUI DE
58
STANDALONE LITE MODE
USE WINDOWS
DEFAULT PRINTER?
[ENTER] = YES
[CLEAR] = NO
Press ENTER to use the Windows default
printer, or press CLEAR to use another printer.
INTERNAL MODEM?
[ENTER] = YES
[CLEAR] = NO
Press ENTER to use the internal modem, or
press CLEAR to use an external modem.
JOURNAL TXNS?
[ENTER] = YES
[CLEAR] = NO
Press ENTER to use Journal Transactions, or
press CLEAR to continue.
PRINT SECOND
RECEIPT?
[ENTER] = YES
[CLEAR] = NO
Press ENTER to print a second copy of receipts,
or press CLEAR to print one copy of receipts.
SWIPE START
TRANSACTIONS?
[ENTER] = YES
[CLEAR] = NO
Press ENTER to enable swipe start
transactions, or press CLEAR to disable swipe
start transactions.
Page 61

PC-EF TP OS i5100 M ERCH ANT O PERATING GUI DE
59
STANDALONE LITE MODE
8.2 Switching Between Standalone Lite Mode and
Integrated Mode.
TERMINAL DISPLAY ACTION
READY
LOGO
hh:mm dd/mm/yy
Press the FUNC key.
FUNCTION:
Key in 11112222 and press ENTER.
SWITCH TO STANDALONE
MODE?
[ENTER] = YES
[CLEAR] = NO
Press the ENTER key for standalone lite mode.
LOGO
PURC CASH RFND
The standalone lite mode idle screen is
displayed.
8.3 Standalone Lite Function Menu.
The standalone lite function menu enables the user to access the terminal
functionality without the use of the POS.
The user can scroll between the functions by pressing ENTER.
The user can access the terminal functions, by pressing the account (soft) keys.
The diagram below illustrates the terminals standalone lite function menu structure.
LOGO
PURC CASH RFND
LOGO
SETL PRE LAST
LOGO
INIT COPY SHFT
Page 62

PC-EF TP OS i5100 M ERCH ANT O PERATING GUI DE
60
STANDALONE LITE MODE
8.4 Terminal Logon using Standalone Lite Mode.
TERMINAL DISPLAY ACTION
LOGO
PURC CASH RFND
Press ENTER until INIT is displayed.
LOGO
INIT COPY SHFT
Press the soft key below INIT.
INITIALISATION
PLEASE WAIT
The terminal is connecting to the bank and
processing the transaction.
LOGON
PASSED
The terminal prints the logon receipt and returns
to the main menu.
Page 63

PC-EF TP OS i5100 M ERCH ANT O PERATING GUI DE
61
STANDALONE LITE MODE
8.5 Purchase using Standalone Lite Mode.
TERMINAL DISPLAY ACTION
LOGO
PURC CASH RFND
Press the soft key below PURC.
PURCHASE AMOUNT?
$X.XX
Key in the purchase amount and press ENTER.
CASH-OUT AMOUNT?
$X.XX
If ‘Purchase with Cash’ transactions are enabled
on the terminal, you can enter a cash-out
amount. The cash-out amount may be left at
$0.00. Press ENTER.
TOTAL AMOUNT
$X.XX
If the total amount is correct, press ENTER.
PURCHASE $X.XX
PRESENT CARD
If presented with a chip card, insert the
customer’s card into the chip card reader. Refer
to Inserting a Chip Card in section 4.1.
OR:
If presented with a magnetic stripe card, swipe
the customer’s card through the card reader.
Refer to Swiping a Magnetic Stripe Card in
section 4.2.
PURCHASE $X.XX
SELECT ACCOUNT
CHQ SAV CR
Press the soft key beneath the account type
needed.
CHEQUE $X.XX
PIN AND/OR ENTER
Where prompted, have the cardholder key
in their PIN and press ENTER, or just press
ENTER.
DEBIT/CREDIT SALE
PROCESSING
Displayed while the transaction is processed
online to the bank. The issuer’s name (eg:
MASTERCARD) is displayed on this screen.
Page 64

PC-EF TP OS i5100 M ERCH ANT O PERATING GUI DE
62
STANDALONE LITE MODE
TERMINAL DISPLAY ACTION
VERIFY SIGNATURE
CORRECT?
If the card was inserted, remove the card from the
reader.
If signature is required: Have the customer sign
the receipt. If the signature matches the signature
on the card, press ENTER. Otherwise press
CANCEL.
CUSTOMER COPY? Press ENTER to print customer receipt.
DEBIT/CREDIT SALE
APPROVED
This message will be displayed if the transaction
is approved.
Before completing the sale, check that the transaction was approved. Hand the
customer their copy of the transaction record and their card. If the transaction
is declined, the terminal will display an error message giving the reason. An
explanation of the error code is available in section 10.2, Response Codes.
8.6 Cash Only using Standalone Lite Mode.
TERMINAL DISPLAY ACTION
LOGO
PURC CASH RFND
Press the soft key below CASH.
CASH-OUT AMOUNT?
$X.XX
Key in the cash amount and press ENTER.
TOTAL AMOUNT
$X.XX
If the total amount is correct, press ENTER.
Page 65

PC-EF TP OS i5100 M ERCH ANT O PERATING GUI DE
63
STANDALONE LITE MODE
TERMINAL DISPLAY ACTION
CASH-OUT $X.XX
PRESENT CARD
If presented with a chip card, insert the
customer’s card into the chip card reader. Refer
to Inserting a Chip Card in section 4.1.
OR:
If presented with a magnetic stripe card, swipe
the customer’s card through the card reader.
Refer to Swiping a Magnetic Stripe Card in
section 4.2.
CASH-OUT $X.XX
SELECT ACCOUNT
CHQ SAV
Have the cardholder select their account type.
Note: Credit is not an option.
CHEQUE $X.XX
PIN AND ENTER
Have the cardholder key in their PIN and press
ENTER.
DEBIT CASH
PROCESSING
The terminal is connecting to the bank and
processing the transaction.
CUSTOMER COPY? Press ENTER to print customer receipt.
DEBIT CASH
APPROVED
This message will be displayed if the transaction
is approved.
Before completing the transaction, check that the transaction was approved. Hand
the customer their copy of the transaction record and their card. If the transaction
is declined, the terminal will display an error message giving the reason. An
explanation of the error code is available in section 10.2, Response Codes.
Page 66

PC-EF TP OS i5100 M ERCH ANT O PERATING GUI DE
64
STANDALONE LITE MODE
8.7 Refund using Standalone Lite Mode.
TERMINAL DISPLAY ACTION
LOGO
PURC CASH RFND
Press the soft key below RFND.
PASSWORD Key in the refund password and press ENTER.
REFUND AMOUNT?
$X.XX
Key in the refund amount and press ENTER.
TOTAL AMOUNT
$X.XX
If the total amount is correct, press ENTER.
REFUND $X.XX
PRESENT CARD
If presented with a chip card, insert the
customer’s card into the chip card reader. Refer
to Inserting a Chip Card in section 4.1.
OR:
If presented with a magnetic stripe card, swipe
the customer’s card through the card reader.
Refer to Swiping a Magnetic Stripe Card in
section 4.2.
REFUND $X.XX
SELECT ACCOUNT
CHQ SAV CR
Have the cardholder select their account type.
CHEQUE $X.XX
PIN AND/OR ENTER
Where prompted, have the cardholder key
in their PIN and press ENTER, or just press
ENTER.
DEBIT/CREDIT RFND
PROCESSING
The terminal is connecting to the bank and
processing the transaction.
Page 67

PC-EF TP OS i5100 M ERCH ANT O PERATING GUI DE
65
STANDALONE LITE MODE
TERMINAL DISPLAY ACTION
VERIFY SIGNATURE
CORRECT?
If signature is required: Have the customer
sign the receipt. If the signature matches the
signature on the card, press ENTER. Otherwise
press CANCEL.
CUSTOMER COPY? Press ENTER to print customer receipt.
DEBIT REFUND
APPROVED
This message will be displayed if the transaction
is approved.
Before completing the refund, check that the transaction was approved. Hand the
customer their copy of the transaction record and their card. If the transaction
is declined, the terminal will display an error message giving the reason. An
explanation of the error code is available in section 10.2, Response Codes.
8.8 Terminal Settlement using Standalone Lite Mode.
TERMINAL DISPLAY ACTION
LOGO
PURC CASH RFND
Press ENTER until SETL is displayed.
LOGO
SETL PRE LAST
Press the soft key below SETL.
PASSWORD
Key in the settlement password and press
ENTER.
SETTLEMENT
PLEASE WAIT
The terminal is connecting to the bank and
processing the settlement.
A settlement report will be printed.
Page 68

PC-EF TP OS i5100 M ERCH ANT O PERATING GUI DE
66
STANDALONE LITE MODE
8.9 Print a Pre-Settlement Report using Standalone Lite Mode.
TERMINAL DISPLAY ACTION
LOGO
PURC CASH RFND
Press ENTER until PRE is displayed.
LOGO
SETL PRE LAST
Press the soft key below PRE.
PASSWORD
Key in the settlement password and press
ENTER.
PRE-SETTLEMENT
PLEASE WAIT
The terminal is connecting to the bank and
processing the pre-settlement.
A pre-settlement report will be printed.
8.10 Print a Last Settlement Report using Standalone Lite Mode.
TERMINAL DISPLAY ACTION
LOGO
PURC CASH RFND
Press ENTER until LAST is displayed.
LOGO
SETL PRE LAST
Press the soft key below LAST.
PASSWORD
Key in the settlement password and press
ENTER.
LAST SETTLEMENT
PLEASE WAIT
The terminal is connecting to the bank and
processing the last settlement.
A last settlement report will be printed.
Page 69

PC-EF TP OS i5100 M ERCH ANT O PERATING GUI DE
67
STANDALONE LITE MODE
8.11 Reprint the Last Transaction using Standalone Lite Mode.
This function will reprint the receipt of the last transaction performed.
The receipt will show ** DUPLICATE RECEIPT ** printed at the top.
TERMINAL DISPLAY ACTION
LOGO
PURC CASH RFND
Press ENTER until COPY is displayed.
LOGO
INIT COPY SHFT
Press the soft key below COPY.
The duplicate receipt will be printed.
8.12 Print a Shift Report using Standalone Lite Mode.
TERMINAL DISPLAY ACTION
LOGO
PURC CASH RFND
Press ENTER until SHIFT is displayed.
LOGO
INIT COPY SHFT
Press the soft key below SHFT.
SHIFT TOTALS
PRINTING
A shift report will be printed.
RESET
SHIFT TOTALS?
YES OR NO
Press ENTER to reset the shift totals, or press
CANCEL to exit without resetting the shift
totals.
Page 70

PC-EF TP OS i5100 M ERCH ANT O PERATING GUI DE
68
CONTACTLESS PAYMENTS
9.0 CONTACTLESS PAYMENTS.
The ViVOtech® contactless card reader is designed to make payments faster and
easier for both you and the cardholder. It enables MasterCard® PayPass™ and Visa®
payWave cards to be used without being inserted into, or swiped through the EFTPOS
terminal. These cards are embedded with an antenna which enables the card to be
read when it is within four centimetres of the reader.
It also enables small ticket purchases to be completed without PIN or signature
verification, dependent on the rules of the card issuer.
If the cardholder does not have a contactless card, then the card will need to be
inserted into, or swiped through the EFTPOS terminal, in the usual manner. Refer
to section 5.0 Transaction Procedures for further instructions on transaction
processing.
• MasterCard® and the MasterCard Brand Mark are registered trademarks of MasterCard International Incorporated.
• Visa® is a registered trademark of Visa Worldwide PTe Limited.
Page 71

PC-EF TP OS i5100 M ERCH ANT O PERATING GUI DE
69
CONTACTLESS PAYMENTS
9.1 CONTACTLESS PAYMENTS.
Contactless payments are only available on credit accounts, where a MasterCard
PayPass or Visa payWave card has been presented.
Contactless payment is available on the following transaction types:
• Purchase
• Refund
Contactless payment is not available on the following transaction types:
• Purchase with cash
• Cash only
• Pre-Authorisation
• Completion
• Purchase with tip
In these instances the card will need to be inserted into, or swiped through the
EFTPOS terminal.
Each card will have in-built limits or restrictions regarding the amount of the
transaction that can be processed on the contactless reader, without entering a PIN
or providing signature verification. If a cardholder wants to know what those limits or
restrictions are, refer them to their card issuer.
The contactless reader and the EFTPOS terminal will always guide you and the
cardholder as to how the transaction needs to be completed.
Page 72
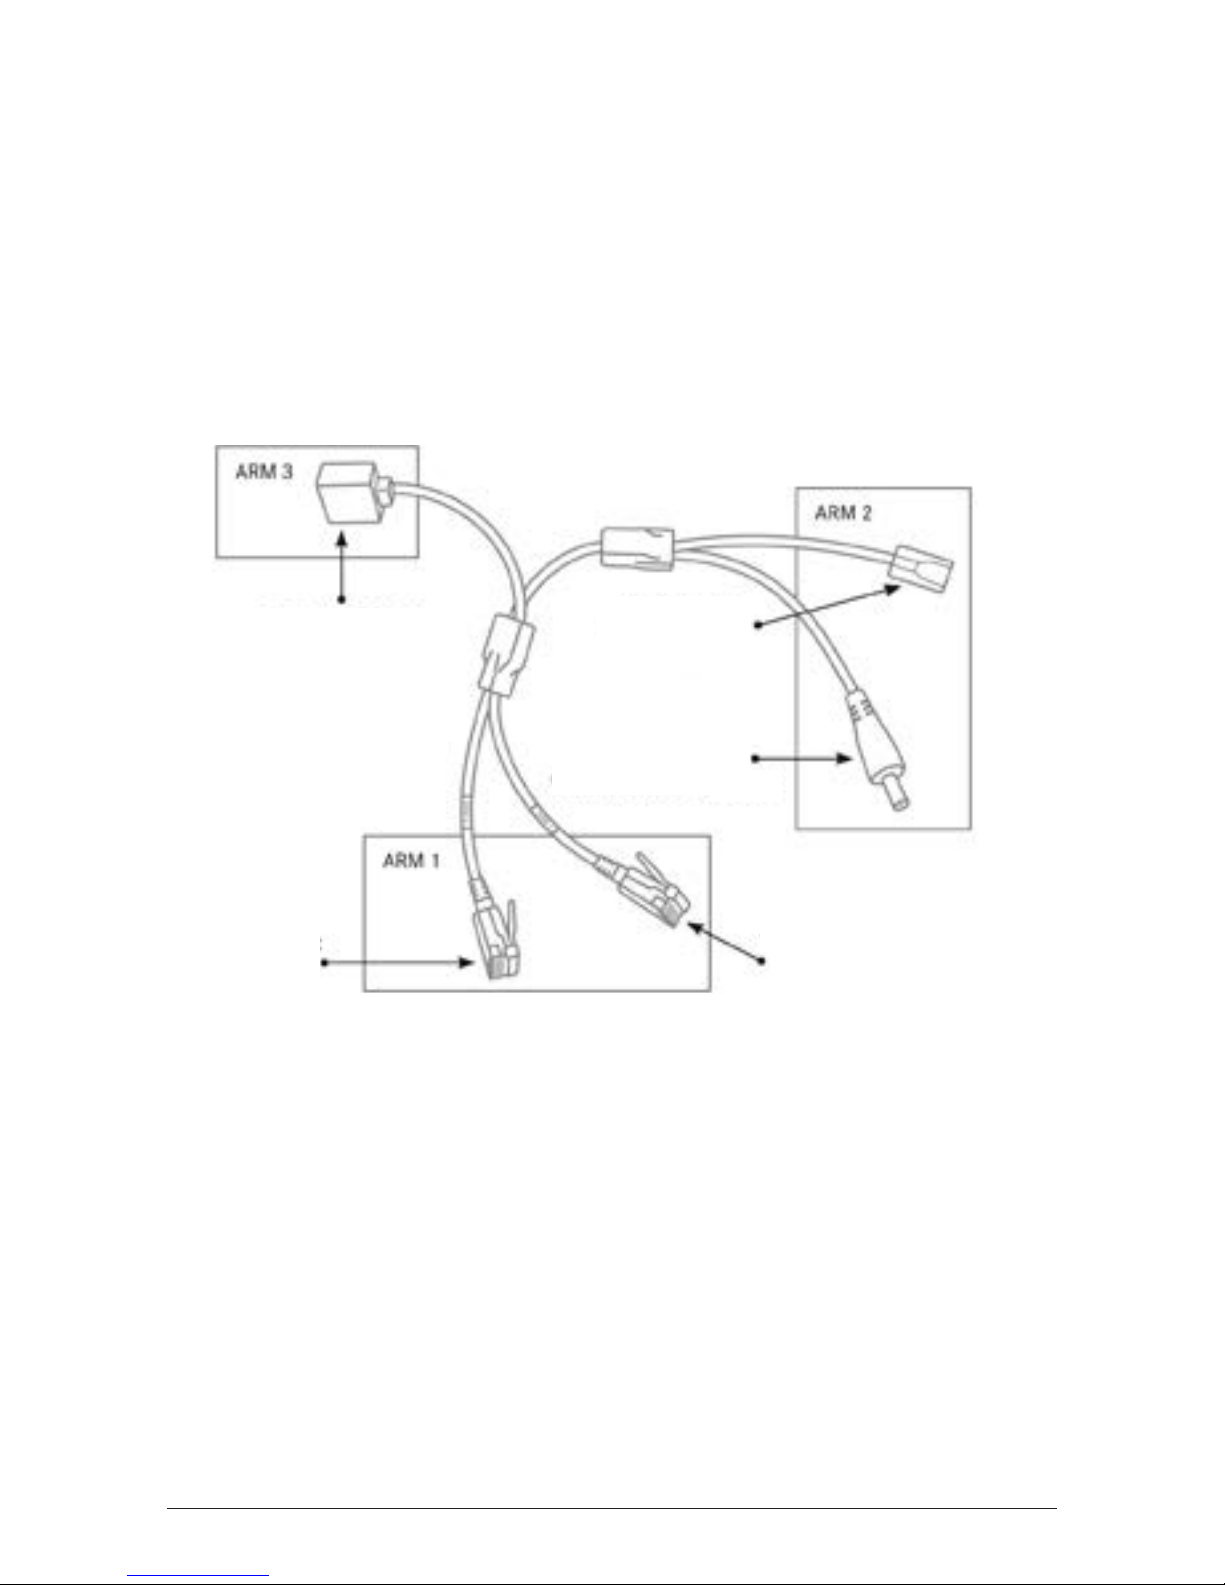
PC-EF TP OS i5100 M ERCH ANT O PERATING GUI DE
70
CONTACTLESS PAYMENTS
9.2 GETTING STARTED.
ViVOtech Contactless Card Reader.
The ViVOtech contactless card reader operates as a card reader only. The ViVOtech
contactless card reader kit includes:
• a ViVOtech contactless card reader
• a detachable connecting cable
Detachable Connecting Cable:
Note:
The detachable connecting cable has 5 connections and is segmented into 3 major
“arms” in this diagram, for easy identification.
• Arm 1: Cables to the PC-EFTPOS i5100 terminal.
• Arm 2: Cables to the contactless reader cable.
• Arm 3: Cable to the POS PC.
RS232 Serial Port
RJ12 Connector
(COM 1)
RJ45 Connector
Power Connector
RJ12 Connector
(COM 2)
Page 73

PC-EF TP OS i5100 M ERCH ANT O PERATING GUI DE
71
CONTACTLESS PAYMENTS
Connecting the ViVOtech Contactless Card Reader.
The ViVOtech contactless card reader is connected directly to the PC-EFTPOS i5100
terminal using the detachable connecting cable.
The ViVOtech contactless card reader can be connected to a PC-EFTPOS i5100
terminal which is being used in either integrated mode or standalone lite mode.
Connecting to the PC-EFTPOS i5100 Terminal using
Integrated Mode.
a. Remove the cable management clip on the base of the EFTPOS terminal as shown
.
Cable Management Clip
b. Refer to section 2.3 Connecting the PC-EFTPOS i5100 Terminal for information
regarding installation and connection of the terminal
.
c. Remove the RS232 serial cable from the RS232-1 port on the base of the terminal.
Insert this same RS232 serial cable into the RS232 serial port on the contactless
detachable connecting cable (Arm 3).
Base of i5100 terminal
RS232-1 RS232-2
Power
Page 74

PC-EF TP OS i5100 M ERCH ANT O PERATING GUI DE
72
CONTACTLESS PAYMENTS
d. Insert the RJ12 connector (COM 1) on the contactless detachable connecting cable
(Arm 1), into the RS232-1 port on the base of the terminal.
e. Insert the RJ12 connector (COM 2) on the contactless detachable connecting cable
(Arm 1), into the RS232-2 port on the base of the terminal.
f. Insert the RJ45 connector on the contactless detachable connecting cable (Arm 2),
into the RJ45 port on the contactless reader cable.
Contactless
Reader
Cable
RJ45 Connector
Power Port
Power Connector
RJ45 Port
Detachable Connecting Cable
(Arm 2)
g. Insert the power connector on the contactless detachable connecting cable
(Arm 2), into the power port on the contactless reader cable.
h. The contactlesss card reader will power up and display WELCOME on the screen.
i. Re-insert the cable management clip on the base of the EFTPOS terminal to
keep the cables in place.
RJ12 Connector (COM 1)
RJ12 Connector (COM 2)
Detachable Connecting Cable (Arm 1)
Page 75

PC-EF TP OS i5100 M ERCH ANT O PERATING GUI DE
73
CONTACTLESS PAYMENTS
Connecting to the PC-EFTPOS i5100 Terminal using Standalone
Lite Mode.
a. Remove the cable management clip on the base of the EFTPOS terminal
as shown.
Cable Management Clip
b. Refer to section 2.3 Connecting the PC-EFTPOS i5100 Terminal for information
regarding installation and connection of the terminal.
c. If the RS232 serial cable is connected to the base of the terminal, remove it from
the RS232-1 port. Insert this same RS232 serial cable into the RS232 serial port
on the contactless detachable connecting cable (Arm 3). (Note: The RS232 serial
cable may or may not be connected, when the terminal is using standadalone lite
mode).
Base of i5100 terminal
RS232-1 RS232-2
Power
d. Insert the RJ12 connector (COM 1) on the contactless detachable connecting
cable (Arm 1), into the RS232-1 port on the base of the terminal.
Page 76

PC-EF TP OS i5100 M ERCH ANT O PERATING GUI DE
74
CONTACTLESS PAYMENTS
Connecting the ViVOtech Contactless Card Reader.
The ViVOtech contactless card reader is connected directly to the PC-EFTPOS i5100
terminal using the detachable connecting cable.
The ViVOtech contactless card reader can be connected to a PC-EFTPOS i5100
terminal which is being used in either integrated mode or standalone lite mode.
Connecting to the PC-EFTPOS i5100 Terminal using
Integrated Mode.
a. Remove the cable management clip on the base of the EFTPOS terminal as shown
.
Cable Management Clip
b. Refer to section 2.3 Connecting the PC-EFTPOS i5100 Terminal for information
regarding installation and connection of the terminal
.
c. Remove the RS232 serial cable from the RS232-1 port on the base of the terminal.
Insert this same RS232 serial cable into the RS232 serial port on the contactless
detachable connecting cable (Arm 3).
Base of i5100 terminal
RS232-1 RS232-2
Power
Page 77

PC-EF TP OS i5100 M ERCH ANT O PERATING GUI DE
75
CONTACTLESS PAYMENTS
d. Insert the RJ12 connector (COM 1) on the contactless detachable connecting cable
(Arm 1), into the RS232-1 port on the base of the terminal.
e. Insert the RJ12 connector (COM 2) on the contactless detachable connecting cable
(Arm 1), into the RS232-2 port on the base of the terminal.
f. Insert the RJ45 connector on the contactless detachable connecting cable (Arm 2),
into the RJ45 port on the contactless reader cable.
Contactless
Reader
Cable
RJ45 Connector
Power Port
Power Connector
RJ45 Port
Detachable Connecting Cable
(Arm 2)
g. Insert the power connector on the contactless detachable connecting cable
(Arm 2), into the power port on the contactless reader cable.
h. The contactlesss card reader will power up and display WELCOME on the screen.
i. Re-insert the cable management clip on the base of the EFTPOS terminal to
keep the cables in place.
RJ12 Connector (COM 1)
RJ12 Connector (COM 2)
Detachable Connecting Cable (Arm 1)
Page 78

PC-EF TP OS i5100 M ERCH ANT O PERATING GUI DE
76
CONTACTLESS PAYMENTS
9.3 TRANSACTION PROCEDURES.
How to Process a Sale.
No PIN or Signature Verification Required.
If the transaction meets the card issuer requirements, no PIN will need to be entered
and/or no signature will be required to complete the transaction.
Contactless Reader
Display
Terminal Display Procedure
WELCOME
READY
LOGO
hh:mm dd/mm/yy
Initiate a PURCHASE
transaction via the POS.
PRESENT CARD
$XX.XX
PURCHASE $XX.XX
PRESENT CARD
The cardholder can hold/
tap their card on the
contactless card reader.
PROCESSING
ONLINE
CARD SALE
PROCESSING
The terminal is
connecting to the bank
and processing the
transaction.
TRANSACTION
APPROVED
CARD SALE
APPROVED
This message is
displayed when the
transaction is approved.
Page 79

PC-EF TP OS i5100 M ERCH ANT O PERATING GUI DE
77
CONTACTLESS PAYMENTS
PIN or Signature Verification Required.
If the transaction does not meet the card issuer requirements, a PIN will need to be
entered and/or a signature will be required to complete the transaction.
Contactless Reader
Display
Terminal Display Procedure
WELCOME
READY
LOGO
hh:mm dd/mm/yy
Initiate a PURCHASE
transaction via the POS.
PRESENT CARD
$XX.XX
PURCHASE $XX.XX
PRESENT CARD
The cardholder can hold/
tap their card on the
contactless card reader.
PIN OR ENTER
ON TERMINAL
CREDIT $XX.XX
PIN OR ENTER
Where prompted, have
the cardholder key in their
PIN and press ENTER, or
just press ENTER.
PROCESSING
ONLINE
CARD SALE
PROCESSING
The terminal is
connecting to the bank
and processing the
transaction.
SIGNATURE
REQUIRED
VERIFY SIGNATURE
CORRECT?
If signature is required:
Have the customer
sign the receipt. If the
signature matches the
signature on the card,
press the soft key next to
YES, or press ENTER.
(NO or CANCEL will
cancel the transaction).
TRANSACTION
APPROVED
CARD SALE
APPROVED
This message is
displayed when the
transaction is approved.
Page 80

PC-EF TP OS i5100 M ERCH ANT O PERATING GUI DE
78
CONTACTLESS PAYMENTS
How to Process a Refund.
The card issuer will determine if a PIN will need to be entered and/or a signature will
be required to complete the transaction.
Contactless Reader
Display
Terminal Display Procedure
WELCOME
READY
LOGO
hh:mm dd/mm/yy
Initiate a REFUND
transaction via the POS.
PRESENT CARD
$XX.XX
REFUND $XX.XX
PRESENT CARD
The cardholder can hold/
tap their card on the
contactless card reader.
PIN OR ENTER
ON TERMINAL
CREDIT $XX.XX
PIN OR ENTER
Where prompted, have
the cardholder key in their
PIN and press ENTER, or
just press ENTER.
PROCESSING
ONLINE
CARD RFND
PROCESSING
The terminal is
connecting to the bank
and processing the
transaction.
SIGNATURE
REQUIRED
VERIFY SIGNATURE
CORRECT?
If signature is required:
Have the customer
sign the receipt. If the
signature matches the
signature on the card,
press the soft key next to
YES, or press ENTER.
(NO or CANCEL will
cancel the transaction).
TRANSACTION
APPROVED
CARD RFND
APPROVED
This message is
displayed when the
transaction is approved.
Page 81

PC-EF TP OS i5100 M ERCH ANT O PERATING GUI DE
79
CONTACTLESS PAYMENTS
Card Read Error.
If the reader cannot read the card correctly when it is tapped, the cardholder may be
prompted to insert/swipe the card on the terminal.
Contactless Reader
Display
Terminal Display Procedure
WELCOME
READY
LOGO
hh:mm dd/mm/yy
Initiate a PURCHASE
transaction via the POS.
PRESENT CARD
$XX.XX
PURCHASE $XX.XX
PRESENT CARD
The cardholder can hold/
tap their card on the
contactless card reader.
RETRY CARD
TAP
READER ERROR
PRESENT CARD
This message will be
displayed if there is an
error reading the card.
The cardholder can hold/
tap their card on the
contactless card reader
again.
NO CONTACTLESS
INSERT/SWIPE
CARD
READER ERROR
INSERT/SWIPE CARD
If the error re-occurs,
the cardholder will be
prompted to insert/swipe
their card on the terminal.
Continue processing the
transaction using the
terminal.
Page 82

PC-EF TP OS i5100 M ERCH ANT O PERATING GUI DE
80
MINIMISING FRAUD
Page 83

PC-EF TP OS i5100 M ERCH ANT O PERATING GUI DE
81
MINIMISING FRAUD
10.0 MINIMISING FRAUD.
At BankSA, we take fraud seriously, and you
should too.
Fraud can cost your business significant
amounts of money. Certain types of merchants
– based on the types of goods sold – are more
prone to fraudulent transactions than others. We
believe it is essential for you to have a sound
understanding of credit card fraud, how it can be
detected and how it can be prevented.
Additional fraud prevention information is available on the banksa website at:
http://www.banksa.com.au/business/payment-solutions/
10.1 CCV Security Codes.
What is CCV?
The three or four digit value printed on a payment card, used to verify card-notpresent transactions.
CCV security codes are a way to lessen the risk of fraud and chargeback when the
cardholder is not physically present, or when a card cannot be inserted/swiped
successfully. In these cases you can key in the card number.
A CCV security code is printed on the card but does not appear on receipts. When
you key in the CCV code, a check is made that the code matches the card number.
This gives greater assurance that the customer is in possession of the card. CCV
codes are numbers of three or four digits, depending on the card type.
Note:
• Some cards do not have a CCV code.
• CCV (Card Check Value) is also known as CVV and CVC.
4000 0 012 34 56 7890 123
AUTHORISED SIGNATURE
NOT VALID U NLES S SIGNE D
CCV
Page 84

PC-EF TP OS i5100 M ERCH ANT O PERATING GUI DE
82
TROUBLE SHOOTING
Where Can I Find the CCV Security Code?
Some cards, for example MasterCard and Visa, have a three-digit CCV printed on
the signature panel on the reverse side of the card. Other numbers may precede the
CCV. The last three digits on the signature panel are the CCV.
Other cards, for example American Express, have a four-digit CCV on the front of the
card, above the account number.
Some cards do not have a CCV.
Should I Save CCV Security Codes?
No. It is prohibited to store the CCV codes. They must remain secret. You must not
write them down or save them electronically. Doing so might lead to heavy penalties.
Manual Authorisations and CCV
If your terminal is not functioning at all, you can revert to a manual imprinter. When
seeking authorisation for a credit card transaction above the floor limit, be sure to
provide the CCV number if available.
Page 85

PC-EF TP OS i5100 M ERCH ANT O PERATING GUI DE
83
TROUBLE SHOOTING
11.0 TROUBLE SHOOTING.
11.1 Hardware Faults.
Hardware Faults Action
No response from
the terminal
1. Ensure that the power cable is securely connected to the
terminal.
2. Power off the terminal for 10 seconds.
3. Power on the terminal.
4. Retry the transaction.
5. Call the Helpdesk if the problem persists.
Terminal not
reading cards
1. Re-insert/swipe the card as per instructions in section 4.0.
2. If there is still no response from the card reader power off
the terminal for 10 seconds.
3. Power on the terminal.
4. Retry the transaction.
5. Call the Helpdesk if the problem persists.
Paper jamming
Or
Not feeding
Or
Not printing
1. Remove the paper roll from the printer to ensure that
there is no paper caught.
2. If the existing paper roll is damaged in any way then
replace this with a new roll.
3. If the problem continues power off the terminal for 10
seconds.
4. Power on the terminal.
5. If the terminal is using standalone lite mode, initialise the
terminal by pressing ENTER until INIT is displayed as one
of the options. Press the select key directly beneath INIT.
6. The terminal should print a logon receipt. This will confirm
if the printer is operational.
7. Re-test the printer using the FEED button.
8. Call the Helpdesk if the problem persists.
Response
Code Location
Page 86

PC-EF TP OS i5100 M ERCH ANT O PERATING GUI DE
84
TROUBLE SHOOTING
11.2 Response Codes.
Below is a copy of a receipt which indicates the location of the Response Codes.
CUSTOMER COPY
BANKSA TEST LAB
97 KING WILLIAM STREET
ADELAIDE SA 5000
MasterCard
………… 1234 (C)
ACCT TYPE CHEQUE
TRANS TYPE PURCHASE
TERMINAL ID 28010101
POS REF 123456789876
INV/ROC NO 000553
BANK REF 001258
DATE/TIME 23 JUN 09 11:35
AID A0000000041010
TC 244F234AC7FD7547
AMOUNT $20.00
TOTAL AUD $20.00
AUTH 182126
APPROVED 00
Remember to always check the
receipt to verify if a transaction has
been approved.
Where your terminal displays a response code not listed in this guide, and you use
an electronic terminal supplied by us, you should phone the EFTPOS Helpdesk on
1300 650 977 for clarification.
Page 87

PC-EF TP OS i5100 M ERCH ANT O PERATING GUI DE
85
TROUBLE SHOOTING
Code Display Cause/Action
00 APPROVED • The transaction has been approved
08 APPROVED
With signature
• The transaction has been approved if the
signature is correct
Y1 APPROVED • The transaction has been approved
Y3 APPROVED • The transaction has been approved
01 CALL FOR AUTH • Unable to obtain electronic authorisation
• Call for authorisation from appropriate
authorisation centre then complete manual
sales voucher if approved
02 CALL FOR AUTH • Unable to obtain electronic authorisation
• Call for authorisation from appropriate
authorisation centre then complete manual
sales voucher if approved
03 INVALID PPID • Contact the Helpdesk
04 CONTACT CARD ISSUER • Obtain another form of payment
• Advise cardholder to contact card issuer
05 CANNOT PAY • Obtain another form of payment
• Advise cardholder to contact card issuer
06 CANNOT PAY • Obtain another form of payment
• Advise cardholder to contact card issuer
08 APPROVED PENDING
SIGNATURE
• The transaction is approved if the signature
is correct
• The cardholder should now sign the receipt
12 INVALID TRANSACTION • Retry the transaction selecting a different
account
• If the transaction is declined again, obtain
another form of payment
• Advise cardholder to contact card issuer
13 CANNOT PAY • Obtain another form of payment
• Advise cardholder to contact card issuer
14 CONTACT CARD ISSUER • Obtain another form of payment
• Advise cardholder to contact card issuer
Page 88

PC-EF TP OS i5100 M ERCH ANT O PERATING GUI DE
86
TROUBLE SHOOTING
Code Display Cause/Action
30 FORMAT ERR CALL
HELPDESK
• Power the terminal off and on and retry the
transaction
• Contact the Helpdesk whilst the cardholder
is present to confirm if the transaction has
been processed correctly
39 WRONG ACCOUNT • Retry the transaction, selecting a different
account
• If the transaction is declined again, obtain
another form of payment
• Advise cardholder to contact card issuer
41 CONTACT CARD ISSUER • Contact manual Credit Card Authorisations
• Press the option for extension 500
43 CONTACT CARD ISSUER • Contact manual Credit Card Authorisations
• Press the option for extension 500
51 CANNOT PAY • Obtain another form of payment
• Advise cardholder to contact card issuer
52 WRONG ACCOUNT • Retry the transaction, selecting a different
account
• If the transaction is declined again, obtain
another form of payment
• Advise cardholder to contact card issuer
53 WRONG ACCOUNT • Retry the transaction, selecting a different
account
• If the transaction is declined again, obtain
another form of payment
• Advise cardholder to contact card issuer
54 EXPIRED CARD
CANNOT PAY
• Check the card expiry date
• Obtain another form of payment
• Advise cardholder to contact card issuer
55 INVALID PIN • The cardholder has entered the wrong PIN
• Retry the transaction with the correct PIN
56 CONTACT CARD ISSUER • Obtain another form of payment
• Advise cardholder to contact card issuer
Page 89

PC-EF TP OS i5100 M ERCH ANT O PERATING GUI DE
87
TROUBLE SHOOTING
Code Display Cause/Action
58 INVALID TRANSACTION • Obtain another form of payment
• Advise cardholder to contact card issuer
59 CANNOT PAY • Obtain another form of payment
• Advise cardholder to contact card issuer
61 CANNOT PAY • Obtain another form of payment
• Advise cardholder to contact card issuer
62 CANNOT PAY • Obtain another form of payment
• Advise cardholder to contact card issuer
65 CANNOT PAY • Obtain another form of payment
• Advise cardholder to contact card issuer
75 CANNOT PAY • Retry the transaction
• If the transaction is declined again, obtain
another form of payment
• Advise cardholder to contact card issuer
90 PLEASE RETRY • Retry the transaction
• If the transaction is declined again, obtain
another form of payment
• Advise cardholder to contact card issuer
91 ISSUER NOT AVAILABLE • Bank is unavailable; retry the transaction
• If the transaction is declined again follow
manual fall back procedures as explained in
section 7.2
94 CANNOT PAY • Obtain another form of payment
• Advise cardholder to contact card issuer
97 SETTLE NOT AVAILABLE • A settlement has been processed in the
last 24 hours, or the settlement is being
attempted between 9.30pm and 11.00pm
(AEST)
• Retry during settlement hours, making sure
24 hours have elapsed since the previous
settlement
Page 90

PC-EF TP OS i5100 M ERCH ANT O PERATING GUI DE
88
GLOS SARY OF COMM ON TER MS
Code Display Cause/Action
98 SYSTEM ERROR • Turn terminal off, then back on, and retry
the transaction
• Contact the Helpdesk if the problem
persists
TC DECLINED TC • Retry the transaction, selecting a different
account
• If the transaction is declined again, obtain
another form of payment
• Advise cardholder to contact card issuer
TL DECLINED TL • Signature error
XO DECLINED TIME OUT • Retry the transaction
• Contact the Helpdesk if the problem
persists
X7 CANCELLED SYSTEM
ERROR
• Retry the transaction
• Contact the Helpdesk if the problem
persists
Z1 CANNOT PAY • Obtain another form of payment
Z3 ISSUER UNAVAILABLE • Obtain another form of payment
Z4 CANNOT PAY • Obtain another form of payment
Page 91

PC-EF TP OS i5100 M ERCH ANT O PERATING GUI DE
89
NOTES
12.0 GLOSSARY OF COMMON TERMS.
CCV Number
(Card Check Value)
An additional security feature used in transactions where
the card number is entered manually, for example when the
cardholder is not present (MOTO or ECOM).
Charge Card American Express (AMEX), Diners Club or Japanese
Credit Bureau (JCB).
Credit Card MasterCard or Visa.
Debit (EFTPOS) Card A card that gives the customer access to a cheque account
or savings account. The customer must be present when
accessing these account types. Details cannot be hand-keyed
into an EFTPOS terminal.
Electronic Fall Back
(EFB)
The ability to continue performing transactions on the terminal
when communication with the host has been lost.
Manual Fall Back The use of a manual ‘click clack’ imprinter as a back-up, when
an electronic terminal is not working.
Merchant (ID)
Number
An eight digit number used to identify your business and
obtain an authorisation code for credit card transactions. This
number is unique to your business, and can be found on any
of the following:
• An EFTPOS receipt printed from your POS or terminal.
• Your merchant statement.
• The metal plate on your manual imprinter.
ROC Number The ‘Record of Charge’ number found on your terminal receipt.
Terminal (ID) Number An eight digit number that identifies your EFTPOS terminal.
The terminal ID can be found on any transaction receipt or
EFTPOS report printed from your POS.
Notes
Page 92

Information contained in this brochure was correct at time of printing (December 2011) and is subject to change.
BankSA – A Division of Westpac Banking Corporation ABN 33 007 457 141 AFSL 233714 ACL 233714.
BSA04037 (10/14)
 Loading...