

PBZ CropCare F2500 Owner's Manual

by PBZ
Owner's Manual
2.5 Gallon Turf Foam Marker
Model F2500
PBZ LLC | 295 Wood Corner Rd | Lititz PA 17543
www.CropCareEquipment.com | (717) 738-7365
A Paul B Zimmerman Inc. Company
Form: F2500OM
Rev. Date 08/16

CropCare® would like to thank you for choosing to purchase our model F2500 turf foam marker system. We appreciate your
business and want to personally ll all of your equipment and sprayer needs. We also desire to provide you with the technical support
and needed parts that will allow you to continue using your turf foam marker without disruption. For parts and service, please contact
an authorized CropCare® dealer.
Table Of Contents
Identication of Machine ...................................................................2
Specications ..........................................................................................2
Before You Begin ....................................................................................2
Safety Precautions.................................................................................3
General Guidelines .....................................................................3
Mounting the Turf Foam Marker ......................................................3
Turf Foam Marker Unit ..............................................................4
Wiring Harness ............................................................................4
Discharge Tubes ..........................................................................5
Discharge Hose ...........................................................................5
Operating Instructions ........................................................................5
Maintenance Instructions ..................................................................6
Routine Maintenance ................................................................6
Winterizing your Turf Foam Marker .....................................7
Troubleshooting .........................................................................7
Breakdowns & Parts Lists ....................................................................8
F2500 Breakdown .......................................................................8
F2500 Parts List ...........................................................................9
Decal List .......................................................................................9
CM40 Compressor Breakdown ........................................... 10
F2504 Discharge Tube Breakdown...................................10
CropCare
Contact Us ............................................................................................. 12
®
Limited Warranty ....................................................... 11
Ordering Parts ........................................................................... 12
Identication of Machine
• Model #’s: F2500
• The model number and revision identication decal is located on foam marker frame beside compressor.
Specications
2.5 gallon Turf Foam Marker
Tank Capacity .......................................................................2.5 gallons
Power usage ................................7 amp draw / 15 amp start load
Min power supply ...................................................12 volt / 15 amp
Max continuous run time ........................................................90 min
Max boom length ...............................................................................30’
Wiring Harness .........................................................................................
16’ length
Shipping weight ......................................................................................
17 lbs
Before You Begin
Please read and understand this manual and its instructions and warnings completely before operating
the turf foam marker.
• Be aware of all safety guidelines, warnings, and cautions including those of the sprayer, no-till planter, or any
other piece of equipment that the turf foam marker may be mounted on.
• Read and understand the warnings and instructions of the foam concentrate that you are using.
• Always use an approved foam concentrate.
• Ensure that you have a power source that meets the requirements of 12 volt DC and 15 amps.
2

Safety Precautions
General Guidelines
Every year many unnecessary accidents occur due to improper equipment handling and a disregard for safety precautions. You, the
operator, can avoid accidents by observing the precautions listed in this section.
• The operator should be a responsible adult. Do not
allow persons to operate the turf foam marker until they
have displayed a thorough understanding of turf foam
marker safety precautions and operational use.
• Never attempt to operate the turf foam marker while
under the inuence of alcohol or drugs.
Warning
• Always use an approved foam solution. Do not, for any
reason, use dish soap, hand soap, or any other cleaning
product. The use of an unapproved foaming solution
could result in lowered performance or machine
damage.
• Do Not eliminate the fuse on the battery wiring
harness under any circumstances. Elimination of
the fuse could result in damage to the machine
or personal injury.
• Always disconnect the power before performing
maintenance or repairs on the turf foam marker. Failure
to adhere to this warning could result in personal injury.
• When performing maintenance on the turf foam marker,
pay close attention to any moving parts. Be especially
aware of the metal fan blade on the compressor.
• Do not touch the surface of the compressor since it may
cause burns during and after operation. See the warning
label on the compressor.
Mounting the Turf Foam Marker
Read Entire Owner’s
Manual Before Operation
Figure 1: Owner’s Manual Decal (DE39)
• Be aware of the location of the owner’s manual warning
decal on the turf foam marker’s frame. Always replace
any warning decals that are not legible or are missing.
(See Figure 1)
• Do Not attempt to adjust the foam discharge rate. This
rate is preset and should never need to be adjusted. Any
such adjustment will void the manufacturer’s warranty.
• If there is any portion of this manual that you do not fully
understand, please contact an authorized CropCare®
dealer.
It is important to follow these mounting instructions to ensure that your CropCare® turf foam marker system operates at its fullest
potential. Please note that these are only general instructions for proper mounting and may not be relevant to all applications. In
certain applications, you may need be creative in order to achieve the best mounting technique. If you are having trouble mounting
your turf foam marker, contact an authorized CropCare® dealer for service.
3
Mounting the Turf Foam Marker
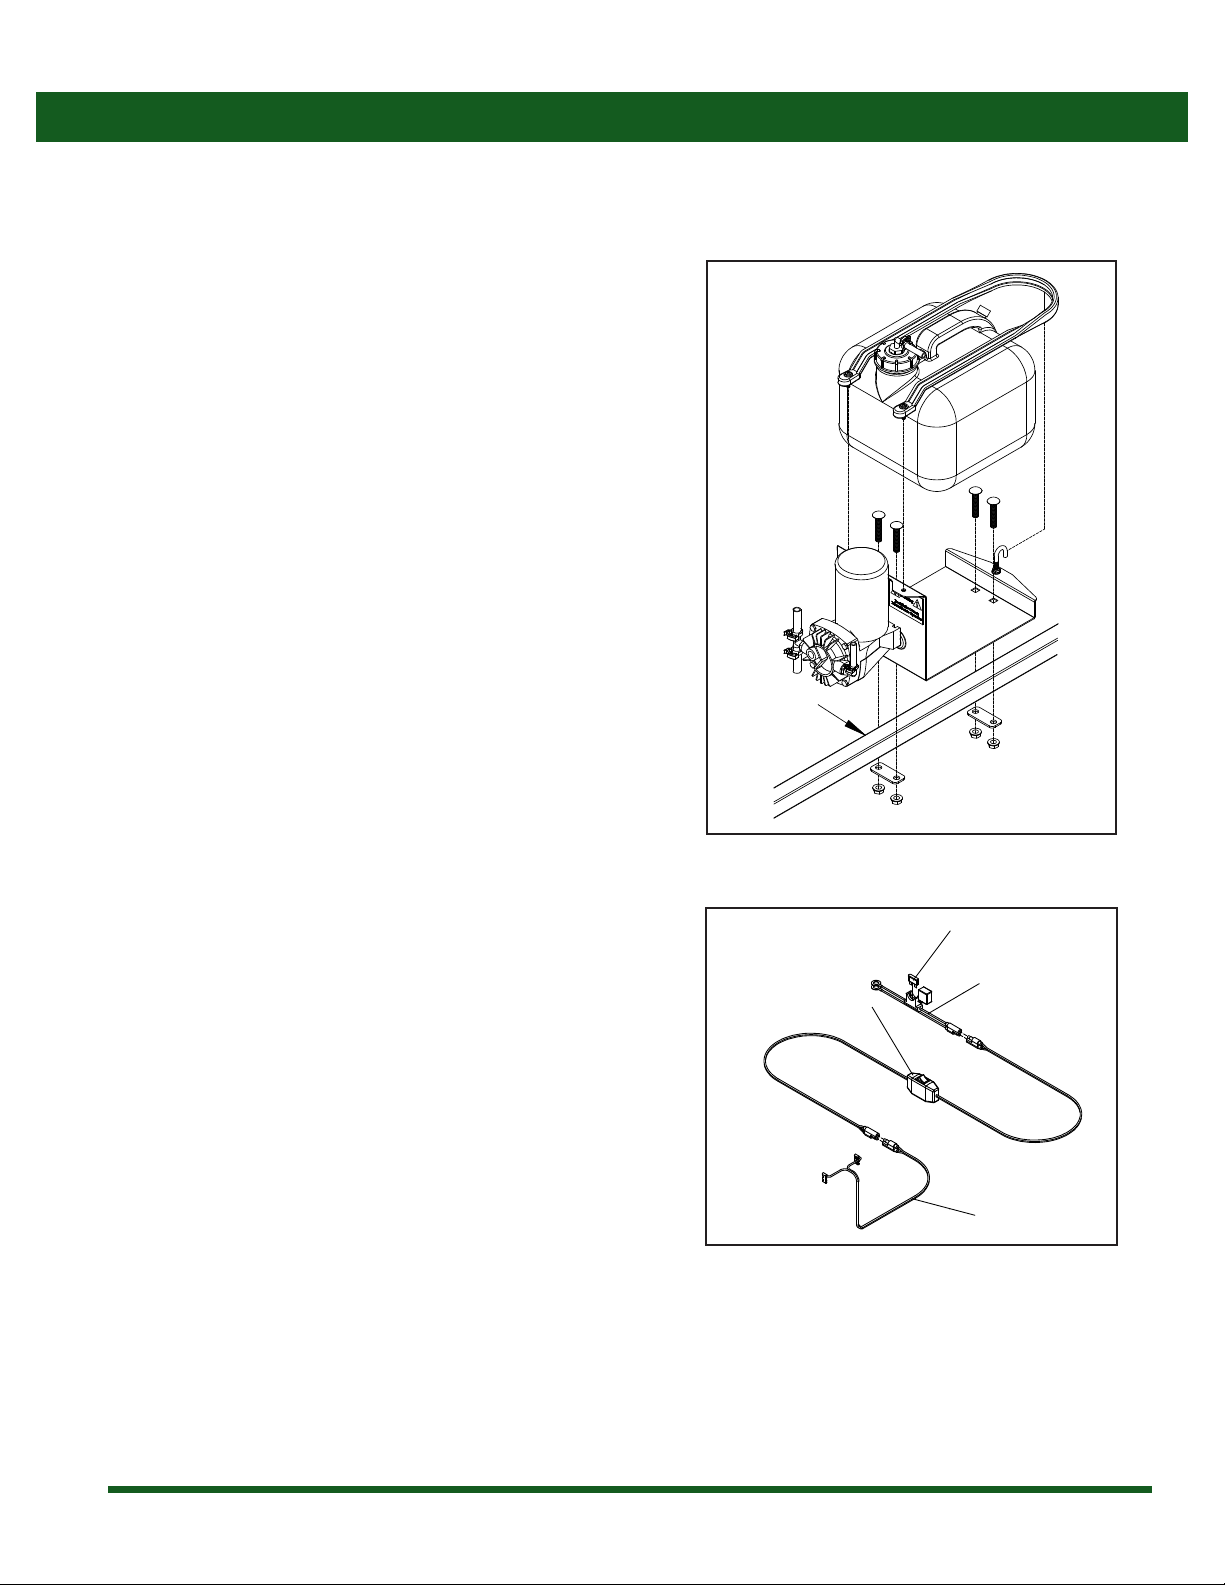
Turf Foam Marker Unit
1. If mounting the turf foam marker on a CropCare®
sprayer, place it on the center of the boom frame (Figure
2). Attach the turf foam marker by using the included
3/8” carriage bolts to clamp the turf foam marker frame
around the main boom tube. The unit may be mounted in
either direction on the boom.
2. If mounting the turf foam marker on any other application,
begin by choosing a convenient location that is easily
accessible for mounting and lling the solution tank. The
turf foam marker should be mounted in the center of the
machine so both discharge hoses are the same length, and
where it will receive a minimal amount of dust or dirt.
3. The mounting location must be able to support the weight
of the turf foam marker unit with a full solution tank.
4. Secure the turf foam marker unit by attaching the turf
foam marker frame to your equipment. Use the included
3/8” carriage bolts and ange nuts. Insert the carriage
bolts through the four square holes, which are located
on the bottom of the turf foam marker frame, and secure
them with the ange nuts.
Boom Frame
Wiring Harness
1. The compressor wiring harness (a) has a 2-pronged plug.
This wiring harness needs to be connected to the switch
wiring harness (b) which includes the control switch.
Make sure the colors match (Figure 3).
2. The switch wiring harness (b) needs to be connected to
the battery wire harness (c) which includes the 15 amp
fuse (d). Make sure the colors match (Figure 3).
3. The battery wire harness needs to be connected to
a 12 volt DC power source. Connect the red wire to
a positive power source either at the tractor's battery
terminal or at a power access point with at least 15 amp
capability. The black wire needs to be connected to a
good ground source or to the negative terminal of the
battery.
4. Ensure that the power source is adequate, since an
inadequate power source could cause numerous problems
with the turf foam marker unit. If you are using a power
access point, ensure that it has at least 15 amp capability.
5. You now need to place the switch in a location where it is
easily accessible for operation. Secure it so that it cannot
fall or become entangled and cause damage.
Figure 2: Turf Foam Marker Unit Mounting
d
c
b
a
Figure 3: Wiring Harness
4
 Loading...