

Pazzles Mini Creative Cutter User Manual

Pazzles
Creative Cutter
Mini
User Guide
www.pazzles.com

© 2003, 2004, 2005 Pazzles. All rights reserved.
Mini Edition 2, January 2007
Trademark Acknowledgements
Adobe® Illustrator and Adobe® Photoshop Elements are either registered trademarks or trademarks of Adobe Systems Incorporated in
the United States and/or in other countries.
AOL® software is a registered trademark of America Online.
CorelDRAW® is a registered trademark or registered trademarks of Corel Corporation or Corel Corporation Limited.
Microsoft® Publisher®, Microsoft® Windows® operating systems, and Outlook® Express are registered trademarks of the Microsoft
Corporation.
PrintShop® and PrintMaster® are registered trademarks of Riverdeep Interactive Learning Limited, and its licensors. All rights
reserved.
QuickTime© is a trademark of Apple Computer, Inc., registered in the US and other countries.
Pazzles
P.O. Box 630, Kuna, ID 83634
(208) 922-3558
Toll Free 1-866-729-9537

Contents
Contents
1 Introduction Welcome to Pazzles Mini Creative Cutter! . . . . . . . . . . . . . . . . . . . . . . . . . . . .1
Viewing the Creative Cutter Basics Video . . . . . . . . . . . . . . . . . . . . . . . .1
Using This Book . . . . . . . . . . . . . . . . . . . . . . . . . . . . . . . . . . . . . . . . . . .1
Recommended Reading Sequence. . . . . . . . . . . . . . . . . . . . . . . . . . .2
Sharing Tips and Ideas . . . . . . . . . . . . . . . . . . . . . . . . . . . . . . . . . . . . . . .2
Contacting Customer Support. . . . . . . . . . . . . . . . . . . . . . . . . . . . . . . . . . 2
2 Installation and
Setup
What To Do Before You Contact the Pazzles Support Team . . . . . . .2
Contents of the Creative Cutter Package . . . . . . . . . . . . . . . . . . . . . . . . . . . . .5
Installing the Software . . . . . . . . . . . . . . . . . . . . . . . . . . . . . . . . . . . . . . . . . . . 6
Installing and Starting the Software . . . . . . . . . . . . . . . . . . . . . . . . . . . . . 6
Setting Up the Cutter and Installing the USB Driver . . . . . . . . . . . . . . . . . . . .6
Attach the Cutter to the Computer . . . . . . . . . . . . . . . . . . . . . . . . . . . . . .6
Install the USB Driver . . . . . . . . . . . . . . . . . . . . . . . . . . . . . . . . . . . . . . .7
Determine the Port the USB to Serial Was Assigned To . . . . . . . . . . . . . . 9
Change the Port Number . . . . . . . . . . . . . . . . . . . . . . . . . . . . . . . . . . . . .9
Install the USB Security Key (Hardlock) . . . . . . . . . . . . . . . . . . . . . . . . . . . . 10
Setting Up the Software . . . . . . . . . . . . . . . . . . . . . . . . . . . . . . . . . . . . . . . . .10
Configuring Toolbars and Software Settings . . . . . . . . . . . . . . . . . . . . . 11
Select the Plotter . . . . . . . . . . . . . . . . . . . . . . . . . . . . . . . . . . . . . . . . . .13
Select the Port . . . . . . . . . . . . . . . . . . . . . . . . . . . . . . . . . . . . . . . . . . . .13
Working With the Blade . . . . . . . . . . . . . . . . . . . . . . . . . . . . . . . . . . . . . . . . 13
Characteristics of Properly Installed Blades . . . . . . . . . . . . . . . . . . . . . . 13
Replacing the Blade . . . . . . . . . . . . . . . . . . . . . . . . . . . . . . . . . . . . . . . .14
Blade Positioning Guide . . . . . . . . . . . . . . . . . . . . . . . . . . . . . . . . . 16
iii

Contents
Working With the Cutting Mat. . . . . . . . . . . . . . . . . . . . . . . . . . . . . . . . . . . . 17
Insert the Mat Into the Cutter . . . . . . . . . . . . . . . . . . . . . . . . . . . . . . . . . 18
How To Tell When You Need a New Mat . . . . . . . . . . . . . . . . . . . . . . . 19
Tips for Getting the Most From Your Cutter Blade and Mat . . . . . . . . . . 19
Care and Usage Guidelines fro Cutting Mats . . . . . . . . . . . . . . . . . 19
3 Basic Procedures for
Using the Mini
Creative Cutter
Introducing the Cutting Control Panel . . . . . . . . . . . . . . . . . . . . . . . . . . . . . . 21
Settings for the Cutting Control Panel . . . . . . . . . . . . . . . . . . . . . . . . . . 22
Material . . . . . . . . . . . . . . . . . . . . . . . . . . . . . . . . . . . . . . . . . . . . . 22
Advance . . . . . . . . . . . . . . . . . . . . . . . . . . . . . . . . . . . . . . . . . . . . . 22
Vinyl Size . . . . . . . . . . . . . . . . . . . . . . . . . . . . . . . . . . . . . . . . . . . 22
Zoom Tools . . . . . . . . . . . . . . . . . . . . . . . . . . . . . . . . . . . . . . . . . . 22
Color Boxes . . . . . . . . . . . . . . . . . . . . . . . . . . . . . . . . . . . . . . . . . . 22
Panels . . . . . . . . . . . . . . . . . . . . . . . . . . . . . . . . . . . . . . . . . . . . . . 22
Starting and Using the Cutter . . . . . . . . . . . . . . . . . . . . . . . . . . . . . . . . . . . . . 22
Step 1: Start the Cutter . . . . . . . . . . . . . . . . . . . . . . . . . . . . . . . . . . . . . . 23
Step 2: Start the Software. . . . . . . . . . . . . . . . . . . . . . . . . . . . . . . . . . . . 23
Step 3: Make the Cut . . . . . . . . . . . . . . . . . . . . . . . . . . . . . . . . . . . . . . . 24
Change the Page Size . . . . . . . . . . . . . . . . . . . . . . . . . . . . . . . . . . . . . . . 26
Tips for Determining Proper Pressure to Assure Clean Cuts . . . . . . . . . . 27
Changing the Position of the Paper and Blade Carriage . . . . . . . . . . . . . . . . . 27
Fixing Problems that Occur During Cutting . . . . . . . . . . . . . . . . . . . . . . . . . . 28
Canceling a Cutting Job . . . . . . . . . . . . . . . . . . . . . . . . . . . . . . . . . . . . . 28
Cutter Starts to Cut Poorly . . . . . . . . . . . . . . . . . . . . . . . . . . . . . . . . . . . 28
4 Creative Cutter
Tutorials
iv
Tutorial 1: Import a Graphic File, Add a Shadow Mat, and Fill a Page With
Multiple Iimages . . . . . . . . . . . . . . . . . . . . . . . . . . . . . . . . . . . . . . . . . . . . . . 31
Import the Graphic File and the Software Program . . . . . . . . . . . . . . . . . 31
Find and Import an Image . . . . . . . . . . . . . . . . . . . . . . . . . . . . . . . . . . . 33
Adjusting the Blade Carriage . . . . . . . . . . . . . . . . . . . . . . . . . . . . . 27
Step 1: Insert an Images CD . . . . . . . . . . . . . . . . . . . . . . . . . . . . . . 31
Step 2: Open the Pazzles Creative Cutter Program . . . . . . . . . . . . . 32

Contents
Step 2: Create a Shadow Mat for the Image . . . . . . . . . . . . . . . . . . 34
Multiply the Image and Fill the Page . . . . . . . . . . . . . . . . . . . . . . . . . . . 36
Step 1: Select and Position the Image . . . . . . . . . . . . . . . . . . . . . . . 36
Step 2: Multiply the Image and Fill the Page Across . . . . . . . . . . . .37
Step 3: Multiply the Image and Fill the Page Down . . . . . . . . . . . . 39
Make the Cut . . . . . . . . . . . . . . . . . . . . . . . . . . . . . . . . . . . . . . . . . 40
Pressure Adjustments . . . . . . . . . . . . . . . . . . . . . . . . . . . . . . . . . . .41
Cut the Shadow Mat . . . . . . . . . . . . . . . . . . . . . . . . . . . . . . . . . . . . . . . . 41
Step 1: Cut the Shadow Mat Pieces. . . . . . . . . . . . . . . . . . . . . . . . .41
Step 2: Separate the Shadow Mat From the Image (Optional) . . . . . 41
Tutorial 2: Create a Title With Connected Letters, Add a Graphic, and Create a
Shadow . . . . . . . . . . . . . . . . . . . . . . . . . . . . . . . . . . . . . . . . . . . . . . . . . . . . . 42
Create your title . . . . . . . . . . . . . . . . . . . . . . . . . . . . . . . . . . . . . . . . . . . 42
Step 1: Prepare the software . . . . . . . . . . . . . . . . . . . . . . . . . . . . . . 42
Step 2: Type the Title . . . . . . . . . . . . . . . . . . . . . . . . . . . . . . . . . . . 43
Step 3: Connect the Letters. . . . . . . . . . . . . . . . . . . . . . . . . . . . . . . 45
Cut your Title . . . . . . . . . . . . . . . . . . . . . . . . . . . . . . . . . . . . . . . . . . . .48
Step 1: Select the Inside and Outside Part of the Word . . . . . . . . . . 48
Add a Graphic to the Title . . . . . . . . . . . . . . . . . . . . . . . . . . . . . . . . . . . 50
Step 1: Prepare the Software. . . . . . . . . . . . . . . . . . . . . . . . . . . . . . 50
Step 2: Import a Graphic . . . . . . . . . . . . . . . . . . . . . . . . . . . . . . . . 51
Move and Edit the Graphic Image . . . . . . . . . . . . . . . . . . . . . . . . . 52
Weld the Title and the Image . . . . . . . . . . . . . . . . . . . . . . . . . . . . . . . . . 53
Create a Shadow Mat for the Title (Optional) . . . . . . . . . . . . . . . . . . . . . 54
Step 1: Create the shadow . . . . . . . . . . . . . . . . . . . . . . . . . . . . . . . 54
Step 2: Separate and Position the Shadow. . . . . . . . . . . . . . . . . . . . 56
Tutorial 3: Prepare, Scan, and Convert a Basic Line Graph to Cutting Format 58
Prepare the Line Graphic . . . . . . . . . . . . . . . . . . . . . . . . . . . . . . . . . . . . 58
Scan the Drawing into Pazzles Creative Cutter . . . . . . . . . . . . . . . . . . . . 59
Convert the Scan Into Cutting Format: Vectorization . . . . . . . . . . . . . . . 62
Changing the Resolution: What to Do If You Get a MessageAbout
Converting the Image to Black and White. . . . . . . . . . . . . . . . . . . .64
Edit the Image . . . . . . . . . . . . . . . . . . . . . . . . . . . . . . . . . . . . . . . . . . . . 65
v

Contents
Multiply the Image, Fill the Page, and Cut the project . . . . . . . . . . . . . . 68
Tutorial #4: Hand Vectorizing a Graphic or Photo . . . . . . . . . . . . . . . . . . . . . 69
Import an Image Saved on Your Computer. . . . . . . . . . . . . . . . . . . . . . . 69
Trace the Graphic (Hand Vectorize) . . . . . . . . . . . . . . . . . . . . . . . . . . . . 71
Step 1: Review the Location and Uses of Tools . . . . . . . . . . . . . . . 71
Step 2: Set the Line Thickness and Color . . . . . . . . . . . . . . . . . . . . 71
Step 3: Begin Tracing the Picture . . . . . . . . . . . . . . . . . . . . . . . . . . 73
Step 4: Continue Tracing and Refine . . . . . . . . . . . . . . . . . . . . . . . 74
Step 5: Outline Other Features . . . . . . . . . . . . . . . . . . . . . . . . . . . . 76
Step 6: Check your Work . . . . . . . . . . . . . . . . . . . . . . . . . . . . . . . . 78
5 Manipulating
Letters and Shapes
Tools Used for Manipulating Letters and Shapes . . . . . . . . . . . . . . . . . . . . . . 81
Changing the Look of Images and Text . . . . . . . . . . . . . . . . . . . . . . . . . . . . . 83
Changing and Previewing Various Fonts . . . . . . . . . . . . . . . . . . . . . . . . 83
Moving and Resizing Images . . . . . . . . . . . . . . . . . . . . . . . . . . . . . . . . . 84
Selecting an Object . . . . . . . . . . . . . . . . . . . . . . . . . . . . . . . . . . . . 84
Resizing an Object . . . . . . . . . . . . . . . . . . . . . . . . . . . . . . . . . . . . . 85
Moving an Object. . . . . . . . . . . . . . . . . . . . . . . . . . . . . . . . . . . . . . 85
Filling a Page With an Image (Multiplying) . . . . . . . . . . . . . . . . . . . . . . 85
Measuring the Size of a Project . . . . . . . . . . . . . . . . . . . . . . . . . . . . . . . 87
Creating Outlines and Shadows . . . . . . . . . . . . . . . . . . . . . . . . . . . . . . . 87
Outlining Problems and Solutions . . . . . . . . . . . . . . . . . . . . . . . . . 88
Separating the Outline From the Word or Image. . . . . . . . . . . . . . . 88
Distorting Words Into Different Shapes . . . . . . . . . . . . . . . . . . . . . . . . . 89
Creating Curved Titles and Words . . . . . . . . . . . . . . . . . . . . . . . . . . . . . 90
Spelling Words Vertically . . . . . . . . . . . . . . . . . . . . . . . . . . . . . . . . . . . 92
Joining Letters Together . . . . . . . . . . . . . . . . . . . . . . . . . . . . . . . . . . . . 93
vi
Using the Center Technique to Spell Words Vertically . . . . . . . . . . 92
Using the Break Text Technique to Spell Words Vertically . . . . . . 93
Using Visual Text Spacing to Join Letters . . . . . . . . . . . . . . . . . . . 93
How to Lengthen Letters . . . . . . . . . . . . . . . . . . . . . . . . . . . . . . . . 95
Using the Welding Tool to Join Letters With a Bar. . . . . . . . . . . . . 96

Contents
Welding Images and Words Together . . . . . . . . . . . . . . . . . . . . . . . . . . .97
Tips for Fixing Welding Problems . . . . . . . . . . . . . . . . . . . . . . . . . . . . .97
Using Drawing Tools to Change Letters and Images . . . . . . . . . . . . . . . . . . .97
Tips for Using Drawing Tools . . . . . . . . . . . . . . . . . . . . . . . . . . . . . . . .97
Move Point Tool . . . . . . . . . . . . . . . . . . . . . . . . . . . . . . . . . . . . . . . . . .98
Fixing Scanned Images With the Move Point Tool . . . . . . . . . . . . . 98
Break and Move Tool. . . . . . . . . . . . . . . . . . . . . . . . . . . . . . . . . . . . . . . 99
Cut Path Tool . . . . . . . . . . . . . . . . . . . . . . . . . . . . . . . . . . . . . . . . . . . . .99
Join Two Points Tool . . . . . . . . . . . . . . . . . . . . . . . . . . . . . . . . . . . . . . 100
Change Color Line Tool . . . . . . . . . . . . . . . . . . . . . . . . . . . . . . . . . . . . 100
Creating Words Inside a Rectangle. . . . . . . . . . . . . . . . . . . . . . . . . . . . . . . . 101
Creating a Word with Separated Letters . . . . . . . . . . . . . . . . . . . . . . . . 101
Creating a Word With Attached Letters . . . . . . . . . . . . . . . . . . . . . . . . 102
6 Working With
Graphics
Introduction: Pixels, Resolution, Vectors, Oh My! . . . . . . . . . . . . . . . . . . . .105
Manipulating, Scanning, and Importing Graphics . . . . . . . . . . . . . . . . . . . . . 106
Scanning a Picture or Drawing into Pazzles Creative Cutter . . . . . . . . . 106
Importing an Image or Word Created in CorelDraw or Adobe Illustrator . .
106
Converting and Vectorizing Graphics. . . . . . . . . . . . . . . . . . . . . . . . . . . . . . 106
Importing and Vectorizing a Word or Graphic . . . . . . . . . . . . . . . . . . . 106
Tools and Tips for Cleaning Up Vectorized Images . . . . . . . . . . . . . . . 107
Replace a Line . . . . . . . . . . . . . . . . . . . . . . . . . . . . . . . . . . . . . . . 107
Replace a Rough Curved Area . . . . . . . . . . . . . . . . . . . . . . . . . . . 107
Cut Away Points or Bad Areas . . . . . . . . . . . . . . . . . . . . . . . . . . . 108
Smooth a Selected Area . . . . . . . . . . . . . . . . . . . . . . . . . . . . . . . . 108
Convert an Uneven Circle . . . . . . . . . . . . . . . . . . . . . . . . . . . . . . 108
Straighten a Crooked Line . . . . . . . . . . . . . . . . . . . . . . . . . . . . . . 108
Eliminate Stray Lines . . . . . . . . . . . . . . . . . . . . . . . . . . . . . . . . . . 108
Remove Extra Lines . . . . . . . . . . . . . . . . . . . . . . . . . . . . . . . . . . . 109
Avoid Double Lines . . . . . . . . . . . . . . . . . . . . . . . . . . . . . . . . . . . 109
Fixing Vectorizing in Scanned Drawings or Photographs . . . . . . . 109
Converting Low-Resolution Images . . . . . . . . . . . . . . . . . . . . . . . . . . . 109
vii

Contents
Converting an Image to Black and White Before Saving as a Bitmap . . 110
Practice Project: Converting and Vectorizing a Bitmap File . . . . . . . . . 110
Hand-Vectorizing An Image . . . . . . . . . . . . . . . . . . . . . . . . . . . . . . . . . . . . 110
Step 1: Prepare the Image and the Tools. . . . . . . . . . . . . . . . . . . . . . . . 111
Step 2: Trace the Image . . . . . . . . . . . . . . . . . . . . . . . . . . . . . . . . . . . . 111
Step 3: Shape the Lines to Fit the Image . . . . . . . . . . . . . . . . . . . . . . . 113
Tracking Customer Data . . . . . . . . . . . . . . . . . . . . . . . . . . . . . . . . . . . . . . . 115
7 Specialized Cutting
and Finishing
Techniques
Tips for Cutting Unusual Media and Sizes . . . . . . . . . . . . . . . . . . . . . . . . . . 117
Special Techniques for Cutting . . . . . . . . . . . . . . . . . . . . . . . . . . . . . . . . . . 118
Moving Objects From the Front or Back When Working With Lines . . 118
Sorting the Inline Path Before Cutting . . . . . . . . . . . . . . . . . . . . . . . . . 118
Troubleshooting Problems With Inline Cutting. . . . . . . . . . . . . . . 119
Cutting a Project More Than Once . . . . . . . . . . . . . . . . . . . . . . . . . . . . 119
Creating Stencil Cuts . . . . . . . . . . . . . . . . . . . . . . . . . . . . . . . . . . . . . . 119
Scoring Paper. . . . . . . . . . . . . . . . . . . . . . . . . . . . . . . . . . . . . . . . . . . . 120
Scoring and Then Cutting an Image . . . . . . . . . . . . . . . . . . . . . . . 120
Cutting Round Corners. . . . . . . . . . . . . . . . . . . . . . . . . . . . . . . . . . . . . 121
Cutting Around Tight Corners . . . . . . . . . . . . . . . . . . . . . . . . . . . . . . . 122
Creating Stitch Marks . . . . . . . . . . . . . . . . . . . . . . . . . . . . . . . . . . . . . 122
Converting Lines to Stitch Marks . . . . . . . . . . . . . . . . . . . . . . . . . 122
Cutting With the Creative Cutter Pen Tool . . . . . . . . . . . . . . . . . . . . . . . . . . 123
Step 1: Insert the Pen Into the Holder and Into the Cutter . . . . . . . . . . . 123
Step 2: Using the Pen . . . . . . . . . . . . . . . . . . . . . . . . . . . . . . . . . . . . . . 123
8 Troubleshooting
Troubleshooting Tips . . . . . . . . . . . . . . . . . . . . . . . . . . . . . . . . . . . . . . . . . . 127
Guide
viii
Creating a Drawing With Multiple Colors . . . . . . . . . . . . . . . . . . 124
Change the Pen Color and Cut . . . . . . . . . . . . . . . . . . . . . . . . . . . 124

1
Introduction
Welcome to Pazzles Mini Creative Cutter!
Congratulations on your purchase of the Pazzles Mini Creative Cutter and on your move to a
more powerful and creative level of scrapbooking! With the Pazzles Mini Creative Cutter and
software, all scrapbookers can make cuts and use techniques that once were available only from
professional diecutters. This computer-driven blade-cut system puts production of custom cuts
in your hands, without the added costs (often totaling hundreds of dollars) for dies.
To get the most of your cutter, we recommend you spend a few moments becoming acquainted
with the cutter, the Pazzles Creative Cutter software, and the supplemental Creative Cutter
learning aids.
Viewing the Creative Cutter Basics Video
The Creative Cutter Basics video provides quick and clear instructions on installing, setting up,
and using the Creative Cutter. Keep it in a safe place for easy reference if you need to reinstall
your product later on.
Using This Book
Keep this manual handy as you explore the possibilities with the Pazzles Mini Creative Cutter.
We recommend that you skim through it to get an idea of what it contains and then follow the
recommended reading sequence on page 2.
Creative Cutter MINI 1

Chapter 1 Introduction
Recommended Reading Sequence
If you’re very comfortable with Windows® software applications and basic printer
operation, use Chapter 2 to properly install and set up the Pazzles Mini Creative Cutter. Skim
through Chapter 3 and 6. To get the most from the cutter, work through the projects in Chapter
4. Finally, review the contents of the remaining chapters to acquaint yourself with the
techniques you can begin incorporating into your scrapbooking projects.
If you’re more confident in your scrapbooking skills than you are with a computer, we
recommend you carefully read Chapters 2 and 3 first. Then work through all the projects in
Chapter 4.
• Chapter 2 will guide you through proper installation and set up of the Pazzles Creative Cutter.
• Chapter 3 provides concise instructions on starting the cutter, using the software, and making cuts.
• Chapter 4 leads you directly through your first projects! In just a few hours, you will master the
techniques you'll use the most often with the Pazzles Creative Cutter.
When you are comfortable with the techniques in the early Chapters of the book, begin to
explore the scrapbooking techniques described in Chapter 5 and beyond.
Sharing Tips and Ideas
The folks who use the Pazzles Creative Cutter are enthusiastic, knowledgeable, and love to
share tips and ideas! To join the discussions, get tips and suggestions from other scrapbookers,
learn about new products, and obtain free fonts and images, visit our website at
www.pazzles.com
.
Contacting Customer Support
Your Pazzles Mini Creative Cutter comes with the following support packages, based on which
package you have purchased:
• Basic: 30 days unlimited phone support (866-729-9537) from date of shipping.
• Standard: 6 months of unlimited phone support (866-729-9537) from date of shipping.
• Premium: 1 year of unlimited phone support (866-729-9537) from date of shipping.
Following that period, Pazzles provides one year unlimited online support from the Creative
Cutter support team at www.pazzles.com
from 9:00 am to 3:00 pm Mountain Time Monday–Friday at a rate of $25.00 per hour. Before
you contact the support team, please complete the following steps.
What To Do Before You Contact the Pazzles Support Team
. After those periods, technical support is available
• Check your hardware. Are all cords and connectors on the cutter and your computer fully plugged
in? Is the cutter connected to the computer?
• If the problem seems to occur with the software, turn off your computer and then restart it. Try the
operation again.
• Read Chapter 8 for troubleshooting tips.
2 Creative Cutter MINI

• If the problem is with cutting, check the blade and the mat.
Chapter 1 Introduction
Creative Cutter MINI 3

Chapter 1 Introduction
• If the problem remains after completing these steps, contact Pazzles at www.pazzles.com. Include
the following information in your e-mail:
• Your name and (if applicable) your company name
• Your TSID number
• A complete description of the problem and if appropriate, the problem file as an attachment.
4 Creative Cutter MINI
2
Installation and Setup
Contents of the Creative Cutter Package
Before you begin to install and set up the Mini Creative Cutter, unpack the shipping
package and verify you have all parts and pieces.
• Pazzles Creative Cutter Instruction Manual (this book)
• THE FOLLOWING CD’S ARE ALL COMBINED ON ONE CD SEE figure 1
Figure 1
*Creative Cutter “The Basics” Tutorial (CD)
*Sample Images CD
*Paper Piecing Patterns from the Swap CD collection
• Creative Cutter Mini Machine
• USB Cord (1)
• Black Power Cord (1)
• Blade holder with blade properly inserted (1). Black washer is already installed.
• Cutting mat (2)
• Pazzles Cutting and Design Software(CD) (1)
• Software training (CD) (1)
• Set-Up Card
Creative Cutter MINI 5
Chapter 2 Installation and Setup
Installing the Software
Follow these instructions to successfully install and configure the Pazzles Creative Cutter
software.
Installing and Starting the Software
1 Insert the Pazzles Cutting and Design Software for the Creative Cutter into your CD-ROM.
The installation program should begin automatically. If it does not, open My Computer,
locate the CD Drive and click the program icon.
2 To install the software, click Install Letter 2005.
3 When you are prompted to enter a password, type
4 Leave this CD in until instructed to remove.
pazzmini.
Setting Up the Cutter and Installing the USB Driver
Attach the Cutter to the Computer
1 Verify the cutter is placed on a sturdy, flat surface that can withstand the weight of the
cutter.
2 Place the cutter in the mini platform if it was included in the Mini Creative Cutter®
package the you purchased, please read the instructions on the platform prior to installing.
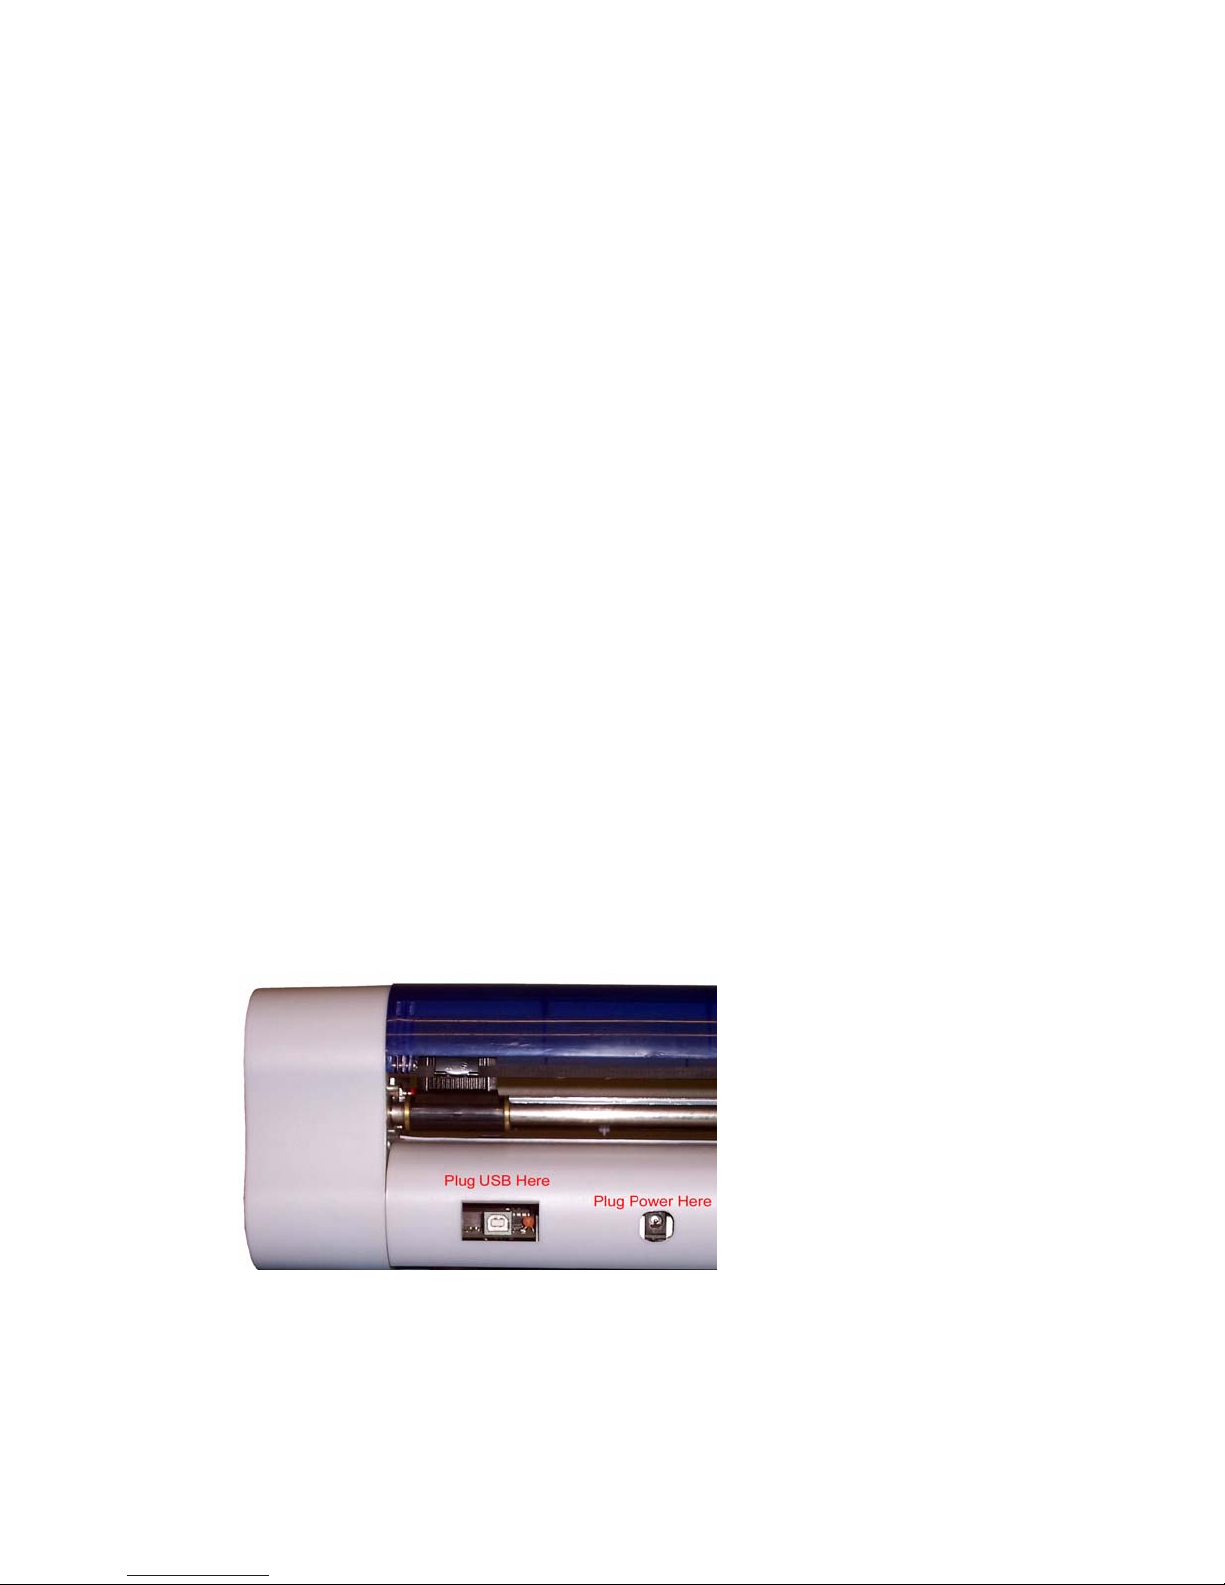
3 Connect the power cord. See figure 2 .
Figure 2
6 Creative Cutter MINI

Chapter 2 Installation and Setup
Install the USB Driver
1 If a USB/Serial device has been installed on your machine before and the drivers that are
about to be installed are different from those installed already, the original drivers need to be
uninstalled.
2 Using the Purple or Gray USB cord, connect the cutter to your computer. See figure 2 on
page 6.
3 Use the power button to turn on the power to the cutter. See figure 3 .
Figure 3
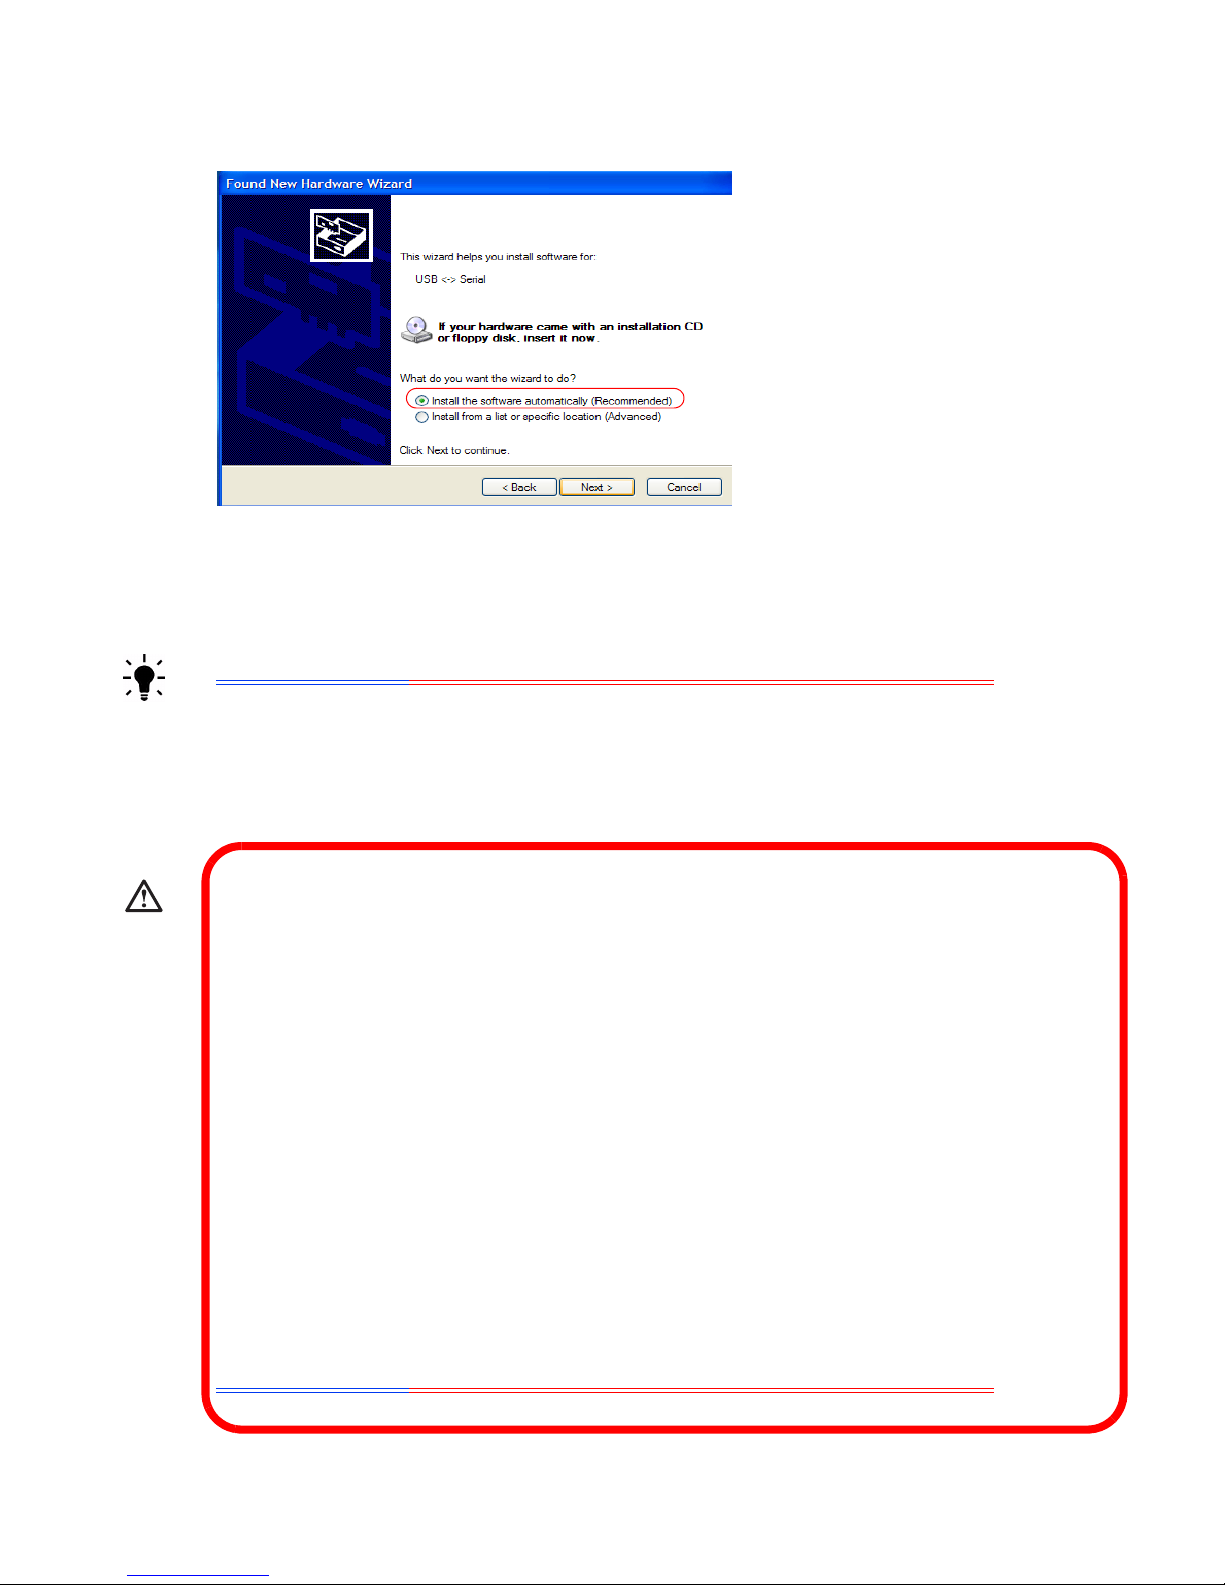
4 When the Windows Found New Hardware wizard open, select “No, not at this time”, then
click Next to proceed with the installation.
5 Follow the figures 4 and 5 when the Windows Found New Hardware wizard comes up.
6 On figure 4 , select “No, Not At This Time.”
Figure 4
Creative Cutter MINI 7
Chapter 2 Installation and Setup
Figure 5
7 The progress of the installation is displayed on your screen. When the installation is
complete, click Finish.
IMPORTANT: You must repeat this process one more time!!!
8 The Windows Found New Hardware wizard will appear again. Follow figure 4 on
page 7and figure 5 on page 8 to complete the process for the second set of drivers.
9 When the last window comes up press Finish again, and installtion is complete. Please
remove the Cutting and Design software for the Creative Cutters at this time. If the drivers did
not properly install, please follow the steps listed below.
WARNING! ONLY FOLLOW THE STEPS BELOW IF THE ABOVE
STEPS DO NOT INSTALL PROPERLY!!!
1 Press BACK until you reach the page shown in figure 4 on page 7, then Select “No, Not at
this Time”. Then click Next to proceed with the installation.
2 On the window shown in figure 5 , select Install from a list or specific location
(Advanced), then click next.
3 Select Search for the best driver in these locations and enter the file path (your CD drive,
most are D) in the combo box. (Example: D:\\ ) OR browse by clicking the browse button and
go to your CD drive. Click Next when finished.
4 The Windows Found New Hardware wizard will appear again. Follow steps 1-3 to
complete the process for the second set of drivers.
NOTE: If a warning message about non-WHQL certified driver are about to be installed, click
Continue Anyway to continue with the installation
IMPORTANT: You must repeat this process one more time!!!
8 Creative Cutter MINI
Chapter 2 Installation and Setup
Determine the Port the USB to Serial Was Assigned To
Complete these steps after installing the USB to Serial Converter (See INSTALL THE USB
DRIVER) section if you have not already done so.
1 Go to Start at the bottom-left corner or your screen and click on it.
2 Find My Computer and RIGHT-click on it. When you do, a menu opens.
3 Click on Manage.
4 Click Device Manager.
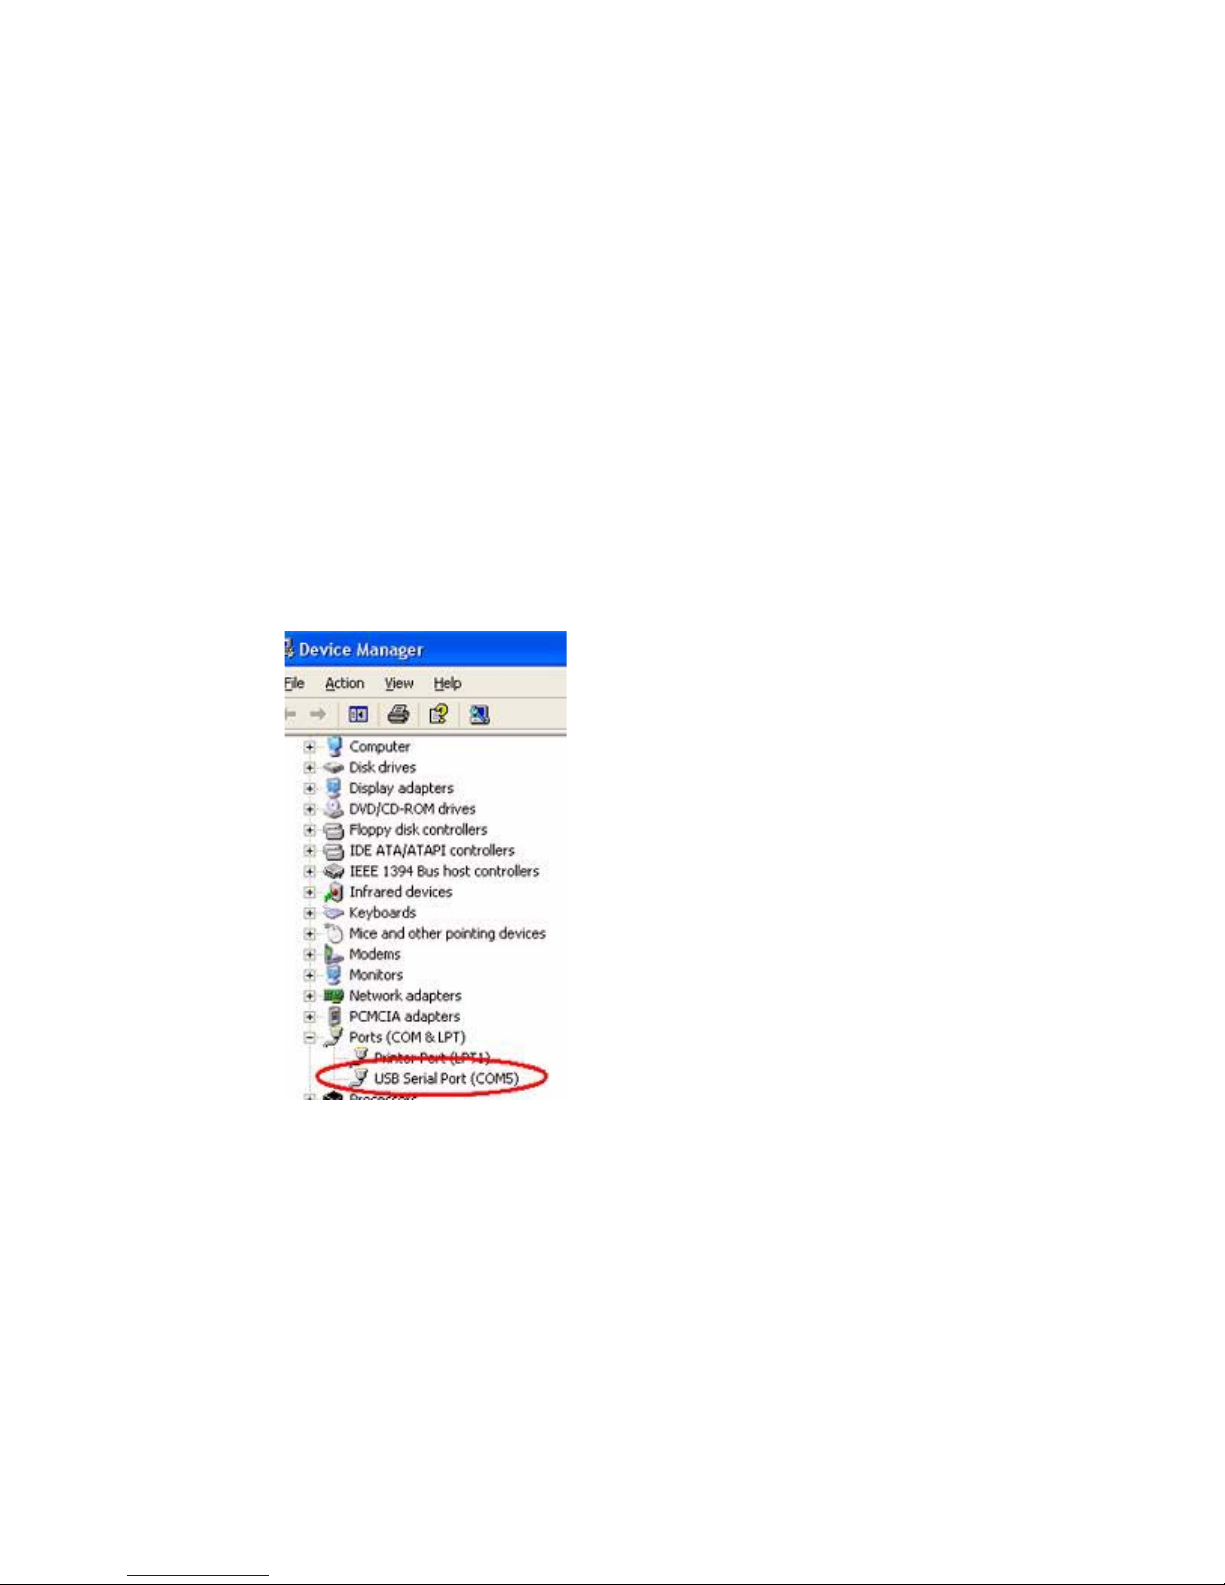
5 Click Ports to view a list of ports see figure 6 .
6 From the list of ports, look for a USB Serial Port. Take note of the port number assigned to
it. You will use the port number when setting up the plotter codes in the Cutting Program. If the
number is higher than 6, you must change it using the “Change Port Number” procedure that
follows these instructions.
Figure 6
Change the Port Number
Use this procedure if the port number is higher than 6.
1 Double-click on the port to open the Port Properties screen.
2 Click on the Port Settings tab.
3 Click on the Advanced button.
Creative Cutter MINI 9
Chapter 2 Installation and Setup
4 Look for the COM Port Number window.
5 Click the arrow to display available ports. Ports that are unavailable are marked “In Use”.
6 Choose an available port with a number 1, 2, 3, 4, 5, or 6 and click OK.
7 Use the number to set up the cutting in plotter codes under settings in the software. You
may want to write it down for reference so you’ll remember.
Install the USB Security Key (Hardlock)
1 Insert the USB Key (the black key with a green light on one end that says ROCKEY2 in
white lettering). See Figure 6.
NOTE: The key can be found in your Cutting And Design software case with the Pazzles
Creative Cutter software CD.
Figure 7
2 This key will install automatically.
WARNING! This key must be inserted at ALL times when the program is in use! This key
must also be inserted into the SAME USB port on you computer that it was installed on
originally, otherwise you will encounter an error when trying to open or operate the program!
Setting Up the Software
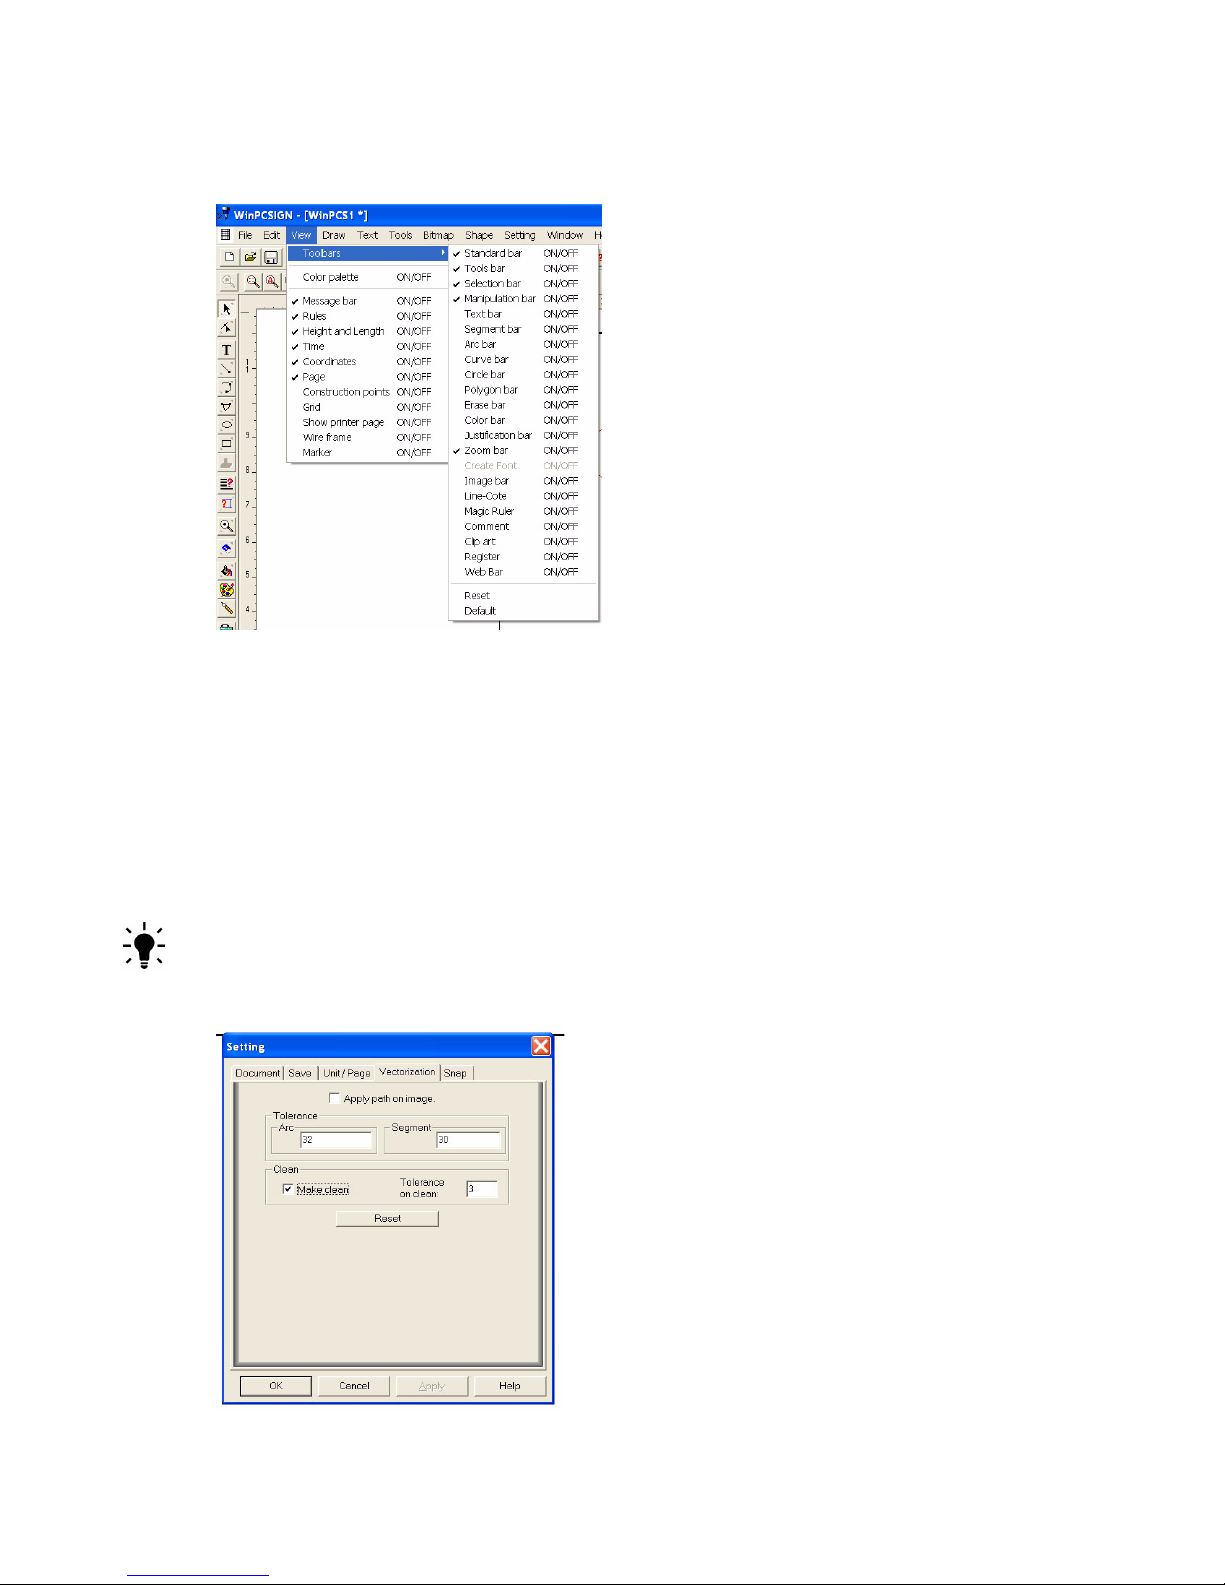
1 Start Pazzles Creative Cutter. To do so, double clicking on the Creative Cutter Icon on
your Desktop. See figure 8 .
Figure 8
2 When the Start Up window (figure 9 ) opens, press the ESC key on your keyboard. The
Wel come screen then opens.
10 Creative Cutter MINI

Chapter 2 Installation and Setup
Figure 9
3 Click on the image in the left part of the welcome window that appears in Pazzles Creative
Cutter. See figure 10.
Figure 10
4 In the Page box, type the dimensions of the size of paper you plan to cut. For now, type 11
in the Length and 8 in the Height box. Then click OK. The page dimensions you typed are
saved for use in the future, and the Work spac e screen opens.
IMPORTANT: The mini uses 11” for the Length and 8” for the Height, See figure 23
on page 23. The page should look like it is in a landscaped orientation on your
computer.
Configuring Toolbars and Software Settings
1 Click the View menu on the Pazzles Creative Cutter screen, and then click Toolbars. See
figure 11 on page 12. (Toolbar selections determine the toolbars that appear when you open the
program)
Creative Cutter MINI 11
Chapter 2 Installation and Setup
2 Click each of the following options to select them: Standard bar, Tools bar, Selection
bar, Manipulation bar, Zoom bar. The toolbars you select are marked with a checkmark.
Figure 11
3 From the View menu, click Grid to select it. Turning on Grid is helpful in placing images
by displaying small dots at 1-inch intervals on the Page screen.
4 Click the Settings menu, and then click Grid to open the Setting box.
5 In the Setting box, click the Unit/Page tab.
6 Under Unit of measurement, click inches.
TIP: You can change the Toolbar and Grid settings at any time.
7 Click the Vectorization tab, and then click the Make Clean box to check it.
12 Creative Cutter MINI

Chapter 2 Installation and Setup
Figure 12
Unless you reinstall the software, you should not need to make further changes to the
Vectorization settings.
Select the Plotter
1 Open Pazzles Creative Cutter.
2 Click Settings, and then click Plotter Codes. When you do, the Setup Plotter box opens.
3 Click Add/Remove and then select MINI MC270 from the list of Active Plotters.
4 Click Accept/Save.
Select the Port
In the Port box, click COM port and then select the one assigned (see “Determine the Port the
USB to Serial Was Assigned To” on page 9). Try a test cut. (See “Basic Procedures for Using
the Mini Creative Cutter” on page 21.)
IMPORTANT: Do NOT leave the Creative Cutter Mini on for extended
NOTE: When unplugging the Mini, always connect power and then the USB. If using a laptop,
turn off screen savers & sleep mode. This causes the ports to ‘go to sleep’. If this happens you
must unplug and re-plug your cutter back into your computer to re-establish connection.
Working With the Blade
The cutter is delivered with the blade inserted properly into the blade-holder unit.
Characteristics of Properly Installed Blades
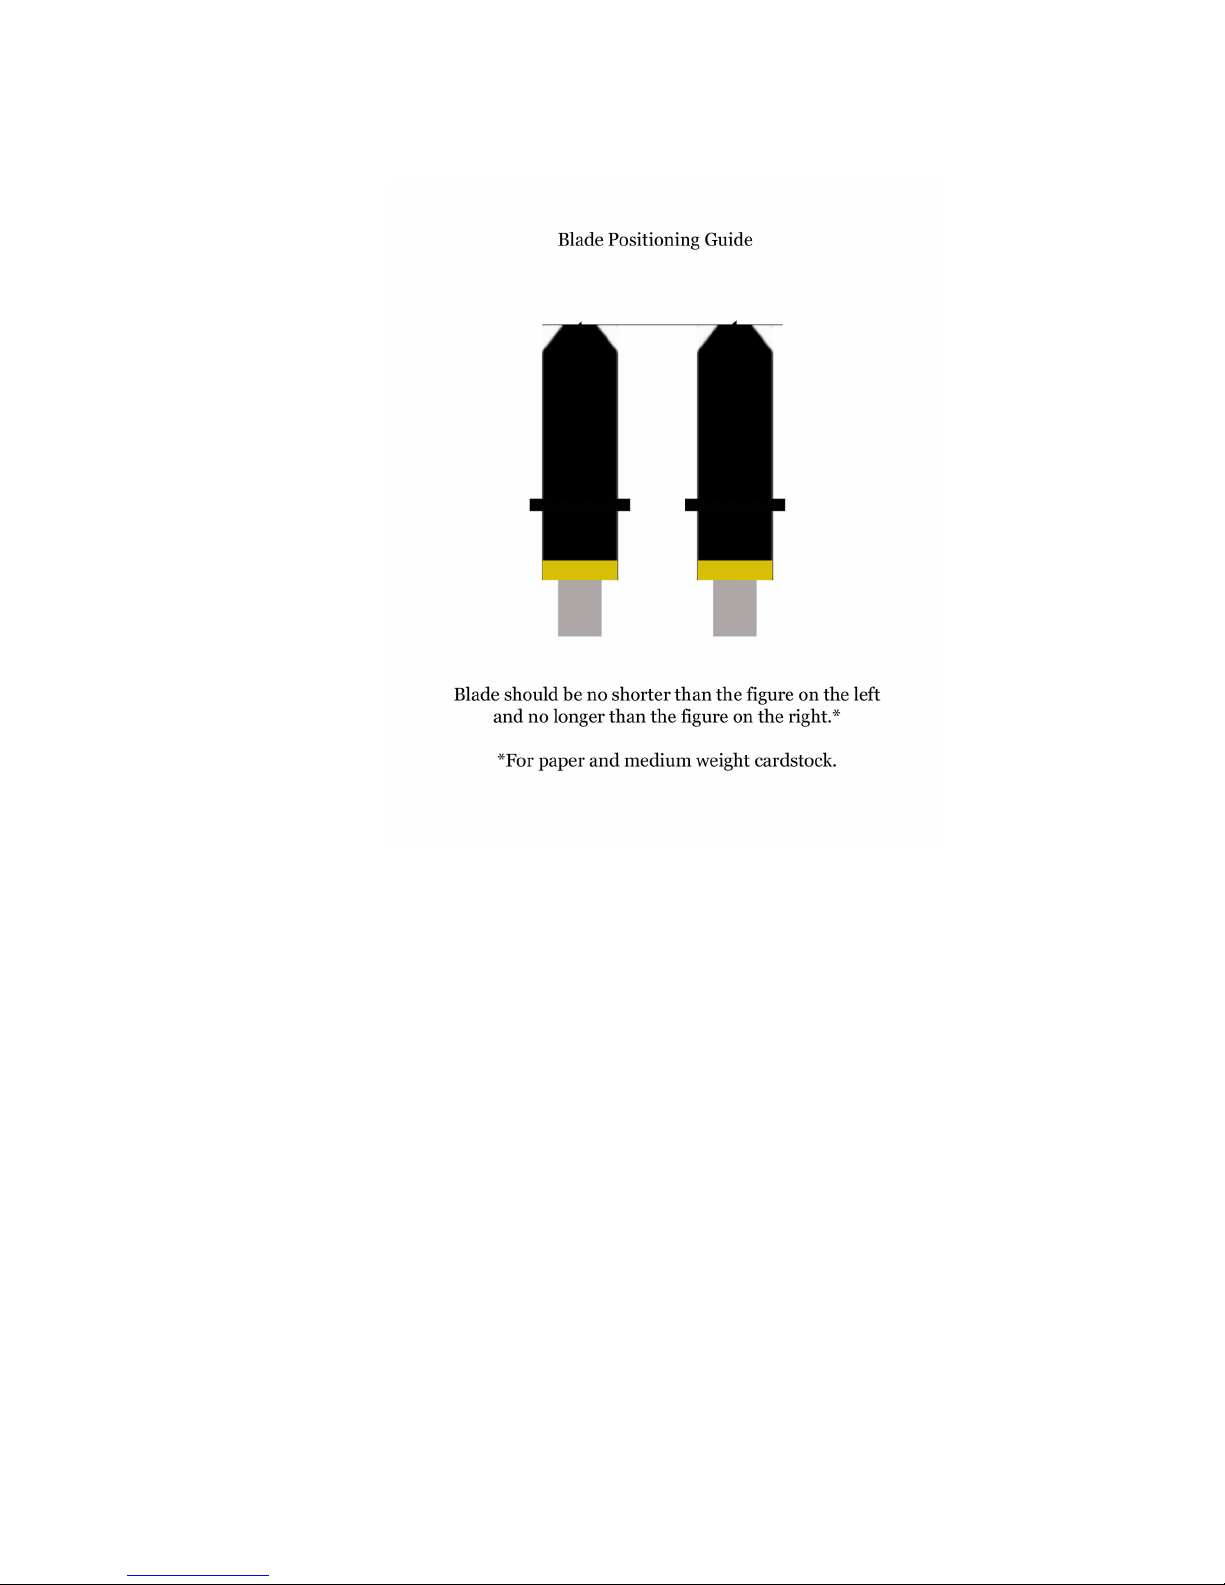
Take note of how far the blade is installed in the casing—a properly-installed blade is barely
visible. Use the blade gauge included with the cutter to determine the proper blade length.
See figure 15 on page 16.
Many factors affect the life of your blade.
• The weight of the paper being cut.
periods of time!!!
• The composition of the paper being cut.
• The experience of the person doing the cutting. The life of your blade will depend on the
improvements to your technique that come with practice.
Proper adjustment and correct pressure will ensure you derive maximum longevity from your
blade.
Creative Cutter MINI 13
Chapter 2 Installation and Setup
Replacing the Blade
Blades should be replaced when any of the following conditions occur:
• Cut quality suddenly gets worse.
• You must continue to increase pressure to get clean cuts.
• The corners and tight turns do not cut cleanly or are pushed in.
NOTE: This condition can also be caused by using too much pressure.
Use the following procedure when it is time to replace the blade.
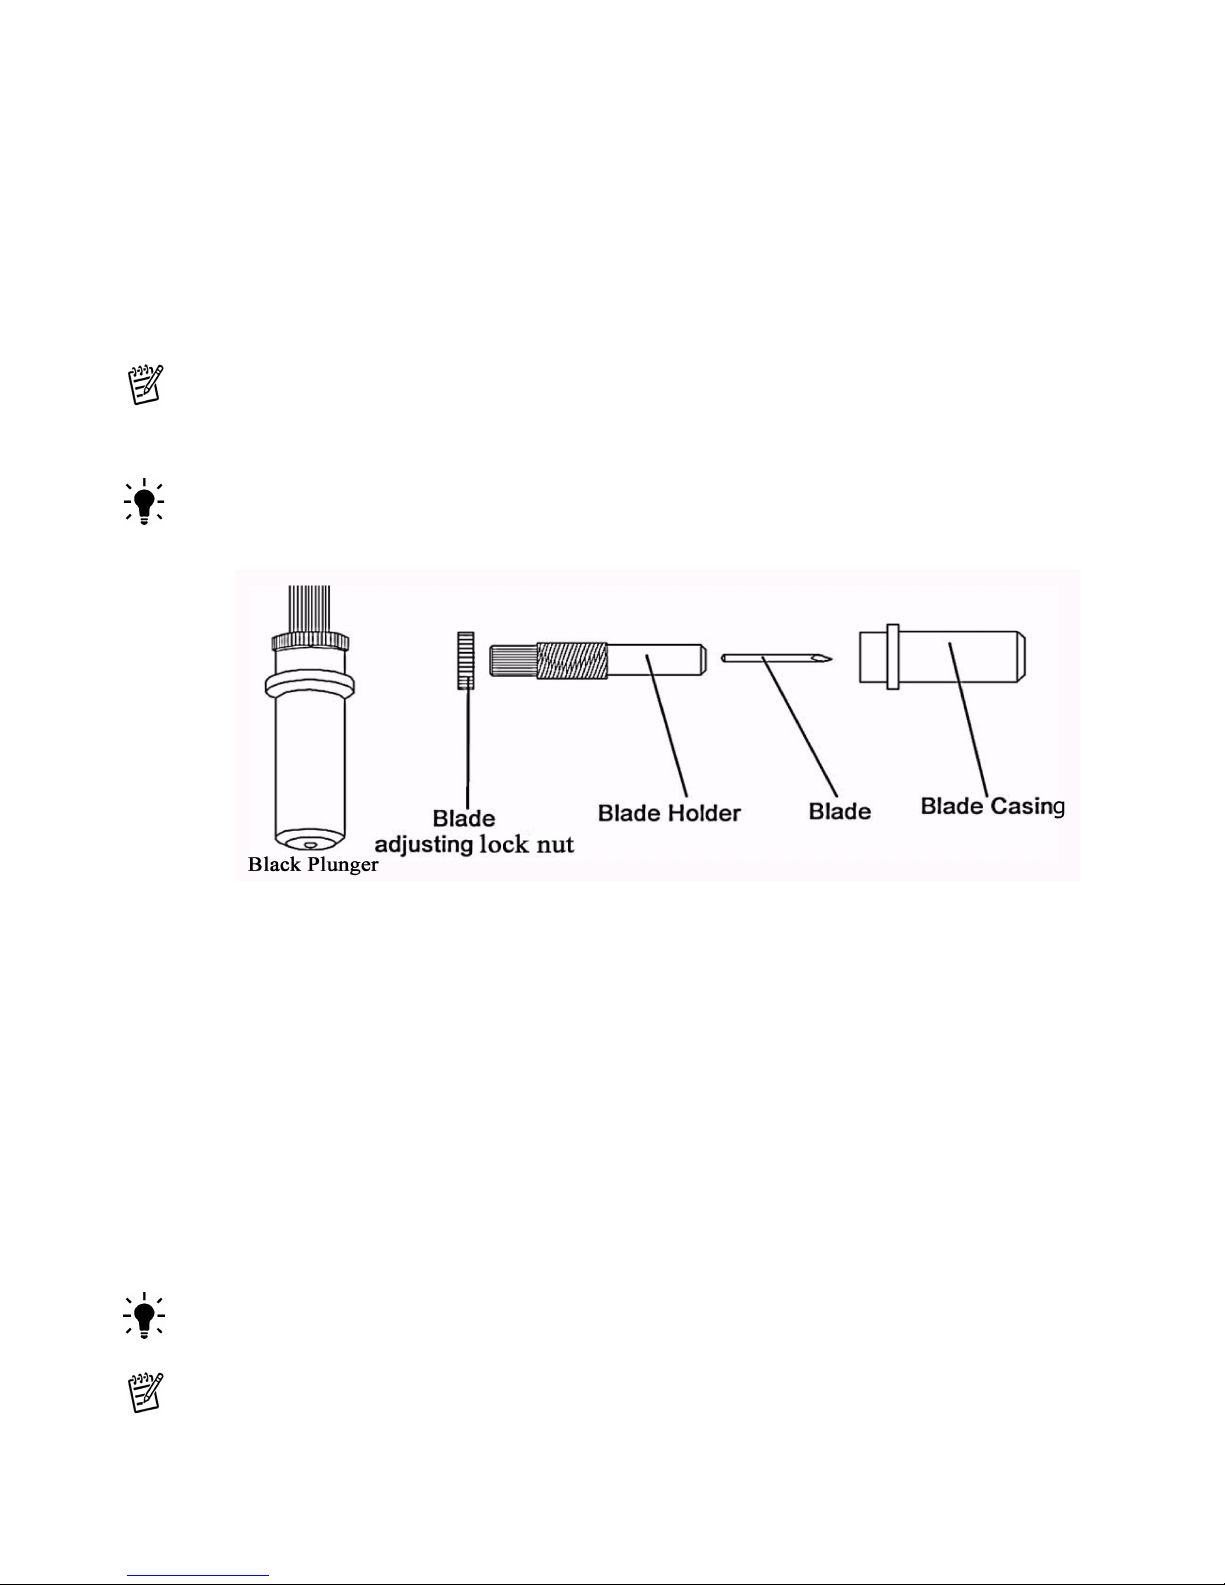
TIP: Be sure to remove the blue cap from the blade before inserting.
1 Loosen the gold adjusting lock nut from the blade casing and then remove the silver
bladeholder from the blade casing. See figure 13 .
Figure 13
2 Insert the blade into the silver holder as far as it will go. To avoid puncturing your skin on
the blade, push the blade with your fingernail.
3 Screw the bladeholder into the black plunger until the blade is barely visible and can barely
be felt. Use the blade positioning guide see figure 15 on page 16 on how to adjust the blade to
the correct length. Because of paper thickness and characteristics of individual machines, you
might need to make minor adjustments.
IMPORTANT: DO NOT ADJUST YOUR BLADE WHEN YOU FIRST RECEIVE
YOUR MACHINE, IT HAS BEEN PRE-SET FOR CARDSTOCK CUTTING!!!
4 Use the blade positioning guide shown in figure 15 on page 16 to check the position of your
blade. Place the blade next to the picture; the blade in the picture and your blade should match.
5 Tighten the gold adjusting lock nut to hold the blade in place.
TIP: Keeping the silver bladeholder still while you tighten the gold adjusting lock nut can take
some practice.
NOTE: The blade only needs to be extended out as thick as your paper is. Over-extending the
blade will casue poor cutting quality and excessive wear on your blade and mat.
14 Creative Cutter MINI
Chapter 2 Installation and Setup
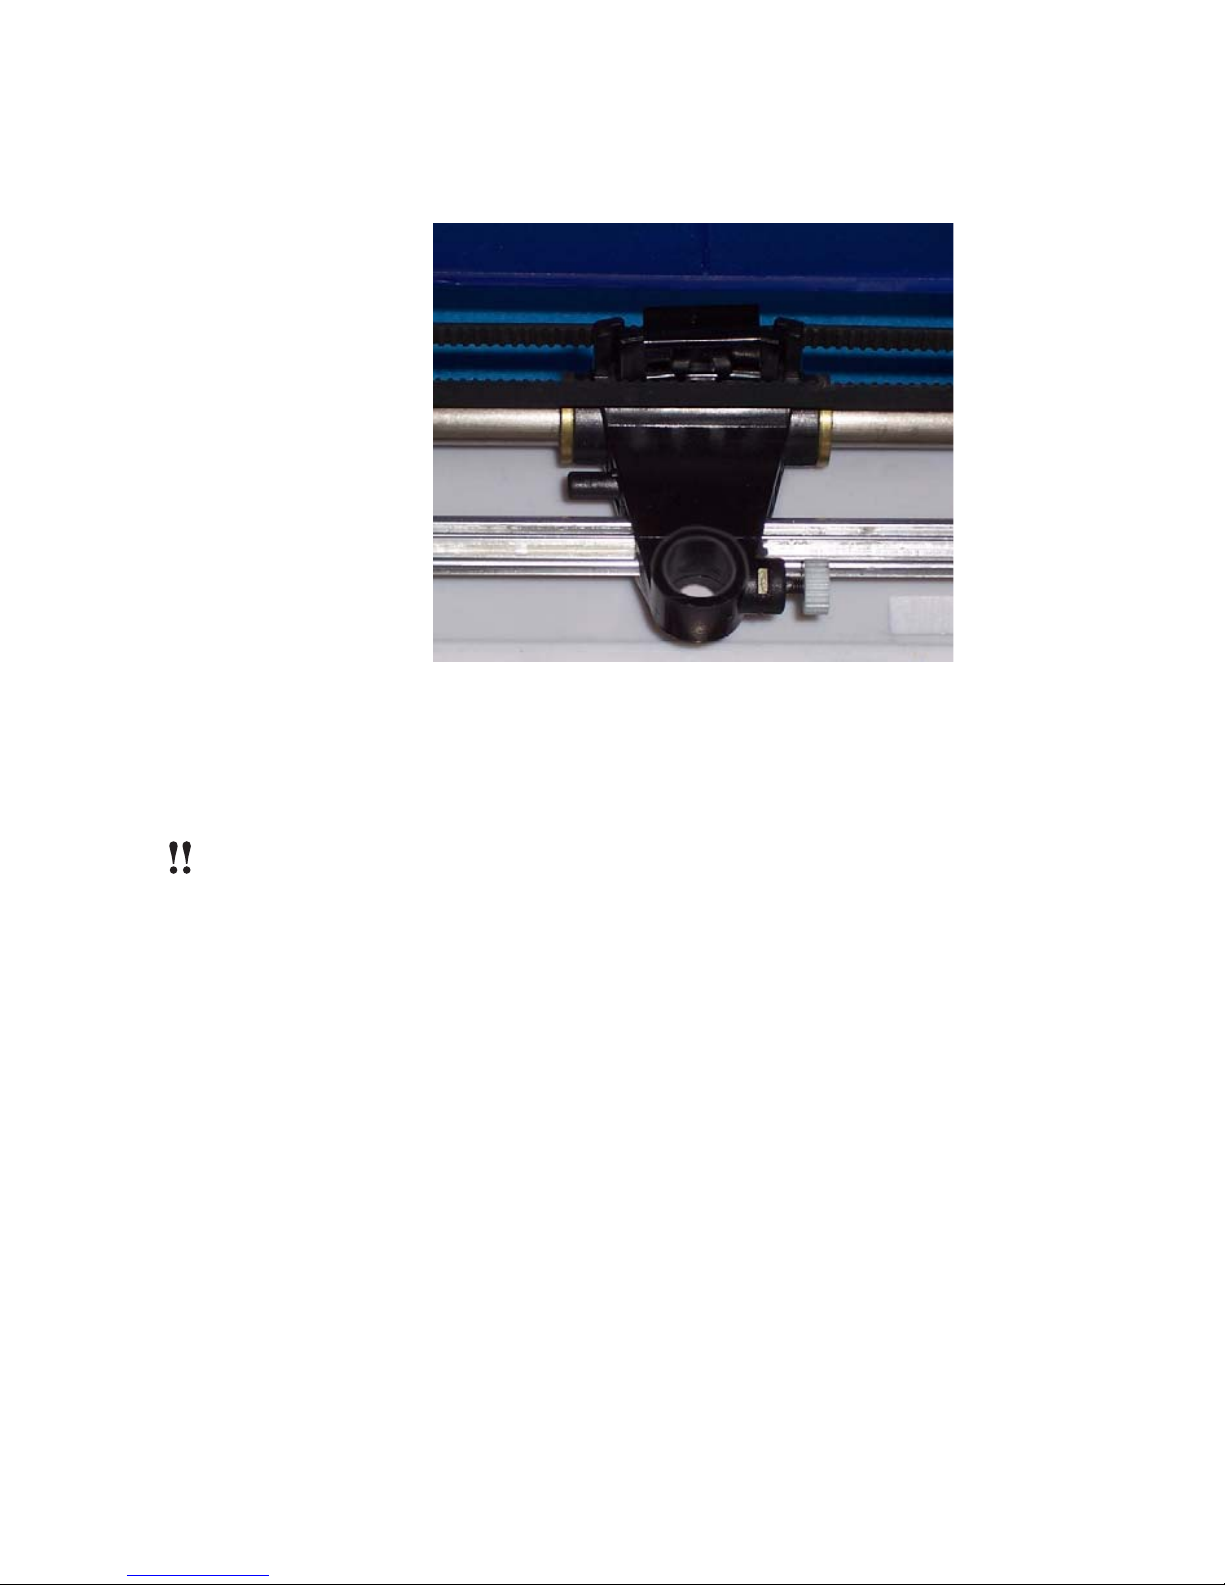
6 Loosen the white thumbscrew on the cutting carriage (figure 14 ). Insert the blade unit into
the opening of the cutting carriage. Loosen to remove blade holder.
Figure 14
7 While supporting the carriage with a finger, push in the bladeholder. When the blade-holder
unit is inserted as far as it will go, tighten the screw
IMPORTANT: Remember to tighten the white thumbscrew after you put the
blade holder back into the carriage.
Creative Cutter MINI 15
Chapter 2 Installation and Setup
Blade Positioning Guide
Figure 15
16 Creative Cutter MINI
Working With the Cutting Mat
IMPORTANT: Using a cutting mat beyond its useful life will result in poor-quality cuts.
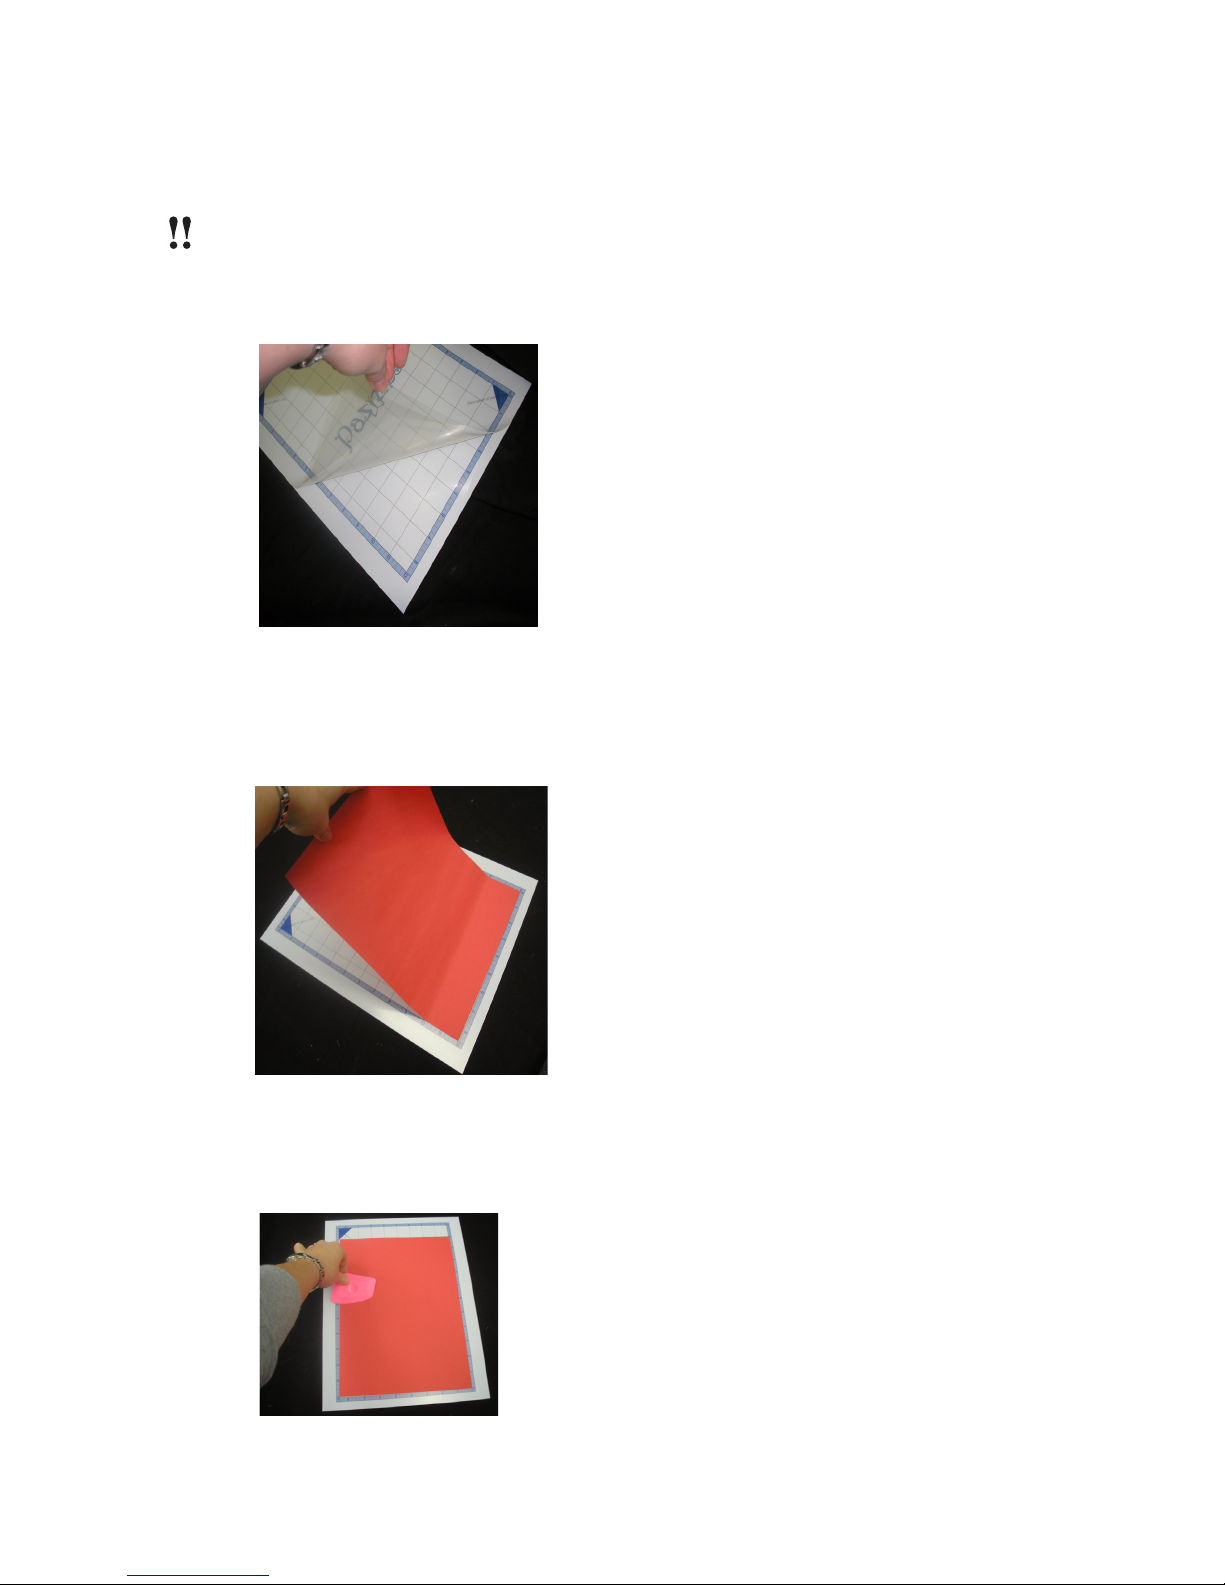
1 Please take off the clear cover that came on your mat before putting the paper on the mat.
See figure 16
Chapter 2 Installation and Setup
Figure 16
2 Place your paper on the mat inside the blue border, on the sticky part of the mat. See
figure 17 .
Figure 17
3 Smooth your paper on the mat.
Creative Cutter MINI 17
Chapter 2 Installation and Setup
Figure 18
4 Put mat into cutter when you are ready to cut.
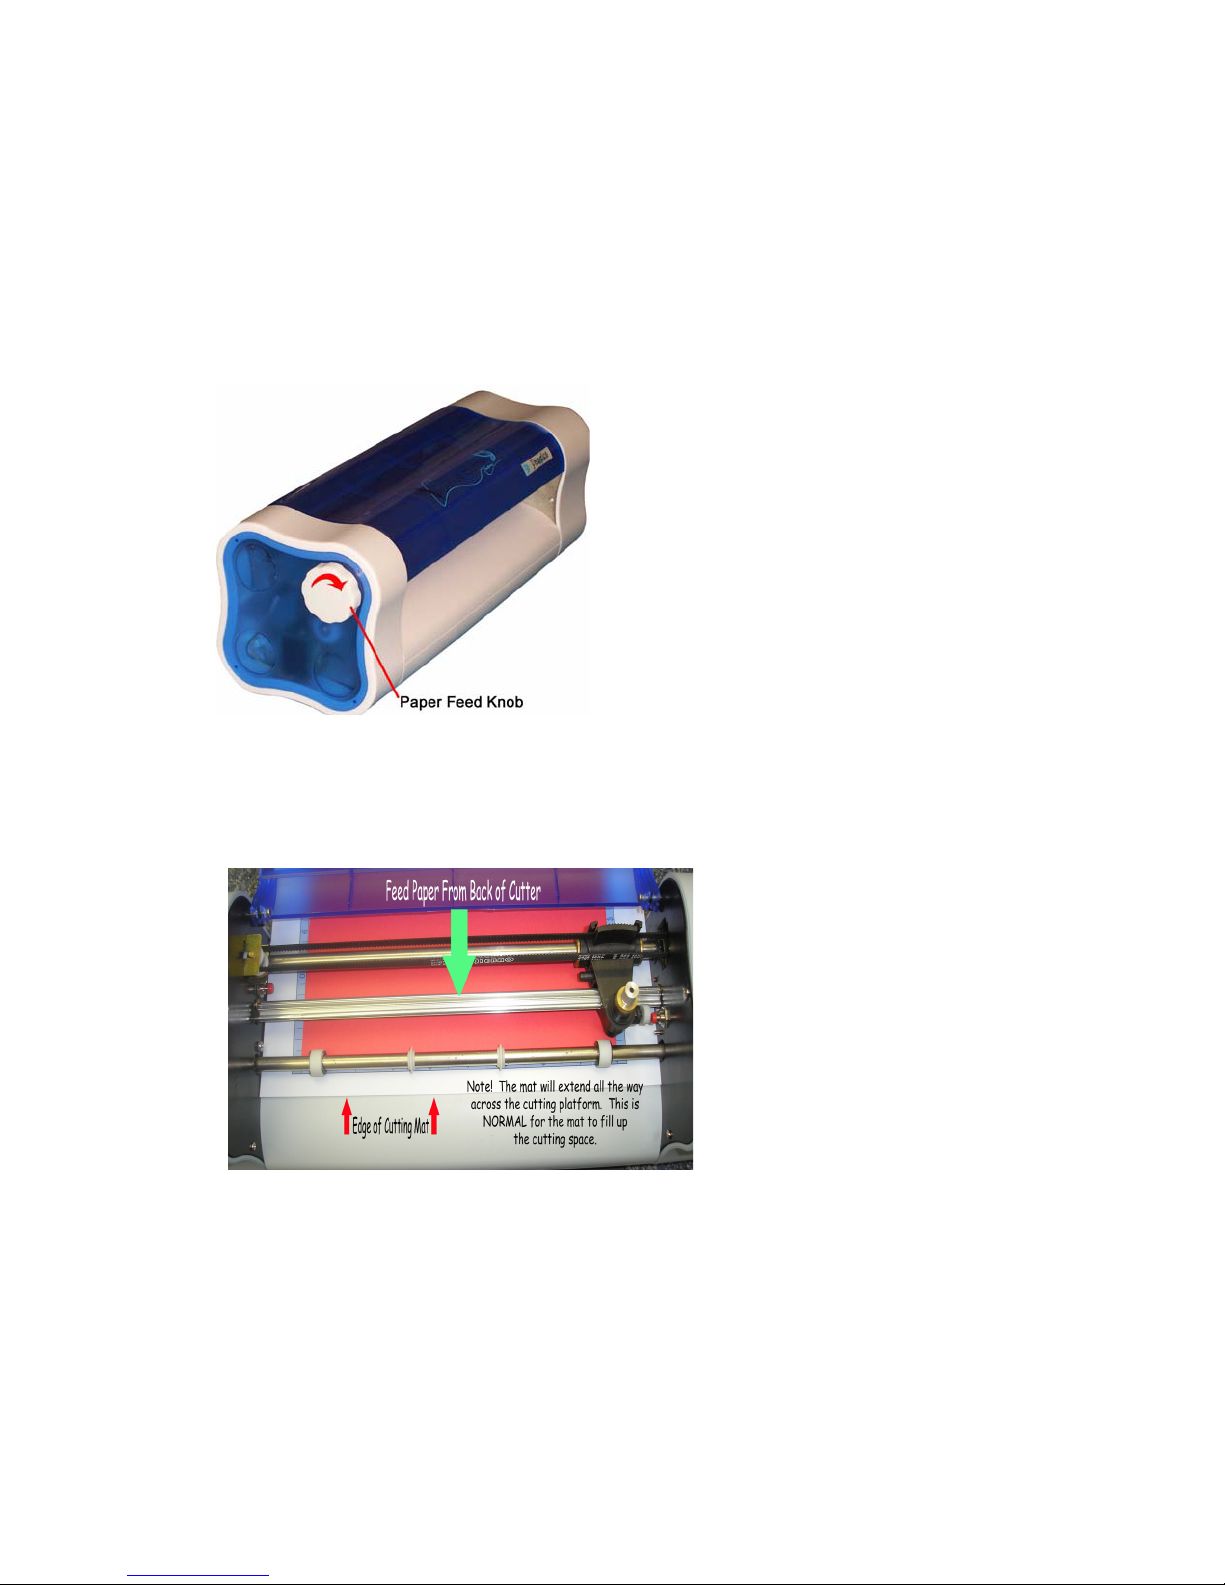
Insert the Mat Into the Cutter
5 Insert the mat from the back of the cutter.
6 Turn the paper feed knob located on the left side of the cutter foward to move the mat under
the pinch rod. See figure 19 .
Figure 19
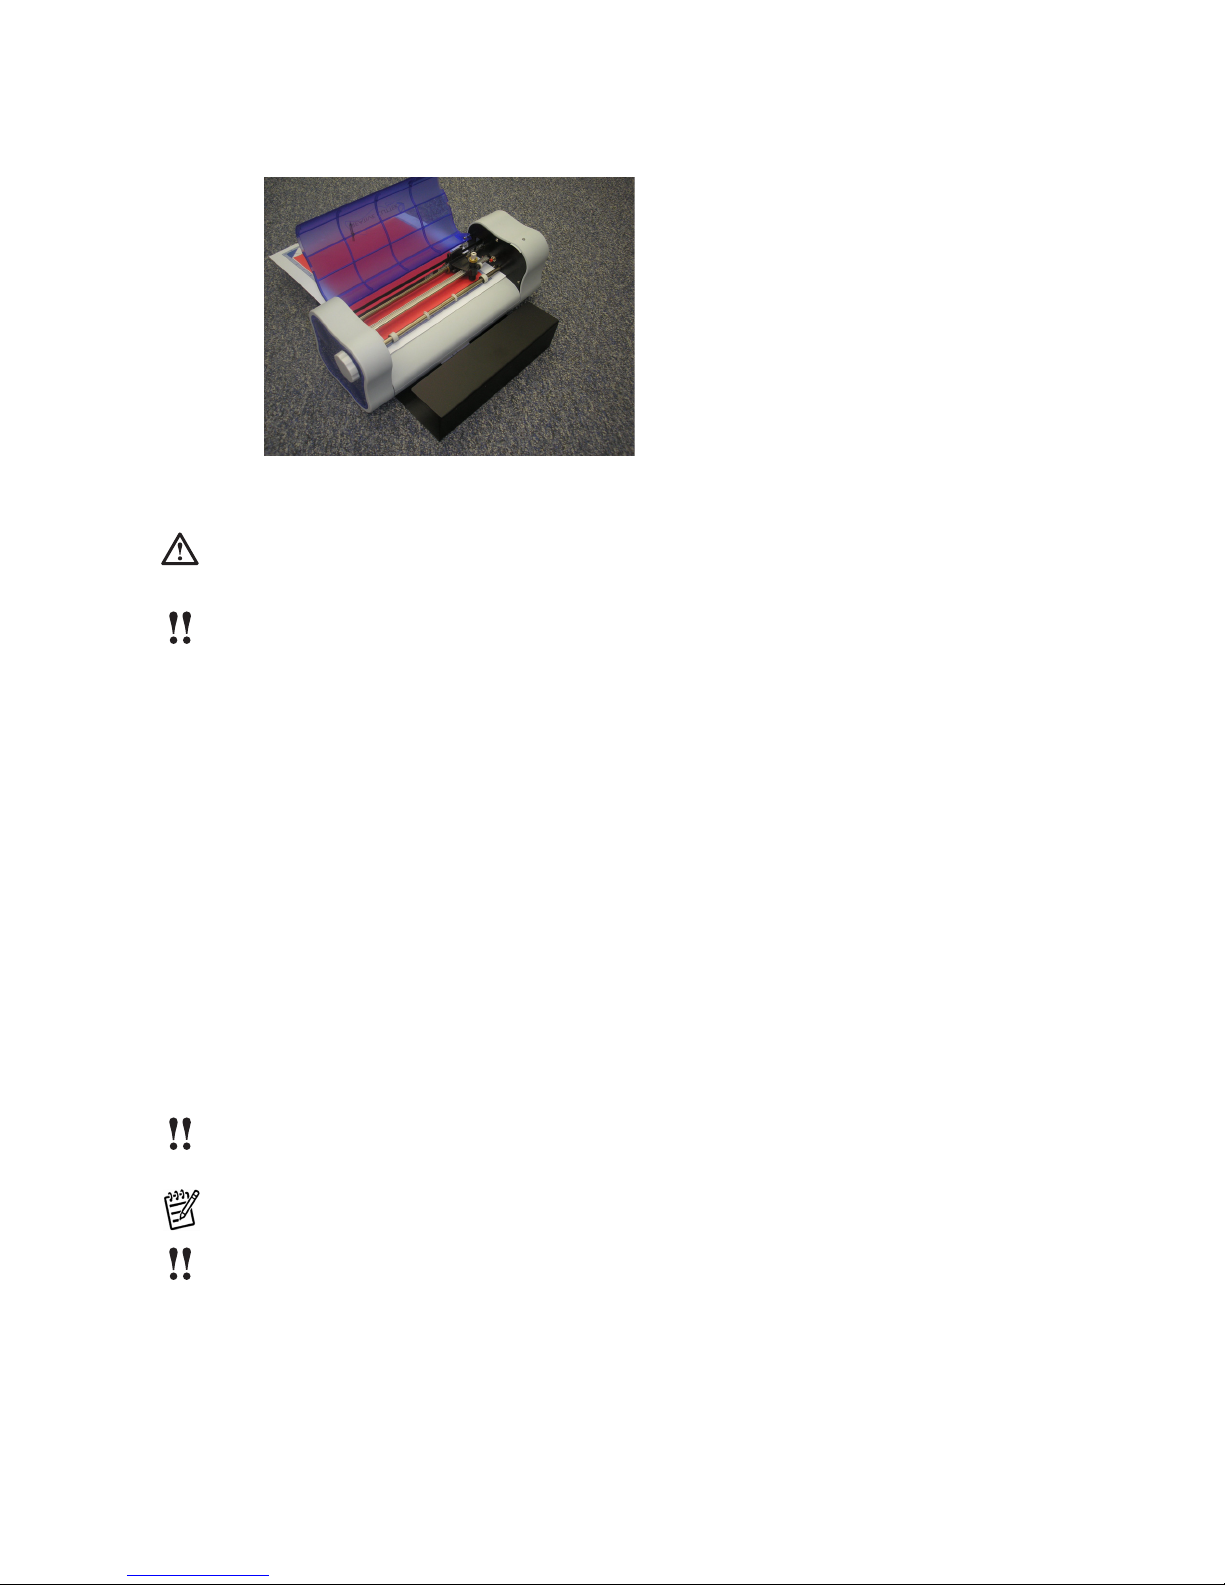
7 See figure 20 , this shows how the mat goes into the cutter. When inserted, the bulk of the
mat should extend out the back of your cutter. See figure 21 on page 19.
Figure 20
18 Creative Cutter MINI
Chapter 2 Installation and Setup
Figure 21
WARNING! The tip of your blade holder needs to be in the corner of the paper to make the cut
match the design on your screen.
IMPORTANT: Using a cutting mat beyond its useful life will result in poor-quality cuts.
How To Tell When You Need a New Mat
• Your mat is warped, heavily scored or won’t lie flat.
• You have a new blade and your cutting quality is poor overall.
• Your design cuts fine in some places but not in others.
• The mat no longer holds paper effectively.
Tips for Getting the Most From Your Cutter Blade and Mat
• Always store your mat flat and keep it covered with it’s clear covering when not in use.
• When cared for properly, the adhesive on the cutting mat has a useful life of about 25-50
passes.
• Do not over-extend the blade. You should barely be able to see or feel the blade.
IMPORTANT: If you see heavy score marks in the adhesive, your blade is out too far or the
pressure is too great.
NOTE: Humidity affects the tackiness on the mat!
IMPORTANT: Your machine is shipped to you with its blade already properly inserted. Please
DO NOT adjust your blade once you receive your machine. We recommend that you become
familiar with your cutter before you attempt to adjust the blade.
Care and Usage Guidelines fro Cutting Mats
• Store the mat flat and covered with its clear protective sheet covering the adhesive.
Creative Cutter MINI 19

Chapter 2 Installation and Setup
• If oil from your hands gets on the mat, try to remove it with a lint roller or masking tape. How-
ever, if your mat is too tacky, this can help alleviate some of the stickyness.
• Scrape bits of paper off the mat, try to remove it by patting rolled-up packing tape over the
mat, or by using an old credit card.
• Do not cut high fiber papers that can leave fibers on the mat.
• Since the protective cover for the mat is plastic, it will attract dust. When removin the plastic
covers, place it in a dust-free area. If the protective cover does attract dust, wipe it off prior to
recovering the mat for storage.
20 Creative Cutter MINI
3
Basic Procedures for Using
the Mini Creative Cutter
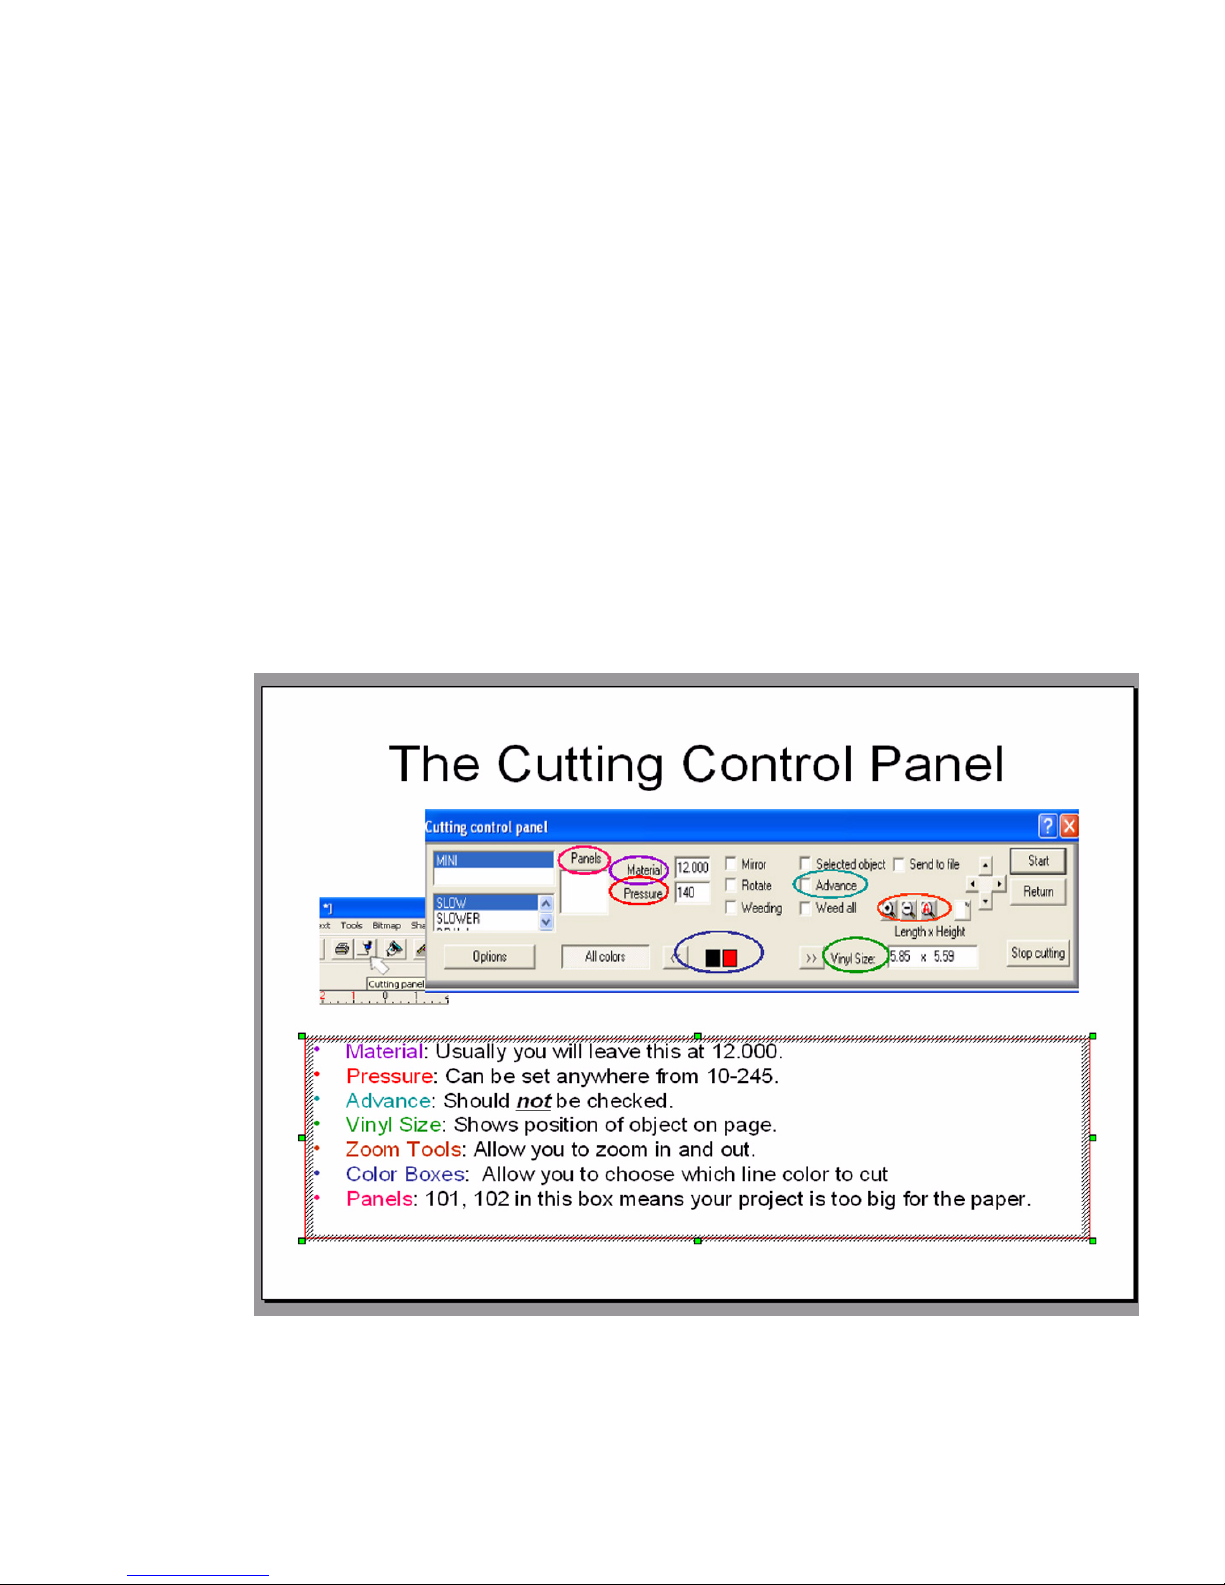
Introducing the Cutting Control Panel
The Cutting Control Panel plays an important role in the success of your cutting projects. It’s
important that you are familiar with the Cutting Control Panel and the settings you will apply to
it. Refer the information in this chapter as you use the cutter. See figure 22.
Figure 22
Creative Cutter MINI 21

Chapter 3 Basic Procedures for Using the Mini Creative Cutter
Settings for the Cutting Control Panel
Material
Set Material to 12.00.
Advance
Leave clear (not checked).
Vinyl Size
Shows the position of the object on the page.
Zoom Tools
Enables zooming in and out while within the cutting mode.
Color Boxes
Enables you to select which line color to cut.
Panels
If 101, 102 appears, indicates that your project is too big for the paper.
Speed
Slow and Medium are the most commonly used speeds.
Pressure
Set between 80 and 245
Positioning Arrows
Allow you to move the mat forward and backward and to move the blade to the left or right.
Starting and Using the Cutter
CAUTION: Do not leave the cutter powered on for extended periods.
22 Creative Cutter MINI
 Loading...