

Page 1

Express Checkout
Integration Overview
DEVELOPER DOCUMENTATION
Document edition:
v. 08/16/13
Page 2

Contents
Getting Started with PayPal .................................................................................... 3
What is Express Checkout? .................................................................................. 3
How Express Checkout Works .............................................................................. 3
Designing an Optimal Checkout Flow .................................................................... 5
Integration Use Cases ............................................................................................ 9
Obtaining an Express Checkout Button and PayPal Mark .......................................... 9
Use case 1: A Sale transaction ........................................................................... 10
Use case 2: Auth / Capture ............................................................................... 14
Use Case 3: Refunds / Voids .............................................................................. 15
Managing Response Codes ................................................................................ 16
Testing Your Integration ................................................................................... 16
Going Live With Your Express Checkout Integration .............................................. 17
Sample Code ...................................................................................................... 17
Which interface am I using? .............................................................................. 17
Express Checkout Sample Code ......................................................................... 18
Documentation ................................................................................................... 18
Online references (in English) ............................................................................ 18
Copyright © 2012-2013 PayPal. All rights reserved.
Page 3
Express Checkout ~ Integration Overview
Getting Started with PayPal
This guide provides you with the basic information and best practices guidelines you will
need to integrate Express Checkout on your website. It is intended for you, the merchant,
to help you create an online shopping experience that can increase sales and customer
loyalty by building a checkout process that is fast, easy and intuitive.
For comprehensive integration information, see the Express Checkout Integration Guide.
What is Express Checkout?
Express Checkout provides a seamless checkout experience via an API-based integration for
buyers who want to use their PayPal accounts or Credit Cards (even without logging into a
PayPal account). Buyers select their payment methods and shipping information on PayPal,
then return to your website to finalize their purchases. Express Checkout allows your buyers
to complete transactions in very few steps. It eliminates one of the major causes of
checkout abandonment by giving buyers all the transaction details at once, including order
details, shipping options and tax totals. Use Express Checkout to complement your existing
payment solutions and to do the following:
Accept payments from buyers using credit cards or from any PayPal account.
Reduce checkout abandonment by eliminating the need for customers to
reenter personal information, including shipping, billing and payment
information.
Keep customers on your site after they complete their transactions.
How Express Checkout Works
Buyers use Express Checkout to pay you on PayPal's secure site and return to your site to
complete the transaction. When buyers complete their purchases, your website makes an
API call (unseen by the customer) to PayPal to request payment. The payment transaction
is initiated and PayPal sends buyers email receipts for the payments.
8/16/2013 Page 3 of 18
Page 4
Express Checkout ~ Integration Overview
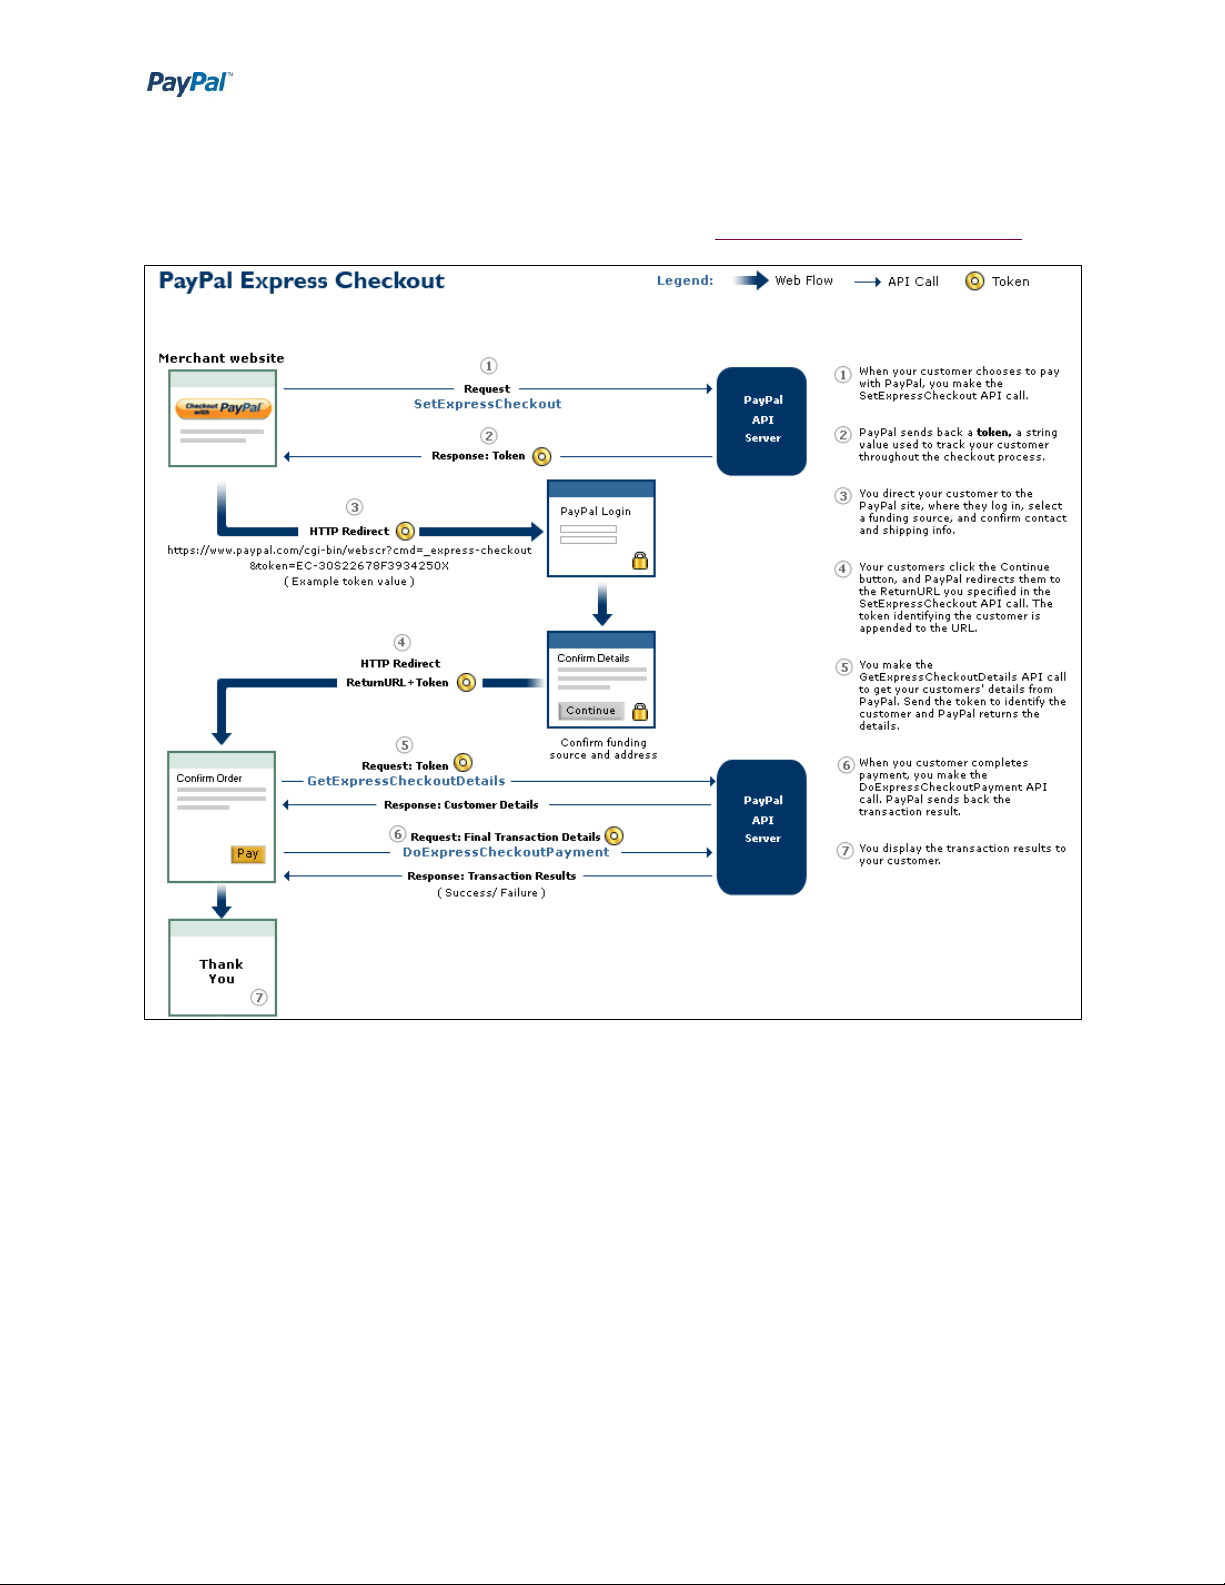
Express Checkout API Calls Backend Flow
The following diagram shows the Express Checkout API operations that are called during a
typical payment transaction. For integration details, see Use case 1: A Sale transaction.
8/16/2013 Page 4 of 18
Page 5
Express Checkout ~ Integration Overview
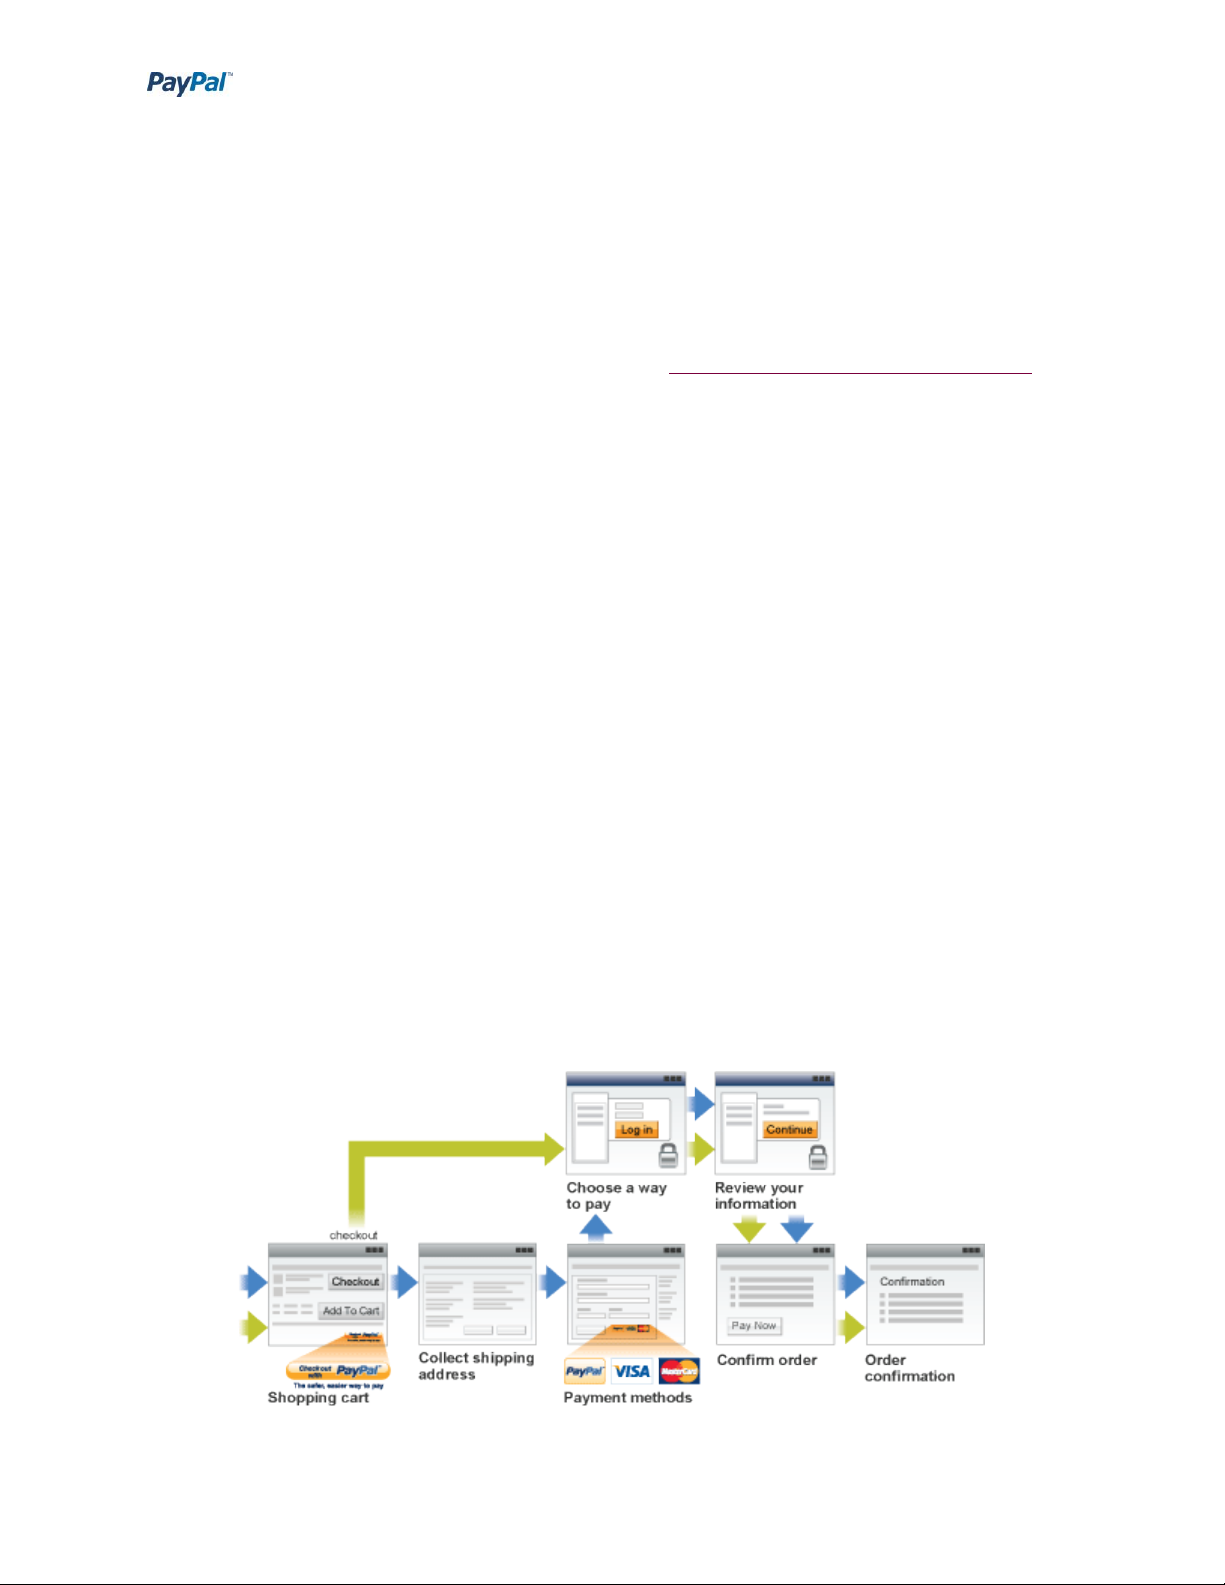
Designing an Optimal Checkout Flow
PayPal has identified specific elements which can help you optimize the checkout experience
and get the most out of using Express Checkout. These elements were identified through
years of A/B testing, industry research and qualitative studies with merchants and buyers.
Implementing these guidelines can:
Result in higher sales conversions.
Create an online shopping experience that can increase sales and customer loyalty.
Build a checkout process that is fast, easy and intuitive.
The following easy steps can help you optimize your checkout flow and increase conversion
by improving your buyer experience.
1. Show what payment options you offer on your Home and Product Details
pages. Buyers start thinking about how they will pay for their purchases before they
see the final payment page. Placing payment messaging early and often allows
buyers to make that payment choice quicker, which can increase the likelihood of a
purchase.
8/16/2013 Page 5 of 18
Page 6
Express Checkout ~ Integration Overview
2. Add a PayPal Express Checkout Shortcut to the Shopping cart page to the
right or left, top or bottom of your checkout button.
The Checkout with PayPal button should:
Always be clickable.
Be placed right below or next to your own cart's checkout button.
Appear before your website collects any billing or shipping details, and before
any other payment.
Be aligned vertically or horizontally with your own checkout button.
Include a What is PayPal? link.
When the buyer clicks the PayPal button:
Call the SetExpressCheckout API operation to initiate the transaction. See
Setting Up the Express Checkout Transaction for integration details.
8/16/2013 Page 6 of 18
Page 7

Express Checkout ~ Integration Overview
After receiving the SetExpressCheckout API response, redirect the customer
to PayPal.
3. Show PayPal as a payment option near the other payment options on your
Payment Methods page. Adding a PayPal radio button to your existing payment
choices helps buyers read and understand the payment options in a clearer way.
4. Provide a What is PayPal? link when using any PayPal banner, button or
placement. Explaining what PayPal is will help new buyers understand the benefits
of choosing PayPal.
5. Pass your store logo and business name to the PayPal login and review
pages. Passing your store logo and business name to be displayed on PayPal
checkout pages creates a more seamless transition for your buyers and reassures
them that they are still in your checkout flow. To set up this feature, log into your
PayPal account, choose Profile > My Selling Tools > Custom payment pages and
select to add a new page style. Note: Ensure that your logo is stored on a secure
8/16/2013 Page 7 of 18
Page 8

Express Checkout ~ Integration Overview
server so that your buyer's web browser does not display a message that the
payment page contains non-secure items.
6. Pass line item details to PayPal, including the breakdown of items and total
purchase costs. Passing line item details also helps create a seamless transition
from your site to the PayPal checkout flows and makes buyers feel more confident in
their transactions because they can see their purchase details from start to end.
7. Customize the PayPal Payment Pages to match the style of your website.
You can tailor PayPal's payment pages to match the style of your website and give
buyers a seamless payment experience. Choose custom page colors and add images
to make PayPal's payment flow yours. To customize the PayPal payment pages, log
into your PayPal account, choose Profile > My Selling Tools, then from the Selling
Online section, select Custom payment pages. For detailed instructions refer to the
customizing the PayPal payment page guide.
8. Pass to PayPal any customer information you have already collected in
order to pre-fill billing fields. If your website collects customer information about
your buyer, you can pass that information to PayPal to pre-populate the
corresponding customer information fields. This saves your buyer time and
eliminates the need re-enter their information.
9. Set the credit card statement name. Ensure your business name or website
name is correctly set to show up on your buyers' credit card statements to avoid any
confusion and potential chargebacks. To set the credit card statement name, log into
your PayPal account, choose Profile, > My Selling Tools, then from the Selling Online
section, select Credit Card Statement Name.
You can customize your PayPal payment pages to provide a seamless experience for
your buyers. Be sure to do the following:
8/16/2013 Page 8 of 18
Page 9

Express Checkout ~ Integration Overview
1. Pass your
store logo and
store name to
PayPal to
display.
2. Pass full line
item details,
including the
breakdown of
items and
total costs.
3. Customize
colors to
match your
website.
4. Pre-populate
billing fields
with any
customer
information
your website
collects.
Integration Use Cases
Implementing Express Checkout requires you to set up a PayPal button and call the
appropriate API's for the type of payments you want to offer. You must also enable the
buyer to select PayPal as the payment method after the buyer starts to check out on your
site. That means you must offer PayPal on your website in at least the following two places
in the checkout flow:
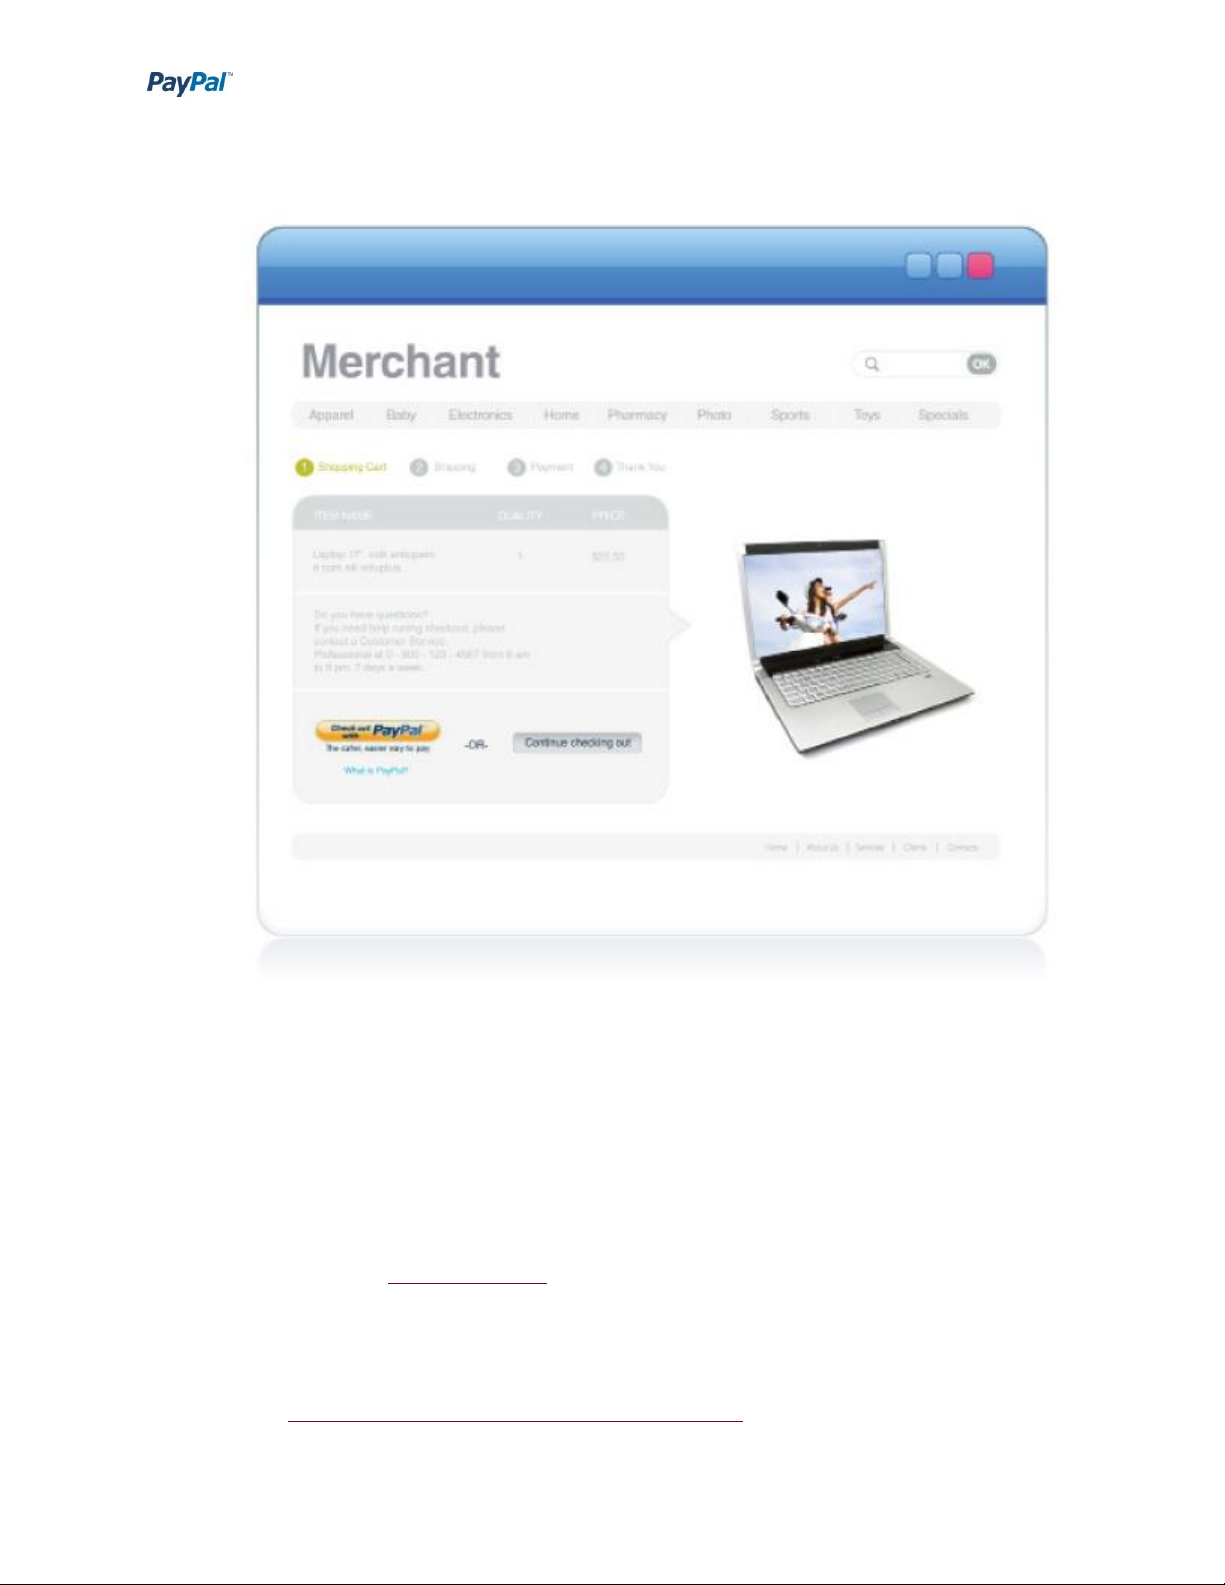
As a checkout option on your Shopping Cart page
As a payment option on your Payment Methods page
Obtaining an Express Checkout Button and PayPal Mark
PayPal provides buttons and images for you to place on your website. To implement Express
Checkout, you must:
1. Place the following button on your shopping cart page. To create a checkout button,
log in to your PayPal account and navigate to the Merchant Services tab. After you
8/16/2013 Page 9 of 18
Page 10

Express Checkout ~ Integration Overview
create a button, copy the button HTML code to your website.
2. Offer PayPal as a payment choice on your payment options page using radio buttons.
You can find html code to copy and paste on your site here.
3. Include the words "What is PayPal?" next to the Express Checkout Shortcut Button,
next to the PayPal Mark on your payment options page, and next to any PayPal
banners or messaging. You can find the html code to copy and paste on your site
here.
Use case 1: A Sale transaction
The following integration use cases highlight the basics of setting up a simple Express
Checkout flow. For more advanced functionality, including how to set up recurring payments
(subscriptions), reference transactions and implementing Express Checkout for Mobile and
Digital Goods, please see the Express Checkout Integration Guide.
To create the simplest Express Checkout integration, you specify "Sale" as the payment
action enabling you to receive the money right away. You can also set up a payment to be
collected later, or refund a payment.
The simplest Express Checkout integration requires the following PayPal API operations:
SetExpressCheckout.
GetExpressCheckoutDetails (optional).
DoExpressCheckoutPayment.
Setting Up the Express Checkout Transaction
To set up an Express Checkout transaction, you must invoke the SetExpressCheckout API
operation to provide sufficient information to initiate the payment flow. Then redirect to
PayPal if the operation is successful.
NOTE: This example assumes that you have set up the mechanism you will use to
communicate with the PayPal server and have a PayPal business account with API
credentials. It also assumes that the payment action is a final sale.
When you set up an Express Checkout transaction, you specify values in the
SetExpressCheckout request and then call the API. The values you specify control the
8/16/2013 Page 10 of 18
Page 11

Express Checkout ~ Integration Overview
PayPal page flow and the options available to buyers. You should start by setting up a
standard Express Checkout transaction, which can be modified to include additional options.
To set up the simplest standard Express Checkout transaction:
Specify the amount of the transaction; include the currency if it is not in US dollars.
Specify the total amount of the transaction if it is known; otherwise, specify the
subtotal.
For most currencies, the amount format must have a decimal point with exactly
two digits to the right and an optional thousands separator to the left, which must
be a comma. See the PayPal currency codes page for information about currencies
that do not support decimals.
For example, EUR 2.000,00 must be specified as 2000.00 or 2,000.00.
The specified amount cannot exceed USD $10,000.00, regardless of the currency
used.
PAYMENTREQUEST_0_AMT=amount
PAYMENTREQUEST_0_CURRENCYCODE=currencyID
Specify the return URL
The return URL is your website page to which PayPal redirects the buyer's browser
after the buyer logs into PayPal and approves the payment. Typically, this is a secure
page (https://...) on your website.
NOTE: You can use the return URL to piggyback parameters between pages on
your site. For example, you can set your Return URL to specify additional
parameters using the
https://www.yourcompany.com/page.html?param=value... syntax.
The parameters become available as request parameters on the page
specified by the Return URL.
RETURNURL=return_url
Specify the cancel URL
The cancel URL is the page to which PayPal redirects the buyer’s browser
if the consumer does not approve the payment. Typically, this is the
secure page (https://...) on your website from which you redirected the
consumer to PayPal.
You can pass SetExpressCheckout request values as parameters in your
website's URL to have the values available, if necessary, after PayPal
redirects to your website's URL.
CANCELURL=cancel_url
Specify the payment action.
8/16/2013 Page 11 of 18
Page 12

Express Checkout ~ Integration Overview
Although the default payment action is a Sale, it is a best practice to
explicitly specify the payment action as one of the following values:
PAYMENTREQUEST_0_PAYMENTACTION=Sale
PAYMENTREQUEST_0_PAYMENTACTION=Authorization
PAYMENTREQUEST_0_PAYMENTACTION=Order
Execute the SetExpressCheckout API operation to set up the Express
Checkout transaction.
Test that the response to the SetExpressCheckout API operation was
successful (ACK=Success).
If calling the SetExpressCheckout API was successful, redirect the
consumer's browser to PayPal and execute the _express-checkout
command using the token returned in the SetExpressCheckout response.
Obtaining the Express Checkout Transaction Details
To obtain details about an Express Checkout transaction, you can invoke the GetExpressCheckoutDetails API operation.
NOTE: This example assumes that PayPal redirects to your buyer's browser with a valid
token after the consumer reviews the transaction on PayPal.
Although you are not required to invoke the GetExpressCheckoutDetails
API operation, most Express Checkout implementations take this action to
obtain information about the buyer.
You invoke the GetExpressCheckoutDetails API operation from the page
specified by return URL, which you set in your call to the
SetExpressCheckout API.
Typically, you invoke this operation as soon as the redirect occurs and use
the information in the response to populate your review page.
To obtain a buyer's shipping address and Payer ID, specify the token
returned by PayPal when it redirects the consumer's browser to your site.
PayPal returns the token to use in the token HTTP request parameter when
redirecting to the URL you specified in your call to the SetExpressCheckout
API.
TOKEN=tokenValue
Execute the GetExpressCheckoutDetails API operation to obtain
information about your buyer.
Access the fields in the GetExpressCheckoutDetails API response.
8/16/2013 Page 12 of 18
Page 13

Express Checkout ~ Integration Overview
NOTE: Only populated fields are returned in the response.
Completing the Express Checkout Transaction
To complete an Express Checkout transaction, you must invoke the
DoExpressCheckoutPayment API operation.
NOTE: This example assumes that PayPal redirects the buyer's browser to your website
with a valid token after you call the SetExpressCheckout API. Optionally, you may call
the GetExpressCheckoutDetails API before calling the DoExpressCheckoutPayment
API.
In the simplest case, set the total amount of the order when you call the
SetExpressCheckout API.
However, you can change the amount before calling the
DoExpressCheckoutPayment API if you did not know the total amount
when you called the SetExpressCheckout API.
NOTE: This example assumes the simplest case, in which the total amount was
specified in the return URL when calling the SetExpressCheckout API. Although
you can specify additional options, this example does not use any additional
options.
Specify the token returned by PayPal when it redirects the consumer's
browser to your site.
PayPal returns the token to use in the token HTTP request parameter when
redirecting to the URL you specified in your call to the SetExpressCheckout
API.
TOKEN=tokenValue
Specify the Payer ID returned by PayPal when it redirects the buyer's
browser to your website.
PayPal returns the Payer ID to use in the token HTTP request parameter
when redirecting to the URL you specified in your call to the
SetExpressCheckout API. Optionally, you can obtain the Payer ID by calling
the GetExpressCheckoutDetails API.
PAYERID=id
Specify the amount of the order including shipping, handling, and tax;
include the currency if it is not in US dollars.
8/16/2013 Page 13 of 18
Page 14

Express Checkout ~ Integration Overview
Regardless of the specified currency, the format for most currencies must
include a decimal point with exactly two digits to the right and an optional
thousands separator to the left, which must be a comma.
For example, EUR 2.000,00 must be specified as 2000.00 or 2,000.00.
The specified amount cannot exceed USD $10,000.00, regardless of the
currency used.
NOTE: Some currencies such as Yen do not support decimal points. See the
PayPal Currency Codes page for currencies that do not support decimals.
PAYMENTREQUEST_0_AMT=amount
PAYMENTREQUEST_0_CURRENCYCODE=currencyID
Specify the payment action.
Although the default payment action is a Sale, it is a best practice to
explicitly specify the payment action as one of the following values:
PAYMENTREQUEST_0_PAYMENTACTION=Sale
PAYMENTREQUEST_0_PAYMENTACTION=Authorization
PAYMENTREQUEST_0_PAYMENTACTION=Order
Execute the DoExpressCheckoutPayment API to complete the Express
Checkout transaction.
Examine the values returned by the API if the transaction completed
successfully (ACK=Success).
Use case 2: Auth / Capture
An Authorization is used to put a hold on the funds. When you submit an Authorization you
are asking PayPal to see if the funds are available, and if they are, to place a hold on them
for 3 days.
You can capture an Authorization for up to 29 days; however, the funds are only on hold for
3 days. These 3 days are known as the "honor period".
NOTE: The honor period is a PayPal function. This is 3 days by default, and the
maximum honor period is 10 days. This time period is dependent on the card-issuing
bank or the bank itself in ACH transactions such as a bank initiated transfer.
Authorization Example:
You know that you have the product in stock, but you only ship on Wednesdays and
Fridays; and, today is Monday.
Monday:
8/16/2013 Page 14 of 18
Page 15

Express Checkout ~ Integration Overview
The buyer goes to your website and adds the item to his/her cart and checks out via PayPal
Express Checkout.
You set the PAYMENTACTION to Authorization in both the
SetExpressCheckout and DoExpressCheckoutPayment API calls.
You get back an Authorization ID. The transaction is successful thus far.
Wednesday:
You go to ship the product.
But before it ships, you capture the payment by making a DoCapture API
call.
You send the amount you want to capture and the Authorization ID to
PayPal, and the actual money is moved from the consumer's funding source
to the PayPal account.
You see a Success returned from PayPal and you ship the item.
NOTE: You may capture less than the Original Authorization, you may capture the full
Authorization amount, or, you may capture more than the original Authorization (Up to
115% of the original Authorization, or $75 USD more, whichever is less).
Use Case 3: Refunds / Voids
Use the RefundTransaction API to issue one or more refunds associated with a transaction,
such as a transaction created by a capture of a payment. The transaction is identified by a
transaction ID that PayPal assigns when the payment is captured.
You can use the RefundTransaction PayPal API operation to issue refunds.
NOTE: You cannot make a refund if the transaction occurred after the refund period
has passed; typically, the refund period is 60 days. If you need to issue a refund after
60 days, a credit must be issued to the buyers' PayPal account instead.
You can refund amounts up to the total amount of the original transaction.
If a full refund is specified, the entire amount is refunded.
If a partial refund is specified, the amount to refund, the currency, and a
description of the refund, which is called a memo, must be specified.
When you call the RefundTransaction API, PayPal responds with another
transaction ID that is associated with the refund (not the original transaction)
and additional information about the refund. This information identifies:
The gross amount of the refund, which is returned to the consumer.
The amount of the refund associated with the original transaction fee,
which is returned to you.
8/16/2013 Page 15 of 18
Page 16

Express Checkout ~ Integration Overview
The net amount of the refund, which is deducted from your balance.
To issue a refund:
In the RefundTransaction request, specify the transaction ID of the
original transaction which you want to refund.
TRANSACTIONID=transaction_id
Specify the kind of refund, which is either Full or Partial.
REFUNDTYPE=Full
Or
REFUNDTYPE=Partial
For a partial refund, specify the refund amount, including the currency.
AMT=amount
CURRENCYCODE=currencyID
For a partial refund, specify the memo description.
NOTE=description
Execute the RefundTransaction operation.
Check the acknowledgement status in the RefundTransaction response
to ensure that the operation was successful (ACK=Success).
Managing Response Codes
Possible error codes returned by each of the PayPal APIs can be found in an online list of API
Error Codes.
The error codes are broken out by API.
The documentation includes both the Short and Long Message for each error
and, where appropriate, a possible corrective action to be taken.
Testing Your Integration
To test your integration, PayPal provides a Sandbox for you to use to ensure
that your integration is working properly before releasing it to your buyers.
The Sandbox environment is a duplicate of the live PayPal environment,
except no money changes hand. You will need to sign up for a Sandbox
account in order to use this environment. For more information and to sign
up for a Sandbox account, please see the PayPal Sandbox Guide.
8/16/2013 Page 16 of 18
Page 17

Express Checkout ~ Integration Overview
NOTE: The PayPal developer site automatically creates Sandbox credentials for you
when you log in with your PayPal account for the first time to
https://developer.paypal.com.
Going Live With Your Express Checkout Integration
1. After you have tested your application with the PayPal Sandbox, and you are
ready to move it to production, use the following checklist to ensure you are
not forgetting any steps for going live. For more information see the Going
Live documentation. Create and configure your live PayPal account.
2. Verify that your live account's profile settings match those in your sandbox
account's profile or that you understand and approve the differences.
3. Set up credentials for your live PayPal account. API credentials are associated
with an account; thus, your credentials in production are different than those
for the Sandbox. You must obtain either a different signature or download a
different certificate for your live account.
4. If your application uses a PayPal SDK, create an API Profile object that
contains the details of your live account. You must specify the "environment"
field as live and, if you use a certificate, include the API username, API
password and path to your production API certificate with your live account.
5. Add PayPal's IP addresses to any list of trusted IP addresses needed by your
firewall or other network devices. You can find a current list of PayPal IP
addresses here.
Sample Code
Which interface am I using?
PayPal provides an API to allow you to integrate with PayPal.
There are two interfaces to the PayPal API. Your technical team should use the one that
makes the most sense for your development style and environment:
Name-Value Pair (NVP) interface
Requests and responses are sent using simple HTTP. This interface is better for those who
prefer more lightweight, script-based development.
SOAP Interface
Requests and responses are sent using Simple Object Access Protocol (SOAP). This interface
is better for those who prefer object-oriented development.
8/16/2013 Page 17 of 18
Page 18

Express Checkout ~ Integration Overview
API Call
Sample Code
SetExpressCheckout
PHP
Java
.NET
GetExpressCheckoutDetails
PHP
Java
.NET
DoExpressCheckoutPayment
PHP
Java
.NET
Express Checkout Sample Code
Use the following table to view sample code for each of the three API calls needed for
Express Checkout:
For SDK information, see the Merchant API SDK.
Documentation
Online references (in English)
Express Checkout Integration Guide
NVP API Developer Guide
API Endpoints
Digital Goods with Express Checkout Guide
Name-Value Pair (NVP) Interface
SOAP Interface
Classic APIs Getting Started Guide
PayPal SDKs
PayPal IP Addresses
PayPal Sandbox Guide
8/16/2013 Page 18 of 18
 Loading...