

Page 1

PayPal Express
Checkout Integration
Guide
Last updated: August 7, 2012
Page 2

PayPal Express Checkout Integration Guide
Document Number: 100010.en_US-20120807
© 2012 PayPal, Inc. All rights reserved. PayPal is a registered trademark of PayPal, Inc. The PayPal logo is a trademark of PayPal, Inc. Other
trademarks and brands are the property of their respective owners.
The information in this document belongs to PayPal, Inc. It may not be used, reproduced or disclosed without the written approval of PayPal, Inc.
Copyright © PayPal. All rights reserved. PayPal S.à r.l. et Cie, S.C.A., Société en Commandite par Actions. Registered office: 22-24 Boulevard Royal, L2449, Luxembourg, R.C.S. Luxembourg B 118 349
Consumer advisory: The PayPal™ payment service is regarded as a stored value facility under Singapore law. As such, it does not require the approval
of the Monetary Authority of Singapore. You are advised to read the terms and conditions carefully.
Notice of non-liability:
PayPal, Inc. is providing the information i n this document t o you “AS-IS” with all faults. PayPal, Inc. makes no warranties of any kind (whether express,
implied or statutory) with respect to the information co ntained herein. PayPal, Inc. assumes no liability for damages (whether direct or indirect), caused
by errors or omissions, or resulting from the use of this document or the information contained in this document or resulting f rom the application or use
of the product or service described herein. PayPal, Inc. reserves the right to make changes to any information herein without further notice.
Page 3

Contents
Chapter Preface . . . . . . . . . . . . . . . . . . . . . . . . . . . 7
About This Guide. . . . . . . . . . . . . . . . . . . . . . . . . . . . . . . . . . . . . . . . 7
Intended Audience . . . . . . . . . . . . . . . . . . . . . . . . . . . . . . . . . . . . . . . 7
Where to Go for More Information . . . . . . . . . . . . . . . . . . . . . . . . . . . . . . . 7
Documentation Feedback . . . . . . . . . . . . . . . . . . . . . . . . . . . . . . . . . . . 7
Chapter 1 Getting Started With Express Checkout. . . . . . . . . . . 9
Key Features of Express Checkout . . . . . . . . . . . . . . . . . . . . . . . . . . . . . . 9
The Express Checkout Experience . . . . . . . . . . . . . . . . . . . . . . . . . . . 11
Supported Countries and Currencies . . . . . . . . . . . . . . . . . . . . . . . . . . 12
Relationship Between Express Checkout and Shopping Carts . . . . . . . . . . . . . . . 12
Express Checkout Prerequisites . . . . . . . . . . . . . . . . . . . . . . . . . . . . . . . 12
Implementing the Simplest Express Checkout Integration. . . . . . . . . . . . . . . . . . 13
Obtaining an Express Checkout Button and PayPal Mark. . . . . . . . . . . . . . . . 14
Before You Start Coding . . . . . . . . . . . . . . . . . . . . . . . . . . . . . . . . . 15
Setting Up the Express Checkout Transaction . . . . . . . . . . . . . . . . . . . . . 16
Obtaining Express Checkout Transaction Details . . . . . . . . . . . . . . . . . . . . 18
Completing the Express Checkout Transaction . . . . . . . . . . . . . . . . . . . . . 19
Testing an Express Checkout Integration . . . . . . . . . . . . . . . . . . . . . . . . 20
Security Issues. . . . . . . . . . . . . . . . . . . . . . . . . . . . . . . . . . . . . . 25
Troubleshooting Your Express Checkout Integration . . . . . . . . . . . . . . . . . . . . 25
Error Handling . . . . . . . . . . . . . . . . . . . . . . . . . . . . . . . . . . . . . . 26
Timeouts. . . . . . . . . . . . . . . . . . . . . . . . . . . . . . . . . . . . . . . . . 26
Logging API Operations . . . . . . . . . . . . . . . . . . . . . . . . . . . . . . . . . 27
Encoding and Decoding Values . . . . . . . . . . . . . . . . . . . . . . . . . . . . . 27
Express Checkout Features . . . . . . . . . . . . . . . . . . . . . . . . . . . . . . . . . 27
Customizing the Express Checkout User Interface . . . . . . . . . . . . . . . . . . . 27
Settlements and Captured Payments . . . . . . . . . . . . . . . . . . . . . . . . . . 28
Refunds . . . . . . . . . . . . . . . . . . . . . . . . . . . . . . . . . . . . . . . . . 28
Recurring Payments . . . . . . . . . . . . . . . . . . . . . . . . . . . . . . . . . . . 29
Mobile Express Checkout . . . . . . . . . . . . . . . . . . . . . . . . . . . . . . . . 29
Parallel Payments With Express Checkout . . . . . . . . . . . . . . . . . . . . . . . 29
Fraud Management Filters. . . . . . . . . . . . . . . . . . . . . . . . . . . . . . . . 30
Express Checkout Integration Guide August 7, 2012 3
Page 4

Contents
Event Notification . . . . . . . . . . . . . . . . . . . . . . . . . . . . . . . . . . . . 30
Dynamic Images Overview . . . . . . . . . . . . . . . . . . . . . . . . . . . . . . . 31
Express Checkout Instant Update . . . . . . . . . . . . . . . . . . . . . . . . . . . . 31
Express Checkout Building Blocks. . . . . . . . . . . . . . . . . . . . . . . . . . . . . . 31
Express Checkout Buttons. . . . . . . . . . . . . . . . . . . . . . . . . . . . . . . . 32
Express Checkout API Operations . . . . . . . . . . . . . . . . . . . . . . . . . . . 33
Express Checkout Command . . . . . . . . . . . . . . . . . . . . . . . . . . . . . . 33
Express Checkout Token Usage. . . . . . . . . . . . . . . . . . . . . . . . . . . . . 34
Chapter 2 Express Checkout User Interface Requirements . . . . . . 35
Express Checkout Flow . . . . . . . . . . . . . . . . . . . . . . . . . . . . . . . . . . . 35
Checkout Entry Point . . . . . . . . . . . . . . . . . . . . . . . . . . . . . . . . . . 36
Payment Option Entry Point . . . . . . . . . . . . . . . . . . . . . . . . . . . . . . . 36
PayPal Button and Logo Images. . . . . . . . . . . . . . . . . . . . . . . . . . . . . . . 37
Express Checkout Image Flavors . . . . . . . . . . . . . . . . . . . . . . . . . . . . 37
Express Checkout Images. . . . . . . . . . . . . . . . . . . . . . . . . . . . . . . . 37
Payment Mark . . . . . . . . . . . . . . . . . . . . . . . . . . . . . . . . . . . . . . 38
Chapter 3 Related API Operations . . . . . . . . . . . . . . . . . . . 39
Sale Payment Action for Express Checkout . . . . . . . . . . . . . . . . . . . . . . . . . 39
Authorization Payment Action for Express Checkout . . . . . . . . . . . . . . . . . . . . 39
Order Payment Action for Express Checkout . . . . . . . . . . . . . . . . . . . . . . . . 40
Issuing Refunds . . . . . . . . . . . . . . . . . . . . . . . . . . . . . . . . . . . . . . . 41
Tracking Failed or Pending Requests . . . . . . . . . . . . . . . . . . . . . . . . . . . . 42
Chapter 4 Integrating Express Checkout With PayPal SDKs. . . . . . 45
Chapter 5 Going Live With Your Express Checkout Integration . . . .47
Chapter A Obtaining API Credentials. . . . . . . . . . . . . . . . . .49
Creating an API Signature . . . . . . . . . . . . . . . . . . . . . . . . . . . . . . . . . . 49
Creating an API Certificate. . . . . . . . . . . . . . . . . . . . . . . . . . . . . . . . . . 50
Encrypting Your Certificate Into PKCS12 Format . . . . . . . . . . . . . . . . . . . . 51
Importing Your Certificate . . . . . . . . . . . . . . . . . . . . . . . . . . . . . . . . 52
Chapter B PayPal Name-Value Pair API Basics . . . . . . . . . . . . .55
PayPal API Client-Server Architecture. . . . . . . . . . . . . . . . . . . . . . . . . . . . 55
4 August 7, 2012 Express Checkout Integration Guide
Page 5

Contents
PayPal Name-Value Pair API Requests and Responses . . . . . . . . . . . . . . . . 56
UTF-8 Character Encoding . . . . . . . . . . . . . . . . . . . . . . . . . . . . . . . 56
Multiple API Operations . . . . . . . . . . . . . . . . . . . . . . . . . . . . . . . . . 56
NVP Format . . . . . . . . . . . . . . . . . . . . . . . . . . . . . . . . . . . . . . . . . 57
Creating an NVP Request . . . . . . . . . . . . . . . . . . . . . . . . . . . . . . . . . . 58
Specifying the PayPal API Operation . . . . . . . . . . . . . . . . . . . . . . . . . . 58
Specifying an API Credential Using Signatures . . . . . . . . . . . . . . . . . . . . . 59
URL Encoding . . . . . . . . . . . . . . . . . . . . . . . . . . . . . . . . . . . . . . 60
List Syntax for Name-Value Pairs . . . . . . . . . . . . . . . . . . . . . . . . . . . . 61
Executing NVP API Operations . . . . . . . . . . . . . . . . . . . . . . . . . . . . . . . 61
Specifying a PayPal Server . . . . . . . . . . . . . . . . . . . . . . . . . . . . . . . 62
Logging API Operations . . . . . . . . . . . . . . . . . . . . . . . . . . . . . . . . . 62
Responding to an NVP Response . . . . . . . . . . . . . . . . . . . . . . . . . . . . . . 62
Common Response Fields. . . . . . . . . . . . . . . . . . . . . . . . . . . . . . . . 63
Error Responses. . . . . . . . . . . . . . . . . . . . . . . . . . . . . . . . . . . . . 63
URL Decoding . . . . . . . . . . . . . . . . . . . . . . . . . . . . . . . . . . . . . . 64
Chapter C PayPal SOAP API Basics . . . . . . . . . . . . . . . . . .65
PayPal WSDL/XSD Schema Definitions . . . . . . . . . . . . . . . . . . . . . . . . . . . 66
PayPal SOAP API Definitions . . . . . . . . . . . . . . . . . . . . . . . . . . . . . . . . 66
Security . . . . . . . . . . . . . . . . . . . . . . . . . . . . . . . . . . . . . . . . . . . 67
SOAP RequesterCredentials: Username, Password, Signature, and Subject. . . . . . . . 67
SOAP Service Endpoints. . . . . . . . . . . . . . . . . . . . . . . . . . . . . . . . . . . 68
SOAP Request Envelope . . . . . . . . . . . . . . . . . . . . . . . . . . . . . . . . . . 68
Request Structure . . . . . . . . . . . . . . . . . . . . . . . . . . . . . . . . . . . . . . 69
SOAP Message Style: doc-literal . . . . . . . . . . . . . . . . . . . . . . . . . . . . . . 71
Response Structure . . . . . . . . . . . . . . . . . . . . . . . . . . . . . . . . . . . . . 71
Error Responses . . . . . . . . . . . . . . . . . . . . . . . . . . . . . . . . . . . . . . . 73
CorrelationID for Reporting Problems to PayPal. . . . . . . . . . . . . . . . . . . . . . . 75
UTF-8 Character Encoding . . . . . . . . . . . . . . . . . . . . . . . . . . . . . . . . . 75
Date/Time Formats. . . . . . . . . . . . . . . . . . . . . . . . . . . . . . . . . . . . . . 75
Core Currency Amount Data Type. . . . . . . . . . . . . . . . . . . . . . . . . . . . . . 75
Revision History. . . . . . . . . . . . . . . . . . . . . . . . . . . . . . 77
Express Checkout Integration Guide August 7, 2012 5
Page 6

Contents
6 August 7, 2012 Express Checkout Integration Guide
Page 7

Preface
About This Guide
This document describes basic Express Checkout integration.
Intended Audience
This document is for merchants and developers who want to get started implementing Express
Checkout.
Where to Go for More Information
Express Checkout Advanced Features Guide
Name-Value Pair API Developer Guide
SOAP API Developer Reference
Merchant Setup and Administration Guide
Documentation Feedback
Help us improve this guide by sending feedback to:
documentationfeedback@paypal.com
Express Checkout Integration Guide August 7, 2012 7
Page 8

Preface
Documentation Feedback
8 August 7, 2012 Express Checkout Integration Guide
Page 9

Getting Started With Express
1
Checkout
The Express Checkout button gives buyers another way to pay, and it complements your
existing payment solution. Online shoppers appreciate the convenience and security of PayPal,
where they can pay with their PayPal balance, bank account, or credit card.
Key Features of Express Checkout
Express Checkout is a fast, easy way for buyers to pay with PayPal. Express Checkout
eliminates one of the major causes of checkout abandonment by giving buyers all the
transaction details at once, including order details, shipping options, insurance choices, and
tax totals.
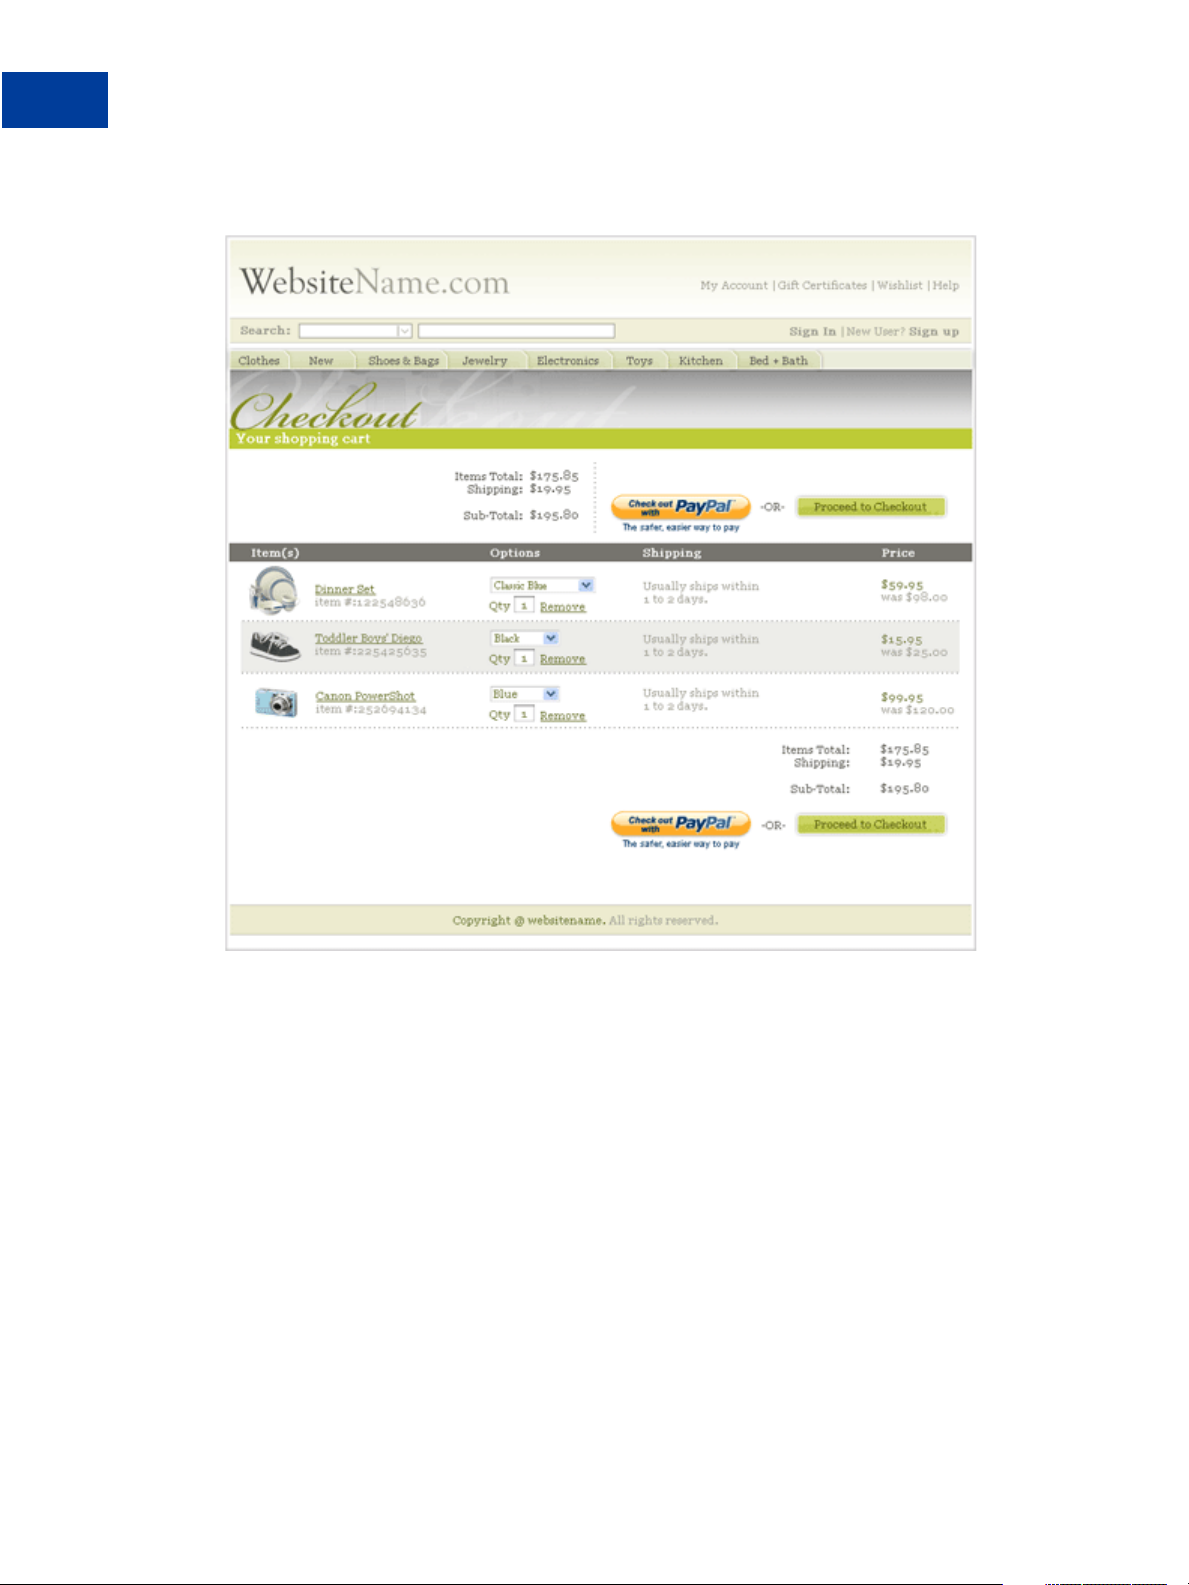
Studies show that adding the Express Checkout button to your website can increase your sales
up to 18 percent. The following web page shows the Express Checkout button side-by-side
with an existing checkout button:
Express Checkout Integration Guide August 7, 2012 9
Page 10
Getting Started With Express Checkout
Key Features of Express Checkout
Use Express Checkout to:
Accept payments from any PayPal account.
Eliminate the need for customers to enter personal information, including shipping, billing,
or payment information.
Keep customers on your site after completing the transaction.
Sign up customers to make payments at regular intervals.
10 August 7, 2012 Express Checkout Integration Guide
Page 11
See more at: https://merchant.paypal.com/cgi-
bin/marketingweb?cmd=_rendercontent&content_ID=merchant/express_checkout&nav=2.1.5
The Express Checkout Experience
Express Checkout makes it easier for buyers to pay online. It also enables you to accept PayPal
while retaining control of the buyer and the overall checkout flow.
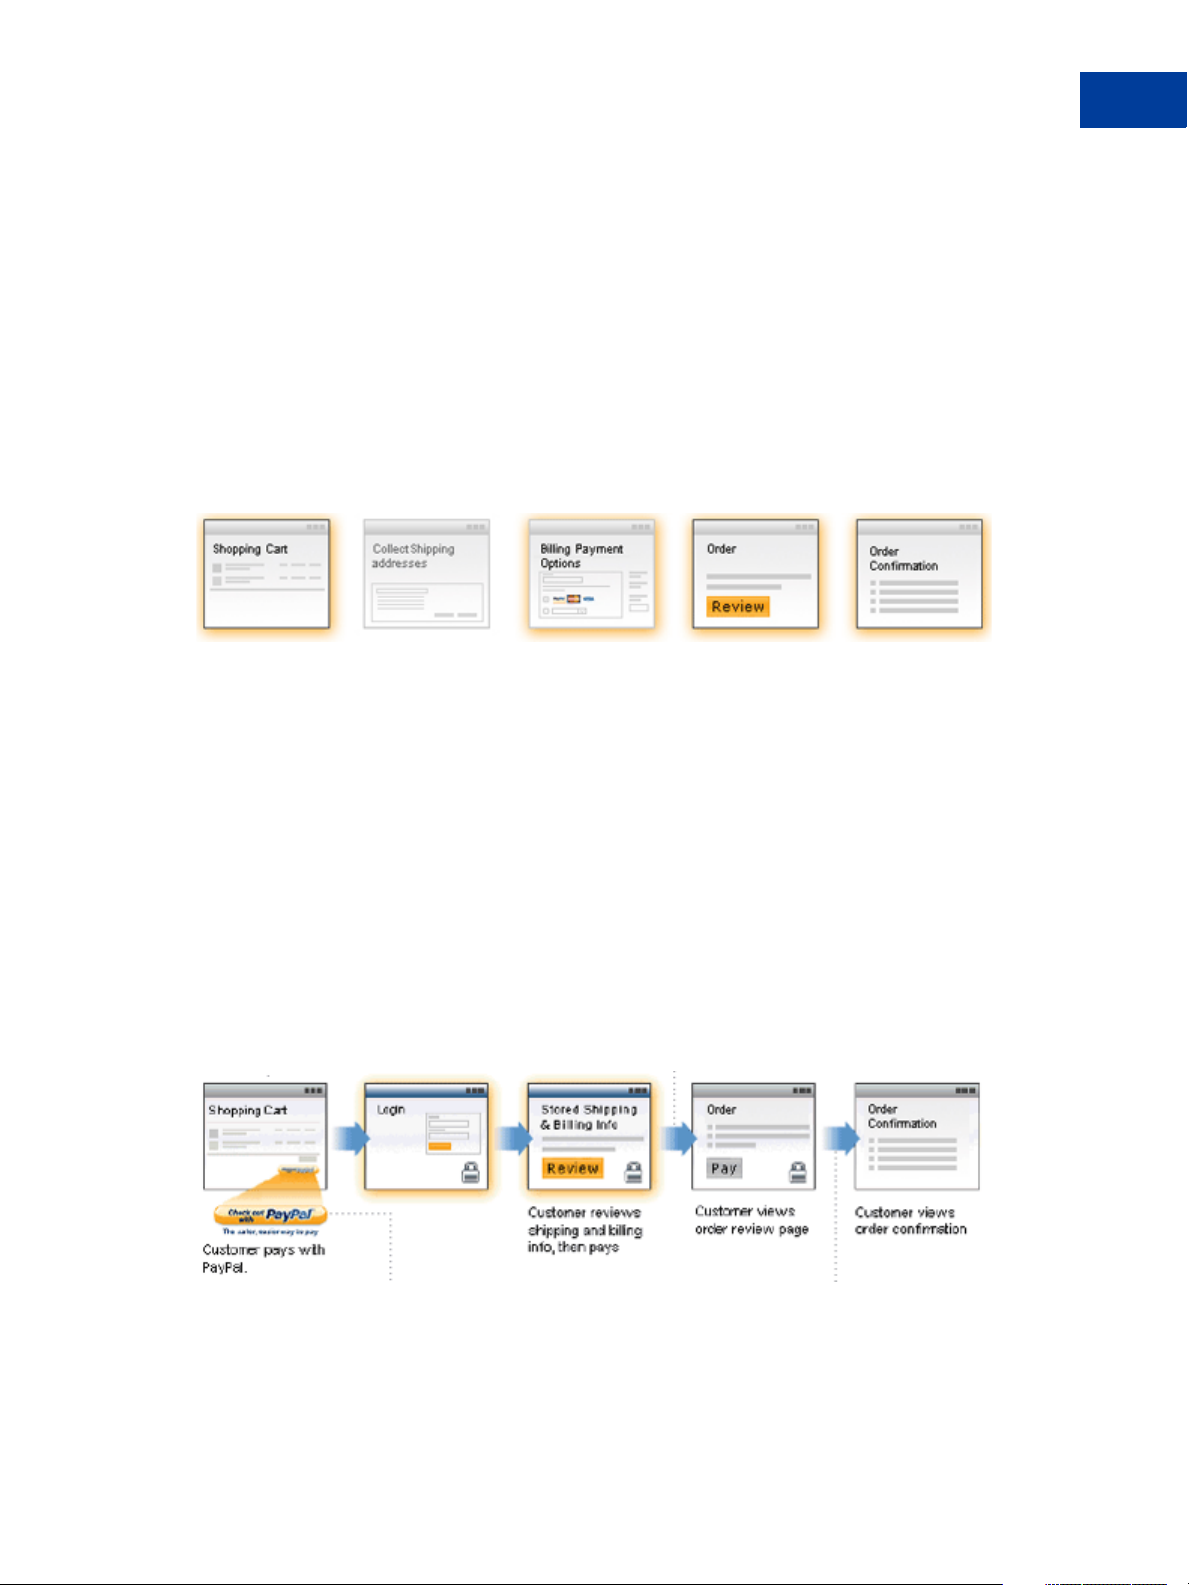
Consider your buyers’ experience before implementing Express Checkout. A generic flow
probably has the following sequence of pages:
A generic checkout flow
In a typical checkout flow, a buyer:
Getting Started With Express Checkout
Key Features of Express Checkout
1. Checks out from the shopping cart page
2. Provides shipping information
3. Chooses a payment option and provides billing and payment information
4. Reviews the order and pays
5. Receives an order confirmation
In an Express Checkout flow, a buyer still checks out at the beginning of the flow. However,
the buyer does not enter shipping, billing, or payment information, because PayPal provides
the stored information. This simplifies and expedites the checkout process.
The following diagram shows the Express Checkout flow:
Express Checkout flow
In the Express Checkout flow, the buyer:
1. Chooses Express Checkout by clicking Check out with PayPal
2. Logs into PayPal to authenticate his or her identity
Express Checkout Integration Guide August 7, 2012 11
Page 12

Getting Started With Express Checkout
Relationship Between Express Checkout and Shopping Carts
3. Reviews the transaction on PayPal
NOTE: Optionally, (not shown in the diagram), the buyer can then proceed to review the
order on your site. You can also include other checkout steps, including upselling
on your Review Order page.
4. Confirms the order and pays from your site
5. Receives an order confirmation
Supported Countries and Currencies
Express Checkout enables you to accept payments from many countries and regions. The
checkout flow is also localized for a subset of countries.
For information about the countries and currencies that Express Checkout supports, see
Offerings W orldwide. For information about localized flows and additional country information,
Send and Receive Payments Securely Worldwide.
see
PayPal
Relationship Between Express Checkout and Shopping Carts
If you do not have your own shopping cart and have not integrated Express Checkout with
your website, you might consider using a third-party shopping cart. A shop ping cart is
software that lets buyers put items in a basket and calculates totals during checkout.
PayPal partners with a wide variety of shopping carts, all of which are PayPal compatible and
provide secure purchases for your buyers. The shopping cart vendor provides instructions for
integrating their shopping cart on your website. See the PayPal Partner Directory
(https://www.paypal-
marketing.com/emarketing/partner/directory/directory.page?type=Shopp
ing+Cart#mode=dir&dir%5Bops%5D=either&dir%5Bkey%5D=Keyword+term&dir%
5Btyp%5D%5B%5D=1&dir%5Bind%5D%5B%5D=0&dir%5Brod%5D%5B%5D=1&dir%5Brod
%5D%5B%5D=2) for available shopping carts.
IMPORTANT: If you choose a shopping cart, do not contact PayPal. PayPal has no authority
over a shopping cart vendor and cannot help you resolve issues that might
arise from the integration with or use of a third-party shopping cart.
Express Checkout Prerequisites
Prerequisites to Express Checkout include the kind of PayPal accounts you need as well as the
required programming skills and experience. If you want to use Express Checkout but do not
have the required skills or experience, you should consider using PayPal Payments Standard
(previously known as Website Payments Standard) or a shopping cart provided by PayPal or a
third party.
12 August 7, 2012 Express Checkout Integration Guide
Page 13

Getting Started With Express Checkout
Implementing the Simplest Express Checkout Inte gr at ion
To use Express Checkout, you must have:
A Business or Premier account. A Business or Premier account enables you to become a
merchant for whom PayPal collects money from buyers for goods or services. PayPal
manages these transactions and charges you a small fee and a percentage of the amount
collected from the buyer for each transaction.
A Sandbox account with two test accounts. The PayPal Sandbox provides an environment
that simulates PayPal, in which you execute your Express Checkout integration without
actually exchanging money. One of your test accounts represents you as the merchant, or
seller using Sandbox terminology, and the other test account represents a buyer. Your
testing is not restricted to just two accounts; however , you must have a Sandbox account to
create test accounts and perform actual testing.
HTML experience. Probably, you already have an existing website and may have already
implemented a checkout experience for the goods or services you sell on your site. You
will need to add the Pay with Express Checkout button, as well as another button, called
the Express Checkout mark, to your web pages. The Pay with Express Checkout button
initiates the PayPal checkout flow. The mark enables the buyer to choose Express
Checkout from the page that specifies the payment method, called the payment page, in
case the buyer did not start with Pay with Express Checkout.
Programming experience. When the buyer clicks a button, you must provide code that
requests a PayPal server to set up or process the transaction and code to handle the
response. PalPal provides an easy-to-user interface built on the HTTP request-response
model, as well as a more complicated SOAP web services interface. PayPal also provides
Software Development Kits (SDKs) that provide an interface in various programming
languages, such as PHP, Ruby, Java, and .NET languages like C#. Although you need not
know a specific language, you will need to understand programming logic, especially the
request-response model, error handling, and the nuances of writing application-level code.
NOTE: If the description of the programming experience prerequisite seems confusing
(like “what’s an interface?”), you can still use Express Checkout provided by a
shopping cart vendor, including PayPal, or use another PayPal product, such as
PayPal Payments Standard. You should not attempt to integrate Express Checkout
on your own unless you have sufficient programming experience. A programmer
or developer will find Express Checkout easy; a complete novice could lose sales
or goods and not even know it.
Implementing the Simplest Express Checkout Integration
The simplest Express Checkout integration requires you to set up a PayPal button and call the
following PayPal API operations when your buyer clicks the button: SetExpressCheckout,
DoExpressCheckoutPayment, and typically, GetExpressCheckoutDetails.
You must also enable the buyer to select PayPal as the payment method after the buyer starts
to check out. Thus, you must call these API operations from two places. You must perform
these API operations on your checkout page and on your payment method page.
Express Checkout Integration Guide August 7, 2012 13
Page 14

Getting Started With Express Checkout
Implementing the Simplest Express Checkout Inte gr at ion
Related information:
"Express Checkout Flow" on page 35
Obtaining an Express Checkout Button and PayPal Mark
PayPal requires that you use the Check out with PayPal button and the PayPal mark image
hosted on secure PayPal servers. When the images are updated, the changes appear
automatically in your application.
You must put the Express Checkout button on your checkout page. To obtain an Express
Checkout Button:
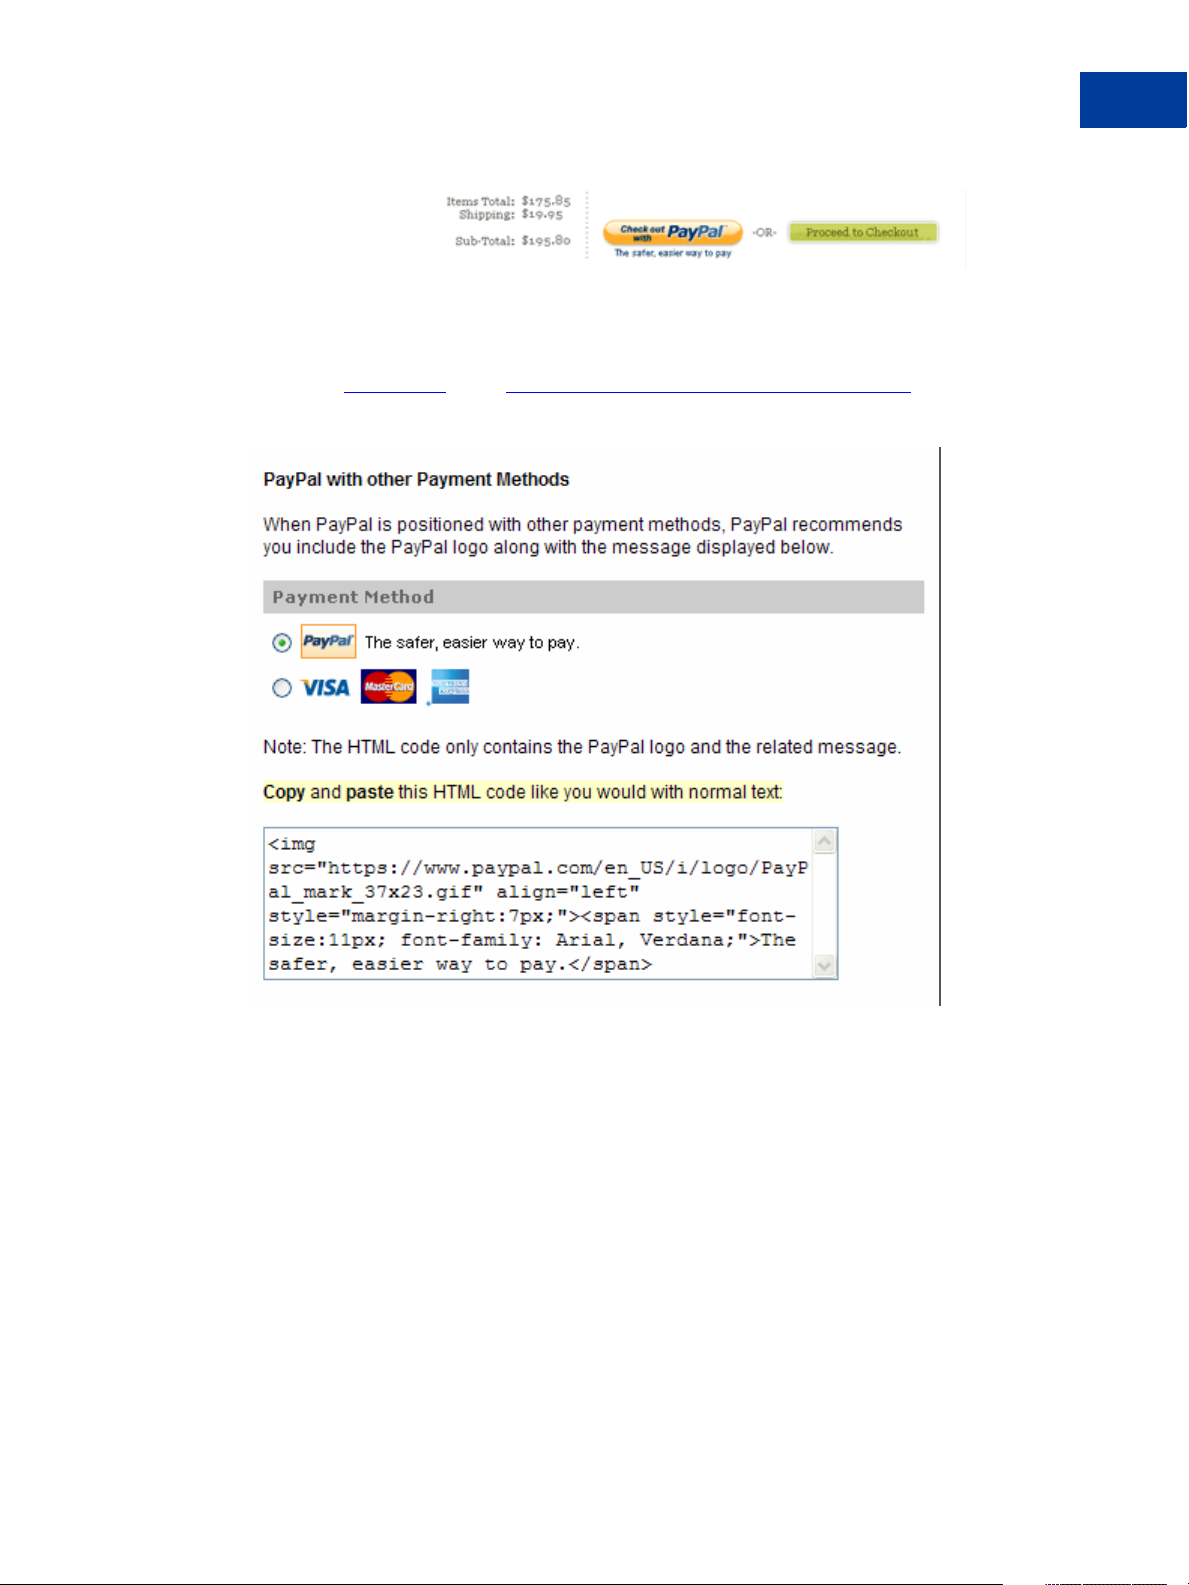
1. Go to the PayPal
Button Code page (https://www.paypal.com/express-checkout-buttons).
A page similar to the following one appears:
2. Select and copy the image source text from the window below the button.
3. Paste the image source text into your checkout page’s HTML source where you want the
button to appear on your page.
Result:
When you display your checkout page in the browser, the Check out with PayPal button
should appear:
14 August 7, 2012 Express Checkout Integration Guide
Page 15
Getting Started With Express Checkout
Implementing the Simplest Express Checkout Inte gr at ion
After Completing This Task:
You will need to place the PayPal mark image on your payment page. The instructions for
obtaining this image are similar to the instructions for obtaining the button. The mark is found
on the same
Checkout button:
Button Code page (https://www.paypal.com/express-checkout-buttons) as the Express
Before You Start Coding
If you are not familiar with how PayPal APIs work, read this topic. It provides the minimum
information you need to be successful using the PayPal Name-Value Pair API.
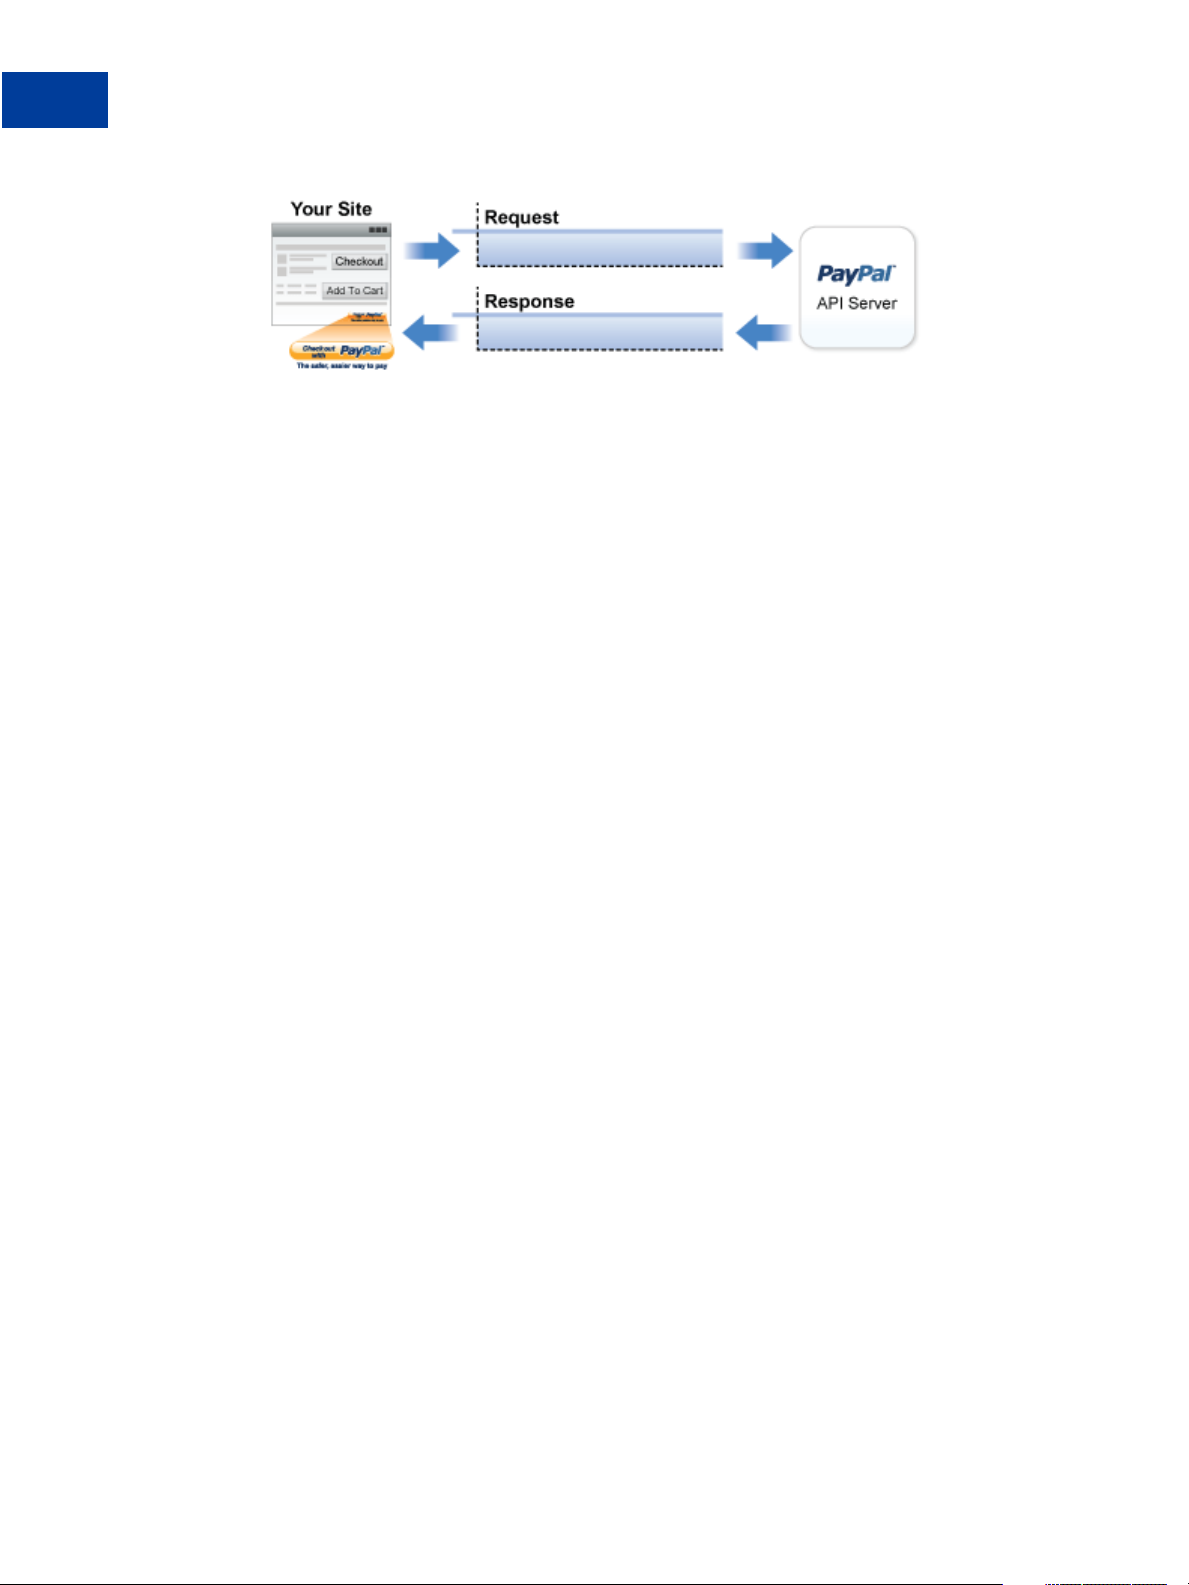
PayPal API Client-Server Architecture
The PayPal API uses a client-server model in which your website is a client of the PayPal
server.
A page on your website initiates an action on a PayPal API server by sending a request to the
server. The PayPal server responds with a confirmation that the requested action was taken or
indicates that an error occurred. The response might also contain additional information
related to the request. The following diagram shows the basic request-response mechanism.
Express Checkout Integration Guide August 7, 2012 15
Page 16
Getting Started With Express Checkout
Implementing the Simplest Express Checkout Inte gr at ion
For example, you might want to obtain the buyer’s shipping address from PayPal. You can
initiate a request specifying an API operation to obtain buyer details. The response from the
PayPal API server contains information about whether the request was successful. If the
operation succeeds, the response contains the requested information. In this case, the response
contains the buyer’s shipping address. If the operation fails, the response contains one or more
error messages.
Related information:
"Creating an NVP Request" on page 58
"Responding to an NVP Response" on page 62
Obtaining API Credentials
To use the PayPal API, you must have API credentials that identify you as a PayPal Business
or Premier account holder who is authorized to perform various API operations. Although you
can use either an API signature or a certificate for credentials, PayPal recommends you use a
signature.
IMPORTANT: Although you can have both a signature and certificate, you cannot use both at
the same time.
Setting Up the Express Checkout Transaction
T o set up an Express Checkout transaction, you must invoke the SetExpressCheckout API
operation to provide sufficient information to initiate the payment flow and redirect to PayPal
if the operation was successful.
This example assumes that you have set up the mechanism you will use to communicate with
the PayPal server and have a PayPal Business account with API credentials. It also assumes
that the payment action is a final sale.
When you set up an Express Checkout transaction, you specify values in the
SetExpressCheckout request and then call the API. The values you specify control the
PayPal page flow and the options available to you and your buyers. You should start by setting
up a standard Express Checkout transaction, which can be modified to include additional
options.
To set up the simplest standard Express Checkout transaction:
16 August 7, 2012 Express Checkout Integration Guide
Page 17

Getting Started With Express Checkout
Implementing the Simplest Express Checkout Inte gr at ion
1. Specify that you want to execute the SetExpressCheckout API operation and the
version you want to use.
METHOD=SetExpressCheckout
VERSION=XX.0
2. Specify your API credentials.
Use the following parameters for a signature:
USER=API_username
PWD=API_password
SIGNATURE=API_signature
In the Sandbox, you can always use the following signature:
USER=sdk-three_api1.sdk.com
PWD=QFZCWN5HZM8VBG7Q
SIGNATURE=A-IzJhZZjhg29XQ2qnhapuwxIDzyAZQ92FRP5dqBzVesOkzbdUONzmOU
3. Specify the amount of the transaction; include the currency if it is not in US dollars.
Specify the total amount of the transaction if it is known; otherwise, specify the subtotal.
Regardless of the specified currency, the format must have a decimal point with exactly
two digits to the right and an optional thousands separator to the left, which must be a
comma.
For example, EUR 2.000,00 must be specified as 2000.00 or 2,000.00. The specified amount
cannot exceed USD $10,000.00, regardless of the currency used.
PAYMENTREQUEST_0_AMT=amount
PAYMENTREQUEST_0_CURRENCYCODE=currencyID
4. Specify the return URL.
The return URL is the page to which PayPal redirects your buyer’s browser after the buyer
logs into PayPal and approves the payment. Typically, this is a secure page
(https://...) on your site.
NOTE: You can use the return URL to piggyback parameters between pages on your site.
For example, you can set your Return URL to specify additional parameters using
the https://www.
yourcompany.com/page.html?param=value... syntax. The
parameters become available as request parameters on the page specified by the
Return URL.
RETURNURL=return_url
Express Checkout Integration Guide August 7, 2012 17
Page 18

Getting Started With Express Checkout
Implementing the Simplest Express Checkout Inte gr at ion
5. Specify the cancel URL.
The cancel URL is the page to which PayPal redirects your buyer’s browser if the buyer
does not approve the payment. Typically, this is the secure page (https://...) on your
site from which you redirected the buyer to PayPal.
NOTE: You can pass SetExpressCheckout request values as parameters in your URL
to have the values available, if necessary, after PayPal redirects to your URL.
CANCELURL=cancel_url
6. Specify the payment action.
Although the default payment action is a Sale, it is a best practice to explicitly specify the
payment action as one of the following values:
PAYMENTREQUEST_0_PAYMENTACTION=Sale
After Completing This Task:
If calling the SetExpressCheckout API was successful, redirect the buyer’s browser to
PayPal and execute the _express-checkout command using the token returned in the
SetExpressCheckout response.
NOTE: The following example uses the PayPal Sandbox server:
https://www.sandbox.paypal.com/webscr
?cmd=_express-checkout&token=tokenV alue
Obtaining Express Checkout Transaction Details
To obtain details about an Express Checkout transaction, you can invoke the
GetExpressCheckoutDetails API operation.
This example assumes that PayPal redirects to your buyer’s browser with a valid token after
the buyer reviews the transaction on PayPal.
Although you are not required to invoke the GetExpressCheckoutDetails API operation,
most Express Checkout implementations take this action to obtain information about the
buyer. You invoke the GetExpressCheckoutDetails API operation from the page
specified by return URL, which you set in your call to the SetExpressCheckout API.
Typically, you invoke this operation as soon as the redirect occurs and use the information in
the response to populate your review page.
To obtain a buyer’s shipping address and Payer ID:
1. Specify that you want to execute the GetExpressCheckoutDetails API operation and
the version you want to use.
18 August 7, 2012 Express Checkout Integration Guide
Page 19

Getting Started With Express Checkout
Implementing the Simplest Express Checkout Inte gr at ion
METHOD=GetExpressCheckoutDetails
VERSION=XX.0
2. Specify your API credentials.
Use the following parameters for a signature:
USER=API_username
PWD=API_password
SIGNATURE=API_signature
3. Specify the token returned by PayPal when it redirects the buyer’s browser to your site.
PayPal returns the token to use in the token HTTP request parameter when redirecting to
the URL you specified in your call to the SetExpressCheckout API.
TOKEN=tokenValue
4. Execute the GetExpressCheckoutDetails AP I to obtain information about the buyer.
5. Access the fields in the GetExpressCheckoutDetails API response.
NOTE: Only populated fields are returned in the response.
Completing the Express Checkout Transaction
To complete an Express Checkout transaction, you must invoke the
DoExpressCheckoutPayment API operation.
This example assumes that PayPal redirects your buyer’s browser to your website with a valid
token after you call the SetExpressCheckout API. Optionally, you may call the
GetExpressCheckoutDetails API before calling the DoExpressCheckoutPayment
API.
In the simplest case, you set the total amount of the order when you call the
SetExpressCheckout API. However, you can change the amount before calling the
DoExpressCheckoutPayment API if you did not know the total amount when you called
the SetExpressCheckout API.
This example assumes the simplest case, in which the total amount was specified in the return
URL when calling the SetExpressCheckout API. Although you can specify additional
options, this example does not use any additional options.
To execute an Express Checkout transaction:
1. Specify that you want to execute the DoExpressCheckoutPayment API operation and
the version you want to use.
Express Checkout Integration Guide August 7, 2012 19
Page 20

Getting Started With Express Checkout
Implementing the Simplest Express Checkout Inte gr at ion
METHOD=DoExpressCheckoutPayment
VERSION=XX.0
2. Specify your API credentials.
Use the following parameters for a signature:
USER=API_username
PWD=API_password
SIGNATURE=API_signature
3. Specify the token returned by PayPal when it redirects the buyer’s browser to your site.
PayPal returns the token to use in the token HTTP request parameter when redirecting to
the URL you specified in your call to the SetExpressCheckout API.
TOKEN=tokenValue
4. Specify the Payer ID returned by PayPal when it redirects the buyer’s browser to your site.
PayPal returns the Payer ID to use in the token HTTP request parameter when redirecting
to the URL you specified in your call to the SetExpressCheckout API. Optionally, you
can obtain the Payer ID by calling the GetExpressCheckoutDetails API.
PAYERID=id
5. Specify the amount of the order including shipping, handling, and tax; include the currency
if it is not in US dollars.
Most of the time, this will be the same amount as you specified in your
SetExpressCheckout call, adjusted for shipping and taxes.
PAYMENTREQUEST_0_AMT=amount
PAYMENTREQUEST_0_CURRENCYCODE=currencyID
6. Specify the same payment action that you specified in SetExpressCheckout.
PAYMENTREQUEST_0_PAYMENTACTION=Sale
Testing an Express Checkout Integration
You can test your Express Checkout integration in the Sandbox.
This example shows how to simulate your web pages using HTTP forms and supplying the
values for API operations from these forms. You can use this strategy for your initial testing;
however, for more complete testing, you need to replace these forms with your web pages
containing your actual code.
20 August 7, 2012 Express Checkout Integration Guide
Page 21

Getting Started With Express Checkout
Implementing the Simplest Express Checkout Inte gr at ion
The following diagram shows the Express Checkout execution flow, which uses the Sandbox
as the API server. The pages on the left represent your site.
The following steps match the circled numbers in the diagram. Perform the actions in each
step to test Express Checkout.
1. Invoke a form on your site that calls the SetExpressCheckout API on the Sandbox.
To invoke the API, set form fields whose names match the NVP names of the fields you want
to set, specify their corresponding values, and then post the form to a PayPal Sandbox server,
such as https://api-3t.sandbox.paypal.com/nvp, as shown in the following
example:
Express Checkout Integration Guide August 7, 2012 21
Page 22

Getting Started With Express Checkout
Implementing the Simplest Express Checkout Inte gr at ion
<form method=post action=https://api-3t.sandbox.paypal.com/nvp>
<input type=hidden name=USER value=API_username>
<input type=hidden name=PWD value=API_p assword>
<input type=hidden name=SIGNATURE value=API_signature>
<input type=hidden name=VERSION value=XX.0>
<input type=hidden name=PAYMENTREQUEST_0_PAYMENTACTION
value=Sale>
<input name=PAYMENTREQUEST_0_AMT value=19.95>
<input type=hidden name=RETURNURL
value=https://www.YourReturnURL.com>
<input type=hidden name=CANCELURL
value=https://www.YourCancelURL.com>
<input type=submit name=METHOD value=SetExpressCheckout>
</form>
NOTE: Use an API username from a Sandbox business test account for which a signature
exists. See the T est Certificates tab of the Sandbox to obtain a signature. If you are not
using a signature, you must use a different Sandbox server.
IMPORTANT: This example does not establish a secure connection and should not be used
live on paypal.com.You must protect the values for USER, PWD, and
SIGNATURE in your implementation. Consider storing these values in a secure
location other than your web server document root and setting the file
permissions so that only the system user that executes your ecommerce
application can access it.
2. Review the response string from the SetExpressCheckout API operation.
PayPal responds with a message, such as the one shown below. Note the status, which
should include ACK set to Success, and a token that is used in subsequent steps.
TIMESTAMP=2007%2d04%2d05T23%3a23%3a07Z
&CORRELATIONID=63cdac0b67b50
&ACK=Success
&VERSION=XX%2e000000
&BUILD=1%2e0006
&TOKEN=EC%2d1NK66318YB717835M
3. If the operation was successful, use the token and redirect your browser to the Sandbox to
log in, as follows:
22 August 7, 2012 Express Checkout Integration Guide
Page 23

Getting Started With Express Checkout
Implementing the Simplest Express Checkout Inte gr at ion
https://www.sandbox.paypal.com/cgi-bin/webscr?
cmd=_express-checkout
&token=EC-1NK66318YB717835M
You may need to decode the URL, which is the opposite of URL encoding, by replacing
hexadecimal codes with ASCII codes; for example, you may need to replace %2d in the
token with a hyphen ( - ).
You must log in to https://developer.paypal.com before you log in to a Sandbox
test account. You then log in to the test account that represents the buyer, not the seller’s
business test account that represents you as the merchant.
4. After logging into the buyer test account, confirm the details.
When you confirm, the Sandbox redirects your browser to the return URL you specified
when invoking the SetExpressCheckout API operation, as in the following example:
http://www.YourReturnURL.com/
?token=EC-1NK66318YB717835M&PayerID=7AKUSARZ7SAT8
5. Invoke a form on your site that calls the GetExpressCheckoutDetails API operation
on the Sandbox:
<form method=post action=https://api-3t.sandbox.paypal.com/nvp
<input type=hidden name=USER value=API_username>
<input type=hidden name=PWD value=API_p assword>
<input type=hidden name=SIGNATURE value=API_signature>
<input type=hidden name=VERSION value=XX.0>
<input name=TOKEN value=EC-1NK66318YB717835M>
<input type=submit name=METHOD value=GetExpressCheckoutDetails>
</form>
If the operation was successful, the GetExpressCheckoutDetails API returns
information about the payer, such as the following information:
Express Checkout Integration Guide August 7, 2012 23
Page 24

Getting Started With Express Checkout
Implementing the Simplest Express Checkout Inte gr at ion
TIMESTAMP=2007%2d04%2d05T23%3a44%3a11Z
&CORRELATIONID=6b174e9bac3b3
&ACK=Success
&VERSION=XX%2e000000
&BUILD=1%2e0006
&TOKEN=EC%2d1NK66318YB717835M
&EMAIL=Y ourSandboxBuyerAccountEmail
&PAYERID=7AKUSARZ7SAT8
&PAYERSTATUS=verified
&FIRSTNAME=...
&LASTNAME=...
&COUNTRYCODE=US
&BUSINESS=...
&PAYMENTREQUEST_0_SHIPTONAME=...
&PAYMENTREQUEST_0_SHIPTOSTREET=...
&PAYMENTREQUEST_0_SHIPTOCITY=...
&PAYMENTREQUEST_0_SHIPTOSTATE=CA
&PAYMENTREQUEST_0_SHIPTOCOUNTRYCODE=US
&PAYMENTREQUEST_0_SHIPTOCOUNTRYNAME=United%20States
&PAYMENTREQUEST_0_SHIPTOZIP=94666
&PAYMENTREQUEST_0_ADDRESSID=...
&PAYMENTREQUEST_0_ADDRESSSTATUS=Confirmed
6. Invoke a form on your site that invokes the DoExpressCheckoutPayment API operation
on the Sandbox:
<form method=post action=https://api-3t.sandbox.paypal.com/nvp>
<input type=hidden name=USER value=API_username>
<input type=hidden name=PWD value=API_p assword>
<input type=hidden name=SIGNATURE value=API_signature>
<input type=hidden name=VERSION value=XX.0>
<input type=hidden name=PAYMENTREQUEST_0_PAYMENTACTION
value=Authorization>
<input type=hidden name=PAYERID value=7AKUSARZ7SAT8>
<input type=hidden name=TOKEN value= EC%2d1NK66318YB717835M>
<input type=hidden name=PAYMENTREQUEST_0_AMT value= 19.95>
<input type=submit name=METHOD value=DoExpressCheckoutPayment>
</form>
24 August 7, 2012 Express Checkout Integration Guide
Page 25

Getting Started With Express Checkout
Troubleshooting Your Express Checkout Integration
7. Review the response string from the DoExpressCheckoutPayment API operation.
If the operation was successful, the response should include ACK set to Success, as
follows:
TIMESTAMP=2007%2d04%2d05T23%3a30%3a16Z
&CORRELATIONID=333fb808bb23
ACK=Success
&VERSION=XX%2e000000
&BUILD=1%2e0006
&TOKEN=EC%2d1NK66318YB717835M
&PAYMENTREQUEST_0_TRANSACTIONID=043144440L487742J
&PAYMENTREQUEST_0_TRANSACTIONTYPE=expresscheckout
&PAYMENTREQUEST_0_PAYMENTTYPE=instant
&PAYMENTREQUEST_0_ORDERTIME=2007%2d04%2d05T23%3a30%3a14Z
&PAYMENTREQUEST_0_AMT=19%2e95
&PAYMENTREQUEST_0_CURRENCYCODE=USD
&PAYMENTREQUEST_0_TAXAMT=0%2e00
&PAYMENTREQUEST_0_PAYMENTSTATUS=Pending
&PAYMENTREQUEST_0_PENDINGREASON=authorization
&PAYMENTREQUEST_0_REASONCODE=None
Security Issues
You must always be concerned with protecting sensitive data. This not only includes your API
credentials, but also any data exposed in a client’s browser, such as data about the transaction
stored in cookies.
In the simplest examples, such as the ones provided by PayPal to demonstrate Express
Checkout usage, the API credentials may be exposed. Thus, if you copy code from
examples or SDKs, you should always review your website for security issues and correct
them before you go live with your website.
Encrypt all saved information related to the PayPal transaction. For example, if you keep
order status information in a cookie, make sure the information is encrypted.
Use a secure transmission protocol, such as HTTPS to transfer information between your
site and PayPal. Do not use HTTP or insecure cURL.
Troubleshooting Your Express Checkout Integration
If you have trouble with your integration, there are several things you can check first. If you
try them yet continue to have problems, you can also contact Merchant Technical Support
(MTS).
If you cannot resolve the issue yourself, you will need to gather some basic information before
contacting MTS, including a log of the actions that led to the error. You can contact MTS at
https://www.paypal.com/mts.
Express Checkout Integration Guide August 7, 2012 25
Page 26

Getting Started With Express Checkout
Troubleshooting Your Express Checkout Integration
Error Handling
The response message contains an ACK value. Unless ACK=Success, you must check further
for an error or warning message.
You must check each response from the PayPal server for an indication that an error occurred.
Because there are several warning and failure values, the safest way to check the response is to
check for ACK=Success. If the ACK returns any other value, you must examine the response
for error numbers and messages.
A non-successful response can contain more than one error number and message. Error fields
start with L_ERRORCODE
There are two messages for each error number, L_SHORTMESSAGE
where
n corresponds with n in L_ERRORCODEn.
IMPORTANT: Because error numbers are not guaranteed to be unique, you must use both the
number and the messages to determine the appropriate action to take when an
error occurs.
Some errors are transitory in nature and you can retry the operation; for example, an error that
indicates a problem with PayPal. If the problem persists for more than an hour, it is probably
related to your Express Checkout implementation because PayPal servers are up and running
almost all of the time.
n, where n, starting from 0, identifies a unique error in the response.
n and L_LONGMESSAGEn,
Timeouts
Some errors indicate problems with the buyer’s account; for example, the funding source is no
longer valid or the buyer’s account is restricted in some way. The error message has enough
information to create a message on your website that tells the buyer how to resolve the issue.
Often, you simply prompt the buyer to choose a dif ferent funding source. Because these kinds
of problems can indicate a risk issue, you do not want to ship goods until the issue has been
resolved.
Other errors indicate a problem with your integration, such as accepting invalid input on your
website and passing it in your request message to PayPal. You need to perform sufficient
testing using the Sandbox to prevent problems from arising after going live.
A timeout situation occurs if an API operation’s completion status is not known or the buyer
navigates away from the page that receives the response before PayPal completes the
operation. You must not ship goods before receiving a valid transaction ID, which indicates
that PayPal accepted the payment.
It is safe to execute the API operation again if the status is not known. In the case of
DoExpressCheckout, you can execute GetExpressCheckoutDetails and examine the
CheckoutStatus field. Any value other than PaymentCompleted indicates that the
payment has not completed. You should not ship goods until you receive a valid transaction ID
from calling either DoExpressCheckoutPayment or GetExpressCheckoutDetails.
26 August 7, 2012 Express Checkout Integration Guide
Page 27

Logging API Operations
You should log basic information from the request and response messages of each PayPal API
operation you execute. You must log the Correlation ID from the response message, which
identifies the API operation to PayPal and which must be provided to Merchant Technical
Support if you need their assistance with a specific transaction.
All responses to PayPal API operations contain information that may be useful for debugging
purposes. In addition to logging the Correlation ID from the response message, you can log
other information, such as the transaction ID and timestamp, to enable you to review a
transaction on the PayPal website or through the API. You could implement a scheme that logs
the entire request and response in a “verbose” mode; however, you should never log the
password from a request.
Encoding and Decoding Values
You must encode and decode all values sent in API operations. Only encode the value and not
the name in NVP and not the tags in SOAP.
Getting Started With Express Checkout
Express Checkout Features
You must encode all request field values in a request to PayPal and decode all field values in
the response. You must encode and decode individual values; do not encode or decode the
entire message. Browsers often attempt to encode and decode messages that are redirected to
or from them; however, you must verify that encoding and decoding is done correctly and only
to field values.
Express Checkout Features
Express Checkout features include ways to configure Express Checkout API reqeusts, ways to
customize the PayPal checkout pages, and additional settings you can specify.
Customizing the Express Checkout User Interface
You can customize the appearance of the PayPal Express Checkout pages. Some changes alter
the checkout flow.
Express Checkout includes options for presenting the checkout pages that appear when the
buyer logs into PayPal during checkout. Some of them make the PayPal pages look like your
own pages, giving the customer a consistent visua l presentation:
Logo to display
Colors for the background and border
Language in which PayPal content is displayed
Your customer service number
Express Checkout Integration Guide August 7, 2012 27
Page 28

Getting Started With Express Checkout
Express Checkout Features
NOTE: All of the above customizations can be set in your profile. You set them in an Expresss
Checkout API operation only when you want to override the default provided by your
profile.
Other options streamline the flow, by allowing the buyer to complete the payment on PayPal,
or change the kind of information that is presented during checkout. On the PayPal Review
page, you can:
Include per-item details
Include tax, insurance, shipping costs, and shipping discounts
Indicate whether the total displayed on the page is exact or an estimate before items such as
tax and shipping costs
Display a note to the buyer; for example, a note identifying the shipping options are
available
Allow your buyer to specify instructions to you
Assign an invoice number to a payment
Other features may be used in specialized cases:
Shipping address display and usage
Choices for gift wrapping
Buyer consent to receive your promotional materials
Survey questions
Settlements and Captured Payments
Express Checkout enables you to collect a payment immediately or capture the payment later;
for example, when you ship the goods. Express Checkout provides several ways to set up a
transaction for later capture.
Often, you accept a payment and ship goods immediately, which is referred to as a sale. In
addition to immediate payments, Express Checkout allows you to authorize payments to be
captured later, which is referred to as an authorization. An authorization is useful, for
example, when you want to reserve a buyer’ s funds pending the shipment of goods; the actual
payment is captured when the goods are shipped. An authorization can be reauthorized one
time if necessary; for example, when you are unable to ship within 3 days of the authorization.
Express Checkout provides an additional option, called an order, which you use when a single
authorization is insufficient. You can create multiple authorizations and capture them as part
of the same order. This is useful, for example, when an order is split into multiple shipments
and you need to capture a payment each time part of the order is shipped.
Refunds
You can issue full or partial refunds up to the full amount of the payment. You can make a
refund for payments captured initially or as part of a later settlement.
28 August 7, 2012 Express Checkout Integration Guide
Page 29

You cannot make a refund if the transaction occurred after the refund period has passed, which
typically is 60 days.
Related information:
"Issuing Refunds" on page 41
Recurring Payments
Express Checkout provides recurring payments, which enables you to manage subscriptions
and other payments on a fixed schedule. If you have permission from PayPal to use reference
transactions, you can provide variable payments on a varying schedule.
When you support recurring payments for a buyer, you create a recurring payments profile.
The profile contains information about the recurring payments, including details for an
optional trial period and a regular payment period. Both periods contain information about the
payment frequency and payment amounts, including shipping and tax, if applicable.
After creating a profile, PayPal automatically queues payments based on the billing start date,
billing frequency, and billin g amount. Payments reoccur until th e profile expires, t here are too
many failed payments to continue, or you cancel the profile.
Getting Started With Express Checkout
Express Checkout Features
Permission to allow recurring payments is established by the buyer setting up a billing
agreement with the merchant on PayPal. For Express Checkout, the billing agreement can be
established either in advance or when the buyer first makes a purchase; in either case, it occurs
when you call Express Checkout API operations.
Recurring Payments Using Reference Transactions
Recurring payments using reference transactions is an alternative, which enables you to ha ndle
payments for varying amounts of money on a va rying schedule. A reference transaction is a
financial transaction from which subsequent transactions can be derived; for example, a buyer
can make a purchase on your site and the PayPal transaction ID, called a reference transaction
ID, can later be used to initiate another transaction.
Mobile Express Checkout
PayPal supports several implementations of Mobile Express Checkout. You can provide a
complete mobile website, or you can create a mobile phone app in which the checkout button
is integrated into the app itself or is on your mobile website.
On mobile devices, Express Checkout provides payment pages tailored for faster checkout and
for smaller mobile screens and keyboards. You can either set up the experience so that the
buyer pays on your site or pays on PayPal.
Parallel Payments With Express Checkout
Parallel payments enable buyers to pay multiple merchants in an Express Checkout flow. This
feature is not available for Mobile Express Checkout.
Express Checkout Integration Guide August 7, 2012 29
Page 30

Getting Started With Express Checkout
Express Checkout Features
In parallel payments, a merchant acts as marketplace host. Consider an online travel agency.
The buyer purchases airline tickets and makes reservations from various merchants such as
hotels, car rental agencies, and entertainment venues hosted on the site. By implementing
parallel payments through Express Checkout, the marketplace host accepts PayPal as a
payment method. The host also provides the buyer with a consolidated order on the PayPal
Review page, summarizing expenses, itineraries, and other supporting information. Buyers see
travel information, including cancellation fees, directly from the supplier on the Transaction
Details page and in an email message.
Fraud Management Filters
Fraud Management Filters (FMF) provide you filters that identify potentially fraudulent
transactions. There are 2 categories of filters:
Basic filters screen against data such as the country of origin and the value of transactions.
PayPal provides basic filters for Business accounts and Website Payments Pro accounts.
Advanced filters screen data such as credit card and addresses information, lists of high-
risk indicators, and additional transaction characteristics. Website Payments Pro merchants
can upgrade to use these filters.
NOTE: Using advanced filters might incur additional charges.
For more information about Fraud Management Filters, see
Event Notification
In most cases, you can use PayPal API operations to determine the information you need about
a transaction. However, there may be some cases in which you must set up IPN; for example,
when you need automatic notification about actions, such as disputes and their resolution.
IPN is a message service that PayPal uses to notify you about events, such as:
Instant payments, including Express Checkout, Adaptive Payments, and direct credit card
payments, and authorizations, which indicate a sale whose payment has not yet been
collected
eCheck payments and associated status, such as pending, completed, or denied, and
payments pending for other reasons, such as those being reviewed for potential fraud
Recurring payment and subscription actions
Chargebacks, disputes, reversals, and refunds associated with a transaction
For more information about IPN, see
Fraud Management Filters
Instant Payment Notification Guide
30 August 7, 2012 Express Checkout Integration Guide
Page 31

Dynamic Images Overview
Dynamic images enables PayPal to tailor the Express Checkout button for a campaign or
event. This feature is not supported for Mobile Express Checkout.
When you participate in a PayPal campaign or event, PayPal automatically updates the image
to reflect the campaign information. When the campaign is over, PayPal restores the default
image. You are not responsible for scheduling or making changes to your website application
code before, during, or after the campaign. These activities are all handled for you when you
set up the dynamic image.
Express Checkout Instant Update
The instant update feature enables you to create a message that responds with shipping
information, allowing you to provide location-based shipping, insurance, and tax information.
It is not available for Mobile Express Checkout.
You specify a URL that provides the information, which is based on the buyer’s address which
is stored on PayPal. You are not allowed to see the buyer’s actual address.
Getting Started With Express Checkout
Express Checkout Building Blocks
Express Checkout Building Blocks
You implement Express Checkout flows with Express Checkout buttons, PayPal API
operations, PayPal commands, and tokens.
The following conceptual diagram identifies the building blocks that you use to integrate
Express Checkout on your website:
Express Checkout Integration Guide August 7, 2012 31
Page 32

Getting Started With Express Checkout
Express Checkout Building Blocks
Express Checkout Integration
A token is a value assigned by PayPal that associates the execution of API operations and
commands with a specific instance of a user experience flow.
NOTE: Tokens are not shown in the diagram.
Express Checkout Buttons
PayPal provides buttons and images for you to place on your website.
To implement the Express Checkout shopping cart experience, place the following button on
your Shopping Cart page:
To implement PayPal as a payment option, which is part of the Express Checkout experience,
associate the PayPal mark image with your payment options. PayPal recommends using radio
buttons for payment options:
32 August 7, 2012 Express Checkout Integration Guide
Page 33

Getting Started With Express Checkout
Express Checkout Building Blocks
Express Checkout API Operations
The PayPal API provides three API operations for Express Checkout. These API operations
set up the transaction, obtain information about the buyer, and handle the payment and
completes the transaction.
API Operation Description
SetExpressCheckout Sets up the Express Checkout transaction. You can specify information
to customize the look and feel of the PayPal site and the information it
displays. You must include the following inform ation:
URL to the page on your website that PayPal redirects to after the
buyer logs into PayPal and approves the payment successfully.
URL to the page on your website that PayPal redirects to if the buyer
cancels.
Total amount of the order or your best estimate of the total. It should
be as accurate as possible.
GetExpressCheckout Obtains information about the buyer from PayPal, including shipping
information.
DoExpressCheckoutPayment Completes the Express Checkout transaction, including the actual total
amount of the order.
Express Checkout Command
PayPal provides a command that you use when redirecting your buyer’s browser to PayPal.
This command enables your buyer to log in to PayPal to approve an Express Checkout
payment.
When you redirect your buyer’s browser to PayPal, you must specify the
_ExpressCheckout command for Express Checkout. You also specify the token that
identifies the transaction, which was returned by the SetExpressCheckout API operation.
NOTE: T o enable PayPal to redirect back to your website, you must have already invoked the
SetExpressCheckout API operation, specifying URLs that PayPal uses to redirect
back to your site. PayPal redirects to the success URL when the buyer pays on PayPal;
otherwise, PayPal redirects to the cancel URL.
If the buyer approves the payment, PayPal redirects to the success URL with the following
information:
The token that was included in the redirect to PayPal
The buyer’s unique identifier (Payer ID)
If the buyer cancels, PayPal redirects to the cancel URL with the token that was included in the
redirect to PayPal.
Express Checkout Integration Guide August 7, 2012 33
Page 34

Getting Started With Express Checkout
Express Checkout Building Blocks
Express Checkout Token Usage
Express Checkout uses a token to control access to PayPal and execute Express Checkout API
operations.
The SetExpressCheckout API operation returns a token, which is used by other Express
Checkout API operations and by the _ExpressCheckout command to identify the
transaction. The life of the token is approximately 3 hours.
34 August 7, 2012 Express Checkout Integration Guide
Page 35

Express Checkout User Interface
2
Requirements
Your Express Checkout integration must conform to PayPal’s requirements for button use and
placement. You must use only buttons hosted on PayPal and place them on your checkout and
payment pages.
Express Checkout Flow
T o implement Express Checkout, you must offer it both as a checkout option and as a payment
method. Typically, you initiate the Express Checkout flow on your shopping cart page and on
your payment options page.
You add Express Checkout to your existing flow by placing the Checkout with PayPal button
on your Shopping Cart page and by placing the PayPal mark on your Payment Methods
page. The following diagram shows the complete flow:
Complete Express Checkout flow
Make the following changes to implement the complete Express Checkout flow:
On your Shopping Cart page, place the Checkout with PayPal button. Handle clicks by
sending the Express Checkout setup request. After receiving the response, redirect your
buyer’s browser to PayPal.
On your Payment Methods page, associate the PayPal mark with an option. Handle clicks
by sending the Express Checkout setup request. After receiving the response, redirect your
buyer’s browser to PayPal.
On the page your buyer returns to, obtain shipping information from PayPal and accept the
payment to complete the Express Checkout transaction.
Express Checkout Integration Guide August 7, 2012 35
Page 36

Express Checkout User Interface Requirements
Express Checkout Flow
NOTE: You also can allow the buye r to pay on the PayPal Review page. In this case, your
checkout flow can omit the Merchant Review page and proceed directly to your
Confirmation page.
Related information:
"Implementing the Simplest Express Checkout Integration" on page 13
Checkout Entry Point
The checkout entry point is one of the places where you must implement Express Checkout.
Buyers initiate the Express Checkout flow on your shopping cart page by clicking the
Checkout with PayPal button.
The following diagram shows how Express Checkout integrates with a typical checkout flow:
Payment Option Entry Point
The payment option entry point is one of the places where you must implement Express
Checkout. Buyers initiate the Express Checkout flow on your payment methods page by
selecting PayPal as the default option.
The following diagram shows how to integrate Express Checkout from your payment methods
page:
36 August 7, 2012 Express Checkout Integration Guide
Page 37

Express Checkout User Interface Requirements
PayPal Button and Logo Images
To inform buyers that PayPal is accepted on your website, you must place PayPal button and
logo images in your checkout flow. PayPal recommends that you use dynamic images.
PayPal Button and Logo Images
PayPal requires that you use Check out with PayPal buttons and PayPal mark images hosted
on secure PayPal servers. When the images are updated, the changes appear automatically in
your application. Do not host copies of the PayPal images locally on your servers. Outdated
PayPal buttons and images reduce buyer confidence in your site.
Express Checkout Image Flavors
The Check out with PayPal button and the PayPal mark image are available in two flavors:
Dynamic image
Static image
The dynamic images enable PayPal to change their appearance dynamically. If, for example,
you have signed up to participate in a PayPal campaign, PayPal can change the appearance of
the image dynamically for the duration of that campaign based on parameter information you
append to the image URL.
The static images cannot be changed dynamically. To participate in a PayPal campaign, you
would have to manually update the image code to change the image displayed and restore the
default image when the campaign is over. The only way you can have image management
taken care of for you is to replace static images in your implementation with dynamic images.
Express Checkout Images
The Check out with PayPal button is the image you place on your shopping cart page. The
US version of the image looks like this.
Express Checkout Integration Guide August 7, 2012 37
Page 38

Express Checkout User Interface Requirements
PayPal Button and Logo Images
To create an Express Checkout button, see https://www.paypal.com/us/cgi-
bin/webscr?cmd=xpt/Merchant/merchant/ExpressCheckoutButtonCode-outside. PayPal also
provides buttons for other countries. To locate a page for another country, replace the country
abbreviation in the link with another country abbreviation. For example, replace us with uk
for United Kingdom, as follows:
bin/webscr?cmd=xpt/Merchant/merchant/ExpressCheckoutButtonCode-outside. PayPal hosts images
for the countries:
Country-specific buttons and images
https://www.paypal.com/uk/cgi-
URL
Country
Australia au
China cn France fr Germany de Italy it
Japan j1 Netherlands nl Poland pl Spain es
Switzerland ch United
Change Country
Austria at Belgium be Canada ca
Kingdom
NOTE: URL changes are case sensitive. The abbreviation in the URL may not be a country
URL
Change Country
uk United
States
URL
Change Country
us
code.
Payment Mark
The PayPal mark is the image you place on your payment methods page. It looks like this:
To implement PayPal as a payment option, which is part of the Express Checkout experience,
associate the PayPal mark image with your payment options. PayPal recommends using radio
buttons for payment options:
URL
Change
To create a PayPal mark, see
bin/webscr?cmd=xpt/Marketing/general/OnlineLogoCenter-outside.
38 August 7, 2012 Express Checkout Integration Guide
https://www.paypal.com/cgi-
Page 39

Related API Operations
3
When you create the simples t Express Ch eckout integratio n, you specify Sale as the payment
action, enabling you to receive the money right away. You can also set up a payment to be
collected later, or refund a payment.
Sale Payment Action for Express Checkout
A sale payment action represents a single payment that completes a purchase for a specified
amount.
A sale is the default Express Checkout payment action; however, you can also specify the
following action in your SetExpressCheckout and DoExpressCheckoutPayment
requests:
PAYMENTREQUEST_n_PAYMENTACTION=Sale
A sale is the most straightforward payment action. Choose this payment action if the
transaction, including shipping of goods, can be completed immediately. To use this payment
action:
The final amount of the payment must be known when you invoke the
DoExpressCheckoutPayment API operation
You should intend to fulfill the order immediately, such as would be the case for digital
goods or for items you have in stock for immediate shipment
After you execute the DoExpressCheckoutPayment API operation, the payment is
complete and further action is unnecessary. You cannot capture a further payment or void any
part of the payment when you use this payment action.
Authorization Payment Action for Express Checkout
An authorization payment action represents an agreement to pay and places the buyer’s funds
on hold for up to three days.
To set up an authorization, specify the following payment action in your
SetExpressCheckout and DoExpressCheckoutPayment requests:
PAYMENTREQUEST_n_PAYMENTACTION=Authorization
Express Checkout Integration Guide August 7, 2012 39
Page 40

Related API Operations
Order Payment Action for Express Checkout
An authorization enables you to capture multiple payments up to 115% of, or USD $75 more
than, the amount you specify in the DoExpressCheckoutPayment request. Choose this
payment action if you need to ship the goods before capturing the payment or if there is some
reason not to accept the payment immediately.
The honor period, for which funds can be held, is three days. The valid period, for which the
authorization is valid, is 29 days. You can reauthorize the 3-day honor period at most once
within the 29-day valid period.
You can void an authorization, in which case the uncaptured part of the amount specified in
the DoExpressCheckoutPayment request becomes void and can no longer be captured. If
no part of the payment has been captured, the entire payment becomes void and nothing can be
captured.
API operations associated with Authorization payment action in Express Checko ut
API Operation Description
DoCapture Capture an authorized payment.
DoReauthorization Reauthorize a payment.
DoVoid Void an order or an authorization.
Order Payment Action for Express Checkout
An order payment action represents an agreement to pay one or more authorized amounts up
to the specified total over a maximum of 29 days.
To set up an order, specify the following payment action in your SetExpressCheckout and
DoExpressCheckoutPayment requests:
PAYMENTREQUEST_n_PAYMENTACTION=Order
An order enables you to create multiple authorizations over the 29 days; each authorization
you create places the buyer’s funds on hold for up to three days. You can capture multiple
payments for each authorization, up to 115% of, or USD $75 more than, the amount you
specify in the DoExpressCheckoutPayment request.
NOTE: The default number of child authorizations in your PayPal account is 1. To do
multiple authorizations please contact PayPal to request an increase.
This payment action provides the most flexibility and should be used when either a sale does
not meet, or one authorization plus one reauthorization, do not meet your needs. Situations in
which orders are appropriate include the handling of:
Back orders, in which available merchandise is sent immediately and the remaining
merchandise is sent when available, which may include more than two shipments
Split orders, in which merchandise is sent in more than one shipment, perhaps to different
addresses, and you want to collect a payment for each shipment
40 August 7, 2012 Express Checkout Integration Guide
Page 41

Related API Operations
Drop shipments, which are shipments from other vendors for which you accept the
payment
You cannot reauthorize an authorization. You handle the need to reauthorize, for example
when the hold period or valid period of an authorization expires, simply by creating another
authorization.
You can void an order or an authorization created from the order. If you void an order, the
uncaptured part of the amount specified in the DoExpressCheckoutPayment request
becomes void and can no longer be captured. If no part of the payment has been captured, the
entire payment becomes void and nothing can be captured.
If you void an authorization associated with the order, the uncaptured part of the amount
specified in the authorization becomes void and can no longer be captured. If no part of the
authorization has been captured, the entire authorized payment becomes void.
API operations associated with Order payment action in Express Checkout
API Operation Description
DoAuthorization Authorize a payment.
Issuing Refunds
DoCapture Capture an authorized payment.
DoVoid Void an order or an authorization.
Issuing Refunds
You can use the RefundTransaction PayPal API operation to issue refunds.
Use the RefundTransaction API to issue one or more refunds associated with a
transaction, such as a transaction created by a capture of a payment. The transaction is
identified by a transaction ID that PayPal assigns when the payment is captured.
NOTE: You cannot make a refund if the transaction occurred after the refund period has
passed; typically, the refund period is 60 days.
You can refund amounts up to the total amount of the original transaction. If you specify a full
refund, the entire amount is refunded. If you specify a partial refund, you must specify the
amount to refund, the currency, and a description of the refund, which is called a memo.
When you call the RefundTransaction API, PayPal responds with another transaction ID,
which is associated with the refund (not the original transaction), and additional information
about the refund. This information identifies:
The gross amount of the refund, which is returned to the payer
The amount of the refund associated with the original transaction fee, which is returned to
you
The net amount of the refund, which is deducted from your balance
To issue a refund:
Express Checkout Integration Guide August 7, 2012 41
Page 42

Related API Operations
Tracking Failed or Pending Requests
1. In the RefundTransaction request, specify the transaction ID of the transaction whose
payment you want to refund.
TRANSACTIONID=transaction_id
2. Specify the kind of refund, which is either Full or Partial.
REFUNDTYPE=Full
or
REFUNDTYPE=Partial
3. For a partial refund, specify the refund amount, including the currency.
AMT=amount
CURRENCYCODE=currencyID
4. For a partial refund, specify the memo description.
NOTE=description
5. Execute the RefundTransaction operation.
6. Check the acknowledgement status in the RefundTransaction response to ensure that
the operation was successful.
Related information:
"Refunds" on page 28
Tracking Failed or Pending Requests
You can use the MsgSubID (Message Submission ID) to help track pending or failed requests.
MsgSubID has been added to the request and response for following API calls:
DoAuthorization
DoReferenceTransaction
RefundTransaction
DoCapture
Idempotency is useful in cases where a request has failed or if you are unsure about the results
of an original request. It also helps to correlate request payloads with response payloads.
Idempotency helps to eliminate duplicate requests, since a request sent with a previously
accompanying MsgSubID will return with latest status of of the previous request that used the
42 August 7, 2012 Express Checkout Integration Guide
Page 43

Related API Operations
Tra ckin g Fa ile d or Pendin g Req u es ts
same MsgSubID. In contrast, a request with no accompanying MsgSubID will instead
duplicate the request.
Scenarios in which idempotency come into play:
In an API request sent with a MsgSubID times out, a client application can retry the
original request using the accompanying MsgSubID. If the request has finished processing,
PayPal then provides the latest status of the request and might return a 11607 warning
code (Duplicate request for specified Message Submission ID).
If a client application sends two API requests with same MsgSubID at the same time,
PayPal processes the first request and the other may fail with 11604 error code (Request
for Message Submission ID already in progress).
NOTE: For DoExpressCheckoutPayment, you can use the token in place of the
MsgSubID. For mutliple payments, a combination of the token and
PaymentRequestID should be used in place of the MsgSubID.
The following example shows MsgSubID used as part of a DoAuthorization request:
<transactionID>O-87H32160HB8486131</transactionID>
<transactionEntity>
<__value__>
<m__value>Order</m__value>
</__value__>
</transactionEntity>
<amount>
<__value>10</__value>
<currencyID>
<__value__>
<m__value>USD</m__value>
</__value__>
</currencyID>
</amount>
<msgSubID>f81d4fae-7dec-11d0-a765-00a0c91e6bf6</msgSubID>
Usage Notes:
The MsgSubID must be unique for each request and, as a best practice, should be unique to
an API call type (e.g. DoAuthorization, DoCapture).
PayPal recommends using the UUID standard for assigning a MsgSubID to your request,
since it meets the 38 single-byte character limit for MsgSubID.
Idempotency only applies when the original request was successful. If the original request
results in an error, the original request is not saved.
PayPal reserves the right to expire a MsgSubID after 13 days.
PayPal provides the status of a request at the current time and not the status of the initial
request. Take for example, an initial request that makes a payment (status is Complete).
The payment is later refunded. If the original request with the original MsgSubId is
resubmitted, the response will indicate that the payment status is Refunded.
Express Checkout Integration Guide August 7, 2012 43
Page 44

Related API Operations
Tracking Failed or Pending Requests
44 August 7, 2012 Express Checkout Integration Guide
Page 45

4
Integrating Express Checkout With Pa yPal SD Ks
You can choose to use a PayPal SDK instead of creating messages as NVP strings or SOAP
structures. These SDKs enable you to code in your preferred pro gramming language, such as
Java, PHP, Ruby, and more.
In addition to working in the programming language of your choice, SDKs make it easy to
perform common tasks, such as encoding and decoding of messages and managing
credentials. For more information about SDKs and to download the preferred one for your
environment, see:
PayPal API: Name-Value Pair Interface
PayPal API: SOAP Interface
Express Checkout Integration Guide August 7, 2012 45
Page 46

Integrating Express Checkout With PayPal SDKs
46 August 7, 2012 Express Checkout Integration Guide
Page 47

5
Going Live With Your Express Checkout Integration
After your application works with the PayPal Sandbox, and you are ready to move it into live
production, review the checklist to make sure you are not forgetting any steps for going live.
1. Create and configure your live PayPal account.
NOTE: If you are executing Express Checkout or other PayPal API operations on behalf of
another merchant, you must obtain permission to execute them in production. In
other words, the merchant for whom you execute API operations must gran t
permission to you so that you can perform the operation in production.
2. Verify that your live account’s profile settings match those in your sandbox account’s
profile or that you understand and approve the differences.
3. Set up credentials for your live PayPal account.
API credentials are associated with an account; thus, your credentials in production are
different than those for the sandbox. You must obtain either a different signature or
download a different certificate for your live account.
4. If your application uses a PayPal SDK, create an API Profile object that contains the
details of your live account.
You must specify the environment field as live and, if you use a certificate, include the
API username, API password, and path to your production API certificate associated with
your live account.
5. Add PayPal's IP addresses to any list of trusted IP addresses needed by your firewall or
other network devices. See the GoLive Checklist for more information:
https://cms.paypal.com/us/cgi-bin/?cmd=_rendercontent&content_ID=developer/howto_api_golivechecklist
Express Checkout Integration Guide August 7, 2012 47
Page 48

Going Live With Your Express Checkout Integration
48 August 7, 2012 Express Checkout Integration Guide
Page 49

Obtaining API Credentials
A
To use the PayPal API, you must have API credentials that identify you as a PayPal Business
or Premier account holder who is authorized to perform various API operations. Although you
can use either an API signature or a certificate for credentials, PayPal recommends you use a
signature.
IMPORTANT: Although you can have both a signature and certificate, you cannot use both at
the same time.
Creating an API Signature
An API signature consists of an API username along with an associated API passwo rd and
signature, all of which are assigned by PayPal. You need to include this information whenever
you execute a PayPal API operation.
You must have a PayPal Business account to create a signature.
To create an API signature:
1. Log in to PayPal, then click Profile under My Account.
2. Click My selling tools.
3. Click API Access.
4. Click Request API Credentials.
5. Check Request API signature and click Agree and Submit.
Express Checkout Integration Guide August 7, 2012 49
Page 50

Obtaining API Credentials
Creating an API Certificate
6. Click Done to complete the process.
Creating an API Certificate
Create an API certificate only if your website requires it. Typically, you want to create an API
signature for your credentials instead.
You must have a PayPal Business account to create an API certificate.
NOTE: The certificate for API credentials is not the same as an SSL certificate for your
website; they are not related to each other.
If you do need a certificate, follow these instructions:
1. Log in to PayPal, then click Profile under My Account.
2. Click My selling tools.
3. Click API Access.
4. Click Request API Credentials.
5. Check Request API certificate and click Agree and Submit.
50 August 7, 2012 Express Checkout Integration Guide
Page 51
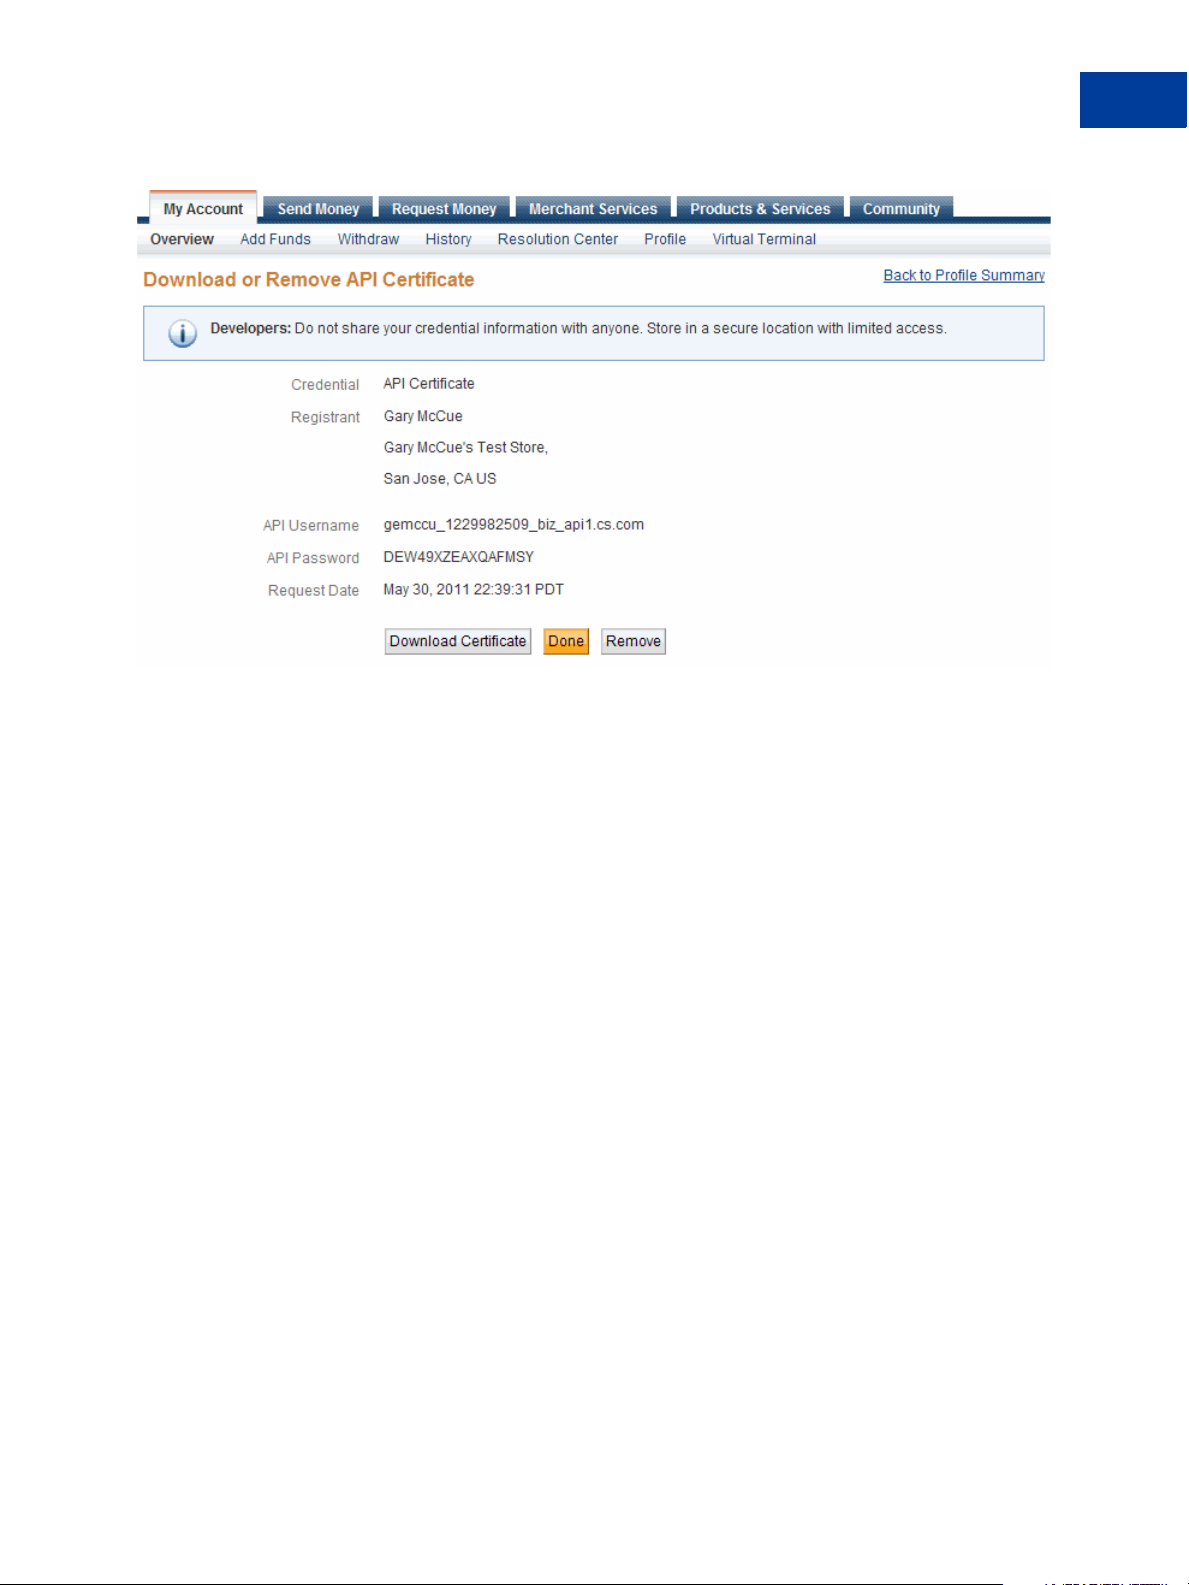
Obtaining API Credentials
Creating an API Certificate
6. Save the values for API Username and API Password for later use.
7. Click Download Certificate and save the file.
8. Rename this file to something familiar, such as paypal_live_cert.pem.
It is not necessary to keep the .txt file extension. Be sure to remember where you save the
file.
After Completing This Task:
If you use the PayPal SDK for Java, the PayPal SDK for .NET, or the PayPal SDK for
Classic ASP, you must encrypt your certificate in PCKS12 format.
If you use the PayPal SDK for .NET or Classic ASP, you must take additional steps to
import the certificate.
Encrypting Your Certificate Into PKCS12 Format
PayPal SDKs for Java, .NET, and Classic ASP require the additional task of encrypting your
certificate into PKCS12 format. Perform this task for both your Sandbox certificate and your
live certificate.
NOTE: This task is not required if you are using the PayPal SDK for PHP.
The certificate you download from PayPal is in PEM format. It contains both your public
certificate and the associated private key. Although the PEM certificate is not human readable,
the file is not encrypted.
Express Checkout Integration Guide August 7, 2012 51
Page 52

Obtaining API Credentials
Creating an API Certificate
The steps in this task require you to use the OpenSSL encryption tool. On Unix, this tool is
typically installed for you. On Windows, you typically must download OpenSSL yourself; in
this case, accept the defaults when you install OpenSSL and add OpenSSL to the path.
NOTE: In Windows, the Path is a System environment variable, which is accessible from the
Advanced tab when you right-click on your My Computer icon and view its
properties. Do not confuse the System variables path with with the User variables
path. Add OpenSSL to the System variables path.
To encrypt your certificate into PKCS12 format:
1. Use OpenSSL to create the PKCS12-format certificate from the downloaded PEM-format
certificate.
openssl pkcs12 -export -in
certificate.p12
2. At the prompt, enter an Export Password for the certificate.
3. Save your Export Password.
Importing Your Certificate
For either PayPal SDK for .NET or Classic ASP, you must download and execute the
Windows HTTP Services Certificate Configuration Tool, WinHTTPCertCfg. If you use the
.NET platform and develop with the PayPal SDK for .NET , you need to take a few more steps
before your certificate can be used.
You must use WinHTTPCertCfg to import the certificate into the Windows Certificate Store
and grant access to your private key to the user executing your web application. This is a
Windows requirement, not a PayPal requ irement. You can download WinHTTPCertCfg from
the Microsoft Windows Server 2003 Resource Kit Tools page
(http://www.microsoft.com/downloads/en/details.aspx?familyid=9d467a6
9-57ff-4ae7-96ee-b18c4790cffd&displaylang=en). For Microsoft documentation,
see
WinHttpCertCfg.exe, a Certificate Configuration Tool.
download.txt -inkey download.txt -out
To import a certificate:
1. Execute WinHTTPCertCfg to import the certificate into the Windows Certificate Store
and grant access to your private key to the party executing your web application.
WinHttpCertCfg -i
where
certificate is your PKCS12 certificate and privateKeyPassword is your Export
certificate.p12 -p privateKeyPassword -c
Password.
52 August 7, 2012 Express Checkout Integration Guide
Page 53

Obtaining API Credentials
Creating an API Certificate
2. Using WinHTTPCertCfg, change the username in LOCAL_MACHINE\My -a username
to one of the following values:
Configuration Username value
ASP. NET
Windows IIS 5 default configuration IWAM_machineName, where machineName is the computer
Windows IIS 6 default configuration
ASPNET
name
“NETWORK SERVICE” (You must include the quote marks.)
Express Checkout Integration Guide August 7, 2012 53
Page 54

Obtaining API Credentials
Creating an API Certificate
54 August 7, 2012 Express Checkout Integration Guide
Page 55

PayPal Name-Value Pair API
B
Basics
The Name-Value Pair (NVP) API provides parameter-based association between request and
response fields of a message and their values. The request message is sent from your website
by the API, and a response message is returned by PayPal using a client-server model in which
your site is a client of the PayPal server.
NOTE: The PayFlow API also uses name-value pairs to provide parameter-based association
between request and response fields of a message and their values; however, the
PayFlow API is not the same as the NVP API; for more information about the
PayFlow API, see
PayPal API Client-Server Architecture
The PayPal API uses a client-server model in which your website is a client of the PayPal
server.
Gateway Developer Guide and Reference.
A page on your website initiates an action on a PayPal API server by sending a request to the
server. The PayPal server responds with a confirmation that the requested action was taken or
indicates that an error occurred. The response might also contain additional information
related to the request. The following diagram shows the basic request-response mechanism.
For example, you might want to obtain the buyer’s shipping address from PayPal. You can
initiate a request specifying an API operation to obtain buyer details. The response from the
PayPal API server contains information about whether the request was successful. If the
operation succeeds, the response contains the requested information. In this case, the response
contains the buyer’s shipping address. If the operation fails, the response contains one or more
error messages.
Related information:
"Creating an NVP Request" on page 58
"Responding to an NVP Response" on page 62
Express Checkout Integration Guide August 7, 2012 55
Page 56

PayPal Name-Value Pair API Basics
PayPal API Client-Server Architecture
PayPal Name-Value Pair API Requests and Responses
To perform a PayPal NVP API operation, you send an NVP-formatted request to a PayPal
NVP server and interpret the response.
In the following diagram, your website generates a request. The request is executed on a
PayPal server and the response is returned to your site.
The request identifies:
The name of the API operation, specified by METHOD=name, to be performed and its
version
NOTE: After the METHOD parameter, you can specify the parameters in any order.
Credentials that identify the PayPal account making the request
Request-specific information that controls the API operation to be performed
A PayPal API server performs the operation and returns a response. The response contains:
An acknowledgement status that indicates whether the operation was a success or failure
and whether any warning messages were returned
Information that can be used by PayPal to track execution of the API operation
Response-specific information required to fulfill the request
UTF-8 Character Encoding
The PayPal API assumes that all data in requests is in Unicode, specifically, the Unicode (or
UCS) Transformation Format, 8-bit encoding form (UTF-8).
In responses, the API always returns data in UTF-8.
Multiple API Operations
Some of the features, such as Express Checkout, require you to call multiple API operations.
Typically, these features require you to:
56 August 7, 2012 Express Checkout Integration Guide
Page 57
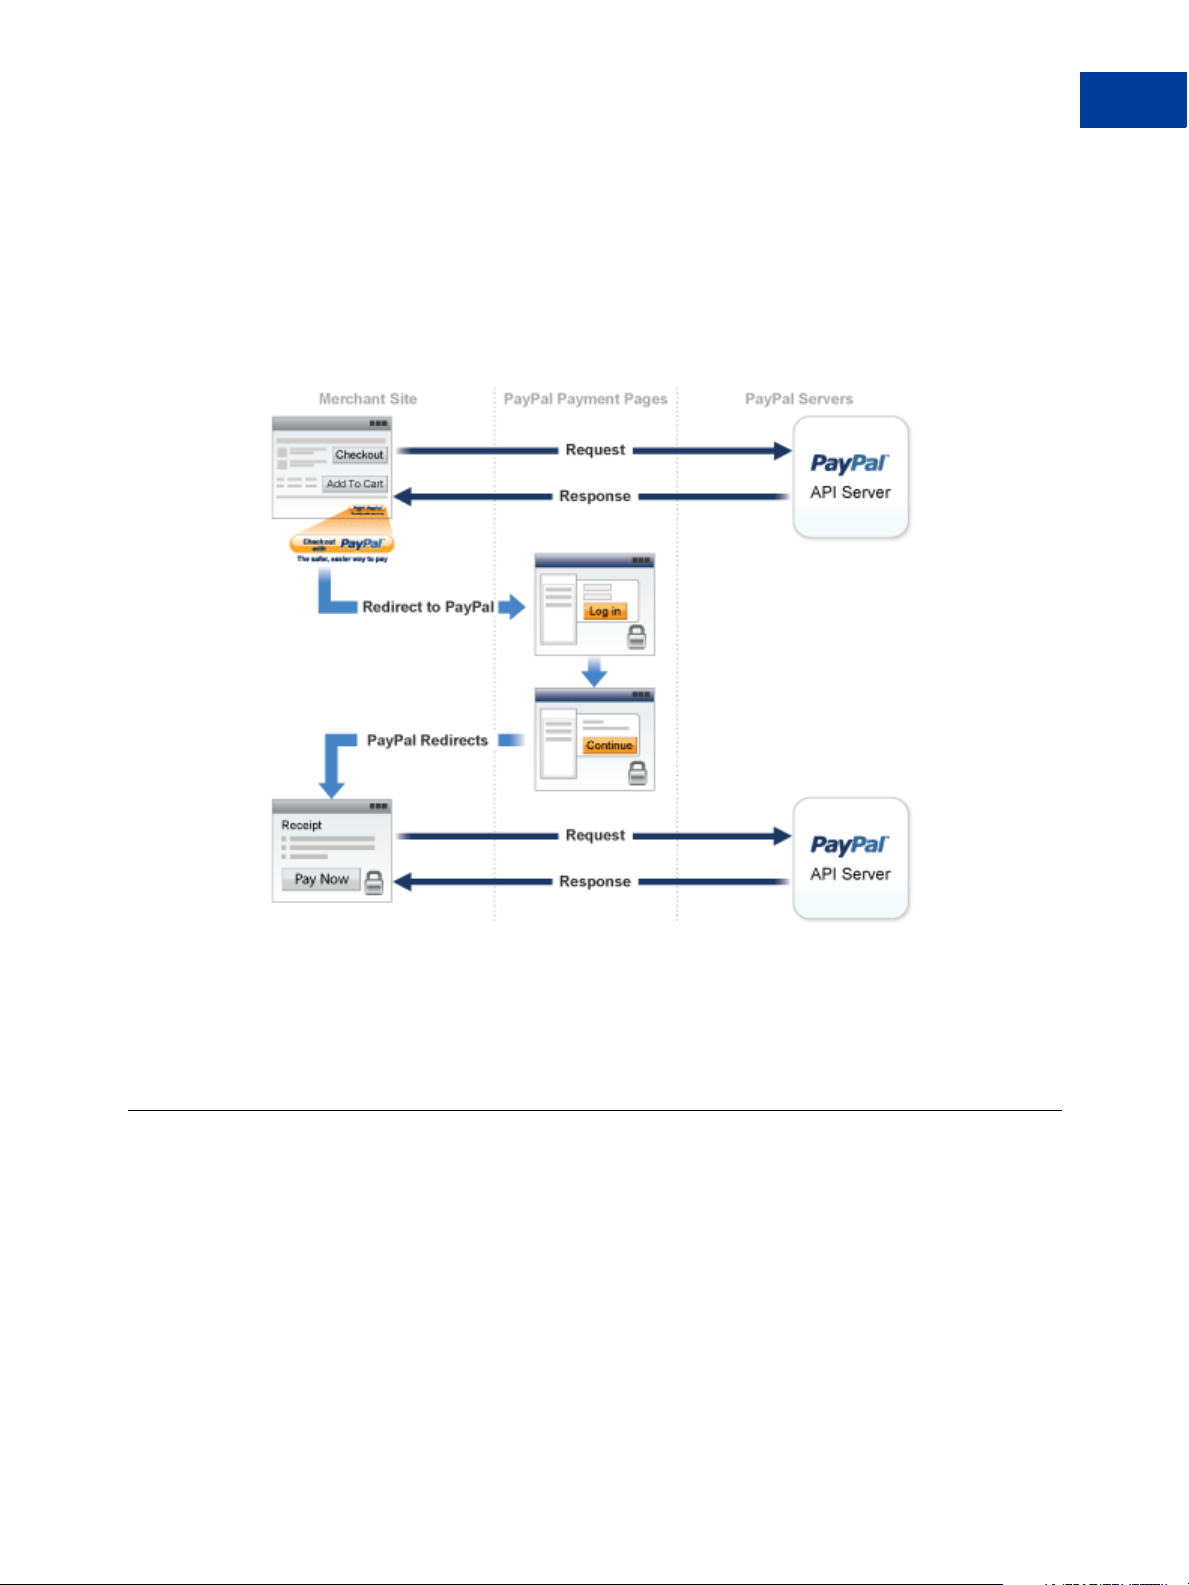
PayPal Name-Value Pair API Basics
NVP Format
1. Invoke an API operation, such as SetExpressCheckout, that sets up the return URL to
which PayPal redirects your buyer’s browser after the buyer finishes on PayPal. Other
setup actions also can be performed by this API operation.
2. Invoke additional API operations after receiving the buyer’s permission on PayPal, for
example, GetExpressCheckoutDetails or DoExpressCheckoutPayment.
The following diagram shows the execution flow between your site and PayPal:
Token Usage
Typically, the API operation that sets up a redirection to PayPal returns a token. This token is
passed as a parameter in the redirect to PayPal. The token also might be required in related
API operations.
NVP Format
NVP is a way of specifying names and values in a string. NVP is the informal name for the
query in the URI specification. The NVP string is appended to the URL.
An NVP string conforms to the following guidelines:
The name is separated from the value by an equal sign (=). For example:
FIRSTNAME=Robert
Express Checkout Integration Guide August 7, 2012 57
Page 58

PayPal Name-Value Pair API Basics
Creating an NVP Request
Name-value pairs are separated by an ampersand (&). For example:
FIRSTNAME=Robert&MIDDLENAME=Herbert&LASTNAME=Moore
The values for each value in an NVP string are URL-encoded.
Creating an NVP Request
The Name-Value Pair request format specifies the API operation to perform, credentials that
authorize PayPal to access your account, and fields containing additional information to be
used in the request.
Related information:
"PayPal API Client-Server Architecture" on page 15
Specifying the PayPal API Operation
For the NVP version of the PayPal API, you must specify the name of the PayPal API
operation to execute in each request along with the version of the API operation.
The following diagram shows the API operation part of an NVP request:
A method specifies the PayPal operation you want to execute, and each method is associated
with a version. Together, the method and version define the exact behavior of the API
operation. Typically, the behavior of an API operation does not change between versions;
however, you should carefully retest your code whenever you change a version.
To specify a method and version number:
1. Choose the PayPal API operation you want to use.
METHOD=
operation
2. Choose the appropriate version.
In most cases, you should use the latest version of the API operation.
VERSION=
58 August 7, 2012 Express Checkout Integration Guide
version_number
Page 59

PayPal Name-Value Pair API Basics
Specifying an API Credential Using Signatures
You must specify API credentials in each request to execute a PayPal API operation. You can
use either a signature or a certificate, but not both.
When you execute a PayPal API operation, you use credentials, such as a signature, to
authenticate that you are requesting the API operation. The following diagram shows the API
credentials part of an NVP request:
IMPORTANT: You must protect the values for USER, PWD, and SIGNATURE in your
implementation. Consider storing these values in a secure location other than
your web server document root and setting the file permissions so that only
the system user that executes your ecommerce application can access it.
Creating an NVP Request
To enable PayPal to authenticate your request:
1. Specify the API username associated with your account.
API_username
USER=
2. Specify the password associated with the API user name.
API_password
PWD=
3. If you are using an API signature and not an API certificate, specify the API signature
associated with the API username.
SIGNATURE=
API_signature
4. Optionally, you can specify the email address on file with PayPal of the third-party
merchant on whose behalf you are calling the API operation.
SUBJECT=
NOTE: Typically, a merchant grants third-party permissions to a shopping cart. The merchant
merchantEmailAddress
previously must have given you permission to execute the API ope r ation.
Specifying Credentials Using cURL
The following example shows one way to specify a signature using cURL:
Express Checkout Integration Guide August 7, 2012 59
Page 60

PayPal Name-Value Pair API Basics
Creating an NVP Request
curl --insecure https://api-3t.sandbox.paypal.com/nvp -d ^
"METHOD=name^ &VERSION=XX.0^ &USER=API_username^ &PWD=API_password^
&SIGNATURE=API_signature^ &..."
NOTE: This example does not establish a secure connection and should not be used live on
paypal.com.
URL Encoding
All requests to execute PayPal API operations sent using HTTP must be URL-encoded. The
encoding ensures that you can transmit special characters, characters that are not allowed in a
URL, and characters that have special meaning in a URL, such as the equal sign and
ampersand.
The PayPal NVP API uses the HTTP protocol to send requests and receive responses from a
PayPal API server. You must encode all data sent using the HTTP protocol because data that is
not encoded could be misinterpreted as part of the HTTP protocol instead of part of the
request. Most programming languages provide a way to encode strings in this way. You
should consistently URL-encode the complete API request; otherwise, you may find that
unanticipated data causes an error.
NOTE: An HTTP form is automatically URL-encoded by most browsers.
For example, consider the following NVP string:
NAME=Robert Moore&COMPANY=R. H. Moore & Associates
It is encoded as follows:
NAME=Robert+Moore&COMPANY=R.+H.+Moore+%26+Associates
Use the following methods to URL-encode or URL-decode your NVP strings:
60 August 7, 2012 Express Checkout Integration Guide
Page 61

PayPal Name-Value Pair API Basics
Executing NVP API Operations
Encoding and decoding methods for URLs
Language Method
ASP.NET Encode System.Web.HttpUtility.UrlEncode(buffer,
Encoding.Default)
Decode System.Web.HttpUtility.UrlDecode(buffer,
Encoding.Default)
Classic ASP Encode Server.URLEncode
Decode No built-in function. Several implementation examples are available on the
Internet.
Java Encode java.net.URLEncoder.encode
Decode java.net.URLDecoder.decode
PHP Encode urlencode()
Decode urldecode()
ColdFusion Encode URLEncodedFormatstring [, charset]
Decode URLDecodeurlEncodedString[, charset])
Related information:
"URL Decoding" on page 64
List Syntax for Name-Value Pairs
The PayPal API uses a special syntax for NVP fields defined as lists.
The NVP interface to the PayPal API requires a unique name for each field. In the API, lists
are prefixed by L_. T o identify an element within the list, use the offset from the beginning of
the list, starting with 0 as the first element. For example, L_DESC0 is the first line of a
description, L_DESC1, is the second line, and so on.
NOTE: Not all lists follow the L_ prefix convention; however, all lists start with 0 as the first
element.
Executing NVP API Operations
You execute a PayPal NVP API operation by submitting an HTTPS POST request to a PayPal
API server, or by using cURL or another mechanism to provide secure access between the
buyer’s browser and the PayPal API server. For example, you might implement a system in
which the buyer’s browser remains a client of your server and your server becomes a client of
the PayPal API server.
Express Checkout Integration Guide August 7, 2012 61
Page 62

PayPal Name-Value Pair API Basics
Responding to an NVP Response
Specifying a PayPal Server
You execute a PayPal API operation by submitting the request to a PayPal API server.
To execute a PayPal NVP API operation, submit the request to one of the following end
points:
Server end point Description
https://api3t.sandbox.paypal.com/nvp
https://api-3t.paypal.com/nvp PayPal “live” production server for use with API signatures
https://api.sandbox.paypal.com/nvp Sandbox server for use with API certificates; use for testing
https://api.paypal.com/nvp PayPal “live” production server for use with API certificates
NOTE: You must use different API credentials for each server end point. Typically, you
Sandbox server for use with API signatures; use for testing your
API
your API
obtain API credentials when you test in the Sandbox and then obtain another set of
credentials for the production server. You must change each API request to use the
new credentials when you go live.
Logging API Operations
You should log basic information from the request and response messages of each PayPal API
operation you execute. You must log the Correlation ID from the response message, which
identifies the API operation to PayPal and which must be provided to Merchant Technical
Support if you need their assistance with a specific transaction.
All responses to PayPal API operations contain information that may be useful for debugging
purposes. In addition to logging the Correlation ID from the response message, you can log
other information, such as the transaction ID and timestamp, to enable you to review a
transaction on the PayPal website or through the API. You could implement a scheme that logs
the entire request and response in a “verbose” mode; however, you should never log the
password from a request.
Responding to an NVP Response
The Name-Value Pair response consists of the answer to the request as well as common fields
that identify the API operation and how it was executed.
The following diagram shows fields in the response to a PayPal NVP API operation:
62 August 7, 2012 Express Checkout Integration Guide
Page 63
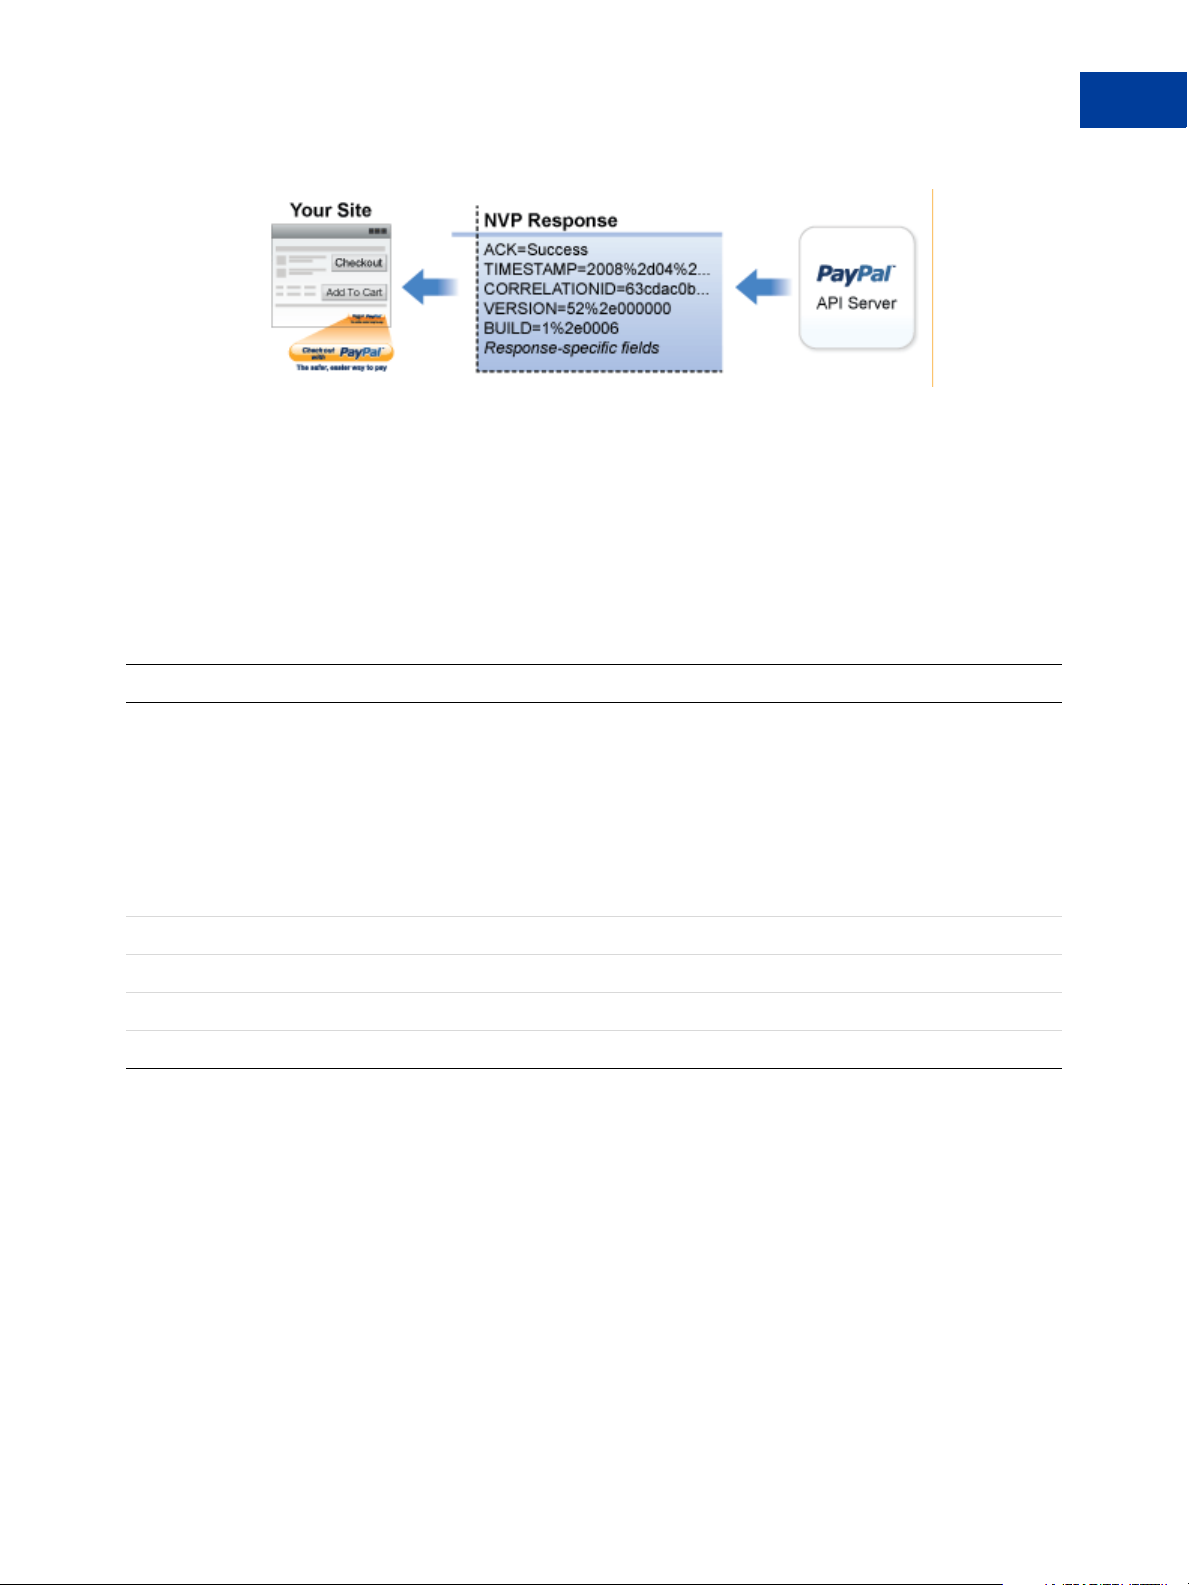
Related information:
"PayPal API Client-Server Architecture" on page 15
Common Response Fields
The PayPal API always returns common fields in addition to fields that are specific to the
requested PayPal API operation.
A PayPal API response includes the following fields:
PayPal Name-Value Pair API Basics
Responding to an NVP Response
Field Description
ACK Acknowledgement status, which is one of the following values:
Success indicates a successful operation.
SuccessWithWarning indicates a successful operation; however, there are
messages returned in the response that you should examine.
Failure indicates the operation failed; the response also contains one or more error
messages explaining the failure.
FailureWithWarning indicates that the operation failed and that there are
messages returned in the response that you should examine.
CORRELATIONID Correlation ID, which uniquely identifies the transaction to PayPal.
TIMESTAMP The date and time that the requested API operation was performed.
VERSION The version of the API.
BUILD The sub-version of the API.
Error Responses
If the ACK value is not Success, API response fields may not be returned. An error response
has the following general format.
Express Checkout Integration Guide August 7, 2012 63
Page 64

PayPal Name-Value Pair API Basics
Responding to an NVP Response
Format of an Error Response
Response Fields on
Error
Additional pass-through information may appear in the L_ERRORPARAMIDn and
L_ERRORPARAMVALUE
TIMESTAMP=2011%2d11%2d15T20%3a27%3a02Z&CORRELATIONID=5be53331d9700&ACK=Fail
ure&VERSION=78%2e0&BUILD=000000&L_ERRORCODE0=15005&L_SHORTMESSAGE0=Processo
r%20Decline&L_LONGMESSAGE0=This%20transaction%20cannot%20be%20processed%2e&
L_SEVERITYCODE0=Error&L_ERRORPARAMID0=ProcessorResponse&L_ERRORPARAMVALUE0=
0051&AMT=10%2e40&CURRENCYCODE=USD&AVSCODE=X&CVV2MATCH=M
In this case, the parameter ID is ProcessorResponse, which indicates an error response by
a credit or debit card processor. The value contains the processor-specific error. These values
are not set by PayPal; rather, they are passed through from the source.
NOTE: PayPal only passes selected values in the L_ERRORPARAMIDn and
ACK=notSuccess&TIMESTAMP=date/timeOfResponse&
CORRELATIONID=
BUILD=
L_SHORTMESSAGE0=
L_LONGMESSAGE0=
L_SEVERITYCODE0=
buildNumber&L_ERRORCODE0=errorCode&
L_ERRORPARAMVALUE
debuggingToken&VERSION=VersionNo&
shortMessage&
longMessage&
severityCode
n fields. Consider the following error response:
n fields.
Multiple errors can be
returned. Each set of
errors has a different
numeric suffix, starting
with 0 and incremented
by one for each error.
URL Decoding
All responses to HTTP POST operations used by the PayPal NVP API must be decoded.
The PayPal NVP API uses the HTTP protocol to send requests and receive responses from a
PayPal API server. You must decode all data returned using the HTTP protocol so that it can
be displayed properly. Most programming languages provide a way to decode strings.
Related information:
"URL Encoding" on page 60
64 August 7, 2012 Express Checkout Integration Guide
Page 65
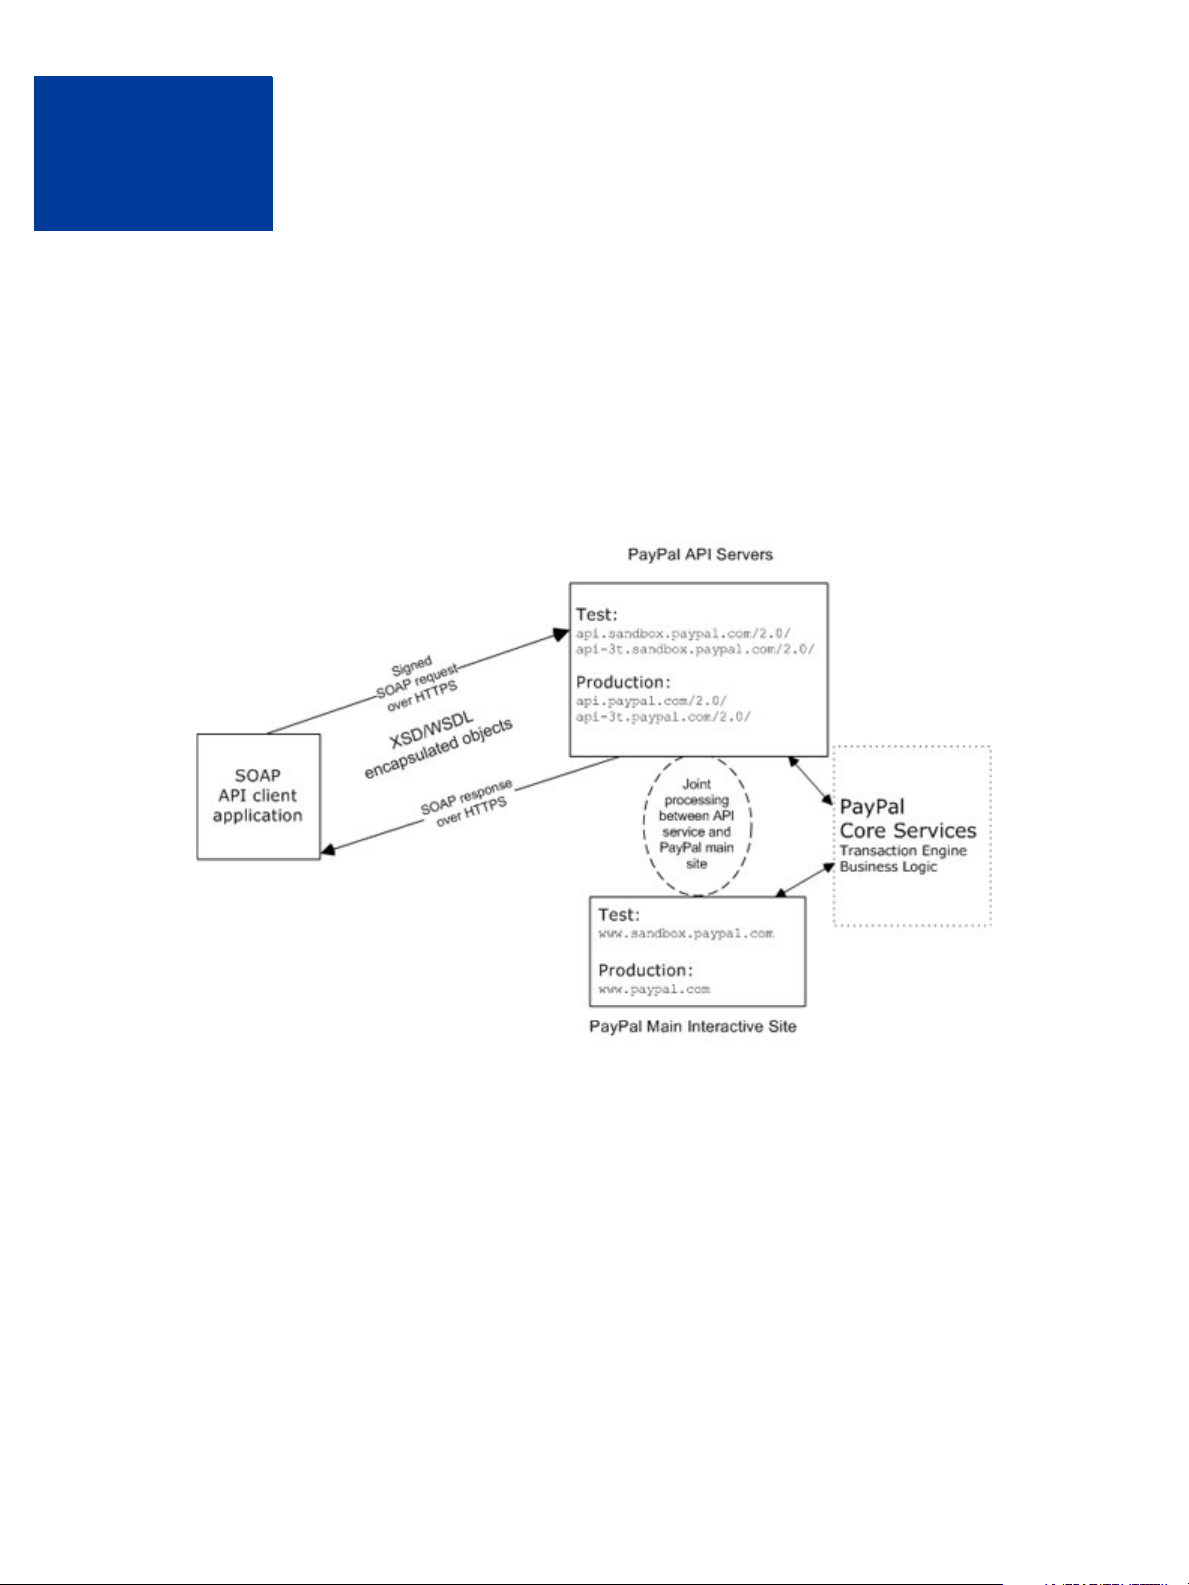
PayPal SOAP API Basics
C
The PayPal SOAP API is based on open standards known collectively as web services, which
include the Simple Object Access Protocol (SOAP), Web Services Definition Language
(WSDL), and the XML Schema Definition language (XSD). A wide range of development
tools on a variety of platforms support web services.
Like many web services, PayPal SOAP is a combination of client-side and server-side
schemas, hardware and software servers, and core services.
PayPal SOAP High-level Diagram
In an object-oriented processing model, the interface to SOAP requests/responses is an object
in your application’s native programming language. Your third-party SOAP client generates
business-object interfaces and network stubs from PayPal-provided WSDL and XSD files that
specify the PayPal SOAP message structure, its contents, and the PayPal API service bindings.
A business application works with data in the form of object properties to send and receive
data by calling object methods. The SOAP client handles the details of building the SOAP
request, sending it to the PayPal service, and converting the response back to an object.
Express Checkout Integration Guide August 7, 2012 65
Page 66

PayPal SOAP API Basics
PayPal WSDL/XSD Schema Definitions
PayPal WSDL/XSD Schema Definitions
The PayPal Web Services schema and its underlying eBay Business Language (eBL) base and
core components are required for developing applications with the PayPal Web Services API.
The following are the locations of the WSDL and XSD files.
Location of PayPal WSDL and XSD Files
Development and Test with the PayPal Sandbox API Service
PayPal Schema https://www.sandbox.paypal.com/wsdl/PayPalSvc.wsdl
eBL Base Components and
Component Types
Production with Live PayPal Web Services API Service
PayPal Schema https://www.paypal.com/wsdl/PayPalSvc.wsdl
eBL Base Components and
Component Types
https://www.sandbox.paypal.com/wsdl/eBLBaseComponents.xsd
https://www.sandbox.paypal.com/wsdl/CoreComponentTypes.xsd
http://www.paypal.com/wsdl/eBLBaseComponents.xsd
http://www.paypal.com/wsdl/CoreComponentTypes.xsd
PayPal SOAP API Definitions
The PayPal SOAP API comprises individual API definitions for specific business functions.
As a foundation, the API relies on eBay Business Language (eBL) base and core components.
The core eBL structures AbstractRequestType and AbstractResponseType are the
basis of the SOAP request and response of each PayPal API. AbstractResponseType is
also the framework for error messages common across all PayPal APIs.
PayPal has made some schema design decisions that can affect how businesses design their
own applications.
Enumerations: Enumerations are defined directly in the PayPal API schema.
Troubleshooting information: The PayPal API returns information about elements that
trigger errors.
Backward compatibility: The PayPal API is versioned so that business applications are
backward compatible when new elements are introduced to the server-side schema.
NOTE: eBL defines many structures that are specific to processing auctions. PayPal’s SOAP
schema includes these definitions to maintain compatibility with eBay’s SOAP and
for possible future joint use of SOAP across both eBay and PayPal. The material
focuses only on those SOAP definitions pertinent to use of the PayPal SOAP API.
66 August 7, 2012 Express Checkout Integration Guide
Page 67

Security
PayPal SOAP API Basics
Security
The PayPal SOAP API service is protected to ensure that only authorized PayPal members use
it. There are four levels of security:
1. A required API username (Username field) and API password (Password field).
2. A third required authentication mechanism, which is either one of the following:
– Client-side request signing using a PayPal-issued API Certificate
– Request authentication using an API Signature included in the request (Signature
field)
3. An optional third-party authorization to make the API call on some other account’s behalf
(the optional Subject field).
4. Secure Sockets Layer (SSL) data transport.
A failure of authenticated security at any one of these levels denies access to the PayPal SOAP
API service.
SOAP RequesterCredentials: Username, Password, Signature,
and Subject
For the security of your business, PayPal must verify that merchants or third-party developers
are permitted to initiate a transaction before they make one. PayPal authenticates each request.
If the request cannot be authenticated, a SOAP security fault is returned.
In the SOAP request header, your SOAP client must set the Username, Password elements
to pass an API username/password combination. In addition, you can set the Signature or
Subject elements to specify your API signature string and an optional third-party account
email address for authentication.
The following example shows part of the RequesterCredentials elements. These
elements are required for all SOAP requests.
<SOAP-ENV:Header>
<RequesterCredentials xmlns=”urn:ebay:api:PayPalAPI”
xsi:type=”ebl:CustomSecurityHeaderType”>
<Credentials xmlns=”urn:ebay:apis:eBLBaseComponents”
xsi:type=”ebl:UserIdPasswordType”>
<Username>api_username</Username>
<Password>api_password</Password>
<Signature>api_signature</Signature>
<Subject>authorizing_account_emailaddress</Subject>
</Credentials>
</RequesterCredentials>
</SOAP-ENV:Header>
Express Checkout Integration Guide August 7, 2012 67
Page 68

PayPal SOAP API Basics
SOAP Service Endpoints
RequesterCredentials Authentication Elements in SOAP Header
Element Value Description
<Username> api_username Your API username, which is auto-generated by PayPal when you
apply for a digital certificate to use the PayPal SOAP API. You can
see this value on https://www.paypal.com/
API Access > API Certificate Information.
<Password> api_password Y our API password, which you specify when you apply for a digital
certificate to use the PayPal SOAP API.
<Signature> api_signature Your API signature, if you use one instead of an API Certificate.
in your Profile under
<Subject> authorizing_
account_
emailaddress
The email address of a third-party for whom you are sending
requests to the PayPal SOAP API. Your API username must have
been granted permission by this third-party to make any particular
PayPal API request.
Related information:
"Request Structure" on page 69
SOAP Service Endpoints
Depending on your chosen authentication mechanism, your SOAP requests must be processed
by different service endpoints.
SOAP Service Endpoints
Authentication
Mechanism Live Production Endpoint Test (Sandbox) Endpoint
API Signature https://api -3t .p aypal.com/2.0/ https://api-3t.sandbox.paypal.com/2.0/
API Certificate https://api.paypal.com/2.0/ https://api.sandbox.paypal.com/2.0/
SOAP Request Envelope
The following diagram illustrates the contents of a PayPal SOAP request envelope.
All PayPal APIs are based on two core structures: AbstractRequestType and
AbstractResponseType.
68 August 7, 2012 Express Checkout Integration Guide
Page 69

Diagram of SOAP Request Envelope
PayPal SOAP API Basics
Request Structure
Request Structure
The following annotated description of the SOAP request structure shows the elements
required by the PayPal SOAP API.
General Structure of PayPal API SOAP Request
<?xml version=”1.0” encoding=”UTF-8”?>
<SOAP-ENV:Envelope xmlns:xsi= ” http://www.w3.org/2001/XMLSchema-instance”
xmlns:SOAP-ENC=”http://schemas.xmlsoap.org/soap/encoding/”
xmlns:SOAP-ENV=”http://schemas.xmlsoap.org/soap/envelope/”
xmlns:xsd=”http://www.w3.org/2001/XMLSchema”
SOAP-ENV:encodingStyle=”http://schemas.xmlsoap.org/soap/encoding/”
><SOAP-ENV:Header>
<RequesterCredentials xmlns=”urn:ebay:api:PayPalAPI”>
<Credentials xmlns=”urn:ebay:apis:eBLBaseComponents”>
<Username>api_username</Username>
Express Checkout Integration Guide August 7, 2012 69
Page 70

PayPal SOAP API Basics
Request Structure
<Password>api_password</Password>
<Signature/>
<Subject/>
</Credentials>
</RequesterCredentials>
</SOAP-ENV:Header>
<SOAP-ENV:Body>
<specific_api_name_Req xmlns=”urn:ebay:api:PayPalAPI”>
<specific_api_name_Request>
<Version xmlns=urn:ebay:apis:eBLBaseComponents”>service_version
</Version>
<required_or_optional_fields xsi:type=”some_type_here”>data
</required_or_optional_fields>
</specific_api_name_Request>
</specific_api_name_Req>
</SOAP-ENV:Body>
</SOAP-ENV:Envelope>
Annotation of Generic SOAP Request
Lines Comment
12, 13 The <Username> and <Password> fields are part of the PayPal SOAP API
<RequesterCredentials> security authentication mechanism you must construct for
every SOAP request header.
14 The <Signature> element should include your API signature string if that is the kind of API
credential you are using.
15 The <Subject> element can specify a third-party PayPal account by whom you are
authorized to make this request.
19 through 27 The SOAP request for every PayPal API follows this element-naming pattern. The API’s
specific name is appended with Req, and in this element the specific_api_name_Request is
nested. Each specific_api_name_Request has a corresponding
specific_api_name_RequestType.
22 The number of the PayPal SOAP API version is required on each SOAP request.
This version number is the value of ns:version in
https://www.paypal.com/wsdl/PayPalSvc.wsdl
24 For details about required and optional elements and values for specific requests, see the
description of individual APIs.
.
Related information:
"SOAP RequesterCredentials: Username, Password, Signature, and Subject" on page 67
70 August 7, 2012 Express Checkout Integration Guide
Page 71

SOAP Message Style: doc-literal
PayPal uses doc-literal SOAP messaging, not rpc-encoding. With doc-literal, a
single service interface call passes an XML document in the request to the PayPal API server,
which responds with an XML document instance.
Response Structure
The following is an annotated description of the structure of a SOAP response from the PayPal
API where response is Success:
PayPal SOAP API Basics
SOAP Message Style: doc-literal
Express Checkout Integration Guide August 7, 2012 71
Page 72

PayPal SOAP API Basics
Response Structure
<?xml version=”1.0”?>
<SOAP-ENV:Envelope
xmlns:SOAP-ENV= ”http://schemas.xmlsoap.org/soap/envelope/”
xmlns:SOAP-ENC=”http://schemas.xmlsoap.org/soap/encoding/”
xmlns:xsi=”http://www.w3.org/2001/XMLSchema-instance”
xmlns:xsd=”http://www.w3.org/2001/XMLSchema”
xmlns:xs=”http://www.w3.org/2001/XMLSchema”
xmlns:cc=”urn:ebay:apis:CoreComponentTypes”
xmlns:wsu=”http://schemas.xmlsoap.org/ws/2002/07/utility”
xmlns:saml=”urn:oasis:names:tc:SAML:1.0:assertion”
xmlns:ds=”http://www.w3.org/2000/09/xmldsig#”
xmlns:wsse=”http://schemas.xmlsoap.org/ws/2002/12/secext”
xmlns:ebl=”urn:ebay:apis:eBLBaseComponents”
xmlns:ns=”urn:ebay:api:PayPalAPI”>
<SOAP-ENV:Header>
<Security
xmlns=”http://schemas.xmlsoap.org/ws/2002/12/secext”
xsi:type=”wsse:SecurityType”
/>
<RequesterCredentials xmlns=”urn:ebay:api:PayPalAPI”
xsi:type=”ebl:CustomSecurityHeaderType”>
<Credentials
/>
</RequesterCredentials>
</SOAP-ENV:Header>
<SOAP-ENV:Body id=”_0”>
<specific_api_name_Response xmlns=”urn:ebay:api:PayPalAPI”>
<Timestamp xmlns=”urn:ebay:api:PayPalAPI”> dateTime_in_UTC/GMT
</TIMESTAMP>
<Ack xmlns=”urn:ebay:apis:eBLBaseComponents”>Success</Ack>
<Version xmlns=”urn:ebay:apis:eBLBaseComponents”>
</Version>
<CorrelationId xmlns=”urn:ebay:apis:eBLBaseComponents”>
</CorrelationID>
<Build xmlns=”urn:ebay:apis:eBLBaseComponents”>
</Build>
<element s_for_specific_ap i_response> data
</elements_for_specific_api_response>
</specific_api_name_Response>
</SOAP-ENV:Body>
</SOAP-ENV:Envelope>
xmlns=”urn:ebay:apis:eBLBaseComponents”
xsi:type=”ebl:UserIdPasswordType”
serviceVersion
applicationCorrelation
api_build_number
72 August 7, 2012 Express Checkout Integration Guide
Page 73
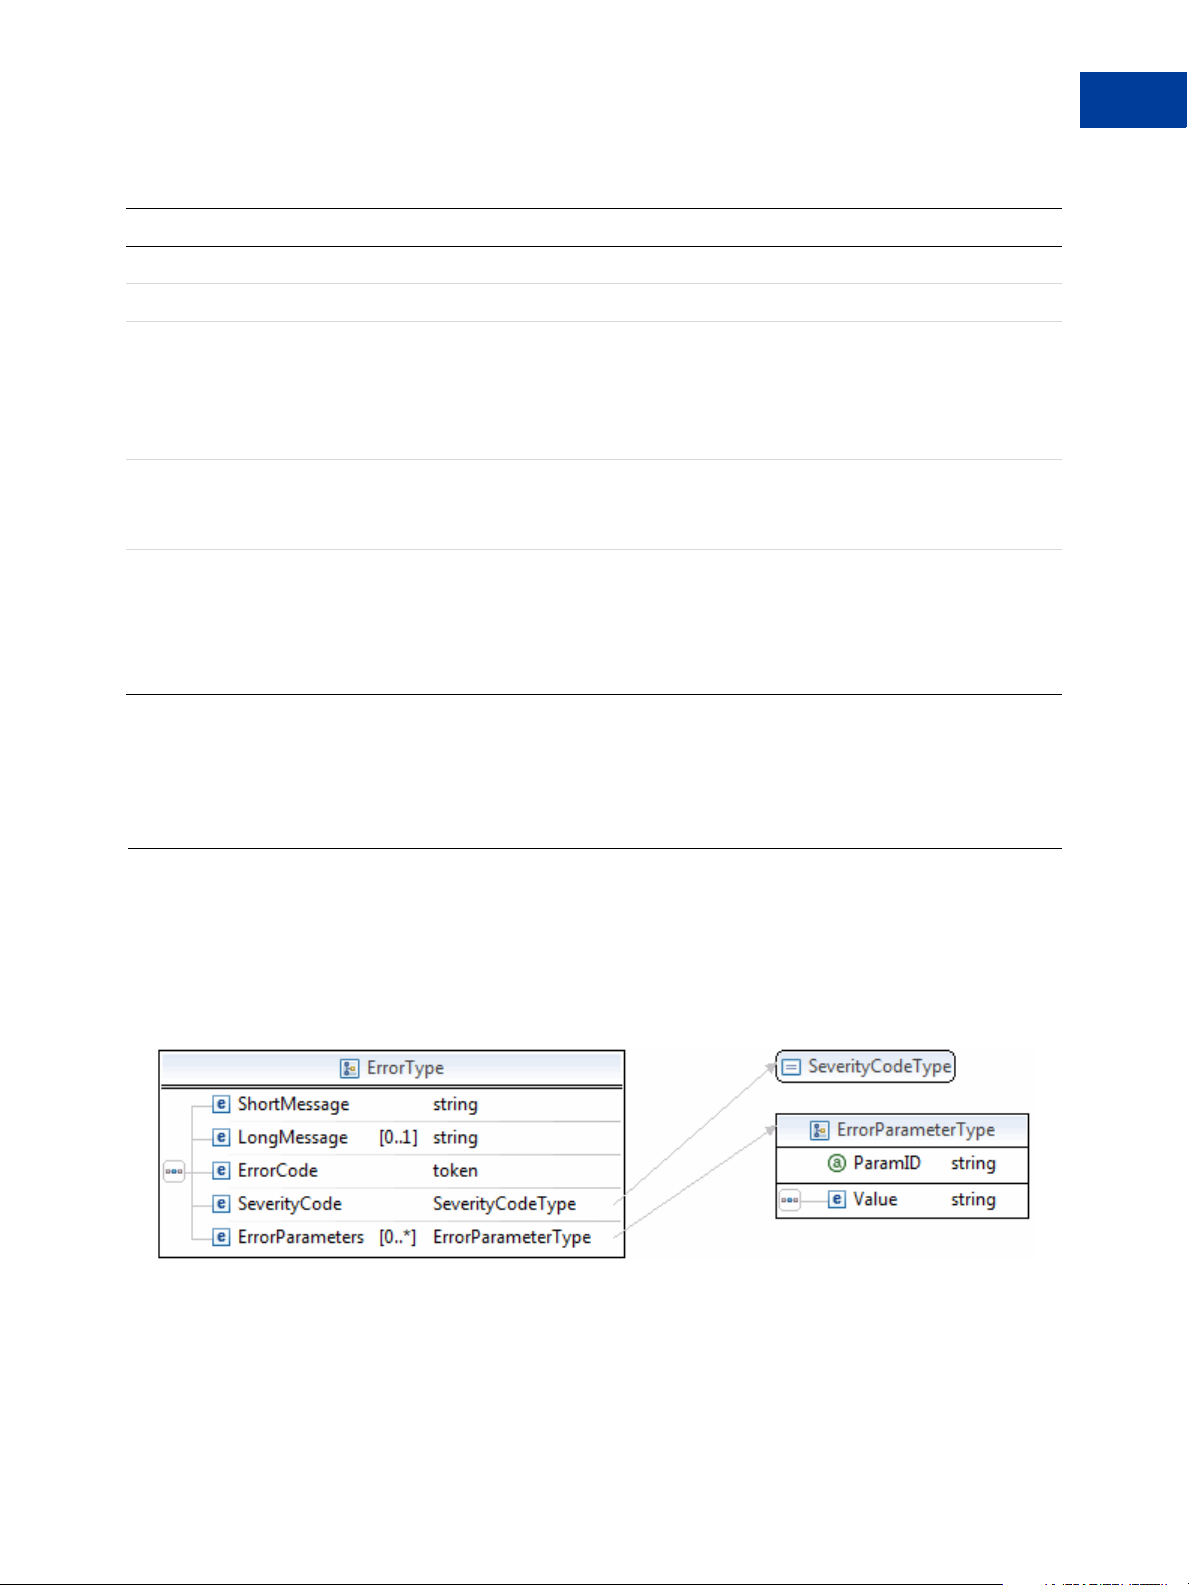
PayPal SOAP API Basics
Error Responses
Annotation of Generic SOAP Response
Lines Comment
22 and 31 The specific_api_name_Response start and end elements.
23 Each API response contains a timestamp with its date and time in UTC/GMT.
24 The <Ack> element contains the string Success after the corresponding request has been
successfully processed.
In the case of errors, Ack is set to a value other than Success, and the response body contains
an <Errors> element with information to help you troubleshoot the cause of the error. See
“Error Responses” on page 73.
26 The <CorrelationID> element contains information about the PayPal application that
processed the request.
Use the value of this element if you need to troubleshoot a problem with one of your requests.
27 through 30 The different PayPal APIs return different structures depending on their response definitions.
For detailed information, see the description of the individual APIs.
NOTE: Because a field is defined in the formal structure of an API response, this does not
mean that the field is necessarily returned. Data are returned in a response only if
PayPal has recorded data that corresponds to the field.
Related information:
"Error Responses" on page 73
Error Responses
If a request is malformed or contains some other error, the body of the SOAP response
contains an <Errors> element with other elements that can help you troubleshoot the cause
of the error.
The structure of error messages are as follows:
The most important of these additional elements are as follows:
ShortMessage
LongMessage
ErrorCode
Express Checkout Integration Guide August 7, 2012 73
Page 74

PayPal SOAP API Basics
Error Responses
Additional information can appear as part of ErrorParametersType. For example, if the
error in ParamID is ProcessorResponse, the Value would contain the processor-specific
error, such as 0091. Values set in the ErrorParametersType are not set by PayPal; rather,
they are passed through from the source.
NOTE: PayPal only passes selected values in ErrorParametersType.
The following example shows the error response if your API username and password do not
match a legitimate API username and password on file with PayPal.
Example of SOAP Error Response: Bad Username or Password
<?xml version="1.0" encoding="UTF-8"?>
<SOAP-ENV: Envelope details not shown >
<S OAP-ENV:Header>... details not shown.</SOAP-ENV:Header>
<SOAP-ENV:Body id="_0">
<GetTransactionDetailsResponse xmlns="urn:ebay:api:PayPalAPI">
<Timestamp xmlns="urn:ebay:apis:eBLBaseComponents">
</Timestamp>
<Ack xmlns="urn:ebay:apis:eBLBaseComponents">Failure</Ack>
<Errors
</Errors>
<CorrelationID xmlns="urn:ebay:apis:eBLBaseComponents">
</CorrelationID>
<Version xmlns="urn:ebay:apis:eBLBaseComponents">
</Version>
<Build xmlns="urn:ebay:apis:eBLBaseComponents">1.0006</Build>..
other elements in response.
</SOAP-ENV:Body>
</SOAP-ENV:Envelope>
2005-02-09T21:51:26Z
xmlns="urn:ebay:apis:eBLBaseComponents"
xsi:type="ebl:ErrorType">
<ShortMessage xsi:type="xs:string">
Authentication/Authorization Failed
</ShortMessage>
<LongMessage xsi:type="xs:string">
Username/Password is incorrect
</LongMessage>
<ErrorCode xsi:type="xs:token">10002</ErrorCode>
<SeverityCode xmlns="urn:ebay:apis:eBLBaseComponents">
Error </SeverityCode>
debugging_info
1.000000
Related information:
"Response Structure" on page 71
74 August 7, 2012 Express Checkout Integration Guide
Page 75

PayPal SOAP API Basics
CorrelationID for Reporting Problems to PayPal
CorrelationID for Reporting Problems to PayPal
The value returned in CorrelationID is important for PayPal to determine the precise cause
of any error you might encounter. If you have to troubleshoot a problem with your requests,
we suggest that you capture the value of CorrelationID so you can report it to PayPal.
UTF-8 Character Encoding
The PayPal API assumes that all data in requests is in Unicode, specifically, the Unicode (or
UCS) Transformation Format, 8-bit encoding form (UTF-8).
In responses, the API always returns data in UTF-8.
Date/Time Formats
The PayPal SOAP API schema defines date/time values as Coordinated Universal Time
(UTC/GMT), using ISO 8601 format, and of type ns:dateTime. An example date/time
stamp is 2006-08-24T05:38:48Z
Core Currency Amount Data Type
The core currency amount data type is called BasicAmountType and is derived from
string. All currency amount fields have the following structure:
1. The currencyID attribute is required.
2. The amount must have two decimal places.
3. The decimal separator must be a period (“.”).
4. You must not use any thousands separator.
5. BasicAmountType has a data type of ebl:CurrencyCodeType, which defines a large
number of different currency codes. However, for your processing to succeed, you must set
currencyCode to a valid currency code. Some APIs support only a subset of currencies.
Here is an example. (The field name Amount is an example; actual field names can vary
depending on the specific API.)
<Amount currencyID=”currencyCode”>3.00</Amount>
Express Checkout Integration Guide August 7, 2012 75
Page 76

PayPal SOAP API Basics
Core Currency Amount Data Type
76 August 7, 2012 Express Checkout Integration Guide
Page 77

Revision History
Revision history for PayPal Express Checkout Integration Guide.
Date Published Description
08/07/12 Maintenance release.
04/03/12 Updated references to Website Payments Standard and Website Payments Pro to
PayPal Payments Standard and PayPal Payments Pro, respectively.
02/13/12 Updated user experience graphics.
06/21/11 Added a quick overview chapter and additional information about SOAP,
credentials, SDKs, and going live. Moved recurring payments chapter to the
Express Checkout Advanced Features Guide.
05/02/11 Moved the Mobile Express Checkout chapter to the Express Checkout Advanced
Features Guide.
01/24/11 Added information on guest checkout integration for mobile devices, removed
restrictions for using reference transactions and recurring payments with mobile
devices, and removed the usage restriction for Germany PayPal accounts with
mobile devices.
12/20/10 Replaced deprecated field names in examples.
11/15/10 Revised for version 65.3, with updates to the locales supported by Express
Checkout on mobile devices.
10/26/10 Added the chapter “Express Checkout on Mobile Devices.”
08/11/10 Divided the Express Checkout Integration Guide into 2 guides: the Express
Checkout Integration Guide and the Express Checkout Advanced Features
Guide.
05/11/10 Added details for integrating parallel payments using the NVP and SOAP API,
including use with airlines. Added new Immediate Payment functionality.
Updated billing agreements with functionality to obtain the latest billing
address, skip billing agreement creation, and clarify use of the BAUpdate API.
03/10/10 Added support for parallel payments.
01/21/2010 Added new Express Checkout fields to provide the buyer contact information,
gift options, promotions, and a survey question on the PayPal pages. Added a
new callback response API field providing no-shipping details.
10/05/2009 Added Immediate Payment.
Edited for technical accuracy.
Removed PayPal placement guidelines.
06/30/2009 Added a section on payment review.
Express Checkout Integration Guide August 7, 2012 77
Page 78

Date Published Description
06/04/2009 Added a chapter on pre-populating the PayPal review page. Updated PayPal
Review pages. Moved some customization topics out of this guide. They are
now in the Merchant Setup and Administration Guide.
04/30/2009 Created first edition for Enterprise-level merchants and added chapter on
reference transactions.
04/08/2009 Added a chapter describing the Instant Update Callback API.
03/03/2009 Updated to allow useraction=continue for eBay incentives.
11/13/2008 Added information about integrating dynamic images and added information
about order details that can be displayed on the Pa yPal Review page.
06/30/2008 Complete revision.
78 August 7, 2012 Express Checkout Integration Guide
 Loading...