

Page 1

Express Checkout
Integration Guide
Last updated: May 2010
Page 2

Express Checkout Integration Guide
Document Number: 100010.en_US-201005
© 2010 PayPal, Inc. All rights reserved. PayPal is a registered trademark of PayPal, Inc. The PayPal logo is a trademark of PayPal, Inc. Other
trademarks and brands are the property of their respective owners.
The information in this document belongs to PayPal, Inc. It may not be used, reproduced or disclosed without the written approval of PayPal, Inc.
Copyright © PayPal. All rights reserved. PayPal S.à r.l. et Cie, S.C.A., Société en Commandite par Actions. Registered office: 22-24 Boulevard Royal, L2449, Luxembourg, R.C.S. Luxembourg B 118 349
Consumer advisory: The PayPal™ payment service is regarded as a stored value facility under Singapore law. As such, it does not require the approval
of the Monetary Authority of Singapore. You are advised to read the terms and conditions carefully.
Notice of non-liability:
PayPal, Inc. is providing the information i n this document t o you “AS-IS” with all faults. PayPal, Inc. makes no warranties of any kind (whether express,
implied or statutory) with respect to the information co ntained herein. PayPal, Inc. assumes no liability for damages (whether direct or indirect), caused
by errors or omissions, or resulting from the use of this document or the information contained in this document or resulting f rom the application or use
of the product or service described herein. PayPal, Inc. reserves the right to make changes to any information herein without further notice.
Page 3

Contents
Preface . . . . . . . . . . . . . . . . . . . . . . . . . . . . . . . . . . 9
Intended Audience . . . . . . . . . . . . . . . . . . . . . . . . . . . . . . . . . . . . . . . 9
Where to Go for More Information . . . . . . . . . . . . . . . . . . . . . . . . . . . . . . . 9
Revision History . . . . . . . . . . . . . . . . . . . . . . . . . . . . . . . . . . . . . . . . 9
Chapter 1 Introducing Express Checkout . . . . . . . . . . . . . . .11
The Express Checkout Experience . . . . . . . . . . . . . . . . . . . . . . . . . . . . . 11
Express Checkout Integration Steps. . . . . . . . . . . . . . . . . . . . . . . . . . . . . 12
Configuring and Customizing the Express Checkout Experience . . . . . . . . . . . . 13
Additional PayPal API Operations . . . . . . . . . . . . . . . . . . . . . . . . . . . . 13
Express Checkout Flow . . . . . . . . . . . . . . . . . . . . . . . . . . . . . . . . . . . 14
Checkout Entry Point . . . . . . . . . . . . . . . . . . . . . . . . . . . . . . . . . . 14
Payment Option Entry Point . . . . . . . . . . . . . . . . . . . . . . . . . . . . . . . 15
Express Checkout Building Blocks. . . . . . . . . . . . . . . . . . . . . . . . . . . . . . 15
Express Checkout Buttons. . . . . . . . . . . . . . . . . . . . . . . . . . . . . . . . 16
Express Checkout API Operations . . . . . . . . . . . . . . . . . . . . . . . . . . . 17
Express Checkout Command . . . . . . . . . . . . . . . . . . . . . . . . . . . . . . 17
Express Checkout Token Usage. . . . . . . . . . . . . . . . . . . . . . . . . . . . . 18
Chapter 2 Express Checkout Button and Logo Image Integration . . .19
About PayPal Button and Logo Images . . . . . . . . . . . . . . . . . . . . . . . . . . . 19
Express Checkout Images. . . . . . . . . . . . . . . . . . . . . . . . . . . . . . . . 19
Express Checkout Image Flavors . . . . . . . . . . . . . . . . . . . . . . . . . . . . 19
Dynamic Images . . . . . . . . . . . . . . . . . . . . . . . . . . . . . . . . . . . . . . . 20
Configuring the Dynamic Image . . . . . . . . . . . . . . . . . . . . . . . . . . . . . . . 20
Set Up the Default Image . . . . . . . . . . . . . . . . . . . . . . . . . . . . . . . . 21
Set Up Image for Dynamic Use . . . . . . . . . . . . . . . . . . . . . . . . . . . . . 21
Change the Locale. . . . . . . . . . . . . . . . . . . . . . . . . . . . . . . . . . . . 22
Feedback to Buyer Meeting an Incentive . . . . . . . . . . . . . . . . . . . . . . . . 22
Choose the Image . . . . . . . . . . . . . . . . . . . . . . . . . . . . . . . . . . . . 22
Dynamic Image Command Reference . . . . . . . . . . . . . . . . . . . . . . . . . . . . 22
Dynamic Image Parameters . . . . . . . . . . . . . . . . . . . . . . . . . . . . . . . 23
Locale Codes . . . . . . . . . . . . . . . . . . . . . . . . . . . . . . . . . . . . . . 23
Express Checkout Integration Guide May 2010 3
Page 4

Contents
Static PayPal Button and Mark Images Source Requirements . . . . . . . . . . . . . . . 25
Chapter 3 PayPal Name-Value Pair API Basics . . . . . . . . . . . . .27
PayPal API Client-Server Architecture. . . . . . . . . . . . . . . . . . . . . . . . . . . . 27
PayPal Name-Value Pair API Requests and Responses . . . . . . . . . . . . . . . . 28
Multiple API Operations . . . . . . . . . . . . . . . . . . . . . . . . . . . . . . . . . 28
Obtaining API Credentials . . . . . . . . . . . . . . . . . . . . . . . . . . . . . . . . . . 30
Creating an API Signature. . . . . . . . . . . . . . . . . . . . . . . . . . . . . . . . 30
Creating an API Certificate . . . . . . . . . . . . . . . . . . . . . . . . . . . . . . . 31
Creating an NVP Request . . . . . . . . . . . . . . . . . . . . . . . . . . . . . . . . . . 31
Specifying the PayPal API Operation . . . . . . . . . . . . . . . . . . . . . . . . . . 32
Specifying an API Credential . . . . . . . . . . . . . . . . . . . . . . . . . . . . . . 32
URL Encoding . . . . . . . . . . . . . . . . . . . . . . . . . . . . . . . . . . . . . . 33
List Syntax for Name-Value Pairs . . . . . . . . . . . . . . . . . . . . . . . . . . . . 34
Executing NVP API Operations . . . . . . . . . . . . . . . . . . . . . . . . . . . . . . . 34
Specifying a PayPal Server . . . . . . . . . . . . . . . . . . . . . . . . . . . . . . . 34
Logging API Operations . . . . . . . . . . . . . . . . . . . . . . . . . . . . . . . . . 34
Responding to an NVP Response . . . . . . . . . . . . . . . . . . . . . . . . . . . . . . 35
Common Response Fields. . . . . . . . . . . . . . . . . . . . . . . . . . . . . . . . 35
URL Decoding . . . . . . . . . . . . . . . . . . . . . . . . . . . . . . . . . . . . . . 36
Chapter 4 Implementing the Simplest Express Checkout Integration . 37
Setting Up the Express Checkout Transaction. . . . . . . . . . . . . . . . . . . . . . . . 37
Obtaining Express Checkout Transaction Details . . . . . . . . . . . . . . . . . . . . . . 39
Completing the Express Checkout Transaction . . . . . . . . . . . . . . . . . . . . . . . 39
Chapter 5 Testing an Express Checkout Integration . . . . . . . . . .43
Chapter 6 Customizing Express Checkout . . . . . . . . . . . . . . .49
PayPal Review Page Order Details . . . . . . . . . . . . . . . . . . . . . . . . . . . . . 49
Special Instructions to Merchant. . . . . . . . . . . . . . . . . . . . . . . . . . . . . 51
Integrating Order Details into the Express Checkout Flow . . . . . . . . . . . . . . . 52
eBay-Issued Incentives . . . . . . . . . . . . . . . . . . . . . . . . . . . . . . . . . 55
Integrating eBay Incentives into the Express Checkout Flow . . . . . . . . . . . . . . 56
Providing Gift Options . . . . . . . . . . . . . . . . . . . . . . . . . . . . . . . . . . . . 58
Getting Buyer Consent to Receive Promotional Email. . . . . . . . . . . . . . . . . . . . 60
Providing Your Customer Service Number. . . . . . . . . . . . . . . . . . . . . . . . . . 60
4 May 2010 Express Checkout Integration Guide
Page 5

Contents
Adding a Survey Question . . . . . . . . . . . . . . . . . . . . . . . . . . . . . . . . . . 61
PayPal Page Style . . . . . . . . . . . . . . . . . . . . . . . . . . . . . . . . . . . . . . 62
Custom Page Style . . . . . . . . . . . . . . . . . . . . . . . . . . . . . . . . . . . 62
Individual Page Style Characteristics . . . . . . . . . . . . . . . . . . . . . . . . . . 63
Changing the Locale . . . . . . . . . . . . . . . . . . . . . . . . . . . . . . . . . . . . . 66
Confirmed Address . . . . . . . . . . . . . . . . . . . . . . . . . . . . . . . . . . . 68
Suppressing the Buyer’s Shipping Address . . . . . . . . . . . . . . . . . . . . . . . 70
Shipping Address Override . . . . . . . . . . . . . . . . . . . . . . . . . . . . . . . 72
Automatically Filling Out the PayPal Login Page . . . . . . . . . . . . . . . . . . . . . . 73
Buyer Pays on PayPal . . . . . . . . . . . . . . . . . . . . . . . . . . . . . . . . . . . . 75
Chapter 7 Implementing the Instant Update API . . . . . . . . . . . .77
About the Instant Update API . . . . . . . . . . . . . . . . . . . . . . . . . . . . . . . . 77
Integration Steps. . . . . . . . . . . . . . . . . . . . . . . . . . . . . . . . . . . . . 77
Post-Integration Checkout Experience . . . . . . . . . . . . . . . . . . . . . . . . . 78
How the Callback Works in the Express Checkout Flow. . . . . . . . . . . . . . . . . . . 80
Following Instant Update API Best Practices . . . . . . . . . . . . . . . . . . . . . . . . 81
Setting Up the Callback . . . . . . . . . . . . . . . . . . . . . . . . . . . . . . . . . . . 82
GetExpressCheckoutDetails and DoExpressCheckoutPayment Changes . . . . . . . 83
Other Considerations . . . . . . . . . . . . . . . . . . . . . . . . . . . . . . . . . . 83
Using the Callback . . . . . . . . . . . . . . . . . . . . . . . . . . . . . . . . . . . . . . 85
SetExpressCheckout . . . . . . . . . . . . . . . . . . . . . . . . . . . . . . . . . . 85
Callback Request . . . . . . . . . . . . . . . . . . . . . . . . . . . . . . . . . . . . 88
Callback Response . . . . . . . . . . . . . . . . . . . . . . . . . . . . . . . . . . . 88
Chapter 8 Immediate Payment . . . . . . . . . . . . . . . . . . . . .91
Overview of Immediate Payment . . . . . . . . . . . . . . . . . . . . . . . . . . . . . . 91
About Immediate Payment For Third Party Checkout . . . . . . . . . . . . . . . . . . . . 91
Integrating Immediate Payment for Third-Party Checkout. . . . . . . . . . . . . . . . . . 93
The Call to SetExpressCheckout . . . . . . . . . . . . . . . . . . . . . . . . . . . . 93
The Call to DoExpressCheckoutPayment . . . . . . . . . . . . . . . . . . . . . . . . 94
About Immediate Payment For Express Checkout . . . . . . . . . . . . . . . . . . . . . 94
Integrating Immediate Payment for Express Checkout . . . . . . . . . . . . . . . . . . . 95
Chapter 9 Implementing Parallel Payments . . . . . . . . . . . . . . 97
About Parallel Payments. . . . . . . . . . . . . . . . . . . . . . . . . . . . . . . . . . . 97
What Is and What Is Not Supported . . . . . . . . . . . . . . . . . . . . . . . . . . . 97
Express Checkout Integration Guide May 2010 5
Page 6

Contents
Post-Integration Experience . . . . . . . . . . . . . . . . . . . . . . . . . . . . . . . 98
Name-Value Pair Syntax Supporting Parallel Payments. . . . . . . . . . . . . . . . . . . 99
Integrating Parallel Payments Using the NVP API. . . . . . . . . . . . . . . . . . . . . .100
Integrating Parallel Payments Using the SOAP API . . . . . . . . . . . . . . . . . . . . .103
Handling Errors . . . . . . . . . . . . . . . . . . . . . . . . . . . . . . . . . . . . . . .108
Chapter 10 Handling Payment Settlements . . . . . . . . . . . . . . 109
Sale Payment Action for Express Checkout . . . . . . . . . . . . . . . . . . . . . . . . .109
Authorization Payment Action for Express Checkout . . . . . . . . . . . . . . . . . . . .109
Order Payment Action for Express Checkout . . . . . . . . . . . . . . . . . . . . . . . .110
Chapter 11 Handling Recurring Payments . . . . . . . . . . . . . . . 113
How Recurring Payments Work . . . . . . . . . . . . . . . . . . . . . . . . . . . . . . .113
Limitations . . . . . . . . . . . . . . . . . . . . . . . . . . . . . . . . . . . . . . . .114
Recurring Payments Terms . . . . . . . . . . . . . . . . . . . . . . . . . . . . . . . . .114
Options for Creating a Recurring Payments Profile . . . . . . . . . . . . . . . . . . . . .115
Specifying the Regular Payment Period . . . . . . . . . . . . . . . . . . . . . . . . .115
Including an Optional Trial Period . . . . . . . . . . . . . . . . . . . . . . . . . . . .116
Specifying an Initial Payment . . . . . . . . . . . . . . . . . . . . . . . . . . . . . .116
Maximum Number of Failed Payments . . . . . . . . . . . . . . . . . . . . . . . . .117
Billing the Outstanding Amount . . . . . . . . . . . . . . . . . . . . . . . . . . . . .117
Recurring Payments With Express Checkout . . . . . . . . . . . . . . . . . . . . . . . .117
Initiating the Processing Flow With SetExpressCheckout . . . . . . . . . . . . . . .119
Redirecting the Buyer’s Browser to PayPal . . . . . . . . . . . . . . . . . . . . . . .120
Getting Buyer Details Using GetExpressCheckoutDetails. . . . . . . . . . . . . . . .121
Creating the Profiles With CreateRecurringPaymentsProfile . . . . . . . . . . . . . .121
Recurring Payments Profile Status. . . . . . . . . . . . . . . . . . . . . . . . . . . . . .122
Getting Recurring Payments Profile Information. . . . . . . . . . . . . . . . . . . . . . .122
Modifying a Recurring Payments Profile. . . . . . . . . . . . . . . . . . . . . . . . . . .123
Updating Addresses . . . . . . . . . . . . . . . . . . . . . . . . . . . . . . . . . . .124
Updating the Billing Amount . . . . . . . . . . . . . . . . . . . . . . . . . . . . . . .124
Billing the Outstanding Amount of a Profile . . . . . . . . . . . . . . . . . . . . . . . . .124
Recurring Payments Notifications . . . . . . . . . . . . . . . . . . . . . . . . . . . . . .125
6 May 2010 Express Checkout Integration Guide
Page 7

Contents
Chapter 12 Using Other PayPal API Operations . . . . . . . . . . . . 127
Issuing Refunds . . . . . . . . . . . . . . . . . . . . . . . . . . . . . . . . . . . . . . .127
Handling Payment Review. . . . . . . . . . . . . . . . . . . . . . . . . . . . . . . . . .128
Chapter 13 Integrating giropay with Express Checkout . . . . . . . . 131
giropay Page Flows . . . . . . . . . . . . . . . . . . . . . . . . . . . . . . . . . . . . .131
giropay Payment Page Flow. . . . . . . . . . . . . . . . . . . . . . . . . . . . . . .131
Cancelled or Unsuccessful giropay Payment Page Flow . . . . . . . . . . . . . . . .132
giropay Integration . . . . . . . . . . . . . . . . . . . . . . . . . . . . . . . . . . . . . .133
Initiate the Flow with SetExpressCheckout . . . . . . . . . . . . . . . . . . . . . . .133
Redirect the Buyer to PayPal . . . . . . . . . . . . . . . . . . . . . . . . . . . . . .133
Complete the Transaction . . . . . . . . . . . . . . . . . . . . . . . . . . . . . . . .134
Receive Transaction Status Notification . . . . . . . . . . . . . . . . . . . . . . . . .134
Express Checkout Integration Guide May 2010 7
Page 8

Contents
8 May 2010 Express Checkout Integration Guide
Page 9

Preface
This document describes Express Checkout integration.
Intended Audience
This document is intended for merchants and developers implementing Express Checkout.
Where to Go for More Information
For information on the administrative tasks you can perform from your PayPal account, see
the Merchant Setup and Administra tion Guide. The guide is located on the Documentation
page linked to the Library tab in Developer Central.
Revision History
Revision history for Express Checkout Integration Guide.
TABLE 1.1 Revision history
Date Description
05/11/10 Added details for integrating parallel payments using the NVP and SOAP
03/10/10 Added support for parallel payments.
01/21/2010 Added new Express Checkout fields to provide the buyer contact
10/05/2009 Added Immediate Payment.
06/30/2009 Added a section on payment review.
API, including use with airlines. Added new Immediate Payment
functionality. Updated billing agreements with functionality to obtain the
latest billing address, skip billing agreement creation, and clarify use of the
BAUpdate API.
information, gift options, promotions, and a survey question on the PayPal
pages. Added a new callback response API field providing no-shipping
details.
Edited for technical accuracy.
Removed PayPal placement guidelines.
Express Checkout Integration Guide May 2010 9
Page 10

Revision History
T
ABLE 1.1 Revision history
Date Description
06/04/2009 Added a chapter on pre-populating the PayPal review page. Updated PayPal
04/30/2009 Created first edition for Enterprise-level merchants and added chapter on
04/08/2009 Added a chapter describing the Instant Update Callback API.
03/03/2009 Updated to allow useraction=continue for eBay incentives.
11/13/2008 Added information about integrating dynamic images and added
06/30/2008 Complete revision.
Review pages. Moved some customization topics out of this guide. They
are now in the Merchant Setup and Administration Guide.
reference transactions.
information about order details that can be displayed on the PayPal Review
page.
10 May 2010 Express Checkout Integration Guide
Page 11

Introducing Express Checkout
1
Express Checkout is PayPal’s premier checkout solution, which streamlines the checkout
process for buyers and keeps them on the merchant’s site after making a purchase.
z The Express Checkout Experience
z Express Checkout Integration Steps
z Express Checkout Flow
z Express Checkout Building Blocks
NOTE: For information about administrative tasks you can perform from your PayPal account
such as adding users, setting up custom page styles, and managing multiple currency
balances, see the
The Express Checkout Experience
Merchant Setup and Administration Guide.
Express Checkout makes it easier for a buyers to pay online. It also enables you to accept
PayPal while retaining control of the buyer and the overall checkout flow.
Consider your buyers’ experience before implementing Express Checkout. A generic flow
probably has the following sequence of pages:
A generic checkout flow
In a typical checkout flow, a buyer:
1. Checks out from the shopping cart page
2. Provides shipping information
3. Chooses a payment option and provides billing and payment information
4. Reviews the order and pays
5. Receives an order confirmation
In an Express Checkout flow, a buyer still checks out at the beginning of the flow. However,
the buyer does not enter shipping, billing, or payment information, because PayPal provides
the stored information. This simplifies and expedites the checkout process.
Express Checkout Integration Guide May 2010 11
Page 12

Introducing Express Checkout
1
Express Checkout Integration Steps
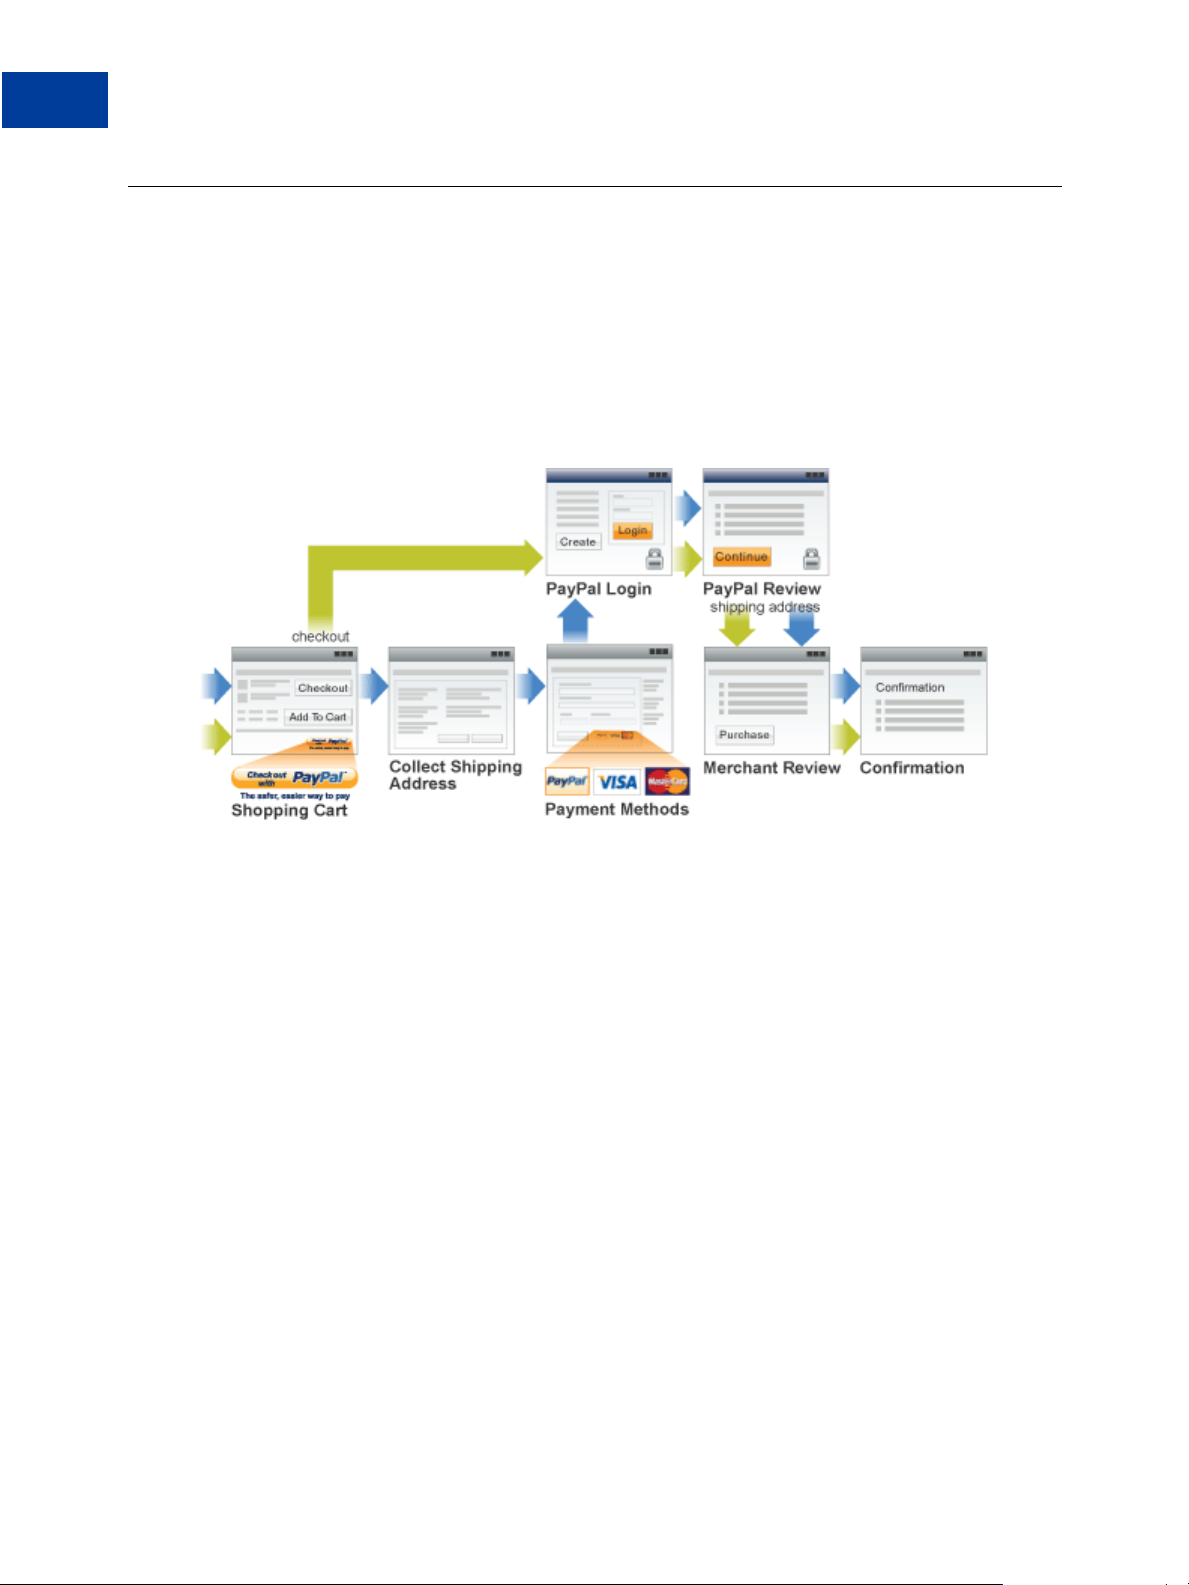
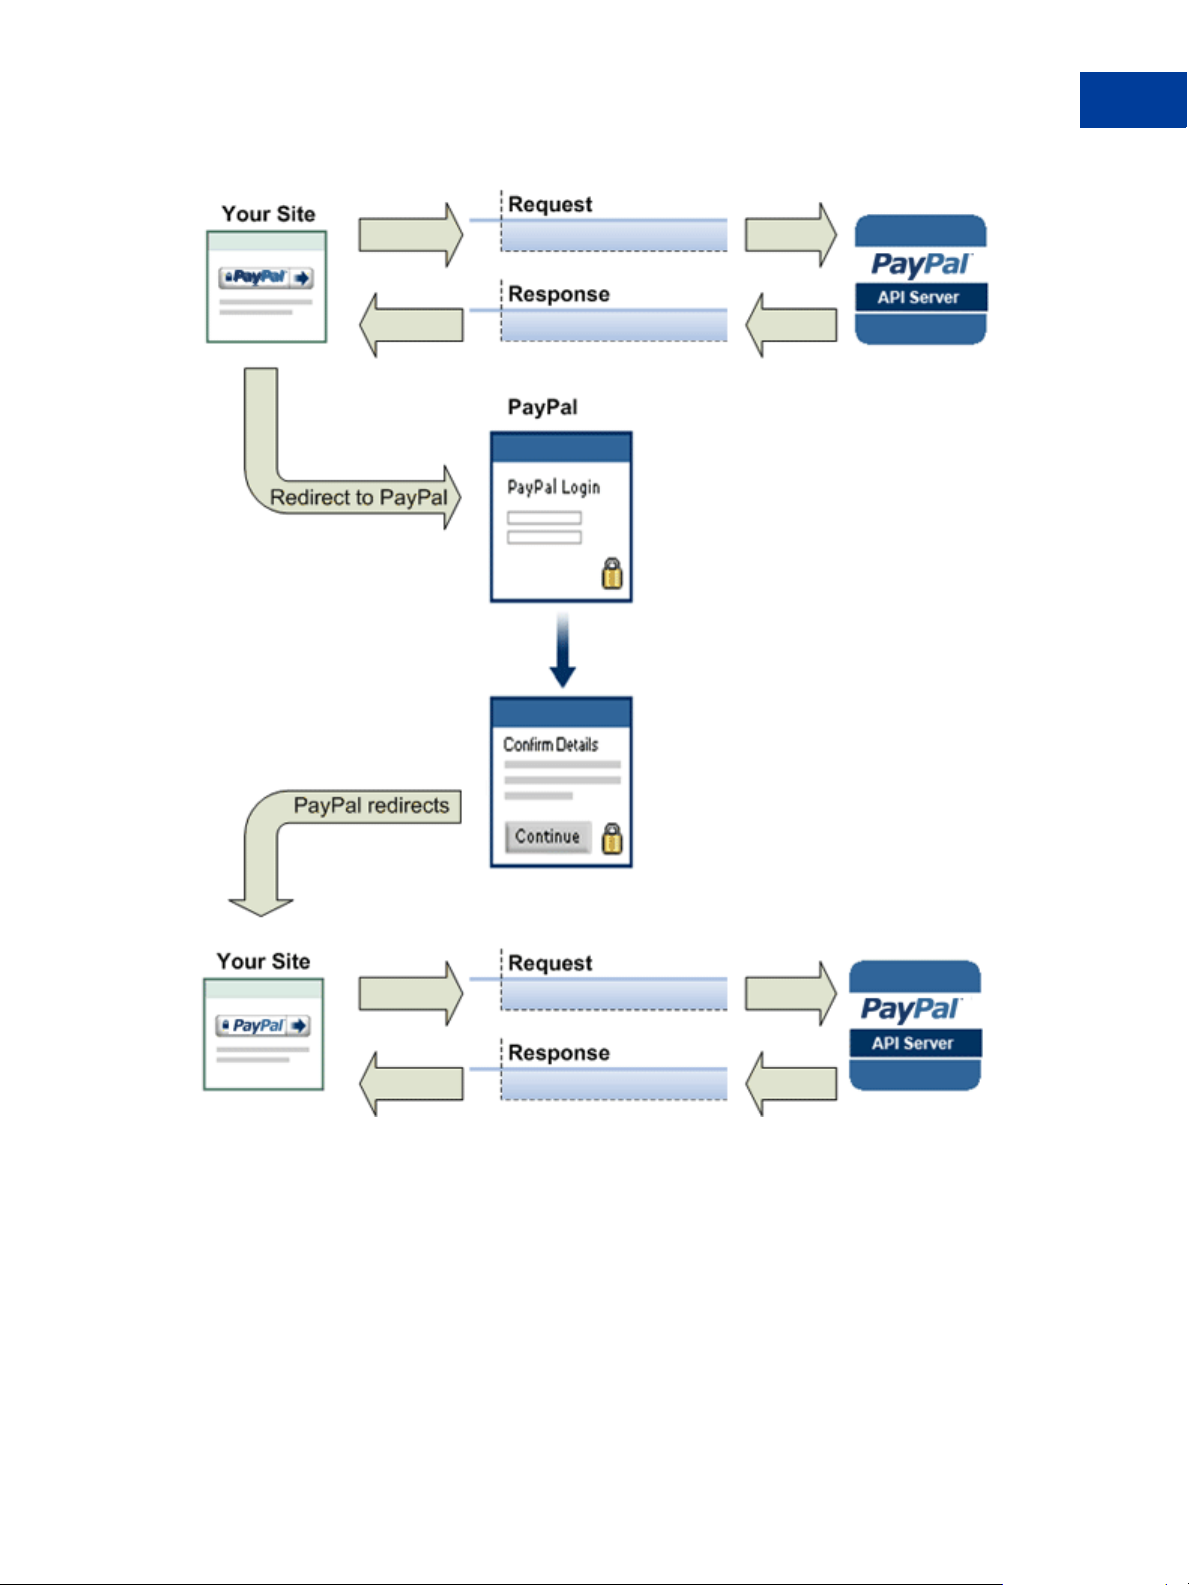
The following diagram shows the Express Checkout flow:
Express Checkout Flow
In the Express Checkout flow, the buyer:
1. Chooses Express Checkout by clicking Check out with PayPal
2. Logs into PayPal to authenticate his or her identity
3. Reviews the transaction on PayPal
NOTE: Optionally, (not shown in the diagram), the buyer can then proceed to review the
order on your site. You can also include other checkout steps, including upselling
on your Review Order page.
4. Confirms the order and pays from your site
5. Receives an order confirmation
Express Checkout Integration Steps
You can implement Express Checkout in 4 steps:
1. Place PayPal checkout buttons and PayPal payment mark images in your checkout flow.
2. For each PayPal button that you place, modify your page to handle the button click.
Use a PayPal Express Checkout API operation to set up the interaction with PayPal and
redirect the browser to PayPal to initiate buyer approval for the payment.
3. On your order confirmation page, obtain the payment authorization from PayPal and use
PayPal Express Checkout API operations to obtain the shipping address and accept the
payment.
4. Test your integration using the PayPal Sandbox before taking your pages live.
Because PayPal offers you the flexibility to control your checkout flow, you should first
understand how your current checkout flow works, then, become familiar with the Express
Checkout flow. Start by reviewing Express Checkout Flow. For additional background
information to help you get started, see Express Checkout Building Blocks.
12 May 2010 Express Checkout Integration Guide
Page 13

Introducing Express Checkout
Express Checkout Integration Steps
Configuring and Customizing the Express Checkout Experience
After you implement and test your basic Express Checkout integration, you should configure
the additional features of Express Checkout to customize it to meet your needs.
Carefully evaluate each feature because the more you streamline the checkout process and
make Express Checkout seamless to buyers, the more likely your sales will increase.
At a minimum, you should:
z Set your logo on the PayPal site and provide order details in the transaction history.
z Use the PayPal confirmation page as your Order Review page to further streamline the user
experience when you do not need the benefits associated with paying on your site. This
strategy can lead to a better order completion rate, also known as a conversion rate.
Configure the look and feel of PayPal pages to match the look and feel of your site by
specifying the:
z Logo to display
z Colors for the background and border
z Language in which PayPal content is displayed
1
You should include:
z Order details, including shipping and tax, during checkout
IMPORTANT: Not displaying this information is a major cause of shopping cart
abandonment during checkout.
z Shipping information for non-digital goods, which can be your address information for the
buyer or the address on file with PayPal; if you use the address on file with PayPal, you can
specify whether or not it must be a confirmed address
You can also activate additional features, including:
z Associate a payment with an eBay auction item
z Assign an invoice number to a payment
z Accept payments with giropay (Germany only)
Additional PayPal API Operations
You can use PayPal API operations to include advanced processing and back-office processes
with Express Checkout. You can:
z Capture payments associated with authorizations and orders
z Process recurring payments
z Issue refunds, search transactions using various criteria, and provide other back-office
operations
Express Checkout Integration Guide May 2010 13
Page 14
Introducing Express Checkout
1
Express Checkout Flow
Express Checkout Flow
T o implement Express Checkout, you must offer it both as a checkout option and as a payment
method. Typically, you initiate the Express Checkout flow on your shopping cart page and on
your payment options page.
You add Express Checkout to your existing flow by placing the Checkout with PayPal button
on your Shopping Cart page and by placing the PayPal mark on your Payment Methods
page. The following diagram shows the complete flow:
Complete Express Checkout flow
Make the following changes to implement the complete Express Checkout flow:
z On your Shopping Cart page, place the Checkout with PayPal button and respond to a
click by setting up the Express Checkout request and redirecting your buyer’s browser to
PayPal.
z On your Payment Methods page, associate the PayPal mark with an option. Handle
selection of the PayPal mark by setting up the Express Checkout request and redirecting
your buyer’s browser to PayPal.
z On the page your buyer returns to, obtain shipping information from PayPal and accept the
payment to complete the Express Checkout transaction.
NOTE: You also can allow the buyer to pay on the PayPal Review page; in which case, your
checkout flow can omit the Merchant Review page and proceed directly to your
Confirmation page. For more information see “Buyer Pays on PayPal” on page 75.
Checkout Entry Point
The checkout entry point is one of the places where you must implement Express Checkout.
Buyers initiate the Express Checkout flow on your shopping cart page by clicking the
Checkout with PayPal button.
The following diagram shows how Express Checkout integrates with a typical checkout flow:
14 May 2010 Express Checkout Integration Guide
Page 15
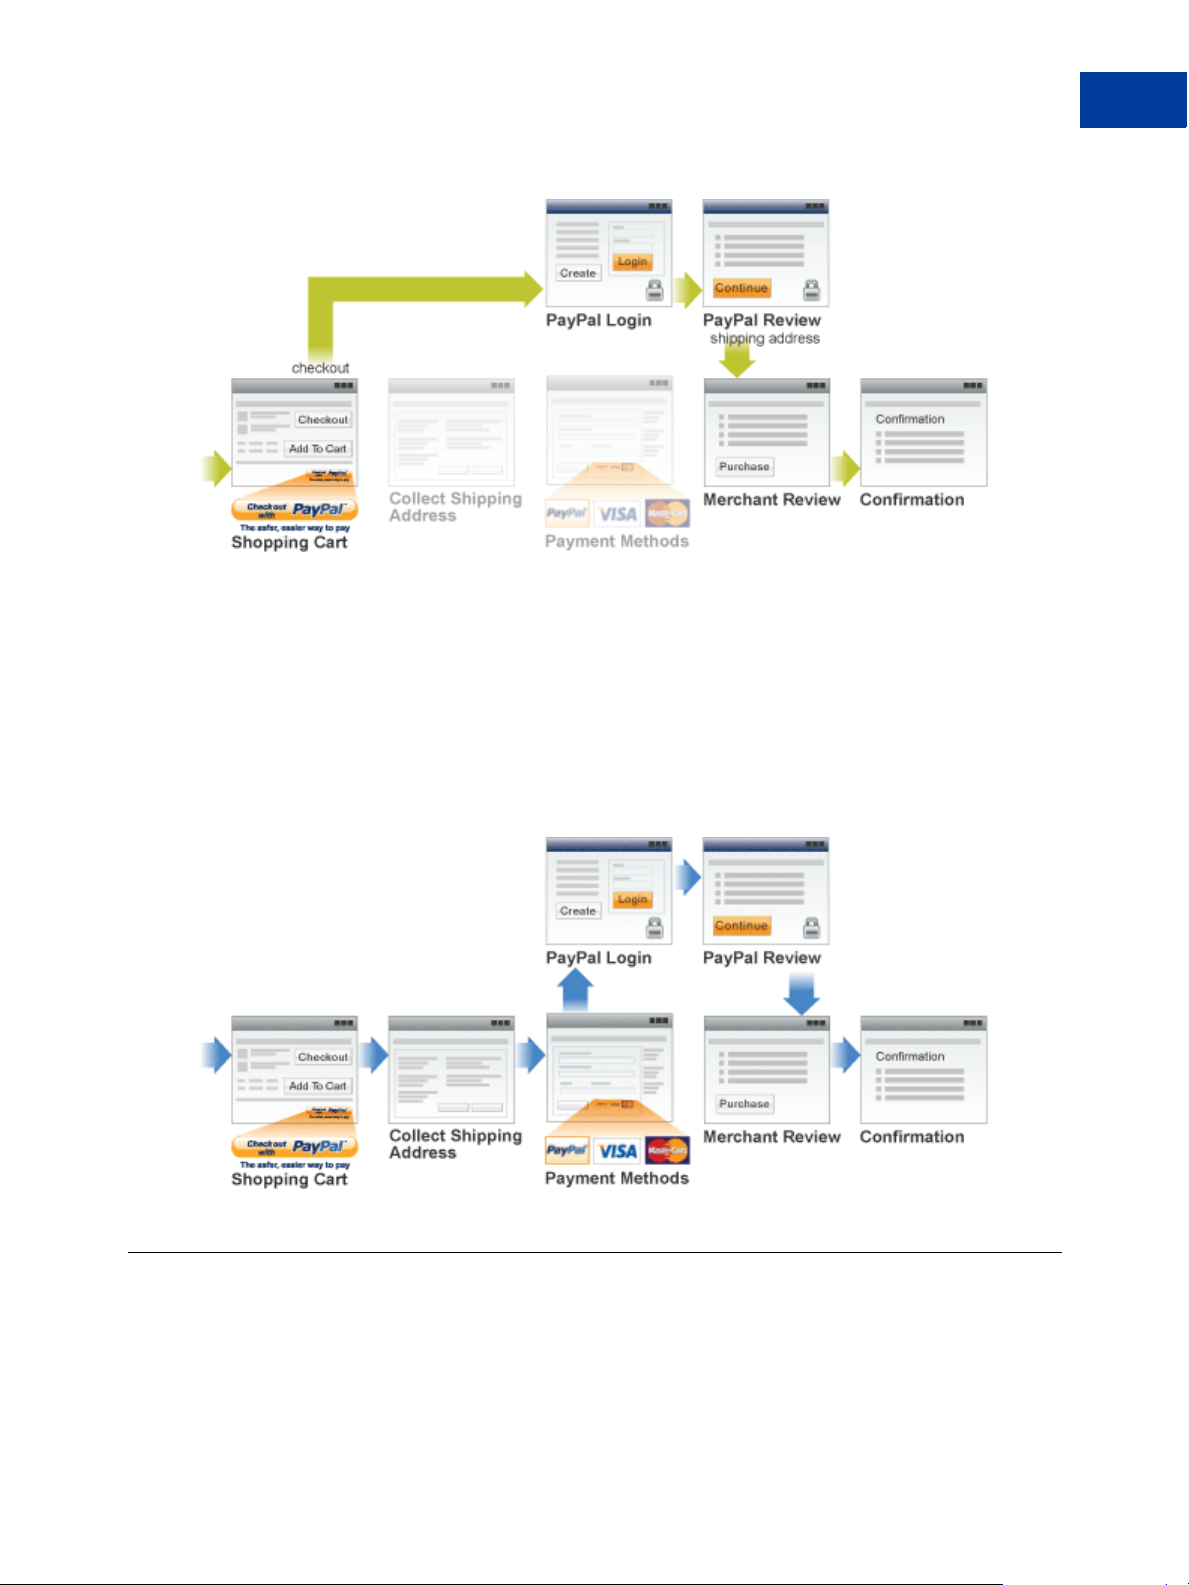
Integrating Express Checkout from the Shopping Cart page
Payment Option Entry Point
The payment option entry point is one of the places where you must implement Express
Checkout. Buyers initiate the Express Checkout flow on your payment methods page by
selecting PayPal as the default option.
Introducing Express Checkout
Express Checkout Building Blocks
1
The following diagram shows how to integrate Express Checkout from your payment methods
page:
Integrating Express Checkout from the Payment Method page
Express Checkout Building Blocks
You implement Express Checkout flows with Express Checkout buttons, PayPal API
operations, PayPal commands, and tokens.
Express Checkout Integration Guide May 2010 15
Page 16
Introducing Express Checkout
1
Express Checkout Building Blocks
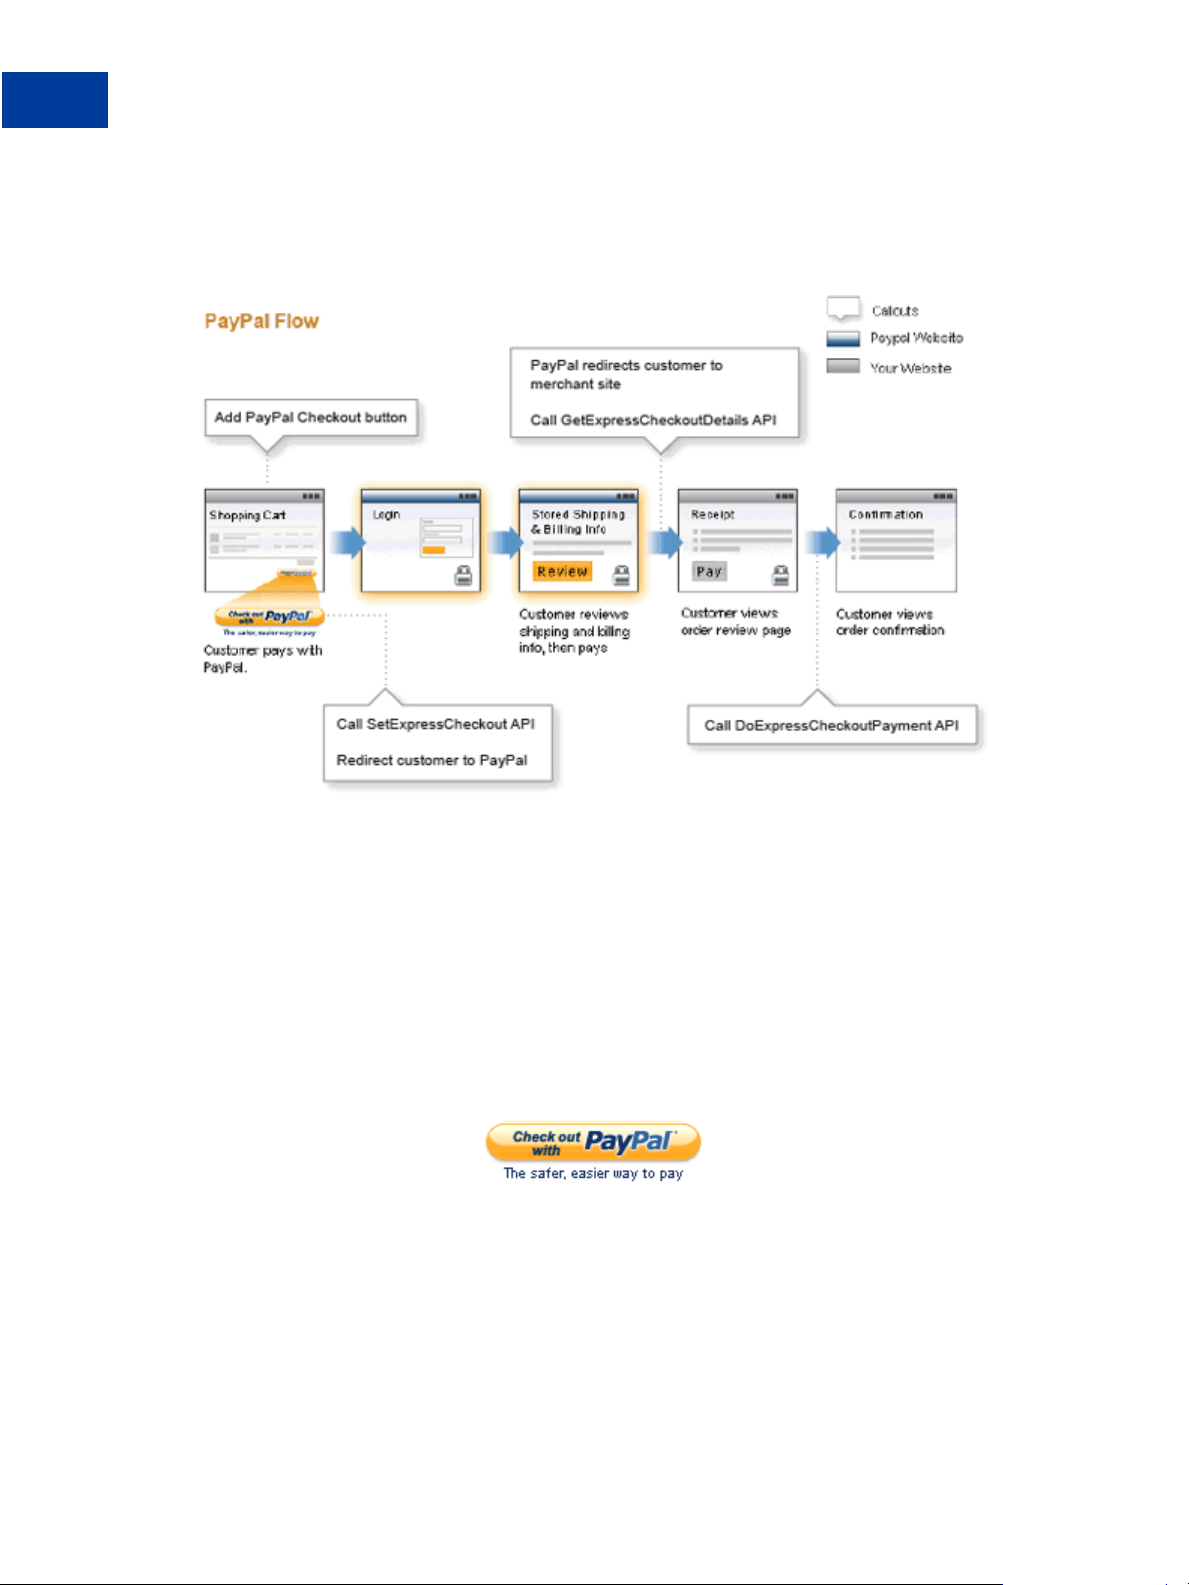
The following conceptual diagram identifies the building blocks that you use to integrate
Express Checkout on your website:
Express Checkout Integration
A token is a value assigned by PayPal that associates the execution of API operations and
commands with a specific instance of a user experience flow.
NOTE: Tokens are not shown in the diagram.
Express Checkout Buttons
PayPal provides buttons and images for you to place on your website.
To implement the Express Checkout shopping cart experience, place the following button on
your Shopping Cart page:
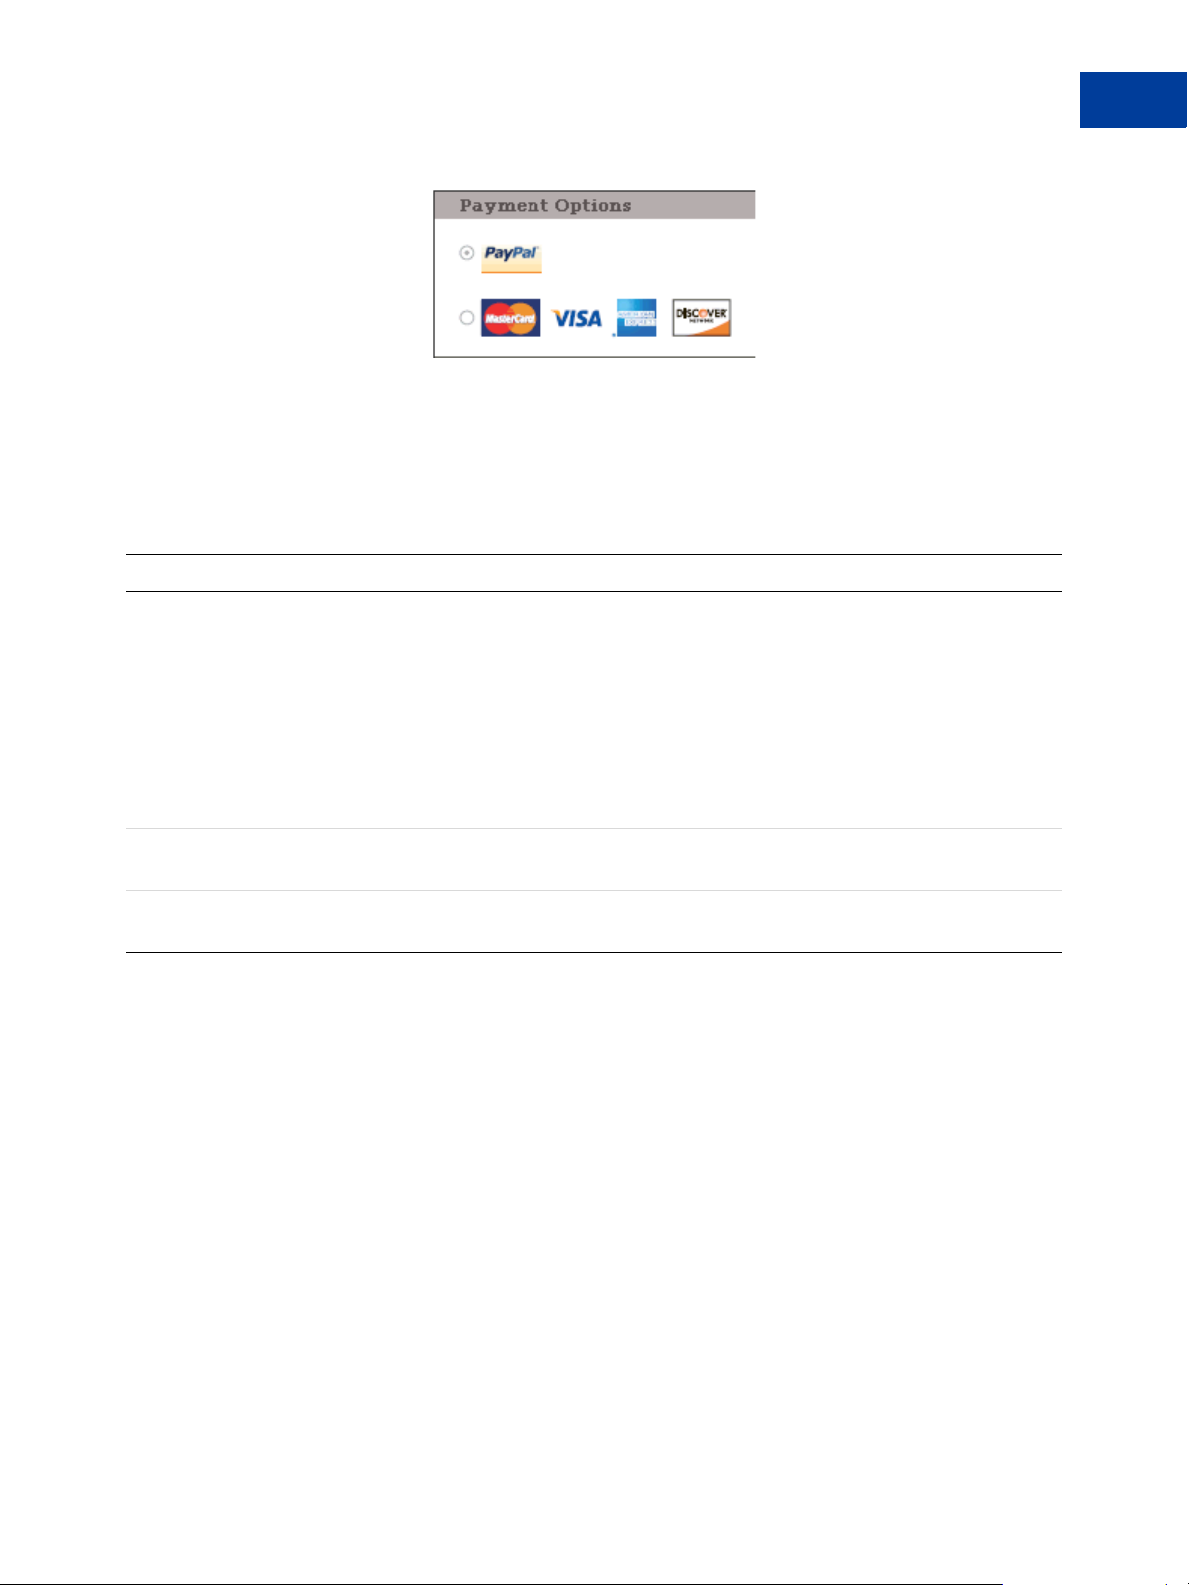
To implement PayPal as a payment option, which is part of the Express Checkout experience,
associate the PayPal mark image with your payment options. PayPal recommends using radio
buttons for payment options:
16 May 2010 Express Checkout Integration Guide
Page 17
Introducing Express Checkout
Express Checkout Building Blocks
Express Checkout API Operations
The PayPal API provides three API operations for Express Checkout, which sets up the
transaction, obtains information about the buyer, and handles the payment and completes the
transaction.
API Operation Description
SetExpressCheckout Sets up the Express Checkout transaction. You can specify information
to customize the look and feel of the PayPal site and the information it
displays. You must include the following inform atio n:
z URL to the page on your website that PayPal redirects to after the
buyer logs into PayPal and approves the payment successfully.
z URL to the page on your website that PayPal redirects to if the buyer
cancels.
z T otal amount of the order or your best estimate of the total. It should
be as accurate as possible.
1
GetExpressCheckout Obtains information about the buyer from PayPal, including shipping
information.
DoExpressCheckoutPayment Completes the Express Checkout transaction, including the actual total
amount of the order.
Express Checkout Command
PayPal provides a command that you use when redirecting your buyer’s browser to PayPal.
This command enables your buyer to log into PayPal to approve an Express Checkout
payment.
When you redirect your buyer’s browser to PayPal, you must specify the
_ExpressCheckout command for Express Checkout. You also specify the token that
identifies the transaction, which was returned by the SetExpressCheckout API operation.
NOTE: T o enable PayPal to redirect back to your website, you must have already invoked the
SetExpressCheckout API operation, specifying URLs that PayPal uses to redirect
back to your site. PayPal redirects to the success URL when the buyer pays on PayPal;
otherwise, PayPal redirects to the cancel URL.
If the buyer approves the payment, PayPal redirects to the success URL with the following
information:
Express Checkout Integration Guide May 2010 17
Page 18

Introducing Express Checkout
1
Express Checkout Building Blocks
z The token that was included in the redirect to PayPal
z The buyer’s unique identifier (Payer ID)
If the buyer cancels, PayPal redirects to the cancel URL with the token that was included in the
redirect to PayPal.
Express Checkout Token Usage
Express Checkout uses a token to control access to PayPal and execute Express Checkout API
operations.
The SetExpressCheckout API operation returns a token, which is used by other Express
Checkout API operations and by the _ExpressCheckout command to identify the
transaction. The life of the token is approximately 3 hours.
18 May 2010 Express Checkout Integration Guide
Page 19
Express Checkout Button and
2
Logo Image Integration
PayPal hosts the PayPal button and logo images that you use on your website. Using PayPal’s
buttons and logos is convenient and standardizes appearance on websites that use PayPal as a
payment option.
z About PayPal Button and Logo Images
z Dynamic Images
z Configuring the Dynamic Image
z Dynamic Image Command Reference
z Static PayPal Button and Mark Images Source Requirements
About PayPal Button and Logo Images
To inform buyers that PayPal is accepted on your website, you must place PayPal button and
logo images in your checkout flow.
PayPal Express Checkout requires that you integrate two images. The Check out with PayPal
button and the PayPal Acceptance mark.
Express Checkout Images
The Check out with PayPal button is the image you place on your shopping cart page. The US
version of the image looks like this. PayPal also provides buttons for other locales.
The PayPal Acceptance Mark is the image you place on your payment methods page. It looks
like this:
Express Checkout Image Flavors
The Check out with PayPal button and the PayPal Acceptance mark images are available in
two flavors:
z Dynamic image
Express Checkout Integration Guide May 2010 19
Page 20

Express Checkout Button and Logo Image Integration
2
Dynamic Images
z Static image
The dynamic images enable PayPal to change their appearance dynamically. If, for example,
you have signed up to participate in a PayPal campaign, PayPal can change the appearance of
the image dynamically for the duration of that campaign based on parameter information you
append to the image URL. By default, the Express Checkout images appears as shown above.
The static images cannot be changed dynamically. To participate in a PayPal campaign, you
would have to manually update the image code to change the image displayed and restore the
default image when the campaign is over. The only way you can have image management
taken care of for you is to replace static images in your implementation with dynamic images.
Dynamic Images
To use dynamic images, you mus t pass information to PayPal as parameters appended to the
image URL. Your unique ID tells PayPal whether or not you are participating in events that
require image changes. Other information you pass instructs PayPal on the types of images to
return.
If, for example, you are participating in a PayPal campaign that you have signed up for with
PayPal and you have passed the appropriate parameter information to PayPal, PayPal
automatically updates the image to reflect the campaign information. When the campaign is
over, PayPal restores the default image. You are not responsible for scheduling or making
changes to your website application code before, during, o r af ter the campaign. It is all
handled for you when you set up the dynamic image.
If you require localized campaign images, you can have the localized button image display for
each country in which you participate. Simply assign the correct code for the country to the
locale parameter you append to the dynamic image URL. PayPal will return to the default
button image associated with each locale when the campaign is not available.
Configuring the Dynamic Image
To set up the dynamic image, you provide the name-value pair parameter information in the
image URL. You can pass information in the image URL for any of the following options.
z Set Up the Default Image
z Set Up Image for Dynamic Use
z Change the Locale
z Feedback to Buyer Meeting an Incentive
z Choose the Image
20 May 2010 Express Checkout Integration Guide
Page 21

Express Checkout Button and Logo Image Integration
Set Up the Default Image
The following URL points to the default Check out with PayPal image:
https://fpdbs.paypal.com/dynamicimageweb?cmd=_dynamic -image
T o make the image dynamic, you need only add parameters to this URL to specify the changes
you want displayed.
To test in the Sandbox environment, send the image to the following Sandbox URL:
https://fpdbs.sandbox.paypal.com/dynamicimageweb?cmd=_dynamic-image
Set Up Image for Dynamic Use
T o set up the image URL for dynamic use, you associate it with your PayPal Secure Merchant
Account ID or pal. You can obtain your pal by getting it from the Profile page, contacting
PayPal, or calling the GetPalDetails API.
This is an example call to GetPalDetails request.
Request Parameters:
Configuring the Dynamic Image
2
[requiredSecurityParameters]
&METHOD=GetPalDetails
Response Parameters
This GetPalDetails response returns the value of PAL and your country code (LOCALE), as
shown below:
[successResponseFields]
&PAL=SFJCXFDLNFR5U
&LOCALE=en_US
1. Append the pal parameter to the image URL, and set the parameter to the value of your
encrypted PayPal merchant account number.
https://fpdbs.paypal.com/dynamicimagewe b?cmd=_dynamicimage&pal=SFJCXFDLNFR5U
2. You can optionally change the value of LOCALE. See Change the Locale for details.
3. Place the URL with parameter informa tion at the appropriate image locations in your web
application.
The pal alerts PayPal to campaigns in which you are participating. PayPal obtains this
information from your account and replaces the default image with the appropriate
campaign image during that campaign.
NOTE: If you pass in a pal value matching a merchant account that is not yours, PayPal
displays the image for that account. Be sure to pass the pal value matching your
account.
Express Checkout Integration Guide May 2010 21
Page 22

Express Checkout Button and Logo Image Integration
2
Dynamic Image Command Reference
Change the Locale
To specify the locale of the image, append the locale parameter set to the code for the
appropriate country to the image URL. If a country does not have a localized image or if you
do not pass a locale value, the default US image displays. This example displays the image
for the Spanish locale:
https://fpdbs.paypal.com/dynamicimagewe b?cmd=_dynamicimage&pal=SFJCXFDLNFR5U&locale=es_ES
If you are participating in a campaign across multiple countries, you can set the image locale
for each country in which you participate. PayPal returns the default image associated with the
locale when the campaign is over.
Feedback to Buyer Meeting an Incentive
Pass the order total amount in the ordertotal parameter so PayPal can determine if the
buyer is eligible for an incentive. Say, for example, that you are participating in a campaign in
which the buyer is eligible for a 20% discount when thei r order meets a minimum of $50.00.
You can pass that value to PayPal in the ordertotal parameter, as shown here:
https://fpdbs.paypal.com/dynamicimagewe b?cmd=_dynamicimage&pal=SFJCXFDLNFR5U&ordertotal=50.0 0
When a buyer’s order meets or exceeds $50.00, PayPal displays the incentive image informing
the buyer of their eligibility for the discount. When a buyer’s order is less than $50.00, PayPal
displays the default image.
NOTE: If ordertotal is not passed, PayPal does not display the incentive image even if the
buyer is eligible for the incentive.
Choose the Image
To specify the image that you want to display, set the value of buttontype. This example
sets buttontype to the PayPal Acceptance Mark image:
https://fpdbs.paypal.com/dynamicimagewe b?cmd=_dynamicimage&pal=SFJCXFDLNFR5U&buttontype=ecma rk
The default value for buttontype is ecshortcut.
Dynamic Image Command Reference
To set up the information that enables dynamic images, you add name-value pairs to the
dynamic image URL. Parameters and values are described below.
22 May 2010 Express Checkout Integration Guide
Page 23

Express Checkout Button and Logo Image Integration
Dynamic Image Parameters
The table below describes the dynamic image name-value pair parameters.
Dynamic-Image Command Variable Descriptions
pal Type: encrypted PayPal account number
(Optional) Unique identification number. When merchants sign up for a PayPal
business account, PayPal assigns them an account number. The pal value
represents the pay-to merchant account, not a third party making the API request
on behalf of this merchant.
NOTE: If pal is not passed, PayPal displays the default Check out with PayPal
button.
ordertotal Type: numeric
(Optional) The total cost of the order to the buyer. If shipping and sales tax are
known, include them in this value. If not, this value should be the current subtotal
of the order.
NOTE: If ordertotal is not passed, PayPal does not display the incentive
image even if the buyer is eligible for the incentive.
Character length and limitations: Must not exceed $10,000.00 USD in any
currency. No currency symbol.Must have two decimal places, decimal separator
must be a period (.), and the optional thousands separator must be a comma(,).
Dynamic Image Command Reference
2
locale Ty pe: string
(Optional) The five-character locale code. See Locale Codes.
Any other values default to US.
NOTE: The merchant can participate in one campaign per country.
buttontype Type: string
(Optional) Indicates a dynamic image. The values are:
z (Default) Check out with PayPal button image: ecshortcut
z PayPal Acceptance Mark image: ecmark
Locale Codes
The table below lists the locale values. Country code is the two-letter code for the country.
Language priority is the language associated with the country code where language_0 is the
default.
Express Checkout Integration Guide May 2010 23
Page 24

Express Checkout Button and Logo Image Integration
2
Dynamic Image Command Reference
Country codes, language priorities, and locale values
Country code Language priority Locale
AT language_0 de_DE
AT language_1 en_US
AU language_0 en_AU
BE language_0 en_US
BE language_1 nl_NL
BE language_2 fr_FR
C2 language_0 en_US
C2 language_1 zh_XC
C2 language_2 fr_XC
C2 language_3 es_XC
CH language _0 de_DE
CH language_1 fr_FR
CH language_2 en_US
CN language_0 zh_CN
default language_0 en_US
default language_1 fr_XC
default language_2 es_XC
default language_3 zh_XC
DE language_0 de_DE
DE language_1 en_US
ES language_0 es_ES
ES language_1 en_US
FR language_0 fr_FR
FR language_1 en_US
GB language _0 en_GB
GF language_0 fr_FR
GF language_1 en_US
GI language_0 en_US
GP language_0 fr_FR
GP language_1 en_US
24 May 2010 Express Checkout Integration Guide
Page 25

Express Checkout Button and Logo Image Integration
Static PayPal Button and Mark Images Sour ce Requirements
Country code Language priority Locale
IE language_0 en_US
IT language_0 it_IT
IT language_1 en_US
JP language_0 ja_JP
JP language_1 en_US
MQ language_0 fr_FR
MQ language_1 en_US
NL language_0 nl_NL
NL language_1 en_US
PL language_0 pl_PL
PL language_1 en_US
RE language_0 fr_FR
2
RE language_1 en_US
US language_0 en_US
US language_1 fr_XC
US language_2 es_XC
US language_3 zh_XC
Static PayPal Button and Mark Images Source Requirements
Using the static image code on the PayPal servers eliminates the need for you to maintain them
yourself.
PayPal requires that you use the Check out with PayPal and the PayPal acceptance mark
images hosted on secure PayPal servers. When the images are updated, the changes appear
automatically in your application.
Do not host copies of the PayPal images locally on your servers. Outdated PayPal images
reduces buyer confidence in your site.
Follow the links in the table below to obtain HTML code that displays the PayPal-hosted
images.
HTML Code for Displaying PayPal-Hosted Button and Mark Images
Country Links to HTML Code for Displaying PayPal-Hosted Images
Australia https://www.paypal.com/au/cgi-
bin/webscr?cmd=xpt/Merchant/merchant/ExpressCheckoutButtonCode-outside
Express Checkout Integration Guide May 2010 25
Page 26
Express Checkout Button and Logo Image Integration
2
Static PayPal Button and Mark Images Source Requirements
Country Links to HTML Code for Displaying PayPal-Hosted Images
Austria https://www.paypal.com/at/cgi-
bin/webscr?cmd=xpt/Merchant/merchant/ExpressCheckoutButtonCode-outside
Belgium https://www.paypal.com/be/cgi-
bin/webscr?cmd=xpt/Merchant/merchant/ExpressCheckoutButtonCode-outside
Canada https://www.paypal.com/ca/cgi-
bin/webscr?cmd=xpt/Merchant/merchant/ExpressCheckoutButtonCode-outside
China https://www.paypal.com/cn/cgi-
bin/webscr?cmd=xpt/Merchant/merchant/ExpressCheckoutButtonCode-outside
France https://www.paypal.com/fr/cgi-
bin/webscr?cmd=xpt/Merchant/merchant/ExpressCheckoutButtonCode-outside
Germany https://www.paypal.com/de/cgi-
bin/webscr?cmd=xpt/Merchant/merchant/ExpressCheckoutButtonCode-outside
Italy https://www.paypal.com/it/cgi-
bin/webscr?cmd=xpt/Merchant/merchant/ExpressCheckoutButtonCode-outside
Japan https://www.paypal.com/j1/cgi-
bin/webscr?cmd=xpt/Merchant/merchant/ExpressCheckoutButtonCode-outside
Netherlands https://www.paypal.com/nl/cgi-
bin/webscr?cmd=xpt/Merchant/merchant/ExpressCheckoutButtonCode-outside
Poland https://www.paypal.com/pl/cgi-
bin/webscr?cmd=xpt/Merchant/merchant/ExpressCheckoutButtonCode-outside
Spain https://www.paypal.com/es/cgi-
bin/webscr?cmd=xpt/Merchant/merchant/ExpressCheckoutButtonCode-outside
Switzerland https://www.paypal.com/ch/cgi-
bin/webscr?cmd=xpt/Merchant/merchant/ExpressCheckoutButtonCode-outside
United Kingdom https://www.paypal.com/uk/cgi-
bin/webscr?cmd=xpt/Merchant/merchant/ExpressCheckoutButtonCode-outside
United States https://www.paypal.com/us/cgi-
bin/webscr?cmd=xpt/Merchant/merchant/ExpressCheckoutButtonCode-outside
26 May 2010 Express Checkout Integration Guide
Page 27
3
PayPal Name-Value Pair API Basics
The Name-Value Pair (NVP) API provides parameter-based association between request and
response fields of a message and their values. The request message is sent via the API from
your website and a response message is returned by PayPal using a client-server model in
which your site is a client of the PayPal server.
NOTE: The PayFlow API also uses name-value pairs to provide parameter-based association
between request and response fields of a message and their values; however, the
PayFlow API is not the same as the NVP API; for more information about the
PayFlow API, see
z PayPal API Client-Server Architecture
z Obtaining API Credentials
z Creating an NVP Request
z Executing NVP API Operations
z Responding to an NVP Response
Websit e Payments Pro Pay flo w Edition Developer Guide.
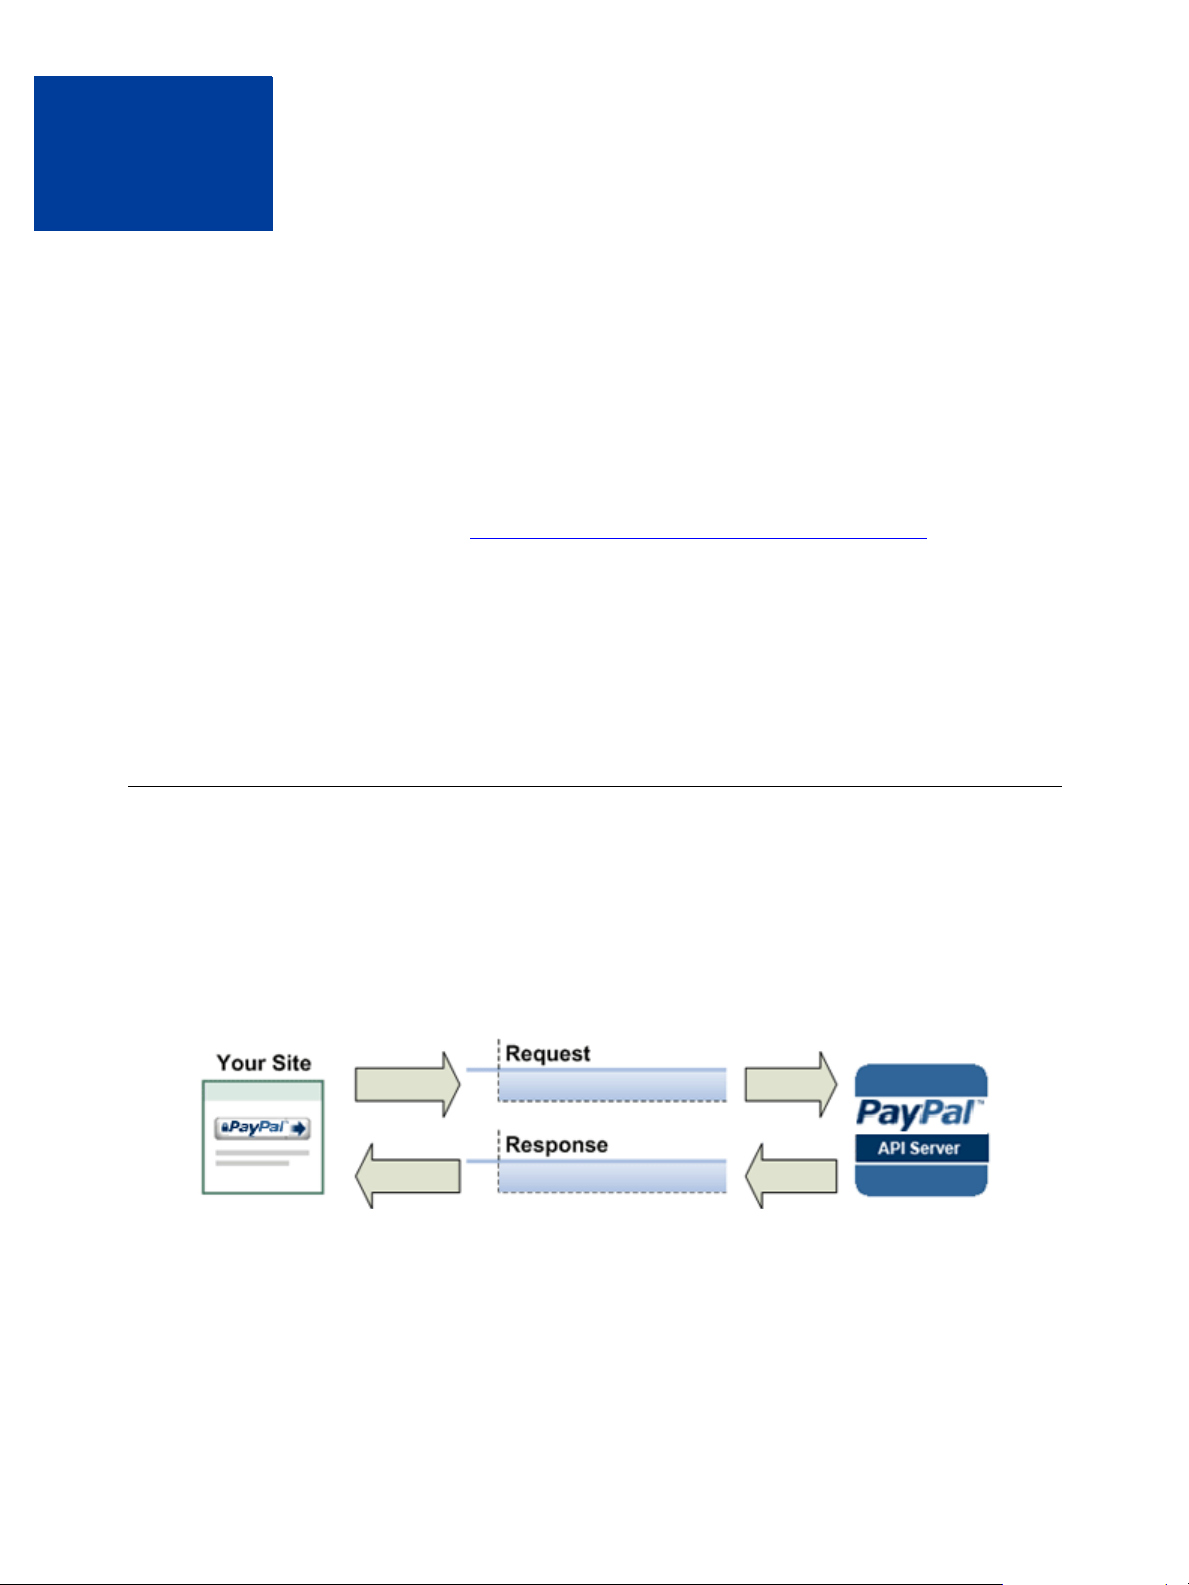
PayPal API Client-Server Architecture
The PayPal API uses a client-server model in which your website is a client of the PayPal
server.
A page on your website initiates an action on a PayPal API server by sending a request to the
server. The PayPal server responds with a confirmation that the requested action was taken or
or indicates that an error occurred. The response might also contain additional information
related to the request. The following diagram shows the basic request-response mechanism.
For example, you might want to obtain the buyer’s shipping address from PayPal. You can
initiate a request specifying an API operation that gets buyer details. The response from the
PayPal API server contains information about whether the request was successful. If the
operation succeeds, the response contains the requested information; in this case, the buyer’s
shipping address. If the operation fails, the response contains one or more error messages.
Express Checkout Integration Guide May 2010 27
Page 28
PayPal Name-Value Pair API Basics
3
PayPal API Client-Server Architecture
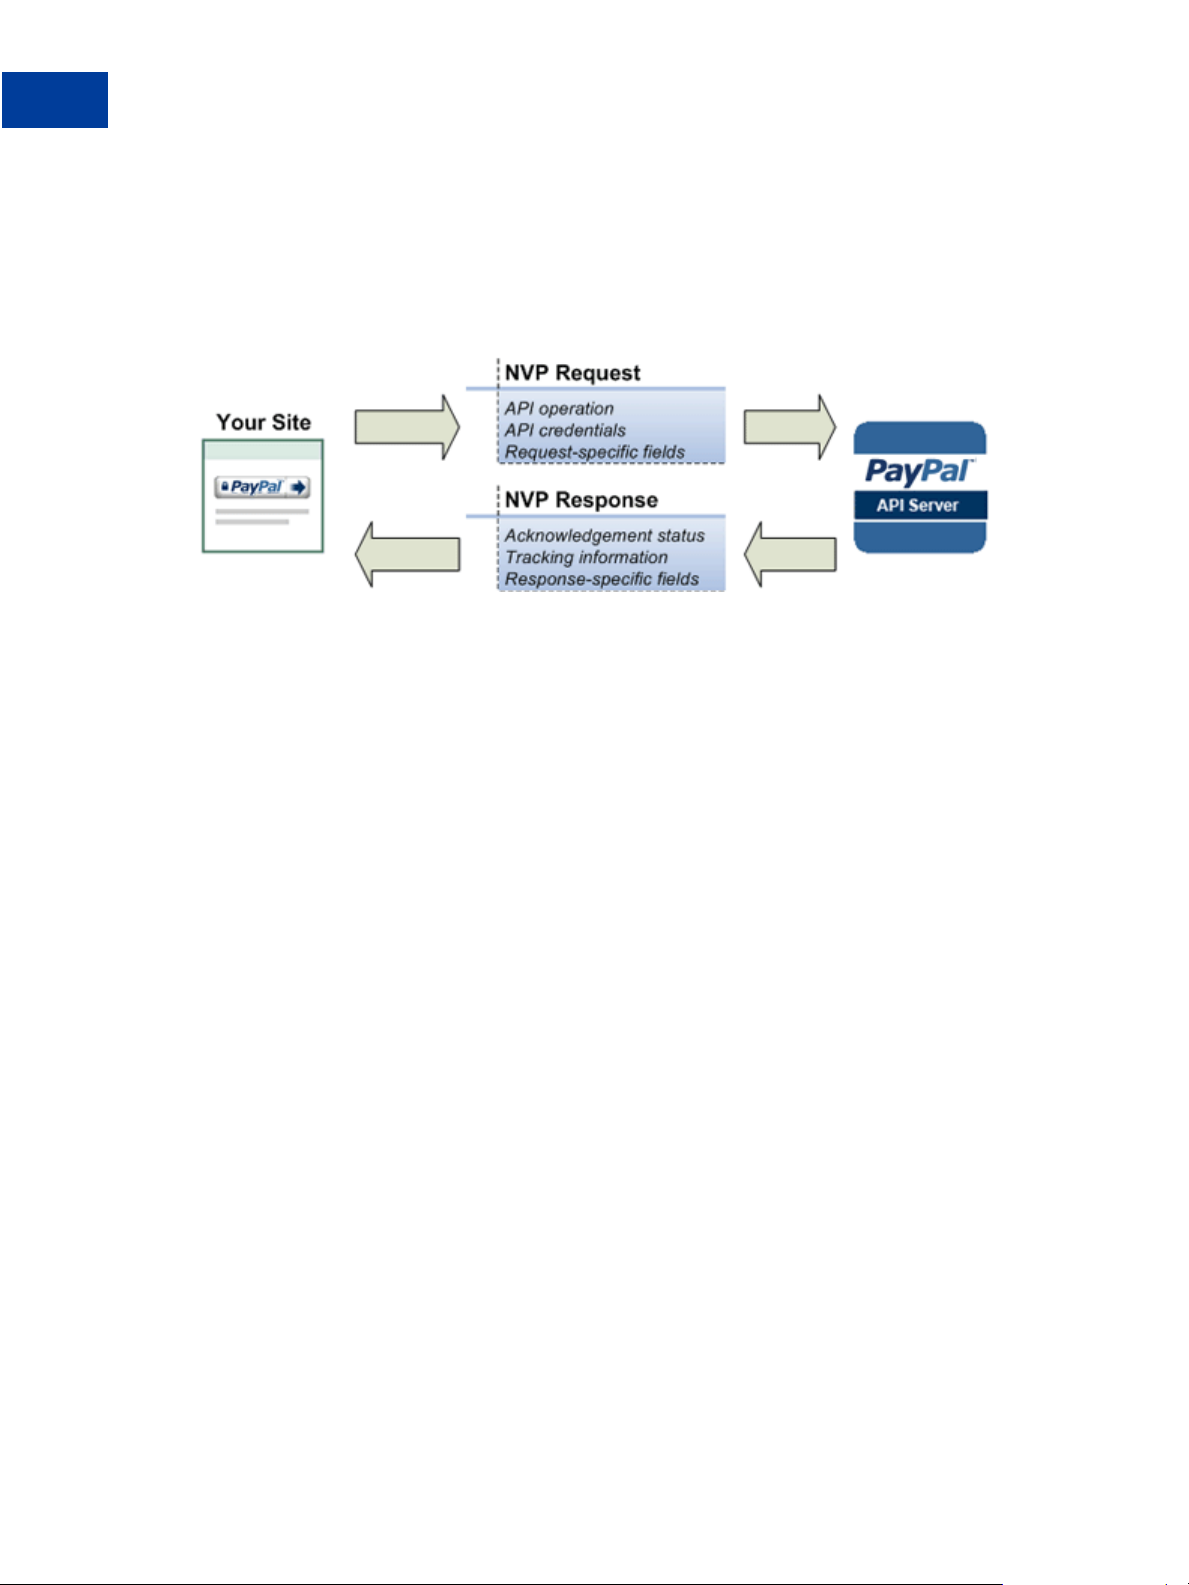
PayPal Name-Value Pair API Requests and Responses
To perform a PayPal NVP API operation, you send an NVP-formatted request to a PayPal
NVP server and interpret the response.
In the following diagram, your website generates a request. The request is executed on a
PayPal server and the response is returned to your site.
The request identifies
z The name of the API operation to be performed and its version; for example,
SetExpressCheckout for version 62.0
z Credentials that identify the PayPal account making the request
z Request-specific information that controls the API operation to be performed
A PayPal API server performs the operation and returns a response. The response contains
z An acknowledgement status that indicates whether the operation was a success or failure
and whether any warning messages were returned
z Information that can be used by PayPal to track execution of the API operation
z Response-specific information required to fulfill the request
Multiple API Operations
Some of the features, such as Express Checkout, require you to call multiple API operations.
Typically, these features require you to
1. Invoke an API operation, suc h as SetExpressCheckout, that sets up the return URL to
which PayPal redirects your buyer’s browser after the buyer finishes on PayPal. Other
setup also can be performed by this API operation.
2. Invoke additional API operations after receiving the buyer’s permission on PayPal, for
example, GetExpressCheckoutDetails or DoExpressC heckoutPayment.
The following diagram shows the execution flow between your site and PayPal:
28 May 2010 Express Checkout Integration Guide
Page 29
PayPal Name-Value Pair API Basics
PayPal API Client-Server Architecture
3
Token Usage
Typically, the API operation that sets up a redirection to PayPal returns a token. This token is
passed as a parameter in the redirect to PayPal. The token also might be required in related
API operations.
Express Checkout Integration Guide May 2010 29
Page 30

PayPal Name-Value Pair API Basics
3
Obtaining API Credentials
Obtaining API Credentials
To use the PayPal API, you must have API credentials that identify you as a PayPal Business
account holder who is authorized to perform various API operations. Although you can use
either an API signature or a certificate for credentials, PayPal recommends you use a
signature.
IMPORTANT: Although you can have both a signature and certificate, you cannot use both at
the same time.
Creating an API Signature
An API signature consists of an API username along with an associated API passwo rd and
signature, all of which are assigned by PayPal. You need to include this information whenever
you execute a PayPal API operation.
You must have a PayPal Business account to create a signature.
To create an API signature :
1. Log into PayPal, then click Profile under My Account.
2. Click API Access.
3. Click Request API Credentials.
4. Check R equest API signature and click Agree and Submit.
30 May 2010 Express Checkout Integration Guide
Page 31

PayPal Name-Value Pair API Basics
Creating an NVP Request
3
5. Click Done to complete the process.
Creating an API Certificate
Create an API certificate only if your website requires it. Typically, you want to create an API
signature for your credentials instead.
If you do need a certificate, follow the instructions at
https://www.paypal.com/IntegrationCenter/ic_api-certificate.html.
NOTE: The certificate for API credentials is not the same as an SSL certificate for your
website; they are not related to each other.
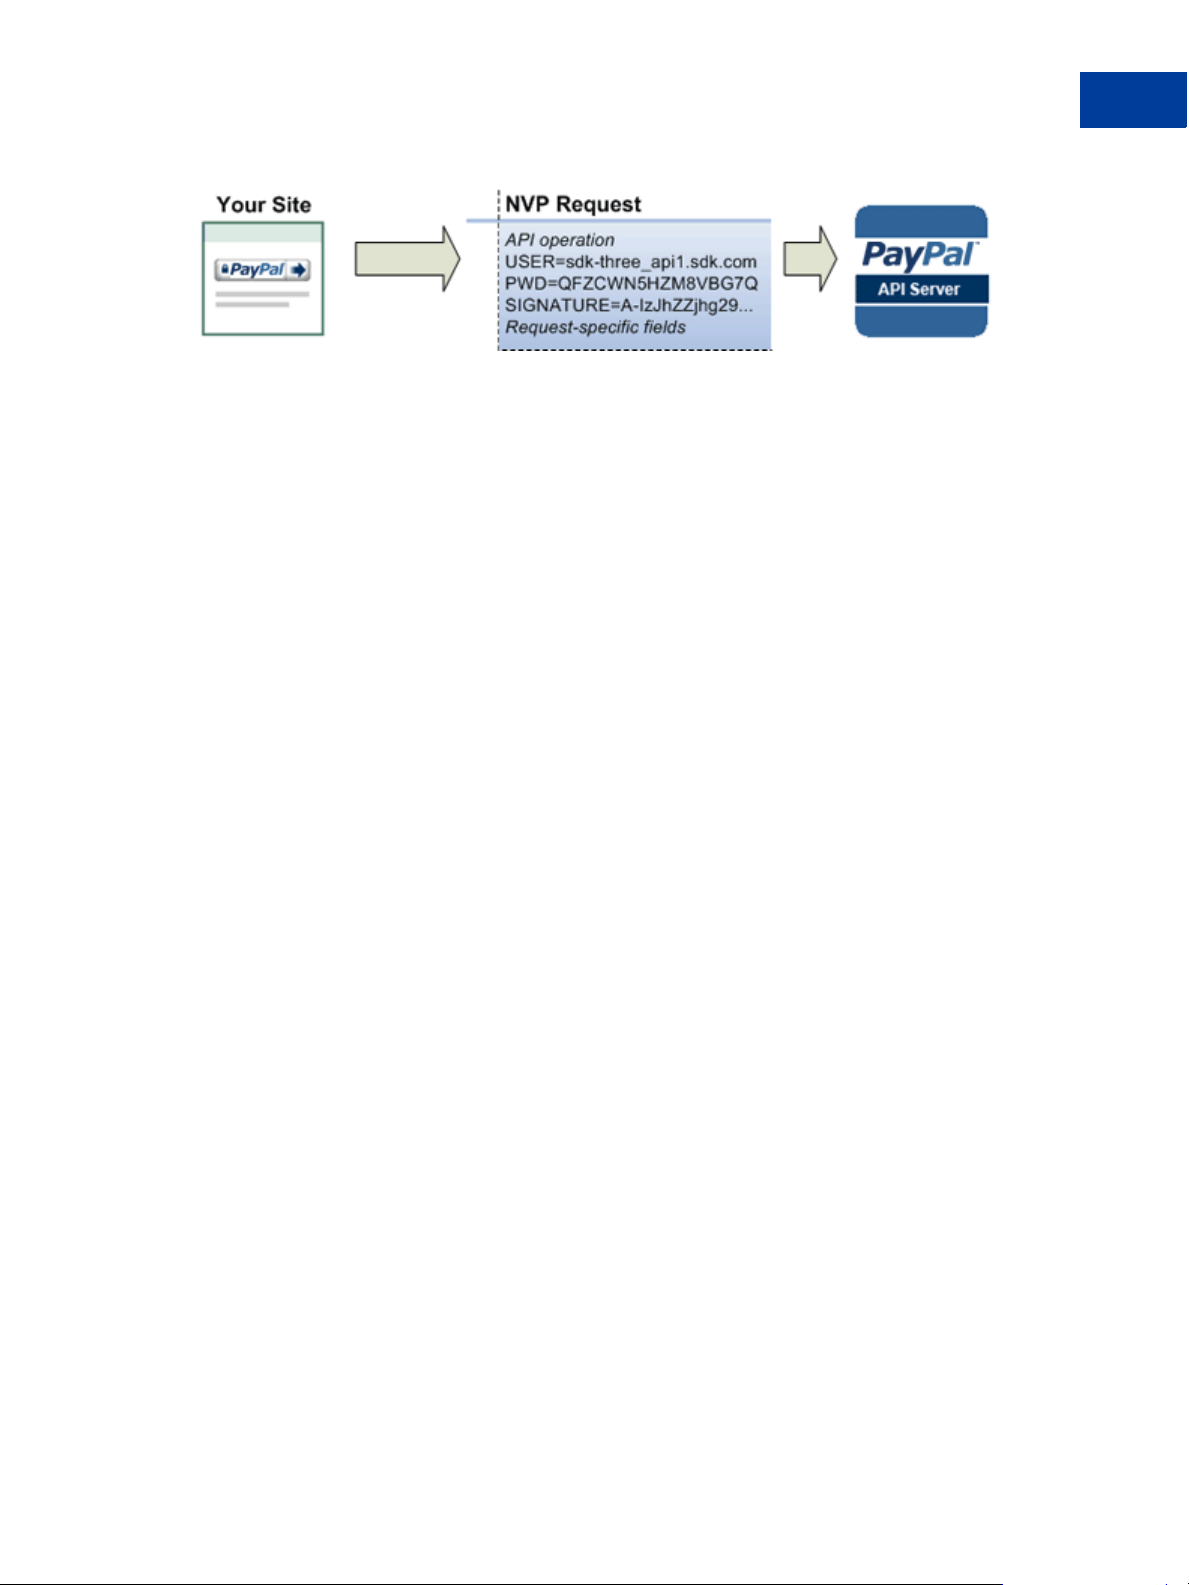
Creating an NVP Request
The Name-Value Pair request format specifies the API operation to perform, credentials that
authorize PayPal to access your account, and fields containing additional information to be
used in the request.
Express Checkout Integration Guide May 2010 31
Page 32

PayPal Name-Value Pair API Basics
3
Creating an NVP Request
Specifying the PayPal API Operation
For the NVP version of the PayPal API, you must specify the name of the PayPal API
operation to execute in each request along with the version of the API operation.
The following diagram shows the API operation part of an NVP request:
A method specifies the PayPal operation you want to execute and each method is associated
with a version. Together, the method and version define the exact behavior of the API
operation. Typically, the behavior of an API operation does not change between versions;
however, you should carefully retest your code whenever you change a version.
To specify a method and version number:
1. Choose the PayPal API operation you want to use.
METHOD=
operation
2. Choose the appropriate version.
In most cases, you should use the latest version of the API operation.
VERSION=
Example of setting the API operation and version using PHP
function PPHttpPost($methodNam e_, $nvpStr_) {
...
$version = urlencode('52.0'); // NVPRequest for submi tting to server
$nvpreq ="METHOD=$methodName_&V ERSION=$version... $nvpStr_";
...
}
version_number
Specifying an API Credential
You must specify API credentials in each request to execute a PayPal API operation.
When you execute a PayPal API operation, you use credentials, such as a signature, to
authenticate that you are requesting the API operation. The following diagram shows the API
credentials part of an NVP request:
32 May 2010 Express Checkout Integration Guide
Page 33
PayPal Name-Value Pair API Basics
To enable PayPal to authenticate your request
1. Spe cify the API user name associated with your account.
Creating an NVP Request
3
USER=
API_username
2. Specify the password associated with the API user name.
API_password
PWD=
3. If you are using an API signature and not an API certificate, specify the API signature
associated with the API username.
SIGNATURE=
Specifying Credentials using cURL
API_signature
The following example shows one way to specify a signature using cURL:
curl --insecure https://api-3t .sandbox.paypal.co m/nvp -d ^
"METHOD=DoDirectPayment^
&VERSION=56.0^
&USER=API_username^
&PWD=API_password^
&SIGNATURE=API_signatue^
&..."
NOTE: This example does not establish a secure connection and should not be used live on
paypal.com.
URL Encoding
All requests to execute PayPal API operations sent via HTTP must be URL encoded.
The PayPal NVP API uses the HTTP protocol to send requests and receive responses from a
PayPal API server. You must encode all data sent using the HTTP protocol because data that is
not encoded could be misinterpreted as part of the HTTP protocol instead of part of the
request. Most programming languages provide a way to encode strings in this way. You
should consistently URL encode the complete API request; otherwise, you may find that
unanticipated data causes an error.
NOTE: An HTTP form is automatically URL encoded by most browsers.
Express Checkout Integration Guide May 2010 33
Page 34

PayPal Name-Value Pair API Basics
3
Executing NVP API Operations
List Syntax for Name-Value Pairs
The PayPal API uses a special syntax for NVP fields defined as lists.
The NVP interface to the PayPal API requires a unique name for each field. In the API, lists
are prefixed by L_. T o identify an element within the list, use the offset from the beginning of
the list, starting with 0 as the first element. For example, L_DESC0 is the first line of a
description, L_DESC1, is the second line, and so on.
NOTE: Not all lists follow the L_ prefix convention; however, all lists start with 0 as the first
element.
Executing NVP API Operations
You execute an PayPal NVP API operation by submitting an HTTP POST request to a PayPal
API server.
Specifying a PayPal Server
You execute a PayPal API operation by submitting the request to a PayPal API server.
T o execute a PayPal NVP API operation, submit your complete request to one of the followi ng
end points:
Server end point Description
https://api3t.sandbox.paypal.com/nvp
https://api-3t.paypal.com/nvp PayPal “live” production server for use with API signatures
https://api.sandbox.paypal.com/ nvp Sandbox server for use with API certificates; use for testing
https://api.paypal.com/nvp PayPal “live” production server for use with API certificates
NOTE: You must use different API credentials for each server end point. Typically, you
obtain API credentials when you test in the Sandbox and then obtain another set of
credentials for the production server. You must change each API request to use the
new credentials when you go live.
Sandbox server for use with API signatures; use for testing your
API
your API
Logging API Operations
You should log basic information about each PayPal API operation you execute.
34 May 2010 Express Checkout Integration Guide
Page 35

All responses to PayPal API operations contain information that may be useful for debugging
purposes. You should log the Correlation ID, which identifies the API operation to PayPal,
and response-specific information, such as the transaction ID, which you can use to review a
transaction on the PayPal website or through the API. You can log other information that may
be useful, such as the timestamp. You could implement a scheme that logs the entire request
and response in a “verbose” mode; however, you should never log the password from a
request.
Responding to an NVP Response
The Name-Value Pair response consists of the answer to the request as well as common fields
that identify the API operation and how it was executed.
The following diagram shows fields in the response to a PayPal NVP API operation:
PayPal Name-Value Pair API Basics
Responding to an NVP Response
3
Common Response Fields
The PayPal API always returns common fields in addition to fields that are specific to the
requested PayPal API operation.
A PayPal API response includes the following fields:
Field D escription
ACK Acknowledgement status, which is one of the following values:
z Success indicates a successful operation.
z SuccessWithWarning indicates a successful operation; however, there are
messages returned in the response that you should examine.
z Failure indicates the operation failed; the response also contains one or more error
messages explaining the failure.
z FailureWithWarning indicates that the operation failed and that there are
messages returned in the response that you should examine
CORRELATIONID Correlation ID, which uniquely identifies the transaction to PayPal
TIMESTAMP The date and time that the requested API operation was performed
VERSION The version of the API
BUILD The sub-version of the API
Express Checkout Integration Guide May 2010 35
Page 36

PayPal Name-Value Pair API Basics
3
Responding to an NVP Response
URL Decoding
All responses to HTTP POST operations used by the PayPal NVP API must be decoded.
The PayPal NVP API uses the HTTP protocol to send requests and receive responses from a
PayPal API server. You must decode all data returned using the HTTP protocol so that it can
be displayed properly. Most programming languages provide a way to decode strings.
NOTE: Most browsers decode responses to HTTP requests automatically.
36 May 2010 Express Checkout Integration Guide
Page 37

Implementing the Simplest
4
Express Checkout Integration
The simplest Express Checkout integration requires the following PayPal API operations:
SetExpressCheckout, DoExpressCheckoutPa yment, and optionally,
GetExpressCheckoutDetails.
z Setting Up the Express Checkout Transaction
z Obtaining Express Checkout Transaction Details
z Completing the Express Checkout Transaction
Setting Up the Express Checkout Transaction
T o set up an Express Checkout transaction, you must invoke the SetExpressCheckout API
operation to provide sufficient information to initiate the payment flow and redirect to PayPal
if the operation was successful.
This example assumes that you have set up the mechanism you will use to communicate with
the PayPal server and have a PayPal business account with API credentials. It also assumes
that the payment action is a final sale.
When you set up an Express Checkout transaction, you specify values in the
SetExpressCheckout request and then call the API. The values you specify control the
PayPal page flow and the options available to you and your buyers. You should start by setting
up a standard Express Checkout transaction, which can be modified to include additional
options.
To set up the simplest standard Express Checkout transaction
1. Specify the amount of the transaction; include the currency if it is not in US dollars.
Specify the total amount of the transaction if it is known; otherwise, specify the subtotal.
Regardless of the specified currency, the format must have decimal point with exactly two
digits to the right and an optional thousands separator to the left, which must be a comma.
For example, EUR 2.000,00 must be specified as 2000.00 or 2,000.00. The specified amount
cannot exceed USD $10,000.00, regardless of the currency used.
AMT=amount
CURRENCYCODE=currencyID
Express Checkout Integration Guide May 2010 37
Page 38

Implementing the Simplest Express Checkout Integration
4
Setting Up the Express Checkout Transaction
2. Specify the return URL.
The return URL is the page to which PayPal redirects your buyer’s browser after the buyer
logs into PayPal and approves the payment. Typically, this is a secure page
(https://...) on your site.
NOTE: You can use the return URL to piggyback parameters between pages on your site.
For example, you can set your Return URL to specify additional parameters using
the https://www.
yourcompany.com/page.html?param=value... syntax. The
parameters become available as request parameters on the page specified by the
Return URL.
RETURNURL=return_url
3. Spe cify the cancel URL.
The cancel URL is the page to which PayPal redirects your buyer’s browser if the buyer
does not approve the payment. Typically, this is the secure page (https://...) on your
site from which you redirected the buyer to PayPal.
NOTE: You can pass SetExpressCheckout request values as parameters in your URL
to have the values available, if necessary, after PayPal redirects to your URL.
CANCELURL=cancel_url
4. Specify the payment action.
Although the default payment action is a Sale, it is a best practice to explicitly specify the
payment action as one of the following values:
PAYMENTACTION=Sale
PAYMENTACTION=Authorization
PAYMENTACTION=Order
5. Execute the SetExpressCheckout API operation to set up the Express Checkout
transaction.
6. Test that the response to the SetExpressCheckout API operation was successful.
7. If calling the SetExpressCheckout API was successful, redirect the buyer’s browser to
PayPal and execute the _express-che ckout command using the token returned in the
SetExpressCheckout response.
38 May 2010 Express Checkout Integration Guide
Page 39

Implementing the Simplest Express Checkout Integration
Obtaining Express Checkout Transaction Details
NOTE: The following example uses the PayPal Sandbox server:
https://www.sandbox.paypal.com /webscr
?cmd=_express-checkout&token=tokenV alue
&AMT=amount
&CURRENCYCODE=currencyID
&RETURNURL=return_url
&CANCELURL=cancel_url
Obtaining Express Checkout Transaction Details
To obtain details about an Express Checkout transaction, you can invoke the
GetExpressCheckoutDetails API operation.
This example assumes that PayPal redirects to your buyer’s browser with a valid token after
the buyer reviews the transaction on PayPal.
Although you are not required to invoke the GetExpressCh eckoutDetails API operation,
most Express Checkout implementations take this action to obtain information about the
buyer. You invoke the GetExpressCheckoutDetails API operation from the page
specified by return URL, which you set in your call to the SetExpressCheckout API.
Typically, you invoke this operation as soon as the redirect occurs and use the information in
the response to populate your review page.
4
To obtain a buyer’s shipping address and Payer ID
1. Specify the token returned by PayPal when it redirects the buyer’s browser to your site.
PayPal returns the token to use in the token HTTP request parameter when redirecting to
the URL you specified in your call to the SetExpressCheckout API.
TOKEN=tokenValue
2. Execute the GetExpressCheckoutDetails API to obtain information about the buyer.
3. Acc ess the fields in the GetExpressCheckoutDetails API response.
NOTE: Only populated fields are returned in the response.
Completing the Express Checkout Transaction
To complete an Express Checkout transaction, you must invoke the
DoExpressCheckoutPayment API operation.
This example assumes that PayPal redirects your buyer’s browser to your website with a valid
token after you call the SetExpressCheckout API. Optionally, you may call the
Express Checkout Integration Guide May 2010 39
Page 40

Implementing the Simplest Express Checkout Integration
4
Completing the Express Checkout Transaction
GetExpressCheckoutDetails API before calling the DoExpress CheckoutPayment
API.
In the simplest case, you set the total amount of the order when you call the
SetExpressCheckout API. However, you can change the amount before calling the
DoExpressCheckoutPayment API if you did not know the total amount when you called
the SetExpressCheckout API.
This example assumes the simplest case, in which the total amount was specified in the return
URL when calling the SetExpressCheckout API. Although you can specify additional
options, this example does not use any additional options.
To execute an Express Checkout transaction
1. Specify the token returned by PayPal when it redirects the buyer’s browser to your site.
PayPal returns the token to use in the token HTTP request parameter when redirecting to
the URL you specified in your call to the SetExpressCheckout API.
TOKEN=tokenValue
2. Spe cify the Payer ID returned by PayPal when it redirects the buyer’s browser to your site.
PayPal returns the Payer ID to use in the token HTTP request parameter when redirecting
to the URL you specified in your call to the SetExpressCheckout API. Optionally, you
can obtain the Payer ID by calling the GetExpressCheckoutDetails API.
PAYERID=id
3. Specify the amount of the order including shipping, handling, and tax; include the currency
if it is not in US dollars.
Regardless of the specified currency, the format must have decimal point with exactly two
digits to the right and an optional thousands separator to the left, which must be a comma;
for example, EUR 2.000,00 must be specified as 2000.00 or 2,000.00. The specified
amount cannot exceed USD $10,000.00, regardless of the currency used.
AMT=amount
CURRENCYCODE=currencyID
4. Specify the payment action.
Although the default payment action is a Sale, it is a best practice to explicitly specify the
payment action as one of the following values:
PAYMENTACTION=Sale
PAYMENTACTION=Authorization
PAYMENTACTION=Order
40 May 2010 Express Checkout Integration Guide
Page 41

Implementing the Simplest Express Checkout Integration
Completing the Express Checkout Transaction
5. Execute the DoExpressCheckoutPayment API to complete the Express Checkout
transaction.
6. Exa mine the values returned by the API if the transaction completed successfully.
4
Express Checkout Integration Guide May 2010 41
Page 42

Implementing the Simplest Express Checkout Integration
4
Completing the Express Checkout Transaction
42 May 2010 Express Checkout Integration Guide
Page 43

5
Testing an Express Checkout Integration
You can test your Express Checkout integration in the Sandbox.
This example shows how to simulate your web pages using HTTP forms and supplying the
values for API operations from these forms. You can use this strategy for your initial testing;
however, for more complete testing, you will want to replace these forms with your web pages
containing actual code.
The following diagram shows the Express Checkout execution flow, which uses the Sandbox
as the API server. The pages on the left represent your site.
Express Checkout Integration Guide May 2010 43
Page 44

Testing an Express Checkout Integration
5
Express Checkout Execution Flow
The following steps match the circled numbers in the diagram. Perform the actions in each
step to test Express Checkout.
1. Invoke a form on your site that calls the SetExpressCheckout API on the Sandbox.
To invo ke the API, set form fields whose names match the NVP names of the fields you want
to set, specify their corresponding values, and then post the form to a PayPal Sandbox server,
such as https://api-3t.sandbox.paypal.com/nvp, as shown in the following
example:
44 May 2010 Express Checkout Integration Guide
Page 45

Testing an Express Checkout Integration
<form method=post action=https ://api-3t.sandbox. paypal.com/nvp>
<input type=hidden name=USER v alue= API_username>
<input type=hidden name=PWD value= API_p assword>
<input type=hidden name=SIGNAT URE value= API_signature>
<input type=hidden name=VERSIO N value=52.0>
<input type=hidden name=PAYMENTACTI ON value=Sale>
<input name=AMT value=19.95>
<input type=hidden name=RETURNURL
value=http://www.YourReturnURL .com>
<input type=hidden name=CANCELURL
value=http://www.YourCancelURL .com>
<input type=submit name=METHOD value=SetExpressC heckout>
</form>
NOTE: The API username is a Sandbox business test account for which a signature exists. See
the Test Certificates tab of the Sandbox to obtain a signature. If you are not using a
signature, you must use a different Sandbox server.
2. Review the response string from the SetExpressCheckout API operation.
5
PayPal responds with a message, such as the one shown below. Note the status, which
should include ACK set to Success, and a token that is used in subsequent steps.
TIMESTAMP=2007%2d04%2d05T23%3a 23%3a07Z
&CORRELATIONID=63cdac0b67b50
&ACK=Success
&VERSION=52%2e000000
&BUILD=1%2e0006
&TOKEN=EC%2d1NK66318YB717835M
3. If the ope ration was successful, use the token and redirect your browser to the Sandbox to
log in, as follows:
https://www.sandbox.paypal.com /cgi-bin/webscr?
cmd=_express-checkout
&token=EC-1NK66318YB717835M
NOTE: The token in the command line is an HTTP request parameter and not the NVP
field; this parameter name must be lowercase.
You may need to replace hexadecimal codes with ASCII codes; for example, you may need
to replace %2d in the token with a hyphen ( - ).
You must log in to https://developer.paypal.com before you log in to a Sandbox
test account. You then log in to the test account that represents the buyer, not the
API_username business test account that represents you as the merchant.
4. After logging into the buyer test account, confirm the details.
When you confirm, the Sandbox redirects your browser to the return URL you specified
when invoking the SetExpressCheckout API operation, as in the following example:
Express Checkout Integration Guide May 2010 45
Page 46

Testing an Express Checkout Integration
5
http://www.YourReturnURL.com/
5. Invoke a form on your site that calls the GetExpressCheckoutDetails API operation
on the Sandbox:
<form method=post action=https ://api-3t.sandbox. paypal.com/nvp
<input type=hidden name=USER v alue=API_username>
<input type=hidden name=PWD value=API_p assword>
<input type=hidden name=SIGNAT URE value=API_signature>
<input type=hidden name=VERSIO N value=52.0>
<input name=TOKEN value=EC-1NK66318 YB717835M>
<input type=submit name=METHOD value=GetExpressC heckoutDetails>
</form>
If the operation was successful, the GetExpressCheckoutDetails API returns
information about the payer, such as the following information:
TIMESTAMP=2007%2d04%2d05T23%3a 44%3a11Z
&CORRELATIONID=6b174e9bac3b3 &ACK=Succes s
&VERSION=52%2e000000
&BUILD=1%2e0006
&TOKEN=EC%2d1NK66318YB717835M
&EMAIL=jsmith01@example.com
&PAYERID=7AKUSARZ7SAT8
&PAYERSTATUS=verified
&FIRSTNAME=...
&LASTNAME=...
&COUNTRYCODE=US
&BUSINESS=...
&SHIPTONAME=...
&SHIPTOSTREET=...
&SHIPTOCITY=...
&SHIPTOSTATE=CA
&SHIPTOCOUNTRYCODE=US
&SHIPTOCOUNTRYNAME=United%20St ates
&SHIPTOZIP=94666
&ADDRESSID=...
&ADDRESSSTATUS=Confirmed
?token=EC-1NK66318YB717835M&Pa yerID=7AKUSARZ7SAT8
6. Invoke a form on your site that invokes the DoExpressCheckoutPayment API operation
on the Sandbox:
46 May 2010 Express Checkout Integration Guide
Page 47

Testing an Express Checkout Integration
<form method=post action=https ://api-3t.sandbox. paypal.com/nvp>
<input type=hidden name=USER v alue=API_username>
<input type=hidden name=PWD value=API_p assword>
<input type=hidden name=SIGNAT URE value=API_signature>
<input type=hidden name=VERSIO N value=52.0>
<input type=hidden name=PAYMENTACTI ON value=Sale>
<input type=hidden name=PAYERI D value=7AKUSARZ7S AT8>
<input type=hidden name=TOKEN value= EC%2 d1NK66318YB717835M>
<input type=hidden name=AMT value= 19.95>
<input type=submit name=METHOD value=DoExpressCh eckoutPayment>
</form>
7. Review the response string from the DoExpressCheckoutPayment API operation.
If the operation was successful, the response should include ACK set to Success, as
follows:
TIMESTAMP=2007%2d04%2d05T23%3a 30%3a16Z
&CORRELATIONID=333fb808bb23 &ACK=Su ccess
&VERSION=52%2e000000
&BUILD=1%2e0006
&TOKEN=EC%2d1NK66318YB717835M
&TRANSACTIONID=043144440L48774 2J
&TRANSACTIONTYPE=expresschecko ut
&PAYMENTTYPE=instant
&ORDERTIME=2007%2d04%2d05T23%3 a30%3a14Z
&AMT=19%2e95
&CURRENCYCODE=USD
&TAXAMT=0%2e00
&PAYMENTSTATUS=Completed
&PENDINGREASON=None
&REASONCODE=None
&FEEAMT=0%2e43
5
Express Checkout Integration Guide May 2010 47
Page 48

Testing an Express Checkout Integration
5
48 May 2010 Express Checkout Integration Guide
Page 49

6
Customizing Express Checkout
You can specify options in Express Checkout API requests that change the appearance,
behavior, and flow of the checkout process.
z PayPal Review Page Order Details
z Providing Gift Options
z Getting Buyer Consent to Receive Promotional Email
z Providing Your Customer Servic e Number
z Adding a Survey Question
z PayPal Page Style
z Changing the Locale
z Handling Shipping Addresses
z Automatically Filling Out the PayPal Login Page
z Buyer Pays on PayPal
PayPal Review Page Order Details
NOTE: PayPal Review Page order details are available with API version 53.0 or later. The
DoExpressCheckoutPayment request includes the same order details as
SetExpressCheckout. It is strongly recommended that you submit the same
parameters in both API calls.
When a buyer logs into PayPal to check out, you can present the buyer with detailed
information about each item in the shopping cart (see PayPal Review page with order details):
(1) – Item name. The item name can identify this item to distinguish it from other line items in
the order.
(2) – Item number. Each item can be further identified by an item number. If the item is an
eBay auction item, it is recommended that you provide the eBay item number in this field.
(3) – Item description. This field identifies which of several items the buyer is purchasing. For
example, you may be offering an item in different sizes. Knowing the size helps the buyer
decide whether the one they selected was appropriate. If the item is an eBay auction item, it is
recommended that you provide the phrase “eBay item” in this field.
(4) – Item unit price. This field specifies exactly how much one unit of the item costs. It can be
a positive or negative value but not zero.
(5) – Item unit quantity. This field identifies the number of units the buyer is ordering.
Express Checkout Integration Guide May 2010 49
Page 50

Customizing Express Checkout
6
PayPal Review Page Order Details
PayPal calculates the value in the Amount (6) column as the product of line-item unit price
and line-item unit quantity.
You can also show other detailed information about the order:
(7) – Item total and tax. These are the respective total of all items in the order and the tax.
(8) – Shipping and handling. PayPal sums the shipping and handling amounts in this field.
(You determine actual shipping and handling amounts.)
(9) – Shipping discount. If the buyer is receiving a discount on shipping, the value appears as a
credit in this field.
(10) – Insurance. If there is insurance on shipping, the insurance fee is shown in this field.
(11) – Total. This is the total of the order, including shipping, handling, tax, and other price
adjustment-related items.
NOTE: The ‘Enter gift certificate, reward, or discount’ link enables the buyer to redeem
certificates, rewards, or discounts that PayPal issues. The link does not enable the
buyer to redeem incentives that you issue.
(12) – Note. You can allow the buyer to send you special instructions about the order in a text
box that appears when the buyer clicks this link.
50 May 2010 Express Checkout Integration Guide
Page 51

PayPal Review page with order details
Customizing Express Checkout
PayPal Review Page Order Details
6
Special Instructions to Merchant
You can allow the buyer to send you special instructions about an order. This feature is
especially helpful to buyers who want to customize merchandise. A buyer also might want to
tell you to ship their order at a later date because they are out of the country.
NOTE: Users of this feature should be sure to read the instructions the buyer sends.
This feature appears as the link just below th e item description on the PayPal Review page
(12). When the buyer clicks the Add special instructions to merchant link, a text box opens, as
shown in Special Instructions text box. After the buyer enters special instructions and clicks
Express Checkout Integration Guide May 2010 51
Page 52

Customizing Express Checkout
6
PayPal Review Page Order Details
Continue, the instructions are returned in the responses to GetExpressCheckoutDetails
and DoExpressCheckoutPayment.
Special Instructions text box
Integrating Order Details into the Express Checkout Flow
To integrate order de tails into the checkout flow, pass the Express Checkout parameters
described in SetExpressCheckout Order Details Parameters to SetExpressCheckout.
52 May 2010 Express Checkout Integration Guide
Page 53

Customizing Express Checkout
PayPal Review Page Order Details
SetExpressCheckout Order Details Parameters
NVP Field SOAP Field Description and Comments
L_NAMEn Name Item name.
L_NUMBERn Number Item number.
L_DESCn Description Item description.
The DESC (NVP) and OrderDescription (SOAP) fields still
exist for backwards compatibility. However, L_DESCn and
Description enable you to provide a more precise description for
each different item purchased such as hiking boots or cookin g
utensils rather than one general purpose description such as
camping supplies.
L_AMTn Amount Item unit price. PayPal calculates the product of the item unit price
and item unit quantity (below) in the Amount column of the PayPal
Review page, as shown in PayPal Review page with order details.
The item unit price can be a positive or a negative value but not 0.
You may provide a negative value to reflect a discount on an order,
for example.
6
L_QTYn Quantity Item unit quantity.
ITEMAMT ItemTotal Sum of cost of all items in this order.
TAXAMT TaxTotal Sum of tax for all items in this order.
SHIPPINGAMT ShippingTotal Total shipping cost for this order. PayPal calculates the sum of the
shipping cost and the handling cost (below) in the PayPal Review
page, as shown at (8) in PayPal Review page with order details.
Pass in a shipping amount that is reasonably accurate, because you
may need to change it later on your final checkout page. You might
assume, for example, the buyer lives in California because your
business is in California.
HANDLINGAMT HandlingTotal Total handling cost for this order. PayPal calculates the sum of the
handling cost and the shipping cost (above), as shown at (8) in
PayPal Review page with order details.
SHIPDISCAMT ShippingDiscountShipping discount for this order. You specify this value as a
negative number.
INSURANCEAMT InsuranceTotal Total shipping insurance cost for this order.
AMT OrderTotal Total of order, including sh ipping, handling, tax, and any other
billing adjustments such as a credit due.
ALLOWNOTE AllowNote Provide a value of 1 to indicate that the buyer may enter a note to
you on the PayPal Review page during checkout. See Special
Instructions text box.
The following example shows how to set the above parameters in the call to
SetExpressCheckout.
Express Checkout Integration Guide May 2010 53
Page 54

Customizing Express Checkout
6
PayPal Review Page Order Details
Request Parameters:
[requiredSecurityParameters]
&METHOD=SetExpressCheckout
&RETURNURL=http://...
&CANCELURL=http://...
&PAYMENTACTION=Sale
&NAME=J Smith
&SHIPTOSTREET=1 Main St
&SHIPTOCITY=San Jose
&SHIPTOSTATE=CA
&SHIPTOCOUNTRYCODE=US
&SHIPTOZIP=95131
&L_NAME0= 10% Decaf Kona Blend Coffee
&L_NUMBER 0=623083
&L_DESC0= Size: 8.8-oz
&L_AMT0=9 .95
&L_QTY0=2
&L_NAME1= Coffee Filter bags
&L_NUMBER 1=623084
&L_DESC1= Size: Two 24-piece bo xes
&L_AMT1=3 9.70
&L_QTY1=2
&ITEMAMT= 99.30
&TAXAMT=2 .58
&SHIPPING AMT=3.00
&HANDLING AMT=2.99
&SHIPDISC AMT=-3.00
&INSURANC EAMT=1.00
&AMT=105. 87
&CURRENCY CODE=USD
&ALLOWNOT E=1
Response Parameters
[successResponseFields]
&TOKEN=EC-17C76533PL706494P
You can provide values for any subset of the Express Checkout parameters shown in
SetExpressCheckout Order Details Parameters in the call to SetExpressCheckout.
If you pass the generic order description parameter (DESC) and any one line-item parameter
listed below, both parameter values display on the Review page. If you pass the generic order
description parameter (DESC) along with any two of the following line-item parameters, the
order description value does not display.
z L_NAMEn
z L_NUMBERn
z L_DESCn
If you pass in unit price information (L_AMTn) without passing in the unit quantity (L_QTYn),
the unit price will not display. To show both values, you must pass in values for both
parameters. You can pass in a value of 1 even if the item purchase is uncountable.
54 May 2010 Express Checkout Integration Guide
Page 55

eBay-Issued Incentives
If the buyer’s checkout includes eBay auction items, you must set additional fields in the call
to SetExpressCheckout to enable buyers to choose from eBay-issued incentives such as
eBay gift certificates, coupons, vouchers, and gift cards that may apply to their order.
To enable the display of eBay incentives on the PayPal Review page, you also must provide
line item detail information for each eBay item. When the buyer clicks the Enter gift
certificate, reward, or discount link, a dialog displays in which the buyer can either enter a
redemption code or select from a list of all discounts applicable to eBay items in the cart
display as shown below . If multiple items display, the buyer can select from the discounts they
want applied to their order.
Dialog for entering redemption code or choosing discounts
Customizing Express Checkout
PayPal Review Page Order Details
6
After entering a redemption code or selecting the incentives, the PayPal Review page reflects
changes to the order. Incentives appear as credits and a new Total is calculated as shown
below.
Express Checkout Integration Guide May 2010 55
Page 56

Customizing Express Checkout
6
PayPal Review Page Order Details
New Total after applying incentives
Integrating eBay Incentives into the Express Checkout Flow
To integrate eBay incentives into the checkout flow:
1. Pass the following parameters and settings in the call to SetExpressCheckout.
– PAYMENTACTION must be Sale
– CHANNELTYPE must be eBayItem
NOTE: For eBay auctions, you cannot set PAYMENTACTI ON to Authorization or
Order. You must set PAYMENTACTION to Sale.
2. For each eBay line item, do one of the following (mutually exclusive choices) in the call to
SetExpressCheckout and in the call to DoExpressCh eckoutPayment.
– For each individual eBay entry, pass the values returned by eBay when setting up the
auction item descriptions in the parameters below.
L_EBAYITEMNUMBERn and L_EBAYITEMAUCTIONT XNIDn
– For multiple eBay items offered as a single order, pass the value returned by eBay when
setting up the auction order description in the parameter below:
L_EBAYITEMORDERIDn
If you are selling on eBay, you are required to perform this step (preferably by setting
L_EBAYITEMNUMBERn and L_EBAYITEMAUCTIONT XNIDn) for the following reasons:
56 May 2010 Express Checkout Integration Guide
Page 57

Customizing Express Checkout
PayPal Review Page Order Details
– Buyer protection programs require it
– It enables buyers to see the transaction details in My eBay and in PayPal transaction
details
– It enables buyers to redeem coupons and incentives they may have received from eBay
NOTE: Passing the same order details and eBay incentive parameters in the call to
DoExpressCheckoutPayment as well as SetExpressCheckout ensures that this
information displays on the PayPal Review page and payment is properly reflected
in My eBay and in PayPal transaction details.
3. It is recommended that you pass the string “eBay item” in L_DESCn and the eBay Item
Number in L_NUMBERn.
4. If you host the final payment confirmation page on yo ur website by setting
useraction=continue in the redirect, you must show the discount amount resulting
from eBay incentives on that page. You can get the discount amount from the
PAYPALADJUSTMENT value returned in the response to GetExpressCheckoutDetails.
NOTE: eBay maintains detailed information about each item sold in eBay auctions. If you set
the value for SHIPPINGAMT in the call to SetExpressCheckout, for example, you
do not need to be concerned about the shipping cost for individual items. eBay
calculates incentives based on its database, not from the values you pass in the
SetExpressCheckout call.
6
The following SetExpressCheckout request example passes order details and eBay
incentives for two eBay auction items:
Express Checkout Integration Guide May 2010 57
Page 58

Customizing Express Checkout
6
Providing Gift Options
Request Parameters:
[requiredSecurityParameters]
&METHOD=SetExpressCheckout
&RETURNURL=http://coffee2go.co m
&CANCELURL=http://cancel.com
&PAYMENTA CTION=Sale
&EMAIL=jsmith01@example.com
&NAME=J Smith
&SHIPTOSTREET=1 Main St
&SHIPTOCITY=San Jose
&SHIPTOSTATE=CA
&SHIPTOCOUNTRYCODE=US
&SHIPTOZIP=95131
&L_NAME0=Photo
&L_NUMBER0=32768923
&L_DESC0=Plastic Frame- An EBa y item
&L_AMT0=25.00
&L_QTY0=1
&L_EBAYIT EMNUMBER0=32768923
&L_EBAYIT EMAUCTIONTXNID0=0
&L_NAME1=Nokia ND
&L_NUMBER1=32768924
&L_DESC1=Nokia Mobile- An EBay item
&L_AMT1=25.00
&L_QTY1=1
&L_EBAYIT EMNUMBER1=32768924
&L_EBAYIT EMAUCTIONTXNID1=72256 87004
&CHANNELT YPE=eBayItem
&ITEMAMT=50.00
&SHIPPINGAMT=3.00
&HANDLINGAMT=3.00
&AMT=56.00
&CURRENCYCODE=USD
&ALLOWNOTE=1
Response Parameters
[successResponseFields]
&TOKEN=EC-2HX34015EC629990M
Providing Gift Options
You can provide the buyer with gift options on the PayPal Review page.
NOTE: Gift options are available with API Version 61.0 or later. To use this feature, you must
implement line-item details. See “PayPal Review Page Order Details” on page 49 for
more information.
You can enable any of the following gift options:
58 May 2010 Express Checkout Integration Guide
Page 59

Customizing Express Checkout
Providing Gift Options
z Gift message — This feature displays a text box in which the buyer can enter a gift
message.
z Gift receipt — This feature provides a checkbox for the buyer to check if they would like a
gift receipt included.
z Gift wrap — This feature provides a checkbox for the buyer to check if they would like to
have the gift wrapped. The gift wrap feature can include a label describing the gift
wrapping, for example, “Decorator box and bow.” Optionally, you can provide the amount
to be charged to the buyer for gift wrapping.
The following SetExpressCheckout request example sets these options:
Request Parameters
[requiredSecurityParameters]
&METHOD=S etExpressCheckout
&RETURNURL=https://...
&CANCELURL=https://...
&AMT=10.00
&CURRENCYCODE=USD
&PAYMENTACTION=Sale
&GIFTMESS AGEENABLE=1
&GIFTRECE IPTENABLE=1
&GIFTWRAP ENABLE=1
&GIFTWRAP NAME="Bow and Ribbon"
&GIFTWRAP AMOUNT=6.00
6
Response Parameters
[successResponseFields]
&TOKEN=EC-17C76533PL706495P
The figure below shows how the gift options appear to the buyer on the PayPal Review page.
NOTE: You can also configure this option through the PayPal Profile page. For details, see the
Merchant Setup and Administration Guide.
Express Checkout Integration Guide May 2010 59
Page 60

Customizing Express Checkout
6
Getting Buyer Consent to Receive Promotional Email
Getting Buyer Consent to Receive Promotional Email
You can get the buyer ’s consent to receive email promotions on the PayPal Review page.
PayPal returns the email address that the buyer enters in the response to
GetExpressCheckoutDetails and DoExpressC heckoutPayment.
NOTE: This feature is available with API Version 61.0 or later.
To get the buyer’s email address, set the BUYEREMAILOPTINENABLE field to 1 in the call to
SetExpressCheckout.
The following request example sets this field:
Request Parameters
[requiredSecurityParameters]
&METHOD=S etExpressCheckout
&RETURNURL=https://...
&CANCELURL=https://...
&AMT=10.00
&CURRENCYCODE=USD
&PAYMENTACTION=Sale
&BUYEREMA ILOPTINENABLE=1
Response Parameters
[successResponseFields]
&TOKEN=EC-17C76533PL706495P
The figure below shows how this appears to the buyer on the PayPal Review page.
NOTE: You can also configure this feature through the PayPal Profile page. For details, see
Merchant Setup and Administration Guide.
the
Providing Your Customer Service Number
You can display your Customer Service number to the buyer on the PayPal Review page by
configuring it on the PayPal Profile page. By doing so, you can quickly answer the buyer’s
questions through a telephone call.
NOTE: This feature is available with API Version 61.0 or later.
To override the Customer Service number configured on the Profile page with a different
number on the PayPal Review page, set the CUSTOMERSERVICEN UMBER field in the call to
60 May 2010 Express Checkout Integration Guide
Page 61

Customizing Express Checkout
Adding a Survey Question
SetExpressCheckout. Provide an alphanumeric string that clearly identifies you as the
merchant.
The following request example sets this field:
Request Parameters
[requiredSecurityParameters]
&METHOD=S etExpressCheckout
&RETURNURL=https://...
&CANCELURL=https://...
&AMT=10.00
&CURRENCYCODE=USD
&PAYMENTACTION=Sale
&CUSTOMER SERVICENUMBER=1-800-F LOWERS
Response Parameters
[successResponseFields]
&TOKEN=EC-17C76533PL706494P
NOTE: For details on configuring the Customer Service number on the PayPal Profile page,
see the
Merchant Setup and Administration Guide.
6
Adding a Survey Question
You can add one survey question to the PayPal Review page. PayPal returns the response that
the buyer chooses in the response to GetExpressCheckoutDetails and
DoExpressCheckoutPayment.
NOTE: This feature is available with API Version 61.0 or later.
The survey question displays in the format of a text string. The buyer responds by selecting
from choices in a drop-down menu.
To enable the display of the survey question and choices, set the SURVEYENABLE field to 1 in
the call to SetExpressCheckout.
z Set the SURVEYENABLE field to 1 in the call to SetExpressCheckout.
z Set SURVEYQUESTION to the string containing your question.
z Provide at least two L_SURVEYCHOICEn options from which the buyer can select one.
The following request example sets these fields:
Express Checkout Integration Guide May 2010 61
Page 62

Customizing Express Checkout
6
PayPal Page Style
Request Parameters
[requiredSecurityParameters]
&METHOD=S etExpressCheckout
&RETURNURL=https://...
&CANCELURL=https://...
&AMT=10.00
&CURRENCYCODE=USD
&PAYMENTACTION=Sale
&SURVEYEN ABLE=1
&SURVEYQU ESTION="How did you h ear about us?"
&L_SURVEY CHOICE0="Through a fr iend"
&L_SURVEY CHOICE1="In a newspap er ad"
Response Parameters
[successResponseFields]
&TOKEN=EC-17C76533PL706495P
The figure below shows how the survey question appears to the buyer on the PayPal Review
page.
NOTE: You can also configure this feature through the PayPal Profile page. For details, see
Merchant Setup and Administration Guide.
the
PayPal Page Style
You can change the overall appearance of the PayPal review page by defining a custom page
style or by customizing individual page style characteristics.
You define a custom page style in the PayPal Profile and then pass the resulting page style
name in the call to SetExpressCheckout. Typically you customize individual page style
characteristics in the PayPal Profile as well. However, you can also call
SetExpressCheckout and pass in individual page characteristics dynamically.
Custom Page Style
When your buyer logs into PayPal to check out, you can make the PayPal pages the buyer sees
appear to have a similar look and feel to those on your website. You can customize any of
these page characteristics and save the results as a Page Style Name: Up to three unique Page
Style Names can be defined in your account. You can specify the following items:
z Header image
z Header border color
62 May 2010 Express Checkout Integration Guide
Page 63

Customizing Express Checkout
PayPal Page Style
z Header background color
z Page background color
For instructions on how to customize page styles and create Page Style Names, see the
Merchant Setup and Administration Guide.
To set a cust om page style in a call to SetExpressCheckout:
1. Include the optional PAGESTYLE parameter in the call to SetExpressCheckout.
2. Set PAGESTYLE to the Page Style Name you defined in your account.
The following example sets PAGESTYLE to the Page Style Name:
Request Parameters
[requiredSecurityParameters]
&METHOD=S etExpressCheckout
&RETURNURL=https://...
&CANCELURL=https://...
&AMT=10.00&CURRENCYCODE=USD
&PAYMENTACTION=Sale&
&PAGESTYL E=TestMerchant
&SHIPTOSTREET=1 Main St
SHIPTOSTREET2=
&SHIPTOCITY=San Jose
&SHIPTOSTATE=CA
&SHIPTOCOUNTRYCODE=US
&SHIPTOZIP=95131
&SHIPTOPHONENUM=408-967-4444
6
Response Parameters
[successResponseFields]
&TOKEN=EC-17C76533PL706494P
Individual Page Style Characteristics
Typically, you create a custom page style for the PayPal pages using the Custom Payment
Pages option from the PayPal Profile tab. In cases where you do not want to use the Profile
option, you can specify any of the individual page style characteristics:
z Header image
z Header border color
z Header background color
z Page background color
To define a header image such as your company logo:
1. Create a header image up to 750 pixels wide by 90 pixels high and save it in a valid
graphics format, such as .gif, .jpg, or .png.
Express Checkout Integration Guide May 2010 63
Page 64

Customizing Express Checkout
6
PayPal Page Style
2. Store the URL to the image on a secure (https) server so your buyer’s web browser does not
display a message that the payment contains insecure items.
3. Assign the URL to the HDRIMG parameter in the call to SetExpressCheckout.
The following example sets HDRIMG to a custom header image.
Request Parameters
[requiredSecurityParameters]
&METHOD=S etExpressCheckout
&RETURNURL=https://...
&CANCELURL=https://...
&AMT=10.00
&MAXAMT=
&PAYMENTACTION=Sale
&HDRIMG=h ttps://www.mayadeviim ports.com/ebay/web sitename-logo.gif
&SHIPTOSTREET=1 Main St
&SHIPTOCITY=San Jose
&SHIPTOSTATE=CA
&SHIPTOCOUNTRYCODE=US
&SHIPTOZIP=95131
&SHIPTOPHONENUM=408-967-4444
Response Parameters
[successResponseFields]
&TOKEN=EC-17C76533PL706494P
The figure below shows the review page with a custom header image set in the
SetExpressCheckout request.
64 May 2010 Express Checkout Integration Guide
Page 65

Review page with custom header image
Customizing Express Checkout
PayPal Page Style
6
The following example sets colors for the header background (HDRBACKCOLOR) and header
border (HDRBORDERCOLOR).
Request Parameters
[requiredSecurityParameters]
&METHOD=S etExpressCheckout
&RETURNURL=https://...
&CANCELURL=https://...
&AMT=10.00
&MAXAMT=
&PAYMENTACTION=Sale
&HDRBACKC OLOR=FFFF66
&HDRBORDE RCOLOR=996666
&SHIPTOSTREET=1 Main St
&SHIPTOCITY=San Jose
&SHIPTOSTATE=CA
&SHIPTOCOUNTRYCODE=US
&SHIPTOZIP=95131
&SHIPTOPHONENUM=408-967-4444
Express Checkout Integration Guide May 2010 65
Page 66

Customizing Express Checkout
6
Changing the Locale
Response Parameters
[successResponseFields]
&TOKEN=EC-17C76533PL706494P
The figure below shows the PayPal Login page with HDRBACKCOLOR and HDRB ORDERCOLOR
set to custom colors.
PayPal Login page with custom header background and bo rder c olors
Changing the Locale
You can change the locale of PayPal pages to match the language on your website.
To change the language displayed on the PayPal Login page, set the LOCALECODE parameter
to one of the following allowable values in the SetExpressCheckout call:
z AU
z DE
z FR
z GB
z IT
z ES
z JP
z US
66 May 2010 Express Checkout Integration Guide
Page 67

The following example sets LOCALCODE to ES (Spain).
Request Parameters
[requiredSecurityParameters]
&METHOD=S etExpressCheckout
&RETURNURL=https://...
&CANCELURL=https://...
&AMT=10.00
&CURRENCYCODE=EUR
PAYMENTACTION=Sale
&LOCALECO DE=ES
&SHIPTOSTREET=1 Main St
&SHIPTOSTREET2=
&SHIPTOCITY=San Jose
&SHIPTOSTATE=CA
&SHIPTOCOUNTRYCODE=US
&SHIPTOZIP=95131
&SHIPTOPHONENUM=408-967-4444
Response Parameters
[successResponseFields]
&TOKEN=EC-17C76533PL706494P
Customizing Express Checkout
Changing the Locale
6
The figure below shows the PayPal Login page when the LOCALECOD E is set to ES.
PayPal login page in Spanish
Express Checkout Integration Guide May 2010 67
Page 68

Customizing Express Checkout
6
Handling Shipping Addresses
Handling Shipping Addresses
You can specify several shipping address options that affect the PayPal Review page.
In your SetExpressCheckout request, you can specify the following options:
z Require a confirmed address
z Not display the shipping address on the review page
z Display an alternative address on the review page.
Confirmed Address
A confirmed address is a shipping address that PayPal has established as belonging to the
PayPal account holder. To be protected by PayPal’s Seller Protection Policy, you must require
the shipping address be a confirmed address.
NOTE: Because many buyers prefer to ship to a non-conf irmed address (they may, for
example, be shipping a gift to someone), PayPal does not recommend requiring a
confirmed address unless you are selling high-risk merchandise. If you prefer
confirmed addresses be used, then do not set ADDROVERRIDE, as described in
Shipping Address Override.
To require a confirmed address for the shipping address, ensure that the shipping address
matches the address on record with PayPal. Yo u can do this through your account profile, as
described in the Merchant Setup and Administration Guide. The guide is available on the
Documentation page linked to the Library tab on
Developer Central. Alternately, you can set a
flag in the call to SetExpressCheckout as described below:
1. Include the optional REQCONFIRMSHIPPING parameter in the call to
SetExpressCheckout.
2. Set REQCONFIRMSHIPPING to 1.
The following example requires the shipping address be a confirmed address.
NOTE: The value of REQCONFIRMSHIPPING overrides the setting in your Merchant Account
Profile.
68 May 2010 Express Checkout Integration Guide
Page 69

Customizing Express Checkout
Handling Shipping Addresses
Request Parameters
[requiredSecurityParameters]
&METHOD=S etExpressCheckout
&RETURNURL=https://...
&CANCELURL=https://...
&AMT=10.00
&PAYMENTACTION=Sale
&REQCONFI RMSHIPPING=1
&SHIPTOSTREET=1 Main St
&SHIPTOCITY=San Jose
&SHIPTOSTATE=CA
&SHIPTOCOUNTRYCODE=US
&SHIPTOZIP=95131
&SHIPTOPHONENUM=408-967-4444
Response Parameters
[successResponseFields]
&TOKEN=EC-6UA07551EA393551U
The figure below shows the PayPal review page when REQCONFIRMSHI PPING is set to 1.
6
Express Checkout Integration Guide May 2010 69
Page 70

Customizing Express Checkout
6
Handling Shipping Addresses
PayPal review page with a required address
Suppressing the Buyer’s Shipping Address
You can suppress the display of the buyer’s shipping address on the PayPal pages. You might
want to do this in these cases:
z You are selling a product or service that does not require shipping.
z You prefer to handle addresses completely on your own and do not want to let buyers
choose from their PayPal address book.
T o suppress the di splay of the buy er’s shipping address, set the NOSHIPPIN G parameter to 1 in
the call to SetExpressCheckout. No shipping address displays on the PayPal pages
whatsoever.
The following example suppresses the shipping address.
70 May 2010 Express Checkout Integration Guide
Page 71

Customizing Express Checkout
Handling Shipping Addresses
Request Parameters
[requiredSecurityParameters]
&METHOD=S etExpressCheckout
&RETURNURL=https://...
&CANCELURL=https://...
&AMT=10.00
&CURRENCYCODE=USD
&PAYMENTACTION=Sale
&NOSHIPPI NG=1
&SHIPTOSTREET=1 Main St
SHIPTOCITY=San Jose
&SHIPTOSTATE=CA
&SHIPTOCOUNTRYCODE=US
&SHIPTOZIP=95131
&SHIPTOPHONENUM=408-967-4444
Response Parameters
[successResponseFields]
&TOKEN=EC-17C76533PL706494P
The figure below shows the PayPal review page when NOSHIPPING is set to 1.
6
PayPal review page with shipping address suppressed
Express Checkout Integration Guide May 2010 71
Page 72

Customizing Express Checkout
6
Handling Shipping Addresses
Shipping Address Override
You can override the buyer’s shipping address stored on PayPal. You would want to do this if,
for example, your website registration already requested the buyer’s shipping address.
Overriding the shipping address stored on PayPal replaces it with one you specify in the call to
SetExpressCheckout. The buyer cannot edit the overridden address.
NOTE: If you prefer to override addresses, it is recommended that you do not set confirmed
addresses as required, as described in Confirmed Address.
To override the shipping address:
1. Set the ADDROVERRIDE parameter to 1 in the call to SetExpressCheckout.
2. Set the following shipping address parameters in the call to SetExpressCheckout to the
address values you want to use for the new address.
– SHIPTONAME
– SHIPTOSTREET
– SHIPTOCITY
– SHIPTOSTATE (Optional)
– SHIPTOCOUNTRYCODE
– SHIPTOZIP
– SHIPTOSTREET2 (Optional)
The following example overrides the shipping address with the address values shown.
Request Parameters
[requiredSecurityParameters]
&METHOD=S etExpressCheckout
&RETURNURL=https://...
&CANCELURL=https://...
AMT=10.00
&CURRENCYCODE=USD
&PAYMENTACTION=Sale
&ADDROVERRIDE=1
&SHIPTOST REET=1 Second St
&SHIPTOST REET2=Ste 210
&SHIPTOCI TY=San Jose
&SHIPTOST ATE=CA
&SHIPTOCO UNTRYCODE=US
&SHIPTOZI P=95131
&SHIPTOPHONENUM=408-967-4444
Response Parameters
[successResponseFields]
&TOKEN=EC-57K68322WE343022B
The figure below shows the PayPal Review page when the shipping address parameters are
overridden by the values shown in the above example.
72 May 2010 Express Checkout Integration Guide
Page 73

Automatically Filling Out the PayPal Login Page
PayPal review page with shipping address override
Customizing Express Checkout
6
Automatically Filling Out the PayPal Login Page
When you pass the buyer’s shipping address and contact information (telephone number and
email address) parameters in the call to SetExpressCheckout, PayPal automatically fills
out the account creation form fields for the buyer on the PayPal Login page.
After the call to SetExpressCheckout, the buyer is redirected to the PayPal Login page.
Buyers having a PayPal account can log in with their email address and password. Buyers who
do not have an account can create one by filling out the form on this page.
T o facilitate filling out the form, you can have PayPal automa tically fill out the billing address
and contact information by passing the shipping address, telephone number, and email address
in the call to SetExpressCheckout, as shown in the example below:
Express Checkout Integration Guide May 2010 73
Page 74

Customizing Express Checkout
6
Automatically Filling Out the PayPal Login Page
Request Parameters
[requiredSecurityParameters]
&METHOD=S etExpressCheckout
&RETURNURL=https://...
&CANCELURL=https://...
&AMT=10.00
&PAYMENTACTION=Sale
&SHIPTOST REET=1 Main Street
&SHIPTOCI TY=San Jose
&SHIPTOST ATE=CA
&SHIPTOCO UNTRYCODE=US
&SHIPTOZI P=95131
&EMAIL=js mith01@example.com
&SHIPTOPH ONENUM=408-559-5948
Response Parameters
[successResponseFields]
&TOKEN=EC-6UA07551EA393551U
As a convenience, PayPal fills out the billing address fields with the buyer’s shipping address
as shown in the example figure below. The buyer can edit the information by clicking the
Change links.
74 May 2010 Express Checkout Integration Guide
Page 75

Pre-populated PayPal Login page
Customizing Express Checkout
Buyer Pays on PayPal
6
Buyer Pays on PayPal
If you do not require the buyer to explicitly review and confirm the payment on your site, you
can configure Express Checkout such that the user commits the payment on PayPal. This
configuration reduces a step in the checkout flow.
You may want to eliminate your Review Your Payment page if there is no additional
information you want to collect from the buyer before he or she completes the transaction. It is
recommended that you collect the information after the buyer completes the purchase.
You should evaluate each Express Checkout flow separately through the cart page and through
the payment methods page. In most checkout flow implementations, the payment methods
page is the last page the buyer sees before committing to a transaction. If this is true in your
implementation, you can use this feature to streamline the buyer experience. The feature
informs the buyer that they are committing to the transaction if they proceed.
To invoke this feature, use the useraction variable in the SetExpressCheckout call.
Setting useraction to commit sets the button text on the PayPal Payment Review page to
Express Checkout Integration Guide May 2010 75
Page 76

Customizing Express Checkout
6
Buyer Pays on PayPal
read Pay Now. (After the buyer returns from the PayPal site, you must call
DoExpressCheckoutPayment to actually complete the transaction.)
To display Pay Now on the button:
1. Get the token from the response to SetExpressCheckout.
The response to SetExpressCheckout is the buyer’s token. For example, if the value of
RETURNURL passed to SetExpressCheckout is
https://www.websitename.com/snagECvalue s, the URL to which PayPal redirects
appears as https://www.websitename.com/snagECvalues?to ken=EC0W8920957N684880R
2. Add the token and the desired
useraction value (continue or commit) as name-value pairs
to the following URL:
https://www.paypal.com/cgi-bin/webscr?cmd=_express-
checkout&token=
valueFromSetExpressCheckoutResponse&useraction=commit
The figure below shows the PayPal Review page when useraction =commit.
PayPal review page when user commits to purchase on PayPal
76 May 2010 Express Checkout Integration Guide
Page 77

Implementing the Instant Update
7
API
The Instant Update API is a callback you can use to obtain the buyer’s shipping address.
z About the Instant Update API
z How the Callback Works in the Express Checkout Flow
z Following Instant Update API Best Practices
z Setting Up the Callback
z Using the Callback
About the Instant Update API
The Instant Update API is a server call to your callback server that instantly updates the
PayPal review page. It enables you to specify a URL for PayPal to call your callback server
with the buyer’s shipping address, so you can provide the buyer with more detailed shipping,
insurance, and tax information.
NOTE: The Instant Update API enhances the Express Checkout flow from the shopping cart
page.
Here is how the Instant Update API works:
1. When a buyer logs in to PayPal, the PayPal server calls your callback server with the
buyer’s default shipping address, which is stored in the PayPal system.
2. Your callback server responds with the shipping options available for that address, along
with any insurance options and tax adjustments on the order.
3. PayPal displays this information on the Review page so buyers can choose from the
options.
4. The buyer’s final choices are returned in the GetExpressCheckoutDetails response.
Integration Steps
Integrating the Instant Update API requires some preparation and modification to the Express
Checkout API calls.
To integrate the server API, follow these steps:
1. Set up a secure, fast web service to accept HTTP requests from PayPal. On the live site, it
needs to be secured by means of SSL.
2. Ena ble the callback service to proc ess PayPal requests and send back responses.
Express Checkout Integration Guide May 2010 77
Page 78

Implementing the Instant Update API
7
About the Instant Update API
3. Modify the existing Express Checkout API calls to accommodate new parameters.
– Send the callback URL, shipping, insurance, and tax information to PayPal in the call to
SetExpressCheckout.
– Call GetExpressCheckoutDeta ils to obtain the buyer’s final choices for shipping
and insurance, if applicable.
– Call DoExpressCheckoutPayme nt with the buyer’s final selections.
4. Eliminate your shipping options page.
5. Test your integration for the callback and flat-rate shipping options.
Post-Integration Checkout Experience
After you integrate the Instant Update API, you can display the shipping options, related
insurance options, and the tax amount on the PayPal Review page.
The shipping and insurance options appear in drop-down menus as shown below.
78 May 2010 Express Checkout Integration Guide
Page 79

Implementing the Instant Update API
About the Instant Update API
PayPal Review Page With Shipping Options, Insurance, and Tax
7
You control which options are displayed and instantly updated on the page.
Express Checkout Integration Guide May 2010 79
Page 80
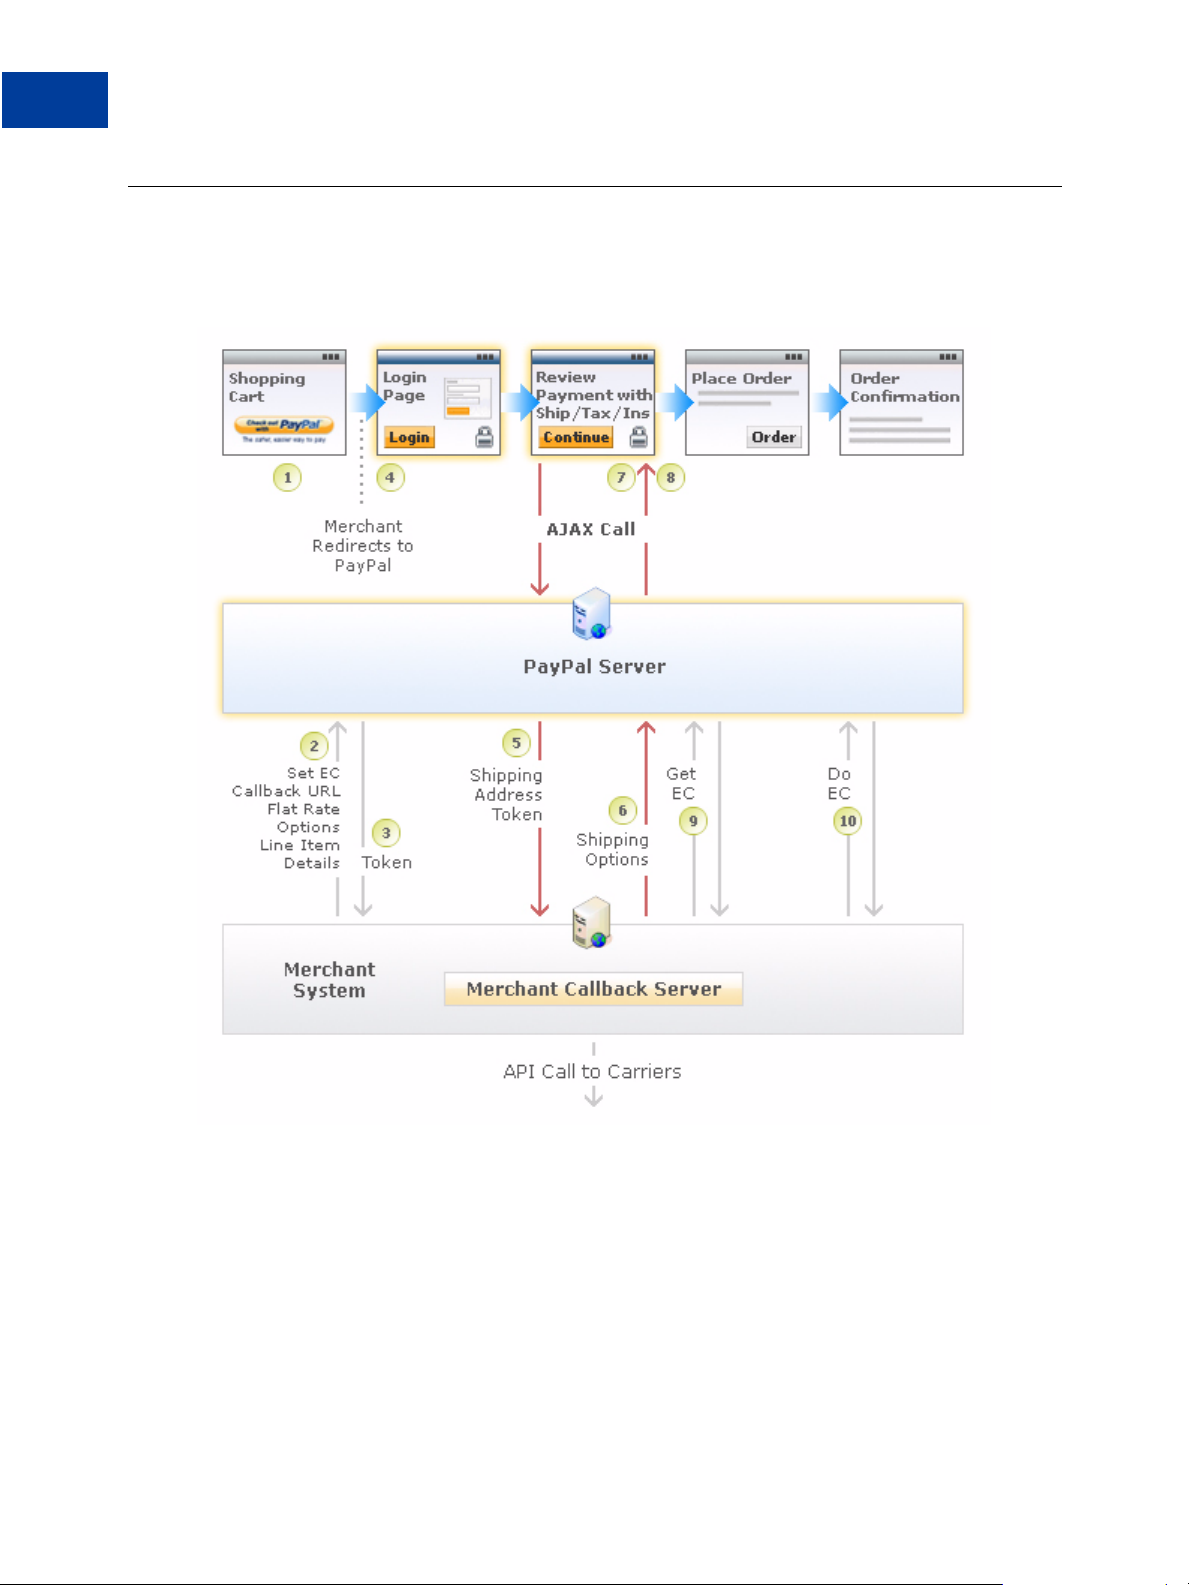
Implementing the Instant Update API
7
How the Callback Works in the Express Checkout Flow
How the Callback Works in the Express Checkout Flow
The figure below shows how the callback integrates into the Express Checkout flow.
Callback integrated into Express Checkout flow
From left to right, the following events are represented. Text in boldface describes events
supporting the callback.
1. The Express Checkout flow is initiated on your shopping cart page when the buyer clicks
the Checkout with PayPal button.
2. In the call to the SetExpressCheckout API operation, you provide the URL where
PayPal can call your callback server, the flat-rate shipping options, and cart line-item
details.
3. You receive a token in the response.
80 May 2010 Express Checkout Integration Guide
Page 81

Implementing the Instant Update API
Following Instant Update API Best Practices
4. The buyer is redirected to PayPal.
5. When the buyer first logs in to the PayPal site, PayPal obtains the buyer’s shipping address
and sends it in the callback request (red down arrow) to your callback server at the
specified URL.
NOTE: If the buyer changes their shipping address on the PayPal Review page, PayPal
will make subsequent calls to the callback request.
6. You respond to the callback (red up arrow) with the shipping option rates based on the
buyer’s shipping address. You can also adjust the tax amount and send insurance options.
Depending on your business processes, you may send an API call to your carrier to
calculate the rates and options based on the shipping address.
7. PayPal updates the Review Page to show the options and rates based on your response.
8. The buy er makes final selections and clicks Continue.
9. You must call GetEx pressCheckoutDetails to obtain the buyer’s final shipping
option selections.
10. You call DoExpressCheckoutPayment to perform the transaction.
7
Following Instant Update API Best Practices
PayPal recommends its list of best practices as a checklist for completing your implementation
of the Instant Update API.
z Meet the pre-requisites – Provide order line-item details to take advantage of the Instant
Update API. The example in this document uses the order line-item details example
described PayPal Review Page Order Details.
z Streamline the checkout flow – Existing partners and merchants with Express Checkout
integrations can eliminate the current shipping options page.
z Use the default callback timeout – Use the recommended 3-second callback response
timeout.
z Follow PayPal-defined semantics and syntax – Adhere to well-formed variable names
and syntax rules in the callback response to PayPal. If errors occur in the response, PayPal
uses the flat-rate shipping options.
z Call GetExpressCheckoutDetails – You must call GetExpressCheckoutDetails to
find out what options the buyer selected on the PayPal Review page.
z Ensure a consistent and good buyer experience – When flat-rate shipping options are
used, you should honor the rates to ensure a consistent and good buyer experience.
z Localize shipping options – Return localized shipping options, based on the buyer’s
country and locale, which PayPal sends in the callback request.
Express Checkout Integration Guide May 2010 81
Page 82

Implementing the Instant Update API
7
Setting Up the Callback
Setting Up the Callback
T o set up the callback, you establish a connection with PayPal by providing the location where
PayPal calls your callback server, along with your shipping options.
To start, you must build and operate a secure, reliable, and fast callback server that computes
shipping options, corresponding insurance options, and tax, based on your business rules. To
verify that callback requests originate from PayPal, check the IP addresses requests against the
list of IP addresses for *.paypal.com, as described in the
The HTTP protocol to specify in your callback URL depends on the integration environment
you are using:
z The callback URL must start with HTTPS for production integration.
z The callback URL must start with HTTP or HTTPS for PayPal Sandbox integration.
In the call to SetExpressCheckout, you must complete the steps 1 throug h 3 below. Steps 4
and 5 are optional:
1. Provide line-item details for the merchandise the buyer selected. For details on how to
integrate line-item details, see Chapter 7, “Customizing Express Checkout,” in the
Checkout Integration Guide.
go-live checklist.
Express
2. Provide the URL to your callback server. PayPal validates the URL as described above.
3. Provide values for the flat-rate shipping options. Fo r each option, specify:
– Option name (L_SHIPPINGOPTIO NNAMEn)
– Option amount (L_SHIPPING OPTIONAMOUNTn)
– The shipping option to appear in the drop-down menu as the default (true)
(L_SHIPPINGOPTIONISDEFAULTn).
NOTE: Set L_SHIPPINGOPTIONISDEFAULTn to true (default) for one and only one
shipping option. Set L_SHIPPINGOPTIONISDEFAULTn to false for each of the
remaining options.
– If required, an adjusted value for TAXAMT
– If required, an adjusted value INSURANCEAMT
4. If necessary to adjust the callback timeout (default: 3 seconds), provide a value from 1 to 6
for the CALLBACKTIMEOUT parameter.
5. Optionally, provide values for any of the shipping option description details fields listed
below:
– Option weight (L_ITEMWEIGHTVA LUEn, L_ITEMWEITHTUNITn)
– Option height (L_ITEMHEIGHT VALUEn, L_ITEMHEIGHTUNITn)
– Option length (L_ITEMLENGTH VALUEn, L_ITEMLENGTHUNITn)
– Option width (L_ITEM WIDTHVALUEn, L_ITEMWIDTHUNITn)
82 May 2010 Express Checkout Integration Guide
Page 83

Implementing the Instant Update API
Setting Up the Callback
GetExpressCheckoutDetails and DoExpressCheckoutPayment Changes
When you implement the callback, you need to call GetExpressCheckoutDetails and
DoExpressCheckoutPayment.
GetExpressCheckoutDetails and DoExpressC heckoutPayment include new
parameter fields in support of the Instant Update API.
You must call the GetExpressCheckoutDetails API operation to obtain the buyer’s final
shipping option selections. GetExpressCheckoutDetails has been updated to return the
buyer’s selections.
Because the cart information passed in the call to SetExpressCheckout is only relevant for
display on the PayPal Review page, you must call the DoExpressCheckoutPayment API
operation with the updated shipping, insurance, and tax data to ensure the buyer sees it upon
redirect to your website.
Other Considerations
When you implement the callback, there are other issues you must take into consideration.
7
These include:
z Callback response errors
z Minimum and maximum shipping options
z Callback times out
z You do not ship to the buyer’s shipping address
Callback Response Errors
If there are any callback response errors, PayPal responds by displaying the flat-rate shipping
options on the PayPal Review page. To obtain the richer set of options available through the
callback, exercise care in the syntax and values you specify and test the callback integration.
Minimum and Maximum Shipping Options
You can specify up to 10 shipping options for the flat-rate options in the call to
SetExpressCheckout and for the detailed options based on shipping address in the callback
response. You must specify at least 1 shipping option.
Callback Times Out
If the callback does not return within the timeout period, PayPal displays the flat-rate shipping
options you specified in the call to SetExpressCheckout in the drop-down menu on the
PayPal Review page.
The PayPal Review page in the figure below shows 2 shipping options from which the buyer
can choose if the callback times out. An amount of $1.00 is offered for insurance.
Express Checkout Integration Guide May 2010 83
Page 84

Implementing the Instant Update API
7
Setting Up the Callback
Example PayPal Review Page When Callback Times Out
You Do Not Ship to the Buyer ’s Shipping Address
If you do not ship to the buyer’s shipping address that PayPal sends in the callback request, set
NO_SHIPPING_OPTION_DETAILS to 1 in the callback response.
84 May 2010 Express Checkout Integration Guide
Page 85

Implementing the Instant Update API
Using the Callback
The sample code below illustrates the callback response when you do not ship to the buyer’s
address.
METHOD=CallbackResponse
NO_SHIPPING_OPTION_DETAILS=1
The figure below illustrates the PayPal Review page when your callback servers sends the
above response. The page has these features:
z A message at the top of the page describes the error.
z The shipping and handling section and the insurance section are dimmed.
z The buyer can change the shipping address.
z A new callback request is sent if the buyer changes the shipping address.
Example PayPal Review Page When You Do Not Ship to the Buyer’s Address
7
Using the Callback
To use the callback, you add parameter fields to SetExpressCheckout, provide PayPal a
URL for sending a callback request, and send PayPal the callback response in Name-Value
pair (NVP) format.
SetExpressCheckout
In the call to SetExpressCheckout, set the following parameters:
z Set the CALLBACK field to the URL where PayPal can call your callback server. PayPal
makes the HTTPS callback request each time either of the following events occur:
– The buyer changes their shipping address
Express Checkout Integration Guide May 2010 85
Page 86

Implementing the Instant Update API
7
Using the Callback
– The buyer enters a new shipping address
z Provide values for the following required parameters:
– Provide values for the line-item details parameters such as L_NAMEn, L_NUMBERn,
L_DESCn, L_AMTn, and L_QTYn shown in the example below.
– Provide values for the flat-rate shipping opt ions: n, L_SHIPPINGOPTIONISDEFAULTn,
L_SHIPPINGOPTIONNAMEn, and L_SHIPPINGOPTIONAMOU NTn.
–Set SHIPPINGAMT to the amount set for the default flat-rate shipping option.
If, for example, L_SHIPPINGISDEFAULT1=true and
L_SHIPPINGOPTIONAMOUNT1=8.00, then SHIPPINGAMT=8.00
–Set MAXAMT to the expected maximum total amount of the complete order.
It is recommended that the maximum total amount be slightly greater than the sum of
the line-item order details, tax, and the shipping option of greatest value.
z Optionally provide values for the following parameters:
–Set INSURANCEOPTIONOFFERED to true to inform PayPal that you are offering
insurance options. Otherwise, set INSURANCEOPTIONSOFFERED to false.
– Set line-item description details such as L_ITEMWEIGHT UNIT1 and
L_ITEMWEIGHTVALUE1 shown in the example below.
–Set CALLBACKTIMEOUT to the amount of time in seconds to process the callback. By
default, CALLBACKTIMEOUT is 3. You can specify a value in the range of 1 to 6
inclusive.
This is an example SetExpressCheckout request. The above parame ters appear in boldface
text.
86 May 2010 Express Checkout Integration Guide
Page 87

Implementing the Instant Update API
Request Parameters:
[requiredSecurityParameters]
&METHOD=SetExpressCheckout
&RETURNURL=http://...
&CANCELURL=http://...
&PAYMENTACTION=Sale
&NAME=J Smith
&SHIPTOSTREET=1 Main St
&SHIPTOCITY=San Jose
&SHIPTOSTATE=CA
&SHIPTOCOUNTRYCODE=US
&SHIPTOZIP=95131
&L_NAME0= 10% Decaf Kona Blend Coffee
&L_NUMBER 0=623083
&L_DESC0= Size: 8.8-oz
&L_AMT0=9 .95
&L_QTY0=2
&L_NAME1= Coffee Filter bags
&L_NUMBER 1=6230
&L_DESC1= Size: Two 24-piece bo xes
&L_AMT1=3 9.70
&L_QTY1=2
&L_ITEMWE IGHTVALUE1=0.5
&L_ITEMWE IGHTUNIT1=lbs
&ITEMAMT= 99.30
&TAXAMT=2 .59
&MAXAMT=1 50.00
&SHIPPING AMT=8.00
&SHIPDISC AMT=-3.00
&AMT=107. 89
&CURRENCY CODE=USD
&ALLOWNOT E=1
&CALLBACK =https://...
&CALLBACK TIMEOUT=4
&INSURANC EOPTIONOFFERED=true
&INSURANC EAMT=1.00
&L_SHIPPI NGOPTIONISDEFAULT0=fa lse
&L_SHIPPI NGOPTIONNAME0=UPS Gro und 7 Days
&L_SHIPPI NGOPTIONAMOUNT0=3.50
&L_SHIPPI NGOPTIONISDEFAULT1=tr ue
&L_SHIPPI NGOPTIONNAME1=UPS Nex t Day Air
&L_SHIPPI NGOPTIONAMOUNT1=8.00
Using the Callback
7
Response Parameters
[successResponseFields]
&TOKEN=EC-17C76533PL706494P
Express Checkout Integration Guide May 2010 87
Page 88

Implementing the Instant Update API
7
Using the Callback
Callback Request
The PayPal sends the parameters in the callback request to the location you specified for
CALLBACK. The callback request parameters include:
z Line-item details you sent in the call to SetExpressCheckout. PayPal also sends back
any line-item description details you may have specified such as the
L_ITEMWEIGHTUNIT1 and L_ITEMWEIGHTVALUE1 values shown in the example below.
By passing this data back to you, PayPal expedites your callback response by eliminating
the need for you to perform a database query to get this information.
z Shipping address of the buyer.
Using the information in the callback request, calculate the rates and options yourself or send
the information in an API call to your carrier to perform the calculations for you. Then send
the shipping options, insurance amounts, and taxes to PayPal in the callback response.
This is an example callback request.
METHOD=CallbackRequest
&CALLBACKVERSION=57.0
&TOKEN=EC-0EE85728D547104V
&CURRENCYCODE=USD
&LOCALECODE=en_US
&L_NAME0=10% Decaf Kona Blend Coffee
&L_NUMBER0=623083
&L_DESC0=Size: 8-oz
&L_AMT0=9.95
&L_QTY0=2
&L_NAME1=Coffee Filter bags
&L_NUMBER1=6230
&L_DESC1=Size: Two 24-piece bo xes
&L_AMT1=39.70
&L_QTY1=2
&L_ITEMWEIGHTUNIT1=lbs
&L_ITEMWEIGHTVALUE1=0.5
&SHIPTOSTREET=1 Main St
&SHIPTOCITY=San Jose
&SHIPTOSTATE=CA
&SHIPTOCOUNTRY=US
&SHIPTOZIP=95131
&SHIPTOSTREET2
Callback Response
Each time your callback server receives a request from PayPal, it must process the request and
respond with the appropriate details.
This is an example callback response.
88 May 2010 Express Checkout Integration Guide
Page 89

Implementing the Instant Update API
METHOD=CallbackResponse
&OFFERINSURANCEOPTION=true
&L_SHIPPINGOPTIONNAME0=UPS Nex t Day Air
&L_SHIPPINGOPTIONAMOUNT0=20.00
&L_TAXAMT0=2.20
&L_INSURANCEAMOUNT0=1.51
&L_SHIPPINGOPTIONISDEFAULT0=fa lse
&L_SHIPPINGOPTIONNAME1=UPS Exp ress 2 Days
&L_SHIPPINGOPTIONAMOUNT1=10.00
&L_TAXAMT1=2.00
&L_INSURANCEAMOUNT1=1.35
&L_SHIPPINGOPTIONISDEFAULT1=tr ue
&L_SHIPPINGOPTIONNAME2=UPS Ground 2 to 7 Days
&L_SHIPPINGOPTIONAMOUNT2=9.99
&L_TAXAMT2=1.99
&L_INSURANCEAMOUNT2=1.28
&L_SHIPPINGOPTIONISDEFAULT2=fa lse
Using the Callback
7
Express Checkout Integration Guide May 2010 89
Page 90

Implementing the Instant Update API
7
Using the Callback
90 May 2010 Express Checkout Integration Guide
Page 91

Immediate Payment
8
Immediate Payment ensures a buyer pays for a purchase immediately after commiting to it.
z “Overview of Immediate Payment” on page 91
z “About Immediate Payment For Third Party Checkout” on page 91
z “Integrating Immediate Payment for Third-Party Checkout” on page 93
z “About Immediate Payment For Express Checkout” on page 94
z “Integrating Immediate Payment for Express Checkout” on page 95
Overview of Immediate Payment
Immediate Payment supports instant funding sources only, ensuring that you receive payment
at the time the buyer commits to a purchase.
PayPal offers 2 applications of Immediate Payment. Use the one that is appropriate for your
integration:
z Immediate Payment for third-party checkout — For third parties who sell items on
eBay and host Express Checkout on their website.
z Immediate Payment for Express Checkout — For any merchant who integrates Express
Checkout.
About Immediate Payment For Third Party Checkout
Immediate Payment for third-party checkout ensures that the buyer pays for an item you are
selling on eBay at the time the buyer commits to it. You add a few Express Checkout
parameters to your integration and use your own off-eBay checkout flow.
NOTE: This feature is available with API version 60.0 and higher.
The SetExpressCheckout request parameters ensure the eBay item is available to ship to
the buyer when DoExpressCheckoutPayment is called. The successful transaction returns
the eBay transaction ID as an additional parameter value in the
DoExpressCheckoutPayment response.
NOTE: PayPal recommends that you do not mix eBay and non-eBay items in an Immediate
Payment Transaction.
Immediate Payment for third-party checkout has the following caveats:
Express Checkout Integration Guide May 2010 91
Page 92

Immediate Payment
8
About Immediate Payment For Third Party Checkout
z By design, it does not support non-instant funds like Electronic Funds Transfer , eCheck, or
ELV.
z It is limited to Express Checkout for eBay auctions only.
z It is limited to processing a single payment per transaction; the buyer can check out with
only one item at a time.
z Sale is the only payment action supported.
z It does inventory checking at eBay and attempts to purchase the item.
After the buyer selects the item on eBay, the buyer is redirected to your website Express
Checkout flow. The figure below shows how Immediate Pay ment for third-party checkout
integrates into your checkout flow.
From left to right, the following events are represented. The numbered callouts in the figure
directly correspond to the numbered comments below:
1. The eBay flow for third-party checkout redirects the buyer from an eBay payment review
page to your shopping cart page. On your shopping cart page, the buyer initiates Express
Checkout by clicking the Checkout with PayPal button.
92 May 2010 Express Checkout Integration Guide
Page 93

Immediate Payment
Integrating Immediate Payment for Third-Party Checkout
2. In the call to the SetExpressCheckout API operation, you must pass the following
Immediate Payment information:
– ALLOWEDPAYMENTMETHOD: This is the payment method type. For immediate payment,
the value is InstantPaymentOnly.
– BUYERUSERNAME: eBay provides you with this value.
– L_EBAYITEMCARTIDn: eBay provides you with this value.
Additionally, in the call to the SetExpressCheckout API operation, you must pass the
following Express Checkout API parameter data:
– CHANNELTYPE: The value of the channel type, which is eBayItem.
– L_EBAYITEMNUMBERn: This is the eBay item number.
– Buyer’s shipping address.
3. The SetExpressCheckout response returns a TOKEN.
4. The buyer is redirected to PayPal.
5. The buyer reviews their payment and clicks Continue.
8
6. (Optional) Call GetExpressCheckoutDetails. The GetExpressCheckoutDetails
response returns information about the buyer.
7. In the call to DoExpressCheckoutPayment, you must pass:
– ALLOWEDPAYMENTMETHOD: This is the payment method type. For immediate payment,
the value is InstantPaymentOnly.
– L_EBAYITEMCARTIDn: eBay provides you with this value.
At this time, PayPal checks the availability of the eBay item.
8. If the item is available and payment is successful, the DoExpressCheckoutPayment
response returns the eBay transaction ID (EBAYITEMAUCTIONTXNID).
Integrating Immediate Payment for Third-Party Checkout
To integrate Immediate Payment for third-party checkout into your Express Checkout
implementation, you add a few new fields to SetExpressCheck out and
DoExpressCheckoutPayment.
The Call to SetExpressCheckout
You must have Express Checkout integrated into your payment solution. It is recommended
that you sell one eBay item in a transaction or a quantity of the same item (considered a single
eBay listing).
Express Checkout Integration Guide May 2010 93
Page 94

Immediate Payment
8
About Immediate Payment For Express Checkout
To integrate Immediate Payment into the SetExpressCheckout call:
1. Set ALLOWEDPAYMENTMETHODTYPE to InstantPaymentOnly.
This blocks all pending funding sources and transactions that end up in a pending state.
2. Pass BUYERUSERNAME and L_EBAYITEMCARTIDn.
3. Set CHANNELTYPE to eBayItem.
4. Set L_EBAYITEMNUMBERn to the number of the eBay item.
5. Specify the buyer’s shipping address.
6. Be prepared to handle Immediate Payment errors.
For errors you choose to handle, you need to send the buyer error messages appropriate to the
situations generating the errors. For example, a buyer may have a mixed cart of eBay and noneBay items.To allow the buyer to check out just the non-Immediate Payment items, you must
provide an appropriate message to the buyer, remove the Immediate Payment item, and retry
the transaction.
The Call to DoExpressCheckoutPayment
To integrate Immediate Payment into the DoExpressCheckoutPayment call:
1. Set ALLOWEDPAYMENTMETHODTYPE to InstantPaymentOnly.
This blocks all pending funding sources and transactions that end up in a pending state.
2. Pass the L_EBAYITEMCARTIDn.
3. Be prepared to handle Immediate Payment errors.
For errors you choose to handle, you need to send the buyer error messages appropriate to
the situations generating the errors. Say, for example, you determine that the buyer has a
mixed cart of eBay and non-eBay items. To allow the buyer to check out just the nonImmediate Payment items, you must provide an appropriate message to the buyer, remove
the Immediate Payment item, and retry the transaction.
If payment is successful, the DoExpressCheckoutPayment response returns the eBay
transaction ID (EBAYITEMAUCTIONTXNID).
About Immediate Payment For Express Checkout
Immediate Payment for Express Checkout ensures the buyer pays for purchases at the time the
buyer commits. This application is available to any merchant integrating Express Checkout.
NOTE: This feature is available with API version 63.0 and higher.
94 May 2010 Express Checkout Integration Guide
Page 95

Immediate Payment
Integrating Immediate Payment for Express Checkout
Immediate Payment for Express Checkout has the following caveats:
z By design, it does not support non-instant funds like Electronic Funds Transfer , eCheck, or
ELV.
z It is open for use by all merchants, whether or not they are selling on eBay.
z Sale is the only payment action supported.
Integrating Immediate Payment for Express Checkout
Immediate Payment for Express Checkout requires that you specify one value for
ALLOWEDPAYMENTMETHOD in the Express Checkout API.
1. In the call to the SetExpressCheckout API operation, you set
ALLOWEDPAYMENTMETHOD to InstantPaymentOnly.
2. (Optional) You can call GetExpress CheckoutDetails to obtain information about the
buyer.
8
3. In the call to DoExpressCheckoutPayment, you set ALLOWEDPAYMENTMETHOD to
InstantPaymentOnly.
Express Checkout Integration Guide May 2010 95
Page 96

Immediate Payment
8
Integrating Immediate Payment for Express Checkout
96 May 2010 Express Checkout Integration Guide
Page 97

Implementing Parallel Payments
9
Not only can Express Checkout support payment between a single buyer and merchant, but it
can support parallel payments. Parallel payments enables a single buyer to pay multiple
merchants in a single checkout session.
z About Parallel Payments
z Name-Value Pair Syntax Supporting Parallel Payments
z Integrating Parallel Payments Using the NVP API
z Integrating Parallel Payments Using the SOAP API
NOTE: Parallel payments is available with API version 63.0 and later.
About Parallel Payments
Parallel payments enables buyers to pay multiple merchants on a marketplace in a single
Express Checkout session.
An online travel agency marketplace is a typical example of parallel payments in use. The
buyer purchases airline tickets and makes reservations from various merchants such as hotels,
car rental agencies, and entertainment venues hosted on the site. By implementing parallel
payments through Express Checkout, the marketplace host accepts PayPal as a payment
method. The host also provides the buyer with a consolidated order on the PayPal Review
page, summarizing expenses, itineraries, and other supporting information. Buyers see travel
information, including cancellation fees, directly from the supplier on the Transaction Details
page and in an email message.
What Is and What Is Not Supported
Parallel payments:
z Supports orders that you later capture with the Authorization and Capture APIs
z Supports up to10 payments in one Express Checkout session
NOTE: The same merchant can receive multiple payments in one Express Checkout
session.
z Does not support use of the Instant Update API (callback)
z Does not support Accelerated Boarding (however single-payment transactions are still
supported)
z Does not support parallel billing agreements
Express Checkout Integration Guide May 2010 97
Page 98

Implementing Parallel Payments
9
About Parallel Payments
Post-Integration Experience
After you integrate parallel payments, the PayPal Review page shows summary information
for each payment. The example below shows summary information for an online travel agency
with payments to an airline and a hotel.
The figure below shows expanded details on the airline purchase.
The figure below shows expanded details on the hotel payment.
98 May 2010 Express Checkout Integration Guide
Page 99

Implementing Parallel Payments
Name-Value Pair Syntax Supporting Parallel Payments
9
Name-Value Pair Syntax Supporting Parallel Payments
The PayPal API uses a special syntax for NVP fields to support parallel payments.
The NVP interface to the PayPal API supports up to a maximum of 10 parallel payments in a
transaction. To accommodate this, request fields have the format shown below, where
number in the range 0 to 9 representing a payment.
PAYMENTREQUEST_
The first numbered field in a list of payments starts with n equal to 0, the second field has n
equal to 1, and so forth. If you are upgrading to version 63.0 of the Express Checkout API, you
will recognize
The response name format is:
PAYMENTREQUEST_
NOTE: Even if your Express Checkout integration is for single payments, you must use this
format and specify
Checkout API.
The payment information returned in the DoExpressCheckoutPa yment response has the
same basic format but the field name starts with PAYMENTINFO, as shown below:
PAYMENTINFO_
The NVP API reference documentation shows the proper format and naming for every NVP
field that uses this syntax.
n_NVPREQUESTFIELDNAME
NVPREQUESTFIELDNAME to be the single-payment NVP request field name.
n_NVPRESPONSEFIELDNAME
n=0 for single payment with version 63.0 and later of the Express
n_NVPRESPONSEFIELDNAME
n is a
Examples:
Express Checkout Integration Guide May 2010 99
Page 100

Implementing Parallel Payments
9
Integrating Parallel Payments Using the NVP API
The following syntax represents the total amount of the first payment:
PAYMENTREQUEST_0_AMT
The following represents the second line of the name for the third payment:
L_PAYMENTREQUEST_2_NAME1
Integrating Parallel Payments Using the NVP API
To integrate parallel payments using the NVP API, you need to use the syntax for creating
unique NVP request field names and create a unique set of fields for each payment. You also
need to set a few required variables.
To integrate parallel payments using the NVP interface to Express Checkout:
1. Create a unique set of NVP request fields for each payment you will be hosting on your
marketplace using the syntax PAYMENTREQUEST_
a value from 0 - 9.
n_NVPREQUESTFIELDNAME where n is
2. You are required to pass values in the following Payment Details Type fields in the call to
SetExpressCheckout and DoExpressChecko utPayment. For each of the
n payments
you host:
– Pass the value Order in PAYMENTREQUEST_
– Pass a unique value for PAYMENTREQUEST_
n_PAYMENTACT ION.
n_PAYMENTR EQUESTID. You will use this
value to locate the matching payment response details for that payment.
– Pass the merchant’s Payer Id (secure merchant account Id) or the merchant’s email
address in PAYMENTREQUEST_
n_SELLERPAYPALACCOUNTID.
3. Use the Payment Details Item Type fields as appropriate in the call to
SetExpressCheckout and DoExpressCheckout Payment to pass data about each
payment.
Result:
For each payment in the transaction, the DoExpressCheckoutPayment response returns:
z A PAYMENTINFO_n_PAYMENTREQUESTID value matching the
PAYMENTREQUEST_
n_PAYMENTREQUESTID value you passed in the
DoExpressCheckoutPayment request. Use this value to locate the response data for
each payment.
z A PAYMENTINFO_n_SELLERPAYPALACCOUNTID. This value is whichever one of the
following values was passed in:
– The merchant’s email address
100 May 2010 Express Checkout Integration Guide
 Loading...