

Page 1

Digital Goods
Integration Guide - EC
Edition
Last updated: January 2012
Page 2

Digital Goods Integration Guide - Express Checkout Edition
Document Number: 10118.en_US-201201
© 2012 PayPal, Inc. All rights reserved. PayPal is a registered trademark of PayPal, Inc. The PayPal logo is a trademark of PayPal, Inc. Other
trademarks and brands are the property of their respective owners.
The information in this document belongs to PayPal, Inc. It may not be used, reproduced or disclosed without the written approval of PayPal, Inc.
Copyright © PayPal. All rights reserved. PayPal S.à r.l. et Cie, S.C.A., Société en Commandite par Actions. Registered office: 22-24 Boulevard Royal, L2449, Luxembourg, R.C.S. Luxembourg B 118 349
Consumer advisory: The PayPal™ payment service is regarded as a stored value facility under Singapore law. As such, it does not require the approval
of the Monetary Authority of Singapore. You are advised to read the terms and conditions carefully.
Notice of non-liability:
PayPal, Inc. is providing the information i n this document t o you “AS-IS” with all faults. PayPal, Inc. makes no warranties of any kind (whether express,
implied or statutory) with respect to the information co ntained herein. PayPal, Inc. assumes no liability for damages (whether direct or indirect), caused
by errors or omissions, or resulting from the use of this document or the information contained in this document or resulting f rom the application or use
of the product or service described herein. PayPal, Inc. reserves the right to make changes to any information herein without further notice.
Page 3

Contents
Preface . . . . . . . . . . . . . . . . . . . . . . . . . . . . . . . . . . 7
About This Guide. . . . . . . . . . . . . . . . . . . . . . . . . . . . . . . . . . . . . . . . 7
Intended Audience . . . . . . . . . . . . . . . . . . . . . . . . . . . . . . . . . . . . . . . 7
Where to Go for More Information . . . . . . . . . . . . . . . . . . . . . . . . . . . . . . . 7
Documentation Feedback . . . . . . . . . . . . . . . . . . . . . . . . . . . . . . . . . . . 7
Chapter 1 Introducing Digital Goods for Express Checkout . . . . . . 9
Introducing Digital Goods Payments. . . . . . . . . . . . . . . . . . . . . . . . . . . . . . 9
Express Checkout Buttons. . . . . . . . . . . . . . . . . . . . . . . . . . . . . . . . 10
Digital Goods Payments In More Detail . . . . . . . . . . . . . . . . . . . . . . . . . 10
Digital Goods Flows . . . . . . . . . . . . . . . . . . . . . . . . . . . . . . . . . . . 11
Other Payments Features That Digital Goods Supports. . . . . . . . . . . . . . . . . 16
After Performing Digital Goods Transactions . . . . . . . . . . . . . . . . . . . . . . 16
Features Not Supported With Digital Goods. . . . . . . . . . . . . . . . . . . . . . . 16
Other Digital Goods Caveats . . . . . . . . . . . . . . . . . . . . . . . . . . . . . . 18
Chapter 2 Integrating Digital Goods for Express Checkout . . . . . .19
Overview of Digital Goods Integration . . . . . . . . . . . . . . . . . . . . . . . . . . . . 19
Integrating Digital Goods Payments With Express Checkout . . . . . . . . . . . . . . . . 22
Setting Up A Digital Goods Payment Transaction. . . . . . . . . . . . . . . . . . . . 22
Redirecting the Buyer to PayPal. . . . . . . . . . . . . . . . . . . . . . . . . . . . . 24
After PayPal Redirects the Buyer To Your Web Page . . . . . . . . . . . . . . . . . . 25
Completing the Digital Goods Transaction. . . . . . . . . . . . . . . . . . . . . . . . 25
Setting Up Web Pages To Invoke the Digital Goods Payments Flow . . . . . . . . . . 26
Chapter 3 Issuing Refunds . . . . . . . . . . . . . . . . . . . . . . .31
Chapter 4 Handling Recurring Payments . . . . . . . . . . . . . . . .33
How Recurring Payments Work . . . . . . . . . . . . . . . . . . . . . . . . . . . . . . . 33
Limitations . . . . . . . . . . . . . . . . . . . . . . . . . . . . . . . . . . . . . . . . 34
Recurring Payments Terms . . . . . . . . . . . . . . . . . . . . . . . . . . . . . . . . . 34
Options for Creating a Recurring Payments Profile . . . . . . . . . . . . . . . . . . . . . 35
Digital Goods Integration Guide - EC Edition January 2012 3
Page 4

Contents
Specifying the Regular Payment Period . . . . . . . . . . . . . . . . . . . . . . . . . 35
Including an Optional Trial Period . . . . . . . . . . . . . . . . . . . . . . . . . . . . 36
Specifying an Initial Payment . . . . . . . . . . . . . . . . . . . . . . . . . . . . . . 36
Maximum Number of Failed Payments . . . . . . . . . . . . . . . . . . . . . . . . . 37
Billing the Outstanding Amount . . . . . . . . . . . . . . . . . . . . . . . . . . . . . 37
Identifying Items as Digital or Physical Goods. . . . . . . . . . . . . . . . . . . . . . 37
Recurring Payments With the Express Checkout API . . . . . . . . . . . . . . . . . . . . 38
Initiating the Processing Flow With SetExpressCheckout . . . . . . . . . . . . . . . 41
Redirecting the Buyer to PayPal. . . . . . . . . . . . . . . . . . . . . . . . . . . . . 42
Getting Buyer Details Using GetExpressCheckoutDetails. . . . . . . . . . . . . . . . 42
Creating the Profiles With CreateRecurringPaymentsProfile . . . . . . . . . . . . . . 42
Recurring Payments Profile Status. . . . . . . . . . . . . . . . . . . . . . . . . . . . . . 44
Getting Recurring Payments Profile Information. . . . . . . . . . . . . . . . . . . . . . . 44
Modifying a Recurring Payments Profile. . . . . . . . . . . . . . . . . . . . . . . . . . . 45
Updating Addresses . . . . . . . . . . . . . . . . . . . . . . . . . . . . . . . . . . . 46
Updating the Billing Amount . . . . . . . . . . . . . . . . . . . . . . . . . . . . . . . 46
Billing the Outstanding Amount of a Profile . . . . . . . . . . . . . . . . . . . . . . . . . 46
Recurring Payments Notifications . . . . . . . . . . . . . . . . . . . . . . . . . . . . . . 47
Appendix A Options For Closing the Lightbox or Mini-browser . . . . . 49
Reloading Parent Page to a Specific URL . . . . . . . . . . . . . . . . . . . . . . . . . . 49
Reloading Parent Page by Removing Frames. . . . . . . . . . . . . . . . . . . . . . . . 50
Appendix B Methods For Integrating Digital Goods Into Flash . . . . .51
Integrating Digital Goods With Flash. . . . . . . . . . . . . . . . . . . . . . . . . . . . . 51
Integrating Digital Goods With Flash - Third-Party Merchant . . . . . . . . . . . . . . . . 51
Appendix C Express Checkout API Fields Supported By Digital Goods .53
Express Checkout NVP API Fields Supported By Digital Goods . . . . . . . . . . . . . . 53
SetExpressCheckout NVP Request Fields . . . . . . . . . . . . . . . . . . . . . . . 53
SetExpressCheckout NVP Response Fields . . . . . . . . . . . . . . . . . . . . . . 54
GetExpressCheckoutDetails NVP Request Fields . . . . . . . . . . . . . . . . . . . 54
GetExpressCheckoutDetails NVP Response Fields . . . . . . . . . . . . . . . . . . 54
DoExpressCheckoutPayment NVP Request Fields . . . . . . . . . . . . . . . . . . . 56
DoExpressCheckoutPayment NVP Response Fields . . . . . . . . . . . . . . . . . . 56
Express Checkout SOAP API Fields Supported By Digital Goods . . . . . . . . . . . . . 57
SetExpressCheckout SOAP Request Fields . . . . . . . . . . . . . . . . . . . . . . 57
4 January 2012 Digital Goods Integration Guide - EC Edition
Page 5

Contents
SetExpressCheckout SOAP Response Fields . . . . . . . . . . . . . . . . . . . . . 58
GetExpressCheckoutDetails SOAP Request Fields . . . . . . . . . . . . . . . . . . 58
GetExpressCheckoutDetails SOAP Response Fields . . . . . . . . . . . . . . . . . 59
DoExpressCheckoutPayment SOAP Request Fields . . . . . . . . . . . . . . . . . . 60
DoExpressCheckoutPayment SOAP Response Fields . . . . . . . . . . . . . . . . . 61
Revision History. . . . . . . . . . . . . . . . . . . . . . . . . . . . . . 63
Digital Goods Integration Guide - EC Edition January 2012 5
Page 6

Contents
6 January 2012 Digital Goods Integration Guide - EC Edition
Page 7

Preface
About This Guide
Digital Goods Integration Guide - Express Checkout Edition describes how to implement
PayPal for Digital Goods.
Intended Audience
This document is intended for developers implementing PayPal for Digital Goods using the
Express Checkout API.
Where to Go for More Information
Merchant Setup and Administration Guide
Documentation Feedback
Help us improve this guide by sending feedback to:
documentationfeedback@paypal.com
Digital Goods Integration Guide - EC Edition January 2012 7
Page 8

Documentation Feedback
8 January 2012 Digital Goods Integration Guide - EC Edition
Page 9
Introducing Digital Goods for
1
Express Checkout
Digital Goods for Express Checkout streamlines the checkout process for buyers and keeps
buyers on your website.
“Introducing Digital Goods Payments” on page 9
Introducing Digital Goods Payments
Digital goods payments combine JavaScript with the Express Checkout API to streamline the
checkout process for buyers of digital goods.
Digital goods are items such as e-books, music files, and digital images distributed in
electronic format. The buyer can conveniently purchase digital goods during checkout with a
minimum of clicks without leaving your website or interrupting their online activities.
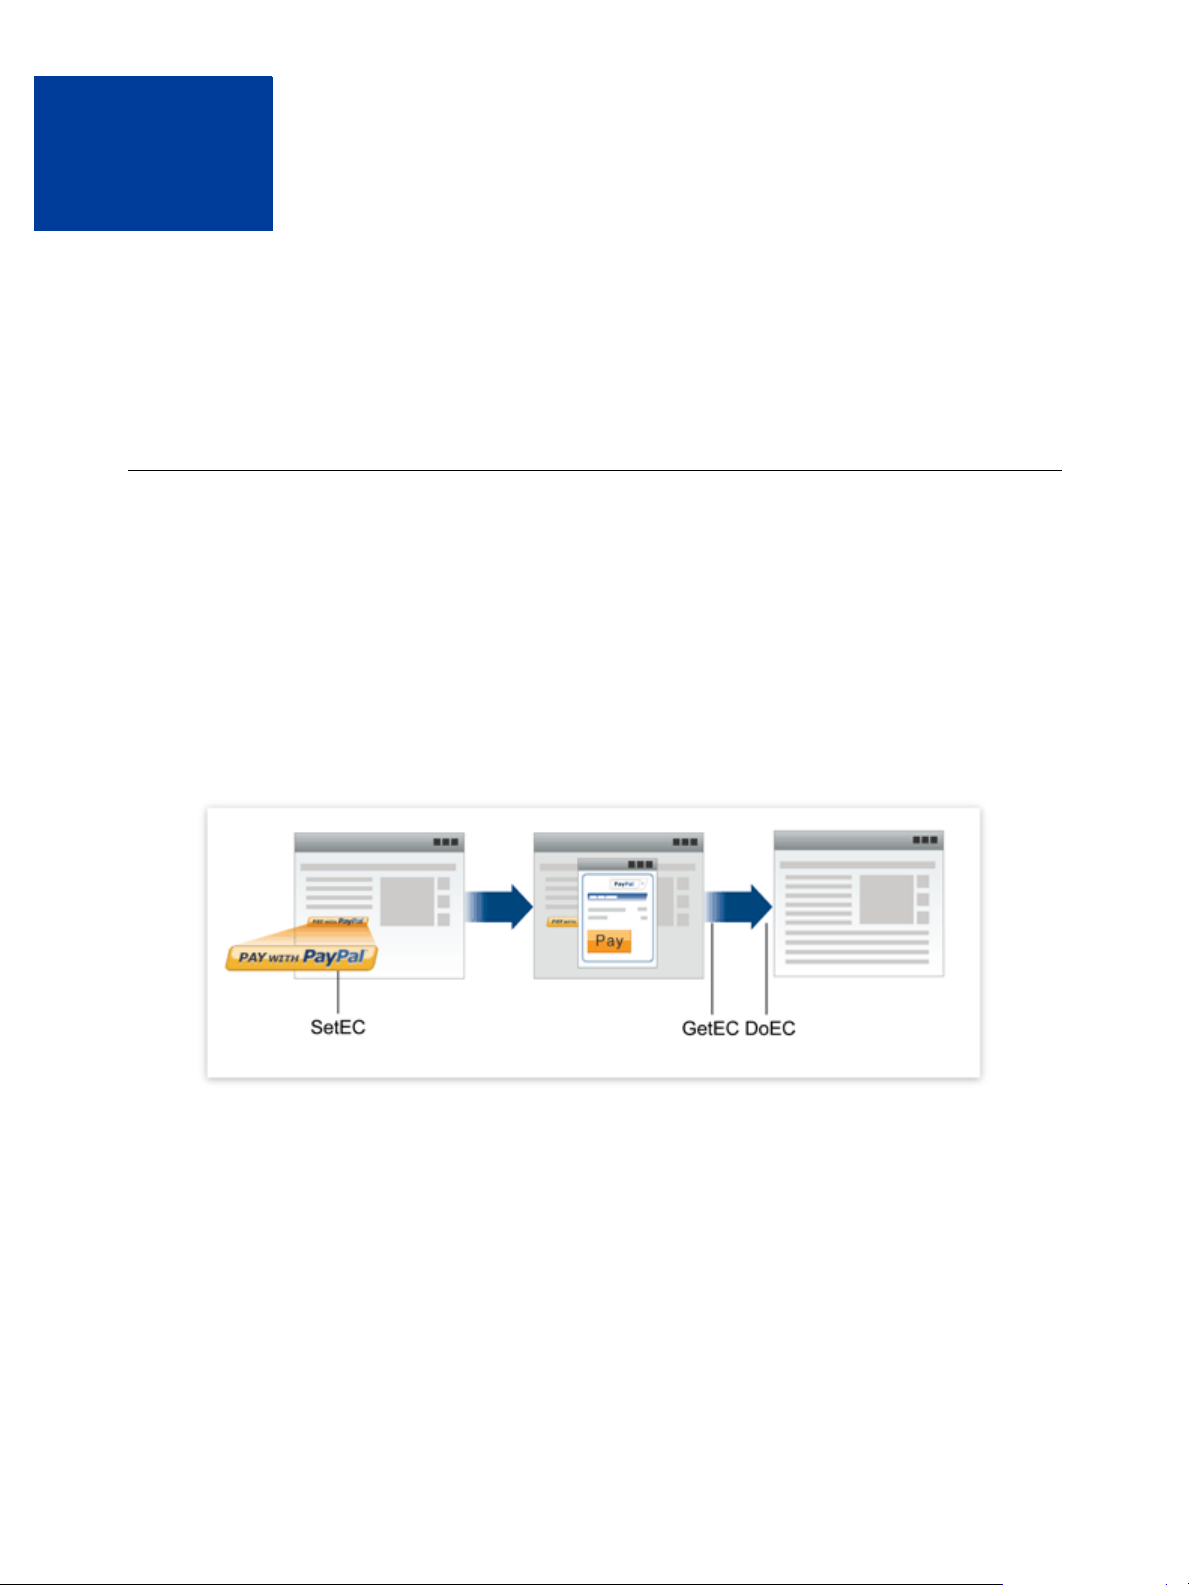
The following figure encapsulates digital goods payments:
PayPal for digital goods payments
To make a payment for a digital goods item, the buyer:
1. Clicks Pay With PayPal.
The button click triggers the call to the SetExpressCheckout API operation. PayPal
redirects the buyer to a lightbox overlaying your website.
2. Clicks Pay to accept the order.
The button click triggers JavaScript code that closes the lightbox.
Digital Goods Integration Guide - EC Edition January 2012 9
Page 10
Introducing Digital Goods for Express Checkout
1
Introducing Digital Goods Payments
3. Confirms the order on your page after the lightbox closes.
4. Resumes activity on your page.
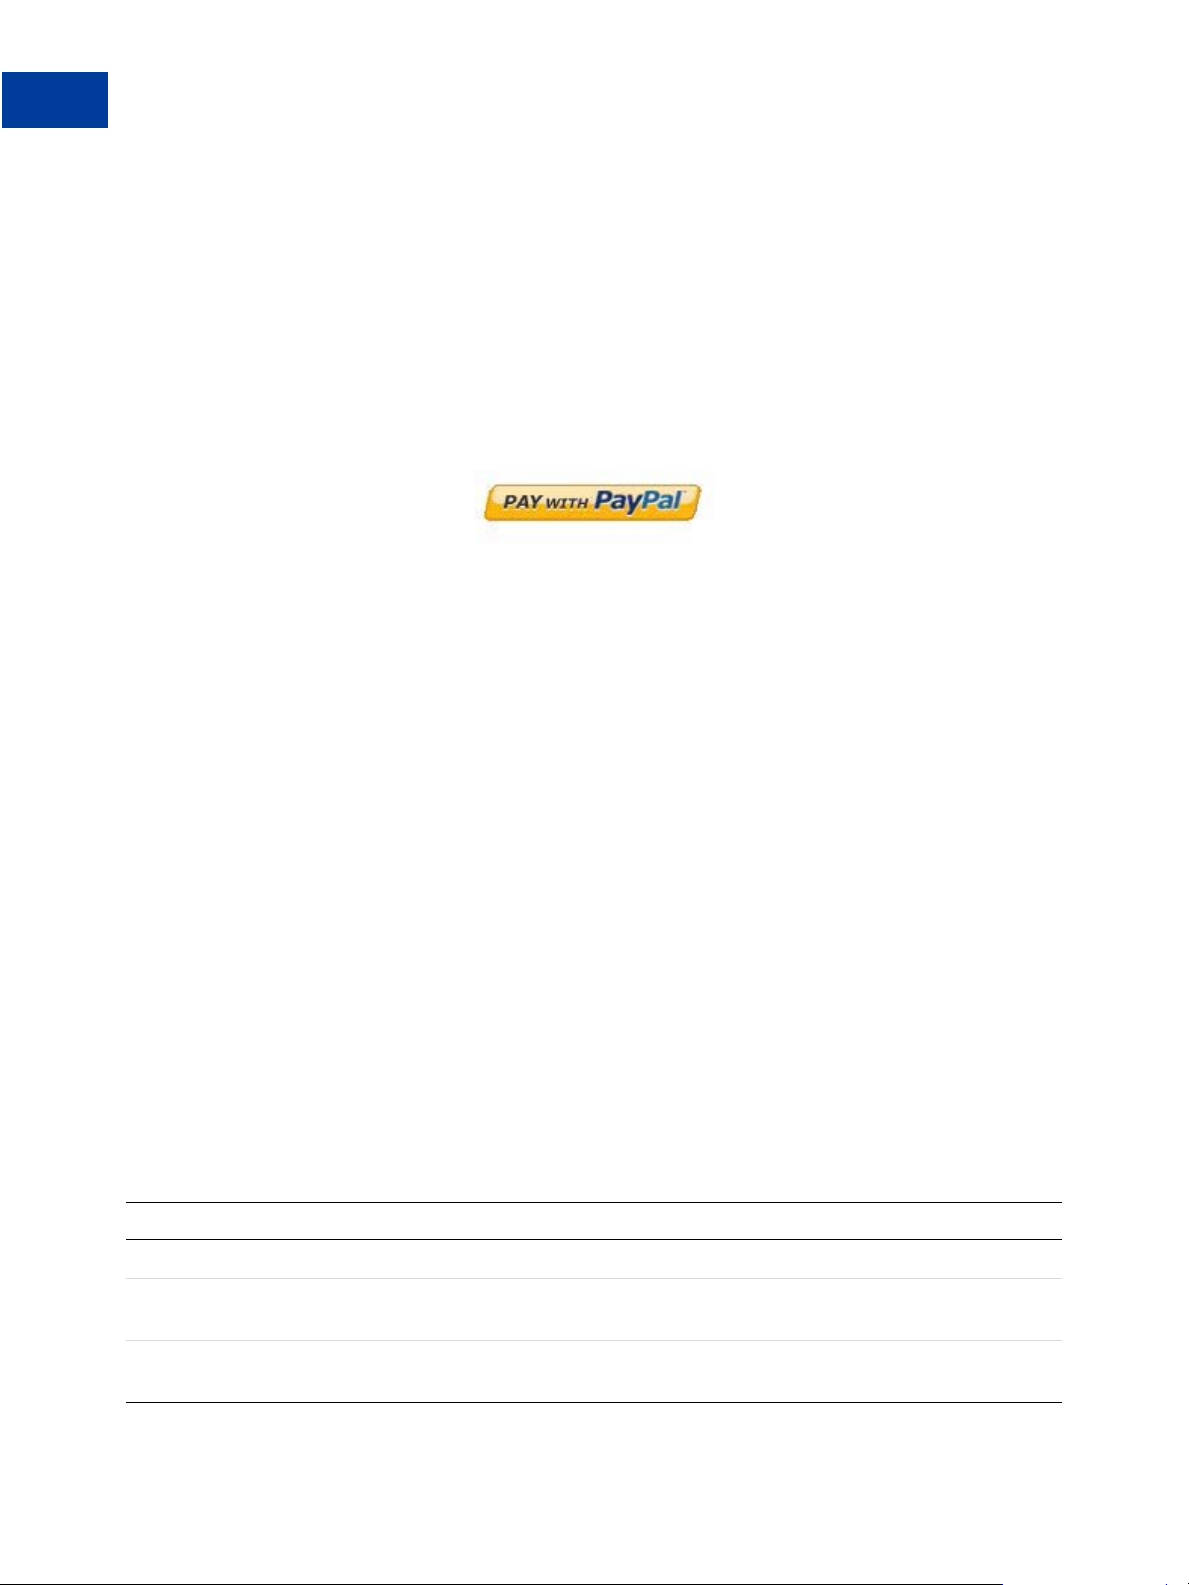
Express Checkout Buttons
The button you place on your web page to initiate PayPal digital goods transactions is
available at the following URL:
https://www.paypal.com/en_US/i/btn/btn_ dg_pay_w_paypal.gif
NOTE: Do not host copies of the PayPal images locally on your servers. Outdated PayPal
images reduce buyer confidence in your site.
Digital Goods Payments In More Detail
To the buyer, the digital goods payment process appears to be built into your website. The
digital goods payment process occurs in a lightbox that temporarily overlays your website.
Your buyer’s digital goods payment experience depends upon two factors:
1. The value you set for the experience type variable on your web page
You determine how the digital goods flow appears to your buyers by setting (or not setting)
the experience type variable (expType) on your web page
(For details on setting expType, see “JavaScript Functions For Digital Goods Payments”
on page 28).
2. Whether the buyer is remembered from a previous transaction
Your buyers partially determine the digital goods flow by choosing whether to check the
“remember me” box on the login page. (Checking the box creates a “remember me cookie”
on the buyer’s machine that lets them skip the login page on subsequent visits.)
The following table describes the possible digital goods (DG) flows that the combination of
expType and “Remember Me Cookie” present to a buyer:
expType Remember Me Cookie DG Flow Experience
instant No The login page opens in a mini-browser.
Yes The merchant review page opens in a lightbox, and a mask is
applied over the underlying web page.
mini No The login page opens in a mini-browser, and a mask is applied
over the underlying web page.
10 January 2012 Digital Goods Integration Guide - EC Edition
Page 11
Introducing Digital Goods for Express Checkout
Introducing Digital Goods Payments
expType Remember Me Cookie DG Flow Experience
Yes The merchant review page opens in a mini-browser, and a
mask is applied over the underlying web page.
popup No The login page opens in a mini-browser, and a mask is not
applied to the underlying web page.
Yes The merchant review page opens in a mini-browser, and a
mask is not applied to the underlying web page.
(not set) No A launch page opens in a lightbox. From here the buyer can
log in (the flow then proceeds to the login page in a minibrowser) or sign up with PayPal, or pay as a guest.
Yes DG opens the merchant review page in a lightbox, and a mask
is applied over the underlying web page.
NOTE: New DG Merchants: Set expTyp e to ‘instant’ for the best performance.
Existing DG Merchants: You can bypass the legacy flow’s lightbox launch page by
setting expType, or leave your web page unchanged to maintain the current behavior.
1
Digital Goods Flows
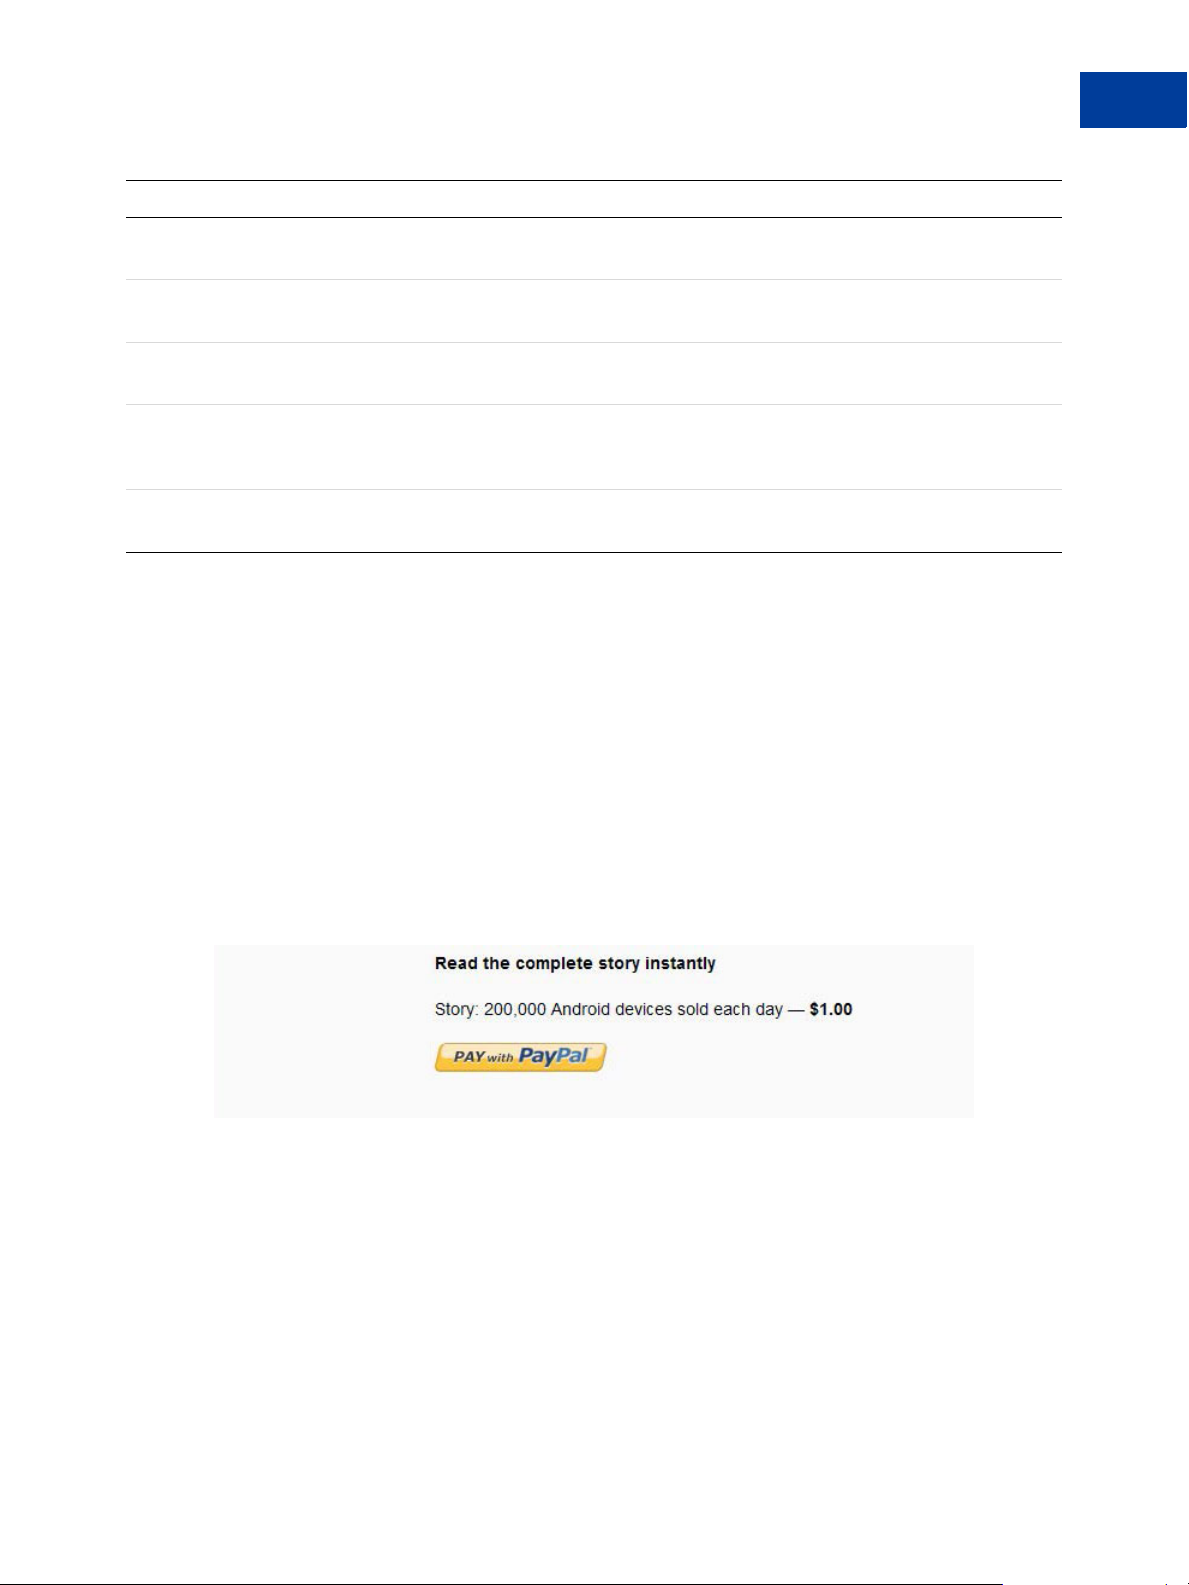
This section shows examples of different Digital Goods flows. The first example shows the
DG Instant flow (expType set to ‘instant’) for a new buyer (or a buyer who didn’t check
the “remember me” box on the login page). The second example shows the same DG Instant
flow for a returning buyer who checked the “remember me” box. The third example shows the
legacy flow (expType is unset) for a new buyer.
The buyer initiates all DG flows by clicking Pay with PayPal:
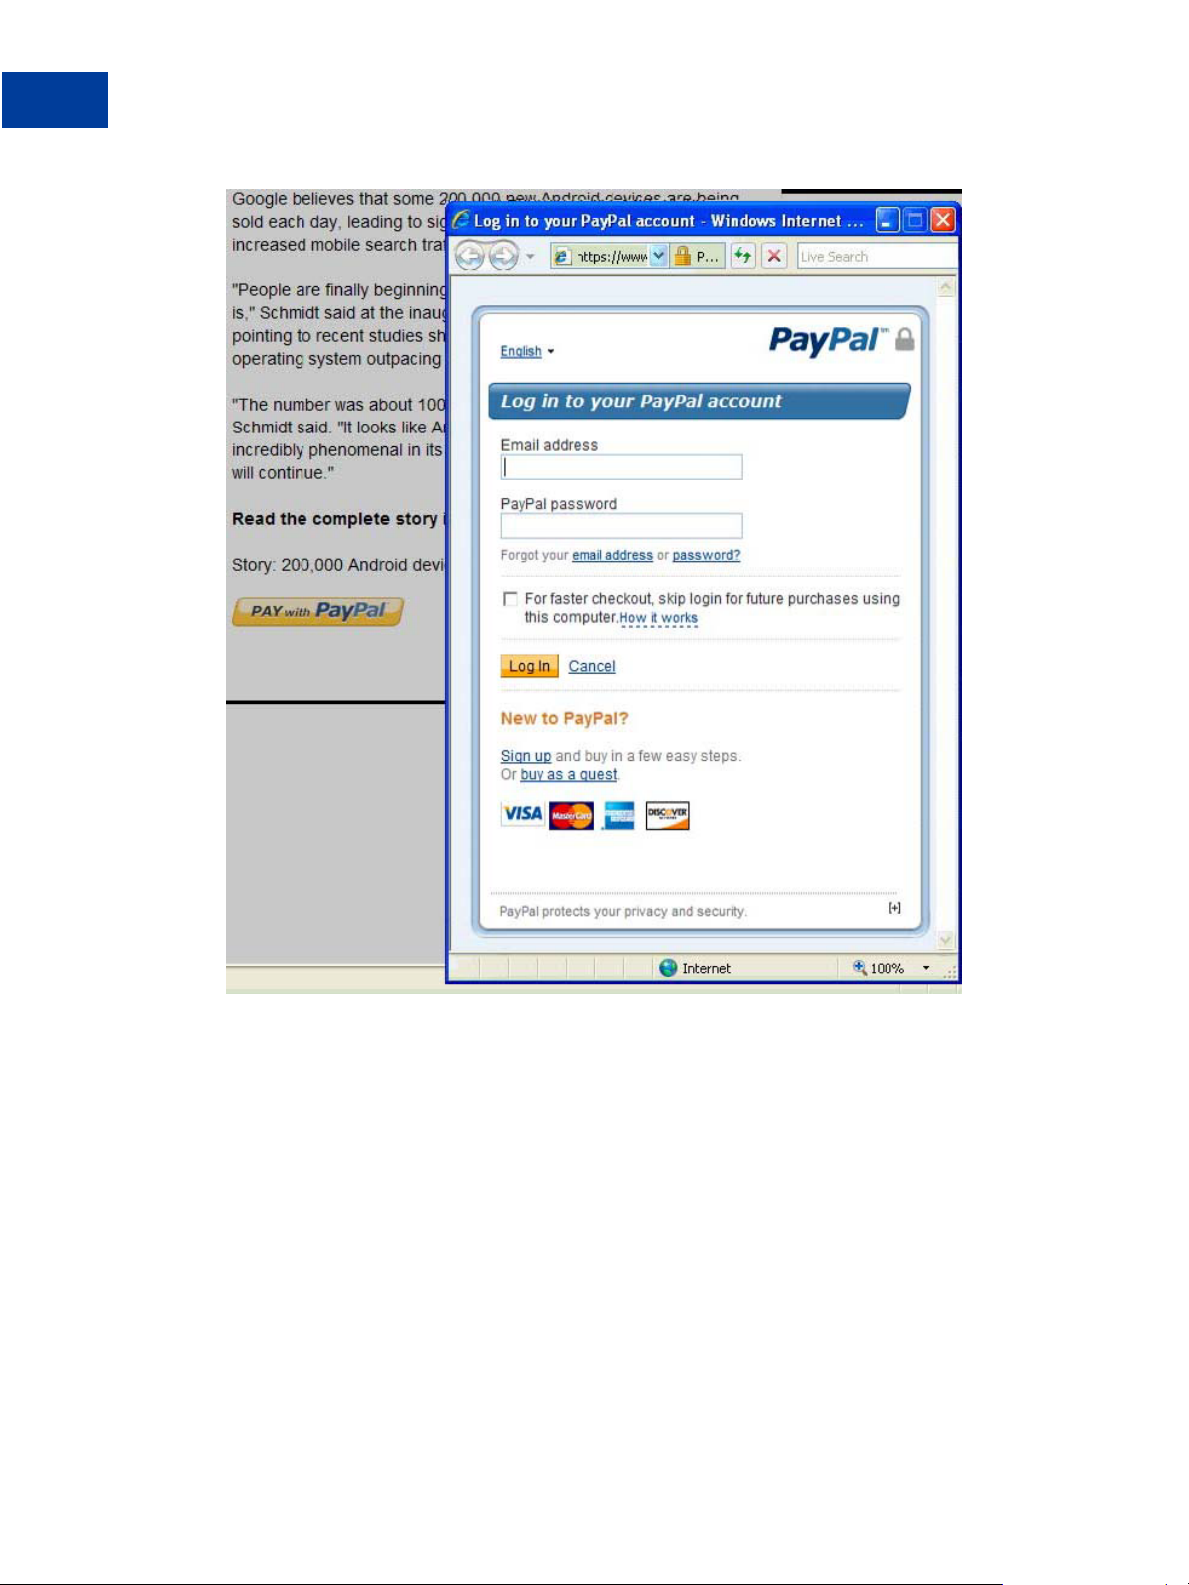
1. The expType variable is set to ‘instant’ and the buyer is new:
The DG flow opens the Log in to your PayPal account page in a mini-browser, with a
mask over the underlying page:
Digital Goods Integration Guide - EC Edition January 2012 11
Page 12
Introducing Digital Goods for Express Checkout
1
Introducing Digital Goods Payments
From this page, the buyer can log in (optionally checking the “remember me” box for
subsequent purchases if there is little risk of their account being misused), or cancel the
transaction.
IMPORTANT: Opting in to the remember me behavior does not guarantee that the buyer
will not be asked to provide log-in credentials.
Buyers without a PayPal account can sign up for one, or proceed as a guest and complete
their purchase with a credit card.
NOTE: Guest checkout provides only the visual benefits of a digital goods payment. It
does not reduce the payment steps.
After successfully logging in, the digital flow presents the You are about to pay page in a
mini-browser:
12 January 2012 Digital Goods Integration Guide - EC Edition
Page 13
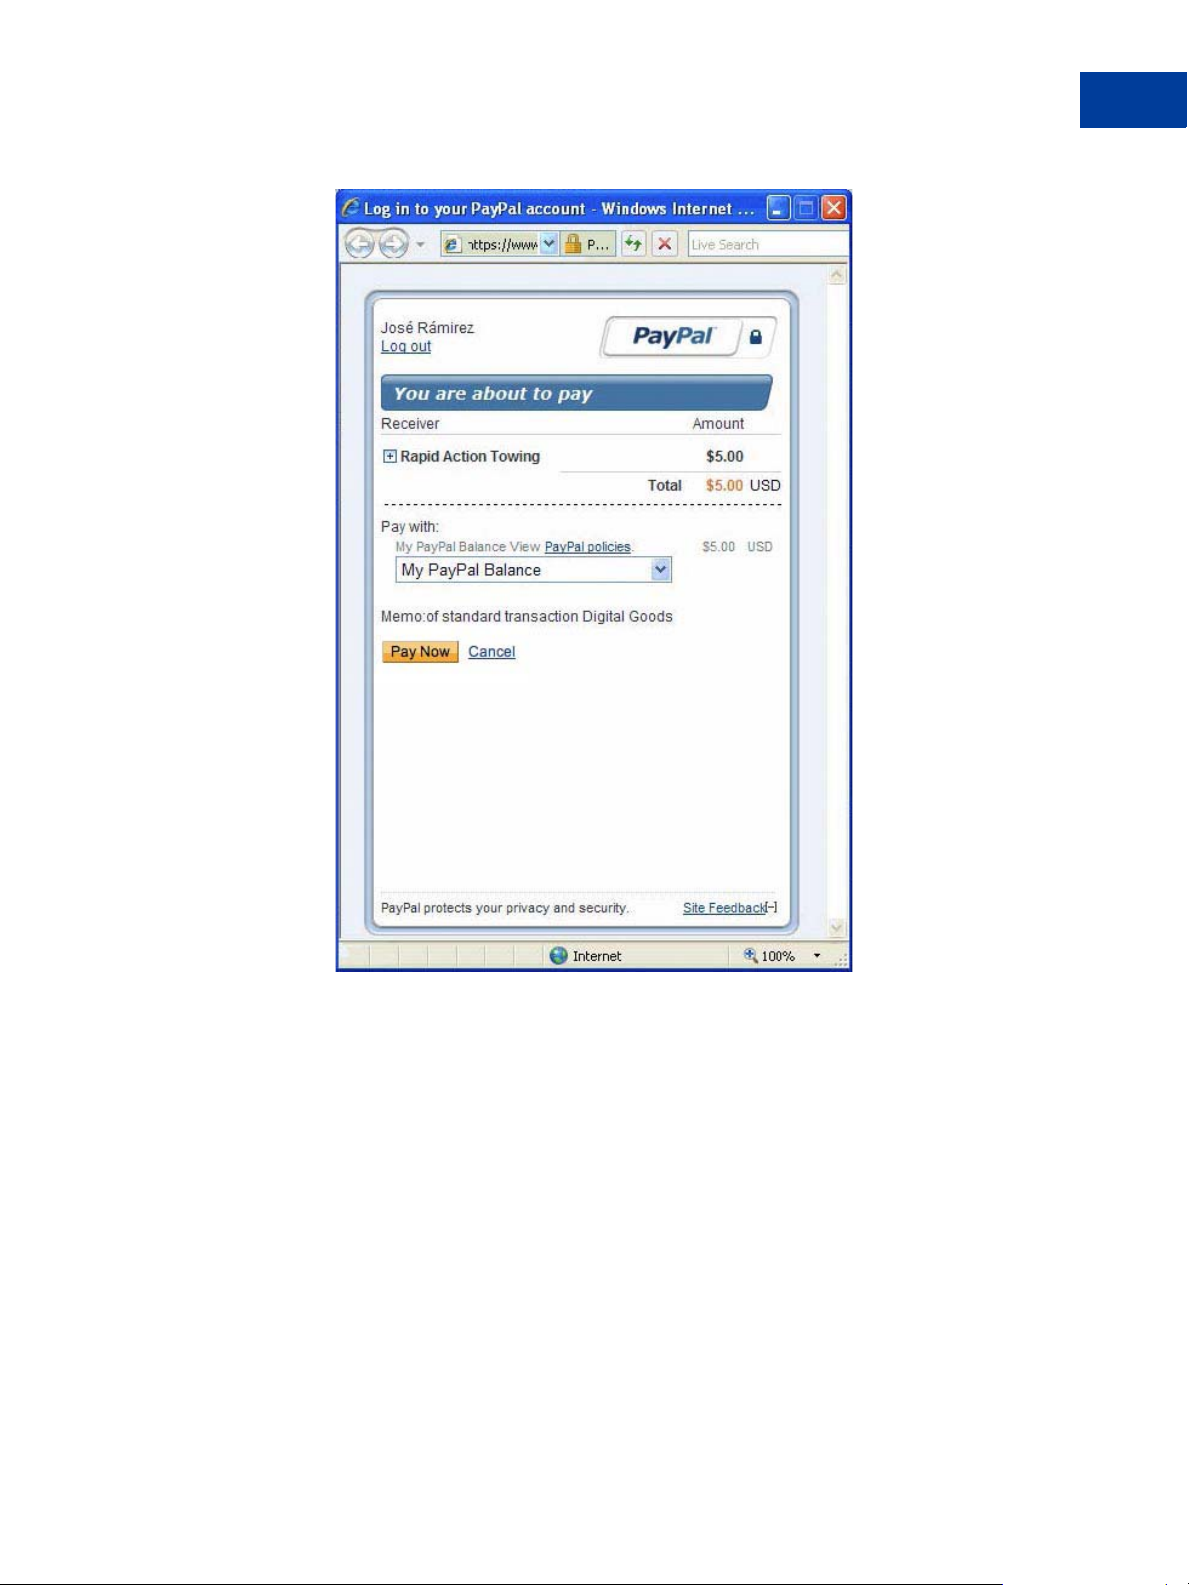
Introducing Digital Goods for Express Checkout
Introducing Digital Goods Payments
1
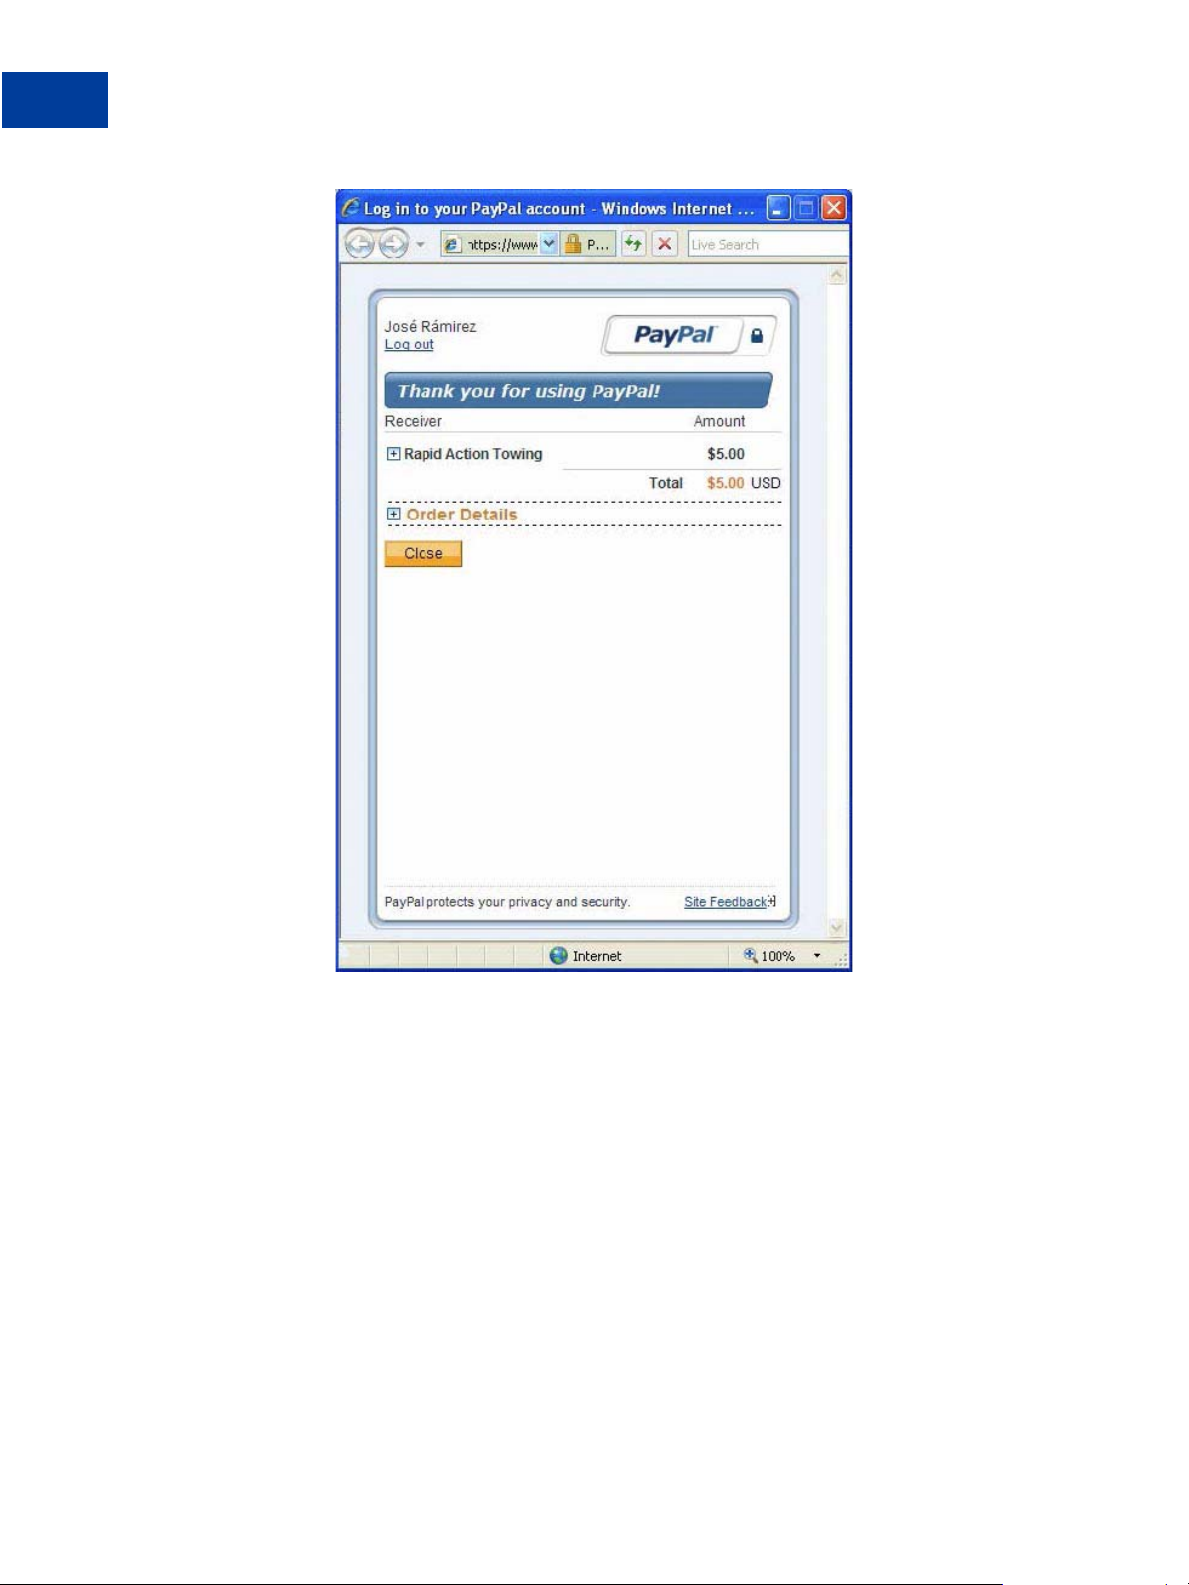
If the buyer chooses Cancel, PayPal redirects the buyer’s browser to the cancel URL
specified in the SetExpressCheckout API operation’s request message. If the buyer
chooses Pay, the Thank you for using PayPal page appears in the mini-browser:
Digital Goods Integration Guide - EC Edition January 2012 13
Page 14
Introducing Digital Goods for Express Checkout
1
Introducing Digital Goods Payments
When the buyer clicks Close, PayPal redirects the buyer’s browser to the return URL
specified in the SetExpressCheckout API operation’s request message.
2. The expType varible is set to ‘instant’ and the buyer checked the “remember me” box:
The digital goods flow skips the login screen and the flow proceeds directly to the payment
page in a lightbox:
14 January 2012 Digital Goods Integration Guide - EC Edition
Page 15

Introducing Digital Goods for Express Checkout
Introducing Digital Goods Payments
1
The rest of the flow proceeds as shown in the previous example, but the pages are
displayed in the lightbox, instead of the mini-browser.
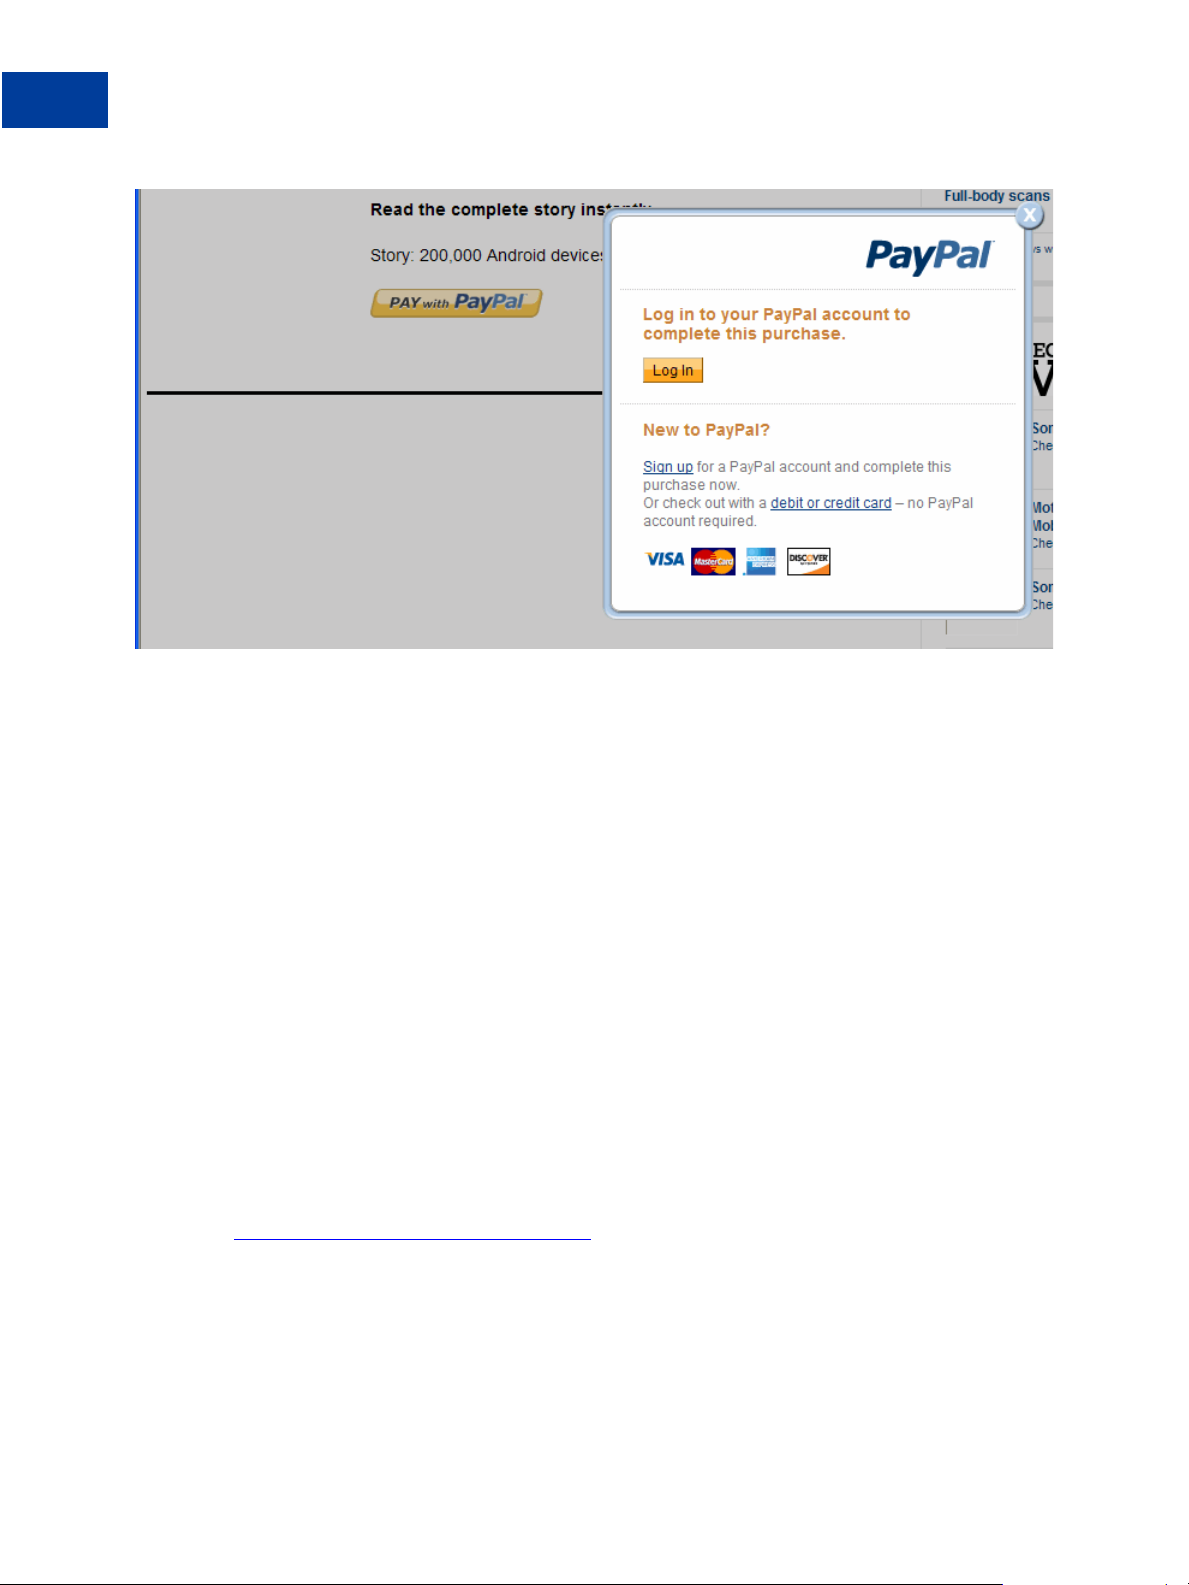
3. The expType variable is unset and the buyer is new:
The launcher page only appears if expType variable is not set and the buyer has not
previously checked the “remember me” box on the login page:
Digital Goods Integration Guide - EC Edition January 2012 15
Page 16
Introducing Digital Goods for Express Checkout
1
Introducing Digital Goods Payments
Other Payments Features That Digital Goods Supports
You can use digital goods with the following payments features:
Recurring payments. Some Express Checkout fields are not relevant to the digital goods
flows, and thus are not supported. See “Features Not Supported With Digital Goods” on
page 16 for details.
After Performing Digital Goods Transactions
After performing digital goods payments transactions, you can use PayPal API operations to
perform the following back-office tasks:
Issue refunds.
Get transaction details.
Search transactions.
Features Not Supported With Digital Goods
Digital goods does not support the following Express Checkout features described in the
Express Checkout Advanced Features Guide.
Physical goods
Digital goods are digital media that the buyer downloads or accesses online.
Shipping addresses
Downloading electronic media only does not involve shipping addresses.
16 January 2012 Digital Goods Integration Guide - EC Edition
Page 17

Introducing Digital Goods for Express Checkout
Introducing Digital Goods Payments
Instant Update API
The PayPal server calls your callback server to instantly update the PayPal pages based on
shipping options changes the buyer selects.
Parallel payments
Parameter fields describe the details of up to 10 payments. Digital goods supports passing a
value for one payment only.
Immediate Payment
Immediate Payment checks that you receive payment at the time the buyer commits to a
purchase (instant payment methods only).
Authorization and Capture API
SetCustomerBillingAgreement API
Giropay
Incentives
Several fields in the Recurring Payments API and in the Reference Transaction API are not
relevant for digital goods transactions and thus are not supported. Do not use the API fields in
the following lists for digital goods operations.
1
Unsupported Fields in the Recurring Payments and Reference Transaction Name/Value
Pair (NVP) APIs:
SHIPTONAME
SHIPTOSTREET
SHIPTOSTREET2
SHIPTOCITY
SHIPTOSTATE
SHIPTOZIP
SHIPTOCOUNTRY
SHIPTOCOUNTRYCODE
SHIPTOPHONENUM
SHIPPINGAMT
REGULARSHIPINGAMT
Unsupported Fields in the Recurring Payments and Reference Transaction SOAP APIs:
Name
Street1
Street2
CityName
StateOrProvince
Digital Goods Integration Guide - EC Edition January 2012 17
Page 18

Introducing Digital Goods for Express Checkout
1
Introducing Digital Goods Payments
PostalCode
Country
Phone
ShippingAmount
Other Digital Goods Caveats
Observe the following notes when integrating digital goods:
Your website requires a P3P header if it is not directly integrating digital goods.
If your site uses a hosted cart embedded in another merchant’s site, you need a P3P header.
For details on P3P, see the following link:
P3P documentation
Pass all the required Express Checkout API parameter fields in digital goods transactions.
For details, see “Integrating Digital Goods Payments With Express Checkout” on page 22.
18 January 2012 Digital Goods Integration Guide - EC Edition
Page 19

Integrating Digital Goods for
2
Express Checkout
This chapter describes how to integrate Digital Goods for Express Checkout with your
website.
“Overview of Digital Goods Integration” on page 19
“Integrating Digital Goods Payments With Express Checkout” on page 22
Overview of Digital Goods Integration
There are two possible ways to integrate the digital goods flow with Express Checkout:
Merchants using PHP can use the PHP Wizard, located here: https://www.paypal-
labs.com/integrationwizard/.
Merchants using other platforms must take the manual approach to integration. Future
releases will feature integration wizards for other platforms.
In either event, when the integration is successfully completed, you will have added the digital
goods JavaScript to the page, set up code to invoke the digital goods flow, and specified URLs
for return and cancel pages.
The following figure summarizes the manual integration steps for the digital goods payments
flow:
Digital Goods Integration Guide - EC Edition January 2012 19
Page 20
Integrating Digital Goods for Express Checkout
2
Overview of Digital Goods Integration
20 January 2012 Digital Goods Integration Guide - EC Edition
Page 21

Integrating Digital Goods for Express Checkout
Overview of Digital Goods Integration
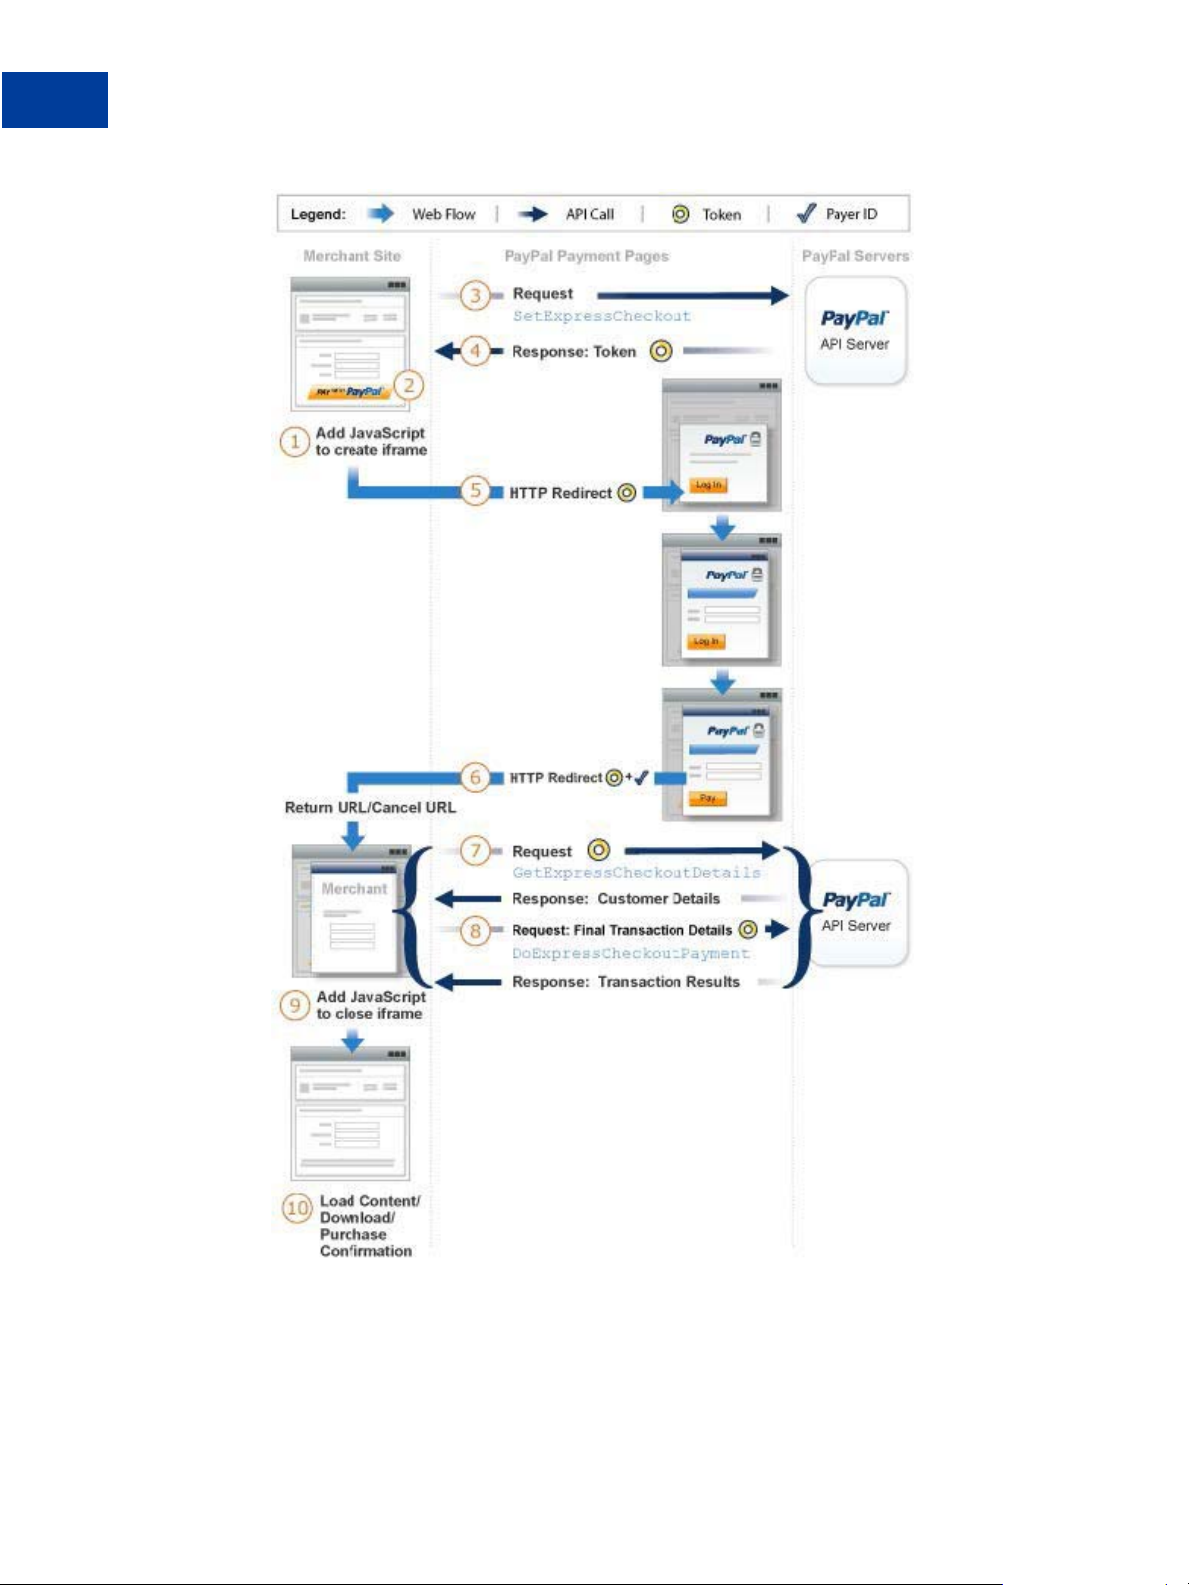
The numbers in the figure correspond to the following steps:
1. Add the dg.js JavaScript (provided by PayPal) to the webpage on which you implement
the Pay With PayPal button. This script manages the PayPal digital goods payments flow.
This flow appears in a lightbox overlaying your webpage.
2. Place the Pay With PayPal button on the same webpage on which you add the dg.js
script.
3. When the buyer clicks Pay With PayPal, call the S etExpressCheckout API operation.
NOTE: Make sure that your API version is 65.1 or greater for each PayPal API call that
you make.
Pass details of the items purchased and other parameter fields required in digital goods
transactions. See “Setting Up A Digital Goods Payment Transaction” on page 22for
details.
4. A successful response returns a token to identify the digital goods transaction. Y o u pass the
token in subsequent Express Checkout API operations related to this transaction.
5. Redirect the buyer to the digital goods flow. Append the token returned in the
SetExpressCheckout response to the redirect URL.
2
If this is the first time the buyer is purchasing digital goods on your page, a mini-browser
displays that lets the buyer log in to PayPal and initiate approval for the payment.
6. After the buyer clicks Pay to approve or cancel, PayPal redirects the buyer to the respective
return or cancel URL page on your site. PayPal passes the token and the buyer’s Payer ID
with the redirect.
7. If the buyer approves payment, you can optionally call GetEx pressCheckoutDetails
to obtain buyer details to display to your webpage.
8. If the buyer approves payment, call DoExpressCheckoutPayment to complete the
payment, including the details of the items purchased.
9. Add JavaScript code to your return and cancel URL pages to close the digital goods
lightbox.
10.Fulfill the buyer’s order from your webpage.
Download the digital goods and provide a purchase confirmation .
NOTE: Make sure that you test your integration before taking your pages live.
Digital Goods Integration Guide - EC Edition January 2012 21
Page 22

Integrating Digital Goods for Express Checkout
2
Integrating Digital Goods Payments With Express Checkout
Integrating Digital Goods Payments With Express
Checkout
Integrating PayPal digital goods payments with the Express Checkout API requires
implementing the following API operations: SetExpressCheckout and
DoExpressCheckoutPayment. Optionally, you can implement
GetExpressCheckoutDetails.
Setting Up A Digital Goods Payment Transaction
To set up a digital goods payment transaction, call the SetExpressC heckout API request
operation. Provide sufficient information to initiate and redirect the buyer to the digital goods
payment flow.
This example assumes that you have set up the mechanism to communicate with the PayPal
server and you have a PayPal Business account with API credentials. It also assumes that the
payment action is a final sale.
NOTE: Use API version 65.1 or greater for all API calls for digital goods payments.
To set up a transaction, you specify values in the SetExpressCheckout request and then
call the API. The values you specify control the options available to you and the buyer.
NOTE: In the call to SetExpressCheckout, you are required to pass values for each digital
goods item the buyer is purchasing and to set the item category field to Digital. (For
details on these parameters, see step 7 in the setup procedure that follows.) To obtain
the discount rate for digital goods, you also must pass these parameters and values in
the call to DoExpressCheckoutPayment.
To set up the transaction:
1. Pass the total amount of the payment as the value of PAYMENTREQUEST_0_AMT; include
the currency if it is not in US dollars. For example:
PAYMENTREQUEST_0_AMT=amount
PAYMENTREQUEST_0_CURRENCYCODE= currencyID
Specify the total amount of the transaction. Regardless of the specified currency, the format
must have a decimal point. There must be exactly 2 digits to the right of the decimal point.
There can be an optional thousands separator to the left. The separator must be a comma.
For example, specify EUR 2.000,00 as 2000.00 or 2,000.00. The specified amount cannot
exceed USD $10,000.00, regardless of the currency used.
2. If you pass in a tax amount for each item, set PAYMENTREQUEST_0_TAXAMT to the total
amount of tax.
22 January 2012 Digital Goods Integration Guide - EC Edition
Page 23

Integrating Digital Goods for Express Checkout
Integrating Digital Goods Payments With Express Checkout
3. Specify the return URL to a page on your site.
RETURNURL=https://...
The return URL is the page to which PayPal redirects your buyer after the buyer approves
the payment. Typically this is a secure page (https://...) on your site.
NOTE: You can use the return URL to pass parameters between pages on your site. For
example, you can set your return URL to specify additional parameters using the
https://www.
parameters become available as request parameters on the page specified by the
return URL.
If you do not require the buyer to explicitly review and confirm the payment on your
review page, the buyer can confirm payment on PayPal. Add th e token and the
value commit as a name/value pair to the return URL:
https://www.paypal.com/incontext?token=
mit
4. Specify the cancel URL.
yourcompany.com/page.html?param=value... syntax. The
useraction
TOKENReturned&useraction=com
2
The cancel URL is the page to which PayPal redirects your buyer if the buyer does not
approve the payment. Typically, this is the secure page (https://...) on your site from
which you redirected the buyer to the PayPal digital goods payments flow.
NOTE: You can pass SetExpressC heckout request values as parameters in your URL
to have the values available, if necessary, after PayPal redirects to your URL.
CANCELURL=cancel_url
5. If you pass a value for PAYMENTREQUEST_0_PAYMENTACTION, you must pass the value
Sale (default).
6. Set PAYMENTREQUEST_0_ITEMAMT to the total of all items in the order.
7. Pass values for the following parameters for each item the buyer is purchasing.
– L_PAYMENTREQUEST_0_NAM E
n
– L_PAYMENTREQUEST_0_AMT n
– L_PAYMENTREQUEST_0_QTY n
– L_PAYMENTREQUEST_0_ITE MCATEGORYn (you must set the value to Digital)
NOTE: Make sure L_PAYMENTREQUEST_0_ITEMCATEGORY is set to Dig ital for every
item in the DoExpressCheckoutPayment request as well as
SetExpressCheckout. Failing to do so will result in incorrect fee calculations.
8. Set REQCONFIRMSHIPPING to 0.
9. Set NOSHIPPING to 1.
Digital Goods Integration Guide - EC Edition January 2012 23
Page 24

Integrating Digital Goods for Express Checkout
2
Integrating Digital Goods Payments With Express Checkout
10.Execute the SetExpressCheckout API operation to set up the Express Checkout
transaction.
11. Test that the response to the SetExpressCheckout API operation was successful.
Upon success, the SetExpressCheckout API operation returns a token. PayPal uses the
token to associate the execution of API operations and commands with a specific instance
of the checkout experience.
12.If calling the SetExpressCheckout API was successful, redirect the buyer to the digital
goods payments flow with the following redirect URL. Append the token value returned in
the SetExpressCheckout response to the URL:
SetExpressCheckout Example For Digital Goods
The following is an example of SetExpressCheckout parameters and values for a digital
goods payments transaction.
Request Parameters
[requiredSecurityParameters]
&METHOD=SetExpressCheckout
&RETURNURL=http://...
&CANCELURL=http://...
&PAYMENTREQUEST_0_CURRENCYCODE =USD
&PAYMENTREQUEST_0_AMT=300
&PAYMENTREQUEST_0_ITEMAMT=200
&PAYMENTREQUEST_0_PAYMENTACTIO N=Sale
&L_PAYMENTREQUEST_0_ITEMCATEGO RY0=Digital
&L_PAYMENTREQUEST_0_ITEMCATEGO RY1=Digital
&L_PAYMENTREQUEST_0_NAME0=Kitt y Antics
&L_PAYMENTREQUEST_0_NAME1=All Abo ut Cats
&L_PAYMENTREQUEST_0_QTY0=1
&L_PAYMENTREQUEST_0_QTY1=1
&L_PAYMENTREQUEST_0_AMT0=100
&L_PAYMENTREQUEST_0_AMT1=100
Response Parameters
[successResponseFields]
&TOKEN=EC-17C76533PL706494P
Redirecting the Buyer to PayPal
T o redirect you r buyer to the PayPal digital go ods payments flow, specify this URL along with
the token returned by the SetExpressCheckout API operation.
https://www.paypal.com/incontext?token=
24 January 2012 Digital Goods Integration Guide - EC Edition
TOKENReturned
Page 25

Integrating Digital Goods for Express Checkout
Integrating Digital Goods Payments With Express Checkout
After the buyer approves the payment or cancels, PayPal redirects back to the return or cancel
URL:
Return URL—If the buyer approves the payment, PayPal redirects to the return URL with
the token you passed in the redirect to PayPal and the buyer’s unique identifier (Payer ID).
Cancel URL—If the buyer cancels, PayPal redirects to the cancel URL with the token that
you passed in the redirect to PayPal.
After PayPal Redirects the Buyer To Your Web Page
The actions you take after PayPal redirects the buyer back to your web page depend upon
whether the buyer approves or cancels the order.
If the buyer approves the order and pays for the digital goods, do the following:
1. Optionally, call the GetExpressCheckoutDetails API operation to obtain details
about the buyer to display to your webpage.
2. Call DoExpressCheckout to complete payment.
2
Completing the Digital Goods Transaction
To complete the digital goods transaction after the buyer approves the order, call the
DoExpressCheckoutPayment API operation.
When calling DoExpressCheckoutPayment, do the following:
1. Pass the token and Payer ID returned by PayPal when it redirected the buyer back to your
site.
TOKEN=tokenValue
PAYERID=payerId
2. Pass the total amount of the payment as the value of PAYMENTREQUEST_0_AMT; include
the currency if it is not in US dollars.
Specify the total amount of the transaction. Regardless of the specified currency, the format
must have decimal point. The decimal point must include exactly 2 digits to the right and
an optional thousands separator to the left, which must be a comma.
For example, specify EUR 2.000,00 as 2000.00 or 2,000.00. The specified amount cannot
exceed USD $10,000.00, regardless of the currency used.
PAYMENTREQUEST_0_AMT=amount
PAYMENTREQUEST_0_CURRENCYCODE= currencyID
3. If you passed in a tax amount for each item, set PAYMENTREQUEST_0_TAXAMT to the total
amount of tax.
Digital Goods Integration Guide - EC Edition January 2012 25
Page 26

Integrating Digital Goods for Express Checkout
2
Integrating Digital Goods Payments With Express Checkout
4. If you pass a value for PAYMENTREQUEST_0_PAYMENTACTION, you must pass the value
Sale (default).
5. Set PAYMENTREQUEST_0_ITEMAMT to the total of all items in the order.
6. Pass values for the following parameters for each item the buyer is purchasing.
NOTE: Even though you passed values for these parameters in the call to
SetExpressCheckout, you must pass them again in the call to
DoExpressCheckoutPayment. Otherwise, you do not receive the discount rate
for digital goods.
– L_PAYMENTREQUEST_0_NAM E
n
– L_PAYMENTREQUEST_0_AMT n
– L_PAYMENTREQUEST_0_QTY n
– L_PAYMENTREQUEST_0_ITE MCATEGORYn (you must set the value to Digital)
7. Examine the values returned if the transaction completes successfully.
Setting Up Web Pages To Invoke the Digital Goods Payments Flow
To invoke the digital goods payments flow, follow these steps to add JavaScript to your
webpages:
1. Add the JavaScript file dg.js to your page, using the path shown. For example:
<script src="https://www.paypa lobjects.com/js/ex ternal/dg.js"
</script>
For best performance, place the path to the JavaScript file just before the closing </body>
element in your page.
2. Customize and include the following code after the JavaScript file. Replace "submitBtn"
with the ID of your HTML form button.
<script>
var dg = new PAYPAL.apps.DGFlow({
// the HTML ID of the form sub mit button which c alls setEC
trigger: "submitBtn"
// the experience type: instan t or mini
expType: ’instant’
});
</script>
NOTE: Do not set a target for the redirect on button click.
3. Include the following JavaScript code on the return URL and cancel URL pages. The
JavaScript closes the digital goods payment flow in the overlay window and sends the
buyer to the correct page.
26 January 2012 Digital Goods Integration Guide - EC Edition
Page 27

Integrating Digital Goods for Express Checkout
Integrating Digital Goods Payments With Express Checkout
NOTE: Make sure that you include content to be displayed in case the customer has
JavaScript disabled on their browser. You should include a link to deliver the content
if the purchase completes successfully.
<script>
if (window.opener){
window.close();
}
else if (top.dg.isOpen() == tr ue){
top.dg.closeFlow();
}
</script>
T o update the page asynchronously without reloading, you need to make some Ajax calls as in
the following example. This is the preferred method for closing the digital go ods paymen ts
flow. For other options, see “Integrating Digital Goods W ith Flash - Third-Party Merchant” on
page 51.
<!-- Use result of DoEC to sen d the buyer to the correct page -->
<!DOCTYPE html>
<html>
<head>
<title></title>
<script>
// Sample AJAX code us ing jQuery (any AJ AX
// library works)
$.ajax({
url: 'http://example.com/path_to_fulfillment_content',
type: 'GET',
error: function () {
// Handle error cases
},
success: function ( response){
// Replace conte nt on page, initia te
// download, etc .
}
});
</script>
</head>
<body>
<!-- Include non-JavaScript co ntent here -->
If this page does not redirect <a href="[page to deliver content
to non-JS customer]">Click Her e</a>
</body>
</html>
2
Digital Goods Integration Guide - EC Edition January 2012 27
Page 28

Integrating Digital Goods for Express Checkout
2
Integrating Digital Goods Payments With Express Checkout
JavaScript Functions For Digital Goods Payments
Include dg.js on any page that invokes or terminates the digital goods payments flow. The
JavaScript functions in dg.js set up and control the PayPal lightbox and mini-browser.
Function and Signature Description
PAYPAL.apps.DGFlow = function
({trigger:
HTML_id_of_event_triggering_flow
expType: experience_type
})
Sets up the digital goods payment flow.
Set the experience type variable (expType) to:
instant—DG flow in lightbox, with overlay mask
mini—DG flow in mini-browser with overlay mask
popup—DG flow in mini-browser
Leave expType unset for the legacy DG flow.
setTrigger: function (
id) Adds a trigger for the flow, where id is the HTML ID of the
event that triggers the flow. The flow must first be set up by
calling PAYPAL.apps.DGFlow.
startFlow: function (
url) Explicitly starts the digital goods flow, where url is the URL
that triggers the flow.
NOTE: Y ou are only required to explicitly start the flow when
there is no triggering event; for example, when you
want to associate digital goods payments with playing
a Flash movie.
closeFlow: function () Closes the mini-browser or lightbox associated with the flow.
Use this function after the buyer completes or cancels the
payment.
isOpen: function () Determines whether the flow is still active.
28 January 2012 Digital Goods Integration Guide - EC Edition
Page 29

Integrating Digital Goods for Express Checkout
Integrating Digital Goods Payments With Express Checkout
Example Merchant Page With Digital Goods JavaScript
The following code presents an example of the HTML code on the merchant page:
<html>
<head>
<meta charset="utf-8" />
<title></title>
<style type="text/css"></style>
</head>
<body>
<!-- Custom merchant code (pat h to merchant app, etc.) -->
<h1>El Jefe's Tours</h1>
<form action="path to setECURL" method=" post">
<p>
<input id="submitBtn" type="submit"
value="Pay with PayPal" />
<input type="hidden" name="success_ url"
value="path to successURL" />
<input type="hidden" name="cancel_u rl"
value="path to cancelURL">
</p>
</form>
<!-- End custom merchant code -->
<script
src="https://paypalobjects.com /js/external/dg.js ">
</script>
<script>
var dg = new PAYPAL.apps.DGFlow({
// HTML ID of form submit butt ons that call setE C
trigger:’submitBtn’,
expType:’instant’
});
</script>
</body>
</html>
2
Digital Goods Integration Guide - EC Edition January 2012 29
Page 30

Integrating Digital Goods for Express Checkout
2
Integrating Digital Goods Payments With Express Checkout
30 January 2012 Digital Goods Integration Guide - EC Edition
Page 31

3
Issuing Refunds
You can use the RefundTransaction PayPal API operation to issue refunds.
Use the RefundTransaction API to issue one or more refunds associated with a
transaction, such as a transaction created by a capture of a payment. The transaction is
identified by a transaction ID that PayPal assigns when the payment is captured.
NOTE: You cannot make a refund if the transaction occurred after the refund period has
passed; typically, the refund period is 60 days.
You can refund amounts up to the total amount of the original transaction. If you specify a a
full refund, the entire amount is refunded. If you specify a partial refund, you must specify the
amount to refund, the currency, and a description of the refund, which is called a memo.
When you call the RefundTransactio n API, PayPal responds with another transaction ID,
which is associated with the refund (not the original transaction), and additional information
about the refund. This information identifies
the gross amount of the refund, which is returned to the payer
the amount of the refund associated with the original transaction fee, which is returned to
you
the net amount of the refund, which is deducted from your balance
To issue a refund
1. In the RefundTransaction request, specify the transaction ID of the transaction whose
payment you want to refund.
TRANSACTIONID=transaction_id
2. Specify the kind of refund, which is either Full or Partial.
REFUNDTYPE=Full
or
REFUNDTYPE=Partial
3. For a partial refund, specify the refund amount, including the currency.
AMT=amount
CURRENCYCODE=currencyID
Digital Goods Integration Guide - EC Edition January 2012 31
Page 32

Issuing Refunds
3
4. For a partial refund, specify the memo description.
NOTE=description
5. Execute the RefundTransaction operation.
6. Check the acknowledgement status in the RefundTransaction response to ensure that
the operation was successful.
32 January 2012 Digital Goods Integration Guide - EC Edition
Page 33

4
Handling Recurring Payments
Set up a recurring payment to handle subscription and other payments that occur on a fixed
schedule.
How Recurring Payments Work
Recurring Payments Terms
Options for Creating a Recurring Payments Profile
Recurring Payments With the Express Checkout API
Recurring Payments Profile Status
Getting Recurring Payments Profile Information
Modifying a Recurring Payments Profile
Billing the Outstanding Amount of a Profile
Recurring Payments Notifications
How Recurring Payments Work
To view a video that demonstrates how to set up Recurring Payments, navigate to: Recurring
Payments Demo
When you support recurring payments for a buyer, you create a recurring payments profile.
The profile contains information about the recurring payments, including details for an
optional trial period and a regular payment period. Both periods contain information about the
payment frequency and payment amounts, including shipping and tax, if applicable.
After creating a profile, PayPal automatically queues payments based on the billing start date,
billing frequency, and billin g amount. Payments reoccur until th e profile expires, t here are too
many failed payments to continue, or you cancel the profile.
NOTE: When using Express Checkout, the buyer can also cancel a recurring payments
profile.
PayPal funds queued payments using the normal payment method hierarchy within the buyer’s
PayPal account.
After creating a recurring payments profile, you can view profile details or cancel the profile
from your PayPal account. You can also access recurring payments reports from the PayPal
Business Overview page.
Also, after creating a recurring payments profile, you can use the Recurring Payments API to
do the following:
Get information details about a recurring payments profile.
Digital Goods Integration Guide - EC Edition January 2012 33
Page 34

Handling Recurring Payments
4
Recurring Payments T erms
Change the status of a recurring payments profile.
Update the details of the recurring payments profile.
Bill the outstanding amount of the recurring payments profile.
Limitations
The current release of the Recurring Payments API has the following limitations:
A profile can have at most one optional trial period and a single regular payment period.
The profile start date may not be earlier than the profile creation date.
Recurring Payments with Express Checkout also has the following limitations:
To be able to create a recurring payments profile for the buyer, you must ensure that the
buyer’s PayPal account includes an active credit card.
You can create a maximum of 10 recurring payments profiles during checkout.
You can increase the profile amount by only 20% in each 180-day interval after you create
the profile.
Recurring Payments Terms
The following table lists and describes terms that are commonly used in the context of PayPal
recurring payments.
Recurring Payments Terms
Term Definition
Recurring payments profile Your record of a recurring transaction for a single buyer. The profile
includes all information required to automatically bill the buyer a fixed
amount of money at a fixed interval.
Billing cycle Make one payment per billing cycle. Each billing cycle has 2 components:
The billing period specifies the unit to calculate the billing cycle (such as
days or months).
The billing frequency specifies the number of billing periods that make
up the billing cycle.
For example, if the billing period is Month and the billing frequency is 2, the
billing cycle is 2 months. If the billing period is Week and the billing
frequency is 6, PayPal schedules the payments every 6 weeks.
Regular payment period The main subscription period for this profile, which defines a payment
amount for each billing cycle. The regular payment period begins after the
trial period, if you specify a trial period for the profile.
34 January 2012 Digital Goods Integration Guide - EC Edition
Page 35

Handling Recurring Payments
Options for Creating a Recurring Payments Profile
Term Definition
Trial period An optional subscription period before the regular payment period begins. A
trial period may not have the same billing cycles and payment amounts as
the regular payment period.
Payment amount The amount the buyer pays for each billing cycle.
Outstanding balance If a payment fails for any reason, PayPal adds that amount to the profile’s
outstanding balance.
Profile ID An alphanumeric string (generated by PayPal) th at uniquely identifies a
recurring profile. You can specify the Profile ID in the
TransactionSearch API operation to ob tain all payments associated
with the identified profile.
Options for Creating a Recurring Payments Profile
You can create a recurring payments profile that allows a regular payment period, an optional
trial period, an initial payment, and other options.
4
Specifying the Regular Payment Period
Each recurring payments profile has a regular payment period that defines the amount and
frequency of the payment. The following table lists the required fields for specifying the
regular payment period.
Required fields for specifying a regular payment period
NVP SOAP Description
PROFILESTARTDATE RecurringPaymentsProfileDet
ails.BillingStartDate
BILLINGPERIOD Sc heduleDetails.
PaymentPeriod.BillingPeriod
The date when billing for this profile
begins.
NOTE: The profile may take up to 24
hours for activation.
The unit of measure for the billing cycle.
Must be one of the following:
Day
W eek
S emiMonth
M onth
Y ear
Digital Goods Integration Guide - EC Edition January 2012 35
Page 36

Handling Recurring Payments
4
Options for Creating a Recurring Payments Profile
NVP SOAP Description
BILLINGFREQUENCY ScheduleDetails.
PaymentPeriod.BillingFreque
ncy
AMT ScheduleDetails.
PaymentPeriod.Amount
You can optionally include a value for TOTALBILLINGCYCLES (SOAP field
ScheduleDetails.PaymentPeriod.TotalBill ingCycles), which specifies the total
number of billing cycles in the regular payment period. If you either do not specify a value or
specify the value 0, the payments continue until PayPal (or the buyer) cancels or suspends the
profile. If the value is greater than 0, the regular payment period continues for the specified
number of billing cycles.
You can also specify an optional shipping amount or tax amount for the regular payment
period.
Including an Optional Trial Period
The number of billing periods that make
up one billing cycle. The combination of
billing frequency and billing period must
be less than or equal to one year.
NOTE: If the billing period is
SemiMonth, the billing
frequency must be 1.
Amount to bill for each billing cycle.
You can optionally include a trial period in the profile by specifying the following fields in the
CreateRecurringPaymentsProfile request. The following table lists the required fields
for creating an optional trial period.
Required fields for specifying a trial period
NVP SOAP
TRIALBILLINGPERIOD ScheduleDetails.TrialPeriod.Bil lingPeriod
TRIALBILLINGFREQUENCY ScheduleDetails.TrialPeriod.Bil lingFrequency
TRIALAMT ScheduleDetails.TrialPeriod.Amo unt
TRIALTOTALBILLINGCYCLES ScheduleDetails.TrialPeriod.Tot alBillingCycles
Specifying an Initial Payment
You can optionally specify an initial non-recurring payment when the recurring payments
profile is created by including the following fields in the
CreateRecurringPaymentsProfile request:
36 January 2012 Digital Goods Integration Guide - EC Edition
Page 37

Handling Recurring Payments
Options for Creating a Recurring Payments Profile
Required fields for specifying an initial payment
NVP SOAP
INITAMT ScheduleDetails.ActivationDetai ls.InitialAmount
FAILEDINITAMTACTION ScheduleDetails.ActivationDetai ls.FailedInitAmoun tAction
By default, PayPal does not activate the profile if the initial payment amount fails. To override
this default behavior, set the FAILEDINITAMTACTION field to ContinueOnFailur e. If the
initial payment amount fails, ContinueOnFailure instructs PayPal to add the failed
payment amount to the outstanding balance due on this recurring payment profile.
If you do not set FAILEDINITAMTACTION or set it to CancelOnFailure, PayPal creates the
recurring payment profile. However, PayPal places the profile into a pending status until the
initial payment completes. If the initial payment clears, PayPal notifies you by Instant
Payment Notification (IPN) that it has activated the pending profile. If the payment fails,
PayPal notifies you by IPN that it has canceled the pending profile.
If you created the profile using Express Checkout, the buyer receives an email stating that
PayPal cleared the initial payment or canceled the pending profile.
4
Maximum Number of Failed Payments
By including the MAXFAILEDPAYMENTS field in the CreateRecurringPayment sProfile
request, you set the number of failed payments allowed before PayPal automatically suspends
the profile. PayPal sends you an IPN message when the number of failed payments reaches the
maximum number specified.
Billing the Outstanding Amount
If a payment fails for any reason, PayPal adds the billing amount (including shipping and tax,
if applicable) to the profile’s outstanding balance. Use the AUTOBILLOUTAMT field in the
CreateRecurringPaymentsProfile request to specify whether PayPal should add the
outstanding amount to the payment amount for the next billing cycle.
Whether or not you choose to include the outstanding amount with the payment for the next
billing cycle, you can also use the BillOutstandingAmount API to programmatically
collect that amount at any time.
Identifying Items as Digital or Physical Goods
Set all the payment details item fields in the following table in the
CreateRecurringPaymentsProfile request. If all items are digital goods, be sure to set
the item category field to Digital to get the discount rate for digital goods.
Digital Goods Integration Guide - EC Edition January 2012 37
Page 38

Handling Recurring Payments
4
Recurring Payments With the Express Checkout API
Required fields for specifying item details
NVP SOAP Description
L_PAYMENTREQUEST_0_
ITEMCATEGORY
L_PAYMENTREQUEST_0_
NAME
n
L_PAYMENTREQUEST_0_
n
AMT
L_PAYMENTREQUEST_0_
n
QTY
n
ItemCategory For digital goods, this field must be set to
Digital.
Digital
P hysical
Name Item name.
Amount Cost of item.
Quantity Item quantity.
Recurring Payments With the Express Checkout API
During the checkout flow, you can create one or more recurring payments and mix recurring
payments with other purchases.
The following diagram illustrates the typical processing flow to create recurring payments
during checkout.
38 January 2012 Digital Goods Integration Guide - EC Edition
Page 39

Handling Recurring Payments
Recurring Payments With the Express Checkout API
4
The circled numbers in the diagram correspond to the numbered steps in the following table:
NOTE: For digital goods, you must use API version 65.1 or greater.
Digital Goods Integration Guide - EC Edition January 2012 39
Page 40

Handling Recurring Payments
4
Recurring Payments With the Express Checkout API
Recurring payments processing flow
Step Merchant... PayPal...
1 Adds JavaScript to your webpage to create the
PayPal digital goods payments flow, which appears
in a lightbox overlaying your webpage (Digital
Goods only).
2 Places the Pay With PayPal button on your
webpage.
3Calls SetExpressCheckout, setting up one or
more billing agreements in the request.
4 Returns a token that identifies the transaction to the
merchant.
5 Redirects buyer’s browser to:
https://www.paypal.com/cgibin/webscr?cmd=_express-checko ut
&token=
SetExpressCheckout
<token returned by
>
Displays login page and allows user to select
payment options and shipping address.
6 Redirects buyer’s browser to returnURL passed to
SetExpressCheckout if buyer agrees to payment
description.
7Calls GetExpressCheckoutDetails to get
buyer information (optional).
Returns GetExpressCheckoutDetails
response.
Displays merchant review page for buyer.
8Calls DoExpressCheckoutPayment if the order
includes one-time purchases as well as a recurring
payment. Otherwise, skip this step.
Returns DoExpressCheckoutPayment response.
9Calls CreateRecurring PaymentsProfile one
time for each recurring payment item included in
the order. If the order includes a one-time digital
goods purchase, sets values for the required
payment details item parameters. Sets the item
category to Digital.
Returns ProfileID in
CreateRecurringPaymentsProfile response
for each profile successfully created.
40 January 2012 Digital Goods Integration Guide - EC Edition
Page 41

Handling Recurring Payments
Recurring Payments With the Express Checkout API
Step Merchant... PayPal...
10 Adds JavaScript to close the lightbox (Digital
Goods only).
11 Fulfills the buyer’s order and displays a successful
transaction page.
Initiating the Processing Flow With SetExpressCheckout
As in the Express Checkout flow, the SetExpr essCheckout request notifies PayPal that you
are:
Initiating an order that can be either a one-time purchase, up to 10 recurring payments, or a
mixture of a one-time purchase and recurring payments
Initiating the processing flow to create one or more billing agreements for recurring
payments with no associated one-time purchase or recurring payment
NOTE: You can also initiate the processing flow using SetCustomerBillingAgreement
for orders that contain only a single recurring payment.
4
Typically, you set the amount of the payment for an Express Checkout transaction when you
call the SetExpressCheckout request. You confirm the amount in the
DoExpressCheckoutPayment request. If, however, you set the amount of the payment to 0
in the SetExpressCheckout request, you can create a billing agreement without initiating a
payment.
NOTE: To create a billing agreement without purchase, use Version 54.0 or higher, of the
PayPal API.
To set up one or more billing agreements for recurring payments, modify the
SetExpressCheckout request as follows:
1. Add an L_BILLINGTYPEn field for each billing agreement you want to create; n is a value
in the range of 0 to 9, inclusive. Set the value of each field to RecurringPayments.
L_BILLINGTYPE0=RecurringPayments
2. Add an L_BILLINGAGREEMENTDESCRIPTIONn field to correspond to each
L_BILLINGTYPEn field you pass; n is a value in the range of 0 to 9, inclusive. Set the
value of each field to the description of the goods or services associated with that billing
agreement, for example:
L_BILLINGAGREEMENTDESCRIPTION0=Time Mag azine subscription
3. If there is no associated purchase, set PAYMENTREQUEST_0_AMT to 0.
PAYMENTREQUEST_0_AMT=0
Digital Goods Integration Guide - EC Edition January 2012 41
Page 42

Handling Recurring Payments
4
Recurring Payments With the Express Checkout API
4. (Optional) Set MAXAMT to the average expected transaction amount.
PayPal uses the value you pass to validate the buyer’s payment method for recurring
payments. If you do not specify a value, the default is 25.00.
The SetExpre ssCheckout response provides a token that uniquely identifies the transaction
for subsequent redirects and API calls.
Redirecting the Buyer to PayPal
After you receive a successful response from SetExpressCheckout, add the TOKEN from
the SetExpressCheckout respon se as a name/value pair to the following URL, and redirect
your buyer to it:
https://www.paypal.com/cgi-bin /webscr?cmd=_expre ss-checkout&
token=<value_returned_by_SetExpressCheckoutResponse>
When redirecting the buyer to PayPal, PayPal recommends that you use the HTTPS response
302 “Object Moved” with the URL as the value of the Location header in the HTTPS
response. Make sure that you use an SSL-enabled server to prevent browser warnings about a
mix of secure and insecure graphics.
Getting Buyer Details Using GetExpressCheckoutDetails
The GetExpressCheckoutDetails method returns information about the buyer, including
name and email address stored on PayPal. You can optionally call this API after PayPal
redirects the buyer’s browser to the ReturnURL you specified in the SetExpressCheckout
request.
The GetExpressCheckoutDetails request has one required parameter, TOKEN, which is
the value returned in the SetExpressCheckout response.
PayPal does not return the values you specified for the following parameter fields in the
GetExpressCheckoutDetails response unless the transaction includes a purchase. PayPal
ignores the fields if you set up a billing agreement for a recurring payment that is not
immediately charged.
PAYMENTREQUEST_n_DESC
PAYMENTREQUEST_n_CUSTOM
PAYMENTREQUEST_n_INVNUM
Creating the Profiles With CreateRecurringPaymentsProfile
After your buyer has agreed to the recurring payments billing agreement on your confirmation
page, you must call CreateRecurringPaymentsProfile to create the profile. If you are
creating multiple recurring payments profiles, you must call
CreateRecurringPaymentsProfile once for each profile you plan to create.
42 January 2012 Digital Goods Integration Guide - EC Edition
Page 43

Handling Recurring Payments
Recurring Payments With the Express Checkout API
If the transaction includes a mixture of a one-time purchase and recurring payments profiles,
call DoExpressCheckou tPayment to complete the one-time purchase transaction. Then call
CreateRecurringPaymentsProfile for each recurring payment profile you plan to
create.
IMPORTANT: PayPal does not create the recurring payments profile until you receive a
success response from the CreateRecurringPaymentsProfile call.
T o obtain the best rates for digital goods, set values for the following required pay ment details
item fields:
L_PAYMENTREQUEST_0_NAMEn
L_PAYMENTREQUEST_0_AMTn
L_PAYMENTREQUEST_0_QTYn
L_PAYMENTREQUEST_0_ITEMCATEGORYn (you must set the value to Digital)
NOTE: The payment details item fields are available with version 69.0 and later of the
CreateRecurringPaymentsProfile API.
The CreateRecurringPaymentsProfile response contains a Profile ID, which is an
encoded string that uniquely identifies the recurring payments profile.
4
The following is a CreateRecurringPaymentsProfile example that enables you to
obtain the best rates for digital goods items.
Request Parameters
[requiredSecurityParameters]
&METHOD=CreateRecurringPayment sProfile
TOKEN=EC-13W99099UU817504D
&PROFILESTARTDATE:20XX-03-05T03 :00:00
&DESC=Movie clips
&BILLINGPERIOD=Month
&BILLINGFREQUENCY=12
&AMT=1.00
&CURRENCYCODE=USD
&EMAIL=payername@bbb.net
&L_PAYMENTREQUEST_0_ITEMCATEGO RY0=Digital
&L_PAYMENTREQUEST_0_NAME0=Kitt y Antics
&L_PAYMENTREQUEST_0_AMT0=1.00
&L_PAYMENTREQUEST_0_QTY0=1
Response Parameters
[successResponseFields]
&PROFILEID=I-G7ALAX8095JY
&PROFILESTATUS=Active
Digital Goods Integration Guide - EC Edition January 2012 43
Page 44

Handling Recurring Payments
4
Recurring Payments Profile Status
Recurring Payments Profile Status
The recurring payments actions you may take depend on the status of the profile.
A recurring payments profile can have one of the following status values:
ActiveProfile
PendingProfile
ExpiredProfile
SuspendedProfile
CancelledProfile
If PayPal successfully creates the profile, the profile has an ActiveProfile status. However,
if a non-recurring initial payment fails and you set FAILEDINITAMTA CTION to
CancelOnFailure in the CreateRecurringPayment sProfile request, PayPal creates
the profile with a status of PendingProfile. The profile remains in this status until the
initial payment either completes successfully or fails.
A profile has a status of ExpiredProfile when PayPal completes the total billing cycles for
the optional trial and the regular payment periods.
You can suspend or cancel a profile by using the
ManageRecurringPaymentsProfileStatus API. You can also reactivate a suspended
profile. If PayPal has already reached the maximum number of failed payments, however, you
must increase the number of failed payments before reactivating the profile.
NOTE: You can also suspend, cancel, or reactive a recurring payments profile through the
PayPal website.
For recurring payments profiles created with the Express Checkout API, the buyer receives an
email about the change in status of their recurring payment.
Getting Recurring Payments Profile Information
Use the GetRecurringPaymentsProfileDetails API to obtain information about a
profile.
NOTE: You can also get information about recurring payments profiles from the PayPal
website.
Along with the information that you specified in the CreateRecurringPaymentsProfile
request, GetRecurringPaymentsProfileDetails also returns the following summary
information about the profile:
Profile status
Next scheduled billing date
Number of billing cycles completed in the active subscription period
44 January 2012 Digital Goods Integration Guide - EC Edition
Page 45

Number of billing cycles remaining in the active subscription period
Current outstanding balance
Total number of failed billing cycles
Date of the last successful payment received
Amount of the last successful payment received
Modifying a Recurring Payments Profile
Use the UpdateRecurringPaymentsProfile API to modify a recurring payments profile.
NOTE: You can also modify recurring payments profiles from the PayPal website.
You can modify only the following specific information about an active or suspended profile:
Subscriber name or address
Past due or outstanding amount
Handling Recurring Payments
Modifying a Recurring Payments Profile
4
Whether to bill the outstanding amount with the next billing cycle
Maximum number of failed payments allowed
Profile description and reference
Number of additional billing cycles
Billing amount, tax amount, or shipping amount
NOTE: You cannot modify the billing frequency or billing period of a profile. You can modify
the number of billing cycles in the profile.
You can modify the following profile information during the trial period or regular payment
period.
Billing amount
Number of billing cycles
NOTE: For recurring payments with the Express Checkout API, PayPal does not allow certain
updates, such as billing amount, within 3 days of the scheduled billing date.
The profile changes take effect with the next payment after the call to update the profile. Say,
for example, the buyer has made 1 trial payment out of a total of 3. You call
UpdateRecurringPaymentsProfile to increase the number of billing cycles to 5. This
provides the buyer with 4 additional trial payments. If you call
UpdateRecurringPaymentsProfile during the regular payment period, t he changes take
effect with the buyer’s next scheduled regular payment.
For complete details, see the Name-Value Pair Developer Guide and Reference or the SOAP
API Reference.
Digital Goods Integration Guide - EC Edition January 2012 45
Page 46

Handling Recurring Payments
4
Billing the Outstanding Amount of a Profile
Updating Addresses
When you update the subscriber shipping address, you must enter all of address fields, not just
those that are changing:
To update the subscriber’s street address, for example, specify all the address fields listed in
the Name-Value Pair Developer Guide and Refer ence or SOAP API Reference. Do not specify
only the street address field.
Updating the Billing Amount
For profiles created using Express Checkout, you can increase the recurring payment total
amount by 20% maximum in a fixed 180-day interval after profile creation. The 20%
maximum is based on the total amount of the profile at the beginning of the 180-day interval,
including any shipping or tax amount.
If, for example, you create a profile on March 10 with a total amount of $100, during the 180day interval from March 10 to September 6, you can increase the amount to a maximum of
$120 (120% of $100).
Suppose that during the first 180-day interval, you increased the payment amount to $110.
During the next 180-day interval (starting September 7), you can only increase the amount of
the payment to a maximum of $132 (120% of $110).
Billing the Outstanding Amount of a Profile
Use the BillOutstandingAmount API to immediately bill the buyer for the current past
due or outstanding amount for a recurring payments profile.
NOTE: You can also bill the buyer for the current past due or outstanding amount for a
recurring payments profile from the PayPal website.
To bill the outstanding amount:
The profile status must be active or suspended.
NOTE: The BillOutstandingAm ount API does not reactivate a suspended profile. You
need to call ManageRecurringProfileStatus to do this.
The profile must have a non-zero outstanding balance.
The amount of the payment cannot exceed the outstanding amount for the profile.
The BillOutstandingAmount call cannot be within 24 hours of a regularly scheduled
payment for this profile.
NOTE: An error occurs when another outstanding balance payment is already queued.
PayPal informs you by IPN about the success or failure of the outstanding payment. For
profiles created using Express Checkout, the buyer receives an email notification of the
payment.
46 January 2012 Digital Goods Integration Guide - EC Edition
Page 47

Handling Recurring Payments
Recurring Payments Notifications
Recurring Payments Notifications
PayPal notifies you of recurring payments events through IPN and email. Typically, however,
you can call GetTransactionDetails to obtain the information you need.
PayPal notifies you of certain events through IPN. For recurring payments profiles created
using Express Checkout, PayPal also notifies buyers of specific events by email. The
following table indicates when PayPal generates IPN and emails:
Recurring payments IPN messages and email
Event IPN Buyer Email
Profile successfully created Ye s Yes
Profile creation failed Yes Yes
Profile canceled from paypal.com interface Yes Yes
Profile status changed using API No Yes
Profile updated using API No Yes
4
Initial payment either succeeded or failed Yes Yes
Payment either succeeded or failed (during either trial
period or regular payment period)
Outstanding payment either succeeded or failed Yes Yes
Maximum number of failed payments reached Yes No
NOTE: API transactions such as ManangeRecurringPaymentsProfileStatus do not
Yes Yes
trigger IPN notification. The API response immediately provides the success or failure
of the call.
Digital Goods Integration Guide - EC Edition January 2012 47
Page 48

Handling Recurring Payments
4
Recurring Payments Notifications
48 January 2012 Digital Goods Integration Guide - EC Edition
Page 49

Options For Closing the Lightbox
A
or Mini-browser
The following options for closing the lightbox or mini-browser reload the parent page:
“Reloading Parent Page to a Specific URL” on page 49
“Reloading Parent Page by Removing Frames” on page 50
Reloading Parent Page to a Specific URL
This procedure for closing the lightbox or mini-browser reloads the parent page to a specific
URL:
1. Optionally, to obtain details about the buyer to display to your web page, call the
GetExpressCheckoutDetails API operation.
2. Call DoExpressCheckout to complete payment. See “Completing the Digital Goods
Transaction” on page 25.
3. Include JavaScript code, such as in the following example, on the return URL and cancel
URL pages:
<!-- Use result of DoEC to sen d the buyer to the correct page -->
<!DOCTYPE html>
<html>
<head>
<title></title>
<script>
top.location.href=’http://example.com/path_to_fulfillment_p age’;
</script>
</head>
<body>
If this page does not redir ect <a href="[page to deliver content
to non-JS customer]">Click Her e</a>
</body>
</html>
If the buyer cancels the order, close the lightbox or mini-browser without fulfilling the order.
The top window is the browser window. This code replaces the top window content with the
content of the page at the specified URL.
Digital Goods Integration Guide - EC Edition January 2012 49
Page 50

Options For Closing the Lightbox or Mini-browser
A
Reloading Parent Page by Removing Frames
Reloading Parent Page by Removing Frames
This procedure for closing the lightbox or mini-browser reloads the parent page by removing
frames:
1. Optionally, to obtain details about the buyer to display to your web page, call the
GetExpressCheckoutDetails API operation.
2. Call DoExpressCheckout to complete payment. See “Completing the Digital Goods
Transaction” on page 25.
NOTE: You perform the previous 2 steps while you are still in control of the lightbox.
3. Include JavaScript code, such as in the following example, on the return URL and cancel
URL pages:
<!-- Use result of DoEC to sen d the buyer to the correct page -->
<!DOCTYPE html>
<html>
<head>
<title></title>
<script>
if (window != top) {
top.location.replace(d ocument.location);
}
</script>
</head>
<body>
<!-- Include non-JavaScript c ontent here -->
If this page does not redirect <a href="[page to deliver content
to non-JS customer]">Click Her e</a>
</body>
</html>
If the buyer cancels the order, close the lightbox or mini-browser without fulfilling the order.
The top window is the browser window. This code replaces the top window content with the
content of the page at the specified URL.
50 January 2012 Digital Goods Integration Guide - EC Edition
Page 51

Methods For Integrating Digital
B
Goods Into Flash
You can integrate digital goods into a Flash file.
“Integrating Digital Goods With Flash - Third-Party Merchant” on page 51
“Integrating Digital Goods With Flash” on page 51
Integrating Digital Goods With Flash
The following is an example of how a first-party merchant can integrate digital goods with
Flash.
To integrate digital goods with Flash:
1. Include the digital goods JavaScript library in the HTML page game.html, which also
includes the Flash movie game.swf.
2. Include the following ActionScript in the Flash movie game.swf to initialize the digital
goods object:
dg_button.addEventListener(
MouseEvent.MOUSE_UP,
function(evt:MouseEvent):void {
var payment_URL:String = "<Mer chant URL to initi ate API call>";
// use ExternalInterface to call the JavaScrip t method dg.startFlow
var result:uint =
ExternalInterface.call("dg.sta rtFlow",payment_URL );
}
);
function paymentComplete(response Text):void {
// use responseText to do any customizations
}
// register the callback metho d so it can be cal led via JavaScript
ExternalInterface.addCallback( "paymentCompleteEx t", paymentComplete);
Integrating Digital Goods With Flash - Third-Party Merchant
The following is an example of how a third-party merchant can integrate digital goods with
Flash.
In the following example, use ActionScript 3.0’s LocalConnection in the Flash movie,
game.swf, to respond to the payment.
Digital Goods Integration Guide - EC Edition January 2012 51
Page 52

Methods For Integrating Digital Goods Into Flash
B
Integrating Digital Goods With Flash - Third-Party Merchant
1. Create the Flash movie, game.swf, with the following code. The code assumes the button
click on dg_button initiates payment.
// create local connection
var conn:LocalConnection;
conn = new LocalConnection();
// allow cross domain connecti on
conn.allowDomain('*');
// identify this movie as the receiver (i.e. cli ent)
conn.client = this;
dg_button.addEventListener(
MouseEvent.MOUSE_UP,
function(evt:MouseEvent):void {
// following URL will begin the DG API call
var payment_URL:String =
"<Merchant URL to initiate API call>";
// following JS opens a new wi ndow to the approp riate size
// for DG checkout
var jscommand:String = "windo w.open('"+payment_ URL+"','win',
'height=550,width=400,toolbar= no,scrollbars=no'); ";
var url:URLRequest = new URLRe quest("javascript: " +
jscommand + "
void(0);");
navigateToURL(url, "_self");
//initiate listening on connec tion
conn.connect('paymentConn');
});
function paymentComplete(response Text):void {
//use responseText to do any c ustomizations
//close the LocalConnection
conn.close();
}
2. Specify another Flash movie, return.swf, as the return URL in the API call.
3. Use FlashVars or ExternalInterface in return.swf to gather any required values
from the API response.
4. Use the LocalConnection from step 1 in return.swf to communicate with
game.swf, for example:
var sendingLC:LocalConnection = new Local Connection();
// do anything required to get API response para meters into
// the ‘response’ variable
// connect to game.swf and cal l paymentComplete
sendingLC.send('paymentConn', 'pa ymentComplete', respons e);
52 January 2012 Digital Goods Integration Guide - EC Edition
Page 53

Express Checkout API Fields
C
Supported By Digital Goods
A subset of the Express Checkout API parameter fields are relevant in digital goods
integrations.
“Express Checkout NVP API Fields Supported By Digital Goods” on page 53
“Express Checkout SOAP API Fields Supported By Digital Goods” on page 57
Express Checkout NVP API Fields Supported By Digital Goods
SetExpressCheckout NVP Request Fields
SetExpressCheckout Request Fields
METHOD (Must be set to SetExpressCheckout)
TOKEN
RETURNURL
CANCELURL
REQCONFIRMSHIPPING
NOSHIPPING
ALLOWNOTE
LOCALECODE
PAYMENTDETAILS
Payment Details Type Fields
PAYMENTREQUEST_n_AMT
PAYMENTREQUEST_n_CURRENCYCODE
PAYMENTREQUEST_n_ITEMAMT
PAYMENTREQUEST_n_TAXAMT
PAYMENTREQUEST_n_DESC
PAYMENTREQUEST_n_INVNUM
PAYMENTREQUEST_n_NOTIFYURL
PAYMENTREQUEST_n_PAYMENTACTION
Digital Goods Integration Guide - EC Edition January 2012 53
Page 54

Express Checkout API Fields Supported By Digital Goods
C
Express Checkout NVP API Fields Supported By Digital Goods
Payment Details Item Type Fields
PAYMENTREQUEST_n_NAMEm
PAYMENTREQUEST_n_DESCm
PAYMENTREQUEST_n_AMTm
PAYMENTREQUEST_n_NUMBERm
PAYMENTREQUEST_n_QTYm
PAYMENTREQUEST_n_TAXAMTm
PAYMENTREQUEST_n_ITEMCATEGORYm
SetExpressCheckout NVP Response Fields
SetExpressCheckout Response Fields
TOKEN
GetExpressCheckoutDetails NVP Request Fields
GetExpressCheckoutDetails Request Fields
METHOD (Must be set to GetExpressCheckoutDetails)
TOKEN
GetExpressCheckoutDetails NVP Response Fields
GetExpressCheckoutDetails Response Fields
TOKEN
INVNUM
PHONENUM
NOTE
REDIRECTREQUIRED
CHECKOUTSTATUS
Payer Information Fields
EMAIL
PAYERID
PAYERSTATUS
COUNTRYCODE
BUSINESS
54 January 2012 Digital Goods Integration Guide - EC Edition
Page 55

Express Checkout API Fields Supported By Digital Goods
Express Checkout NVP API Fields Supported By Digital Goods
Payer Name Fields
SALUTATION
FIRSTNAME
MIDDLENAME
LASTNAME
SUFFIX
Payment Details Type Fields
PAYMENTREQUEST_n_AMT
PAYMENTREQUEST_n_CURRENCYCODE
PAYMENTREQUEST_n_ITEMAMT
PAYMENTREQUEST_n_TAXAMT
PAYMENTREQUEST_n_DESC
PAYMENTREQUEST_n_INVNUM
PAYMENTREQUEST_n_NOTIFYURL
C
PAYMENTREQUEST_n_TRANSACTIONID
PAYMENTREQUEST_n_PAYMENTREQUESTID
Payment Details Item Type Fields
L_PAYMENTREQUEST_n_NAMEm
L_PAYMENTREQUEST_n_DESCm
L_PAYMENTREQUEST_n_AMTm
L_PAYMENTREQUEST_n_NUMBERm
L_PAYMENTREQUEST_n_QTYm
L_PAYMENTREQUEST_n_TAXAMTm
L_PAYMENTREQUEST_n_ITEMCATEGORYm
NVP GetExpressCheckoutDetails Response Fields
TOKEN
INVNUM
PHONENUM
NOTE
REDIRECTREQUIRED
CHECKOUTSTATUS
Digital Goods Integration Guide - EC Edition January 2012 55
Page 56

Express Checkout API Fields Supported By Digital Goods
C
Express Checkout NVP API Fields Supported By Digital Goods
DoExpressCheckoutPayment NVP Request Fields
DoExpressCheckoutPayment Request Fields
METHOD (Must be set to DoExpressCheckoutPayment)
TOKEN
RETURNURL
CANCELURL
NOSHIPPING
ALLOWNOTE
LOCALECODE
Payment Details Type Fields
PAYMENTREQUEST_n_AMT
PAYMENTREQUEST_n_CURRENCYCODE
PAYMENTREQUEST_n_ITEMAMT
PAYMENTREQUEST_n_TAXAMT
PAYMENTREQUEST_n_DESC
PAYMENTREQUEST_n_INVNUM
PAYMENTREQUEST_n_NOTIFYURL
PAYMENTREQUEST_n_PAYMENTACTION
PAYMENTREQUEST_n_PAYMENTREQUESTID
Payment Details Item Type Fields
PAYMENTREQUEST_n_NAMEm
PAYMENTREQUEST_n_DESCm
PAYMENTREQUEST_n_AMTm
PAYMENTREQUEST_n_NUMBERm
PAYMENTREQUEST_n_QTYm
PAYMENTREQUEST_n_TAXAMTm
PAYMENTREQUEST_n_ITEMCATEGORYm
DoExpressCheckoutPayment NVP Response Fields
DoExpressCheckoutPayment Response Fields
TOKEN
NOTE
REDIRECTREQUIRED
56 January 2012 Digital Goods Integration Guide - EC Edition
Page 57

Express Checkout API Fields Supported By Digital Goods
Express Checkout SOAP API Fields Supported By Digital Goods
Payment Details Type Fields
PAYMENTREQUEST_n_AMT
PAYMENTREQUEST_n_CURRENCYCODE
PAYMENTREQUEST_n_ITEMAMT
PAYMENTREQUEST_n_TAXAMT
PAYMENTREQUEST_n_DESC
PAYMENTREQUEST_n_INVNUM
PAYMENTREQUEST_n_NOTIFYURL
PAYMENTREQUEST_n_PAYMENTACTION
PAYMENTREQUEST_n_PAYMENTREQUESTID
Payment Information Fields
PAYMENTINFO_n_ TRANSACTIONID
PAYMENTINFO_n_ TRANSACTIONTYPE
PAYMENTINFO_n_ ORDERTIME
C
PAYMENTINFO_n_ CURRENCYCODE
PAYMENTREQUEST_n_FEEAMT
PAYMENTINFO_n_ SETTLEAMT
PAYMENTINFO_n_ TAXAMT
PAYMENTINFO_n_ EXCHANGERATE
PAYMENTINFO_n_ PAYMENTSTATUS
PAYMENTINFO_n_ PENDINGREASON
PAYMENTINFO_n_ REASONCODE
PAYMENTINFO_n_ FMFfilterIDm
PAYMENTINFO_n_ FMFfilterNAMEm
Express Checkout SOAP API Fields Supported By Digital Goods
SetExpressCheckout SOAP Request Fields
SetExpressCheckout Request Fields
Token
ReturnURL
CancelURL
Digital Goods Integration Guide - EC Edition January 2012 57
Page 58

Express Checkout API Fields Supported By Digital Goods
C
Express Checkout SOAP API Fields Supported By Digital Goods
RegConfirmShipping
NoShipping
AllowNote
LocaleCode
PaymentDetails
Payment Details Type Fields
OrderTotal
ItemTotal
TaxTotal
OrderDescription
InvoiceID
NotifyURL
PaymentDetailsItem
PaymentAction
Payment Details Item Type Fields
Name
Description
Amount
Number
Quantity
Tax
ItemCategory
SetExpressCheckout SOAP Response Fields
SetExpressCheckout Response Fields
Token
GetExpressCheckoutDetails SOAP Request Fields
GetExpressCheckoutDetails Request Fields
Token
58 January 2012 Digital Goods Integration Guide - EC Edition
Page 59

Express Checkout API Fields Supported By Digital Goods
Express Checkout SOAP API Fields Supported By Digital Goods
GetExpressCheckoutDetails SOAP Response Fields
GetExpressCheckoutDetails Response Fields
Token
InvoiceID
ContactPhone
Note
RedirectRequired
CheckoutStatus
PaymentDetails
Payer Information Fields
Payer
PayerID
PayerStatus
C
PayerCountry
PayerBusiness
Payer Name Fields
Salutation
FirstName
MiddleName
LastName
Suffix
Payment Details Type Fields
OrderTotal
ItemTotal
TaxTotal
OrderDescription
InvoiceID
NotifyURL
PaymentDetailsItem
TransactionID
PaymentRequestID
Payment Details Item Type Fields
Name
Digital Goods Integration Guide - EC Edition January 2012 59
Page 60

Express Checkout API Fields Supported By Digital Goods
C
Express Checkout SOAP API Fields Supported By Digital Goods
Description
Amount
Number
Quantity
Tax
ItemCategory
DoExpressCheckoutPayment SOAP Request Fields
DoExpressCheckoutPayment Request Fields
Token
PayerID
PaymentDetails
ReturnFMFDetails
Payment Details Type Fields
OrderTotal
ItemTotal
TaxTotal
OrderDescription
InvoiceID
NotifyURL
PaymentAction
PaymentDetailsItem
PaymentRequestID
Payment Details Item Type Fields
Name
Description
Amount
Number
Quantity
Tax
ItemCategory
60 January 2012 Digital Goods Integration Guide - EC Edition
Page 61

Express Checkout API Fields Supported By Digital Goods
Express Checkout SOAP API Fields Supported By Digital Goods
DoExpressCheckoutPayment SOAP Response Fields
DoExpressCheckoutPayment Response Fields
Token
Note
RedirectRequired
Payment Information Fields
TransactionID
TransactionType
PaymentDate
GrossAmount
FeeAmount
SettleAmount
TaxAmount
C
ExchangeRate
PaymentStatus
PendingReason
ReasonCode
Digital Goods Integration Guide - EC Edition January 2012 61
Page 62

Express Checkout API Fields Supported By Digital Goods
C
Express Checkout SOAP API Fields Supported By Digital Goods
62 January 2012 Digital Goods Integration Guide - EC Edition
Page 63

Revision History
Revision history for PayPal Digital Goods Integration Guide - Express Checkout Edition.
Date Published Descr iption
01/30/12 Updated to describe the use of the expType variable to achieve different DG
Flows. Split Chapter 1 into 2 chapters, in an effort to separate the bulk of the
conceptual info from the procedural info. Fixed doc b ugs, re-formatt ed API field
reference.
03/15/11 Updated to include a note on setting item detail variables in
SetExpressCheckout and DoExpressCheckou tPayment to obtain the
digital goods discount rate.
03/08/11 Updated information for V ersion 69.0: Describes how to obtain the best rates for
digital goods items for recurring payments and reference transactions.
01/26/11 First publication.
Digital Goods Integration Guide - EC Edition January 2012 63
Page 64

64 January 2012 Digital Goods Integration Guide - EC Edition
 Loading...