

Page 1
15/11/2010
Ins-30047 PROXIMITY P50 compact kit
Technical Support
Paxton
01273 811011
Documentation on all Paxton products can be found on our website - http://www.paxton.co.uk/
Suitability
Mounted on metal surface
Fitting the kit
support@paxton.co.uk
Technical help is available: Monday - Friday from 07:00 - 19:00 (GMT)
Saturday from 09:00 - 13:00 (GMT)
Security-sensitive doors
Readers mounted together
Exit
Wet environments
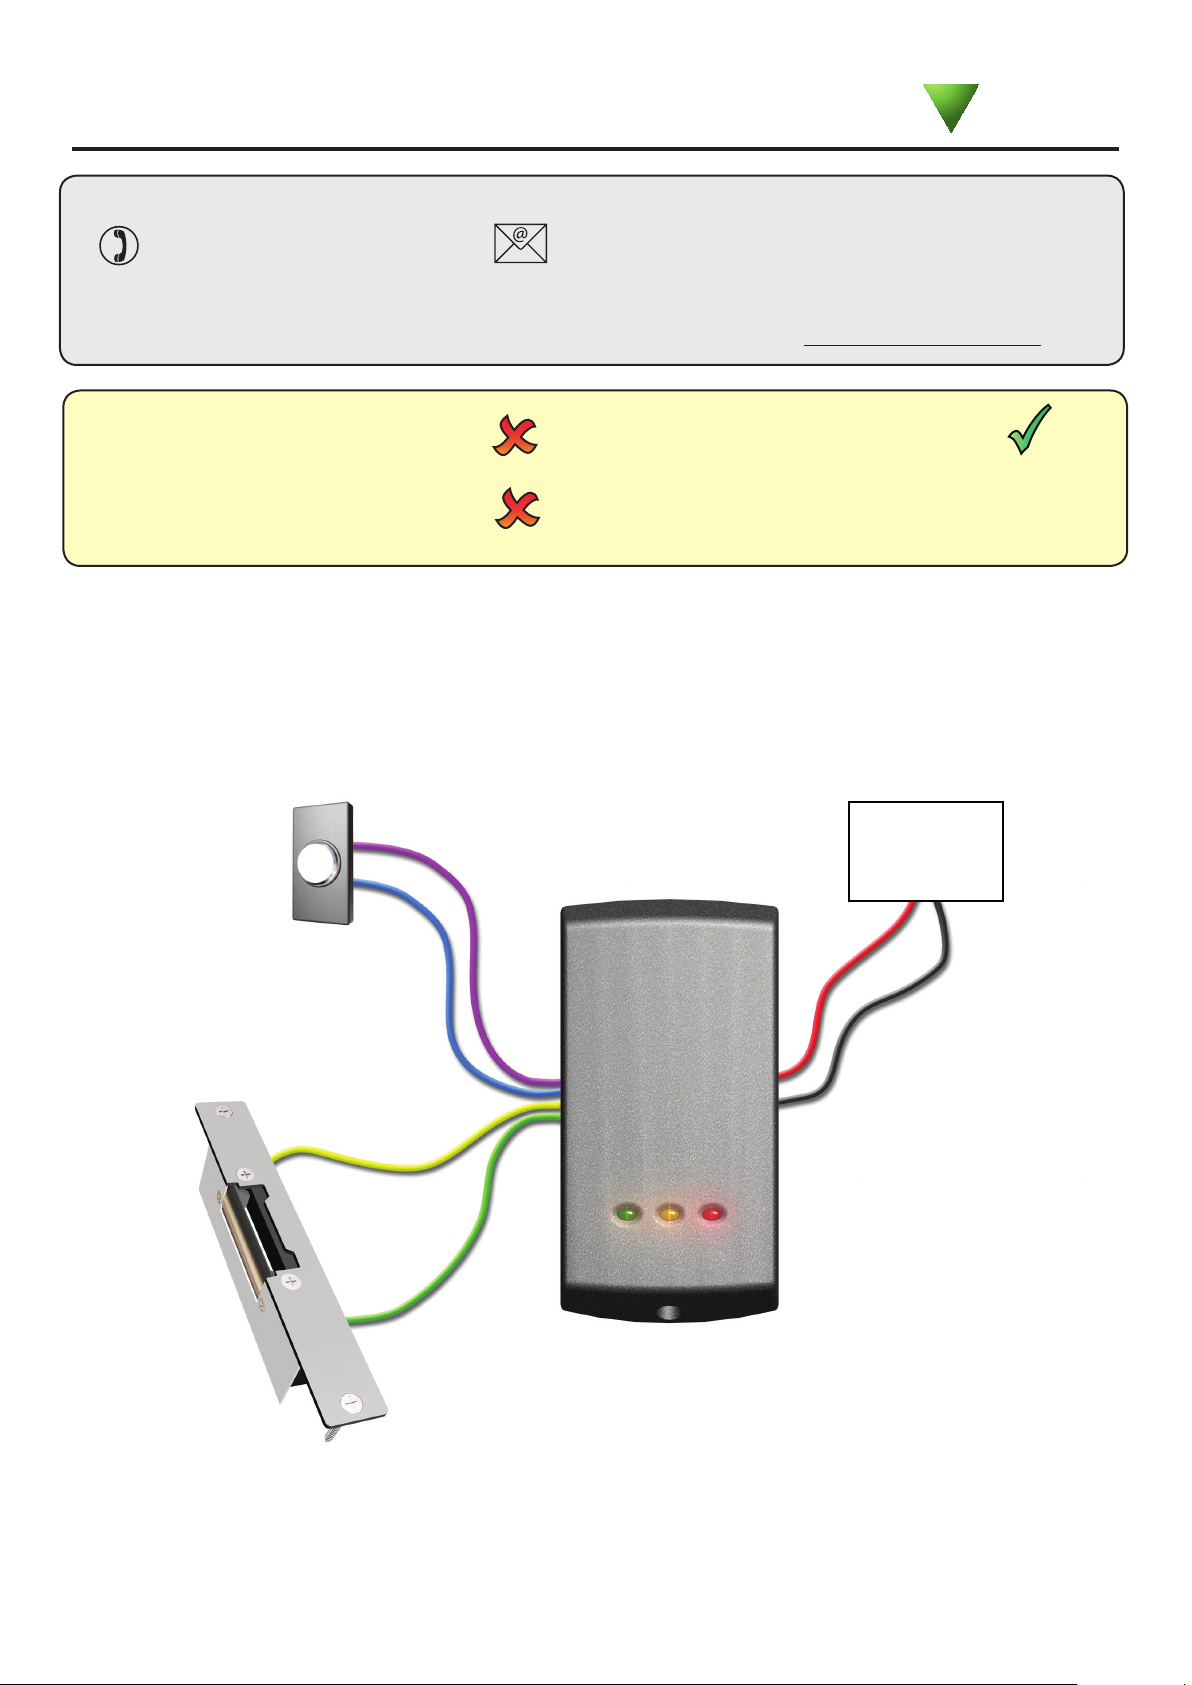
To 12V DC
power supply
300 mm
between readers
Exit button
(push to make)
+12V
Electric release
0V
0V
+12V
12V DC release current rating must be less than 1A.
0V
Page 2
Installation
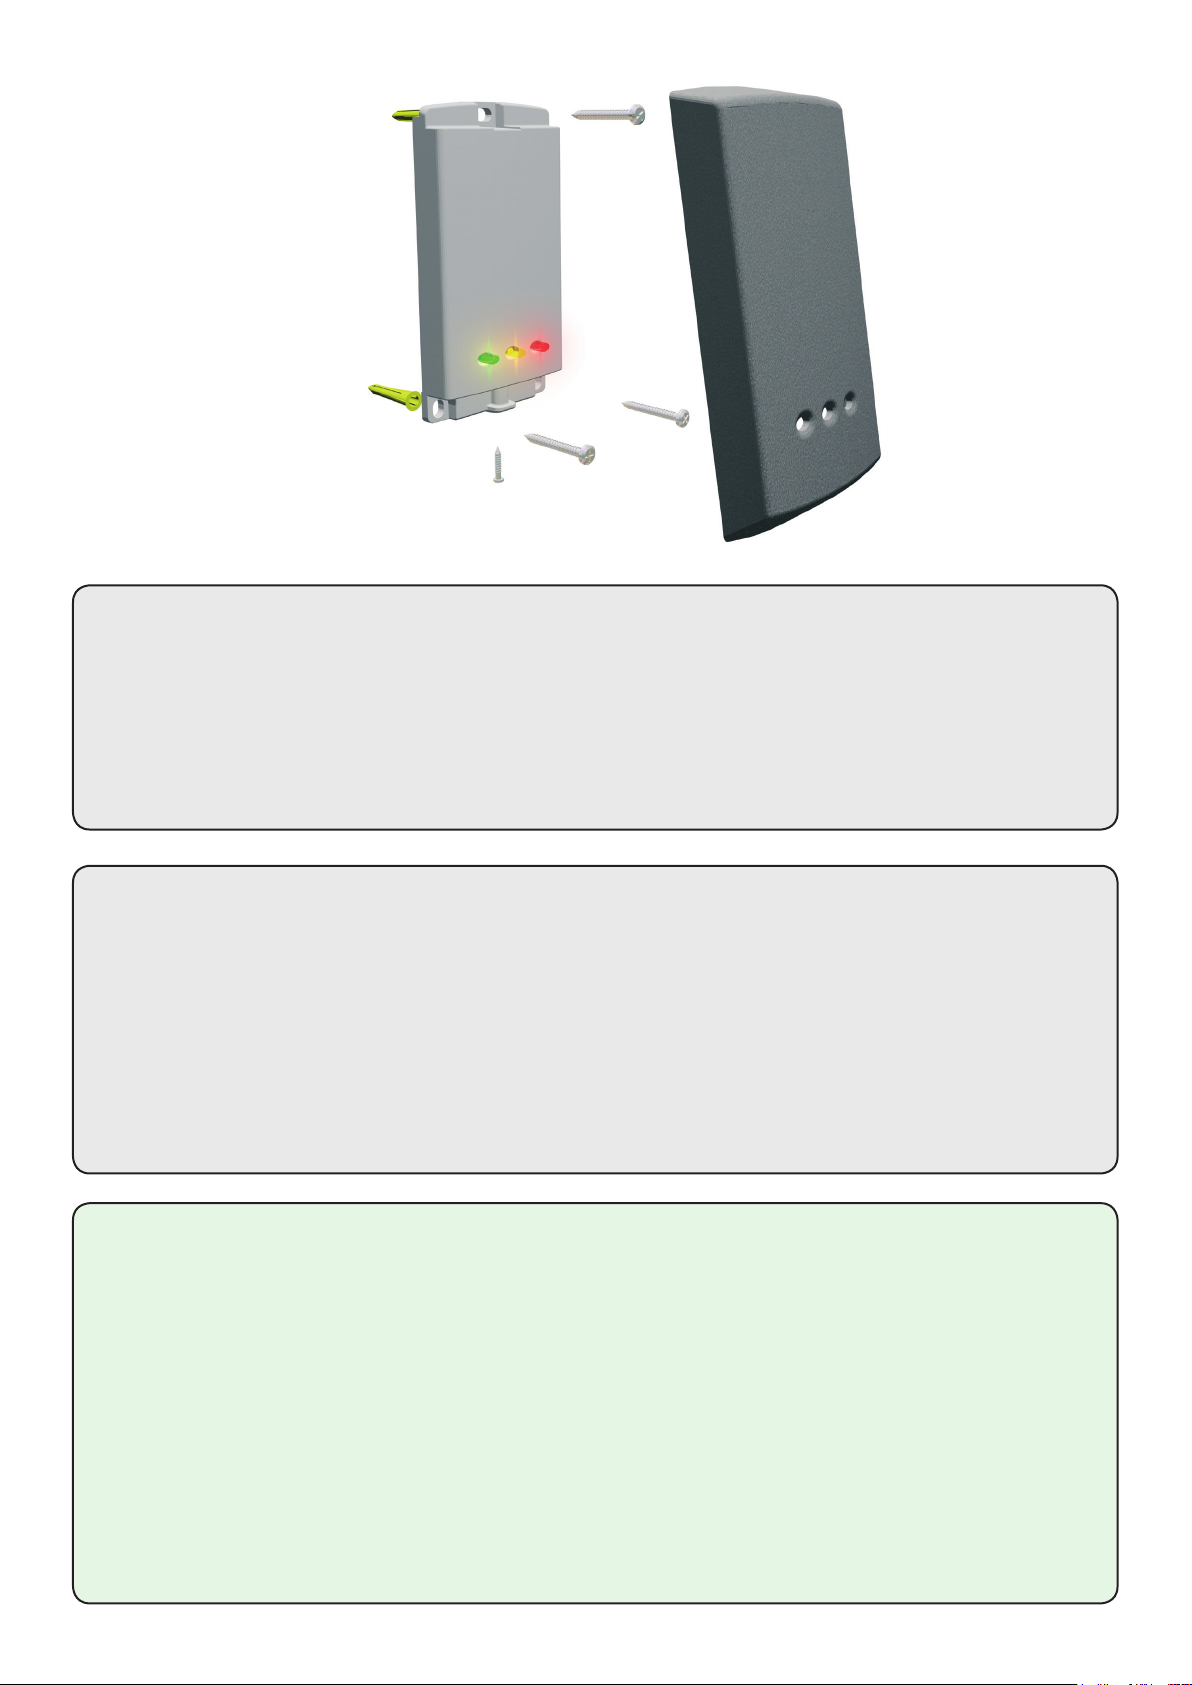
Fitting the reader
Step 1: Carefully mark out the mounting holes for the reader and the hole of the cable feed.
Step 2: Drill the marked holes for the mounting points and the cable feed. When drilling the holes, ensure
that you are aware of any hidden cables or pipes. Once the holes have been drilled, t the supplied wall
plugs and feed the cable through the cable feed hole before securing the reader to the wall using the
screws supplied.
Step 3: Fit the reader cover to the reader, and secure using the screw provided.
Fitting the power supply
Step 1: Mark the mounting points for the power supply. Drill the four holes, t the wall plugs and
screw the power supply to the wall.
Step 2: Run the black/red cables from the reader to the power supply. Attach the red wire to the 12V
power supply terminal, and the black wire to the 0V power supply terminal. The cables can be secured in
place using the cable clips provided. Please ensure that the cable is not damaged when tting the cable
clips. Fit the power lead provided.
Step 3: Using the guides provided, make a gap for the cables on the power supply cover. Fit the cover,
feeding the cables through the gap. Do not connect the power supply to the mains until the lock is tted.
Once this is done, power the system up, and start programming the system.
Full System Reset
Should it be required, the system can be reset. There are two ways of doing this.
Only use one method to reset the system.
1. Power down the unit.
2. Press and hold the exit button.
3. Power up the unit. It will beep several times.
4. Wait for a further beep and then release and press
the exit button twice more while it beeps 3 times.
5. The reader will beep 6 times.
OR
1. Present Enrolment card.
2. Present Door open time card twice.
3. Present Enrolment card.
4. Present Door open time card twice.
5. WAIT FOR 5 SECONDS!
Page 3

Programming the system
1. At installation, present this card to the
reader to validate the tokens in this pack
2. To re-validate a user token present this
enrolment card to the reader followed
by the
user token
FUNCTION CARD
enrolment card
1. At installation, present this card to the
reader to validate the tokens in this pack
2. To re-validate a user token present this
enrolment card to the reader followed
by the
user token
FUNCTION CARD
enrolment card
1. At installation, present this card to the
reader to validate the tokens in this pack
2. To re-validate a user token present this
enrolment card to the reader followed
by the
user token
FUNCTION CARD
enrolment card
1. At installation, present this card to the
reader to validate the tokens in this pack
2. To re-validate a user token present this
enrolment card to the reader followed
by the
user token
FUNCTION CARD
enrolment card
Adding the card pack
1 2 3 4
BEEP!
BEEP!
PROXIMITY
enrolment card
1. At installation, present this
card to the reader to validate
the tokens in this pack.
2. To re-validate a user token,
present this enrolment card
to the reader followed by the
user token.
1. Take the enrolment card from the box of cards.
2. Present the enrolment card to the reader.
3. The reader beeps and the LED's light up as the enrolment card is acknowledged.
4. Return the enrolment card to the box. All the included user keyfobs are now valid.
Adding user cards
1 2 3 4
Shadow cards
User keyfob
1. Each user keyfob has a corresponding shadow card.
2. Write the name of the user on the shadow card.
3. Issue the keyfob to the user.
4. Return the shadow card to the card box and keep in a safe place.
Barring user cards
1 2 3 4
Swipe this card to bar:
Swipe this card to bar:
Swipe this card to bar:
Swipe this card to bar:
John Smith
Write name:
John Smith
Write name:
John Smith
Write name:
John Smith
Write name:
1. If a user has lost their keyfob, it can easily be removed from the system.
2. Take the matching shadow card from the card box.
3. Present the shadow card to the reader and return to the card box.
4. If the user tries to use their keyfob, they will no longer be granted entry.
Page 4

Unbarring user cards
1 2 3 4
1. At installation, present this card to the
reader to validate the tokens in this pack
2. To re-validate a user token present this
enrolment card to the reader followed by the
user token
FUNCTION CARD
enrolment card
1. At installation, present this card to the
reader to validate the tokens in this pack
2. To re-validate a user token present this
enrolment card to the reader followed
by the
user token
FUNCTION CARD
enrolment card
This card is used with systems where a fail open
electric release is used for the safe operation in the
event of a fire. Present the card to the reader to
drive a fail open release or a maglock. Present the
card again to revert to the fail closed operation
Paxton Access
FUNCTION CARD
fail open release
1. If a user nds their keyfob after it has been barred, it can be added back onto the system.
2. Take the enrolment card from the card box.
3. Present the enrolment card to the reader. The amber LED starts ashing.
4. Present the keyfob to the reader. The keyfob is now active again.
Setting the door open time
1 2 3 4
BEEP!
Swipe this card to bar:
Swipe this card to bar:
Swipe this card to bar:
Swipe this card to bar:
Swipe this card to bar:
John Smith
Write name:
John Smith
Write name:
John Smith
Write name:
John Smith
Write name:
John Smith
Write name:
FUNCTION CARD
door open time card
The period that the door is unlocked for when a
valid token is presented is set as follows:
1. Present this card
2. Wait for the required period
3. Present this card again, the beeping will stop
Paxton Access
FUNCTION CARD
door open time card
The period that the door is unlocked for when a
valid token is presented is set as follows:
1. Present this card
2. Wait for the required period
3. Present this card again, the beeping will stop
Paxton Access
BEEP!
1. Take the door open time card from the card box.
2. Present the card to the reader. The reader will commence beeping once a second.
3. Wait the required time.
4. Present the door open time card again and return to the card box.
Setting the lock type
1 2
3
4
FUNCTION CARD
door open time card
The period that the door is unlocked for when a
valid token is presented is set as follows:
1. Present this card
2. Wait for the required period
3. Present this card again, the beeping will stop
Paxton Access
BEEP!
Swipe this card to bar:
Swipe this card to bar:
Swipe this card to bar:
Swipe this card to bar:
Swipe this card to bar:
John Smith
Write name:
John Smith
Write name:
John Smith
Write name:
John Smith
Write name:
John Smith
Write name:
FUNCTION CARD
fail open release
This card is used with systems where a fail open
electric release is used for the safe operation in the
event of a fire. Present the card to the reader to
drive a fail open release or a maglock. Present the
card again to revert to the fail closed operation
Paxton Access
1. The system can be used with a fail open or fail closed lock. The default is set to fail closed.
2. Take the fail open release card from the card box and present the card to the reader.
3. The reader will beep and the lock setting is changed.
4. To change back, simply present the fail open release card again.
BEEP!
Page 5

Silent operation card
1 2 3 4
Swipe this card to bar:
Swipe this card to bar:
Swipe this card to bar:
Swipe this card to bar:
Swipe this card to bar:
John Smith
Write name:
John Smith
Write name:
John Smith
Write name:
John Smith
Write name:
FUNCTION CARD
John Smith
Write name:
silent operation
Present this card to silence the beeping noises
made by the reader. Present this card again to
re-enable the beeping noises
Paxton Access
FUNCTION CARD
silent operation
Present this card to silence the beeping noises
made by the reader. Present this card again to
re-enable the beeping noises
Paxton Access
1. Take the silent operation card from the card box.
2. Present the card to the reader. The reader give a single beep.
3. The reader will now be silent when a token is presented.
4. To activate the beep again, present the silent operation card.
Specications
BEEP!
FUNCTION CARD
silent operation
Present this card to silence the beeping noises
made by the reader. Present this card again to
re-enable the beeping noises
Paxton Access
BEEP!
BEEP!
Features
Number of Users
Number of Card Packs
Door open time
Time zones (with additional time clock)
Access levels (Colour Zones)
Silent operation
Can be used with fail OPEN locks
Can be used with fail CLOSED locks
Exit button input
Electrical
Voltage
Current
Switchable current
Environment
Operating temperature
Waterproof
Read Range
Dimensions
Min
Max
1 10,000
1 100
1 sec 60 secs
1 2
1 3
Yes
Yes
Yes
Yes
Min
Max
11V DC 14V DC
100mA
1A
Min
Max
-20 °C +55 °C
IPX7
Token Watchprox
Keyfob
80 mm 50 mm
Width
Height
50 mm 100 mm
Outdoor Use
35 mm
Depth
15 mm
Important information
Electrical shock from voltages used in this system can cause injury or death. Prior to making any electrical
connections, or performing maintenance and repair, ensure power is removed.
Mains electrical connections should be made only by qualied personel in accordance with local regulation.
1. Safety goggles should be worn while using power tools.
2. Before drilling the mounting holes, check the area for concealed wires and pipes.
3. The power supply provided is suitable for internal mounting only.
The declaration of conformity is available on request.
Contact details are provided at: http://paxton.info/596
 Loading...