

Page 1
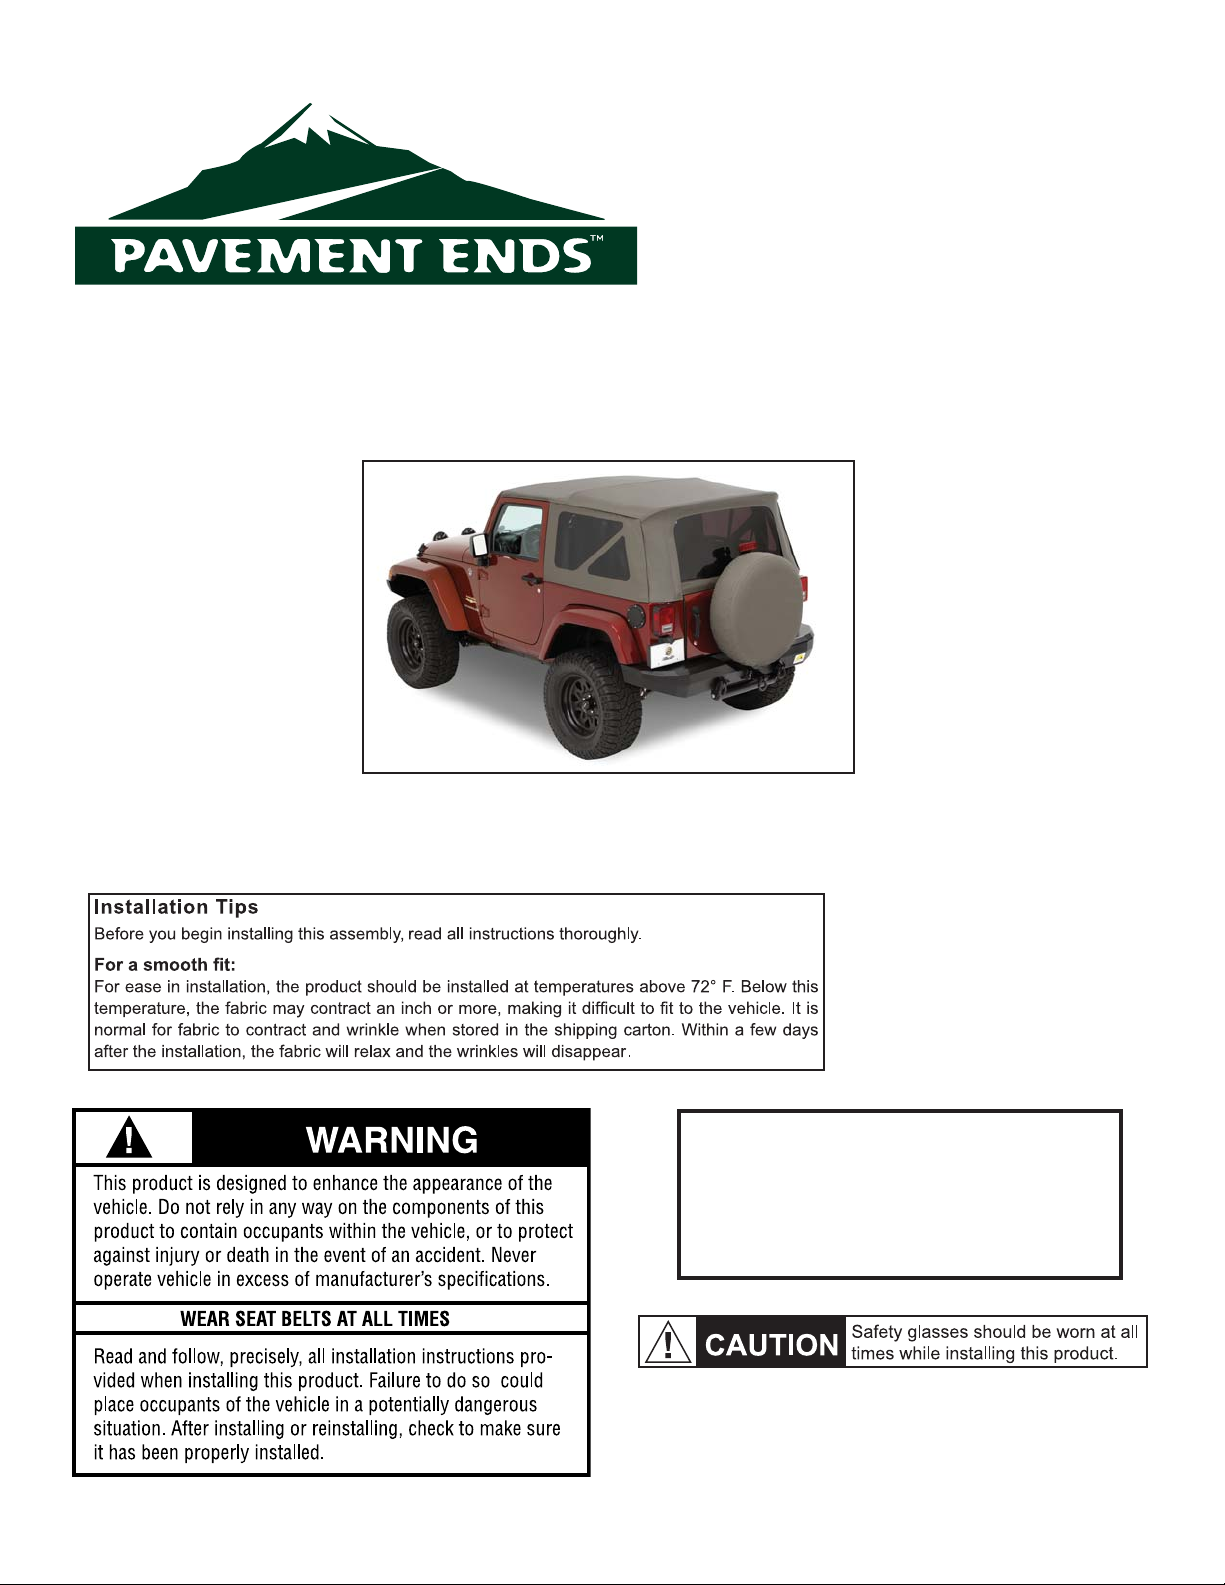
Cable Top Sailcloth Replay Top
with Tinted Windows
Installation Instructions
For: Jeep Wrangler (JK) 2 Door
2010 and Newer
Part Number: 51203
51203 pg 1
Table of Contents
WRANGLER REPLAY TOP PARTS LIST ...................PAGE 2
RANGLER REPLAY TOP TOOLS NEEDED .............. PAGE 2
W
WRANGLER REPLAY TOP INSTALLATION ................. PAGE 2
WRANGLER REPLAY TOP WARRANTY .................... PAGE 9
0612 Rev. A
Page 2
Tools Needed
Safety Glasses
Phillips Screwdriver
Masking Tape
Pliers
T-15 Torx Wrench
Fabric Top Qty - 1
Quarter Window, Right Qty - 1
Quarter Window, Left Qty - 1
Rear Window Qty - 1
Elastic Garter Qty - 2
Header Foam, Driver's Side Qty - 1
Header Foam, Passenger Side Qty - 1
Fabric Foam Qty - 2
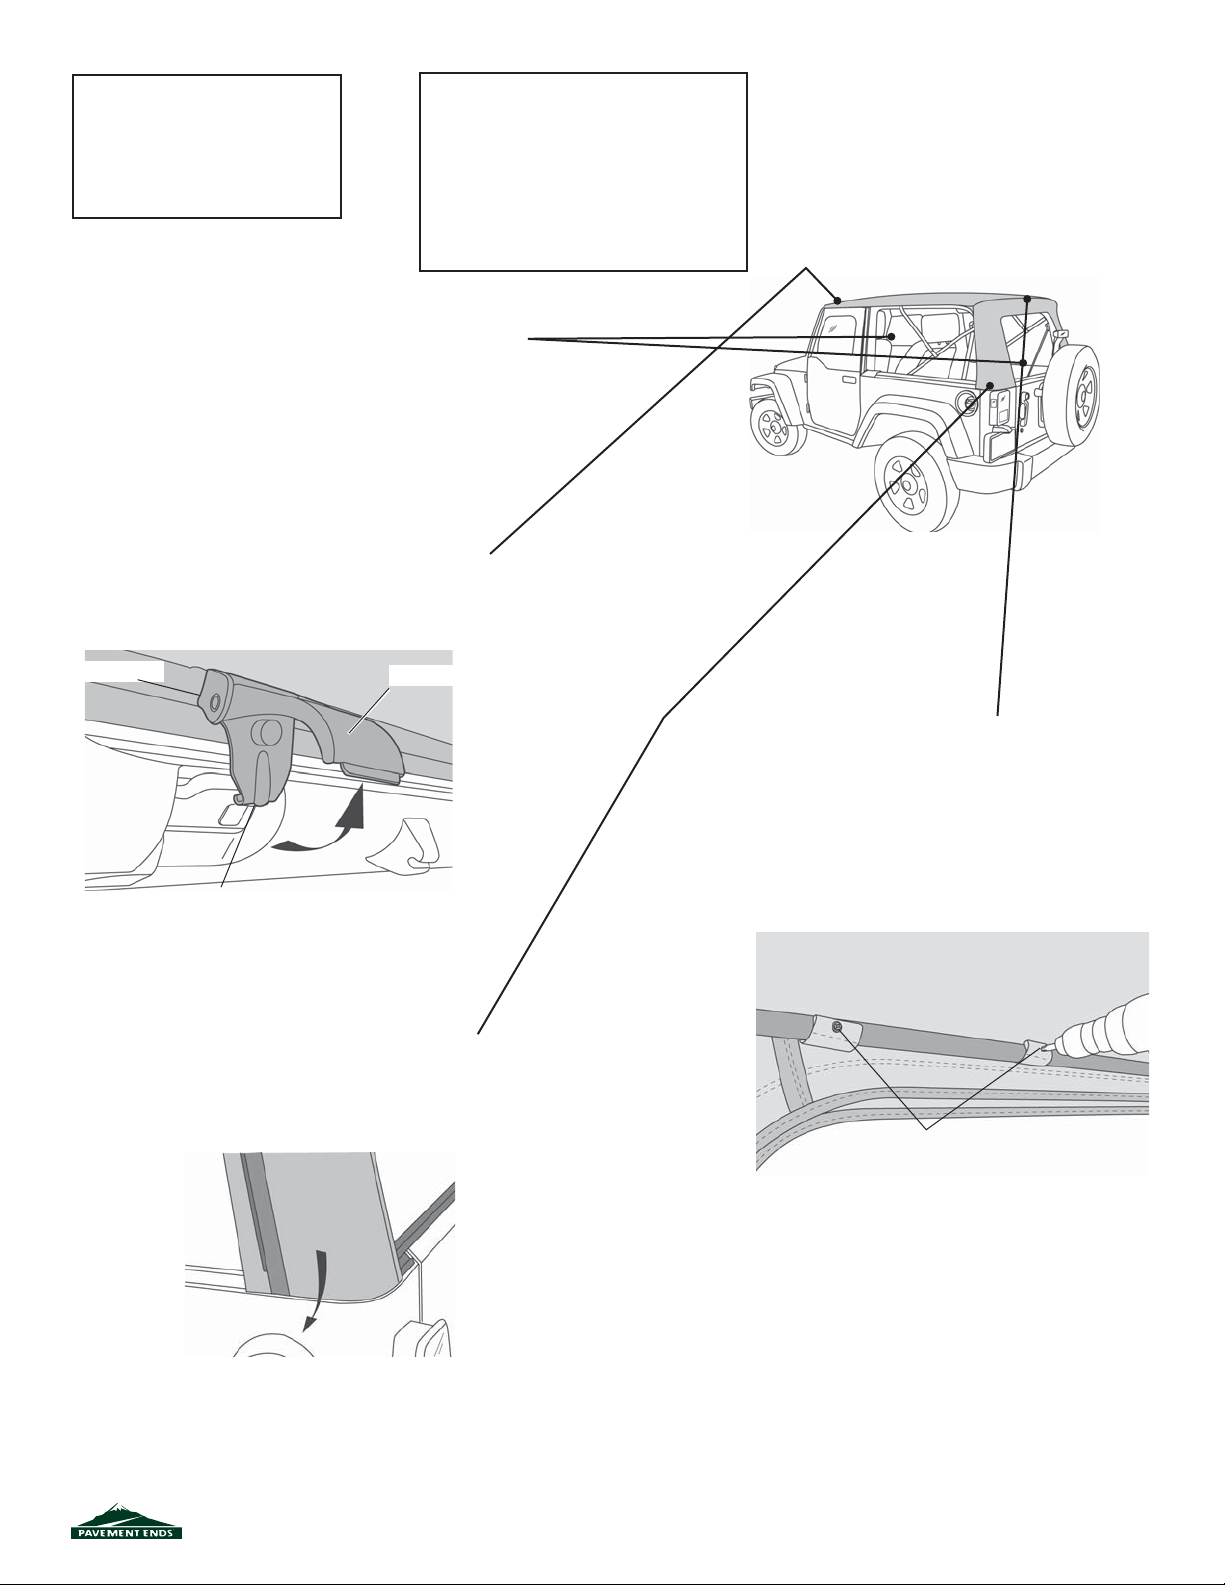
Step One
REMOVE QUARTER WINDOWS AND REAR WINDOW
Remove the Quarter Windows and the Rear
Window. Remove the metal Tailgate Bar from the
bottom of the Rear Window and set it aside.
Step Two
RELEASE WINDSHIELD LATCHES
Release the latch that secures the header to the
windshield. Pull up on the lever and then down
and out to release the hook from the loop in the
windshield frame.
Parts List
Header Latch
Windshield
Frame
Release hook
from loop
Windshield
Pull lever up
Step Three
RELEASE REAR CORNERS
Release the rear corners of the top. Pull gently
down and then out to release the plastic strip
from the retainer on the vehicle.
Step Four
RELEASE REAR BOW
Use a phillips screwdriver to remove the four (4)
screws that attach the fl ap in the top to the rear
bow. Set the screws aside to be reused later.
Allow the bow to drop onto the tailgate.
Unscrew the fabric
from the Rear Bow
View from inside vehicle
Rear Window
Opening
Pull down and then out
to release the fabric from
the retainer
51203 pg 2
0612 Rev. A
Page 3
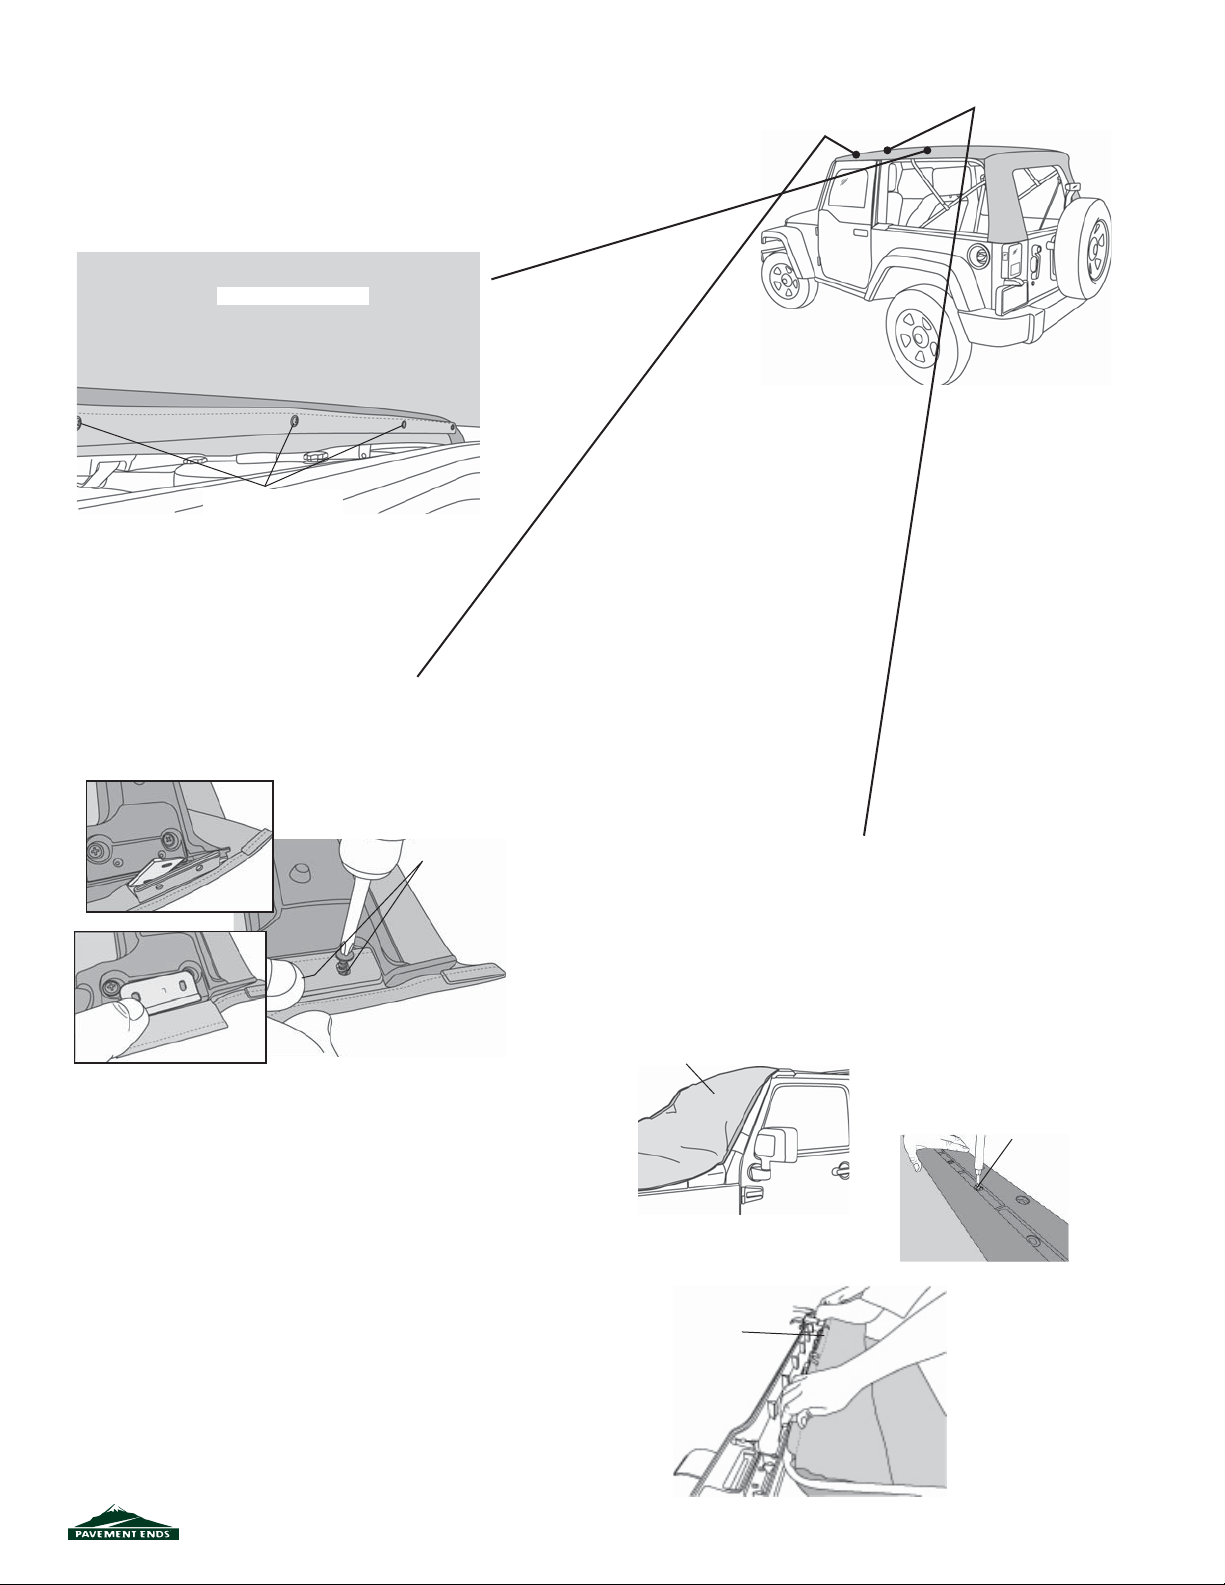
Step Five
UNFASTEN CENTER BOW
Use a phillips screwdriver to remove the fi ve (5)
screws that attach the fl ap in the top to the Center
Bow. Set the screws aside to be reused later.
View from inside vehicle
Unscrew the fabric
from the Center Bow
Step Six
REMOVE HEADER SCREWS
Collapse the bow assembly down onto the tailgate to
access the header. Use a T-15 Torx to remove the two
screws that secure the fabric to the header.
Remove
Screws
Step Seven
REMOVE TOP FABRIC
Raise the bow assembly and lock the header to the windshield.
Drape the top fabric, backing side up, over the hood and
windshield. Remove the twenty-seven (27) screws that secure
the fabric to the upper and lower headers. Set the screws aside
for use in installing the new top. Slide the extrusion along the
front edge of the top out of the channel in the lower header and
remove the old top from the vehicle.
Top Fabric - Backing Side Up
Remove Screws (27)
Across Header
Slide Extrusion along
the Front Edge of the
Channel to remove
Top
51203 pg 3
0612 Rev. A
Page 4
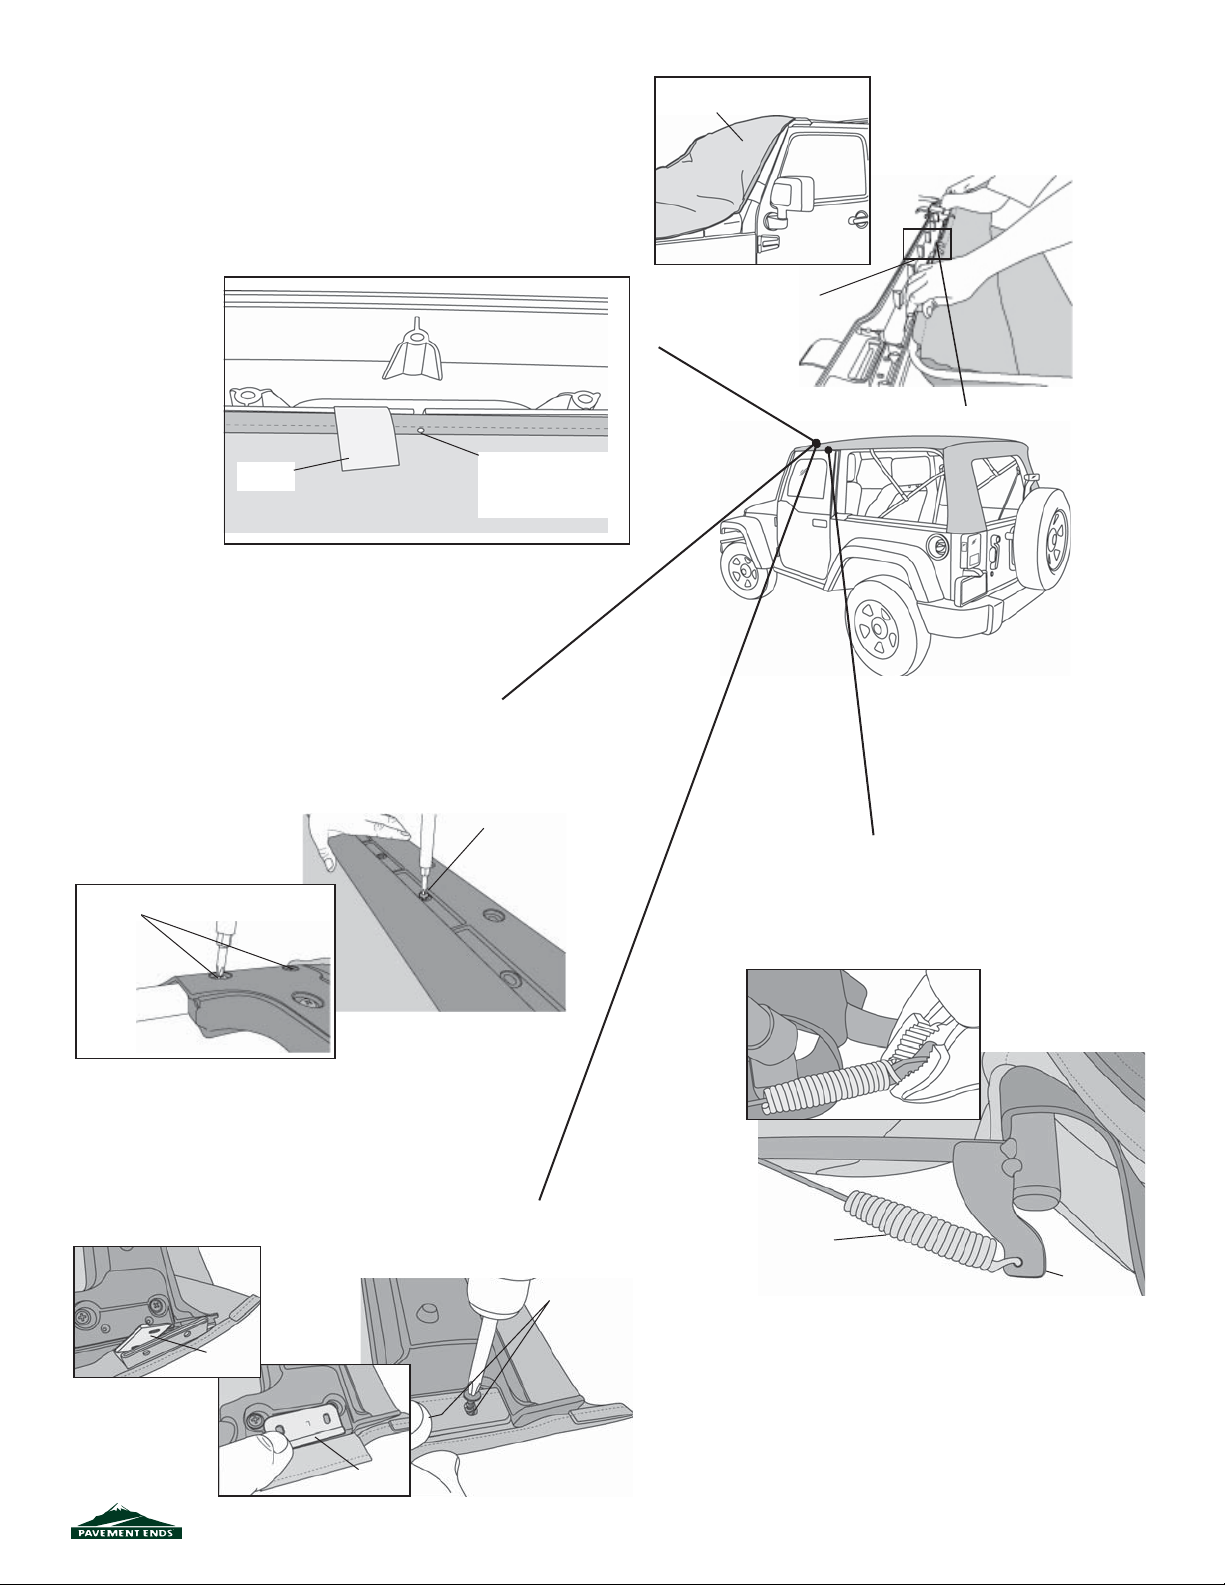
Step Eight
INSTALL TOP FABRIC
Raise the bow assembly and lock the header to the windshield.
Drape the top fabric, backing side up, over the hood and windshield. Slide the extrusion along the front edge of the top into
the channel in the lower header. Line up the center drill hole in
the fabric with the center notch in the header. Use masking tape
to help hold the fabric in place along the lower header.
Top Fabric - Backing
Side Up
Slide Extrusion along
the Front Edge of the
Channel
Masking
Tape
Line up the Center Drill
Hole in the Fabric with
the Center Notch in the
Header
Step Nine
INSTALL TOP FABRIC
Close the upper header over the fabric, sandwiching the fabric. Reinstall the four (4) corner screws.
Then install the twenty-three (23) screws across the
header.
Lower the bow assembly to the rear of the vehicle.
Install Screws
Across Header
Reinstall Corner
Screws
Step Eleven
SECURE CABLE SPRING
Hook the Cable Spring to the bracket on the bow
and use pliers to crimp the spring.
Step Ten
INSTALL CORNER SCREWS
Slip the fabric pocket sewn into the top between the
headers and position the cable anchor.
Install two (2) T-15 Torx Screws through the fabric and
metal fl ag into the Lower Header on each side.
Cable
Anchor
Cable
Anchor
51203 pg 4
Reinstall Torx
Screws
Cable Spring
Bracket
0612 Rev. A
Page 5
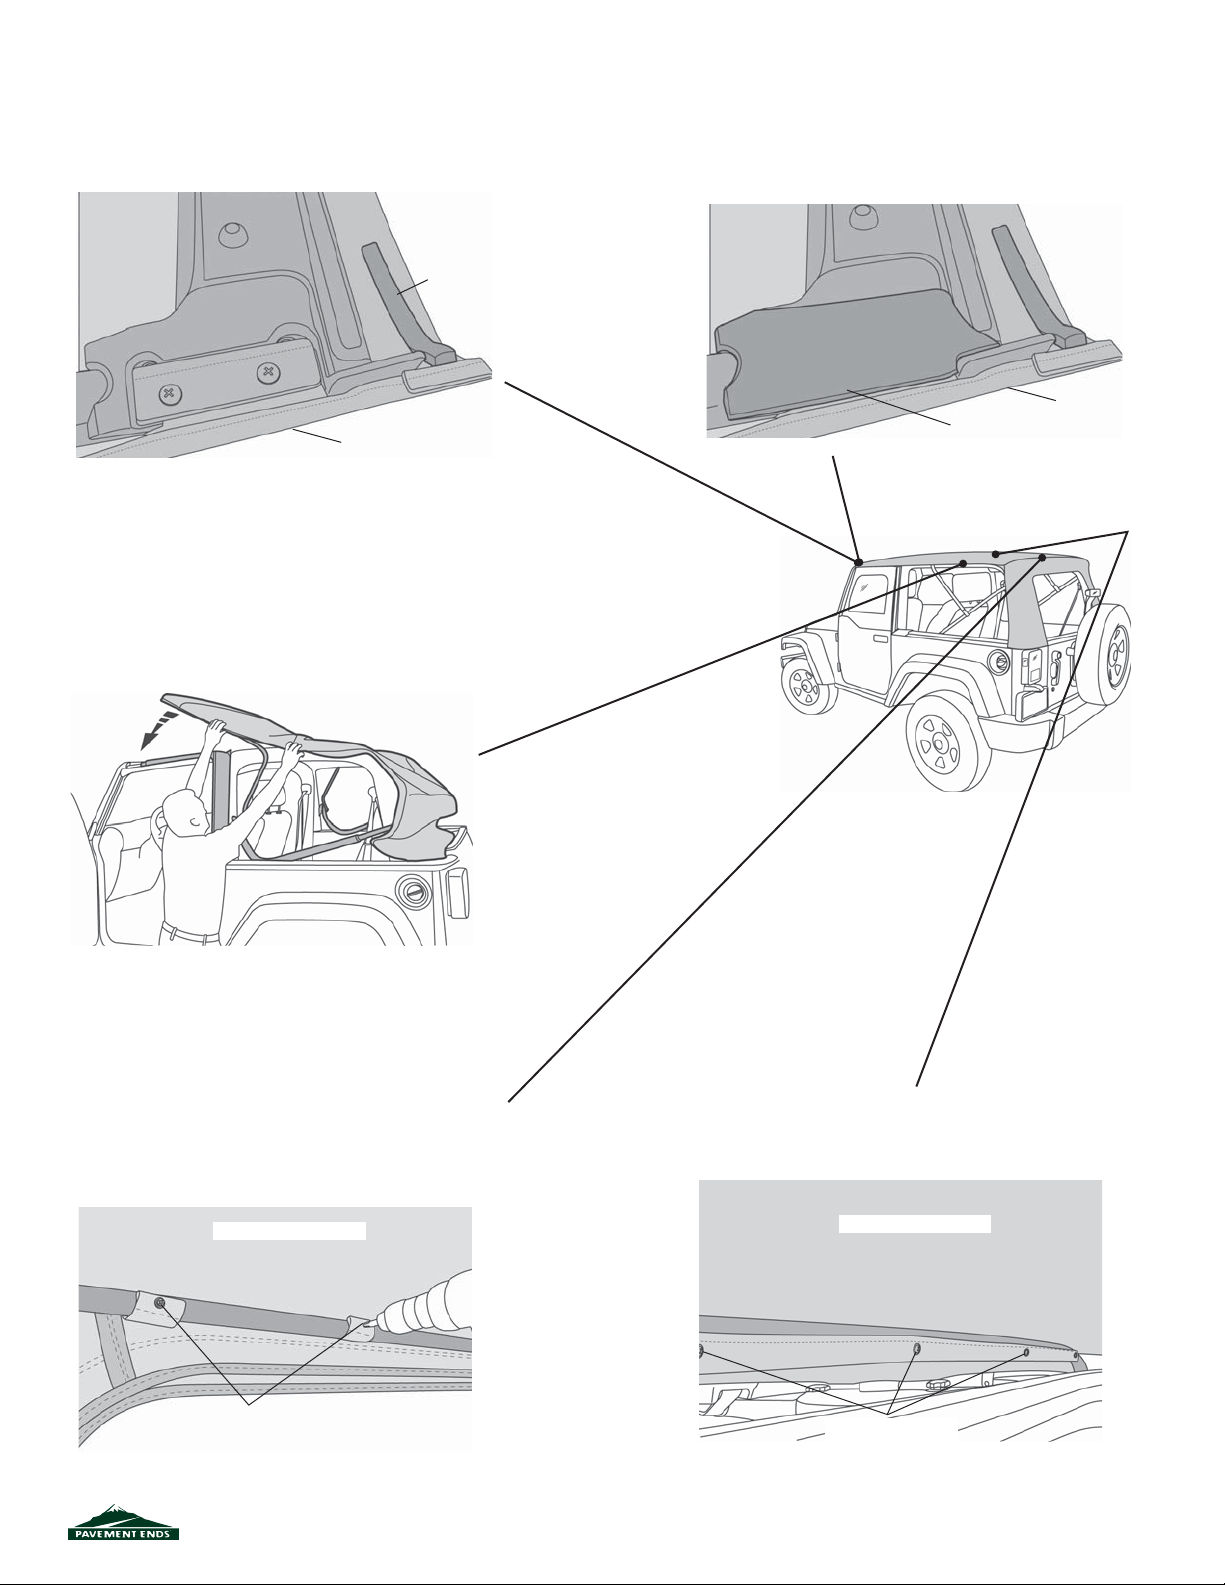
Step Twelve
INSTALL FABRIC FOAM
Peel the backing off the Fabric Foam and install
it on each side of the Header.
Fabric
Foam
Header
Step Fourteen
DRAPE TOP OVER CAB
Open the top and drape the fabric over the
cab.
Step Thirteen
INSTALL HEADER FOAM
Peel the backing off the Driver’s Side Header Foam
and install it on the driver’s side of the Header.
Repeat on the passenger side.
Header
Header Foam
Driver’s Side Shown
Step Fifteen
ATTACH TOP TO REAR BOW
Locate the fl aps inside the top above the rear
window opening. Use the four (4) screws that were
removed in Step 4 to secure the fl aps to the Rear
Bow.
View from inside vehicle
Reinstall screws to
secure fl aps to the
Rear Bow
51203 pg 5
Rear Window
Opening
Step Sixteen
SECURE CENTER BOW
Reinstall the screws removed in Step 5 to secure
the fabric to the Center Bow.
View from inside vehicle
Reinstall screws to
secure the fabric to
the Center Bow
0612 Rev. A
Page 6
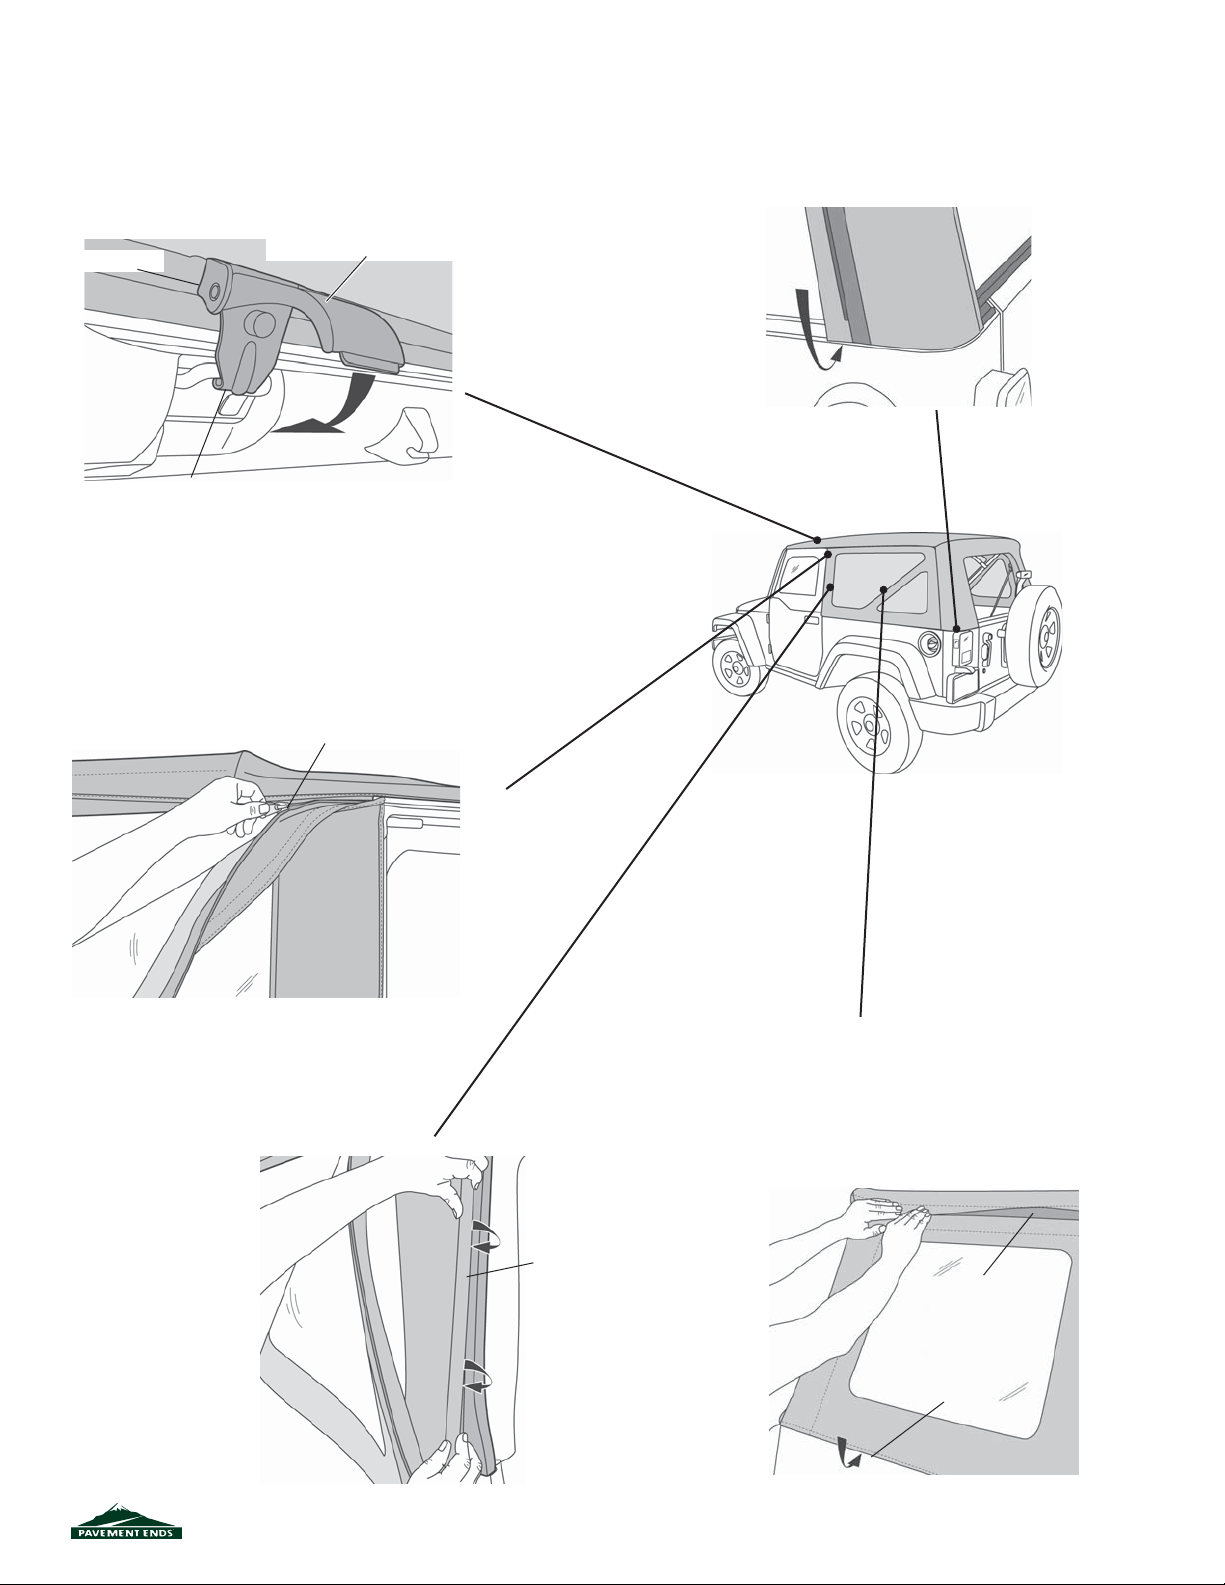
Step Seventeen
SECURE HEADER TO WINDSHIELD
Close the header latches to secure the front of the
top to the windshield. Catch the hook in the loop in
the windshield frame and then close the lever over
it so that it lays fl at against the windshield frame.
Close lever over top of hook to
Header Latch
Windshield
Frame
lay fl ush with windshield frame
Step Eighteen
SECURE REAR CORNERS
Pull down gently on the Rear Bow and work
the plastic sewn to the rear corners of the
top into the retainer on the vehicle.
Pull down gently
on the Rear Bow
and slip plastic into
retainer
Catch hook
in loop
Windshield
Step Nineteen
ATTACH QUARTER WINDOW ZIPPERS
Start the zipper on the Quarter Window and
close it 1-2 inches.
Start Zipper on
Quarter Window
Step Twenty
SECURE FRONT OF QUARTER WINDOW
Roll the plastic strip
along the front of the
Quarter Window into
the channel in the
Door Surround.
Roll Plastic Strip into
channel in retainer
Step Twenty-one
SECURE QUARTER WINDOW
Close the zipper and slip the plastic along the
bottom of the Side Window into the channel on the
vehicle.
Fasten the hook and loop strip above the window to
the top.
Fasten Hook
and Loop
51203 pg 6
Roll Plastic into
Channel
0612 Rev. A
Page 7
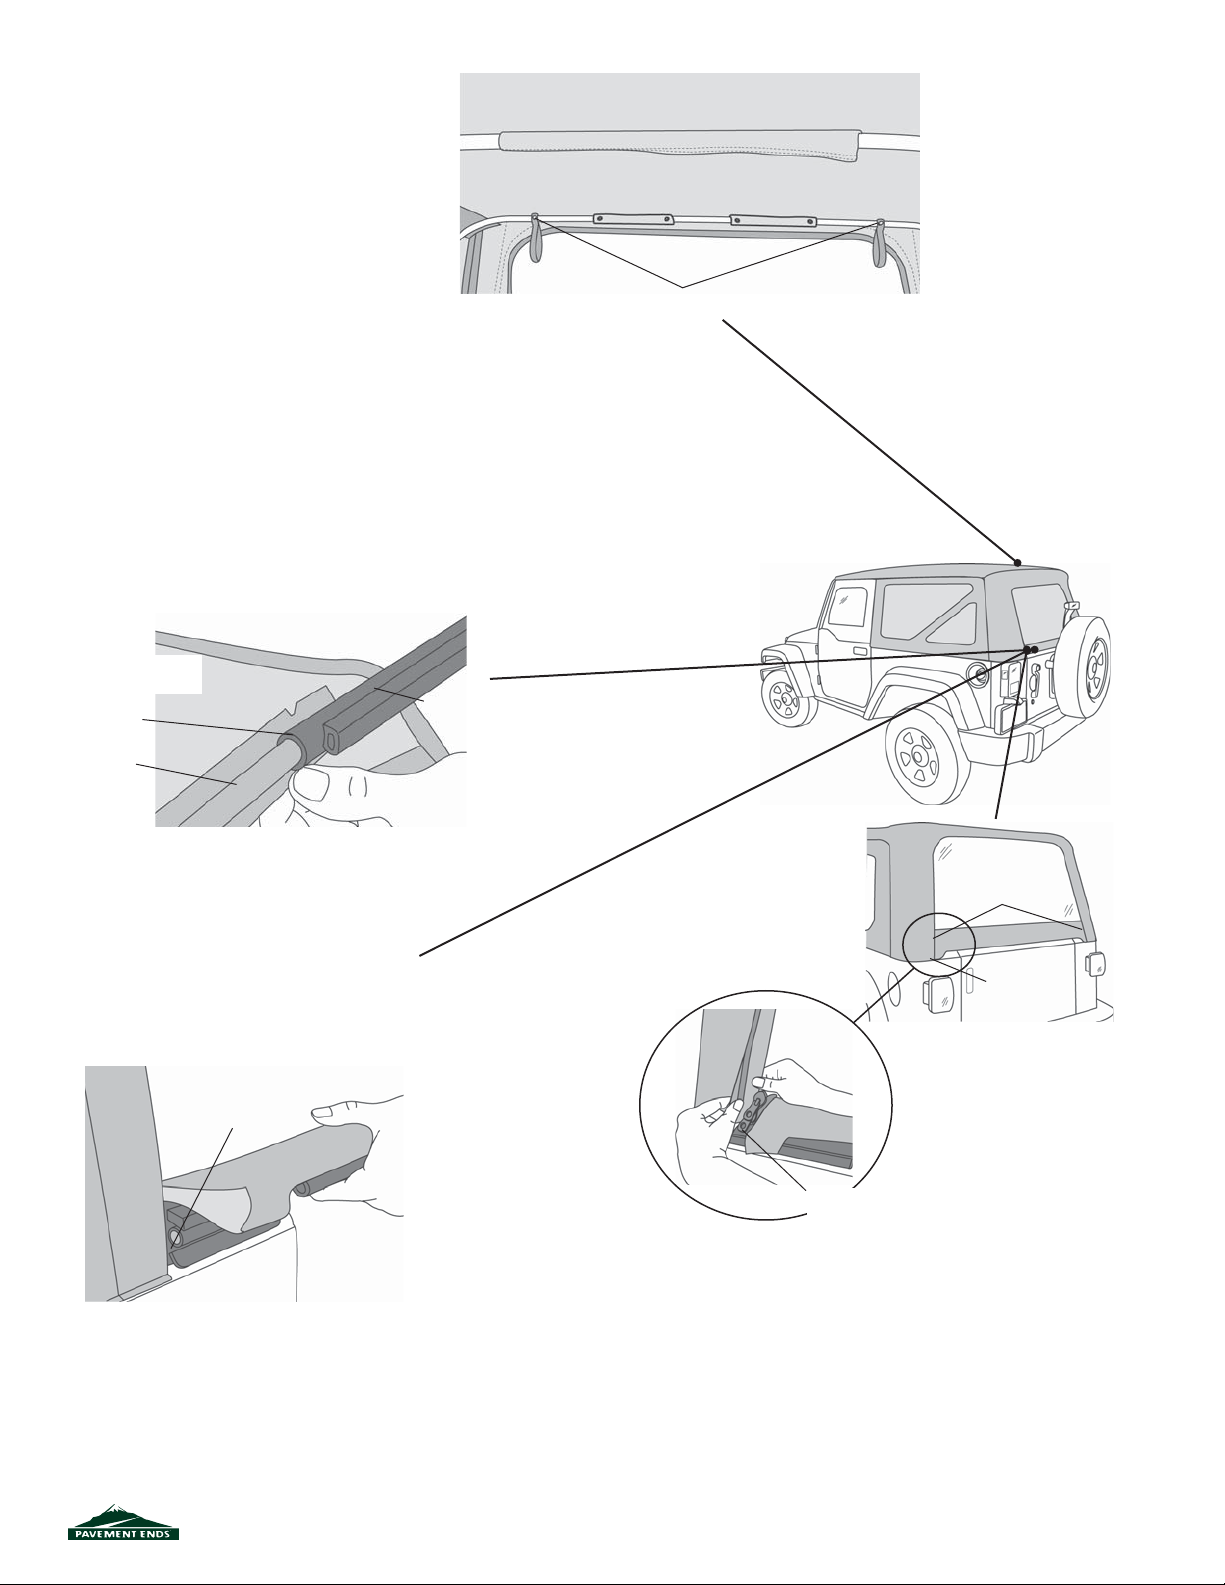
Step Twenty-two
INSTALL ELASTIC GARTERS
Snap the Elastic Garters to the
snaps on the Rear Bow above
the rear window opening.
Step Twenty-three
INSTALL TAILGATE BAR ON REAR WINDOW
Remove the Rear Window from the box and lay it fl at with the
backing side up. Locate the Tailgate Bar set aside in Step One.
The bar has a “C” shaped channel, when viewed from the
end. Orient the bar with the round seal down and slide the “C”
channel on the retainer onto the tubed strip sewn to the backing
side of the Rear Window.
Tailgate Bar
Rear Window Backing Side
Tailgate
Retainer
Channel
Tubed
Strip
Snap Elastic Garters
to Rear Bow
Step Twenty-four
INSTALL TAILGATE BAR ON VEHICLE
Insert the Tailgate Bar into the mounts on
each side of the tailgate opening with the
vinyl side of the Rear Window toward the
outside of the vehicle.
Place Tailgate
Bar in mounts
Tuck Flaps
under top
Start
Zipper
Pull both sliders down as far
as possible to catch pin
Step Twenty-fi ve
SECURE REAR WINDOW ZIPPERS
To start the zipper, pull the two sliders as far down as possible on the
driver’s side of the window in order to catch the sliders to the pin.
Once the zipper is caught, start the top slider 1/2". Then hold up the
top of the window with one hand and close the zipper with the other.
The zipper is sandwiched between layers of fabric in the corners so be
careful not to catch extra fabric in the zipper. Close the zipper.
Make sure that the Tailgate Bar is centered and is securely in the
mounts. Then tuck the fl aps on the Rear Window under the top fabric.
51203 pg 7
0612 Rev. A
Page 8
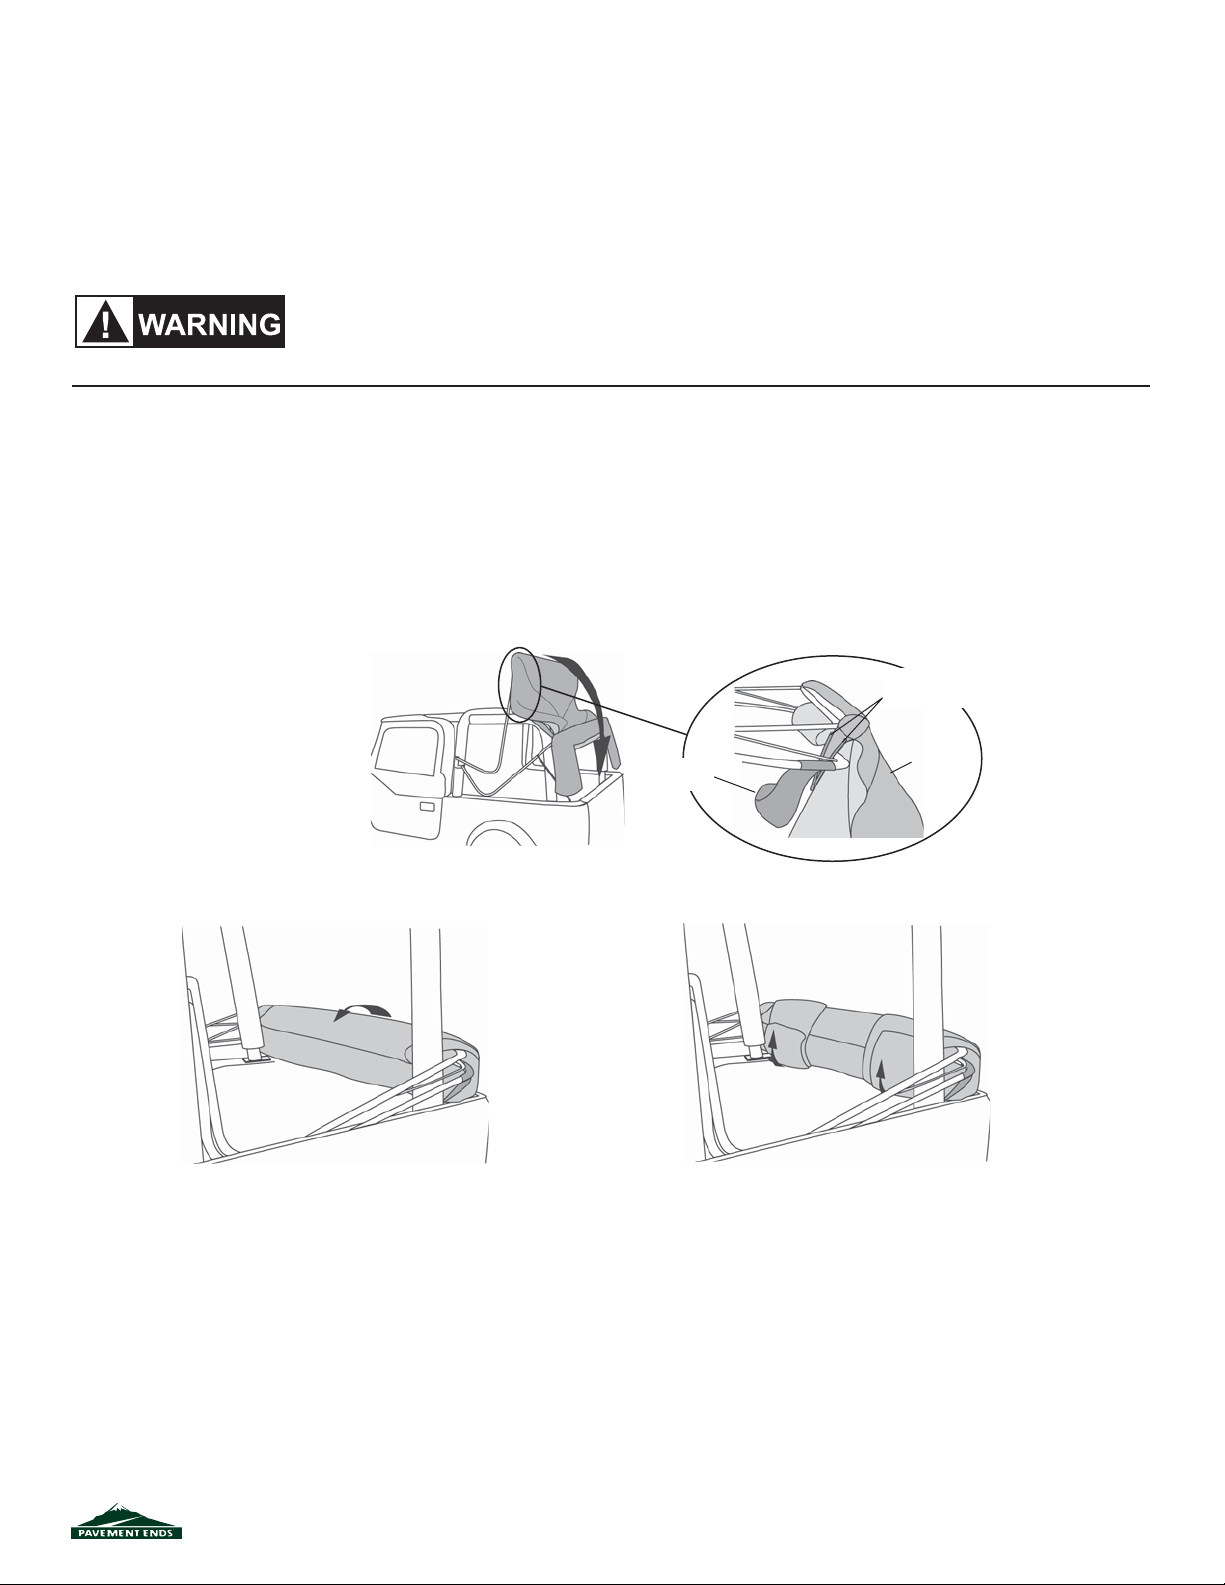
Step Twenty-six
TO FOLD THE TOP DOWN
REMOVE QUARTER PANELS AND REAR WINDOW
Remove the Quarter Panels and the Rear Window. To remove the Quarter Windows, unzip the rear and top zippers. Release
the plastic strip from the retainer. Release the Hook and Loop Fasteners from around the Vertical Retainer.
To roll up the Rear Window, remove the Tailgate Bar and open the zippers on each side of the window to the top. Start at the
bottom and roll the window to the inside. Avoid wrinkles in the fabric and window. Secure it in place with the elastic garters
inside of the top.
When operating the vehicle without the Quarter Windows, the Rear Window should be rolled up and
secured with the elastic garters for proper ventilation.
Step Twenty-seven
TO FOLD THE TOP DOWN
COLLAPSE TOP
Release the front of the top from the windshield. Raise the front of the deck
and collapse the rear bows, tucking the two plastic strips above the door
openings and the stay pad on the rear bow inside of the bows, Wrap the
fabric around the bows, then tuck the rear legs of the top under the bows.
Collapse bows and
fold toward rear
Tuck plastic strips
inside bows
Wrap fabric
around bows
Tuck stay pad
inside bows
Wrap rear legs
under bows
Top Fabric
51203 pg 8
0612 Rev. A
Page 9
Care and Maintenance of your New Top
Your top is made of the fi nest materials available. To keep it looking new and for the maximum
possible wear, it will need periodic cleaning and maintenance.
Washing: The fabric should be washed often using soap, warm water and a soft
bristle brush. Rinse with clear water to remove all traces of soap.
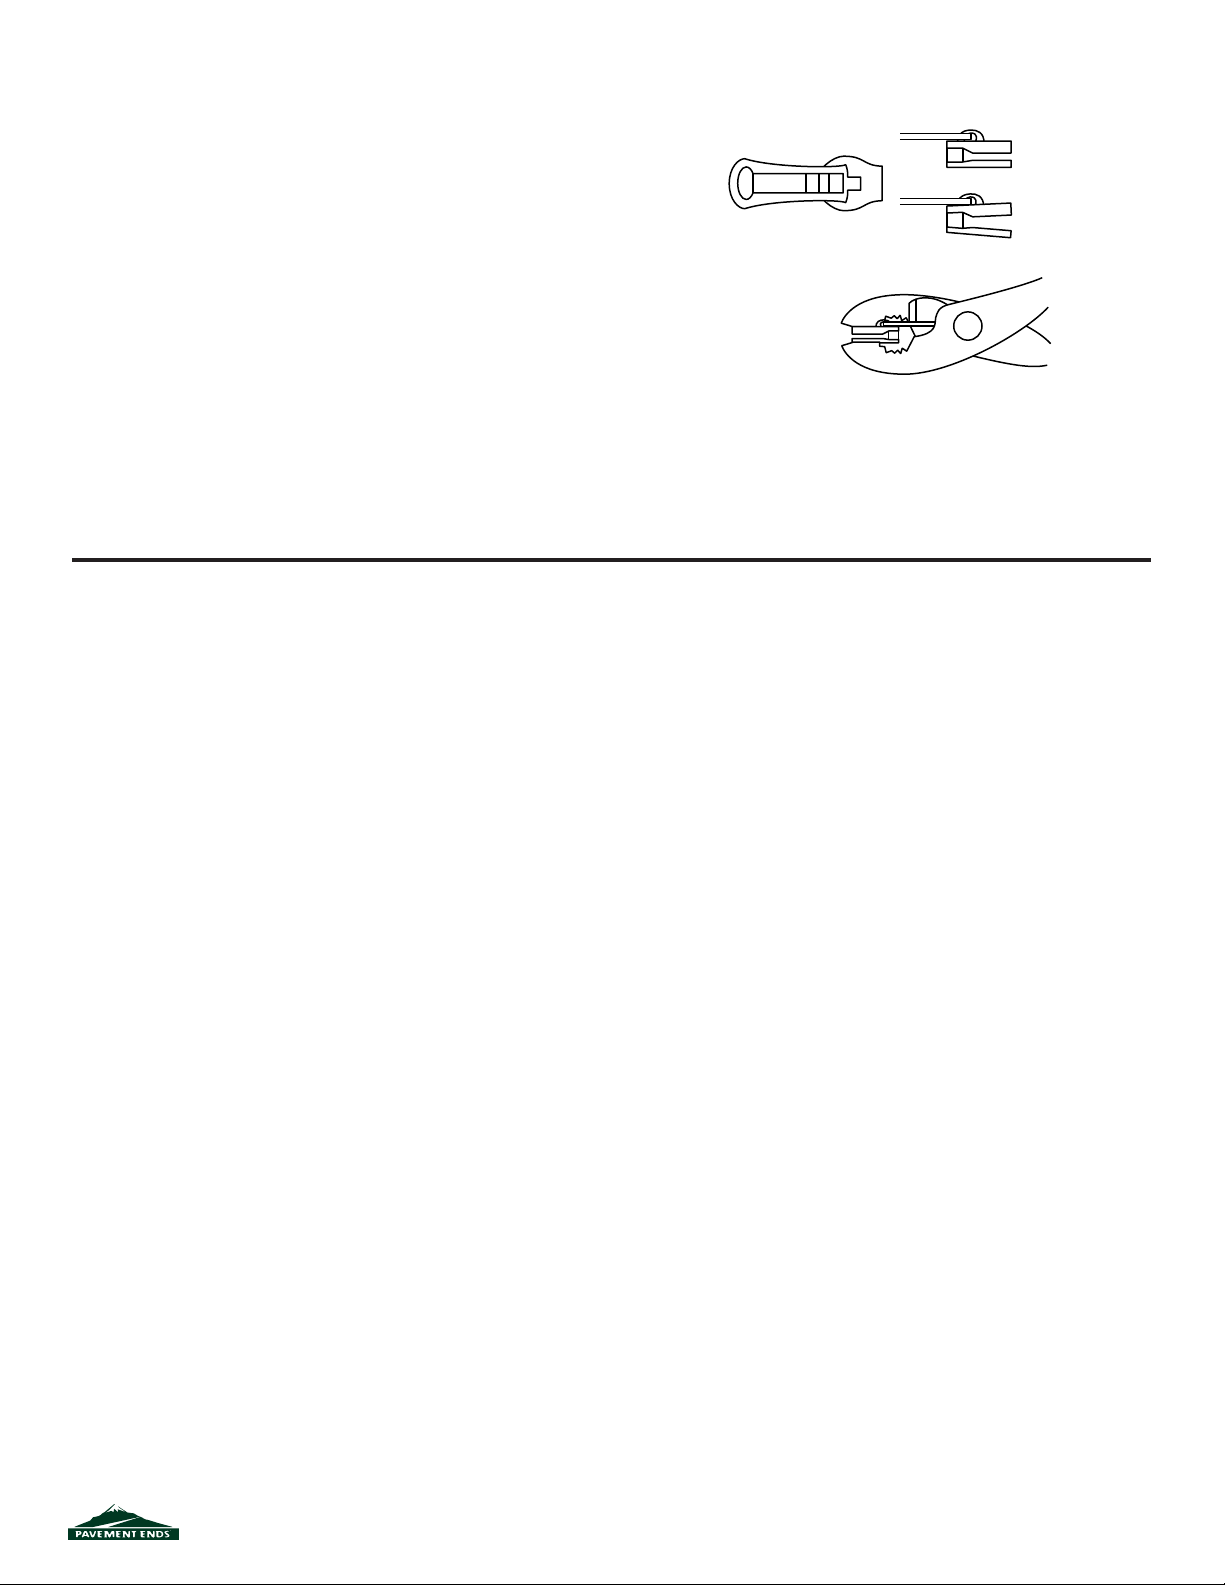
Zippers: Keeping the zipper cleaned and lubricated with a silicone lubricant
will help prevent damage and keep the zippers in a smooth working condition. If a zipper
opens behind the slider, the slider may have been spread apart. This problem can usually
be repaired by using an ordinary pair of pliers to bring the sides back into parallel. Return
slider to the end of the zipper in the normal Open position. Squeeze lightly at fi rst and test
the zipper. If the zipper continues to remain open squeeze more fi rmly with the pliers and
try the zipper again. Repeat this procedure until the zipper operates correctly.
Water: In the event of seeping through the seams, 3M Scotchgard® may be applied on the
inside of the seams to stop the seepage. Rips in the fabric may be repaired with Bondex®
iron on patches. Iron the patches to the Inside of the top, carefully following the Bondex® instructions.
Snaps: Keep snaps cleaned and lubricated with silicone to help prevent snaps from sticking to the studs. If a snap
does become stuck to a stud, use a screwdriver and GENTLY pry apart to prevent permanent damage to the snap
or the top fabric.
LIMITED WARRANTY
We warrant our product to be free from defects in material and workmanship, for terms specifi ed below, provided
there has been normal use and proper mainte nance. This warranty applies to the original purchaser only. All
remedies under this warranty are limited to the repair or replacement of any item or items found by the factory
to be defective within the time period specifi ed.
If you have a warranty claim, fi rst you must call our factory at the number below for instructions. You must retain
proof of purchase and submit a copy with any items returned for warranty work. Upon completion of warranty
work, if any, we will return the repaired or replaced item or items to you freight prepaid. Damage to our products
caused by accidents, fi re, vandalism, negligence, misinstallation, misuse, Acts of God, or by defective parts not
manufactured by us, is not covered under this warranty.
THE WARRANTY TIME PERIOD IS AS FOLLOWS: ALL “GOODS” MANUFACTURED BY OUR COMPANY: ONE
YEAR FROM DATE OF PURCHASE.
ANY IMPLIED WARRANTIES OF MERCHANTABILITY AND/OR FITNESS FOR A PARTICULAR PURPOSE CREATED HEREBY ARE LIMITED IN DURATION TO THE SAME DURATION AND SCOPE AS THE EXPRESS WRITTEN
WARRANTY. OUR COMPANY SHALL NOT BE LIABLE FOR ANY INCIDENTAL OR CONSEQUENTIAL DAMAGE.
Some states do not allow limitations on how long an implied warranty lasts, or the exclusion or limitation of
incidental or consequential damages, so the above limitations or exclusions may not apply to you.
This warranty gives you specifi c legal rights, and you may also have other rights which vary from state to state.
For further information, please contact: Customer Service
877-638-9509
Normal Slider Jaws Parallel
Damaged Slider Jaws Spread Apart
(sometimes broken)
51203 pg 9
All or a portion of this product may have been made in China.
0612 Rev. A
 Loading...