

Page 1
Replay
Fabric Replacement Top
Installation Instructions
For: Isuzu Amigo 1989 - 1994 with Part Number: 51139
Patented Belt Rail Tailgate Enhancement
The metal Belt Rail Tailgate Retainer included in
this product is an original design and is
protected by U.S. Patent #4,757,854.
WARNING
This product is designed to enhance the appearance of the
vehicle and to shield the occupants from ordinary weather conditions. Do not rely in any way on the components of this product
to contain occupants within the vehicle, or to protect against
injury or death in the event of an accident. This top will not protect
the occupants from falling objects. Never operate vehicle in
excess of manufacturer’s specifications.
WEAR SEAT BELTS AT ALL TIMES
Read and follow, precisely, all installation instructions provided
when installing top. Failure to do so may result in a poor fitting
top and could place occupants of the vehicle in a potentially
dangerous situation. After installing or reinstalling the top,
check to make sure it has been properly installed.
Installation Tips
After completing the installation, keep these instructions for
future reference. Before you begin installing this Replay
Top assembly, read all instructions thoroughly. Below are
a few tips to make this installation easier.
For a smooth fit:
For ease in installation, the Replay Top should be installed
at temperatures above 72° F. Below this temperature, the
fabric may contract an inch or more, making it difficult to fit
to the vehicle.
It is normal for the fabric to contract and wrinkle when
stored in the shipping carton. Within a few days after the
installation, the fabric will relax and the wrinkles will
disappear.
51139 pg 1
Rev. D 0903
Page 2
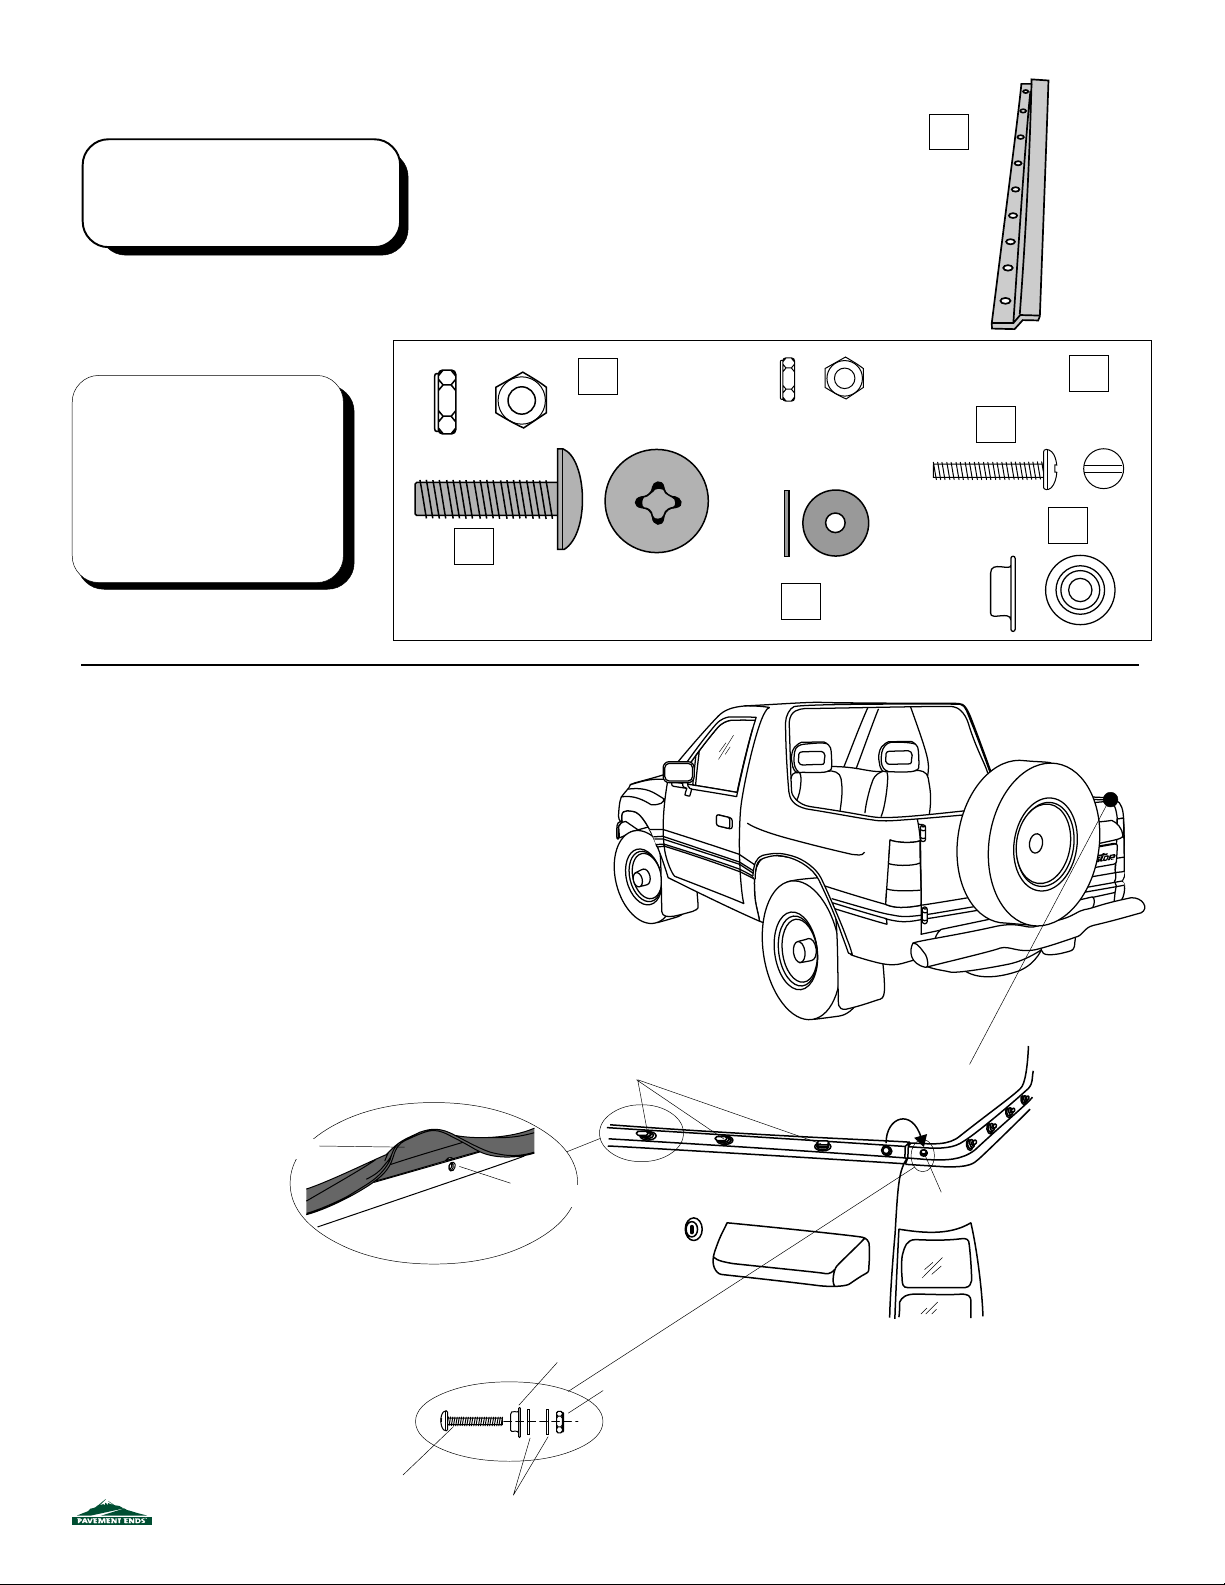
Parts List and Hardware Identification
Top Fabric Assembly Qty - 1
Rear Curtain (Window) Qty - 1
Adhesive Hook Strip, 5/8" x 2" Qty - 4
3-3/4" Plastic Strip Qty - 1
Tools Needed
Phillips Screwdriver
Flat Screwdriver
7/16" Wrench
10mm Wrench
50/50 Alcohol/Water Solution
Clean Cloth
Safety Glasses
Step One
Remove the old top.
1/4 - 20 Locknut, Qty - 9, Part
Number 198.26
1/4 - 20 Phillips Head Bolt,
Qty - 9, Part Number 257.92
Parts Shown in Actual Size
Tailgate Retainer, Qty - 1, Part
Number 286.50
The appliation of the above part is
protected under U.S. Patent
#4,757,854.
#6-32 Locknut, Qty - 2,
Part Number 298.25
#6-32 x 3/4 Pan Head Screw,
Qty - 2, Part Number 298.23
#6 Washer, Qty - 4,
Part Number 298.24
Body Stud, Qty - 2,
Part Number 9.68
Lift up slightly on the rubber seal along the top of the tailgate to access
the nuts securing the seven “Lift-a-Dot” Posts to the tailgate. Remove
the “Lift-a-Dot” Posts.
Remove the corner screws, next to the tailgate on each side. Relocate
the snaps on each end of the tailgate to the screw holes on either side of
the tailgate.
FOR 1989 MODELS ONLY: On 1989 models, there is a turnbuckle on each
end of the tailgate. Remove it. Use the Body Studs, #6-32 x 3/4 Pan
Head Screws, #6-32 Washers and #6-32 Locknuts from the Parts Kit.
Install the Body Studs with a washer behind the stud and one in front of
the nut.
Rubber Seal Detail
Pull up gently on
rubber seal
Remove Turnbuckles
View from Inside
of Vehicle
FOR 1989 MODELS ONLY
Remove Turnbuckle and
Install Body Stud
Body Stud
Remove Turnbuckles on
Tailgate
#6-32 Locknut
Tailgate
Relocate Snap from Tailgate to
Screw Hole
Remove Corner Screw
#6-32 x 3/4 Pan
Head Screw
#6-32 Washers
51139 pg 2
Rev. D 0903
Page 3
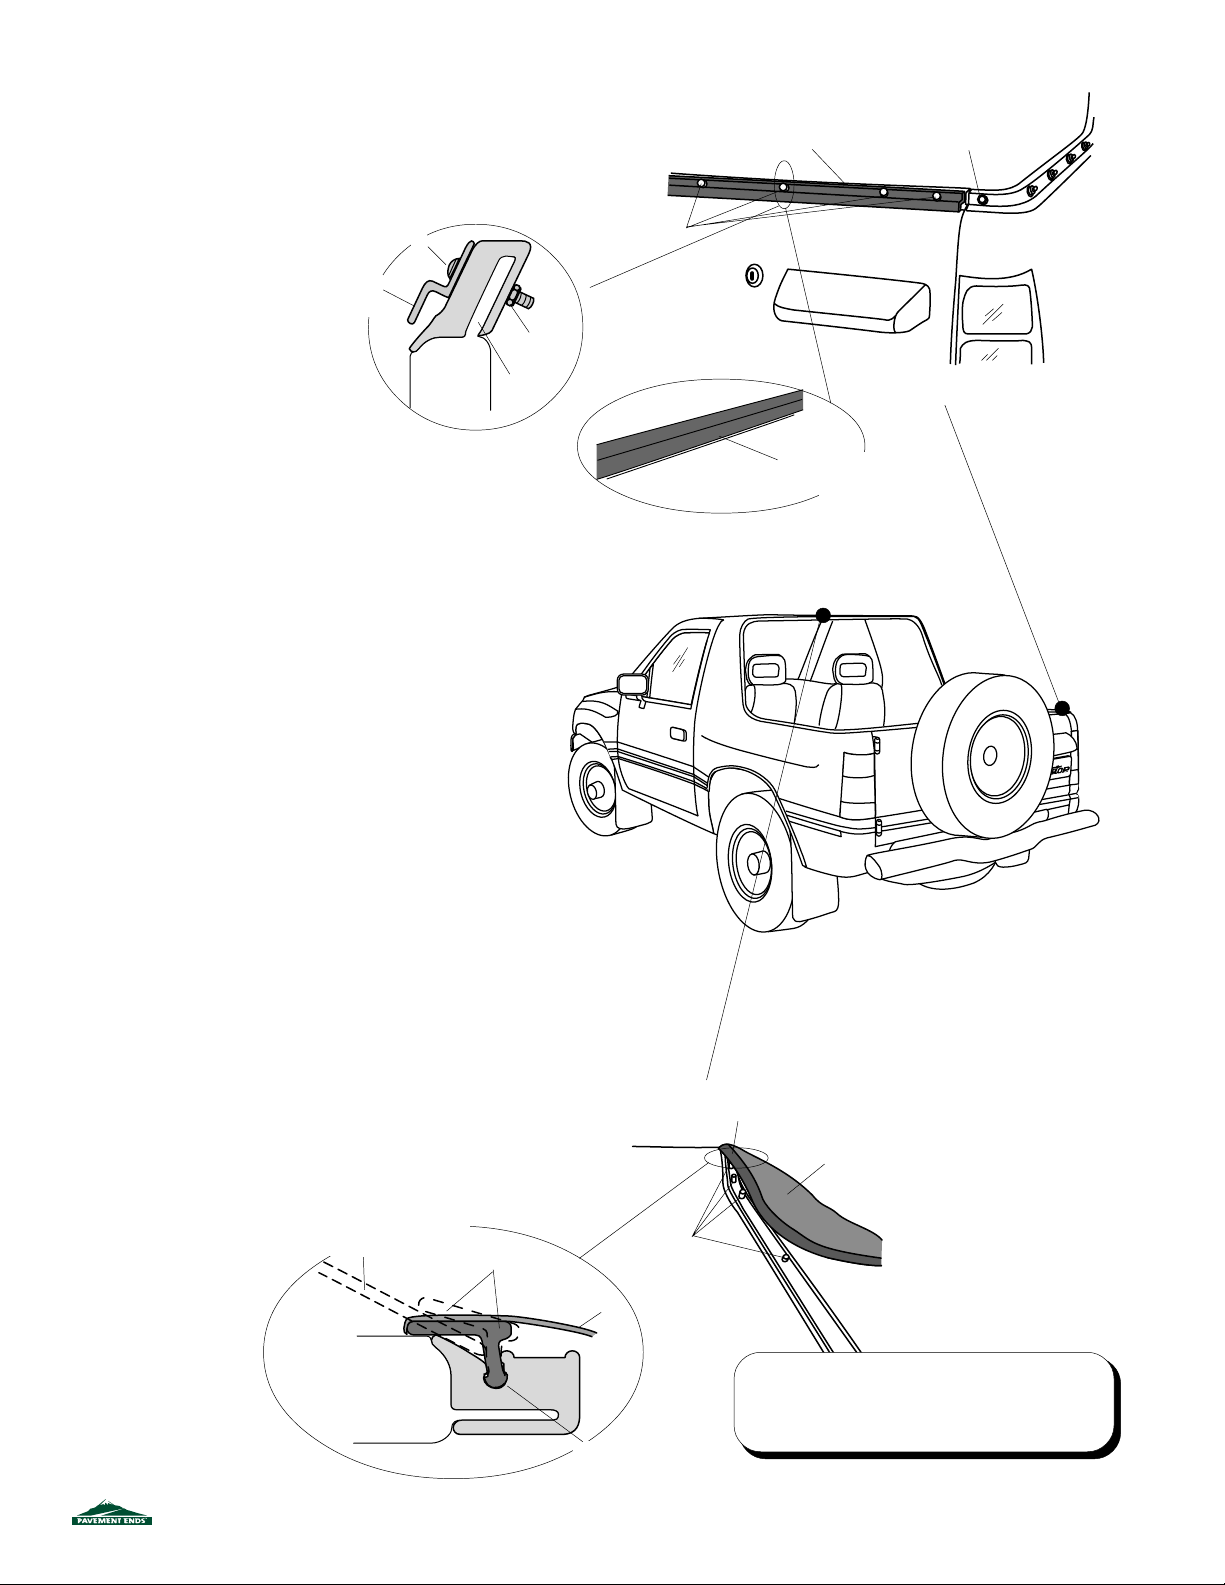
Step Two
Install Tailgate Retainer on top of tailgate. Place the retainer over
the holes from the turnbuckles and install it with the 9 Bolts and
Locknuts provided. Check the rubber seal to make certain it
returns to the proper position.
Tailgate Retainer Detail
Cross Section
Tailgate
Retainer
Bolt
Locknut
Tailgate
Rubber Seal Detail
Bolts and Locknuts
View from Inside of
Vehicle
Tailgate Retainer
Make sure rubber seal
returns to position
over bolts
Snap
Step Three
Orient the top fabric on the vehicle with the weatherstripping
and the Lift-a-Dots toward the front. With the bow folded
forward, start in the center along the front of the vehicle and
seat the rubber seal into the channel on the roof. Make sure
the rubber seal is seated in the channel and not folded over. Push
the Lift-a-Dot in the fabric over the stud on the vehicle. Alternate
between seating the rubber seal into the channel and fastening
the Lift-a-Dots across the top of the roof. Do not continue down
the sides at this time.
Rubber Seal Detail
Cross Section
3 3/4" Plastic Strip - Use to
lever Rubber Seal into
position
Front
Vehicle Body
Rubber Seal
Fabric
Channel
Front
Lift-a-Dots
Rubber Seal
Top Fabric
Note:
Make sure the rubber seal is seated in the
channel (not folded over) before fastening the Lifta-Dots. Alternate between seating the rubber seal
and fastening the Lift-a-Dots.
51139 pg 3
Rev. D 0903
Page 4
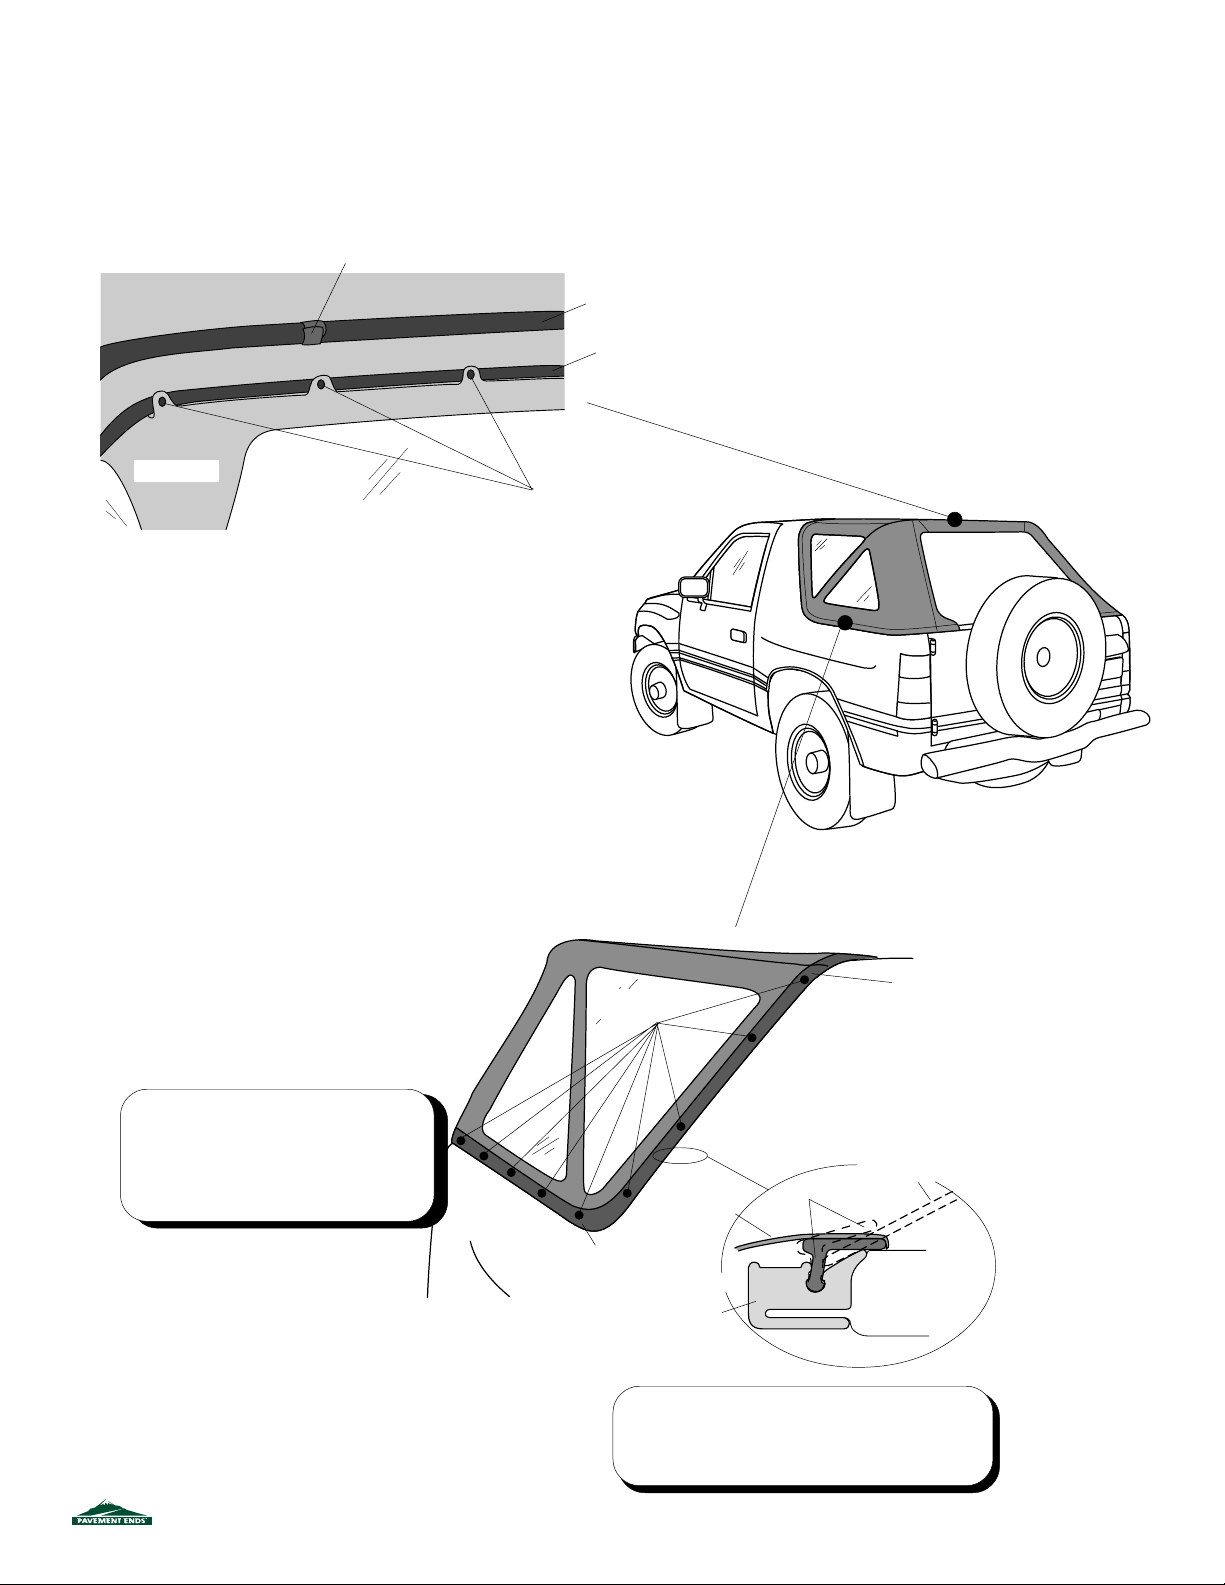
Step Four
Drape the fabric over the bow and gently pull the bow back
into position. Snap the five snaps inside the rear seam to
the rear bow. Then wrap the hook and loop strips around
the front bow.
Fasten Hook and Loop
Strips to each other
Front Bow
Rear Bow
Inside of Top
Rear Window
Snap to Rear Bow
Step Five
Install the remaining rubber seal and the Lift-a-Dots down the front
and around the corner on the side panel. As before, make sure that
the rubber seal is seated in the channel and not folded over before
fastening the Lift-a-Dots. Alternate between seating the rubber seal
and fastening the Lift-a-Dots.
Lift-a-Dots
(Hidden)
Rubber Seal
Note: The Lift-a-Dot studs may be adjusted
from side to side on the vehicle, if necessary
to match the Lift-a-Dots in the top. Use a
wrench to loosen the studs from inside the
vehicle, underneath the rubber seal and
slide the stud in the direction required.
Channel
Rubber Seal Detail
Cross Section
Fabric
Front
Rubber Seal
3 3/4" Plastic Strip Use to lever Rubber
Seal into position
Vehicle Body
Note: Make sure the rubber seal is seated in the
channel (not folded over) before fastening the Lift-aDots. Alternate between seating the rubber seal and
fastening the Lift-a-Dots.
51139 pg 4
Rev. D 0903
Page 5
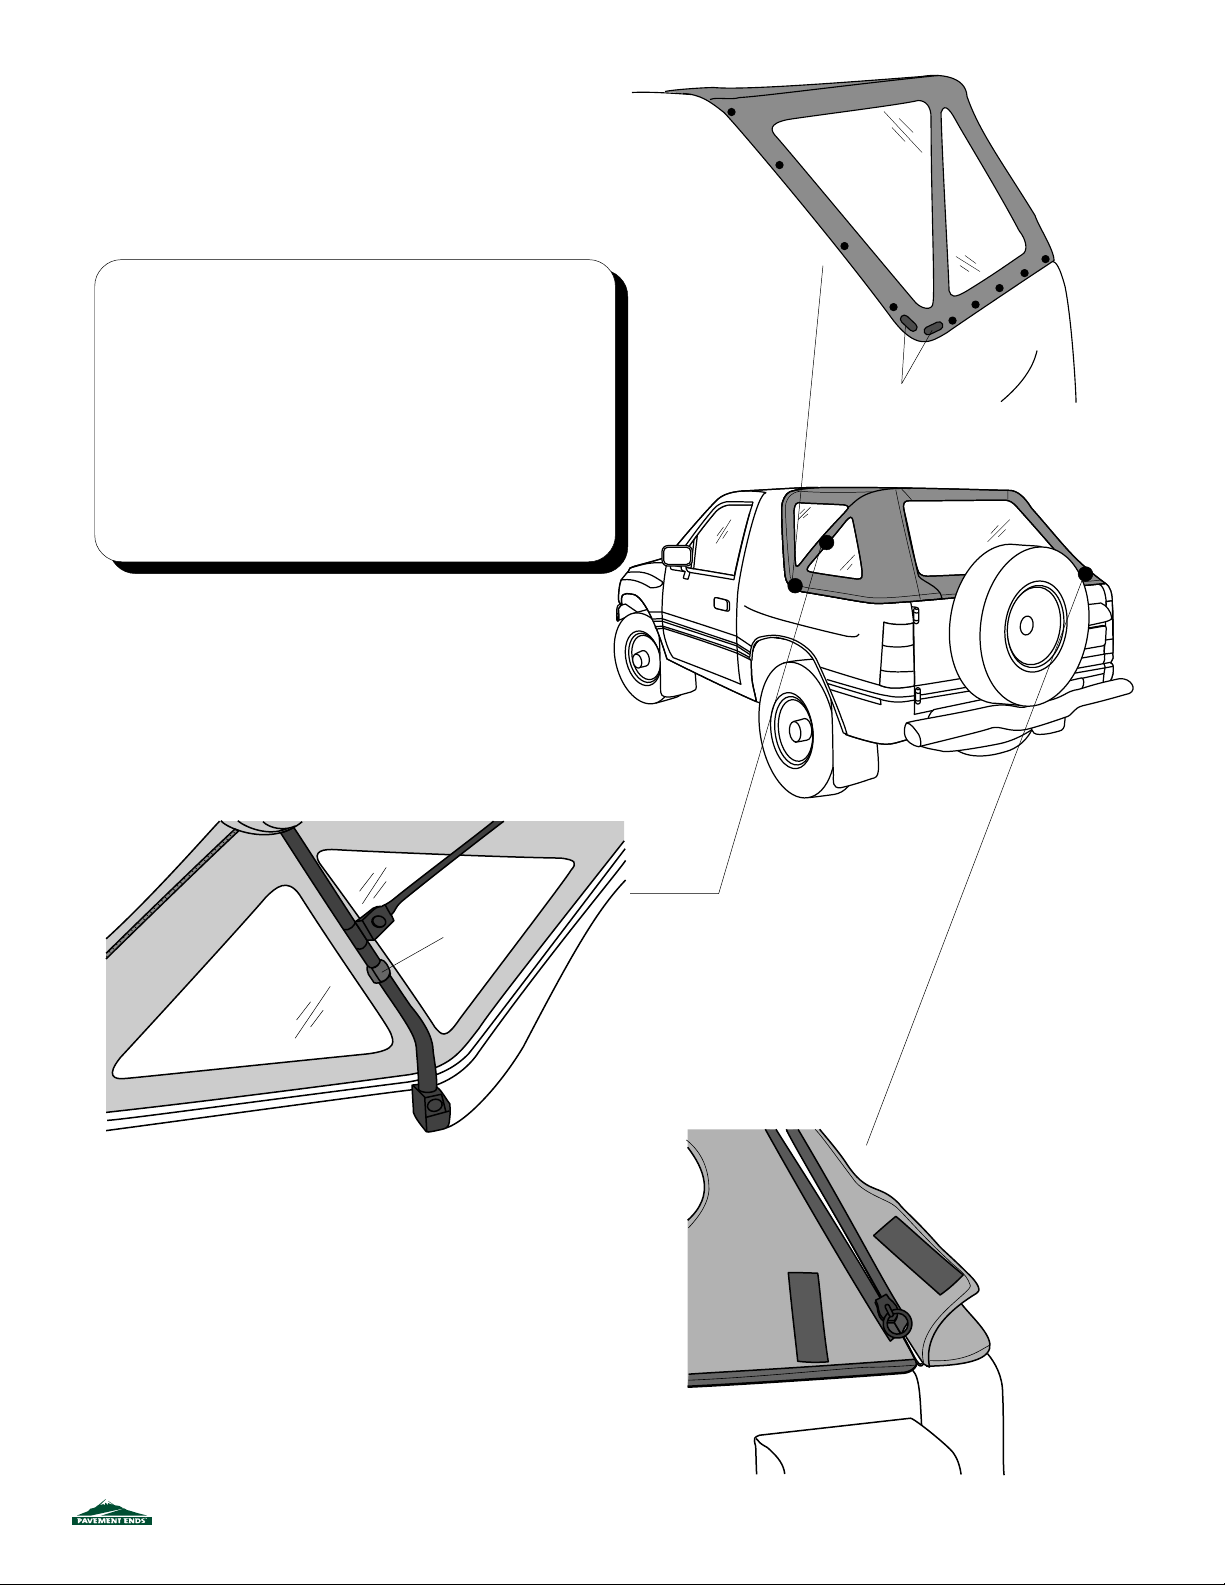
Step Six
Locate the two 3" loop strips sewn to the inside of the top in the corner of the side
panels, between the Lift-a-Dots. Use the loop strips as guides to install the 5/8" x
2" Adhesive Hook Strips between the Lift-a-Dot Studs. Peel the backing off the
Adhesive Hook Strips and press them firmly into place. After installing the
Adhesive Hook Strips, fasten the loop strips on the side panel to the hook strips.
Hook and Loop Installation
The Adhesive Hook Strip in the parts kit fastens to the loop strip sewn into
the cover.
Use a 50/50 solution of alcohol and water to clean the locations for the
adhesive Hook Strip. Be sure to remove all dirt, silicone sealants, wax,
and any other substances which might prevent the adhesive from sticking
to the paint.
Note: Do not attempt to apply the adhesive hook in temperatures of less
than 60˚ F. The adhesive backing will fully set within 72 hours of
application. You may install the Top after about 12 hours, but you should
avoid unnecessary fastening and unfastening of the cover for 72 hours.
Step Seven
Locate the hook and loop strips sewn to the inside of the top
between the side windows. Wrap the strips around the bow
and fasten them to each other.
Hook and Loop
Strips
Adhesive Hook Strip Inside Side Panel
Inside of Vehicle
Rear
Window
Zip Rear Window into
Top
Step Eight
Open the tailgate. Start on the passenger side and zip the
Rear Window to the top.
51139 pg 5
Rev. D 0903
Page 6
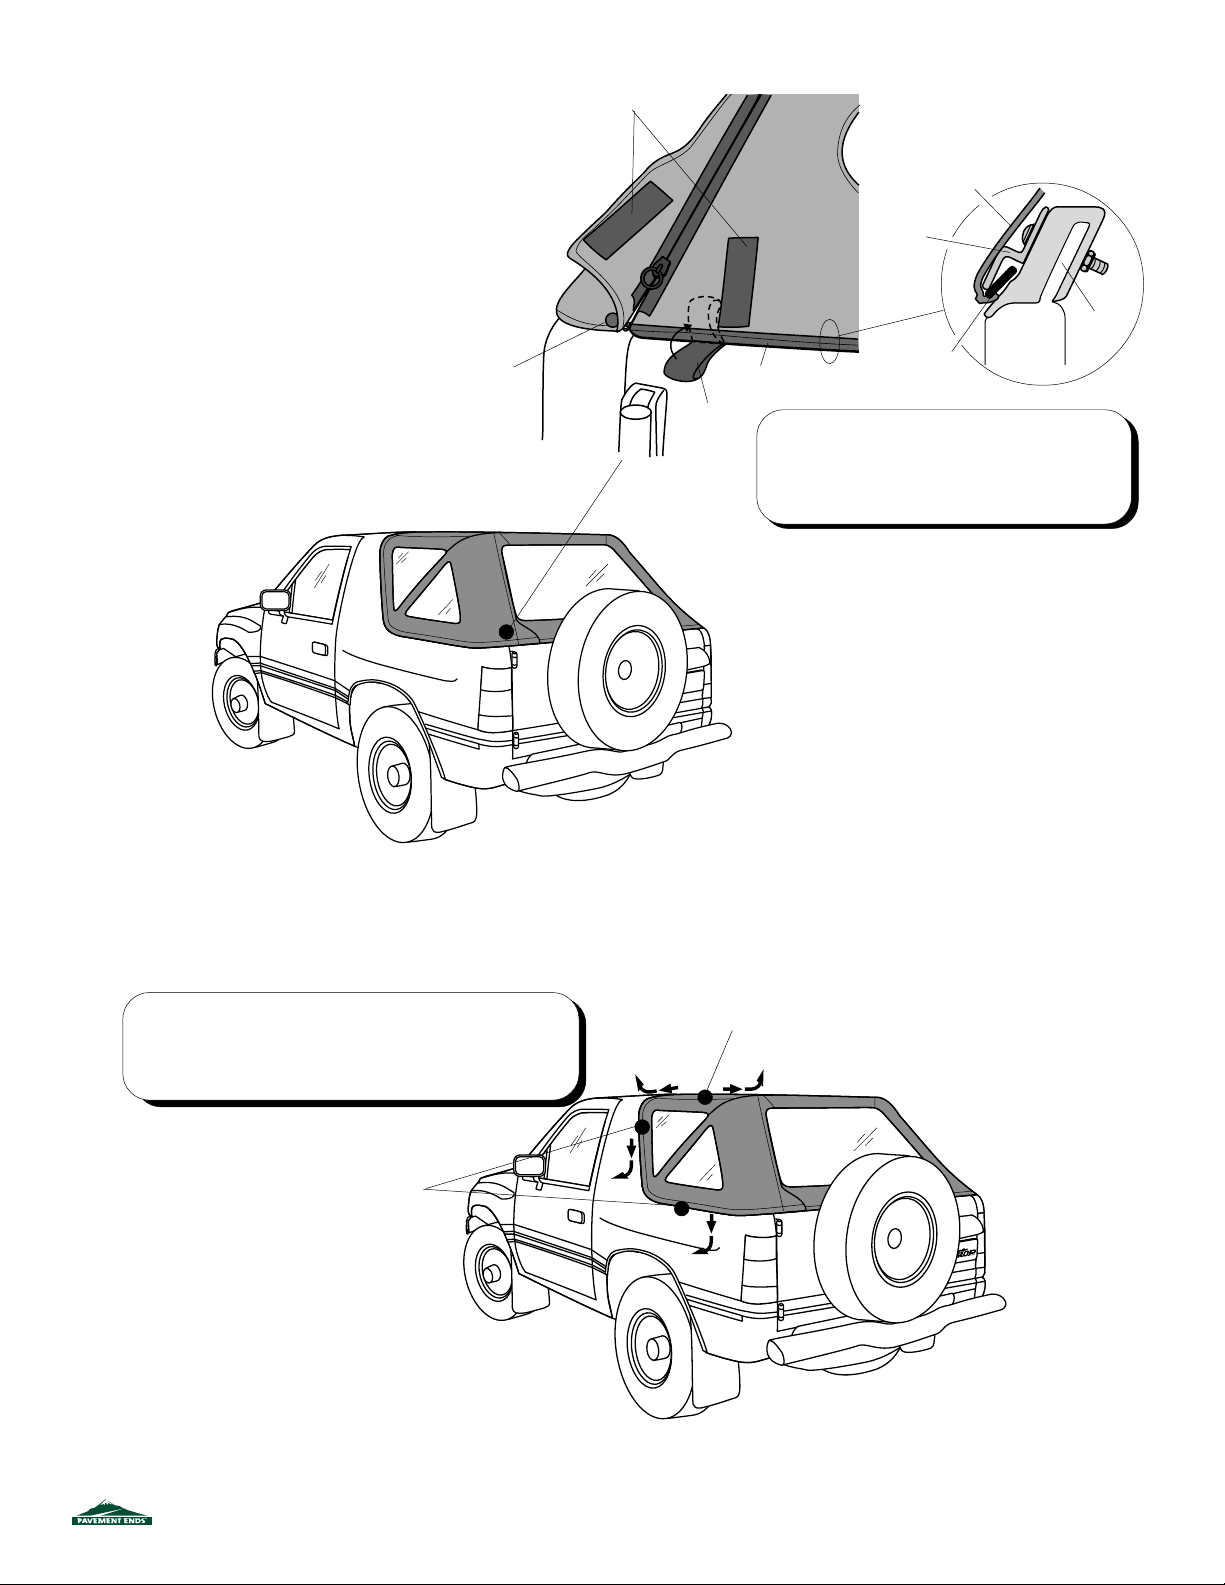
Fasten Hook and Loop Strips
Step Nine
Lift up the bottom of the Rear Window and close the
tailgate. Slip the plastic strip sewn to the bottom of the
Rear Window into the Tailgate Retainer. Snap the snaps
on each side of the tailgate. Tuck the loops on the inside
of the top and along the bottom of the Rear Window up
out of the way and fasten the hook and loop strips to
each other.
Fasten Snap
Left Rear Corner of Vehicle
Fold Loop Up
Tailgate
Tailgate Retainer Detail
Cross Section
Fabric
Tailgate
Retainer
Plastic Strip into
Tailgate Retainer
Plastic
Strip
Note: The loops sewn to the rear curtain to assist in
working the plastic strip into and out of the Tailgate
Retainer may be tucked between the rear curtain and
the side fabric when fastening the hook and loop
strips.
Tailgate
To remove the Lift-a-Dots along the top of
the vehicle, pull the fabric toward the near
side of the vehicle (from the center) and
Please Note:
straight out to release the Lift-a-Dots.
When removing the top, the Lift-a-Dots must be removed
carefully in order to avoid damage to the top or to the
Lift-a-Dots.
To remove the Lift-a-Dots along
the bottom and front sides, pull the
fabric straight down and straight
out to release the Lift-a-Dots.
51139 pg 6
Rev. D 0903
Page 7

LIMITED WARRANTY
We warrant our product to be free from defects in material and workmanship, for the terms specified below, provided there has been normal use and
proper maintenance. This warranty applies to the original purchaser only. All remedies under this warranty are limited to the repair or replacement of
any item or items found by the factory to be defective within the time period specified.
If you have a warranty claim, first you must call our factory at the number below for instructions. You must retain proof of purchase and submit a copy
with any items returned for warranty work. Upon completion of warranty work, if any, we will return the repaired or replaced item or items to you freight
prepaid. Damage to our products caused by accidents, fire, vandalism, negligence, misinstallation, misuse, Acts of God, or by defective parts not
manufactured by us, is not covered under this warranty.
THE WARRANTY TIME PERIOD IS AS FOLLOWS: ALL “SOFT GOODS” MANUFACTURED BY OUR COMPANY (USING PRIMARILY VINYLS, PLASTICS,
AND/OR FOAM): ONE YEAR FROM DATE OF PURCHASE.
ANY IMPLIED WARRANTIES OF MERCHANTABILITY AND/OR FITNESS FOR A PARTICULAR PURPOSE CREATED HEREBY ARE LIMITED IN DURATION
TO THE SAME DURATION AND SCOPE AS THE EXPRESS WRITTEN WARRANTY. OUR COMPANY SHALL NOT BE LIABLE FOR ANY INCIDENTAL OR
CONSEQUENTIAL DAMAGE.
Some states do not allow limitations on how long an implied warranty lasts, or the exclusion or limitation of incidental or consequential damages, so the
above limitations or exclusions may not apply to you.
This warranty gives you specific legal rights, and you may also have other rights which vary from state to state.
For further information or request for warranty work, please contact: Customer Service
877 638-9509
51139 pg 7
Rev. D 0903
 Loading...