

Page 1

Fabric Replacement Top
and Doors
Installation Instructions
For: Wrangler/TJ 1997 - 2002 Part Number: 51131
WARNING
This product is designed to enhance the appearance of the
vehicle and to shield the occupants from ordinary weather conditions. Do not rely in any way on the components of this product
to contain occupants within the vehicle, or to protect against
injury or death in the event of an accident. This top will not protect
the occupants from falling objects. Never operate vehicle in
excess of manufacturer’s specifications.
WEAR SEAT BELTS AT ALL TIMES
Read and follow, precisely, all installation instructions provided
when installing top. Failure to do so may result in a poor fitting
top and could place occupants of the vehicle in a potentially
dangerous situation. After installing or reinstalling the top,
check to make sure it has been properly installed.
51131 pg 1 Rev. C 0204
Installation Tips
After completing the installation, keep these instructions for
future reference. Before you begin installing this Replay
Top assembly, read all instructions thoroughly. Below are
a few tips to make this installation easier.
For a smooth fit:
For ease in installation, the Replay Top should be installed
at temperatures above 72° F. Below this temperature, the
fabric may contract an inch or more, making it difficult to fit
to the vehicle.
It is normal for the fabric to contract and wrinkle when
stored in the shipping carton. Within a few days after the
installation, the fabric will relax and the wrinkles will
disappear.
Page 2
Parts List
Removing the Old Top
Fabric Top Qty - 1
Quarter Window, Right Qty - 1
Quarter Window, Left Qty - 1
Rear Window Qty - 1
Door Cover, Right Qty - 1
Door Cover, Left Qty - 1
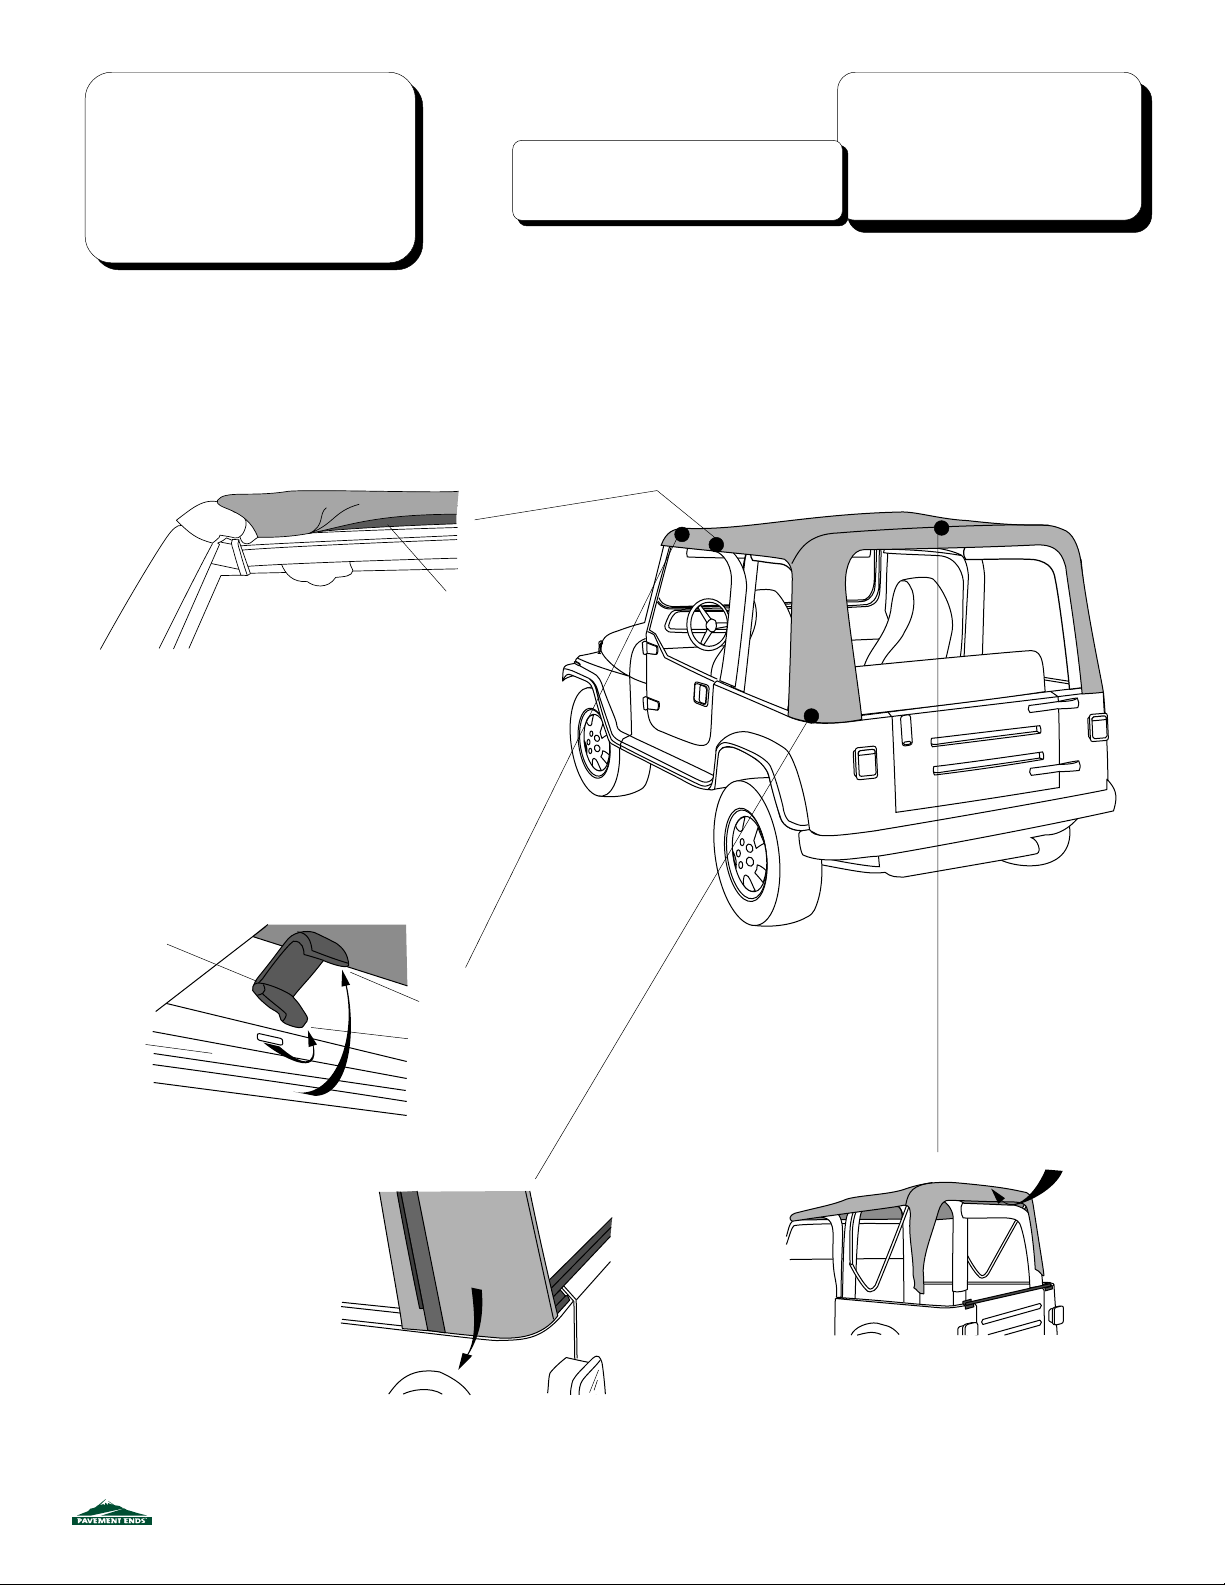
Step One
Remove the Quarter Windows and the Rear Window.
Remove the metal Tailgate Bar from the bottom of the Rear
Window and set it aside.
Release the plastic strip sewn to the top above the doors.
Pull down and out to slip the plastic out of the channel.
Release Plastic Strips from
Retainers
Safety glasses should be worn at all times
CAUTION
while installing this product.
Tools Needed
Shoe Horn
Safety Glasses
Razor Knife
Phillips Screwdriver
Step Two
Release the latch that secures the header to the
windshield. Pull up on the lever and then down and
out to release the hook from the slot in the windshield
frame.
Header Latch
Pull lever up
Windshield
Frame
Windshield
Pull down and then out to release
the fabric from the retainer
Release hook
from slot
Step Three
Release the rear corners of the top. Pull gently down
and then out to release the plastic strip from the
retainer on the vehicle.
51131 pg 2
Unsnap the fabric from
the rear bow
Step Four
Unsnap the fabric from the rear bow
and allow the bow to drop onto the
tailgate.
Rev. C 0204
Page 3
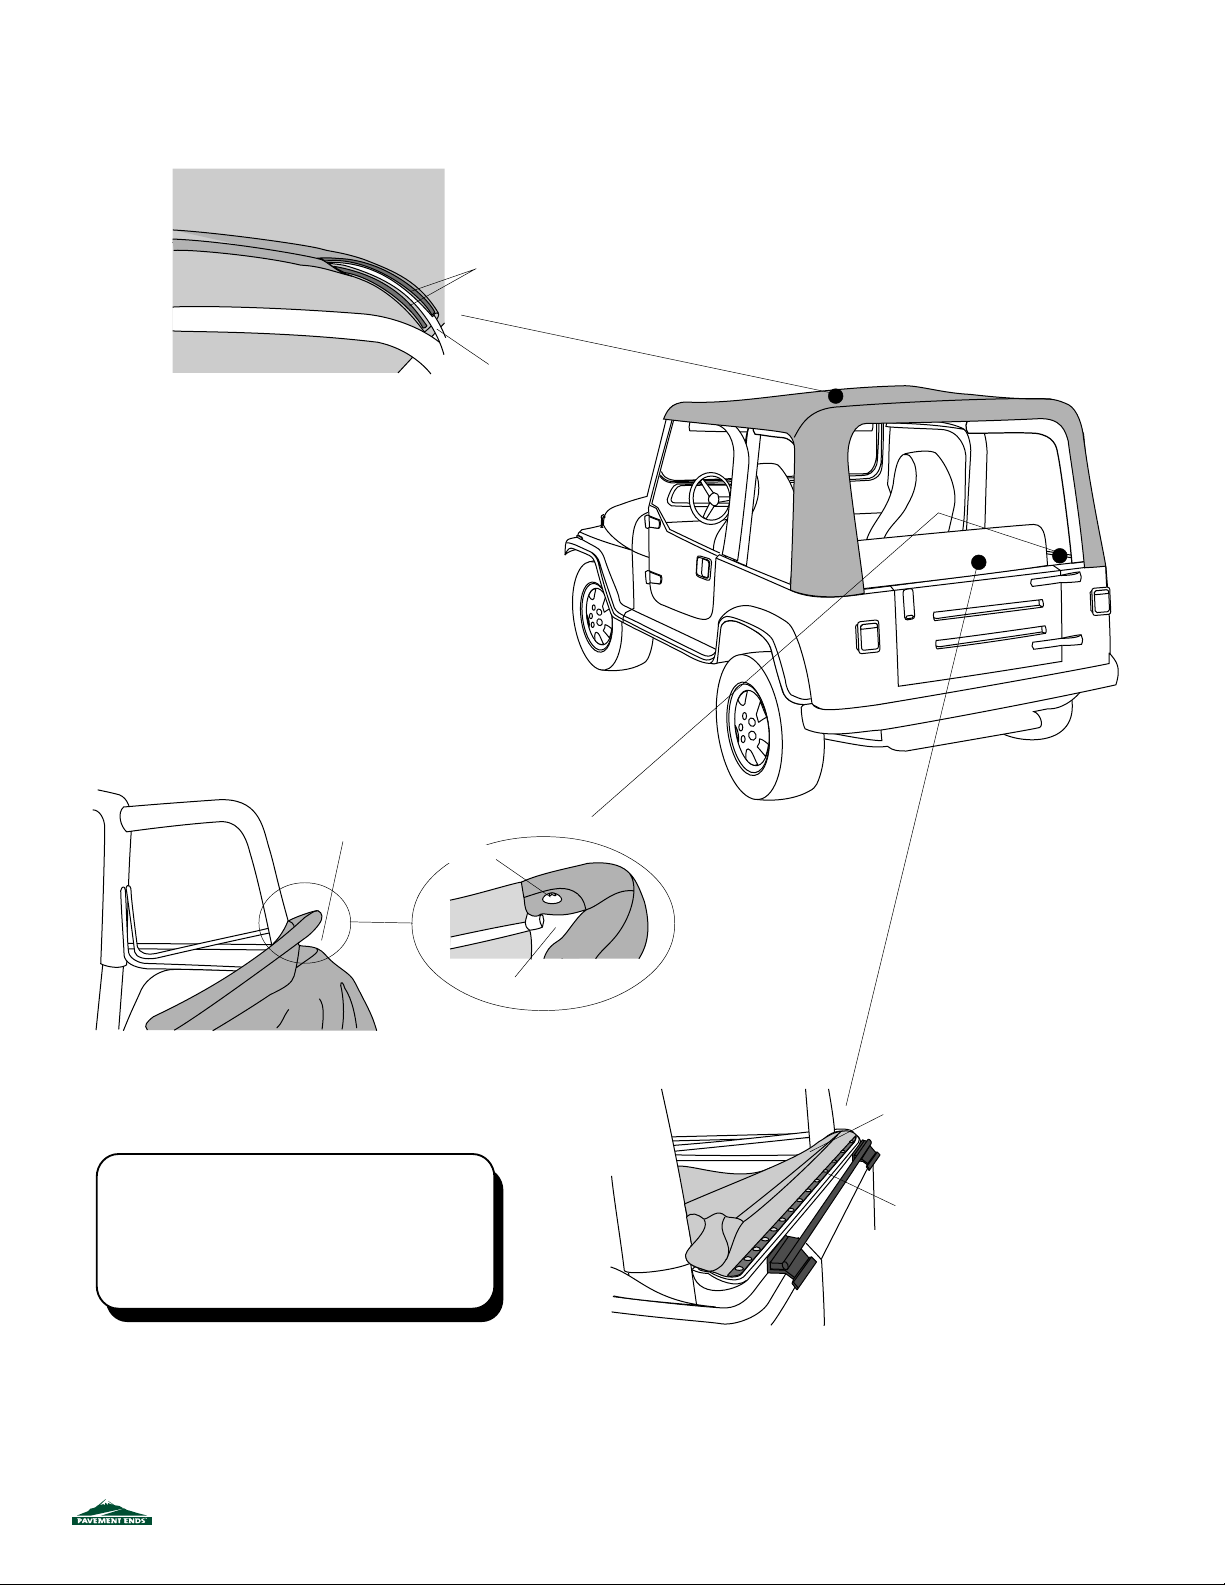
Step Five
Unfasten the flap around the middle bow.
Sport Bar
Unfasten hook and
loop to unwrap flap
View from inside vehicle
Step Six
Collapse the bow assembly down onto the tailgate.
With the bow assembly laying on the tailgate, remove the
screws that fasten the fabric to the corners of the header.
Set the screws aside for use in installing the new top
fabric.
Collapse bows and fabric
onto tailgate
Detail of Header
Remove Screw
Middle Bow
Manufacturing Note: Due to a recent header assembly
modification by Daimler Chrysler, the plastic strip on the
windshield header may have 8 screw locations instead
of 14. Both attachment numbers of screws will securely
fasten the header and perform as the original design was
intended.
51131 pg 3
Header
Flip the fabric into the
rear of the vehicle
Remove the 8 or 14 screws
that secure the fabric
to the header.
Step Seven
Flip the top fabric back over into the rear of the vehicle (so that the
fabric lays backing side up) to expose the plastic strip along the edge
of the fabric. Remove the eight or fourteen screws that secure the fabric
to the header, setting the screws aside for use in installing the new top.
Then remove the old top fabric from the vehicle.
Rev. C 0204
Page 4
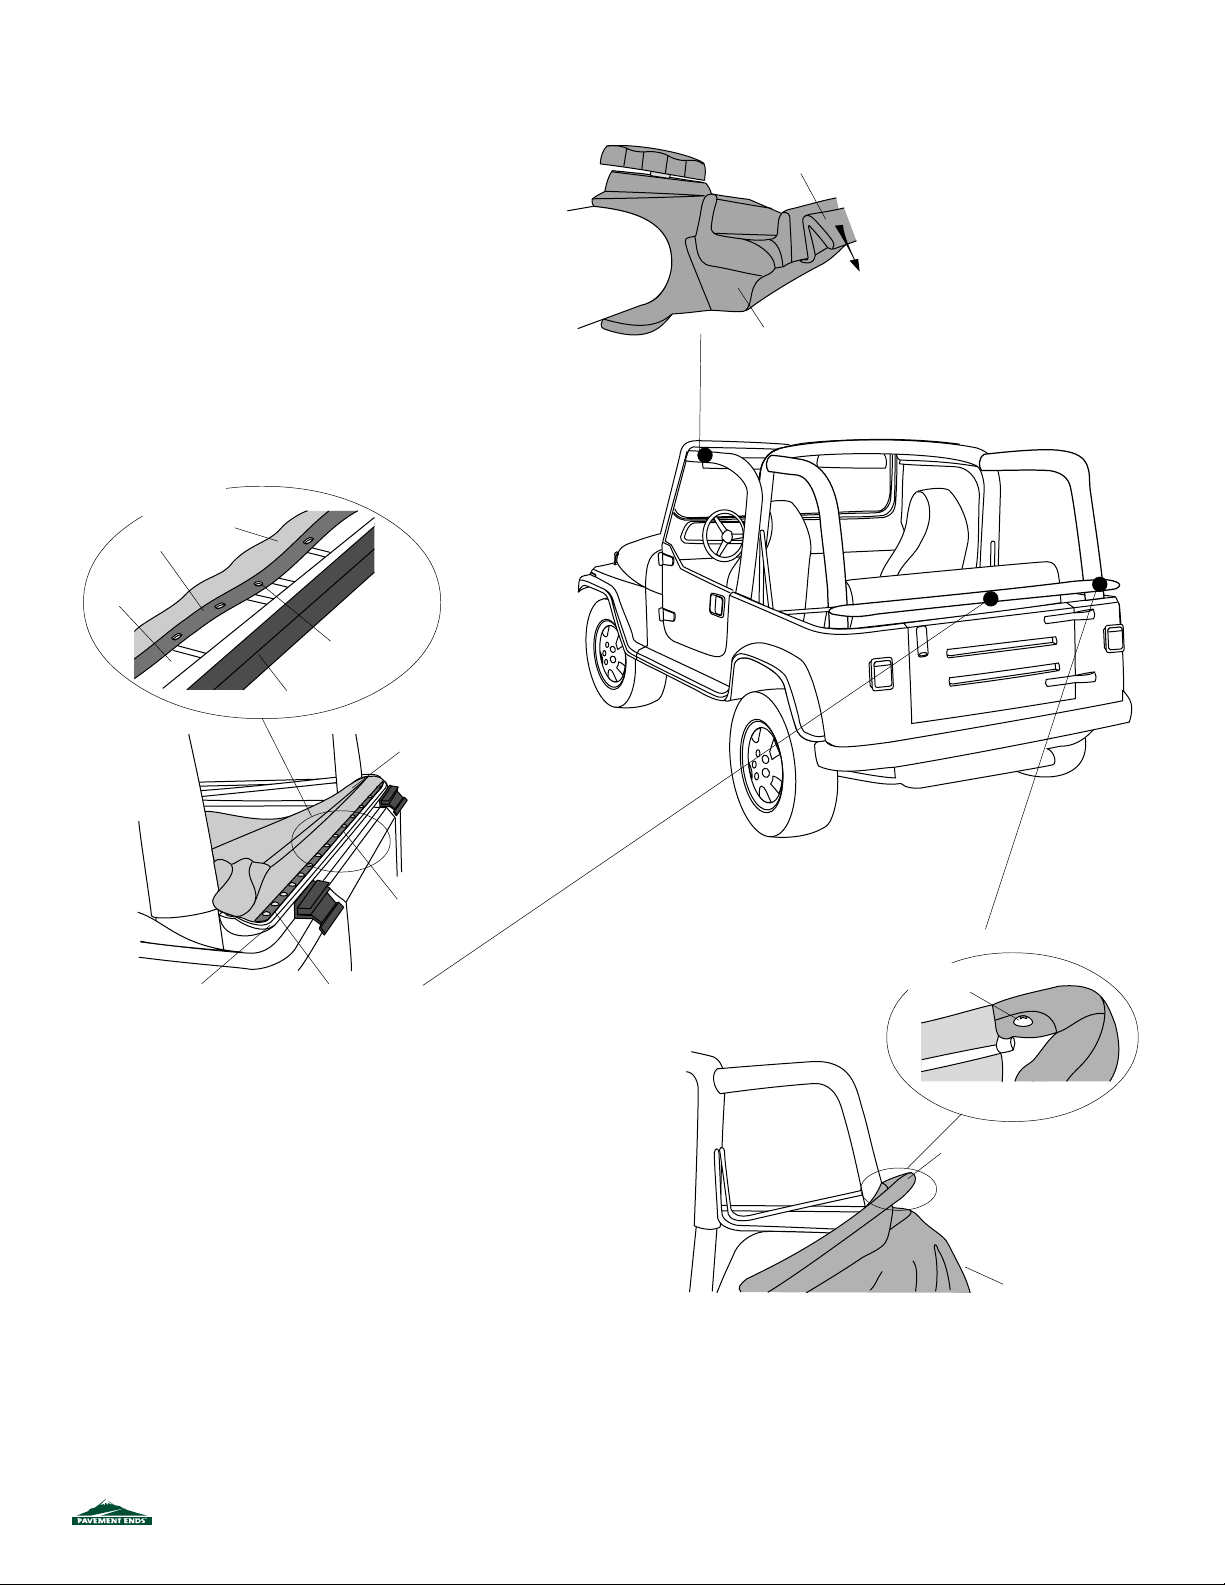
Header
Plastic
Strip
Detail of Center
Screw Hole
Fabric
Installing the New Top
Step One
If you have a 1997 vehicle with a
slip-on plastic extrusion on the
door surround, it must be
removed. Pull down on the
extrusion to work it loose.
Start with center
ROUND hole
Slip-On Plastic
Extrusion
Door Surround
Pull down on extrusion
to remove
Tailgate
Lay fabric, backing up
in rear of vehicle
Start with center ROUND
hole
Align fabric with header
Plastic Strip along front
edge of fabric
Step Two
In order to install the top fabric, make sure that the Center and
Rear Bows are in the folded down position on the rear of the
vehicle.
Lay the top fabric, backing side up in the rear of the vehicle with
the plastic strip facing up and aligned with the front edge of the
header. Locate the round hole that marks the center of the plastic
strip (all other holes are slotted). Install a screw in the round hole
to secure the fabric to the header as well as to center the top.
Then proceed to install screws in the remaining seven or thirteen
holes along the front of the header.
Detail of Header
Install screw to
secure fabric
Work pockets over corners
of header
Drape fabric over
tailgate
Step Three
Flip the fabric over so that it wraps around the header and
drape the top fabric over the tailgate. Raise the header
slightly and work the pockets in the fabric over the corners
of the header. Install an oval head screw in each corner to
secure the fabric to the header.
51131 pg 4
Rev. C 0204
Page 5
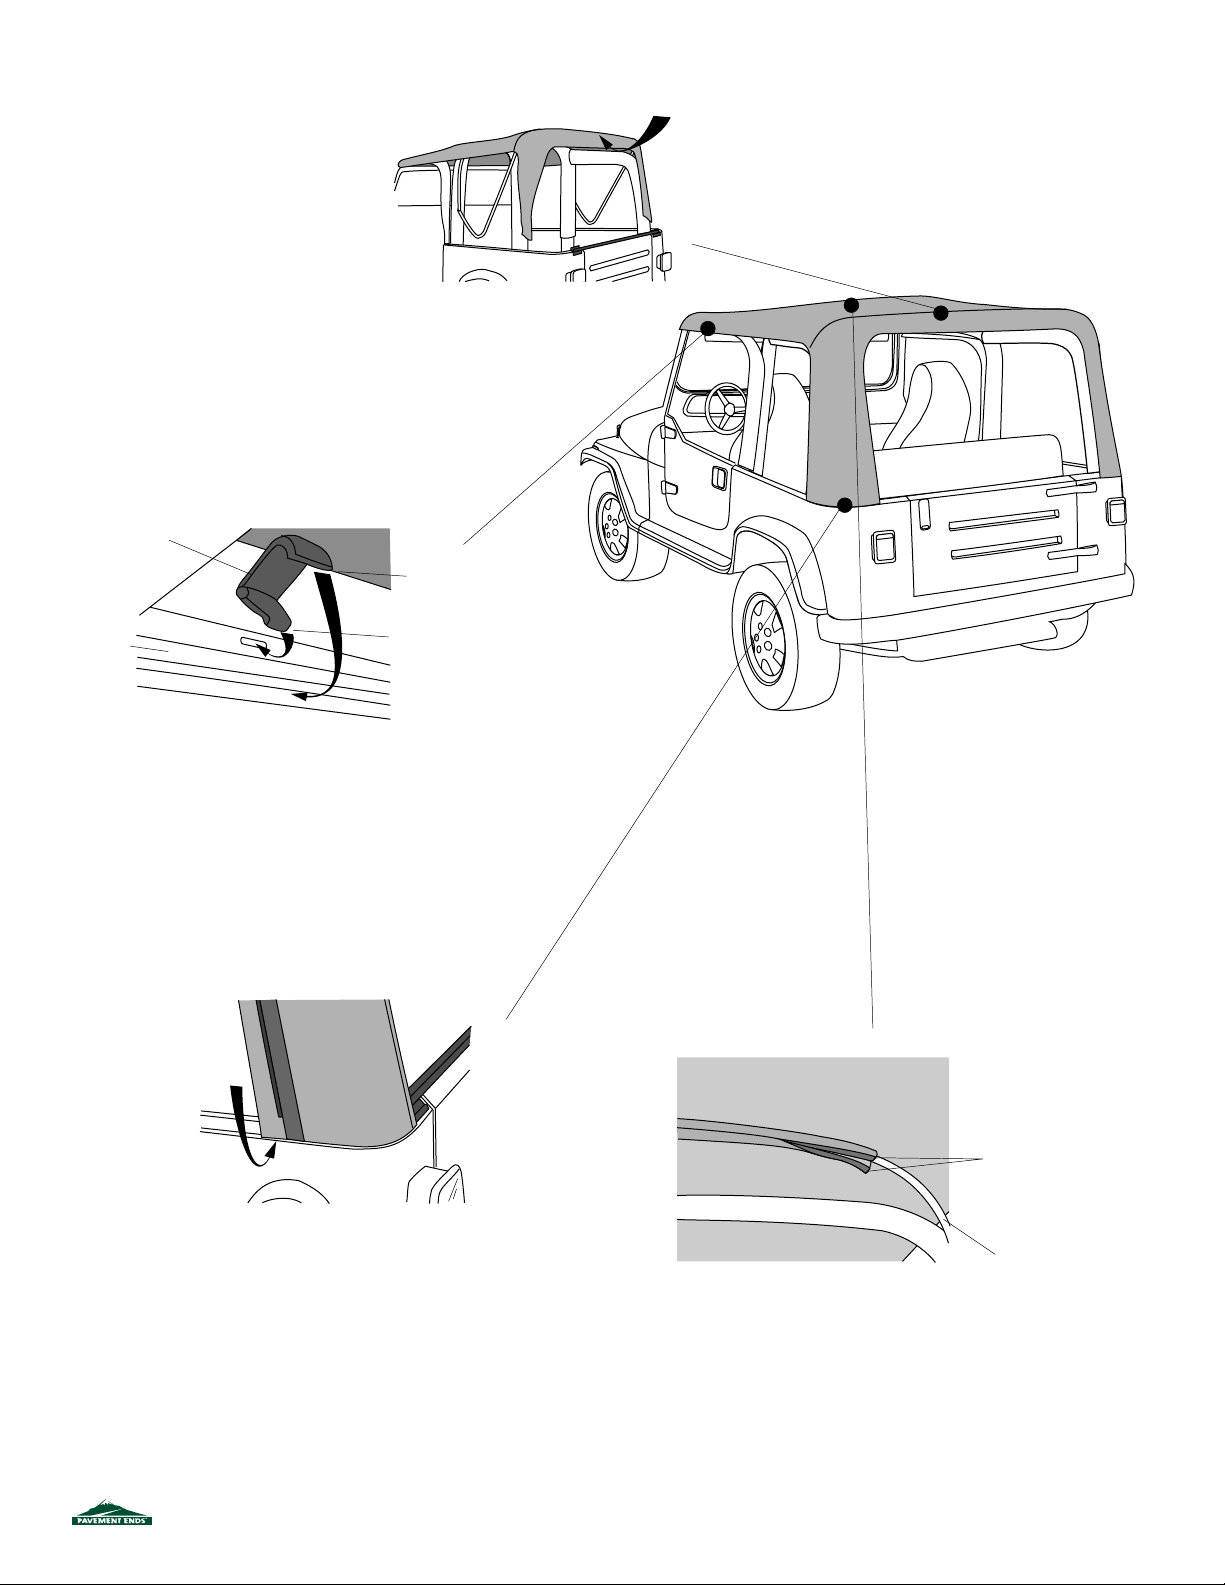
Step Four
Raise the header and bow assembly
toward the windshield and into
position.
Inside the top, snap the fabric to
the Rear Bow (six snaps).
Step Five
Close the header latches to secure the front of the top to
the windshield. Catch the hook in the slot in the windshield
frame and then close the lever over it so that it lays flat
against the windshield frame.
Header Latch
Close lever over top
of hook to lay flush
with windshield frame
Snap fabric to
Rear Bow
Windshield
Frame
Windshield
Catch hook
in slot
Step Six
Make sure that the Center Bow is centered in the hook and
loop flap inside the top. Do not fasten the flap at this time.
Pull down gently on the Rear Bow and work the plastic
sewn to the rear corners of the top into the retainer on the
vehicle.
Pull down gently on the
Rear Bow and slip plastic
into retainer
Sport Bar
Wrap flaps around bow and
fasten hook and loop
View from inside vehicle
Center Bow
Step Seven
Wrap and fasten the hook and loop on the
two flaps inside the top around the Center
Bow.
51131 pg 5
Rev. C 0204
Page 6
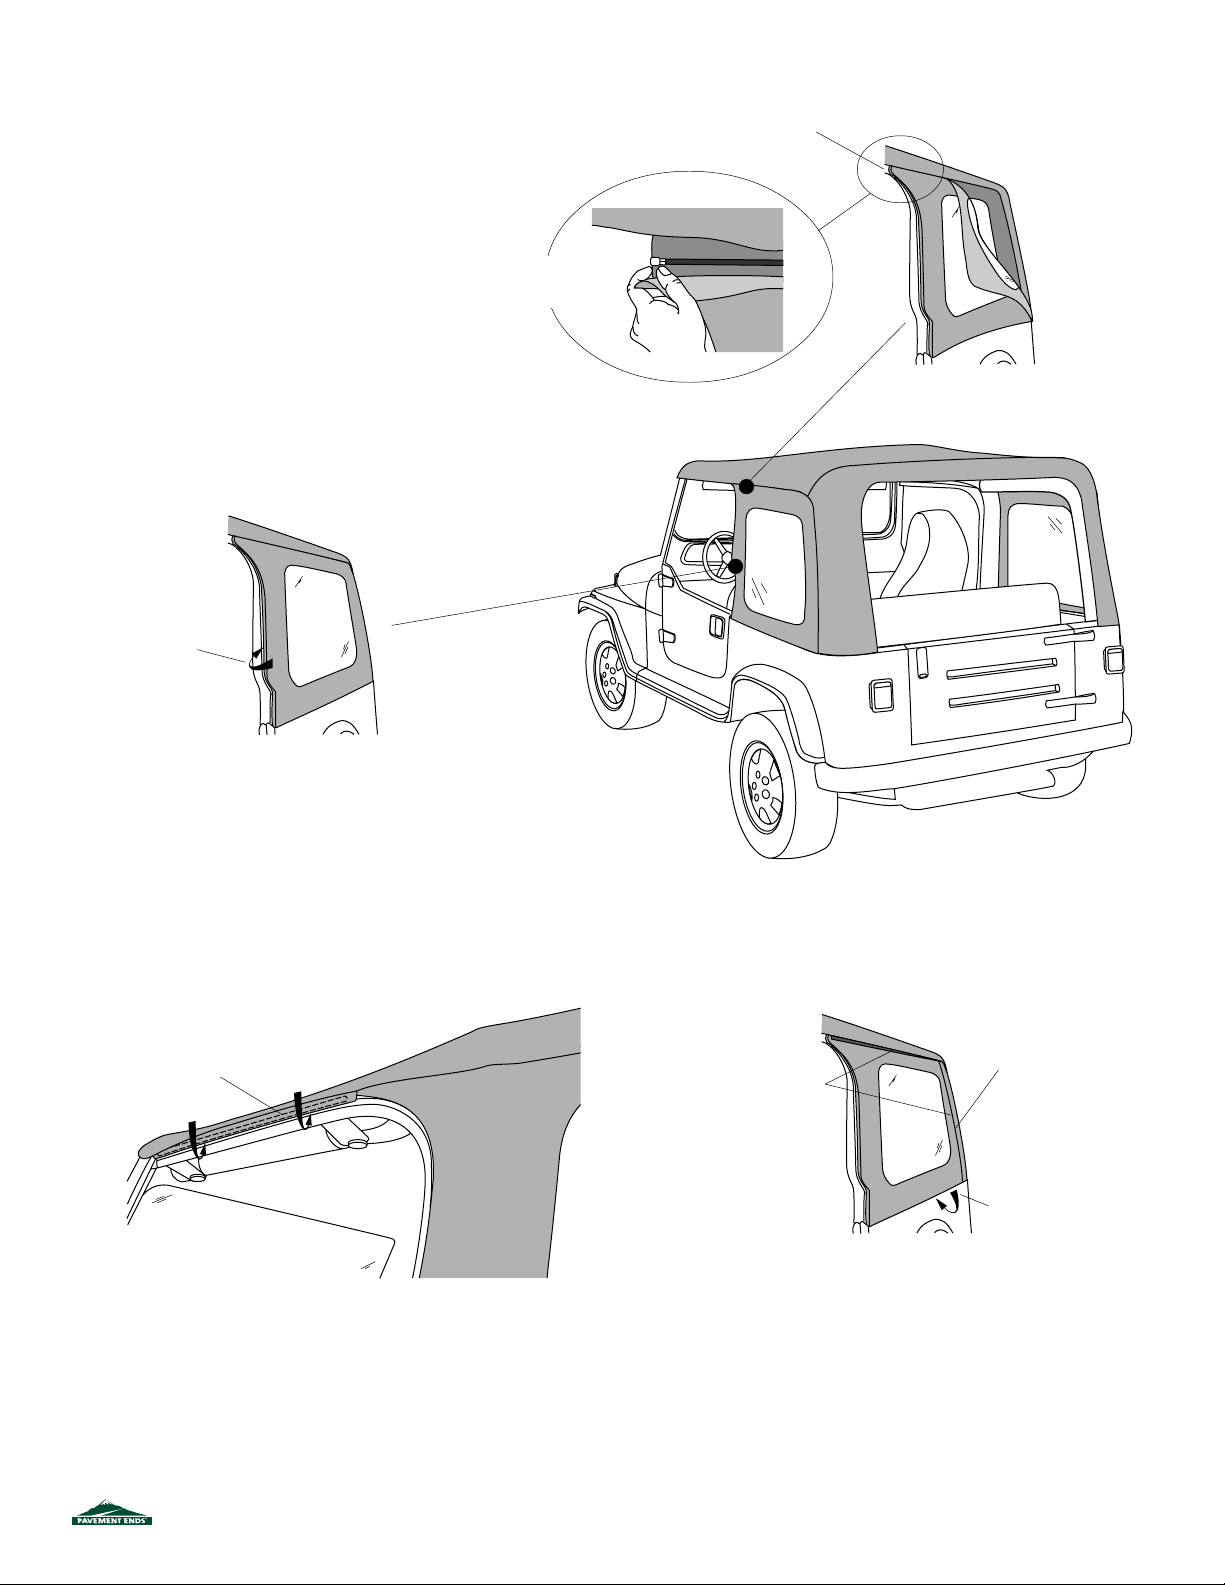
Step Eight
Locate the left and right Quarter Panels and orient them
with the zipper along the top and rear of the panel. Start the
zipper at the front top corner of the Quarter Panel, next to
the door. Hold the end of the zipper and close the zipper
slider 10" - 12" along the top of the panel.
Step Nine
Roll the plastic along the front of the
Quarter Panel into the channel of the Door
Surround on the vehicle.
Roll Plastic Strip into
channel in retainer
Hold end of
zipper while
starting slider
Detail of Quarter
Panel
Start zipper at front and
close 10" - 12"
Step Ten
Locate the plastic strip sewn to each side of the top, above each
door. Slip the strips into the channel in the Door Surround above the
door opening.
Roll Plastic Strip into channel
above door opening
Fasten Hook and Loop
Strips
Close Zipper
Roll Plastic Strip into
channel in retainer
Step Eleven
Close the zippers on the Quarter Panels the rest of the way
to the lower rear corner of the panel.
Start at the rear and roll the plastic along the bottom of the
panel into the retainer on the vehicle. Then fasten the hook
and loop strips along the top and rear of the panel to the
top.
51131 pg 6
Rev. C 0204
Page 7
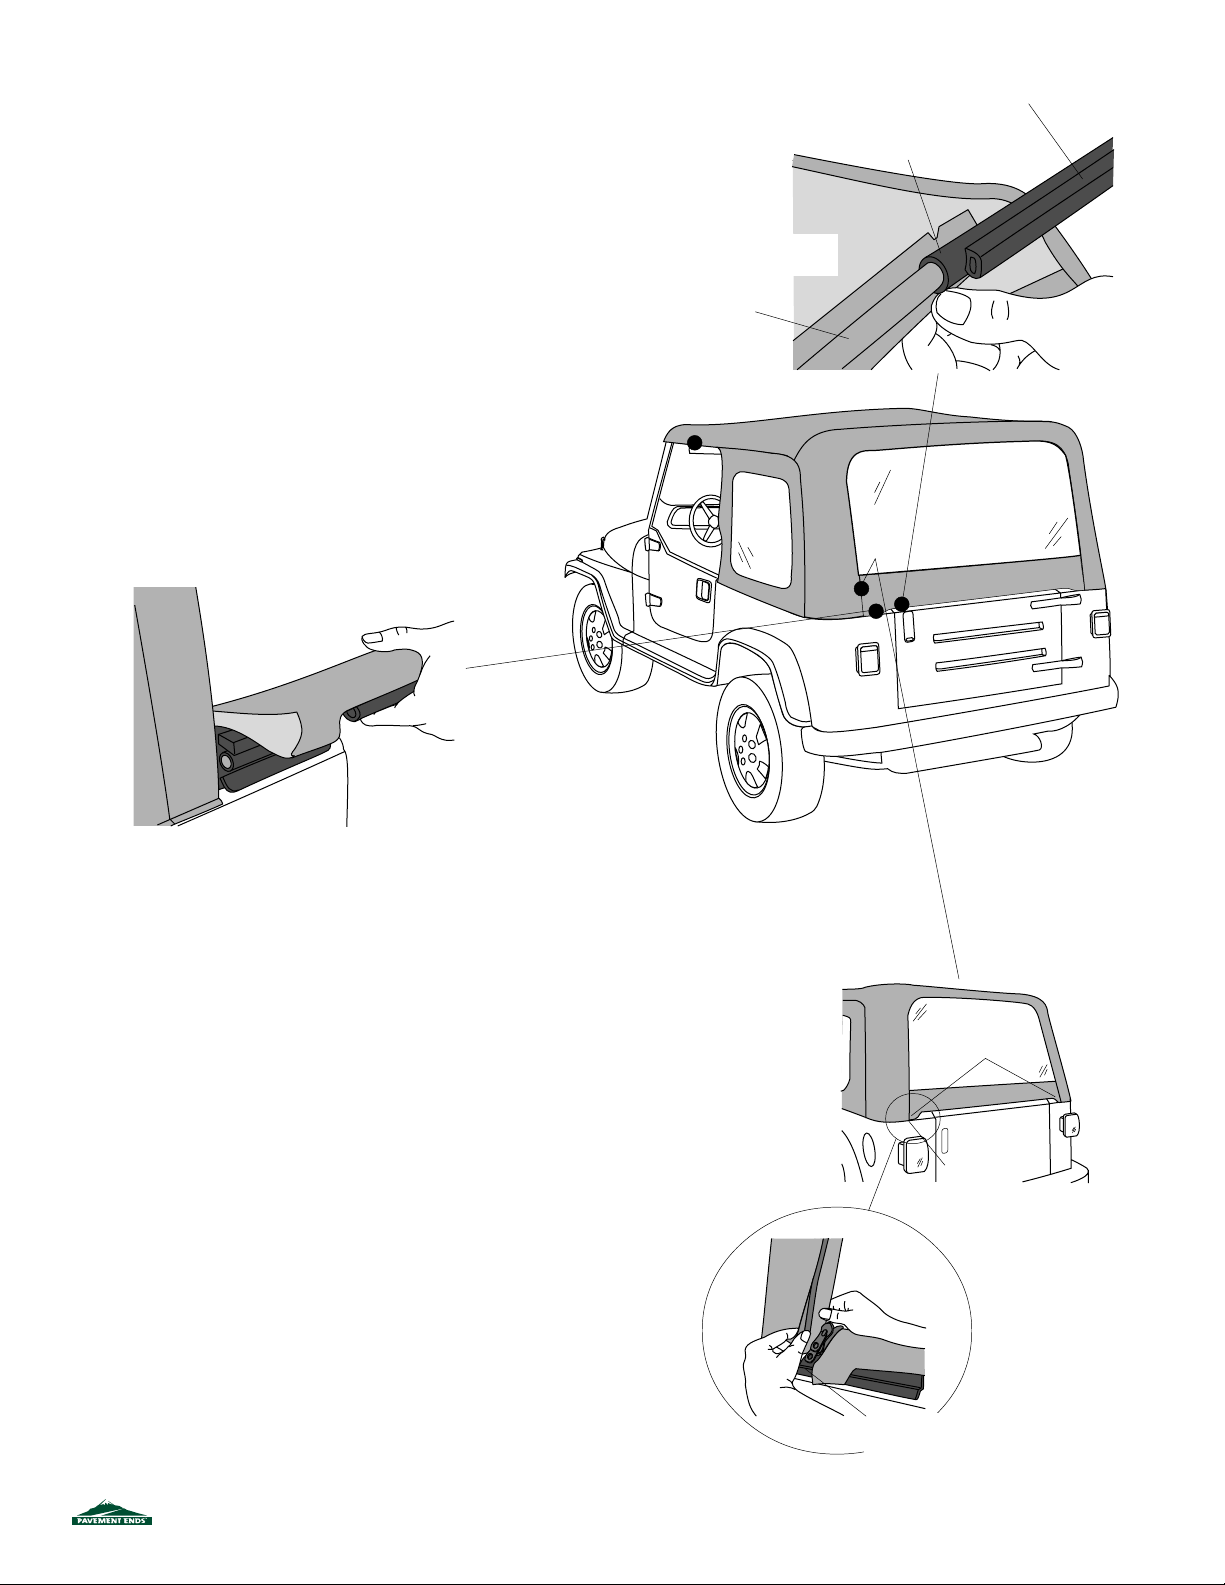
Tailgate Retainer
Step Twelve
Remove the Rear Window from the box and lay it flat with the backing side
up. Locate the Tailgate Bar set aside in Step One. The bar has a "C" shaped
channel, when viewed from the end. Orient the bar with the round seal down
and slide the "C" channel on the retainer onto the tubed strip sewn to the
backing side of the Rear Window.
Step Thirteen
Insert the Tailgate Bar into the mounts on each side of
the tailgate opening with the vinyl side of the Rear
Window toward the outside of the vehicle.
Place Tailgate Bar in
mounts
Tubed Strip
Rear Window Backing Side
Tailgate Retainer
Channel
Step Fourteen
To start the zipper, pull the two sliders as far down as possible on the
driver's side of the window in order to catch the sliders to the pin.
Once the zipper is caught, start the top slider 1/2". Then hold up the top
of the window with one hand and close the zipper with the other. The
zipper is sandwiched between layers of fabric in the corners so be careful
not to catch extra fabric in the zipper. Close the zipper.
Make sure that the Tailgate Bar is centered and is securely in the mounts.
Then tuck the flaps on the Rear Window under the top fabric.
51131 pg 7
Tuck Flaps
under top
Start Zipper
Pull both sliders down as
far as possible to catch
pin
Rev. C 0204
Page 8
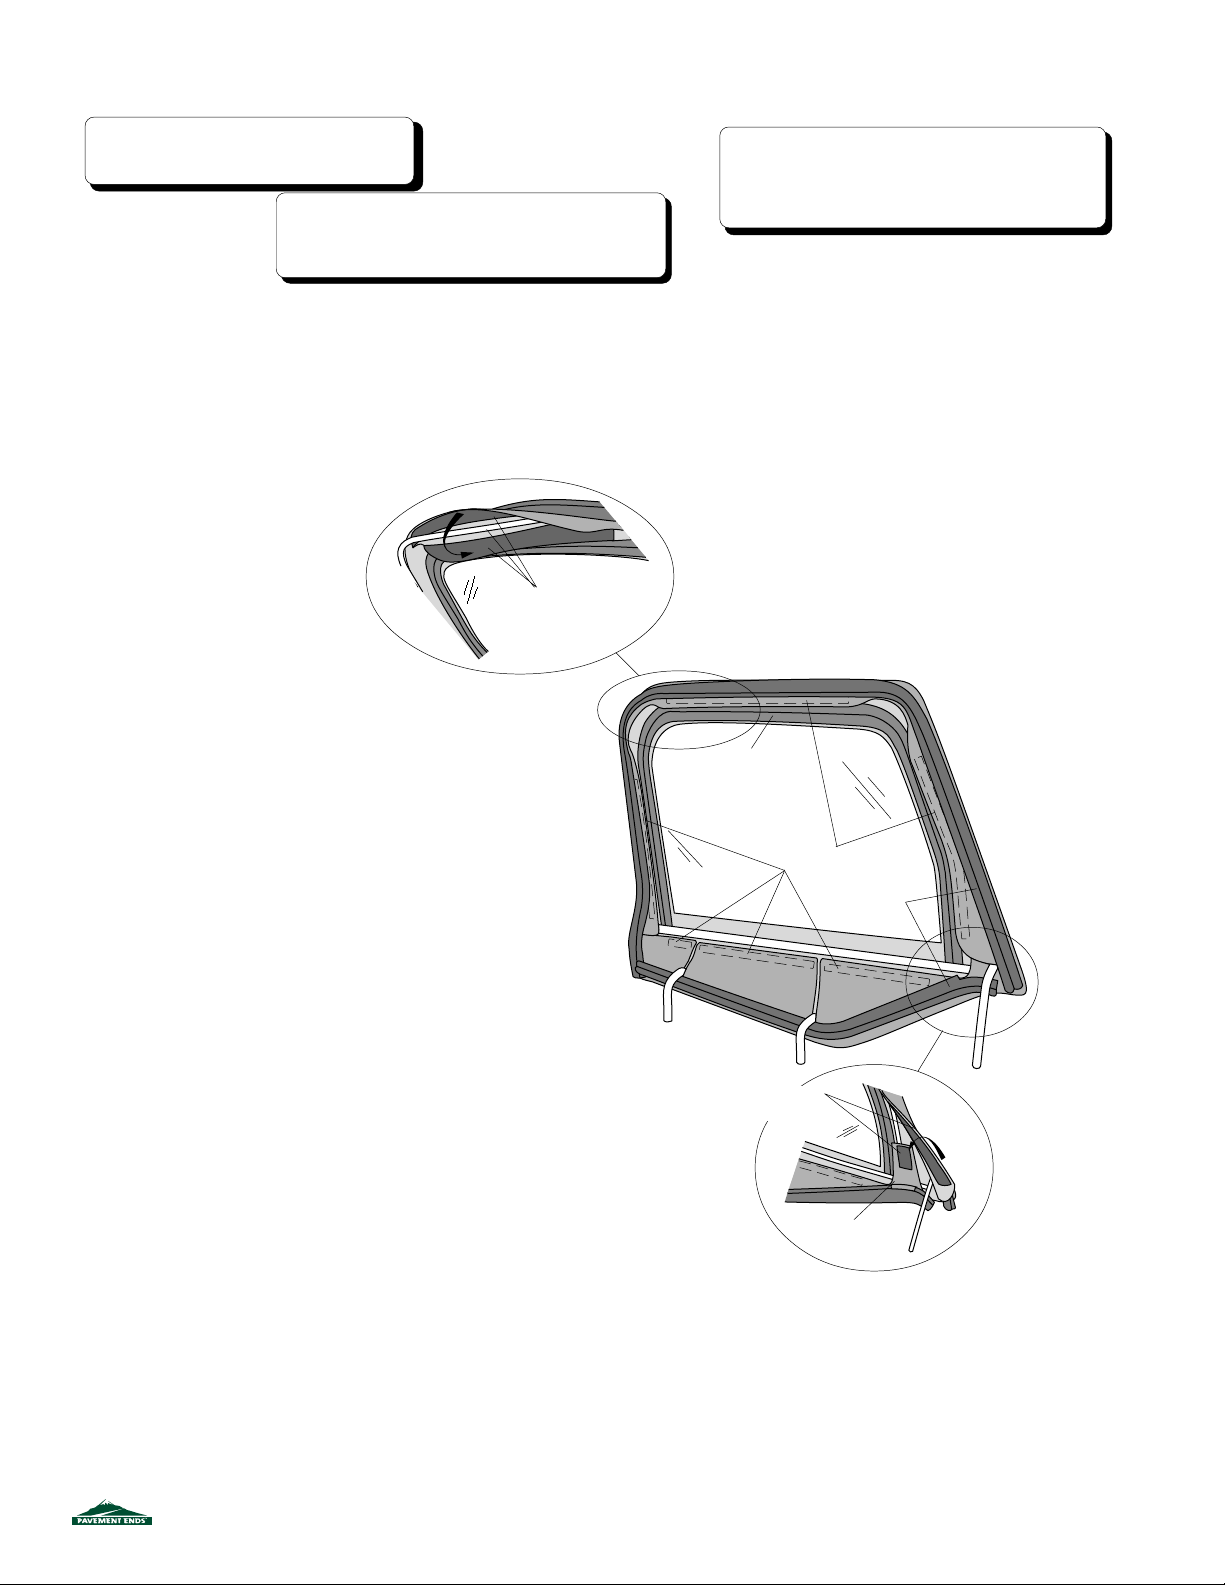
Installing the New Door Covers
Note: For the best results and to minimize
scratches on the windows, remove all jewelry
before installing the door covers.
Note: This door cover is designed to fit very tight on the
door frame. We recommend using a shoe horn to help
work the corners of the cover over the frame without
tearing the fabric.
Step Fifteen
Remove the fabric upper doors from the vehicle. Use a
razor knife to cut the stitches on the old door covers and
take them off of the door frames.
Step Sixteen
Unzip the windows and separate the hook and
loop fasteners on the door covers. Lay the door
cover on a flat smooth surface with the outside
facing down.
4. Use tab to install
Door Frame Between Hook
and Loop Flaps
Upper Rear Corner
WARNING
Do not pull on the weatherstrip to assist in getting the door cover
on the door frame. This will tear the weatherstrip and the door
will not seal properly.
Detail of Hook and Loop Top of Door
3. Install Upper
Front Corner
Unzip Window
before installing
Start by working the lower rear corner of the door
frame into the pocket in the lower rear corner of
the cover. Then work the lower front corner of the
frame into the cover. Work the top front corner of
the frame into the corner of the cover, between
the hook and loop flaps (not between the zipper
and the flap). Finally, use the tab sewn into the
cover to work the last corner of the frame into the
corner of the door cover, again between the hook
and loop flaps.
Make sure that the top edge of the door cover is
straight along the top of the door frame. Work
around the door fastening the hook and loop
strips tightly around the door frame. Once the
door cover is on the frame, the tab in the top rear
corner of the cover may be cut off with a pair of
scissors if desired.
Step Seventeen
Reinstall the upper doors. Insert the
pins into the grommets in the lower
door.
1. Install Lower
Rear Corner
Hook and
Loop
Hook and
Loop
Weatherstrip
Pull Flap Up
First
2. Install Lower
Front Corner
Detail of Hook and Loop - Lower
Front Corner
51131 pg 8
Rev. C 0204
Page 9
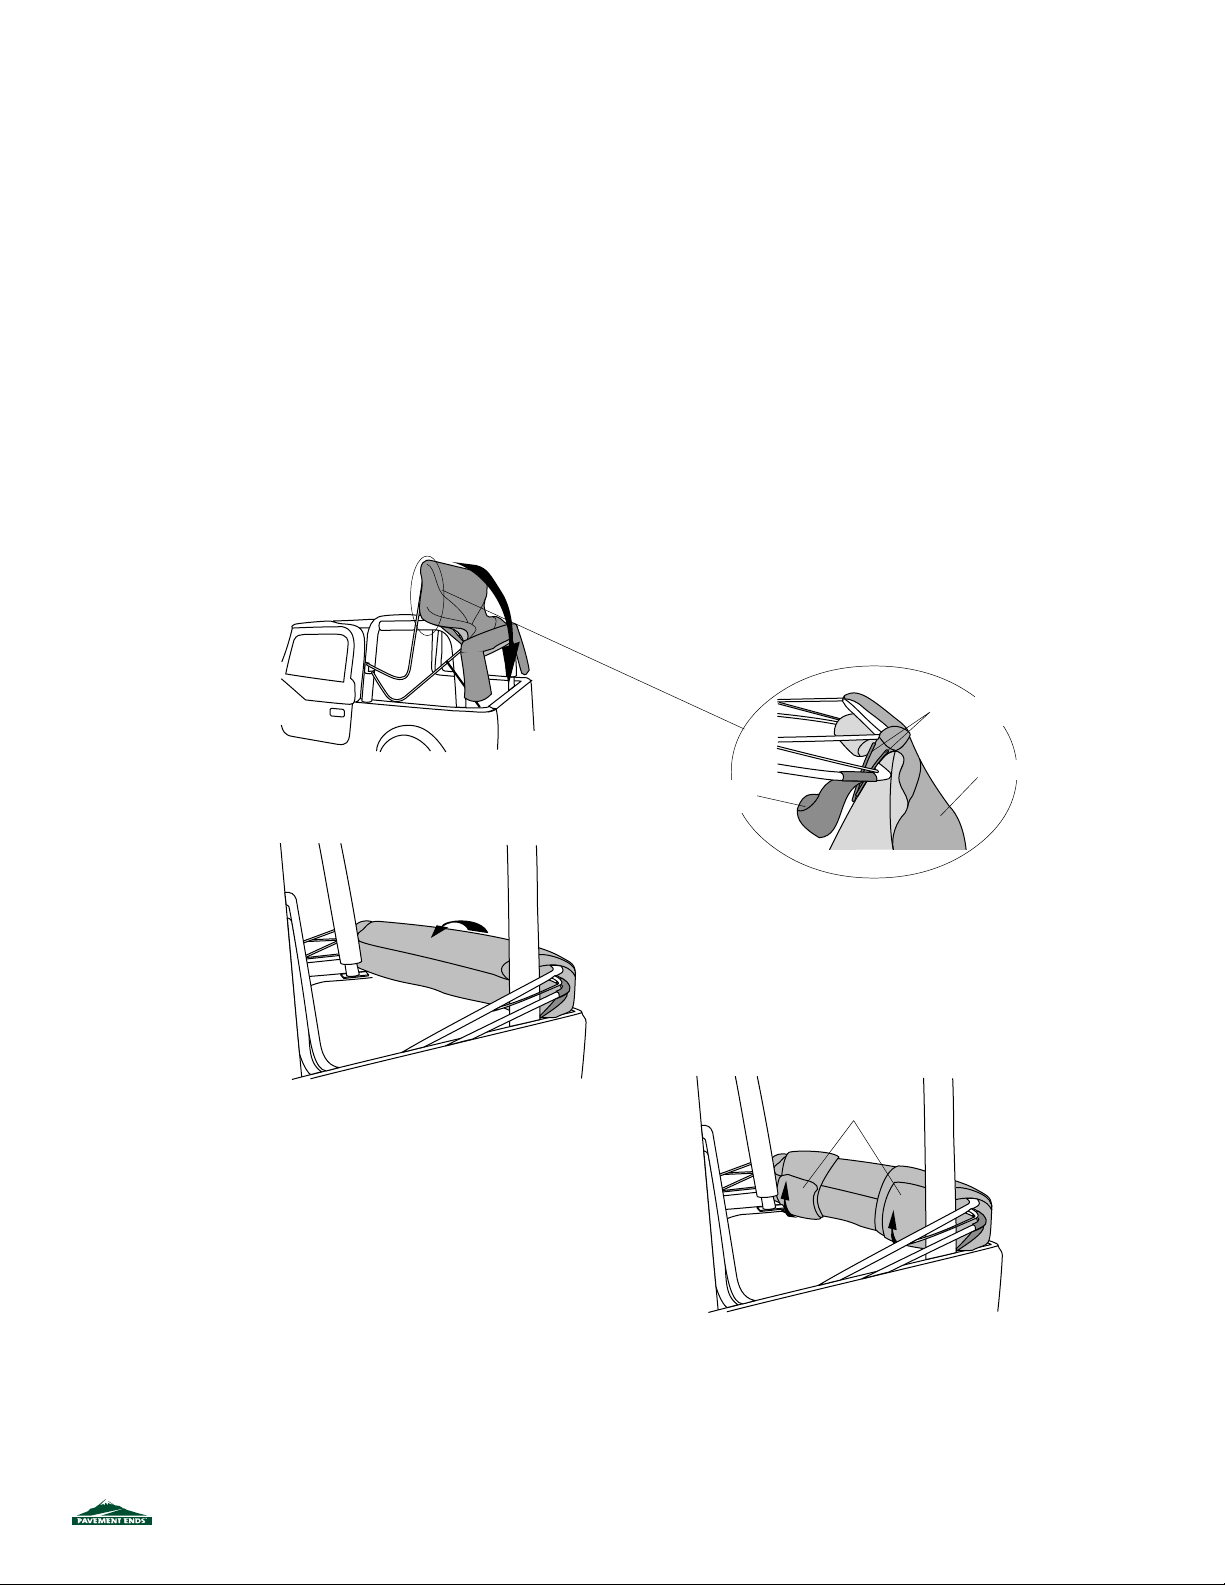
Step One
Remove the Quarter Panels and the Rear
Curtain and store them carefully.
Step Two
Release the front of the top from the windshield.
Raise the front of the deck and collapse the rear
bows, tucking the two plastic strips above the
door openings and the stay pad on the rear bow
inside of the bows, Wrap the fabric around the
bows, then tuck the rear legs of the top under the
bows.
Collapse bows and fold
toward rear
Folding the Top Down
Wrap fabric around
bows
Tuck stay pad
inside bows
Wrap rear legs
under bows
Tuck plastic strips
inside bows
Top Fabric
51131 pg 9
Rev. C 0204
Page 10
Care and Maintenance of your New Top
Your top is made of the finest materials available. To keep it looking new and for the
maximum possible wear, it will need periodic cleaning and maintenance.
Washing: The fabric should be washed often using soap, warm water and a soft bristle
brush. Rinse with clear water to remove all traces of soap.
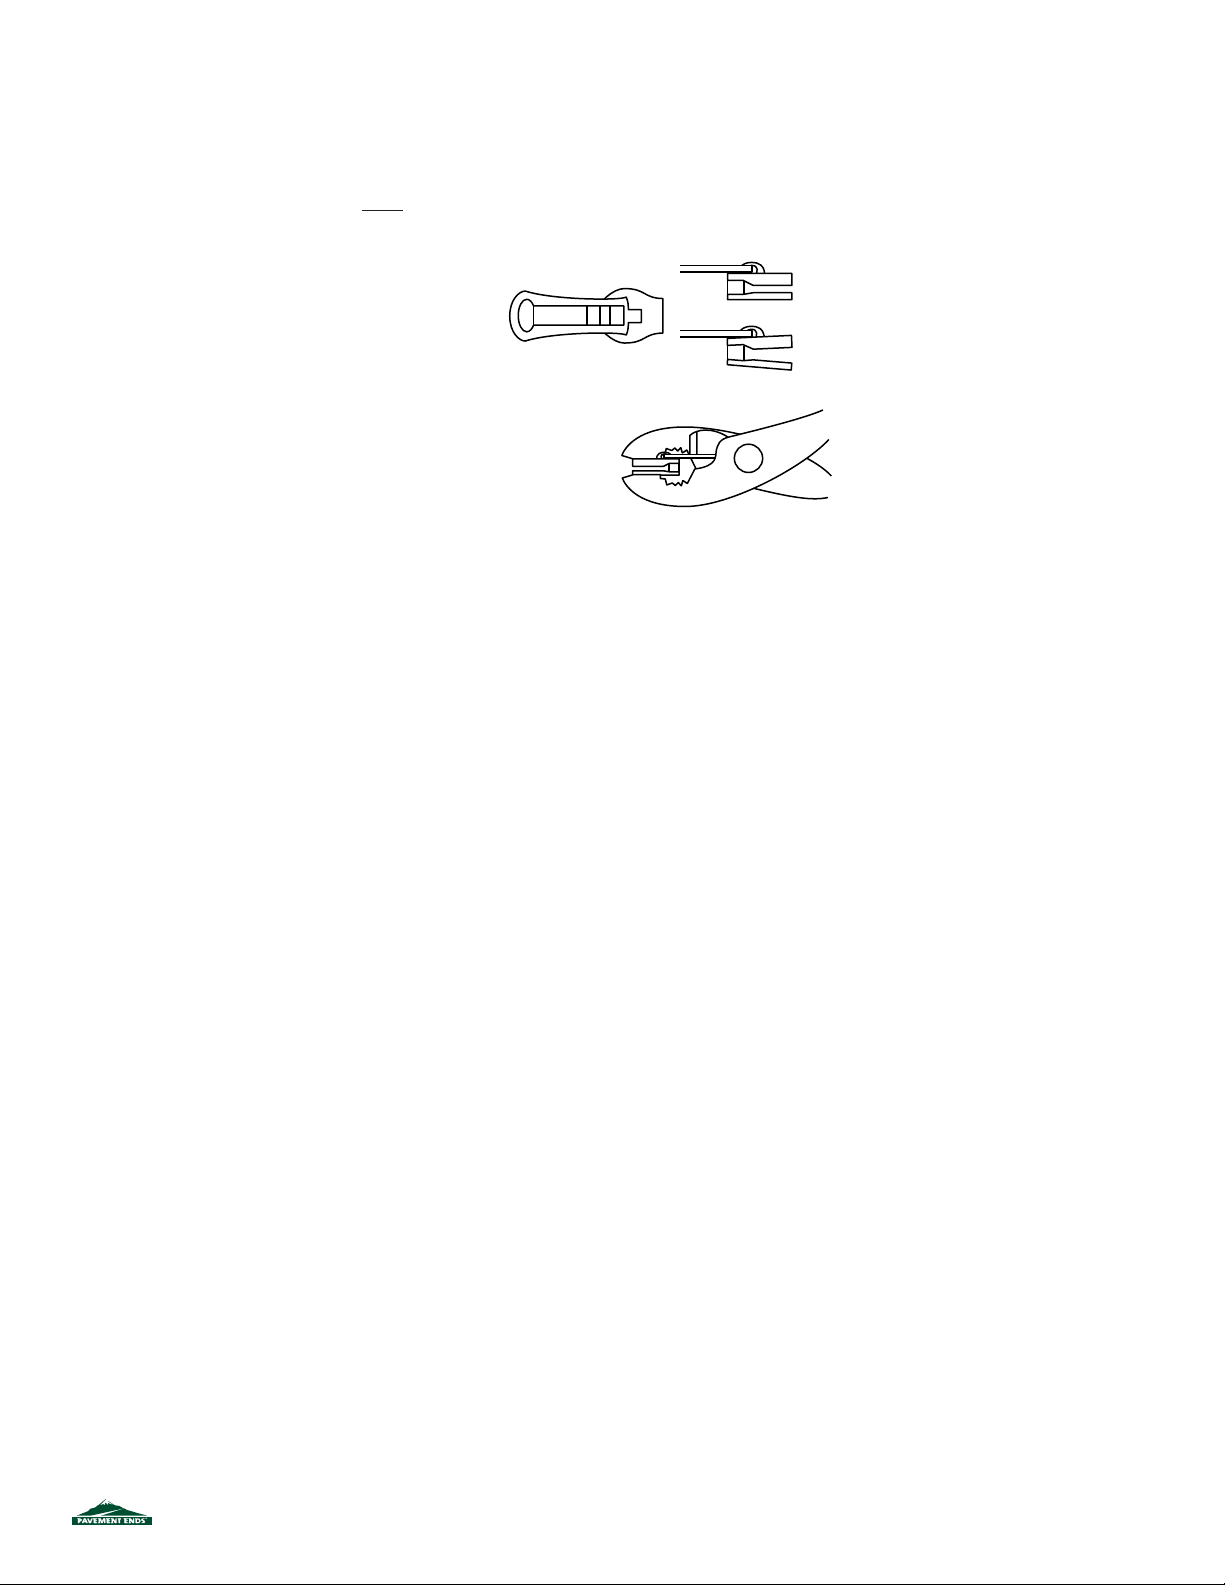
Zippers: Keeping the zipper cleaned and
lubricated with a silicone
Normal Slider Jaws Parallel
lubricant will help prevent
damage and keep the zippers
in a smooth working condition.
If a zipper opens behind the slider, the slider
Damaged Slider Jaws Spread Apart
(sometimes broken)
may have been spread apart. This problem
can usually be repaired by using an ordinary
pair of pliers to bring the sides back into
parallel. Return slider to the end of the zipper
in the normal Open position. Squeeze lightly
at first and test the zipper. If the zipper
continues to remain open squeeze more
firmly with the pliers and try the zipper again. Repeat this procedure until the zipper
operates correctly.
Water: In the event of seeping through the seams, 3M Scotchgard® may be applied on the
inside of the seams to stop the seepage. Rips in the fabric may be repaired with Bondex®
iron on patches. Iron the patches to the Inside of the top, carefully following the Bondex®
instructions.
Snaps: Keep snaps cleaned and lubricated with silicone to help prevent snaps from sticking
to the studs. If a snap does become stuck to a stud, use a screwdriver and GENTLY pry
apart to prevent permanent damage to the snap or the top fabric.
Windows: Keep windows clean to avoid scratching. DO NOT use a brush on the windows!
Wash with a water soaked cloth or sponge and a mild dish washing detergent. NEVER WIPE
THE WINDOWS WHEN THEY ARE DRY. Be careful when cleaning snow or frost from the
vinyl windows since they are easily scratched and may crack at low temperatures. DO NOT
roll the sides or rear window in cold weather. The windows become stiff and will crack.
LIMITED WARRANTY
We warrant our product to be free from defects in material and workmanship, for the terms specified below, provided there has been normal use and
proper maintenance. This warranty applies to the original purchaser only. All remedies under this warranty are limited to the repair or replacement of
any item or items found by the factory to be defective within the time period specified.
If you have a warranty claim, first you must call our factory at the number below for instructions. You must retain proof of purchase and submit a
copy with any items returned for warranty work. Upon completion of warranty work, if any, we will return the repaired or replaced item or items to
you freight prepaid. Damage to our products caused by accidents, fire, vandalism, negligence, misinstallation, misuse, Acts of God, or by defective
parts not manufactured by us, is not covered under this warranty.
THE WARRANTY TIME PERIOD IS AS FOLLOWS: ALL “SOFT GOODS” MANUFACTURED BY OUR COMPANY (USING PRIMARILY VINYLS, PLASTICS, AND/OR FOAM): ONE YEAR FROM DATE OF PURCHASE.
ANY IMPLIED WARRANTIES OF MERCHANTABILITY AND/OR FITNESS FOR A PARTICULAR PURPOSE CREATED HEREBY ARE LIMITED IN
DURATION TO THE SAME DURATION AND SCOPE AS THE EXPRESS WRITTEN WARRANTY. OUR COMPANY SHALL NOT BE LIABLE FOR ANY
INCIDENTAL OR CONSEQUENTIAL DAMAGE.
Some states do not allow limitations on how long an implied warranty lasts, or the exclusion or limitation of incidental or consequential damages, so
the above limitations or exclusions may not apply to you.
This warranty gives you specific legal rights, and you may also have other rights which vary from state to state.
For further information or request for warranty work, please contact: Customer Service
877-638-9509
*All or a portion of this product may be made in China.
51131 pg 10
Rev. C 0204
 Loading...