

Page 1
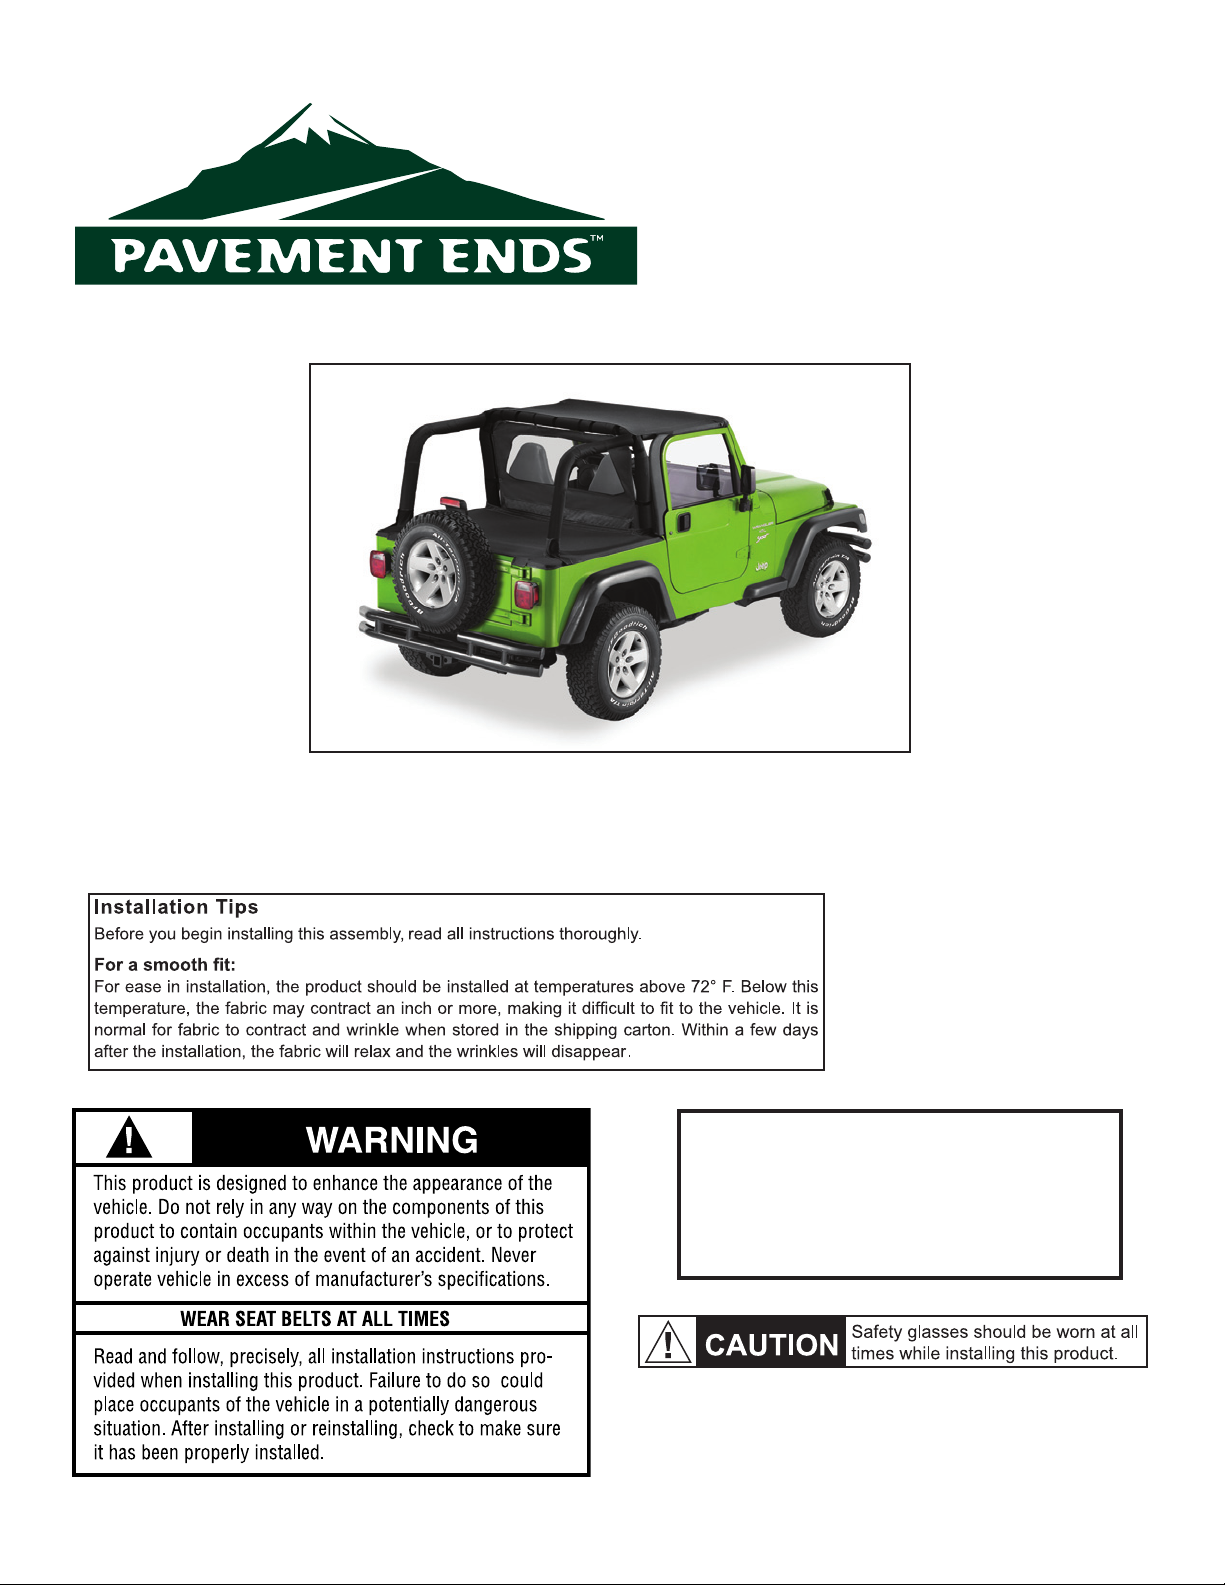
Cargo Cover
Installation Instructions
For: Jeep TJ
2003 – 2006
Part Number: 41826
Cargo Cover shown with Sun Cap and Cab Curtain (sold separately)
DO NOT INSTALL THIS PRODUCT ON ANY VEHICLE OTHER THAN THOSE LISTED ABOVE.
This product is only designed for the vehicles listed above. Failure to install this product on the proper
vehicle could cause injury to the vehicle occupants and damage to the product.
Table of Contents
CARGO COVER PARTS LIST ................................ PAGE 2
C
ARGO COVER TOOLS NEEDED ........................... PAGE 2
ARGO COVER INSTALLATION .............................. PAGE 2
C
C
ARGO COVER WARRANTY ................................. PAGE 5
41826 pg 1
0509 Rev. A
Page 2
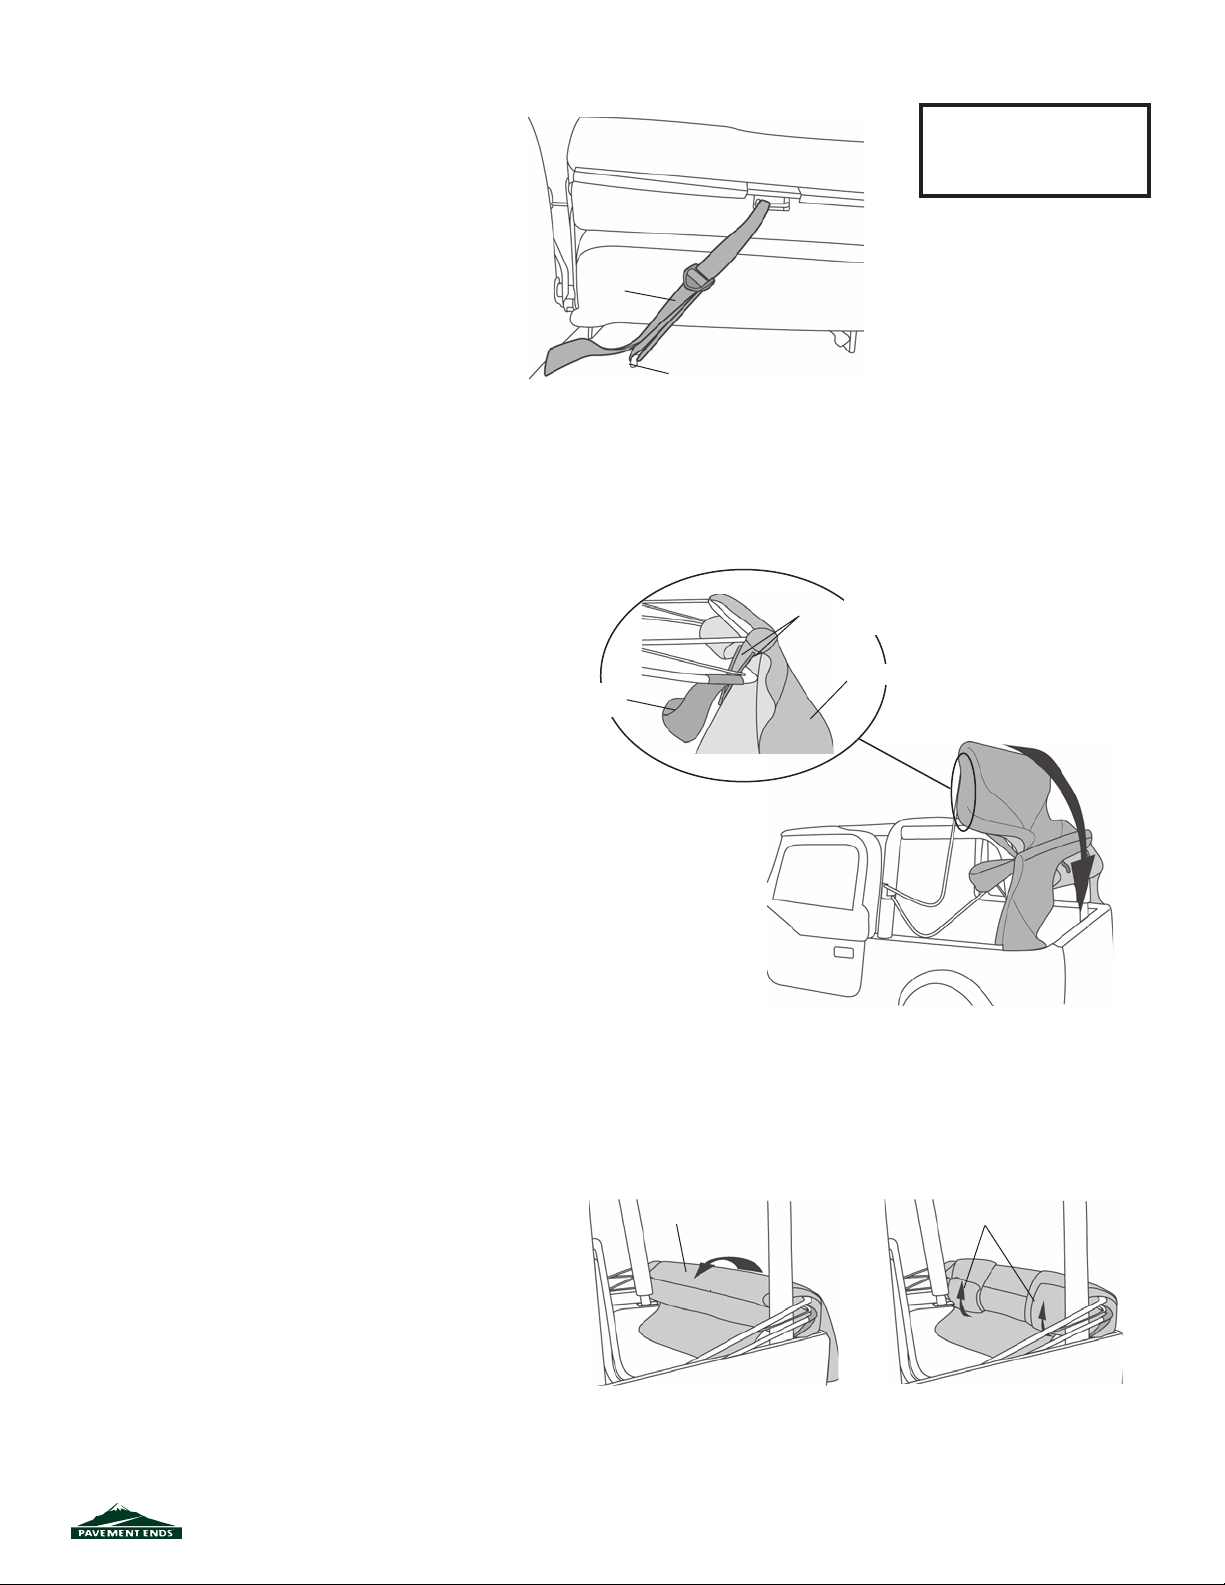
Step One
SECURE REAR SEAT
Locate the Web Buckle Strap in the parts kit.
Thread the web end of the strap through the
footman loop closest to the rear of the seat
on the Driver’s side. Fold the back of the seat
down and thread the web through the bar on
the seat back. Thread the end of the strap
through the buckle and pull it tight. Tightening the strap securely will keep the seat from
banging when the vehicle is moving.
Step Two
FOLD DOWN TOP
Remove the Rear Quarter Windows and Rear Window
from the top. Remove the Tailgate Retainer from the Rear
Window. Cover the “glass” in the Rear Quarter Windows
and the Rear Window and store them while not in use.
Release the front of the top from the windshield. Raise
the front of the deck and collapse the rear bows, tucking
the two plastic strips above the door openings and the
stay pad on the rear bow inside of the bows.
Web Buckle
Strap
Tuck stay pad
inside bows
Seat Back
Footman Loop
View from Rear
Parts List
Cargo Cover Qty - 1
Web Buckle Strap Qty - 1
Seat Bottom
Tuck plastic strips
inside bows
Top Fabric
Collapse bows and
fold toward rear
Step Three
WRAP FABRIC AROUND BOWS
Lay the bows down along the rear of the vehicle.
Wrap the fold of fabric from the rear of the vehicle up
around the bows. Then tuck the rear legs of top under
the bows and wrap them around the deck fabric as
tight as possible. Tuck the fabric and bows down into
the tub as far as possible.
41826 pg 2
Wrap fabric up
around bows
Wrap rear legs
under bows as tight
as possible
0509 Rev. A
Page 3
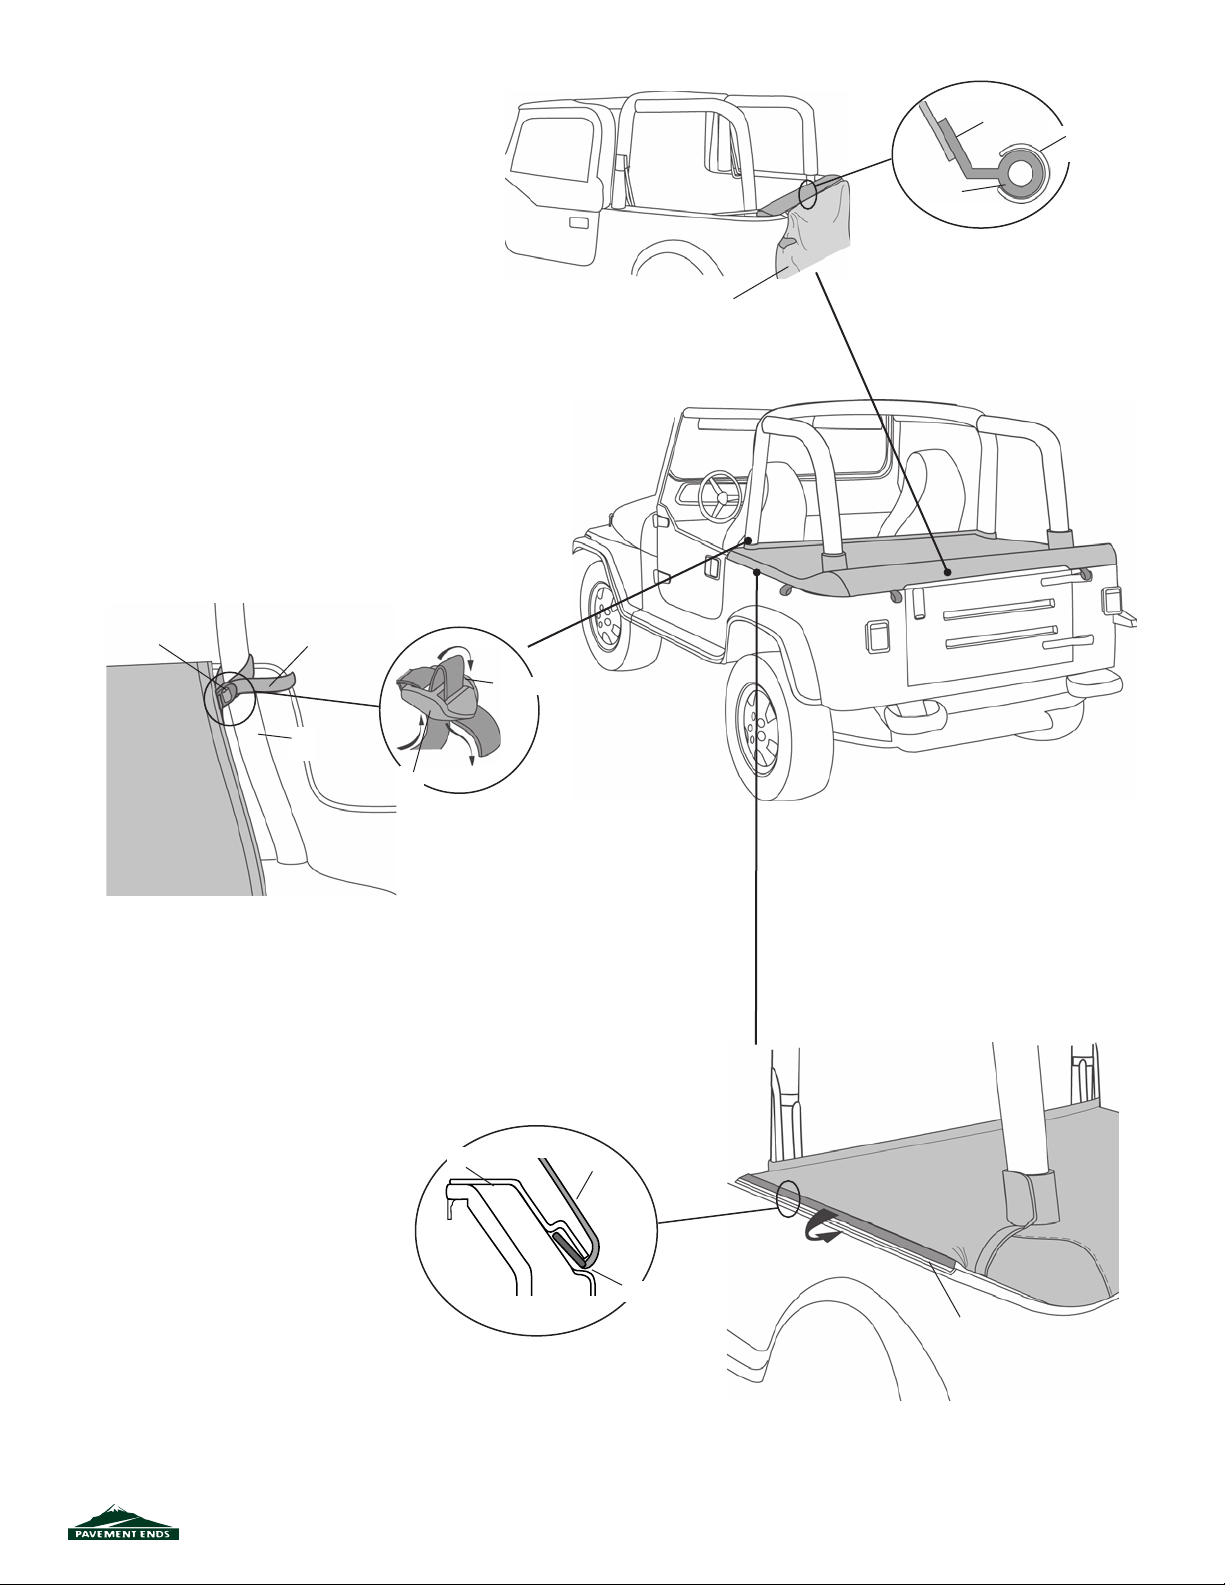
Step Four
INSTALL TAILGATE BAR
From the back of the vehicle, hold the Cargo
Cover with the backing side toward you. Slide
the tubing into the channel in the Tailgate Retainer and install the retainer into the Tailgate
Retainer Mount.
Step Five
SECURE WEB STRAPS
Drape the fabric forward over the rear of the
vehicle and locate the web straps, with buckles
attached, on the front of the Cargo Cover. Wrap
the straps around the front sport bars and thread
the ends loosely through the buckles. Do not pull
the straps tight at this time.
Cargo Cover - Backing
Side Out
Fabric
Tubing
Detail of Tailgate Retainer
Tailgate
Retainer
Channel
Buckle
Web Strap
Strap
Front Sport
Bar
Buckle
Threading Strap
through Buckle
Step Six
SECURE PLASTIC STRIPS
Locate the plastic strip sewn to the Cargo
Cover along each side of the vehicle. Start at
one end on each side and roll the plastic strip
into the Side Retainers.
Side Retainer
Fabric
41826 pg 3
Roll Plastic
Strip into
Side Retainer
Plastic Strip
Plastic Strip
Detail of Plastic Strip
0509 Rev. A
Page 4
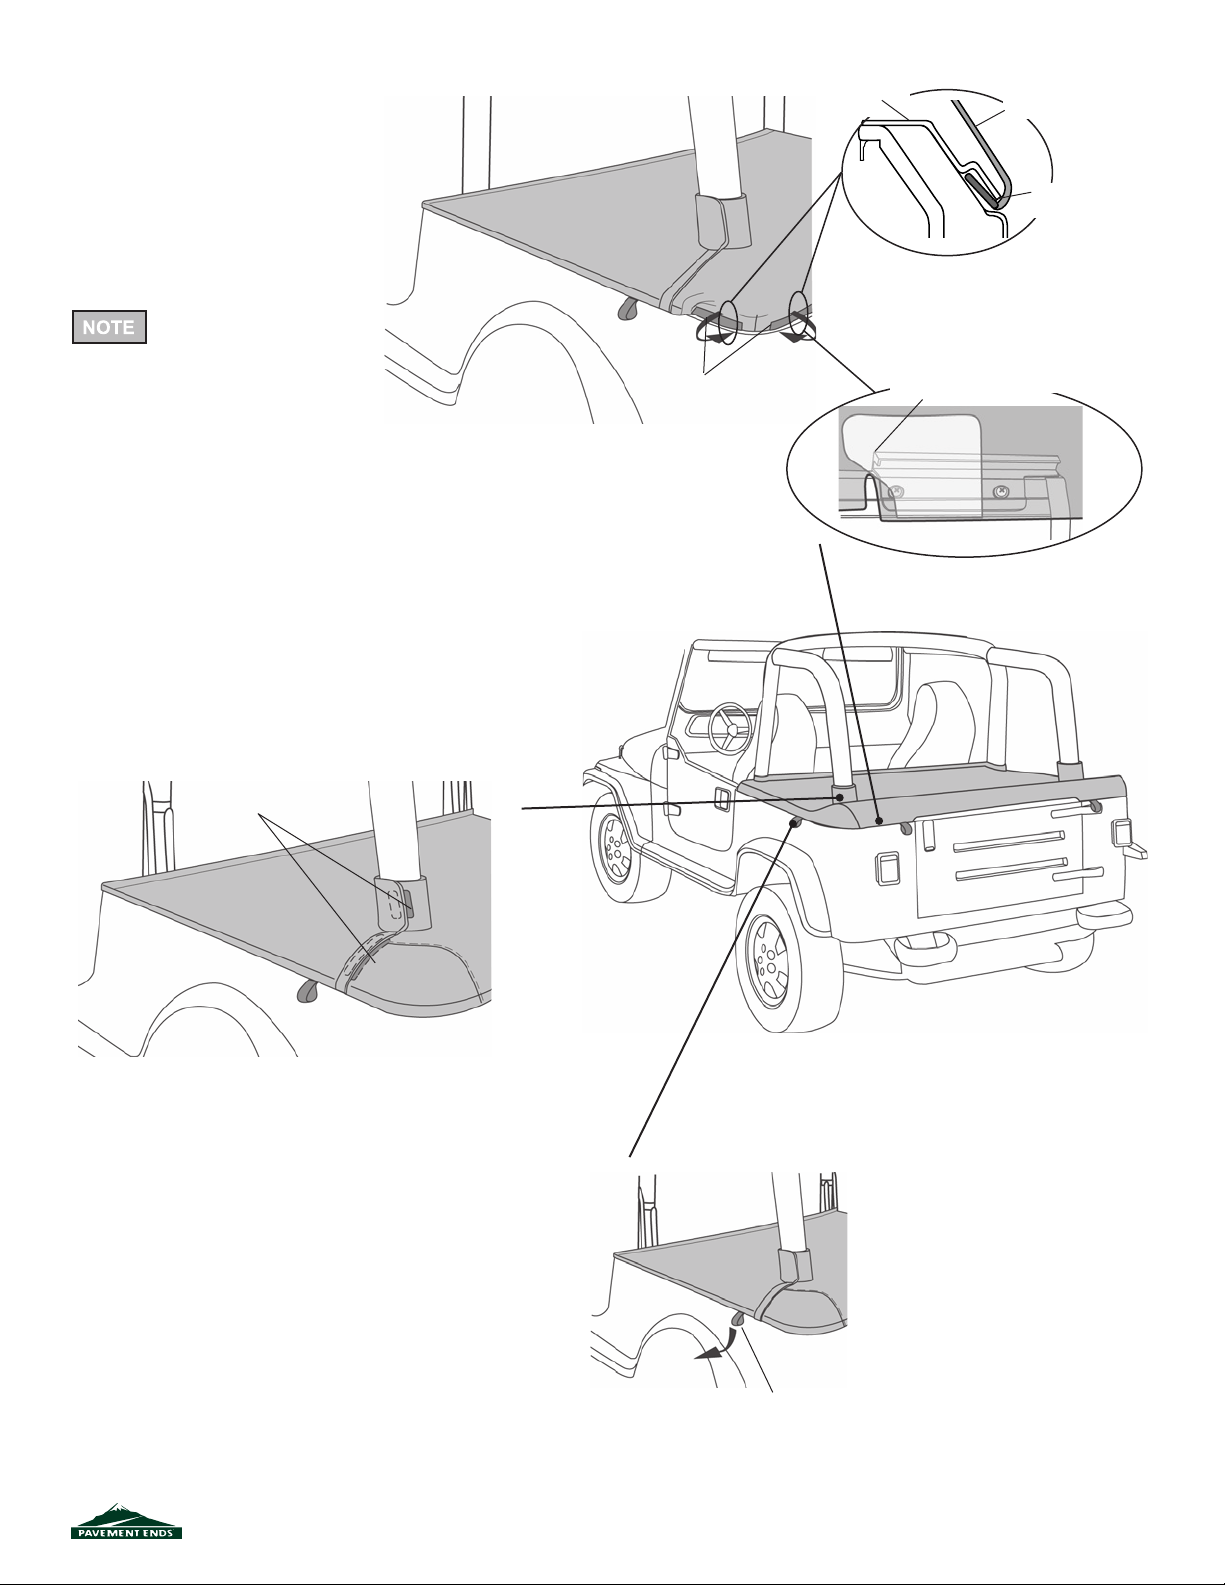
Step Seven
SECURE REAR CORNERS
Roll the plastic strips, sewn into the
rear corners of the Cargo Cover into
the Corner Retainers. Slide the corner plastic strip toward the front of
the vehicle and make sure that the
plastic strip fi ts up into the retainer
so that the collar fi ts properly.
The Fabric Protector
sewn into the fabric
must be located over the Tailgate Retainer Mounts.
Step Eight
SECURE COLLARS
Tuck the seat belt assemblies into the rear sport bar
collars and close the rear sport bar collars by pulling
fi rmly on the fabric and fastening the Hook and Loop
Strips to each other.
Tighten the straps on the front of the Cargo Cover.
Plastic Strips
Detail of Fabric
Protector
Rear Corner
Retainer
Detail of Plastic Strip
Fabric
Plastic
Strip
Make sure the Fabric Protector
under the fabric covers the end of
Tailgate Mount
Hook and
Loop Strips
To Remove Cargo Cover
When removing the Cargo Cover, use
the loops sewn to the fabric to release
the plastic strips. Pull gently down, then
straight out to release the plastic strip
from the retainers.
Pull gently down, then out
to release plastic strip
41826 pg 4
0509 Rev. A
Page 5
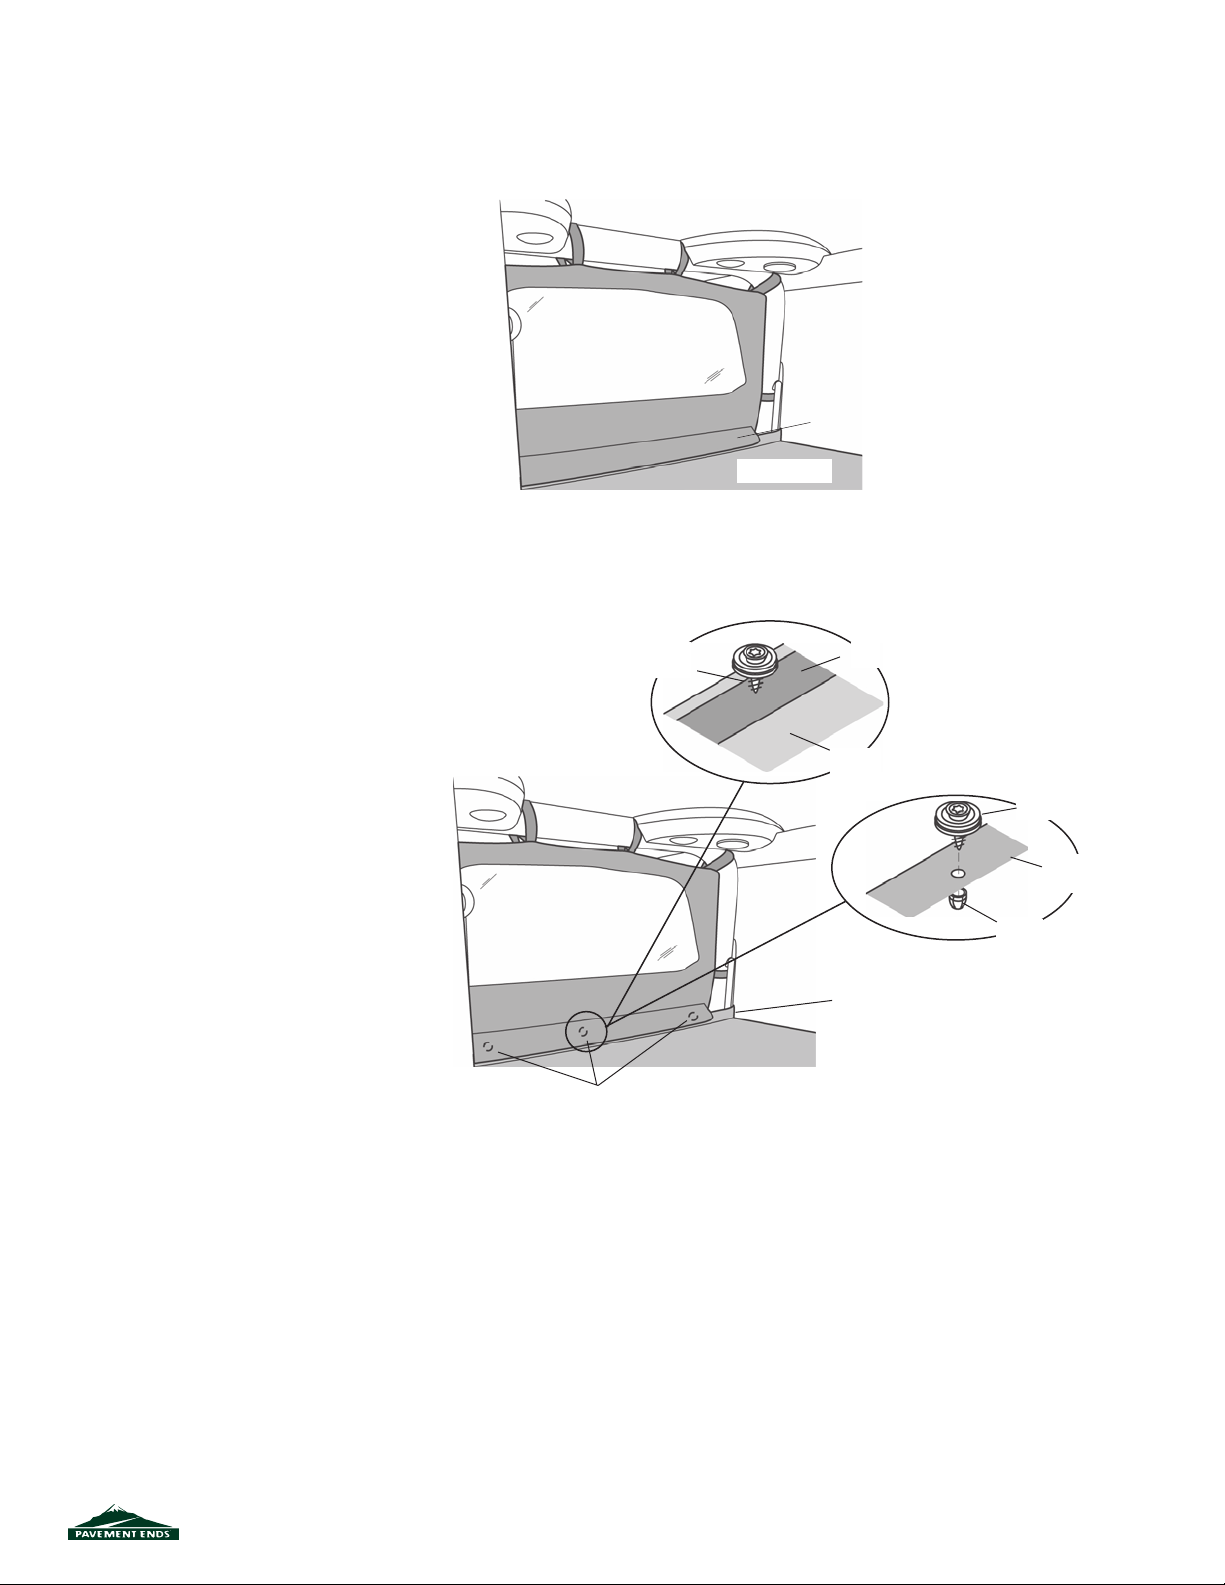
If You Have a New Cab Curtain on Your Vehicle
Step One - Optional
Locate Attaching Snaps from
Hardware Kit supplied with the Cab
Curtain.
Optional Installation
Cab Curtain - From
Rear
Step Two - Optional
Locate the fl ap sewn to the vinyl
side of the Cab Curtain. Pull the fl ap
out over the top of the front edge of
the Cargo Cover.
Step Three - Optional
Pull up on the front, reinforced edge of
the Cargo Cover and mark the locations
matching the three snaps on the Cab
Curtain fl ap, on the doubled fabric along
the top of the Cargo Cover.
Step Four - Optional
At the marked locations, push the sharp
end of a Snap Head Screw through the
Cargo Cover at the marked locations, to
make a hole. Once a hole is formed, pull
the screw back out of the hole. Then push
the screw through the hole from the vinyl
side so that the snap is on top of the vinyl.
Thread an Acorn Locknut over the pointed
end of the Snap Head Screw. Snap
the Cargo Cover and the Cab Curtain
together with the three snaps.
Push Snap Head Screw
through to form a hole
Snaps - on underside of fl ap
Pull Flap out and
Over Cargo Cover
Cargo Cover
Doubled Fabric
Cargo Cover Fabric Backing Up
Snap Head
Screw
Cargo Cover
Fabric - Vinyl Up
Acorn Locknut
Install Studs on Fabric
Reinforced Front Edge of
Cargo Cover
41826 pg 5
0509 Rev. A
Page 6

Care and Maintenance of your New Cargo Cover
Your Cargo Cover is made of the fi nest materials available. To keep it looking new and for the maximum possible wear, it will need
periodic cleaning and maintenance.
Washing: The fabric should be washed often using soap, warm water and a soft bristle brush. Rinse with clear water to remove all
traces of soap.
Water: Seeping through at the seams may be stopped by applying 3-M Scotchgard® on the inside of the seams. Rips in the fabric
may be repaired with Bondex® iron on patches. Iron the patches to the Inside of the top, carefully following the Bondex® instructions.
Snaps: Keep snaps cleaned and lubricated with silicone to help prevent snaps from sticking to the studs. If a snap does become stuck
to a stud, use a screwdriver and GENTLY pry apart to prevent permanent damage to the snap or the top fabric.
LIMITED WARRANTY
We warrant our product to be free from defects in material and workmanship, for terms specifi ed below, provided
there has been normal use and proper mainte nance. This warranty applies to the original purchaser only. All
remedies under this warranty are limited to the repair or replacement of any item or items found by the factory to
be defective within the time period specifi ed.
If you have a warranty claim, fi rst you must call our factory at the number below for instructions. You must retain
proof of purchase and submit a copy with any items returned for warranty work. Upon completion of warranty
work, if any, we will return the repaired or replaced item or items to you freight prepaid. Damage to our products
caused by accidents, fi re, vandalism, negligence, misinstallation, misuse, Acts of God, or by defective parts not
manufactured by us, is not covered under this warranty.
THE WARRANTY TIME PERIOD IS AS FOLLOWS: ALL “GOODS” MANUFACTURED BY OUR COMPANY: ONE
YEAR FROM DATE OF PURCHASE.
ANY IMPLIED WARRANTIES OF MERCHANTABILITY AND/OR FITNESS FOR A PARTICULAR PURPOSE
CREATED HEREBY ARE LIMITED IN DURATION TO THE SAME DURATION AND SCOPE AS THE EXPRESS
WRITTEN WARRANTY. OUR COMPANY SHALL NOT BE LIABLE FOR ANY INCIDENTAL OR CONSEQUENTIAL DAMAGE.
Some states do not allow limitations on how long an implied warranty lasts, or the exclusion or limitation of incidental or consequential damages, so the above limitations or exclusions may not apply to you.
This warranty gives you specifi c legal rights, and you may also have other rights which vary from state to state.
For further information, please contact: Customer Service
877-638-9509
41826 pg 6
All or a portion of this product may have been made in China
0509 Rev. A
.
 Loading...