

Page 1
Sun Cap Plus
Installation Instructions
For: Wrangler 1992 - 1995 Part Number: 41524
DO NOT I
This product is only designed for the vehicles listed above. Failure to install this product on the proper
vehicle could cause injury to the vehicle occupants and damage to the product.
NSTALL THIS PRODUCT ON ANY VEHICLE OTHER THAN THOSE LISTED ABOVE
Important Note: If your vehicle has not been tted with a factory soft top, it will be necessary
to purchase a Windshield Channel Kit Number 45809-01 from your local distributor.
WARNING
Installation Tips
This product is designed to enhance the appearance of the
vehicle and to shield the occupants from ordinary weather conditions. Do not rely in any way on the components of this product
to contain occupants within the vehicle, or to protect against
injury or death in the event of an accident. This top will not protect
the occupants from falling objects. Never operate vehicle in
excess of manufacturer’s specications.
WEAR SEAT BELTS AT ALL TIMES
Read and follow, precisely, all installation instructions provided
when installing top. Failure to do so may result in a poor tting
top and could place occupants of the vehicle in a potentially
dangerous situation. After installing or reinstalling the top,
check to make sure it has been properly installed.
41524 pg 1
After completing the installation, keep these instructions
for future reference. Before you begin installing this
product, read all instructions thoroughly. Below are a
few tips to make this installation easier.
For a smooth t:
For ease in installation, this product should be installed
at temperatures above 72º F. Below this temperature,
the fabric may contract an inch or more, making it
dicult to t to the vehicle.
It is normal for the fabric to contract and wrinkle when
stored in the shipping carton. Within a few days after
the installation, the fabric will relax and the wrinkles will
disappear.
Rev. D 0710
Page 2
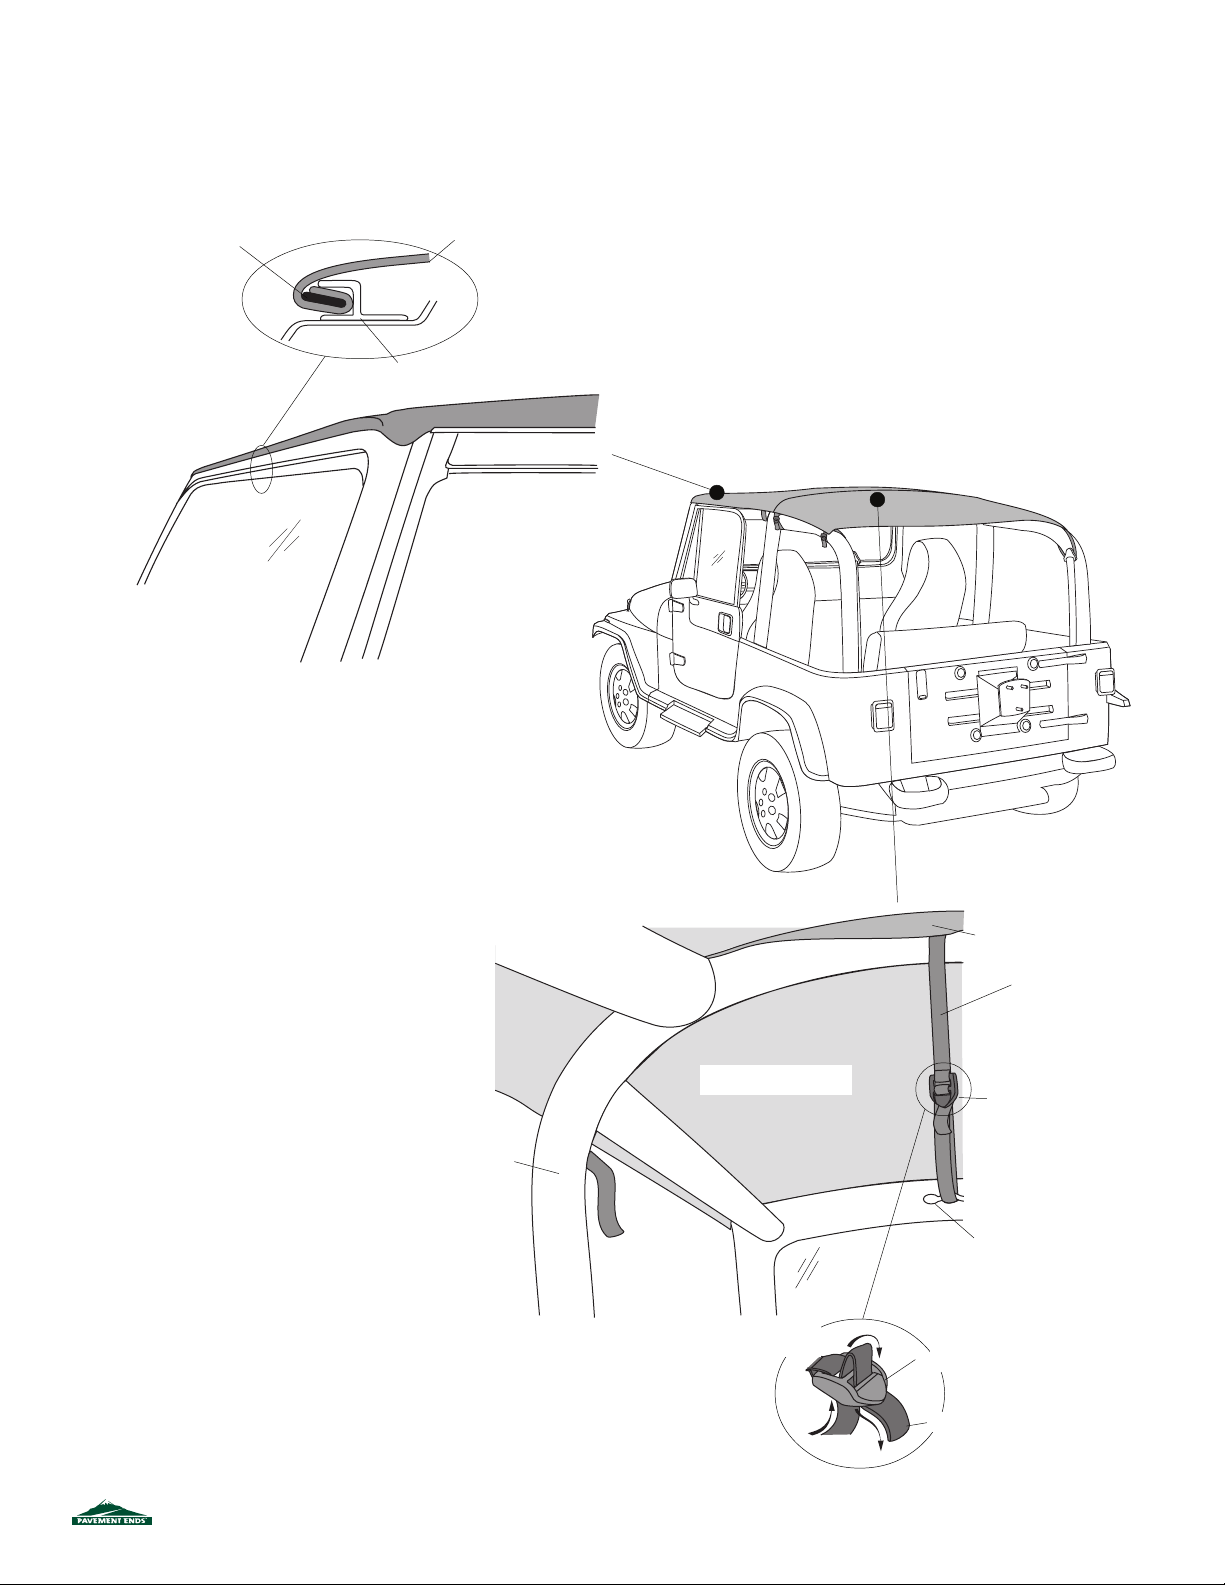
Step One
Locate the Sun Cap Plus and orient it on the vehicle.
Drape it over the sport bar and insert the front of the Sun
Cap Plus into windshield channel.
Fabric Wrapped
Plastic Strip
Windshield
Fabric
Windshield Channel
Driver's Side of Vehicle
Step Two
Locate the long web strap sewn to the center
ap inside the top. Wrap the strap around the
horizontal tube of the sport bar and pull it
toward the front of the vehicle. Thread it
through the footman loop located above the
windshield. Pull the end of the strap back and
thread it through the buckle on the strap. Do
not pull the strap tight at this time.
Rear
Sport Bar
Inside of Sun Cap Plus
Threading Strap
through Buckle
Windshield
Buckle
Strap
Strap Flap
Center Web Strap
Buckle
Center
Footman Loop
41524 pg 2
Rev. D 0710
Page 3
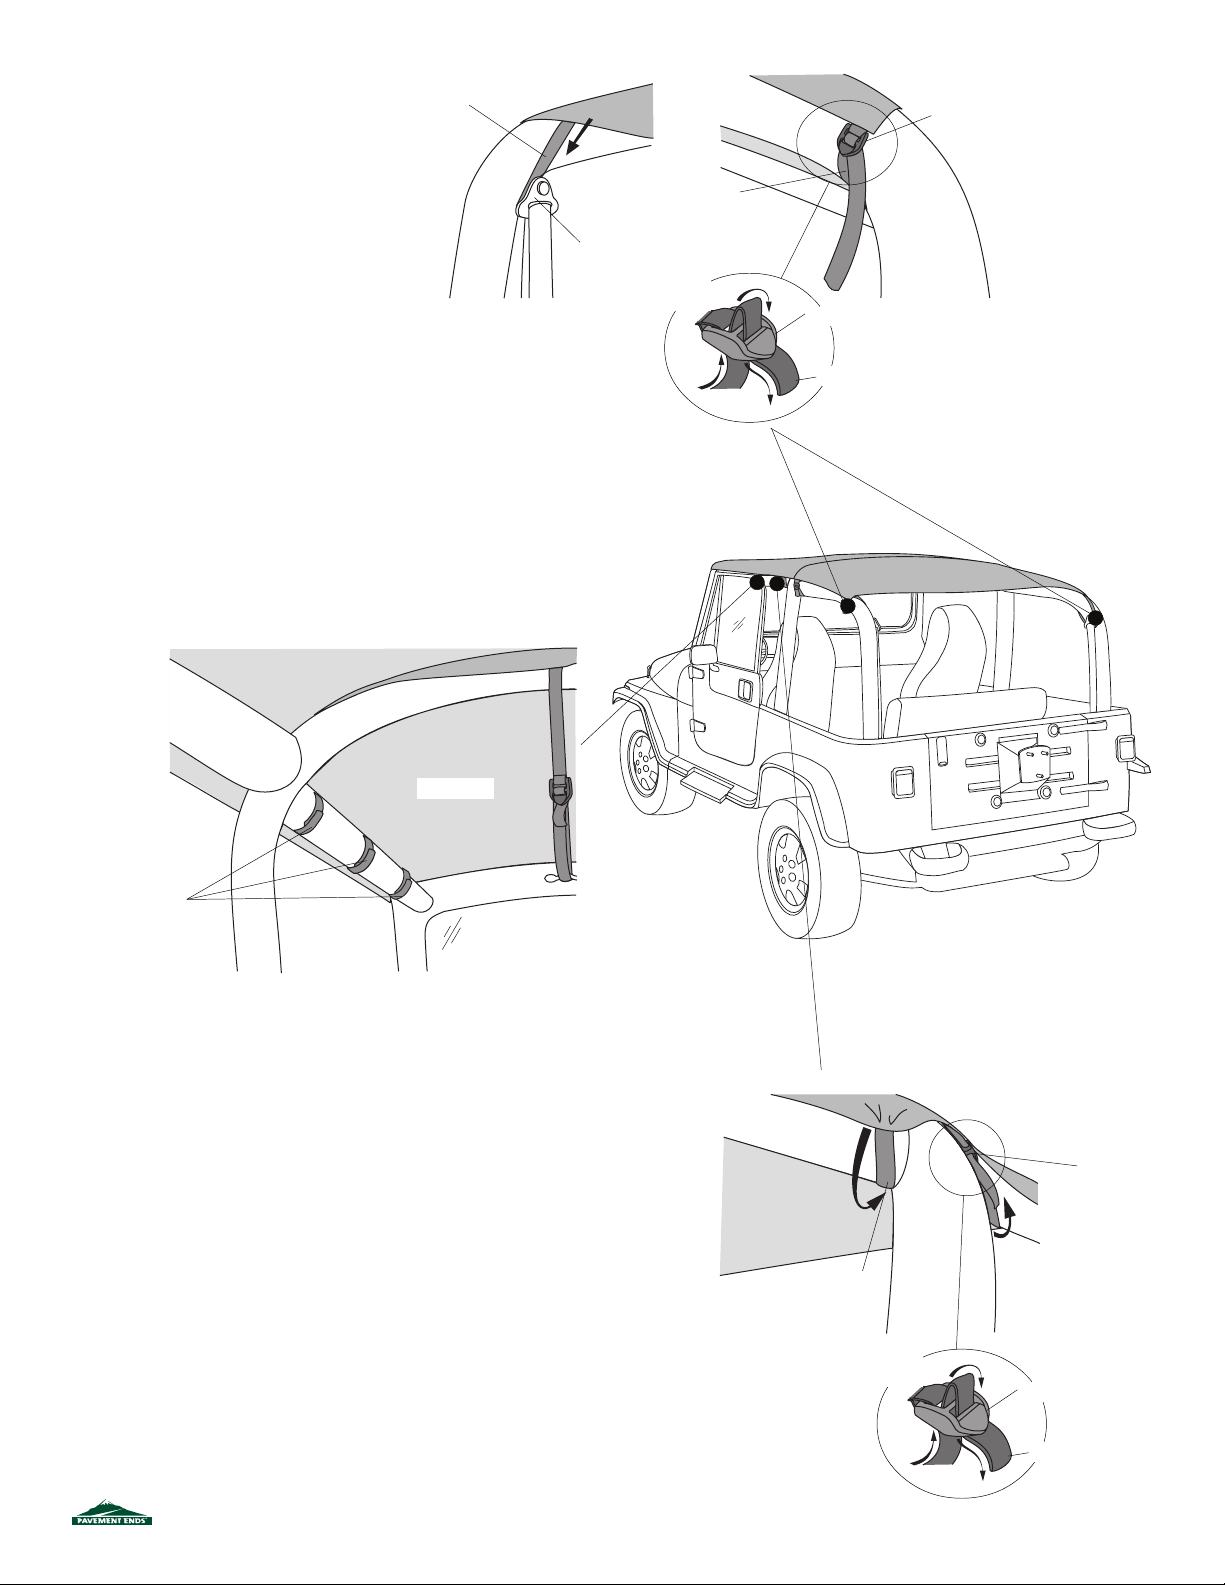
Step Three
Locate the straps sewn to the rear corners of the
Sun Cap Plus. Pull the straps toward the rear and
wrap them under the seat belt assembly mounts
and around the rear sport bar. Pull them tight up
towards buckle and thread the ends of the straps
through the buckles. Pull the straps tight.
Strap
View from Rear
(Driver's Side)
Seat Belt
Assembly
Threading Strap
through Buckle
Strap
Buckle
Strap
View from Side
(Driver's Side)
Buckle
Inside of top
Hook and Loop Strips Wrap around bar and fasten
Windshield
Step Four
Locate the three pairs of hook and loop strips sewn to each side of the top,
above the door opening. Wrap the strips around the sport bar and fasten them
to each other. Make sure that all the hook and loop is as tight as possible.
View from Side
(Driver's Side)
Step Five
Locate the web straps sewn to the top at the rear of the
door opening (near the center seam of the top). Wrap
the strap around the Horizontal Bar and under the
Vertical Sports Bar at the rear of the door and thread it
through the buckle. Pull the strap tight.
Make sure that all the straps are as tight as possible.
Strap
Threading Strap
through Buckle
Buckle
Rear
Buckle
Strap
41524 pg 3
Rev. D 0710
Page 4

LIMITED WARRANTY
We warrant our product to be free from defects in material and workmanship, for the terms specied below, provided there has b
proper maintenance. This warranty applies to the original purchaser only. All remedies under this warranty are limited to the repair or replacement of
any item or items found by the factory to be defective within the time period specied.
If you have a warranty claim, rst you must call our factory at the number below for instructions. You must retain proof of purchase and submit a
copy with any items returned for warranty work. Upon completion of warranty work, if any, we will return the repaired or replaced item or items to
you freight prepaid. Damage to our products caused by accidents, re, vandalism, negligence, misinstallation, misuse, Acts of
parts not manufactured by us, is not covered under this warranty.
THE WARRANTY TIME PERIOD IS AS FOLLOWS: ALL “SOFT GOODS” MANUFACTURED BY OUR COMPANY (USING PRIMARILY VINYLS, PLASTICS, AND/OR FOAM): ONE YEAR FROM DATE OF PURCHASE.
ANY IMPLIED WARRANTIES OF MERCHANTABILITY AND/OR FITNESS FOR A PARTICULAR PURPOSE CREATED HEREBY ARE LIMITED IN
DURATION TO THE SAME DURATION AND SCOPE AS THE EXPRESS WRITTEN WARRANTY. OUR COMPANY SHALL NOT BE LIABLE FOR ANY
INCIDENTAL OR CONSEQUENTIAL DAMAGE.
Some states do not allow limitations on how long an implied warranty lasts, or the exclusion or limitation of incidental or consequential damages, so
the above limitations or exclusions may not apply to you.
This warranty gives you specic legal rights, and you may also have other rights which vary from state to state.
For further information or request for warranty work, please contact: Customer Service
877-638-9509
*All or a portion of this product may be made in China.
een normal use and
God, or by defective
41524 pg 4
Rev. D 0710
 Loading...