

Page 1

VoIPon www.voipon.co.uk sales@voipon.co.uk Tel: +44 (0)1245 808195 Fax: +44 (0)1245 600030
For Quick
For Quick
Start Installation
Start Installation
SmartNode 4830 Series
Analog VoIP Integrated Access
Device
Quick Start Guide
Approval
Models that are equipped with telecom interfaces have been approved for connection to the public telecommunication network as listed
under PSTN regulatory compliance.
Important
This is a Class A device and is intended for use in a light industrial environment. It is not intended nor approved for use in an industrial
or residential environment.
Sales Office: +1 (301) 975-1000
Technical Support: +1 (301) 975-1007
E-mail: support@patton.com
WWW: www.patton.com
Document Number: 13219U7-001 Rev. C
Part Number: 07MSN4830-QS
Revised: May 16, 2007
Page 2

VoIPon www.voipon.co.uk sales@voipon.co.uk Tel: +44 (0)1245 808195 Fax: +44 (0)1245 600030
Patton Electronics Company, Inc.
7622 Rickenbacker Drive
Gaithersburg, MD 20879 USA
Tel: +1 (301) 975-1000
Fax: +1 (301) 869-9293
Support: +1 (301) 975-1007
Web: www.patton.com
E-mail: support@patton.com
Trademark Statement
Patton, the Patton logo, and SmartNode are registered trademarks of Patton Electronics
Company. The terms SmartWare and SmartView Management Center are trademarks of
Patton Electronics Company. All other trademarks presented in this document are the
property of their respective owners.
Copyright © 2007, Patton Electronics Company. All rights reserved.
The information in this document is subject to change without notice. Patton Electronics assumes no liability for errors that may appear in this document.
In no event shall Patton Electronics or its employees and associated companies be liable for any incidental, special, indirect or consequential damages whatsoever, including
but not limited to lost profits, arising out of or related to this manual or the information contained within it, even if Patton Electronics has been advised of, known, or
should have known, the possibility of such damages.
Important Information
To use virtual private network (VPN) and/or AES/DES/3DES encryption capabilities
with the SmartNode 4830, you may need to purchase additional licenses, hardware,
software, network connection, and/or service. Contact sales@patton.com or
+1 (301) 975-1000 for assistance.
Page 3
VoIPon www.voipon.co.uk sales@voipon.co.uk Tel: +44 (0)1245 808195 Fax: +44 (0)1245 600030
1.
2.
3
SmartNode 4830 Quick Start Guide
3.
Introduction
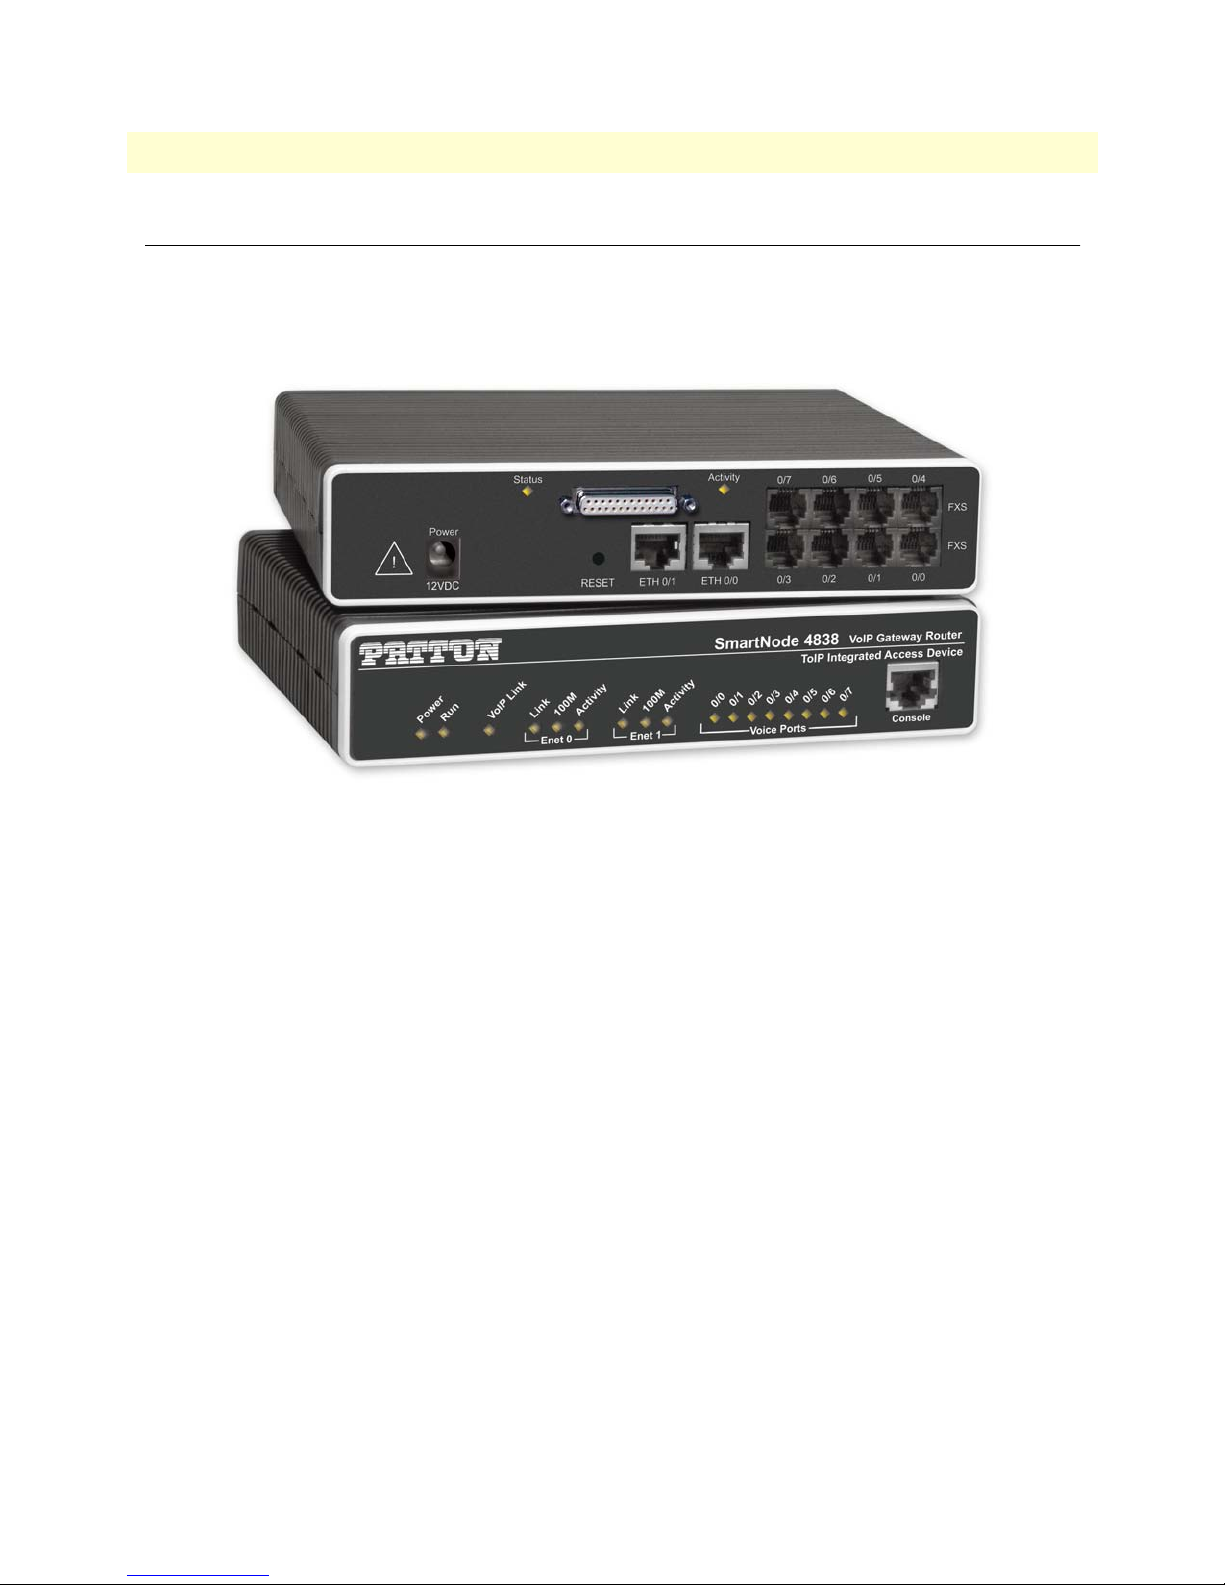
This Quick Start Guide leads you through the basic steps to set up a new SmartNode (see figure 1) and to
download a configuration. Please note that this guide does not replace the detailed Software Configuration
Guide and the Getting Started Guide on the CD-ROM and available online at www.patton.com/voip .
Figure 1. SmartNode product (SmartNode 4838 shown)
SmartNodes can be used for a wide variety of IP and voice over IP applications. To support and ease the configuration of the SmartNodes configuration templates for the most important applications are available online at
http://www.patton.com/voip/appnotes.shtml .
Setting up a new SmartNode consists of the following steps:
Connect a PC to the SmartNode, log in and configure your LAN IP address (see page 4 for details)
Connect the SmartNode to the LAN (see page 6)
Download a configuration example, adapt it to your network, and load it onto the SmartNode (see page 6)
Introduction
Page 4
Console
VoIP Gateway Router
ToIP Integrated Access Device
SmartNode 4524
Link
100M
Activity
0/0
0/1
0/2
0/3
Enet 0 Voice Ports
Power
Run
VoIP Link
Link
100M
Activity
Enet 1
VoIPon www.voipon.co.uk sales@voipon.co.uk Tel: +44 (0)1245 808195 Fax: +44 (0)1245 600030
4
1.
2.
SmartNode 4830 Quick Start Guide
Connecting a PC, logging in, and configuring the LAN IP address
Connecting power and configuring the default IP address
Connect the SmartNode to the mains power supply using the included power supply and cable. When the
RUN LED stops blinking and remains lit, the SmartNode is ready.
The factory default IP settings are listed in table 1. If these addresses do not work with your network they must
be changed. Contact your network administrator if you are not sure which IP address to use in
your installation.
Table 1. Factory default IP address and network mask configuration
Item
WAN interface Ethernet 0 (ETH 0/0)
IP Addresss(es) Network Mask
DHCP DHCP
LAN interface Ethernet 1 (ETH 0/1) 192.168.1.1 255.255.255.0
DHCP server address range 192.168.1.10-192.168.1.19 255.255.255.0
Note
The DHCP server is running on the ETH 0/1 of the SN4830 Series
models. All Ethernet ports are pre-configured and active.
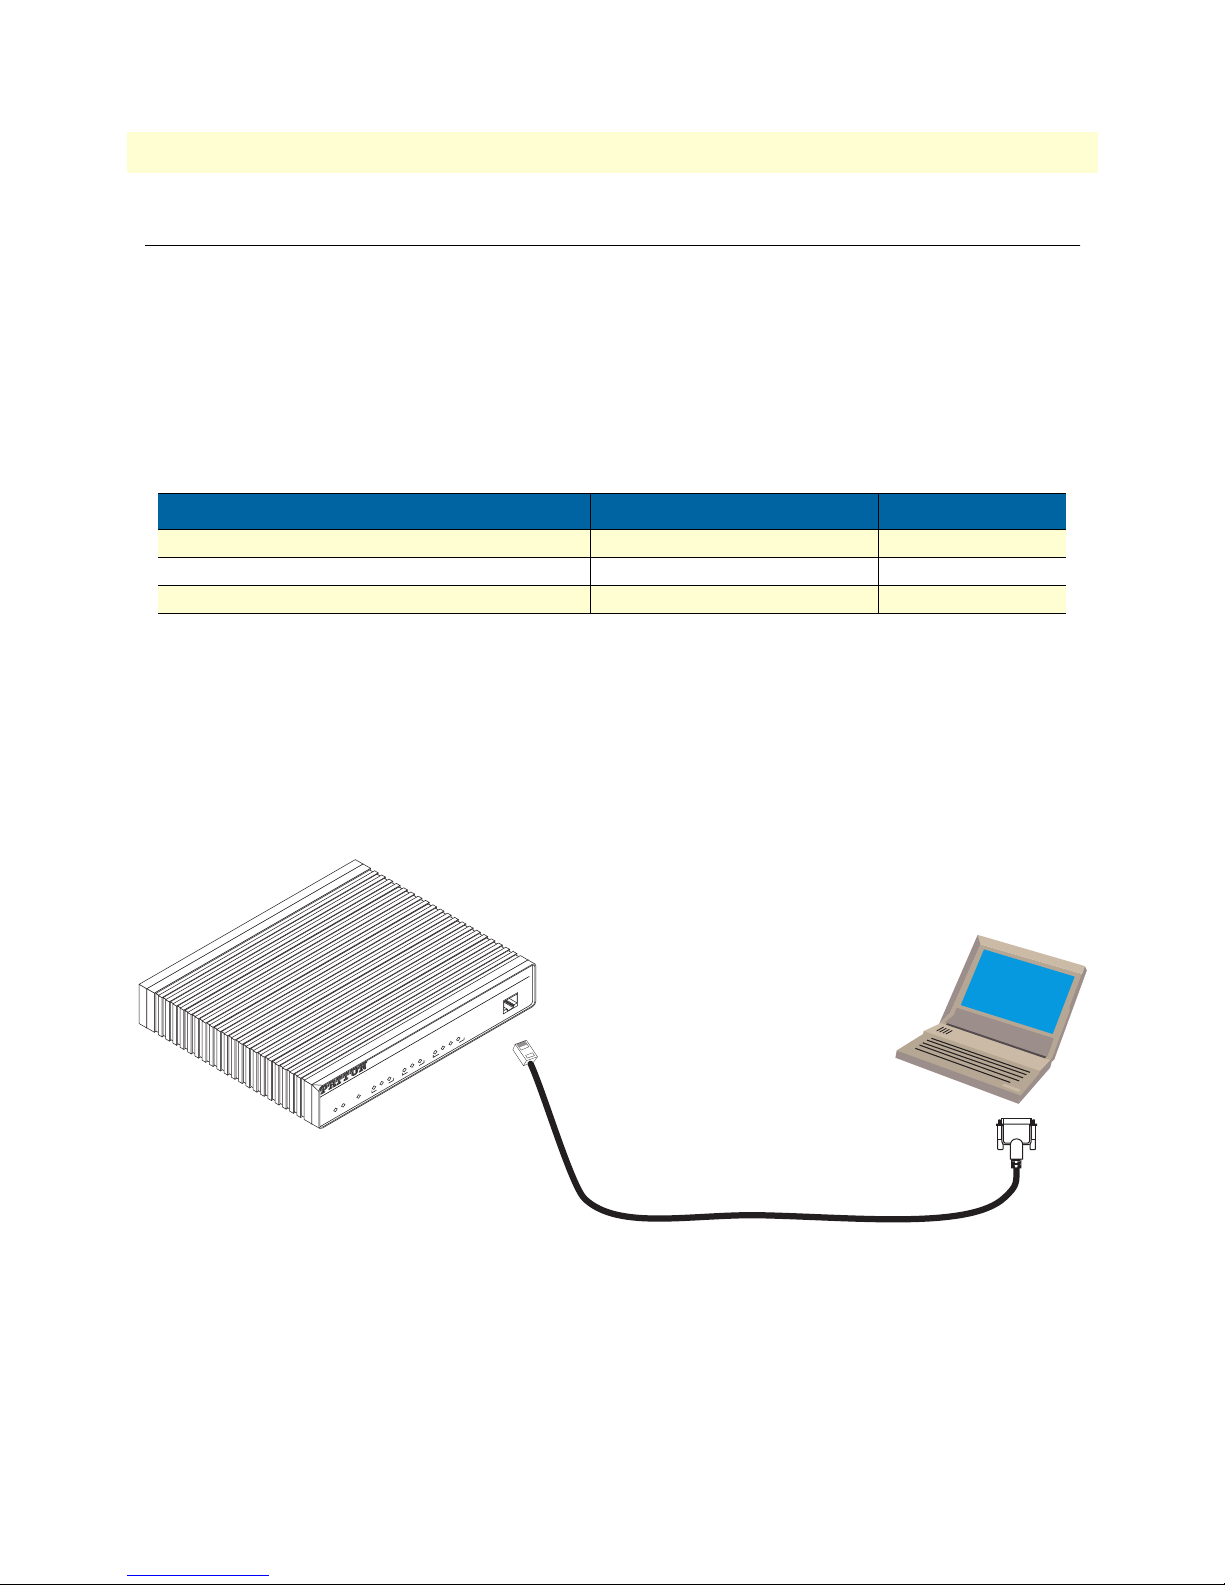
Connecting to a PC and logging in
To access the SmartNode configuration, connect a PC equipped with an RS-232 console port to the Con-
sole port on the front of the SmartNode. Use the included black Ethernet cable and RJ45 to DB-9 adapter
for this purpose (Model 16F-561).
Serial Terminal
Note
A Patton Model 16F-561 RJ45 to DB-9 adapter is included with
each SmartNode 4000 Series device
Figure 2. Connecting to the PC
Open a Terminal connection to the SmartNode. Use the Terminal program included with most PC operating systems (e.g. Hyper Terminal on Windows). The CD-ROM also includes some recommended terminal programs.
Connecting a PC, logging in, and configuring the LAN IP address
Page 5

VoIPon www.voipon.co.uk sales@voipon.co.uk Tel: +44 (0)1245 808195 Fax: +44 (0)1245 600030
5
3.
4.
1.
2.
3.
SmartNode 4830 Quick Start Guide
Type administrator as the login prompt and press the Enter key after the password prompt (do not type
anything for the password). A prompt will appear consisting of the IP address and > character.
login: administrator
password:
172.16.40.1>
Following log in, the SmartNode is in operator execution mode (indicated by > character in the command
line prompt). With the commands enable and configure , you enter the configuration mode.
172.16.40.1> enable
172.16.40.1# configure
172.16.40.1(cfg)#
Changing the IP address
Select the context IP mode to configure an IP interface.
172.16.40.1(cfg)# context ip router
172.16.40.1(ctx-ip)[router]#
Set the IP address and network mask for the each IP interface ( eth0 , for example).
Note
For the examples in this guide, a private network ( 172.16.1 ) IP
address is used.
172.16.40.1(ctx-ip)[router]# interface eth0
172.16.40.1(if-ip)[eth0]# ipaddress 172.16.1.10 255.255.255.0
2002-10-29T00:09:40 : LOGINFO : Link down on interface eth0.
2002-10-29T00:09:40 : LOGINFO : Link up on interface eth0.
172.16.1.10(if-ip)[eth0]#
Make this modified configuration your new start-up configuration. On the next start-up the system will
initialize itself using the modified configuration.
172.16.1.10 (if-ip)[eth0]# copy running-config startup-config
172.16.1.10 (if-ip)[eth0]#
Go to section “Connecting the SmartNode to the LAN” on page 6 to connect the SmartNode to
your network.
Connecting a PC, logging in, and configuring the LAN IP address
Page 6

Console
VoIP Gateway Router
ToIP Integrated Access Device
SmartNode 4524
Link
100M
Activity
0/0
0/1
0/2
0/3
Enet 0 Voice Ports
Power
Run
VoIP Link
Link
100M
Activity
Enet 1
Console
VoIP Gateway Router
ToIP Integrated Access Device
SmartNode 4524
Link
100M
Activity
0/0
0/1
0/2
0/3
Enet 0 Voice Ports
Power
Run
VoIP Link
Link
100M
Activity
Enet 1
VoIPon www.voipon.co.uk sales@voipon.co.uk Tel: +44 (0)1245 808195 Fax: +44 (0)1245 600030
6
SmartNode 4830 Quick Start Guide
Connecting the SmartNode to the LAN
The 4830 Ethernet ports are auto MDX, therefore a straight-through wired cable can be used for host and
switch connections (see figure 3).
Network
interface ETH 0
Cross-over cable
Host
SmartNode
Hub
ETH 0
Straight-through
wired cable
SmartNode
Host
Network
interface
Straight-through
wired cable
Figure 3. Connecting the SmartNode to the network
You can check the connection with the ping command to another host on the local LAN.
172.16.1.99(if-ip)[eth0]#ping <IP Address of the host>
Respectively from the host: ping 172.16.1.99
Note
To ping outside your local LAN, you will need to configure the
default gateway.
You may now start to configure the SmartNode from scratch using the CLI commands, but we recommend
that you start your configuration from a template. See “Downloading a configuration example, adapting it to
your network, and loading it onto the SmartNode” on page 6 for further details.
For a detailed description of the CLI refer to the SmartWare Software Configuration Guide (SCG) available on
the CD-ROM and online at: www.patton.com/voip .
Downloading a configuration example, adapting it to your network,
and loading it onto the SmartNode
Patton provides a collection of configuration templates on the CD-ROM that came with the SmartNode
device—and also on the support page at www.patton.com/voip/appnotes.shtml —one of which may be similar enough to your application that you can use it to speed up configuring the SmartNode. Simply download
the configuration note that matches your application to your PC. Adapt the configuration as described in the
configuration note to your network (remember to modify the IP address) and copy the modified configuration
to a TFTP server. The SmartNode can now load its configuration from this server.
Note
Patton regularly adds new configuration templates to the collection at
www.patton.com/voip/appnotes.shtml, so if you do not see your applica-
tion on the CD-ROM, it may have been added to the website.
Connecting the SmartNode to the LAN
Page 7

SmartNode 4830 Quick Start Guide
VoIPon www.voipon.co.uk sales@voipon.co.uk Tel: +44 (0)1245 808195 Fax: +44 (0)1245 600030
7
Note
If your application is unique and not covered by any of Patton’s configuration templates, you can manually configure the SmartNode instead of loading a configuration file template. In that case, refer to the SmartNode Series
SmartWare Software Configuration Guide for information on configuring the
SmartNode device.
In this example we assume the TFTP server on the host with the IP address 172.16.1.11 and the configuration
named SN.cfg in the root directory of the TFTP server.
172.16.1.99(if-ip)[eth0]#copy tftp://172.16.1.11/SN.cfg startup-config
Download...100%
172.16.1.99(if-ip)[eth0]#
After the SmartNode has been rebooted the new startup configuration will be activated.
When you issue the reload command, the SmartNode will ask
if you want to copy the running configuration to the startup configuration. Since you just downloaded a configuration file to the
startup configuration you must answer this question with NO.
Otherwise, the downloaded configuration will be overwritten
and lost!
172.16.1.99(if-ip)[eth0]#reload
Running configuration has been changed.
Do you want to copy the 'running-config' to the 'startup-config'?
Press 'yes' to store, 'no' to drop changes : no
Press 'yes' to restart, 'no' to cancel : yes
The system is going down
Additional information
For detailed information about configuring and operating guidance, set up procedures, and troubleshooting,
refer to the SmartNode Series SmartWare Software Configuration Guide and the SmartNode Getting Started Guide
on the enclosed Patton VoIP CD-ROM or at http://www.patton.com/voip/. On the CD-ROM you will also
find numerous freeware and shareware tools, including TFTP servers, Telnet clients, etc..
Additional information
Page 8

SmartNode 4830 Quick Start Guide
VoIPon www.voipon.co.uk sales@voipon.co.uk Tel: +44 (0)1245 808195 Fax: +44 (0)1245 600030
Compliance
EMC compliance:
• FCC Part 15, Class A
• EN55022, Class A
• EN55024
Safety compliance:
• UL60950-1/CSA C22.2 No. 60950-1
• IEC 60950-1
• EN60950-1
PSTN regulatory compliance:
• FCC Part 68
• CS-03
• TBR 21
• TBR 12 & 13 (E1)
• AS/ACIF S016:2001 (E1)
• AS/ACIF S043:2005 (DSL Models)
Radio and TV Interference (FCC Part 15)
The SmartNode product generates and uses radio frequency energy, and if not installed and used properly-that
is, in strict accordance with the manufacturer’s instructions-may cause interference to radio and television
reception. The SmartNode product have been tested and found to comply with the limits for a Class A computing device in accordance with specifications in Subpart B of Part 15 of FCC rules, which are designed to
provide reasonable protection from such interference in a commercial installation. However, there is no guarantee that interference will not occur in a particular installation. If the SmartNode product does cause interference to radio or television reception, which can be determined by disconnecting the unit, the user is
encouraged to try to correct the interference by one or more of the following measures: moving the computing
equipment away from the receiver, re-orienting the receiving antenna and/or plugging the receiving equipment
into a different AC outlet (such that the computing equipment and receiver are on different branches).
Compliance 8
Page 9

SmartNode 4830 Quick Start Guide
CAUTION
CAUTION
VoIPon www.voipon.co.uk sales@voipon.co.uk Tel: +44 (0)1245 808195 Fax: +44 (0)1245 600030
Disconnect all power before servicing.
CAUTION
The SmartNode product contains no user serviceable parts.
The mains outlet that is utilized to power the equipment must be
within 1 foot (3 meters) of the device and shall be easily accessible.
FCC Part 68 (ACTA) Statement (FXO ports)
This equipment complies with Part 68 of FCC rules and the requirements adopted by ACTA. On the bottom
side of this equipment is a label that contains—among other information—a product identifier in the format
US: AAAEQ##TXXXX. If requested, this number must be provided to the telephone company.
The method used to connect this equipment to the premises wiring and telephone network must comply with
the applicable FCC Part 68 rules and requirements adopted by the ACTA.
If this equipment causes harm to the telephone network, the telephone company will notify you in advance
that temporary discontinuance of service may be required. But if advance notice isn’t practical, the telephone
company will notify the customer as soon as possible. Also, you will be advised of your right to file a complaint
with the FCC if you believe it is necessary.
The telephone company may make changes in its facilities, equipment, operations or procedures that could
affect the operation of the equipment. If this happens the telephone company will provide advance notice in
order for you to make necessary modifications to maintain uninterrupted service.
If trouble is experienced with this equipment, for repair or warranty information, please contact our company.
If the equipment is causing harm to the telephone network, the telephone company may request that you disconnect the equipment until the problem is resolved.
Connection to party line service is subject to state tariffs. Contact the state public utility commission, public
service commission or corporation commission for information.
Industry Canada Notice (FXO ports)
This equipment meets the applicable Industry Canada Terminal Equipment Technical Specifications. This is
confirmed by the registration number. The abbreviation, IC, before the registration number signifies that registration was performed based on a Declaration of Conformity indicating that Industry Canada technical specifications were met. It does not imply that Industry Canada approved the equipment.
This Declaration of Conformity means that the equipment meets certain telecommunications network protective, operational and safety requirements. The Department does not guarantee the equipment will operate to
the user's satisfaction. Before installing this equipment, users should ensure that it is permissible to be con-
FCC Part 68 (ACTA) Statement (FXO ports) 9
Page 10

SmartNode 4830 Quick Start Guide
VoIPon www.voipon.co.uk sales@voipon.co.uk Tel: +44 (0)1245 808195 Fax: +44 (0)1245 600030
nected to the facilities of the local telecommunications company. The equipment must also be installed using
an acceptable method of connection. In some cases, the company’s inside wiring associated with a single line
individual service may be extended by means of a certified connector assembly (telephone extension cord). The
customer should be aware that compliance with the above condition may not prevent degradation of service in
some situations. Repairs to some certified equipment should be made by an authorized maintenance facility
designated by the supplier. Any repairs or alterations made by the user to this equipment, or equipment malfunctions, may give the telecommunications company cause to request the user to disconnect the equipment.
Users should ensure for their own protection that the ground connections of the power utility, telephone lines
and internal metallic water pipe system, are connected together. This protection may be particularly important
in rural areas.
CE Notice
This equipment conforms to the requirements of Council Directive 1999/5/EC on the approximation of the
laws of the member states relating to Radio and Telecommunication Terminal Equipment and the mutual recognition of their conformity.
The safety advice in the documentation accompanying this product shall be obeyed. the conformity to the
above directive is indicated by the CE sign on the device.
EC Declaration of Conformity
(see section “EG-Konformitätserklärung” for German version)
Product Description: SmartNode 4830
The products described above in the form as delivered are in conformity with the provisions of the following
European Directive:
R&TTE Directive 1999/5/EC
Guidelines of the European Parliament and the Committee for the Harmonisation of the Legal Regulations of the Member States concerning radio equipment and telecommunications terminal equipment and
the mutual recognition of their conformity.
The safety advices in the documentation accompanying the products shall be obeyed. The
conformity to the above directive is indicated by the CE sign on the device.
The signed Declaration of Conformity can be downloaded from www.patton.com/certifications/
Approval
Models that are equipped with FXO ports have been approved for connection to the public telecommunication network.
EG-Konformitätserklärung
(see section “EMC compliance:” for English version)
Produktbezeichnung: SmartNode 4830
Die bezeichneten Produkte stimmen in der von uns in Verkehr gebrachten Ausführung mit den Vorschriften
folgender Richtlinie überein:
CE Notice 10
Page 11

SmartNode 4830 Quick Start Guide
VoIPon www.voipon.co.uk sales@voipon.co.uk Tel: +44 (0)1245 808195 Fax: +44 (0)1245 600030
R&TTE 1999/5/EG
Richtlinie des europäischen Parlaments und des Rates zur Angleichung der Rechtsvorschriften der Mitgliedstaaten über Funkanlagen und Telekommunikations-Endeinrichtungen und die gegenseitige
\
Anerkennung ihrer Konformität.
Die Sicherheitshinweise in der mitgelieferten Produktdokumentation sind zu beachten. Die
Konformität mit der oben erwähnten Richtlinie wird durch das CE-Zeichen auf dem
Gerät bestätigt.
Die unterzeichnete Konformitätserklärung kann heruntergeladen werden von: www.patton.com/certifications/
Zulassung
Der SmartNode ist für die Anschaltung an das öffentliche Telekommunikationsnetz zugelassen. Er darf durch
jedermann an eine FXO Schnittstelle angeschlossen und in Betrieb genommen werden.
Authorized European Representative
D R M Green
European Compliance Services Limited.
Oakdene House, Oak Road
Watchfield,
Swindon, Wilts SN6 8TD, UK
Authorized European Representative 11
Page 12

SmartNode 4830 Quick Start Guide
VoIPon www.voipon.co.uk sales@voipon.co.uk Tel: +44 (0)1245 808195 Fax: +44 (0)1245 600030
Authorized European Representative 12
 Loading...