

Page 1
USER
MANUAL
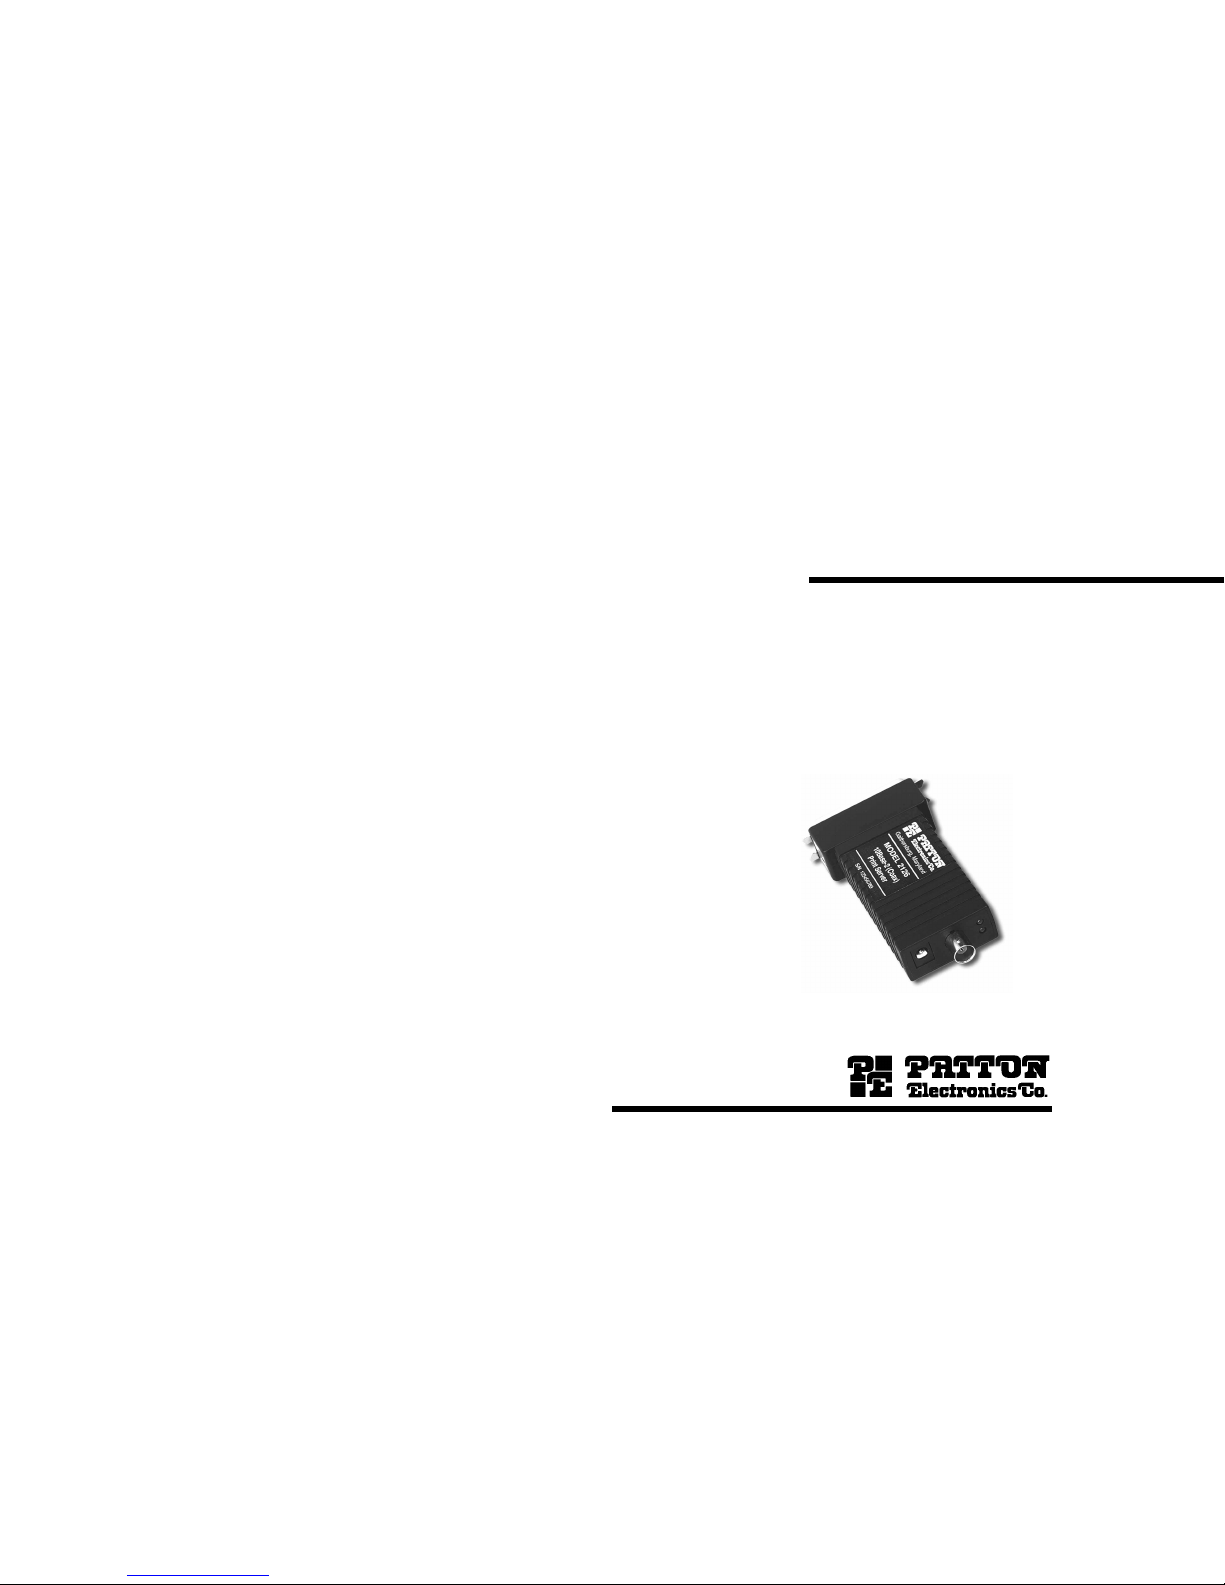
MODEL 2126
PeNetTMMiniature
10Base2 to
Parallel Print
Server
SALES OFFICE
(301) 975-1000
TECHNICAL SUPPORT
(301) 975-1007
07M2126-A
Doc# 081021UA
Revised 3/07/96
Page 2

Table of Contents
1.0 WARRANTY INFORMATION ......................................2
Radio and TV Interference ...........................................2
Service ........................................................................2
2.0 GENERAL INFORMATION..........................................3
Features.......................................................................3
Description...................................................................3
3.0 INSTALLATION ...........................................................4
Checking the Supplied Parts........................................4
Connecting to the Printer .............................................4
Physical Connection and Operation.............................4
Installing UCONNECT..................................................6
Using PCONSOLE.......................................................7
UCONNECT Commands .............................................9
4.0 NOVELL OPERATION...............................................10
Locating the Print Server on the Novell Network .......10
Configuration using UCONNECT...............................14
Testing with UCONNECT...........................................18
Printing within Novell..................................................19
Upgrading within Novell .............................................19
Troubleshooting within Novell....................................20
5.0 TCP/IP OPERATION..................................................22
Locating the Print Server on the TCP/IP Network......22
Configuration within TCP/IP.......................................23
Printing within TCP/IP................................................25
Upgrading within TCP/IP............................................27
Troubleshooting within TCP/IP...................................28
APPENDIX A - Specifications...........................................29
APPENDIX B - Interface Connections .............................30
1
1.0 WARRANTY INFORMATION
Patton Electronics warrants all Model 2126 components to be
free from defects, and will—at our option—repair or replace the product
should it fail within one year from the first date of shipment.
This warranty is limited to defects in workmanship or materials, and
does not cover customer damage, abuse or unauthorized modification.
If this product fails or does not perform as warranted, your sole
recourse shall be repair or replacement as described above. Under no
condition shall Patton Electronics be liable for any damages incurred
by the use of this product. These damages include, but are not limited
to, the following: lost profits, lost savings and incidental or
consequential damages arising from the use of or inability to use this
product. Patton Electronics specifically disclaims all other warranties,
expressed or implied, and the installation or use of this product shall be
deemed an acceptance of these terms by the user.
1.1 Radio and TV Interference
The Model 2126 generates and uses radio frequency energy, and if
not installed and used properly—that is, in strict accordance with the
manufacturer's instructions—may cause interference to radio and
television reception. The Model 2126 has been tested and found to
comply with the limits for a Class A computing device in accordance
with the specifications in Subpart J of Part 15 of FCC rules, which are
designed to provide reasonable protection from such interference in a
commercial installation. However, there is no guarantee that
interference will not occur in a particular installation. If the Model 2126
does cause interference to radio or television reception, which can be
determined by disconnecting the Centronics cable or twisted pair cable,
the user is encouraged to try to correct the interference by one or more
of the following measures: moving the computing equipment away
from the receiver, re-orienting the receiving antenna and/or plugging the
receiving equipment into a different AC outlet (such that the computing
equipment and receiver are on different branches).
1.2 Service
All warranty and non-warranty repairs must be returned freight
prepaid and insured to Patton Electronics. All returns must have a
Return Materials Authorization number on the outside of the shipping
container. This number may be obtained from Patton Electronics
Technical Service at (301) 975-1007.
Packages received without an
RMA number will not be accepted.
Patton Electronics' technical staff is also available to answer any
questions that might arise concerning the installation or use of your
Model 2126. Hours: 8AM to 5PM EST, Monday through Friday.
2
Page 3
2.0 GENERAL INFORMATION
Thank you for your purchase of this Patton Electronics product.
This product has been thoroughly inspected and tested and is
warranted for One Year parts and labor. If any questions or problems
arise during installation or use of this product, please do not hesitate to
contact Patton Electronics Technical Support at (301) 975-1007.
2.1 Features
• Concurrent Novell (Versions 2.x, 3.x and 4.x) and TCP/IP support
• 802.2 and 802.3 compatible (works with Ethernet II, Ethernet SNAP
frames)
• LEDs monitor Power and Link Status
• Installation and diagnostic utility tools supplied with units
• Supports the full range of Novell notify options
• Supports LPQ for Unix print queue examination
• Can Logon to up to ten (10) file servers
• Automatically detects and reconnects to “downed” file servers
(Auto-relog)
• Configured using Novell compatible utility or via Telnet session
• Novell operation can be disabled for TCP/IP only sites
• Printing at 60 Kbytes per second
• Software upgrades performed by network via FLASH EPROM.
2.2 Description
The Patton Model 2126 PeNet
TM
Print Server supports multiprotocol printing in both Novell and TCP/IP LANs, and is fully compliant
to the ANSI/IEEE 802.2 and 802.3 Standards. Able to recognize up to
250 servers, the Model 2126 can simultaneously logon to ten of them. If
the network moves and changes frequently, the Model 2126 can also
be configured to continuously scan and log on to new servers.
In case of power loss, the Model 2126 can restore connection to
servers that are downed. It also supports all the Novell printing and
print server features. The PeNetTMsupports print speeds greater than
60,000 bytes per second. Configuration is accomplished using a Novell
compatible utility. (For TCP/IP environments, configuration is
accomplished via Telnet sessions.) FLASH EPROM allows upgrades to
be done efficiently through the network.
3
3.0 INSTALLATION
The PeNetTMPrint Server is easily installed on a Novell and/or
TCP/IP network using standard Coax cabling. The following section of
this manual describes the installation procedure required. It is highly
recommended that you follow the instructions provided to ensure a
simple and trouble free installation. Note: Please read the file named
“readme.doc” on the enclosed 3.5” hard diskette.
3.1 Checking The Supplied Parts
Unpack the unit and check that the following items have been
supplied:
1. PeNet
TM
Print Server
2. 5v DC wall mount power adapter
3. This Manual
4. Software utilities diskette (contains UCONNECT utility)
If any of these items are missing, then contact your supplier
immediately.
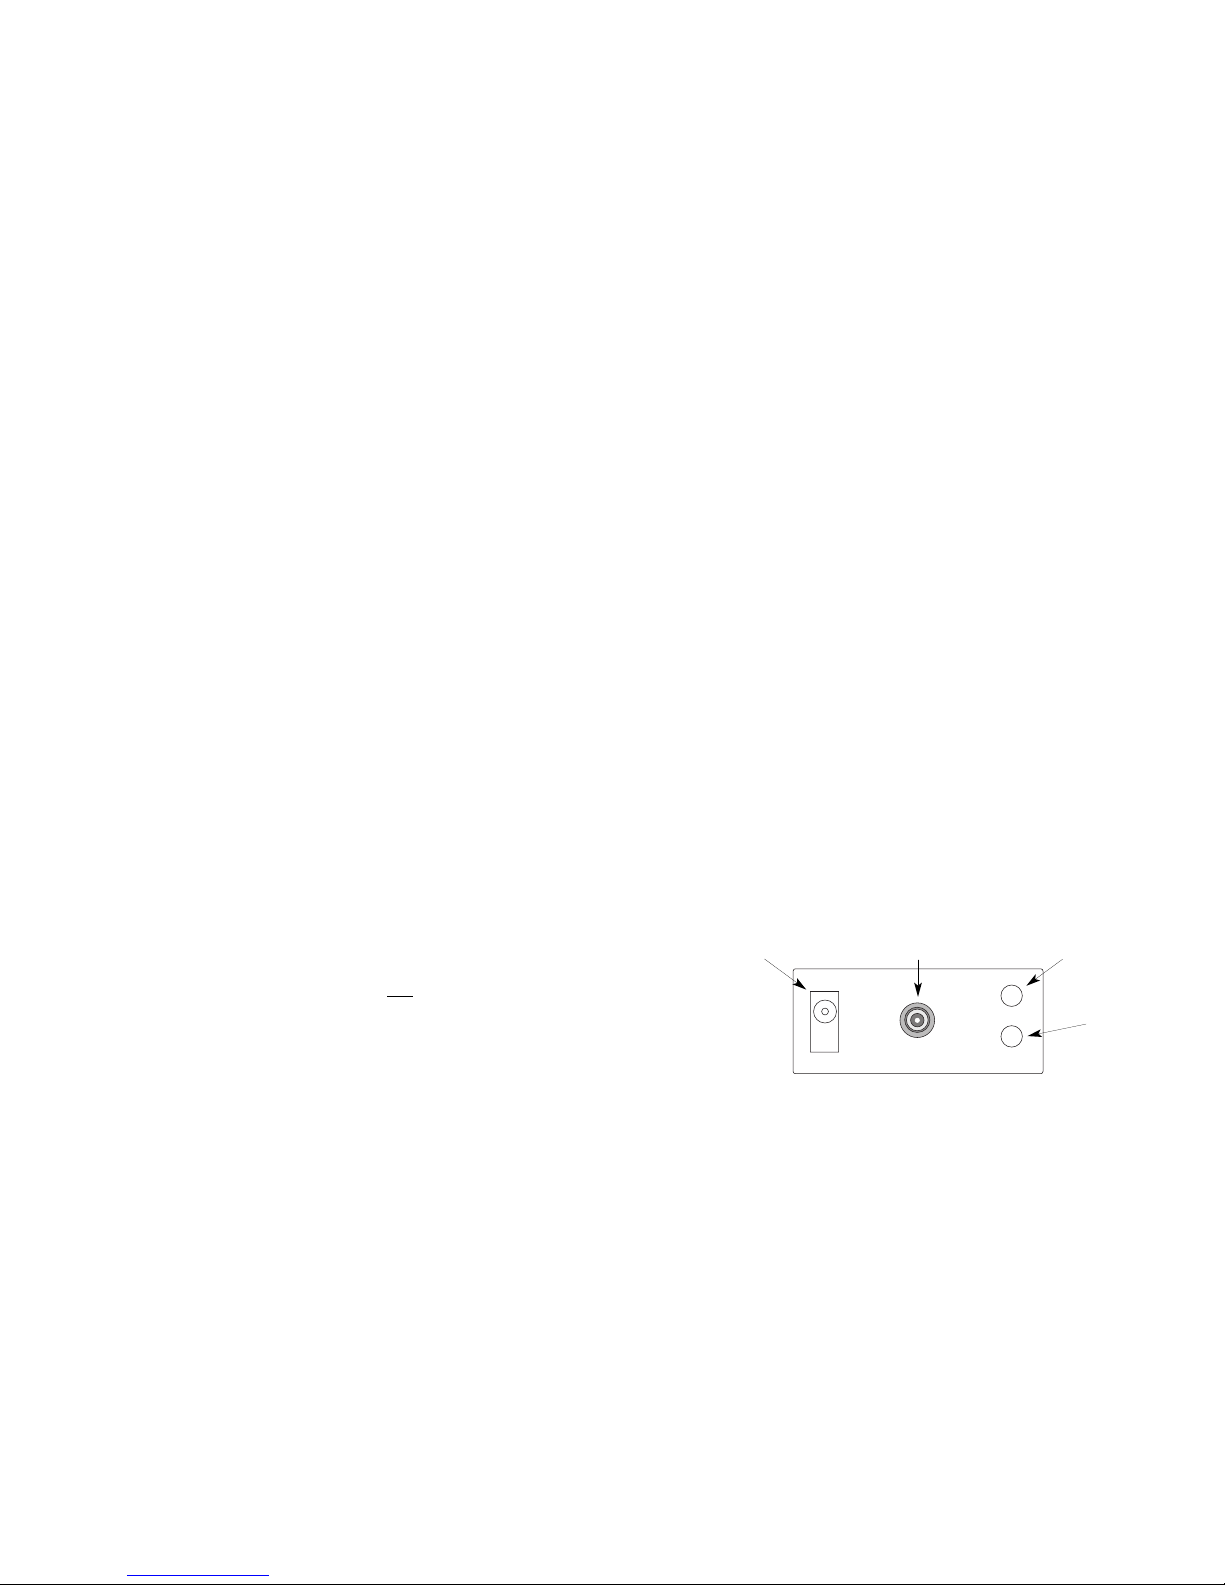
3.2 Physical Connection and Operation
The PeNetTMPrint Server is straightforward to connect and operate.
As Figure 1(below) illustrates, the rear panel of the Print Server
incorporates an external power supply connection, one coaxial
connector, a Link Status LED and a Power LED. (The Centronics
connector on the front of the Print Server plugs directly into a standard
parallel printer port.)
(Continued)
4
Figure 1. Print Server Rear Panel
External Power Jack
BNC Connection
Link Status LED
Power LED
Page 4

Follow the steps below to connect the Print Server to the printer and
network (the order is not critical):
1. Connect the required network cable (10Base2) to the modular
connector on the Print Server (The Link Staus LED will not glow
until power has been applied to the Print Server.)
2. Plug the power supply adapter into the jack on the rear of the Print
Server and then into a (surge protected) AC wall outlet.
When sufficient power is applied to the Print Server (external or
interface power), the Power LED will glow and the Print Server will
boot up. The Link Status LED should also glow, since you have
presumably accomplished Step 1 already.
3. Immediately after performing steps 1 & 2, connect the Print Server
directly to the parallel port of the printer and turn the printer ON (if it
is not already ON)
Approximately 15 - 30 seconds after booting up, the Print Server will
spool a status page to the Centronics port. If you have connected
the Print Server to the printer and turned the printer ON within that
time frame, the status page should print. The status page shows
the unit’s current operating parameters and proves that a good
printer connection exists.
What if a status page does not print after 15 - 30 seconds?
a) If you did not connect to (and turn ON) the printer right away, it is
possible that the Print Server spooled a status page
before
the
printer could respond. Disconnect and reconnect power to the Print
Server. This will reboot the print server and spool another status
page.
b) Is your printer set up for Postscript? If so, this will interfere with
the
default
set-up of the Print Server. The status page may be
garbled or may not print at all. See Section 4.8 on General
Troubleshooting.
c) If your printer has a large buffer, the printing of the status page
may depend on the timeout setting within your printer. It may take a
few minutes for a large print buffer to timeout and print.
5
Note: Some printers are able to supply 5 V DC (TTL Spec.) on
pin 18 of the Centronics connector. If your printer is one
of these, you may not need the AC power adapter.
3.3 Installing UCONNECT on a Workstation
UCONNECT is the configuration utility that is supplied with the
Print Server. UCONNECT allows the Print Server to be installed on a
Novell network, and will run on any Novell compatible workstation.
(Note: Both Novell and TCP/IP parameters can be configured using
UCONNECT. However, you cannot run a TCP/IP session in
UCONNECT. See Section 5.0 for more information.)
UCONNECT is supplied on a PC-DOS diskette. For your
convenience, we recommend that you copy the utility (file name
UCONNECT.EXE) to your workstation hard drive. The transaction
might look something like this:
MD C:\UCONNECT
(insert diskette into drive A)
COPY A:\*.* C:\UCONNECT
Once the utility program has been copied to the hard drive, type
UCONNECT at the DOS prompt and press [ENTER] to execute the
utility.
(Continued)
6
STOP! If you are connecting the Print Server to a TCP/IP
network that is
not
Novell based, go immediately to Section 5.0
TCP/IP Operation. If you are connecting the Print Server to a
Novell network, or to a Novell network running TCP/IP, continue
on to Sections 3.4 and 4.0.
Page 5

3.4 Using PCONSOLE
PCONSOLE is a Novell supplied utility for setting up Print Queues
and Print Servers. Before it is possible to print using the Print Server
unit, it will be necessary to use PCONSOLE to inform Novell of the
presence of a new Print Server and to create/attach print queues to this
Print Server. You will require Supervisor privileges to create a new
Print Server and Queue.
Run PCONSOLE from the command prompt on a workstation and
the following screen will appear:
From the Available Options Menu select Print Server Information. This
will display a list of currently available Print Servers. Press the INSERT
key and enter the name you allocated to the PeNet
TM
Print Server unit
(Units LOGIN Name) within the configuration procedure explained
earlier. Press ENTER to inform Novell of the newly installed device.
Once this new Print Server is displayed in the list of available Print
Servers, select it by hi-lighting it using the cursor keys and then
7
Stop! Before running UCONNECT, check the following Novell
operating system parameters. If you are unfamiliar with any of
them, consult your Novell manual or contact your Novell
Administrator.
1) Check that ‘Allow Unencrypted Passwords’ has been
set to ON
2) Ensure that the unit’s Name and Password are as
allocated in PCONSOLE
3) Check that there is a connection available for the Print Server
(use Monitor on the Server Console)
4) If Selective Login is enabled, ensure correct File Server
name(s) have been entered
5) Check that Novell Mode is not disabled
Available Options
| Change Current File Server
| Print Queue Information
| Print Server Information
pressing enter. It is now possible to enter further details about the
device in question. For full details of the various options available, refer
to the relevant Novell manual.
The available option fields now displayed are as follows:
• Change Password The password allocated within the
configuration utility (Units
PASSWORD) must be entered
here.
• Full Name This field is optional. A more
descriptive unit name may be
entered here if required.
• Print Server Configuration This option allows more specific
configuration information to be
entered. See the next section for
further details.
• Print Server ID displays the units Network
identification.
• Operators / Users These two sections allow a list of
permitted operators and users to be
assigned to the interface.
• Status / Control This section displays the current
status of the Print Server and
allows control over the current state
of the individual printers.
Selecting this option will produce the following screen:
(continued)
8
Print Server Configuration
| File Servers To Be Serviced
| Notify List For Printer
| Printer Configuration
| Queues Serviced By Printer
Page 6

The following briefly explains the functions of the options listed on the
previous page:
• File Servers to be Serviced This option allows the user to
specify which File Servers the Print
Server will search for its queues etc.
• Notify List for Printer This option may be used to specify
which users will be notified of Printer
Problems (paper jams etc.) if and
when they occur.
• Printer Configuration This option is used to configure
printer connected to the PeNetTM
Print Server. The printer must be
defined as Parallel LPT1 (parallel
port 1).
• Queues Serviced by Printer It is possible to specify which
queues the connected printer will
service. Up to 16 queues may be
specified for each print server.
If necessary, create a new queue by selecting Print Queue
Information from the Available Options menu, and use INSERT to
create new print queues to be served by PeNetTM Print Server.
A test file can be printed while in PCONSOLE using the
Current Job
Entries
option in the Print Queue Information menu. Press INSERT and
then ENTER to obtain a list of files to print.
3.5 UCONNECT Commands
Once the UCONNECT utility has been copied to the hard drive,
type UCONNECT at the DOS prompt and press [ENTER] to execute the
program.
UCONNECT is a menu driven program. To work within the menus,
use the arrow keys to scroll up and down between menu items. The
[esc] key is a toggle switch used to select and deselect menu items to
be edited. The [ENTER] key is used to update the file and move to
another menu screen. Some screens have slightly different commands.
These are noted on the screen itself.
9
4.0 NOVELL OPERATION
This section tells how to use the Print Server with a Novell network.
Functions described include locating the Print Server on the network,
configuration, testing, printing, and FLASH EPROM upgrading. For
instructions on use of the Print Server within a TCP/IP network that is
not
Novell based, please refer to Section 5.0.
4.1 Locating the Print Server on the Network
The Print Server has a unique NIC Address that has been provided
by Patton Electronics with the approval of the ISO council (this NIC
Address has been marked on a label on the underside of the unit).
Before the Print Server can be configured, operated, tested or
upgraded, it must be located and recognized by the network. Using
the UCONNECT utility, follow these steps to locate the print server:
1) Having completed the instructions in Section 3.0, you should see the
Main Menu screen.
2) Select “Configuration” and press [ENTER]. This will take you to the
Specify Print Server Address screen (following page).
10
Note: the appearance of many of the screens will vary based
upon the configuration of your particular network. The
network component names show are examples only.
Page 7

3) In the Specify Print Server Address Screen, select “Search Network
for Print Servers” and press [ENTER]. This will take you to the Selected
Networks screen.
4) The Selected Networks screen allows you to choose the networks
you want UCONNECT to search in order to locate the Print Server. Use
the arrow keys to scroll between lines. Use the [esc] key to select and
deselect networks. Press [ENTER] to update the file with your
selections and go to the Select Required Search Method screen.
5) The Select Required Search Method screen allows you to specify the
search path(s) that UCONNECT takes in order to locate the Print
Server. The first option will route the search through the file sever your
workstation is connected to. This will limit the search. The second
option will search all selected networks in a “broadcast” manner. (The
default is
both
methods.) Use the arrow keys to scroll between lines.
Use the [esc] key to select and deselect search methods. Press
[ENTER] to update the file with your selections and go to the next
screen.
11
6) The Start Scan for Print Servers screen allows you to initiate the
scan based upon the criteria you have chosen. Select an option using
[ENTER]. Choosing “yes” will begin the search. Choosing “no” will
take you back to the Main Menu.
Once your search has begun, UCONNECT will provide you with
screens updating you on the progress of the search. If you have
chosen to search through the local file server, you will see a displayonly screen that looks like the image below:
If you have chosen the broadcast search option, you will then see a
display-only screen that looks like the following image:
(continued)
12
Routing Search Through
Server Name
Searching on Network xxxxxxxxxxx
Patton Print Servers Found :xx
Networks Searched :xx
Networks to Search :xx
Using Broadcast Search
Searching on Network xxxxxxxxxxx
Patton Print Servers Found :xx
Networks Searched :xx
Networks to Search :xx
Page 8

7) When the search is complete, you will see a list of the Print Servers
UCONNECT has located on the Available Print Servers screen (see
below). Use the arrow keys to scroll between listed servers, and the
[ENTER] key to select a single print server to configure.
8) When you have selected a print server to configure, you will see the
Password screen. Key in the password “PATTON” and press [ENTER]
to move to the Available Configuration Options screen.
9) The Available Configuration Options screen lets you select several
pathways of configuration depending upon the operating system your
network is using. Section 4.3 will give you an overview of the
configuration options so that you can custom-tailor the Print Server to
your own requirements.
13
4.2 Configuration within Novell using UCONNECT
UCONNECT lets you configure the Print Server to work with several
types of Novell compatible network operating systems. This section will
guide you through the various configuration options.
4.2.1 General Configuration
The first option on the Available Configuration Options screen lets
you key in general information that will apply to any operating system.
In most cases you will need to enter information in the General
Configuration Parameters screen, as well as a second screen that
applies more specifically to the particular operating system you are
using.
Each of the options on the General Configuration Parameters screen
can be edited using the arrow and [esc] keys to scroll and select.
1) The Configuration Password may be altered to suit your needs.
2) The Upgrade Password
may
be altered, but we recommend that
you leave this password unchanged.
3) You mustchange the Postscript Printer field to YES if your
printer uses Postscript. Otherwise, the printer will not output
correctly.
4) The Power up Status Page field may be changed to NO if you do
not want a status page to appear upon power up of the Print Server.
(continued)
14
Page 9

4.2.2 Novell Configuration
The second option on the Available Configuration Options screen
lets you enter information to configure the Print Server to work in a
standard Novell environment. Any of these fields may be edited.
4.2.3 Advanced Novell Configuration
The third option on the Available Configuration Options screen is
“Advanced Novell”. This is UCONNECT’s alternative to the
PCONSOLE print queue utility. Advanced Novell lets you point a
particular print server to specific file servers and print queues. This is
done in two steps:
1) When you select the Advanced Novell option, you will be prompted to
supply a print server to configure. Use the arrow and [esc] keys to
scroll and select the print server you wish to configure. Then press
[ENTER].
15
2) Once you have selected a print server to configure, you will receive
the Advanced Novell Configuration screen, where you can point the
print server to particular file servers and print queues.
4.2.4 TCP/IP Configuration
The fourth option on the Available Configuration Options screen lets
you configure the Print Server to work in a Novell network running
TCP/IP. Remember: You cannot run a Unix session using
UCONNECT. See Section 5.0 for TCP/IP operation.
4.2.5 Personal Netware Configuration
The fifth option on the Available Configuration Options screen lets
you configure the Print Server to work with Personal Netware.
16
Warning! Contact your Novell Administrator if you are unfamiliar
with Novell setup procedures.
Page 10

4.2.6 Reset to Factory Defaults
The sixth option on the Available Configuration Options screen
resets the Print Server to all Factory Defaults. If you select “Yes” on the
Reset Available Configuration Options screen, UCONNECT will reset
the Print Server and return you to the . If you select “no” on the Reset
screen, UCONNECT will return you immediately to the Available
Configuration Options screen.
4.2.7 Exit
The seventh option on the Available Configuration Options screen
exits to the Main Menu. However, you will exit directly to the Main
Menu only if you have made no changes to the configuration of the unit.
If you have made changes, you will be sent into the following sequence:
1) If you select Exit and you have made configuration changes, you will
next see the Send Changes screen. If you select “No” on this screen,
you will go immediately to the UCONNECT Main Menu and your
changes will not be saved. If you select “Yes”, you will receive a
timeout at the bottom of your screen while UCONNECT sends your
configuration changes to the Print Server. (Note: the changes you
entered will not take effect until the Print Server is rebooted.)
17
Warning! If you select “Yes” you will lose all changes you have
made in the configuration process.
2) After you have sent your configuration changes to the print server
and have seen a timeout at the bottom of your screen, you will then see
the Reboot screen. Selecting “Yes” on the Reboot screen immediately
reboots the print server and takes you to the DOS prompt. The
configuration changes you have entered will now be in effect. Selecting
“No” on the Reboot screen takes you immediately to the UCONNECT
Main Menu. Your configuration changes will then not take effect until
the next time the Print Server is rebooted.
4.3 Testing within Novell using UCONNECT
The UCONNECT utility may be used to test the Print Server in a
Novell environment. To access the Available Test Options screen,
perform the operation described in Section 4.2, choosing Test from the
Main Menu instead of Configure. When the screen appears, pressing
[ENTER] will cause the Print Server to print a status page, thereby
testing the setup. Choosing “Exit” will take you back to the DOS
prompt.
18
Reboot Print Server for Changes to Take Effect
Yes
No
Warning! Do NOT remove power while the timeout message is
displayed! Only after the timeout message disappears is it safe to
remove power from the Print Server.
Page 11

4.6 Troubleshooting within Novell
This section describes the options available for diagnosing possible
problems that may occur with the PeNetTMPrint Server unit.
The Novell set up utility, UCONNECT can be used to force print a
Status Page to the connected printer. Select Force Status Page from
the main menus within UCONNECT.
General
No Power LED
1) Check that external power supply adapter is correct type and is
functioning correctly.
2) Ensure DC connector to the Print Server is seated correctly.
3) If you are relying only upon interface power on pin 18 of the
Centronics interface, be sure the output is 5 V DC (TTL Spec.).
Status Page Not Printed
1) The status page prints only within 30 seconds of power-up or when
forced by software (see Test Section 4.3)
2) The power-on status page option may be disabled (see
General Configuration Section 4.2.1)
3) The Postscript printer option may be set incorrectly for your printer
(see General Configuration Section 4.2.1)
4) Your printer may have a large internal buffer, in which case the
status page may have spooled to your printer but is waiting for a
timeout or command in order to print. (Check your Printer manual.)
(continued)
20
4.4 Printing within Novell
It will be of great benefit to users who are not familiar with the Novell
printing environment to obtain the Novell flip-guide entitled “Novell
Quick Access Guide” before continuing with this section. Read the
chapter entitled “PRINTING” to gain a clearer understanding of the
Novell printing system. More information is available from Novell’s
Concepts
and
Print Server
manuals.
The PeNetTMPrint Server interface fully supports all common Novell
print commands including CAPTURE, NPRINT and PCONSOLE.
e.g. NPRINT
testfile.doc
PS=PESERV Queue=TEST
This command prints a document called ‘testfile.doc’ to the print
queue called TEST which is serviced by a Print Server called PESERV.
4.5 Upgrading within Novell
The PeNetTMPrint Server is equipped with 128k Bytes of FLASH
EPROM which is used to store the operating code and also the units
configuration data. If it is necessary to upgrade the units operating
system (for example if support for new protocols is added) this may be
easily achieved by transmitting the new operating system to the unit
over the network. Once transmission is complete, this new code will be
permanently stored in the units FLASH memory.
Upgrading under Novell is achieved by selecting the UPGRADE
option from the UCONNECT main menu. Ensure that the units new
operating system (supplied on a single 3.5 inch diskette containing a
single file called IMAGEnnn.BIN ) has been copied to the same
directory that contains UCONNECT.EXE.
Enter the NIC and Network address of the unit to be upgraded and
then enter the UPGRADE PASSWORD when prompted (rather than the
CONFIGURATION PASSWORD with does not permit FLASH
upgrades). Once communication to the unit in question has been
achieved, a window will appear on the screen displaying the progress of
the file transfer from UCONNECT to the Print Server (see following
page). Once this window disappears, the FLASH upgrade is complete.
(continued)
19
Page 12

Novell Specific
UCONNECT Can’t Communicate with Print Server
1) Check the correct Network Number and NIC Address have been
entered
2) Ensure PeNetTMPrint Server is functioning correctly (check the
power LED and status page production)
Status Page Shows No Novell Server or Queue Details
1) If Server shows, but no Queue details, then no Print Queues have
been assigned (See PCONSOLE Section 3.4 or consult your Novell
Administrator)
2) See section on “PeNetTMPrint Server Unable To Login” (below)
Print Server Is Unable To LOGIN To Novell Servers
1) Check that ‘Allow Unencrypted Passwords’ has been set to ON
2) Ensure that the units Name and Password are as allocated in
PCONSOLE
3) Check that there is a connection available for PeNetTMPrint Server
(use Monitor on the Server Console)
4) If Selective Login is enabled, ensure correct File Server name(s)
have been entered
5) Check that Novell Mode is not disabled
21
5.0 TCP/IP OPERATION
This section tells how to use the Print Server with a TCP/IP
network. Functions described include locating the Print Server on the
network, configuration, initialization, testing, printing, and FLASH
EPROM upgrading.
5.1 Locating the Print Server on the TCP/IP Network
When used in the TCP/IP environment, the Print Server has one
assigned Internet Address and one printer port.
5.1.1 Assigning the Internet Address
If it is not possible to use the UCONNECT utility to configure the
units Internet Address, then the following method should be followed:
1. Create an entry in the ARP table using the Unix command :
arp -S [ether] IPaddress NICaddress where...
IPaddress is the required Internet Address
NICaddress is the units NIC address
2. Use PING to send this new IP address to the NIC address of the
Print Server:
PING xx.xx.xx.xx where xx.xx.xx.xx is the IP address above
(continued)
22
NOTE: This method will only work if the units Internet Address is
currently set to 0.0.0.0 and PING will only affect the unit with
the NIC address entered in the ARP table.
Some versions of Unix will require the ‘ether’ command to be
entered as shown
Page 13

5.1.2 Using PING to Verify Network Communications
PING is the standard method used on TCP/IP networks to verify that
communication is possible to and from a given Internet address
(NOTE: not all TPC/IP networks have the PING utility. Its use with the
Print Server is optional). The Print Server will correctly respond to
PING requests and hence a typical method of quickly establishing if
communications are possible with the Print Server would be:
PING xx.xx.xx.xx where xx.xx.xx.xx. is the unit’s Internet address
PING will then report to the operator if communication was
achieved. If problems exist communicating with the Print Server,
carefully check that the Internet Address allocated to the unit is a valid
address for the network in question. Consult the network supervisor if
problems persist with PING.
5.2 Configuration within TCP/IP
Once the unit’s Internet Address has been set correctly and PING
has proven that network communications are possible to the unit, now is
the time to use Telnet to further configure the unit if required. Here is a
typical transaction used to connect to the Print Server via Telnet:
Type Unit’s Address: TELNET xx.xx.xx.xx
Response:
Connected to (Unit’s Internet Address)
Escape Character is ^]
Welcome to Patton Print Server Configuration
Please Enter Login Command: PESETUP
Enter Setup Password: PATTON
Menu Displays
Once connection to the Print Server has been achieved using the
Telnet Protocol, it is then simply necessary to enter the command,
PESETUP, to enter the configuration utility. The Print Server will then
prompt the user to enter a password (default is Patton) and, once the
entered password has been verified, a command prompt will appear.
23
5.2.1 Telnet Configuration Commands
The following commands may be entered from the command
prompt:
GENERAL Displays the current General parameters
NOVELL Displays the current Novell parameters
TCPIP Displays the current TCP/IP parameters
PERSONAL Displays the current Personal Novell
parameters
HELP Displays a help screen
SET [parameter] = [value] Sets parameter to given value
EXIT Exits from Telnet
HELP Displays a help screen
PORT Displays the current port status
STATUS Print status page to printer
The following table lists the available parameters for use in the SET
command, and their corresponding abbreviations:
SP Set-up Password UP Upgrade Password
PS Postscript Support PU Power-UP Status Page
E2 Ethernet 2 Support E22 Ethernet 802.2 Support
E23 Ethernet 802.3 Support ES Ethernet SNAP support
NL Novell Login Name NP Novell Login Password
S0-S9 Novell Server Names SS Novell Server Searching
TA Internet Address PN Port Name
TH TCP/IP Header String
(continued)
24
Hint: Deleting the Novell login name will turn off Novell server
search and speed up TCP/IP operations. This step is highly
recommended.
Page 14

For example, to set the Power Up Status Page option to NO, the
following would be required:
SET PU = NO
5.3 Printing within TCP/IP
There are two main methods of printing documents to the Print
Server using the TCP/IP protocol:
• PRR Berkeley remote LPR (LPD daemon)
• FTP File Transfer Protocol
5.3.1 Printing using LPR
The typical command line for sending a print via remote LPR to the
PeNet
TM
Print Server would be:
LP -d
printdef
file.txt where
printdef
is the printer name
defined in a printcap file, with
:rm=Host Name and :rp=Port Name
The LPQ and LPSTAT commands are supported by Print Server by
returning “No Entries”
5.3.2 Printing From IBM AIX
Printing from AIX using LPR is possible. The necessary setup is
performed with a utility called SMIT.
(continued)
25
Technical Note: The Print Server unit responds to Telnet Data
in accordance with RFC 854 on the standard Telnet Port, 23
(decimal).
NOTE: Printing from ‘LP’ or ‘LPR’ on Unix V systems, is only
possible if an application program is available to re-route
print data to the LPR socket.
Setup the Print Server as for normal TCP/IP operation regarding
Internet Address etc. and then use SMIT to add a host with the PeNet
TM
Print Server’s Host Name. Add a remote queue and specify
Destination Host
(as above) and Queue, on Remote Printer=Pport1 (or
other PeNetTMPrint Server port). Set the
Remote Device To Add
to the
Printer Name for this printer.
To print, use the following command: LPR -P printer name file.txt
5.3.3 Printing Using FTP
It is also possible to print files to the Print Server using FTP (File
Transfer Protocol). Typically this would be achieved by instigating an
FTP session, as the sequence of commands below shows:
ftp hostname where hostname is the Print Server to connect to
put filename
quit
5.3.4 Printing From SCO UNIX
SCO Unix no longer supports remote LPR so the FTP method of
printing will need to be used. A script file can be created to automate
this process as shown below:
TMPFILE=/tmp/ftpprint.$$
printer=laserprt $(0)
/usr/spool/lp/model/standard “$@”>$TMPFILE
ftp -n $printer <<END
binary
put $TMPFILE
quit
rm $TMPFILE
exit
The script intercepts the print command and redirects the output to
a temporary file. FTP then sends this file to the host before deleting it
and exiting from the script file.
26
Technical Note: The Print Server unit supports the LPR protocol
as defined in RFC 1179 and FTP as defined in RFC 959. The unit
responds to LPR data sent to socket 515 and FTP data sent to
socket 20.
Page 15

5.5 Troubleshooting within TCP/IP
The following hints should help you if trouble arises when using the
Print Server. If you experience additional problems, contact Patton
Technical Support M-F, 8:30 - 5:00 PM EST at (301) 975-1007.
General
No Power LED
1) Check that external power supply adapter is correct type and is
functioning correctly.
2) Ensure DC connector to the Print Server is seated correctly.
3) If you are relying only upon interface power on pin 18 of the
Centronics interface, be sure the output is 5 V DC (TTL Spec.).
Status Page Not Printed
1) The status page prints only within 30 seconds of power-up or when
forced by software (see Section 5.2.1)
2) The power-on status page option may be disabled (see Section
5.2.1)
3) The Postscript printer option may be set incorrectly for your printer
(see Section 5.2.1)
4) Your printer may have a large internal buffer, in which case the
status page may have spooled to your printer but is waiting for a
timeout or command in order to print. (Check your Printer manual.)
TCP/IP Specific
Print Server Will Not Respond To PING
1) Ensure the units Internet Address has been correctly set
Check the hosts ARP table is correct
28
5.4 Upgrading withinTCP/IP
To use the FTP based method of FLASH upgrade, it is firstly necessary
to establish an FTP connection to the Print Server in the same way as
that used when printing to the unit via FTP. Typically this will be
achieved as follows:
FTP xx.xx.xx.xx where xx.xx.xx.xx is the unit’s Internet Address
Once connection is achieved in this way, the Print Server will
respond with a prompt requesting the USER NAME to be supplied.
When printing to the unit, this field may be ignored but when preparing
to perform a FLASH upgrade, it is the response to this field that
indicates an upgrade is being performed. To continue with the upgrade
procedure, the user must enter:
pattonflashupdate
followed by carriage return. It is now necessary to transmit the new
operating system to the Print Server. The units new operating system
will be supplied on a single 3.5 inch diskette which will contain a single
file called IMAGEnnn.BIN (where nnn is the version number of the
upgrade). This file is typically transmitted to the Print Server using the
PUT command as shown below:
PUT IMAGE.BIN
Assuming that the file transfer was completed correctly, the Print Server
will respond to the end of transfer with the message:
FILE TRANSFER COMPLETE - Upgrade continues when FTP is quit
Quitting FTP will now cause the FLASH upgrade to occur, and after a
few seconds, the unit will reboot and begin operating using the newly
downloaded operating system.
27
Page 16

APPENDIX A
SPECIFICATIONS
Operating Systems Supported: Novell 2.15, 2.2, 3.11, 3.12
and 4.00
Utilities Supported: LPR, FTP, TELNET and PING
Network Connection: 10Base2
Protocols: IPX/SPX, TCP/IP
Frame Types: 802.3, Ethernet II, 802.2 and
Ethernet SNAP
Parallel Ports: one
Parallel Speed: 60,000 bytes /sec (printing on
a Novell 3.11 network )
Connectors: Centronics male (Parallel)
BNC-type female (10Base2)
Cable Recommendations: Ethernet, coaxial cable
conforming to 10Base2
standards
Power Supply: External, wall mount
(120V AC domestic, 220V AC
international)
Temperature Range: 2-60
°
C (37-140°F)
Altitude: 0-10,100 feet
Humidity: Up to 95% non-condensing
Dimensions: 4.0” x 2.1” x 0.8”
Weight: 3 oz. (max)
29
APPENDIX B
INTERFACE CONNECTIONS
1- Strobe (Output)
2- Data bit 0 (I/O)
3- Data bit 1 (I/O)
4- Data bit 2 (I/O)
5- Data bit 3 (I/O)
6- Data bit 4 (I/O)
7- Data bit 5 (I/O)
8- Data bit 6 (I/O)
9- Data bit 7 (I/O)
10- Acknowledge (Input - active low)
11- Busy (Input - active high)
12- Paper End
13- Select
1415- No Connect
161718- +5 volts
Ground -19
Ground -20
Ground -21
Ground -22
Ground -23
Ground -24
Ground -25
Ground -26
Ground -27
Ground -28
Ground -29
Ground -30
-31
Error -32
Ground -33
-34
-35
Ground -36
Model 2127 Centronics Interface
30
 Loading...