

Page 1
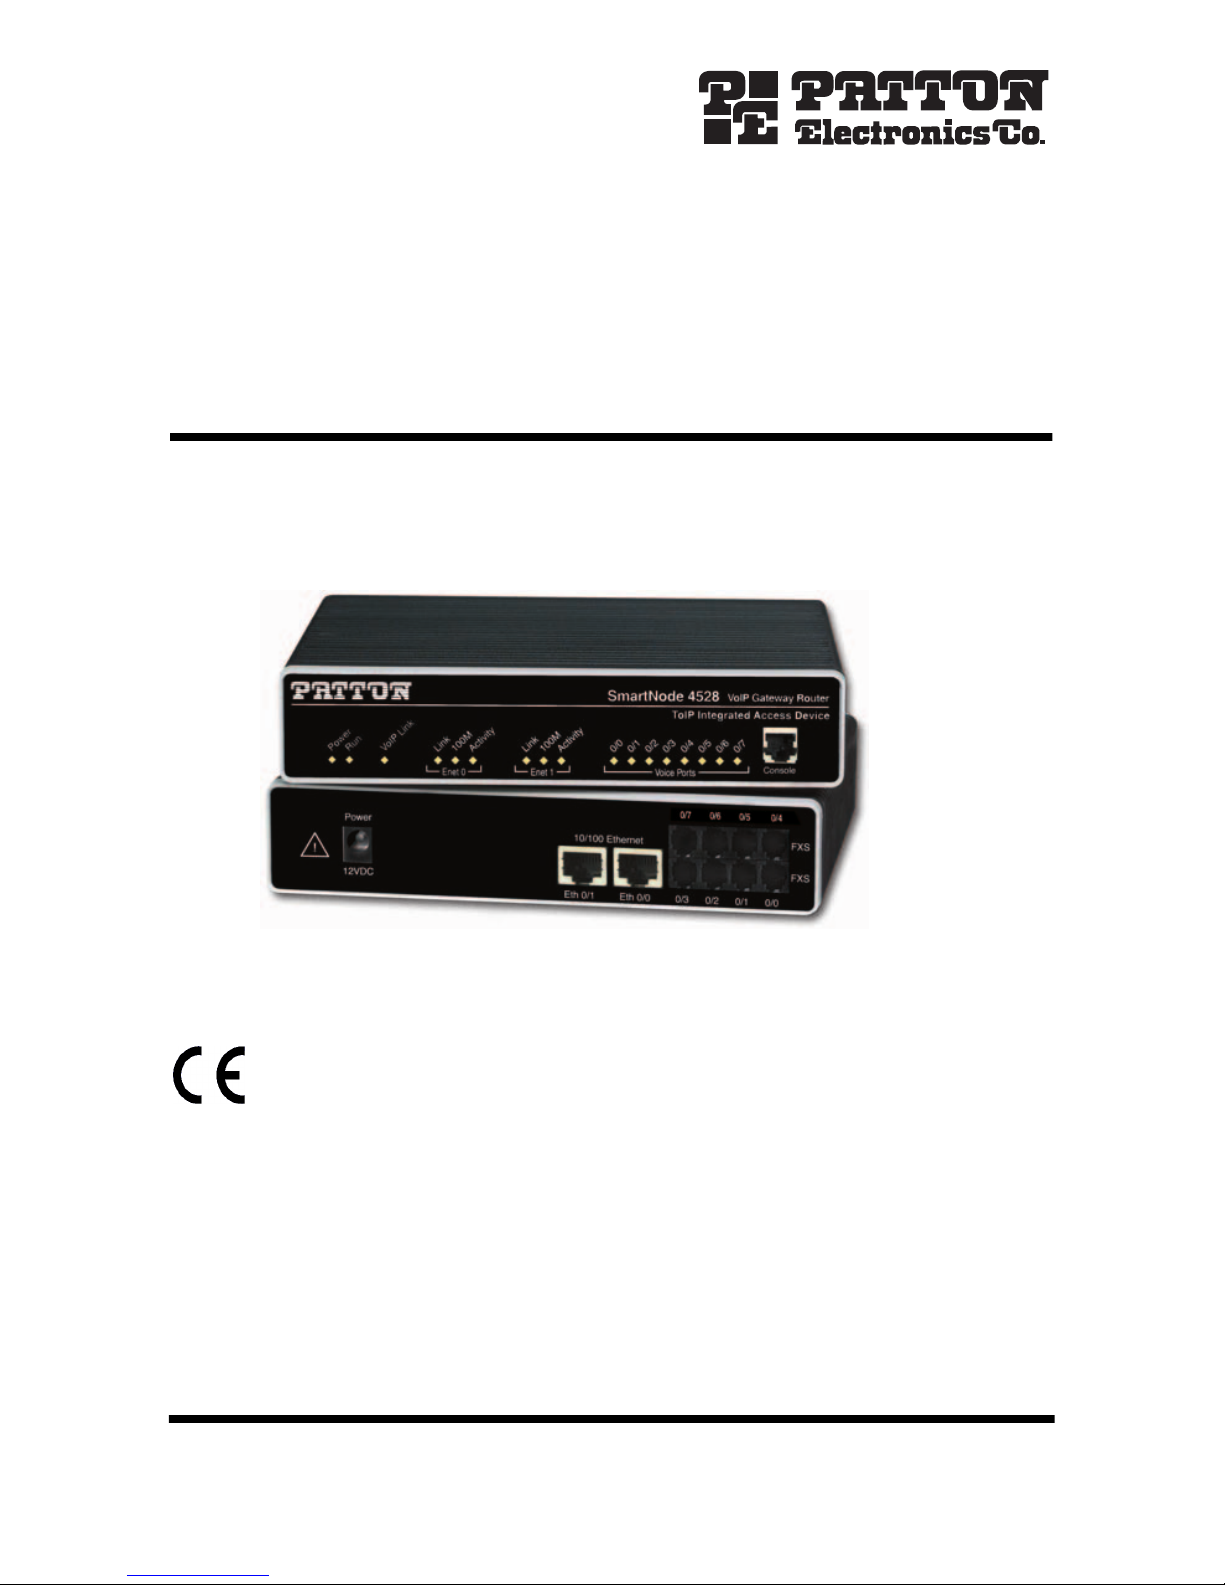
SmartNode 4520 and 4110 Series
www.voipon.co.uk [email protected] Tel: +44 (0)1245 808195 Fax: +44 (0)1245 600030
VoIP Gateway Routers
Quick Start Guide
Approval
approved for connection to the public telecommunication network.
Zulassung
für Anschaltung an das öffentliche Telekommunikationsnetz genehmigt.
Approvazione
sono stato approvato per collegamento alla rete di
telecomunicazion pubblica.
Aprobación
aprobado para la conexión a la red de telecomunicación pública.
Approbation
été approuvés pour le raccordement au réseau de télécommunication public.
Document Number: 13202U7-001 Rev. C
Part Number: 07MSN4000-QS
Revised: March 27, 2006
—Models that are equipped with FXO interfaces have been
—Modelle, die mit FXO Schnittstellen ausgerüstet sind, sind
—I modelli che sono dotato con le interfacce di FXO
—Los modelos que se equipan los interfaces de FXO se han
—Des modéles qui sont équipés des interfaces de FXO ont
Sales Office: +1 (301) 975-1000
Technical Support: +1 (301) 975-1007
E-mail: [email protected]
WWW: www.patton.com
Page 2

WARNING
www.voipon.co.uk [email protected] Tel: +44 (0)1245 808195 Fax: +44 (0)1245 600030
•
The SmartNode contains no user serviceable
parts. The equipment shall be returned to Patton
Electronics for repairs, or repaired by qualified
service personnel.
•
Mains Voltage: Do not open the case when the
power cord is connected. For systems without a
power switch, line voltages are present within
the power supply when the power cord is connected. The mains outlet that is utilized to power
the SmartNode router shall be within 10 feet (3
meters) of the device, shall be easily accessible,
and protected by a circuit breaker
•
The smartNode is not shipped with power
cables. For AC powered units, ensure that the
power cable used meets all applicable standards
for the country in which it is to be installed, and
that it is connected to a wall outlet which has
earth ground.
•
Hazardous network voltages are present in WAN
ports regardless of whether power to the SmartNode is ON or OFF. To avoid electric shock, use
caution when near WAN ports. when detaching
the cables, detach the end away from the SmartNode first.
•
Do not work on the system or connect or disconnect cables during periods of lightning activity.
1.0 Power up the SmartNode
The terminal block header to which the wires are secured provides the disconnect for the SmartNode. Take proper measures
to ensure that it is not permanently fastened to the receptacle
CAUTION
1. Connect the SmartNode to a power source using the included power supply
and cable.
2. When the
to configure.
mounted on the chassis.
Power
LED stops blinking and remains lit, the SmartNode is ready
2 SmartNode 4520 and 4110 Quick Start Guide
Page 3
2.0 Connect the SmartNode to your PC
0
/3
0/2
0
/1
0
/0
V
o
ic
e P
o
rts
F
X
S
0/3
0
/2
0
/1
0
/0
V
o
ic
e P
o
rts
F
X
S
www.voipon.co.uk [email protected] Tel: +44 (0)1245 808195 Fax: +44 (0)1245 600030
Note For factory default IP address information, see Appendix A.0 on page 8.
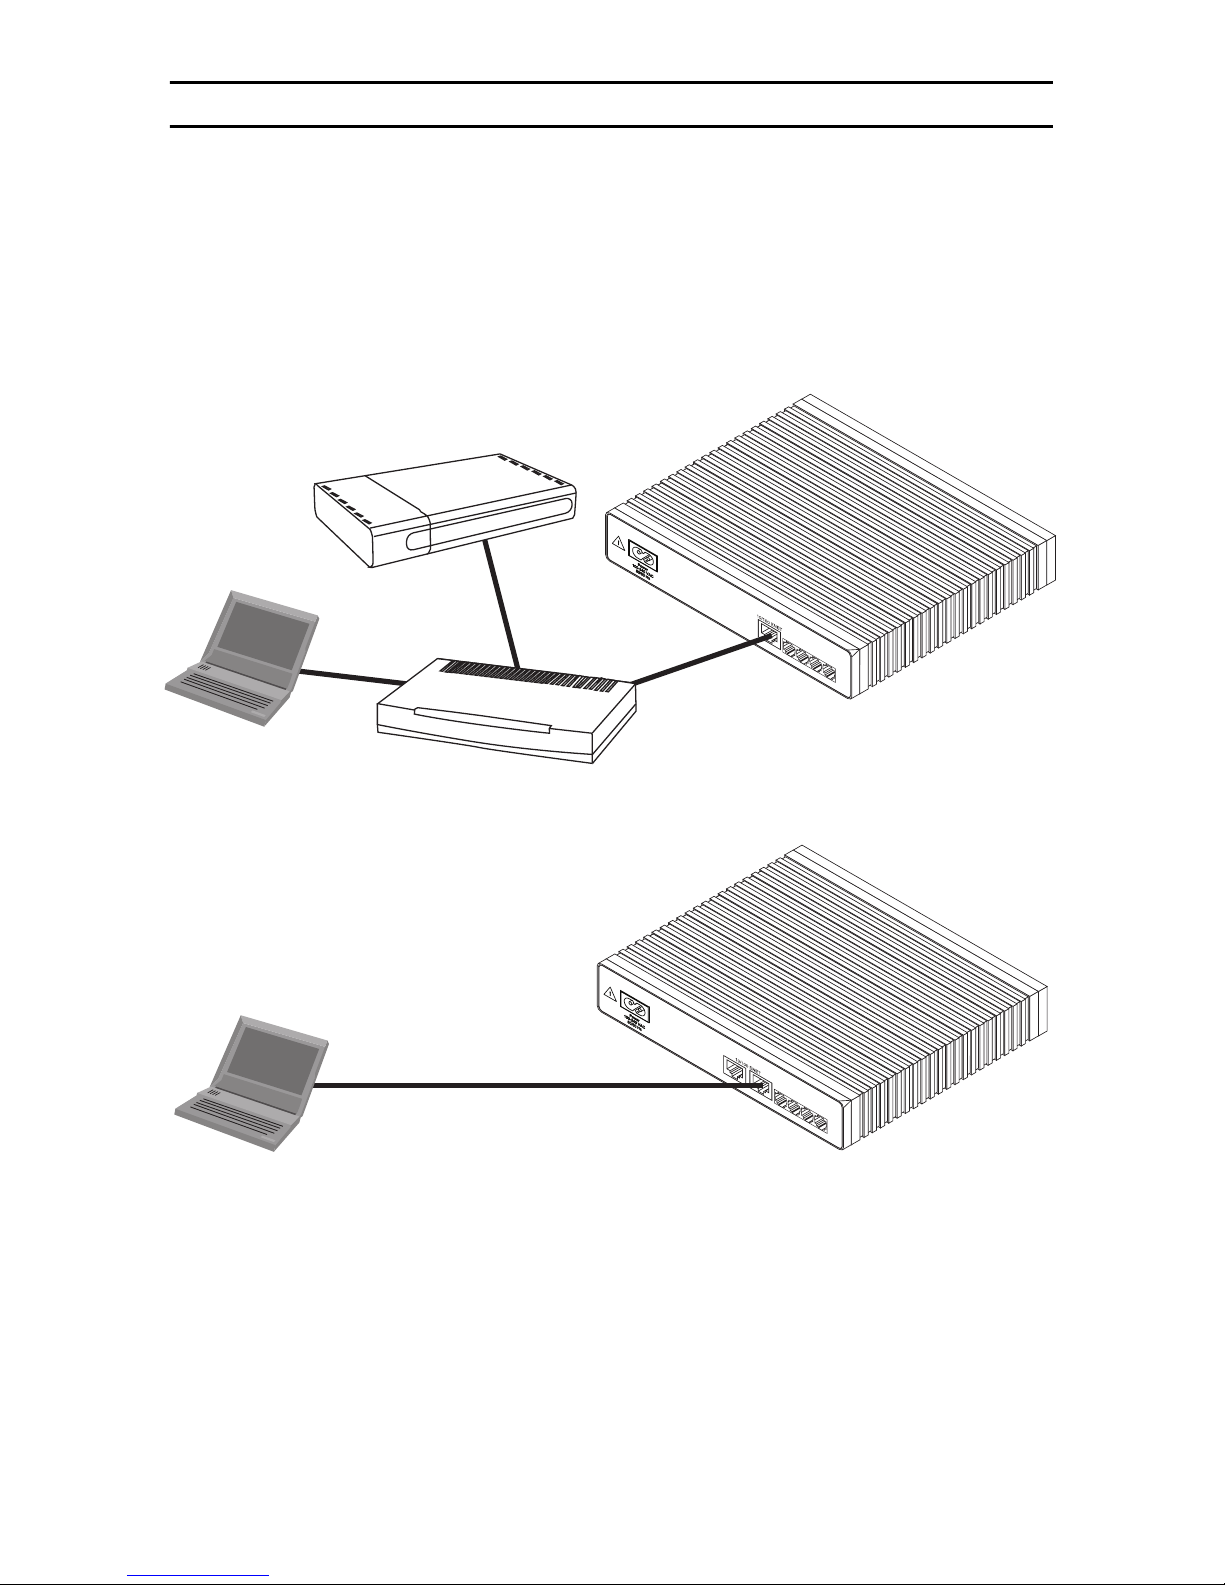
Option 1: Connect to a network that has a DHCP server
(SN4520 &
SN4110). Using the included black Ethernet cable, connect the SmartNode RJ-45
Ethernet WAN port, labeled
ETH0/0
on the same network as your PC. WAN interface
(see figure 1), to an Ethernet hub or switch
ETH0/0
is configured as
DHCP client.
SmartNode
DHCP
Server
E
ETHO/O
PC
Ethernet Hub
or Switch
Figure 1. Connecting the SmartNode to your PC through a hub or switch
TH 0/0
SmartNode
4520
ETH 0/0
ETH
0/1
ETHO/1
PC
Figure 2. Connecting the SmartNode directly to your PC
Option 2: Connect directly to a PC
LAN interface
ETH0/1
is configured as DHCP server (see figure 2).
(SN4520 only).
1. Configure your PC as a DHCP client.
Note The procedures below are for Microsoft Windows. For another operating
system, refer to the operating instruction that came with your PC.
SmartNode 4520 and 4110 Quick Start Guide 3
Page 4
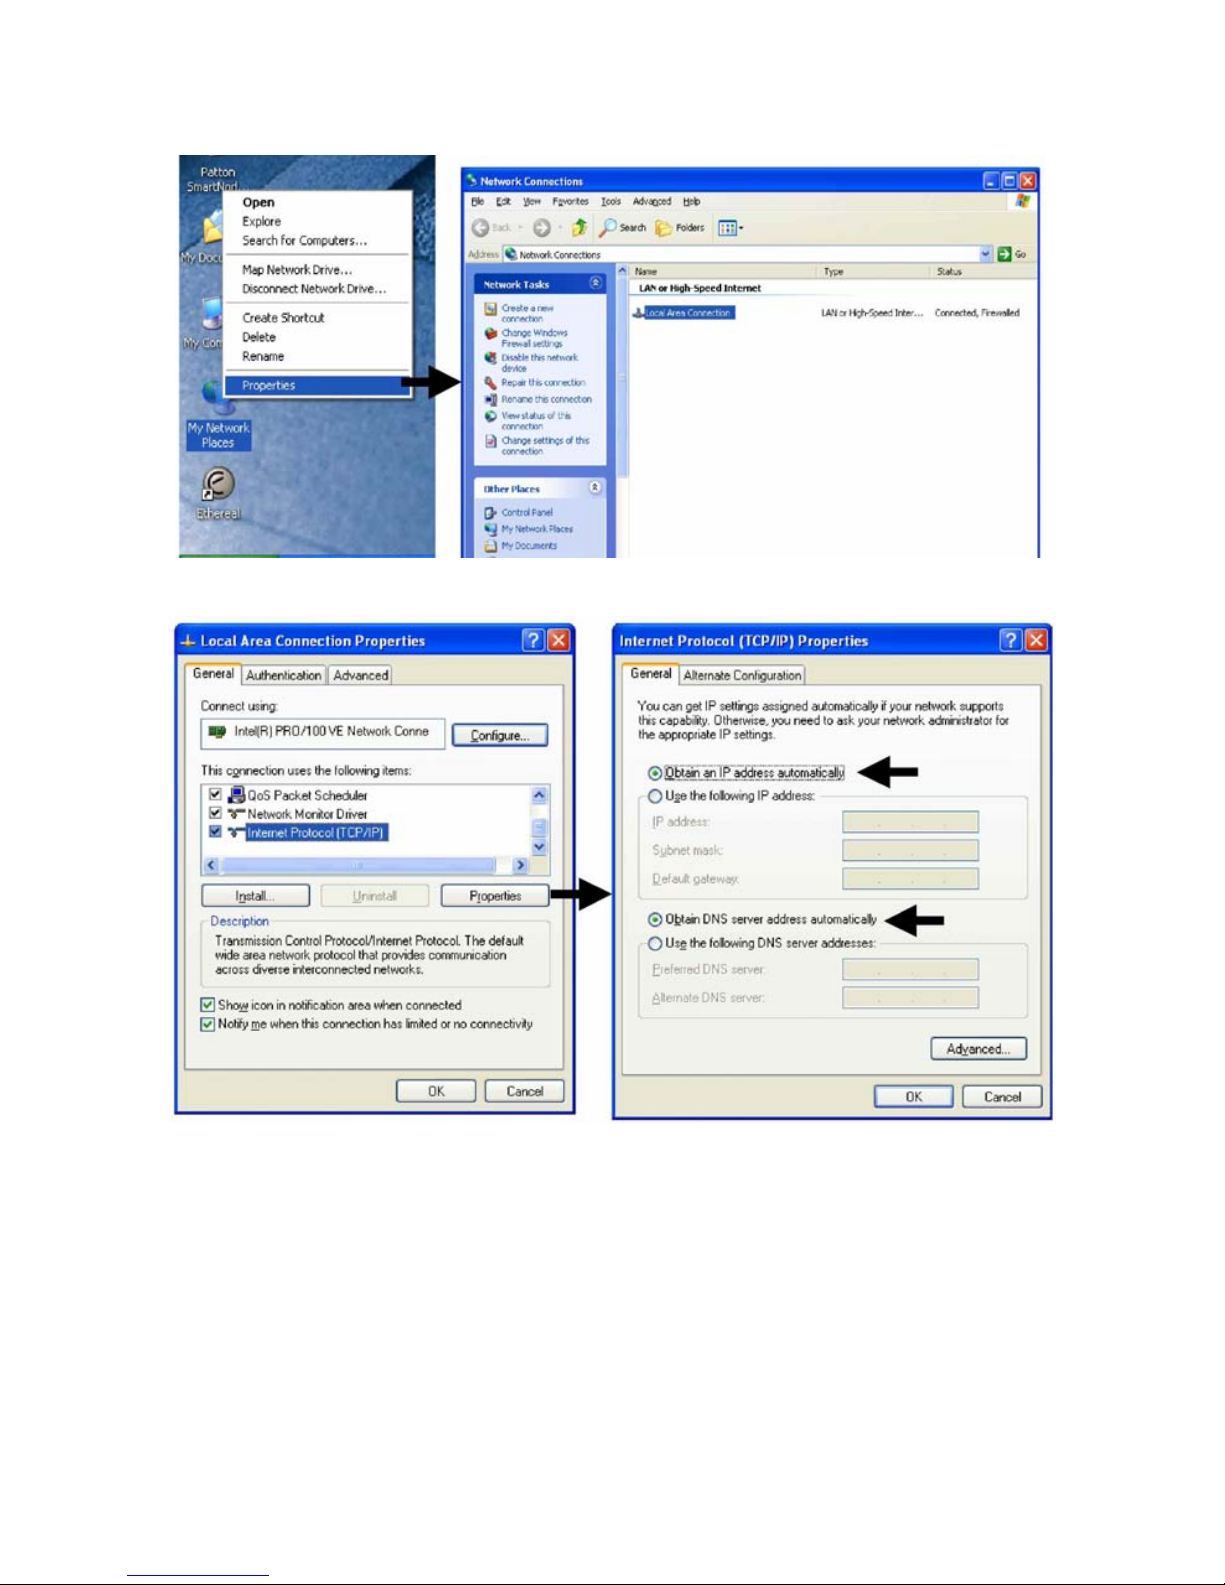
2. Right-click on
www.voipon.co.uk [email protected] Tel: +44 (0)1245 808195 Fax: +44 (0)1245 600030
(see figure 3).
Figure 3. Displaying the Network Connections window
My Network Places
and select
Properties
in the context menu
Figure 4. Displaying the Internet Properties (TCP/IP) Properties window
3. Double-click on
Internet Protocol (TCP/IP) Properties
the
4. Select
Obtain an IP address automatically
automatically
5. Click
OK
to save changes and close the properties windows.
Local Area Connection
options.
and click on
Properties
window (see figure 4).
and
Obtain DNS server address
to open
6. Using the included black Ethernet cable, connect the SmartNode RJ-45
Ethernet LAN port labeled
ETH0/1
directly to the Ethernet port on your PC
(see figure 2 on page 3).
4 SmartNode 4520 and 4110 Quick Start Guide
Page 5
Option 3: Connect the SmartNode console port to your PC
www.voipon.co.uk [email protected] Tel: +44 (0)1245 808195 Fax: +44 (0)1245 600030
(SN4520 & SN4110).
it to connect the SmartNode Console port. Refer to the
Getting Started Guide
If your PC has an RS-232 serial COM port, you may use
SmartNode 4110/4520
located on the CD-ROM shipped with your SmartNode for
the procedure.
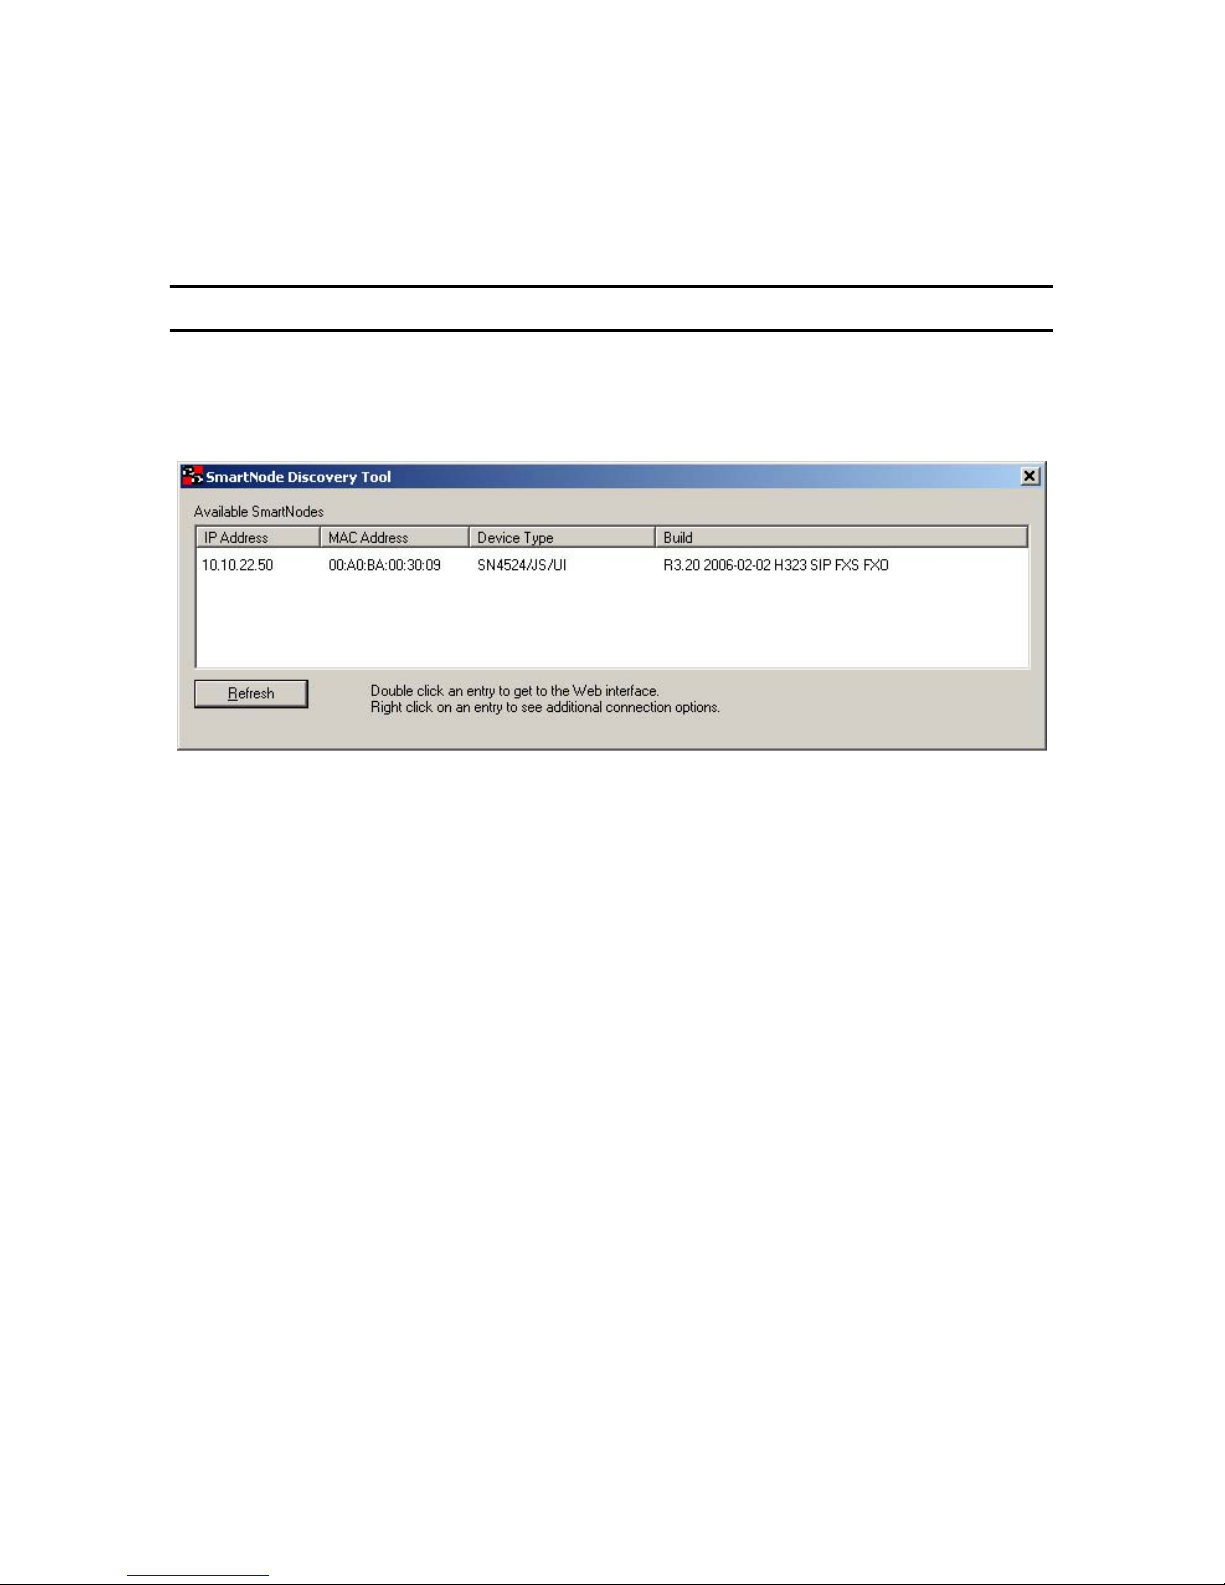
3.0 Start the SmartNode Discovery Tool
1. Insert the CD included with your SmartNode into the CD drive on your PC.
2. Copy the file named
3. At your PC, double-click the
SNDiscovery.exe
SNDiscovery.exe
from the CD to your PC.
file name to activate the tool.
The SmartNode Discovery Tool window will display the IP Address, MAC
Address, Device Type (model number) and Build (software release) of your
SmartNode.
If your SmartNode does not appear:
• Make sure the SmartNode and your PC are on the same routed subnet
• Make sure any firewall programs on your PC are disabled
SmartNode 4520 and 4110 Quick Start Guide 5
Page 6
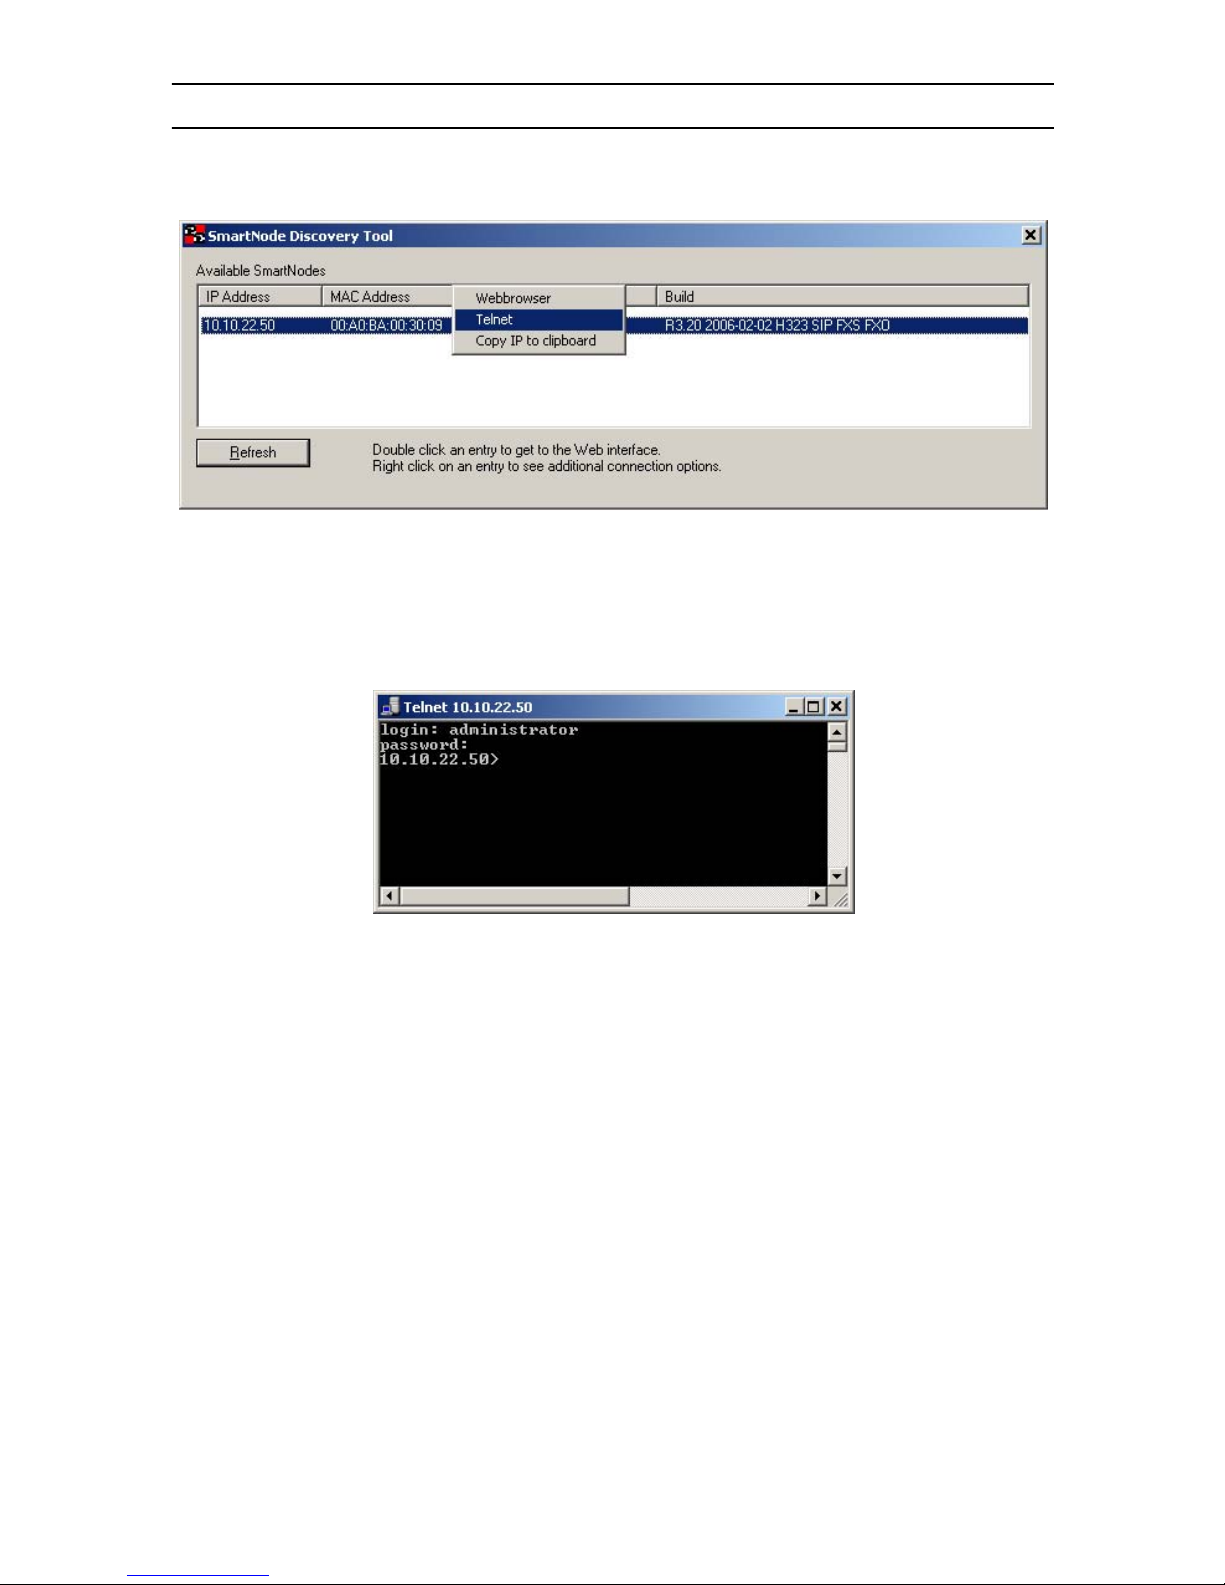
4.0 Access the Command Line Interface
www.voipon.co.uk [email protected] Tel: +44 (0)1245 808195 Fax: +44 (0)1245 600030
1. In the Discovery Tool window, select the IP address of your SmartNode.
2. Right-click the selected line, and select
3. In the telnet window, enter the username
prompt simply press the
enter
key. The SmartNode will respond by display-
Telnet
.
administrator
. At the password
ing its IP address as the command line prompt.
4. After you log in your SmartNode will be running in operator execution
mode (indicated by > character in the command line prompt). To enter configuration mode, use the commands enable and configure.
10.10.22.50>
10.10.22.50#
10.10.22.50(cfg)#
enable
configure
You may now start to configure the SmartNode from scratch using the CLI commands, but we recommend that you start your configuration from a template. See
section 5.0 “Download a configuration example, adapt it to your network, and
load it onto the SmartNode” on page 7 for further details.
For a detailed description of the CLI refer to the
tion Guide
(SCG) available on the CD-ROM and online at
SmartWare Software Configura-
www.patton.com/voip.
6 SmartNode 4520 and 4110 Quick Start Guide
Page 7
5.0 Download a configuration example, adapt it to your network,
www.voipon.co.uk [email protected] Tel: +44 (0)1245 808195 Fax: +44 (0)1245 600030
and load it onto the SmartNode
Patton provides a collection of configuration templates on the CD-ROM shipped
with your SmartNode device—and also on the support page at
www.patton.com/voip/appnotes.shtml
plates should be similar to your application so that you can use it to speed up configuring the SmartNode. Simply download to your PC the configuration note that
most closely matches your application. Adapt the configuration as described in
the configuration note to your network (remember to modify the IP address) and
copy the modified configuration to a TFTP server. The SmartNode can now load its
configuration from this server.
Note Patton regularly adds new configuration templates to the collection at
www.patton.com/voip/appnotes.shtml
application on the CD-ROM, it may have been added to the website. In addition,
www.patton.com/voip/confignotes.shtml
of configuration templates for popular SmartNode services and features.
Note If your application is unique and not covered by any of Patton’s configura-
tion templates, you can manually configure the SmartNode instead of loading a configuration file template. In that case, refer to the
Series SmartWare Software Configuration Guide
figuring the SmartNode device.
. In most cases, one of these tem-
, so if you do not see your
provides a library
SmartNode
for information on con-
In this example we assume an TFTP server resides on the host with the IP address
10.10.1.11 and the configuration file named
SN.cfg
resides in the root directory
of the TFTP server.
10.10.22.50(if-ip)[eth0]#
config
Download...100%
10.10.22.50(if-ip)[eth0]#
copy tftp://10.10.1.11/SN.cfg startup-
After you reboot the SmartNode the new startup configuration will become active.
When you issue the reload command, the SmartNode will ask
if you want to copy the running configuration to the startup
configuration. Since you just downloaded a configuration file
IMPORTANT
10.10.22.50(if-ip)[eth0]#
Running configuration has been changed.
Do you want to copy the 'running-config' to the 'startup-config'?
Press 'yes' to store, 'no' to drop changes :
Press 'yes' to restart, 'no' to cancel :
The system is going down
to the startup configuration you must answer this question with
NO
. Otherwise, the downloaded configuration will be over-
written and lost!
reload
no
yes
SmartNode 4520 and 4110 Quick Start Guide 7
Page 8
6.0 Additional Information
www.voipon.co.uk [email protected] Tel: +44 (0)1245 808195 Fax: +44 (0)1245 600030
Refer to the
the
SmartNode Getting Started Guide
SmartNode Series SmartWare Software Configuration Guide
located on the CD-ROM shipped with
and
your SmartNode device and available online at www.patton.com/manuals. For
detailed information about:
•
Installing, configuring, operating, and troubleshooting.
Warranty, trademark & compliance
•
The CD-ROM also includes many freeware and shareware tools, including TFTP
servers, and Telnet clients.
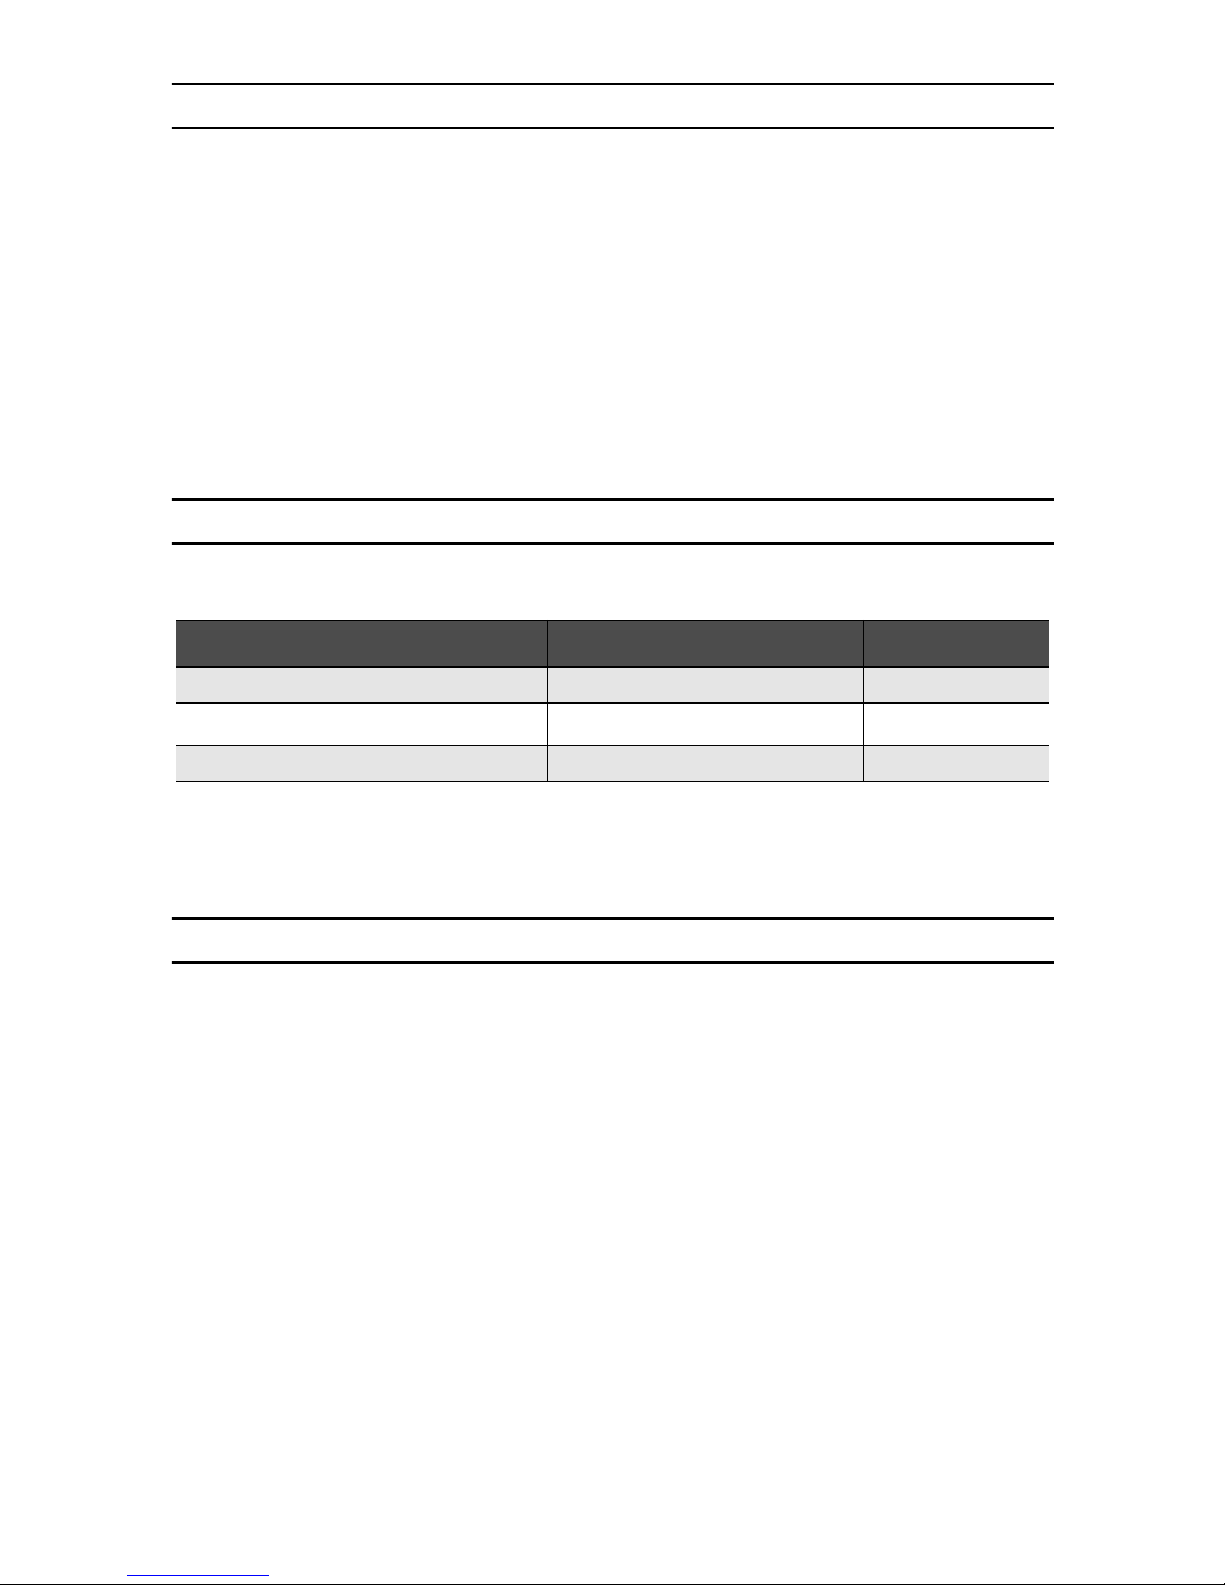
A.0 Factory default IP address information
Item
WAN interface Ethernet 0 (ETH 0/0) DHCP client DHCP client
*
LAN interface Ethernet 1 (ETH 0/1)
192.168.1.1
IP Addresss(es) Network Mask
255.255.255.0
*DHCP server address range 192.168.1.10–192.168.1.19 255.255.255.0
* The SmartNode 4520 factory-default configuration includes a DHCP server run-
ning on the ETH 0/1. All Ethernet ports are pre-configured and active.
B.0 Customer and Technical Support
Toll-Free VoIP support: call sip:[email protected] with a VoIP SIP client
Online support: www.patton.com
E-mail support: [email protected]—answered within 1 business day
Telephone support:
•
Standard: +1 (301) 975-1007 (USA), Monday–Friday: 8:00 am to 5:00 pm
EST (1300 to
2200 UTC/GMT)
Alternate: +41 (0)31 985 25 55 (Switzerland), Monday–Friday: 8:00 am to
•
5:00 pm CET (0900 to 1800 UTC/GMT)
Fax: +1 (253) 663-5693 (USA) or +41 (0)31 985 25 26 (Switzerland)
8 SmartNode 4520 and 4110 Quick Start Guide
Page 9

C.0 Compliance Information
www.voipon.co.uk [email protected] Tel: +44 (0)1245 808195 Fax: +44 (0)1245 600030
C.1 Compliance
EMC Compliance:
FCC Part 15, Class A
•
EN55022, Class A
•
EN55024
•
Safety Compliance:
UL60950-1/CSA C22.2 No. 60950-1
•
IEC 60950-1
•
EN60950-1
•
•
AS/NZS 60950-1
PSTN Regulatory Compliance:
FCC Part 68
•
CS-03
•
•
TBR-21
•
AS/ACIF S002
AS/ACIF S003
•
C.2 Radio and TV interference
The SmartNode router generates and uses radio frequency energy, and if not
installed and used properly—that is, in strict accordance with the manufacturer’s
instructions—may cause interference to radio and television reception. The SmartNode router have been tested and found to comply with the limits for a Class B
computing device in accordance with specifications in Subpart B of Part 15 of
FCC rules, which are designed to provide reasonable protection from such interference in a commercial installation. However, there is no guarantee that interference will not occur in a particular installation. If the SmartNode router does cause
interference to radio or television reception, which can be determined by disconnecting the unit, the user is encouraged to try to correct the interference by one or
more of the following measures: moving the computing equipment away from the
receiver, re-orienting the receiving antenna and/or plugging the receiving equipment into a different AC outlet (such that the computing equipment and receiver
are on different branches).
SmartNode 4520 and 4110 Quick Start Guide 9
Page 10

C.3 FCC Part 68 (ACTA) statement (FXO ports)
www.voipon.co.uk [email protected] Tel: +44 (0)1245 808195 Fax: +44 (0)1245 600030
This equipment complies with Part 68 of the FCC rules and the requirements
adopted by ACTA. On the bottom side of this equipment is a label that contains—
among other information—a product identifier in the format
US:AAEQ##TXXXX
. If requested, this number must be provided to the tele-
phone company.
The method used to connect this equipment to the premises wiring and telephone
network must comply with the applicable FCC Part 68 rules and requirements
adopted by the ACTA.
If this equipment causes harm to the telephone network, the telephone company
will notify you in advance that temporary discontinuance of service may be
required. But if advance notice isn’t practical, the telephone company will notify
the customer as soon as possible. Also, you will be advised of your right to file a
complaint with the FCC if you believe it is necessary.
The telephone company may make changes in its facilities, equipment, operations
or procedures that could affect the operation of the equipment. If this happens the
telephone company will provide advance notice in order for you to make necessary modifications to maintain uninterrupted service.
If trouble is experienced with this equipment, for repair or warranty information,
please contact our company. If the equipment is causing harm to the telephone
network, the telephone company may request that you disconnect the equipment
until the problem is resolved.
Connection to party line service is subject to state tariffs. Contact the state public
utility commission, public service commission or corporation commission
for information
C.4 Industry Canada Notice (FXO ports)
This equipment meets the applicable Industry Canada Terminal Equipment Techni-
cal Specifications. This is confirmed by the registration number. The abbreviation
IC
before the registration number signifies that registration was performed based
on a Declaration of Conformity indicating that Industry Canada technical specifications were met. It does not imply that Industry Canada approved the equipment.
This Declaration of Conformity means that the equipment meets certain telecommunications network protective, operational and safety requirements. The Department does not guarantee the equipment will operate to the user’s satisfaction.
Before installing the equipment, users should ensure that it is permissible to be
connected to the facilities of the local telecommunications company. The equipment must also be installed using an acceptable method of connection. In some
cases, the company’s inside wiring associated with a single line individual service
may be extended by means of a certified connector assembly (telephone extension cord). The customer should be aware that compliance with the above condition may not prevent degradation of service in some situations. Repairs to some
certified equipment should be made by an authorized maintenance facility designated by the supplier. Any repairs or alterations made by the user to this equip-
10 SmartNode 4520 and 4110 Quick Start Guide
Page 11

ment, or equipment malfunctions, may give the telecommunications company
www.voipon.co.uk [email protected] Tel: +44 (0)1245 808195 Fax: +44 (0)1245 600030
cause to request the user to disconnect the equipment. Users should ensure for
their own protection that the ground connections of the power utility, telephone
lines and internal metallic water pipe system, are connected together. This protection may be particularly important in rural areas.
C.5 EC Declaration of Conformity
(See section C.7 “EG-Konformitätserklärung” for German version.)
Product Description: SmartNode 4110 and 4520 Series
The products described above in the form as delivered are in conformity with the
provisions of the following European Directive:
R&TTE Directive 1999/5/EC
Guidelines of the European Parliament and the Committee for the Harmonization of the Legal Regulations of the Member States concerning
radio equipment and telecommunications terminal equipment and the
mutual recognition of their conformity.
The safety advice in the documentation accompanying the
products shall be obeyed. The conformity to the above directive
is indicated by the CE sign on the device.
The signed Declaration of Conformity can be downloaded from
www.patton.com/certifications/.
C.6 Approval
Models that are equipped with FXO ports have been approved for connection to the
public telecommunication network.
C.7 EG-Konformitätserklärung
(see section C.5 “EC Declaration of Conformity” for English version)
Produktbezeichnung: SmartNode 4110 und 4520
Die bezeichneten Produkte stimmen in der von uns in Verkehr gebrachten
Ausführung mit den Vorschriften folgender Richtlinie überein:
R&TTE 1999/5/EG
Richtlinie des europäischen Parlaments und des Rates zur Angleichung
der Rechtsvorschriften der Mitgliedstaaten über Funkanlagen und
Telekommunikations-Endeinrichtungen und die gegenseitige
Anerkennung ihrer Konformität.
Die Sicherheitshinweise in der mitgelieferten
Produktdokumentation sind zu beachten. Die Konformität mit
der oben erwähnten Richtlinie wird durch das CE-Zeichen auf
dem Gerät bestätigt.
SmartNode 4520 and 4110 Quick Start Guide 11
Page 12

Die unterzeichnete Konformitätserklärung kann heruntergeladen werden von:
www.voipon.co.uk [email protected] Tel: +44 (0)1245 808195 Fax: +44 (0)1245 600030
www.patton.com/certifications/.
C.8 Zulassung
Der SmartNode ist für die Anschaltung an das öffentliche Telekommunikationsnetz
zugelassen. Er darf durch jedermann an eine FXO Schnittstelle angeschlossen und
in Betrieb genommen werden.
Copyright statement
Copyright © 2005–2006, Patton Electronics Company. All rights reserved.
The information in this document is subject to change without notice. Patton Elec-
tronics assumes no liability for errors that may appear in this document.
Trademarks statement
The term
SmartNode
is a trademark of Patton Electronics Company. All other
trademarks presented in this document are the property of their
respective owners.
Warranty
For warranty information, refer to the
ting Started Guide
located on the CD-ROM that came with your IAD or available
Models SN4110 and SN4520 Series Get-
online at www.patton.com.
In accordance with the requirements of council directive
2002/96/EC on Waste of Electrical and Electronic Equipment
(WEEE), ensure that at end-of-life you separate this product
from other waste and scrap and deliver to the WEEE collection
system in your country for recycling.
12 SmartNode 4520 and 4110 Quick Start Guide
 Loading...