

Page 1

ForeSight 6300
Network Management System
Quick Start Guide
Document Number: 09203U7-001 Rev. A
Part Number: 07MFS6300-QS
Revised: April 18, 2008
Sales Office: +1 (301) 975-1000
Technical Support: +1 (301) 975-1007
E-mail: support@patton.com
WWW: www.patton.com
Page 2
1.0 Mechanical overview
Mount the Linux server hardware on a four-post rack cabinet using the mounting accessories supplied.
•
Mount the monitor and keyboard assembly on a 4-post rack/cabinet structure as per the manufacturer's
•
instruction.
2.0 Power up
1.
Connect one side of the supplied power cable to a power outlet and the other side to the power connector
located at the rear panel of the server.
2.
Connect the eth0 RJ45 Ethernet port to a switch or a hub using a straight-through Ethernet cable.
Note
eth0 is the Ethernet port on the left while viewing the rear of the server.
3.
Connect the monitor and keyboard assembly to the server, following the manufacturer's instructions.
4.
Turn on the power buttons on the monitor and on the server.
5.
The server is pre-configured with Linux and the FS6300 NMS installed, and it is ready to run.
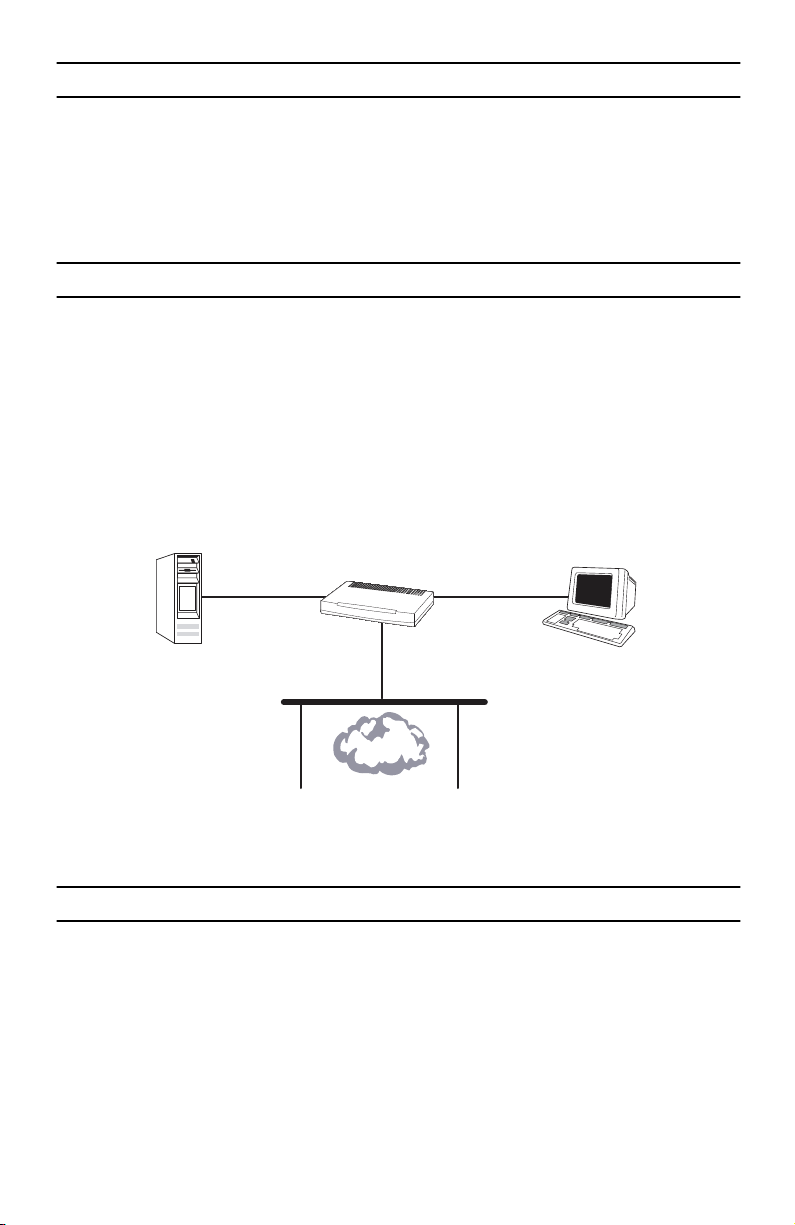
Switch/Hub
Linux box
(server)
Network
Figure 1.
Network diagram for FS6300 NMS
3.0 Log into the Linux box
Log into the Linux box with the following information:
Username:
Password:
2
patton
patton
WRAC
(Windows Remote
Application Client)
ForeSight 6300 NMS Quick Start Guide
Page 3

4.0 Verify the eth0 interface is ‘up’
1.
Open-up a new Terminal window in the Linux box and verify the IP address and gateway.
Using the CLI, type:
#sudo ifconfig
password: ***** //Your user password is ‘patton’.
2.
Verify that the IP address, netmask, and gateway for eth0 is listed and the status is ‘up’.
3.
If eth0 is not listed or active, configure eth0. Bring up the ethernet configuration GUI by typing the ‘neat’
command:
#sudo neat
4.
Configure the IP address, subnet mask, and default gateway. Then, activate eth0 and save the configuration.
5.0 Activate IP Forwarding
1.
Check if IP forwarding is activated using the following command:
#sudo sysctl net.ipv4.ip_forward
Or, you can also use the command below:
#sudo cat /proc/sys/net/ipv4/ip_forward
2.
If the resulting value is 0, IP forwarding is not activated. You will need to activate the service using the
following command:
#sudo sysctl -w net.ipv4.ip_forward=1
Or, you can also use the command below:
#sudo echo 1 > /proc/sys/net/ipv4/ip_forward
ForeSight 6300 NMS Quick Start Guide
3
Page 4

6.0 Set up the physical connection
1.
Connect the switch to an Ethernet port of the Patton WRAC workstation with a straight-through cable as
shown in Figure 1 on page 2. Or, connect to a WAN port of a SmartNode or router. Refer to the
Started Guide
for more information.
Getting
The WRAC workstation operates with the factory default settings:
Default IP Address:
Default gateway:
192.168.254.2/24
192.168.254.1
7.0 Test the connection
1.
Check the connection between the server and the PC by typing the following command from the Linux
box:
#ping 192.168.254.2
192.168.254.2
is the default IP address of the WRAC workstation.
8.0 Start the FS6300 NMS
The Server and the WRAC PC are now physically connected and you may start up the FS6300 NMS server.
8.1 Open the server launcher file
To start the server, from the directory where the FS6300 server software resides, i.e.
FS6300_1_xxx
. From the terminal session, execute these commands:
#ls
// The files in this directory will be displayed,
// which includes the shell command WebNMSLauncher.sh
#sudo -b ./WebNMSLauncher.sh
// The launcher will be displayed.
#
/opt/FS6300/
8.2 Run the FS6300 NMS server
On the splash screen window, there are icons in the top pane of the window.
1.
Right-click on
2.
In the resulting pop-up window [FS6300 Grant Permission Window], enter the IP address of the WRAC
workstation–
3.
Press
4
Grant Permission
192.168.254.2
and select
.
Run
.
Grant. Verify that the IP address is successfully granted. Close the window.
ForeSight 6300 NMS Quick Start Guide
Page 5

4.
Right-click on
5.
Right-click on
6.
At the end of the start-up log, the following message will display:
….please connect your client to the web server on port:6300
The server is ready to be connected to the network and the remote application client.
Reinitialize 6300NMS
Start 6300NMS Server
and select
and select
Run.
Run
.
9.0 Run the Application Client
1.
Power up the FS6300 Windows PC workstation.
2.
Log into the PC with the username:
3.
On the desktop, double-click on the WRAC icon.
4.
A splash screen will display with icons for the Application Client, Web Client and Set Server IP Address.
5.
Right-click on the
6.
A pop-up window will display. Enter the following information:
Host:
192.168.254.1
Port:
6300
Username:
Password:
7.
Press
Connect to Server
instructions on how to operate and manage features in the Application Client.
Application Client
superuser
superuser
and the WRAC GUI will display. Refer to the
patton
and password:
icon and select
Run
.
patton
.
Getting Started Guide
for detailed
10.0 Additional information
For detailed information about installing, configuring, operating, and troubleshooting, refer to the
6300 NMS Getting Started Guide
ton CD-ROM or at
ForeSight 6300 NMS Quick Start Guide
www.patton.com/manuals
and the
ForeSight 6300 NMS Administrator’s Reference Guide
.
on the enclosed Pat-
ForeSight
5
Page 6

Copyright statement
Copyright © 2008, Patton Electronics Company. All rights reserved.
The information in this document is subject to change without notice. Patton Electronics assumes no
liability for errors that may appear in this document.
Trademarks statement
The term
ForeSight
is a trademark of Patton Electronics Company. All other trademarks presented in this docu-
ment are the property of their respective owners.
Patton support headquarters in the USA
•
Online support: Available at
•
E-mail support: E-mail sent to
•
Telephone support: Standard telephone support is available five days a week—from
5:00 pm EST (1300
•
Support via VoIP: Contact Patton free of charge by using a VoIP ISP phone to call
•
Fax:
+1 (253) 663-5693
www.patton.com
support@patton.com
to
2200 UTC/GMT
will be answered within 1 business day
)—by calling
+1 (301) 975-1007
8:00 am
to
sip:support@patton.com
Alternate Patton support for Europe, Middle East, and Africa (EMEA)
Telephone support: Standard telephone support is available five days a week—from
•
5:00 pm CET (0900
Fax:
+41 (0)31 985 25 26
•
to
1800 UTC/GMT
)—by calling
+41 (0)31 985 25 55
8:00 am
to
Note
For additional service and support information, refer to the “Contacting Patton for assistance” chapter
of the
ForeSight 6300 NMS Getting Started Guide
available online at www.patton.com.
located on the CD-ROM that came with your NMS or
Warranty, Trademark, & Compliance Information
For warranty, trademark and compliance information, refer to the
ForeSight 6300 NMS
located on the CD-ROM that came with your NMS or available online at
6
Getting Started Guide
www.patton.com
ForeSight 6300 NMS Quick Start Guide
.
Page 7

NOTES
____________________________________________________________________
____________________________________________________________________
____________________________________________________________________
____________________________________________________________________
____________________________________________________________________
____________________________________________________________________
____________________________________________________________________
____________________________________________________________________
____________________________________________________________________
____________________________________________________________________
____________________________________________________________________
____________________________________________________________________
____________________________________________________________________
____________________________________________________________________
____________________________________________________________________
____________________________________________________________________
ForeSight 6300 NMS Quick Start Guide
7
Page 8

NOTES
____________________________________________________________________
____________________________________________________________________
____________________________________________________________________
____________________________________________________________________
____________________________________________________________________
____________________________________________________________________
____________________________________________________________________
____________________________________________________________________
____________________________________________________________________
____________________________________________________________________
____________________________________________________________________
____________________________________________________________________
____________________________________________________________________
____________________________________________________________________
____________________________________________________________________
____________________________________________________________________
8
ForeSight 6300 NMS Quick Start Guide
 Loading...