

Page 1
CopperLink™ Model 1101
Line Power PoE Ethernet Extender
User Manual
This is a Class A device and is not intended for use in a residential environment.
Sales Office: +1 (301) 975-1000
Technical Support: +1 (301) 975-1007
E-mail: support@patton.com
Part Number: 07MCL1101-UM, Rev. A
WWW: www.patton.com
Revised: September 22, 2016
Page 2

Patton Electronics Company, Inc.
7622 Rickenbacker Drive
Gaithersburg, MD 20879 USA
Tel: +1 (301) 975-1000
Fax: +1 (301) 869-9293
Support: +1 (301) 975-1007
Web: www.patton.com
E-mail: support@patton.com
Trademark Statement
The term CopperLink is a trademark of Patton Electronics Company. All other trade-
marks presented in this document are the property of their respective owners.
Copyright © 2016, Patton Electronics Company. All rights reserved.
The information in this document is subject to change without notice. Patton
Electronics assumes no liability for errors that may appear in this document.
Warranty Information
Patton Electronics warrants all CopperLink components to be free from defects, and
will—at our option—repair or replace the product should it fail within one year from
the first date of the shipment.
This warranty is limited to defects in workmanship or materials, and does not cover
customer damage, abuse or unauthorized modification. If the product fails to perform
as warranted, your sole recourse shall be repair or replacement as described above.
Under no condition shall Patton Electronics be liable for any damages incurred by the
use of this product. These damages include, but are not limited to, the following: lost
profits, lost savings and incidental or consequential damages arising from the use of or
inability to use this product. Patton Electronics specifically disclaims all other warran
ties, expressed or implied, and the installation or use of this product shall be deemed
an acceptance of these terms by the user.
-
Page 3

Summary Table of Contents
1 General information ..........................................................................................................................................11
2 Installation ............................................................
3 Operation.......
4 Contacting Patton for assistance.....................................................
A Compliance Information ..............................
B Specifications ....................................................................................................................................................34
C Factory Replacement Parts and Accessories ................................................
D Interface Pin Assignment ...........................................
E Line Rate & Reach Chart ...........
...................................................................................................................................................26
.......................................................................................................................42
............................................................................................19
....................................................................28
.....................................................................................................31
........................................................36
.......................................................................................38
3
Page 4

Table of Contents
Summary Table of Contents ...................................................................................................................................3
Table of Contents ...................................................................................................................................................4
List of Figures .........................................................................................................................................................6
List of Tables ..........................................................................................................................................................7
About This Guide ..................................................................................................................................................8
Safety When Working With Electricity .............................................................................................................9
1 General information ..................................................................................
Overview ...............................................................................................................................................................12
Features .................................................................................................................................................................12
Description............................................................................................................................................................12
Unit Definitions....................................................................................................................................................13
Data ......................................................................................................................................................................13
Power ....................................................................................................................................................................13
Front panel description..........................................................................................................................................15
Power Transmission ..............................................................................................................................................16
General Background .......................................................................................................................................16
Wire Specifics .................................................................................................................................................17
CL1101 specifics .............................................................................................................................................18
2 Installation ..........
Planning the Installation........................................................................................................................................20
Connecting the Line Interface ...............................................................................................................................20
Connecting the RJ-45 Line Interface ..............................................................................................................21
Connecting the Terminal Block Line Interface ...............................................................................................22
Connecting the BNC (Coaxial) Line Interface ................................................................................................22
Connecting the 10/100Base-T Ethernet Interface..................................................................................................22
Connecting the Grounding Stud ...........................................................................................................................23
Connecting Power.................................................................................................................................................24
Configuring the DIP Switch..................................................................................................................................24
..............................................................................................................................................19
........................................................11
3 Operation...................................
Introduction..........................................................................................................................................................27
Front Panel LED Status Indicators ........................................................................................................................27
4 Contacting Patton for assistance............................................................................
Introduction..........................................................................................................................................................29
Contact information..............................................................................................................................................29
Warranty Service and Returned Merchandise Authorizations (RMAs)...................................................................29
Warranty Coverage .........................................................................................................................................29
Out-of-Warranty Service .................................................................................................................................29
Returns for Credit ...........................................................................................................................................29
RMA Numbers ...............................................................................................................................................30
.......................................................................................................................26
.............................................28
4
Page 5

CopperLink Line Power 1101 PoE Extender User Manual
Shipping Instructions ......................................................................................................................................30
A Compliance Information ...............................................................................................
....................................31
Regulatory Information.........................................................................................................................................32
EMC Directive: ..............................................................................................................................................32
Low-Voltage Directive (Safety): ......................................................................................................................32
PSTN: ............................................................................................................................................................32
Radio and TV Interference (FCC Part 15) ............................................................................................................32
CE Declaration of Conformity ..............................................................................................................................32
Authorized European Representative .....................................................................................................................32
Service ...................................................................................................................................................................33
B Specifications .........................................
...........................................................................................................34
Line Connector .....................................................................................................................................................35
LAN Connectors ...................................................................................................................................................35
Transmission Line .................................................................................................................................................35
LED Status Indicators ...........................................................................................................................................35
Power Supply ........................................................................................................................................................35
External AC option: ........................................................................................................................................35
Physical .................................................................................................................................................................35
Operating Temperature Range ........................................................................................................................35
Humidity ........................................................................................................................................................35
Dimensions .....................................................................................................................................................35
C Factory Replacement Parts and Accessories ...............................................................
.........................................36
CL1101/CL1101 Factory Replacement Parts and Accessories ...............................................................................37
D Interface Pin Assignment ........................................................
..........................................................................38
10/100Base-T Interface .........................................................................................................................................39
Ethernet (RJ-45) .............................................................................................................................................39
Line Interface ........................................................................................................................................................40
RJ-45 .............................................................................................................................................................40
Terminal Block ...............................................................................................................................................40
BNC (Coaxial) ................................................................................................................................................41
E Line Rate & Reach Chart ......
............................................................................................................................42
CL1101 Power & Data Performance (Twisted Pair)..............................................................................................43
CL1101 Power Performance (Twisted Pair) ..........................................................................................................43
CL1101 Power & Data Performance (RG59)........................................................................................................44
CL1101 Power Performance (RG59) ....................................................................................................................44
5
Page 6

List of Figures
1 Typical application . . . . . . . . . . . . . . . . . . . . . . . . . . . . . . . . . . . . . . . . . . . . . . . . . . . . . . . . . . . . . . . . . . . . . . 12
2 Data path . . . . . . . . . . . . . . . . . . . . . . . . . . . . . . . . . . . . . . . . . . . . . . . . . . . . . . . . . . . . . . . . . . . . . . . . . . . . . 13
3 Power supply and data paths for power-across-link application . . . . . . . . . . . . . . . . . . . . . . . . . . . . . . . . . . . . . 14
4 Power supply and data paths for remote-power application . . . . . . . . . . . . . . . . . . . . . . . . . . . . . . . . . . . . . . . . 14
5 CL1101 front panels . . . . . . . . . . . . . . . . . . . . . . . . . . . . . . . . . . . . . . . . . . . . . . . . . . . . . . . . . . . . . . . . . . . . . 15
6 Power supply and data paths for remote-power application . . . . . . . . . . . . . . . . . . . . . . . . . . . . . . . . . . . . . . . . 16
7 RJ-45 pin-out . . . . . . . . . . . . . . . . . . . . . . . . . . . . . . . . . . . . . . . . . . . . . . . . . . . . . . . . . . . . . . . . . . . . . . . . . . 21
8 CL1101 10/100Base-T RJ-45 Connector Pin-out . . . . . . . . . . . . . . . . . . . . . . . . . . . . . . . . . . . . . . . . . . . . . . 22
9 4-position DIP switch . . . . . . . . . . . . . . . . . . . . . . . . . . . . . . . . . . . . . . . . . . . . . . . . . . . . . . . . . . . . . . . . . . . . 24
10 CL1101 10/100Base-T RJ-45 Connector Pin-out . . . . . . . . . . . . . . . . . . . . . . . . . . . . . . . . . . . . . . . . . . . . . . 39
11 RJ-45 pin-out . . . . . . . . . . . . . . . . . . . . . . . . . . . . . . . . . . . . . . . . . . . . . . . . . . . . . . . . . . . . . . . . . . . . . . . . . . 40
6
Page 7

List of Tables
1 RJ-45 wire modes . . . . . . . . . . . . . . . . . . . . . . . . . . . . . . . . . . . . . . . . . . . . . . . . . . . . . . . . . . . . . . . . . . . . . . . 21
2 Terminal block wire modes . . . . . . . . . . . . . . . . . . . . . . . . . . . . . . . . . . . . . . . . . . . . . . . . . . . . . . . . . . . . . . . . 22
3 Coaxial (BNC) wire modes . . . . . . . . . . . . . . . . . . . . . . . . . . . . . . . . . . . . . . . . . . . . . . . . . . . . . . . . . . . . . . . . 22
4 RJ-45 wire modes . . . . . . . . . . . . . . . . . . . . . . . . . . . . . . . . . . . . . . . . . . . . . . . . . . . . . . . . . . . . . . . . . . . . . . . 23
5 DIP switch settings . . . . . . . . . . . . . . . . . . . . . . . . . . . . . . . . . . . . . . . . . . . . . . . . . . . . . . . . . . . . . . . . . . . . . . 25
6 LED status descriptions . . . . . . . . . . . . . . . . . . . . . . . . . . . . . . . . . . . . . . . . . . . . . . . . . . . . . . . . . . . . . . . . . . 27
7 Remote unit PoE LVL LED definitions . . . . . . . . . . . . . . . . . . . . . . . . . . . . . . . . . . . . . . . . . . . . . . . . . . . . . . 27
8 RJ-45 wire modes . . . . . . . . . . . . . . . . . . . . . . . . . . . . . . . . . . . . . . . . . . . . . . . . . . . . . . . . . . . . . . . . . . . . . . . 39
9 RJ-45 wire modes . . . . . . . . . . . . . . . . . . . . . . . . . . . . . . . . . . . . . . . . . . . . . . . . . . . . . . . . . . . . . . . . . . . . . . . 40
10 Terminal block wire modes . . . . . . . . . . . . . . . . . . . . . . . . . . . . . . . . . . . . . . . . . . . . . . . . . . . . . . . . . . . . . . . . 40
11 Coaxial (BNC) wire modes . . . . . . . . . . . . . . . . . . . . . . . . . . . . . . . . . . . . . . . . . . . . . . . . . . . . . . . . . . . . . . . . 41
12 CL1101 power & data performance over twisted-pair wires . . . . . . . . . . . . . . . . . . . . . . . . . . . . . . . . . . . . . . . 43
13 CL1101 power performance over twisted-pair wires . . . . . . . . . . . . . . . . . . . . . . . . . . . . . . . . . . . . . . . . . . . . . 43
14 CL1101 power & data performance over RG59 coaxial cable . . . . . . . . . . . . . . . . . . . . . . . . . . . . . . . . . . . . . . 44
15 CL1101 power performance over RG59 coaxial cable . . . . . . . . . . . . . . . . . . . . . . . . . . . . . . . . . . . . . . . . . . . . 44
7
Page 8

CopperLink Line Power 1101 PoE Extender User Manual About This Guide
T
About This Guide
This guide describes the CopperLink Model 1101 hardware, installation, and basic configuration.
Audience
This guide is intended for the following users:
• Operators
• Installers
• Maintenance technicians
Structure
This guide contains the following chapters and appendices:
• Chapter 1 on page 11 provides information about CL1101 features and capabilities
• Chapter 2 on page 19 provides information about installing and configuring the CL1101
• Chapter 3 on page 26 provides information about the CL1101 operation
• Chapter 4 on page 28 explains how to contact Patton for support
• Appendix A on page 31 provides compliance information for the CL1101
• Appendix B on page 34 provides specifications for the CL1101
• Appendix C on page 36 provides a table of replacements for parts and accessories
• Appendix D on page 38 provides diagrams of detailed pin assignments
• Appendix E on page 42 provides CL1101 power and data performance values for RG59 coaxial and
twisted-pair cables
For best results, read the contents of this guide before you install the CopperLink 1101.
Precautions
Notes and cautions, which have the following meanings, are used throughout this guide to help you become
aware of potential Router modem problems. Warnings relate to personal injury issues, and Cautions refer to
potential property damage.
Note A note presents addition.al information or interesting sidelights.
The alert symbol and IMPORTANT heading calls attention to
important information.
IMPORTAN
8
Page 9
CopperLink Line Power 1101 PoE Extender User Manual About This Guide
CAUTION
CAUTION
The alert symbol and CAUTION heading indicate a potential
hazard. Strictly follow the instructions to avoid property
damage.
The shock hazard symbol and CAUTION heading indicate a
potential electric shock hazard. Strictly follow the instructions to
avoid property damage caused by electric shock.
The alert symbol and WARNING heading indicate a potential safety hazard. Strictly follow the warning instructions
to avoid personal injury.
WARNING
The shock hazard symbol and WARNING heading indicate
a potential electric shock hazard. Strictly follow the warn
ing instructions to avoid injury caused by electric shock.
WARNING
-
Safety When Working With Electricity
• For devices with an external power adapter, the power
adapter shall be a listed Limited Power Source. The
WARNING
mains outlet that is utilized to power the device shall be
within 10 feet (3 meters) of the device, shall be easily
accessible, and protected by a circuit breaker in compli
ance with local regulatory requirements.
• For AC powered devices, ensure that the power cable
used meets all applicable standards for the country in
which it is to be installed.
• For AC powered devices which have 3 conductor power
plugs (L1, L2 & GND or Hot, Neutral & Safety/Protective
Ground), the wall outlet (or socket) must have an earth
ground.
• For DC powered devices, ensure that the interconnecting
cables are rated for proper voltage, current, anticipated
temperature, flammability, and mechanical serviceability.
• Do not work on the device or connect or disconnect
cables during periods of lightning activity.
-
9
Page 10

CopperLink Line Power 1101 PoE Extender User Manual About This Guide
In accordance with the requirements of council directive 2002/
96/EC on Waste of Electrical and Electronic Equipment
(WEEE), ensure that at end-of-life you separate this product
from other waste and scrap and deliver to the WEEE collection
system in your country for recycling.
This device contains no user serviceable parts. This
device can only be repaired by qualified service personnel.
WARNING
Electrostatic Discharge (ESD) can damage equipment and
CAUTION
impair electrical circuitry. It occurs when electronic printed cir
cuit cards are improperly handled and can result in complete or
intermittent failures. Do the following to prevent ESD:
-
• Always follow ESD prevention procedures when removing
and replacing cards.
• Wear an ESD-preventive wrist strap, ensuring that it makes
good skin contact. Connect the clip to an unpainted surface of
the chassis frame to safely channel unwanted ESD voltages
to ground.
• To properly guard against ESD damage and shocks, the wrist
strap and cord must operate effectively. If no wrist strap is
available, ground yourself by touching the metal part of the
chassis.
10
Page 11

Chapter 1 General information
Chapter contents
Overview ...............................................................................................................................................................12
Features .................................................................................................................................................................12
Description............................................................................................................................................................12
Unit Definitions....................................................................................................................................................13
Data ......................................................................................................................................................................13
Power ....................................................................................................................................................................13
Power-across-link application ....................................................................................................................13
Remote-power application ........................................................................................................................14
Front panel description..........................................................................................................................................15
Power Transmission ..............................................................................................................................................16
General Background .......................................................................................................................................16
Wire Specifics .................................................................................................................................................17
CL1101 specifics .............................................................................................................................................18
11
Page 12
CopperLink 1101 Line Power PoE Extender User Manual 1 • General information
Overview
Thank you for purchasing this Patton Electronics product. This product has been thoroughly inspected and
tested and is warranted for one year for parts and labor. If any questions or problems arise during installation or
use of this product, contact Patton Electronics Technical Support at +(301) 975-1007.
Features
• Ethernet Extension—Extends 10/100Base-TX Ethernet over 3,000 feet using 2-wire, 24-AWG twisted-
pair, Cat 3, Cat 5e/6/7, or coaxial cable.
• Delivers PoE—PowerPlus technology powers up both the remote CopperLink extender and the PoE
enabled device connected to it. No power is required at the remote location.
• Transparent LAN Bridging—Passes higher layer protocols, including 802.1Q VLAN tagged and untagged
packets. Fully transparent to various video compression schemes such as WMV, MPEG-4 and MJPEG.
Description
The Patton Electronics CL1101 Power over Ethernet (PoE) Ethernet Extenders provide Ethernet communication and (depending on the model) power across 2-wire, 24-AWG twisted-pair; Cat 3; Cat 5e/6/7; or
coaxial
cable:
• The CL1101 transmits at 10 or 100 Mbps.
• The two endpoints must both operate at the same bandwidth.
• The CL1101 operates only in full-duplex mode.
• The actual data rate and power delivered by the CL1101 depends on line quality.
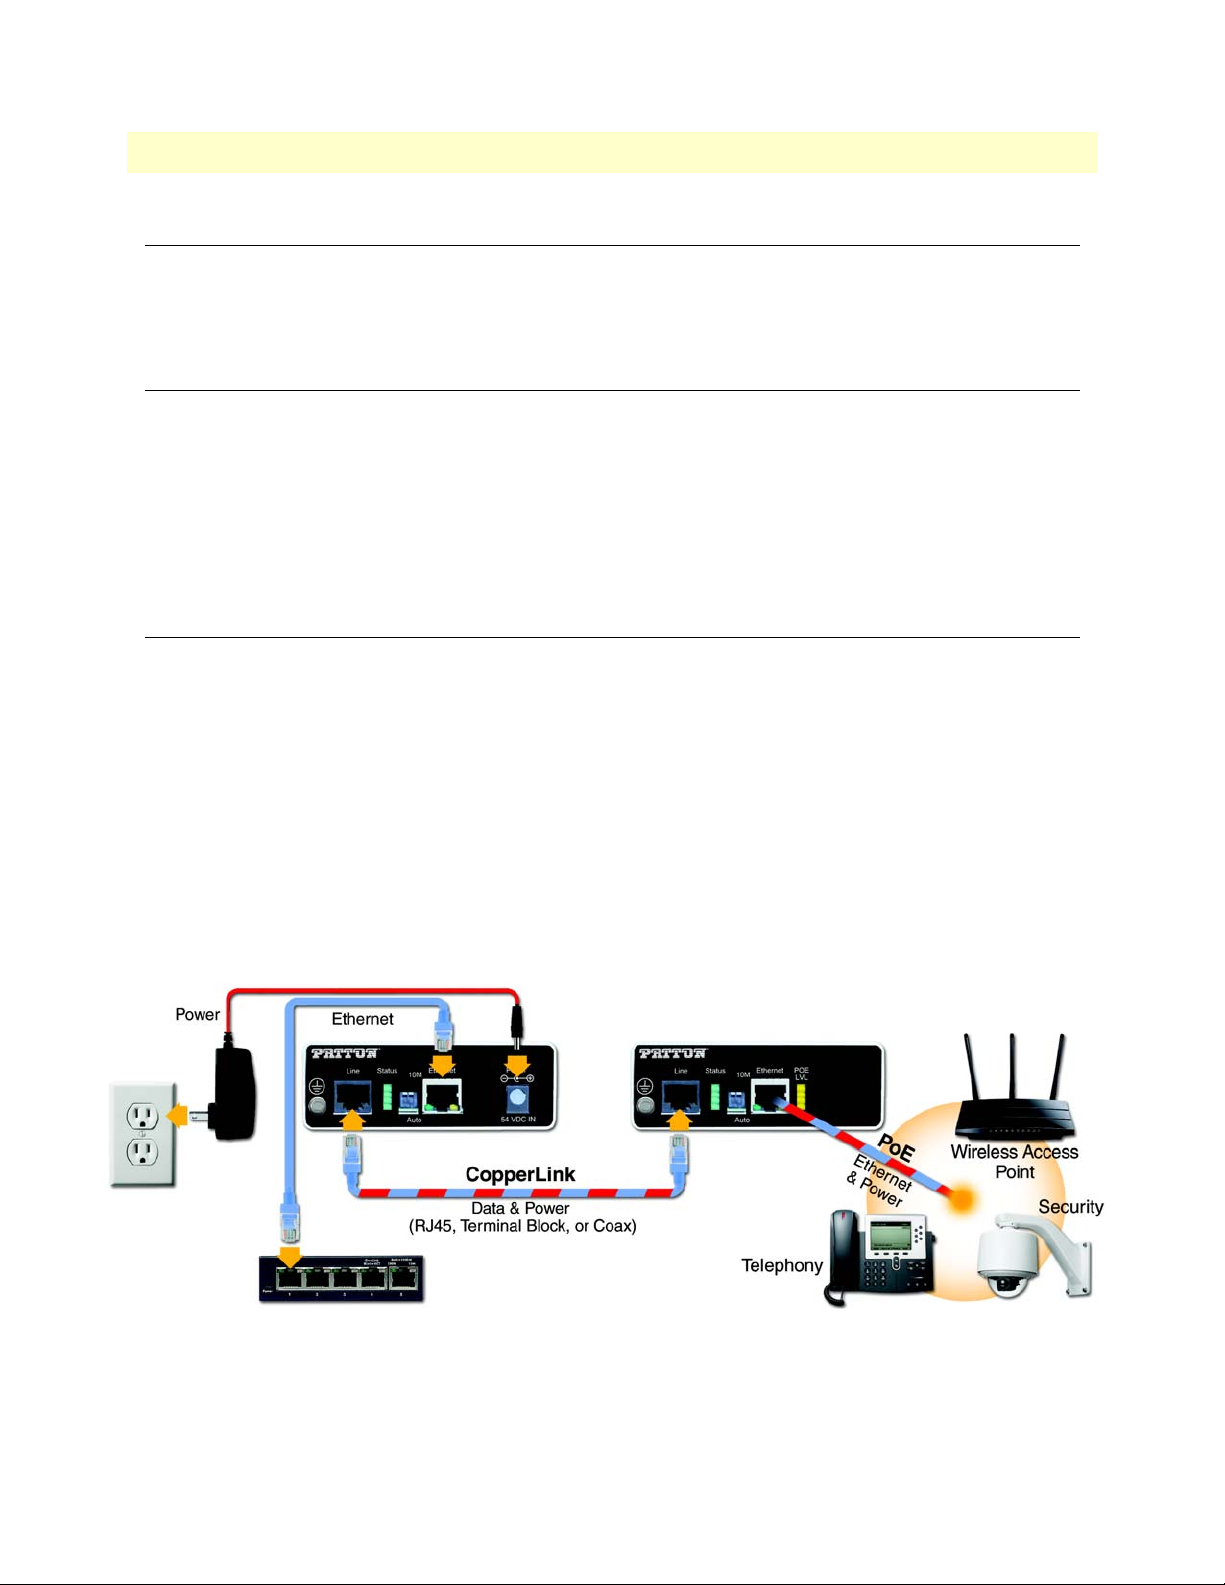
The CopperLink 1101 enables Ethernet connectivity over previously installed copper infrastructure. The solution breathes new life into circuits deployed for such traditional non-IP applications as RS232/485 controls,
alarms, CCTV, analog phones, intercom speakers, and others.
Figure 1 shows a typical application.
Figure 1. Typical application
Overview 12
Page 13
CopperLink 1101 Line Power PoE Extender User Manual 1 • General information
Unit Definitions
Local Customer Endpoint (LCE)—Customer equipment that is typically closer to the centralized location.
This is often times a server or a network switch.
Remote Customer Endpoint (RCE)—Customer equipment that is typically far away from other devices. It is
often a phone, camera, or other small device.
Local (L) Ethernet Extender—The extender closer to the Local Customer Endpoint.
Remote (R) Ethernet Extender—The extender closer to the Remote Customer Endpoint.
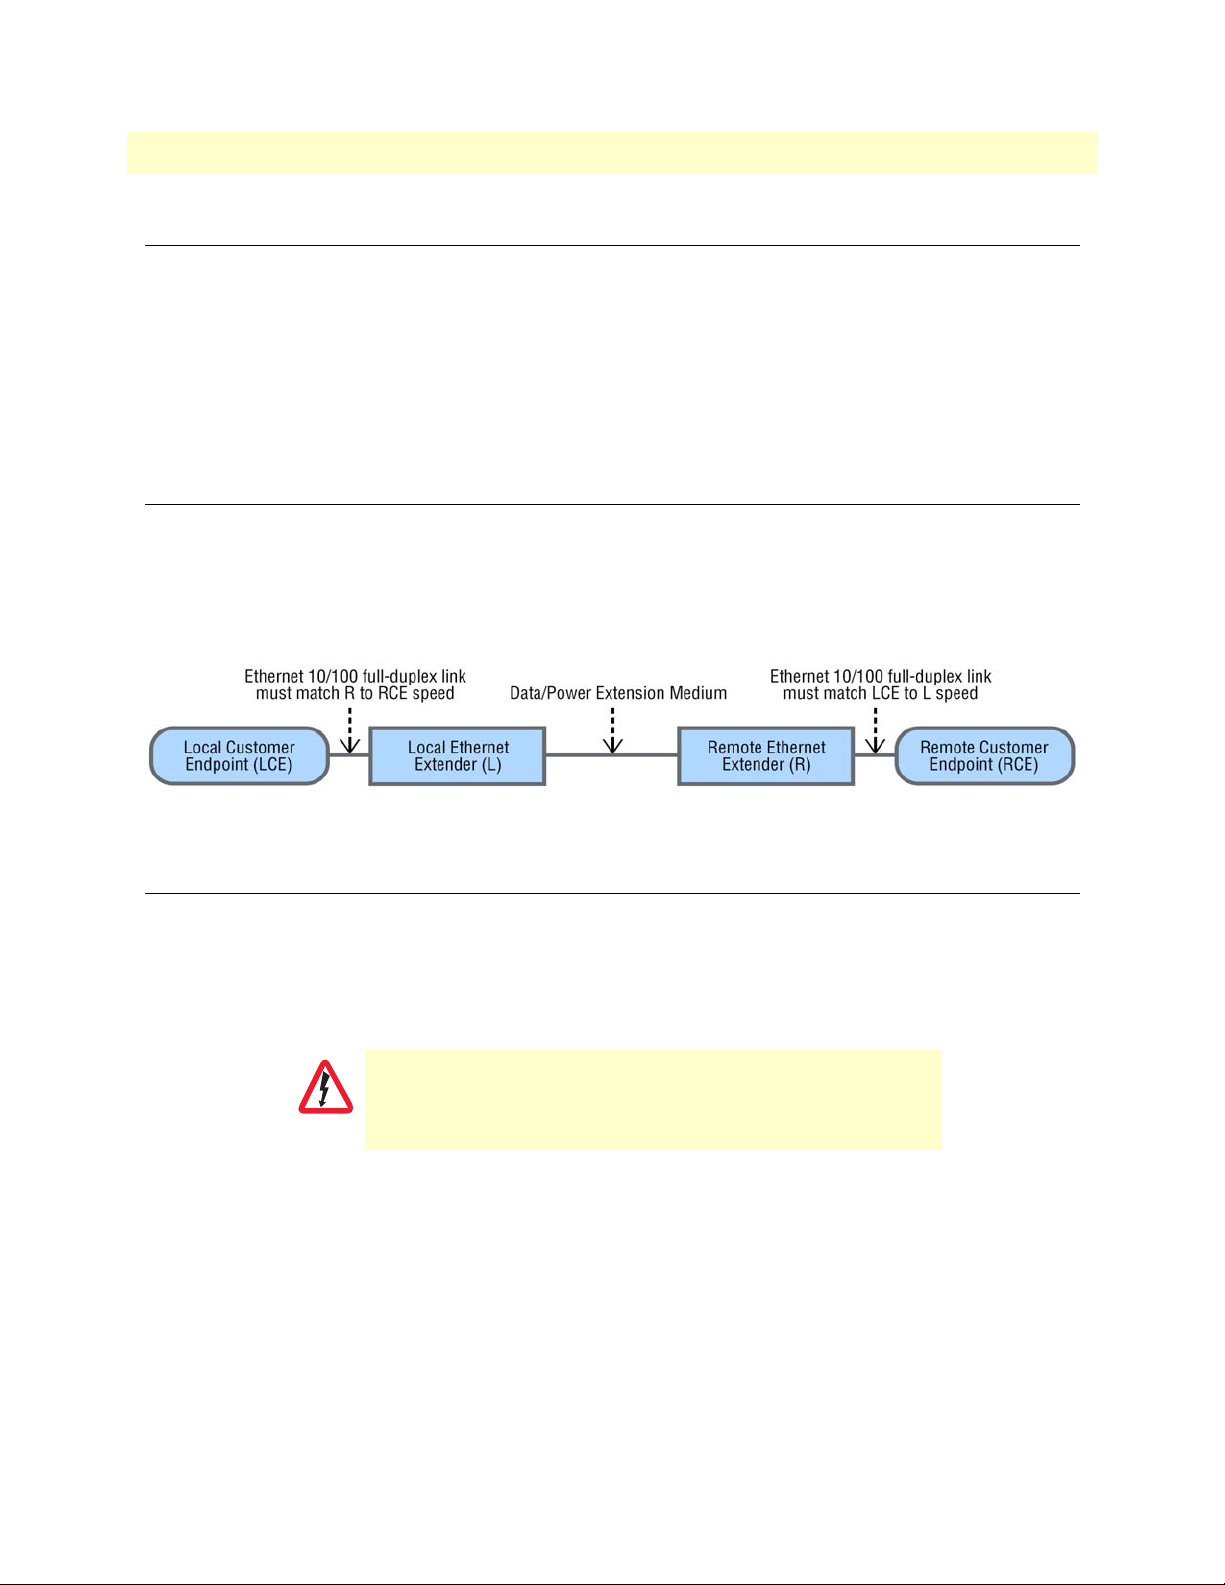
Data
Data may be transmitted full duplex at 10Mbit or 100Mbit. LCE and RCE must be able to be at the same data
rate.
Both the LCE and the RCE Ethernet ports should support at least 10Mbit full duplex, and be configured identically (see figure 2).
Figure 2. Data path
Power
Power across the system as a whole must be defined before details about each unit can be understood.
The Local Customer Endpoint should not have power on the line in all cases. The Ethernet port on the Local
Ethernet Extender is not a PoE port. It is a 10/100 Ethernet port. If IEEE80.2af/at PoE is applied to it, the
power negotiation between the ports will fail.
If PoE power is applied to the Local Ethernet Extender’s
Ethernet port, equipment damage may occur.
CAUTION
Power-across-link application
The Local Customer Endpoint has no power on the Ethernet port.
The Local Ethernet Extender is powered using a PoE voltage external power source (approximately 54VDC).
This power supply's positive and negative leads are internally connected to data wires through some circuitry.
The chassis is not directly connected to the power supply so it is possible to use positive, negative, and isolated
1
voltage sources.
completely passive.
Power is sent to the Remote Ethernet Extender without any detection or negotiation. It is
When choosing to transmit non-isolated voltage, great care must be taken. There is no isolation in the system
besides the power supply.
Unit Definitions 13
Page 14
CopperLink 1101 Line Power PoE Extender User Manual 1 • General information
If the RCE’s input power is grounded in any way, it will
short out the power being sent which could cause equip
ment damage or personal injury.
WARNING
-
The Remote Ethernet Extender receives power. Shortly after it is powered, it will provide power using an IEEE
802.3at/af port.
The Remote Customer Endpoint will receive negotiated 802.3at/af PoE power (see figure 3).
Figure 3. Power supply and data paths for power-across-link application
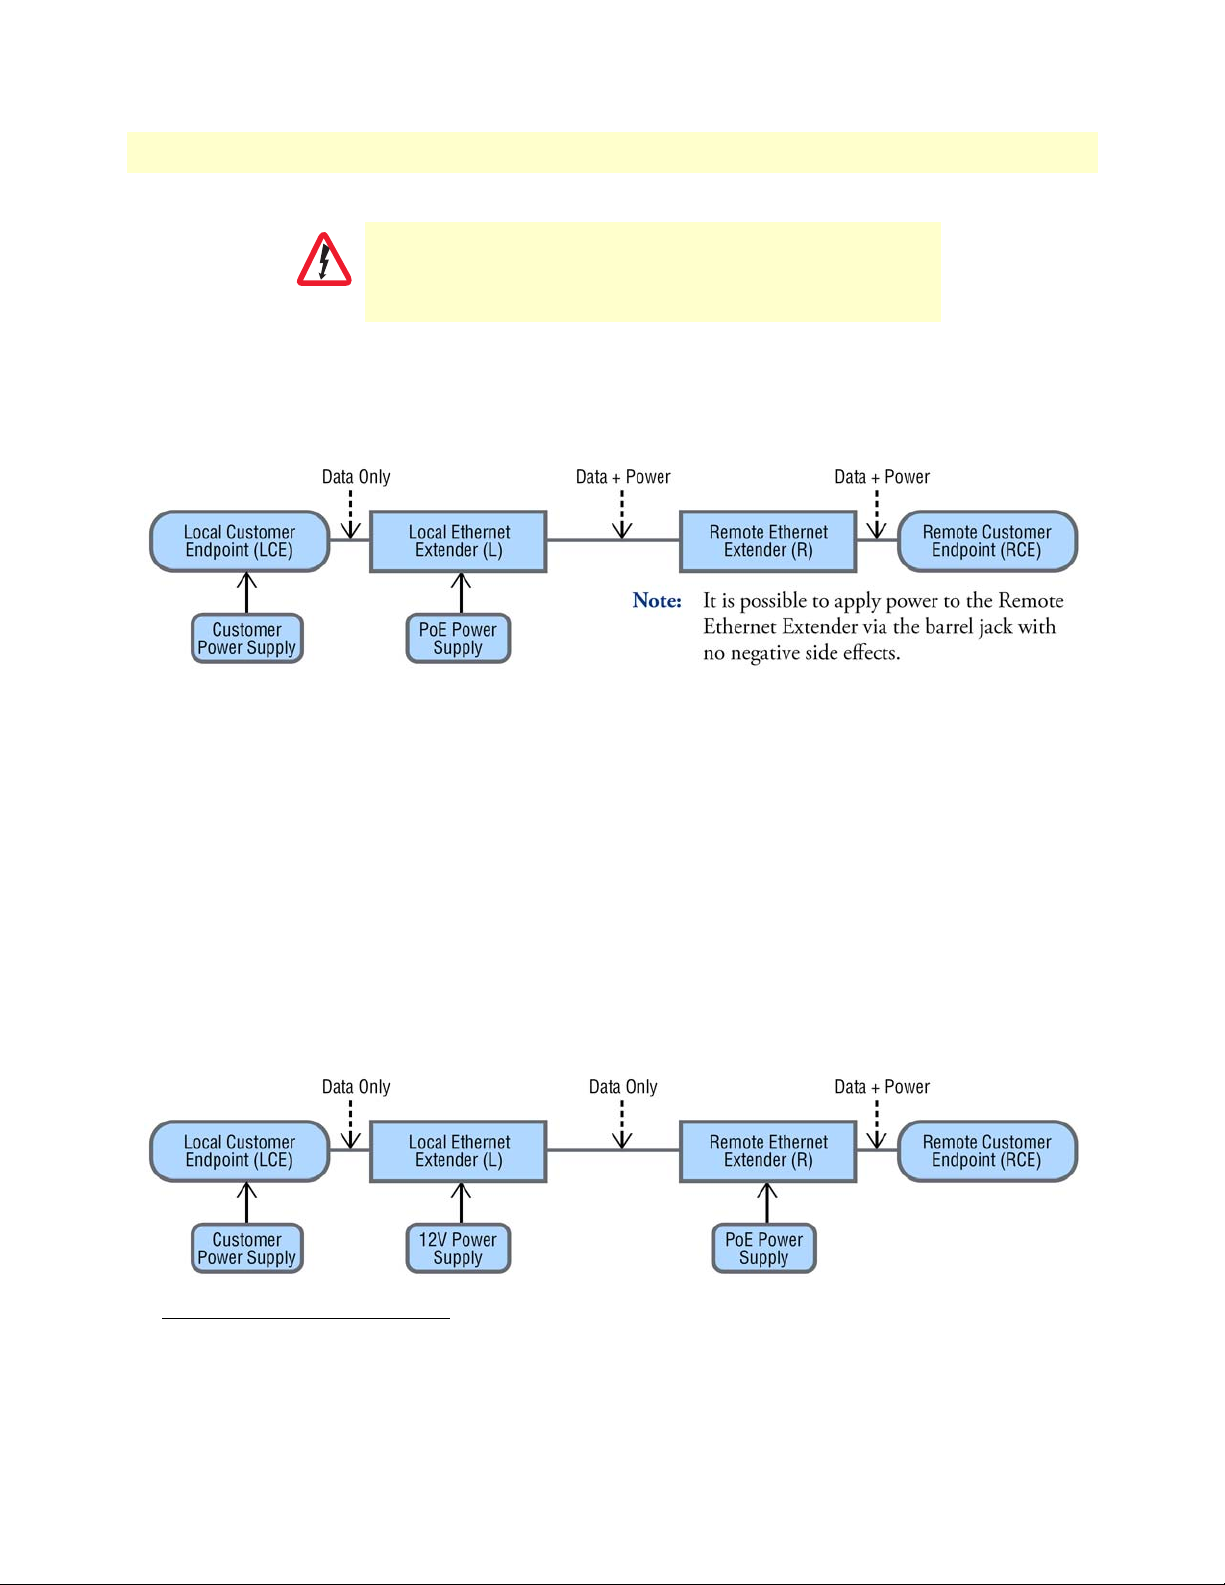
Remote-power application
The Local Customer Endpoint has no power on the Ethernet port.
Note It is possible to apply power to the Remote Ethernet Extender via the barrel
jack with no negative side effects.
The Local Ethernet Extender is powered by a 12 VDC power supply. It is not used to transmit power across the
extension link.
The Remote Ethernet Extender is powered using a PoE voltage external power source (approximately 54
VDC). Shortly after it is powered, it will provide power using an IEEE802.3at/af port.
The Remote Customer Endpoint will receive negotiated 802.3at/af PoE power (see figure 4).
Figure 4. Power supply and data paths for remote-power application
1. For coaxial products, the negative input of the power supply is tied to the chassis. This means negative voltage
would short to the chassis and possibly cause damage to devices or human injury. This is due to the nature of
the coaxial cable (the outer conductor is exposed and must be used for GND). For this reason, only positive
or isolated voltages are recommended when using coaxial.
Power 14
Page 15

CopperLink 1101 Line Power PoE Extender User Manual 1 • General information
Figure 5. CL1101 front panels
Front panel description
The following describes the ports, indicators, and grounding stud for the CL1101 (see figure 5):
• Grounding stud—Prevents high voltage surges from reaching human accessible components (the shielded
connector). This has a minimum effect on protecting internal circuitry. The exception is for coax where the
negative input is directly connected to this ground stud.
• Line—The extension interface used for sending data and power.
∕
RJ-45—Interface for two, four, six or eight wires—pin-out to TIA/EIA T568A/B (see section “RJ-45” on
page 40 for more information).
∕
Ter m ina l Bl oc k —Interface for a single pair of wires; 16–28 AWG (see section “Terminal Block” on
page 40 for more information).
∕
Coaxial—Interface for a single pair of wires; 75-ohm BNC connection; outer conductor tied to negative
input of Local Ethernet Extender’s power input as well as grounding stud (see section
“BNC (Coaxial)” on
page 41 for more information).
• DIP Switch—The DIP switch configures the line rate, power mode, and number of wire pairs used (see
section
“Configuring the DIP Switch” on page 24 for more information)
• Ethernet—10/100 Full duplex port. Left LED (green) indicates link (solid) and activity (blinking). Right
LED (yellow) indicates connection rate, 10 Mb (off) and 100Mb (solid). See section
“10/100Base-T Inter-
face” on page 39 for more information.
Note Remote unit only: If this is a unit that can transmit power, it will do so as an
802.3at/af compliant port.
• Power—Power input jack; center positive.
Note Power supply can be installed on remote unit even if the unit is receiving
power across the line.
Front panel description 15
Page 16

CopperLink 1101 Line Power PoE Extender User Manual 1 • General information
CAUTION
IMPORTANT
∕
Used for data extension only mode. The power supply provided is 12 VDC center positive.
∕
For Power Across Link, this jack can be used to supplement power available at the PoE port.
Ensure that the barrel jack cap is installed when barrel jack is
not used to minimize risk of electrostatic discharge events into
the unit.
∕
For Remote Power, the power is a PoE level isolated power supply. This means a -54 VDC isolated power
supply.
Figure 6. Power supply and data paths for remote-power application
• Link—The four stacked Link LEDs indicate line status (see section “Front Panel LED Status Indicators” on
page 27 for more information).
• PoE LVL (remote unit only)—Indicates how much power is available out of the PoE port (to apply to the
Remote Customer Endpoint). See section
“Front Panel LED Status Indicators” on page 27 for more infor-
mation.
Power Transmission
The following is intended for educational purposes only; consult
with a licensed electrician before applying this information in
practice.
This section details generic information on power transmission and how it affects the CL1101. The following
is basically a crash course on the theory and application.
General Background
There are several important factors to consider when dealing with power transmission to a remote load. The
factors that should be understood are ampacity (current carrying capability of the wire), insulation of the wire,
voltage being transmitted, current being transmitted, resistance of the wire, and resistance of the load (end
point).
-
The physical limitations of the wire are ampacity and insulation of the wire. The maximum current is the
amount of current that can be safely per regional electrical codes. The insulation of the wire will determine
Power Transmission 16
Page 17

CopperLink 1101 Line Power PoE Extender User Manual 1 • General information
what voltage the wire can tolerate before it breaks down. This information is provided by the wire manufacturer.
Given a certain power consumption of a remote unit and given a certain voltage being applied, it's possible to
calculate the amount of current that the unit should expect to receive. Unfortunately, sending any current (at
all) will cause the voltage to sag by the time it reaches the remote device (due to the voltage drop along the
wire). This in turn increases the current draw (to overcome the drop in voltage) causing the voltage to drop
even further! So this is a bit of a self-defeating cycle. It does balance out, but in the end it means there is a max
imum amount of power that can be transmitted given a voltage being applied and the resistance of the wire.
This is why relatively high (though still safe) voltage is chosen for use in PoE applications.
As a result, when transmitting power over long distances, it is the voltage being applied and the resistance of the
wire that limits the maximum power that can be transmitted.
Wire Specifics
Wire comes in all shapes and sizes. It can be thick and made from copper (good wire for power transmission) or
thin and made from aluminum (poor wire for power transmission).
There is also a hybrid sometimes used called copper clad aluminum. This is aluminum wire that is surrounded
by a layer of copper. This is reasonable for some data transmission because high frequency signals tend to travel
on the outer surface of the wire (skin effect), but DC power uses the entire wire. As a result, this makes for a
rather poor power conductor.
-
Additionally, hotter environments typically increase the resistance.
Some figures at room temperature (-20 °C, 68 °F) follow:
• 24 AWG solid copper wire: ~0.09 ohms per meter
• 28 AWG solid copper wire: ~0.21 ohms per meter
• 24 AWG CCA (copper clad aluminum) wire: ~0.13 ohms per meter
• 28 AWG CCA wire: ~0.32 ohms per meter
Since the circuit must complete a round trip, the values actually double. Although some of the numbers don't
appear too different, the effect can be significant.
A real world example:
An endpoint consumes 10W (including the extender) of power. If you are sending 54 VDC, what is the maximum distance this power can be sent?
For transmitting the maximum amount of power across a particular medium, the maximum power transfer
theorem suggests that half of the power is lost in the endpoint while the other half is lost in the wire. This effec
tively means seeing a 27 V drop across the wire (when using the Patton PoE power supply) when it is sending
the maximum amount of power. We also need to take into account the (2x) resistance for completing the loop.
This is also a best case result. If we account for approximately 30% inefficiency (and applying algebra on
Ohm's law equations), we get the following equation:
-
Max distance in meters = 0.7 x (voltage sent)2/(2 x one way wire Ohms/m x power needed)
Or more concretely for 24 AWG solid copper, (0.7 x 27 x 27)/(2 x 0.09 x 10) = 284 meters
If you had more wire pairs, then further distances are possible, just multiply by the number of wire pairs.
Power Transmission 17
Page 18

CopperLink 1101 Line Power PoE Extender User Manual 1 • General information
CL1101 specifics
The above example is completely hypothetical but is realistic. Unfortunately, it is often difficult to determine
the resistance of pre-existing cables. To make things easier, the unit has the ability to approximate the resistance
of the wire and determine what the maximum amount of power could be available on extender's PoE port.
This information is only available on the Remote unit however. The Local unit merely states how much total
power is being sent down the line.
Power Transmission 18
Page 19

Chapter 2 Installation
Chapter contents
Planning the Installation........................................................................................................................................20
Connecting the Line Interface ...............................................................................................................................20
Connecting the RJ-45 Line Interface ..............................................................................................................21
Connecting the Terminal Block Line Interface ...............................................................................................22
Connecting the BNC (Coaxial) Line Interface ................................................................................................22
Connecting the 10/100Base-T Ethernet Interface..................................................................................................22
Connecting the Grounding Stud ...........................................................................................................................23
Connecting Power.................................................................................................................................................24
Configuring the DIP Switch..................................................................................................................................24
19
Page 20

CopperLink 1101 Line Power PoE Extender User Manual 2 • Installation
CAUTION
CAUTION
IMPORTANT
Planning the Installation
The Interconnecting cables shall be acceptable for external use
and shall be rated for the proper application with respect to volt
age, current, anticipated temperature, flammability, and
mechanical serviceability.
-
To install the CL1101 Ethernet Extender, do the following:
1. Connect a data & power cable to the Line interface (see section “Connecting the Line Interface”)
2. Connect an Ethernet cable to the Ethernet interface (see section “Connecting the 10/100Base-T Ethernet
Interface” on page 22)
3. Connect a ground wire to the grounding stud (see section “Connecting the Grounding Stud” on page 23)
4. Connect the power supply cable to the Power port (see section “Connecting Power” on page 24)
5. Configuring the DIP switch (see section “Configuring the DIP Switch”)
Connecting the Line Interface
The interconnecting cables shall be acceptable for external use
and shall be rated for the proper application with respect to volt
age, current, anticipated temperature, flammability, and
mechanical serviceability.
-
The CL1101 supports communication between two peer Ethernet LAN devices over a distance of up to 3300
ft (1 km) over 24 AWG (0.5
mm) twisted-pair wire, Cat5+, or 75-ohm BNC. The CL1101 will be equipped
with one of the following interfaces:
• RJ-45 (see section “Connecting the RJ-45 Line Interface”)
• Terminal block (see section “Connecting the Terminal Block Line Interface” on page 22)
• BNC (Coaxial) (see section “Connecting the BNC (Coaxial) Line Interface” on page 22)
Note The CL1101 units work in pairs. The CL1101/L connects to the
CL1101/R.
Note Actual distance and link performance may vary depending on the environ-
ment and type/gauge of wire used.
Power is NOT transmitted as on traditional PoE. PoE pin-out
assumes that the same polarity is on a single pair of wires, but
in order to accommodate 1 pair mode, the polarity is alternated
within the pair.
Planning the Installation 20
Page 21

CopperLink 1101 Line Power PoE Extender User Manual 2 • Installation
CAUTION
Never connect the Line interface to a PoE port because equipment damage may occur.
Connecting the RJ-45 Line Interface
Do the following to connect the Line interface.
1. To function properly, the two CL1101s must be connected together using twisted-pair, unconditioned,
dry, metal wire, between 19 (0.9mm) and 26 AWG (0.4mm). Leased circuits that run through signal
equalization equipment are not acceptable.
2. The CL1101 is equipped with an RJ-45 interface jack (see figure 7)
Figure 7. RJ-45 pin-out
3. The RJ-45 connector on the CL1101’s twisted pair interface is polarity insensitive, and is wired for two,
four, six or eight wires—pin-out to TIA/EIA T568A/B (see
Table 1. RJ-45 wire modes
Pair Pin Voltag e
1+ 3 +
1- 6 –
2+ 1 +
2- 2 –
3+ 4 +
3- 5 –
4+ 7 +
4- 8 –
Note
• 2-wire mode—non-standard pin-out
• 4-wire mode—802.3i/802.3u wired compatible pin-out
• 8-wire mode—802.3ab/802.3an wired compatible pin-out
table 4).
Connecting the Line Interface 21
Page 22

CopperLink 1101 Line Power PoE Extender User Manual 2 • Installation
CAUTION
Connecting the Terminal Block Line Interface
Do the following to connect the Line interface:
1. To connect the line interface of the CL1101/TB simply use a single pair of 16–28 AWG wires to connect
the pair of CL1101s (see table 2).
Table 2. Terminal block wire modes
Pair Pin Voltag e
1+ Left +
1- Right –
Connecting the BNC (Coaxial) Line Interface
Do the following to connect the Line interface:
1. To connect the line interface of the CL1101/BNC simply use a coaxial cable with a BNC connector at
each end to connect the pair of CL1101s (see table 3)
Table 3. Coaxial (BNC) wire modes
Pair Pin Voltag e
1+ Inner +
1- Outer –
...
Connecting the 10/100Base-T Ethernet Interface
Do the following to connect the 10/100Base-T Ethernet interface:
1. The RJ-45 Ethernet port is an Auto-MDIX 10/100Base-T that connects to a 10/100Base-T device or net-
work. Figure 8 shows the signal/pin relationships on this interface. You may connect this port to a hub or
PC using a straight-through or crossover cable (see Appendix 4 on page 23) that is up to 328 ft long.
The interconnecting cables shall be acceptable for external use
and shall be rated for the proper application with respect to volt
age, current, anticipated temperature, flammability, and
mechanical serviceability.
Figure 8. CL1101 10/100Base-T RJ-45 Connector Pin-out
-
Connecting the 10/100Base-T Ethernet Interface 22
Page 23

CopperLink 1101 Line Power PoE Extender User Manual 2 • Installation
Table 4. RJ-45 wire modes
Pin Voltag e Functio n
1 Mode A + Tx +
2 Mode A + Tx –
3 Mode A – Rx +
4 Mode B +* N/A
5 Mode B +* N/A
6 Mode A – Rx –
7 Mode B –* N/A
8 Mode B –* N/A
Note * Mode A and Mode B are not configurable, the remote unit requires different
hardware.
For Mode A order:
• CL1101/PAFA/x/EUI-2PK (Ethernet Extender Kit)
• CL1101/PAFA/x/EUI (Remote PoE Extender)
For Mode B order:
• CL1101/PAFB/x/EUI-2PK (Ethernet Extender Kit)
• CL1101/PAFB/x/EUI (Remote PoE Extender)
Connecting the Grounding Stud
As a standard safety practice, the chassis of the CL1101 must be properly grounded to protect against any contact with an electrical fault condition.
Do the following to connect to the CL1101 to ground:
1. Use a #4 ring terminal to terminate the CL1101 end of a #18 AWG (minimum) stranded ground wire.
2. Connect the ring terminal to the grounding stud of the CL1101. Do not over-tighten the grounding stud
hex-nut.
3. Connect the other end of the ground wire to an electrical ground nearest the CL1101. Often this will be
on an electrical panel or sub panel. If you cannot locate a nearby electrical ground, contact Patton Techni
cal Support at (301) 975-1000 to discuss an alternative grounding solution.
Note Keep the length of the ground wire as short as possible.
4. Verify that the resistance of the ground path is less than 0.5 ohms.
-
Connecting the Grounding Stud 23
Page 24

CopperLink 1101 Line Power PoE Extender User Manual 2 • Installation
CAUTION
CAUTION
Connecting Power
The interconnecting cables shall be acceptable for external use
and shall be rated for the proper application with respect to volt
age, current, anticipated temperature, flammability, and
mechanical serviceability.
The CL1101 does not have a power switch, so it powers up as soon as it is connected to a power source.
An external AC to DC adapter is supplied with the units. This connection is made via the barrel jack on the
front panel of the CL1101. No configuration is necessary for the power supply.
DC power (supplied via the power supply jack to the CL1101) must meet the following requirements; DC
power supplied must be regulated 12 VDC ±5% to 54 VDC ±5%.The barrel type plug has 2.5/5.5/10mm
I.D./O.D./Shaft Length dimensions.
Note A power supply can be installed on the remote unit even if the unit is receiv-
ing power across the line.
Verify that the included barrel jack cap is installed on the
remote unit when the barrel jack is not used to minimize risk of
electrostatic discharge events into the unit.
-
Configuring the DIP Switch
DIP switch (see figure 9) settings are described in table 5.
Figure 9. 4-position DIP switch
Connecting Power 24
Page 25

CopperLink 1101 Line Power PoE Extender User Manual 2 • Installation
Table 5. DIP switch settings
Switch (left to right) 1 2 3 4
Function Down: 100 Mb,
Up: 10 Mb
*8-wire mode 10 Mb not supported, will default to 10 Mb 4-wire mode
**Switch has no function on Local unit
Down Down: 2-wire mode
Down Up or Up Down: 4-wire mode
Up Up: 8-wire mode*
Remote only**
Up: Legacy PoE mode
Down: IEEE802.3af PoE
Configuring the DIP Switch 25
Page 26

Chapter 3 Operation
Chapter contents
Introduction..........................................................................................................................................................27
Front Panel LED Status Indicators ........................................................................................................................27
26
Page 27

CopperLink 1101 Line Power PoE Extender User Manual 3 • Operation
Introduction
Once the CL1101s are properly installed, they should operate transparently. No user settings required. This
section describes reading the LED status monitors.
Front Panel LED Status Indicators
The CL1101 provides the following status indicators:
• Link—There are four stacked green LEDs that indicate line status (see table 6).
Table 6. LED status descriptions
Pattern Status
Fast blinking 1–4 LEDs The unit is attempting to link using configured wire pairs
Solid 1–4 LEDs Linked at configured wire pairs
• Ethernet port—10/100 Full duplex port. Left LED (green) indicates link (solid) and activity (blinking).
Right LED (yellow) indicates connection rate, 10 Mb (off) and 100Mb (solid).
Note Remote unit only: If this is a unit that can transmit power, it will do so as a
802.3at/af compliant port.
• PoE LVL (yellow) (remote unit only)—Indicates how much power is available out of the PoE port (to
apply to the Remote Customer Endpoint). When the unit first turns on, the unit does not power the
Remote Customer Endpoint but the LED will display how much power is available on the port. After the
Remote Customer Endpoint is turned on, the LED will indicate how much more power could potentially
be sent (how close you are to maxing out the wire) (see
Table 7. Remote unit PoE LVL LED definitions
LEDs on Power Available*
0 ~0W
1 ~3W
2 ~6W
3 ~13W
4 ~25W
*If there is no PoE device attached, LED accuracy is
greatly reduced.
table 7).
Introduction 27
Page 28

Chapter 4 Contacting Patton for assistance
Chapter contents
Introduction..........................................................................................................................................................29
Contact information..............................................................................................................................................29
Warranty Service and Returned Merchandise Authorizations (RMAs)...................................................................29
Warranty Coverage .........................................................................................................................................29
Out-of-Warranty Service .................................................................................................................................29
Returns for Credit ...........................................................................................................................................29
Return-for-Credit Policy ...........................................................................................................................30
RMA Numbers ...............................................................................................................................................30
Shipping Instructions ......................................................................................................................................30
28
Page 29

CopperLink 1101 Line Power PoE Extender User Manual 4 • Contacting Patton for assistance
Introduction
This chapter contains the following information:
• “Contact information”—describes how to contact Patton technical support for assistance.
• “Warranty Service and Returned Merchandise Authorizations (RMAs)”—contains information about
obtaining a return merchandise authorization (RMA).
Contact information
Patton Electronics offers a wide array of free technical services. If you have questions about any of our other
products we recommend you begin your search for answers by using our technical knowledge base. Here, we
have gathered together many of the more commonly asked questions and compiled them into a searchable
database to help you quickly solve your problems:
• Online support—available at www.patton.com/returns/
• E-mail support—e-mail sent to support@patton.com will be answered within 1 business day
• Telephone support—standard telephone support is available five days a week—from 8:00 am to 5:00 pm
EST (1300 to 2200 UTC)—by calling +1 (301) 975-1007
Warranty Service and Returned Merchandise Authorizations (RMAs)
Patton Electronics is an ISO-9001 certified manufacturer and our products are carefully tested before shipment. All of our products are backed by a comprehensive warranty program.
Note If you purchased your equipment from a Patton Electronics reseller, ask your
reseller how you should proceed with warranty service. It is often more con
venient for you to work with your local reseller to obtain a replacement.
Patton services our products no matter how you acquired them.
Warranty Coverage
Our products are under warranty to be free from defects, and we will, at our option, repair or replace the product should it fail within one year from the first date of shipment. Our warranty is limited to defects in workmanship or materials, and does not cover customer damage, lightning or power surge damage, abuse, or
unauthorized modification.
Out-of-Warranty Service
Patton services what we sell, no matter how you acquired it, including malfunctioning products that are no
longer under warranty. Our products have a flat fee for repairs. Units damaged by lightning or other catastro
phes may require replacement.
Returns for Credit
Customer satisfaction is important to us, therefore any product may be returned with authorization within 30
days from the shipment date for a full credit of the purchase price. If you have ordered the wrong equipment or
you are dissatisfied in any way, please contact us to request an RMA number to accept your return. Patton is
not responsible for equipment returned without a Return Authorization.
-
-
Introduction 29
Page 30

CopperLink 1101 Line Power PoE Extender User Manual 4 • Contacting Patton for assistance
Return-for-Credit Policy
• Less than 30 days: No Charge. Your credit will be issued upon receipt and inspection of the equipment.
• 30 to 60 days: We will add a 20% restocking charge (crediting your account with 80% of the purchase price).
• Over 60 days: Products will be accepted for repairs only.
RMA Numbers
RMA numbers are required for all product returns. You can obtain an RMA by doing one of the following:
• Completing a request on the RMA Request page in the Support section at www.patton.com/returns/
• By calling +1 (301) 975-1007 and speaking to a Technical Support Engineer
• By sending an e-mail to returns@patton.com
All returned units must have the RMA number clearly visible on the outside of the shipping container. Please use
the original packing material that the device came in or pack the unit securely to avoid damage during shipping.
Shipping Instructions
The RMA number should be clearly visible on the address label. Our shipping address is as follows:
Patton Electronics Company
RMA#: xxxx
7622 Rickenbacker Dr.
Gaithersburg, MD 20879-4773 USA
Patton will ship the equipment back to you in the same manner you ship it to us. Patton will pay the return
shipping costs.
Warranty Service and Returned Merchandise Authorizations (RMAs) 30
Page 31

Appendix A Compliance Information
Chapter contents
Regulatory Information.........................................................................................................................................32
EMC Directive: ..............................................................................................................................................32
Low-Voltage Directive (Safety): ......................................................................................................................32
PSTN: ............................................................................................................................................................32
Radio and TV Interference (FCC Part 15) ............................................................................................................32
CE Declaration of Conformity ..............................................................................................................................32
Authorized European Representative .....................................................................................................................32
Service ...................................................................................................................................................................33
31
Page 32

CopperLink 1101 Line Power PoE Extender User Manual A • Compliance Information
Regulatory Information
EMC Directive:
• FCC Part 15, Class A
• EN55022, Class A
• EN55024
• EN50581
Low-Voltage Directive (Safety):
• IEC/EN60950-1, 2nd Edition
• UL60950-1/CSA C22.2 No. 60950-1
PSTN:
• This device is not intended nor approved for connection to the PSTN
Radio and TV Interference (FCC Part 15)
This device generates and uses radio frequency energy, and if not installed and used properly-that is, in strict
accordance with the manufacturer’s instructions-may cause interference to radio and television reception. The
device has been tested and found to comply with the limits for a Class A computing device in accordance with
specifications in Subpart B of Part 15 of FCC rules, which are designed to provide reasonable protection from
such interference in a commercial installation. However, there is no guarantee that interference will not occur
in a particular installation. If the device does cause interference to radio or television reception, which can be
determined by disconnecting the unit, the user is encouraged to try to correct the interference by one or more
of the following measures: moving the computing equipment away from the receiver, re-orienting the receiving
antenna and/or plugging the receiving equipment into a different AC outlet (such that the computing equip
ment and receiver are on different branches).
-
CE Declaration of Conformity
This device is in compliance with the essential requirements and other relevant provisions of Directive 2004/
108/EC relating to electromagnetic compatibility and Directive 2006/95/EC relating to electrical equipment
designed for use within certain voltage limits. The Declaration of Conformity may be obtained from Patton
Electronics, Inc at www.patton.com/certifications.
The safety advice in the documentation accompanying this device shall be obeyed. The conformity to the
above directive is indicated by CE mark on the device.
Authorized European Representative
D R M Green
European Compliance Services Ltd
Greyfriars Court
Paradise Square
Oxford, OX1 1BE, UK
Regulatory Information 32
Page 33

CopperLink 1101 Line Power PoE Extender User Manual A • Compliance Information
Service
All warranty and non-warranty repairs must be returned freight prepaid and insured to Patton Electronics. All
returns must have a Return Materials Authorization number on the outside of the shipping container. This
number may be obtained from Patton Electronics Technical Services at:
• Tel: +1 (301) 975-1007
• Email: support@patton.com
• URL: http://www.patton.com
Packages received without an RMA number will not be accepted.
Service 33
Page 34

Appendix B Specifications
Chapter contents
Line Connector .....................................................................................................................................................35
LAN Connectors ...................................................................................................................................................35
Transmission Line .................................................................................................................................................35
LED Status Indicators ...........................................................................................................................................35
Power Supply ........................................................................................................................................................35
External AC option: ........................................................................................................................................35
Physical .................................................................................................................................................................35
Operating Temperature Range ........................................................................................................................35
Humidity ........................................................................................................................................................35
Dimensions .....................................................................................................................................................35
34
Page 35

CopperLink 1101 Line Power PoE Extender User Manual B • Specifications
Line Connector
• RJ-45, Terminal Block, or BNC Coaxial
LAN Connectors
• 1 RJ-45, 10/100Base-T, IEEE 802.3 Ethernet (Local)
• IEEE 802.3af/at PoE Ethernet (Remote)
Transmission Line
1 to 4 pairs of 2-wire or coaxial (CL1101/BNC)
LED Status Indicators
• PoE LVL (4 yellow LEDs)
• Status (4 green LEDs)
• Ethernet: Left LED (green) indicates link (solid) and activity (blinking). Right LED (yellow) indicates con-
nection rate, 10 Mb (off) and 100Mb (solid).)
Power Supply
External AC option:
• AC: UI (120–240 VAC)
• DC: 12–54 VDC (54 VDC recommended for optimal performance
• Power consumption: 1.25 A
Physical
Operating Temperature Range
32 to 122°F (0 to 50°C)
For extended temperature option see CL1101E
Humidity
Up to 90% non-condensing.
Dimensions
1.50 H x 4.06 W x 3.50 D in. (3.81 H x 10.31 W x 8.89 D mm)
Weight
0.78 oz (22 g)
Line Connector 35
Page 36

Appendix C Factory Replacement Parts and
Accessories
Chapter contents
CL1101/CL1101 Factory Replacement Parts and Accessories ...............................................................................37
36
Page 37

CopperLink 1101 Line Power PoE Extender User Manual C • Factory Replacement Parts and Accessories
CL1101/CL1101 Factory Replacement Parts and Accessories
Patton Model # Description
Base Models
C1101/L/P/RJ45/EUI CopperLink Power Plus 10/100 Local Power Extender; 1x 10/100; RJ45
Line; 100–240VAC
C1101/R/PAFA/RJ45/E CopperLink Power Plus 10/100 Remote Extender w/PoE; 1x 10/100;
802.3af (mode A); RJ45 Line; Powered by Local Unit
C1101/PAFA/RJ45/EUI-2PK CopperLink Power Plus 10/100 Power Extender Kit w/PoE; 802.3af; RJ45
Line; 100–240VAC
C1101/L/P/TB/EUI CopperLink Power Plus 10/100 Local Power Extender; 1x 10/100; Terminal
Block Line; 100–240VAC
C1101/R/PAFA/TB/E CopperLink Power Plus 10/100 Remote Extender w/PoE; 1x 10/100;
802.3af (mode A); Terminal Block Line; Powered by Local Unit
C1101/PAFA/TB/EUI-2PK CopperLink Power Plus 10/100 Power Extender Kit; 802.3af; Terminal
Block Line; 100–240VAC
C1101/L/P/BNC/EUI CopperLink Power Plus 10/100 Local Power Extender; 1x 10/100; BNC
Coax Line; 100–240VAC
C1101/R/PAFA/BNC/E CopperLink Power Plus 10/100 Remote Extender w/PoE; 1x 10/100;
802.3af (mode A); BNC Coax Line; Powered by Local Unit
C1101/PAFA/BNC/EUI-2PK CopperLink Power Plus 10/100 Power Extender Kit w/PoE; 802.3af; BNC
Coax Line; 100–240VAC
07MCL1101L-UM User Manual
Accessories
PS-03671H1-021 Power Supply, AC/DC,UNIVERSAL INPUT,54V,1.2A,65W,DESKTOP
0805US IEC320 Power Cord, United States
0805EUR IEC320 Power Cord, European
0805UK IEC320 Power Cord, United Kingdom
0805AUS IEC320 Power Cord, Australia/New Zealand
CL1101/CL1101 Factory Replacement Parts and Accessories 37
Page 38

Appendix D Interface Pin Assignment
Chapter contents
10/100Base-T Interface .........................................................................................................................................39
Ethernet (RJ-45) .............................................................................................................................................39
Line Interface ........................................................................................................................................................40
RJ-45 .............................................................................................................................................................40
Terminal Block ...............................................................................................................................................40
BNC (Coaxial) ................................................................................................................................................41
38
Page 39

CopperLink 1101 Line Power PoE Extender User Manual D • Interface Pin Assignment
10/100Base-T Interface
Ethernet (RJ-45)
Figure 10. CL1101 10/100Base-T RJ-45 Connector Pin-out
Table 8. RJ-45 wire modes
Pin Voltag e Functio n
1 Mode A + Tx +
2 Mode A + Tx –
3 Mode A – Rx +
4 Mode B +* N/A
5 Mode B +* N/A
6 Mode A – Rx –
7 Mode B –* N/A
8 Mode B –* N/A
Note * Mode A and Mode B are not configurable, the remote unit requires different
hardware.
For Mode A order:
• CL1101/PAFA/x/EUI-2PK (Ethernet Extender Kit)
• CL1101/PAFA/x/EUI (Remote PoE Extender)
For Mode B order:
• CL1101/PAFB/x/EUI-2PK (Ethernet Extender Kit)
• CL1101/PAFB/x/EUI (Remote PoE Extender)
10/100Base-T Interface 39
Page 40

CopperLink 1101 Line Power PoE Extender User Manual D • Interface Pin Assignment
Line Interface
RJ-45
Figure 11. RJ-45 pin-out
Table 9. RJ-45 wire modes
Pair Pin Voltag e
1+ 3 +
1- 6 –
2+ 1 +
2- 2 –
3+ 4 +
3- 5 –
4+ 7 +
4- 8 –
Note These devices are polarity sensitive.
Note
• 2-wire mode—non-standard pin-out
• 4-wire mode—802.3i/802.3u wired compatible pin-out
• 8-wire mode—802.3ab/802.3an wired compatible pin-out
Terminal Block
Table 10. Terminal block wire modes
Pair Pin Voltag e
1+ Left +
1- Right –
Line Interface 40
Page 41

CopperLink 1101 Line Power PoE Extender User Manual D • Interface Pin Assignment
BNC (Coaxial)
.
Table 11. Coaxial (BNC) wire modes
Pair Pin Voltag e
1+ Inner +
1- Outer –
Line Interface 41
Page 42

Appendix E Line Rate & Reach Chart
Chapter contents
CL1101 Power & Data Performance (Twisted Pair)..............................................................................................43
CL1101 Power Performance (Twisted Pair) ..........................................................................................................43
CL1101 Power & Data Performance (RG59)........................................................................................................44
CL1101 Power Performance (RG59) ....................................................................................................................44
42
Page 43

CopperLink 1101 Line Power PoE Extender User Manual E • Line Rate & Reach Chart
CL1101 Power & Data Performance (Twisted Pair)
Table 12. CL1101 power & data performance over twisted-pair wires
10 Mbps 100 Mbps
2 wire 4 wire 2 wire 4 wire 8 wire
Min. distance
feet (meters)
Max. distance
feet (meters)
Link time
Min. distance
Link time
Max. distance
PoE class at
Max. distance
6
(1.83)
2500
(762)
5 sec 157 sec 5 sec 5 sec 5 sec
5–10 sec 8–265 sec 5 sec 6 sec 6 sec
Class 1 Class 2 Class 2/3 Class 4 Class 3/4
131
(39.9)
3300
(1005)
CL1101 Power Performance (Twisted Pair)
Table 13. CL1101 power performance over twisted-pair wires
PoE Class
1
(3.84 watts)
2
(6.49 watts)
3
(12.95 watts)
4
(25.50 watts)
2 wire
feet (meters)
2648
(807)
1587
(484)
784
(239)
262
(80)
feet (meters)
4 wire
5453
(1662)
3322
(1012)
1587
(484)
653
(199)
6
(1.83)
915
(278.9)
feet (meters)
(1.83)
(324.6)
6 wire
8363
(2549)
5041
(1536)
2519
(768)
119 6
(365)
6
1065
6
(1.83)
1849
(563.6)
8 wire
feet (meters)
11,555
(3521)
6905
(2104)
3456
(1052)
1587
(484)
CL1101 Power & Data Performance (Twisted Pair) 43
Page 44

CopperLink 1101 Line Power PoE Extender User Manual E • Line Rate & Reach Chart
CL1101 Power & Data Performance (RG59)
Table 14. CL1101 power & data performance over RG59 coaxial cable
10 Mbps 100 Mbps
Min. distance
feet (meters)
Max. distance
feet (meters)
Link time
Min. distance
Link time
Max. distance
PoE class at
Max. distance
6
(1.83)
4925
(1501)
5 sec 5 sec
5–10 sec 5 sec
Class 2/3 Class 4
6
(1.83)
1225
(323)
CL1101 Power Performance (RG59)
Table 15. CL1101 power performance over RG59 coaxial cable
PoE Class
1
(3.84 watts)
2
(6.49 watts)
3
(12.95 watts)
4
(25.50 watts)
RG59
feet (meters)
4975
(1516)
4975
(1516)
3925
(1196)
1675
(511)
CL1101 Power & Data Performance (RG59) 44
 Loading...