

Page 1
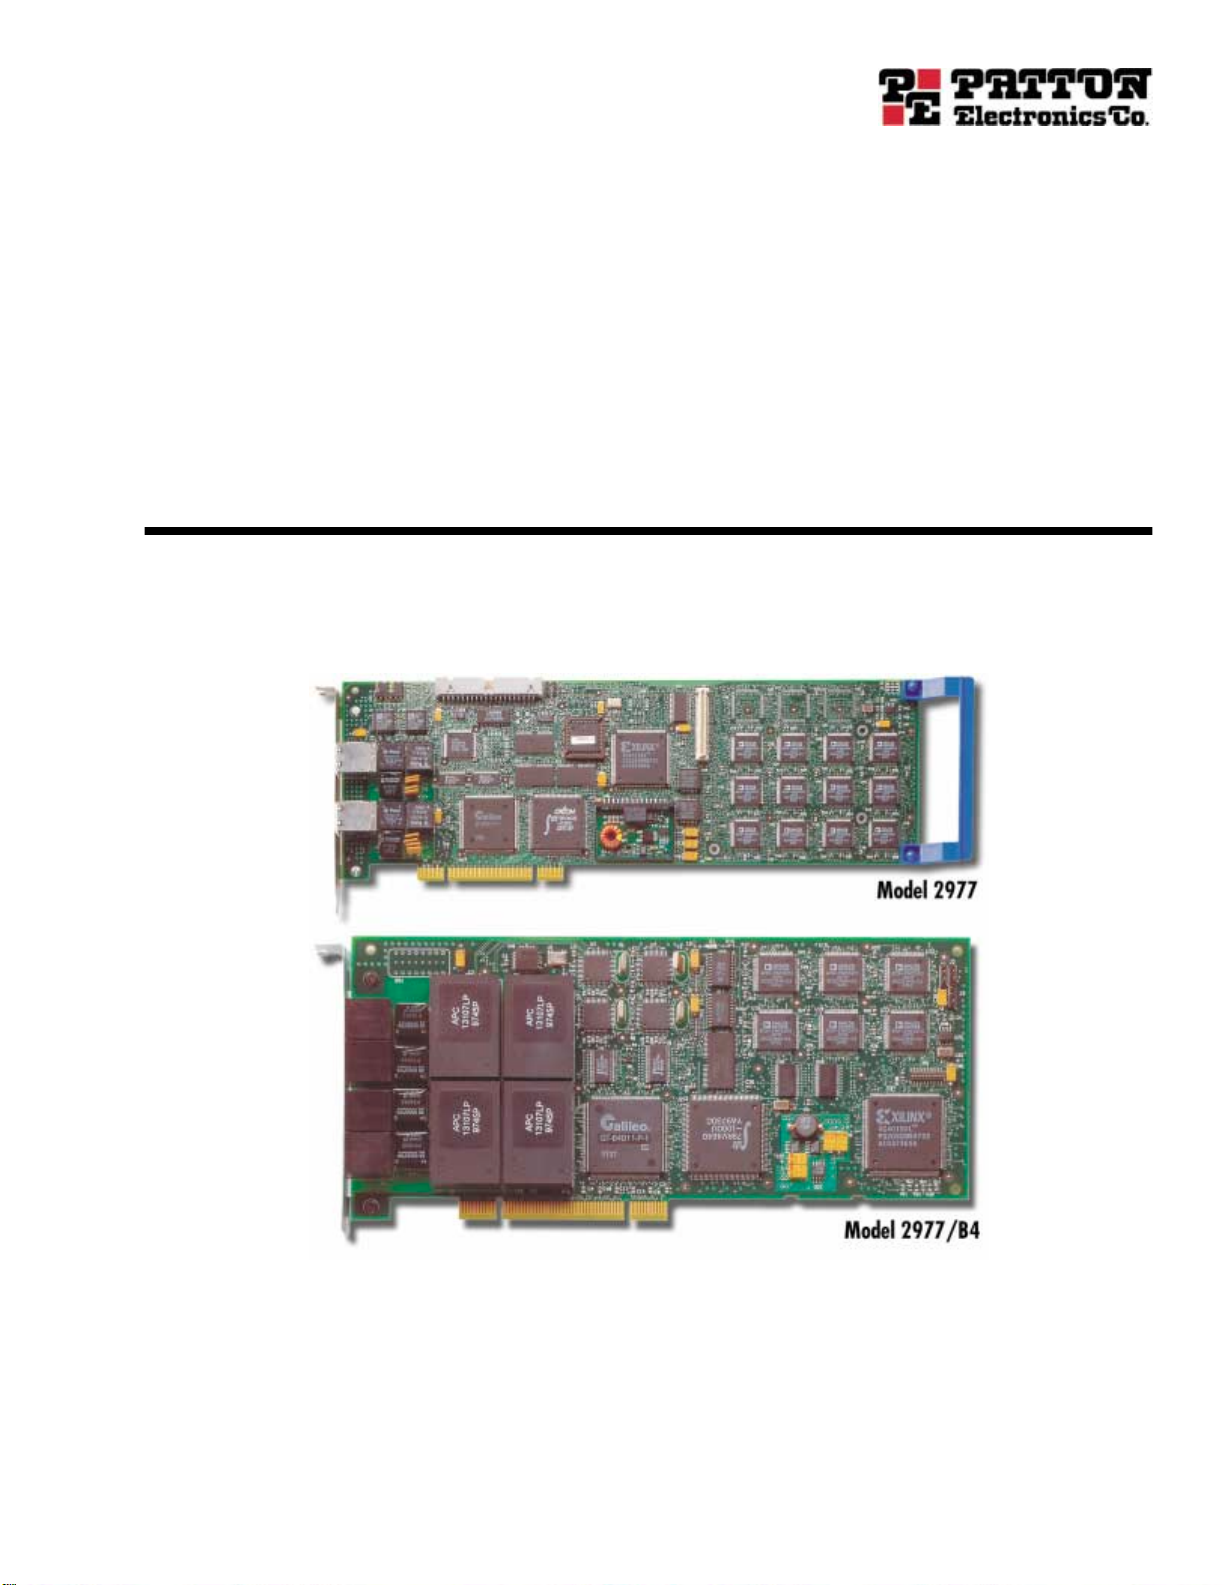
Model 2977 Family
DialFire Remote Access Server
User Guide
Sales Office: +1 (301) 975-1000
Technical Support: +1 (301) 975-1007
E-mail: support@patton.com
URL: www.patton.com
Document Number: 107131U Rev. A
Part Number: 07M2977
Revised: December 4, 2002
Page 2

Patton Electronics Company, Inc.
7622 Rickenbacker Drive
Gaithersburg, MD 20879 USA
tel: +1 (301) 975-1000
fax: +1 (301) 869-9293
support: +1 (301) 975-1007
web: www.patton.com
e-mail: support@patton.com
Copyright © 2002, Patton Electronics Company. All rights reserved.
The information in this document is subject to change without notice. Patton
Electronics assumes no liability for errors that may appear in this document.
Any software described in this document is furnished under license and may
be used or copied only in accordance with the terms of such license.
Page 3

Contents
Compliance Information .......................................................................................................................................7
Radio and TV Interference ..................................................................................................................................... 7
Industry Canada Notice.......................................................................................................................................... 7
FCC Information ................................................................................................................................................... 7
FCC Part 68 Compliance Statement ...................................................................................................................... 9
CE Notice .............................................................................................................................................................. 9
About this user guide ...........................................................................................................................................11
Audience ...............................................................................................................................................................11
Structure................................................................................................................................................................11
Precautions ........................................................................................................................................................... 12
Typographical conventions used in this document................................................................................................ 12
General conventions .......................................................................................................................................12
Mouse conventions .........................................................................................................................................13
1 DialFire Model 2977 RAS Adapters .............................................................................................................. 15
Introduction..........................................................................................................................................................16
Model 2977 DialFire RAS overview ......................................................................................................................16
Model 2977/B4 DialFire BRI RAS .................................................................................................................17
Model 2977 DialFire T1/E1 RAS ...................................................................................................................17
Supported Operating Systems................................................................................................................................18
2 Preparation.................................................................................................................................................... 19
Completing a configuration worksheet ..................................................................................................................20
DialFire Basic BRI Configuration Worksheet........................................................................................................21
DialFire PTE Configuration Worksheet, Channelized T1, Long Haul (External T1)............................................22
DialFire Channelized T1, Short-Haul Configuration Worksheet ..........................................................................23
DialFire PTE ISDN E1 (Euro ISDN) Configuration Worksheet ..........................................................................24
DialFire PTE ISDN T1 (PRI), Long-Haul (External T1) Configuration Worksheet.............................................25
DialFire ISDN T1 (PRI), Short-Haul Configuration Worksheet...........................................................................27
3 Installing the Model 2977 adapter ................................................................................................................ 29
Introduction..........................................................................................................................................................30
Model 2977 B4 ST adapter installation .................................................................................................................30
Determining your line termination requirements ............................................................................................30
Installing the DialFire RAS B4ST Adapter ......................................................................................................31
Model 2977 B4 U adapter installation...................................................................................................................32
Model 2977 PE1 PE2 adapter installation.............................................................................................................34
Model 2977 PT1 PT2 adapter installation ............................................................................................................35
Model 2977 daughter board installation................................................................................................................36
Parts List .........................................................................................................................................................36
Installation ......................................................................................................................................................36
4 Driver installation and configuration............................................................................................................ 39
3
Page 4

Contents
Model 2977 DialFire RAS User Guide
Introduction..........................................................................................................................................................41
Driver installation for the Windows 2000 operating system...................................................................................41
Supported Products ........................................................................................................................................41
Requirements ..................................................................................................................................................41
Procedure ........................................................................................................................................................41
Installing the Driver ........................................................................................................................................42
Procedure ..................................................................................................................................................42
Upgrading the Driver ......................................................................................................................................42
Procedure ..................................................................................................................................................42
Driver installation for the Windows XP operating system ...............................................................................43
Additional Notes .......................................................................................................................................44
Configuring Incoming Dial-up Networking Connections ...............................................................................44
Procedure ..................................................................................................................................................44
Configuring Outgoing Dial-up Networking Connections ...............................................................................45
Procedure ..................................................................................................................................................45
Changing Adapter Properties ..........................................................................................................................45
Procedure ..................................................................................................................................................45
Changing Phone and Modem Options ...........................................................................................................45
Procedure ..................................................................................................................................................45
Uninstalling the Driver ...................................................................................................................................46
Procedure ..................................................................................................................................................46
Using the Windows Troubleshooter ...............................................................................................................46
Procedure ..................................................................................................................................................46
Driver installation for the Microsoft Windows NT operating system.....................................................................46
Installing the Driver: CD ................................................................................................................................46
Procedure ..................................................................................................................................................46
Installing the Driver: Downloaded ..................................................................................................................47
Procedure ..................................................................................................................................................47
Installing the MS Loopback Adapter ...............................................................................................................47
Procedure ..................................................................................................................................................47
Configuring the Adapter: First Time ...............................................................................................................48
Procedure ..................................................................................................................................................48
Changing the Adapter Configuration ..............................................................................................................48
Procedure ..................................................................................................................................................48
Configuring RAS Ports ...................................................................................................................................48
Procedure ..................................................................................................................................................48
Configuring RAS Dial-in Permissions .............................................................................................................49
Procedure ..................................................................................................................................................49
Configuring Dial-up Networking Connections ...............................................................................................50
Procedure ..................................................................................................................................................50
Configuring Modems on COM Ports .............................................................................................................50
Procedure ..................................................................................................................................................50
Uninstalling the Driver ...................................................................................................................................50
Procedure ..................................................................................................................................................50
4
Page 5

5
Model 2977 DialFire RAS User Guide
Contents
Changing Serial Port Names ...........................................................................................................................51
Procedure ..................................................................................................................................................51
5 Using the Viewer ........................................................................................................................................... 53
About Patton View................................................................................................................................................54
Starting Patton View .......................................................................................................................................54
6 Operation and shutdown .............................................................................................................................. 55
Activating the Model 2977....................................................................................................................................56
De-activating the Model 2977...............................................................................................................................56
7 Troubleshooting and maintenance................................................................................................................ 57
Introduction..........................................................................................................................................................58
Periodic maintenance ............................................................................................................................................58
Calibration ......................................................................................................................................................58
Maintenance..........................................................................................................................................................58
8 Contacting Patton for assistance ................................................................................................................... 59
Introduction..........................................................................................................................................................60
Contact information..............................................................................................................................................60
Warranty Service and Returned Merchandise Authorizations (RMAs)...................................................................60
Warranty coverage ..........................................................................................................................................60
Out-of-warranty service .............................................................................................................................60
Returns for credit ......................................................................................................................................60
Return for credit policy .............................................................................................................................61
RMA numbers ................................................................................................................................................61
Shipping instructions ................................................................................................................................61
A Software License Agreements ........................................................................................................................ 63
Agreement for using the DialFire driver software with the Microsoft Windows 2000 operating system.................64
Agreement for using the DialFire driver software with the Microsoft Windows NT operating system ...................65
Page 6

6
Contents
Model 2977 DialFire RAS User Guide
Page 7
Compliance Information
Radio and TV Interference
The Model 2977 generates and uses radio frequency energy, and if not installed and used properly—that is, in
strict accordance with the manufacturer's instructions—may cause interference to radio and television reception. The Model 2977 has been tested and found to comply with the limits for a Class A computing device in
accordance with the specifications in Subpart B of Part 15 of FCC rules, which are designed to provide reasonable protection from such interference in a commercial installation. However, there is no guarantee that interference will not occur in a particular installation. If the Model 2977 causes interference to radio or television
reception, which can be determined by disconnecting the cables, try to correct the interference by one or more
of the following measures: moving the computing equipment away from the receiver, re-orienting the receiving
antenna, and/or plugging the receiving equipment into a different AC outlet (such that the computing equipment and receiver are on different branches).
Industry Canada Notice
The Canadian Department of Communications label identifies certified equipment. This certification means
that the equipment meets certain telecommunications network protective, operational and safety requirements. The Department does not guarantee the equipment will operate to the user's satisfaction. Before installing this equipment, users should ensure that it is permissible to be connected to the facilities of the local
telecommunications company. The equipment must also be installed using an acceptable method of connection. In some cases, the company’s inside wiring associated with a single line individual service may be
extended by means of a certified connector assembly (telephone extension cord). The customer should be
aware that compliance with the above condition may not prevent degradation of service in some situations.
Repairs to some certified equipment should be made by an authorized maintenance facility designated by the
supplier. Any repairs or alterations made by the user to this equipment, or equipment malfunctions, may give
the telecommunications company cause to request the user to disconnect the equipment. Users should ensure
for their own protection that the ground connections of the power utility, telephone lines and internal metallic
water pipe system, are connected together. This protection may be particularly important in rural areas.
User should not attempt to establish or modify ground connections themselves, instead they should contact the appropriate electric inspection
authority or electrician.
FCC Information
The Model 2977 has been tested with the specifications in Part 68 of the FCC rules. Your telephone company
may make changes in its facilities, equipment, operations or procedures that could affect the proper operation
of the Model 2977. If this happens, the telephone company should give you advance notice to prevent the
interruption of your service. The telephone company may decide to temporarily discontinue your service if
they believe your Model 2977 may cause harm to the telephone network. Whenever possible, they will contact
7
Page 8

Compliance Information
Model 2977 DialFire RAS User Guide
you in advance. If you elect to do so, you have the right to file a complaint with the FCC. If you have any trouble operating the Model 2977, please contact Patton Electronics Technical Support at +1 301-975-1000. The
telephone company may ask you to disconnect the equipment from the telephone network until the problem
has been corrected or until you are certain that the Model 2977 is not malfunctioning. In accordance with
FCC rules and regulation CFR 47 68.218(b)(6), you must notify the telephone company prior to disconnection. The following information may be required when applying to your local telephone company for leased
line facilities. The Universal Service Order Code (USOC) is RJ49C. The Facility Interface Codes (FIC) are
shown in table 1 (for the DialFire B4/ST), table 2 (for the DialFire B4/U), and table 3 (for the DialFire 24/48
Dual-T1). The Service Order Code (SOC) is 6.0P.
Table 1. DialFire B4/ST RAS
Facility
Service
1.544 Mbps SF format without line power 02IS5 6.0P RJ-49C
1.544 Mbps SF and B8ZS without line power 02IS5 6.0P RJ-49C
1.544 Mbps ANSI ESF without line power 02IS5 6.0P RJ-49C
1.544 Mbps ANSI ESF and B8ZS without line power 02IS5 6.0P RJ-49C
Interface Code
Service
Code
Network
Connection
Table 2. DialFire B4/U RAS
Facility
Service
1.544 Mbps SF format without line power 02IS5 6.0P RJ-49C
1.544 Mbps SF and B8ZS without line power 02IS5 6.0P RJ-49C
1.544 Mbps ANSI ESF without line power 02IS5 6.0P RJ-49C
1.544 Mbps ANSI ESF and B8ZS without line power 02IS5 6.0P RJ-49C
Interface Code
Service
Code
Network
Connection
Table 3. DialFire 24/48 Dual T1 RAS
Facility
Service
1.544 Mbps SF format without line power 02IS5 6.0P RJ-49C
1.544 Mbps SF and B8ZS without line power 02IS5 6.0P RJ-49C
1.544 Mbps ANSI ESF without line power 02IS5 6.0P RJ-49C
1.544 Mbps ANSI ESF and B8ZS without line power 02IS5 6.0P RJ-49C
Interface Code
Service
Code
Network
Connection
8
Page 9

3.
4.
5.
2.
9
1.
Model 2977 DialFire RAS User Guide
Compliance Information
FCC Part 68 Compliance Statement
This equipment complies with Part 68 of FCC Rules. Please note the following:
You are required to request service from the telephone company before you connect the RAS to a network.
When you request T1 Service, you must provide the telephone company with the Facility Interface Code.
Provide the telephone company with the appropriate FIC codes from Table 1 on page 8 for the DialFire
B4/ST, Table 2 on page 8 for the DialFire B4/U, or Table 3 on page 8 for the DialFire 24/48 Dual-T1.
The telephone company will select the code it has available. The Service Order Code(s) (SOC): 6.0P. The
required Universal Service Order Code (USOC) jack: RJ49C. The make, model number, and FCC Registration number of the RAS.
Your telephone company may make changes to its facilities, equipment, operations, or procedures that
could affect the proper functioning of your equipment. The telephone company will notify you in advance
of such changes to give you and opportunity to maintain uninterrupted telephone service.
If your RAS causes harm to the telephone network, the telephone company may temporarily discontinue
your service. If possible, they will notify you in advance, but if advance notice is not practical, you will be
notified as soon as possible and will be informed of your right to file a complaint with the FCC.
If you experience trouble with the RAS, please contact Patton Electronics, Co. for service or repairs.
Repairs should be performed only by Patton Electronics Co.
You are required to notify the telephone company when you disconnect the RAS from the network.
CE Notice
The CE symbol on your Patton Electronics equipment indicates that it is in compliance with the Electromagnetic Compatibility (EMC) directive and the Low Voltage Directive (LVD) of the European Union (EU). A
Certificate of Compliance is available by contacting Technical Support.
Page 10

10
Compliance Information
Model 2977 DialFire RAS User Guide
Page 11

About this user guide
This guide describes installing and configuring a Patton Electronics Model 2977 Remote Access Server (RAS).
It provides:
• An introduction to your Patton product, how to install, configure and use the Patton product and, if appli-
cable, how to troubleshoot should you encounter a problem
• Configuration examples, where appropriate
• Administration procedures, where applicable
Audience
This guide is intended for the person responsible for configuring and administering a Patton adapter or system.
This person should have experience configuring network devices and be familiar with networking concepts.
This guide is also intended for the following users:
• Operators
• Installers
• Maintenance technicians
Structure
This guide contains the following chapters and appendices:
• Chapter 1 describes the DialFire RAS
• Chapter 2 contains the worksheets that will help you prepare for DialFire RAS installation
• Chapter 3 describes installing the RAS hardware
• Chapter 4 describes installing and configuring the device driver package
• Chapter 5 describes using the PattonAssist Manager
• Chapter 6 details how to power up and deactivate the RAS
• Chapter 7 contains troubleshooting and maintenance information
• Chapter 8 contains information on contacting Patton technical support for assistance
For best results, read the contents of this guide before you install the DialFire RAS.
11
Page 12
12
About this user guide
Model 2977 DialFire RAS User Guide
Precautions
Notes and cautions, which have the following meanings, are used throughout this guide to help you become
aware of potential RAS problems:
Note
Calls attention to important information.
The shock hazard symbol and WARNING heading indicate a potential electric
shock hazard. Strictly follow the warning instructions to avoid injury caused
by electric shock.
The alert symbol and WARNING heading indicate a potential safety hazard.
Strictly follow the warning instructions to avoid personal injury.
The shock hazard symbol and CAUTION heading
indicate a potential electric shock hazard. Strictly follow the instructions to avoid property damage
caused by electric shock.
The alert symbol and CAUTION heading indicate a
potential hazard. Strictly follow the instructions to
avoid property damage.
Typographical conventions used in this document
This section describes the typographical conventions and terms used in this guide.
General conventions
The procedures described in this manual use the following text conventions:
Table 4. General conventions
Convention Meaning
Futura bold type
Italicized Futura type
Futura type
Garamond bold type
< >
Are you ready?
% dir *.*
Indicates the names of menu bar options.
Indicates the names of options on pull-down menus.
Indicates the names of fields or windows.
Indicates the names of command buttons that execute an
action.
Angle brackets indicate function and keyboard keys, such
as <SHIFT>, <CTRL>, <C>, and so on.
All system messages and prompts appear in the Courier
font as the system would display them.
Bold Courier font indicates where the operator must type a
response or command
Precautions
Page 13

13
Model 2977 DialFire RAS User Guide
Mouse conventions
The following conventions are used when describing mouse actions:
Table 5. Mouse conventions
Convention Meaning
Left mouse button
Right mouse button This button refers the secondary or rightmost mouse button (unless
Point This word means to move the mouse in such a way that the tip of
Click Means to quickly press and release the left or right mouse button
Double-click Means to press and release the same mouse button two times quickly
Drag This word means to point the arrow and then hold down the left or
This button refers to the primary or leftmost mouse button (unless
you have changed the default configuration).
you have changed the default configuration).
the pointing arrow on the screen ends up resting at the desired location.
(as instructed in the procedure). Make sure you do not move the
mouse pointer while clicking a mouse button.
right mouse button (as instructed in the procedure) as you move the
mouse to a new location. When you have moved the mouse pointer
to the desired location, you can release the mouse button.
About this user guide
Typographical conventions used in this document
Page 14

14
About this user guide
Model 2977 DialFire RAS User Guide
Typographical conventions used in this document 15
Page 15

Chapter 1
Chapter contents
Introduction..........................................................................................................................................................16
Model 2977 DialFire RAS overview ......................................................................................................................16
Model 2977/B4 DialFire BRI RAS .................................................................................................................17
Model 2977 DialFire T1/E1 RAS ...................................................................................................................17
Supported Operating Systems................................................................................................................................18
DialFire Model 2977 RAS Adapters
Page 16

16
1 • DialFire Model 2977 RAS Adapters
Model 2977 DialFire RAS User Guide
Introduction
The Patton DialFire Model 2977 family of DSP-based RAS concentrator adapters are designed for such serverbased applications as modem-pooling, remote access, advanced fax, World-Wide Web and branch office internetworking.
The dense modem technology built into DialFire adapters is based on high performance digital signal processors (DSPs). On-board DSPs provide advanced modem and fax support and maximize the efficiency of each
communications channel. Each DialFire channel operates independently and configures itself dynamically for
analog (up to V.90 or K56flex) or digital (ISDN B-channel) support. This ensures smooth, remote connections
regardless of whether callers are using analog modems or ISDN devices.
All DialFire adapers operate within the PCI 2.1 mechanical and electrical specifications, support 3.3-or 5-volt
PCI and CompactPCI servers, and share a common software architecture. These features ensure compatibility
with a wide variety of PCs and application software, enhance reliability, and facilitate support.
DialFire adapters integrate with the inherent communication capabilities already built into your server operating environment. DialFire drivers are written to standard APIs and are enhanced with PattonAssist management software. Using standard APIs ensures that installing and managing your ports will already be a familiar
and intuitive process for network administrators. IT managers can continue to use the same management systems and administrative tools they know and trust. Users can continue to use the same remote access resources
they're accustomed to since the DialFire RAS concentrators offer full modem coverage.
Model 2977 DialFire RAS overview
The following Model 2977 DialFire RAS concentrator adapters are available:
• Model 2977/B4 DialFire RAS—for use in BRI RAS and fax applications (see “Model 2977/B4 DialFire
BRI RAS” on page 17)
• Model 2977 DialFire RAS—for use in T1/E1 RAS and fax adapter applications (see “Model 2977 DialFire
T1/E1 RAS” on page 17)
Introduction
Page 17

17
Model 2977 DialFire RAS User Guide
1 • DialFire Model 2977 RAS Adapters
Model 2977/B4 DialFire BRI RAS
The Model 2977 DialFire BRI RAS (see figure 1) is the ultimate WAN adapter card for use with BRI lines. It
is designed to work in a standard PCI 2.1 slot (5.0 or 3.3 volts) and can terminate four BRI communication
lines, allowing up to eight simultaneous digital or analog remote access connections. Calls can be originated
and answered on all 8 channels (2 each for all 4 BRI connections). All channels can handle modem calls (up to
56 kbps–V.90 and K56flex) and B channel calls (64 kbps).
Figure 1. Model 2977/B4 BRI RAS
DialFire adapters support a full range of connections, from low density analog modem, to medium density
Basic Rate Interface (BRI) ISDN, to high density T1/E1 and Primary Rate Interface (PRI) ISDN. Multiple
DialFire adapters can be installed in a single server so capability can be added as system needs grow.
Model 2977 DialFire T1/E1 RAS
Supporting open-standards remote access, fax, data collection, and modem pooling, the Model 2977 DialFire
RAS server-based RAS (see figure 2) provides up to 60 ports in a single PCI slot.
Figure 2. Model 2977 T1/E1 RAS
For demanding, server-based applications including modem-pooling, remote access, advanced fax, World
Wide Web and branch office internetworking, you won't find a better product line than the Patton’s Model
2977 DialFire RAS.
The Model 2977 DialFire DSP-based RAS concentrator support a full range of connections, from low density
to high density T1/E1 and primary rate interface (PRI) ISDN. Multiple Model 2977 DialFire adapters can be
installed in a single server so capability can be added as system needs grow.
Model 2977 DialFire RAS overview
Page 18

1 • DialFire Model 2977 RAS Adapters Model 2977 DialFire RAS User Guide
Supported Operating Systems
The Model 2977 DialFire RAS supports the operating systems shown in table 6.
Table 6. Supported operating systems
Platform
Microsoft
(primary)
Linux
(primary)
a
Sun
(secondary)
SCO*
(secondary)
Novell*
(as-is)
Operating
System
Windows NT
Service Pack 4 or higher
Notes
4.0
Windows
2000
Windows XP XP driver available in beta form.
RedHat 5.2,
6.0, 6.1,
These drivers have been, and shall continued to be tested for support
within the Linux kernel. Additional releases maybe added.
6.2, 7.0
Debian 2.1
Turbo Linux
Server 6.0
SuSE 6.4, 7.1
Solaris 2.6,
7, 8
Solaris 8 support for analog/modem fax connections only. The market for
this is narrow. Analysis will be needed to evaluate. This driver maybe critical for the cPCI RAS adapters.
UnixWare 2.x,
7.x
OpenServer
5.x
SCO has been acquired/merged with Caldera (of Linux fame). While it
appears that they are continuing the software of SCO, the market focus is
on Windows and Linux platforms. We will continue to support these while
analysis of the market and end-user continues.
NetWare 4.2 Novell drivers will be supported on an as-is basis and will be available.
NetWare 5.0
There will be no further on-going development or testing of Novell drivers.
NetWare 5.1
a Legacy drivers available—No installation or technical support is available.
18 Supported Operating Systems
Page 19

Chapter 2 Preparation
Chapter contents
Completing a configuration worksheet ..................................................................................................................20
DialFire Basic BRI Configuration Worksheet........................................................................................................21
DialFire PTE Configuration Worksheet, Channelized T1, Long Haul (External T1)............................................22
DialFire Channelized T1, Short-Haul Configuration Worksheet ..........................................................................23
DialFire PTE ISDN E1 (Euro ISDN) Configuration Worksheet ..........................................................................24
DialFire PTE ISDN T1 (PRI), Long-Haul (External T1) Configuration Worksheet.............................................25
DialFire ISDN T1 (PRI), Short-Haul Configuration Worksheet...........................................................................27
19
Page 20

2 • Preparation Model 2977 DialFire RAS User Guide
Completing a configuration worksheet
The following worksheets are available for documenting the line provisioning for your RAS configuration:
• DialFire Basic BRI Configuration Worksheet (see page 21)
• DialFire Channelized T1, Long-Haul Configuration Worksheet (see page 22)
• DialFire Channelized T1, Short-Haul Configuration Worksheet (see page 22)
• DialFire ISDN E1 Configuration Worksheet (see page 24)
• DialFire ISDN T1 (PRI), Long-Haul Configuration Worksheet (see page 25)
• DialFire ISDN T1 (PRI), Short-Haul Configuration Worksheet (see page 25)
Refer to the appropriate worksheet and complete it, then go to chapter 3, “Installing the Model 2977 adapter”
on page 29.
Note If you haven’t yet installed a T1 or PRI line, and need information, here are some web
sites to help you get started:
North America International
www.bell-atl.com www.francetelecom.com
www.uswest.com www.telecom.co.nz
www.pacbell.com www.bt.com
www.att.com
www.mci.com
www.sprint.com
www.ameritech.com
www.bellsouthcorp.com
www.gte.com
www.sbc.com
www.bell.ca
20 Completing a configuration worksheet
Page 21

Model 2977 DialFire RAS User Guide 2 • Preparation
DialFire Basic BRI Configuration Worksheet
Use the form below to gather the information that may be required to complete the configuration of your DialFire RAS B4STU adapter within your operating system environment.
Note Not all operating systems support all parameters.
Note With the exception of Modem Nationality, all parameters should be obtained from
your service provider.
Parameter Value
Switch Type [ ] 5ESS [ ] DMS100 [ ] ETSI (Euro ISDN) [ ] INS-64 (Japan)
[ ] NI1 [ ] None
Directory Number
List the telephone number of each logical terminal:
SPID or Subaddress
Modem Nationality Enter the country in which the RAS B4STU adapter will be installed:
MSN (Multiple Subscriber
Numbers)
Leased Channels List which, if any, B-channels are leased:
For switch types 5ESS, DMS100, NI1 and None, list the SPID (Service
Profile Identifier) for each logical terminal; for switch types ETSI (Euro
ISDN) and INS-64, list the Subaddress of each logical terminal:
Available only for ETSI (Euro ISDN) switch type, in Linux installations.
[ ] Disabled [ ] 1-8 (specify):
After completing the worksheet, go to chapter 3, “Installing the Model 2977 adapter” on page 29.
DialFire Basic BRI Configuration Worksheet 21
Page 22

2 • Preparation Model 2977 DialFire RAS User Guide
DialFire PTE Configuration Worksheet, Channelized T1, Long Haul
(External T1)
Use the worksheet below to collect the information that may be required to complete the configuration of your
DialFire PTE adapter within your operating system environment.
Note Not all operating systems support all parameters.
Note The parameters on this page are for channelized T1 connected directly to an external
T1 telephone line (long haul). If your adapter is connected to a PBX or similar inhouse network, use the short haul worksheet. See Channelized T1, Short Haul (PBX
or Other Internal Network) on page 22.
Parameter Value
Coding [ ] B8ZS [ ] AMI
Framing [ ] ESF [ ] D4
Long Haul Line Build Out (Level) [ ] 0 dB [ ] 7.5 dB [ ] 15 dB [ ] 22.5 dB
Signaling [ ] Ground Start [ ] Loop Start [ ] Immediate Start [ ] Wink Start -- Wink
Patton Electronics (1-20): _________________
Leased Time Slots List which, if any, T1 time slots are leased:
Modem Nationality Enter the country in which the PTE adapter will be installed:
After completing the worksheet, go to chapter 3, “Installing the Model 2977 adapter” on page 29.
22 DialFire PTE Configuration Worksheet, Channelized T1, Long Haul (External T1)
Page 23

Model 2977 DialFire RAS User Guide 2 • Preparation
DialFire Channelized T1, Short-Haul Configuration Worksheet
Use the worksheet below to collect the information that may be required to complete the configuration of your
DialFire PTE adapter within your operating system environment.
Note Not all operating systems support all parameters.
Note The parameters on this page are for channelized T1 connected to a PBX or similar in-
house network (Short Haul). If your adapter is connected directly to an external T1
telephone line, use the Channelized T1, Long Haul (External T1) worksheet on
page 22.
Parameter Value
Coding [ ] B8ZS [ ] AMI
Framing [ ] ESF [ ] D4
Short Haul Length in feet (meters) [ ] 0–133 ft (0–41 m) [ ] 133–266 ft (40.5–81 m)
[ ] 266–399 ft (81–122 m) [ ] 399–533 ft (122–162 m)
[ ] 533–655 ft (162–200 m)
Signaling [ ] Ground Start [ ] Loop Start [ ] Immediate Start [ ] Wink Start -- Wink
Patton Electronics (1-20): _________________
Leased Time Slots List which, if any, T1 time slots are leased:
Modem Nationality Enter the country in which the PTE adapter will be installed:
After completing the worksheet, go to chapter 3, “Installing the Model 2977 adapter” on page 29.
DialFire Channelized T1, Short-Haul Configuration Worksheet 23
Page 24

2 • Preparation Model 2977 DialFire RAS User Guide
DialFire PTE ISDN E1 (Euro ISDN) Configuration Worksheet
Use the worksheet below to collect the information that may be required to complete the configuration of your
DialFire PTE adapter within your operating system environment.
Note Not all operating systems support all parameters.
Note The parameters on this page are for ISDN E1 (Euro ISDN).
Parameter Value
Line Type E1
Framing [ ] CEPT with CRC4 [ ] CEPT without CRC4
Coding [ ] HDB3 [ ] AMI
Signaling [ ] ETSI (Euro ISDN) [ ] None
Leased Time Slots List which, if any, E1 time slots are leased:
Modem Nationality Enter the country in which the PTE adapter will be operated:
Before You Install the DialFire
RAS B4ST Adapter…
.
Order the ISDN Line
If you do not have an ISDN line installed, you need to contact your telephone company and order a Basic Rate ISDN line (2B+D) with the following recommended configuration:
Note If your telephone company supports either of the
following ISDN Ordering Codes, request that your
ISDN line be configured to one of them.
• EZ-ISDN 1 (Preferred)
• Capability S
If your telephone company does not support either of these Ordering
Codes, request the following ISDN line configuration:
• Switch Type: National ISDN 1 (preferred), ETSI, AT&T 5ESS, or Nortel
DMS 100
• ISDN Basic Rate Interface (BRI) service (2B+D)
• 2 B channels, D channel for signaling only (no D channel packet data)
• Circuit Switched data and voice (CSD/CSV) on each channel
• Dynamic TEI
• Multipoint bus configuration
• Terminal type A (AT&T Custom switch only)
• No EKTS or special services or features
*You must select a long distance carrier and forward your choice, along with the Ordering
Code or line configuration, to your telephone company
After completing the worksheet, go to section chapter 3, “Installing the Model 2977 adapter” on page 29.
24 DialFire PTE ISDN E1 (Euro ISDN) Configuration Worksheet
Page 25

Model 2977 DialFire RAS User Guide 2 • Preparation
DialFire PTE ISDN T1 (PRI), Long-Haul (External T1) Configuration
Worksheet
Use the worksheet below to collect the information that may be required to complete the configuration of your
DialFire PTE adapter within your operating system environment.
Note The parameters on this page are for ISDN T1 (PRI) connected directly to an exter-
nal T1 telephone line (Long Haul). If your adapter is connected to a PBX or similar
in-house network, use the ISDN T1 (PRI), Short Haul (PBX or Other Internal Network) configuration worksheet (page 27).
Parameter Value
Coding [ ] B8ZS
Framing [ ] ESF
Long Haul Line Build
Out (Level)
Signaling [ ] AT&T 5ESS [ ] Nortel DMS 100/250 [ ] ETSI (Euro ISDN) [ ] INS-1500 (Japan)
NFAS Master Port (RAS
48 PT2 Only)
Leased Time Slots List which, if any, PRI time slots are leased:
Modem Nationality Enter the country in which the PTE adapter will be installed:
[ ] 0dB [ ] 7.5 dB [ ] 15 dB [ ] 22.5 dB
[ ] National ISDN2 [ ] None
[ ] None
[ ] 1 [ ] 2
Interface ID for Port 1(0–127):
________
Interface ID for Port 2
(0–127): ________
DialFire PTE ISDN T1 (PRI), Long-Haul (External T1) Configuration Worksheet 25
Page 26

2 • Preparation Model 2977 DialFire RAS User Guide
Parameter Value
Before You Install the
DialFire RAS B4ST
Adapter…
Order the ISDN Line
If you do not have an ISDN line installed, you need to contact your telephone company
and order a Basic Rate ISDN line (2B+D) with the following recommended configuration:
Note If your telephone company supports either of the following
ISDN Ordering Codes, request that your ISDN line be configured to one of them.
• EZ-ISDN 1 (Preferred)
• Capability S
If your telephone company does not support either of these Ordering Codes, request
the following ISDN line configuration:
• Switch Type: National ISDN 1 (preferred), ETSI, AT&T 5ESS, or Nortel DMS 100
• ISDN Basic Rate Interface (BRI) service (2B+D)
• 2 B channels, D channel for signaling only (no D channel packet data)
• Circuit Switched data and voice (CSD/CSV) on each channel
• Dynamic TEI
• Multipoint bus configuration
• Terminal type A (AT&T Custom switch only)
• No EKTS or special services or features
*You must select a long distance carrier and forward your choice, along with the Ordering Code or line
configuration, to your telephone company
After completing the worksheet, go to chapter 3, “Installing the Model 2977 adapter” on page 29.
26 DialFire PTE ISDN T1 (PRI), Long-Haul (External T1) Configuration Worksheet
Page 27

Model 2977 DialFire RAS User Guide 2 • Preparation
DialFire ISDN T1 (PRI), Short-Haul Configuration Worksheet
Use the worksheet below to collect the information that may be required to complete the configuration of your
DialFire PTE adapter within your operating system environment.
Note Not all operating systems support all parameters.
Note The parameters on this page are for ISDN T1 (PRI) connected to a PBX or similar
in-house network (Short Haul). If your adapter is connected directly to an external
T1 telephone line, use the ISDN T1 (PRI), Long Haul (External T1) configuration
worksheet (page 25).
Parameter Value
Coding [ ] B8ZS
Framing [ ] ESF
Short Haul Length in
feet (meters)
Signaling [ ] AT&T 5ESS [ ] Nortel DMS 100/250
NFAS Master Port (RAS
48 PT2 Only)
Leased Time Slots List which, if any, PRI time slots are leased:
Modem Nationality Enter the country in which the PTE adapter will be installed:
[ ] 0–133 ft (0–41 m) [ ] 133–266 ft (40.5–81 m)
[ ] 266–399 ft (81–122 m) [ ] 399–533 ft (122–162 m)
[ ] 533–655 ft (162–200 m)
[ ] ETSI (Euro ISDN) [ ] INS-1500 (Japan)
[ ] National ISDN2 [ ] None
[ ] None
[ ] 1 [ ] 2
Interface ID for Port
1(0–127): ________
Interface ID for
Port 2 (0–127):
________
DialFire ISDN T1 (PRI), Short-Haul Configuration Worksheet 27
Page 28

2 • Preparation Model 2977 DialFire RAS User Guide
Parameter Value
Before You Install the
DialFire RAS B4ST
Adapter…
Order the ISDN Line
If you do not have an ISDN line installed, you need to contact your telephone
company and order a Basic Rate ISDN line (2B+D) with the following recommended configuration:
Note If your telephone company supports either of the following
ISDN Ordering Codes, request that your ISDN line be
configured to one of them.
• EZ-ISDN 1 (Preferred)
• Capability S
If your telephone company does not support either of these Ordering Codes,
request the following ISDN line configuration:
• Switch Type: National ISDN 1 (preferred), ETSI, AT&T 5ESS, or Nortel DMS 100
• ISDN Basic Rate Interface (BRI) service (2B+D)
• 2 B channels, D channel for signaling only (no D channel packet data)
• Circuit Switched data and voice (CSD/CSV) on each channel
• Dynamic TEI
• Multipoint bus configuration
• Terminal type A (AT&T Custom switch only)
• No EKTS or special services or features
*You must select a long distance carrier and forward your choice, along with the Ordering Code or
line configuration, to your telephone company
Note After completing the worksheet, go to chapter 3, “Installing the Model 2977
adapter” on page 29
28 DialFire ISDN T1 (PRI), Short-Haul Configuration Worksheet
Page 29

Chapter 3 Installing the Model 2977 adapter
Chapter contents
Introduction..........................................................................................................................................................30
Model 2977 B4 ST adapter installation .................................................................................................................30
Determining your line termination requirements ............................................................................................30
Installing the DialFire RAS B4ST Adapter ......................................................................................................31
Model 2977 B4 U adapter installation...................................................................................................................32
Model 2977 PE1 PE2 adapter installation.............................................................................................................34
Model 2977 PT1 PT2 adapter installation ............................................................................................................35
Model 2977 daughter board installation................................................................................................................36
Parts List .........................................................................................................................................................36
Installation ......................................................................................................................................................36
29
Page 30

3 • Installing the Model 2977 adapter Model 2977 DialFire RAS User Guide
Introduction
This chapter contains the following procedures for installing your Model 2977 adapter. Refer to the appropriate procedure and complete it, then go to chapter 4, “Driver installation and configuration” on page 39 to
install the software driver.
• Model 2977 B4 ST (see “Model 2977 B4 ST adapter installation” on page 30)
• 2977 B4 U adapter installation (see “Model 2977 B4 U adapter installation” on page 32)
• 2977 PE1 PE2 adapter installation (see “Model 2977 PE1 PE2 adapter installation” on page 34)
• 2977 PT1 PT2 adapter installation (see “Model 2977 PT1 PT2 adapter installation” on page 35)
• 2977 daughter board installation (see “Write down the serial number of the adapter in the space provided
below. The serial number label has the general form: “S/N (S) XXX XXXXX”” on page 36)
Model 2977 B4 ST adapter installation
The DialFire RAS B4ST adapter provides four ISDN Basic Rate Interface (2B+D) lines in a package that fits in
a single PCI slot in your server.
This section describes how to install your DialFire RAS B4ST adapter.
Determining your line termination requirements
ISDN Basic Rate Lines must be terminated. By default, the DialFire RAS B4ST adapter terminates the BRI
line with a 100-ohm resister across the transmit and receive lines. In most cases, no changes are required. In the
event that multiple ISDN S/T devices are installed on the same ISDN BRI line, only one device (the device
farthest from the NT1) should be terminated. If the DialFire RAS B4ST is not that device, you will need to
change the switch setting from Terminated to Open (see Step 8 of the Installation procedure). Ensure that the
terminating resistors in the farthest ISDN device are enabled, and that the NT1 is set to 100-ohm termination.
30 Introduction
Page 31

Model 2977 DialFire RAS User Guide 3 • Installing the Model 2977 adapter
The terminating switches must be changed in pairs (one for transmit and one for receive), as shown in figure 3.
The figure shows the switches set for no termination (OFF position). To terminate the lines, place the switches
in the ON position (down, or toward the board).
Figure 3. DialFire BRI connectors and line-terminating DIP switch
Installing the DialFire RAS B4ST Adapter
Do the following:
1. Unplug power from the computer.
2. Remove the computer’s cover.
3. Put on the wrist strap (included in your DialFire RAS package) and attach it to the computer’s chassis.
To guard against damage to the DialFire RAS adapter due to
electrostatic discharge (ESD), do not remove the adapter from its
protective packaging until you have grounded yourself to the
computer chassis
4. Locate an available full-length PCI slot in your computer and remove the slot plate.
5. Remove the DialFire RAS adapter from its protective packaging.
6. Write down the serial number of the adapter in the space provided below. The serial number label has the
general form: “S/N (S) XXX XXXXX”
Serial Number: ________________________
7. Insert the adapter into the slot and screw the endplate to the computer chassis. The endplate must be
screwed into the computer chassis to remain in compliance with Part 15 of FCC rules.
8. Set the BRI line termination DIP switches according to your configuration.
Model 2977 B4 ST adapter installation 31
Page 32

3 • Installing the Model 2977 adapter Model 2977 DialFire RAS User Guide
9. Replace the computer’s cover.
10. Connect the telephone line(s) to the adapter (see figure 3 on page 31 for connector locations).
Adapter installation is complete. Refer to Chapter 4, “Driver installation and configuration”.
Model 2977 B4 U adapter installation
The DialFire RAS B4ST adapter provides four ISDN Basic Rate Interface (2B+D) lines in a package that fits in
a single PCI slot in your server.
This section describes how to install your DialFire RAS B4ST adapter.
Do the following:
1. Unplug power from the computer.
2. Remove the computer’s cover.
3. Put on the wrist strap (included in your DialFire RAS package) and attach it to the computer’s chassis.
To guard against damage to the DialFire RAS adapter due to
electrostatic discharge (ESD), do not remove the adapter from its
protective packaging until you have grounded yourself to the
computer chassis
4. Locate an available full-length PCI slot in your computer and remove the slot plate.
5. Remove the DialFire RAS adapter from its protective packaging.
6. Write down the serial number of the adapter in the space provided below. The serial number label has the
general form: “S/N (S) XXX XXXXX”
Serial Number: ________________________
7. Insert the adapter into the slot and screw the endplate to the computer chassis. The endplate must be
screwed into the computer chassis to remain in compliance with Part 15 of FCC rules.
8. Replace the computer’s cover.
32 Model 2977 B4 U adapter installation
Page 33

Model 2977 DialFire RAS User Guide 3 • Installing the Model 2977 adapter
Figure 4. DialFire BRI connectors
9. Connect the telephone line(s) to the adapter (see figure 4 for connector locations).
Adapter installation is complete. Refer to Chapter 4, “Driver installation and configuration”.
Model 2977 B4 U adapter installation 33
Page 34

3 • Installing the Model 2977 adapter Model 2977 DialFire RAS User Guide
Model 2977 PE1 PE2 adapter installation
The DialFire RAS PTE Series adapters provide one or two 30B+D PRI interfaces in a package that fits in a single PCI slot in your server.
Because it uses DSP (digital signal processor) technology, the DialFire RAS adapter supports digital or analog
connections on PRI circuits. The adapter supports up to 30 channels on each line.
The position of the PRI connectors is shown in figure 5.
Note Line 1 and Line 2 connectors are present on RAS PE1 and RAS PE2
adapters, but only Line 1 is active on RAS PE1 adapters. A RAS PE1
adapter may be field-upgraded to RAS PE2 by the addition of a
daughter card
Line 2
Green LED
Yellow LED
Figure 5. PE1 & PE2 Connector Locations
Line 1
Do the following:
1. Unplug power from the computer.
2. Remove the computer’s cover.
To guard against damage to the DialFire RAS adapter due to
electrostatic dis-charge (ESD), do not remove the adapter from its
protective packaging until you have grounded yourself to the
computer chassis
3. Put on the wrist strap (included in your DialFire RAS package) and attach it to the computer’s chassis.
4. Locate an available full-length PCI slot in your computer and remove the slot plate.
5. Remove the DialFire RAS adapter from its protective packaging.
34 Model 2977 PE1 PE2 adapter installation
Page 35

Model 2977 DialFire RAS User Guide 3 • Installing the Model 2977 adapter
6. Write down the serial number of the adapter in the space provided below. The serial number label has the
general form: “S/N (S) XXX XXXXX”
Serial Number: ________________________
7. Insert the adapter into the slot and screw the endplate to the computer chassis.
8. Replace the computer’s cover.
9. Connect the PRI line(s) to the adapter. If the adapter is a RAS PE1, only Line 1 (see figure 5 on page 34)
is active. If the adapter is a RAS PE2, two PRI lines are supported and both connectors may be used.
Adapter installation is complete. Refer to Chapter 4, “Driver installation and configuration”.
Model 2977 PT1 PT2 adapter installation
The DialFire RAS PTE Series adapters provide one or two 30B+D PRI interfaces in a package that fits in a single PCI slot in your server.
Because it uses DSP (digital signal processor) technology, the DialFire RAS adapter supports digital or analog
connections on PRI circuits. The adapter supports up to 30 channels on each line.
The position of the PRI connectors is shown in figure 6.
Do the following:
Note Line 1 and Line 2 connectors are present on RAS PT1 and RAS PT2
adapters, but only Line 1 is active on RAS PT1 adapters. A RAS PT1
adapter may be field-upgraded to RAS PT2 by the addition of a
daughter card
Line 2
Green LED
Yellow LED
Figure 6. PT1 & PT2 Connector Locations
Line 1
1. Unplug power from the computer.
2. Remove the computer’s cover.
Model 2977 PT1 PT2 adapter installation 35
Page 36

3 • Installing the Model 2977 adapter Model 2977 DialFire RAS User Guide
To guard against damage to the DialFire RAS adapter due to
electrostatic dis-charge (ESD), do not remove the adapter from its
protective packaging until you have grounded yourself to the
computer chassis
3. Put on the wrist strap (included in your DialFire RAS package) and attach it to the computer’s chassis.
4. Locate an available full-length PCI slot in your computer and remove the slot plate.
5. Remove the DialFire RAS adapter from its protective packaging.
6. Write down the serial number of the adapter in the space provided below. The serial number label has the
general form: “S/N (S) XXX XXXXX”
Serial Number: ________________________
7. Insert the adapter into the slot and screw the endplate to the computer chassis.
8. Replace the computer’s cover.
9. Connect the PRI line(s) to the adapter. If the adapter is a RAS PT1, only Line 1 (see figure 6 on page 35)
is active. If the adapter is a RAS PT2, two PRI lines are supported and both connectors may be used.
Adapter installation is complete. Refer to Chapter 4, “Driver installation and configuration”.
Model 2977 daughter board installation
You can activate the second port on your DialFire PT1 or PE1 adapter by adding a daughter card. This section
provides instructions for installing the daughter card on PCI and CompactPCI (cPCI) adapters.
Parts List
• DialFire PTE series daughter card
• Spacers, quantity: 4
• Screws, quantity: 8
• Wrist strap for static protection
Installation
1. If your DialFire adapter is currently installed in your system, follow the normal procedure to prepare your
system for hardware removal or exchange.
2. Put on the wrist strap (included with the adapter) and attach it to the system chassis.
For ESD protection, do not touch the DialFire adapter or the
daughter card until you have grounded yourself to the system
chassis
3. Remove the DialFire adapter from the system (if installed).
36 Model 2977 daughter board installation
Page 37

Model 2977 DialFire RAS User Guide 3 • Installing the Model 2977 adapter
4. Remove the daughter card from its ESD protective packaging.
5. Using the screws provided, attach the four spacers to the DialFire adapter, on the side with the connector,
as shown in figure 7 (below) and figure 8 on page 38. Be sure to install the spacers on the plated throughholes.
6. Plug the daughter card onto the DialFire adapter (see figure 7 and figure 8). The spacers should line up
with the plated through-holes on the daughter card.
Mating
Connectors
Platedthrough holes
Spacers
Screws
Figure 7. PCI Board: Installing the Daughter Card on the DialFire PTE Adapter
Model 2977 daughter board installation 37
Page 38

3 • Installing the Model 2977 adapter Model 2977 DialFire RAS User Guide
Plated-through holes
Spacers
Screws
Mating
Connectors
Figure 8. CompactPCI (cPCI) Board: Installing the Daughter Card on the DialFire PTE Adapter
7. Secure the daughter card to the adapter with the remaining four screws.
8. Install the adapter in your computer or store it in a static dissipating sleeve for ESD protection before
removing the wrist strap.
9. Record the adapter serial number in the space provided below. The serial number label has the following
general form: S/N (S) XXX XXXXX
Serial Number: ________________________
Daughter card installation is complete.
38 Model 2977 daughter board installation
Page 39

Chapter 4 Driver installation and
configuration
Chapter contents
Introduction..........................................................................................................................................................41
Driver installation for the Windows 2000 operating system...................................................................................41
Supported Products ........................................................................................................................................41
Requirements ..................................................................................................................................................41
Procedure ........................................................................................................................................................41
Installing the Driver ........................................................................................................................................42
Procedure ..................................................................................................................................................42
Upgrading the Driver ......................................................................................................................................42
Procedure ..................................................................................................................................................42
Driver installation for the Windows XP operating system ...............................................................................43
Additional Notes .......................................................................................................................................44
Configuring Incoming Dial-up Networking Connections ...............................................................................44
Procedure ..................................................................................................................................................44
Configuring Outgoing Dial-up Networking Connections ...............................................................................45
Procedure ..................................................................................................................................................45
Changing Adapter Properties ..........................................................................................................................45
Procedure ..................................................................................................................................................45
Changing Phone and Modem Options ...........................................................................................................45
Procedure ..................................................................................................................................................45
Uninstalling the Driver ...................................................................................................................................46
Procedure ..................................................................................................................................................46
Using the Windows Troubleshooter ...............................................................................................................46
Procedure ..................................................................................................................................................46
Driver installation for the Microsoft Windows NT operating system.....................................................................46
Installing the Driver: CD ................................................................................................................................46
Procedure ..................................................................................................................................................46
Installing the Driver: Downloaded ..................................................................................................................47
Procedure ..................................................................................................................................................47
Installing the MS Loopback Adapter ...............................................................................................................47
Procedure ..................................................................................................................................................47
Configuring the Adapter: First Time ...............................................................................................................48
Procedure ..................................................................................................................................................48
Changing the Adapter Configuration ..............................................................................................................48
Procedure ..................................................................................................................................................48
Configuring RAS Ports ...................................................................................................................................48
Procedure ..................................................................................................................................................48
Configuring RAS Dial-in Permissions .............................................................................................................49
Procedure ..................................................................................................................................................49
39
Page 40

4 • Driver installation and configuration Model 2977 DialFire RAS User Guide
Configuring Dial-up Networking Connections ...............................................................................................50
Procedure ..................................................................................................................................................50
Configuring Modems on COM Ports .............................................................................................................50
Procedure ..................................................................................................................................................50
Uninstalling the Driver ...................................................................................................................................50
Procedure ..................................................................................................................................................50
Changing Serial Port Names ...........................................................................................................................51
Procedure ..................................................................................................................................................51
40
Page 41

Model 2977 DialFire RAS User Guide 4 • Driver installation and configuration
Introduction
This chapter contains the following procedures for installing and configuring your Model 2977 software driver.
Refer to the appropriate procedure and complete it, then go to chapter 5, “Using the Viewer” on page 53 to
install the PattonAssist Manager.
• Microsoft Windows 2000 installation (see “Driver installation for the Windows 2000 operating system”)
• Microsoft Windows NT (see “Driver installation for the Microsoft Windows NT operating system” on
page 46)
Driver installation for the Windows 2000 operating system
This section describes installing and configuring the DialFire device driver package.
Supported Products
Use this documentation to help you install and configure Windows 2000 device drivers for the following Patton RAS products:
• DialFire RAS PT1&PT2 & PE1&PE2
• DialFire RAS B4ST\U adapters
Requirements
The following factors affect the process of installing or upgrading Patton device drivers:
• New Patton drivers may be delivered on a CD-ROM or downloaded from the Patton Support Web site
(support.patton.com).
• Patton drivers for Microsoft Windows 2000 may be either signed or unsigned.
• Some Patton adapters may have an outdated driver in the Windows 2000 driver database, which must be
replaced when you install the adapter.
• A Patton device driver often supports multiple types of adapters. It is possible for driver version conflicts to
occur, depending on the specific combination of adapters and drivers in your system.
Windows 2000 Plug and Play installation, while appropriate for most devices, does not resolve conflicts resulting from these factors.
For most Patton adapters, a configuration wizard starts automatically as part of the installation or upgrade process. You may need to step through configuration wizards for your installed adapters, but your current configuration parameters remain intact unless you make changes.
Procedure
1. Install the adapter. See the appropriate hardware installation card for information.
Note When you install multiple PCI adapters of the same type on a Win-
dows system, it is sometimes difficult to determine which adapter you
are configuring. To avoid confusion, you may wish to install and configure the adapters one at a time.
Introduction 41
Page 42

4 • Driver installation and configuration Model 2977 DialFire RAS User Guide
Installing the Driver
Use this procedure to install a Patton device driver on Microsoft Windows 2000.
Note If you installed your adapter before performing this procedure, go to
Completing an Installation instead.
Procedure
1. Ensure that Windows 2000 is running on your system.
2. Install the adapter according to the hardware installation instructions.
3. Apply power to the system and start Windows 2000. Choose where driver is located or select Browse CD
and point to drivers.
4. If the driver is unsigned, choose
Yes to continue through each of the Digital Signature Not Found warnings. This
ensures that the most current driver software is installed.
5. Follow the instructions to complete the installation. For most Patton adapters, a configuration wizard
starts automatically as part of the installation process.
When the installation is complete, the adapter is ready to use. There is no need to restart Windows unless
you are notified to do so.
Upgrading the Driver
Use this procedure to upgrade Patton device drivers for Microsoft Windows 2000 adapters already installed in
your system.
Because a Patton device driver often supports multiple types of adapters, you must use the Patton Driver
Upgrade Wizard to upgrade drivers. The wizard resolves possible driver conflicts and ensures that the correct
drivers install for the Patton adapters in your system.
Patton drivers may be delivered on a CD-ROM or downloaded from the Patton Support Web site (http://
support.patton.com). Patton drivers for Windows 2000 may be either signed or unsigned.
Procedure
To update a previously installed Digi device driver to a new Patton device driver, do the following:
1. First, run the program padrcln.cmd to remove the existing INF files for the adapter. This ensures that the
new driver files will be installed instead of the old driver files.
padrcln.cmd is part of the driver software pack-
age and can be found in the same directory as the new driver files.
2. Next, navigate to the Device Manager and locate the adapter whose device driver is to be updated:
– From the Desktop, right-click on
My Computer
– Select Manage
– In the left-hand side of the Computer Management window, select Device Manager
Locate the adapter to update:
– In the right-hand side of the window, expand the
Network adapters category.
– Right-click on the device to update
42 Driver installation for the Windows 2000 operating system
Page 43

Model 2977 DialFire RAS User Guide 4 • Driver installation and configuration
– Choose Properties
Begin the upgrade process:
– Click the
– Click the
– Click
Driver tab
Update Driver... button
Next >
– Verify that the default option is selected, "Search for a suitable driver for my device (recommended)"
– Click
Next >
– Deselect all options
– Select the option,
Specify a location
– Click Next >
– Enter the path to the new driver files and click OK
– Click Next >
3. Windows may display a Digital Signature Not Found message, explaining that the driver is not signed. Click Yes to
continue the installation. One may see several of these warnings—simply click
Yes for each message to pro-
ceed with the upgrade.
4. Windows will now install the new device driver for the adapter and its modems.
5. Follow any other instructions to complete the installation.
6. Click
Finish to dismiss the Upgrade Device Driver Wizard.
7. Repeat steps 2 through 6 for each device to be upgraded.
Driver installation for the Windows XP operating system
This section describes installing and configuring the DialFire device driver package.
1. First, run the program padrcln.cmd to remove the existing INF files for the adapter. This ensures that the
new driver files will be installed instead of the old driver files.
padrcln.cmd is part of the driver software pack-
age and can be found in the same directory as the new driver files.
2. Next, navigate to the Device Manager and locate the device whose device driver is to be updated:
– Open the Start menu
– Right-click
My Computer
– Select Manage
– In the left-hand side of the Computer Management window, select Device Manager
Locate the adapter to update:
– In the right-hand side of the window, expand the
Network adapters category.
– Right-click on the device to update
– Choose
Properties
Driver installation for the Windows 2000 operating system 43
Page 44

4 • Driver installation and configuration Model 2977 DialFire RAS User Guide
Begin the upgrade process:
– Click the
– Click the
– Click
Driver tab
Update Driver... button
Next >
– Verify that the default option is selected, "Search for a suitable driver for my device (recommended)"
– Click
Next >
– Deselect all options
– Select the option,
Specify a location
– Click Next >
– Enter the path to the new driver files and click OK
– Click Next >
3. Windows will display a dialog indicating that the software has not passed Windows Logo testing. Choose
Continue Anyway to proceed with the upgrade. One may see several of these warnings—click Continue Anyway for
each message to continue the installation.
4. Windows will now install the new device driver for the adapter and its modems.
5. Follow any other instructions to complete the installation.
6. Click
Finish to dismiss the Upgrade Device Driver Wizard.
7. Repeat steps 2 through 6 for each device to be upgraded.
Additional Notes
This driver has not been signed by Microsoft WHQL.
On-line help is available when you install the product.
Additional installation documentation can be found on Patton's Web site, www.patton.com.
Configuring Incoming Dial-up Networking Connections
Use this procedure to configure incoming Dial-up Networking connections from other systems to your server.
You should have already installed the Patton adapter and device driver.
Procedure
1. From the Start menu, choose Settings > Network and Dial-up Connections.
2. Choose
3. Choose
4. From the
Make New Connection to start the Network Connection Wizard.
Accept incoming connections and complete the wizard.
Start menu, choose Settings > Control Panel > Administrative Tools > Routing and Remote Access. You can use the
Routing and Remote Access control panel to monitor communications activity on the server.
If you have not yet configured your system as a Remote Access Server, choose
Action > Add server, and follow
the on-screen instructions.
44 Driver installation for the Windows 2000 operating system
Page 45

Model 2977 DialFire RAS User Guide 4 • Driver installation and configuration
Configuring Outgoing Dial-up Networking Connections
Use this procedure to configure outgoing Dial-up Networking connections from your server to other systems.
You should have already installed the Patton adapter and device driver.
Procedure
1. From the Start menu, choose Settings > Network and Dial-up Connections.
2. Choose
3. Choose
Make New Connection to start the Network Connection Wizard.
Dial-up to private network and complete the wizard.
4. Upon completion of the wizard, choose Properties if you wish to configure dialing rules (such as what
number to dial to get an outside line) or to add alternate phone numbers to try if the primary number is
busy.
Changing Adapter Properties
Use this procedure to change the configuration of an installed adapter.
Procedure
1. From the Start menu, choose Settings > Control Panel > System > Hardware > Device Manager.
2. From the displayed list, choose DialFire RAS as your network adapter.
3. Choose the Patton adapter you wish to configure.
4. From the Action menu, choose
Properties > Advanced.
5. Configure the adapter as necessary.
6. If you changed the hardware resources from the default settings, Windows may notify you to restart the
system to complete the configuration.
If you left the hardware resources at their default values, the adapter is ready to use without restarting the
system.
Changing Phone and Modem Options
Use this procedure once you have installed and configured the driver and now want to change the configuration.
Phone and modem options that can be set with this procedure include:
• Maximum Port Speed
• Speaker Volume
• Dial Control
• Wait for tone before dialing
• Extra Initialization Commands
Procedure
1. From the Start menu, choose Settings > Control Panel > Phone and Modem Options > Modems.
2. Choose a Patton modem device to configure.
Driver installation for the Windows 2000 operating system 45
Page 46

4 • Driver installation and configuration Model 2977 DialFire RAS User Guide
3. Choose Properties.
4. Configure the options as necessary. Refer to Windows Help for more information.
Uninstalling the Driver
Use this procedure to uninstall the Microsoft Windows 2000 device driver.
Procedure
1. From the Start menu, choose Settings > Control Panel > Add/Remove Hardware > Next.
2. Choose
3. Choose
4. Choose the device you wish to uninstall, then choose
Uninstall/Unplug a device > Next.
Uninstall a device > Next.
Next > Yes > Next > Finish.
Note To prevent the driver from being automatically reinstalled when you
restart Windows, shut down Windows, turn off the computer and
remove the adapter. If you wish to disable the driver without physically removing the adapter, choose Unplug a device in Step 3.
Using the Windows Troubleshooter
Use this procedure to help resolve any basic installation or configuration problems with a Microsoft Windows
2000 or Microsoft Windows NT adapter.
Procedure
1. From the Start menu, select Control Panel > System > Hardware > Device Manager.
2. From the displayed list, choose DialFire RAS as your network adapter.
3. Choose a Patton adapter.
4. Choose
5. If the Device Status window indicates that the device is not operating properly, choose
Actions > Properties > General to view the Device Status window.
Troubleshooting and
follow the instructions. Use Windows Help for more information.
Driver installation for the Microsoft Windows NT operating system
This section describes installing and configuring the DialFire device driver package.
Installing the Driver: CD
Use this procedure to install a driver from the Patton Electronics CD. You should have already started the Patton Electronics CD front-end program.
Procedure
1. Choose an operating system.
2. Choose the Hardware product name.
3. Choose the Software Driver.
4. Choose Install Software.
46 Driver installation for the Microsoft Windows NT operating system
Page 47

Model 2977 DialFire RAS User Guide 4 • Driver installation and configuration
5. Follow the prompts
Installing the Driver: Downloaded
Use this procedure to install a driver that you have downloaded from the Patton Electronics Support Web site
(http://support.patton.com).
Note If you are installing multiple adapters, each adapter needs to be
installed separately. You need to restart your computer before installing another adapter.
Procedure
1. Log on to Windows NT as Administrator.
2. From
Start, choose Settings > Control Panel > Network > Adapters.
3. Do one of the following:
– If this is the first time you have installed this driver, choose
– If you have installed an earlier version of this driver, choose
4. Enter the path to where the driver is stored and then choose
5. Choose the driver and then
6. Choose
OK on the Setup screen to complete installation.
OK.
Add > Have Disk.
Update.
OK.
The adapter appears on the Network Adapters list.
7. Choose
Close and restart the computer.
Installing the MS Loopback Adapter
Use this procedure to install the MS Loopback Adapter.
Procedure
1. From the Windows NT Control Panel, choose Network.
The system displays the following prompt: Windows NT Networking is not installed. Do you want to install
it now?
2. Choose
Yes .
The system asks if your computer is wired to the network or connected via Remote Access (modem).
3. Choose
4. Choose
5. Choose
6. Install the default network services by choosing
Wired to the Network > Next > Select from list.
MS Loopback Adapter from the dialog box and Next.
NetBEUI as the network protocol and then Next.
Next > Next.
The system asks for a directory path.
7. Enter either
d:\i386\ (for Intel processors; use d:\alpha\ for Alpha systems) and load your Windows NT CD-
ROM. (This assumes that your CD-ROM drive is drive D.)
Driver installation for the Microsoft Windows NT operating system 47
Page 48

4 • Driver installation and configuration Model 2977 DialFire RAS User Guide
The system asks you to specify a Frame Type.
8. Choose
802.3 and then Continue.
The network bindings page appears.
9. Choose
10. Enter the name of your computer and workgroup and click
Next to accept the bindings and Next again to start the network.
Next.
11. Restart your computer to activate Windows NT Networking.
Configuring the Adapter: First Time
Use this procedure to configure a Patton Electronics adapter for the first time.
Procedure
1. Install the driver. See Installing the Driver: CD or Installing the Driver: Downloaded.
2. Use the configuration wizard and online Help to guide you through initial configuration.
Changing the Adapter Configuration
Use this procedure to change the configuration of a previously-configured Patton Electronics adapter.
Procedure
1. Access the configuration utility by choosing Control Panel > Network > Adapters.
2. Choose the adapter from the list and then Properties. The adapter properties page appears.
3. Select an item to reconfigure from the left-hand pane of the properties page and then choose
4. Change the configuration as required and then choose
OK.
Properties.
Configuring RAS Ports
Use this procedure to configure Patton Electronics devices as RAS ports (sometimes called RAS capable
devices).
Procedure
1. If you need to access Windows NT RAS, choose Control Panel > Network > Services > Remote Access Services > Properties.
2. To add a modem port to the RAS configuration, do the following:
– Choose
– Choose <Don't detect my modem; I will select it from a list> and then choose
– Choose
Model's list and then choose
Add > Install Modem.
Next.
Patton Electronics International from the Manufacture's list and Patton Electronics RAS 56K Modem from the
Next.
– Install this modem type on the ports you want to use for RAS and then follow the prompts until you get
to the Add RAS Device dialog.
– From the Add RAS Device dialog, choose devices to add to RAS and then OK.
– Configure a RAS device by doing the following:
o Choose the device and then Configure.
48 Driver installation for the Microsoft Windows NT operating system
Page 49

Model 2977 DialFire RAS User Guide 4 • Driver installation and configuration
o Configure the device as desired.
o Choose
OK.
– If all devices are to be configured the same, use
Clone. Otherwise, repeat these steps for each device.
3. If you have a RAS B or RAS PTE adapter and want to add an ISDN port (B-channel) to the RAS configu-
ration, do the following:
– Choose
– Choose a device from the list in RAS Capable Devices and then choose
Add.
OK.
– Install this device on the ports you want to use for RAS and then follow the prompts until you get to the
Add RAS Device dialog.
– From the
Add RAS Device dialog, choose devices to add to RAS and then OK.
– Configure a RAS device by doing the following:
o Choose the device and then
Configure.
o Configure the device as desired.
o Choose
– If all devices are to be configured the same, use
OK.
Clone. Otherwise, repeat these steps for each device.
4. If you have an adapter and want to add an X.25 switched virtual circuit (SVC) or a PPP device to the RAS
configuration, do the following:
– Choose
Add.
– Choose an X.25 SVC or a Patton Electronics PPP device from the list in RAS Capable Devices and then
OK.
5. To configure the network protocols to use over a port, do the following:
– Choose the port.
– Choose the Network button to access the protocol-specific configuration.
– Use Microsoft's help text to guide you through the network protocol configuration. If you plan to use
Multilink PPP over this connection, ensure that Multilink is selected.
6. Choose
Continue to finish RAS configuration.
7. Close the Microsoft Network applet.
8. Reboot when prompted to do so.
Configuring RAS Dial-in Permissions
Use this procedure to configure dial-in permissions for Microsoft Windows NT RAS ports.
Note If you are using RAS, use the User Manager for Domains to configure
RAS dial-in permissions. See the Microsoft help text for more information.
Procedure
1. Access the RAS Admin utility by choosing Start > Programs > Administrative Tools > Remote Access Admin.
Driver installation for the Microsoft Windows NT operating system 49
Page 50

4 • Driver installation and configuration Model 2977 DialFire RAS User Guide
2. Choose Users > Permission from the menu.
3. Configure permission. Use Microsoft Windows NT online help for information.
Configuring Dial-up Networking Connections
Use this procedure to configure Dial-up Networking connections for a Patton Electronics adapter.
Procedure
1. To access the Dial-up Networking utility, double-click My Computer and then Dial-up Networking.
2. Choose
New.
3. Fill out configuration fields. Here are a few tips:
– If you will use more than one telephone number to make the connection, do the following: (a) Fill in
the telephone number (b) Choose the
Alternate button, (c) Add numbers. (d) Choose OK when you are
done.
– In the
– If you want to configure a Multilink connection, do the following: (1) Choose
Dial-up using field, specify the device that will be used for the connection.
Multiple Lines in the Dial-up
using
field. This entry will appear only if you have configured the connection in RAS for Multilink. (2)
Choose
Configure. (3) Check any channels that are to be part of the multilink connection.
– When providing telephone numbers, remember the following: (a) You may have to include the number
9 or some other digit to get an outside line if your site uses a PBX or Centrex service. (b) For ISDN connections, do not use spaces, dashes, or commas in the telephone number. (c) If this is a long distance
call, be sure the telephone number includes the number 1 and an area code.
– When selecting ISDN Devices, select the line type ordered from your service provider.
4. Choose
OK > Close.
Configuring Modems on COM Ports
Use this procedure to configure a Patton Electronics modem as a Microsoft Windows NT COM port.
Procedure
1. Choose Control Panel > Modems > Add.
2. Check
3. Choose the Patton Electronics modem and then
4. Choose COM ports on which to install the modem and then
Don't detect my modem; I will select it from a list and then choose Next.
Next.
Next > Finish.
Uninstalling the Driver
Use this procedure to uninstall a Microsoft Windows NT driver.
Procedure
1. Open the Windows NT Control Panel.
2. Choose
3. Highlight the adapter and choose
50 Driver installation for the Microsoft Windows NT operating system
Network > Adapters.
Remove.
Page 51

Model 2977 DialFire RAS User Guide 4 • Driver installation and configuration
4. If you have installed external modems on an AccelePort Xp adapter or if you have configured internal
modems on AccelePort or DialFire adapters, remove them from the Windows NT Modem list by doing
the following:
– From the Control Panel, choose
– Choose the modem to remove, then choose
Modems.
Remove.
5. Restart Windows NT to complete the removal process.
Changing Serial Port Names
Use this procedure to change the name of a serial port in Microsoft Windows NT.
Procedure
1. Access the configuration utility by choosing Control Panel > Network > Adapters.
2. Choose your adapter from the list and then
Properties.
The adapter properties page appears.
3. If necessary, expose individual serial ports by clicking the
4. Choose a port to rename and then
5. Supply a new name and then choose
Properties.
OK.
+ (plus sign) at the left of the Serial label.
Driver installation for the Microsoft Windows NT operating system 51
Page 52

4 • Driver installation and configuration Model 2977 DialFire RAS User Guide
52 Driver installation for the Microsoft Windows NT operating system
Page 53

Chapter 5 Using the Viewer
Chapter contents
About Patton View................................................................................................................................................54
Starting Patton View .......................................................................................................................................54
53
Page 54

5 • Using the Viewer Model 2977 DialFire RAS User Guide
About Patton View
Patton View is a diagnostic utility—currently available only for the Microsoft Windows 2000 operating system—that provides tools to monitor and troubleshoot Patton adapter connections. Patton Viewer includes the
following features:
• Line monitoring that includes information on each line and virtual circuit, and on the various protocol lay-
ers
• Line tracing
• Trace filtering tools that allow you to eliminate unwanted information from the display of information cap-
tured during a trace
• Trace analysis tools that allow you to easily identify individual fields within captured frames
• Graphical user interface and context-sensitive help
To use PattonAssist Viewer, see section “Starting Patton View”.
Starting Patton View
To start PattonAssist Viewer do the following:
1. From the
2. Enter the program name
Start menu choose Run.
Pattonview.
3. Patton Viewer will start. For detailed information on Patton View tools, choose Help.
54 About Patton View
Page 55

Chapter 6 Operation and shutdown
Chapter contents
Activating the Model 2977....................................................................................................................................56
De-activating the Model 2977...............................................................................................................................56
55
Page 56

6 • Operation and shutdown Model 2977 DialFire RAS User Guide
Activating the Model 2977
The Model 2977 RAS activates automatically when power is applied to computer in which the RAS is
installed.
De-activating the Model 2977
To de-activate a Model 2977 RAS, the computer in which the RAS is installed must be powered-off. Follow
the appropriated directions for shutting-down the computer.
56 Activating the Model 2977
Page 57

Chapter 7 Troubleshooting and maintenance
Chapter contents
Introduction..........................................................................................................................................................58
Periodic maintenance ............................................................................................................................................58
Calibration ......................................................................................................................................................58
Maintenance..........................................................................................................................................................58
57
Page 58

7 • Troubleshooting and maintenance Model 2977 DialFire RAS User Guide
Introduction
This chapter describes troubleshooting and fault analysis that can be performed by the operator. If you require
more help, refer to Chapter 8, “Contacting Patton for assistance”. Refer to TBD for a list of common symptoms and suggested remedies.
Note The following information assumes that there is only one failure
involving the RAS and that if you perform the corrective action
listed, it will solve the problem. If you are unable to correct a failure,
refer to Chapter 8, “Contacting Patton for assistance”.
TBD
Periodic maintenance
The RAS requires no periodic maintenance
Calibration
The RAS requires no calibration.
Maintenance
This section describes replacing the RAS. If you isolate a problem to the a RAS component, the entire RAS
must be replaced as follows:
TBD
58 Introduction
Page 59

Chapter 8 Contacting Patton for assistance
Chapter contents
Introduction..........................................................................................................................................................60
Contact information..............................................................................................................................................60
Warranty Service and Returned Merchandise Authorizations (RMAs)...................................................................60
Warranty coverage ..........................................................................................................................................60
Out-of-warranty service .............................................................................................................................60
Returns for credit ......................................................................................................................................60
Return for credit policy .............................................................................................................................61
RMA numbers ................................................................................................................................................61
Shipping instructions ................................................................................................................................61
59
Page 60

8 • Contacting Patton for assistance Model 2977 DialFire RAS User Guide
Introduction
This chapter contains the following information:
• “Contact information”—describes how to contact PATTON technical support for assistance.
• “Warranty Service and Returned Merchandise Authorizations (RMAs)”—contains information about the
RAS warranty and obtaining a return merchandise authorization (RMA).
Contact information
Patton Electronics offers a wide array of free technical services. If you have questions about any of our other
products we recommend you begin your search for answers by using our technical knowledge base. Here, we
have gathered together many of the more commonly asked questions and compiled them into a searchable
database to help you quickly solve your problems.
• Online support—available at www.patton.com.
• E-mail support—e-mail sent to support@patton.com will be answered within 1 business day
• Telephone support—standard telephone support is available 5 days a week, from 8:00am to 5:00pm EST
by calling +1 (301) 975-1007
Warranty Service and Returned Merchandise Authorizations (RMAs)
Patton Electronics is an ISO-9001 certified manufacturer and our products are carefully tested before shipment. All of our products are backed by a comprehensive warranty program.
Note If you purchased your equipment from a Patton Electronics reseller,
ask your reseller how you should proceed with warranty service. It is
often more convenient for you to work with your local reseller to
obtain a replacement. Patton services our products no matter how
you acquired them.
Warranty coverage
Our products are under warranty to be free from defects, and we will, at our option, repair or replace the product should it fail within one year from the first date of shipment. Our warranty is limited to defects in workmanship or materials, and does not cover customer damage, lightning or power surge damage, abuse, or
unauthorized modification.
Out-of-warranty service
Patton services what we sell, no matter how you acquired it, including malfunctioning products that are no
longer under warranty. Our products have a flat fee for repairs. Units damaged by lightning or other catastrophes may require replacement.
Returns for credit
Customer satisfaction is important to us, therefore any product may be returned with authorization within 30
days from the shipment date for a full credit of the purchase price. If you have ordered the wrong equipment or
you are dissatisfied in any way, please contact us to request an RMA number to accept your return. Patton is
not responsible for equipment returned without a Return Authorization.
60 Introduction
Page 61

Model 2977 DialFire RAS User Guide 8 • Contacting Patton for assistance
Return for credit policy
• Less than 30 days: No Charge. Your credit will be issued upon receipt and inspection of the equipment.
• 30 to 60 days: We will add a 20% restocking charge (crediting your account with 80% of the purchase
price).
• Over 60 days: Products will be accepted for repairs only.
RMA numbers
RMA numbers are required for all product returns. You can obtain an RMA by doing one of the following:
• Completing a request on the RMA Request page in the Support section at www.patton.com
• By calling +1 (301) 975-1000 and speaking to a Technical Support Engineer
• By sending an e-mail to returns@patton.com
All returned units must have the RMA number clearly visible on the outside of the shipping container. Please
use the original packing material that the device came in or pack the unit securely to avoid damage during
shipping.
Shipping instructions
The RMA number should be clearly visible on the address label. Our shipping address is as follows:
Patton Electronics Company
RMA#: xxxx
7622 Rickenbacker Dr.
Gaithersburg, MD 20879-4773 USA
Patton will ship the equipment back to you in the same manner you ship it to us. Patton will pay the return
shipping costs.
Warranty Service and Returned Merchandise Authorizations (RMAs) 61
Page 62

8 • Contacting Patton for assistance Model 2977 DialFire RAS User Guide
62 Warranty Service and Returned Merchandise Authorizations (RMAs)
Page 63

Appendix A Software License Agreements
Chapter contents
Agreement for using the DialFire driver software with the Microsoft Windows 2000 operating system.................64
Agreement for using the DialFire driver software with the Microsoft Windows NT operating system ...................65
63
Page 64

A • Software License Agreements Model 2977 DialFire RAS User Guide
Agreement for using the DialFire driver software with the Microsoft Windows 2000 operating system
LICENSE. Patton Electronics Company, Inc. grants to you only a non-assignable, nonexclusive and nontransferable license to use the software contained on this media (hereinafter "Patton Software") subject to the
terms and conditions of this Software License Agreement. Your use will be limited to an object code version of
the Patton Software. Your use of the Patton Software will be limited to one computer. The license will commence on the day you receive the Patton Software and will continue until this license is terminated by its own
terms and conditions. You may make one copy of the Patton Software, but only for archival or backup purposes, and if you do make that additional copy, you agree to reproduce all copyright and other proprietary
rights notices that appear on the Patton Software. You are granted only a limited license to use the Patton Software, and Patton retains all right, title, interest and ownership in and to the Patton Software, which includes all
rights arising under the patent, copyright, trade secret or trademark laws of the United States or any foreign
jurisdiction.
CONFIDENTIALITY. You understand and agree that the Patton Software contains valuable confidential and
trade secret information which is the extremely valuable property of Patton. You agree to expend all necessary
efforts to ensure that the Patton Software is not disclosed or made available to any third party or any employee
or contractor that doesn't have a need to know.
REVERSE ENGINEERING. You agree not to disassemble, decompile or reverse engineer the Patton Software
under any circumstances.
WARRANTIES. Patton warrants only that: (a) the media upon which you receive Patton Software will be free
of defects in material and workmanship for a period of ninety (90) days from your receipt of the Patton Software; and (b) that if the Patton Software is supplied to you electronically, and there is an error in transmission,
and you inform us of that error within ninety days of your receipt of the Patton Software, Patton will re-transmit the Software to you. YOU UNDERSTAND AND AGREE THAT EXCEPT AS STATED ABOVE, THE
PATTON SOFTWARE IS SUPPLIED 'AS IS,' AND PATTON EXPRESSLY DISCLAIMS ALL OTHER
WARRANTIES, GUARANTEES, OR REMEDIES WHETHER EXPRESS, IMPLIED OR STATUTORY,
INCLUDING, BUT NOT LIMITED TO, ANY IMPLIED WARRANTY OF MERCHANTABILITY OR
FITNESS FOR A PARTICULAR PURPOSE.
LIABILITY LIMITATIONS. UNDER NO CIRCUMSTANCES WILL PATTON OR ANY OF ITS DISTRIBUTORS OR SUPPLIERS BE LIABLE FOR LOSS OF DATA, REPROCUREMENT COSTS, LOST
REVENUE OR PROFITS OR ANY OTHER SPECIAL, INCIDENTAL OR CONSEQUENTIAL DAMAGES, EVEN IF THOSE DAMAGES WERE FORESEEABLE OR YOU HAVE INFORMED PATTON
OF POTENTIAL LIABILITY. PATTON'S TOTAL LIABILITY TO YOU FOR DAMAGES FOR ANY
REASON SHALL NOT EXCEED THE PRICE ACTUALLY PAID TO PATTON BY YOU FOR THE
PRODUCT ASSOCIATED WITH THE SOFTWARE.
TITLE AND OWNERSHIP. You acknowledge and agree that Patton retains all right, title and interest in and
to the Software. You agree to indemnify, defend and hold harmless Patton against any loss suffered or expenditure made by Patton arising from an assertion of an interest in or title to the Patton Software by you and
against any breach by you of any copyright, patent rights, or any other rights in the Patton Software.
TERMINATION. You acknowledge and agree that Patton may terminate your license and use of the Patton
Software without notice if, at any time, you fail to comply with a material term or condition of this Software
License Agreement. Immediately upon termination of this license, you will return all copies of the Patton Software to Patton, together with all documentation, modifications and enhancements thereto, or at Patton's
64 Agreement for using the DialFire driver software with the Microsoft Windows 2000 operating system
Page 65

Model 2977 DialFire RAS User Guide A • Software License Agreements
request, destroy all copies of the Patton Software documentation, modifications and enhancements in your
possession. You understand and agree that in the event of termination, Patton may use computer hardware,
software or other methods to render the Patton Software inoperable.
ASSIGNMENT. You may not assign this license without the prior written consent of Patton. Patton may
assign the Patton Software to any third party at its discretion, but will provide you with written notice in the
event of such assignment.
CHOICE OF LAW AND VENUE. This Software License Agreement shall be governed and construed in
accordance with the laws of the State of Minnesota. Any controversy or claim arising out of or related to this
license and/or your use of the Patton Software shall be venued in Minnesota State District Court, County of
Hennepin or the United States District Court for the District of Minnesota.
MAINTENANCE AND SUPPORT. Any software maintenance or support services provided to you by Patton, are provided at Patton's discretion, and Patton reserves the right to discontinue and/or commence charging fees for maintenance or support services at any time. You also understand and agree that any maintenance
or support services provided to you by Patton are provided as is, and Patton makes no representations or warranties with regard to those services.
Agreement for using the DialFire driver software with the Microsoft Windows NT operating system
LICENSE. Patton Electronics grants to you only a non-assignable, nonexclusive and non-transferable license
to use the software contained on this media (hereinafter "Patton Electronics Software") subject to the terms
and conditions of this Software License Agreement. Your use will be limited to an object code version of the
Patton Electronics Software. Your use of the Patton Electronics Software will be limited to one computer. The
license will commence on the day you receive the Patton Electronics Software and will continue until this
license is terminated by its own terms and conditions. You may make one copy of the Patton Electronics Software, but only for archival or backup purposes, and if you do make that additional copy, you agree to reproduce all copyright and other proprietary rights notices that appear on the Patton Electronics Software. You are
granted only a limited license to use the Patton Electronics Software, and Patton Electronics retains all right,
title, interest and ownership in and to the Patton Electronics Software, which includes all rights arising under
the patent, copyright, trade secret or trademark laws of the United States or any foreign jurisdiction.
CONFIDENTIALITY. You understand and agree that the Patton Electronics Software contains valuable confidential and trade secret information which is the extremely valuable property of Patton Electronics. You agree
to expend all necessary efforts to ensure that the Patton Electronics Software is not disclosed or made available
to any third party or any employee or contractor that doesn't have a need to know.
REVERSE ENGINEERING. You agree not to disassemble, decompile or reverse engineer the Patton Electronics Software under any circumstances.
WARRANTIES. Patton Electronics warrants only that: (a) the media upon which you receive Patton Electronics Software will be free of defects in material and workmanship for a period of ninety (90) days from your
receipt of the Patton Electronics Software; and (b) that if the Patton Electronics Software is supplied to you
electronically, and there is an error in transmission, and you inform us of that error within ninety days of your
receipt of the Patton Electronics Software, Patton Electronics will re-transmit the Software to you. YOU
UNDERSTAND AND AGREE THAT EXCEPT AS STATED ABOVE, THE PATTON ELECTRONICS
SOFTWARE IS SUPPLIED 'AS IS,' AND PATTON ELECTRONICS EXPRESSLY DISCLAIMS ALL
OTHER WARRANTIES, GUARANTEES, OR REMEDIES WHETHER EXPRESS, IMPLIED OR STAT-
Agreement for using the DialFire driver software with the Microsoft Windows NT operating system 65
Page 66

A • Software License Agreements Model 2977 DialFire RAS User Guide
UTORY, INCLUDING, BUT NOT LIMITED TO, ANY IMPLIED WARRANTY OF MERCHANTABILITY OR FITNESS FOR A PARTICULAR PURPOSE.
LIABILITY LIMITATIONS. UNDER NO CIRCUMSTANCES WILL PATTON ELECTRONICS OR
ANY OF ITS DISTRIBUTORS OR SUPPLIERS BE LIABLE FOR LOSS OF DATA, REPROCUREMENT COSTS, LOST REVENUE OR PROFITS OR ANY OTHER SPECIAL, INCIDENTAL OR
CONSEQUENTIAL DAMAGES, EVEN IF THOSE DAMAGES WERE FORESEEABLE OR YOU
HAVE INFORMED PATTON ELECTRONICS OF POTENTIAL LIABILITY. PATTON ELECTRONICS'S TOTAL LIABILITY TO YOU FOR DAMAGES FOR ANY REASON SHALL NOT EXCEED THE
PRICE ACTUALLY PAID TO PATTON ELECTRONICS BY YOU FOR THE PRODUCT ASSOCIATED WITH THE SOFTWARE.
TITLE AND OWNERSHIP. You acknowledge and agree that Patton Electronics retains all right, title and
interest in and to the Software. You agree to indemnify, defend and hold harmless Patton Electronics against
any loss suffered or expenditure made by Patton Electronics arising from an assertion of an interest in or title to
the Patton Electronics Software by you and against any breach by you of any copyright, patent rights, or any
other rights in the Patton Electronics Software.
TERMINATION. You acknowledge and agree that Patton Electronics may terminate your license and use of
the Patton Electronics Software without notice if, at any time, you fail to comply with a material term or condition of this Software License Agreement. Immediately upon termination of this license, you will return all
copies of the Patton Electronics Software to Patton Electronics, together with all documentation, modifications
and enhancements thereto, or at Patton Electronics's request, destroy all copies of the Patton Electronics Software documentation, modifications and enhancements in your possession. You understand and agree that in
the event of termination, Patton Electronics may use computer hardware, software or other methods to render
the Patton Electronics Software inoperable.
ASSIGNMENT. You may not assign this license without the prior written consent of Patton Electronics. Patton Electronics may assign the Patton Electronics Software to any third party at its discretion, but will provide
you with written notice in the event of such assignment.
CHOICE OF LAW AND VENUE. This Software License Agreement shall be governed and construed in
accordance with the laws of the State of Minnesota. Any controversy or claim arising out of or related to this
license and/or your use of the Patton Electronics Software shall be venued in Minnesota State District Court,
County of Hennepin or the United States District Court for the District of Minnesota.
MAINTENANCE AND SUPPORT. Any software maintenance or support services provided to you by Patton Electronics, are provided at Patton Electronics's discretion, and Patton Electronics reserves the right to discontinue and/or commence charging fees for maintenance or support services at any time. You also understand
and agree that any maintenance or support services provided to you by Patton Electronics are provided as is,
and Patton Electronics makes no representations or warranties with regard to those services.
66 Agreement for using the DialFire driver software with the Microsoft Windows NT operating system
 Loading...