

Page 1

USER
Part# 07M1180-B
Doc# 017071UB
Revised 1/5/96
MANUAL
MODEL 1180
Single Fiber
Short Range Modem
SALES OFFICE
(301) 975-1000
TECHNICAL SUPPORT
(301) 975-1007
Page 2

1.0 WARRANTY INFORMATION
Patton Electronics warrants all Model 1180 components to be
free from defects, and will—at our option—repair or replace the product
should it fail within one year from the first date of shipment.
This warranty is limited to defects in workmanship or materials, and
does not cover customer damage, abuse or unauthorized modification.
If this product fails or does not perform as warranted, your sole
recourse shall be repair or replacement as described above. Under no
condition shall Patton Electronics be liable for any damages incurred
by the use of this product. These damages include, but are not limited
to, the following: lost profits, lost savings and incidental or
consequential damages arising from the use of or inability to use this
product. Patton Electronics specifically disclaims all other warranties,
expressed or implied, and the installation or use of this product shall be
deemed an acceptance of these terms by the user.
1.1 RADIO AND TV INTERFERENCE
The Model 1180 generates and uses radio frequency energy, and if
not installed and used properly—that is, in strict accordance with the
manufacturer’s instructions—may cause interference to radio and
television reception. The Model 1180 has been tested and found to
comply with the limits for a Class A computing device in accordance
with the specifications in Subpart J of Part 15 of FCC rules, which are
designed to provide reasonable protection from such interference in a
commercial installation. However, there is no guarantee that
interference will not occur in a particular installation. If the Model 1180
does cause interference to radio or television reception, which can be
determined by turning the power off, the user is encouraged to try to
correct the interference by one or more of the following measures:
moving the computing equipment away from the receiver, re-orienting
the receiving antenna and/or plugging the receiving equipment into a
different AC outlet (such that the computing equipment and receiver are
on different branches).
1.2 SERVICE
All warranty and non-warranty repairs must be returned freight
prepaid and insured to Patton Electronics. All returns must have a
Return Materials Authorization number on the outside of the shipping
container. This number may be obtained from Patton Electronics
Technical Service at (301) 975-1007.
2.0 GENERAL INFORMATION
Thank you for your purchase of this Patton Electronics product.
This product has been thoroughly inspected by Patton’s qualified
technicians. If any questions or problems arise during installation or
use of this product, please do not hesitate to contact Patton Electronics
Technical Support at (301) 975-1007.
2.1 FEATURES
• Operates over a single optical fiber
• Synchronous or asynchronous operation
• Loopback diagnostics
• Asynchronous data rates to 38.4 Kbps
• Synchronous data rates to 256 kbps
• Distances to 5 Km
• Internal or external clocking
• Hardware and software flow control
• Tri-state front panel LEDs
• Available with ST or SMA connectors
2.2 DESCRIPTION
The Model 1180 Single Fiber Short Range Modem accomplishes
point-to-point RS-232 communication over a
single
optical fiber.
Supporting synchronous data rates to 256 Kbps, and asynchronous
data rates to 38.4 Kbps, the Model 1180 automatically adapts to
hardware or software flow control. Synchronous timing can be set for
internal or external clock.
The Model 1180 features extended data rate circuitry that allows for
single fiber distances between 2.5 and 5 Km. Optical fiber may be
connected to the Model 1180 using an ST or SMA type interface. The
Model 1180 encodes the electrical signal using 3B4B modulation. The
electrical signal is then converted to an optical signal and transmitted
using an 880 nm light emitting diode.
The Model 1180 features two test modes: local and remote
loopback. These loopback tests are activated via a front panel switch.
The local loopback test is used to evaluate the RS-232 to modem
connection. The remote loopback test is used to evaluate the condition
of the connection between the modems.
2
RMA number will not be accepted.
Patton Electronics’ technical staff is also available to answer any
questions that might arise concerning the installation or use of your
Model 1180. Technical Service hours: 8AM to 5PM EST, Monday
through Friday.
Packages received without an
1
Page 3

3.0 CONFIGURATION
1 2 3 4 5 6 7 8
ON
FRONT
REAR
1 2 3 4 5 6 7 8
ON
OFF
ON
3.1 DETAILED SWITCH SETTINGS
This section provides detailed information about the function of
each DIP switch and lists all possible settings. Use this section as
configuration guide for applications where the Model 1180’s default
would not provide correct results.
Switch 1: Reserved for Future Use
Switches 2 though 5: Data Rate (Sync. Mode)
Switches 2 through 5 determine two configuration parameters:
synchronous or asynchronous data rate and the mode of
synchronization (Sync. Mode) between two Model 1180s. The “Sync.
Mode” setting (active in both asynchronous and synchronous operating
modes) defines the packet length of the data stream between the two
Model 1180s.
Simply put, the “2X” setting doubles the space between data
packets when compared with the “1X” setting. A Sync. Mode setting of
“2X” facilitates communication distances up to 5 Km. A Sync. Mode
setting of “1X” limits communication distances to 2.5 Km. The following
table shows every possible data rate/Sync. Mode switch setting for the
Model 1180.
SWITCH SUMMARY TABLE
Position Function Factory Default
Switch 1 RESERVED Off
Switch 2 Data Rate (Sync Mode) On
Switch 3 Data Rate (Sync Mode) Off
Switch 4 Data Rate (Sync Mode) Off
Switch 5 Data Rate (Sync Mode) On
Switch 6 Reset Off
Operating Mode
Switch 7 Handshaking On
Control Signal Mode
Switch 8 Clocking Method Off Internal Clock
0 - 19.2
Async (2x)
}
Figure 1. Switch locations underneath Model 1180
Figure 2. Close up of 1180 DIP switch package showing OFF/ON positions.
Figure 3. Summary of switch settings, showing factory defaults
The Model 1180 uses a set of eight external DIP switches that
allow configuration to a wide range of applications. Because all eight
switches are in one externally accessible DIP package, there is no need
to open the Model 1180’s case for configuration. The switches allow
you to control data rates and clocking methods. Figures 1, 2 and 3
summarize the switch locations, positions and functions.
3 4
Page 4

Switch 8: Clocking Method
On = External Clock
Off = Internal Clock
6
Switch 2 Switch 3 Switch 4 Switch 5 Data Rate (Sync. Mode)
On Off Off On 0 - 19.2 (2X)
Asynchronous
On Off Off Off 0 - 38.4 (1X)
Asynchronous
On On On Off 2.4 (1X)
Off On On Off 9.6 (1X)
Off On On On 9.6 (2X)
On On Off Off 19.2 (1X)
On On Off On 19.2 (2X)
Off On Off Off 38.4 (1X)
Off On Off On 38.4 (2X)
On Off On Off 48.0 (1X)
On Off On On 48.0 (2X)
Off Off On Off 56.0 (1X)
Off Off Off Off 64.0 (1X)
Off Off Off On 64.0 (2X)
Off Off On On 192.0 (1X)
On On On On 256.0 (1X)
Switch 6: Reset
Switch 6 lets you reset the Model 1180 without powering down the
unit. The default position of the switch allows normal operation.
Switch 6
On = Reset Condition
Off = Operating Condition
Switch 7: Handshake Mode
The setting for switch 7 determines whether the Model 1180
operates in Control Signal Mode or Standard Modem Mode. In Control
Signal Mode, the two Model 1180s pass RTS/CTS and DTR/DSR
between each other over the fiber link. In Standard Modem Mode,
handshaking only occurs between each Model 1180 and its DTE, not
over the fiber link.
Switch 7
On = Control Signal Mode
Off = Standard Modem Mode
(continued)
5
Switch 8 is used to specify the clocking method. The Model 1180
can provide an internal clock (pin 15) or receive an external clock (from
pin 24).
Switch 8
Page 5

4.0 INSTALLATION
Figure 4. Rear panel of Model 1180 showing interface connections
Powered Short Range Modem
Made In The USA
Fiber
RS-232 Interface
Power
Model 1180
Single-Fiber Modem
Power
- Remote
- Normal
- Local
Test
Modes
TD RD RTS CD
Figure 5. Close up of ST and SMA connections
ST
SMA
alignment pin
faces down
Local Software Handshaking
RS-232 DCE Model 1180
Local Hardware Handshaking
RS-232 DCE Model 1180
DB-25 Pin No. DB-25 Pin No.
1---------------------------------------------------1
2---------------------------------------------------3
3---------------------------------------------------2
4---------------------------------------------------5
5---------------------------------------------------4
6---------------------------------------------------20
8
20---------------------------------------------------6
8
7---------------------------------------------------7
The Model 1180 is easy to install. After configuring the DIP
switches, simply connect the single fiber cable, hook up the RS-232
interface, and plug the power supply adapter into the 1180. Figure 4
shows the location of the interface connections on the Model 1180 rear
panel.
4.1 SINGLE FIBER CONNECTION
These short range modems are designed to work in
pairs
need one at each end of single multi-mode fiber cable. Depending
upon the data rate setting you select, your cable may be a maximum of
2.5 or 5 Km long. The fiber cable connects to each Model 1180 using
either an ST or an SMA connector. Figure 5 shows a close up of both
connector types.
. You will
4.2 RS-232 CONNECTION
The Model 1180 is configured as a DCE. Therefore it wants to
connect to a DTE. When connecting the Model 1180 to DTE hardware
such as a PC, host or terminal, use a
straight through
RS-232 cable.
When connecting the Model 1180 to DCE hardware such as a modem,
multiplexer or printer, use a
null modem
RS-232 cable. The diagrams
below show some typical RS-232 null modem wiring configurations.
Consult your hardware user manual for the specific pin configuration
you need.
DB-25 Pin No. DB-25 Pin No.
1---------------------------------------------------1
2---------------------------------------------------3
3---------------------------------------------------2
4 4
5 5
6 6
8 8
20 20
7---------------------------------------------------7
87
Page 6

5.0 OPERATION
Model 1180 Single-Fiber Modem
Power
- Remote
- Normal
- Local
Test
Modes
TD RD RTS CD
Once you have configured each Model 1180 properly (see Section
3.0) and connected the fiber and RS-232 cables (see Section 4.0), you
are ready to operate the units. This section describes reading the LED
status monitors, power-up and using the built-in loopback test modes.
5.1 LED STATUS MONITORS
5.2 POWER-UP / SYNCHRONIZATION
Apply AC power to the Model 1180 by plugging the separate AC
power adapter first into the rear panel outlet of the Model 1180 and then
into an acceptable AC power outlet. There is no power switch on the
Model 1180: When the “power” LED is glowing steady, the Model 1180
is powered up. Note: Make sure the front panel toggle switch on
both Model 1180s is set to NORMAL.
The Model 1180 features six front panel status LEDs that indicate
the condition of the modem and communication link. Figure 6 shows
the front panel location of each LED. Following Figure 6 is a description
of each LED’s function.
Figure 6. Front view of Model 1180
• The green “Power” LED glows if power is applied to the modem.
• The green “Test Modes” LED indicates that the modem is in a test
mode.
• The “TD” and “RD” indicators blink red and green with data activity.
Red indicates a low RS-232 logic level, green indicates a high RS-
232 logic level. Note: RS-232 devices idle in a
low
state, so the
LED will glow red if the connections are correct and the RS-232
device is in an idle state.
• The “RTS” and “CD” indicators are also tri-state and glows red for a
“low” signal or green for a “high” signal. RTS lights for an incoming
signal on RS-232 pin 4. CD lights for an incoming signal on the
line side, and the resulting output signal on RS-232 pin 8.
After both the local and remote Model 1180s are powered up, a
synchronization process must occur between the two modems before a
link can be established. Depending upon a number of factors, this
synchronization process can take
as long as 60 seconds.
Any time one
of the Model 1180s loses power (i.e., in a lightning storm), the local and
remote units
must re-synchronize
before they can resume data
transmission. Note: If your application cannot tolerate a 60 second
synchronization phase, turn the front panel “Test Modes” switch to
REMOTE and then back to NORMAL to synchronize the units in a
maximum of 250 mS.
When the local and remote Model 1180s are
are passing data
normally
, the following LED conditions will exist:
both
powered up, and
• PWR = green
• TD & RD = flashing red and green
• RTS & DCD = green
• TEST = off
5.3 LOOPBACK TEST MODES
The Model 1180 offers two loopback test modes to evaluate the
condition of the modems and the communication link. These tests are
activated from the front panel.
5.3.1 LOCAL LOOPBACK
The local loopback test checks the operation of the local Model
1180, and is performed separately on each unit. Any data sent to the
local Model 1180 in this test mode will be echoed (returned) back to the
user device. For example, characters typed on the keyboard of a
terminal will appear on the terminal screen.
9 10
To perform a local loopback test, follow these steps:
Page 7
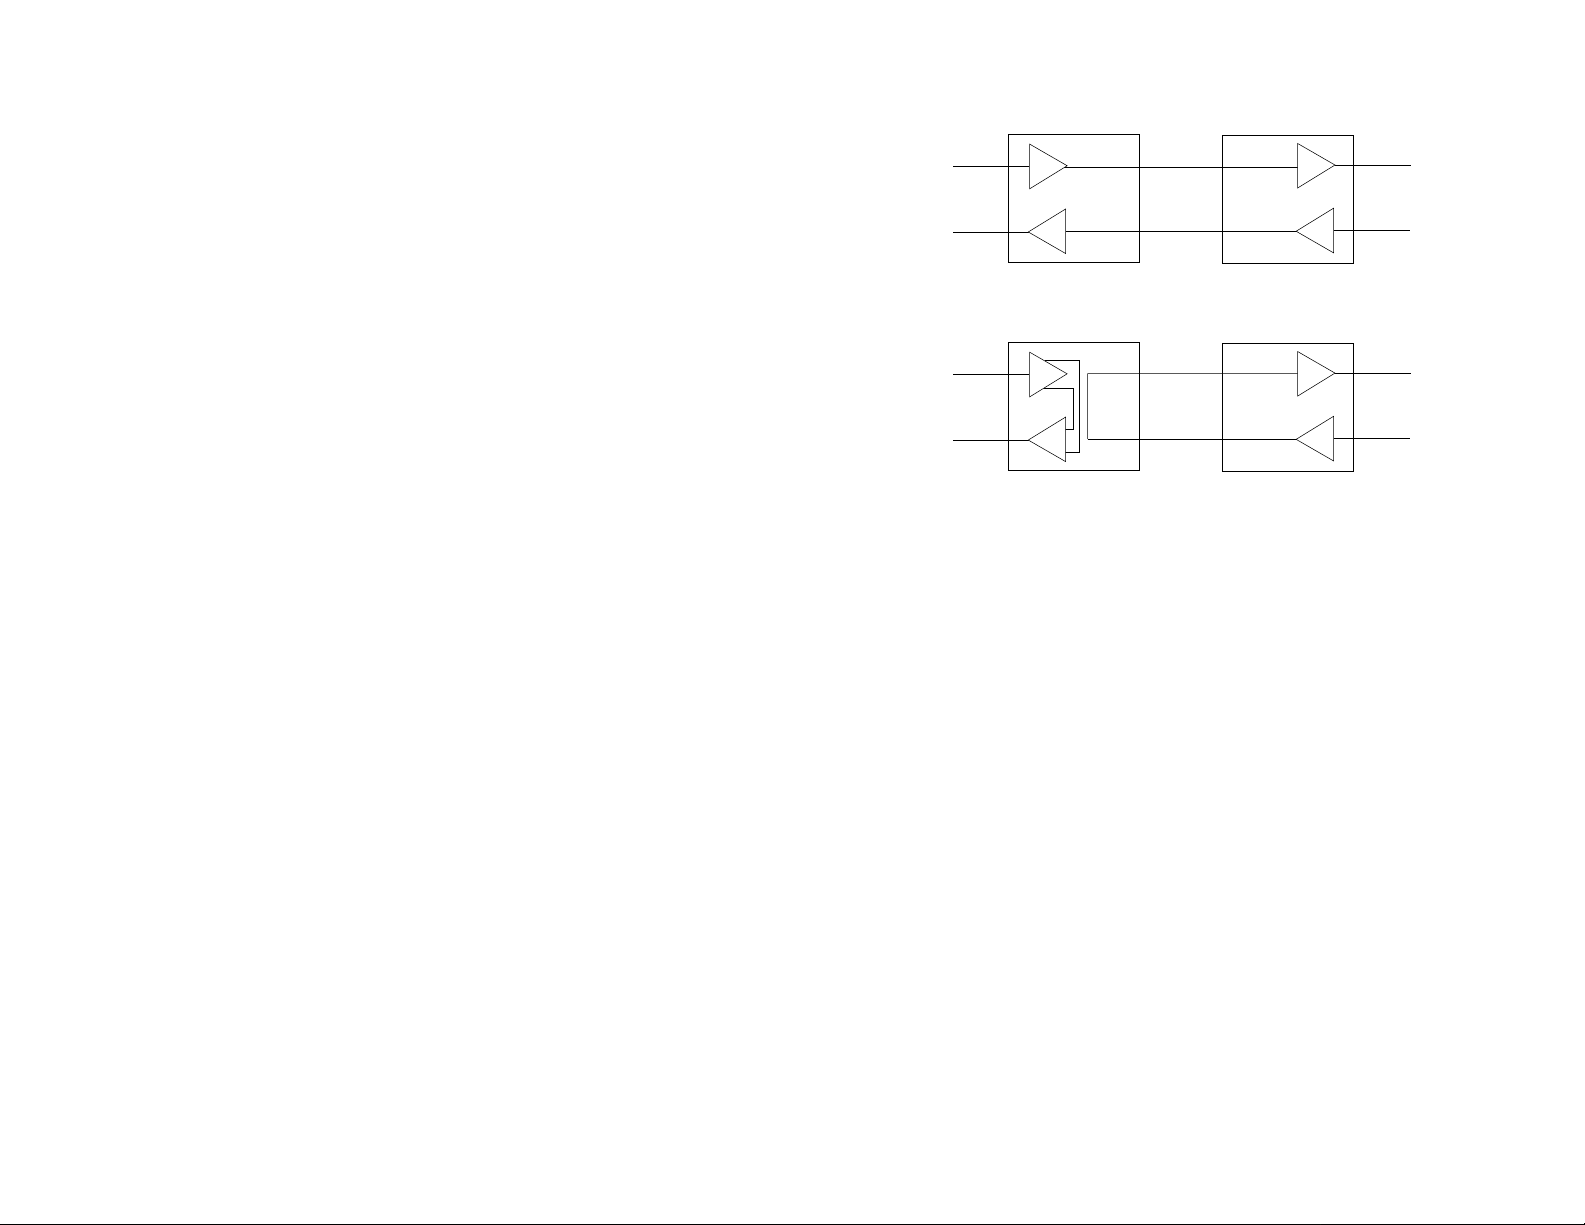
A. Activate local loopback by moving the front panel toggle switch
RD
TD
TD
RD
Local 1180RC
In Normal Mode
Remote 1180RC
In Normal Mode
TX
RX
RX
TX
RD
TD
TD
RD
Local 1180RC
In Loopback Mode
Remote 1180RC
In Normal Mode
RX
TX
TX
RX
Figure 7. Local and remote loopback test modes
DOWN to “Local”. Once local loopback is activated, the Model 1180
transmit output is connected to its own receiver. The “test” LED should
glow. Note: Even though the local Model 1180 cannot communicate
with the remote Model 1180 in this mode, the synchronized connection
between the two modems remains intact.
B. Verify that the data terminal equipment is operating properly and
can be used for a test. If a fault is indicated, call a technician or replace
the unit.
C. Perform a BERT (bit error rate) test on each unit. If the BERT
test equipment indicates no faults, and the data terminal indicates a
fault, follow the manufacturer’s checkout procedures for the data
terminal. Also, check the RS-232 interface cable between the terminal
and the Model 1180.
5.3.2 REMOTE LOOPBACK
The remote loopback test checks the performance of both the local
and remote Model 1180s,
(Figure 7). Any characters sent to the remote Model 1180 in this test
mode will be returned back to the originating device. For example,
characters typed on the keyboard of the local terminal will appear on
the local terminal screen
1180 and looped back. To perform a remote loopback test, follow these
steps:
A. Activate remote loopback by moving the front panel toggle switch
UP to “Remote”. The “test” LED should glow.
B. Perform a BERT (bit error rate) test on the system.
C. If the BERT test equipment indicates a fault, and the local
loopback test was successful for both Model 1180s, this suggests a
problem with the fiber communication line connecting the modems. You
should then test the fiber line for proper connections and continuity.
5.4 POWER-DOWN
Turn off the Model 1180 by simply unplugging the AC power adapter
from the wall. There is no power switch on the Model 1180.
and
the communication link between them
after
having been passed to the remote Model
11 12
Page 8

SYMPTOM PROBLEM SOLUTION
APPENDIX A
TROUBLESHOOTING
LEDs do not light
when AC power
transformer is
plugged into wall
Carrier Detect (CD)
LED is
low
or
Carrier Detect (CD)
LED is
high
, but
1180s are not
communicating
Loose power
connection
Outlet is defective
AC power cord is
defective
AC transformer is not
plugged into the Model
1180
If CD is low, possible
synchronization loss
Test Mode switch is in
the wrong position
DIP switches are set
improperly
Fiber link is connected
improperly
RS-232 connections
are faulty or cables are
pinned wrong
Make sure the AC
connection is flush
Try a different outlet
Remove the cord from
the outlet and check for
continuity
Plug transformer into
Model 1180
Check for ongoing
power loss or break in
fiber if CD does not go
high within 60
seconds
Make sure the Test
Mode switch is set to
NORMAL on both
Model 1180s
Check all DIP switch
settings, esp. Reset
and Data Rate,
against Section 3;
make sure both Model
1180s are configured
the same way
Check the ST or SMA
connection on the back
of both Model 1180s
Check RS-232 cable
continuity and pinning
13
SYMPTOM PROBLEM SOLUTION
Data passes, but
hardware flow
control doesn’t
work
Model 1180s work
in async. mode,
but not sync. mode
Incorrect DIP switch
setting
Incorrect DIP switch
setting
Switch 7 must be in the
ON condition for
hardware flow control
signals to pass
between Model 1180s;
both units must be set
the same way
Switch 8 (internal/
external clock) must be
set the same way for
both Model 1180s
14
Page 9

APPENDIX B
SPECIFICATIONS
Transmission Format: Asynchronous or synchronous
Range: 2.5 Km at all data rates, 5 Km at specified data rates
Data rates: 0 to 38.4 Kbps (async.); 2.4, 9.6, 19.2, 38.4, 56, 64, 192
and 256 Kbps (sync.)
Interface: EIA RS-232 / CCITT V.24
Transmit Mode: Single 62.5 or 50 µ core, multi-mode fiber cable
Clocking: Internal or external
Handshaking: Software (X-ON/X-OFF) or hardware (RTS/CTS), both
modes available at all times
Application: Point-to-point
Typical Link Budget: 8 dB with 50 µ cable; 12 dB with 62.5 µ cable
Responsivity Minimum: 0.12 A/w
LED Indicators: TD, RD, RTS, CTS, Power, Test
Diagnostics: Local and remote loopback
Connectors: DB-25 female (RS-232), ST or SMA (fiber)
Dimensions: 4.127”w x 1.52”h x 5.0”l
Power Supply: Wall-mount, 10VAC, 700mA
APPENDIX C
RS-232 INTERFACE STANDARD
15 16
1- (FG) Frame Ground
2- (TD) Transmit Data To Model 1180
3- (RD) Receive Data From Model 1180
4- (RTS) Request to Send To Model 1180
5- (CTS) Clear to Send From Model 1180
6- (DSR) Data Set Ready From Model 1180
7- (SG) Signal Ground
8- (DCD) Data Carrier Detect From Model 1180
To Model 1180 Data Term. Ready (DTR) - 20
DIRECTION STANDARD “DCE” SETTING DIRECTION
To Model 1180 Transmitting Timing LXC - 24
From Model 1180 Transmitting Timing - 15
From Model 1180 Receiver Timing - 17
 Loading...