

Page 1
For Quick
Start Installation
NanoServ™
Thin System
Ultra-Thin System
User Manual
Sales Office: +1 (301) 975-1000
Technical Support: +1 (301) 975-1007
E-mail: support@patton.com
WWW: www.patton.com
Document Number: 09407U2-001, Rev. A
Part Number: 07M6070-UM
Revised: August 2, 2006
Page 2

Patton Electronics Company, Inc.
7622 Rickenbacker Drive
Gaithersburg, MD 20879 USA
Tel: +1 (301) 975-1000
Fax: +1 (301) 869-9293
Support: +1 (301) 975-1007
Web: www.patton.com
E-mail: support@patton.com
Trademark Statement
Trademark names and copyrights are the registered trademarks or copyright names of
the respective owners and owned by them. Microsoft‚ Windows‚ and AMI are registered trademarks of Microsoft Corporation and American Megatrends, Inc. in the
United States and/or other countries respectively. Other brand names, product names
or trade names appearing in this document are the properties and registered trademarks of their respective owners. All names mentioned herewith are served for identification purpose only.
Copyright © 2006, Patton Electronics Company. All rights reserved.
The information in this manual is subject to change without notice for continuous
improvement in the product. All rights are reserved. The manufacturer assumes no
responsibility for any inaccuracies that may contain in this document, and makes no
commitment to update or to keep current the information contain in this manual.
No part of this manual may be reproduced, copied, translated or transmitted, in whole
or in part, in any form or by any means without prior written permission of the factory.
Special Note To Users
THE FACTORY PROVIDES NO WARRANTY WITH REGARD TO THIS
MANUAL, THE SOFTWARE, OR OTHER INFORMATION CONTAINED
HEREIN AND HEREBY EXPRESSLY DISCLAIMS ANY IMPLIED WARRANTIES OF MERCHANTABILITY OR FITNESS FOR ANY PARTICULAR PURPOSE WITH REGARD TO THIS MANUAL, THE SOFTWARE, OR SUCH
OTHER INFORMATION. IN NO EVENT SHALL THE FACTORY BE LIABLE
FOR ANY INCIDENTAL, CONSEQUENTIAL, OR SPECIAL DAMAGES,
WHETHER BASED ON TORT, CONTRACT, OR OTHERWISE, ARISING
OUT OF OR IN CONNECTION WITH THIS MANUAL, THE SOFTWARE,
OR OTHER INFORMATION CONTAINED HEREIN OR THE USE
THEREOF.
The factory reserves the right to make any modification to this manual or the information contained herein at any time without notice. The software described herein is
governed by the terms of a separated user license agreement or label sticker.
This product contains software owned by the factory and licensed by third parties. Use
of such software is subject to the terms and conditions of license agreements enclosed
with this product. Software specifications are subject to change without notice and
may not necessarily be identical to current retail versions.
Updates and additions to software may require an additional charge. Subscription to
online service providers may require a fee and credit card information. Financial services may require prior arrangements with participating financial institution.
Page 3

Owner’s Record
The serial number of this product is located at the rear panel of your system. Refer to
the model and serial number when you contact the factory for services.
IMPORTANT THERMAL NOTE ON SYSTEM USAGE:
This is a fanless system, so it must be properly mounted to allow for proper cooling.
Be sure to use the metal stand to hold the system upright with blue LED on top, or to
mount the system at least 1 or 2 inches away from the flat side surfaces of the system.
This will help keep the system cool and within thermal operating limits.
Do not leave the system turned on and lying flat on its side. This blocks the air flow
through the vents.
Patton suggests keeping the system cool by using the suspend or sleep features of the
NanoServ™.
SAFETY WHEN WORKING WITH ELECTRICITY
WARNING
•
To prevent shock or fire hazard, do not expose your NanoServ™ to rain or
moisture.
Never install your NanoServ™ in wet locations.
•
•
To avoid electrical shock, do not open the case. Contact the factory offices
for qualified personnel servicing.
•
Never touch un-insulated terminals or wire unless your power adaptor and
display monitor are disconnected.
When using the system, avoid using or installing the modem to the serial
•
port during a storm or lightning.
Do not use the modem or a telephone to report a gas leak in the vicinity of
•
the leak.
•
USB cables are not supplied.
This device contains no user serviceable parts. The equipment shall be
returned to Patton Electronics for repairs, or repaired by qualified service personnel.
The external power adapter shall be a listed Limited Power Source. Ensure
that the power cable used with this device meets all applicable standards for
the country in which it is to be installed, and that it is connected to a wall outlet which has earth ground. The mains outlet that is utilized to power the
devise shall be within 10 feet (3 meters) of the device, shall be easily accessible, and protected by a circuit breaker.
Page 4
Hazardous network voltages are present in WAN ports regardless of whether
power to the unit is ON or OFF. To avoid electric shock, use caution when near
WAN ports. When detaching the cables, detach the end away from the device
first.
Do not work on the system or connect or disconnect cables during periods of
lightning activity.
In accordance with the requirements of council directive 2002/96/EC on
Waste of Electrical and Electronic Equipment (WEEE), ensure that at end-of-life
you separate this product from other waste and scrap and deliver to the WEEE
collection system in your country for recycling.
WARNING
Do not attempt to open or to disassemble the chassis (case) of this product.
See “Contacting Patton for assistance” on page 27.
Page 5

Table of Contents
.........................................................................................................................................................................4
Table of Contents ........................................................................................................................................... 5
Unpacking Your NanoServ™ System ............................................................................................................ 7
Check before use..................................................................................................................................................... 7
1 General Information........................................................................................................................................ 8
NanoServ™ System Overview ................................................................................................................................9
2 NanoServ™ System Overview....................................................................................................................... 10
Ultra-Thin System Overview.................................................................................................................................11
Thin System Overview ..........................................................................................................................................12
3 Peripherals .................................................................................................................................................... 13
Introduction..........................................................................................................................................................14
Connecting the monitor........................................................................................................................................14
Connecting the USB .............................................................................................................................................14
Connecting to the USB, Speaker/Earphone and Internet/Intranet.........................................................................15
Connecting the keyboard and mouse.....................................................................................................................16
Connecting the Printer Port ..................................................................................................................................17
Connecting the power adaptor ..............................................................................................................................18
4 BIOS ............................................................................................................................................................. 19
Reconfiguring the system.......................................................................................................................................20
5 Taking Care Of Your NanoServ™ ................................................................................................................ 21
Storing...................................................................................................................................................................22
Using cables for connection...................................................................................................................................23
Cleaning your NanoServ™...................................................................................................................................23
6 Troubleshooting............................................................................................................................................ 24
Troubleshooting your system.................................................................................................................................25
A. The NanoServ™ does not start ..................................................................................................................25
B. BIOS Error Message ...................................................................................................................................25
C. “Operating System Not Found” .................................................................................................................26
7 Contacting Patton for assistance ................................................................................................................... 27
Introduction..........................................................................................................................................................28
Contact information..............................................................................................................................................28
Patton support headquarters in the USA .........................................................................................................28
Alternate Patton support for Europe, Middle East, and Africa (EMEA) ..........................................................28
Warranty Service and Returned Merchandise Authorizations (RMAs)...................................................................28
Warranty coverage ..........................................................................................................................................28
Out-of-warranty service .............................................................................................................................29
Returns for credit ......................................................................................................................................29
Return for credit policy .............................................................................................................................29
5
Page 6

6
NanoServ User Manual
Table of Contents
RMA numbers ................................................................................................................................................29
Shipping instructions ................................................................................................................................29
A Factory Defaults ........................................................................................................................................... 30
BIOS Defaults.......................................................................................................................................................31
Fedora Core 5 Install Defaults...............................................................................................................................31
B Specifications ................................................................................................................................................ 32
Compliance ...........................................................................................................................................................33
EMC ...............................................................................................................................................................33
Safety ..............................................................................................................................................................33
Radio and TV interference ....................................................................................................................................33
CE Declaration of Conformity ..............................................................................................................................33
System Specifications.............................................................................................................................................34
Technical Specifications ........................................................................................................................................35
Model Numbers ....................................................................................................................................................36
C NanoServ™ System Connectors ................................................................................................................... 37
NanoServ™ System Connectors Summary ...........................................................................................................38
Rear Connectors Outline for the Ultra-Thin System .............................................................................................38
Rear Connectors Outline for the Thin System.......................................................................................................39
Pin Assignments ....................................................................................................................................................40
Page 7
Unpacking Your NanoServ™ System
Congratulations! You have just acquired the world’s smallest and most compact embedded system.
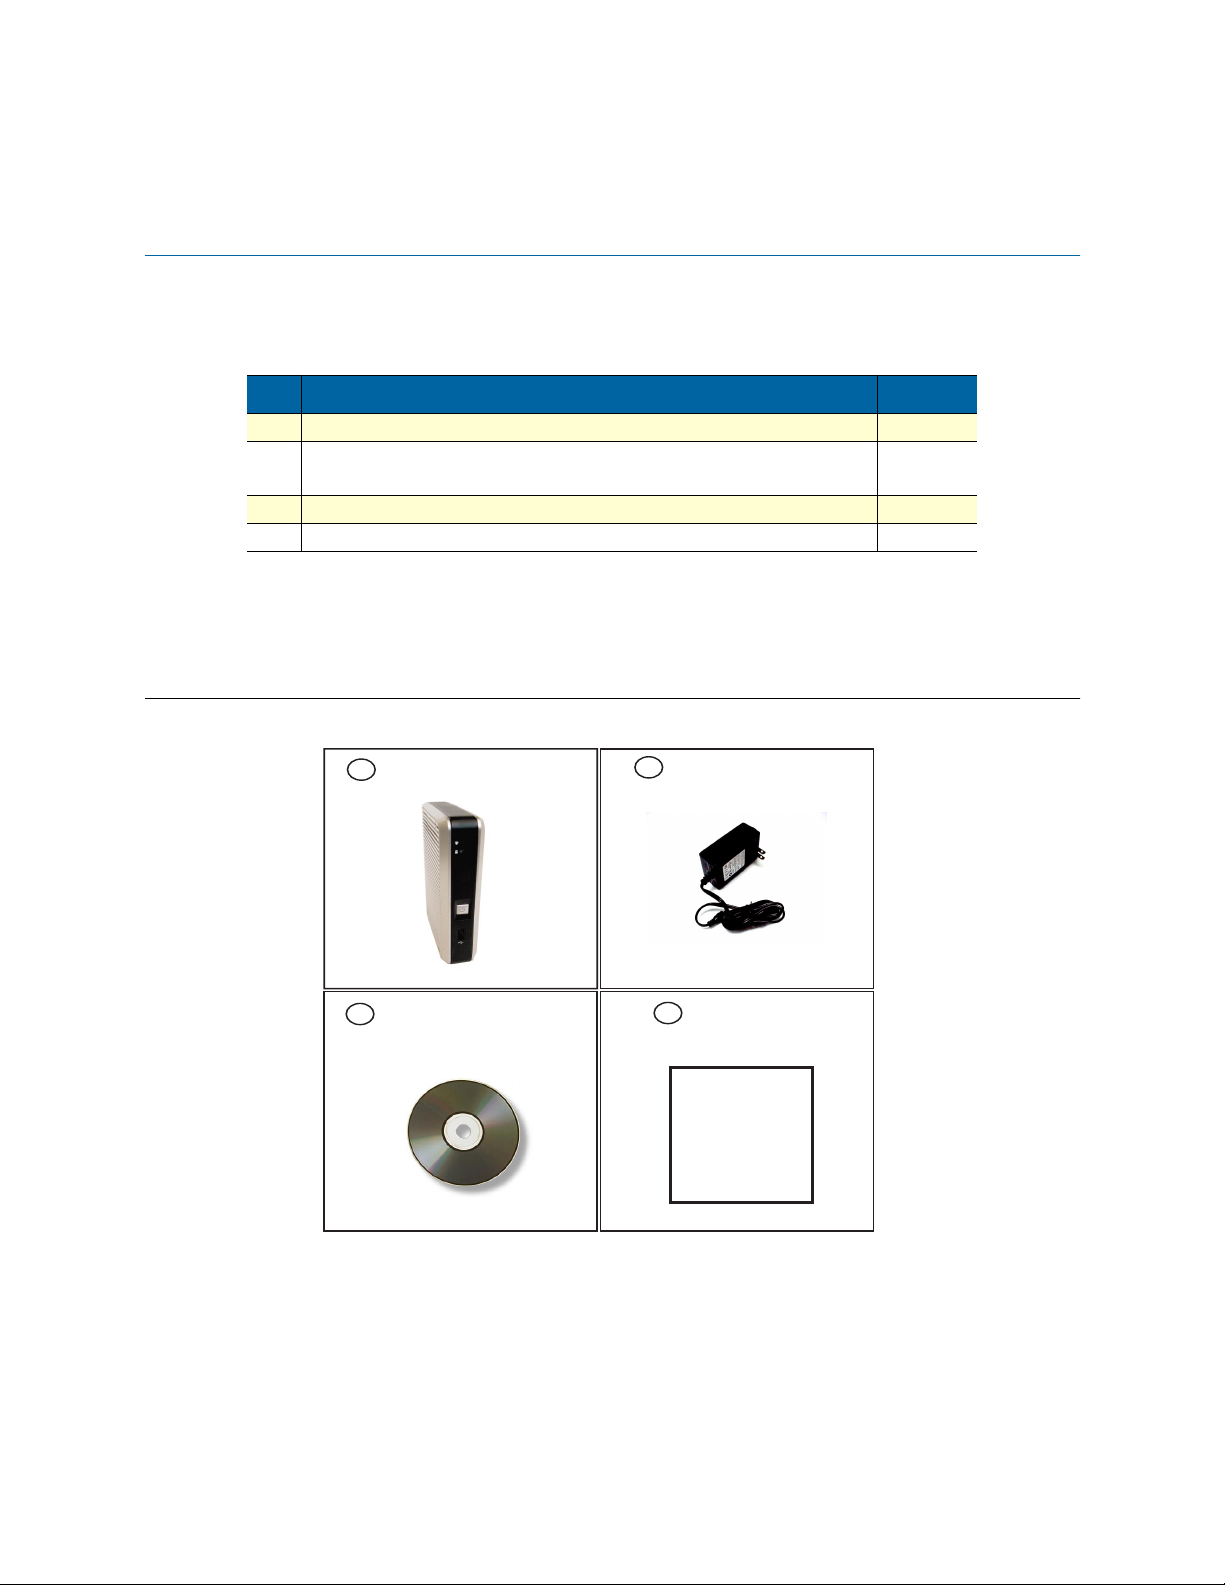
Check to make sure that you have the following items:
Table 1. Packing list
Item Description Quantity
NanoServ™ system computer x1
1
2
Max. 25-watts External Power Adaptor, Vin: 100~240VAC
60/50Hz, 1.0A / Vout:: +5.0~5.25VDC @ 4A max. LPS
3 Documentation CD for the NanoServ™ x1
4 Setup Guide x1
a. Note: The accessories are subject to change without immediate notice.
a
x1
Check before use
1 NanoServ™ System
3 Documentation CD
2 AC Power Adaptor
4 Setup Guide
Printed
Setup
Guide
Note
The keyboard and mouse are not included in the system.
7
Page 8

Chapter 1
Chapter contents
NanoServ™ System Overview ................................................................................................................................8
General Information
8
Page 9
9
NanoServ™ User Manual
1 • General Information
NanoServ™ System Overview
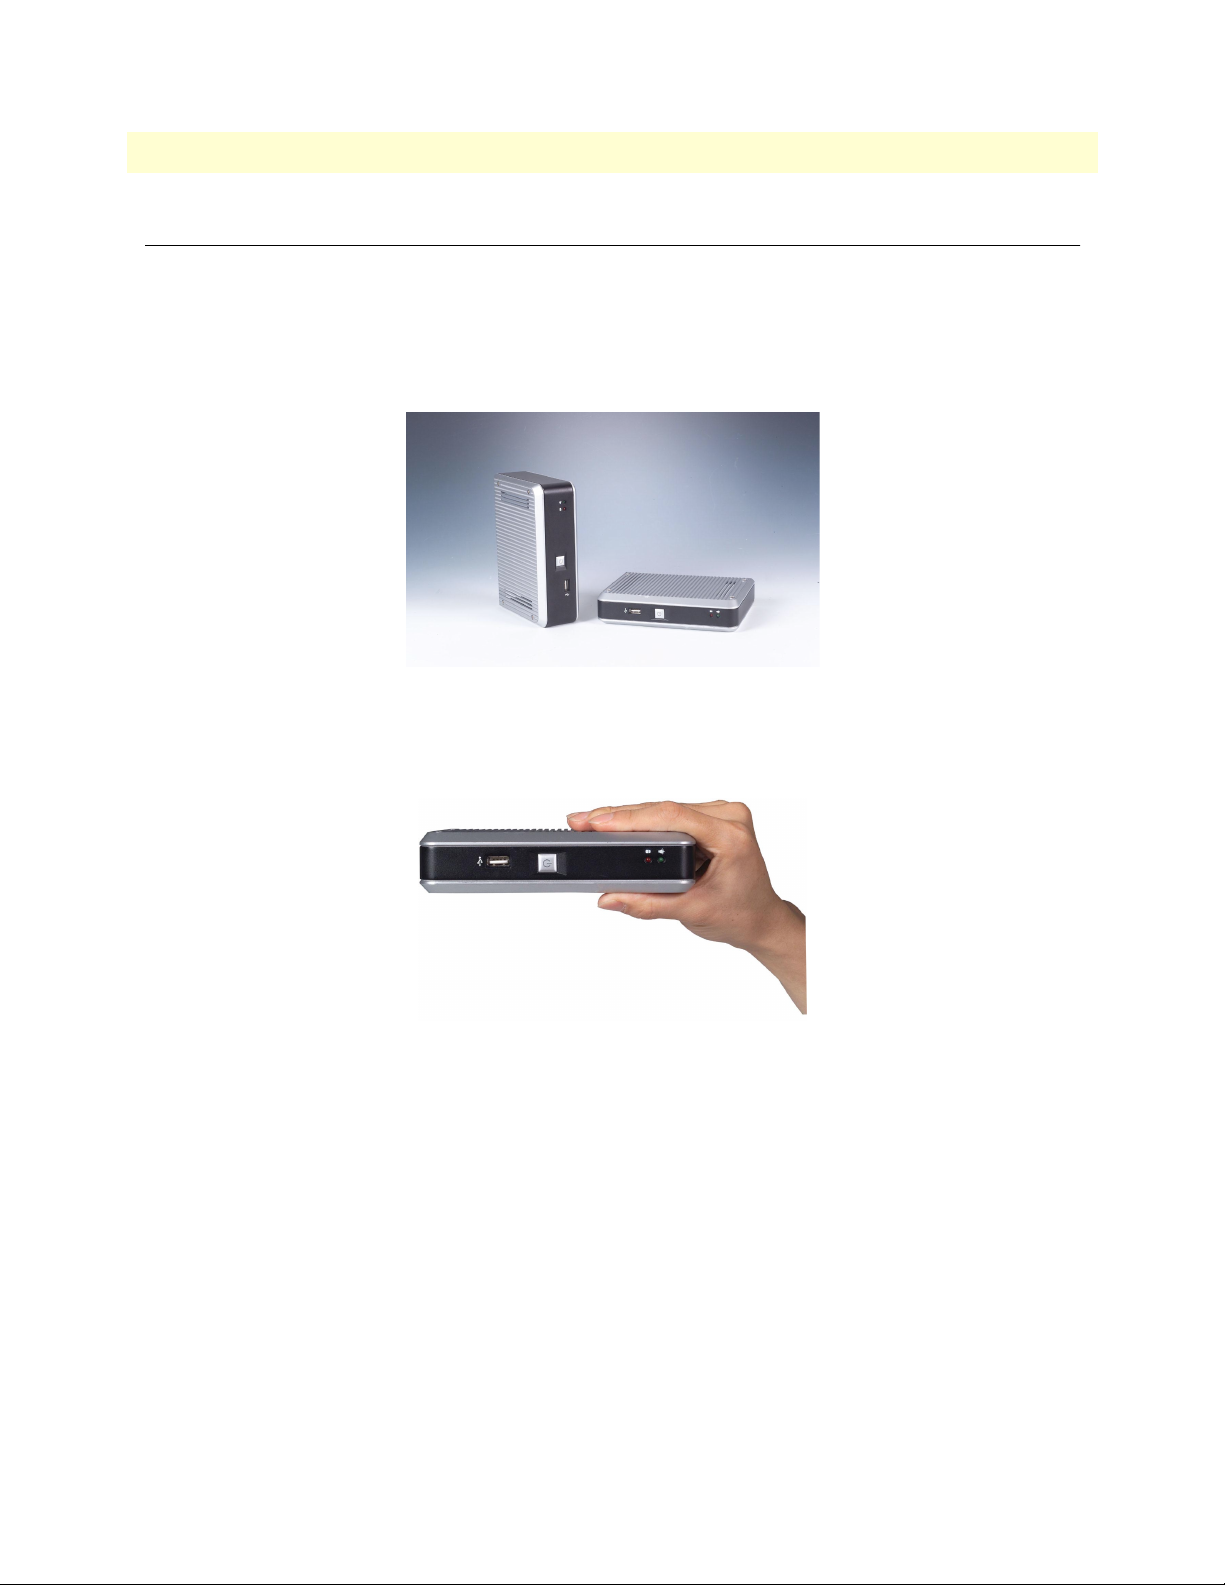
The NanoServ™ is a unique tiny embedded system for a wide range of applications, from industrial to office
to home.
Figure 1. NanoServ™ System
Figure 2. NanoServ™ Ultra-Thin System
This portable device is handy for travelers and service technicians who work in or out of the office. For office
desk workers, the NanoServ™ occupies very little space on the corner of a table.
The NanoServ™ can also serve as an Internet Appliance that offers state-of-art design for networking, computing, transaction and information transport applications.
The NanoServ™ is convenient for users in a variety of business, industrial, and embedded uses. The system
offers multi-server features to function as firewall, mail-server, print server, and many other single task applications. It is suitable for a space-conscious environment, with dimensions of 17x124x38mm (Ultra-Thin System) (or 58mm - Thin System), equivalent to 4.32”x3.15”x0.96” (Ultra-Thin System) (or 1.47” - Thin
System).
NanoServ™ System Overview
Page 10

Chapter 2 NanoServ™ System Overview
Chapter contents
Ultra-Thin System Overview.................................................................................................................................10
Thin System Overview ..........................................................................................................................................11
10
Page 11
11
NanoServ™ User Manual
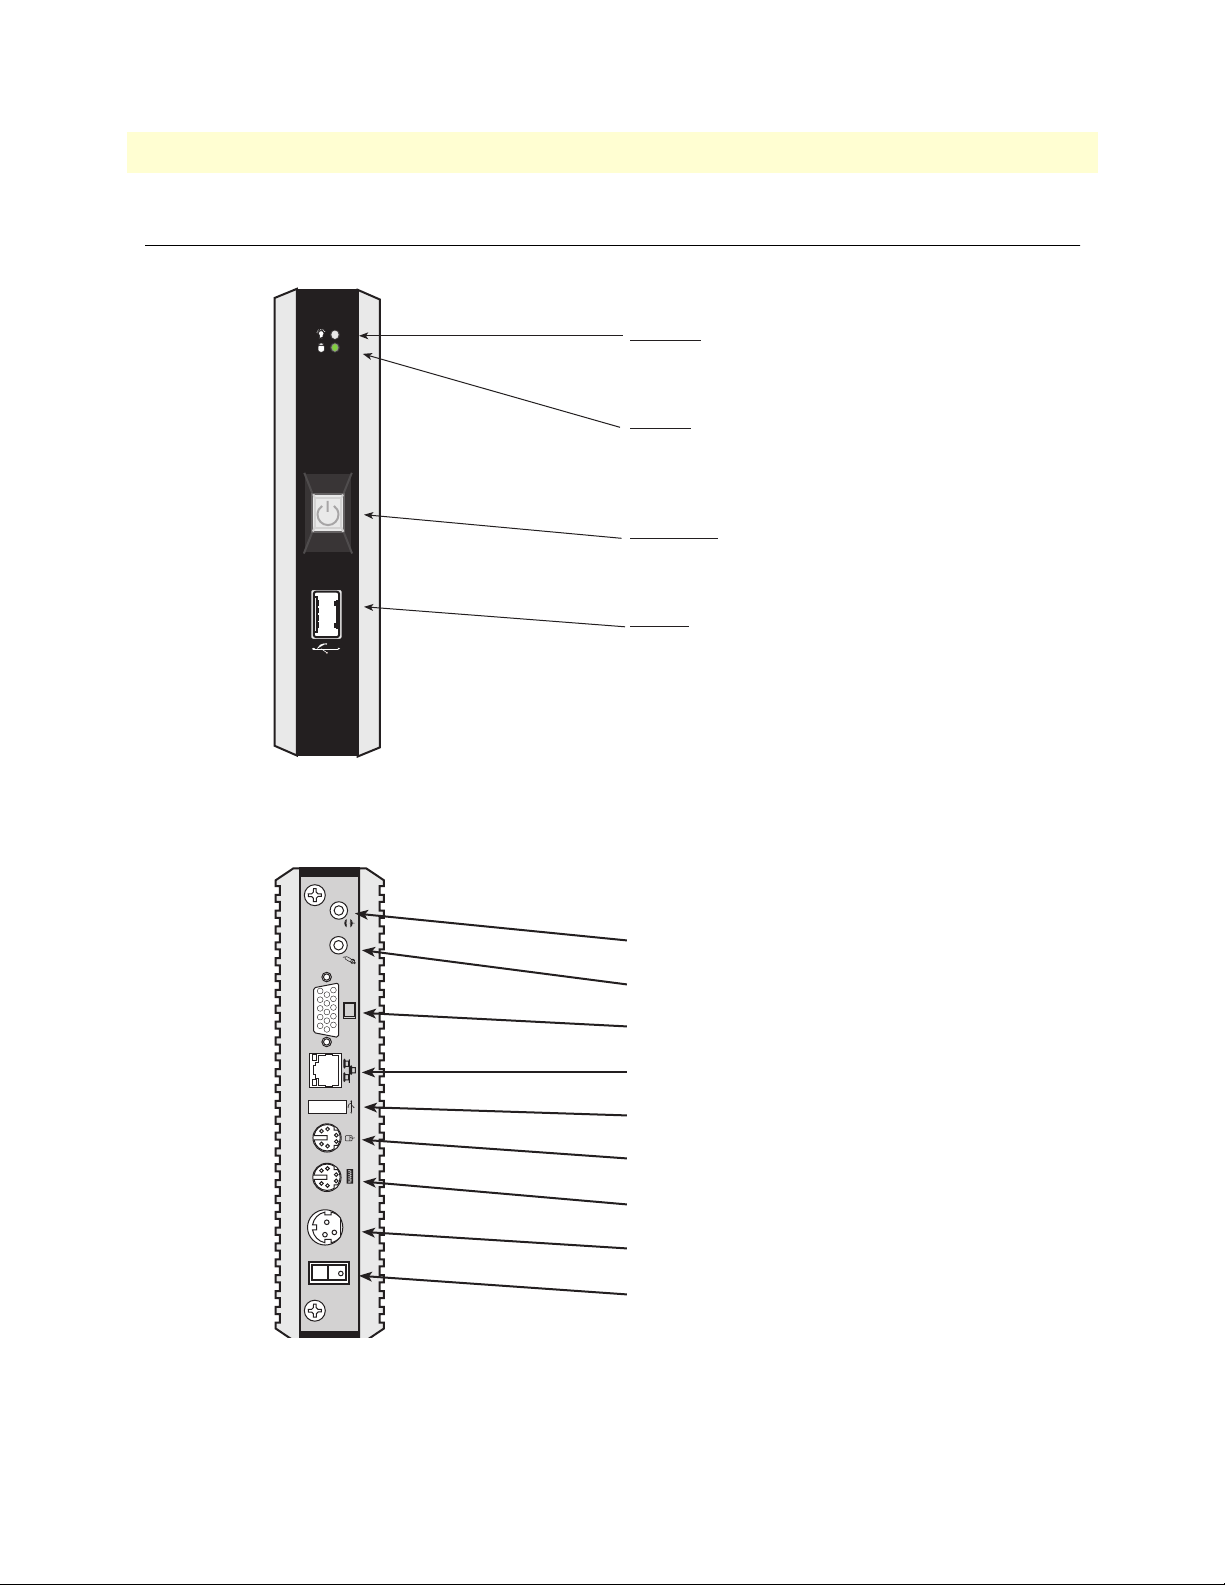
Ultra-Thin System Overview
2 • NanoServ™ System Overview
Front panel
Power LED
The power LED lights up when the system is
turned on.
HDD LED
The HDD LED flashes when the system is working.
Please do not turn off the system when HDD
starts running.
Power Switch
Depress the switch to turn on and turn off the
system.
USB Port
The USB port is for a connection to external
devices with a USB interface (keyboard, mouse,
HDD, CD-ROM, Memory Stick, ect.)
DC-IN 5V
POWER SW
Figure 3. Ultra-Thin System - Front panel
Back panel
Audio Line-Out
Mic-In
VGA Port
RJ-45 10/100 Ethernet Jack
USB Port
PS/2 Mouse (6-pin)
PS/2 Keyboard & Mouse (6-pin)
DC Power Jack (3-pin)
Power supply switch
Figure 4. Ultra-Thin System - Back panel
Ultra-Thin System Overview
Page 12
12
NanoServ™ User Manual
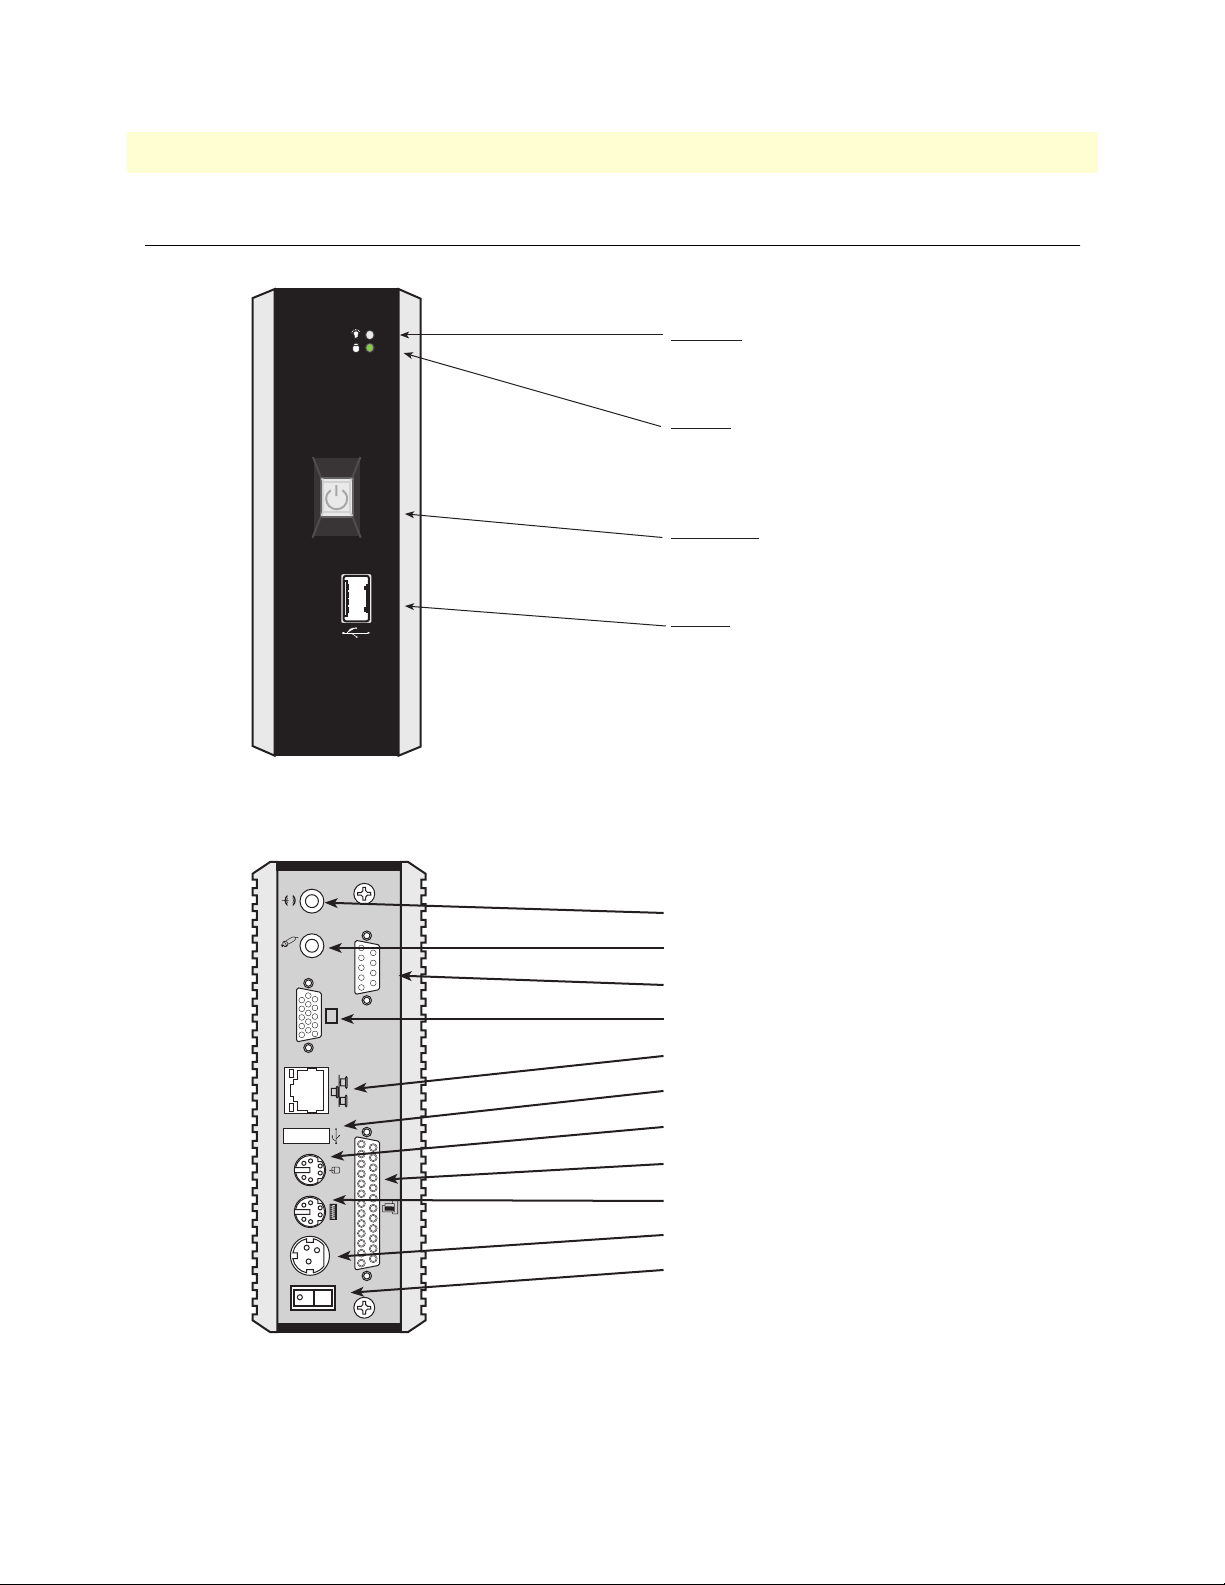
Thin System Overview
2 • NanoServ™ System Overview
Front panel
Power LED
The power LED lights up when the system is
turned on.
HDD LED
The HDD LED flashes when the system is working.
Please do not turn off the system when HDD
starts running.
Power Switch
Depress the switch to turn on and turn off the
system.
USB Port
The USB port is for a connection to external
devices with a USB interface (keyboard, mouse,
HDD, CD-ROM, Memory Stick, ect.)
DC-IN 5V
POWER SW
Figure 5. Thin System - Front panel
Back panel
Audio Line-Out
Mic-In
COM1
Serial Port **
VGA Port
RJ-45 10/100 Ethernet Jack
USB Port
PS/2 Mouse (6-pin)
Parallel Port **
PS/2 Keyboard & Mouse (6-pin)
DC Power Jack (3-pin)
Power supply switch
** This feature is only
available for Model 6075.
Figure 6. Thin System - Back panel
Thin System Overview
Page 13

Chapter 3
Chapter contents
Introduction..........................................................................................................................................................13
Connecting the monitor........................................................................................................................................13
Connecting the USB .............................................................................................................................................13
Connecting to the USB, Speaker/Earphone and Internet/Intranet.........................................................................14
Connecting the keyboard and mouse.....................................................................................................................15
Connecting the Printer Port ..................................................................................................................................16
Connecting the power adaptor ..............................................................................................................................17
Peripherals
13
Page 14

14
NanoServ™ User Manual
3 • Peripherals
Introduction
This chapter shows how to connect various devices to the NanoServ™ System. Connect all the devices you
will be using before turning on the power. The power adaptor should be connected last.
The Interconnecting cables shall be acceptable for external use and shall be
rated for the proper application with respect to voltage, current, anticipated
temperature, flammability, and mechanical serviceability
Connecting the monitor
Table 2. Connecting the monitor
VGA Connection
Depending on your preference, select a conventional CRT or LCD VGA monitor.
Connect the VGA cable of your monitor to the
15-pin D-Sub VGA port on the back of the system.See the diagram on the left.
*Note: Monitor not included.*
Connecting the USB
The system provides two USB ports (one in the front and one at the back of the case).
Table 3. Connecting the USB
Connecting the USB
A USB port is available on the front cabinet of
the unit. Another port is available on the back
of the unit.
Introduction
Page 15

15
NanoServ™ User Manual
3 • Peripherals
Connecting to the USB, Speaker/Earphone and Internet/Intranet
Table 4. Connecting the USB, Speaker/Earphone and Internet/Intranet
USB Port
The second USB port is available on the back
of the unit for connecting USB devices.
Connecting to the Internet/Intranet
There is an available RJ-45 10/100 Ethernet
jack for connection to the hub of your intranet;
and via your server for internet service (see the
diagram for the RJ-45 10/100 Ethernet jack on
{
page 40
Speaker/Earphone
The NanoServ™ supports Input/Output connections for a speaker, earphone and MIC
(microphone). Note that there is a third audio
jack on the inside by the pin header. The extra
small cable for this is optional.
).
*Note: Speaker/Earphone/Microphone not included.*
Connecting to the USB, Speaker/Earphone and Internet/Intranet
Page 16

16
NanoServ™ User Manual
Connecting the keyboard and mouse
Table 5. Connecting the keyboard and mouse
Describing Mouse Actions
Action
Point
Click
Double-click - Press the left button twice.
POWER SW
DC-IN 5V
Right-click
Scroll wheel - Move your finger along the
3 • Peripherals
Description
- Slide and point your mouse to
your desired position
- Press the left button once.
- Press the right button once.
When selecting (most) programs, this action displays a
shortcut menu.
wheel of the mouse and scroll
vertically to move the page
upward and downward.
*Note; Keyboard and mouse not included.*
Describing the Keyboard
The keyboard usually comes in
standard QWERTY; except
that keyboards in different languages come with additional
special characters.
Connecting the keyboard and mouse
Page 17

17
NanoServ™ User Manual
Connecting the Printer Port
Table 6. Connecting the printer port
DC-IN 5V
POWER SW
3 • Peripherals
Printer port
The DB-25 printer port is available on the back
of the thin system unit. It is used for connecting
to a printer.
Connecting the Printer Port
Page 18

NanoServ™ User Manual 3 • Peripherals
Connecting the power adaptor
There is a difference between the power switch on the rear panel and the system switch on the front panel. The
system switch allows the NanoServ™ to suspend or sleep. The power switch supplies power to the
NanoServ™.
Table 7. Connecting the power adaptor
Power Adaptor
To use your NanoServ™ immediately, use the
supplied AC adapter as a power source. See
POWER SW
the diagram on the left.
DC-IN 5V
Connect the DC power jack of the power adaptor to the DC Input jack on the back of the system.
Turn on the power supply switch.
Turning On Your NanoServ™
Press the power button as indicated in the figure on the left; the system will start automatically.
Connecting the power adaptor 18
Page 19

Chapter 4 BIOS
Chapter contents
Reconfiguring the system.......................................................................................................................................21
19
Page 20

NanoServ™ User Manual 4 • BIOS
Reconfiguring the system
1. Note that the AMI BIOS is used in the system. To reconfigure the NanoServ™, depress or hit the <Del>
key to enter your BIOS setup main menu.
2. Select a setup from the menu.
3. Press <Esc> to go back to the main menu.
4. Move your cursor to “Save Settings and Exit”, and press “Y” to save the changes that you made. The sys-
tem will restart automatically according to your new setup.
Figure 7. BIOS setup
Reconfiguring the system 20
Page 21

Chapter 5 Taking Care Of Your NanoServ™
Chapter contents
Storing...................................................................................................................................................................21
Using cables for connection...................................................................................................................................22
Cleaning your NanoServ™...................................................................................................................................22
21
Page 22

NanoServ™ User Manual 5 • Taking Care Of Your NanoServ™
Storing
• Do not place your NanoServ™ in a location that is subject to:
- Heating sources, such as a stove, oven, heater, radiator or air duct
- Direct contact from sunlight
- Rain or moisure
- Excessive dust accumulation
- High humidity
- Constant or occasional mechanical movement, vibration or shock
- Strong magnets, magnetic fields or magnetically unshielded speakers
- Ambient temperature of more than 95ºF (35ºC) or less than 32ºF (0ºC)
Do not place other electronic devices or electronic equipment near your NanoServ™.
•
The electromagnetic field of the NanoServ™ may cause interference subjecting the unit to malfunction.
- Provide adequate air ventilation (circulation) to prevent internal buildup of heat. Do not place your
NanoServ™ near the wall, behind the curtains or draperies, or in between two books that block its ventilation slots.
- Leave a space of at least 8 inches (20cm) around the sides and the back panel of the NanoServ™.
•
Change of environmental temperature: Problems may occur when there is a sudden change of
environmental temperature. If the NanoServ™ is brought directly from a cold location to a warm one,
moisture may condense inside the unit. Allow time for the system to reach normal temperature before use.
•
Checking the surrounding appliance(s) before using your NanoServ™: Because the
NanoServ™ uses a high-frequency radio signal, it may interfere with radio or TV reception causing interference or poor signal display. When this happens, move the NanoServ™ to a suitable distance away from
the set.
•
Do not drop the NanoServ™ from the working table or place heavy objects on top of
the NanoServ™.
Storing 22
Page 23

NanoServ™ User Manual 5 • Taking Care Of Your NanoServ™
Using cables for connection
• To avoid problems, use only the specified interface cables that match the system. The supplier will not be
responsible for problems caused by improper connection with other devices or cables.
• Do not use cut or damaged cables to connect devices to the NanoServ™.
The Interconnecting cables shall be acceptable for external use and shall be
rated for the proper application with respect to voltage, current, anticipated
temperature, flammability, and mechanical serviceability
Cleaning your NanoServ™
• Clean the NanoServ™ with a soft, dry cloth or a soft cloth lightly moistened with a mild detergent solu-
tion.
• Do not use any type of abrasive pad, scouring powder, or solvent such as alcohol or benzine, as these may
damage the finish of your NanoServ™.
• When a solid object falls or a liquid spills onto the NanoServ™, turn off the unit immediately and unplug
the 10/100 Ethernet and power cables. Contact a qualified person or your dealer to check the NanoServ™
before you use it again.
• Always disconnect the power cord from the power source before cleaning the NanoServ™.
Using cables for connection 23
Page 24

Chapter 6 Troubleshooting
Chapter contents
Troubleshooting your system.................................................................................................................................24
A. The NanoServ™ does not start ..................................................................................................................24
B. BIOS Error Message ...................................................................................................................................24
C. “Operating System Not Found” .................................................................................................................25
24
Page 25

NanoServ™ User Manual 6 • Troubleshooting
Troubleshooting your system
This section describes the techniques of resolving some basic problems that you may encounter when using
your NanoServ™. For more troubleshooting guidelines, see “Contacting Patton for assistance” on page 27.
A. The NanoServ™ does not start
• Make sure that the NanoServ™ is properly secured and plugged into a power source before it is turned on.
Make sure the power indicator shows the power is on. See Chapter 2, “NanoServ™ System Overview” on
page 10 for more information about the system power buttons and other connections.
• When the NanoServ™ is plugged into a power strip or the UPS (Uninterruptible Power Supply), make
sure the power strip or UPS is turned on and working normally.
• Check if your VGA or LCD monitor is properly plugged into a power source and turned on. Make sure the
brightness and contrast controls are adjusted correctly. See the manual that came with your monitor for
details.
• If your power control button does not function, remove the AC adaptor. Wait for one minute, and then
reattach the power connection before pressing the power button.
• Condensation may cause the NanoServ™ to malfunction for awhile. If this happens, do not use the
NanoServ™ for at least one hour after the condensation has disappeared.
• When you have checked all the above guidelines and the NanoServ™ still does not work, remove the
power adaptor from the NanoServ™, unplug the power cord, and plug it in again. Then, turn on the
power. This double check is important because sometimes a cable is loose or not completely plugged in.
B. BIOS Error Message
- BIOS error message appears when the NanoServ™ starts
If the BIOS error message appears, press any key to resume or press <DEL> to enter the BIOS setup main
menu.
Follow these steps:
1. Press <DEL>, and the BIOS Setup main menu will appear. Check if HDD is detected at “Pri Master”. If
it is not detected, use the “Sel” keys < > to choose “AUTO”, then go back to the main menu by pressing
<ESC>. Move your cursor down with the “Sel” keys < > , and choose “Save Settings and Exit”, a message
dialog appears as seen below, press <Enter>.
2. “Save current settings and exit (Y/N)? Y ”
3. Go to “Auto Configuration with Optimal Settings” using the “Sel” keys < >, then press <Enter>. A mes-
sage dialog appears as seen below, press “ Y ”, then press <Enter> to save and recover the factory setting.
4. “Load high default settings (Y/N)? N ”
Troubleshooting your system 25
Page 26

NanoServ™ User Manual 6 • Troubleshooting
C. “Operating System Not Found”
- A message indicating that “Operating system not found” appears when the NanoServ™ starts (Win-
dows won’t start).
- Often this message says that an unformatted blank hard disk or blank IDE flash module is installed.
In this case, there is no problem, just load your desired operating system on the disk or flash.
Enter your BIOS setup main menu by pressing the <DEL> key. (Be sure that your C: drive is enabled).
If Windows still does not start, follow these steps to initialize the BIOS:
– 1. Turn off the NanoServ™.
– 2. Remove any peripheral devices connected to the NanoServ™.
– 3. Restart the NanoServ™.
– 4. Press <DEL> to enter BIOS Setup main menu window.
– 5. Follow the steps as written in item, “B. BIOS Error Message” on page 25.
• If you have just connected your NanoServ™ to a CDR or Floppy disk, remove these peripherals. Restart
the NanoServ™ to confirm that the Windows operating system starts properly.
• If the NanoServ™ continues to display the message ”Operating system not found,” and Windows does not
start, please verify that your system came with a disk or flash, and that it is formatted, and that it contains a
valid operating system.
Troubleshooting your system 26
Page 27

Chapter 7 Contacting Patton for assistance
Chapter contents
Introduction..........................................................................................................................................................34
Contact information..............................................................................................................................................34
Patton support headquarters in the USA .........................................................................................................34
Alternate Patton support for Europe, Middle East, and Africa (EMEA) ..........................................................34
Warranty Service and Returned Merchandise Authorizations (RMAs)...................................................................34
Warranty coverage ..........................................................................................................................................34
Out-of-warranty service .............................................................................................................................35
Returns for credit ......................................................................................................................................35
Return for credit policy .............................................................................................................................35
RMA numbers ................................................................................................................................................35
Shipping instructions ................................................................................................................................35
27
Page 28

NanoServ™ User Manual 7 • Contacting Patton for assistance
Introduction
This chapter contains the following information:
• “Contact information”—describes how to contact Patton technical support for assistance.
• “Warranty Service and Returned Merchandise Authorizations (RMAs)”—contains information about the
warranty and obtaining a return merchandise authorization (RMA).
Contact information
Patton Electronics offers a wide array of free technical services. If you have questions about any of our other
products we recommend you begin your search for answers by using our technical knowledge base. Here, we
have gathered together many of the more commonly asked questions and compiled them into a searchable
database to help you quickly solve your problems.
Patton support headquarters in the USA
• Online support: available at www.patton.com
• E-mail support: e-mail sent to support@patton.com will be answered within 1 business day
• Telephone support: standard telephone support is available five days a week—from 8:00 am to
5:00 pm EST (1300 to 2200 UTC/GMT)—by calling +1 (301) 975-1007
• Fax: +1 (253) 663-5693
Alternate Patton support for Europe, Middle East, and Africa (EMEA)
• Online support: available at www.patton-inalp.com
• E-mail support: e-mail sent to support@patton-inalp.com will be answered within 1 business day
• Telephone support: standard telephone support is available five days a week—from 8:00 am to
5:00 pm CET (0900 to 1800 UTC/GMT)—by calling +41 (0)31 985 25 55
• Fax: +41 (0)31 985 25 26
Warranty Service and Returned Merchandise Authorizations (RMAs)
Patton Electronics is an ISO-9001 certified manufacturer and our products are carefully tested before shipment. All of our products are backed by a comprehensive warranty program.
Note If you purchased your equipment from a Patton Electronics reseller, ask your
reseller how you should proceed with warranty service. It is often more convenient for you to work with your local reseller to obtain a replacement.
Patton services our products no matter how you acquired them.
Warranty coverage
Our products are under warranty to be free from defects, and we will, at our option, repair or replace the product should it fail within one year from the first date of shipment. Our warranty is limited to defects in workmanship or materials, and does not cover customer damage, lightning or power surge damage, abuse, or
unauthorized modification.
Introduction 28
Page 29

NanoServ™ User Manual 7 • Contacting Patton for assistance
Out-of-warranty service
Patton services what we sell, no matter how you acquired it, including malfunctioning products that are no
longer under warranty. Our products have a flat fee for repairs. Units damaged by lightning or other catastrophes may require replacement.
Returns for credit
Customer satisfaction is important to us, therefore any product may be returned with authorization within 30
days from the shipment date for a full credit of the purchase price. If you have ordered the wrong equipment or
you are dissatisfied in any way, please contact us to request an RMA number to accept your return. Patton is
not responsible for equipment returned without a Return Authorization.
Return for credit policy
• Less than 30 days: No Charge. Your credit will be issued upon receipt and inspection of the equipment.
• 30 to 60 days: We will add a 20% restocking charge (crediting your account with 80% of the purchase price).
• Over 60 days: Products will be accepted for repairs only.
RMA numbers
RMA numbers are required for all product returns. You can obtain an RMA by doing one of the following:
• Completing a request on the RMA Request page in the Support section at www.patton.com
• By calling +1 (301) 975-1007 and speaking to a Technical Support Engineer
• By sending an e-mail to returns@patton.com
All returned units must have the RMA number clearly visible on the outside of the shipping container. Please use
the original packing material that the device came in or pack the unit securely to avoid damage during shipping.
Shipping instructions
The RMA number should be clearly visible on the address label. Our shipping address is as follows:
Patton Electronics Company
RMA#: xxxx
7622 Rickenbacker Dr.
Gaithersburg, MD 20879-4773 USA
Patton will ship the equipment back to you in the same manner you ship it to us. Patton will pay the return
shipping costs.
Warranty Service and Returned Merchandise Authorizations (RMAs) 29
Page 30

Appendix A Factory Defaults
Chapter contents
BIOS Defaults.......................................................................................................................................................30
Fedora Core 5 Install Defaults...............................................................................................................................30
30
Page 31

NanoServ™ User Manual A • Factory Defaults
BIOS Defaults
Note Only items changed from the received bios are listed.
1. PCI / Plug and Play Setup
1. "Plug and Play Aware O/S": Yes
2. "PCI / Plug and Play Setup": 8MB
Fedora Core 5 Install Defaults
Note Fedora Core 5 is only pre-installed on NanoServ™ Model 6075.
1. Language: English
2. Keyboard: U.S. English
3. Partitioning:
– 1. Ext3 partition at /boot at 100MB (set as primary partition)
– 2. Swap partition at 1.5 times RAM (768MB min)
– 3. Ext3 partition at /var/log at 400MB
– 4. Ext3 partition at / using the rest of the drive space
4. Boot loader: GRUB (defaults)
5. Network Device: eth0 - DHCP (defaults)
6. Time zone: America/New_York
7. Root Password: superuser
8. Default Software Installation: No custom/specialized software
9. Run level: 5 with Gnome.
BIOS Defaults 31
Page 32

Appendix B Specifications
Chapter contents
Compliance ...........................................................................................................................................................32
EMC ...............................................................................................................................................................32
Safety ..............................................................................................................................................................32
Radio and TV interference ....................................................................................................................................32
CE Declaration of Conformity ..............................................................................................................................32
System Specifications.............................................................................................................................................33
Technical Specifications ........................................................................................................................................34
Model Numbers ....................................................................................................................................................35
32
Page 33

NanoServ™ User Manual B • Specifications
Compliance
EMC
• FCC Part 15, Class A
• EN55022, Class A
• EN55024
Safety
• IEC/EN 60950-1
Radio and TV interference
This equipment generates and uses radio frequency energy, and if not installed and used properly—that is, in
strict accordance with the manufacturer's instructions—may cause interference to radio and television reception. This equipment has been tested and found to comply with the limits for a Class A computing device in
accordance with the specifications in Subpart B of Part 15 of FCC rules, which are designed to provide reasonable protection from such interference in a commercial installation. However, there is no guarantee that interference will not occur in a particular installation. If the equipment causes interference to radio or television
reception, which can be determined by disconnecting the cables, try to correct the interference by one or more
of the following measures: moving the computing equipment away from the receiver, re-orienting the receiving
antenna, and/or plugging the receiving equipment into a different AC outlet (such that the computing equipment and receiver are on different branches).
CE Declaration of Conformity
We certify that the apparatus identified in this document conforms to the requirements of Council Directive
1999/5/EC on the approximation of the laws of the member states relating to Radio and Telecommunication
Terminal Equipment and the mutual recognition of their conformity.
The safety advice in the documentation accompanying this product shall be obeyed. The conformity to the
above directive is indicated by the ..... sign on the device.
.
Compliance 33
Page 34

NanoServ™ User Manual B • Specifications
System Specifications
Table 8. System Specifications for the NanoServ™
CPU
VIA EDEN N Nano 800MHz
North/South Bridge
VIA CLE266 + VT8235 Chipsets
Main Memory
256MB
BIOS
“Plug and Play” function,
auto-search devices.
Provide DMI for system management.
Advanced ACPI configuration and power control interface.
Intelligent control system.
VGA
AGP Rev.2.0 Compliant
Resolution to 1280x1024
Audio
AC97 CODEC, Fully Compliant with
AC97v2.1
Keyboard and Mouse
PS/2 Keyboard Port
PS/2 Mouse Port
On-Board IDE
Bus Master
Ultra DMA/66 operation.
Can connect to 2 IDE devices.
Peripheral
1. Printer port x1
(support SPP/EPP/ECP module)
2. USB2.0 ports x2
3. Serial port x1(This function is only available
for the Thin System model).
4. Rear Audio (Mic-in, Line-in, Line-out)
a
Dimension & Weight
NanoServ™ Ultra-Thin System:
170 x 124 x 38 mm / 780g ;
4.32 x 3.15 x 0.96” / 1.72 lbs
NanoServ™ Thin System:
170 x 124 x 58 mm / 940g ;
4.32 x 3.15 x1.47” / 2.07 lbs
10/100 Ethernet
10/100Base-Tx Ethernet Interface
a. Only on the Thin System.
b. These operating systems have drivers for the components used on the NanoServ™ and will load
and work with the NanoServ™ system.
System Specifications 34
Operating System
Fedora Core 5 - Pre-loaded
b
Suitable for: Desktop Linux,
Windows XP, Windows CE.NET
Windows XP Embedded,
Embedded Linux, other X86 OS
Page 35

NanoServ™ User Manual B • Specifications
Technical Specifications
Table 9. Technical specifications for the NanoServ™
Features Description
CPU Onboard VIA EDEN N Nano processor 800MHz
BIOS AMI BIOS
System Chipset VIA CLE266 / VT8235
I/O Chip VT1211
System Memory Onboard 256MB DDR266
Expansion 1xX-PCI connector (use with optional custom case)
I/O
MIO
USB 2x USB 2.0 Ports (one in front)
Display
Chipset Integrated VIA Uni Chrome 2D/3D Graphics
Display Memory 8 MB shared system memory
Resolution CRT CRT mode : 1280 x 1024 @32 bpp (85Hz)
Audio
AC97 2.2 (Codec) VT1612
Audio Interface Line out, Line in, Mic in (one by header pins)
Ethernet
Chipset VT6103 10/100 Base-T
Remote Boot ROM Built-in boot ROM function
Mechanical
Power Requirement+ 5V-5.25 V @ 4A (with VIA Eden N 800 Mhz, 256MB
Operating Temperature 0 ~ 60ºC (32-140ºF)
Operating Humidity 0-90% relative humidity, non-condensing
Size (W x H x D) NanoServ™ Ultra-Thin System: 170 x 124 x 38 mm
Weight: 1.72 lbs (Ultra-Thin System) / 2.07 lbs (Thin System)
1x EIDE (Ultra DMA 133), 1xLPT and 1x RS-232a, 1x PS/2 K/B,
1x PS/2 Mouse
with MPEG2 Accelerator
LCD/Simultaneous mode: 1280 x 1024 @32 bpp (85Hz)
DDR266 & Laptop HDD)
/ 4.32 x 3.15 x 0.96”
NanoServ™ Thin System: 170 x 124 x 58 mm
/ 4.32 x 3.15 x 1.47”
a. Thin System only.
Note System and technical specifications are subject to change without notice.
Technical Specifications 35
Page 36

NanoServ™ User Manual B • Specifications
Model Numbers
Table 10. NanoServ™ Models
NanoServ™ 6070 Series
Model 6073 Ultra-Thin System Disk-less, fan-less
Model 6075 Thin System Fan-less with 40GB hard disk
Model Numbers 36
Page 37

Appendix C NanoServ™ System Connectors
Chapter contents
NanoServ™ System Connectors Summary ...........................................................................................................36
Rear Connectors Outline for the Ultra-Thin System .............................................................................................36
Rear Connectors Outline for the Thin System.......................................................................................................37
Pin Assignments ....................................................................................................................................................38
37
Page 38

NanoServ™ User Manual C • NanoServ™ System Connectors
NanoServ™ System Connectors Summary
Table 11. Connectors Summary
Number Description Type of Connections Pin Number
J1 10/100 Ethernet RJ-45 jack 8-pin
J2 IDE Connector Box Header, 22x2-2.0mm 44-pin
J3 VGA Connector D-Sub Connector 15-pin
J4 USB1 (Front) USB 90º Type1 Connector 8-pin
J5 USB (Back) USB Type1 Connector 6-pin
J6, J7 PS/2 Keyboard & Mouse Mini-Din Connector 6P 6-pin
J8 PRN (Printer) Box Header, 13x2-2.0mm 25-pin
J9 COM1 /RS-232 Pin Header, 5x2-2.0mm 10-pin
J11, J13 Line-Out, MIC Two contact switch 6-pin
J12, J19 Line-In, SB5V Wafer Header 4-2.0mm 4-pin
J15 RST (Reset) Header 2x1-2.0mm 2-pin
J17 DC5V Input Mini-Din Connector 3P 3-pin
J18 X-PCI Header 32x2-2.0mm 64-pin
SP1 Buzzer 2-pin
Rear Connectors Outline for the Ultra-Thin System
Line-Out
VGA
MIC-IN
Figure 8. Ultra-Thin System rear connectors
RJ-45 LAN Jack
USB
PS/2 Mouse
PS/2 Keyboard
DC Power Jack
DC-IN 5V
Power Supply Switch
POWER SW
NanoServ™ System Connectors Summary 38
Page 39

NanoServ™ User Manual C • NanoServ™ System Connectors
Rear Connectors Outline for the Thin System
Power Supply Switch
POWER SW
DC Power Jack
DC-IN 5V
PS/2 Keyboard
Printer Port
USB
PS/2 Mouse
RJ-45 LAN Jack
VGA
Figure 9. Thin System rear connectors
Line-Out
COM1
MIC-IN
Serial Port
Rear Connectors Outline for the Thin System 39
Page 40

NanoServ™ User Manual C • NanoServ™ System Connectors
Pin Assignments
Table 12. J6: KBD (PS/2 Keyboard & Mouse) - 6-pin Mini-Din Connector
Pin # Signal Name
1 KBCLK
2 PMCLK
2
6
5
Table 13. J7: Mouse(PS/2 Mouse) - 6-pin Mini-Din Connector
4
3 GND
1
4 KBDAT
5 PMDAT
3
6 SB5V
7 GND
8 GND
9 GND
Pin # Signal Name
1 PMCLK
2
6
5
Table 14. RJ-45 jack (10/100 Ethernet) - 12-pin RJ45 Connector
4
Pin # Signal Name Pin # Signal Name
1 TX+ 2 TX3 RX+ 4 NC
5 NC 6 RX7 NC 8 NC
9 LED1 10 LED0
11 VCC 12 LED1
2 NC
1
3 GND
4 PMDAT
3
5 NC
6 SB5V
7 GND
8 GND
9 GND
8 2, 1
Pin Assignments 40
Page 41

NanoServ™ User Manual C • NanoServ™ System Connectors
Table 15. J17: DC-IN (DC-IN 5V) - 3-pin MINI-DIN Lock Pin Socket
Pin # Signal Name
1 J23-pin 1 & 2
1
3
2 SB5V
3 NC
4 GND
2
Table 16. J4: USB1 (USB1x90º) 4-pin USB Type 1 Connector (Vertical Type)
Pin # Signal Name
1 VCC
4
1
2 USB03 USBO+
4 GND
5 GGND
6 GGND
7 GGND
8 GGND
Table 17. J3:VGA - 15-pin D-Sub Connector
Pin # Signal Name Pin # Signal Name Pin # Signal Name
1 MR 6 GND 11 NC
5
15
Pin Assignments 41
1
6
2 MG 7 GND 12 VCC
3 MB 8 GND 13 HYSYNC
4 NC 9 NC 14 VSYNC
5 GND 10 GND 15 VCC
11
Table 18. J11: MC_IN - 5-pin RCA Phone Jack
MIC
Pin # Signal Name
1 GND
2 MIC1
3 Open Touch
4 Open Touch
5 VREFOUT
Page 42

NanoServ™ User Manual C • NanoServ™ System Connectors
Table 19. J6: KBD (PS/2 Keyboard & Mouse) - 6-pin Mini-Din Connector
Pin # Signal Name
1 GND
LINE-OUT
Table 20. J9: COM1 - 9pin D-Sub Connector
Pin # Signal Name Pin # Signal Name
1
5
69
1 DCD1 2 RXD1
3 TXD1 4 DTR1
5 GND 6 DSR1
7 RTS1 8 CTS1
9 RI1 - -
2 LOUTL
3 Open Touch
4 Open Touch
5 VREFOUT
Table 21. J5:USB (USB2): For connection to external USB device - 4-pin USB Type 1 Connector (H)
Pin # Signal Name
1 VCC
1
Table 22. SW1: Reset - 2-pole Push button switch
4
2 USB23 USB2+
4 GND
5 NC
6 NC
Action Status
Push RESET
No push OFF
- -
- -
Pin Assignments 42
Page 43

NanoServ™ User Manual C • NanoServ™ System Connectors
Table 23. LEDS: POWER ON/OFF & HDD R/W
LED Color State
Green Power On
Red HDD On
Red Flashes HDD R/W
Pin Assignments 43
 Loading...